Email marketing is a feature that allows event organizers to communicate with attendees, potential customers, and other stakeholders through targeted email campaigns. It is a centralized platform for creating, customizing, and sending emails tailored to the specific needs of your event. These emails can serve promotional, informational, or transactional purposes, enhancing the event’s success by keeping the audience informed, engaged, and motivated to participate.
Purpose:
- Promotion: Announce events, share updates, or promote early-bird discounts.
- Engagement: Engage attendees with personalized emails before, during, and after events.
- Reminders: Send reminders about upcoming sessions, deadlines, or important updates.
- Feedback Collection: Request feedback post-event to improve future experiences.
- Brand Building: Strengthen brand presence through consistent communication.
How to access email marketing:
- Login: Sign in to your eventcenter dashboard.
- Navigate: Select an event and go to the Email templates > Email marketing.
Two key-components of email marketing
Email marketing revolves around Campaigns and Templates, two key components that work together to help event organizers create, manage, and execute professional and targeted email communications with ease.

Before creating any campaign, we first need a template. Templates are important because they provide the structure and design for the email we want to send. So, let’s first explain what templates are and how they work.
Templates
A Template is a pre-designed layout for emails that allows you to maintain consistent branding and streamline the creation of campaigns. templates save time and ensure your emails look professional across devices.
Create a folder
First, you need to create a folder. To do this, begin by locating the “Create folder” option. Click on this option, and a text box or input field will appear where you can type the name of your new folder. Choose a clear and relevant name that reflects the purpose of the folder, such as “Event Invitations”. After entering the name, press the Enter key on your keyboard. The folder will be created instantly and added to your list of folders. This folder can now be used to organize your email templates, making it easier to manage and access templates for different campaigns or events.

After creating folder, you can edit and delete folder by clicking on the particular icons.

Once the folder is created, two options will appear in the top right corner of the screen: “Create Template” and “Copy from Main”.

The “Create template” a template you need to enter following information.

Create template
Template name
A text input field where the user provides a name for the template. This name helps identify the template for future use.
List Type
The list type dropdown will display various templates that the user can select to target specific groups of people. Each list type corresponds to a particular status or action of the invitees or registrants. Below is a detailed explanation of each type:

- App invite: This list includes all participants who are being invited through the mobile or web application. It is ideal for sending invitations directly to users who are already connected with the platform, encouraging them to join or engage in upcoming activities or events.
- Undecided invite: This category includes invitees who have received the registration invitation but have not yet made a decision. They neither accepted nor declined the invite. This list is perfect for sending gentle reminders or providing additional details to help them decide.
- Cancelled registrants: This list contains individuals who received the registration invitation but later cancelled their participation. These could be people who first accepted but then backed out or those who explicitly declined. It can help in tracking cancellations and possibly reaching out to understand the reasons for their decision.
- Accepted registrants: This list comprises invitees who have confirmed their participation by accepting the invitation. They are considered active participants, and this group can be targeted for further event updates, schedules, or instructions.
- Waitlist invite: This list includes individuals who showed interest in the event or activity but were placed on a waiting list due to capacity constraints. These participants may be moved to the confirmed list if spots open up, making it important to keep them informed and engaged.
- Invites who abandoned registrations: This group consists of individuals who started the registration process but did not complete it. They may have abandoned midway, and this list can be used to send reminders or assistance to help them complete the process.
- Checked in: This list tracks participants who have physically or virtually checked in to the event or activity. It confirms their attendance and helps the organizers monitor who has successfully arrived or joined.
- Not checked in: This category identifies invitees or registrants who were expected to attend but have not yet checked in. These individuals might need reminders or assistance to complete their check-in process.
- Mail to speaker: This option allows event organizers to send emails to all speakers assigned to the event.
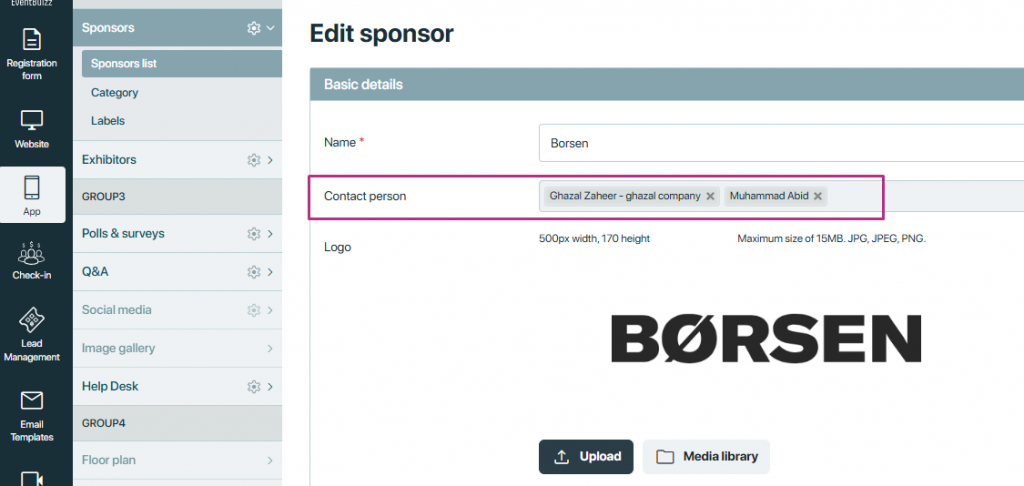
- Mail to sponsor: The template is used to target the contact persons of all sponsors involved in the event.
- Mail to exhibitor: This template is designed to communicate directly with the contact persons of all exhibitors associated with the event.
- Registration who did not respond to the polls: This list consists of participants who were sent polls but did not respond. Follow-up communication might include reminders or an explanation of the importance of their feedback.
- Registration who have completed the polls: This group includes participants who successfully completed and submitted the polls.
- Registration who did not respond to the surveys: This category includes participants who received surveys but have not yet responded. Follow-ups might encourage them to complete the surveys, highlighting deadlines or the importance of their input.
- Registration who have submitted the surveys: This list contains participants who completed and submitted the surveys. Communication to this group may include thank-you notes, results summaries, or updates about how their feedback will be used.
- Registration who did not respond to the sub registration: This list includes participants who completed the initial registration but failed to respond to additional sub-registration requirements. Sub-registration could involve providing extra details, selecting preferences, or completing secondary forms. These participants may need reminders or further clarification.
- Registration who submitted sub registration: This group consists of registrants who not only completed the initial registration but also responded to all sub-registration requirements. They have fulfilled every step of the process and are fully prepared for the event or activity.
- Registration who have paid the invoices: This list tracks participants who have completed the financial aspect of their registration by paying the required invoices. It ensures that only financially cleared participants are accounted for in certain activities or communications.
- Registration who is linked to workshop/ breakout session: This option sends emails to the attendees who are assigned to a program. Attendees can be assigned in two ways:
-
- Directly: Attendees are individually assigned to the program.
- Through Groups: Attendees are assigned to the program as part of a group.
If the setting “Use group to control my program” is turned on, the email will also be sent to attendees who are linked to the program through their group. This ensures that all relevant attendees, whether assigned directly or via groups, receives the email.
Folder
When creating a template, the dropdown menu for the Folder will display all the folders that the user has previously created. This allows the user to select a specific folder where the template will be saved or categorized. For example, if the user has created folders like “Marketing,” “Event Management,” or “Surveys,” these options will appear in the dropdown. The user can choose the relevant folder based on the purpose of the template. Once the folder is selected and the template is saved, it will be stored in that chosen folder, making it easier to organize and find later.

Important note: After giving the template name, selecting the list type, and choosing the folder, you’ll be taken to the email builder. Here only the email template is shown. To see how the email builder works, click here.

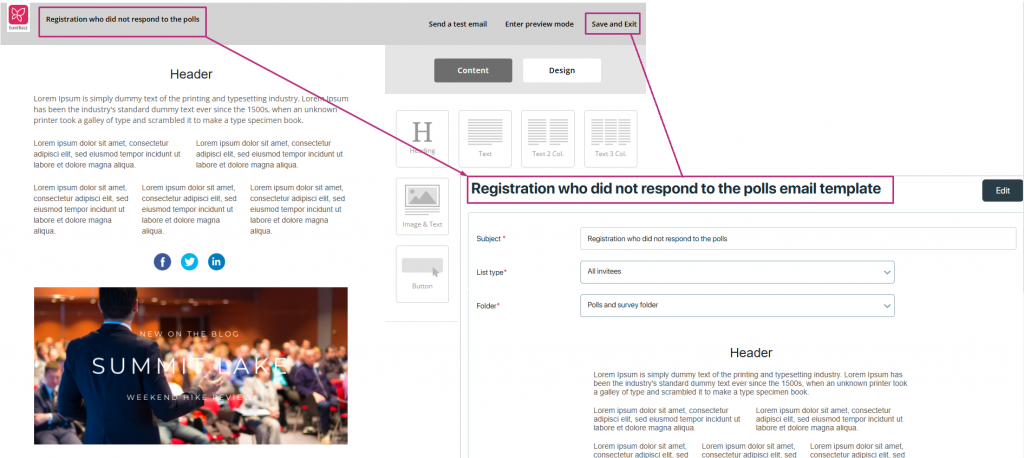
After finalizing the email marketing template organizer will click on save and exit button and will be redirected to template creation screen. Where organizer can take a final look of the created template.
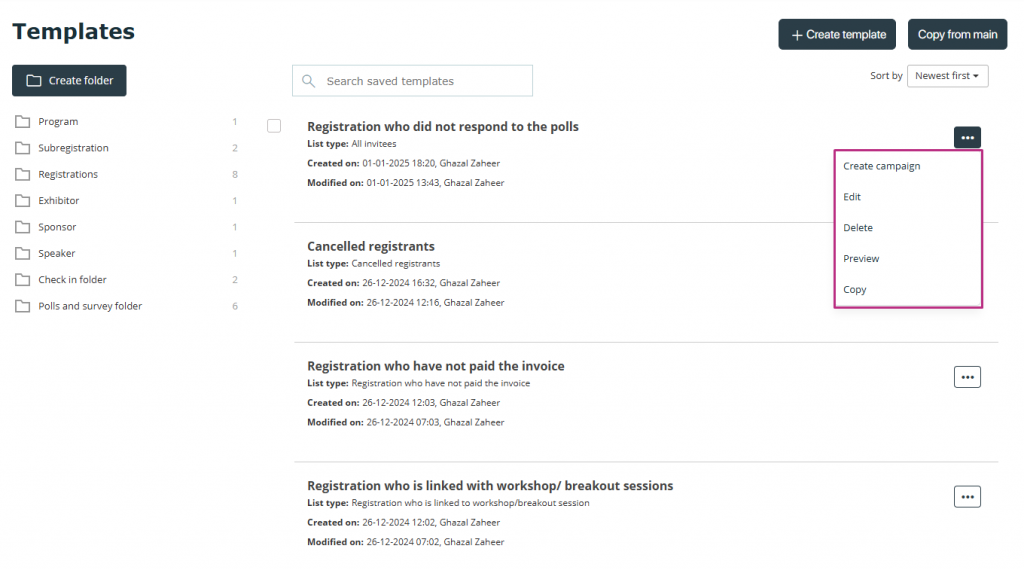
Once the templates are created, you can perform some functions on them. Click on the three dots icon ![]() to explore more options.
to explore more options.
It has following options:
- Create campaign: It will create a campaign for created template. To see the detail, click here.
- Edit: The Edit option allows you to modify or change existing content.
- Delete: This option allows you to remove a selected item or content permanently.
- Preview: This option lets you see how the content will appear before it is finalized or published.
- Copy: This option allows you to duplicate the selected text, file, or item, enabling you to paste it elsewhere.
emailmarketingcampaign
Campaign
In email marketing, a campaign refers to a targeted and organized set of email messages sent to a specific group of recipients to achieve a particular goal. Email campaigns are typically designed to engage, inform, promote, or convert subscribers based on the business’s objectives.
To create a campaign, click on a create campaign button.

On creating a campaign basic info section collects essential details to configure the campaign. It includes the following fields:
Subject: Here, the user enters the email subject line, which is the main heading or title of the email campaign that recipients will see.
Template: A dropdown menu where the user can select a pre-designed template for the campaign. The templates that are showing in the “Create campaign” section are the same templates that we have already created and saved in the “Templates” section. This means any template designed and saved earlier is automatically available for use when setting up a new campaign. It ensures consistency and saves time, as you can directly select a pre-made template without having to create a new one from scratch.

List Type: A dropdown or selection field where the user chooses the audience or recipient group for the campaign.
Status: We have three types of status which indicates the current state of the email marketing campaign:
- Save as draft.
- Schedule.
- Send now.

Save as draft:
Save your current work on the campaign without sending it. This option allows you to come back and edit or finalize the campaign later. You can use this option if you need to gather more information before sending the campaign.
Schedule campaign
These settings provide more control over the timing and frequency of your scheduled campaign. Set a specific date and time for the email campaign to be sent. Plan the sending time to maximize engagement, such as sending during business hours or when your audience is most active.

We have a repeat setting that allows you to make a recurring campaign that is sent at regular intervals. It is useful for ongoing communications like weekly updates or monthly campaign.
These settings provide more control over the timing and frequency of your scheduled campaign
Repeat every:
-
-
- Description: Defines the interval at which the campaign should repeat.
- Example: “1 Day(s)” means the campaign will be sent every day.
-
Ends:
- Never: The email campaign will continue to be sent at the specified interval indefinitely. For example: If set to repeat daily, it will be sent every day forever.
- On: Specifies a date when the recurring email campaign should stop. For example: If the end date is 10-05-2025, the last campaign will be sent on January 10, 2025.
- After: The campaign will stop after a certain number of occurrences. For example If set to “After 1 occurrences,” the campaign will be sent only once.
-

Send Now
This option will send the campaign immediately to the selected template. Use this when your campaign is ready and you want it to be delivered without delay.

Preview:
Before sending or saving the campaign, scroll down to the “Preview” section to see how your email will look to the recipients.

The “Send test email” feature in the preview section allows you to send a test version of your email campaign to yourself or a selected email address before sending it to the actual recipients. This feature is useful for reviewing and verifying how your email will look in an actual inbox.
How it Works:
- Click the “Send Test Email” button.
- Enter your email address or any other test email address.
- The system will send a copy of the email to the provided address.
- Open the email in your inbox to review its appearance and content.

Once the test email has been sent, the system shows the success message and ask you to send another test email or to close the pop up.

To create a campaign using this interface, let’s go step by step through each field and option in detail:
Registrants who have completed the polls/ Registrants who does not respond to polls
When you select the campaign options “Registrants who have completed the polls” or “Registrants who did not respond to polls,” an additional field called Program will become visible. This program field will display a list of all the programs for which polls have been created. The purpose of this field is to allow you to select a specific program so that the campaign targets only the registrants associated with the selected program’s poll.
For example, if you created polls for multiple programs like “Program A” and “Program B,” the Program field will show these options. You can then choose the relevant program to send the campaign to the appropriate group of registrants, ensuring the email is specific and targeted. This helps in managing and organizing campaigns effectively based on the programs and their associated polls.

Registrants who have completed the surveys/ Registrants who does not respond to surveys
When you select the campaign options “Registrants who have completed the surveys” or “Registrants who did not respond to surveys,” an additional field called Survey will become visible. This field will display a list of all the surveys that have been created in the system. The purpose of this field is to allow you to select a specific survey so the campaign targets only the registrants associated with that survey.
For example, if you have multiple surveys like “All anonymous survey” or “No anonymous survey,” these surveys will appear in the dropdown. You can then choose the relevant survey to send the campaign to the right group of registrants, based on whether they completed the survey or did not respond. This feature ensures that your campaign is specific, focused, and relevant to the selected survey.

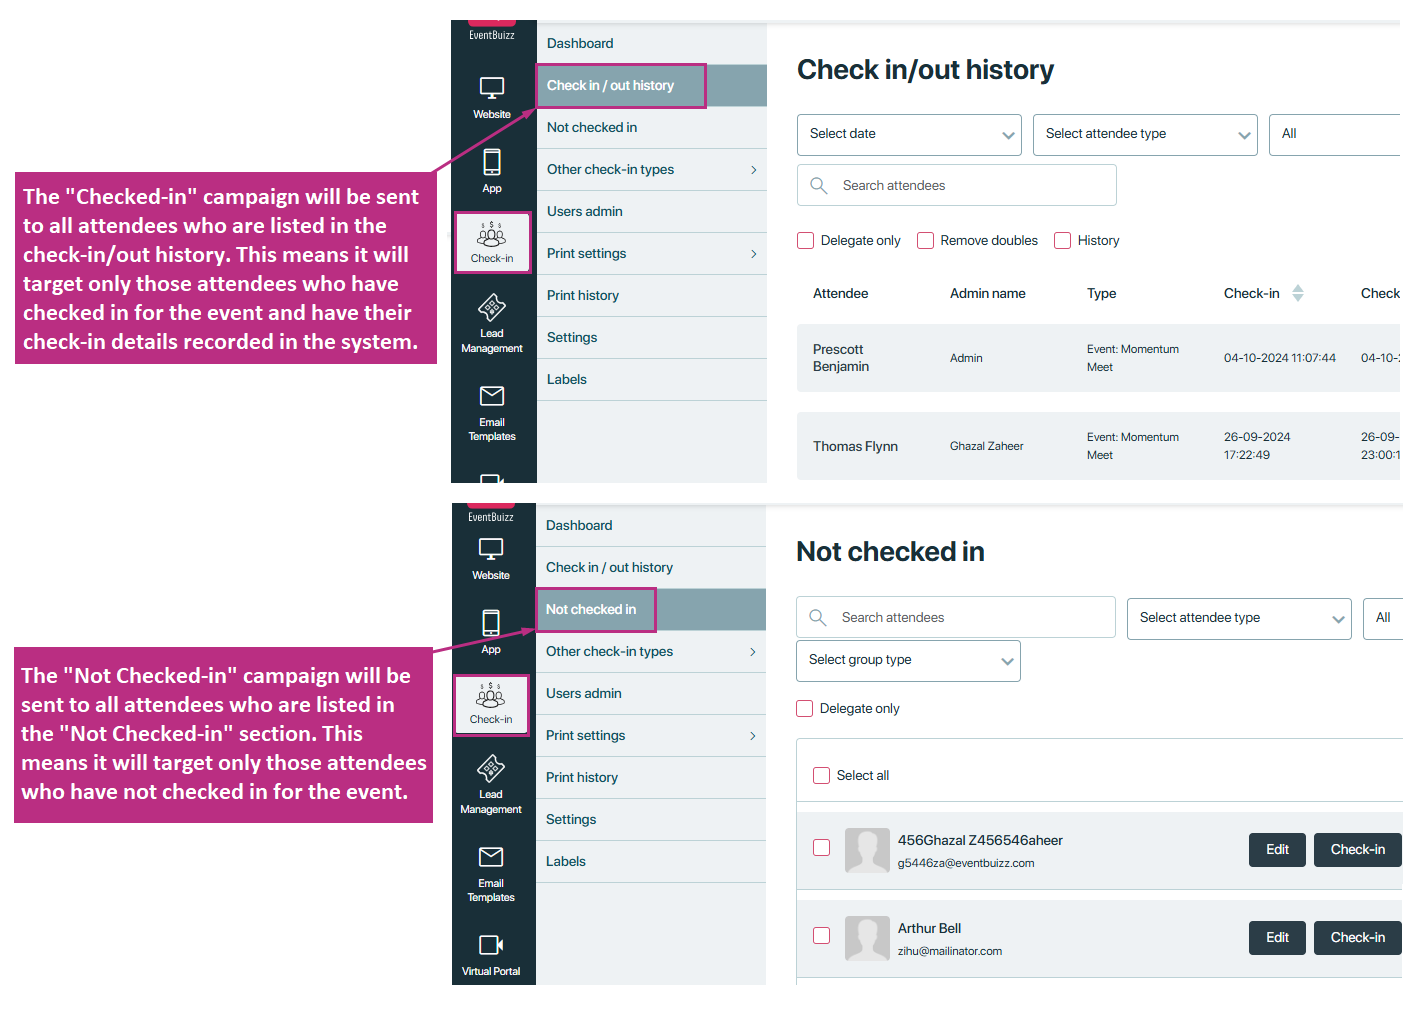
Registrants checked-in/ Registrants not checked-in
When you select the campaign options “Registrants checked-in” or “Registrants not checked-in,” an additional field called Form will become visible. This field will display a list of all the active forms in the system. The purpose of this field is to allow you to select one or more forms associated with the registrants you want to target. This field is required, meaning the user must select at least one form for the campaign to proceed. If no form is selected, the campaign will not be sent.
For example, if there are active forms like “Attendee form” or “Exhibitor form,” these will appear in the dropdown or selection list. You can choose one or multiple forms to ensure the campaign targets only the attendees linked to those forms. This feature provides flexibility and accuracy, allowing you to customize the campaign for specific groups based on their check-in status.

Registration who have completed the sub registration/ Registration who didn’t respond to the sub registration.
When the “Registration who have completed the sub-registration” or “Registration who didn’t respond to the sub-registration” campaigns are selected, a field will appear in the form. This field will show all the active forms available. The field is required, and the user must select one or more forms. If the user does not select any form, the campaign will not be sent.

Attendees who did not respond to the sub-registration will be displayed in the “Unanswered” section of the sub-registration section for the specific form. This means that for each form, there will be a separate section where the attendees who haven’t answered the sub-registration will be listed. The “Unanswered” section will help you easily identify those attendees who still need to complete the sub-registration for that particular form.

Registration who is linked with workshops/ breakout sessions
When the “Registration linked with workshops/breakout sessions” campaign is selected, a field will appear for the program. This field will display all the programs that have been created for the event. The user can then select the relevant program from the list. This option sends emails to the attendees who are assigned to a program.

Undecided invites
This category includes invitees who have received the registration invitation but haven’t made a decision yet. They haven’t accepted or declined the invite. This campaign is ideal for sending gentle reminders or providing more information to help them decide.
In this campaign, there is a form field that will show all the active forms. This field is required, and the user must select one or more forms. If the user does not select any form, the campaign will not be sent.

All the undecided invites are shown under the “Not Registered Attendees” section of the registration invitation.
This means that any invitees who have received the registration invitation but haven’t responded (neither accepted nor declined) will be listed in this section. It helps you easily track and manage the people who have yet to make a decision about registering.

Accepted registrants
The accepted registrants are the attendees who have confirmed their participation by accepting the registration invitation. They are considered active orders/ participants in the order list of registration forms, and this group can be targeted for further event updates, schedules, or instructions.
Invites who abandoned registration
“Invites who abandoned registration” refers to the attendees who started the registration process but did not complete it. These individuals showed initial interest by accepting the registration invitation and later on unsubscribe from he invitation.
In this campaign, there is a required form field that shows all the active forms. The user must select one or more forms from the list. If no form is selected, the campaign will not be sent.

Additionally, attendees who did not accept the registration invitation are listed in the “Not Attending” section of the registration invitation. This campaign is specifically sent to those attendees to remind them or encourage them to complete their registration.

Cancelled registrants
Cancelled registrants in an email marketing campaign refer to individuals who initially accepted the invitation, complete their registration for an event or activity but later decided to cancel it. These registrants are no longer part of the confirmed attendees for the event. there is a required form field that shows all the active forms. The user must select one or more forms from the list. If no form is selected, the campaign will not be sent.

Additionally, this campaign will be sent to attendees whose order status is marked as “cancelled.”
This means that if someone registered for the event but their registration order was canceled for any reason, they will be included in this campaign.

Waited list invites

For each form, the waiting list invites will be shown in the waiting list section of that specific form. This means that for every event form, you can see the names of the people who are waiting for tickets to become available. This list helps you track who is still interested and might attend if more tickets are released.

App invite
This list includes all participants who are being invited through the mobile or web application. It is ideal for sending invitations directly to users who are already connected with the platform, encouraging them to join or engage in upcoming activities or events.

Additionally, the app invite campaign is sent to attendees who have been sent an app invitation to use our webapp or mobile app. You can find the pp invitation section under Attendees > Invitation > App invitation sent.

Registrants who have not paid the invoice
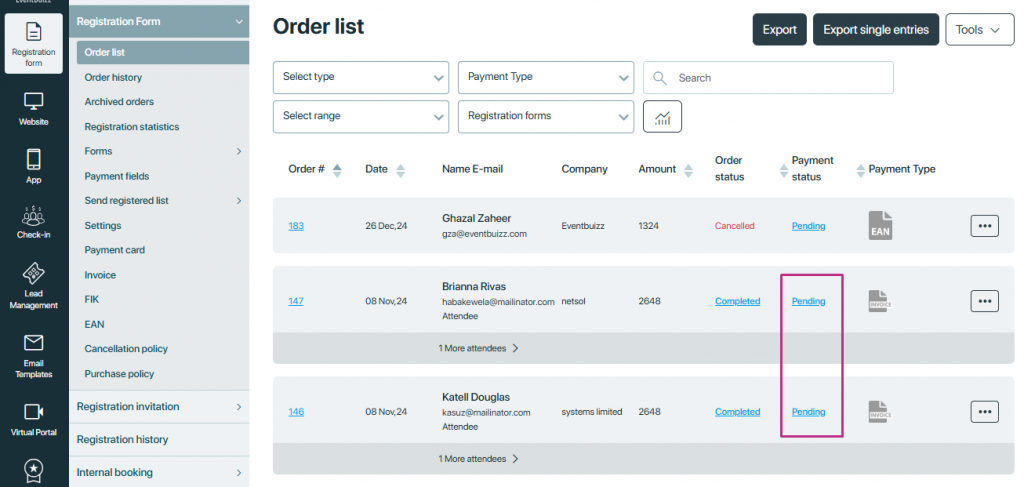
The campaign targeting registrants who have not paid the invoice. This will be sent to all attendees who have registered but have not yet completed their payment. This includes orders placed using any payment method, such as card, public link, or invoice. The campaign specifically focuses on those whose order status is “completed” and payment status is marked as “pending.”
Sponsor/ Exhibitor
This campaign is designed to communicate directly with the contact persons of all exhibitors associated with the event.
Speakers
Mail to speakers allow event organizers to send emails to all speakers assigned in the event.
