An attendee is an individual who registers to participate in an event, such as a conference, seminar, workshop, exhibition, or festival. Attendees can vary widely in terms of their roles, including:
- Attendees: Individuals who attend to gain knowledge, network, or engage in activities related to the event’s theme.
- Speakers: Presenters or experts who share insights or lead discussions during the event.
- Exhibitors: Representatives from companies or organizations showcasing their products or services.
- VIPs: Special guests or stakeholders with unique access or privileges at the event.
Attendees typically provide personal information during registration, such as name, contact details, organisation, and preferences, which helps organisers tailor the event experience.
Purpose of the attendee
The purpose of the attendee in the context of an event management platform like eventbuizz encompasses several key aspects:
-
Participation: Attendees are the primary audience for any event. Their participation is essential for the event’s success, as they bring life to the gathering, engage in discussions, and contribute to the overall experience.
-
Networking: Events often serve as a platform for attendees to connect with peers, industry leaders, and potential partners. The attendee module can facilitate networking opportunities through features like attendee lists, messaging, and scheduling meetings.
-
Feedback and improvement: Attendees provide valuable feedback that can help organisers assess the event’s effectiveness and identify areas for improvement. Gathering input through surveys or polls can enhance future events.
-
Engagement: Keeping attendees engaged before, during, and after the event is crucial. The attendee module can include tools for communication, updates, and interactive features, ensuring participants feel involved and valued.
-
Data collection: Attendee information is vital for organisers to analyse demographics, interests, and behaviours, allowing for better-targeted marketing and event planning in the future.
Program module have two main parts, program can be divided into two main parts. Detail is given below about each available part:
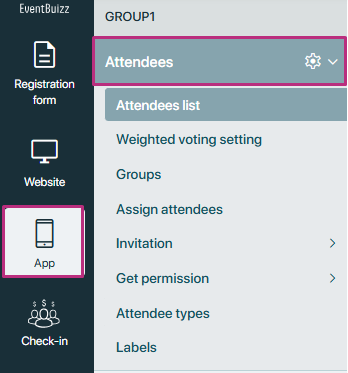
Eventcenter attendee module(For admin site)
Eventcenter attendee module
Attendee organiser module
The Attendee organiser module within the eventbuizz platform is tailored for event organisers, enabling efficient management of all attendee-related aspects. Key features include:
- Attendee listing: Easily view and manage all registered attendees in a centralised list.
- Groups: Organise attendees into specific groups for streamlined communication and management.
- Assign attendees: Delegate roles or responsibilities to specific attendees, enhancing collaboration.
- Invitation: Send out invitations and track responses, ensuring effective outreach.
- Get permissions: Manage and control permissions for different attendee types, ensuring appropriate access.
- Attendee types: Define various attendee categories (e.g., speaker, exhibitor, general participant) to tailor experiences.
- Labels: Utilise labels for quick identification and organisation of attendees based on specific criteria.
- Attendee settings: Customise settings related to attendees, including communication preferences and access rights.
Overall, this module empowers event organizers to efficiently coordinate attendee management, enhancing the overall event experience.
Accessing the program module in eventcenter
Organiser can access the program module by following this path:
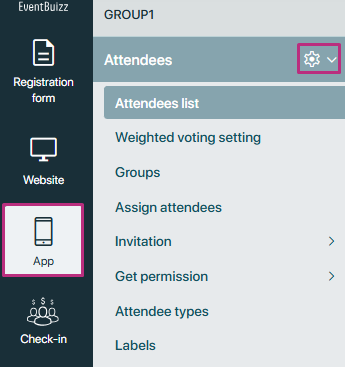
- Eventcenter->app->attendee
In eventcenter side, attendee module consist of the other main sub sections, detail is given below about each available section.
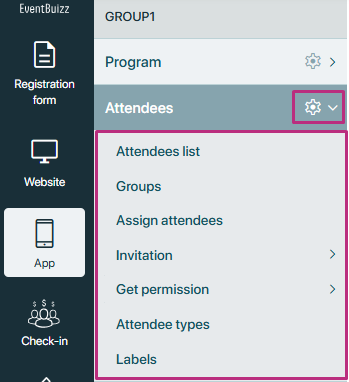
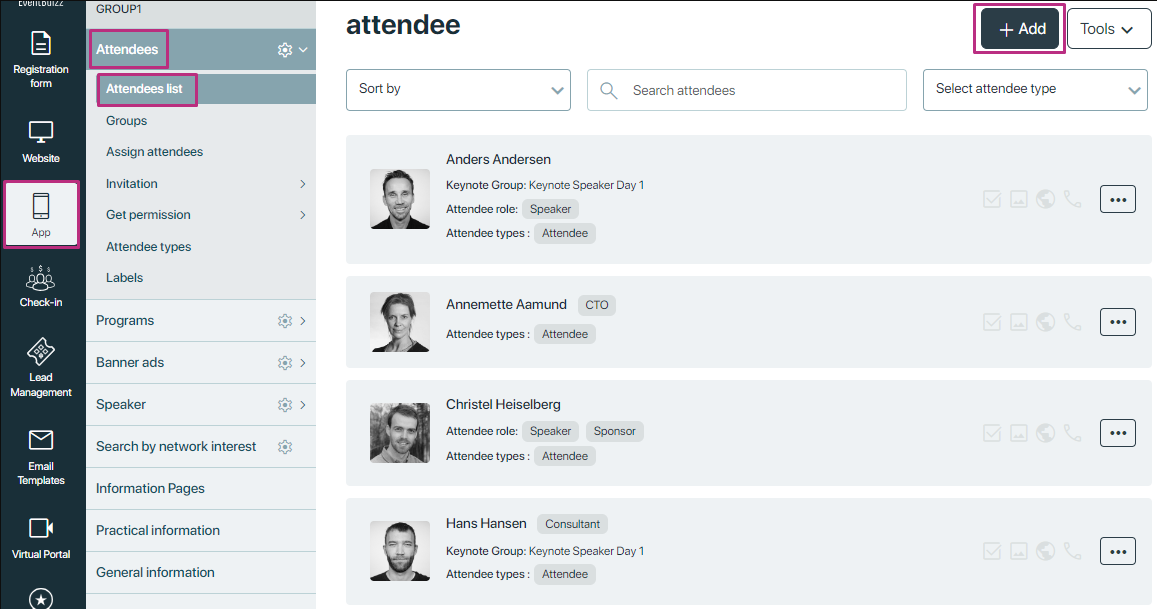
Attendee list
Attendee list
The “Attendee list” is a feature within the Attendee Module that provides event organisers with a comprehensive view containing information of all registered attendees for a particular event. This information typically includes attendee names, contact details, affiliations, job titles, and any other relevant data collected during the registration process.
Attendee listing consist of various options and tools, detail is given below of available features and tools as well.
Add attendee
Access the attendee list
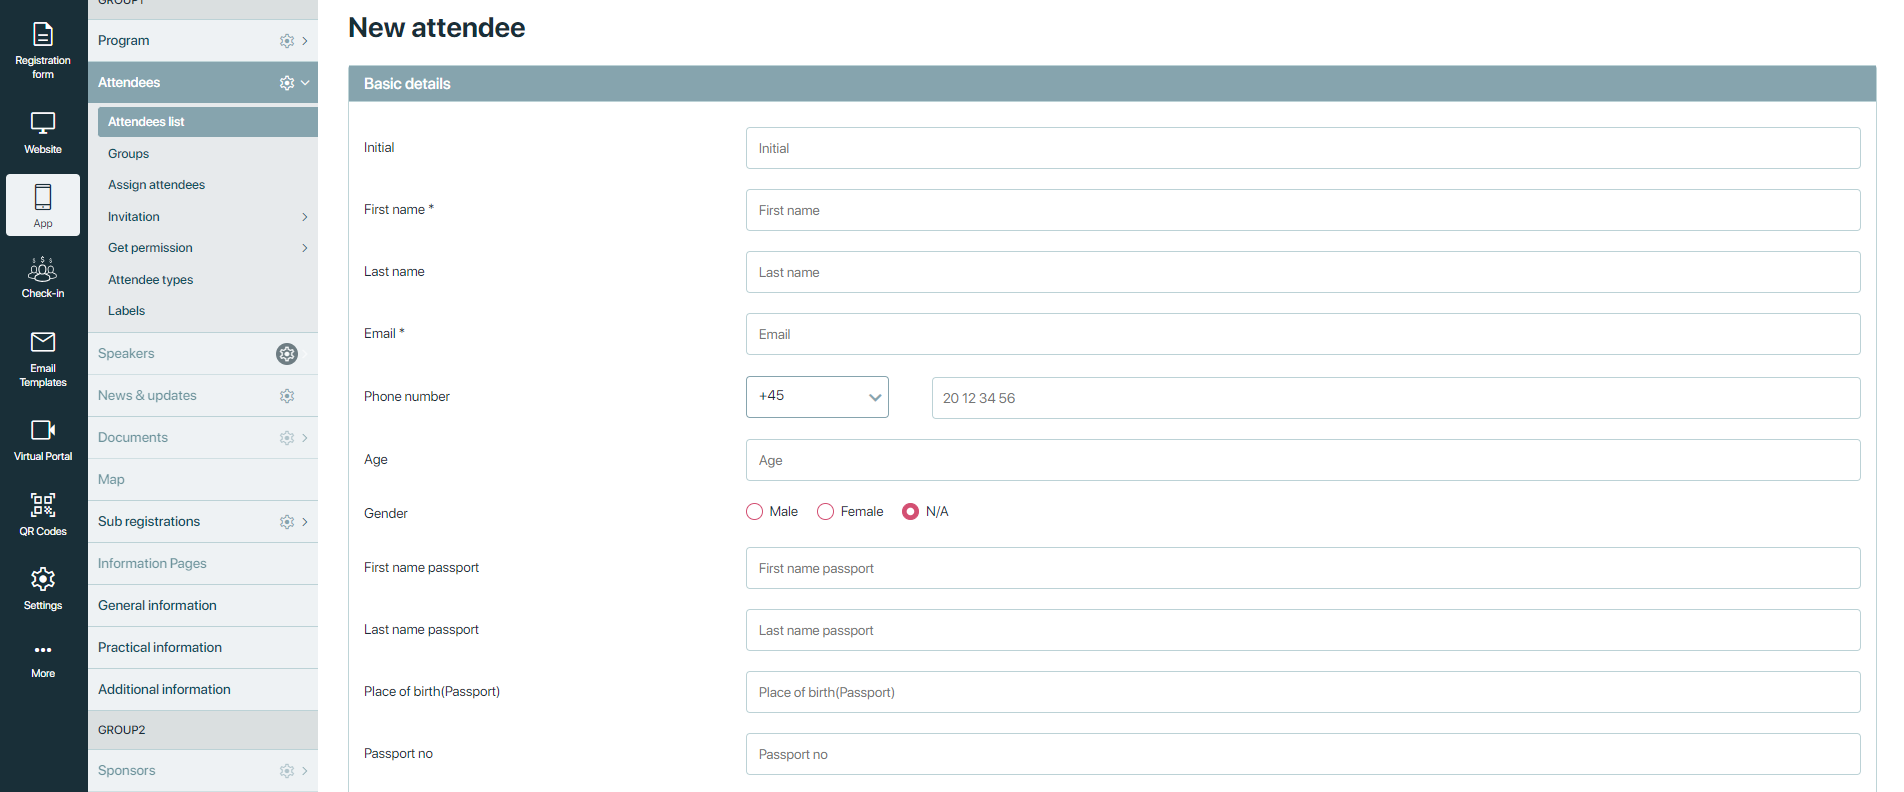
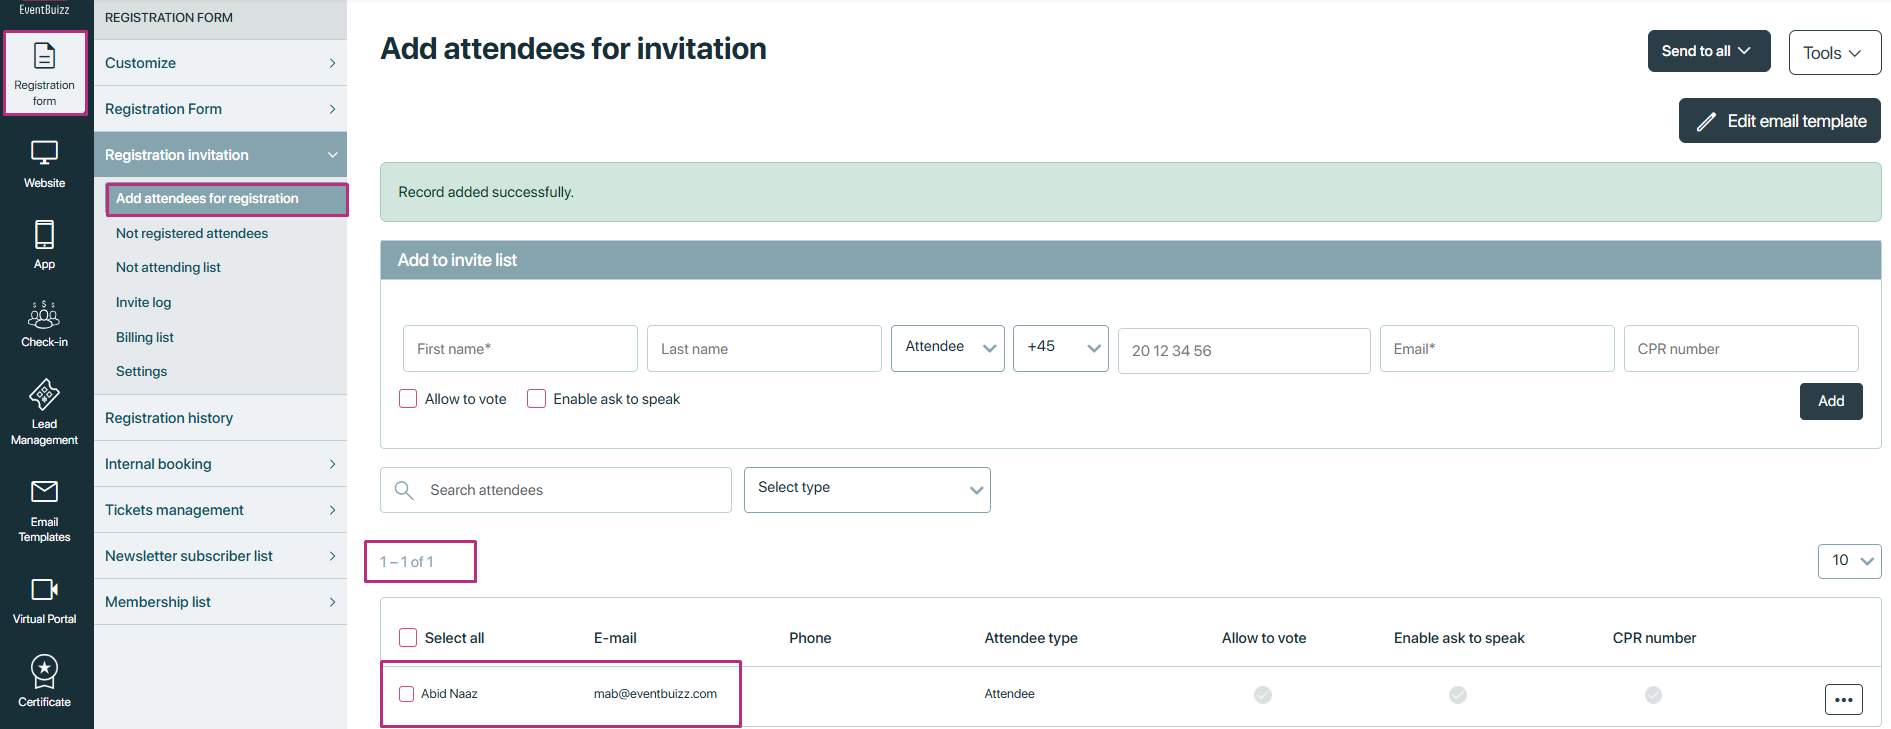
Begin by selecting your event. From the left-hand navigation, click Apps, then Attendees -> Attendees list. Click Add.
You’ll be presented with a registration form where you can input details for the attendees you’re adding. This form typically includes fields for attendee information such as name, email, organization, job title, and any other relevant details. Fill out the form with the necessary information.
Groups
During the process of adding or editing, we have visibility of all available groups. From here, we can assign groups to attendees. Click Groups to see how to create it.

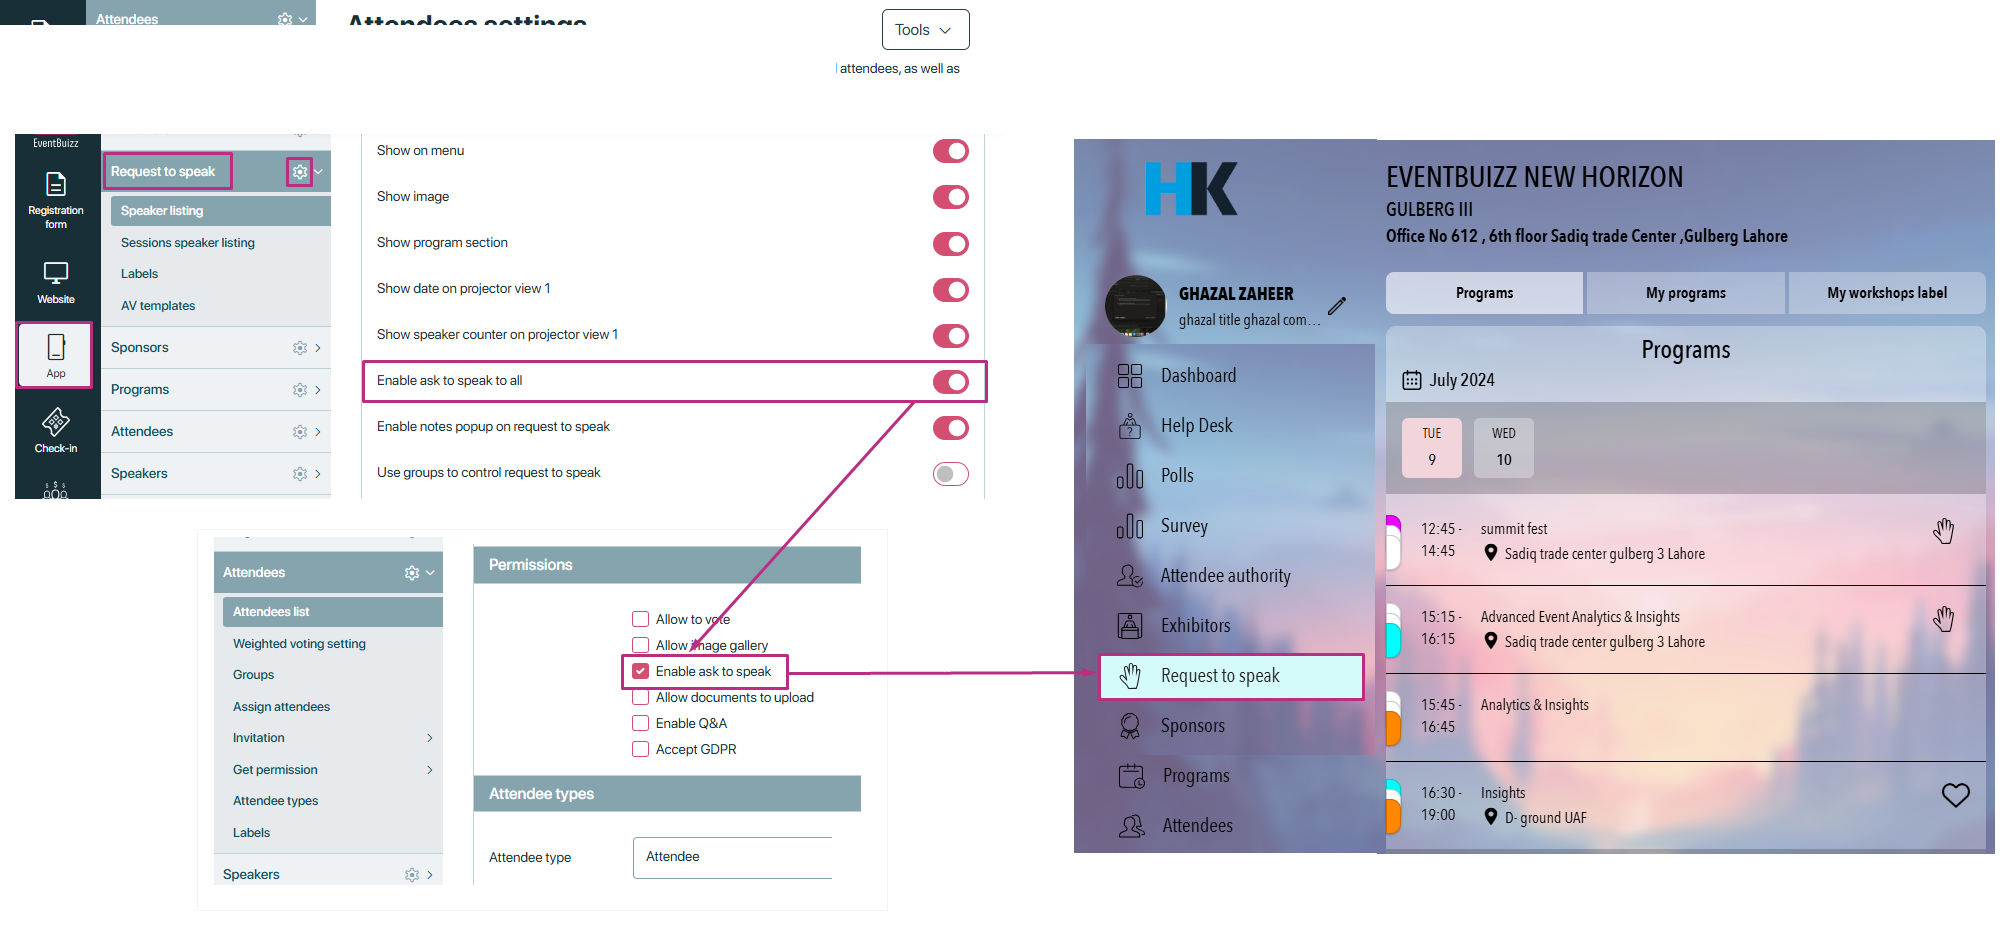
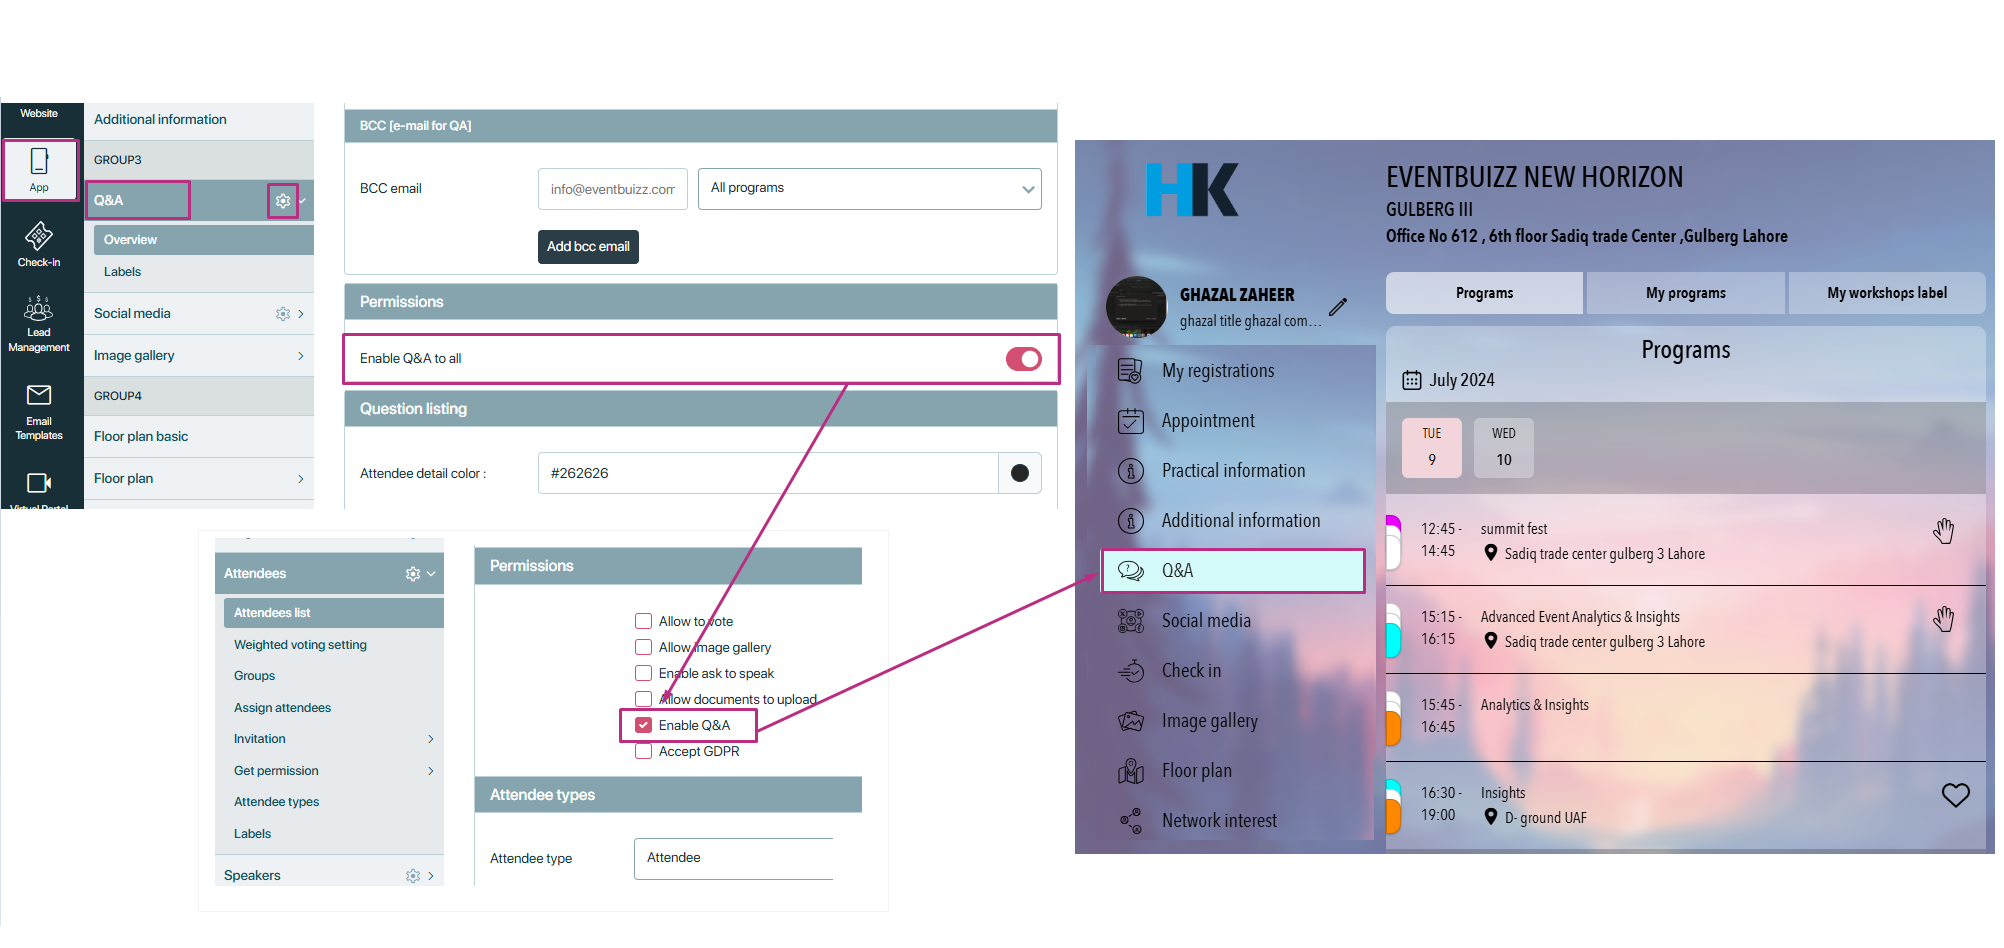
Permissions
In eventbuizz, these settings are typically used to customise the attendee experience and interaction within the platform. Here’s how they might be utilised within an attendee profile:

- Allow to vote: In the attendee settings -> display permissions, there is also an option for “allow voting. If this setting is turned on, all assigned attendees in the event can vote. However, if this setting is turned off and individual attendees have enabled this setting in their profiles, they will bypass the main setting and still have permission to vote.

- Enable ask to speak: We have “Enable ask to speak to all” permission in request to speak module, it will allow all attendees to speak who are assigned in the event but if this setting is OFF, and in attendee profile individual setting is ON, it will not check the module permission and allow the attendee to speak.
- Enable Q&A: We have “Enable Q&A to all” permission in Q&A module, it will allow all attendees to ask questions but if this setting is OFF, and in attendee profile individual setting is ON, it will not check the Q&A module permission and allow the attendee to ask question.
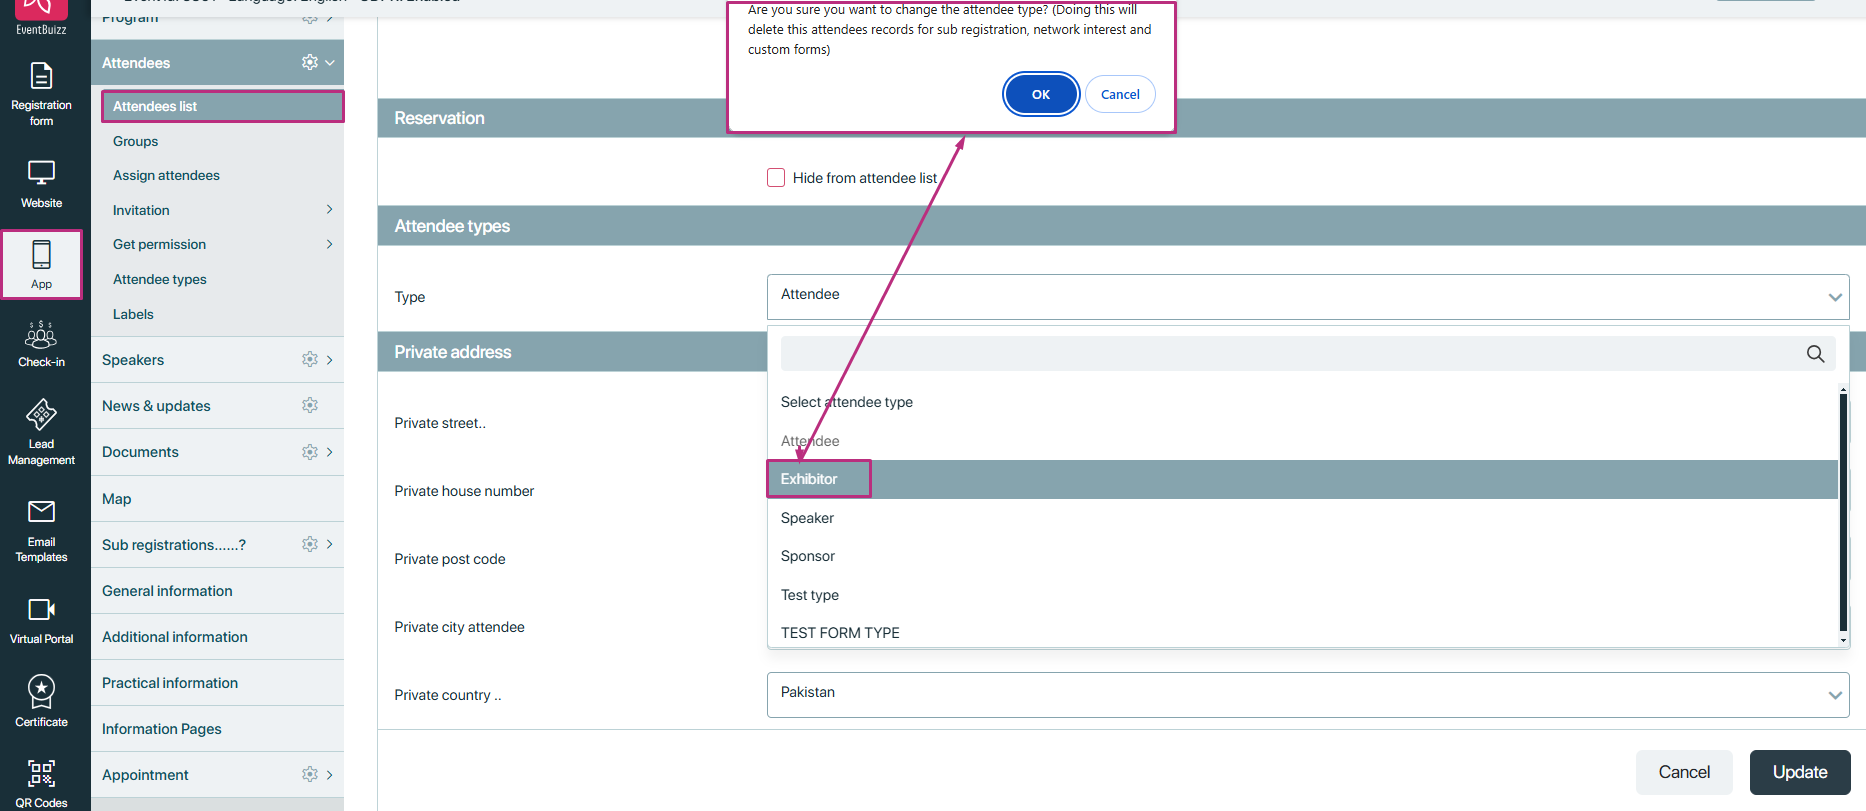
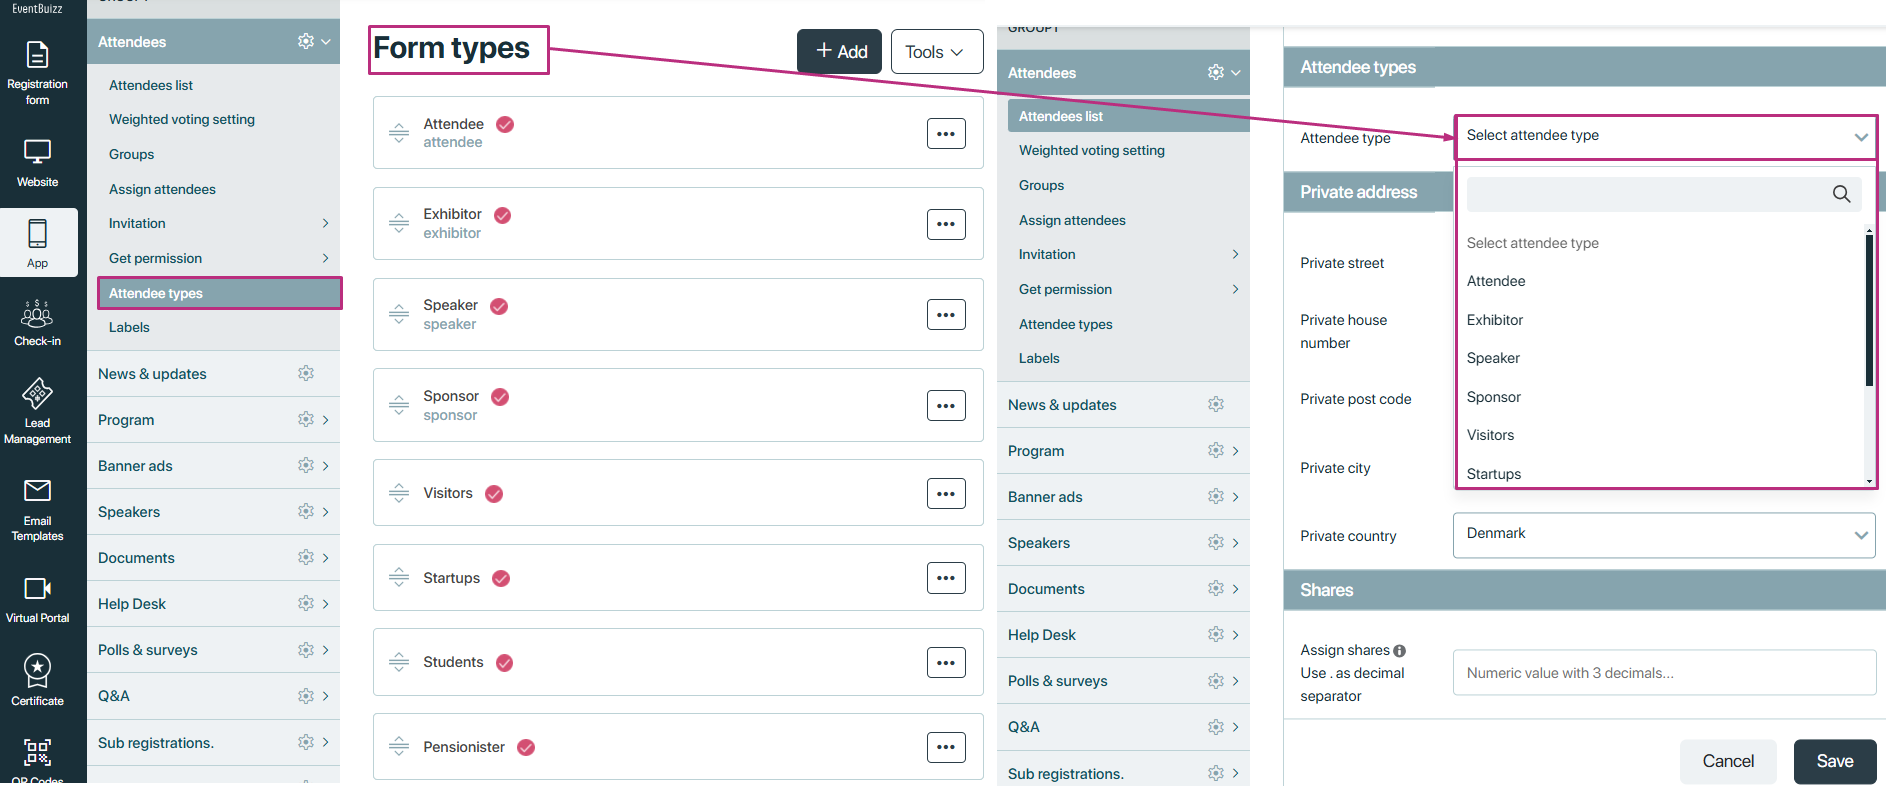
Attendee type
- All the created attendee types in the attendee type sub section will appear here in the drop down.
- Organiser can assign or select any attendee type, base on the attendee role.
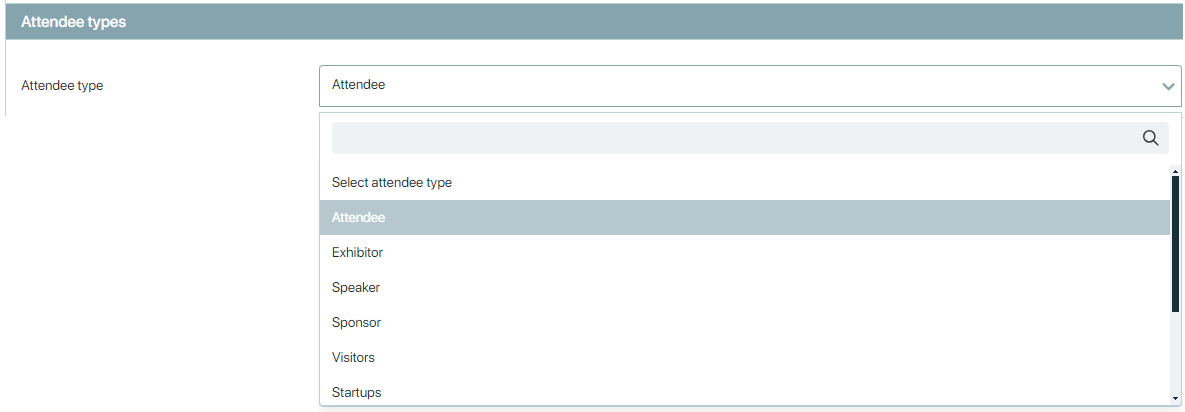
Note:Here, the selected attendee’s type is displayed. If the organiser decides to make changes, it will result in the deletion of the attendee’s records for sub-registration, network interest, and custom forms.
Add any information you want. When you’re finished, click Save. This will automatically add/update the attendee’s details for in your account.
NOTE: If you are adding attendees or speakers directly to your list of attendees, in the event centre, then the system will not allow you to create them, if the email already exists. When you try to do this, the system will tell you: the email already exists. Then instead you need to go to the above left list – find the attendee in question, and then just assign the person directly. The attendee will now be on the attendees list.
Attendee list
After adding attendee, it will redirects on the attendee list, where organiser have the multiple features and menu![]() options and tools are assailable. Detail of each attendee menu listing is given below:
options and tools are assailable. Detail of each attendee menu listing is given below:
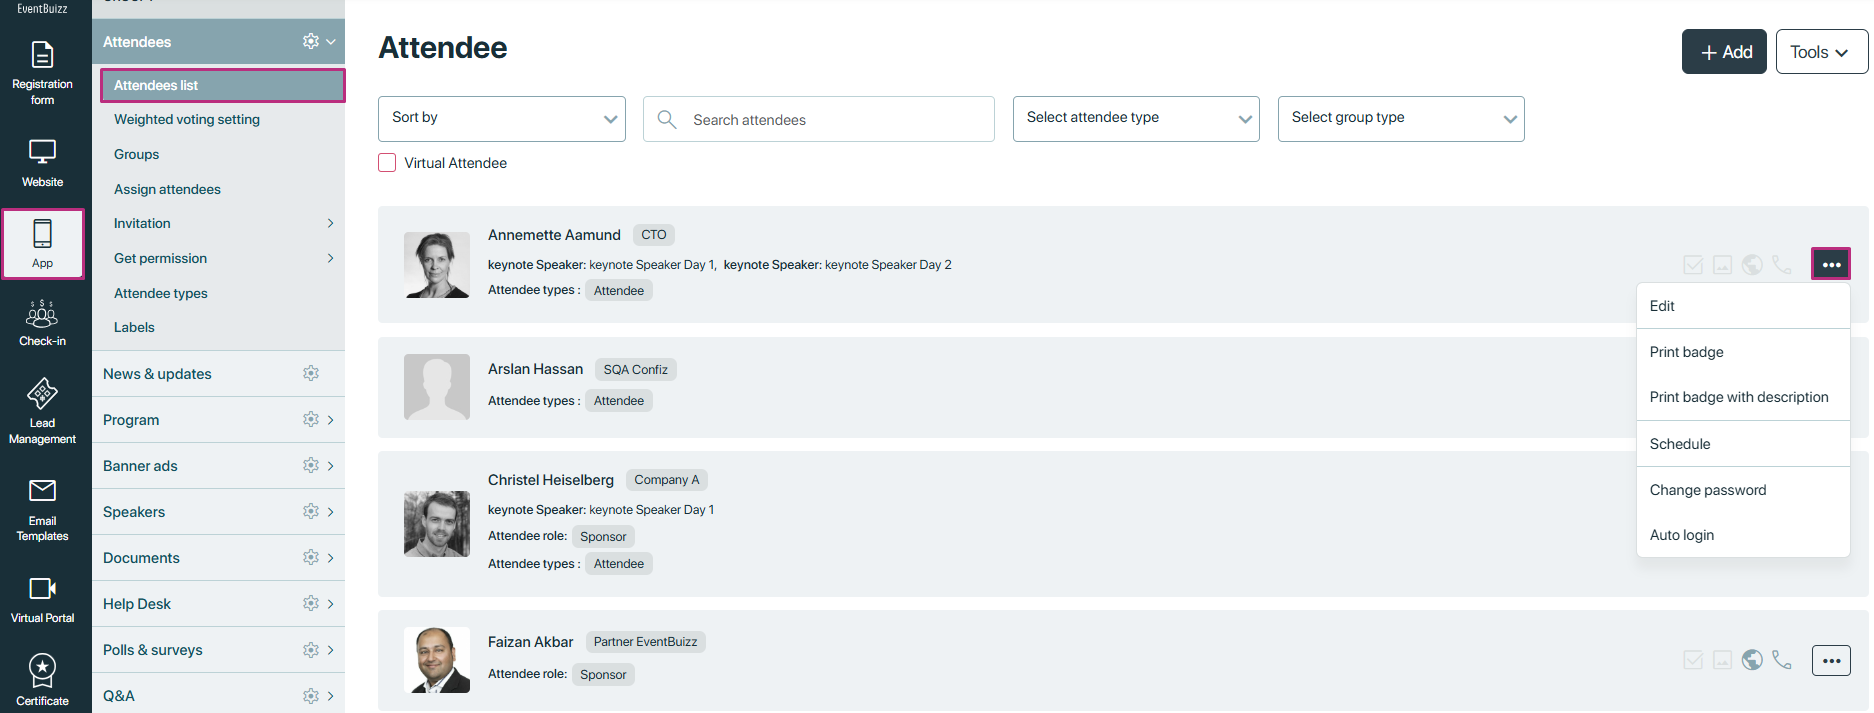
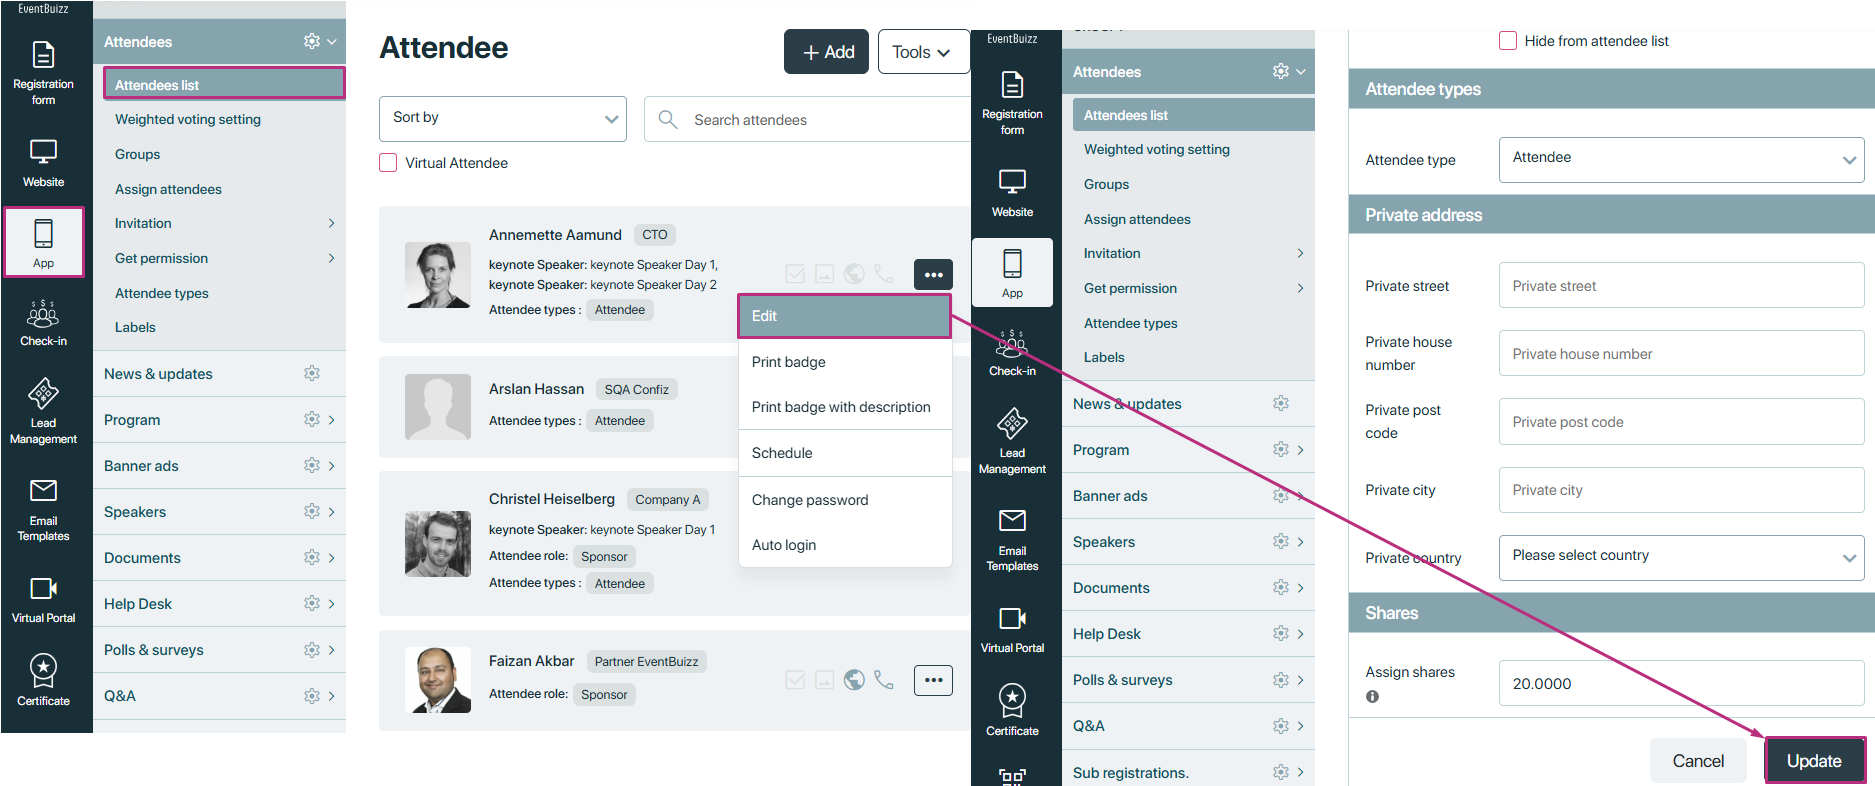
Edit attendee
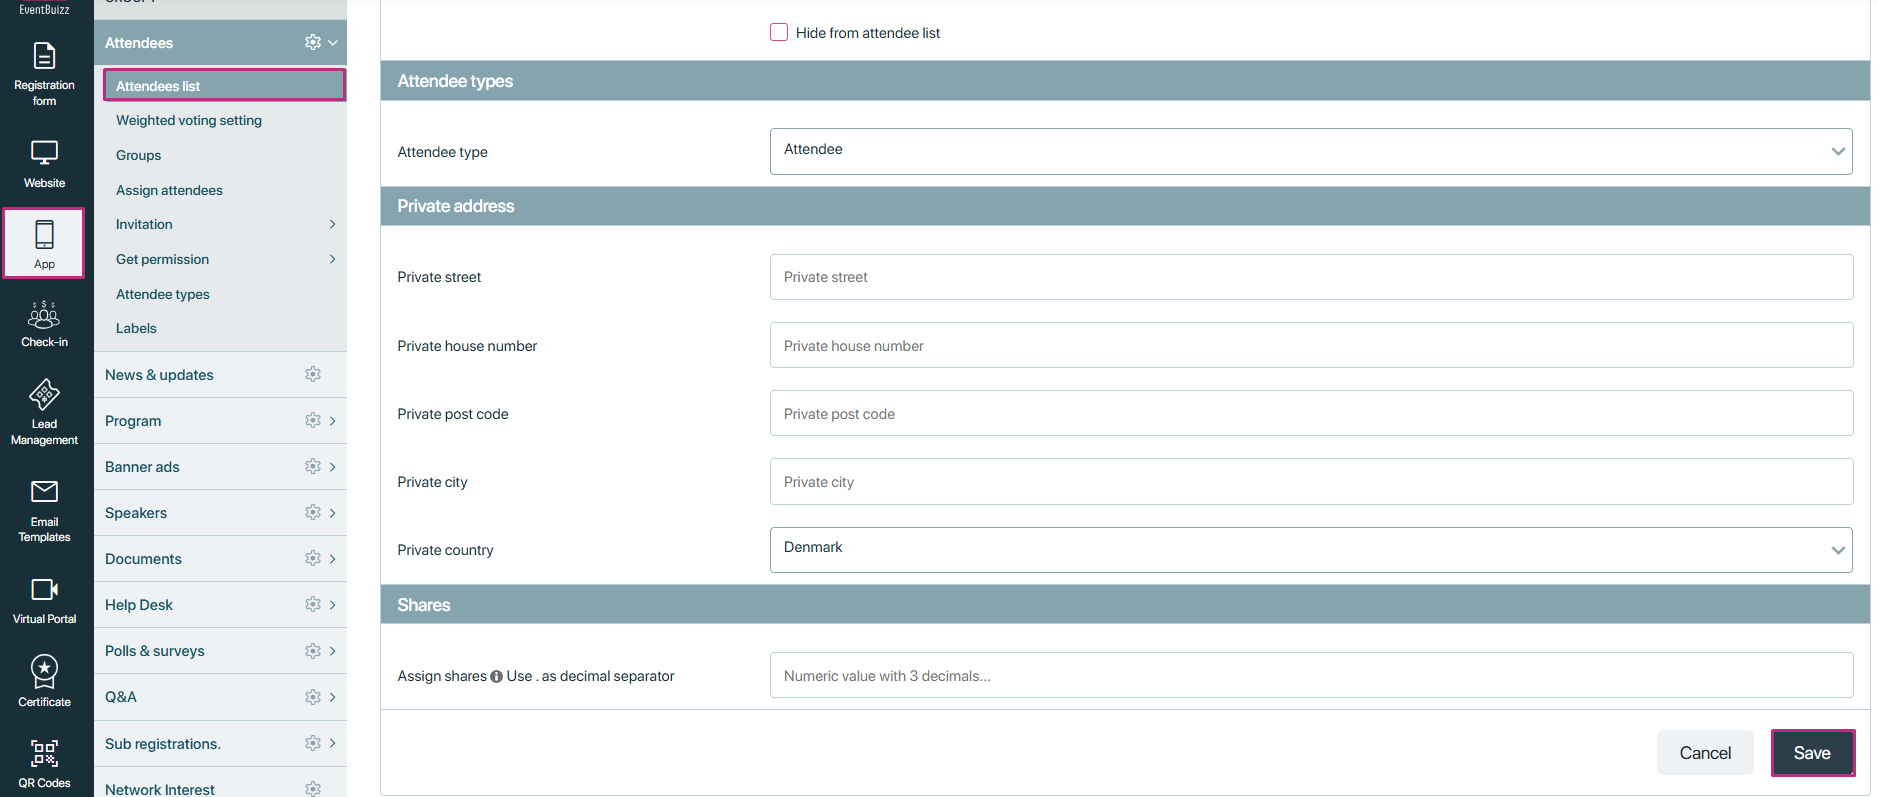
- By clicking on the edit menu option, organiser will redirect on the attendee detail page.
- Where organiser can edit the attendee information like name, email,date of birth, image, or attendee type permission etc.
- After making changes in the attendee profile, organiser will click on Update button, and changes will save.
Email profile
If the organiser wants to share the attendee’s profile, then should click on the “Email profile“ option.

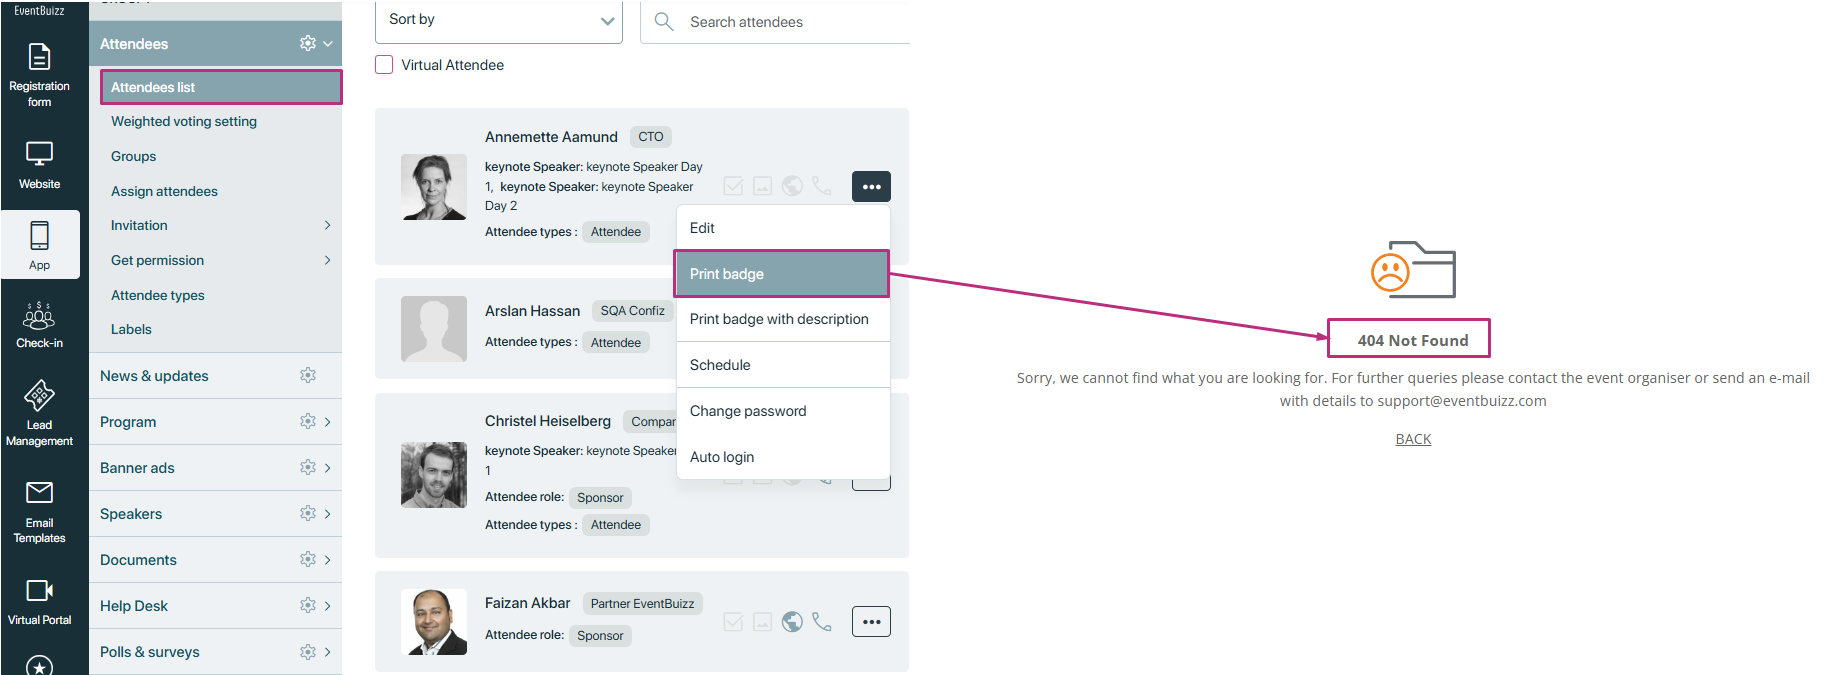
Print badge
- Organiser can generate attendee specific badges from here.
- If attendee badge is not created, then by default when click on it will show the “404 not found”. Here view is given blow.
How badges can create and print?
- How badges can create in eventcenter, and the types of badges, for more detail click here.
- After creating the badges, then user how can print the badges by using this menu option “Print badge”. Click here for more details.
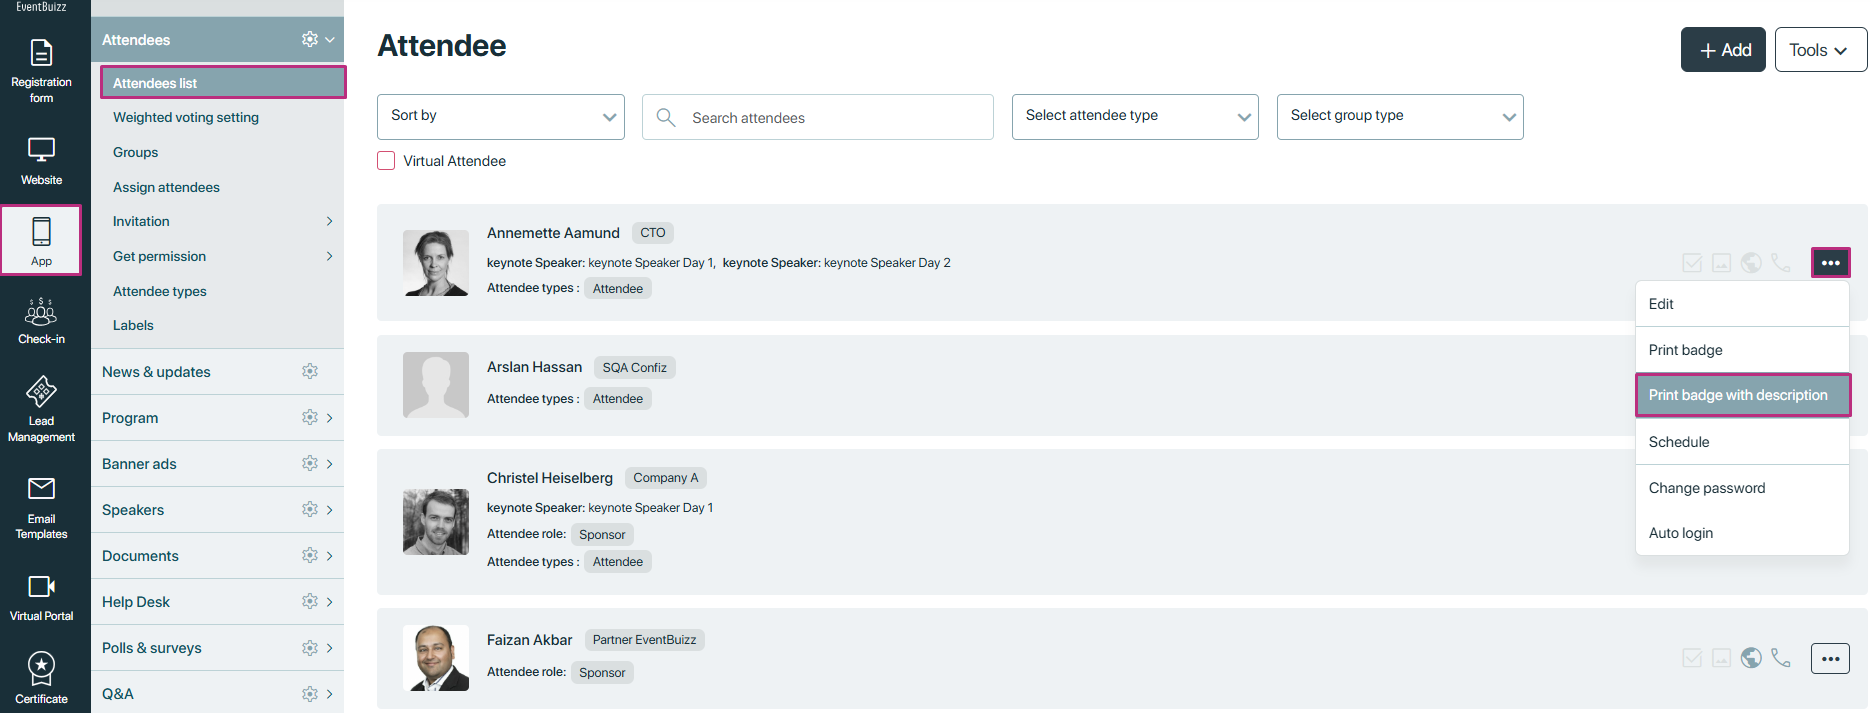
Print badge with description
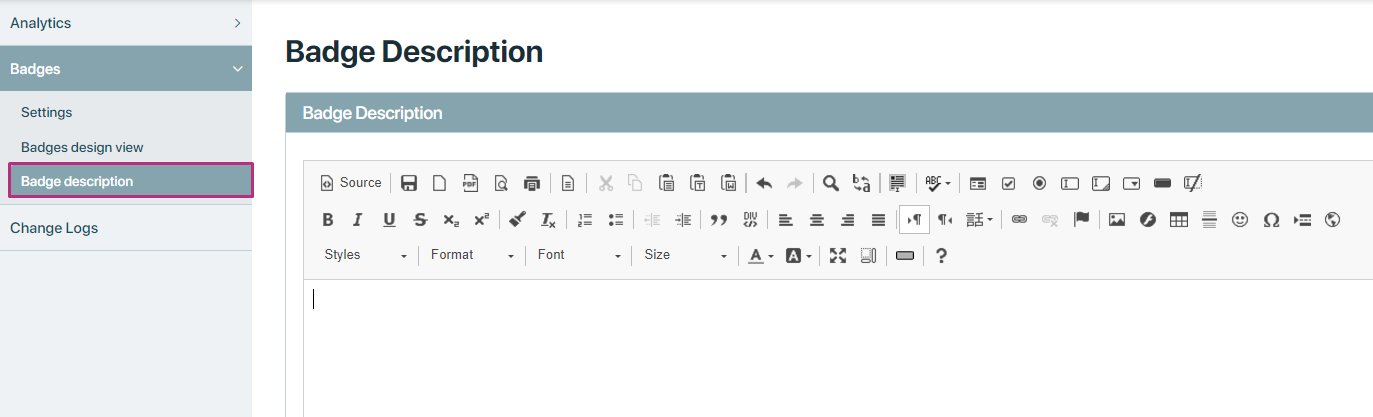
Badge description
The Badge description feature within the pre-event badge printing system allows organisers to add contextual information or notes that will accompany the badges issued to attendees. This section enhances the overall presentation of the badges and provides attendees with relevant details about the event or their specific participation.
- Basically this features allows organisers, if the want to add additional descriptions with eventcenter badges, then organiser will add the description, and when will print the badge with description, both badge,and added description will be download in pdf, and can take print of it.
Accessing badge description
Open badge description editor
- Organisers can access the Badge description option from the badge management menu. By clicking on this option, an editor interface will open, allowing for easy input and formatting of the badge description.
Inputting description
-
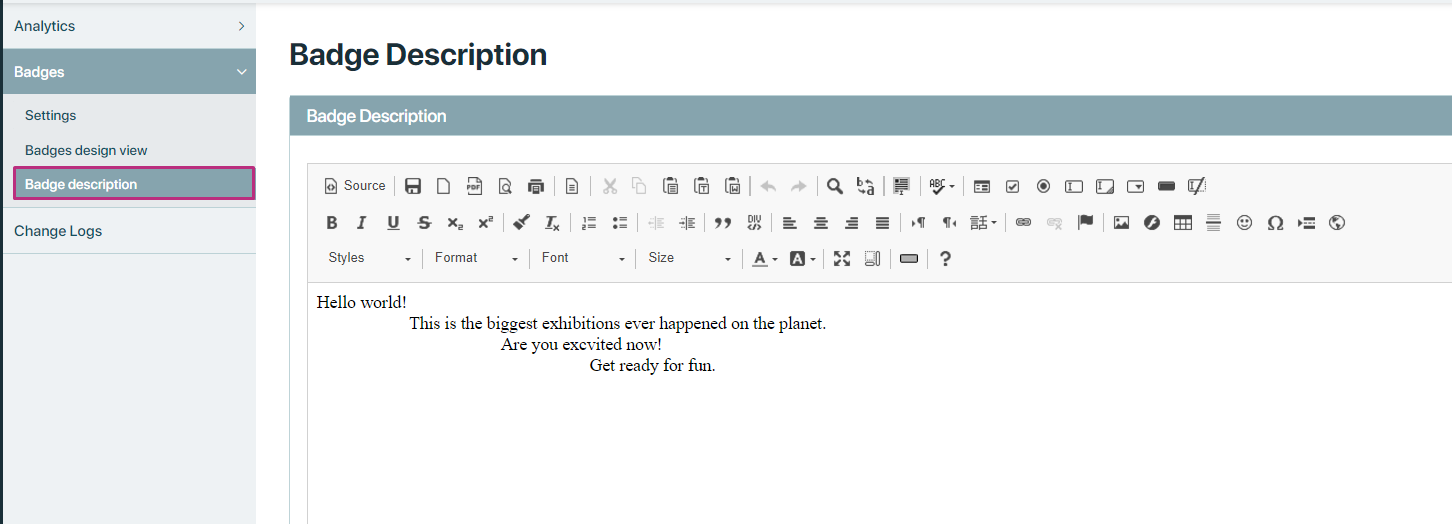
Editor interface: The editor provides a text area where organisers can type in the desired description. This area supports basic formatting options, such as bold, italic, bullet points, and other text enhancements, enabling organisers to create a clear and visually appealing description.
-
Content ideas: Organisers can include various types of information in the description, such as:
- Event details (e.g., date, time, location)
- Agenda highlights
- Instructions for attendees (e.g., check-in process, networking opportunities)
- Contact information for event coordinators
- Special acknowledgements or sponsors
Saving the description
- After inputting the desired text, organisers must click the Save button to store the description. This action ensures that the information is retained and can be accessed later for badge printing.
Printing badges
- Once the badge description is saved, organisers can print badges that include this description. This is done through the Attendee menu option titled Print badge with description. For detail like how it create and works, please click here
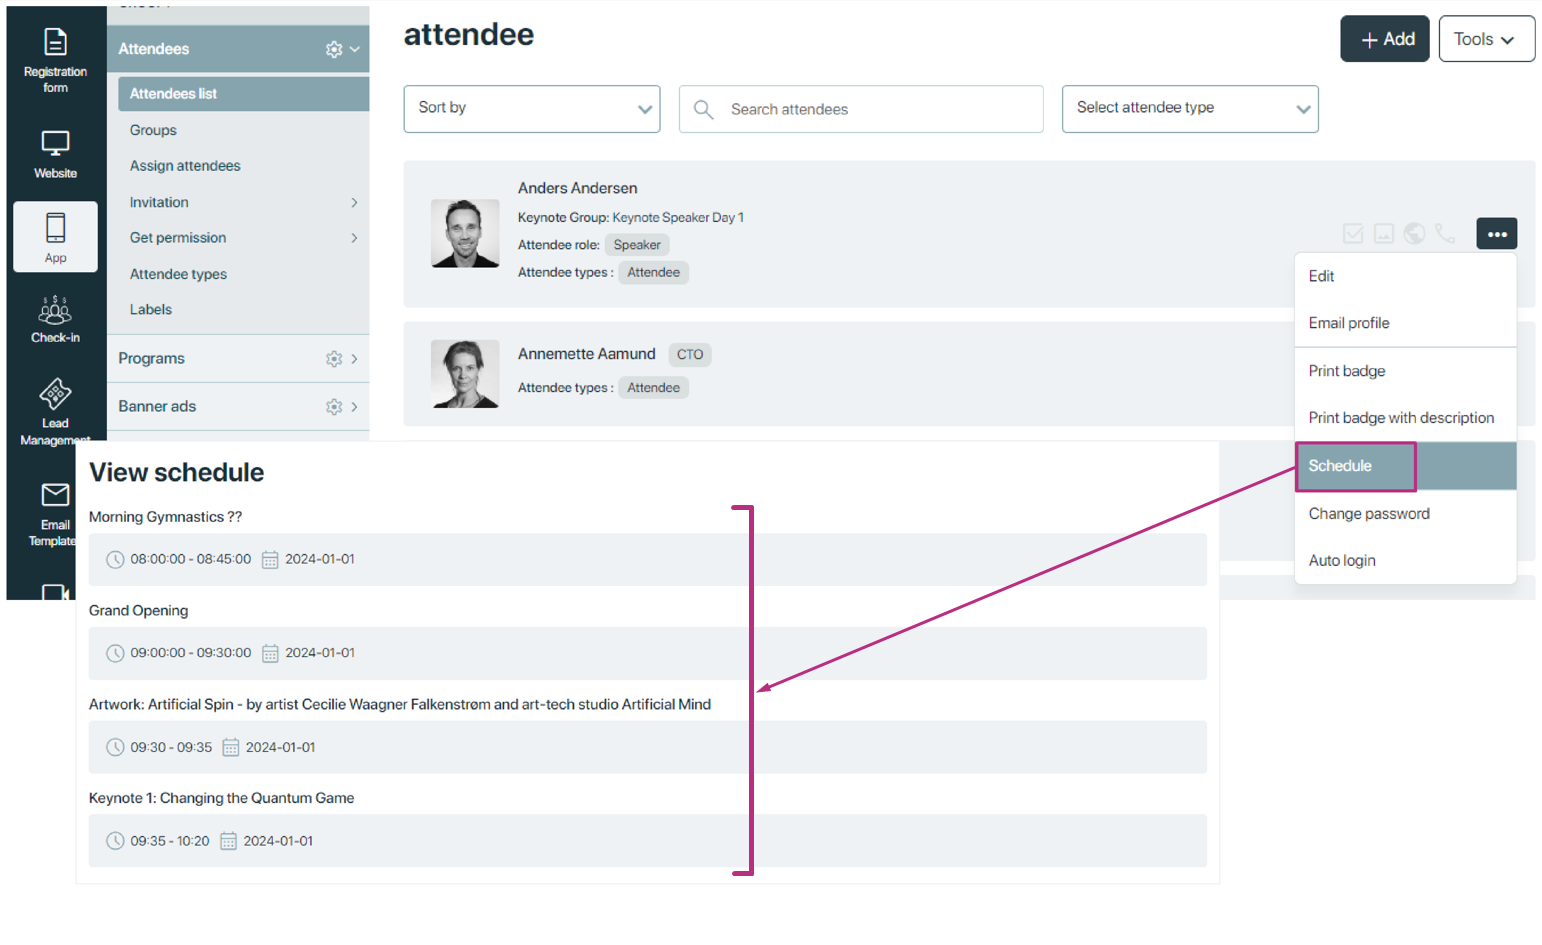
Schedule
The schedule displayed in the attendee’s profile is personalized to their details. It includes sessions, workshops, meetings, or other activities the attendee has registered for or expressed interest in attending. Attendees may have the option to add or remove sessions from their schedule based on their preferences or availability.
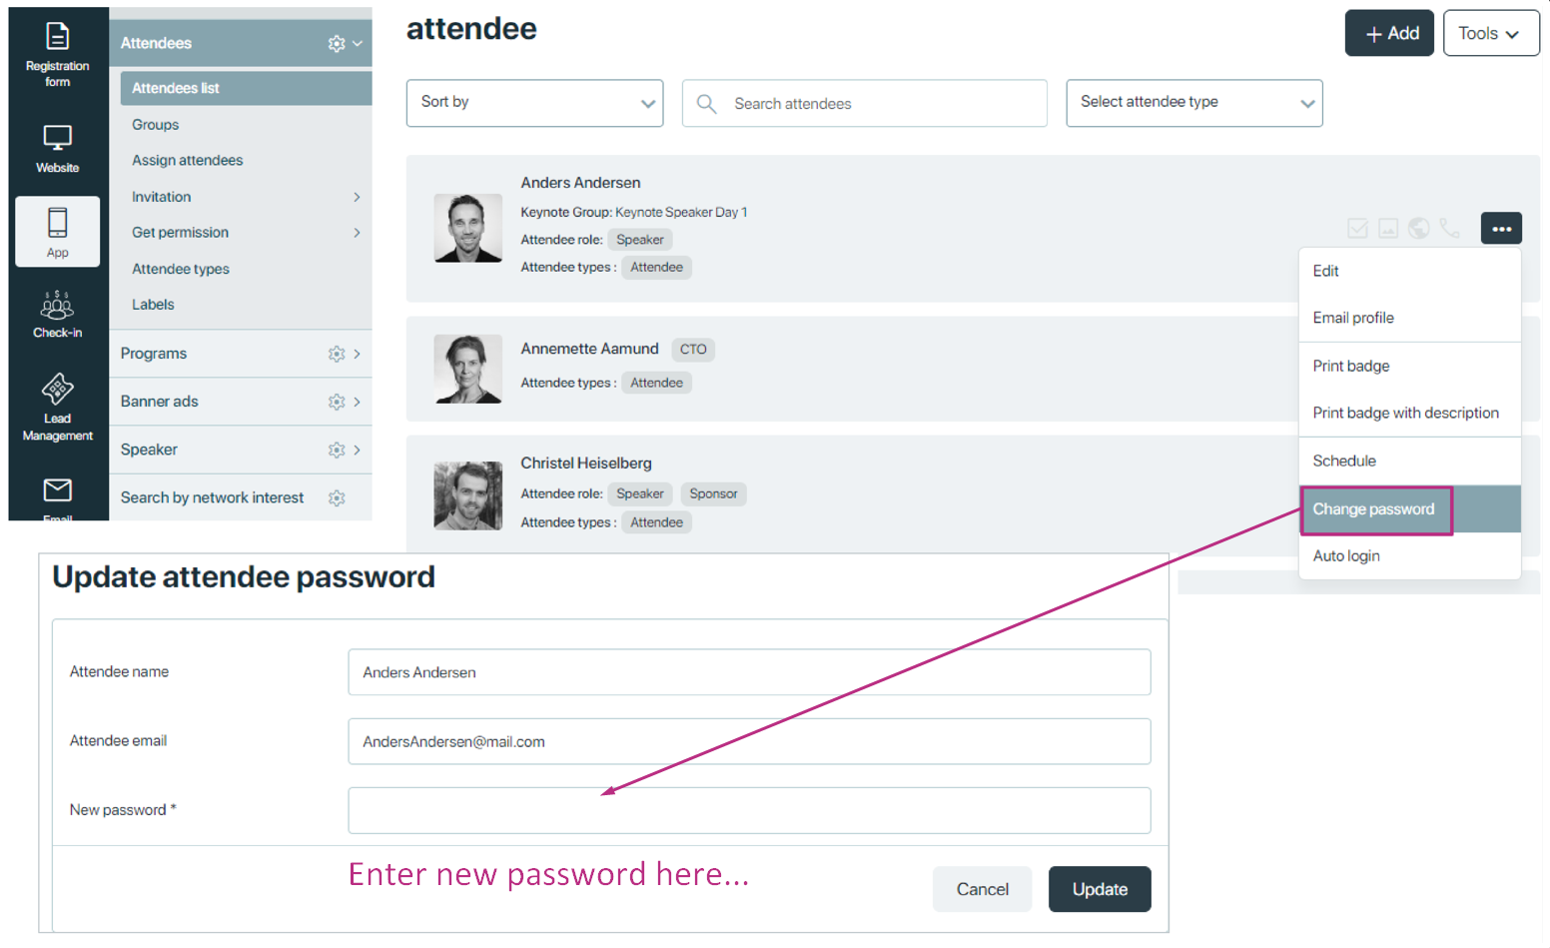
Change password
The “Change password” allows organiser to update attendee current password to a new one.
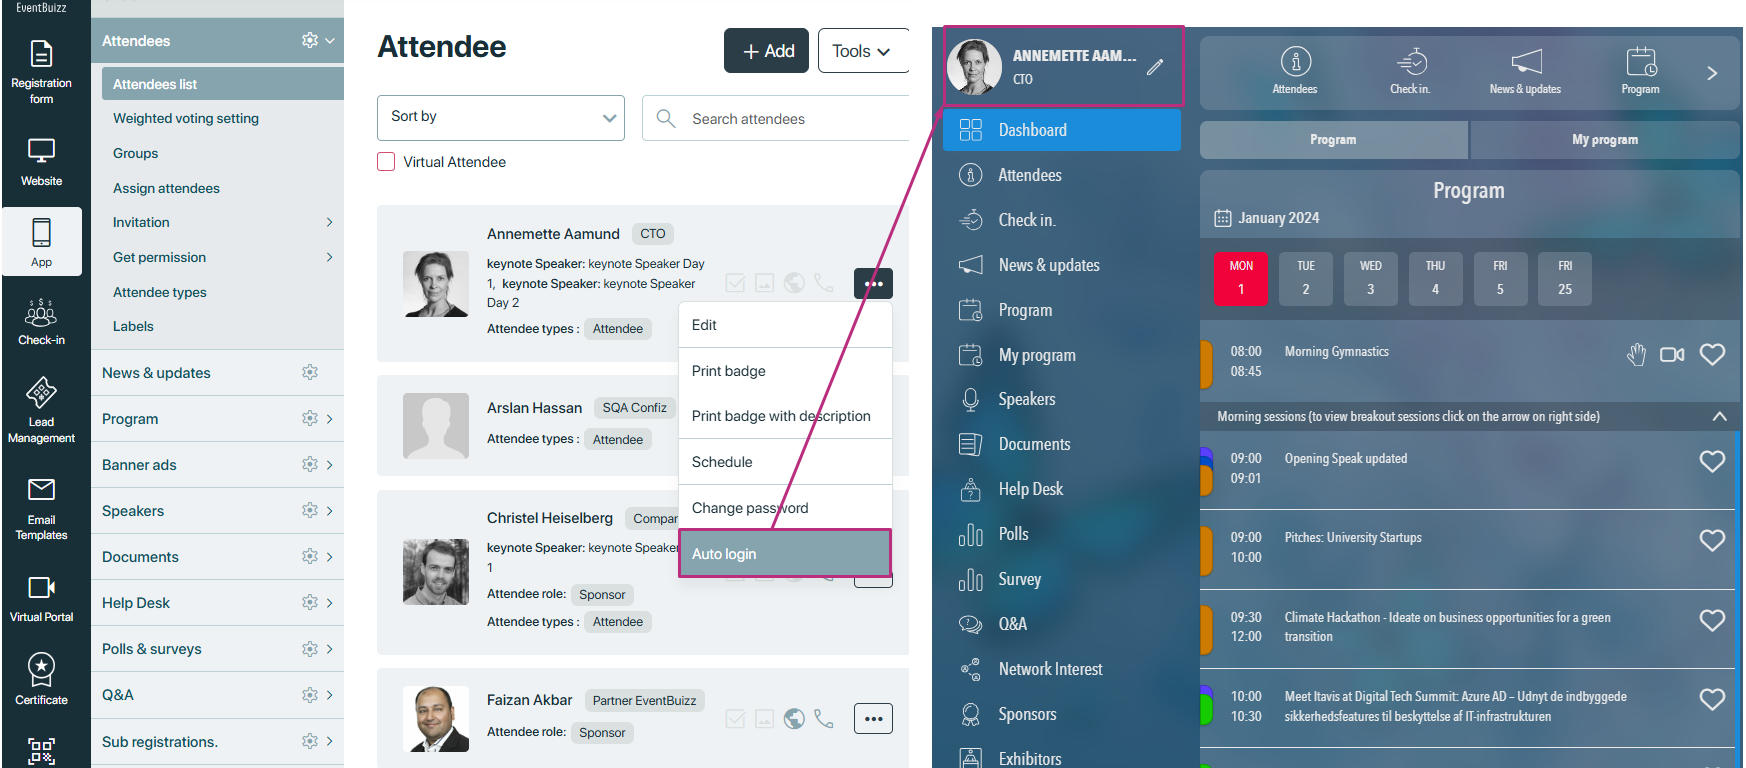
Auto login
Auto login is a feature within the attendee organiser module designed to streamline the login process for attendees accessing the web application. This functionality enhances user experience by allowing event organisers to directly log in attendees without requiring them to enter their credentials each time.
Attendee listing filters
When you have a lot of attendees in your list of ‘Attendees list’, and you want to assign find any of them, we have improved the way you can find them on your list. We have added filters options that helps to find attendees.
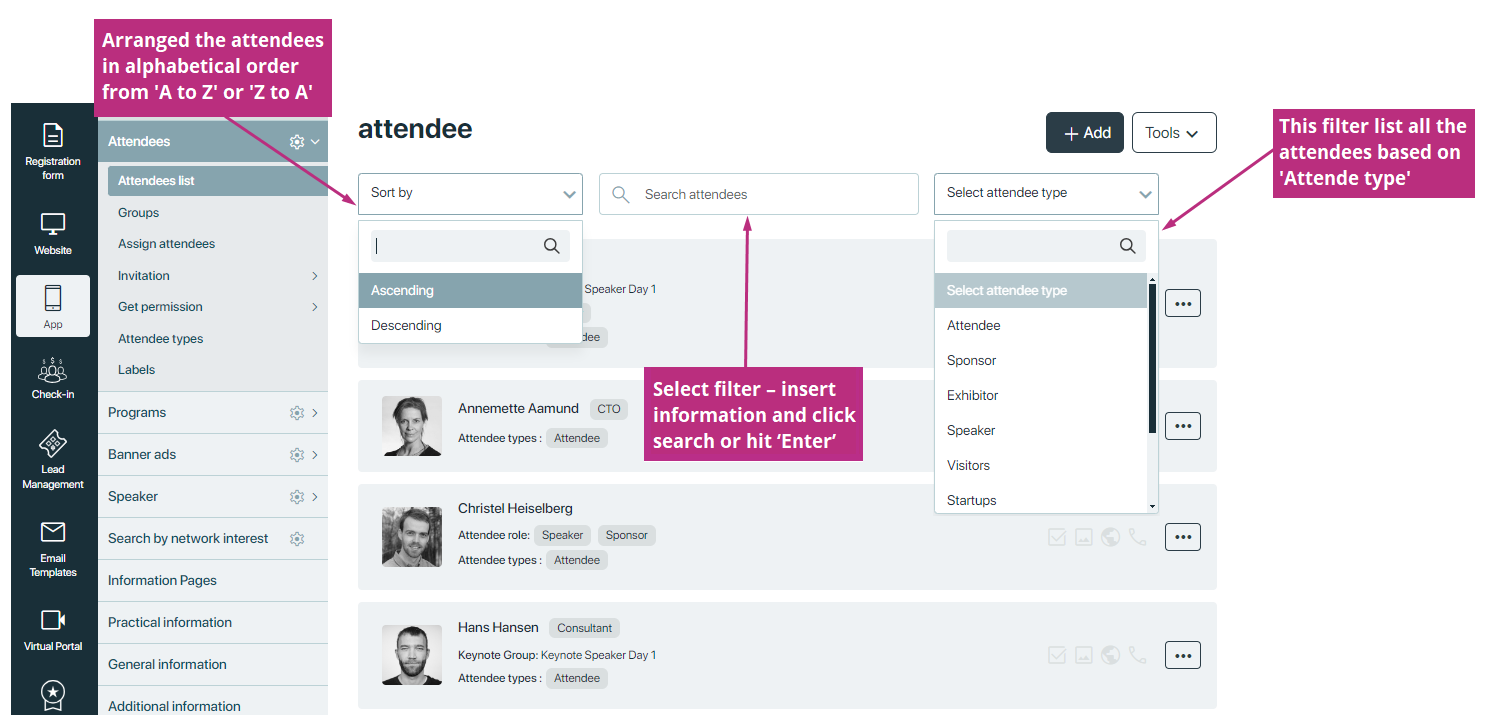
Tools
Eventbuizz offers organisers a robust set of “tools” to manage attendee listings effectively. Detail is given below for the available options.
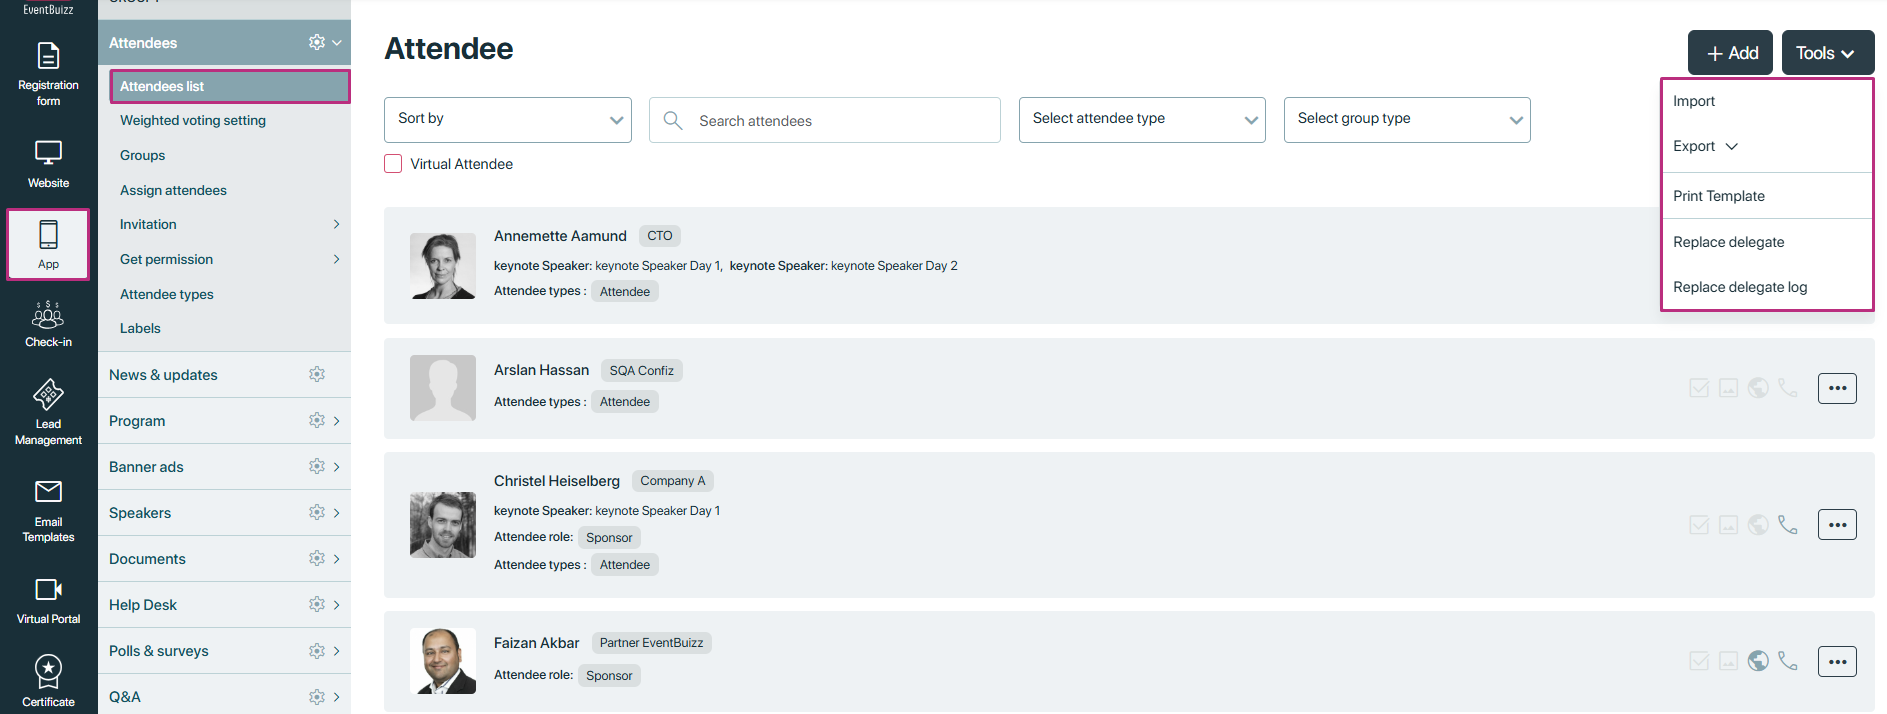
Import
Organisers can upload a CSV file containing essential attendee information. The necessary fields include:
- Attendee name
- Attendee email
- Title
- Company
- Department
- Image
- Attendee type
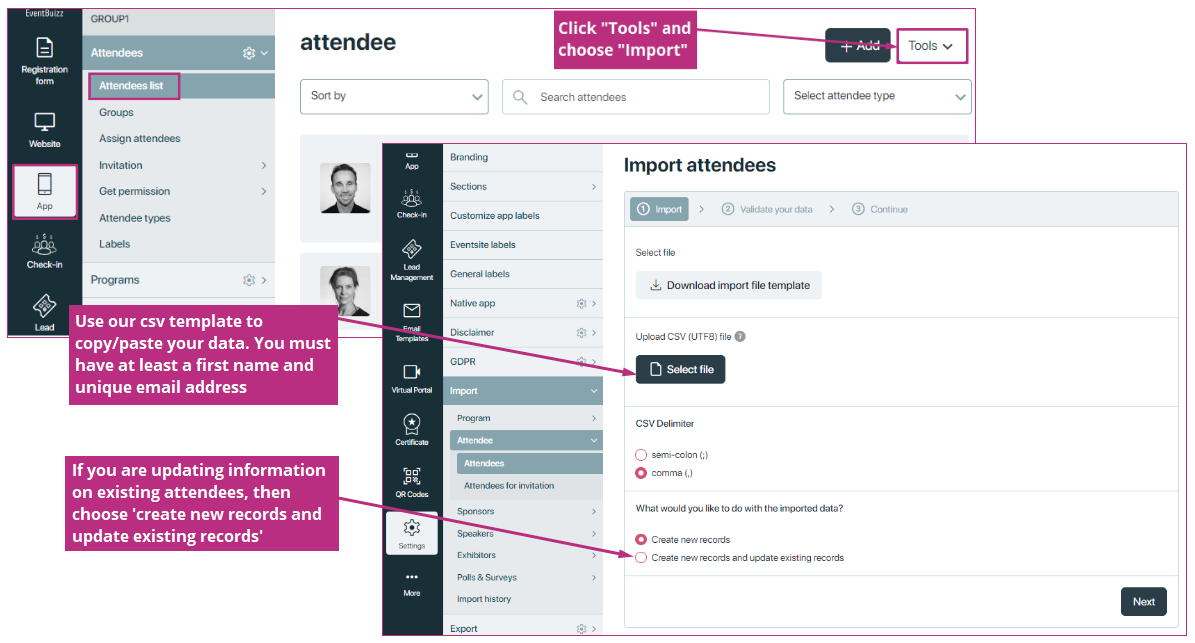
Download Import file template. Copy pastes all the relevant data you have. Save the CSV file on your PC.
NOTE: First name and Email is required. Importing an Attendee is not possible unless you include this information during the import process.
Select file and then you are asked to either import new records or also update existing records.

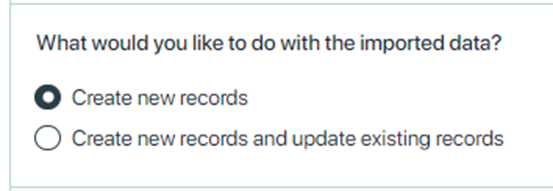
- Choose “Create new records” when you added attendees to the total Attendee list. Then it is only the new records that are imported, meaning no duplicates.
- Choose “Create new records and update existing records” when you will also need to update changes to existing attendee records.
If you have used our template, you do not need to do any changes in mapping, just click ‘Next’. If you use your own CSV file – where the columns are name differently, please map the relevant information.
Import a file -> by clicking on Select File

If you have used our template, you do not need to do any changes in mapping, just click ‘Next’. If you use your own CSV file – where the columns are name differently, please map the relevant information.
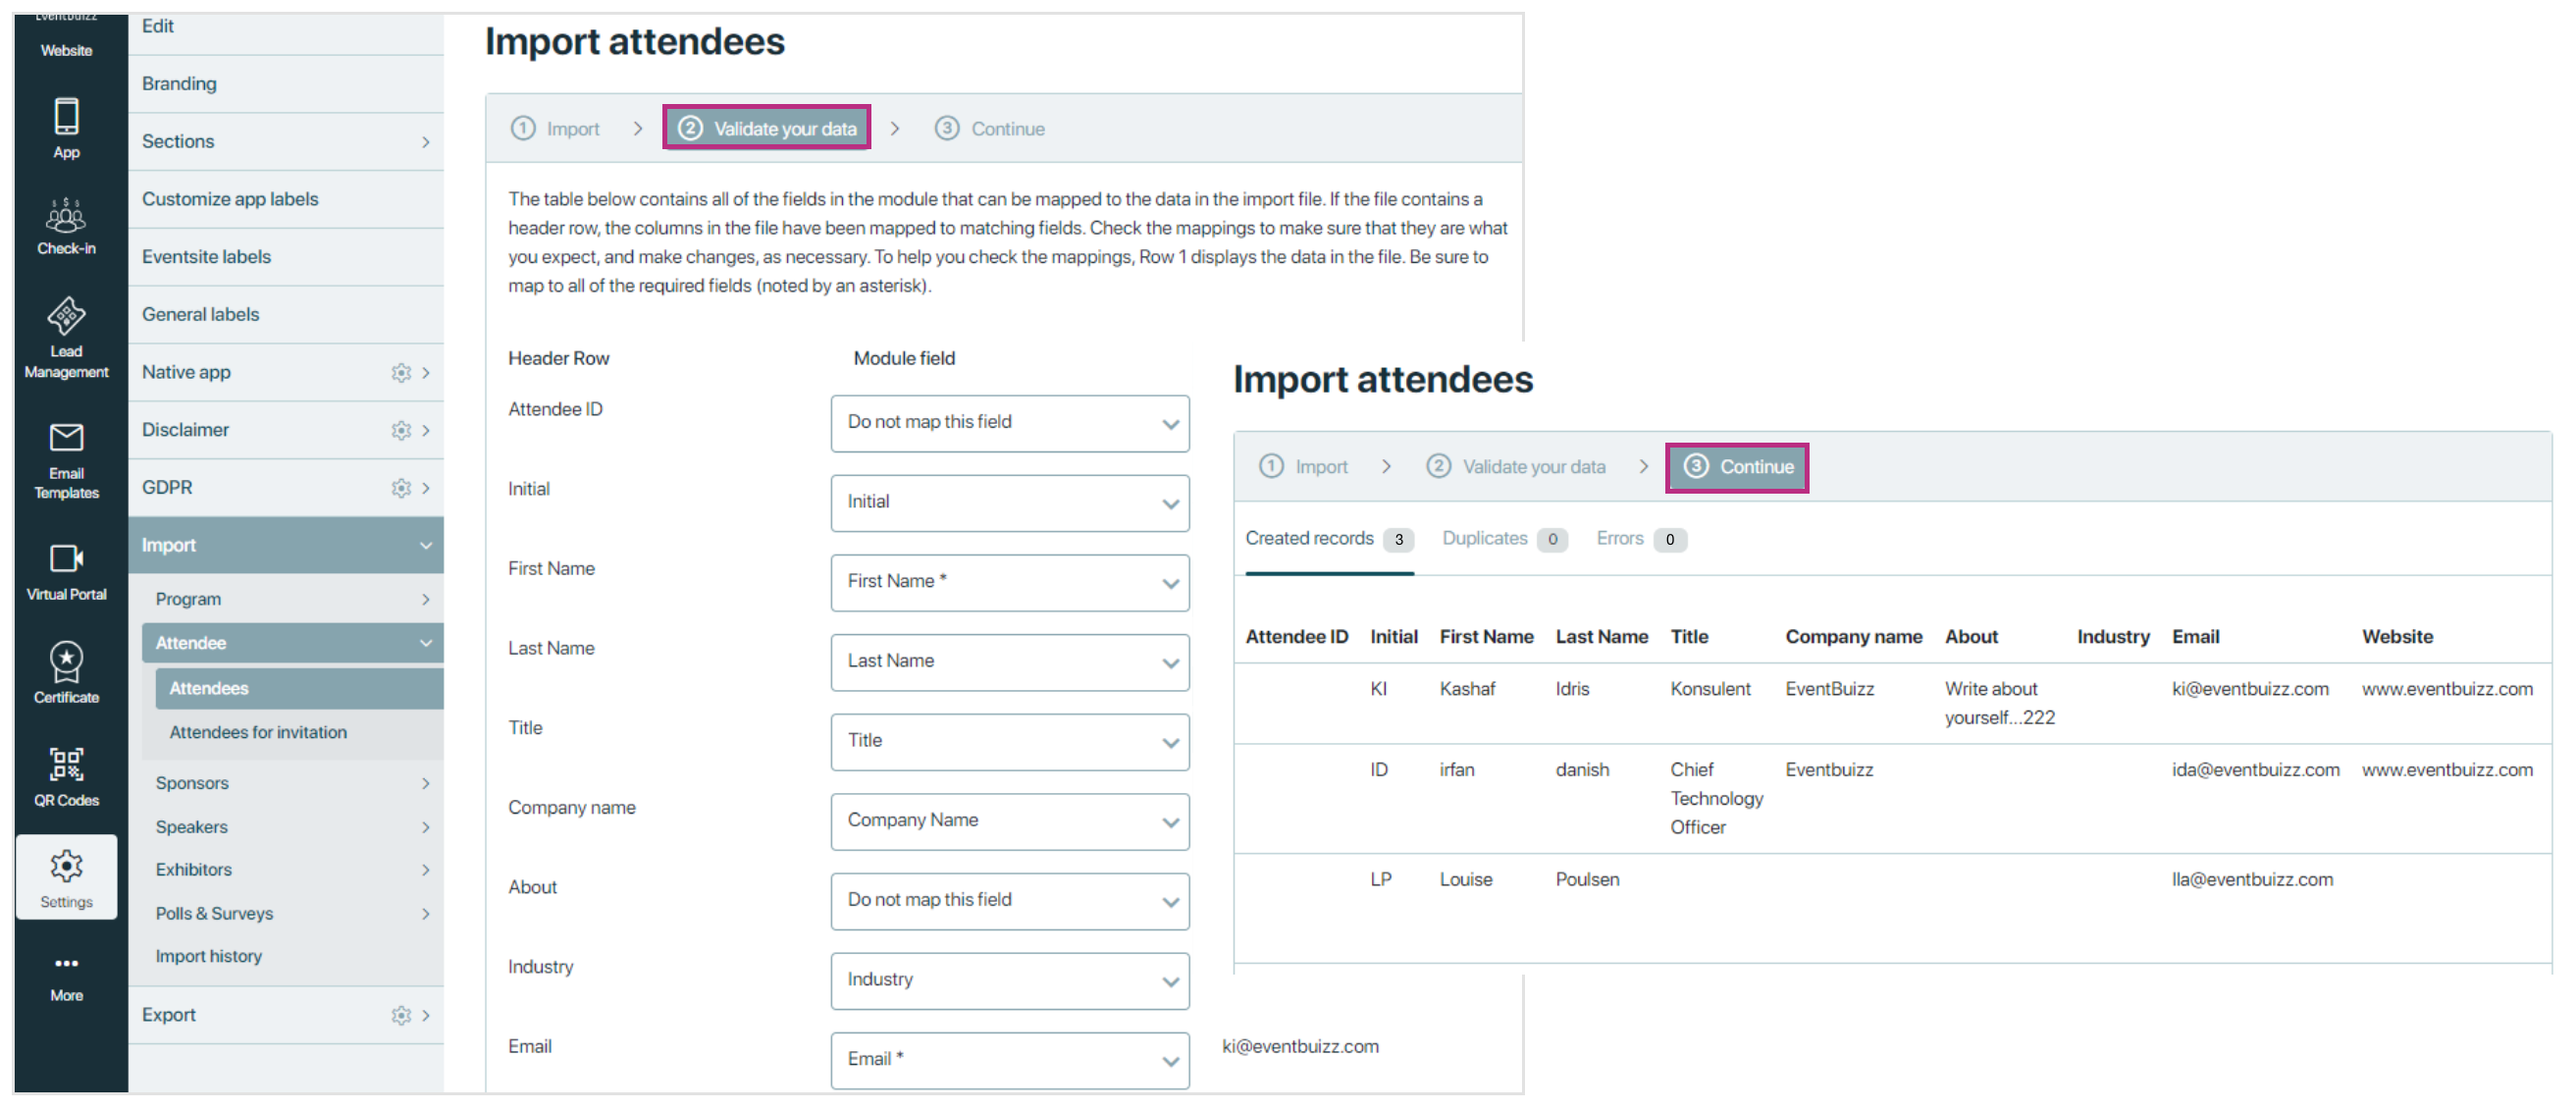
When you click ‘Next’ you can see how nay new records are created and if there are some errors, the system will show this too.
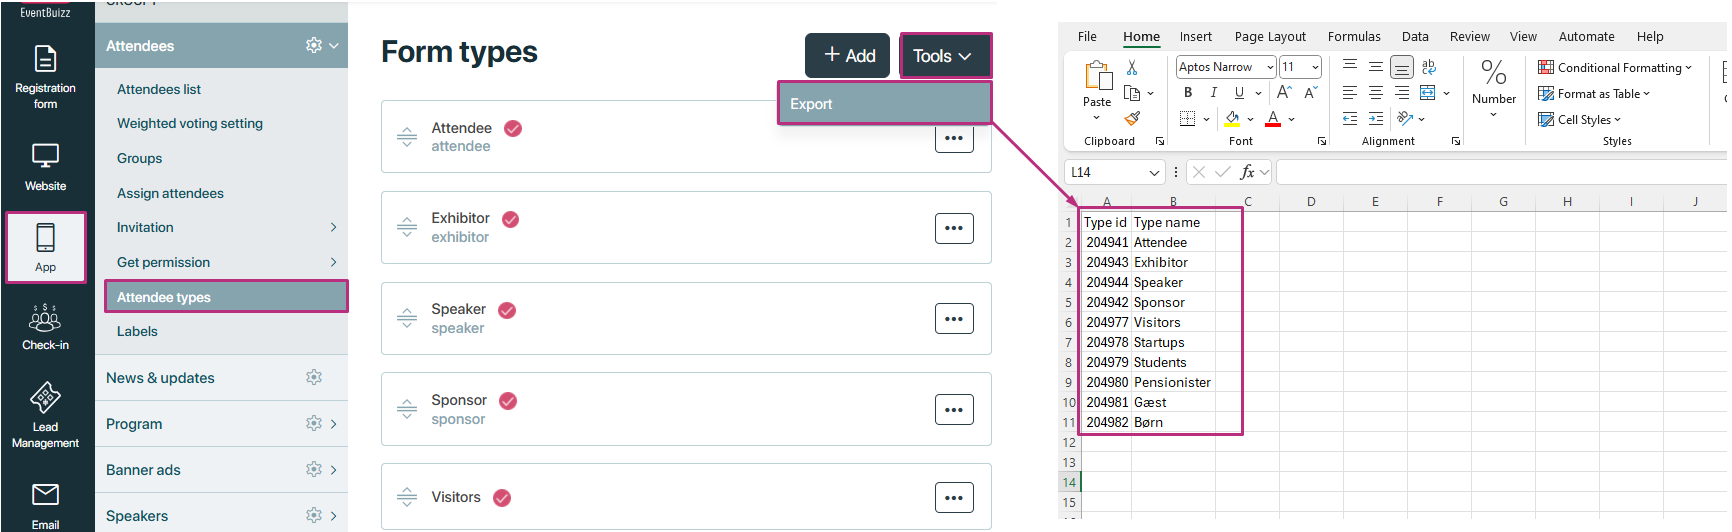
Export
Exporting attendees in eventbuizz typically refers to the process of extracting attendee data from the platform for various purposes such as generating reports, analysing event metrics, or integrating attendee information with other systems.
System offers two types of attendee’s export:
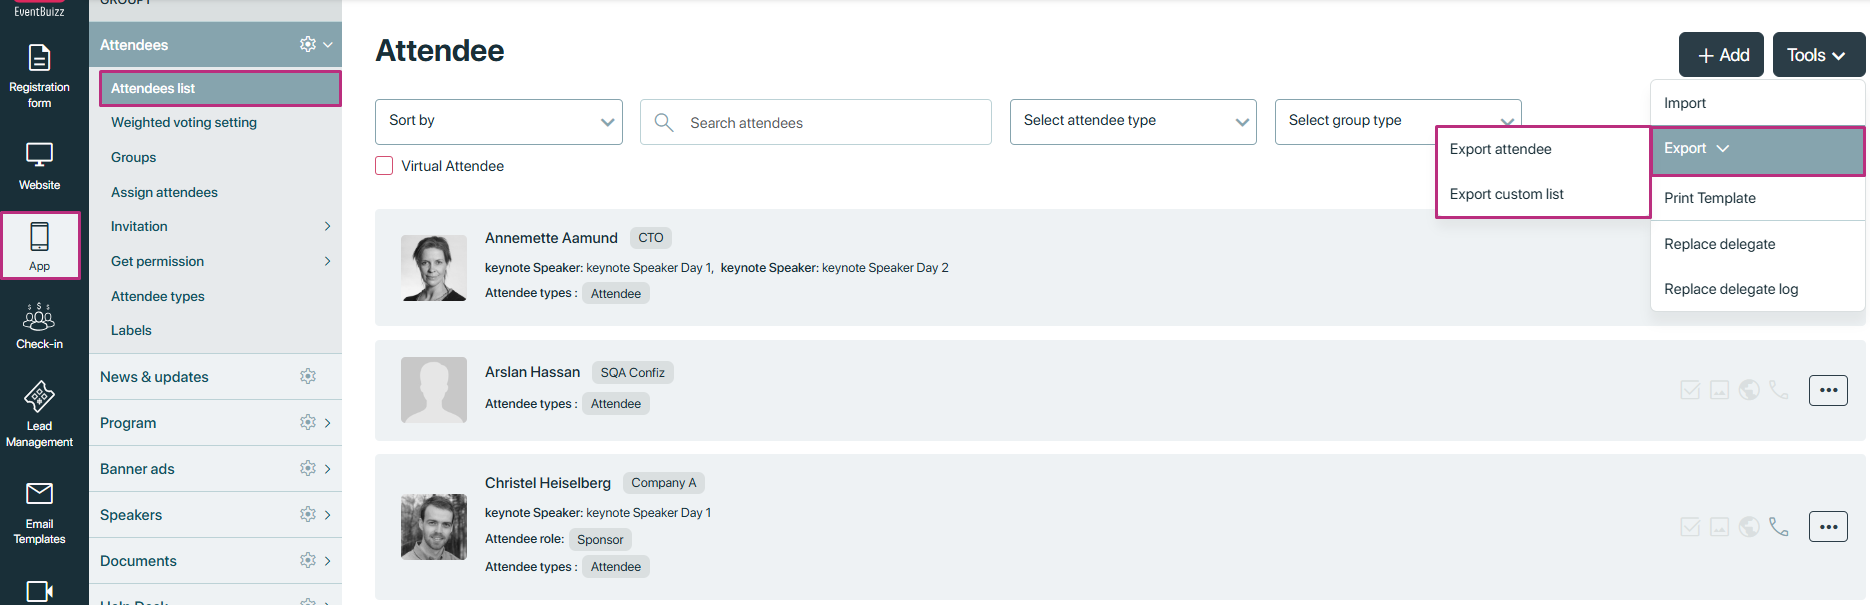
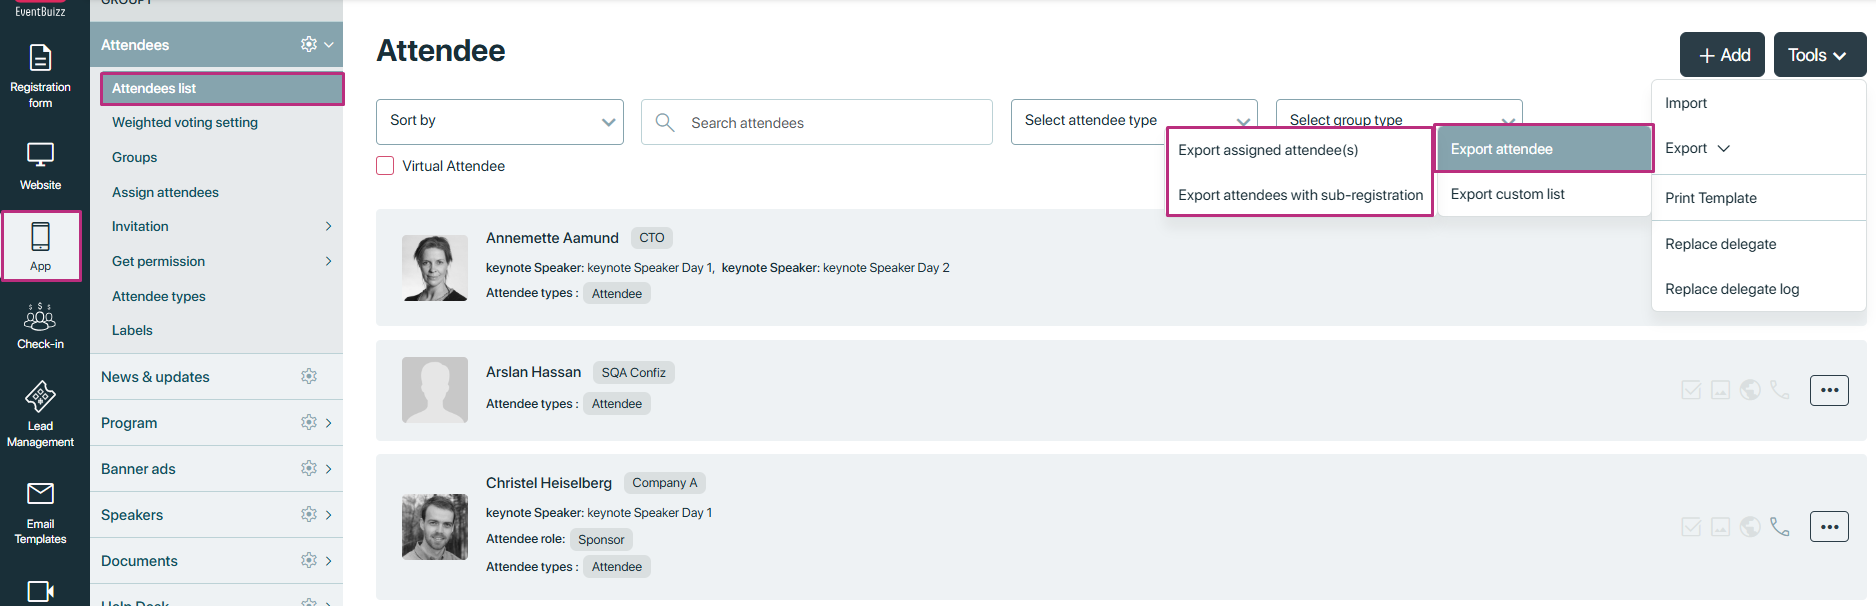
Export attendees
Exporting attendees allows organisers to extract data for reporting, analysis, or integration with other systems. The system offers two types of exports:
- Export assigned attendees: Generate a list of attendees who have been assigned to specific sessions, activities, or tasks within the event.
- Export attendees with sub- registration: This export is a list of primary attendees who have submitted sub-registration
Export custom list
Exporting a custom list of attendees in eventbuizz typically involves retrieving specific information about event attendees according to customised criteria and then exporting that data for external use or analysis.
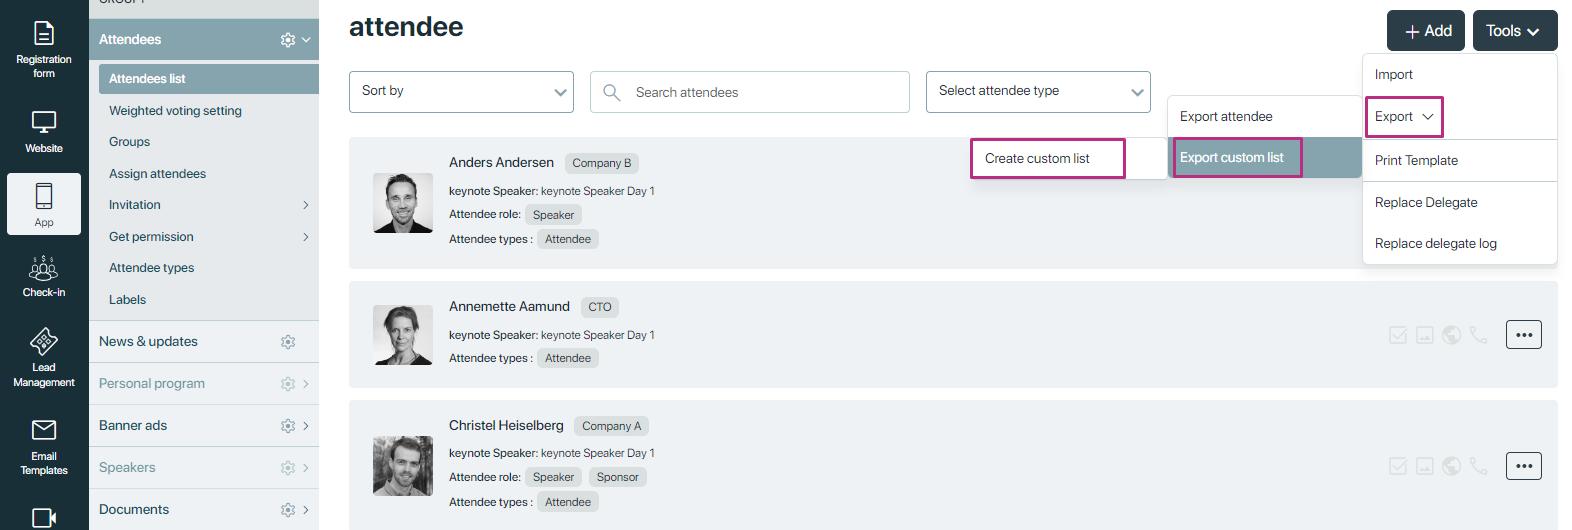
To create a custom template, navigate through Tools > Export > Export Custom list > Create custom list. Determine the specific fields you want to apply to create your custom list.
To move the desired fields from the left column to the right column in the export:
- Identify the fields you wish to include in the export from the left column.
- Drag and drop these fields from the left column to the right column.
- Ensure that all the required fields are included in the right column for the export.
- Once you have moved all desired fields to the right column, proceed with the export process.
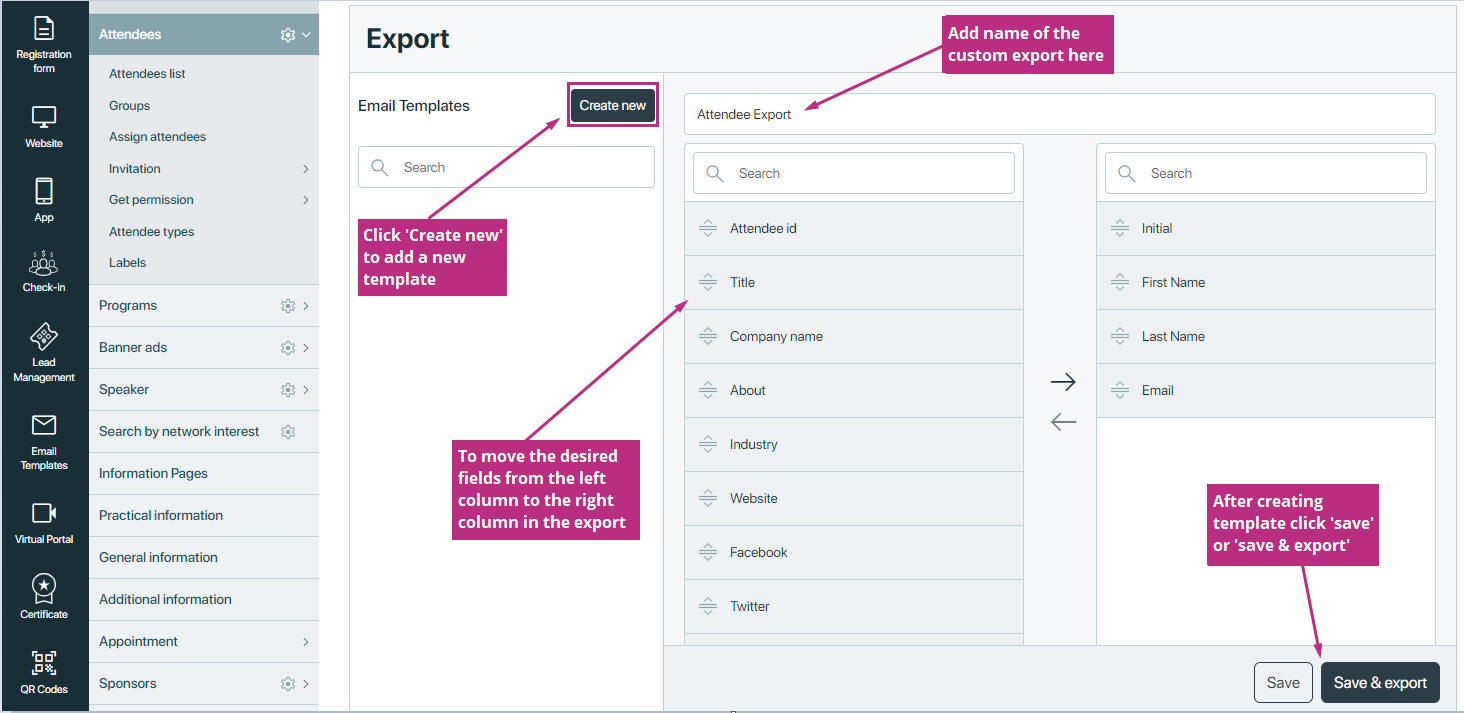
Once the template is created, you can edit, delete, and export from custom exports created.
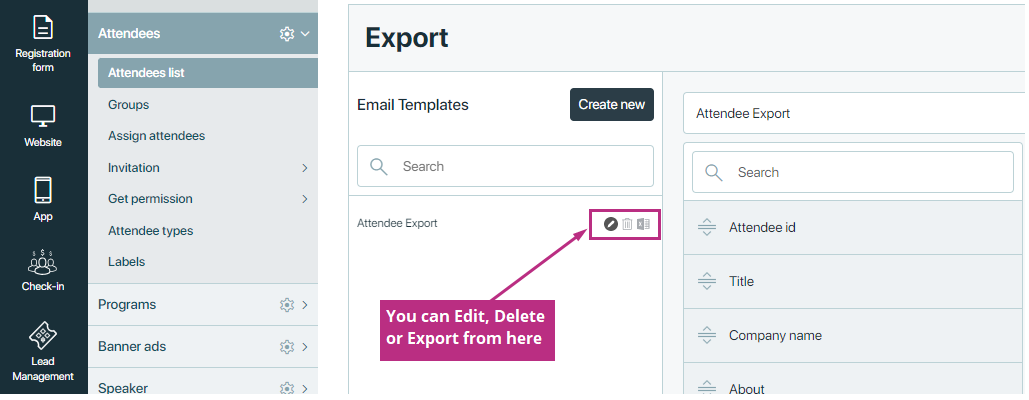
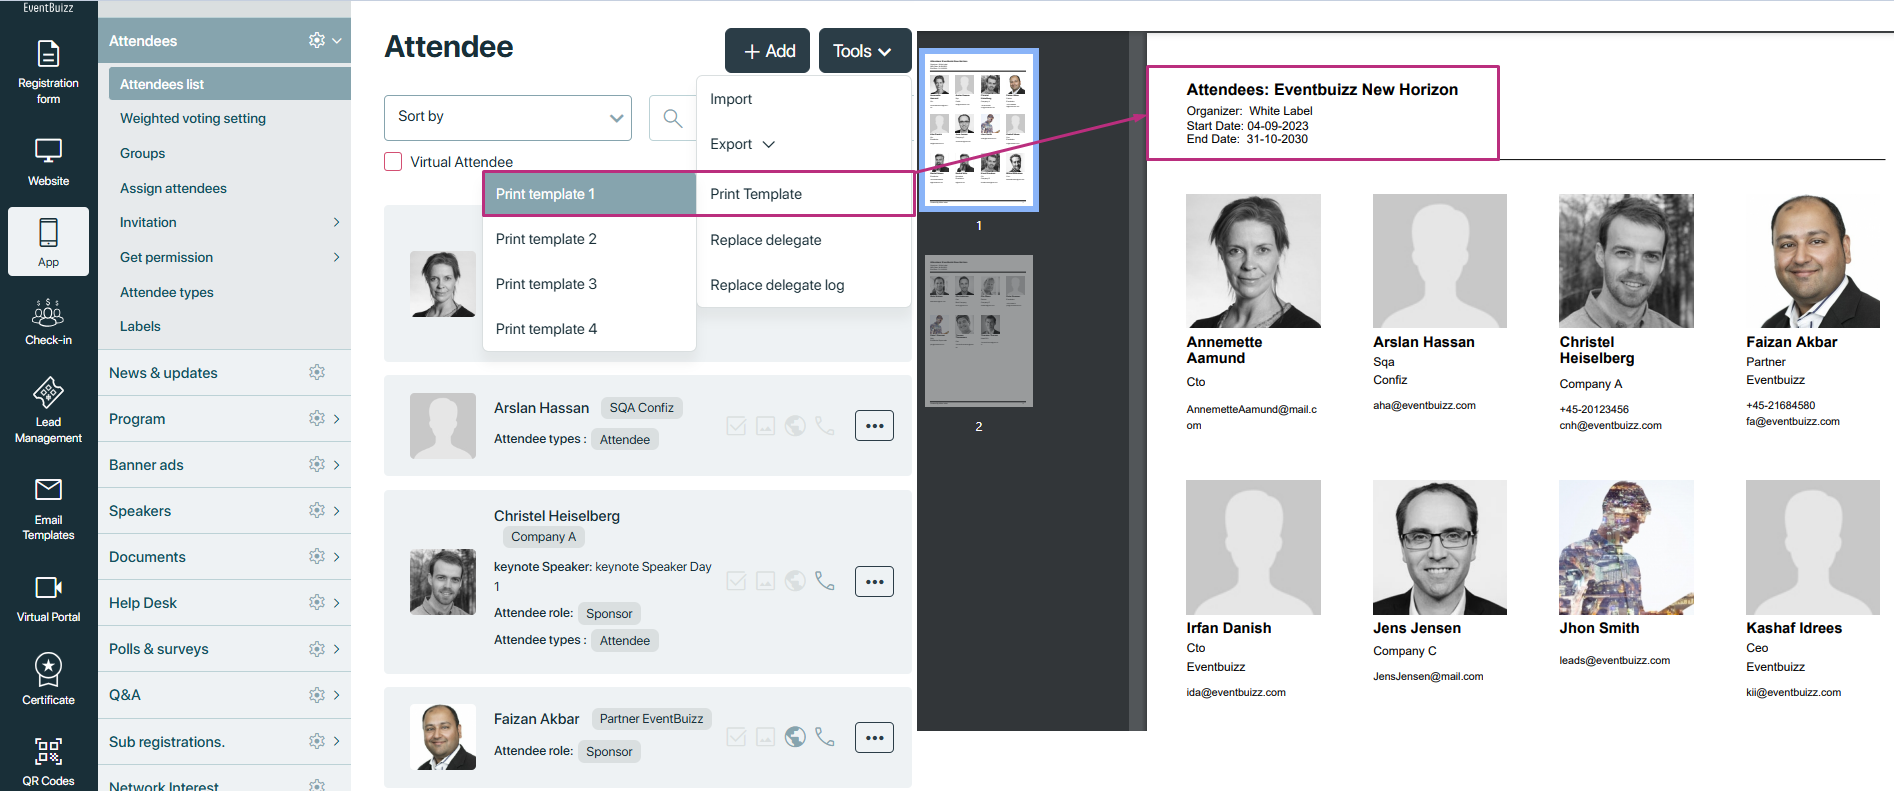
Print template
- Eventbuizz provides four built-in templates that allow organisers to download PDF files containing attendee-specific information.
- Downloaded file have the information or listing of all the attendees.
The templates include details such as:
- Name
- Profile
- Company
Each template has a unique representation style.
Replace delegate
The Delegate number is a unique identifier for attendees, used for voting, check-in, speaker representation, and more.
Features:
- If an attendee is unable to attend, they can assign their delegate number to another attendee, allowing the new delegate to represent them at the event.
- This ensures that each delegate number corresponds to an individual, even if represented by someone else.
By clicking on the replace delegate a new model will open, where organiser will enter the delegate number and can search about that particular delegate number.
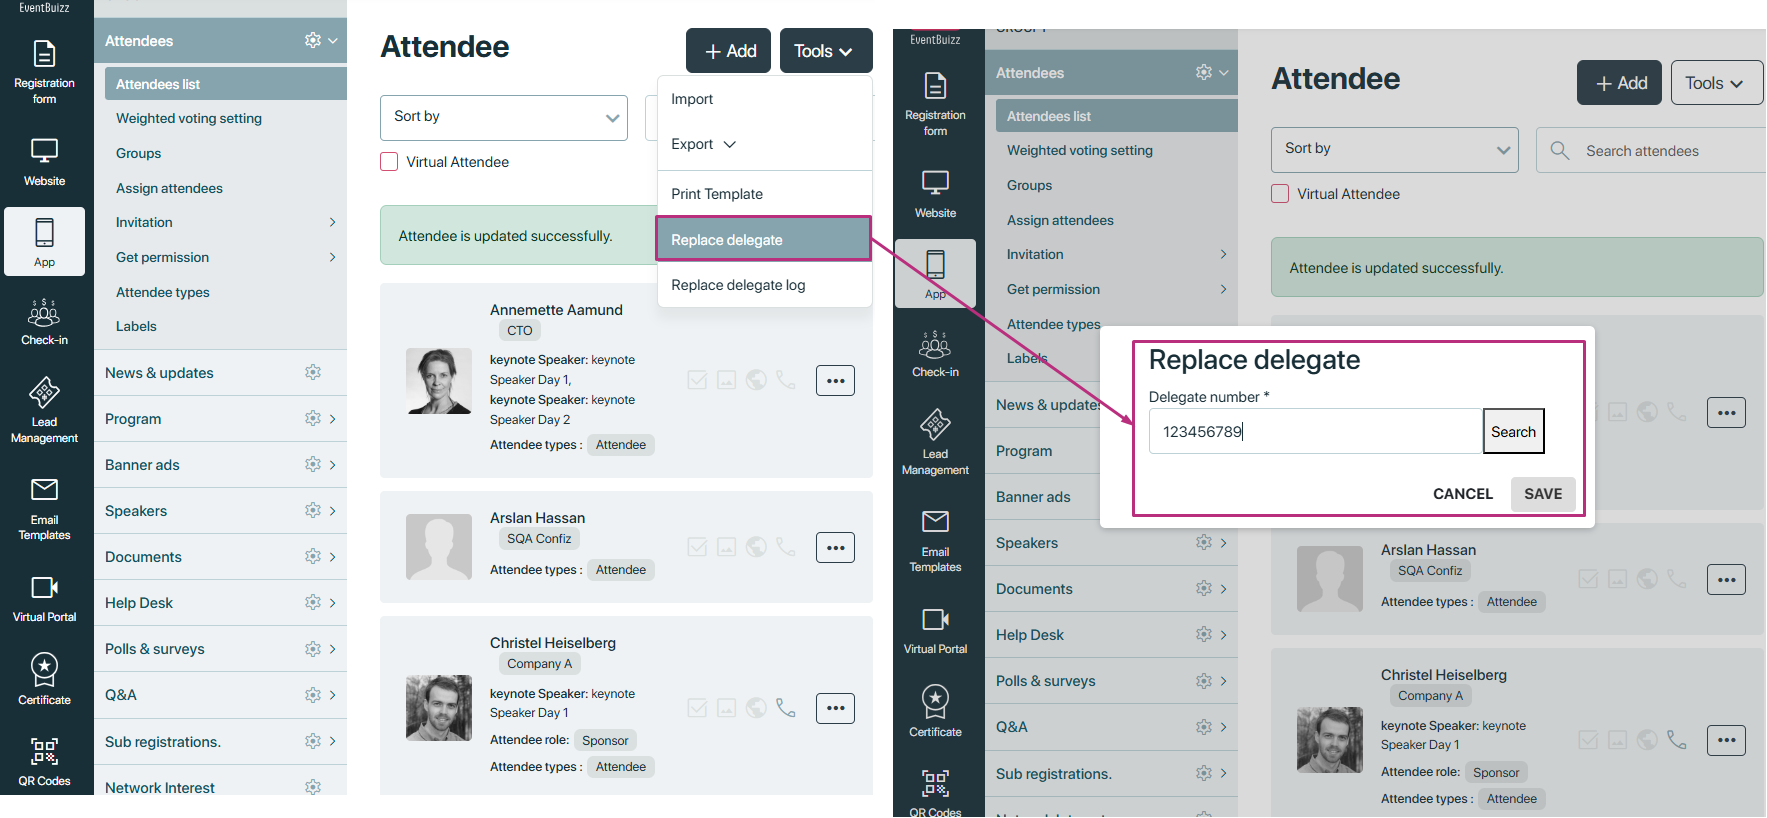
When organiser search any delegate number all the attendees will show in drop-down, which are matching to that delegate number. Organiser will select the attendee, who want to replace.
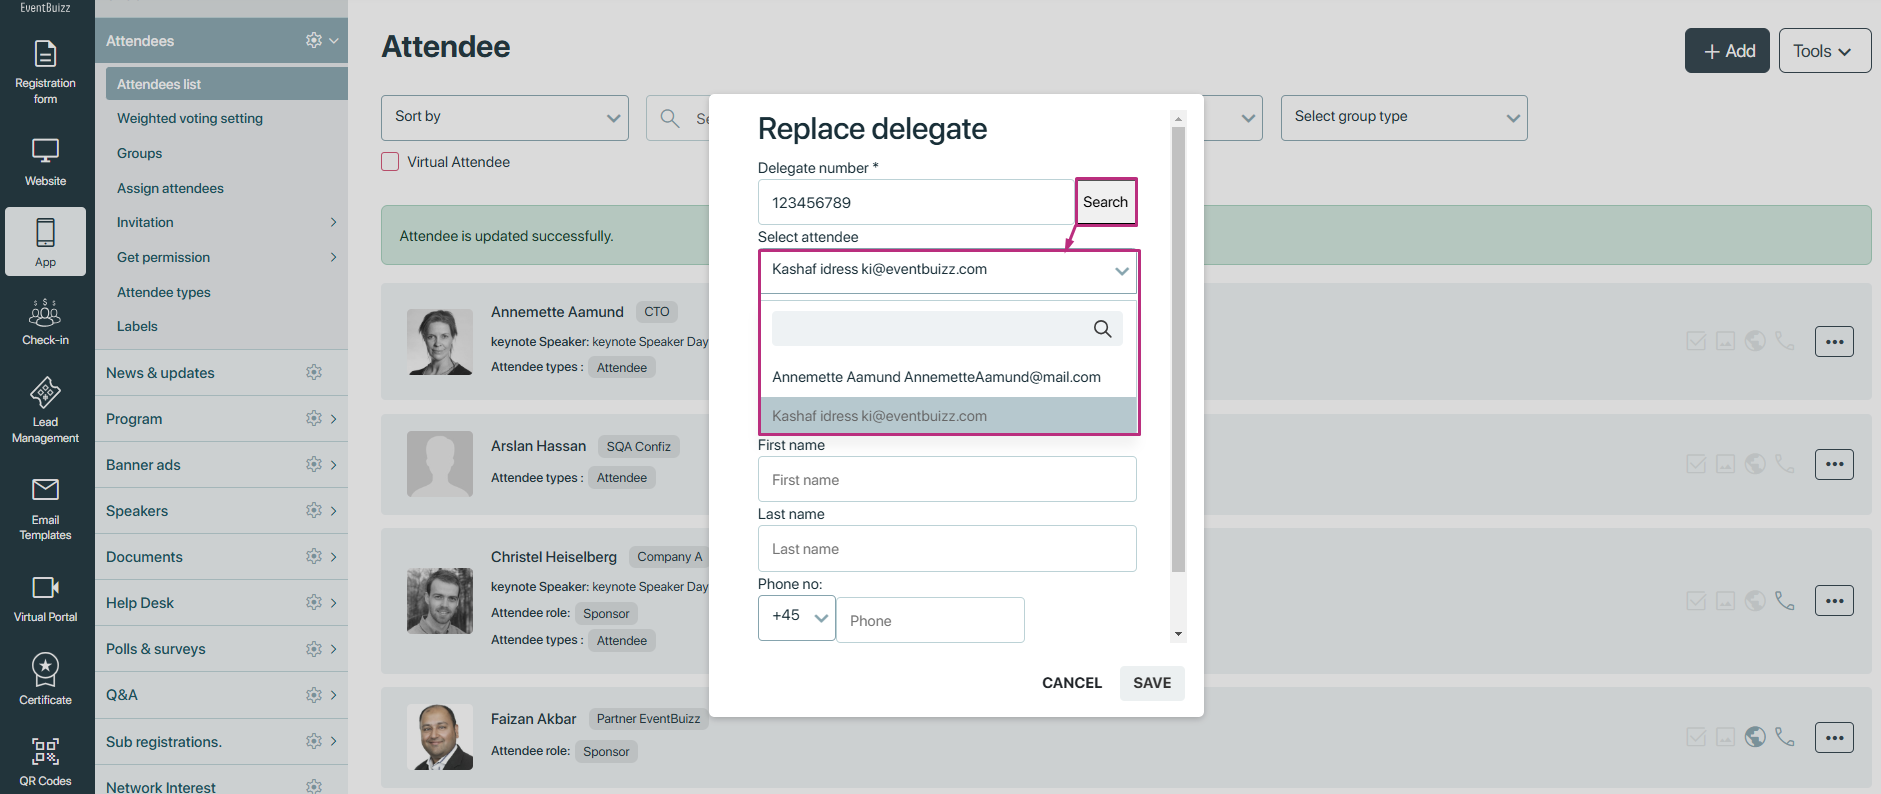
When organiser select the attendee, whose delegate want to replace, and below a new form will open where organiser will enter the email of the attendee, whom he want to replace, and if this attendee is existing in the attendee list, then remaining information automatically filled in the form,otherwise organiser will enter whole information manually, and new attendee will assigned in the event automatically.
Replace delegate log
The replace delegate log tracks all changes made to delegate assignments. Each log entry contains the following information:
- Delegate number: Unique identifier for the delegate.
- Replaced attendee name: Name of the original attendee.
- Replaced attendee email: Email of the original attendee.
- Replaced by attendee name: Name of the new delegate.
- Replaced by attendee email: Email of the new delegate.
- Replace date: Date of the replacement.
Weighted voting setting
Weighted voting setting
Overview
The Weighted Voting feature in eventbuizz allows organisers to assign varying voting weights to attendees. By default, this feature is disabled. When enabled, it provides a structured way to manage attendee voting power based on assigned shares.
Enabling weighted voting
Accessing settings
- Navigate to the attendee settings section.
- Find the setting labelled “Enable weighted voting.”
- By default, this setting is off.
Activating the feature
- When the organiser toggles the “Enable weighted voting” setting to on, the weighted voting subsection becomes visible in the attendee module menu.
Additional settings when enabled
Once the weighted voting feature is enabled, two additional settings are available:
Enable validation of total shares:
-
- This setting checks if the total shares assigned to attendees exceed the overall allowed shares.
- Functionality:
- If enabled, and the organizer sets the total shares (e.g., 100), an alert will appear if the total assigned shares exceed this limit.
- If disabled, no alerts will be shown even if the total assigned shares exceed the limit.
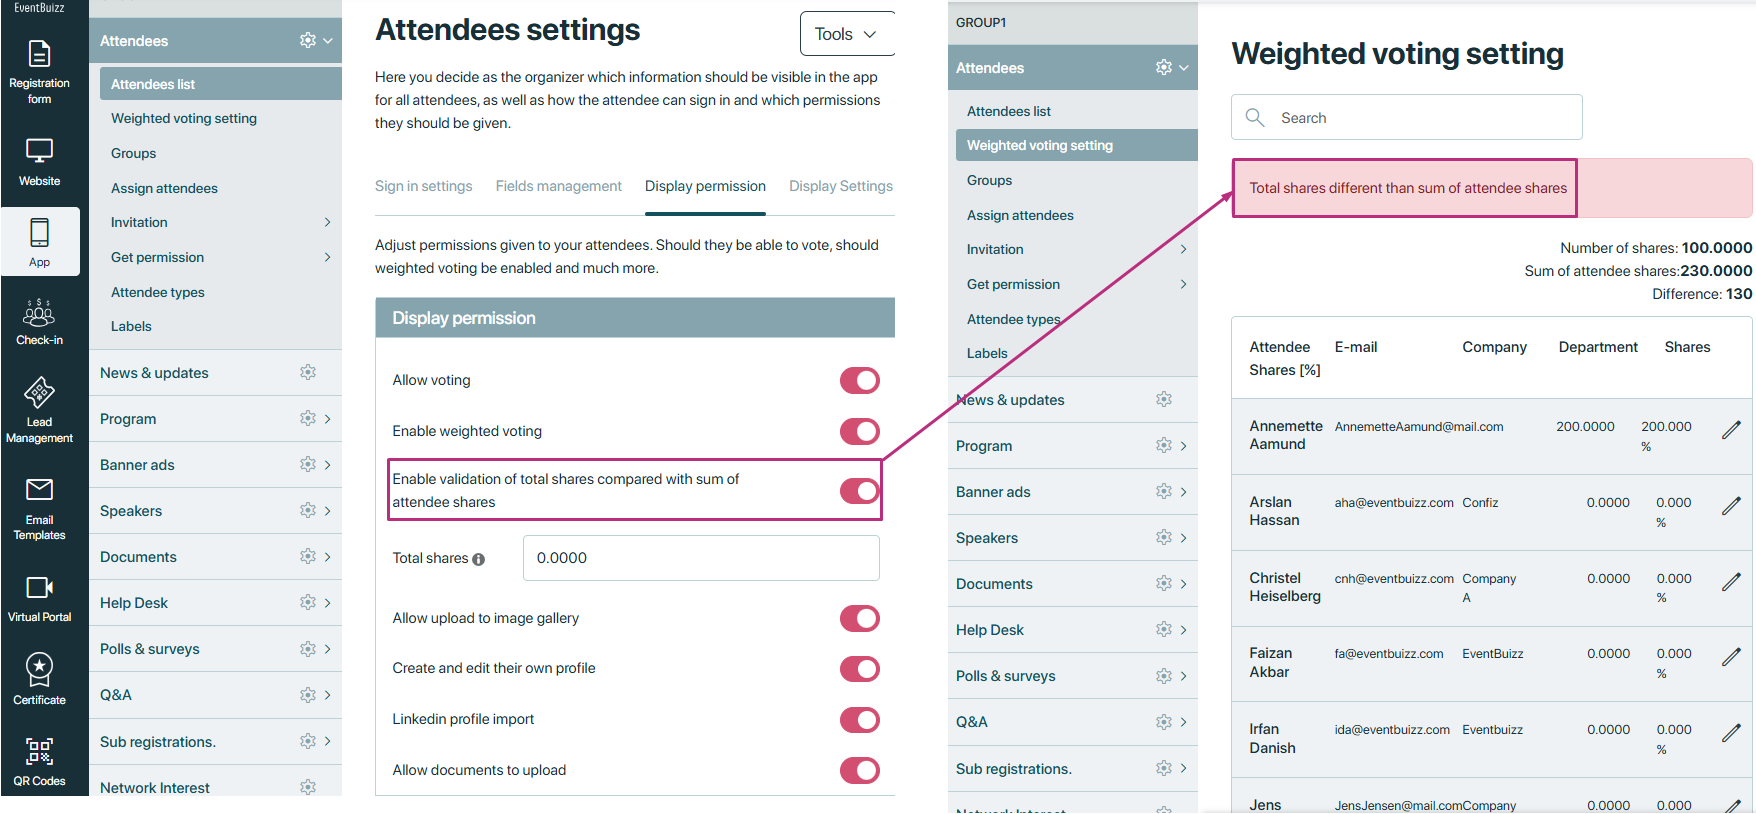
Total shares:
- The organiser can specify the total shares available for voting, such as 100, 200, etc.
- This value sets the cap for the total shares that can be distributed among attendees.
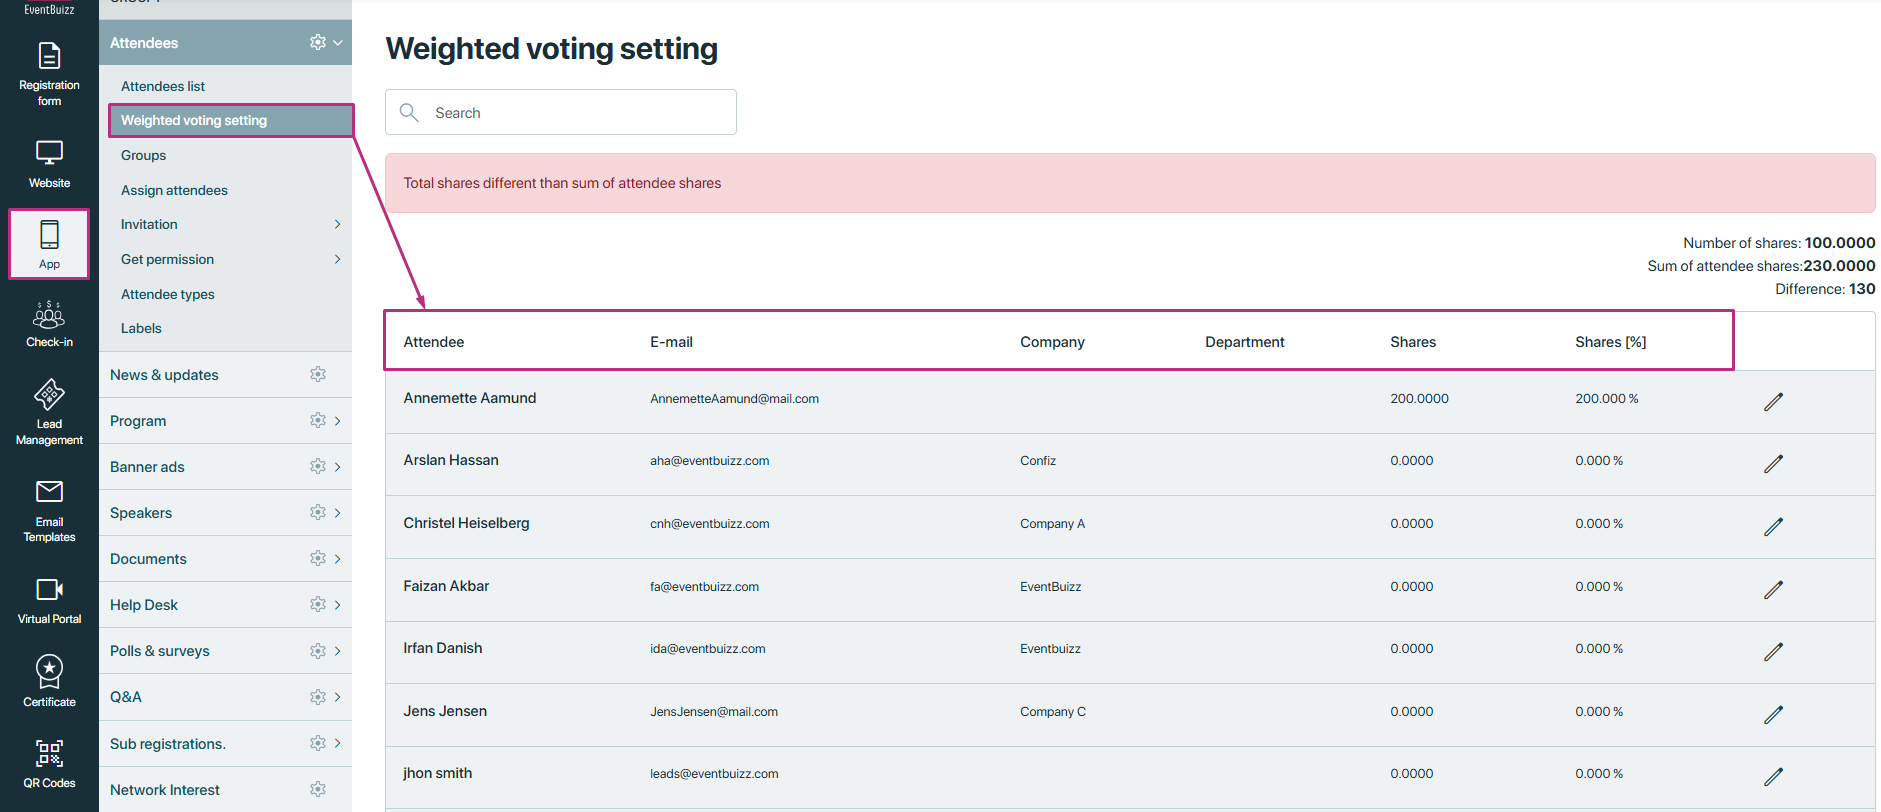
Attendee listing in weighted voting settings
In the weighted voting settings page, a list of all event attendees is displayed. The following fields are provided for each attendee:
- Attendee name: The full name of the attendee.
- Email: The attendee’s email address.
- Company: The company the attendee is associated with.
- Department: The department within the company the attendee belongs to.
- Shares: The number of shares assigned to the attendee.
- Shares [%]: The percentage representation of shares assigned to that attendee based on the total shares.
Editing shares for attendees
Each attendee listing includes an Edit action button. Clicking this button opens a modal where organisers can modify the shares assigned to that attendee.
Edit modal fields:
- Attendee name: Displayed for reference.
- Email: Displayed for reference.
- Share input field: The organizer can input the new number of shares to assign to the attendee.
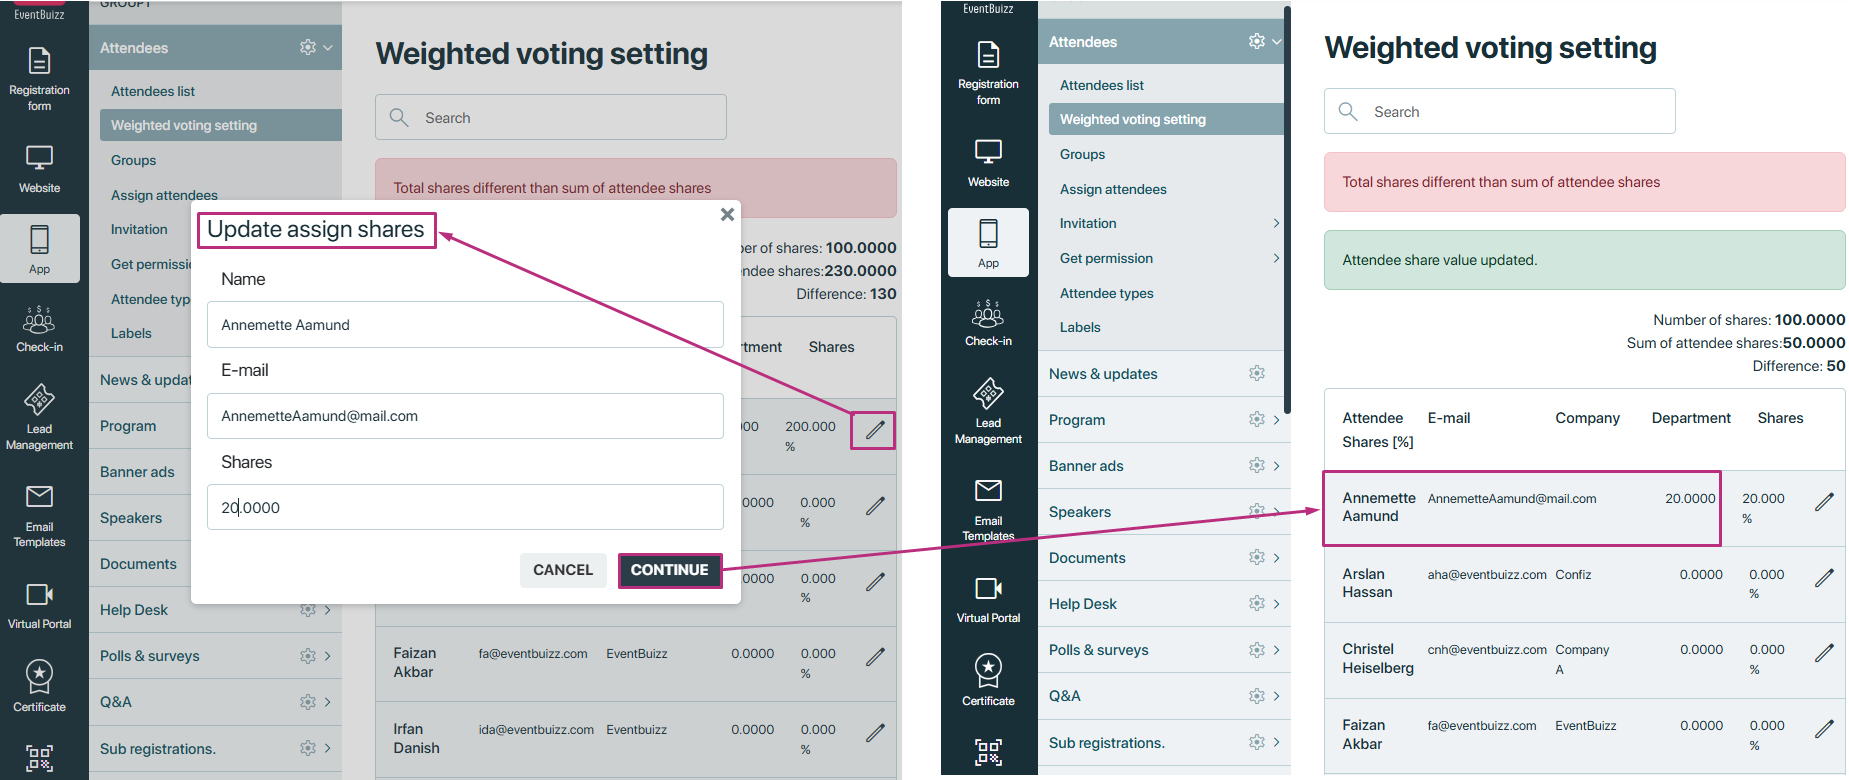
Default share assignment
- By default, each attendee has 0 shares assigned. Organisers can update this value as needed.
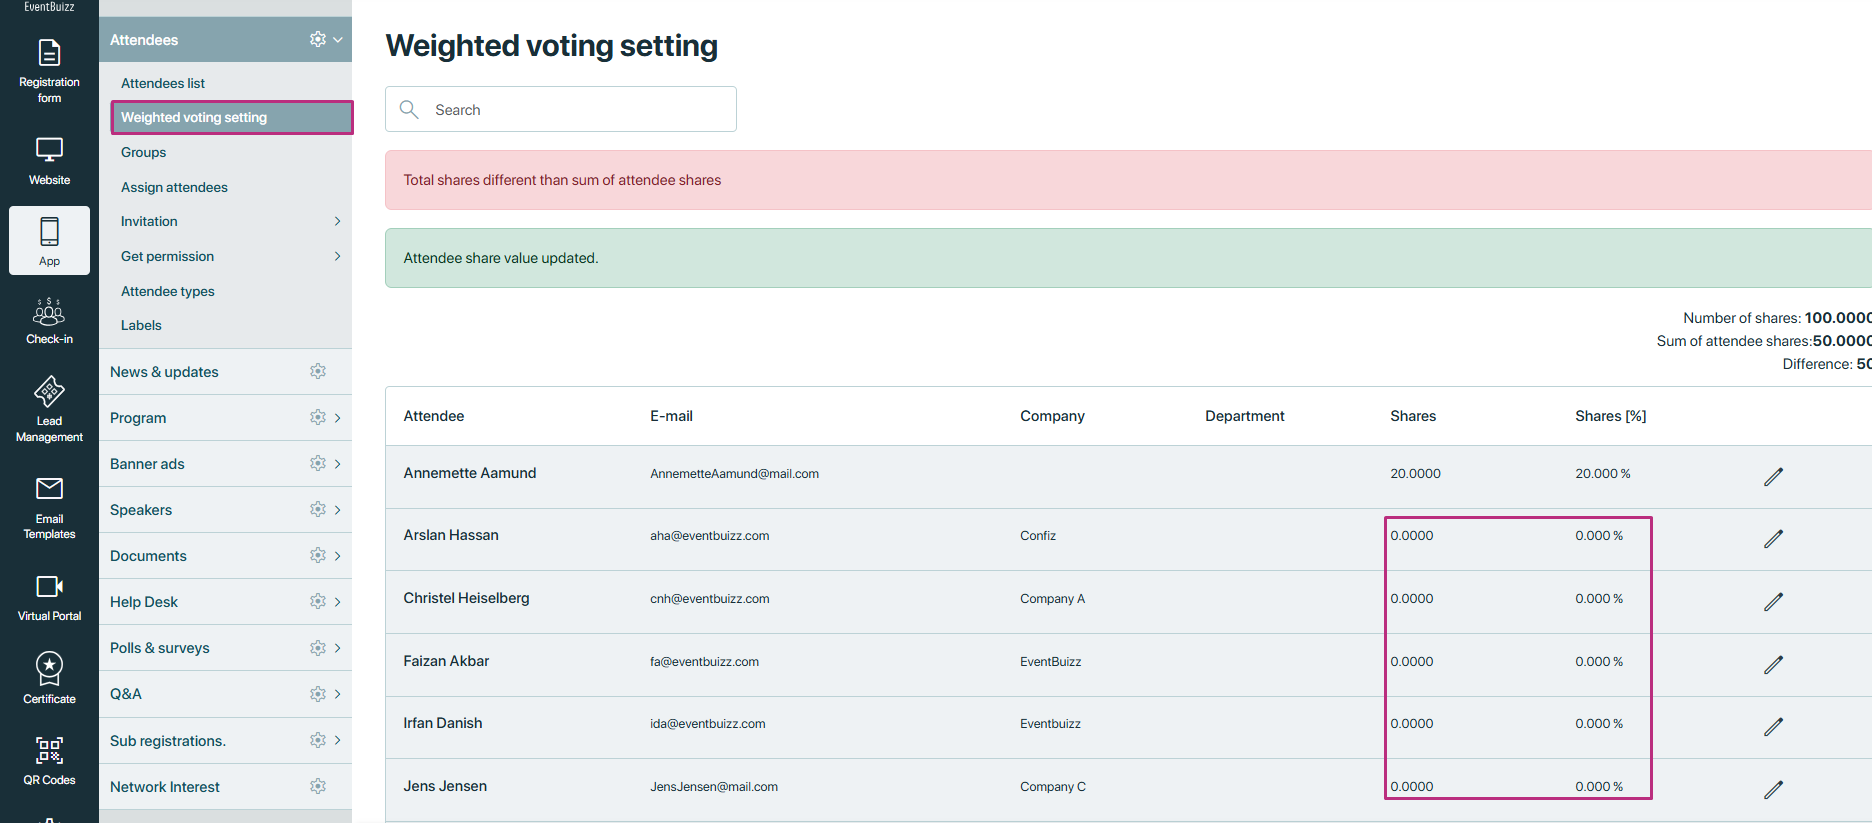
Summary widgets
At the top of the weighted voting settings page, three summary widgets display key information:
- Number of shares: Displays the total shares available (e.g., 100.0000).
- Sum of attendee shares: Shows the current total of shares assigned to all attendees (e.g., 50.0000).
- Difference: Indicates the difference between the total shares and the sum of shares assigned (e.g., 50). This helps organizers quickly assess how many shares are left to assign.
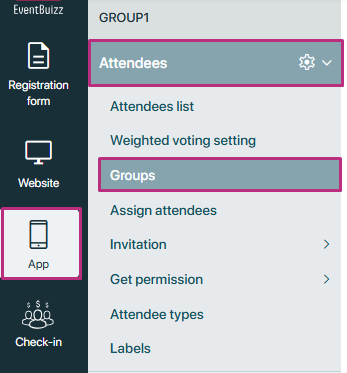
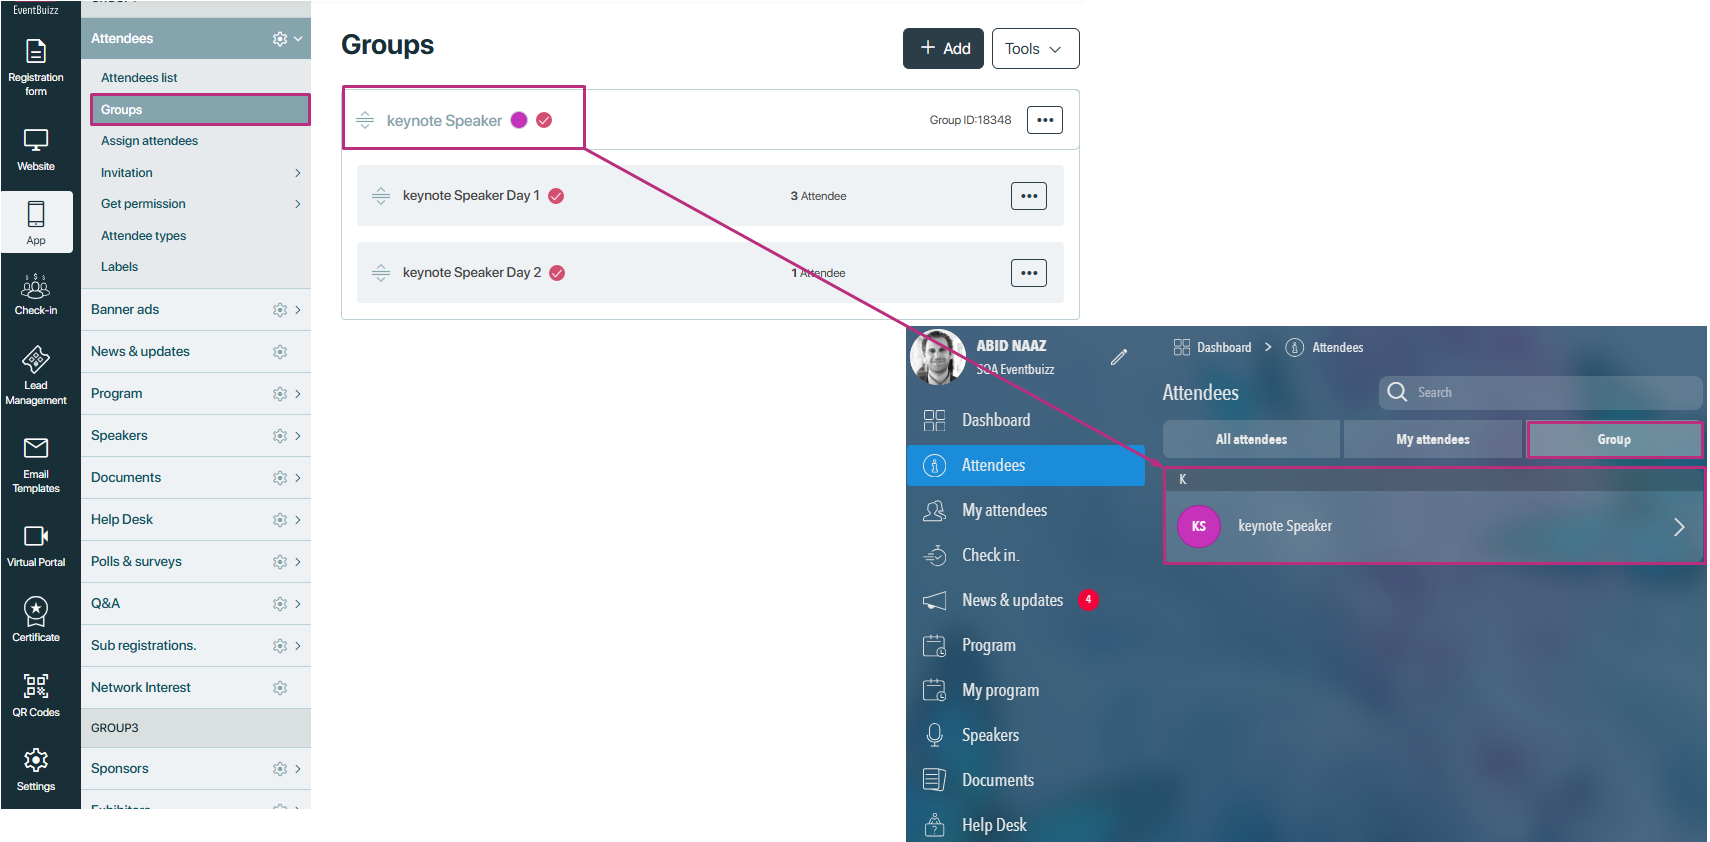
Groups
Groups
Groups typically refer to clusters or collections of attendees that organisers create for various purposes such as facilitating networking, organising workshops, or managing access to specific event features. These groups allow attendees to interact more efficiently with others who share similar interests or roles within the event. Organisers can create, manage, and customise these groups to enhance the overall event experience for participants.
Accessing the groups in organiser side
Organiser can access the groups sub module in attendee module by following this path:
- Eventcenter->app->attendees->groups
When organiser will land on the group sub section, there will be no group by default added and there are two available features or options available on the listing of group.
- Add
- Tools
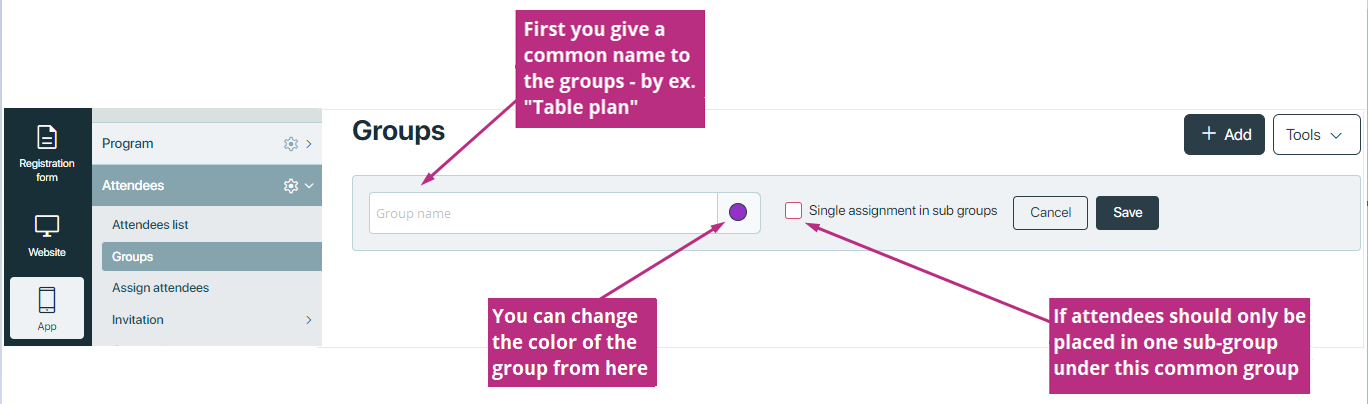
Add a group
By clicking on the “+add” button, organiser can add the groups, by entering the group name in the input fields, detail is given below:
Once the groups are created, each created group have the menu ![]() and there are following available options in menu.
and there are following available options in menu.

Add sub groups
Add sub groups
Add sub groups
- After a group has been created, organisers can create subgroups under that main group.
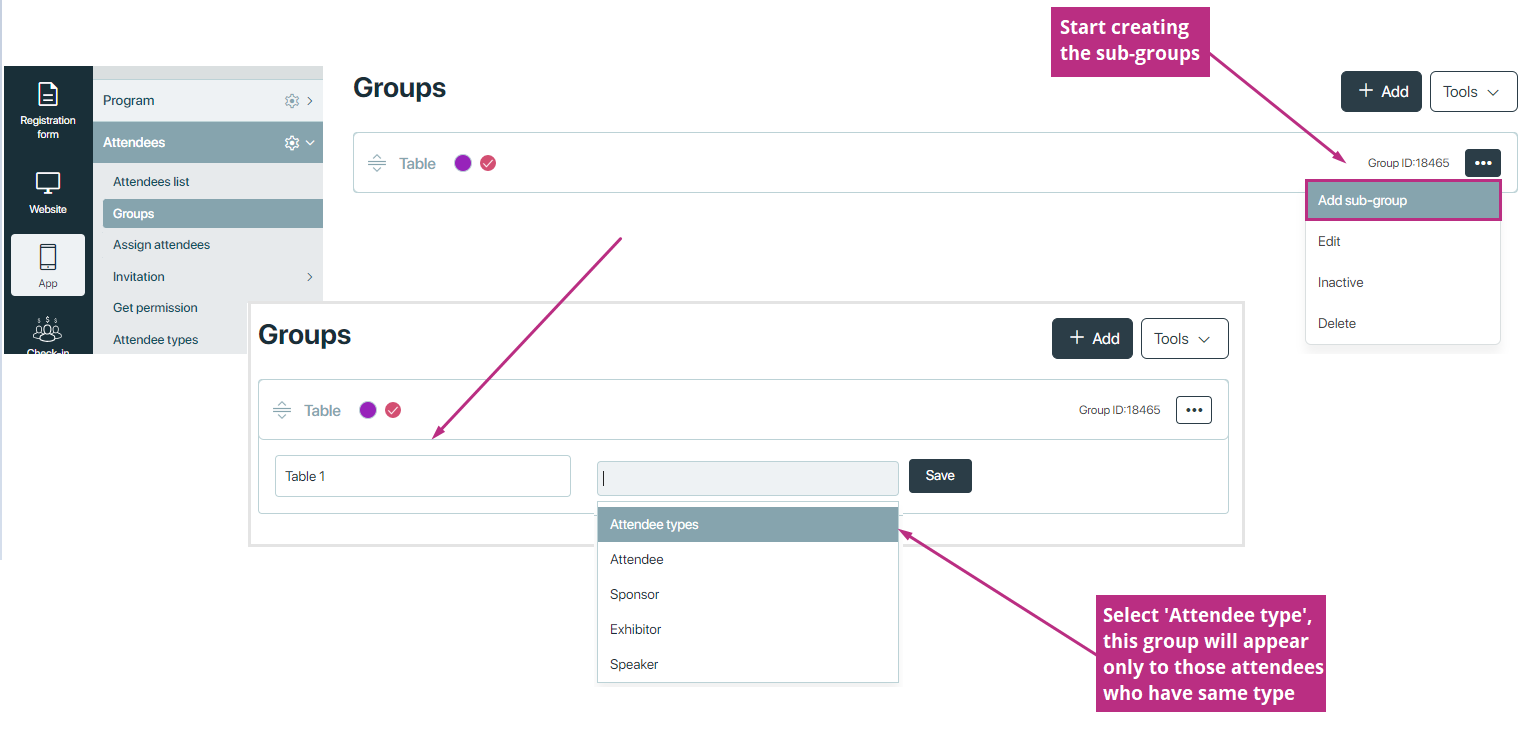
- Once a subgroup is created, organisers have several options to manage attendees within that subgroup. The following functionalities are available:
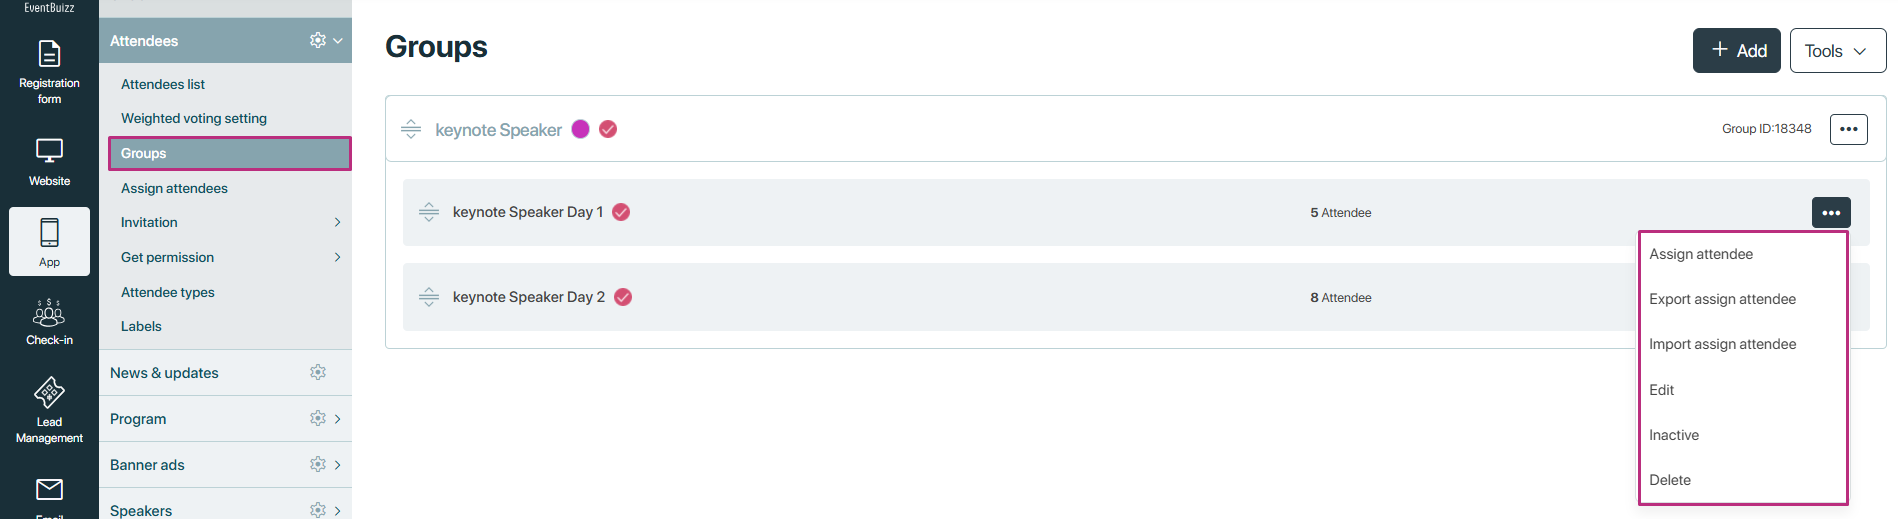
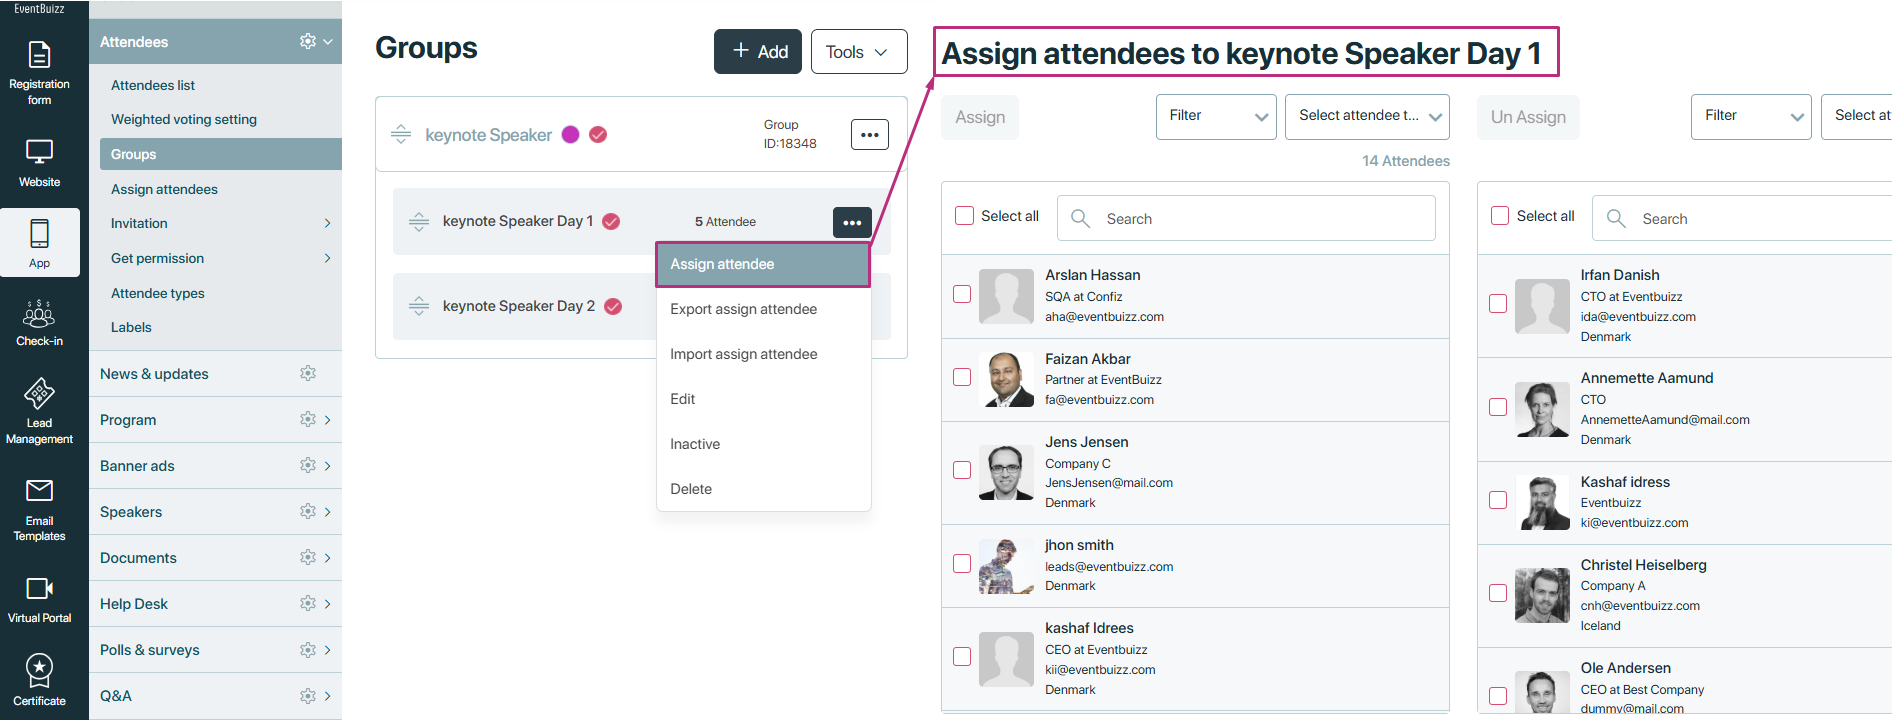
Assign attendee
- Organisers can assign attendees to the subgroup.
- This involves selecting attendees from the overall attendee list and designating them to the specific subgroup.
- This option helps in organising attendees based on different criteria, such as roles or session preferences.
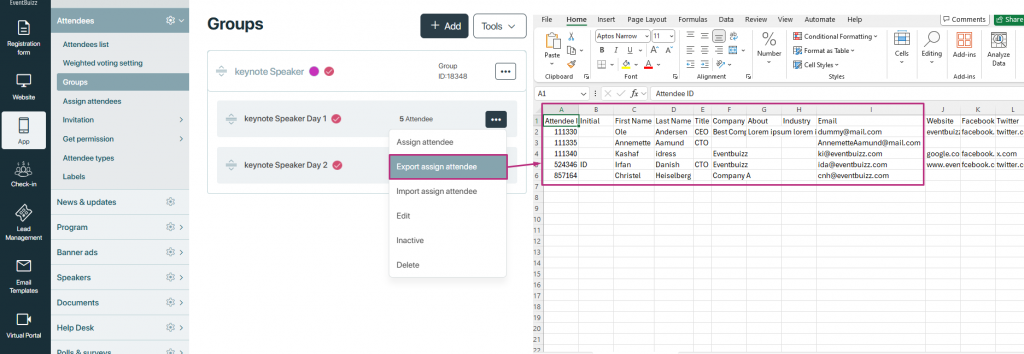
Export assigned attendees
- This feature allows organisers to export the list of attendees assigned to the subgroup.
- The exported data can be used for reporting, analysis, or integration with other systems.
- The export typically includes attendee details such as name, email, and any other relevant information.
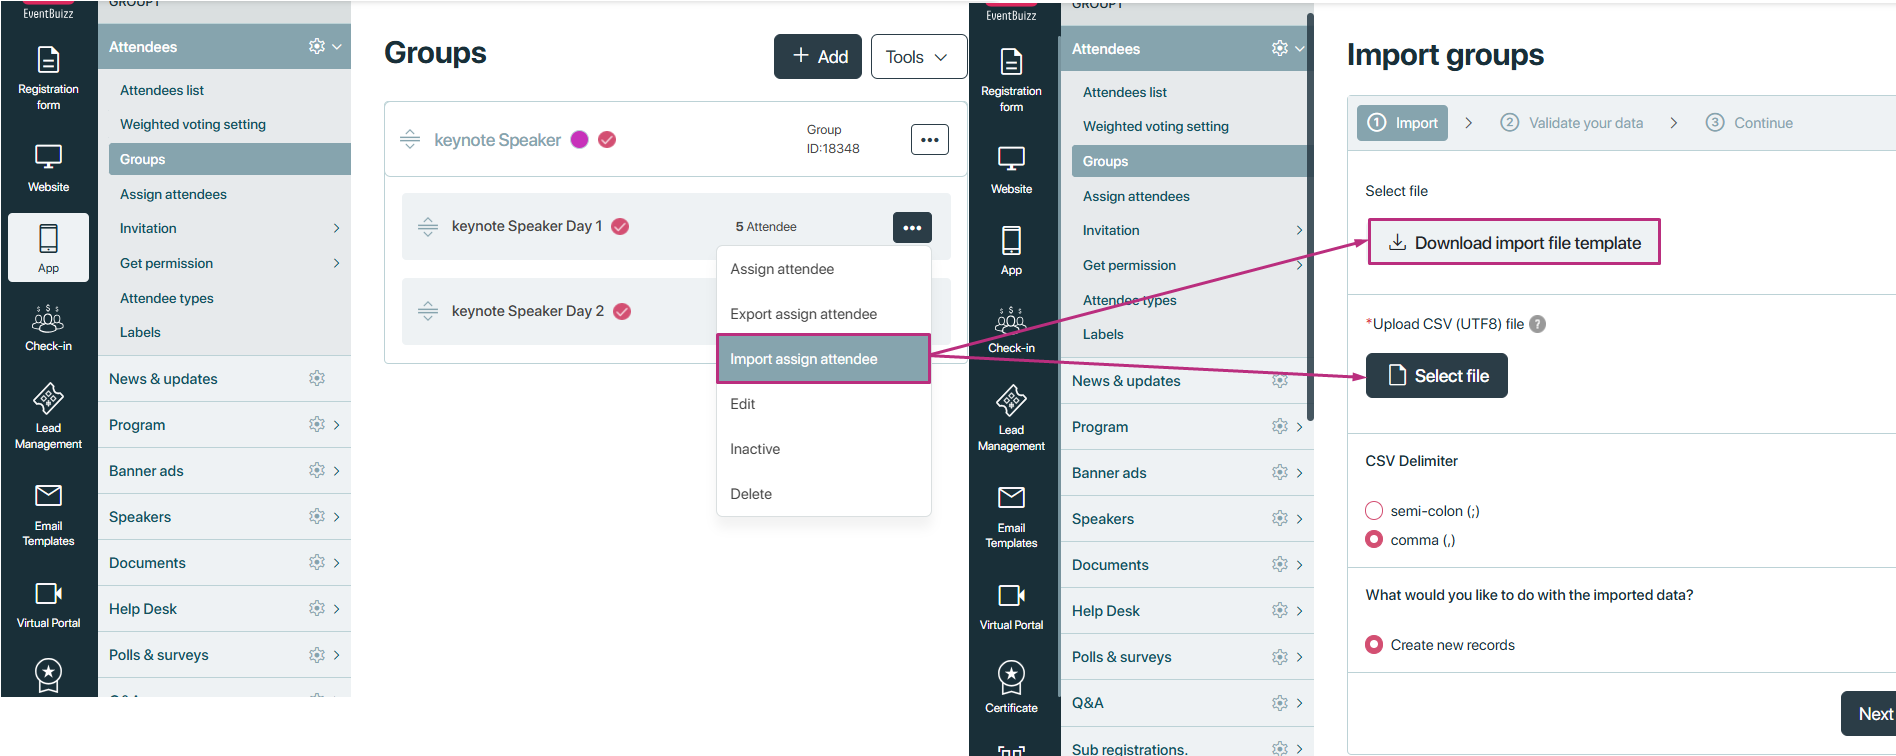
Import assigned attendees
- Organisers can import a list of attendees to assign them to the subgroup.
- This is usually done via a CSV file that includes the necessary attendee information.
- This functionality streamlines the process of assigning multiple attendees at once.
Note: If organiser want to take the sample of the CSV file, simply can download from download import file template, otherwise simple can upload by clicking on the upload CSV button.
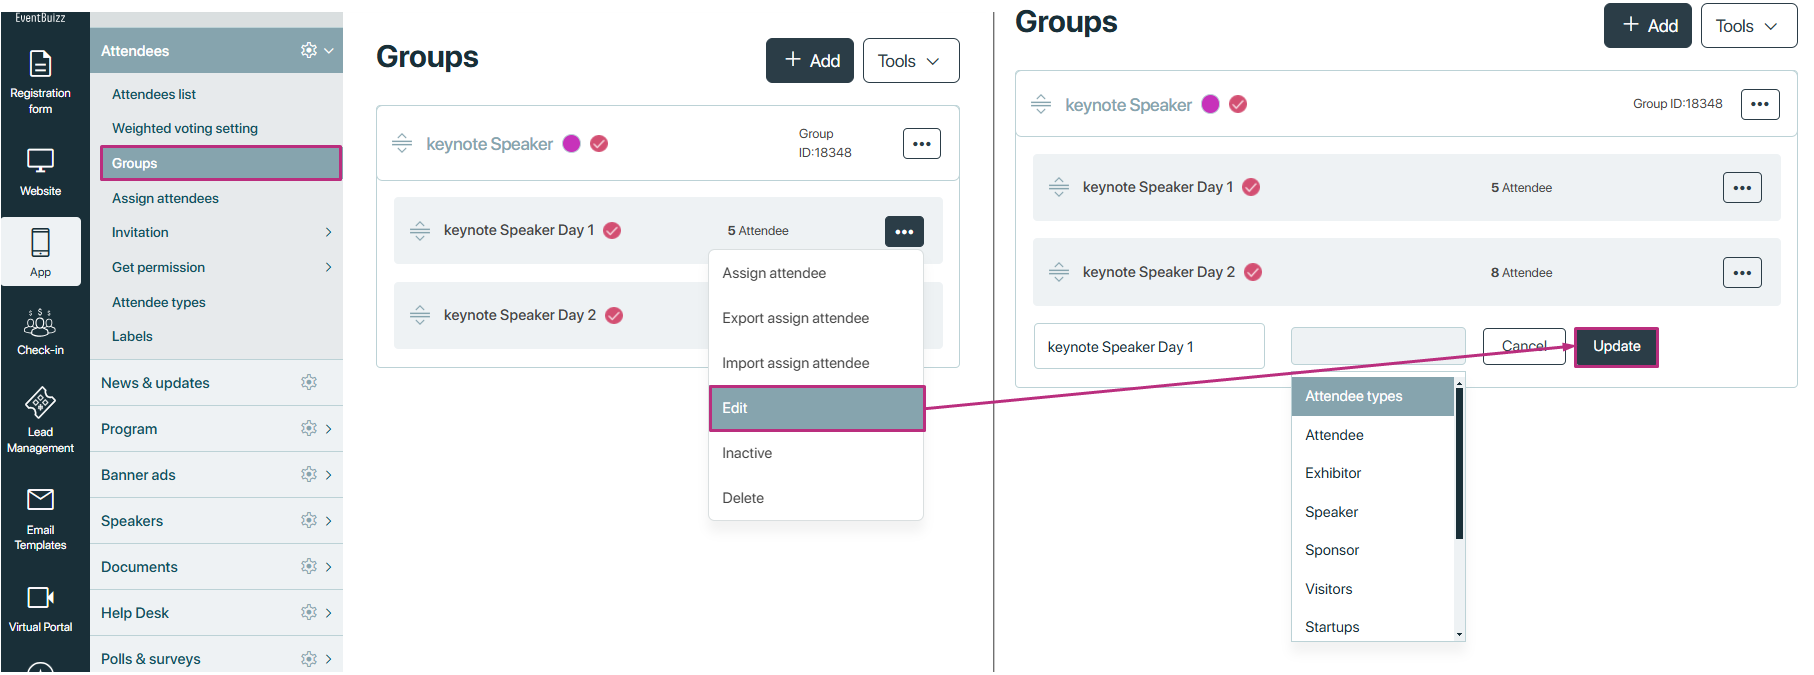
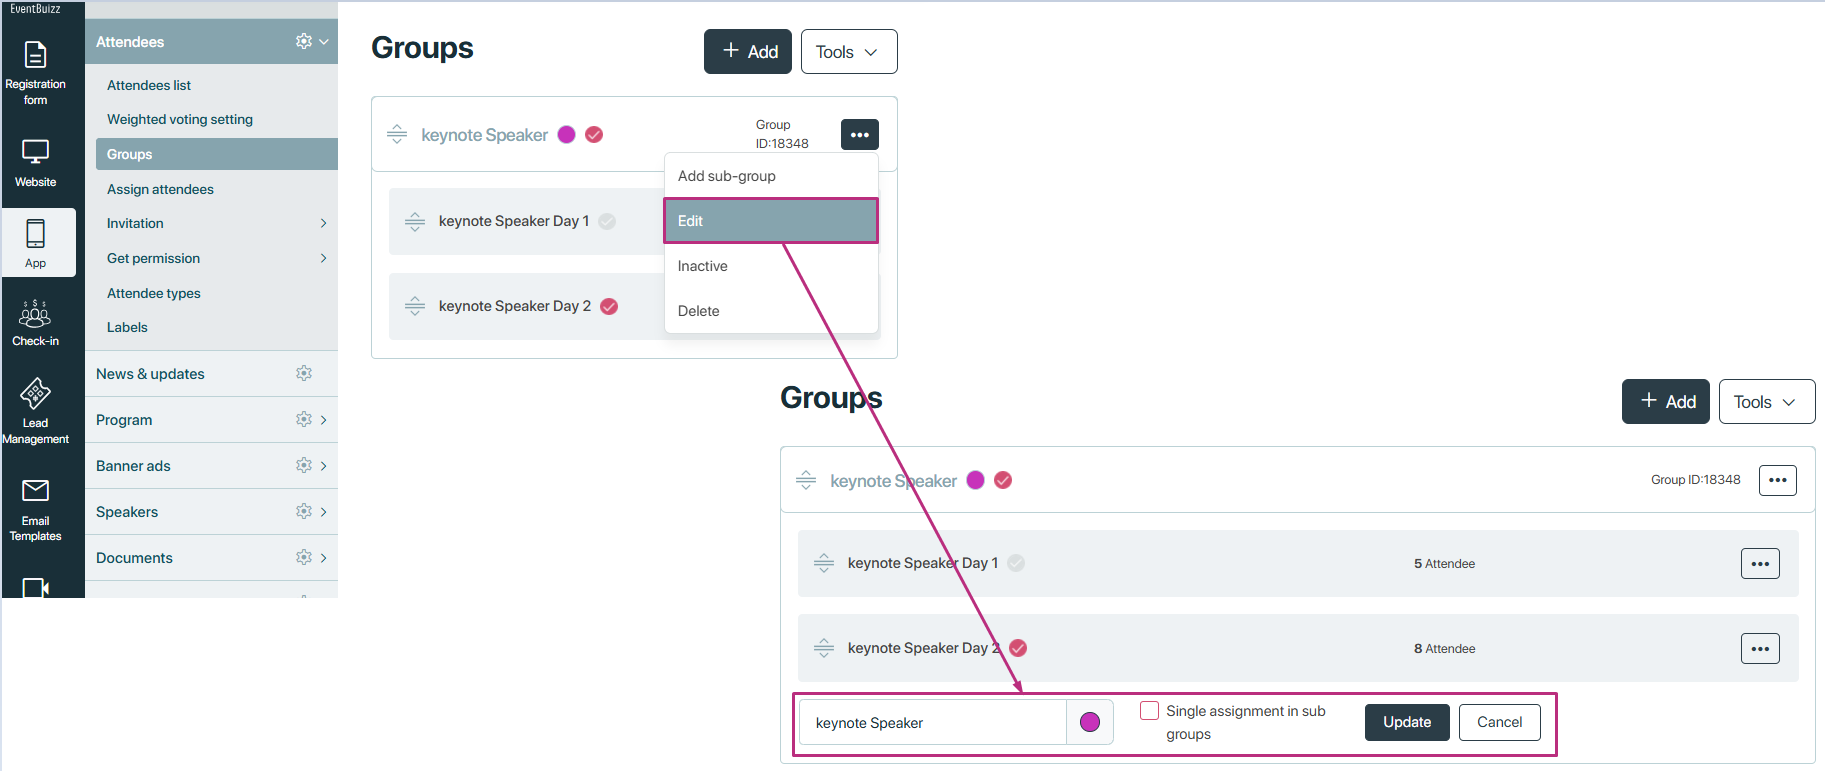
Edit
- The edit option allows organisers to modify the subgroup details.
- Changes can include updating the subgroup name, attendee type, or any other relevant attributes.
- This ensures that the subgroup information remains accurate and up-to-date.
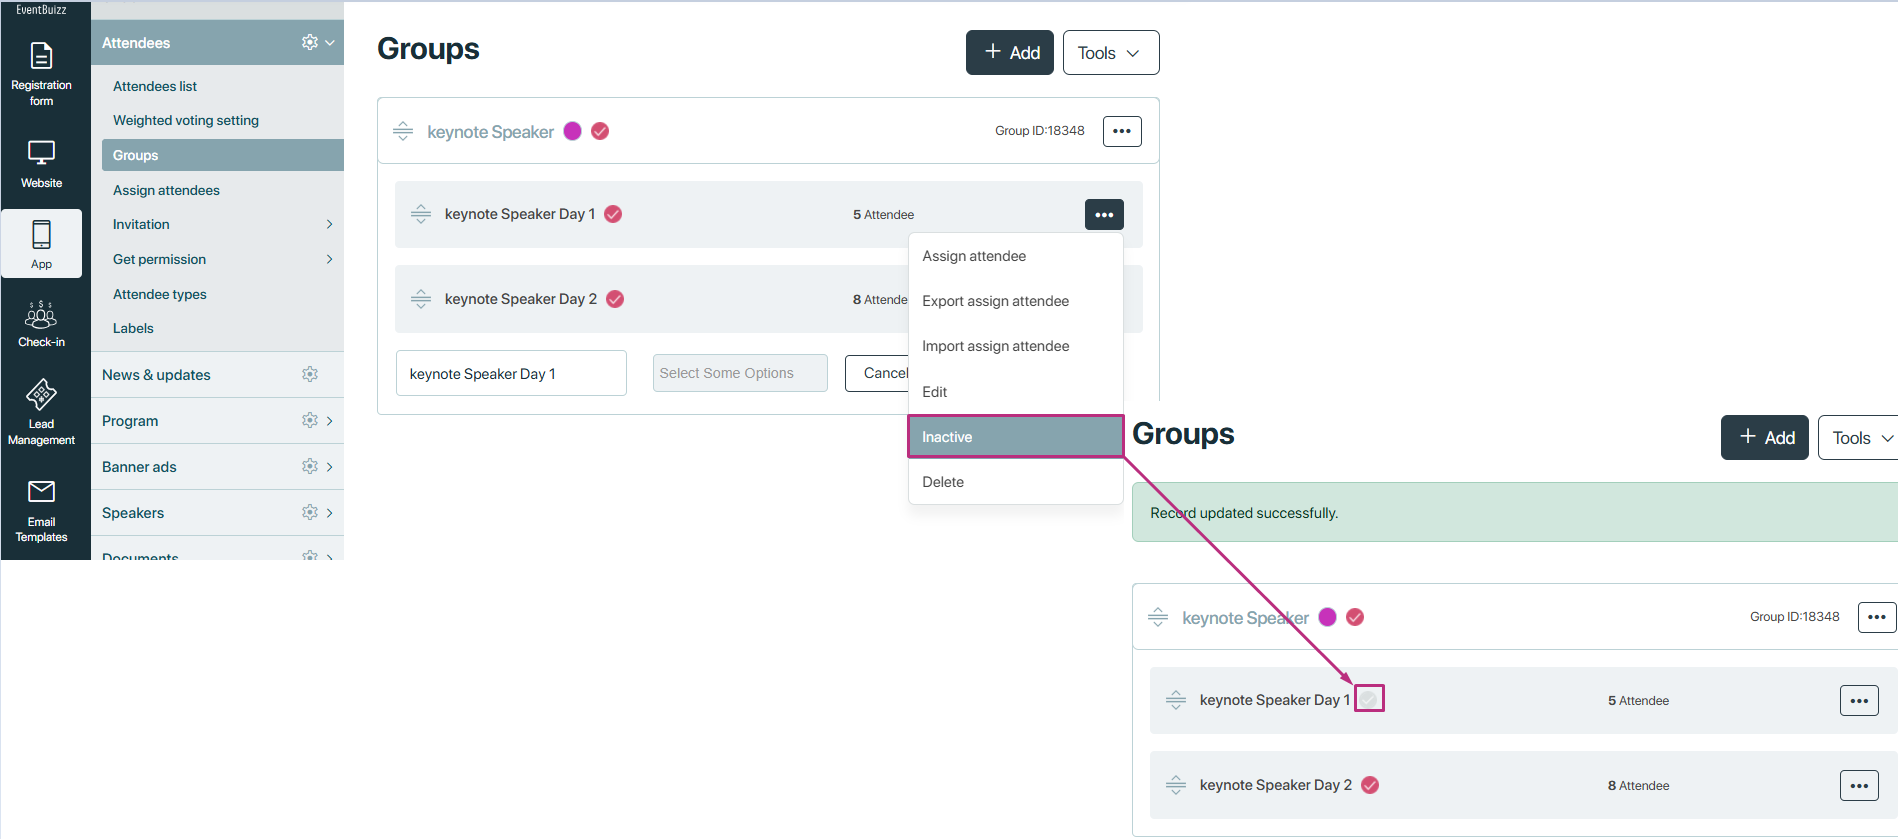
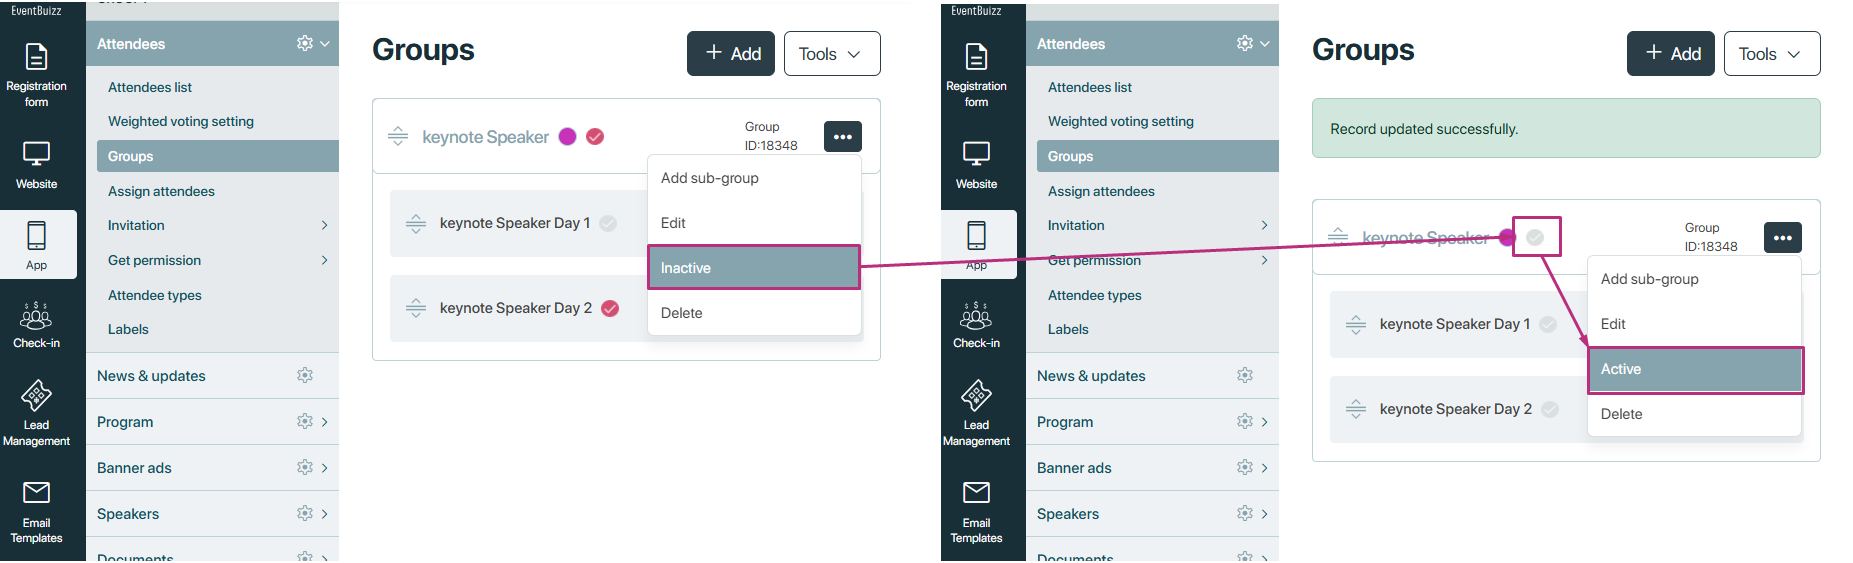
Inactive/active
- Organisers can toggle the status of the subgroup between active and inactive.
- Setting a subgroup to inactive can be useful if the subgroup is no longer needed or if the event has ended.
- This option helps in managing visibility and accessibility of subgroups within the system.
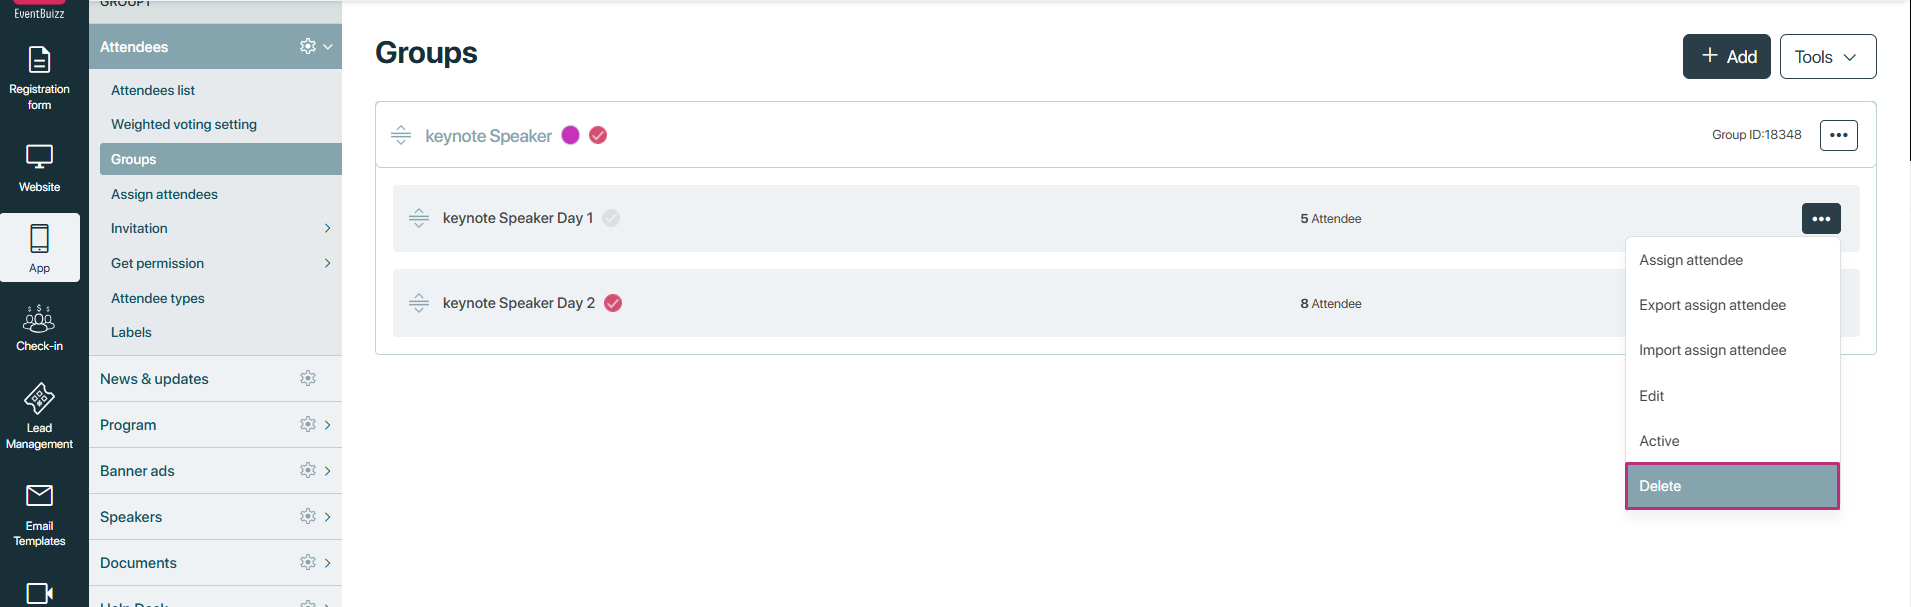
Delete
- If a subgroup is no longer needed, organiser have the option to delete it.
- This action typically requires confirmation to prevent accidental deletions.
- Deleting a subgroup removes it and any associated assignments, so it should be done with caution.
Edit
Edit group
Edit
- Function: Modify existing group details to ensure accurate information.
- Steps:
- Select the group and click Edit.
- Update fields such as group name and description.
- Save changes to update the group.
In-active/active
In-activate/activate
Active/In-active
- Function: Manage the visibility of a group.
- Active status: Group is visible and available for use.
- Inactive status: Group is hidden; useful for groups that are no longer needed.
- Steps:
- Select the group and click the Active/In-active toggle.
- Confirm the status change if prompted.
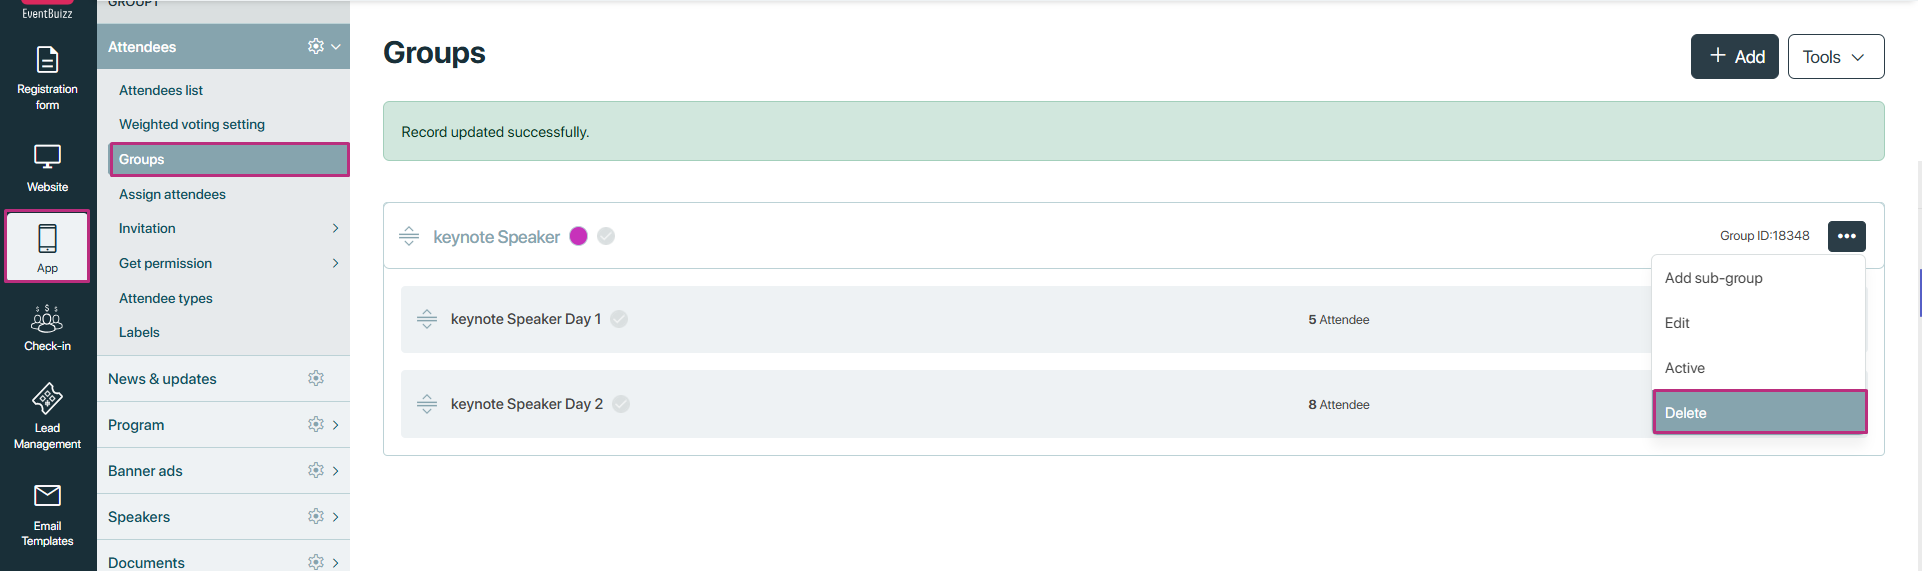
Delete
Delete
- Function: Permanently remove a group from the system.
- Steps:
- Select the group and click Delete.
- Confirm the deletion in the prompt.
- Note: Deleting a group is irreversible, so ensure it’s no longer needed.
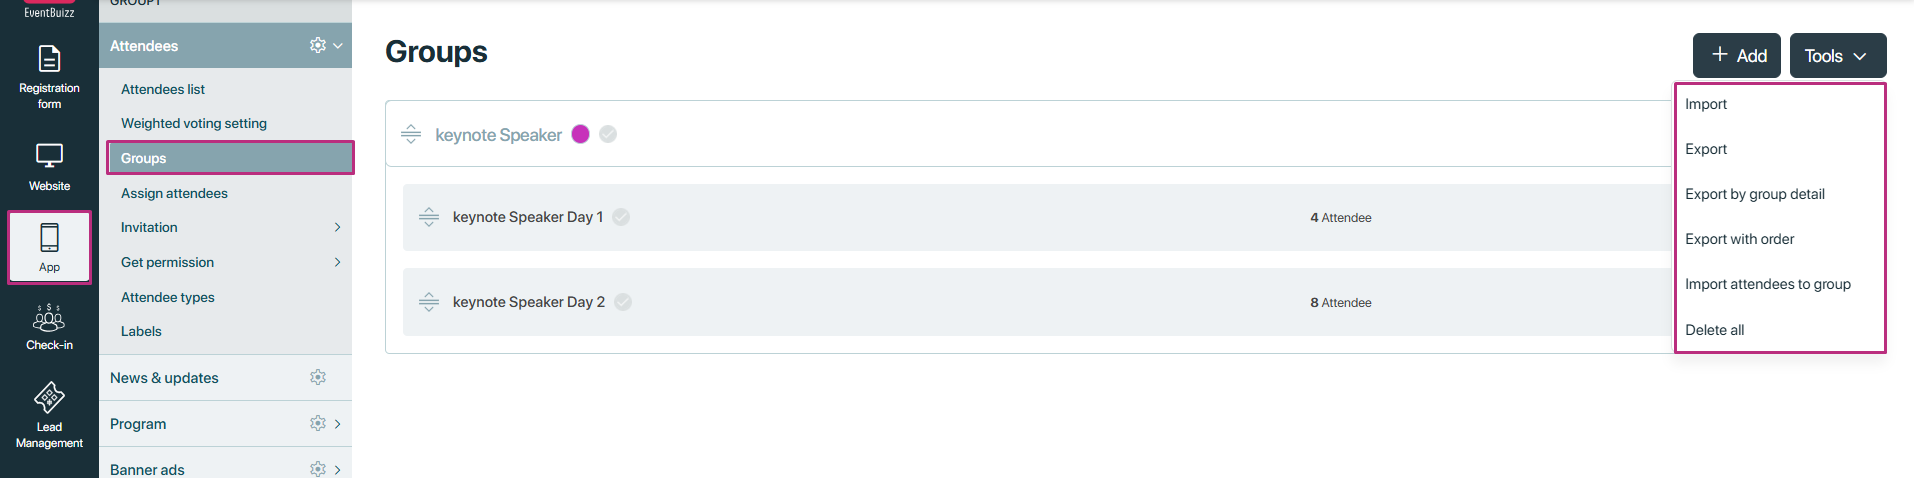
Tools in group
There are various options which are available in tools. Detail is given below about all tools:
- Import:If organiser want to quickly add groups in the listing, then simply can upload the CSV file, with necessary information related to groups,
- Export: Simple export typically involves exporting basic information.
- Export by group detail: Exporting by group detail allows you to export comprehensive information specific to individual groups within your event.
- Export with order: Exporting with order refers to exporting data along with order-related information, typically relevant for events with ticketing, this type of export includes information related to the orders placed by attendees, such as ticket types, quantities, payment status, transaction IDs, and any other order-related data.
- Import attendees to group: Organiser can import the attendees to group, by uploading the CSV, file which included the required information related to attendees.
- Delete all:This features allows
Assigned attendees
Assigned attendees
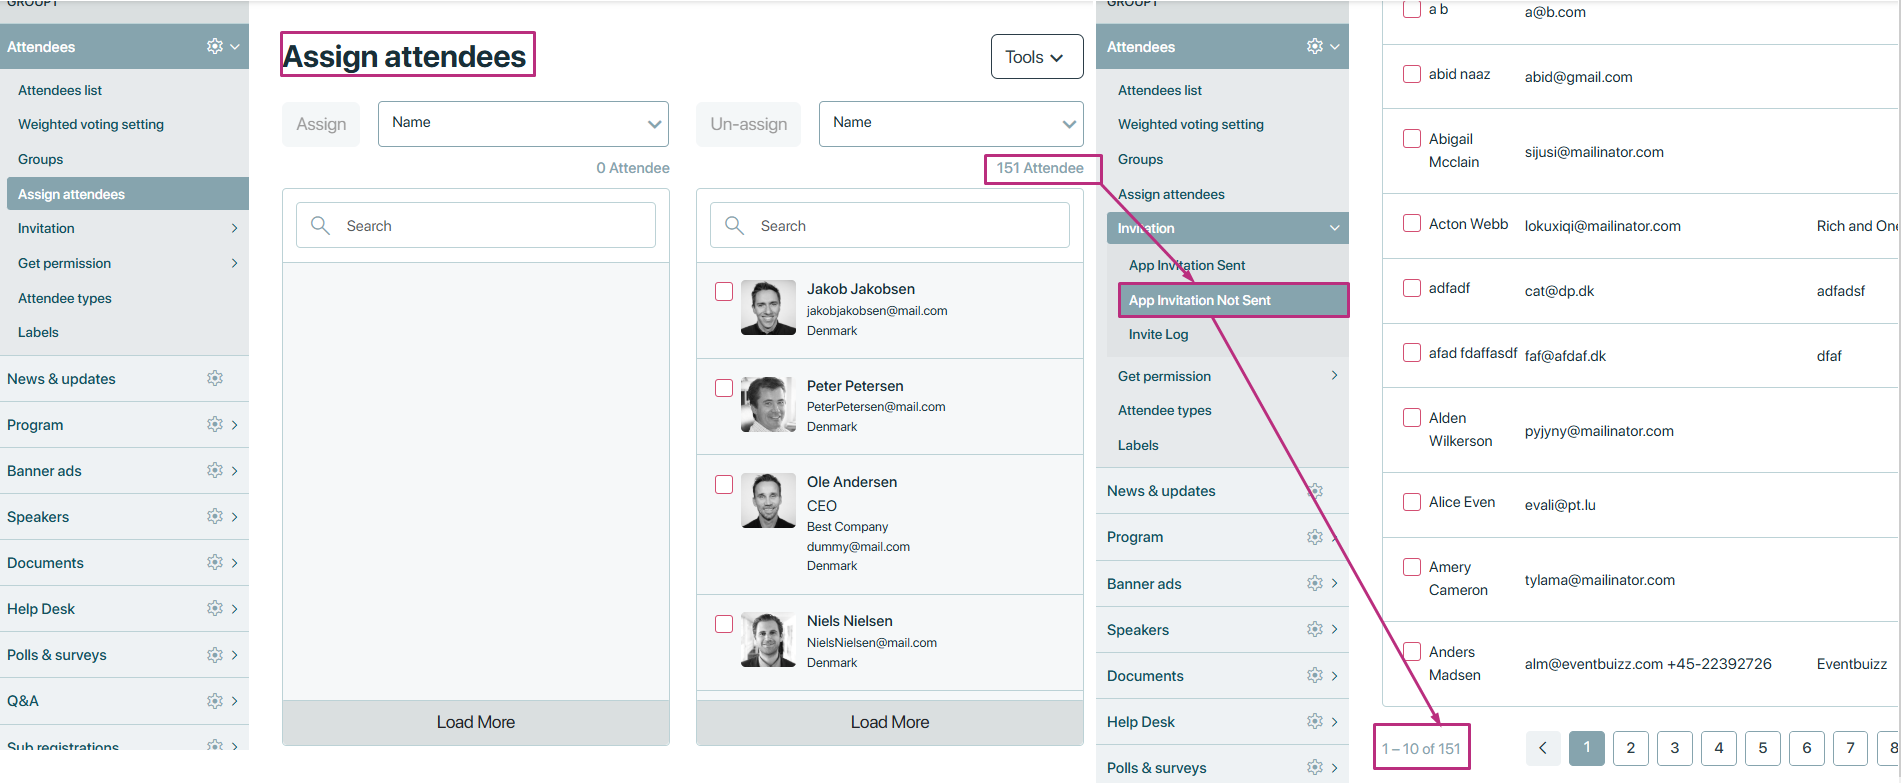
The “assign attendees” sub-module in eventbuizz allows organisers to efficiently manage attendee assignments for events. When a new event is created and attendees are added, their information is automatically stored in a database. This documentation outlines the process of assigning attendees, using filters to find specific attendees, and managing assignments through various tools.
Adding attendees
- Creating a new event:
- When organiser create an event on the Eventbuizz platform, organiser can add attendee data, which is then automatically stored in the database.
- This includes attendee information such as names, titles, profile pictures, company affiliations, and any other relevant details provided during the registration process.
- Accessing unassigned attendees:
- After adding attendees, their information is available for future events.
- Navigate to the “Un-assigned attendees” section, which is located under the “Apps” tab:
- Go to “Attendees”.
- Select “Assign attendees”.
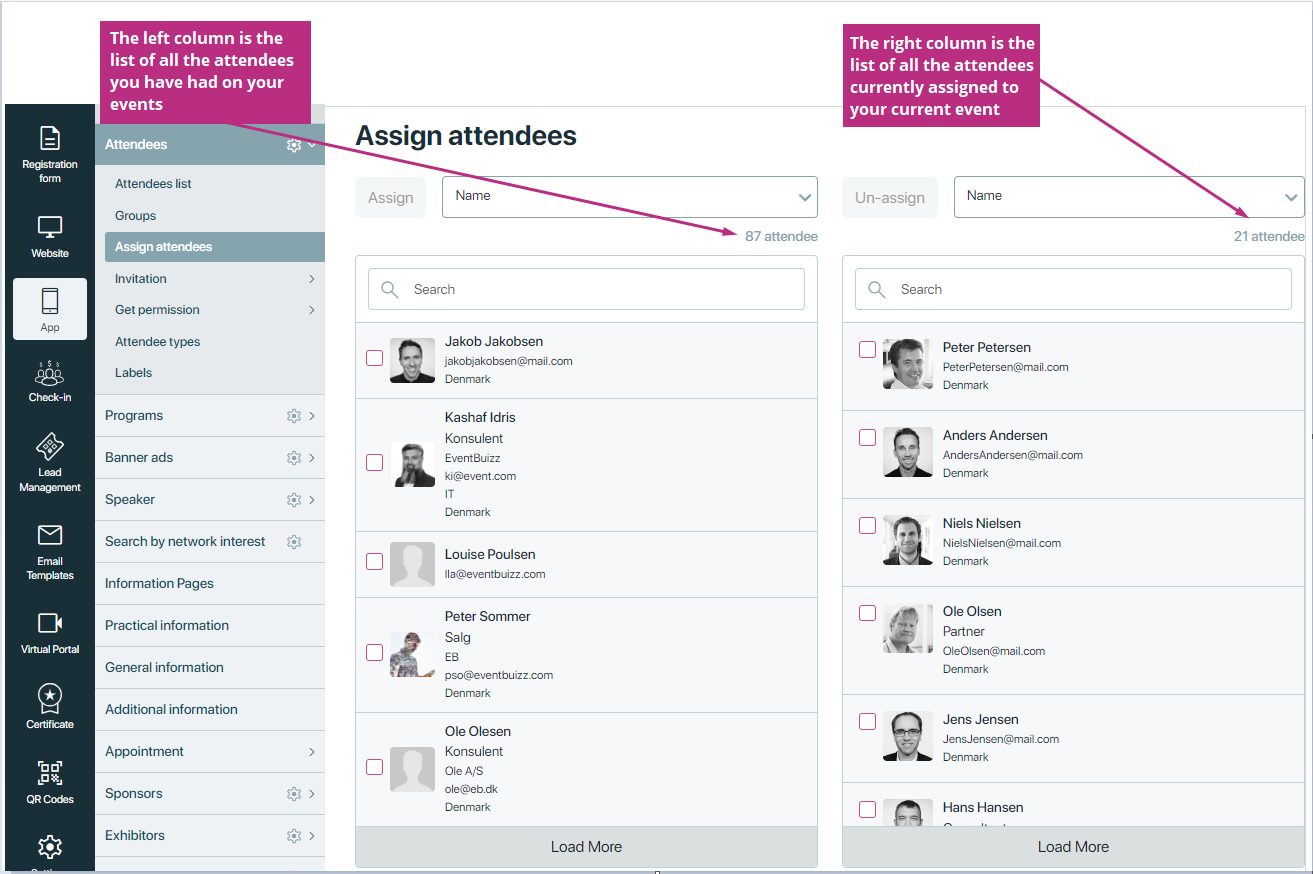
Filtering unassigned/assigned attendees
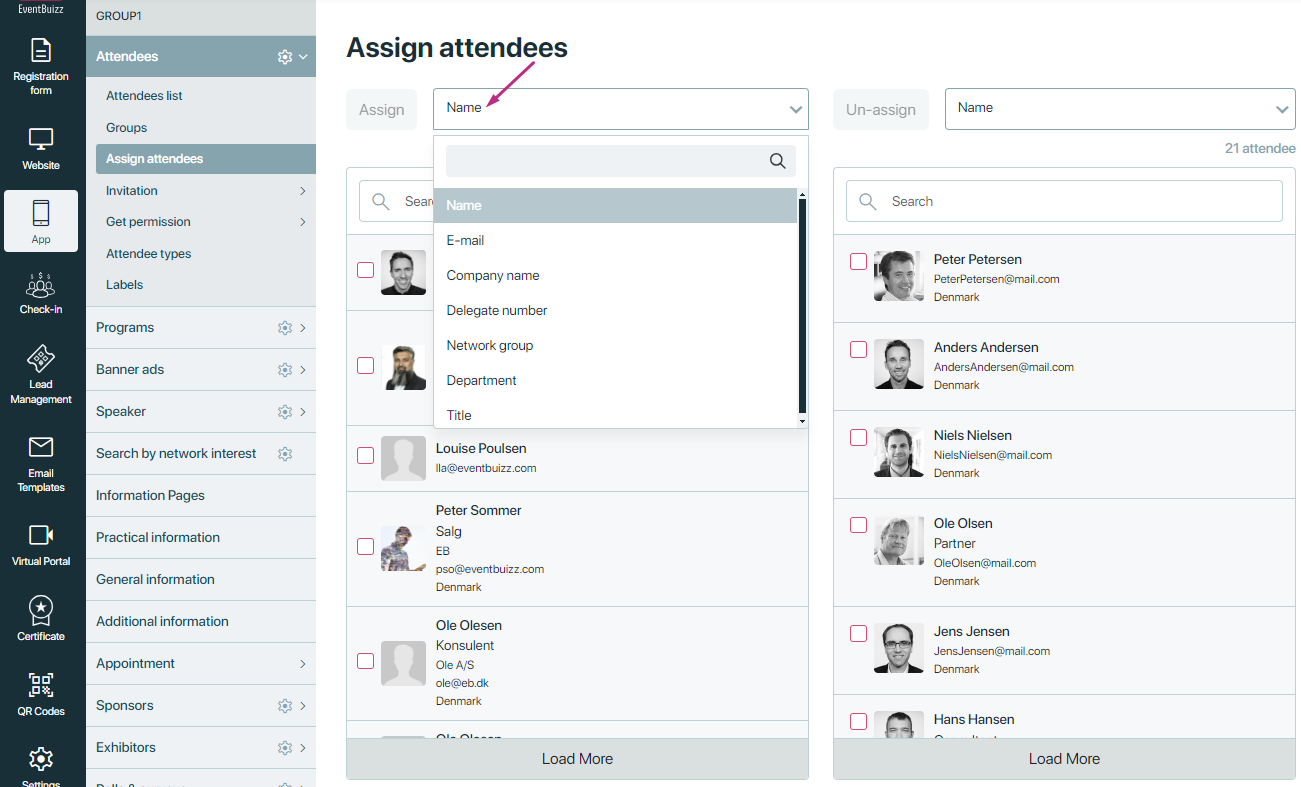
To efficiently manage a large list of unassigned attendees, an improved filtering and search function is available.
-
Using filters:
- The filter option allows you to narrow down the list of unassigned attendees based on specific criteria.
- You can filter using the following columns:
- Name
- Title
- Company name
- Network group
- Department
- Delegate number
-
Steps to filter:
- Select the desired filter criteria from the options.
- Input the relevant information into the filter field.
- Click the Search button or press Enter to display the filtered results.
Assigning attendees
Once you have identified the attendees you want to assign, you can proceed with the assignment process.

Tools menu for assigned attendees:
- Navigate to the Assigned attendees section to access the available tools for managing attendee assignments. Detail is given below about available tools options:
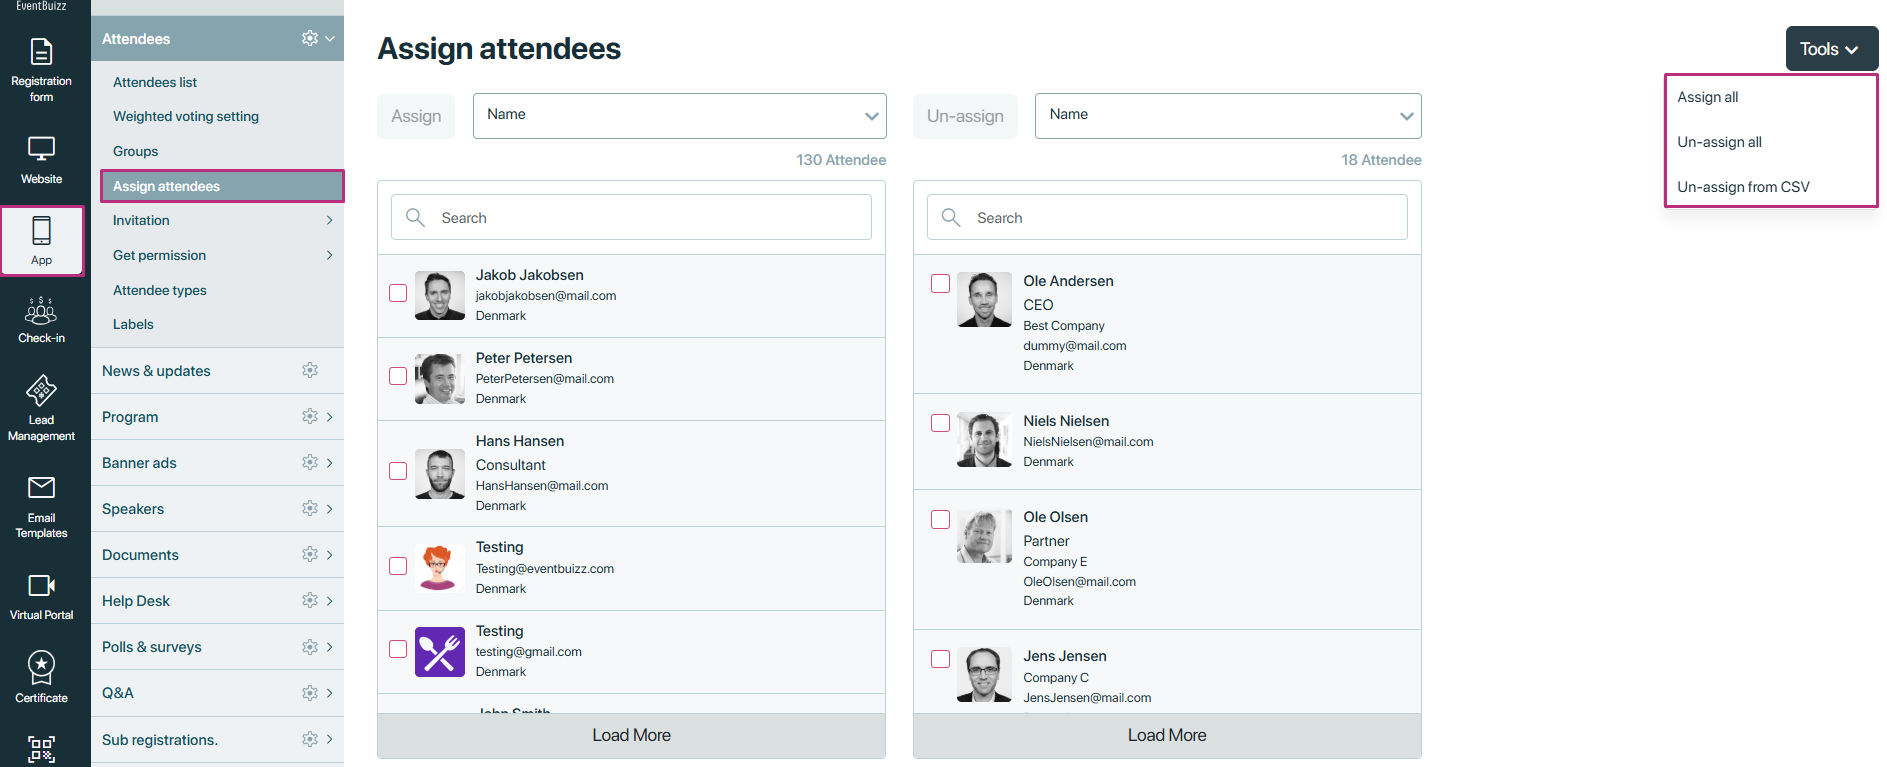
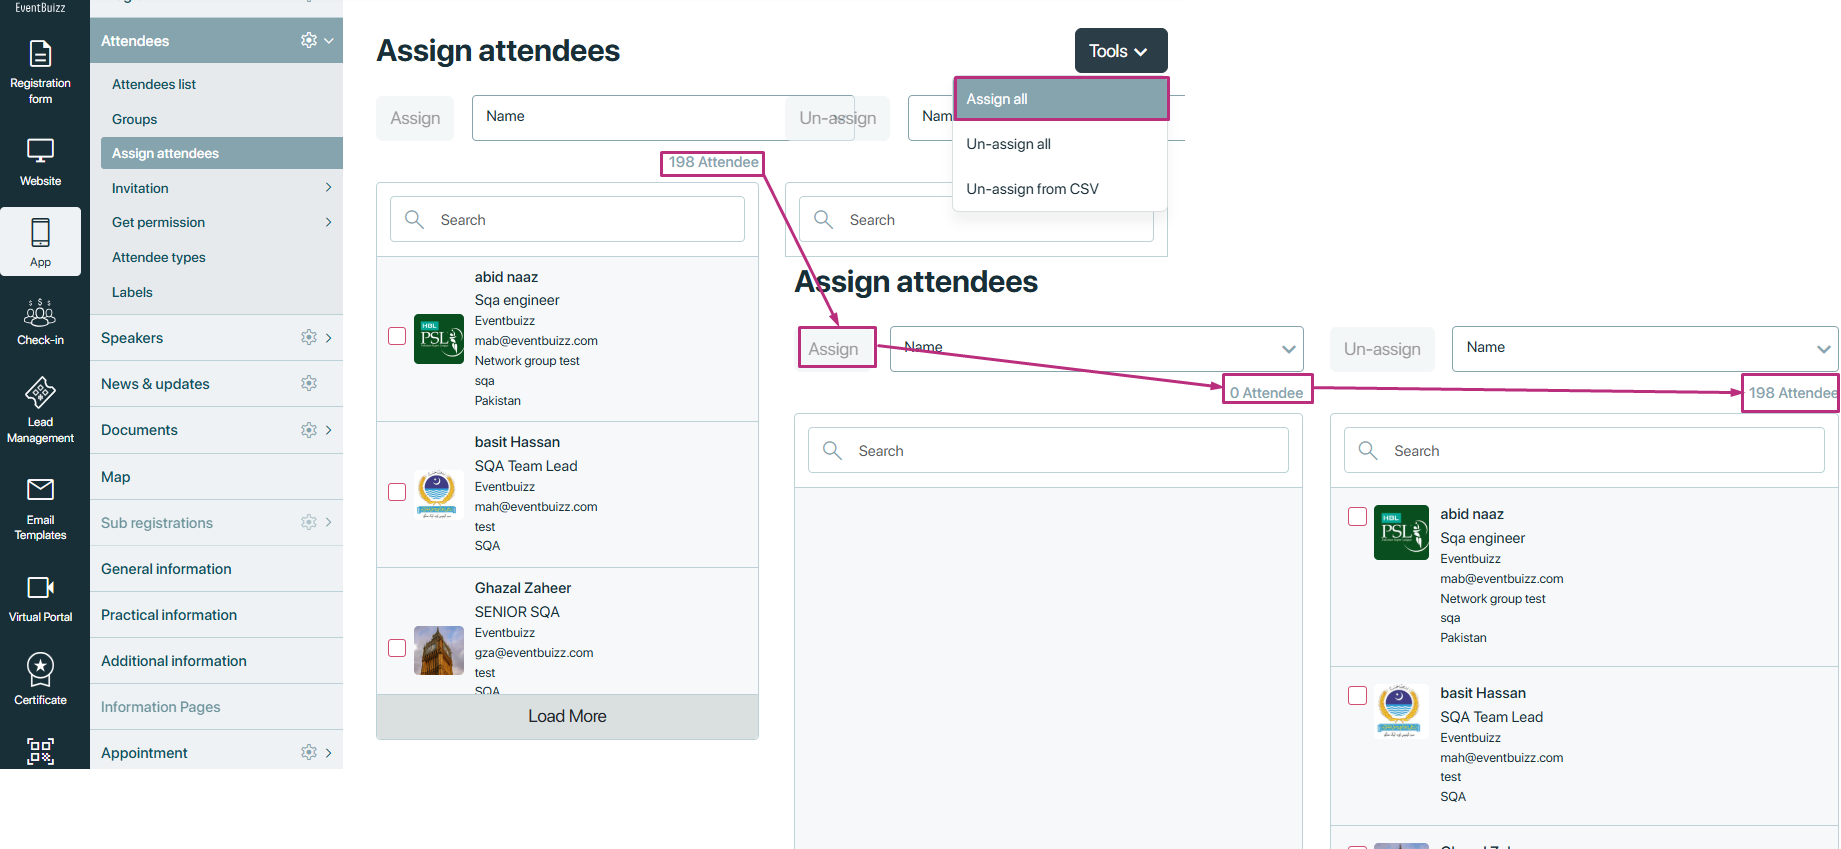
Assign all
- Functionality: Quickly assign or un-assign all attendees from the event.
- Steps:
- In the attendees section, go to assigned attendees.
- Access the tools menu.
- Choose “Assign all attendees”
Un-assign all
- Functionality: Quickly assign or un-assign all attendees from the event.
- Steps:
- In the attendees section, go to assigned attendees.
- Access the tools menu.
- Choose “Un-assign all attendees”.

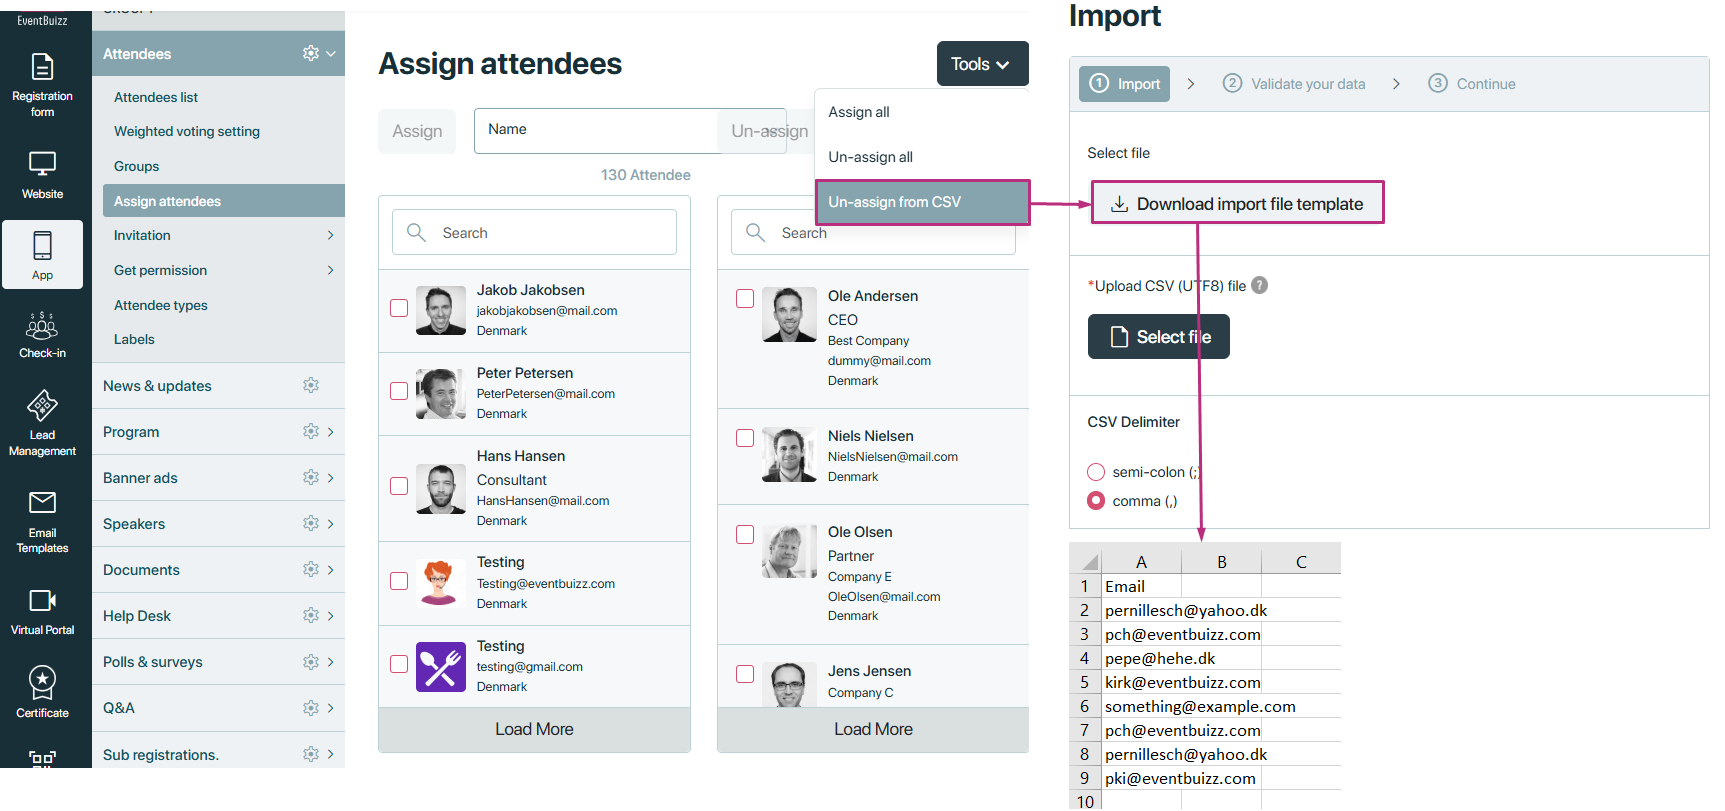
Un-assign from CSV
If you need to unassigned multiple attendees at once, you can do so directly from a CSV file.
Steps to Unassigned attendees from CSV
- Access the Tools menu in the Assigned Attendees section.
- Select “Un-assign from CSV.”
- Download the provided import file template.
- Open the template and copy/paste the relevant attendee data into it, ensuring that you include their email addresses.
- Save the CSV file on your computer.
- Upload the saved CSV file back into the system to process the unassigning of attendees based on the data provided.
Note: Email addresses are required during the unassigning process. The import of attendees cannot occur unless emails are included in the CSV.
Invitations
Invitations
An “App invitation” typically refers to the process of inviting attendees to download and use the eventbuizz mobile application. The eventbuizz app allows attendees to access event details, schedules, speaker information, networking features, and more, all from their mobile devices. Sending app invitations encourages attendees to engage with the event content and enhances their overall event experience.
Accessing the app invitation
Organiser can access the invitation by following this path:
- Eventcenter->app->attendees->invitation
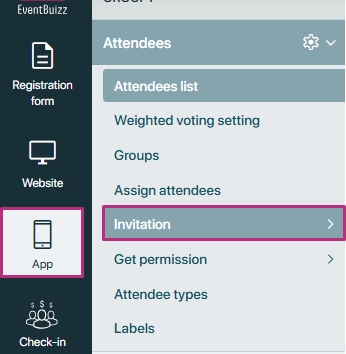
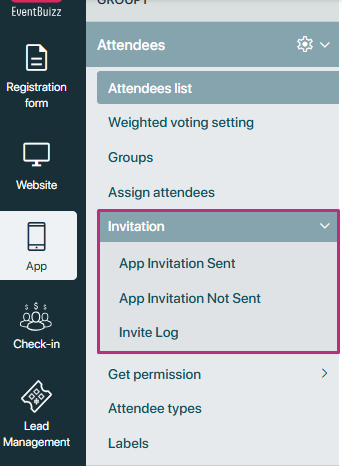
Attendees invitation sub-module consist of the three main sections. Detail is given below about all sections.
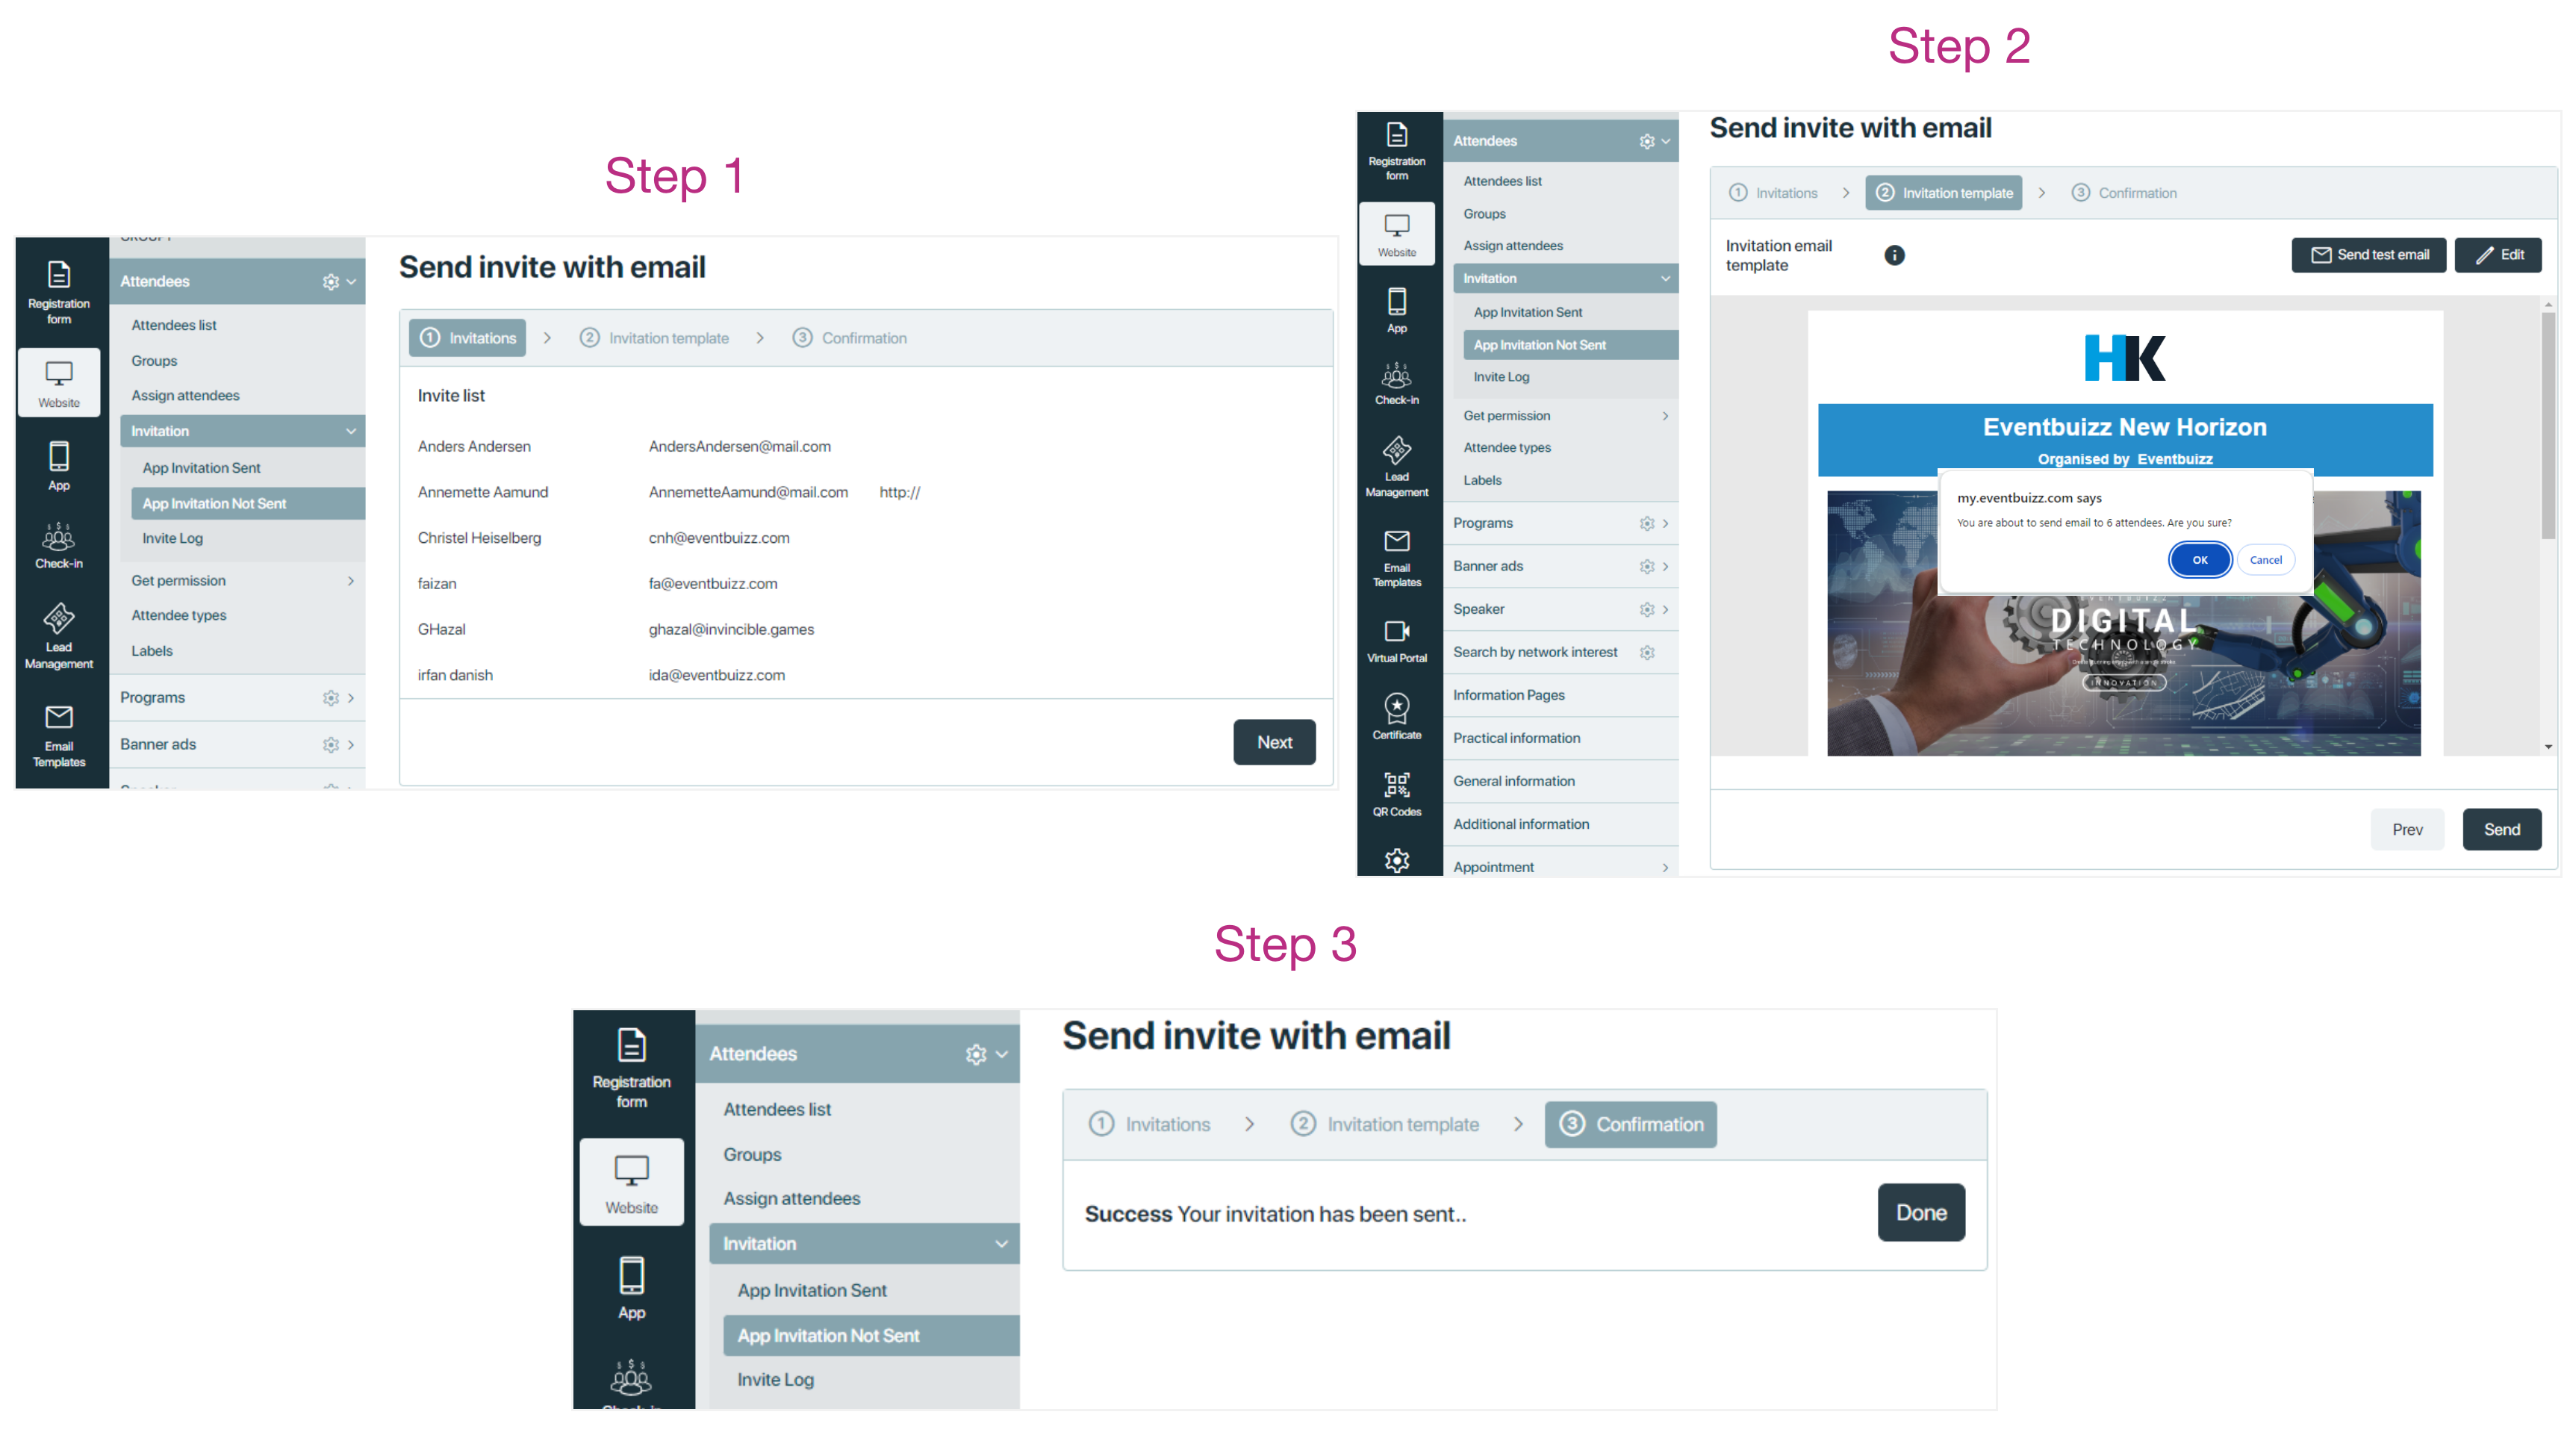
Before starting about the app invitation sent or not, organiser will make sure invitation email template is customised and as per the requirements. Start by customising the email template app invite. If organiser want to send a text message, organiser need to customise the sms template as well. Please be aware that sending text messages will be invoiced separately.
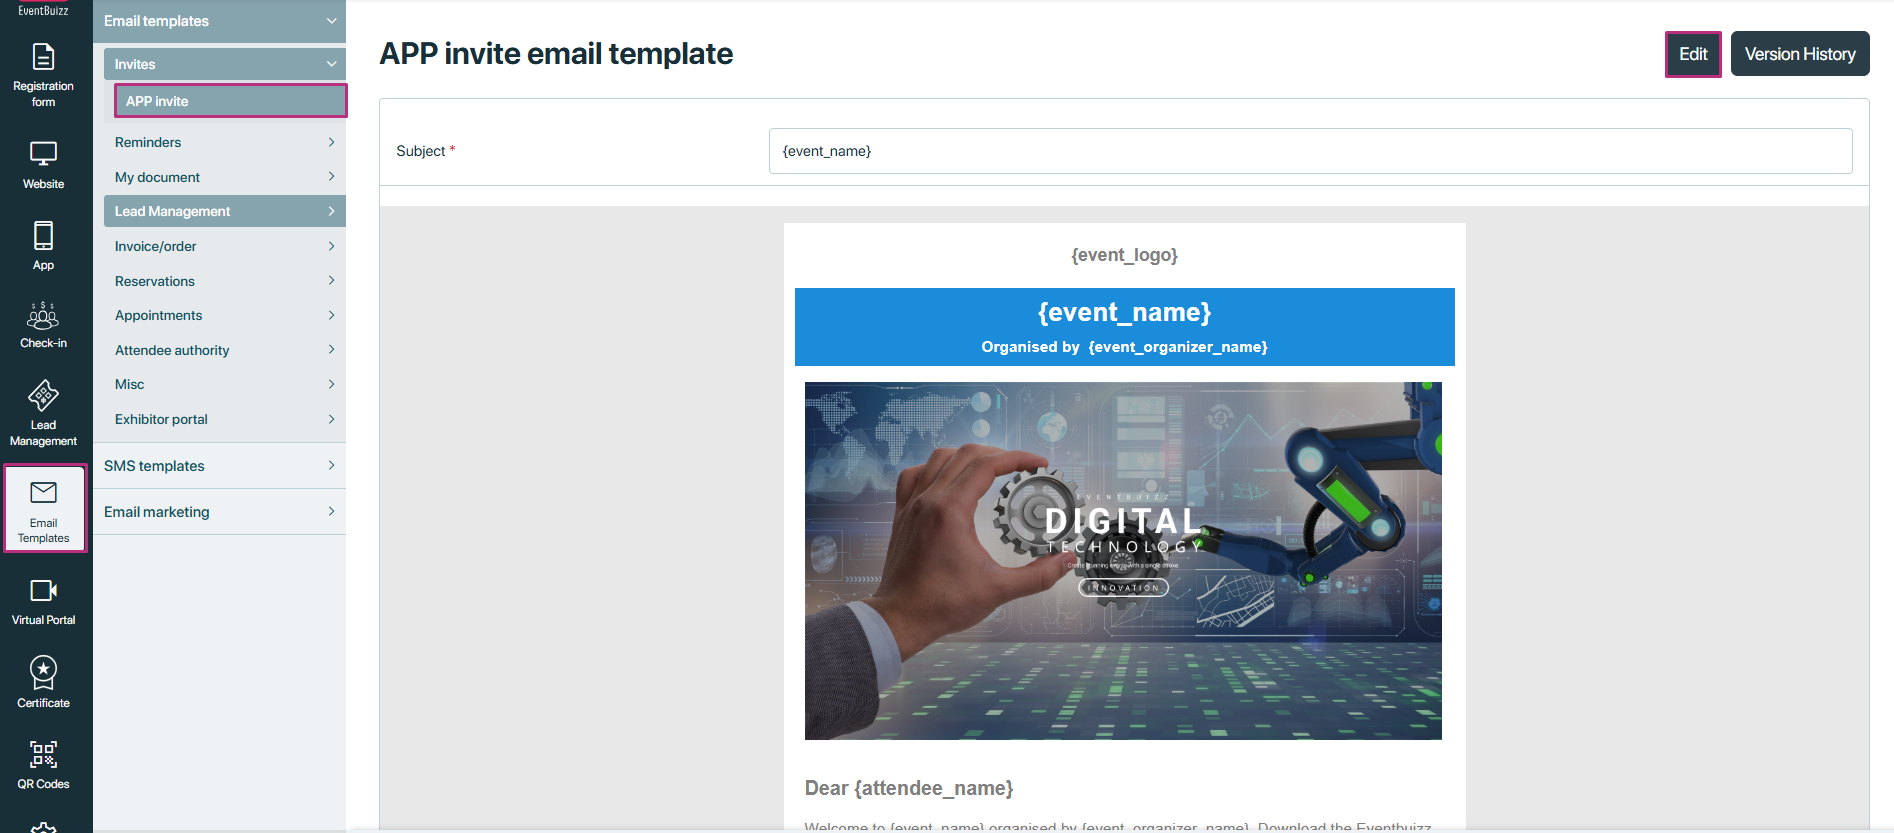
Organiser can edit the default app invite template as per the required requirements.
When the template is done, organiser choose which attendees should receive the email.
- If organiser want to send the newly assigned attendees in the event then will go in the modules -> Attendees -> Invitation -> App invitation not sent.
- If organiser want to resend the app invitation email to those attendees,who not downloaded mobile app yet then will go in modules -> Attendees -> Invitation -> App invitation.
App invitation sent
App invitation sent an organiser can view a list of individuals who have already been sent invitations to download the eventbuizz mobile application. This list typically displays the names or email addresses of those who have received the invitations, helping organisers keep track of whom they have already reached out to regarding app download. Basic features detail is given below:
Invitation tracking
- Organisers can view a list of individuals who have been sent invitations to download the eventbuizz mobile app, including names or email addresses.
Default state
- When a new event is created, no records are present in the app invitations section until invitations are sent.
Sending invitations
- When organisers send invitations from the “not sent” section, those attendees move to the “invitation sent” section.
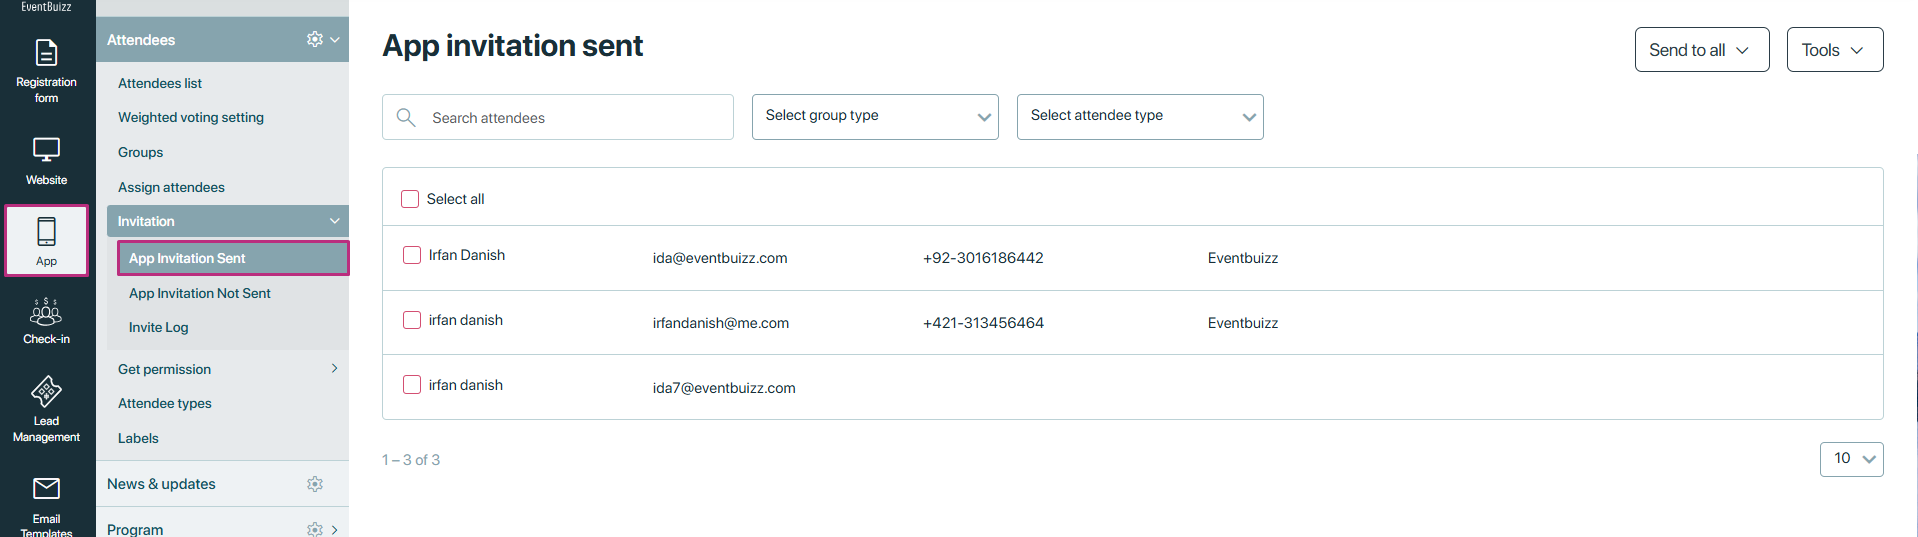
Additional options for reminders
There are some additional features available on the app invitation sent listing for organiser to manage the invitation process and also send the reminder invitation to the attendees. Detail is given below about the available features is:
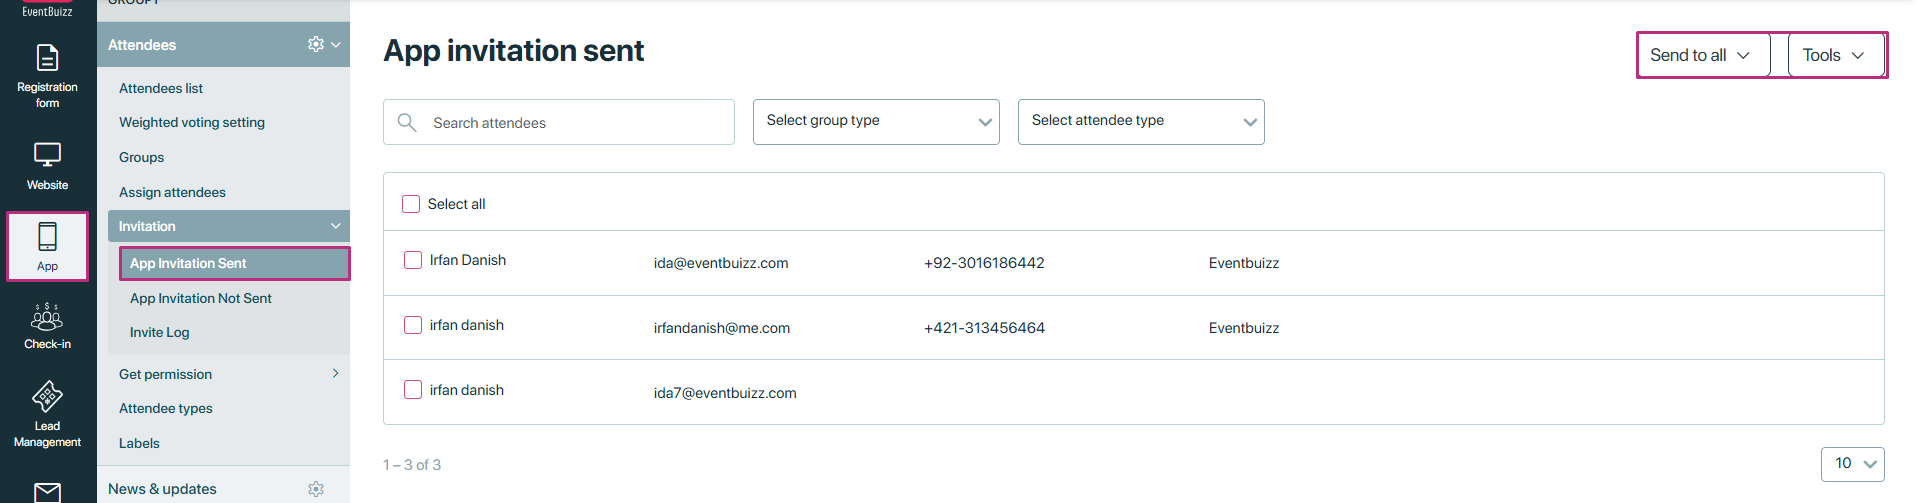
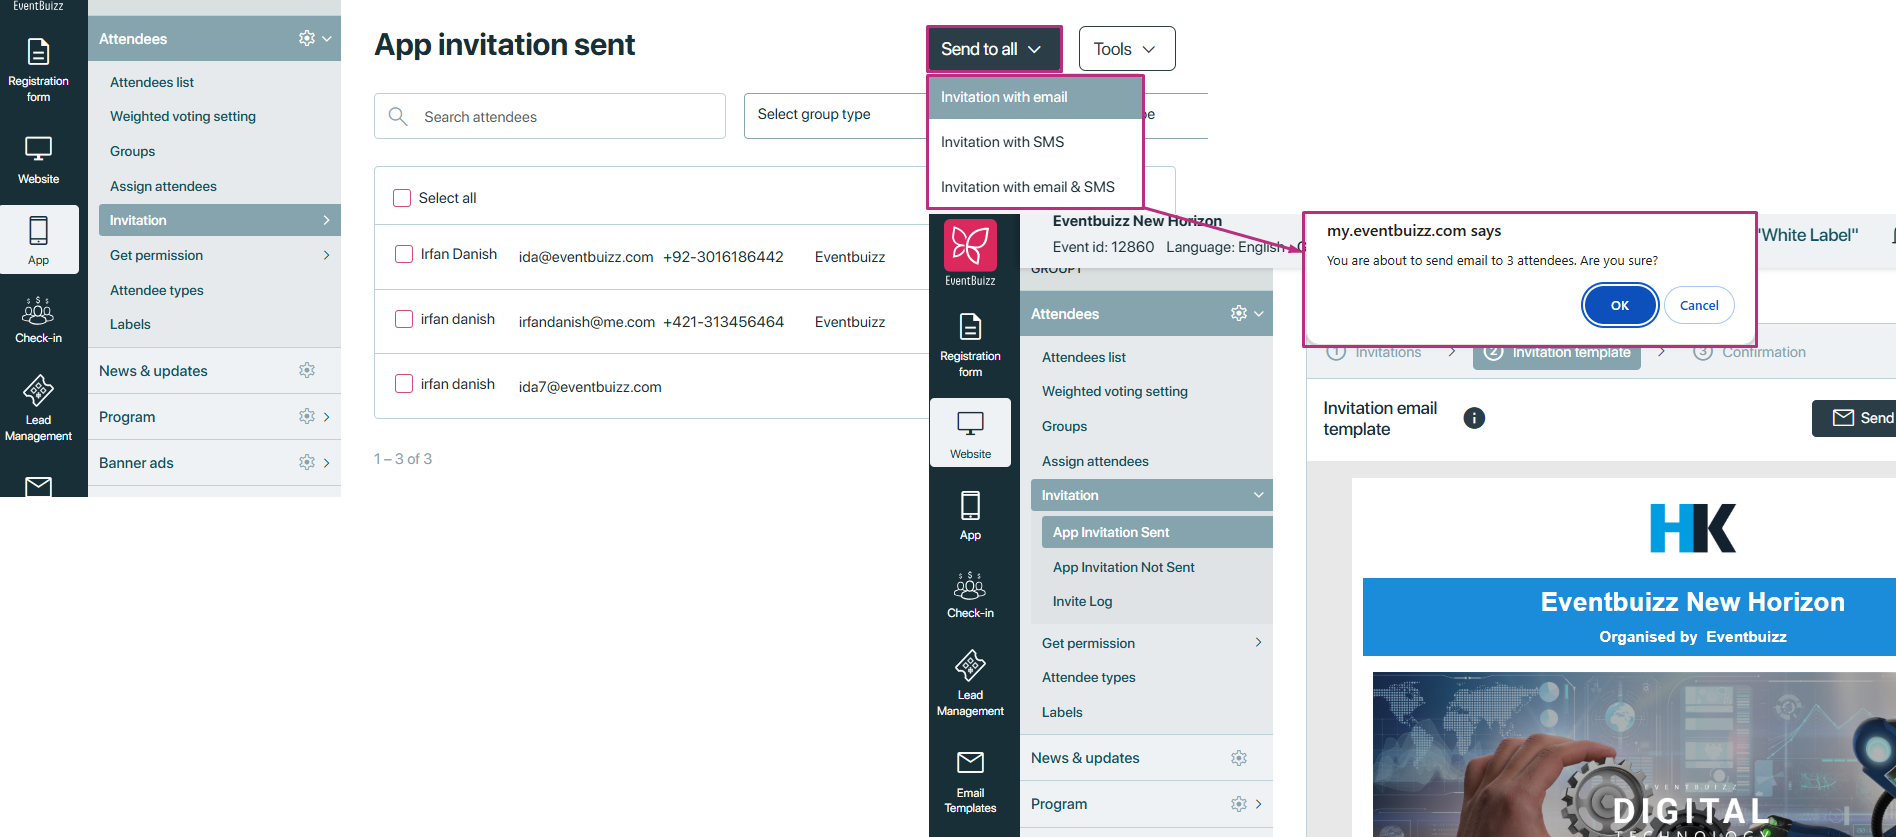
Send to all
The “Send to all” feature provides a streamlined way to communicate with multiple attendees at once, making it efficient for organisers to send reminders or updates. This feature is particularly useful for sending mass communications quickly.
-
Send reminder invitation mail: To resend the original invitation to all attendees who were previously sent invitations.
-
Send SMS: To send a text reminder to all attendees who have received the initial invitation.
-
Mail & SMS: To send both an email and SMS reminder to all attendees simultaneously.
Tools
The “Tools” feature provides organisers with various options for communicating with attendees after invitations have been sent. This functionality allows for personalised outreach and can enhance engagement. Here’s a breakdown of the options available under this feature:
Available tools options
- Send individual email:To reach out to a specific attendee with a personalised message.
- Send individual SMS: To send a quick, direct message via text to a selected attendee.
- Send SMS & Mail:To communicate with the selected attendee through both email and SMS simultaneously.
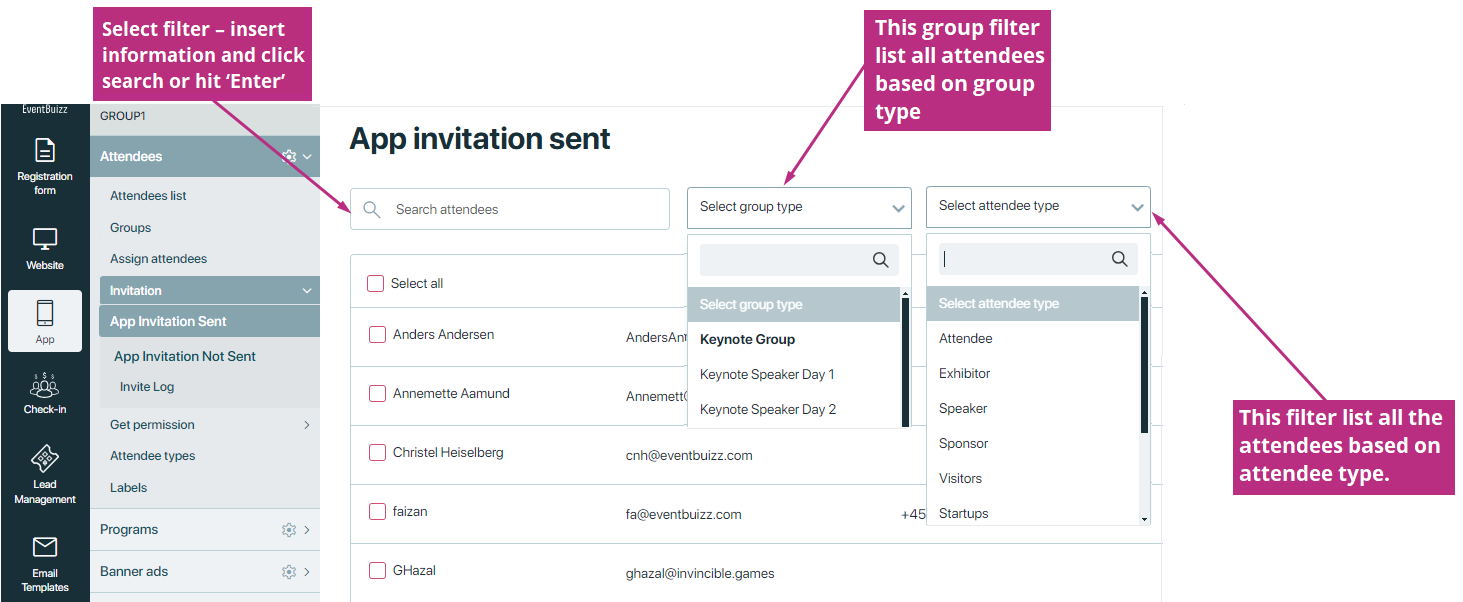
App invitation sent filters
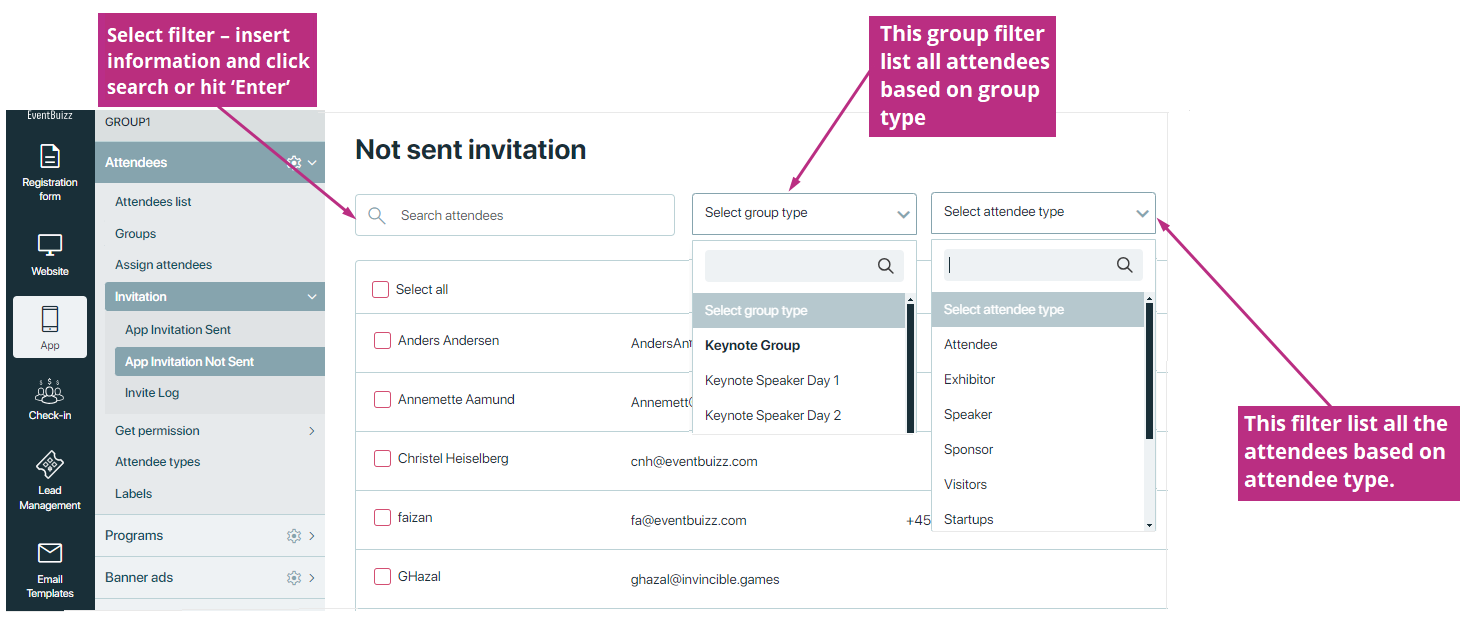
Organiser have the different available filters on the app invitation sent. Detail is given below:
- Search: By searching any attendee name or email organiser can filter the relevant attendees.
- Attendee type: Organiser cam filter the data base on the attendee types filter.
- Group type: Group type filter list all the attendees based on the group type.
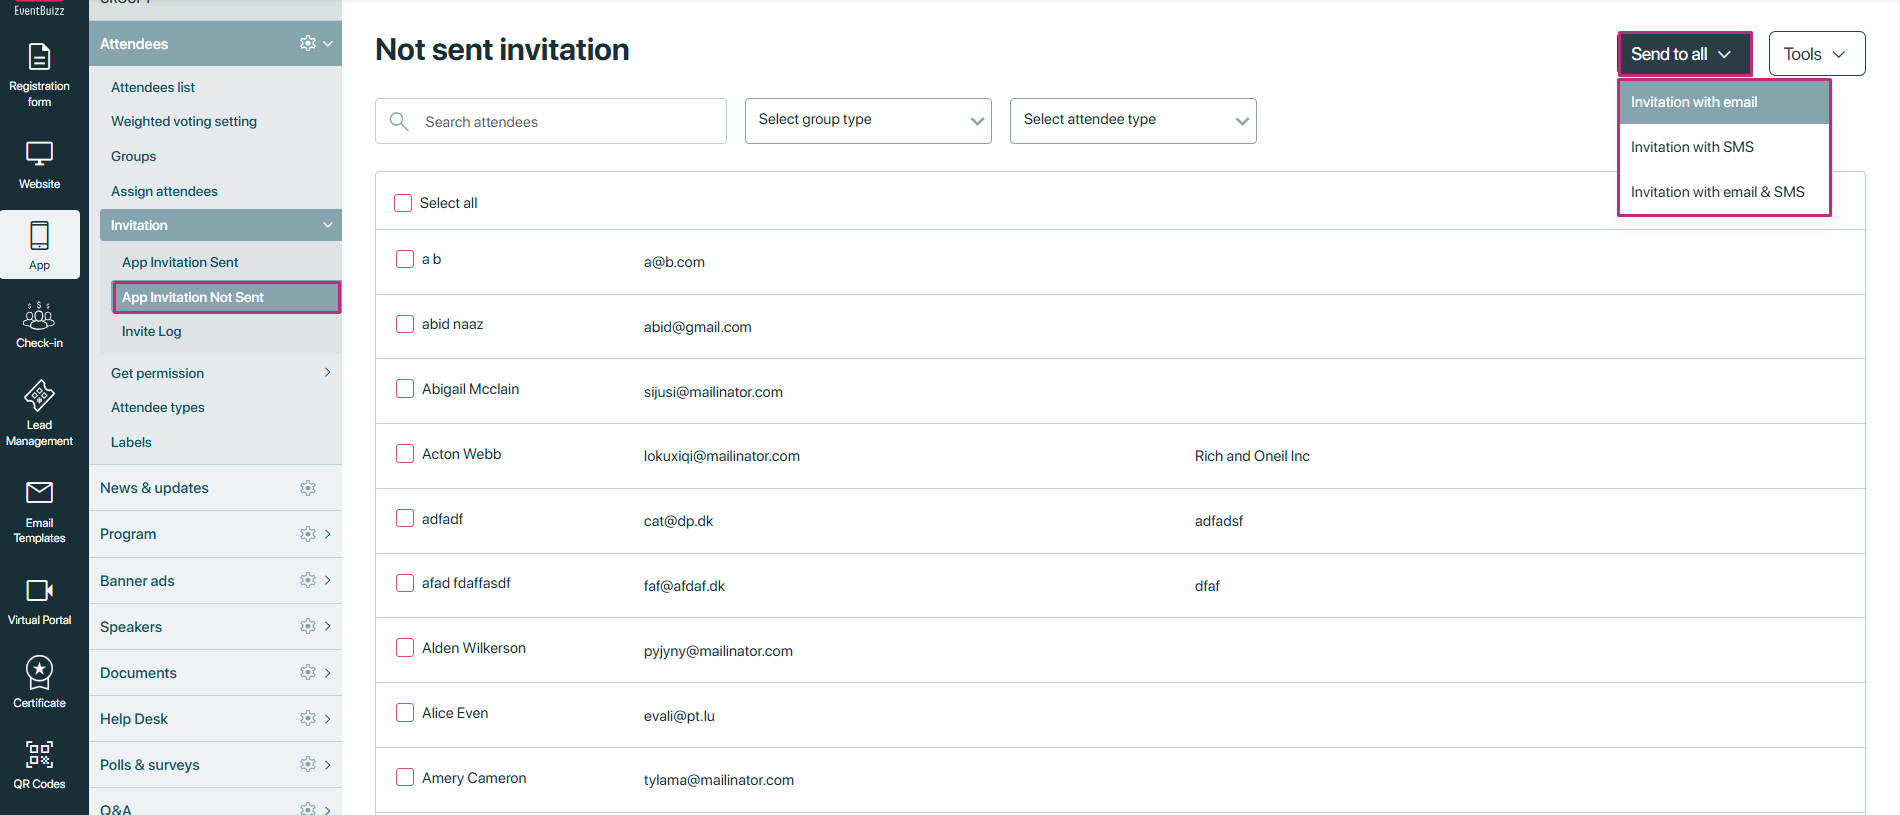
App invitations not sent
- All attendees assigned to the event appear in the “App invitation not sent” listing.
- Those attendees which are not assigned to the event, will not show in the “App invitation not sent” listing.
This section outlines the key features available for sending invitations.
1. Send to all
This feature allows organisers to send app invitations to all attendees who have not received them. The following options are available in the dropdown menu:
- Invitation via email: Sends an invitation to all attendees through their registered email addresses.
- Invitation via SMS: Sends an invitation to all attendees via SMS to their registered phone numbers.
- Invitation via email & SMS: Sends invitations to all attendees using both email and SMS, ensuring maximum reach.
Steps to send invitations
- Select the “Send to All” option from the top right of the listing.
- Choose your preferred method of invitation (Email, SMS, or both).
- Click on the Send button to dispatch the invitations.
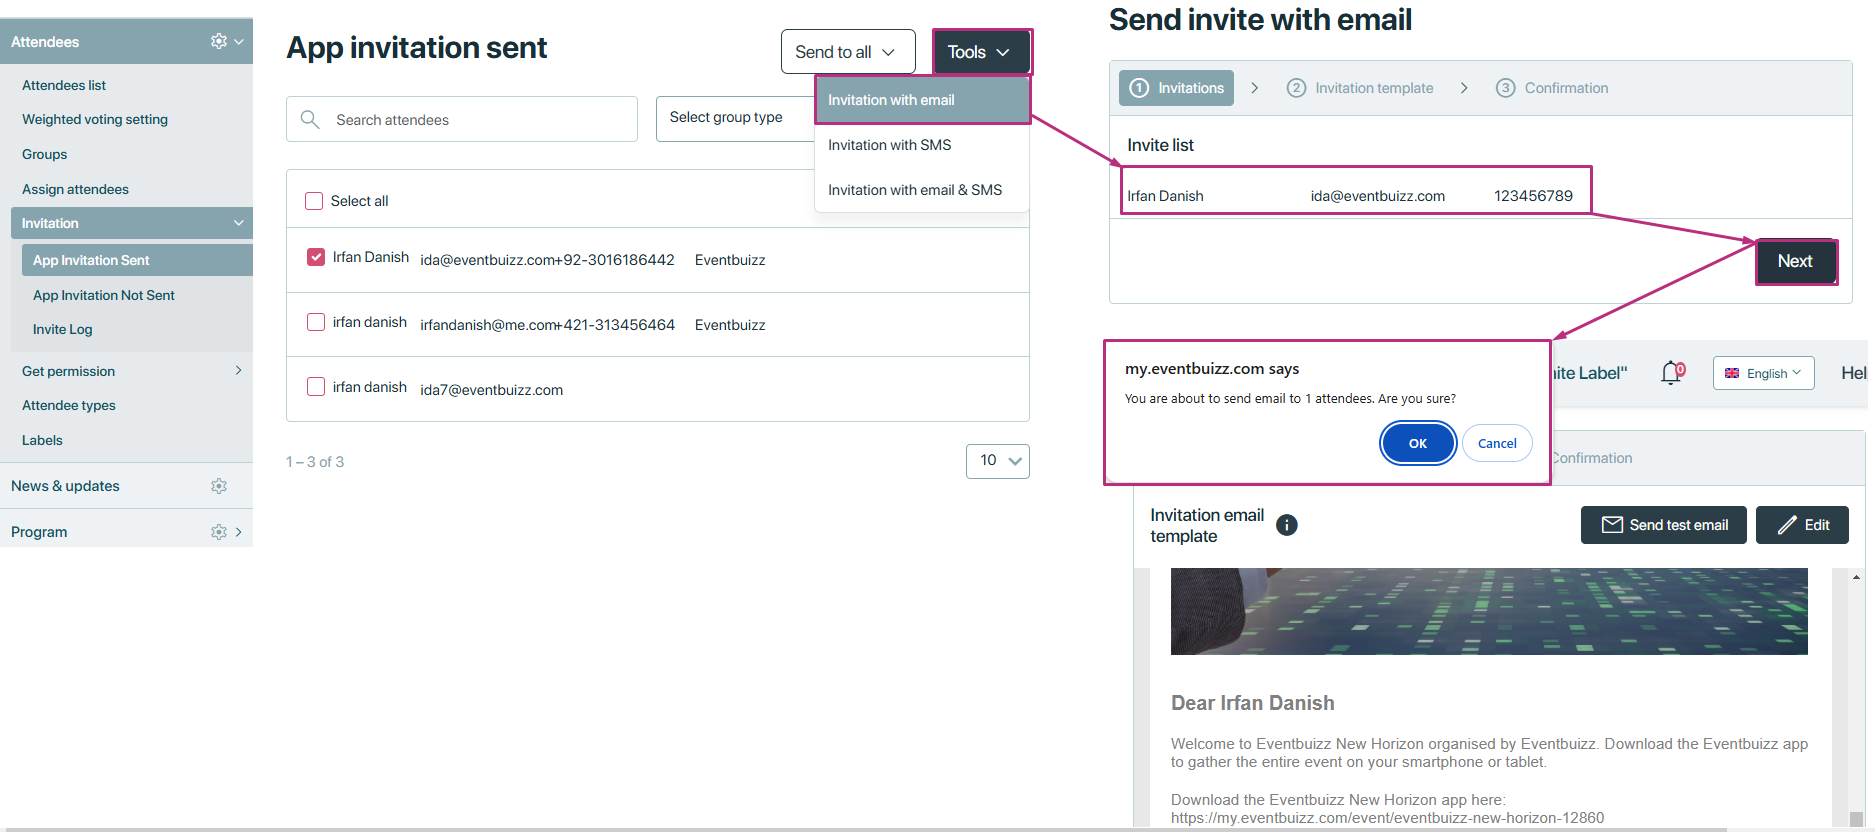
2. Tools
The Tools section provides more granular control, allowing organisers to send invitations individually to specific attendees. This feature is beneficial for personalised communication.
Available options in tools
- Invitation via email: Send invitations to selected attendees via email.
- Invitation via SMS: Send invitations to selected attendees via SMS.
- Invitation via email & SMS: Send invitations to selected attendees through both channels.
Steps to send individual invitations
- Navigate to the Tools section within the “App invitation not sent” listing.
- Select the attendees to whom you wish to send invitations by checking their corresponding boxes.
- Choose the desired invitation method from the dropdown menu (Email, SMS, or both).
- Click the Send button to issue the invitations to the selected attendees.
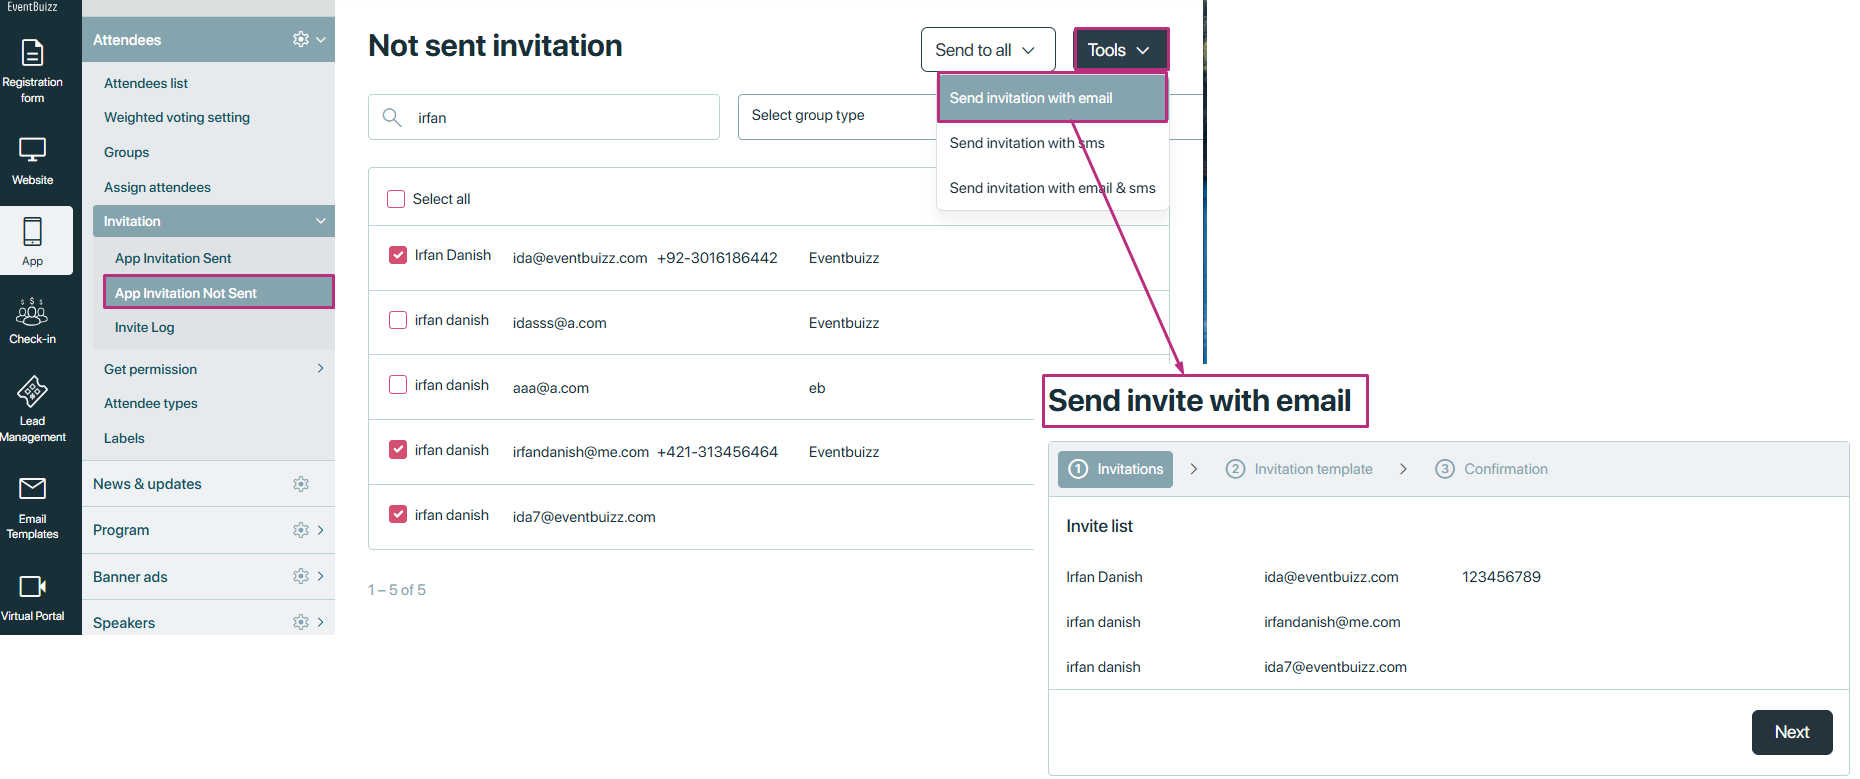
Here is the view and steps shown in the image, how organiser will send email of invitations.
App invitation not sent filters
Organiser have the different available filters on the app invitation not sent. Detail is given below:
- Search: By searching any attendee name or email organiser can filter the relevant attendees.
- Attendee type: Organiser cam filter the data base on the attendee types filter.
- Group type: Group type filter list all the attendees based on the group type.
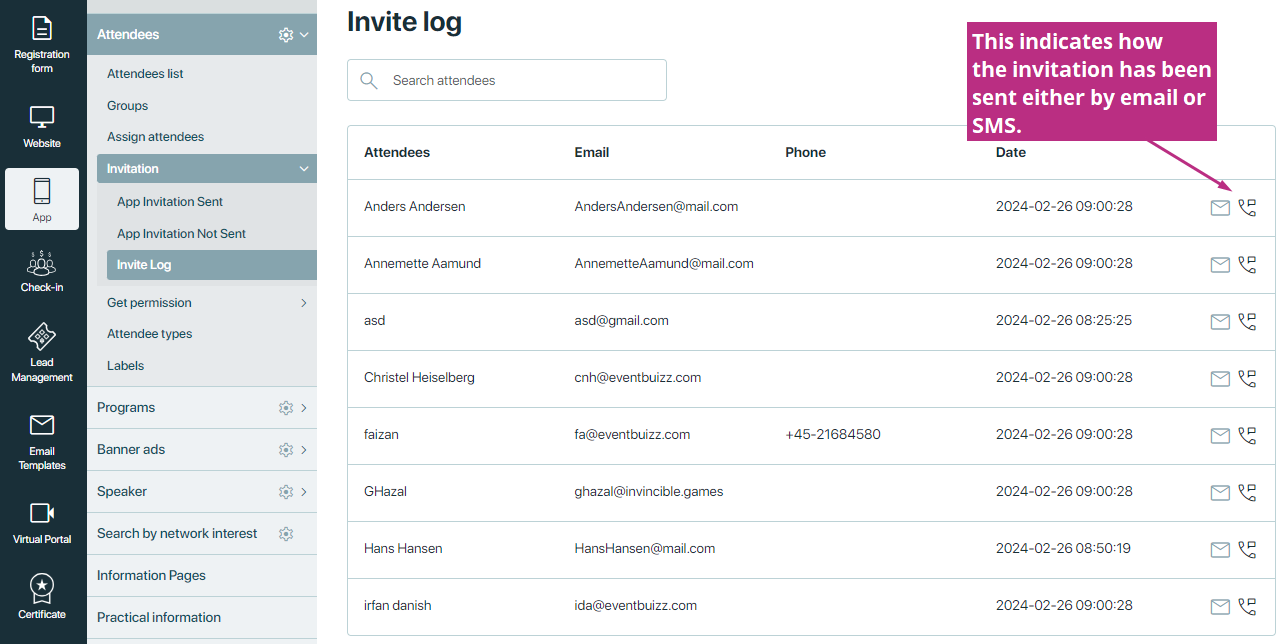
Invite log
The “Invite log” is a feature or section that keeps a record or log of all invitations sent out by organisers to attendees or participants of an event. It typically includes details such as the date and time of the invitation, the recipient’s name or email address, and the method used to send the invitation (e.g., email or SMS). This log helps organizers track the status of their invitations and ensures that they have been successfully delivered to the intended recipients.
Get permissions
Get permissions
The “Get permission” module enables event organisers to request specific permissions or consent from attendees. This is essential for legal compliance and effective communication, particularly regarding the use of attendee data for marketing, sharing contact information, or capturing media consent during events.
Overview of sub-sections
The Get permission module consists of two main parts:
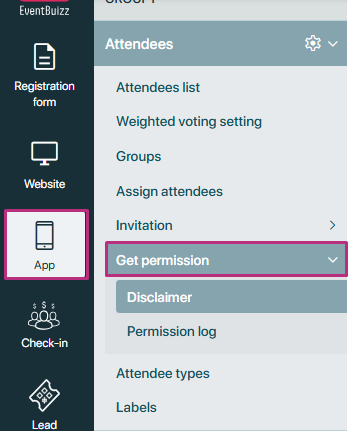
Disclaimer
The Disclaimer section allows organisers to create and customise permission requests related to various aspects, such as marketing communications, newsletters, and specific policies (e.g., food allergies).
Features of the disclaimer section
Editor:
- Organisers have access to an editor where they can define the disclaimer text. Key input fields include:
-
-
- Subject line: A brief title for the disclaimer (e.g., “Consent for food and allergies policy” , Get permission).
- Inline text: A customizable statement that includes links, such as:
- Example: “I agree to {detail_link}food and allergies policy{/detail_link}.”
- Description: A detailed explanation of what the consent entails, helping attendees understand the implications of their agreement.
-

Impact of the disclaimer
Disclaimer have the impact on both registration and app site. Detail is given below about the both impacts.
Web app impact
- The disclaimer will only display in the attendee’s profile settings if the Display food Setting is enabled. By default, this setting is turned off.
- For enabling or disabling this setting organiser will navigate on the following given path: Eventcenter->app->attendee settings->display settings->display food.
When organisers enable this setting:
- The disclaimer will appear on the edit profile page of the web app.
- At the bottom of the page, there will be a checkbox for the food policy.
- When attendees click on the URL, a modal will open displaying the subject line and description of the policy.
- If attendees check the box, they are consenting to the terms outlined in the disclaimer.
Before enabling the display food setting food disclaimer checkbox will not show in “edit profile”. Here is the view of it:

After enabling the display food setting food disclaimer checkbox will start showing in “edit profile”. Here is the view of it:

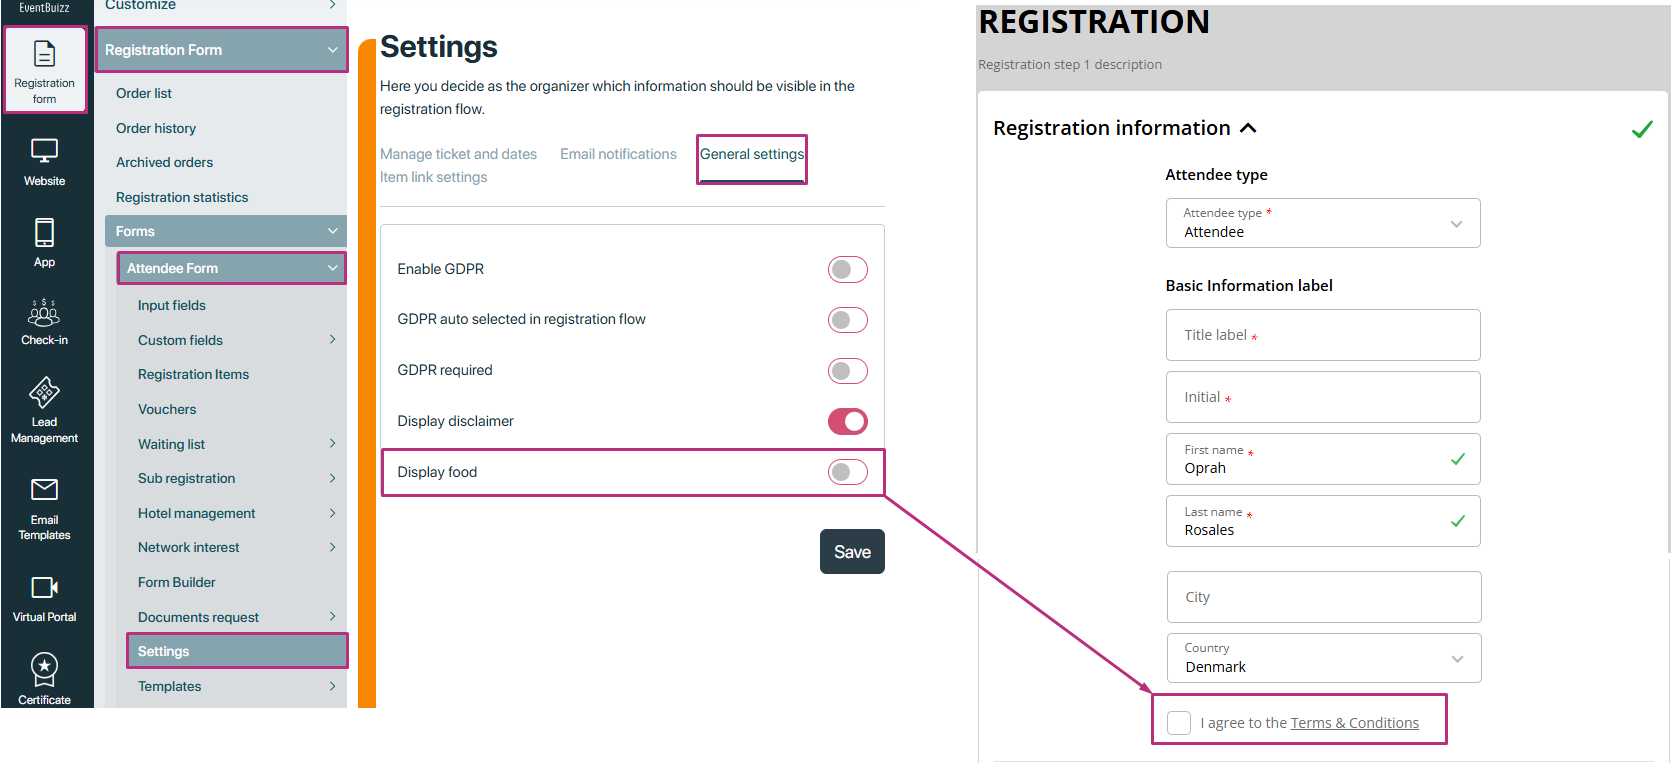
Registration site impact
- The display food setting for the disclaimer is form-based for registration site.
- If organiser enable this setting for specific form then it will show against that form type users in registration site, otherwise it will not show.
- By default in all available forms this setting is off.

If an attendee is registering on the registration site:
- The organiser enabled the setting from the attendee form, which will then show the food policy checkbox on the registration information form.
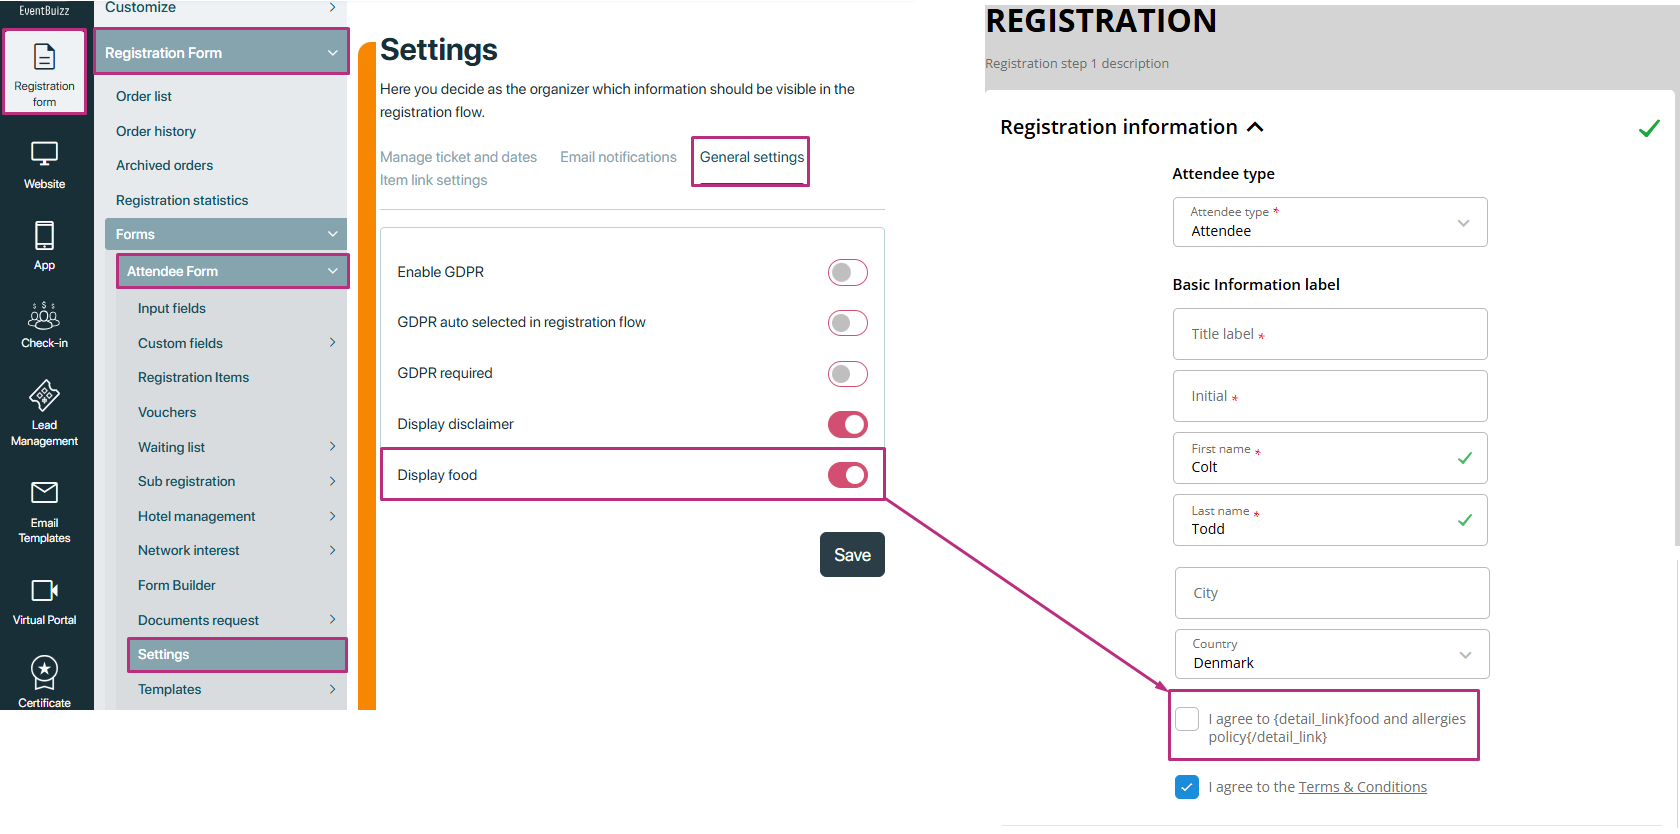
If the setting is not enabled, the checkbox will not appear, ensuring that attendees only see relevant permissions.
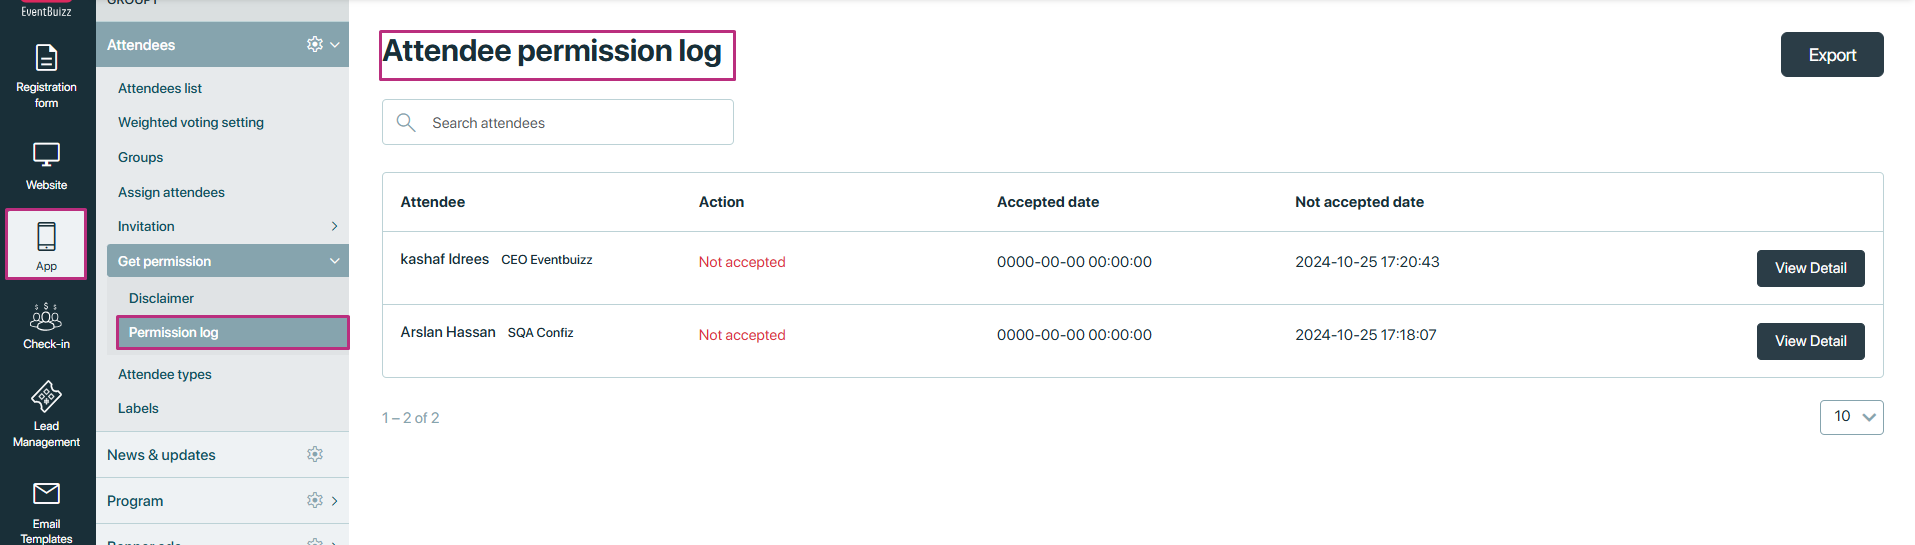
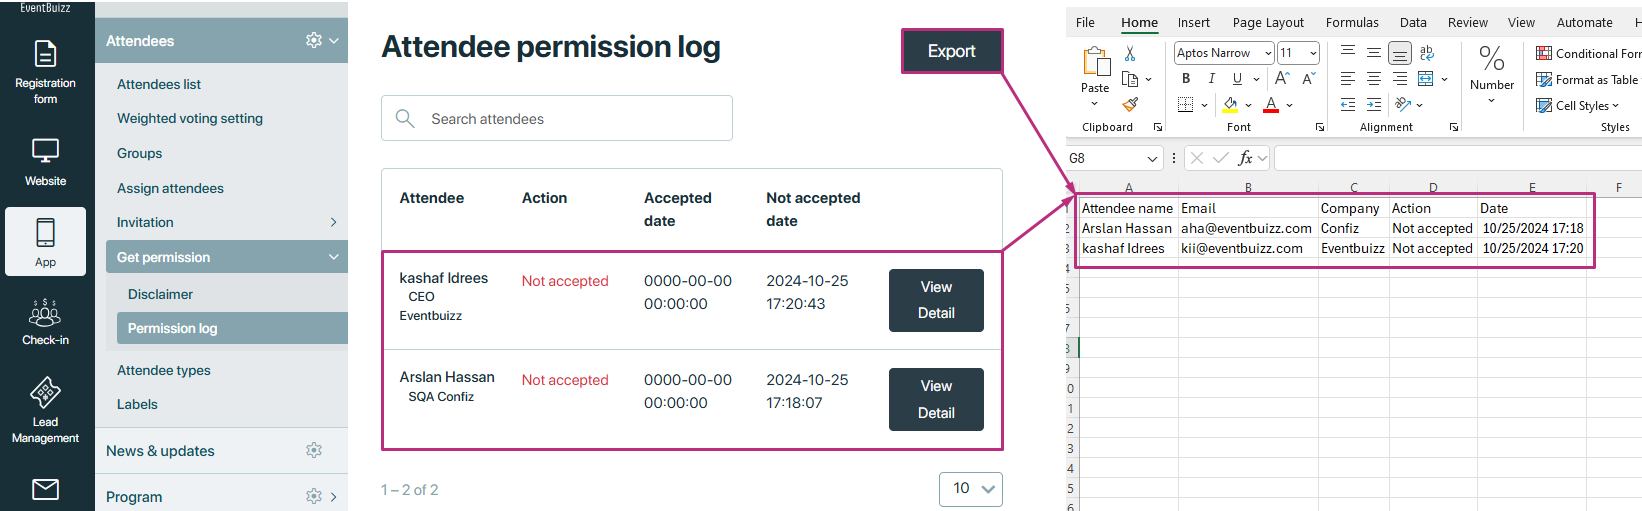
Permission log
The “Permission log” is a record or log maintained that tracks attendees’ responses to permission requests and disclaimers. It provides event organizers with a comprehensive overview of attendees’ consent status and acknowledgment of legal agreements. The permission log may include details such as the date and time of consent, the specific permissions granted or disclaimers accepted, and the attendee’s contact information.
Features of the permission log
Acceptance status
The log categories attendees into two statuses:
- Accepted: Users who have agreed to the permissions.
- Not accepted: Users who have not provided consent.
Log details
For each entry in the permission log, organisers can view:
- Attendee name: The name of the attendee who accepted or declined the permission.
- Acceptance date: The date when the consent was recorded.
- Acceptance status: Indicates whether the attendee accepted or declined the permission.
- Description: The detailed description of what the consent was for
Additional features
Export logs
- Organizers have the option to export all logs into a CSV file. This is useful for record-keeping and compliance audits.
Detailed view
- Organizers can click on individual logs to view detailed information about each attendee’s consent, allowing for better tracking of who has accepted permissions.
Attendee types
Attendee types
“Attendee type” means putting attendees into different groups based on things like their role or what they’re doing at the event. This helps organizers manage who can access certain parts of the event, how much they pay, and what events they can join. It also helps send them the right information and offers.
Common types of attendee classifications in eventbuizz may include:
- Attendees
- Exhibitor
- Sponsor
- Speaker
The organiser can create a new attendee type according to their preference by navigating to “Attendee types” and selecting “Add.”
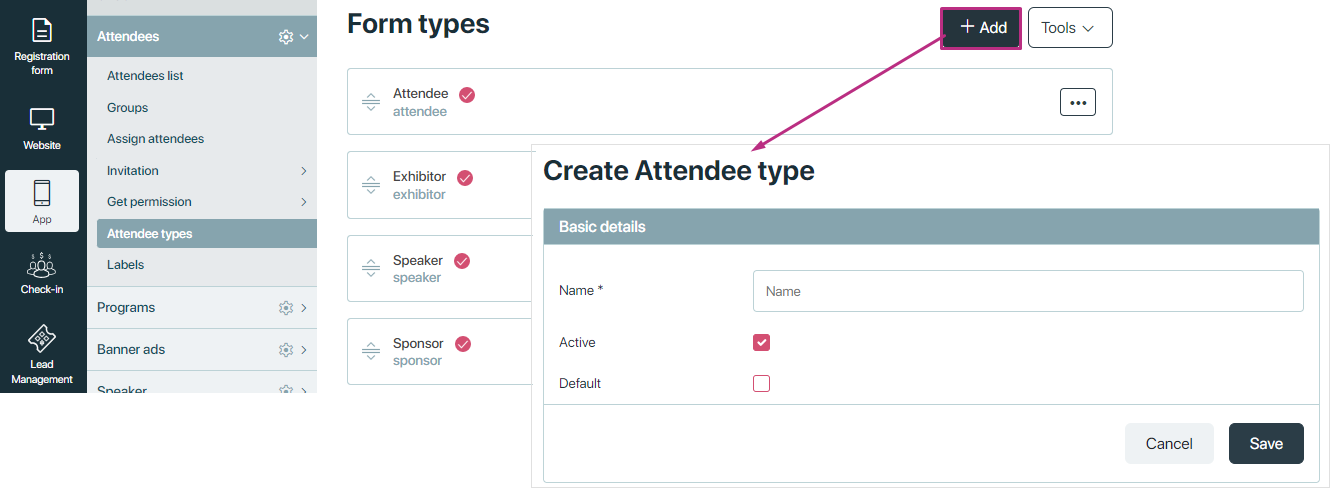
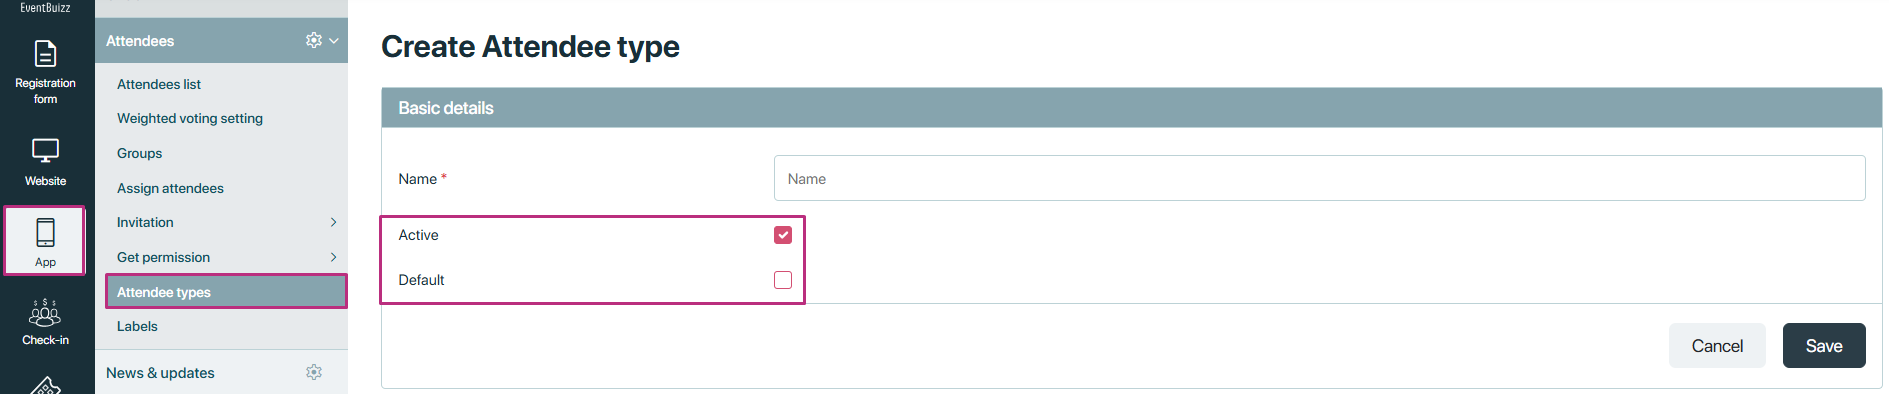
When organiser creates a new attendee types, there are two check box included in the creation process. Detail is given below about that check boxes:
- Active: By default this check box will be selected, and it shows the status of the attendee type, either organiser want to active it or by un-selecting this box, attendee type will be created by status will be in-active and can make active in future for use.
- Default: By default this check box will be not selected, and this check box give the authority to organiser either he want to make this type default attendee type or not. At a time there will be only one type default, if already there is a default attendee type, and organiser also mark this type default, then previous one selected will be un selected.
Additional features in attendee types
All the created attendee types will display on the attendee type listing, and each created attendee type have menu ![]() on listing. Available options in menu are these:
on listing. Available options in menu are these:
- Edit: Will allow organiser to edit the created attendee type name, active/in-active status and default status as well.
- Inactive/active: Will allow organiser to inactive/active the created attendee types. If already inactive then can make active otherwise inactive correspondingly.
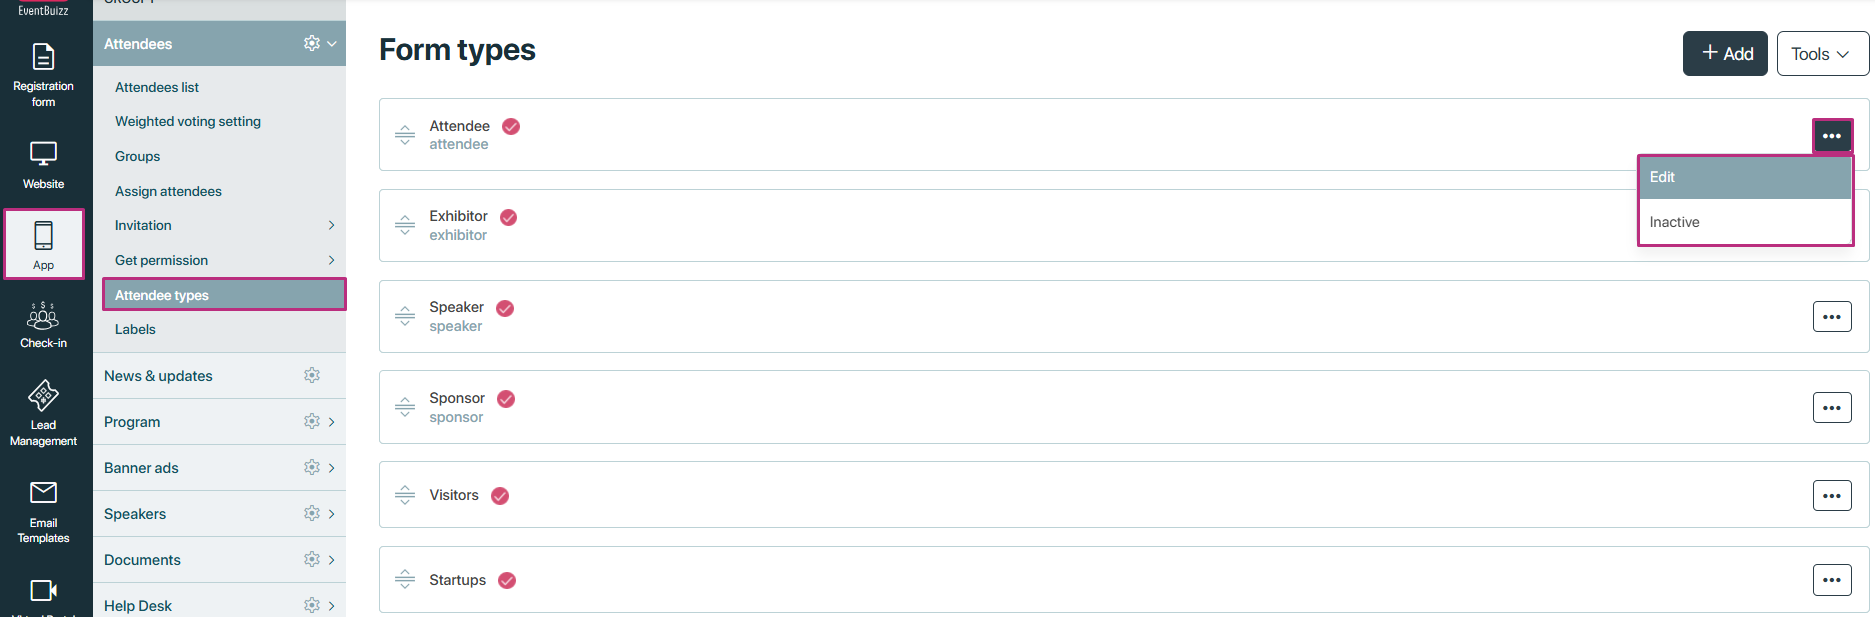
Tools
- In tools organiser have the option to export the all created attendee types.
- A CSV file will be downloaded which have the information of the created types.
Note: All created attendee types organiser can access in attendee listing at the add/edit attendee profile.
Attendee labels
Attendee labels
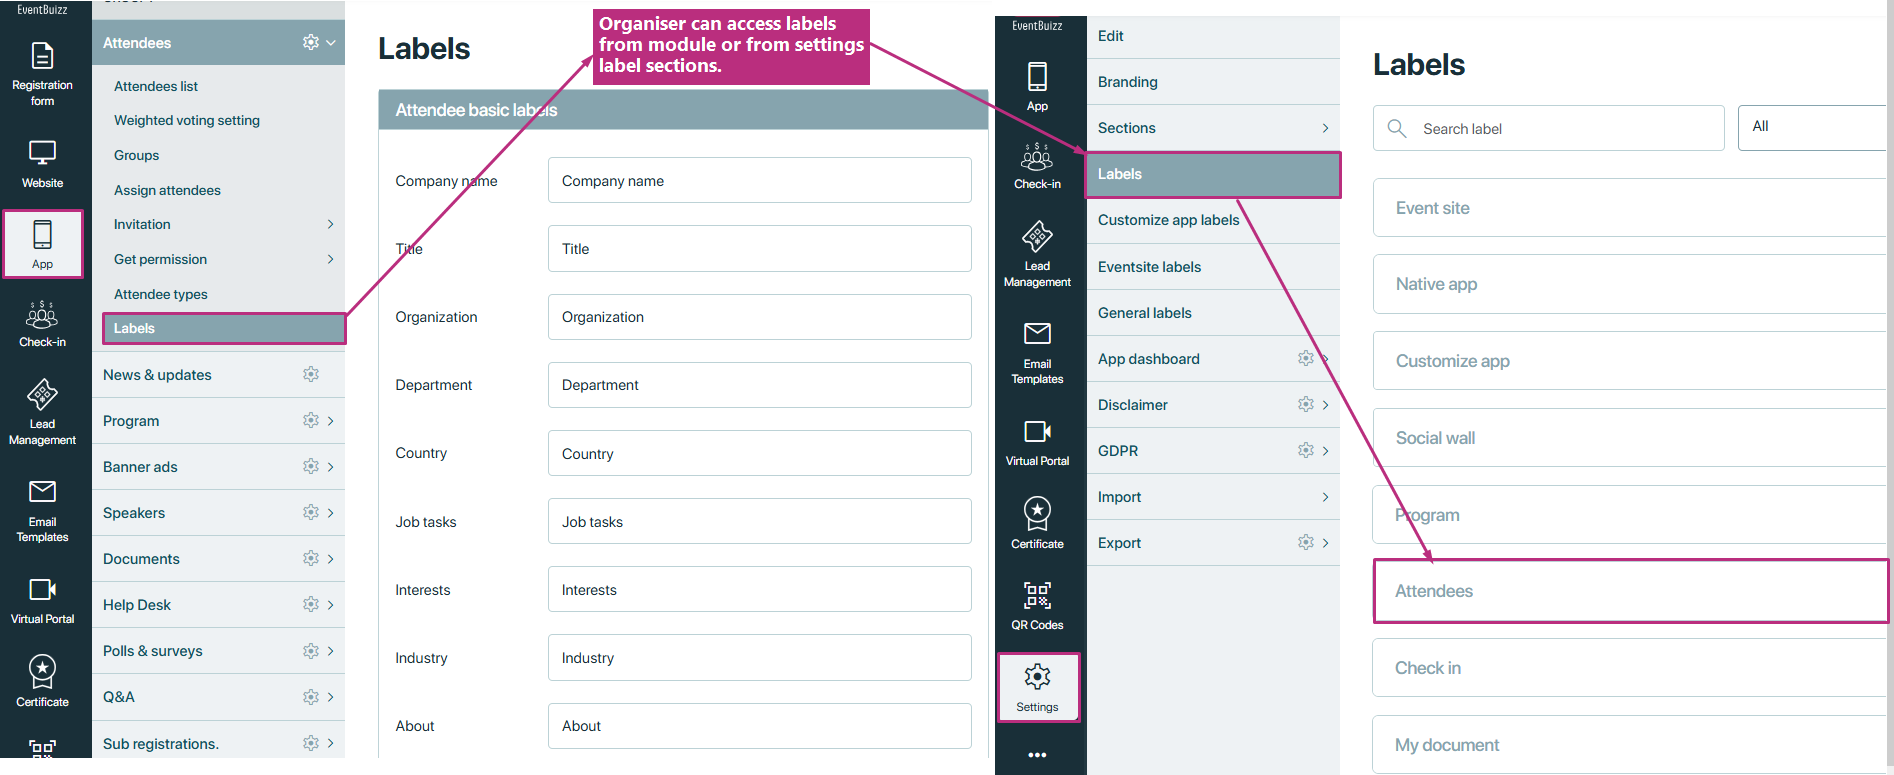
Labels serve as customisation tags or descriptors that provide context and organisation to various components within the attendee module. They play a crucial role in enhancing the user experience, allowing both organizers and attendees to better understand and navigate the event’s offerings. Labels can be used for categorizing attendee types, registration statuses, communication preferences, and other relevant elements, making information easier to find and understand.
Accessing labels
Organisers can access the attendee module labels from two main locations:
Attendee module subsection
- Within the main attendee module, there is a dedicated subsection for managing labels. Organisers can view, edit, labels specific to attendee information directly within the attendee module.
- Organiser can follow this path to access labels in attendee module: Eventcenter->app->attendee module->labels
Settings menu
- Organisers can also navigate to the settings menu in the event center. From there, they can select the Labels option, where all labels used across the event center are listed. This provides a centralised location for managing labels used in various modules, ensuring consistency and coherence throughout the event.
- Organiser can follow this path to access labels in setting module: Eventcenter->setting>labels->attendee labels
Dynamic nature of labels
One of the key features of the label system is its dynamic nature:
Real-time updates
- Any changes made to labels within the event center settings will automatically reflect in the web app. This ensures that both organisers and attendees see consistent terminology and labelling throughout all platforms.
Dynamic text replacement
-
Any label changes propagate throughout the module, reducing confusion and enhancing user experience. Labels are not static, they are designed to adapt based on changes made by organisers
Importance of labels
Clarity and consistency
-
Maintains clear communication, reinforcing event branding and attendee understanding.
Organisational efficiency
-
Helps organisers manage and categorise attendee information effectively.
Customisation:
-
Allows organisers to tailor terminology to better fit the event’s context and audience, enhancing attendee engagement.
Attendee settings
Attendee settings
Overview
The Attendee settings section is essential for managing and customising how attendee-related information is displayed across various platforms, including the web app, native app, and registration site. It serves as a control management system for enhancing the attendee experience.
Purpose of attendee settings
-
Customisation: Organisers can modify how attendee information is presented to align with the event’s branding and objectives.
-
User experience enhancement: By managing visibility and functionality, organisers can create a more intuitive and engaging experience for attendees.
-
Control and flexibility: Organisers can enable or disable features based on specific event needs and audience preferences.
Accessing attendee settings
Organisers can access the attendee settings in the event center by following this path:
- Eventcenter → app → attendee → setting icons
Subsections of attendee settings
The attendee settings section is divided into four main subsections, each designed to manage specific aspects of attendee information and experience:

Sign in settings
Sign in settings
Sign-in settings
This subsection allows organisers to configure how attendees access their accounts and manage sign-in processes. It includes options for authentication methods and security features. Detail of all sign in available settings is given below:
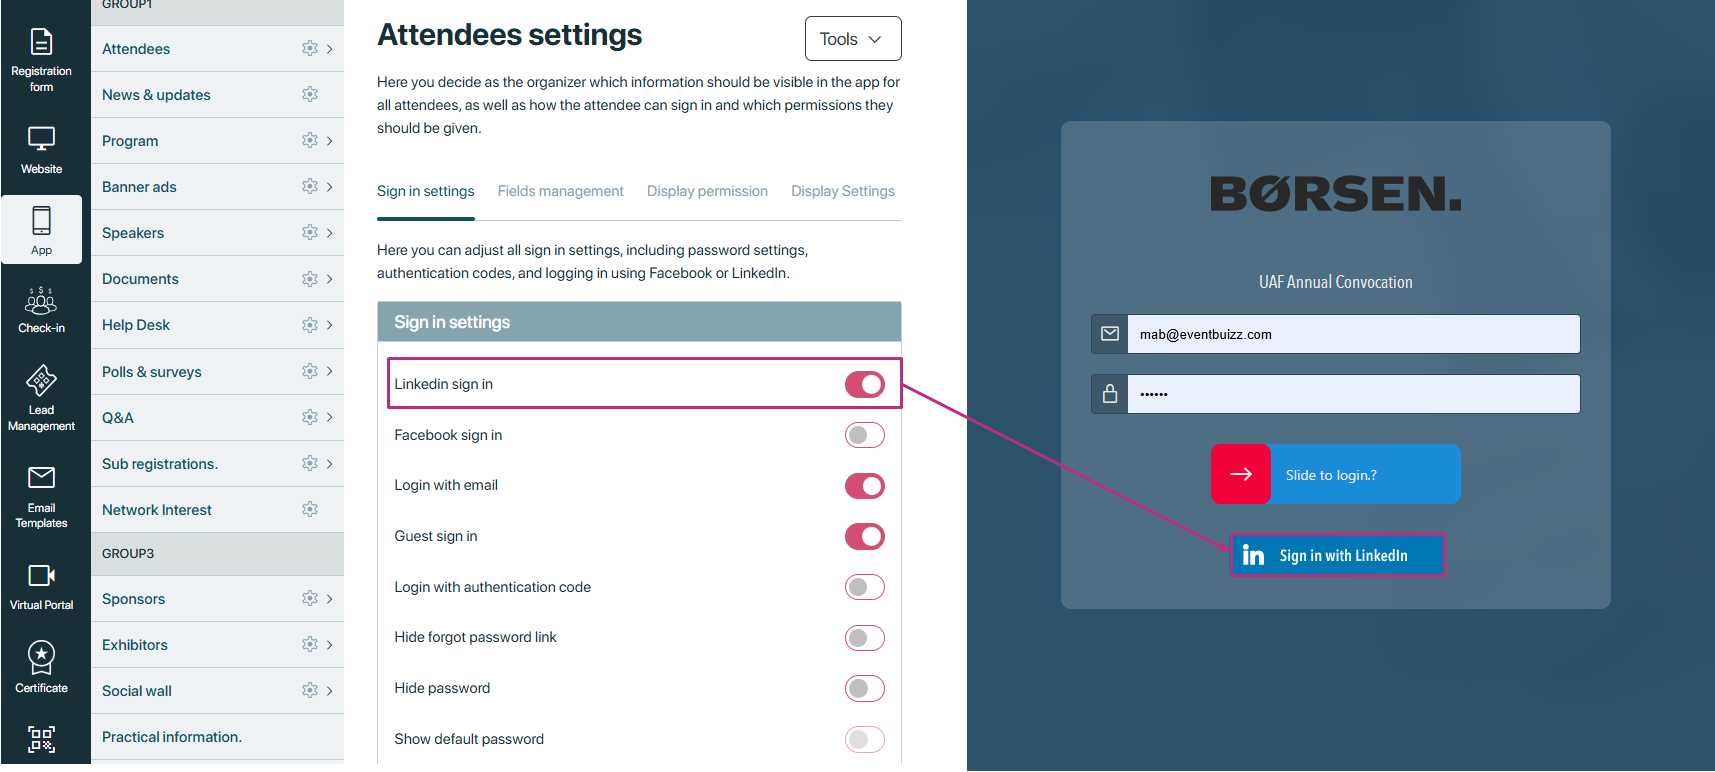
LinkedIn and facebook sign in
This setting allows users to sign in to eventbuizz using their linked-In and face book credentials. It provides a convenient way for users who already have linked-In/ face-book accounts to access the platform without creating a new username and password.
- By default these both settings will be off in the eventcenter attendee settings.
- By enabling these settings on login page sign-in using face-book or linked-in icons will show
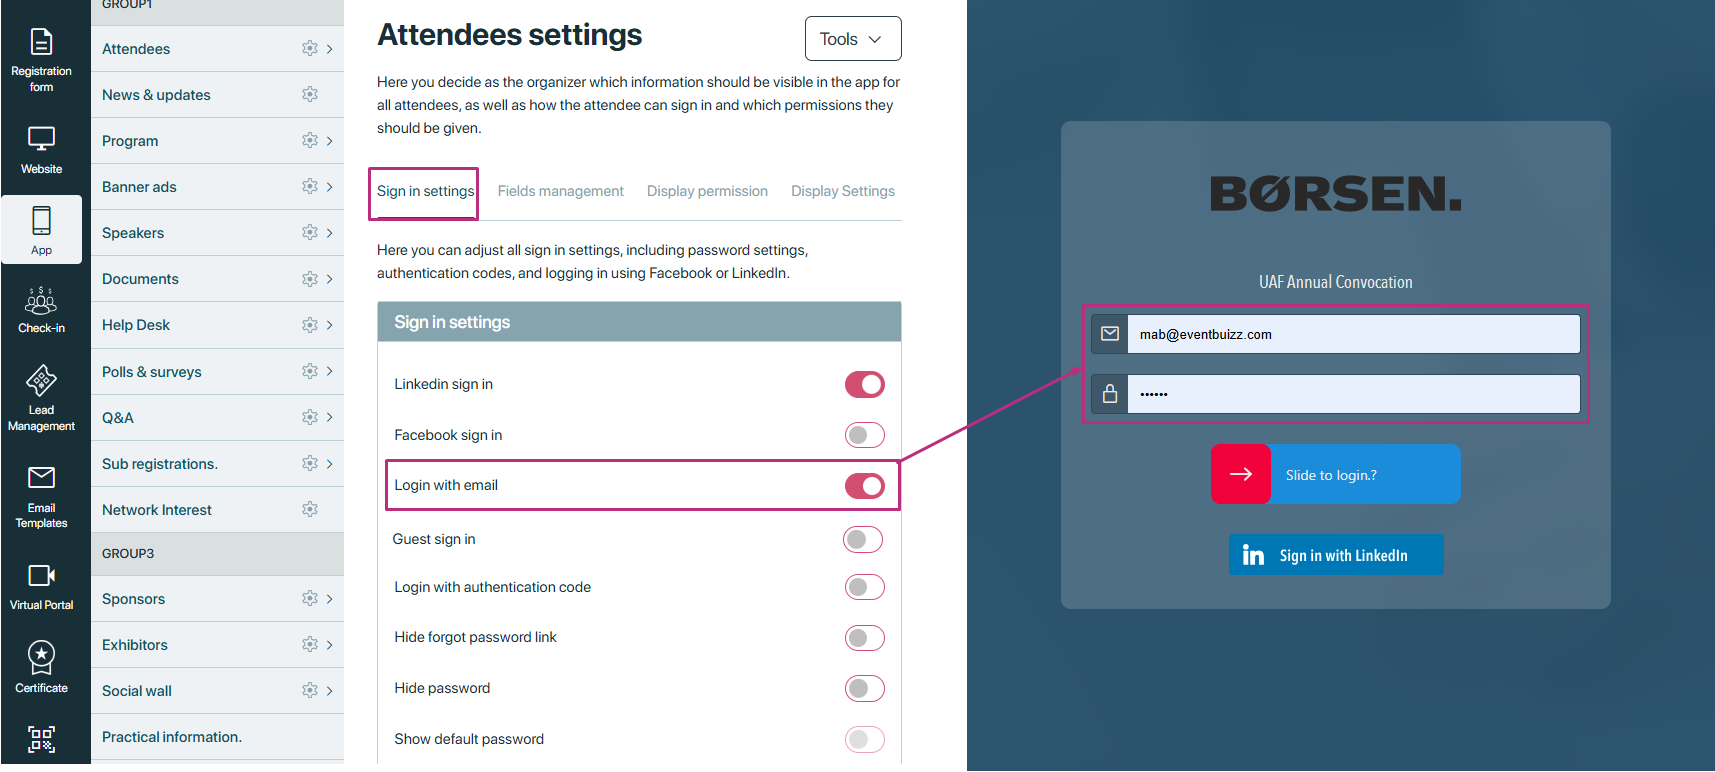
Login with email
This setting allows users to log in to eventbuizz using their email address and a password. It’s a standard authentication method where users create an account with their email and a chosen password.
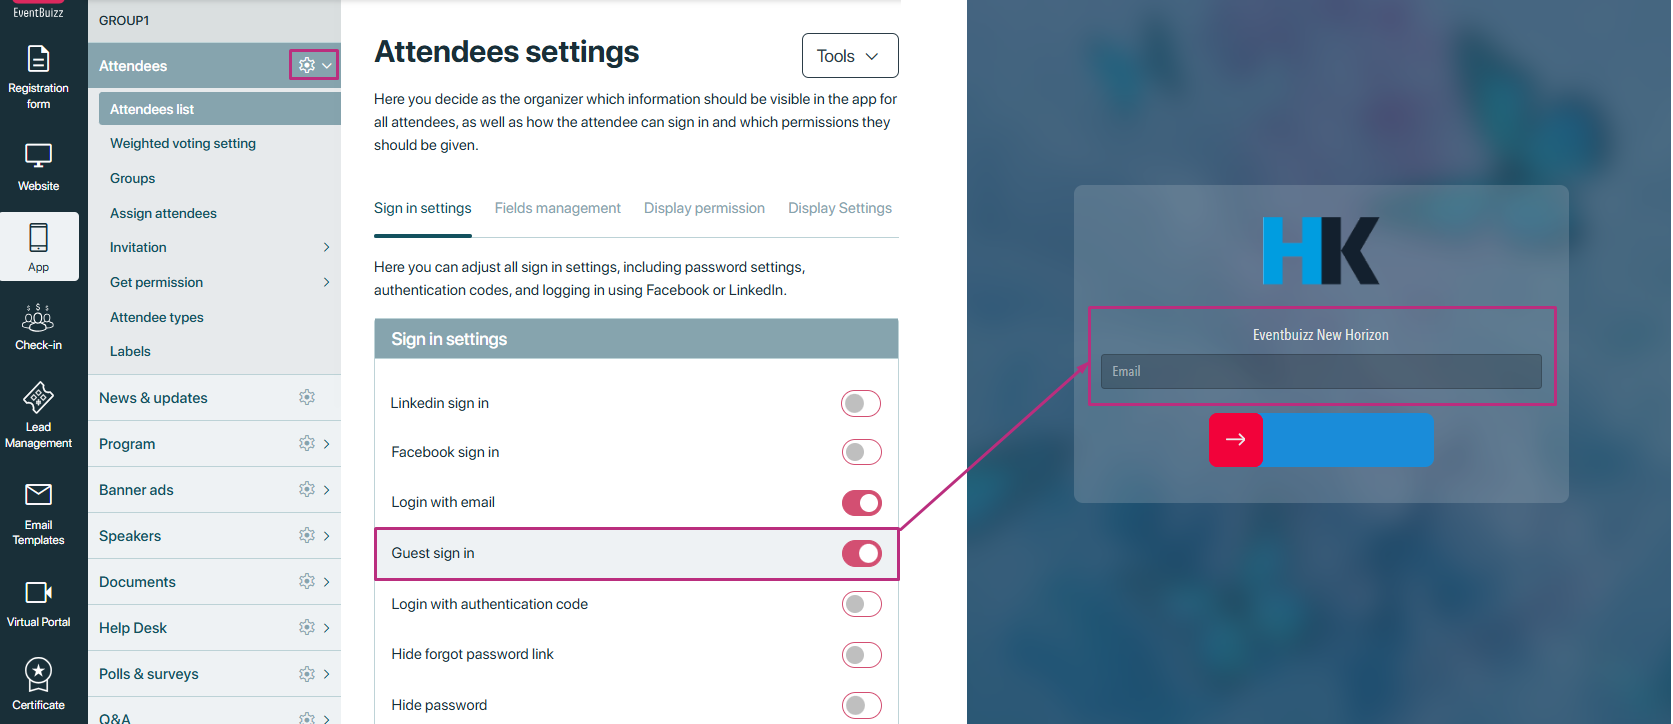
Guest Sign in
Guest sign-in typically refers to allowing users to access certain features or content on the platform without requiring them to create an account or log in. It’s a way to provide limited access to users who may not want to create an account immediately.
Login with authentication code
This setting likely involves two-factor authentication (2FA) or similar security measures.
In 2FA, we typically send the code to the email by default. If you have subscribed to SMS authentication in eventbuizz, after turning on the “Login with authentication code” setting, you will be able to access the SMS authentication setting.
Users are required to enter a code sent to their email or phone after entering their username and password, adding an extra layer of security to the login process.
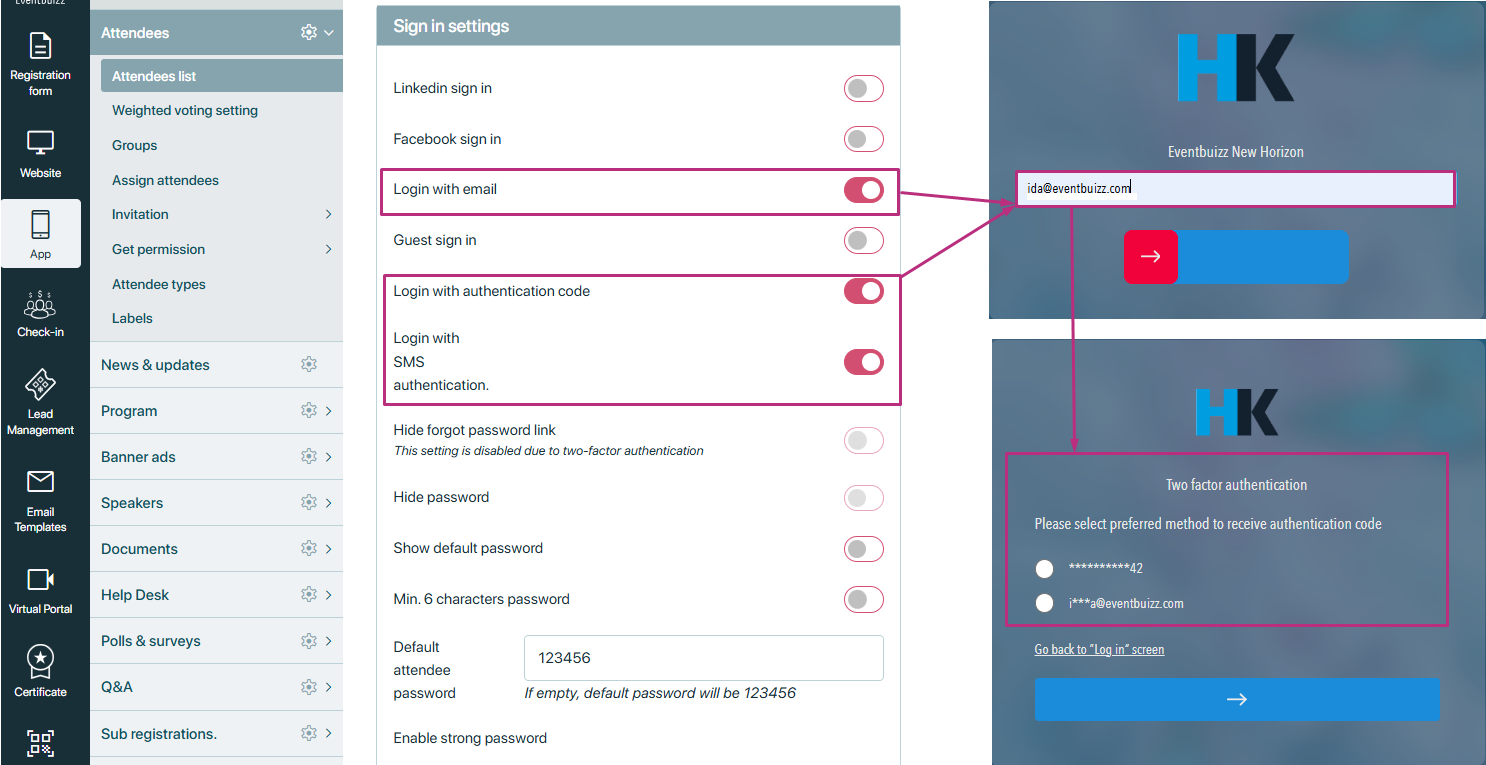
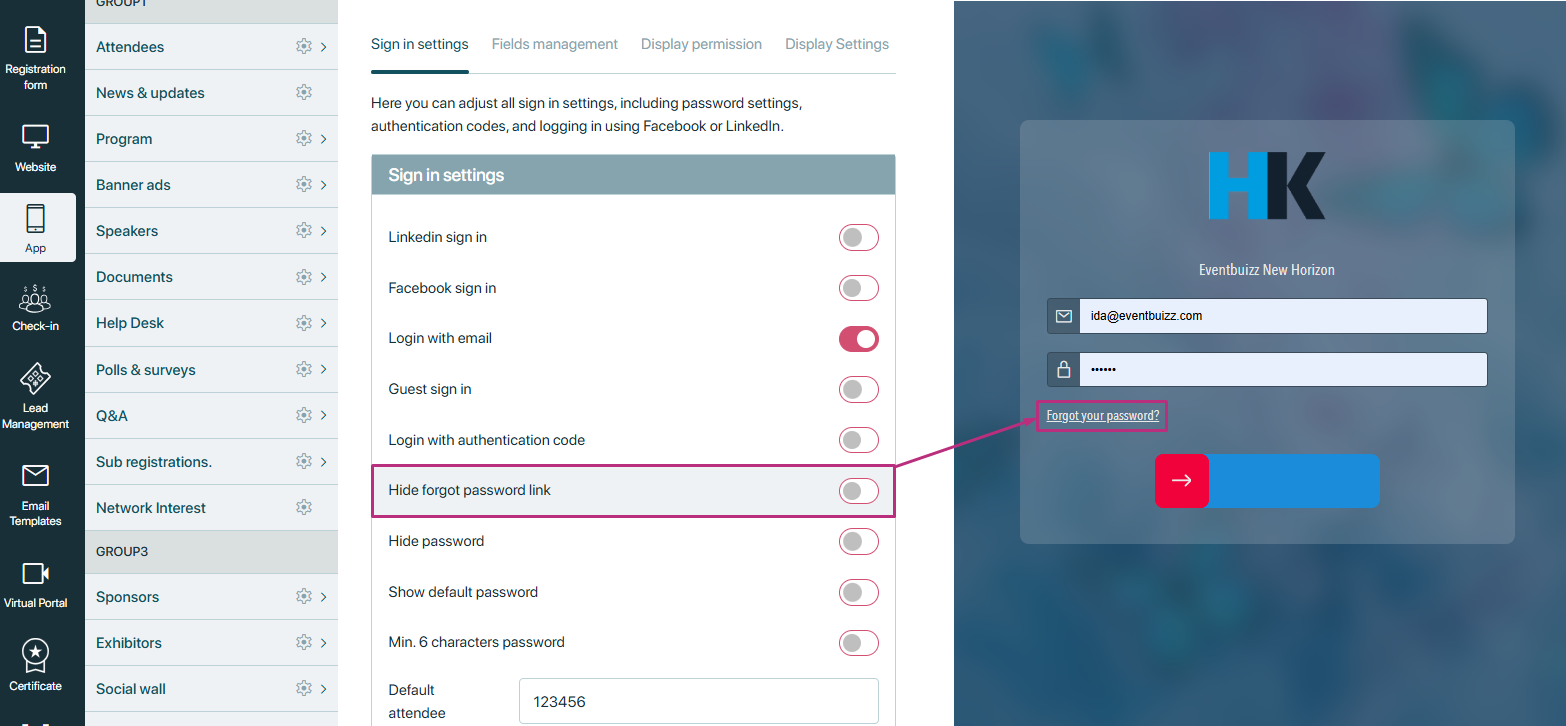
Hide forgot password link
This setting hides the option for users to reset their password if they forget it. It may be useful in situations where users are expected to remember their passwords and there’s no need for a password recovery mechanism.
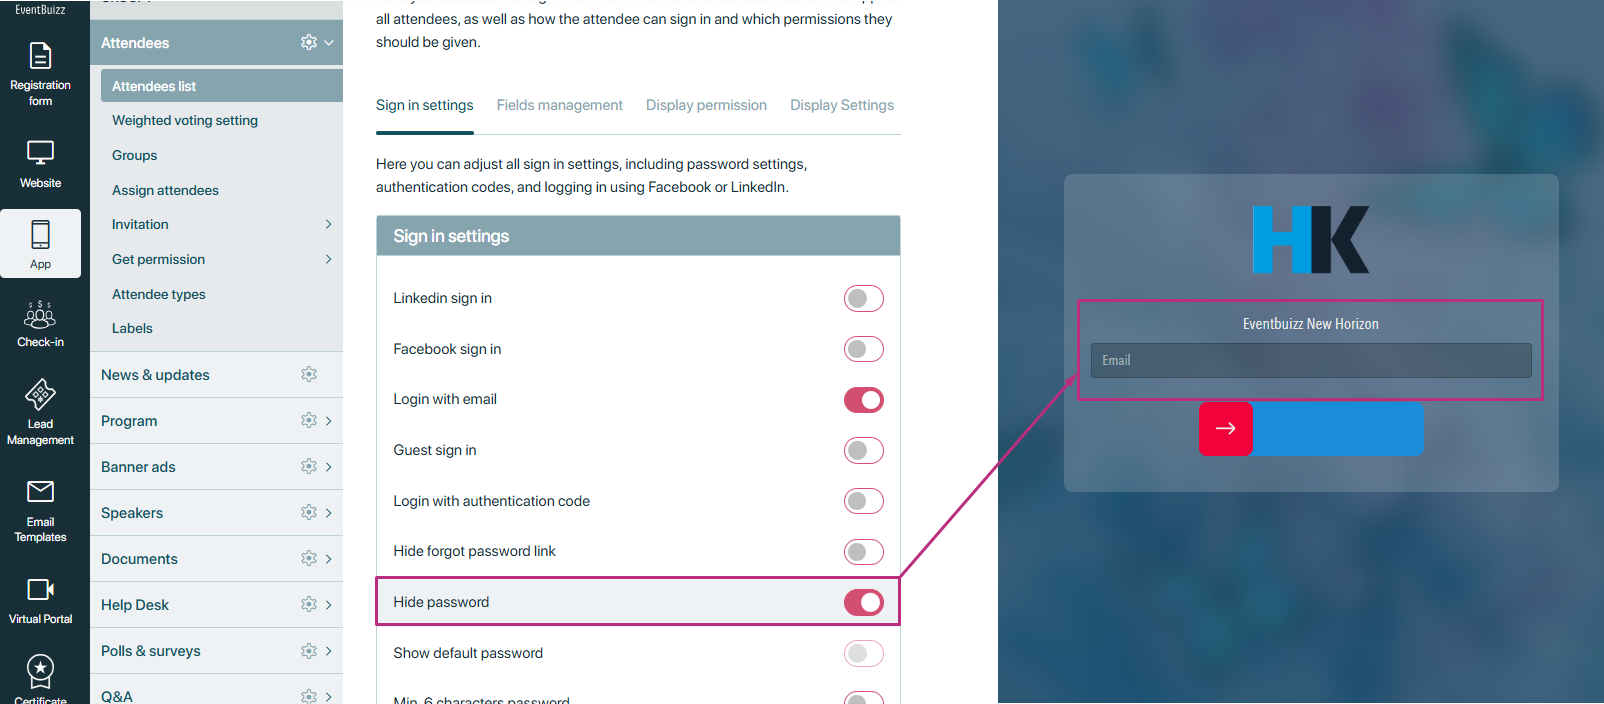
Hide password
The “hide password” setting causes the password field to be obscured or concealed everywhere it appears in the user interface.
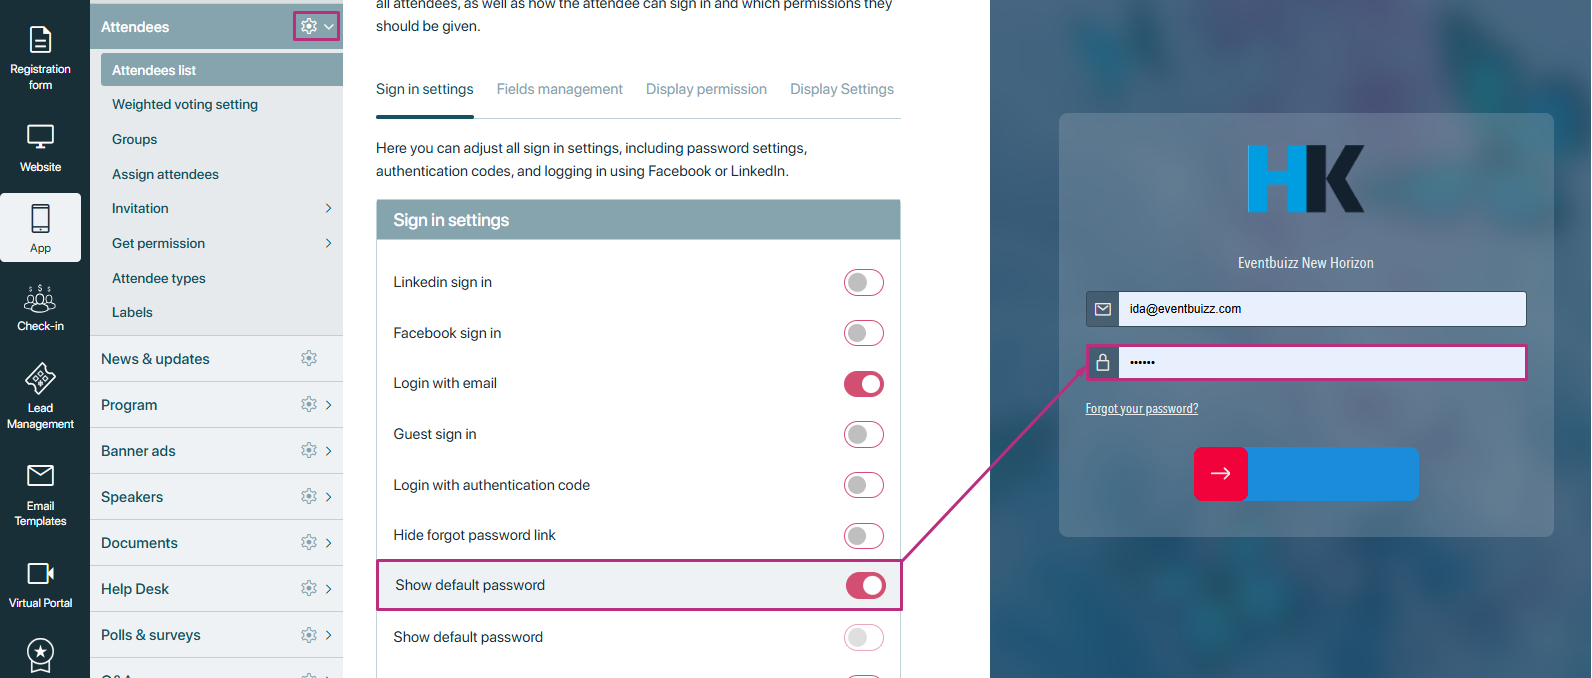
Show default password
This setting would display a default password for users, usually for temporary or initial access.
Minimum 6 characters
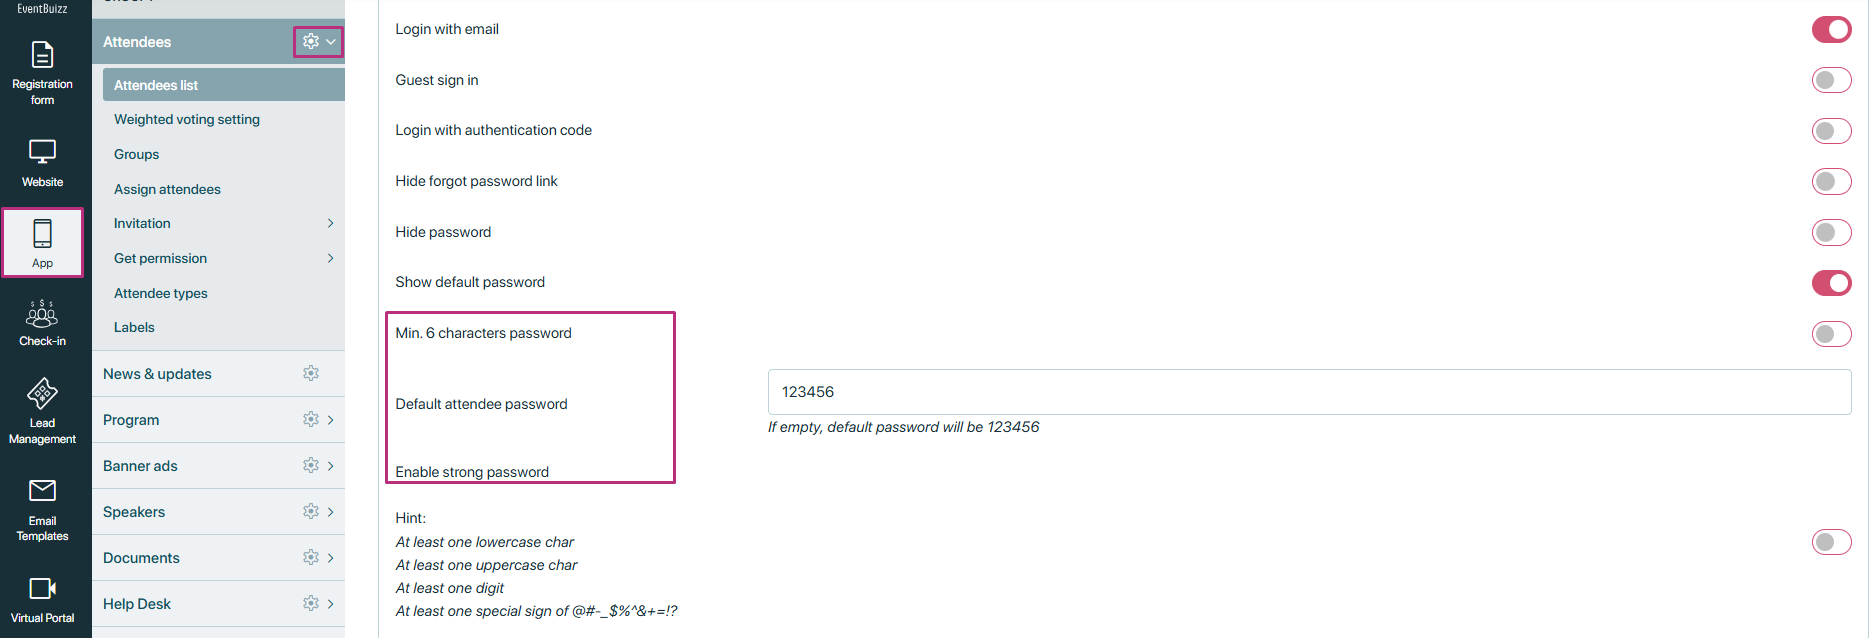
This setting enforces a minimum length requirement for passwords. In this case, passwords must be at least 6 characters long. It’s a basic security measure to encourage users to create stronger passwords that are harder to guess or crack.
Attendee default password
This setting allows you to specify a default password for attendees who register for an event but don’t set their own password. In this case, the default password is set to “123456”. If this field is left empty, “123456” will be used as the default password.
Enable strong password
When enabled, this setting requires attendees to create strong passwords when registering for an event. Strong passwords typically include a combination of uppercase and lowercase letters, numbers, and special characters. The hint provided further explains the criteria for a strong password, which includes at least:
- one lowercase character
- one uppercase character
- one digit
- and one special character from the specified set: “@#-_$%^&+=!?”
Registration verification
The Registration verification setting requires attendees to verify their identity via email before they can log in to the event platform. This step ensures that the attendee’s identity is confirmed before granting access to the event’s resources.
How it works:
- After the attendee completes the registration process, they will receive a verification email containing a unique link or code.

- The attendee must click on the link or enter the code within the email to verify their identity.
- Only after successful verification will the attendee be allowed to log in to the app or platform.
- If the attendee attempts to log in before verifying their identity, they will see an error message: “You are not authorized to login.”
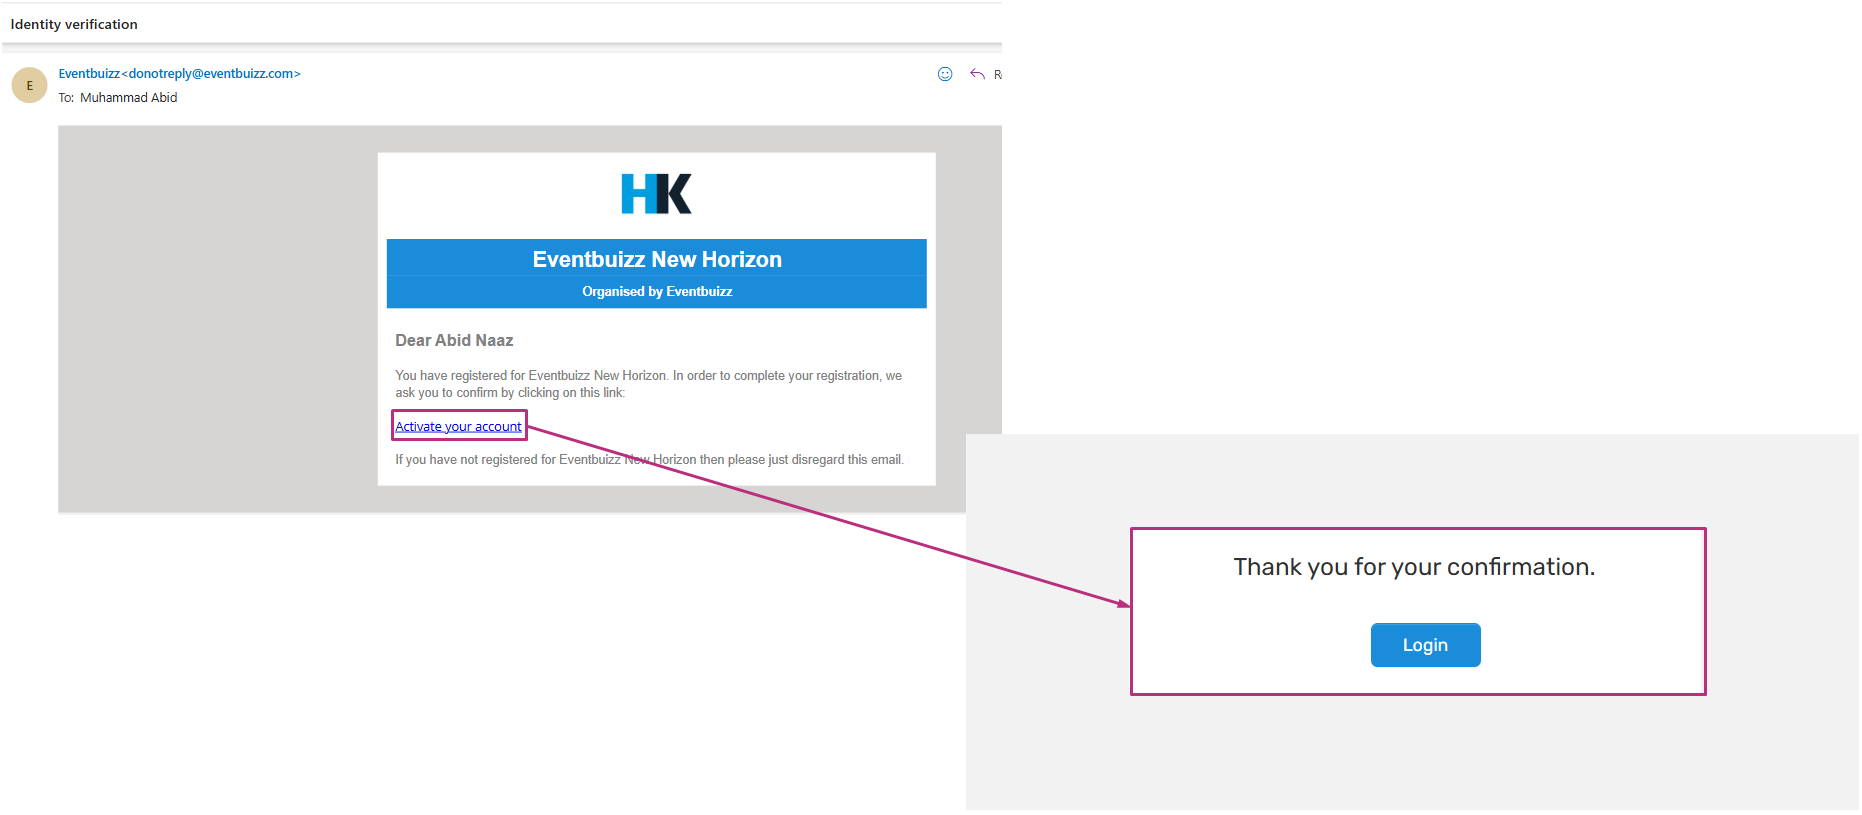
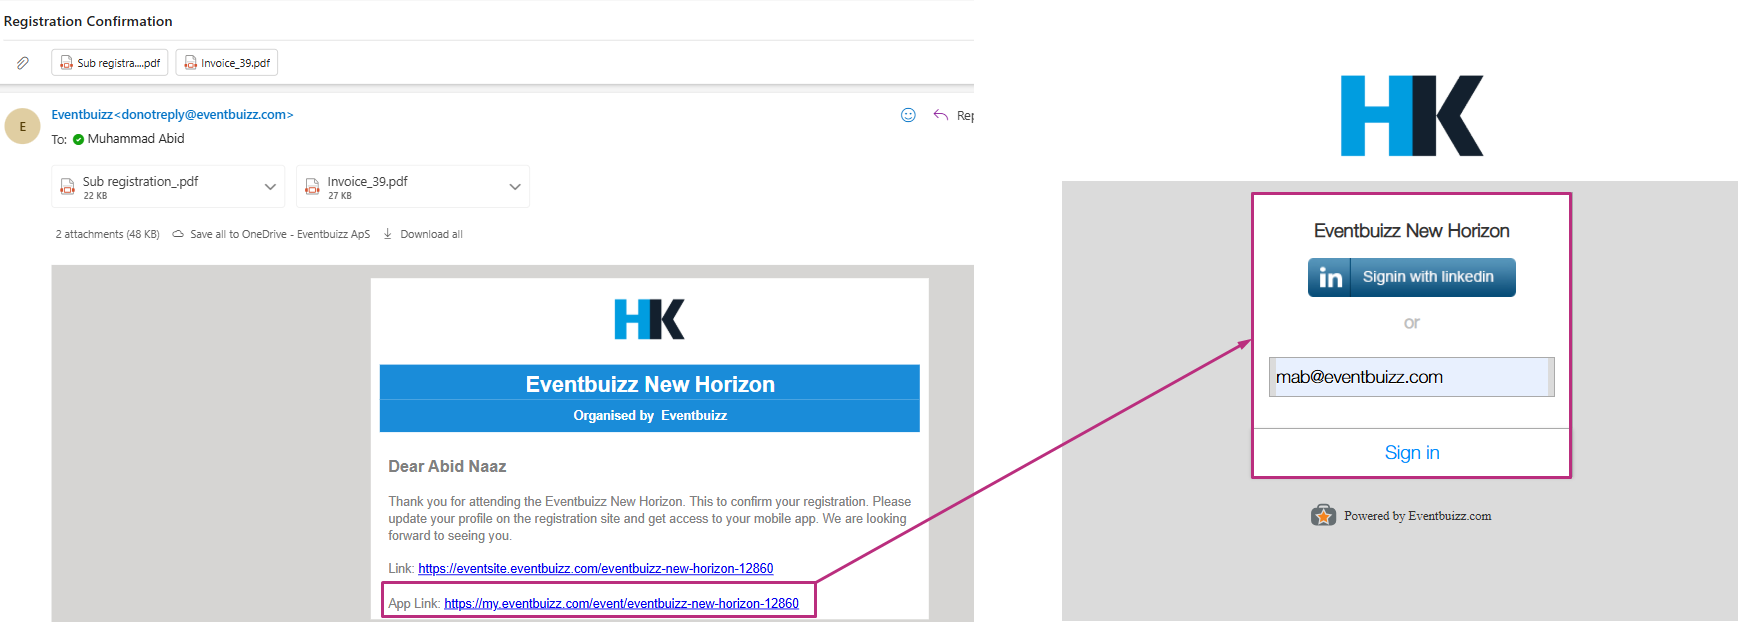
- After successful verification a registration confirmation mail will come to attendee in which app links are given for login to app.
Validate attendee invite
The Validate attendee invite setting restricts event registration to only those attendees who have been specifically invited. If an attendee is not on the invitation list, they will not be able to complete their registration.
How it works:
- When an attendee attempts to register, the system checks whether their email address appears in the invitation list.
- If the email is on the list, the attendee will be allowed to proceed with the registration.
- If the email is not on the list, the attendee will see an error message: “You are not invited to register for this event.”
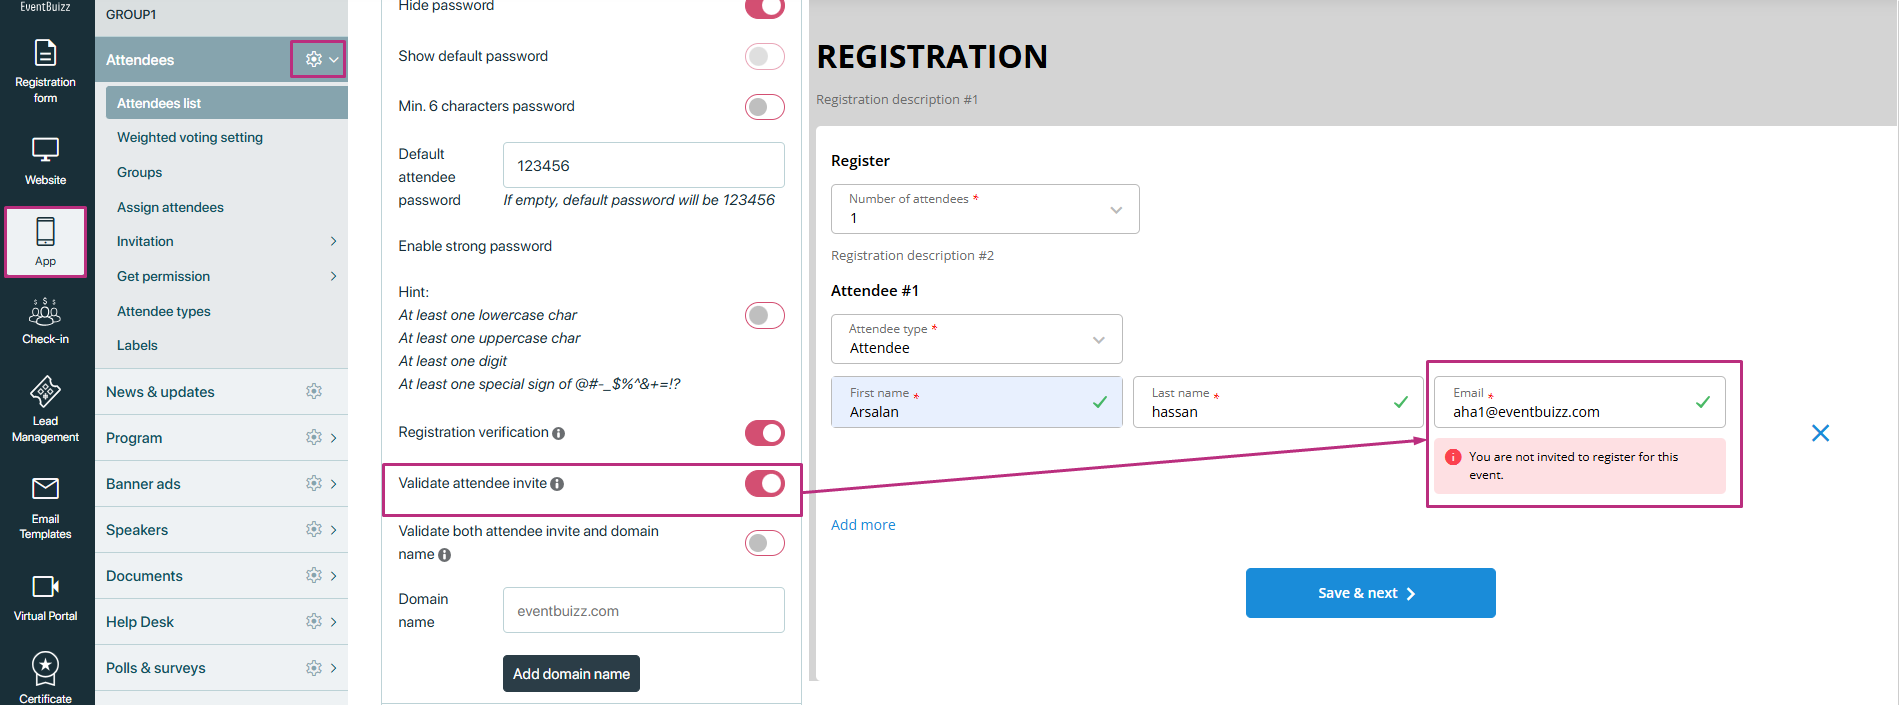
Here is the registered attendee invitation list, and the above attendee is not in the list that’s why showing this alert “You are not invited to register for this event” on the registration process.
Why it’s important:
This setting ensures that only people who have been formally invited to the event can register and participate. It helps prevent unauthorised registrations and ensures that the event is exclusive to the invited audience.
Validate both attendee invite and domain name
The Validate both attendee invite and domain name setting combines the verification of both the attendee’s invitation and their email domain. In addition to checking whether the attendee is on the invitation list, the system also ensures that the email domain provided matches an approved domain set in the registration settings.
How it works:
- The system checks if the attendee is part of the invitation list. If the attendee is on the list, the system proceeds to the next check.
- The system then compares the domain of the attendee’s email address with a predefined domain (or set of domains) that are approved for the event.
- For example, if the event is for employees of “CompanyA,” only attendees using email addresses like
@companyA.comwill be allowed to register.
- For example, if the event is for employees of “CompanyA,” only attendees using email addresses like
- If the domain of the attendee’s email does not match the allowed domain, they will see an error message and will not be able to complete their registration, even if they are invited.
- If the domain matches and they are on the invitation list, registration will proceed as usual.
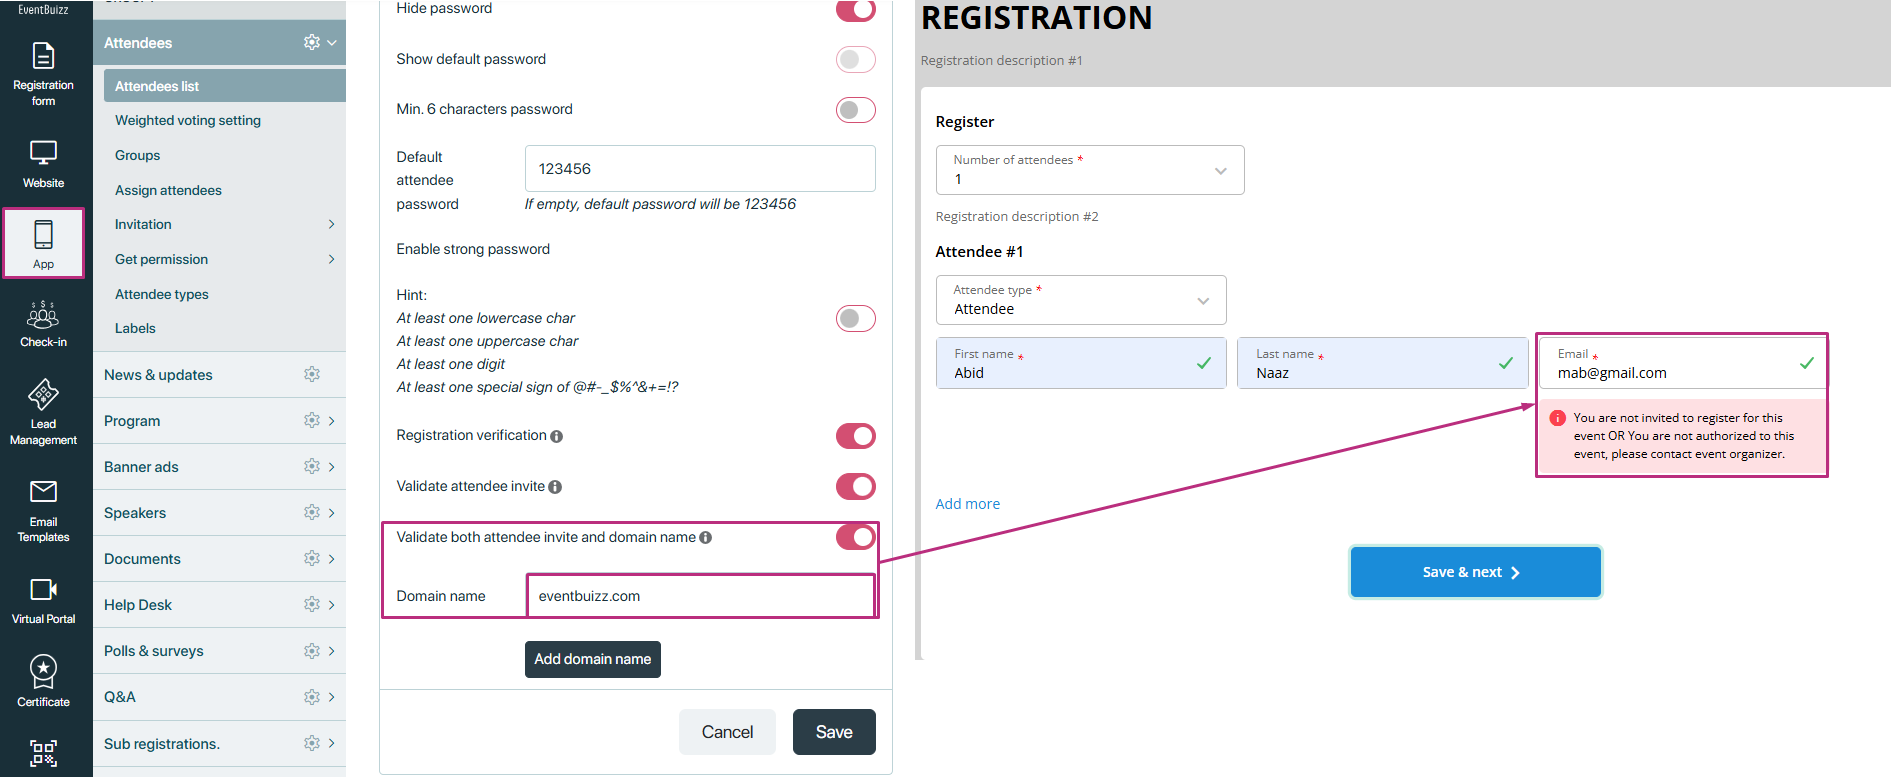
Why it’s important:
This setting ensures an additional layer of security by preventing attendees from using unauthorised email domains to register, even if they were invited. This is particularly useful for corporate or organisational events where only attendees from specific companies or domains should be allowed to register.
Fields Management
Fields management
The Fields management section in the attendee settings allows event organisers to customise how attendee profiles are displayed and managed. It provides options to configure which fields are visible to attendees, what data can be edited, and how that data is organised in their profile. This feature is designed to streamline the process of personalising attendee experiences and gathering necessary information, all while maintaining control over the event’s data structure.
Within Fields management, there are two main sub-sections that define how data fields are handled on attendee profiles:

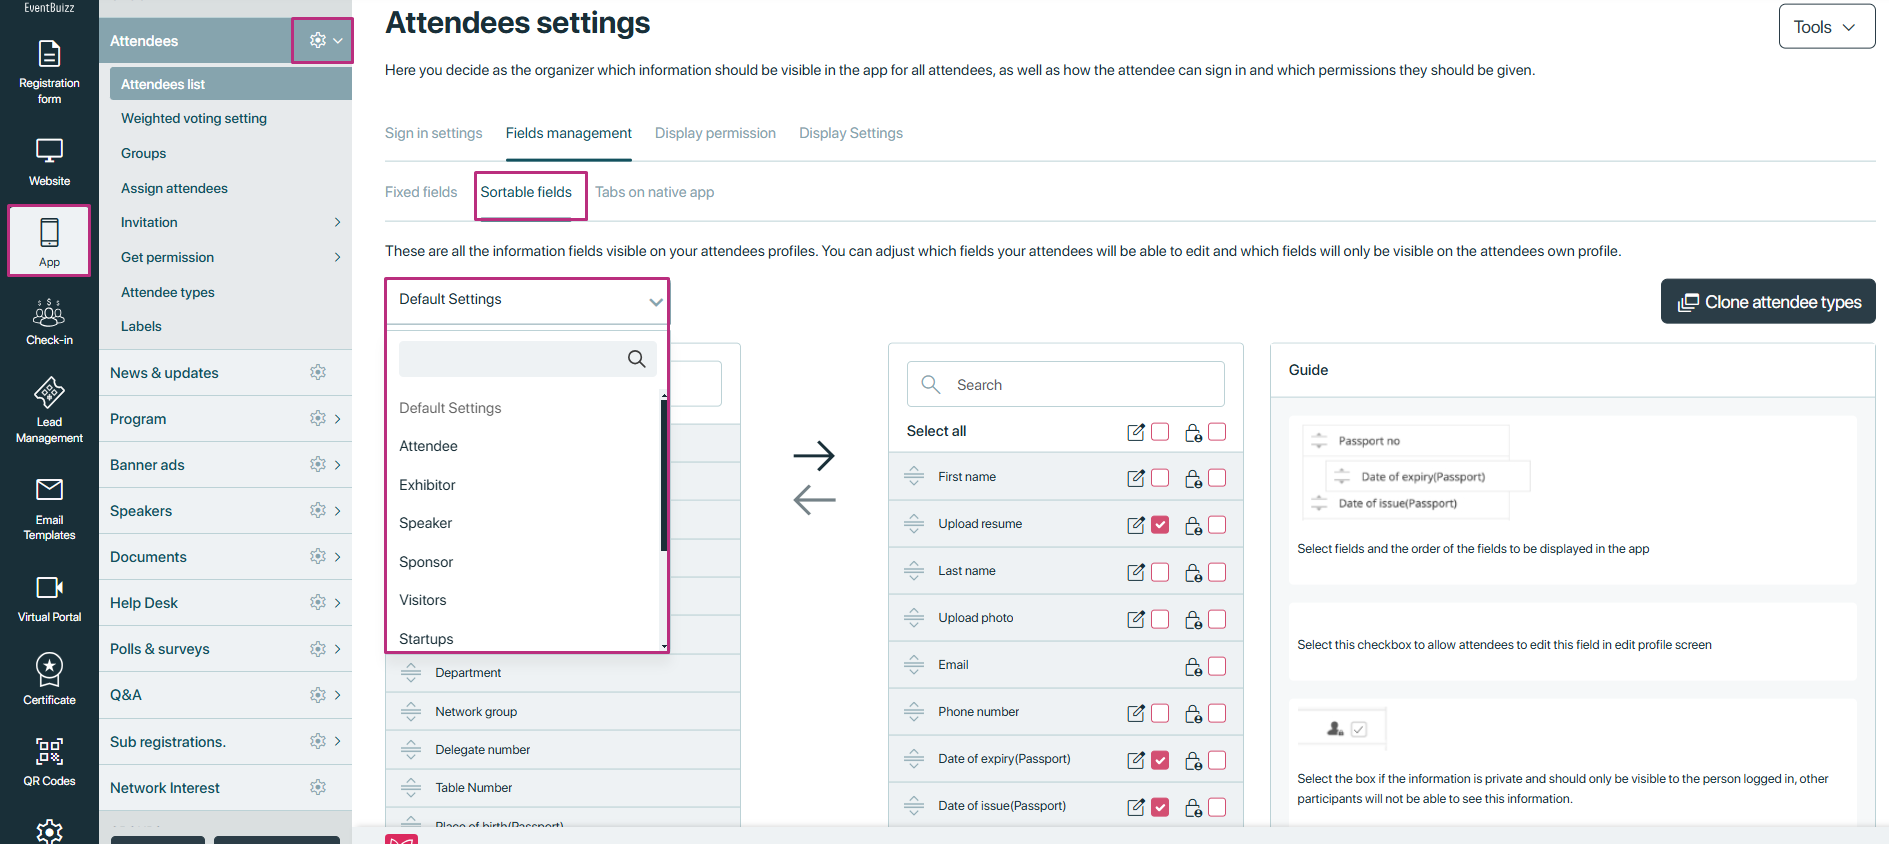
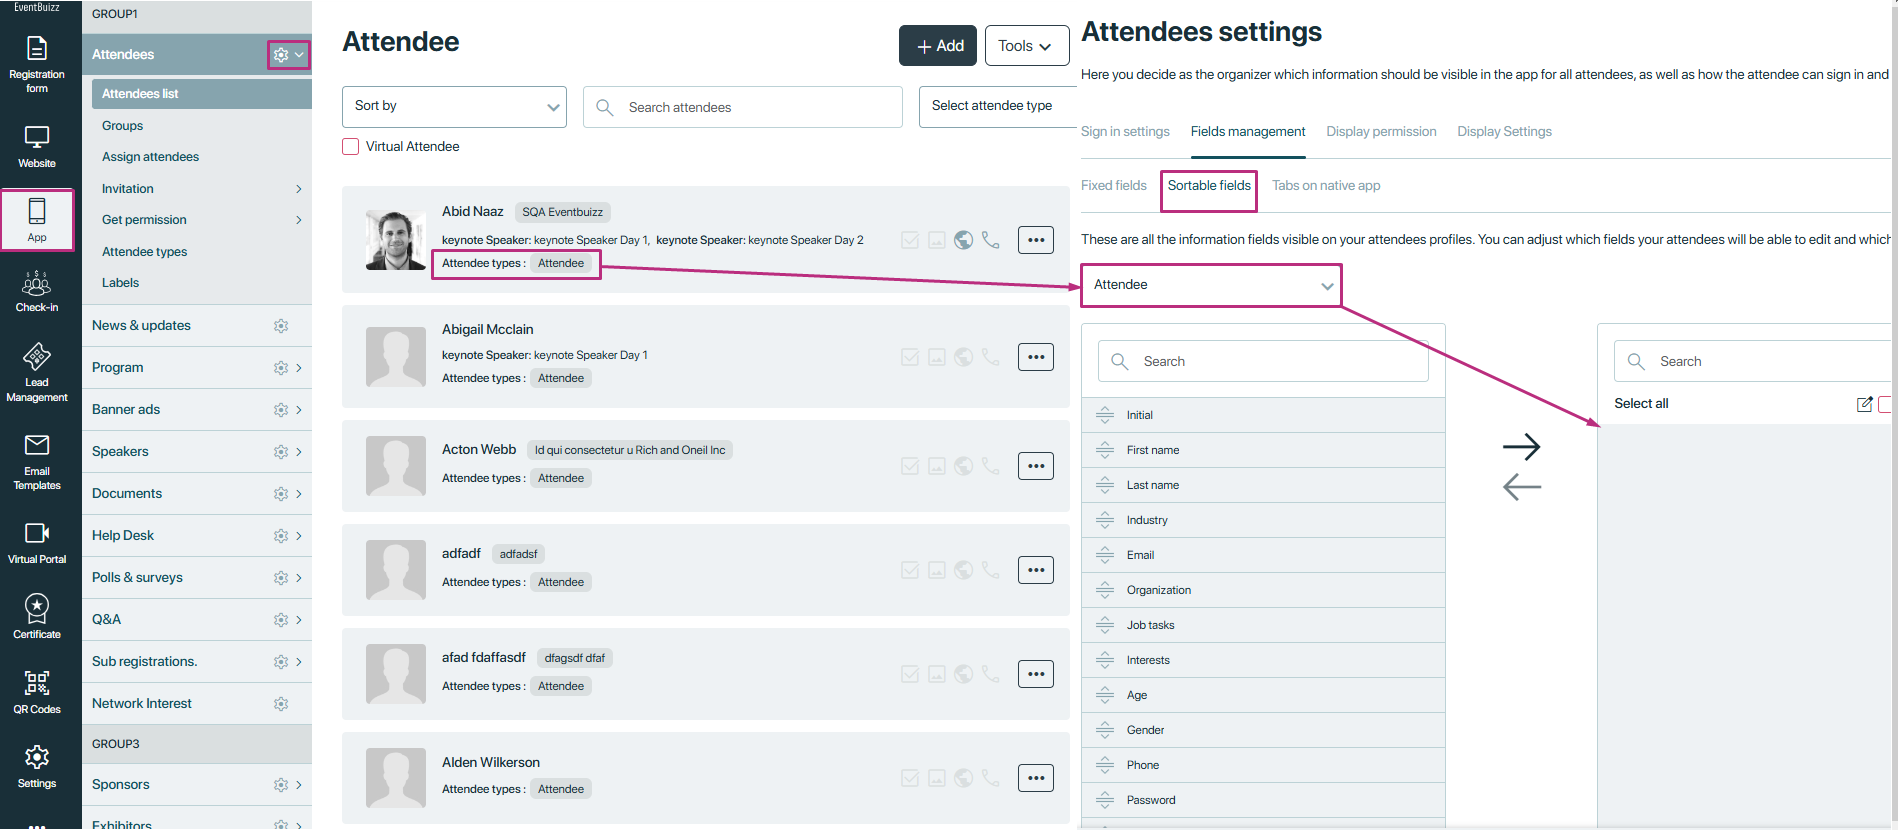
Sortable fields
Sortable fields are dynamic information fields that can be visible and editable by attendees. These fields capture various pieces of data (e.g., name, contact details, job title) and allow event organisers to control which fields attendees are allowed to edit and which fields are read-only.
Purpose:
- Edit ability control: Organisers can set whether specific fields are editable by the attendee (e.g., email, phone number) or are only visible to the attendee on their profile (e.g., registration ID, event location).
- Sorting capability: Fields can be arranged in a custom order, allowing organisers to prioritise what is most important for attendees to see or update.
Example of Sort able fields:
- Name
- Contact details (email, phone number)
- Organisation, Job Title
- Custom fields like “Dietary Restrictions” or “Special Requests”
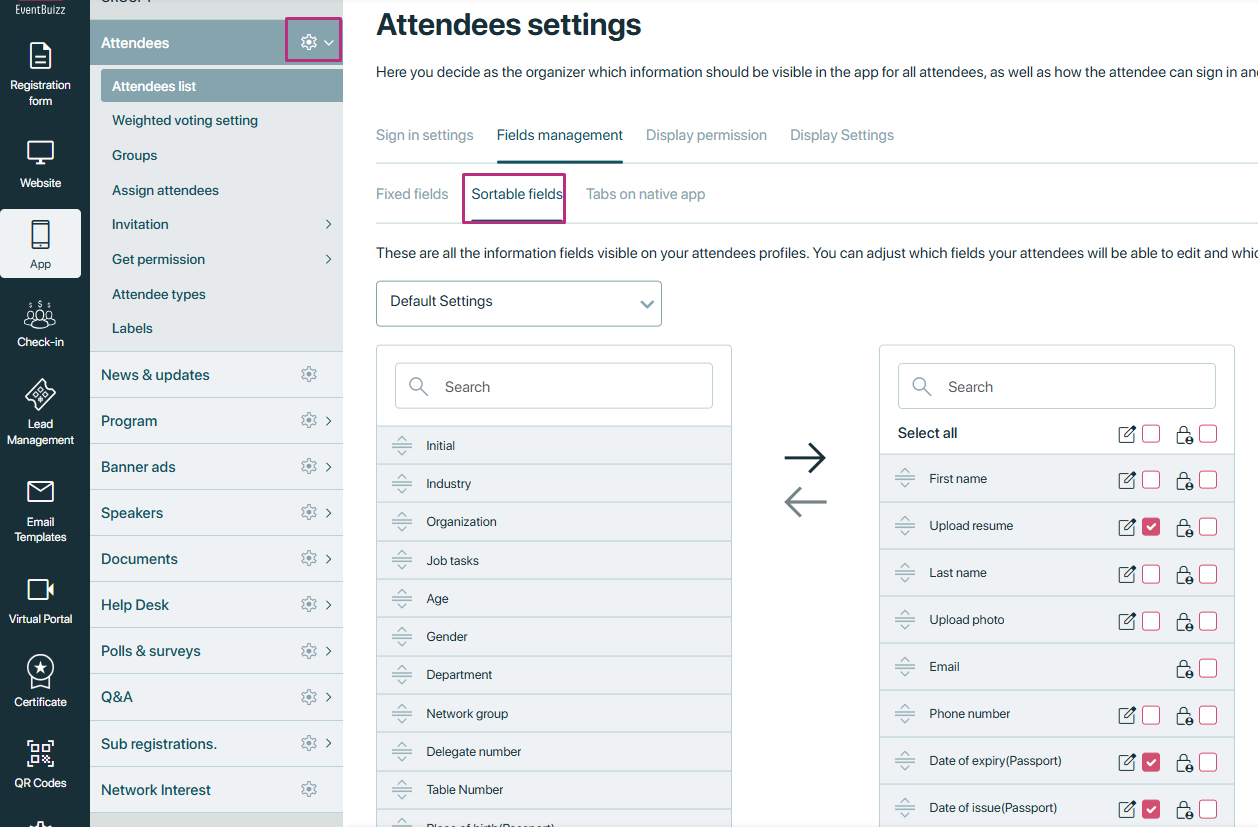
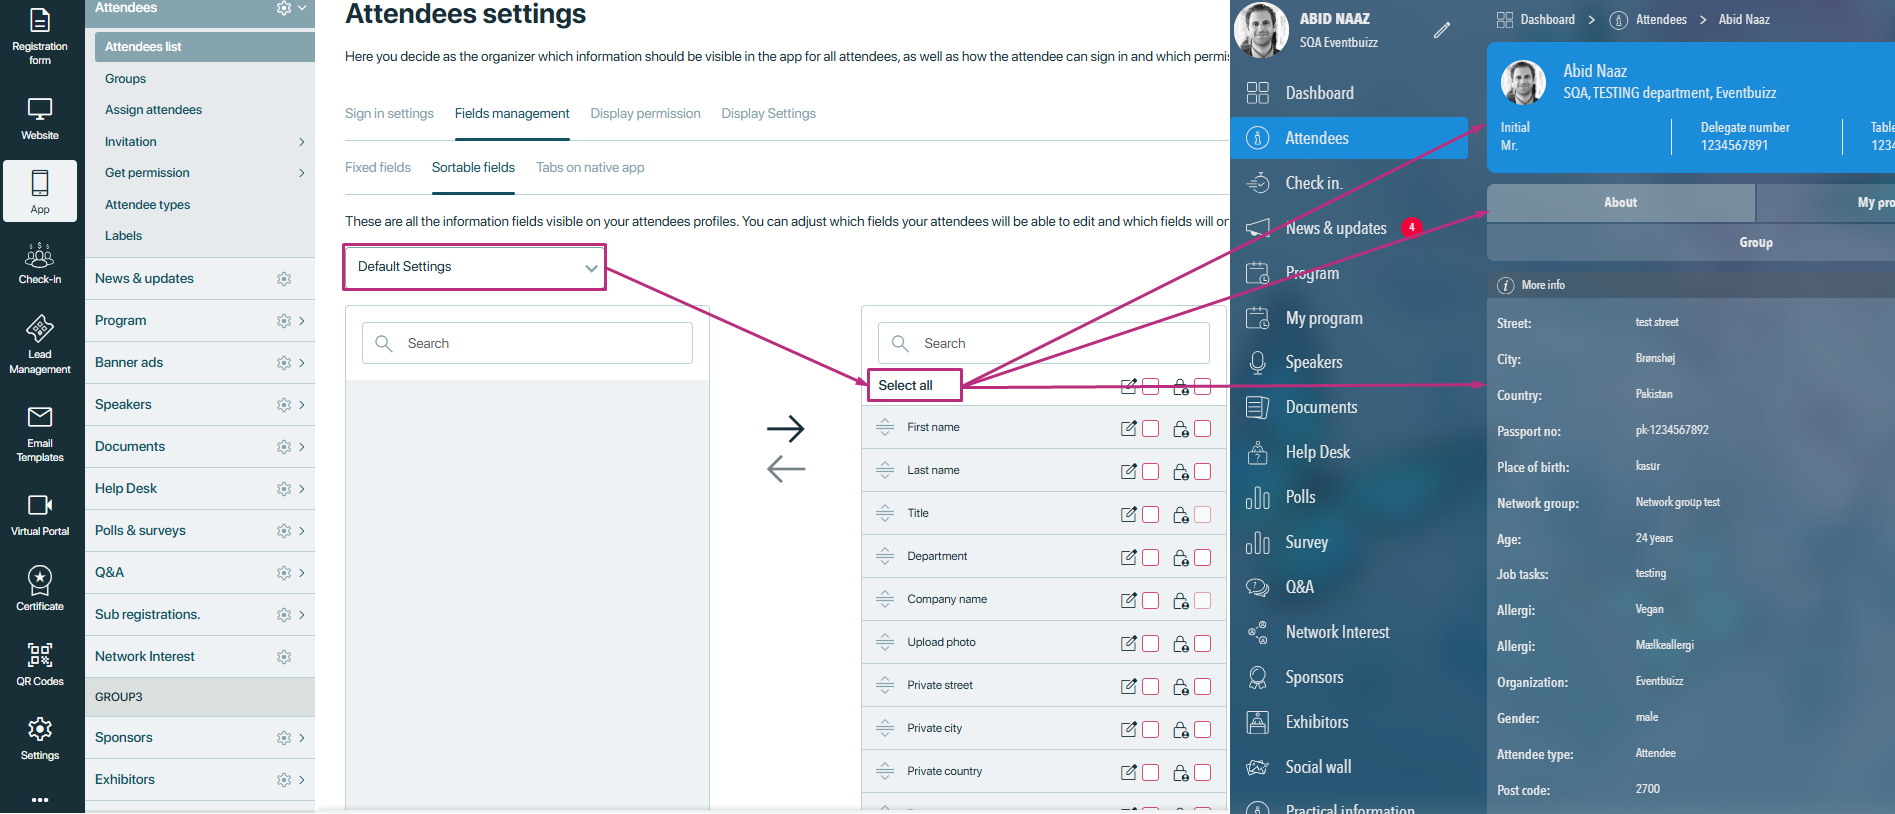
- All the created attendee types will show in the drop down of the sort field, where organiser can set the specific required fields for that attendee types.
- As per the Active sort fields against that attendee type data will show in attendee detail or profile.
- Let suppose if login attendee type is the attendee, and he can see only the active sort fields data in his profile.
Here is the example login attendee type is the attendee, and following given below sort fields are active by the organiser, and same fields data is representing in the edit profile of that attendee.
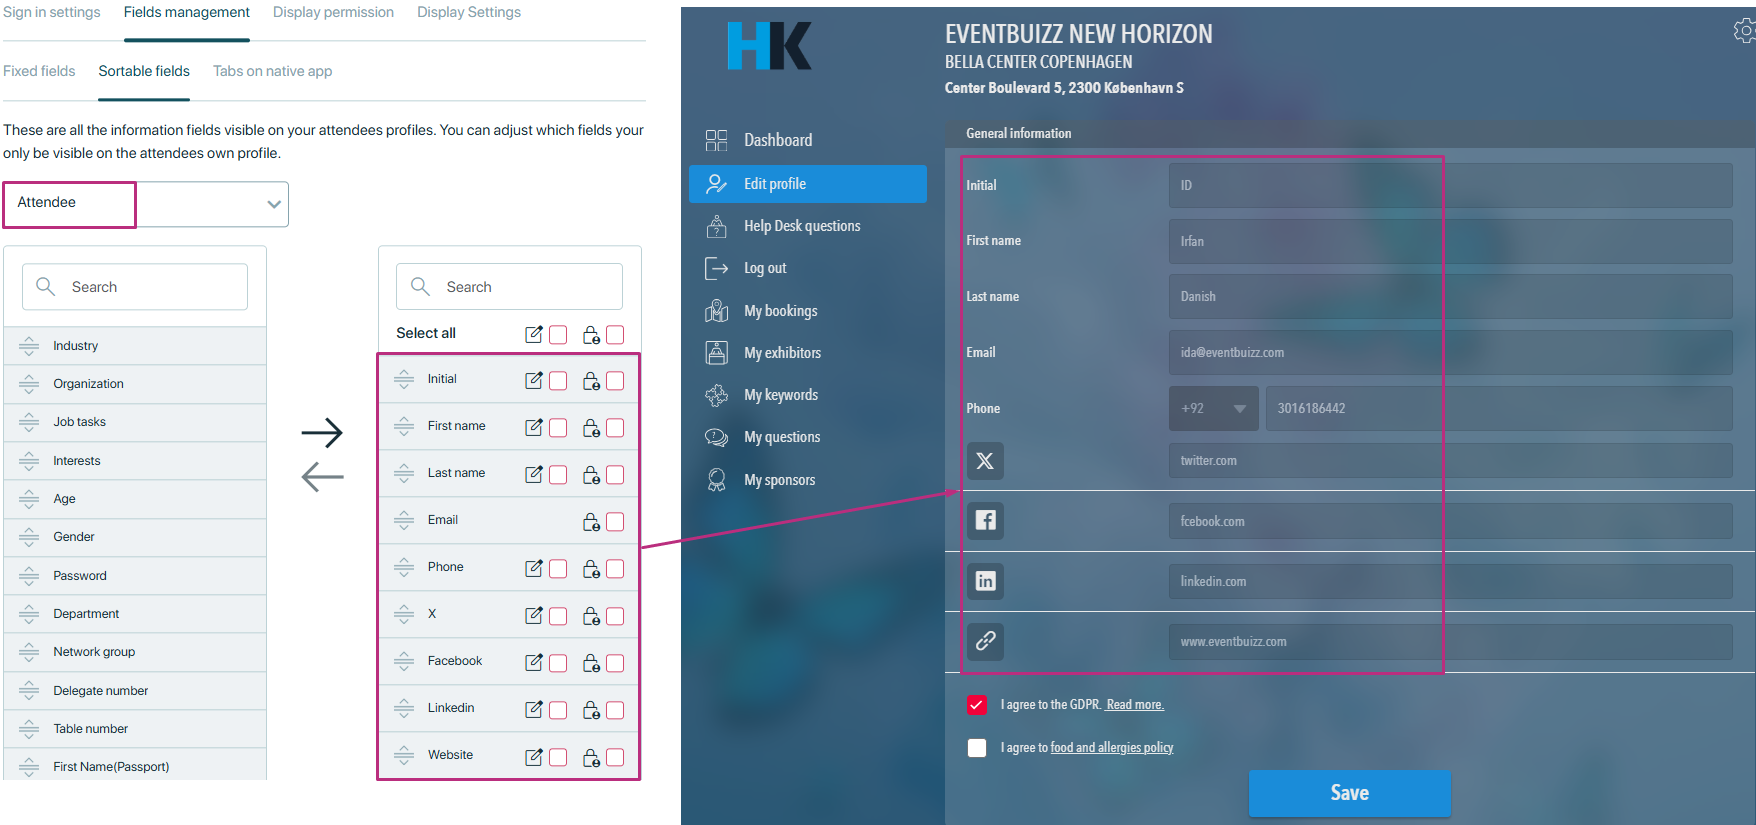
Why it’s important:
Portable fields give event organisers flexibility in tailoring attendee profiles to their needs. By controlling which fields can be edited, organizers can ensure that essential data remains unchanged, while allowing attendees to update or personalize other aspects of their profiles (e.g., contact information, preferences). The ability to sort fields helps organize the profile data in a more intuitive and useful way.
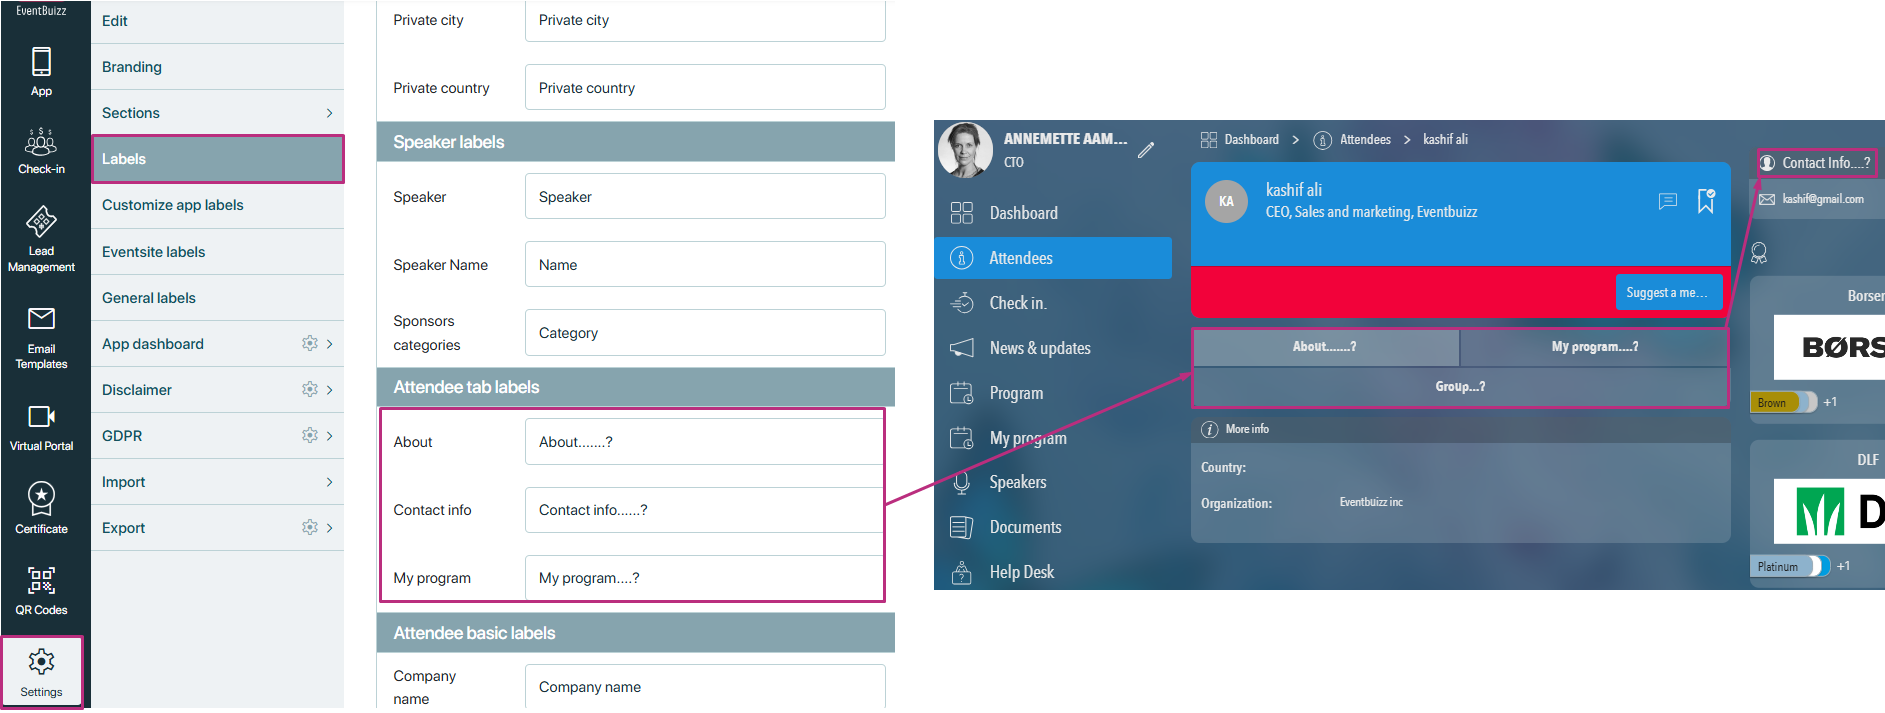
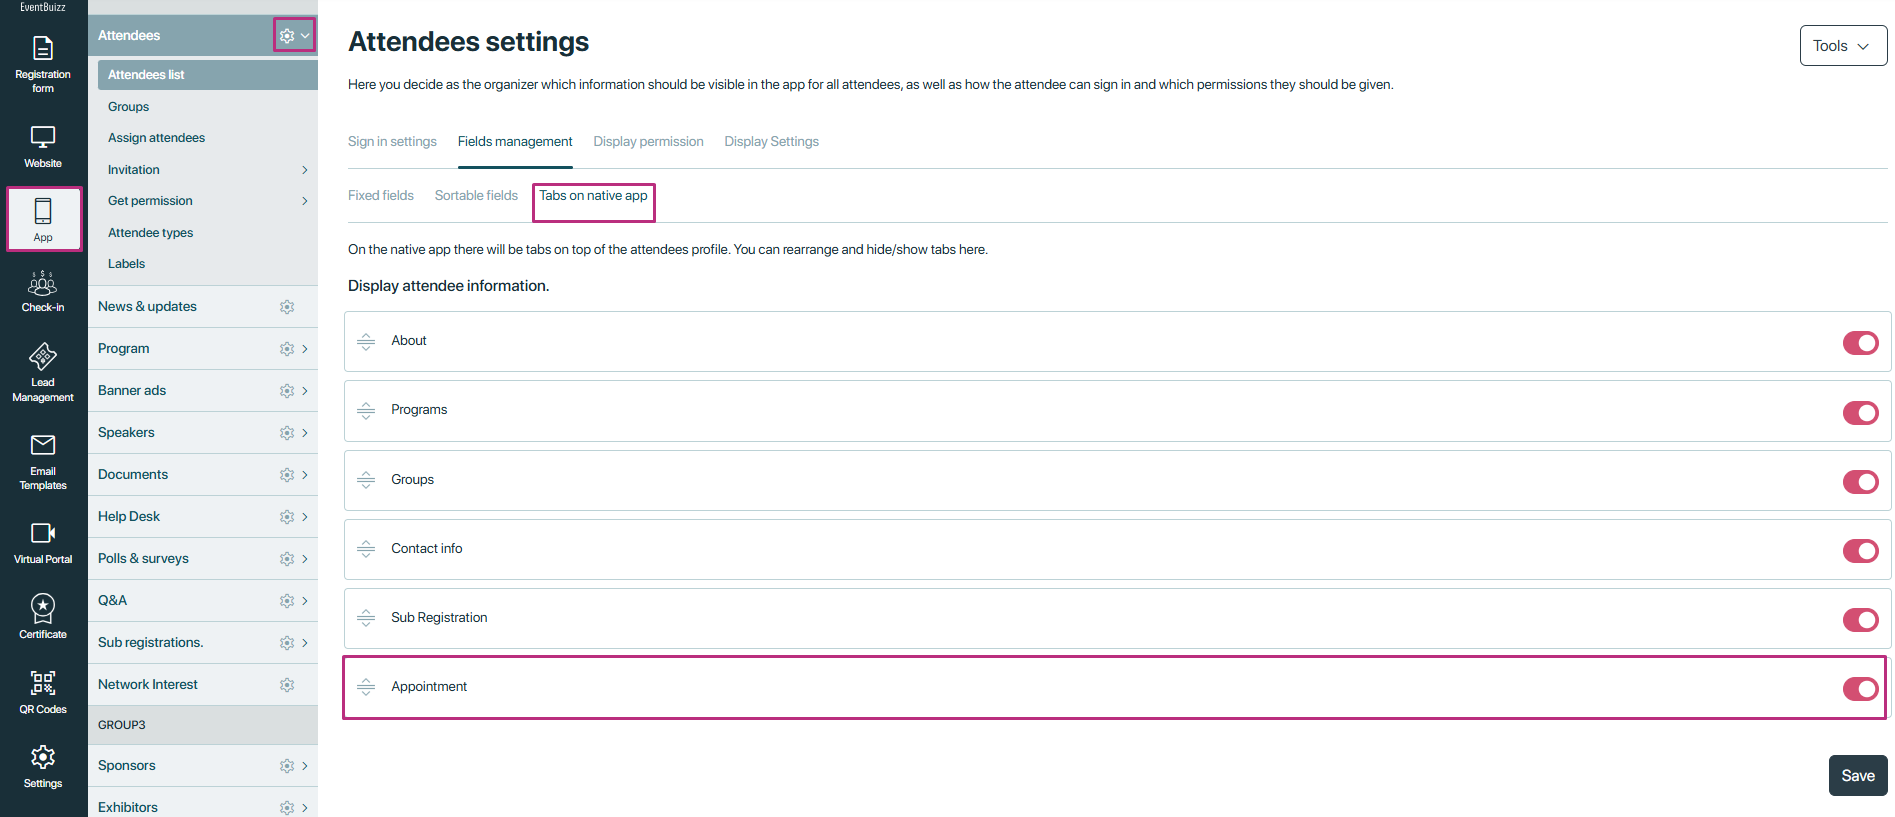
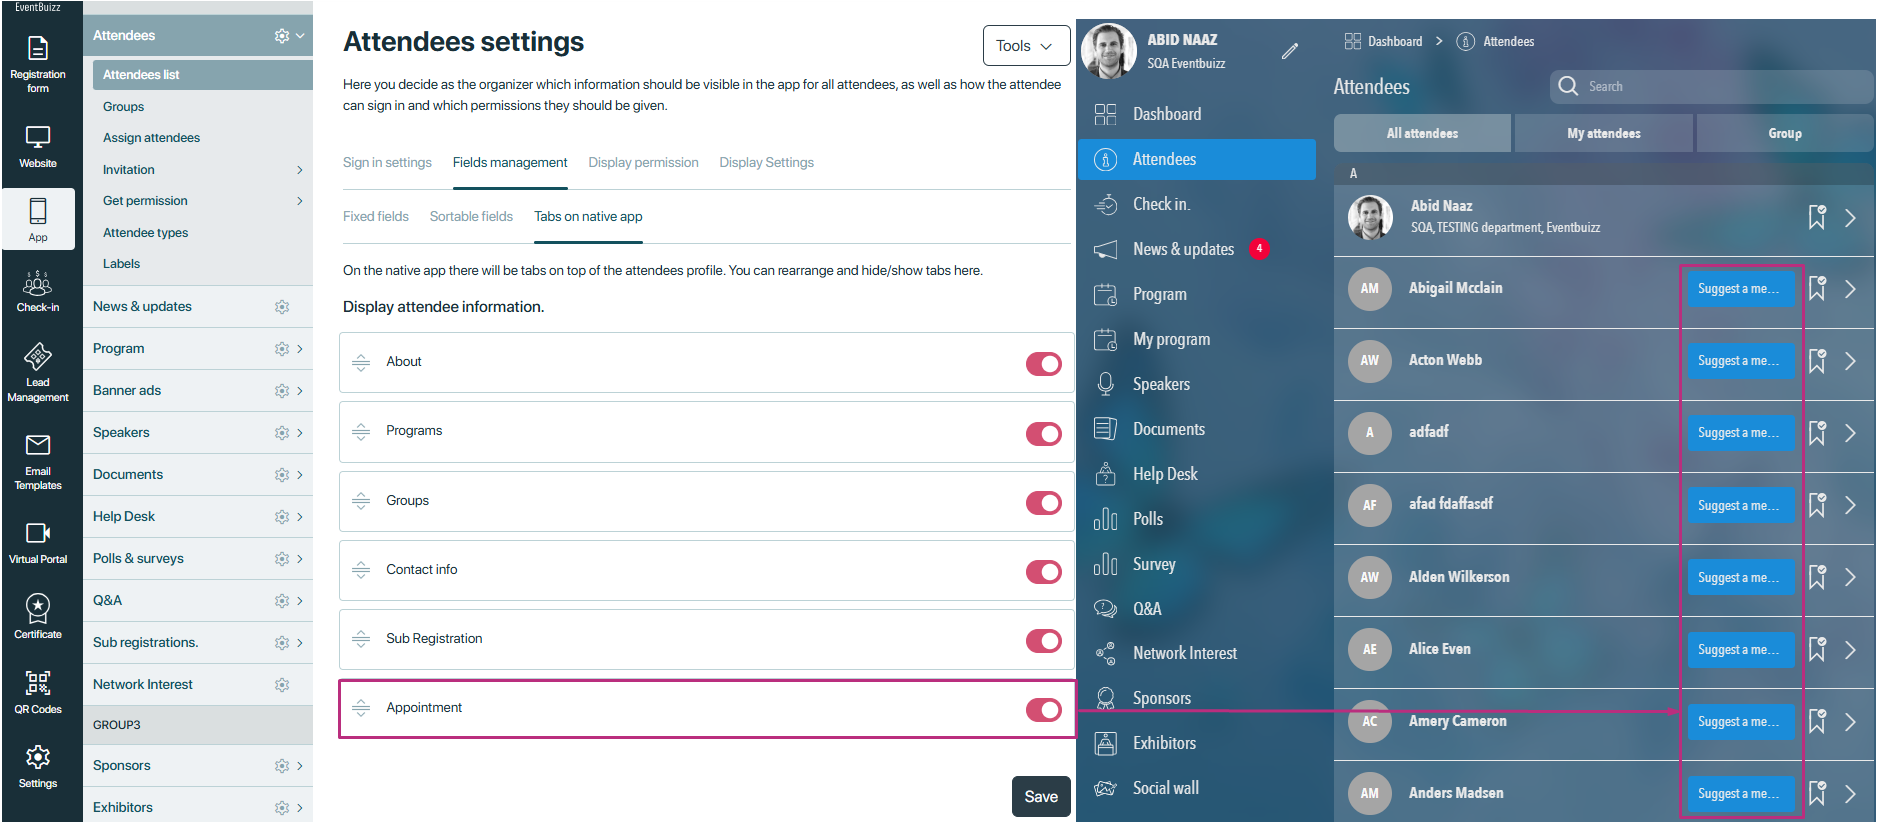
Tab visibility settings (on the native and web app)
This sub-section allows the event organiser to control which tabs are visible on an attendee’s profile within the event app. The tabs are used to display various sections of the attendee’s profile, such as personal details, agenda, groups, and more. Organisers can toggle each tab on or off depending on what information they want to show or hide from the attendees.
Purpose:
- Customize profile experience: Organisers can choose to display or hide specific sections of the profile, depending on the information they want attendees to access or update.
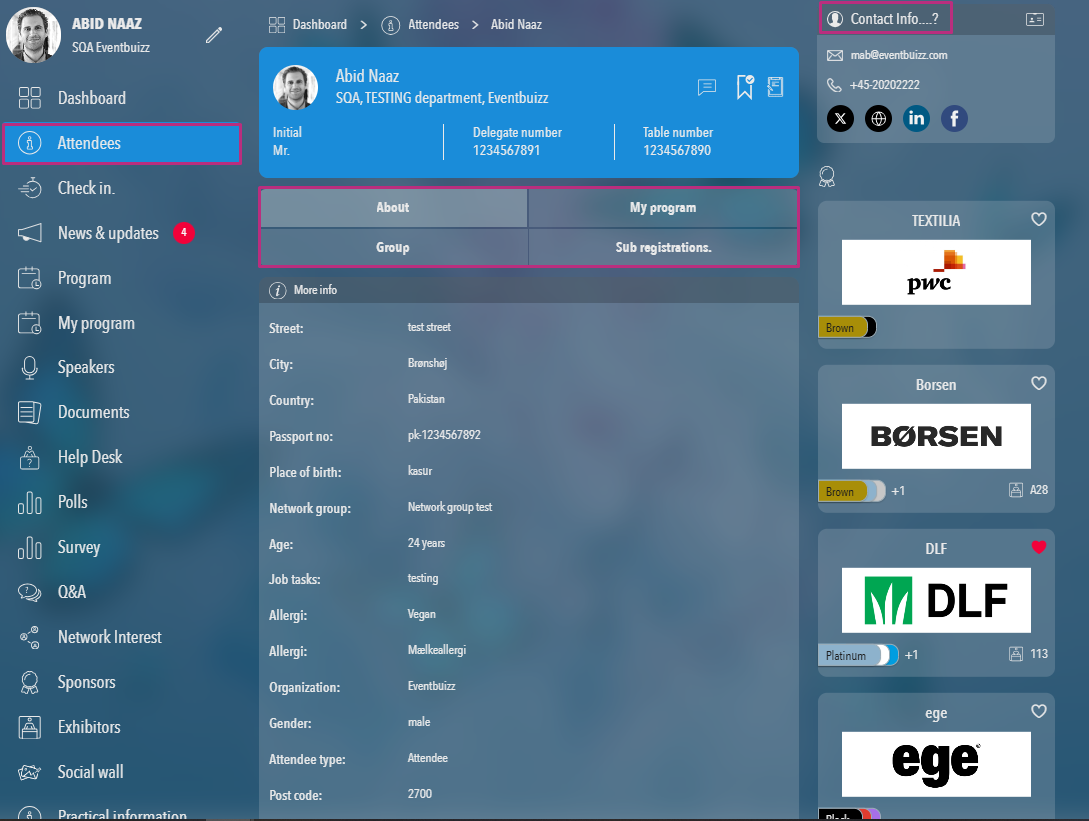
- Tabs and Sections: The app will have predefined tabs such as About, Programs, Groups, Contact info, Sub registration, and Appointment, each representing different aspects of the attendee’s registration and event interaction.
Example of Tabs:
- About: Basic information like name, photo, organisation.
- Programs: Sessions, workshops, or tracks the attendee has registered for.
- Groups: Group affiliations or networking groups the attendee is part of.
- Contact info: Email, phone number, and other contact details.
- Sub registration: Details about any secondary registration or additional items the attendee has signed up for (e.g., workshops, meals).
- Appointments: Scheduled one-on-one meetings or networking appointments.
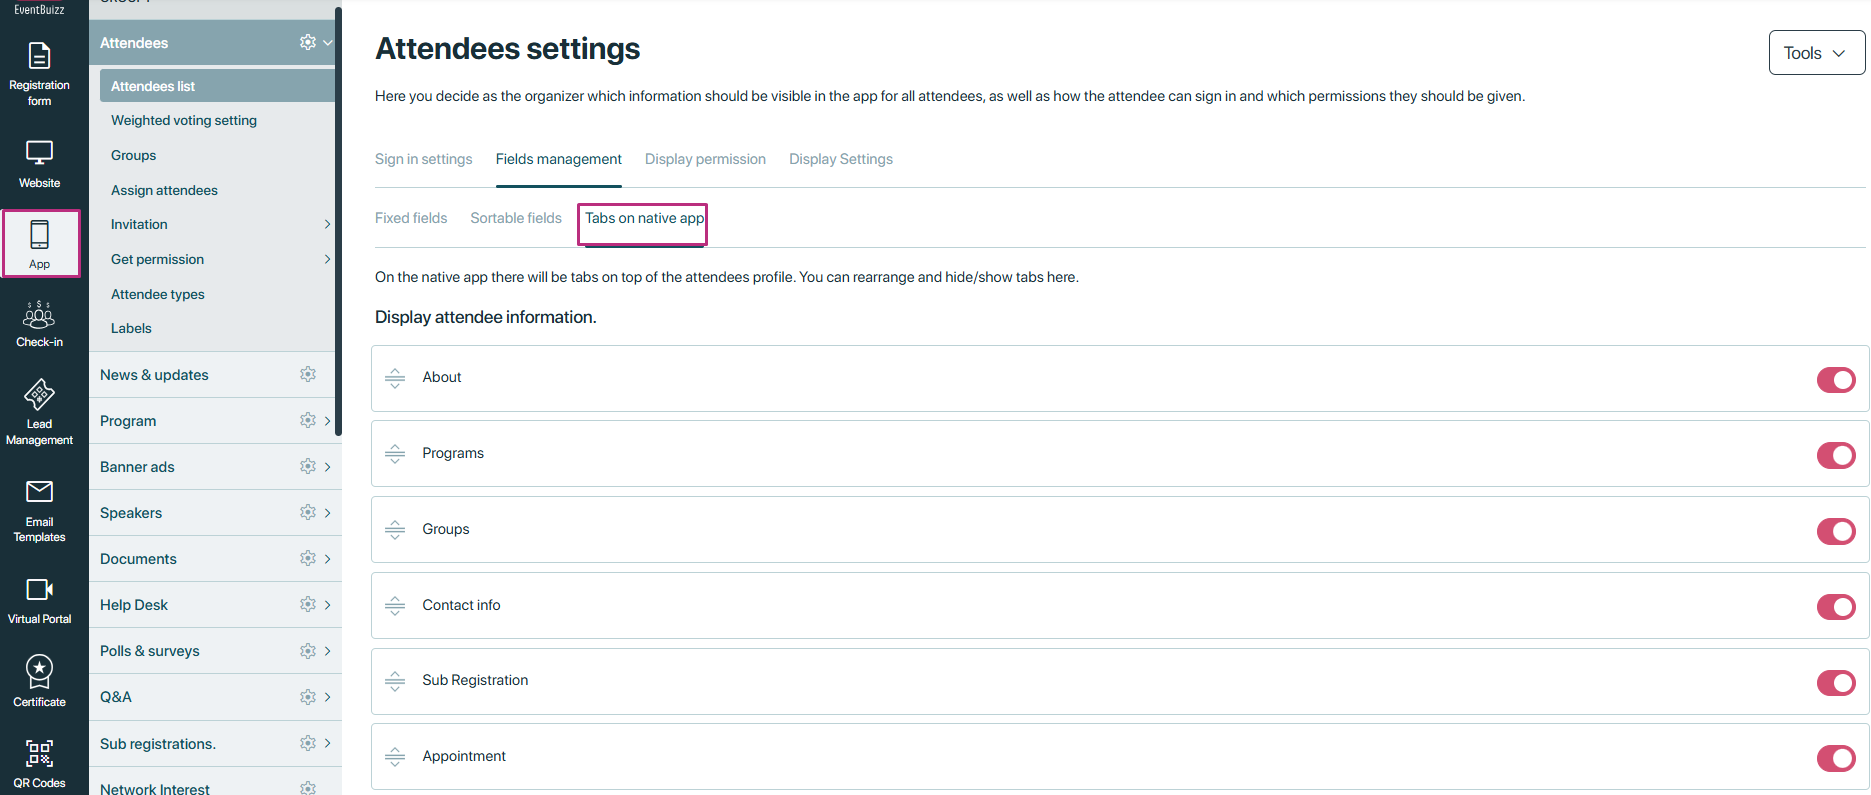
- Organiser can hide or show to any tab base on the organiser need or specific event related requirements.
- Below a view is given how active tabs will show the relevant fields data in the attendee detail.
Why it’s important:
This setting provides flexibility in how attendee profiles are displayed and ensures that the right information is easily accessible to attendees. By controlling which tabs are visible, event organizers can streamline the user interface, making it simpler for attendees to navigate and find the information they need. For example, organizers might want to hide certain tabs (like Appointments) for attendees who have not scheduled any meetings, or they might want to highlight Sub Registration for those who have additional sign-ups.
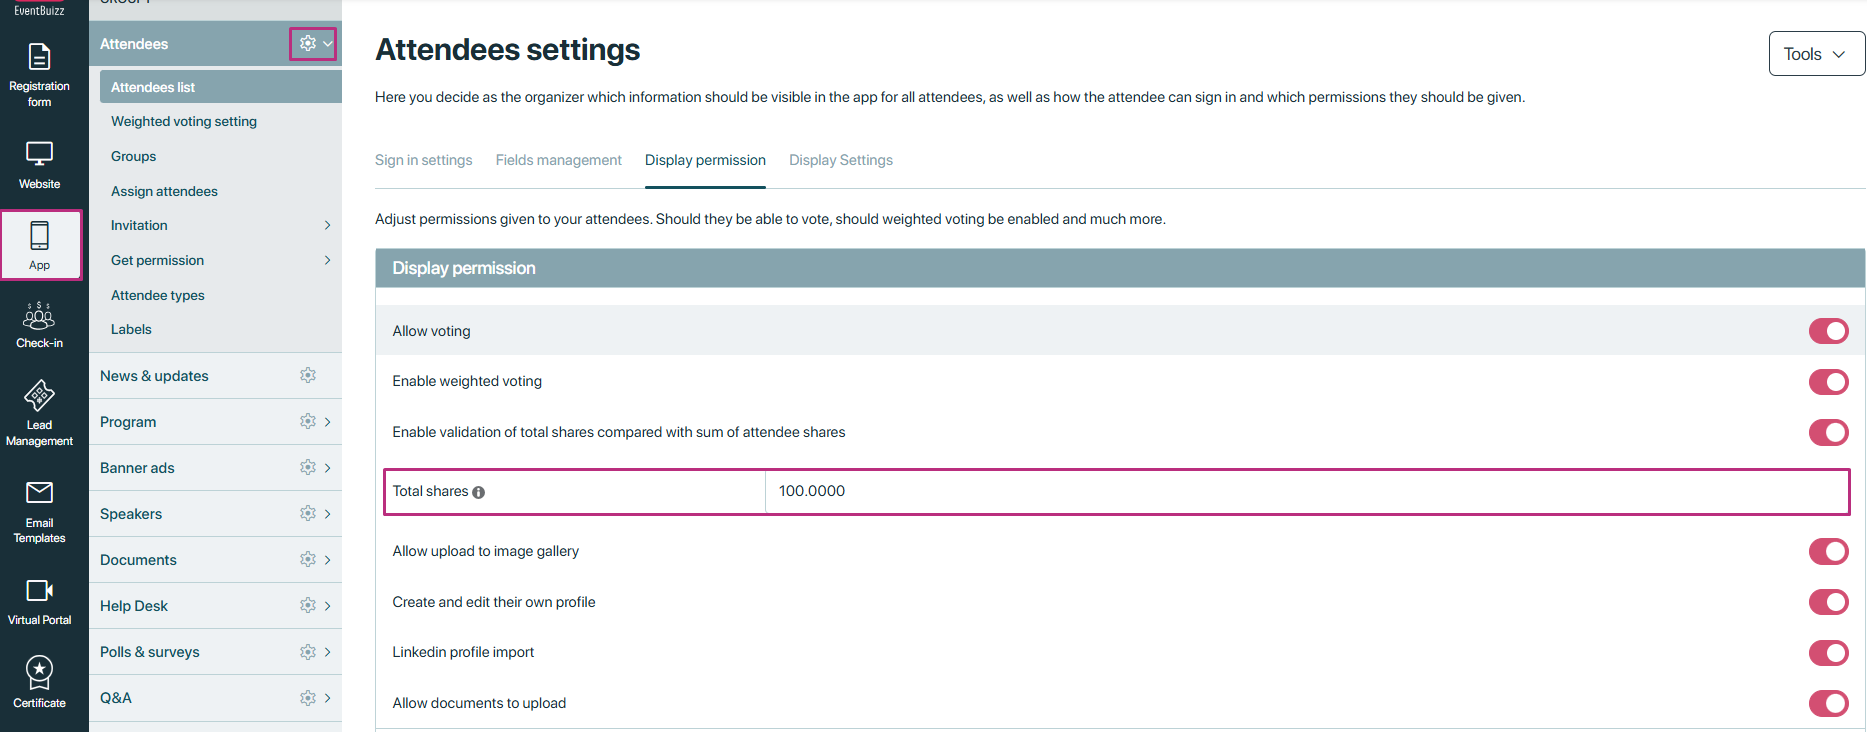
Display permission
Display permission
The Display permission section within attendee settings allows event organisers to control what actions and permissions are granted to attendees during the event. This section covers a wide range of activities and interactions that attendees can participate in, such as voting, uploading content, and customizing their profiles. By adjusting these settings, organizers can create a more controlled and engaging environment for event participants while ensuring the integrity and fairness of event processes.
The Display permission settings provide flexibility in customising attendee interaction, enhancing engagement, and ensuring the event’s operations run smoothly. Whether it’s allowing attendees to vote on decisions, contribute to image galleries, or manage their personal profiles, these settings shape the overall attendee experience.
Display permission settings
There are several settings related to display permissions are available in the attendee settings, organiser can use them as per their requirements. Detail is given below about all available settings in “display permissions” tabs.
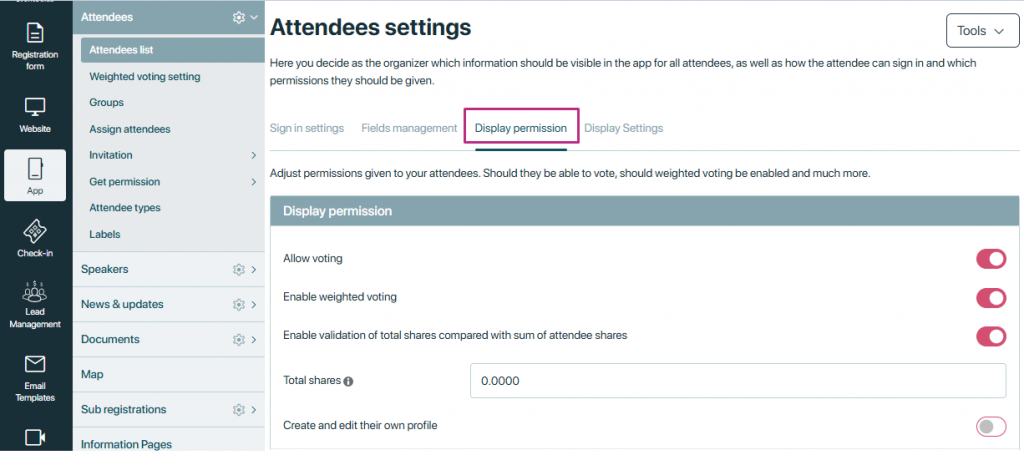
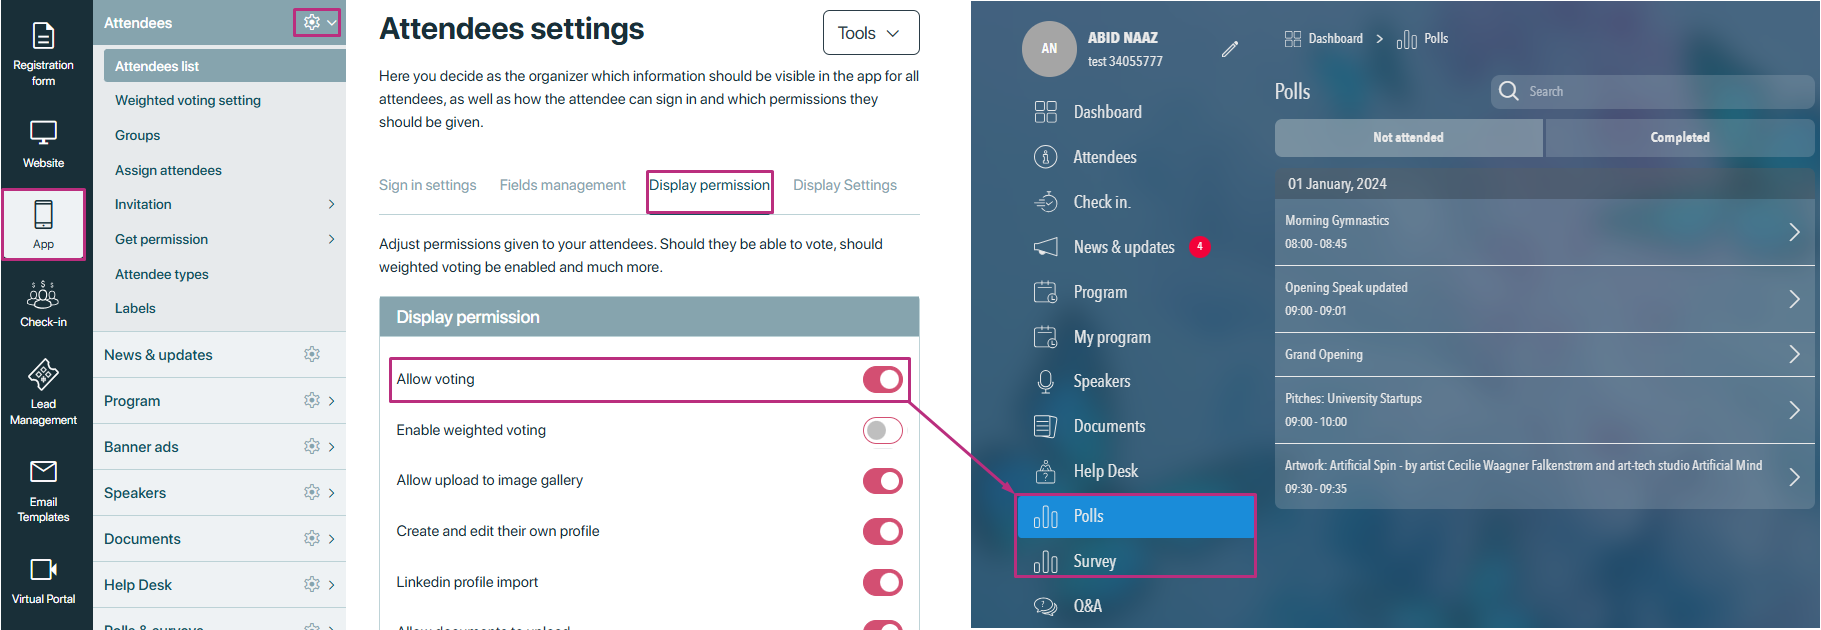
Allow voting
This setting allows attendees to participate in voting activities during the event. Voting can be used for various purposes, such as polls, surveys, or other interactive sessions where attendees can express their opinions or preferences on specific topics, questions, or event-related decisions.
- When allow voting setting is enabled, attendee can access the poll and survey in web app and can answer the poll and surveys.
- And if this setting is off, then attendee can’t able to access polls and surveys, either poll and surveys are available and there module settings are also enabled.
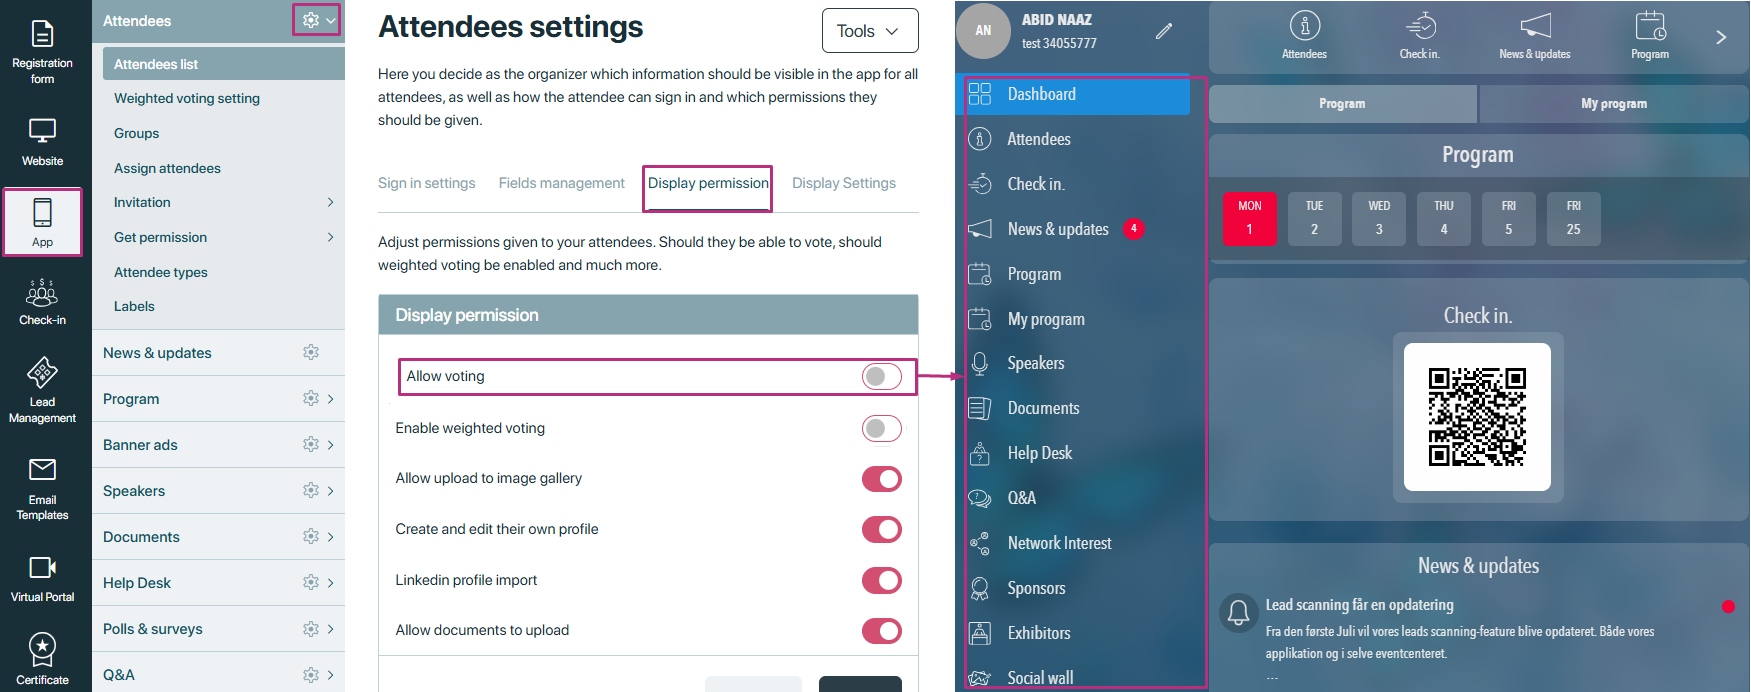
In add/ edit attendee, there is also an option for “allow to vote”. If the main setting in display permission is OFF and individual attendees have enabled this setting in their profiles, they will bypass the main setting and still have permission to vote.
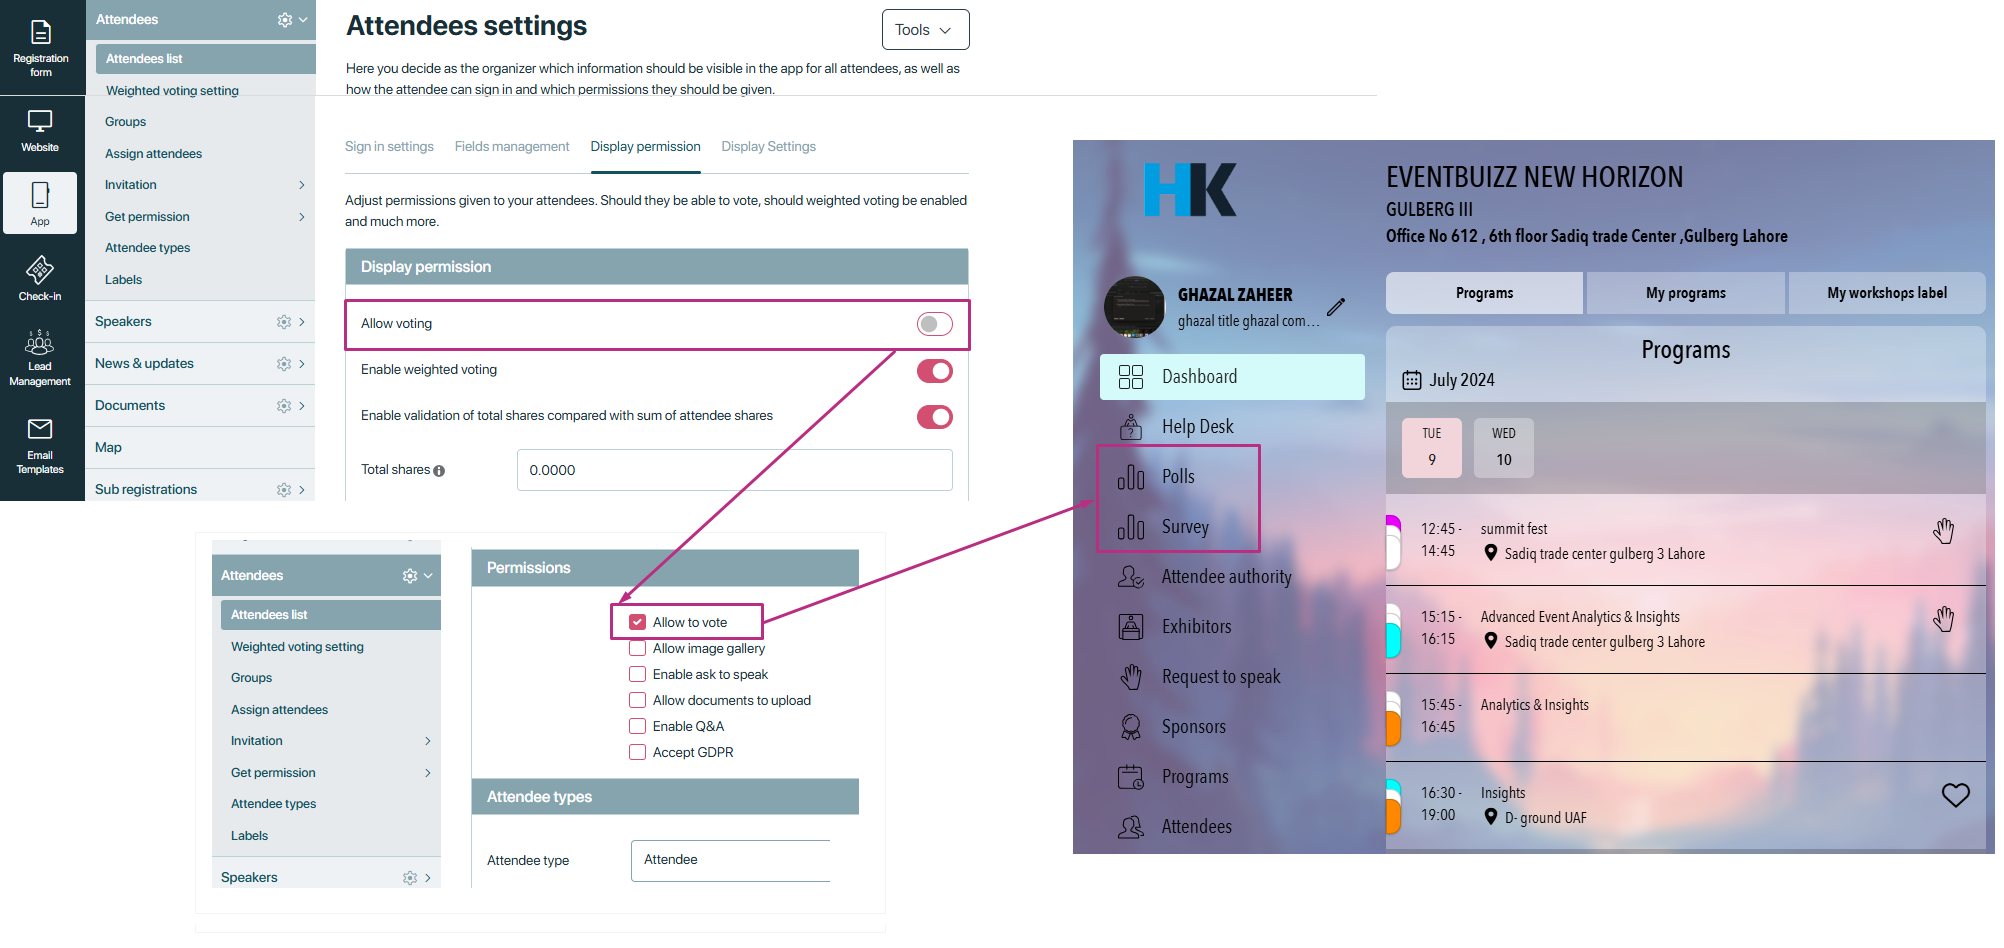
Enable weighted voting
The Enable weighted voting setting allows the event organiser to assign different values or weights to the votes of attendees, based on predefined criteria such as their authority, expertise, or role within the event (e.g., VIPs, speakers, sponsors).
For more detail how enable weighted voting settings works please click here
Purpose:
- Fairer voting: By applying weights, the votes of more influential attendees (e.g., experts or panellists) can have a greater impact on decisions or outcomes, ensuring that important perspectives are given more consideration.
- Flexibility: Weighted voting can be adjusted based on the event’s goals—such as giving more influence to specific groups or using it to reflect different levels of expertise in certain areas.
- Enhanced decision-making: Ensures that the most knowledgeable or relevant stakeholders have a proportionally higher impact on voting results.
Create and edit their own profile
This setting enables attendees to create and edit their own personal profiles within the event platform. Attendees can customise their profiles by adding personal information, photos, professional backgrounds, and other relevant details that reflect their interests and role in the event.
Purpose:
- Customisation: Attendees can personalise their profiles, making it easier for others to learn about them and for the attendee to stand out within the event community
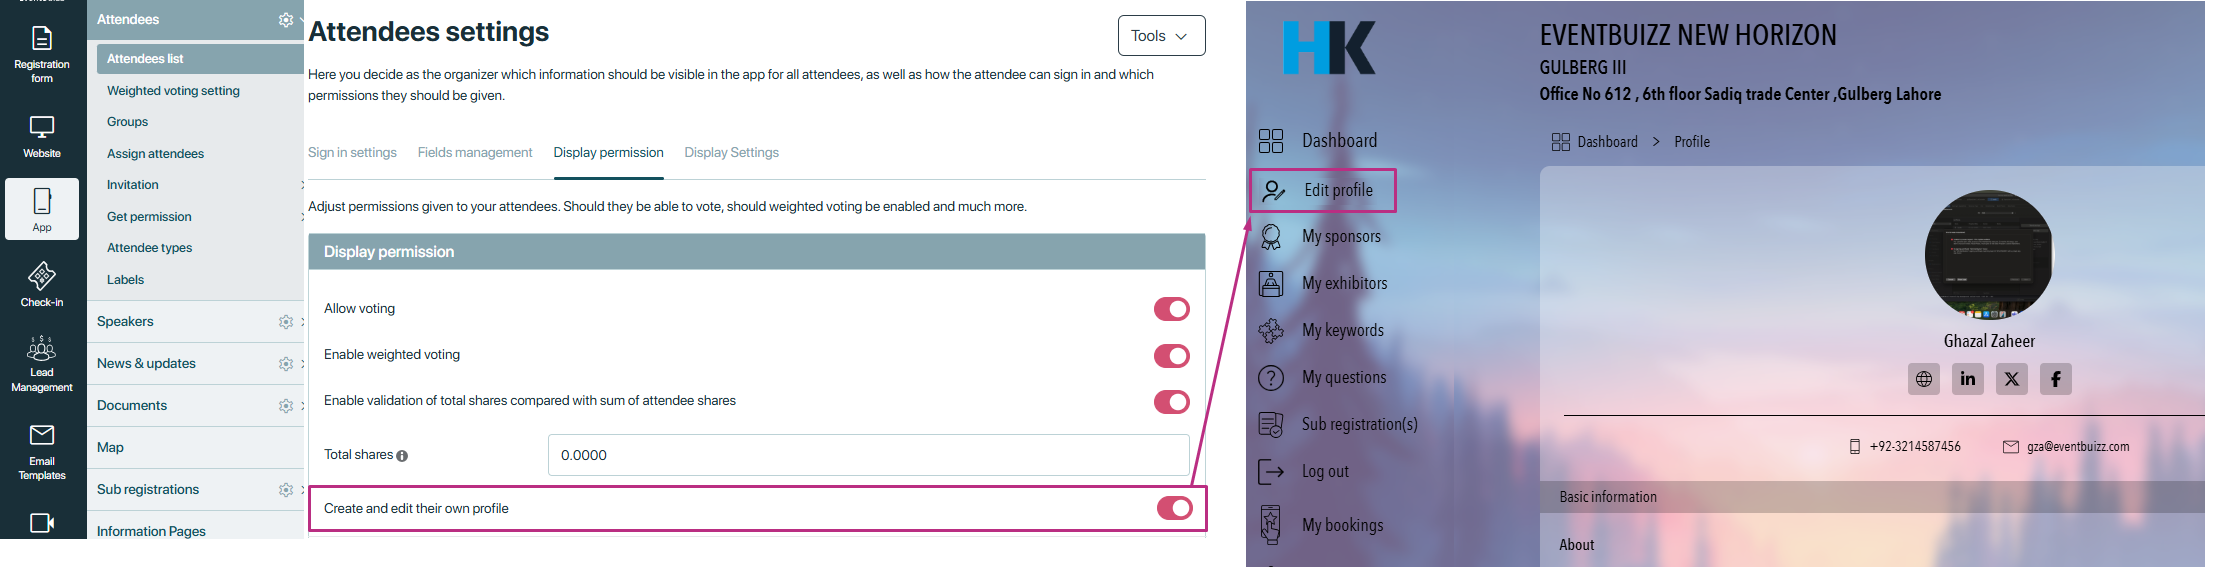
- If this setting is off, then attendee can only view the profile, not able to edit it.

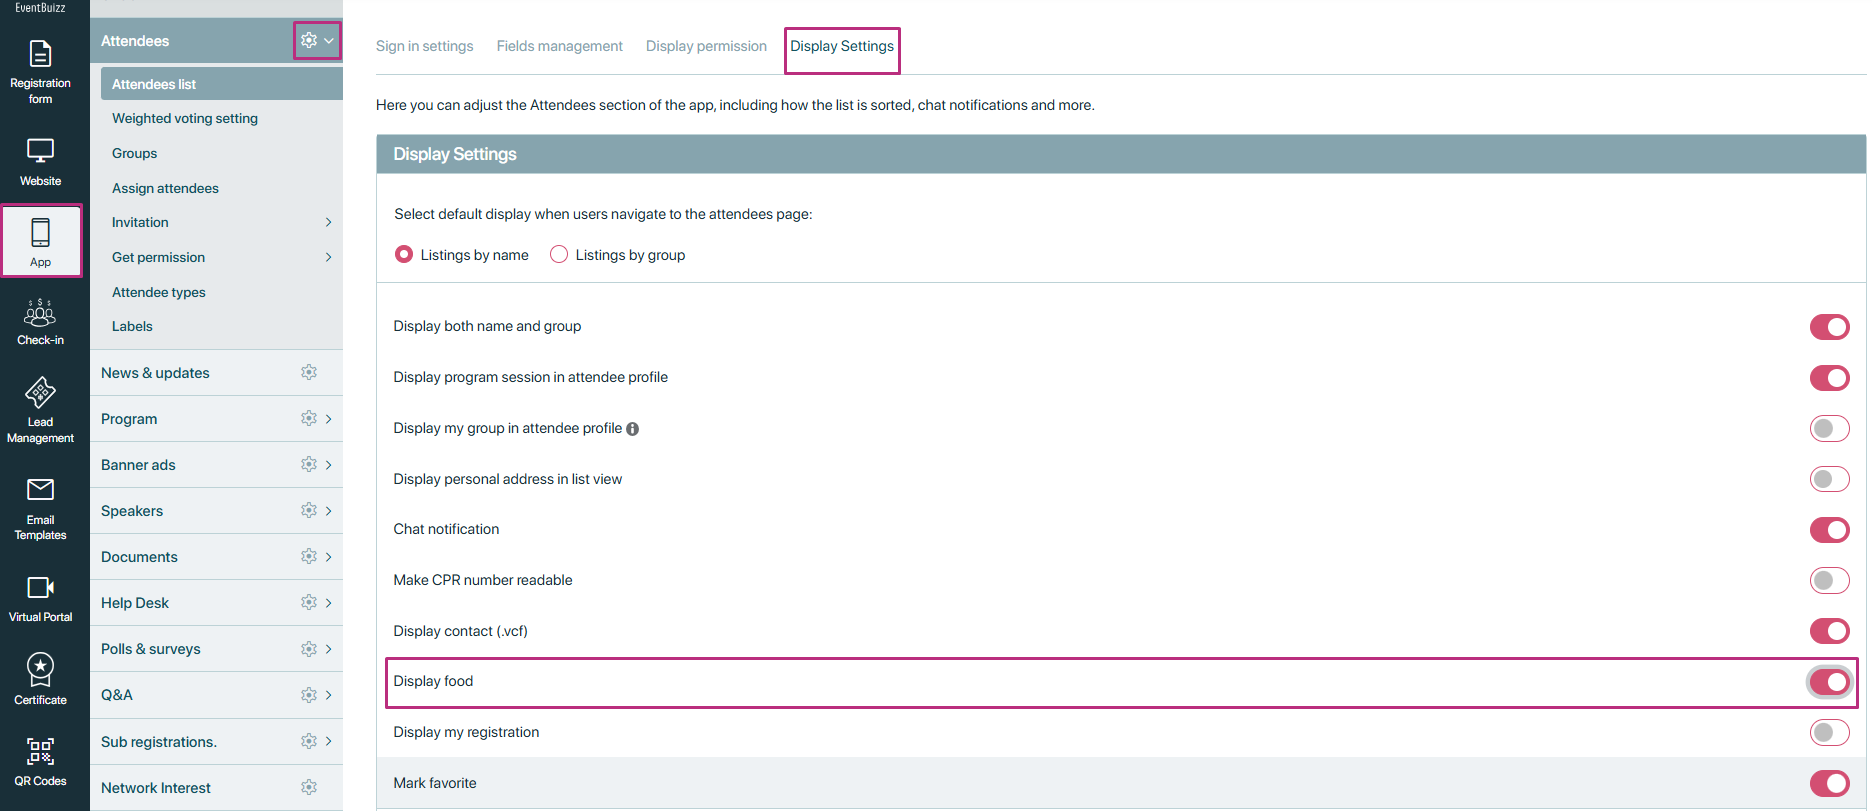
Display settings
Display settings
The Display settings section in eventbuizz allows event organisers to customise how attendee pages and profiles are presented, as well as how certain information is displayed. These settings enable organisers to configure the way attendees interact with the platform, providing flexibility in how attendee data is organised and accessed. By adjusting these settings, event organisers can enhance the overall attendee experience and streamline navigation across profiles, groups, sessions, and other key event details.
Display settings
There are several settings are available in display settings, detail is given below about all the available settings.
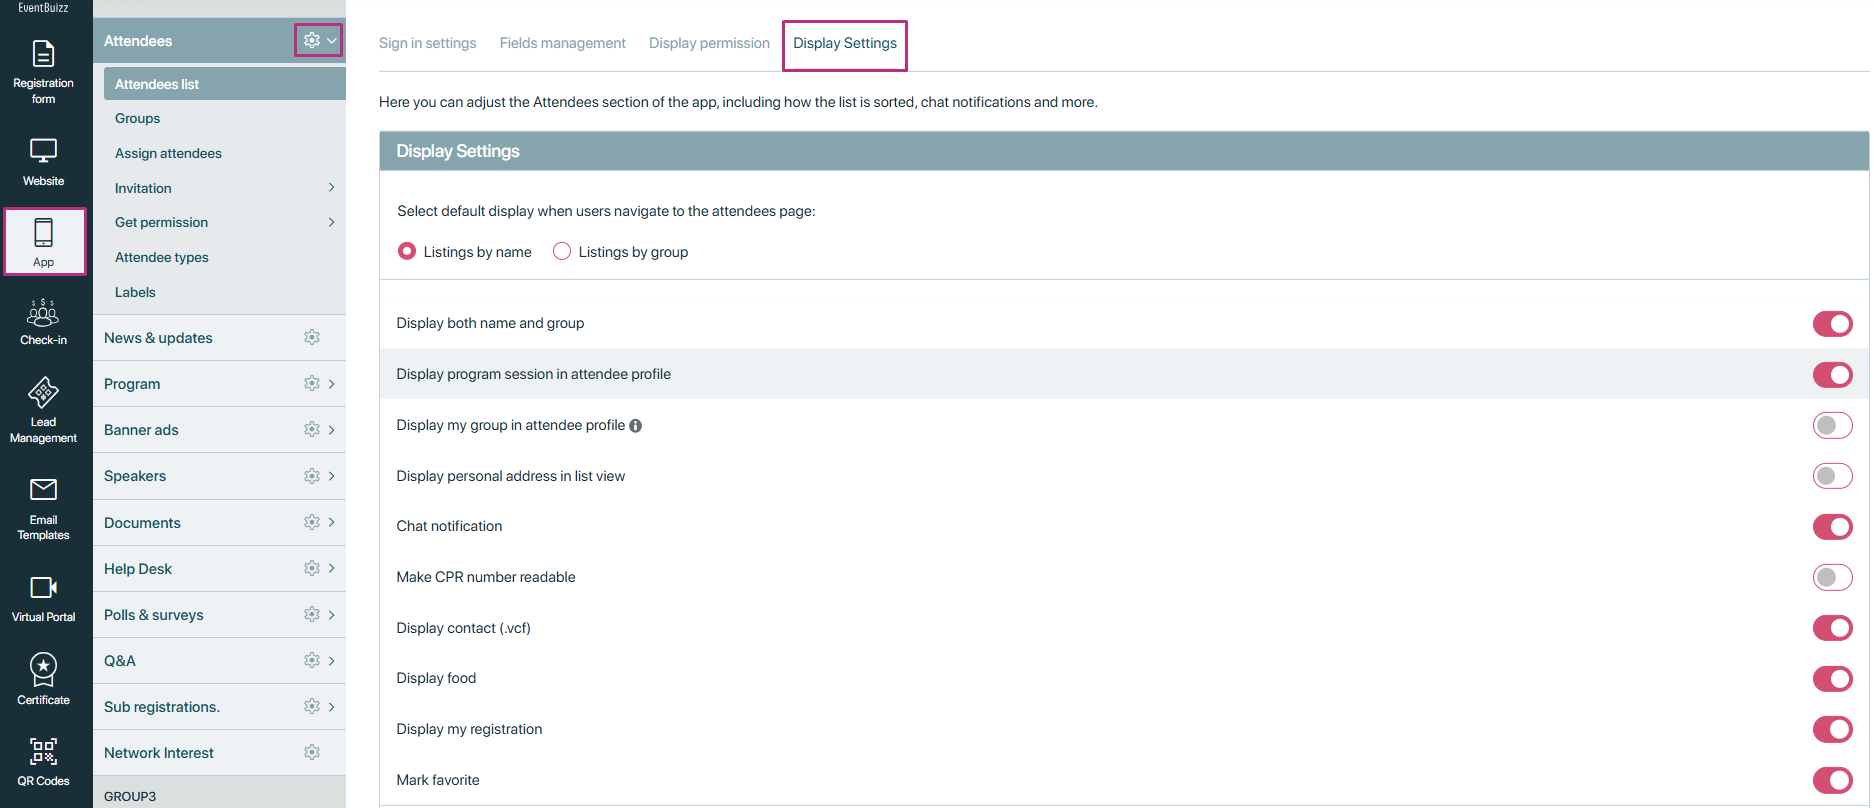
Display both name and group
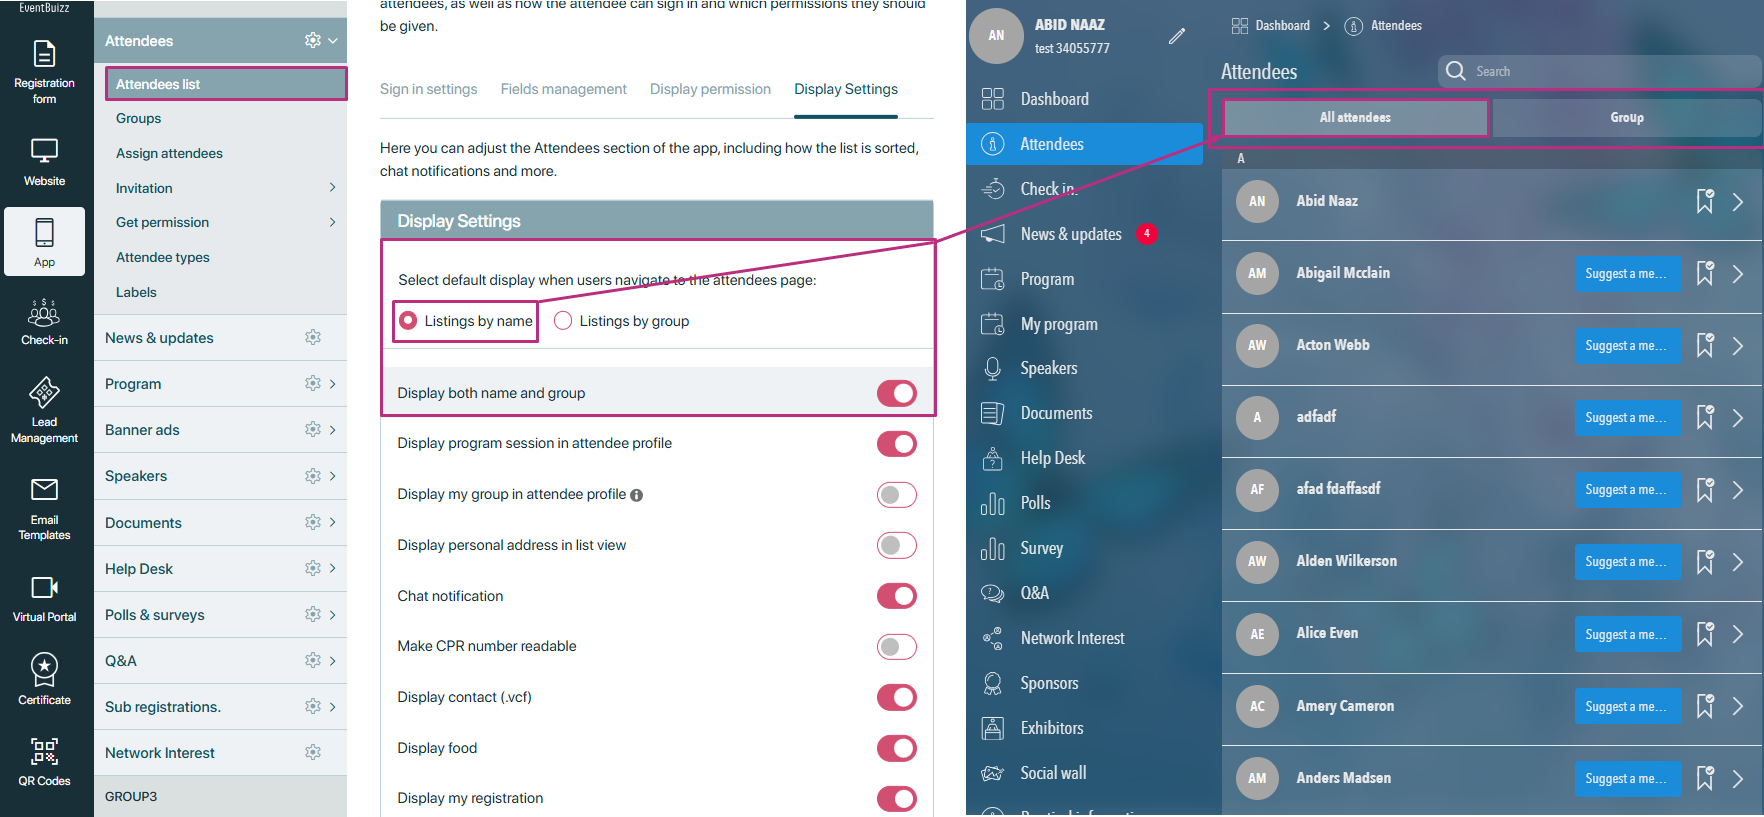
Select default display when users navigate to the attendees page:
- Listing by name
- Listing by group
If this setting is “on” then in attendee listing both attendee name and group tabs will be shown and also on the basis of the “default display” a tab will be selected, like if listing by name radio button is selected then in attendee listing attendee tab will be active by default.
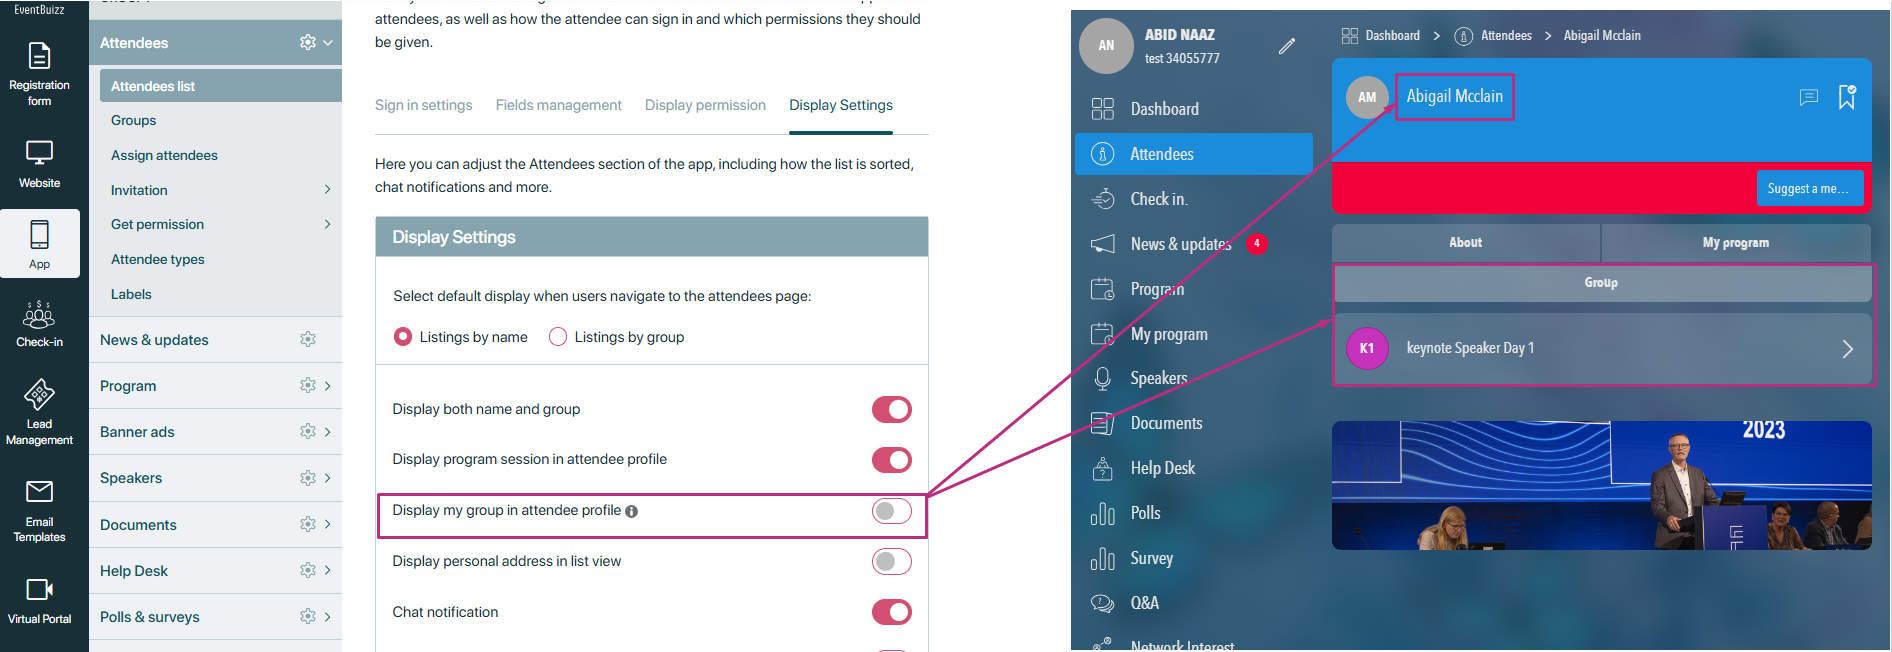
Display my group in attendee profile
If this setting is “on” then attendee can only see assigned group in their profile, those groups in which attendee assigned/attached will show in the my group tab listing.
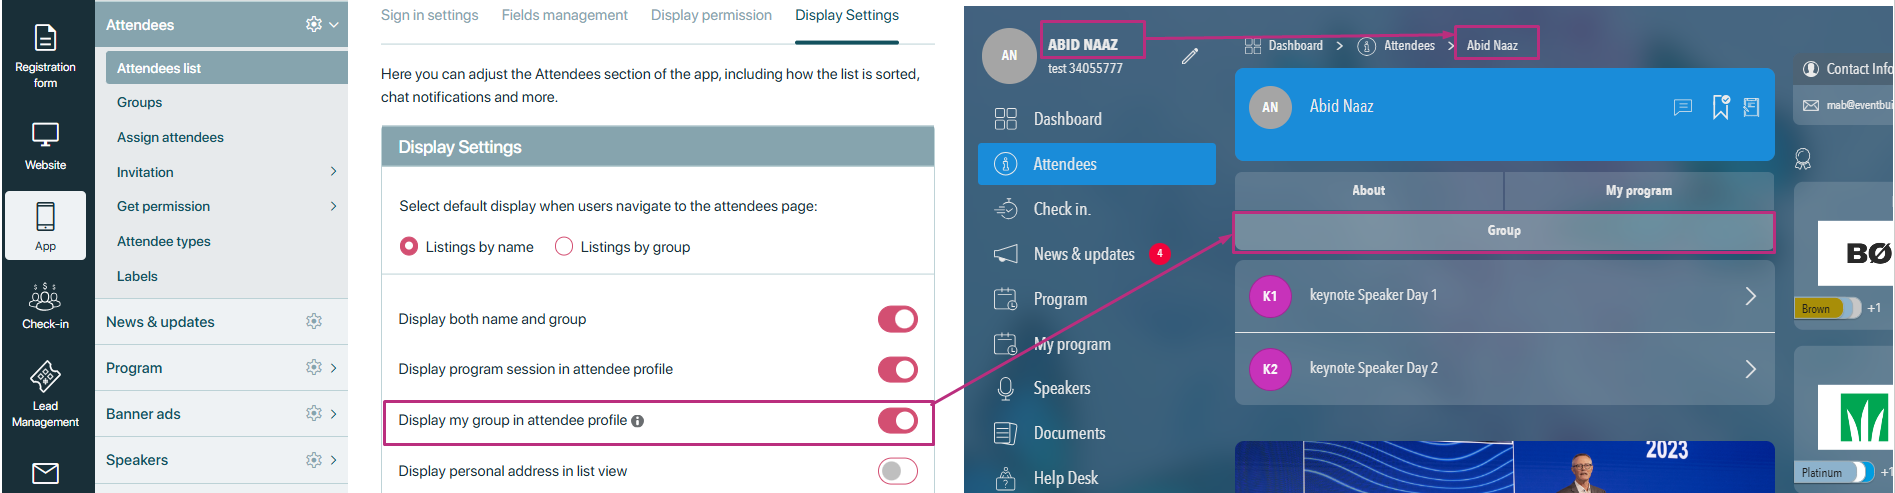
- And when this setting is off but group tab is on, then attendee can see other attendee attached groups in their profile.
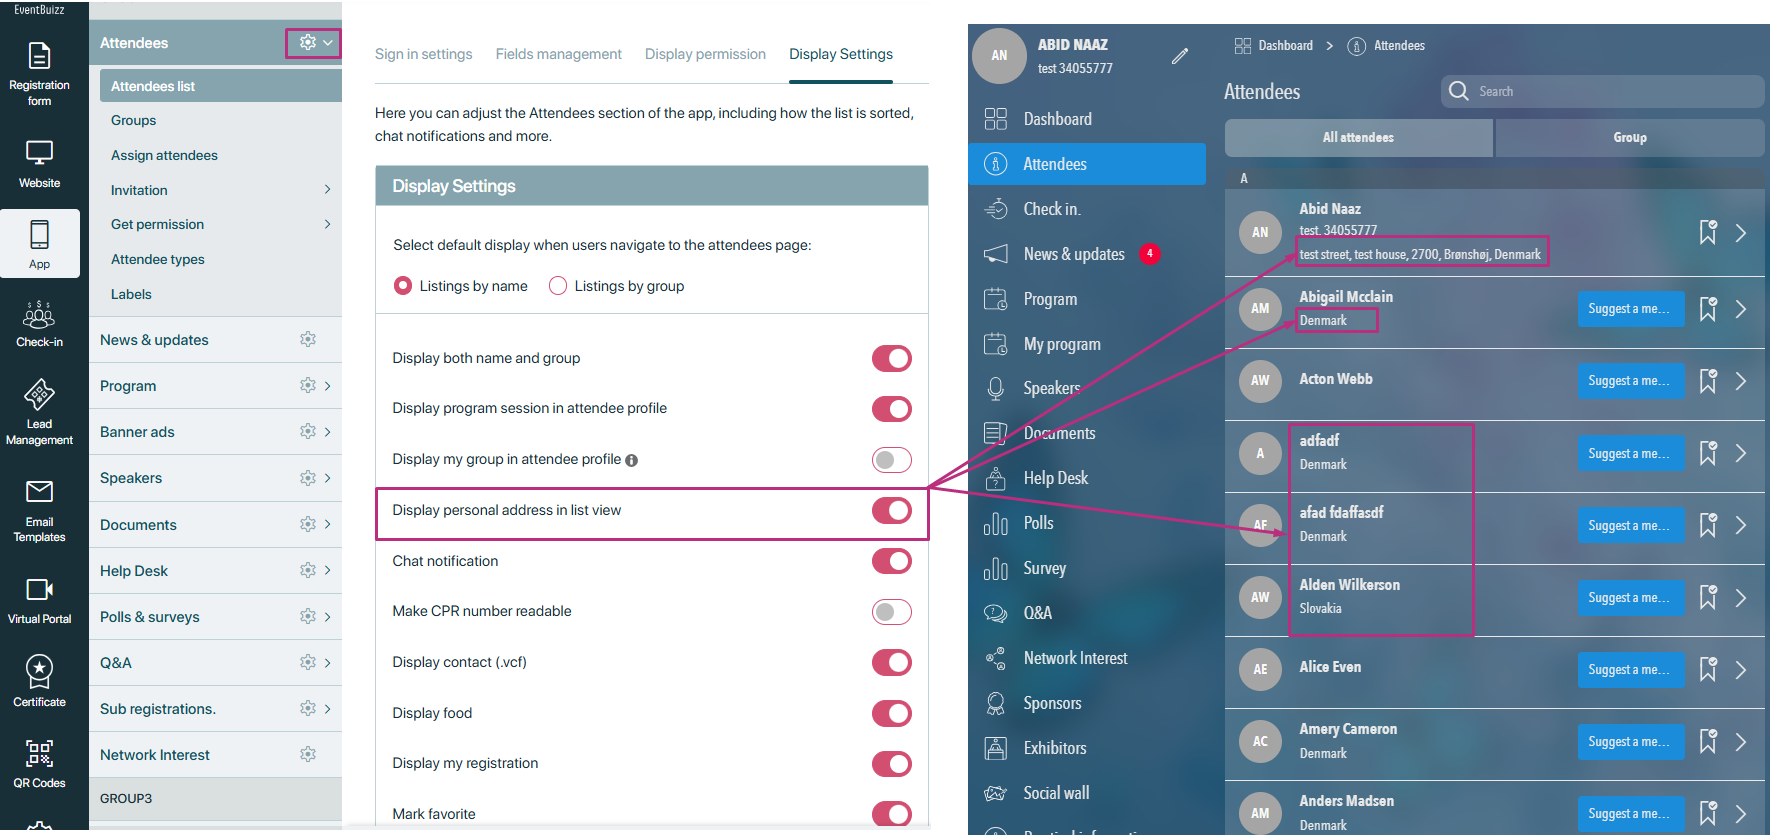
Display personal address in list view
When this setting is enabled, personal addresses of attendees will be visible in the attendee list view.
- Purpose: This option can be useful for certain types of events (e.g., events that require location-based sorting or personalized invitations) but may also raise privacy concerns. It should be used only when appropriate for the event’s purpose and attendee privacy preferences.

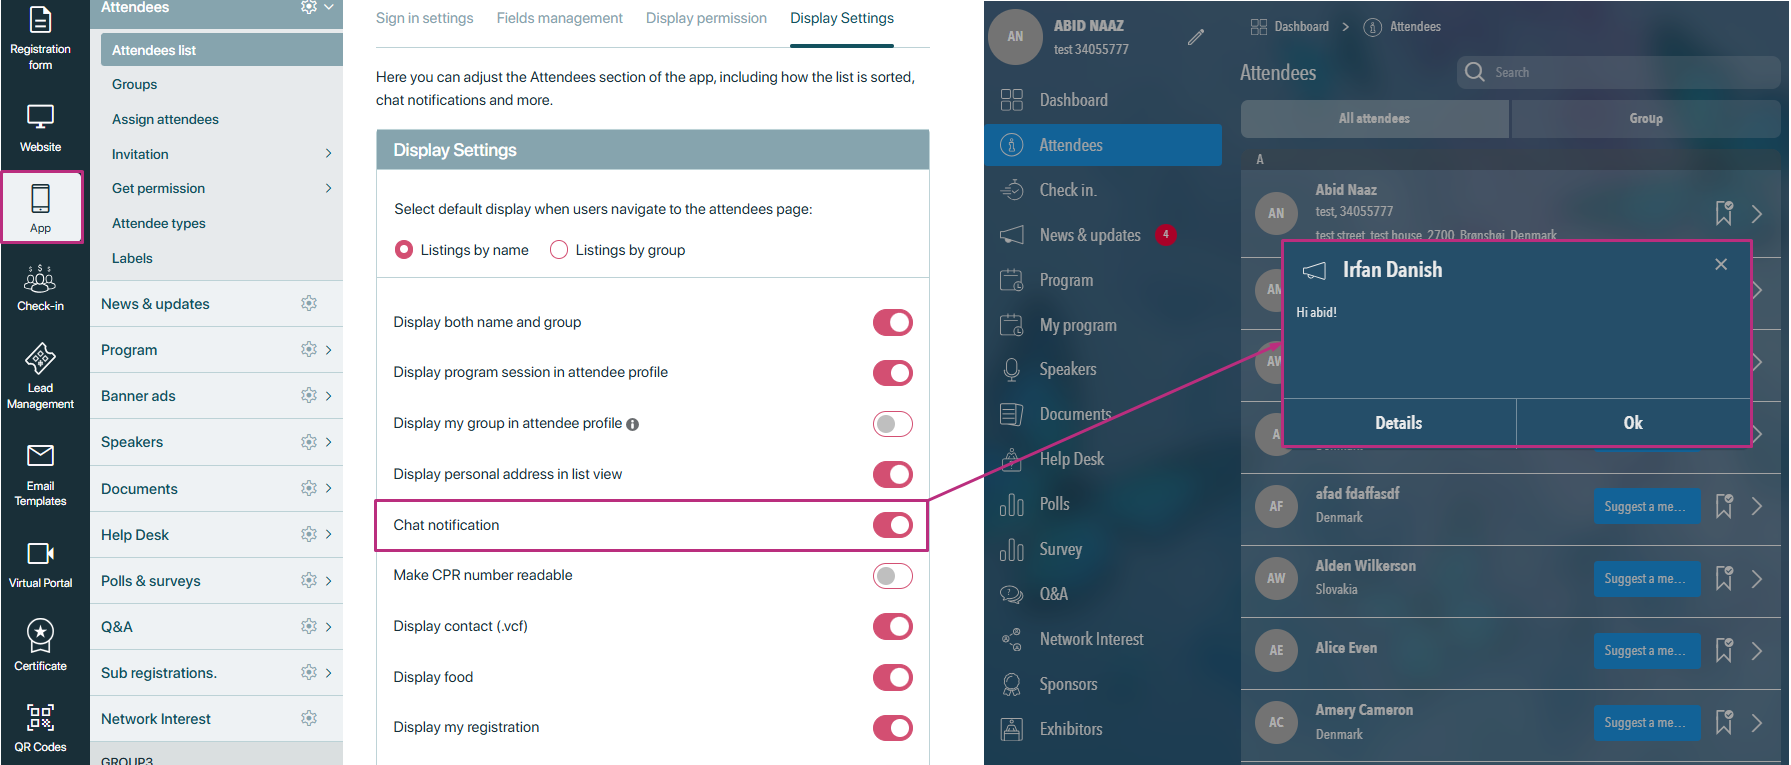
Chat notification
This setting ensures that attendees will receive notifications when they get new messages in the event’s chat system.
- Purpose: Enhances communication by alerting attendees in real-time when they have new messages, helping them stay engaged with the event’s networking and discussions.
Make CPR number readable
This setting formats the CPR (Customer personal number) in a readable format for easier viewing.
- Purpose: This is especially useful for events where personal identification numbers or codes need to be displayed, when this setting is “on” and organiser export the attendee list, in CSV file CPR number will be readable otherwise if this setting is off then CPR number will not be readable only will show No.
- Also if this setting is on, but against attendee profile CPR number is not existing then also it will show No.

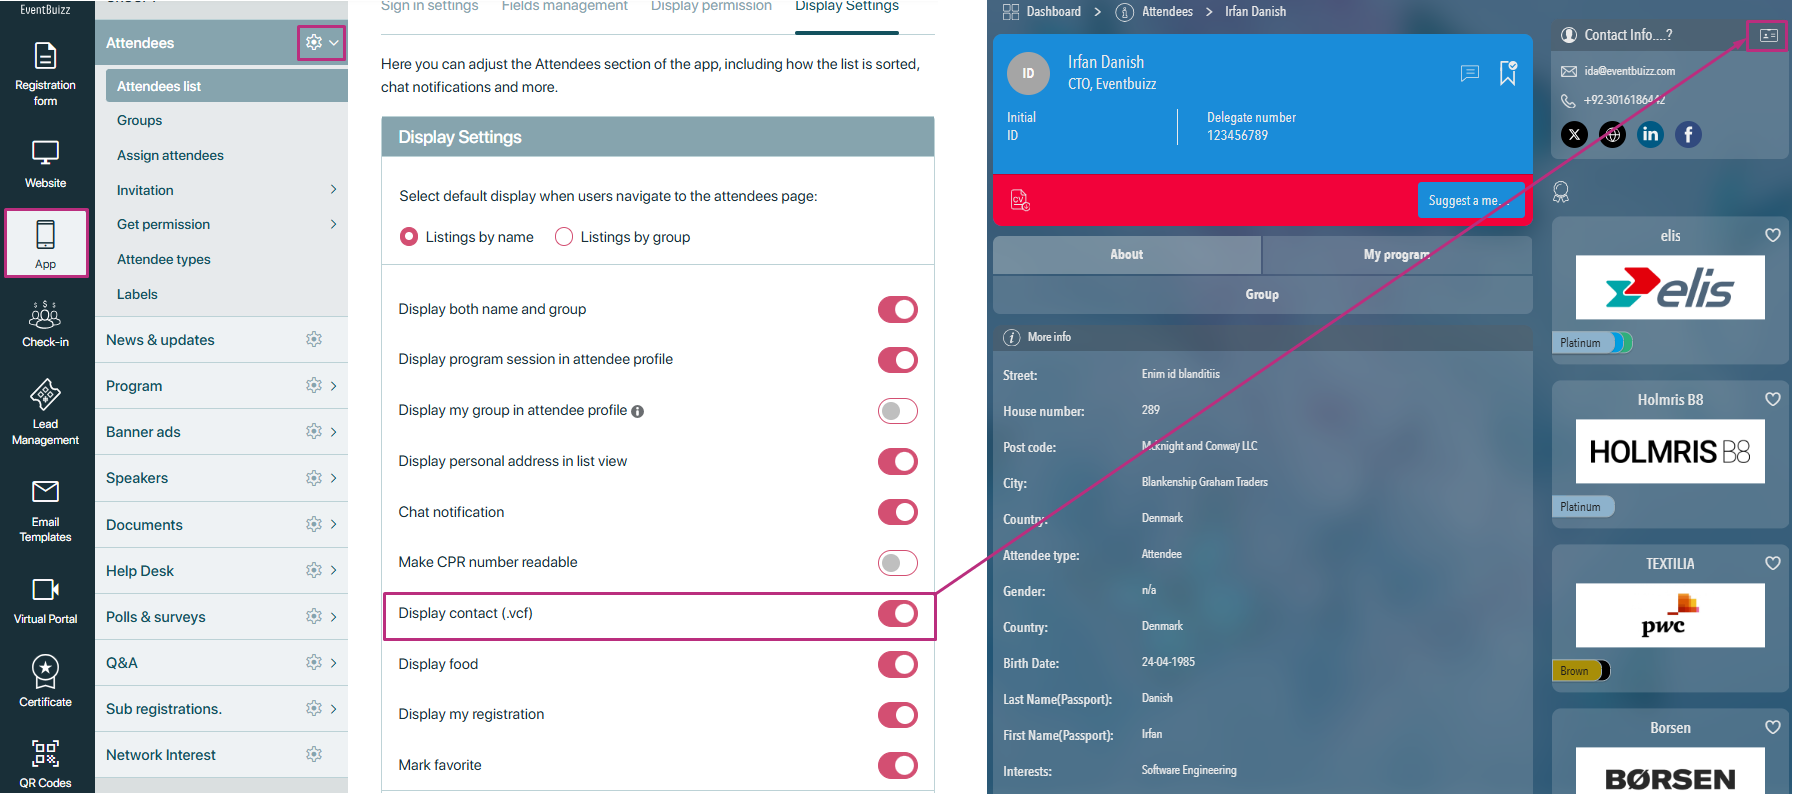
Display contact (.vcf)
When enabled, this setting allows attendees to download other attendees’ contact information in VCF (Virtual contact file) format. VCF is a standard file format used for sharing electronic contact details.
- Purpose: Facilitates networking by allowing attendees to easily download and store contact information of other participants, helping to maintain connections after the event.
- If this setting is on, then .vcf icon will show in attendee detail otherwise it will not display.
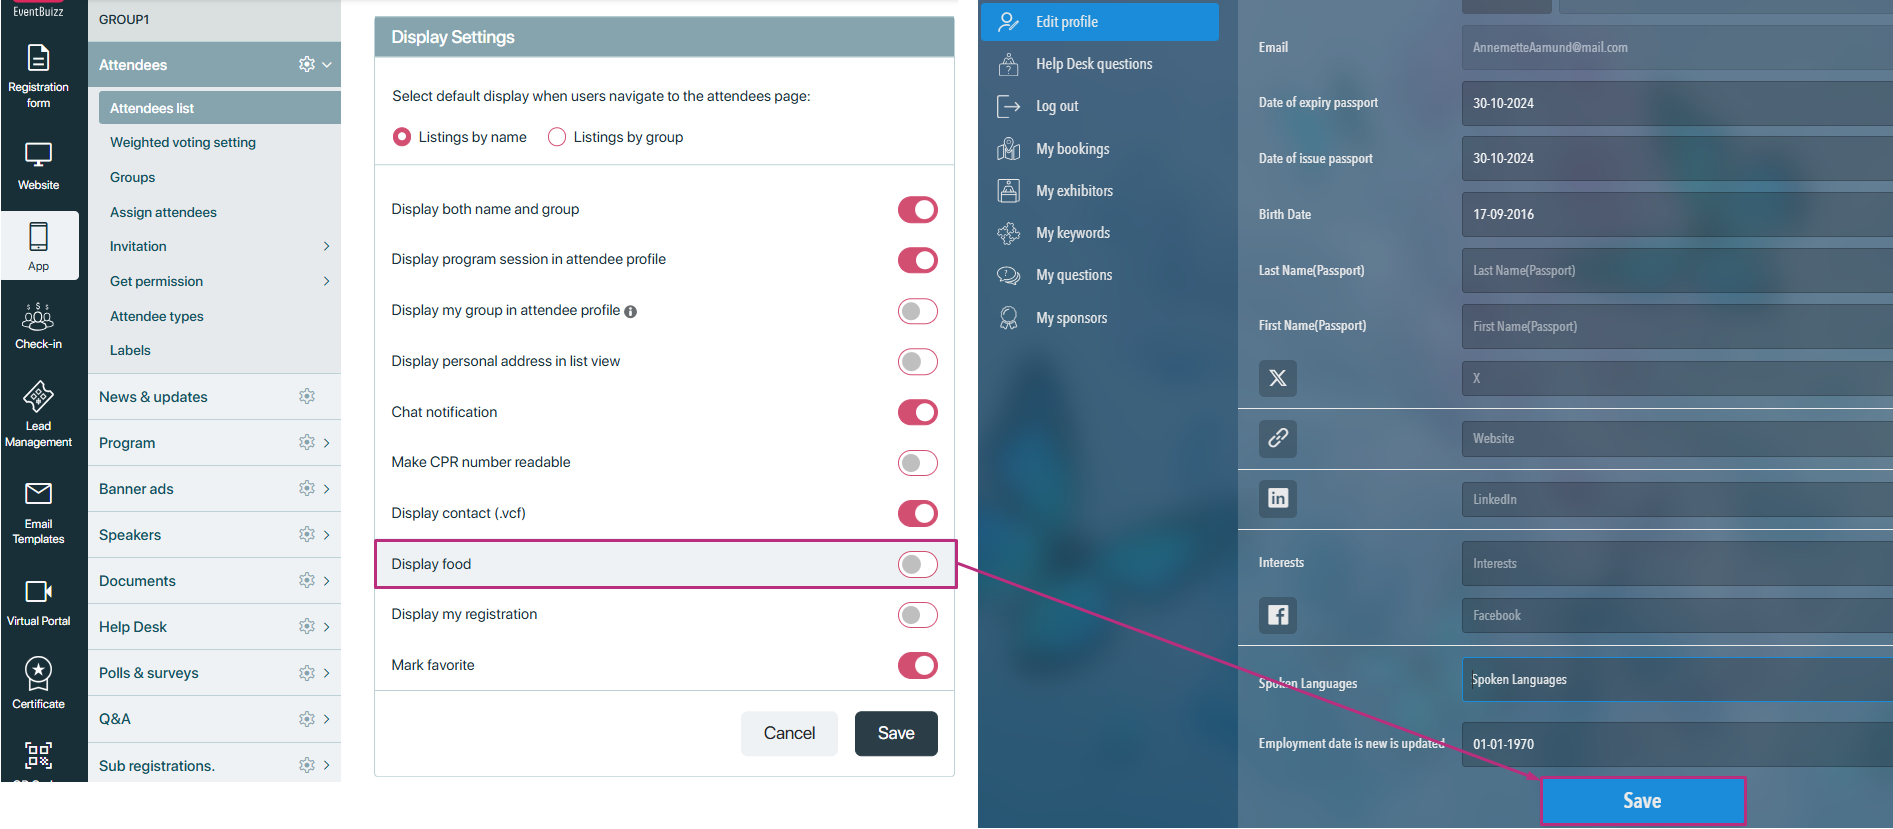
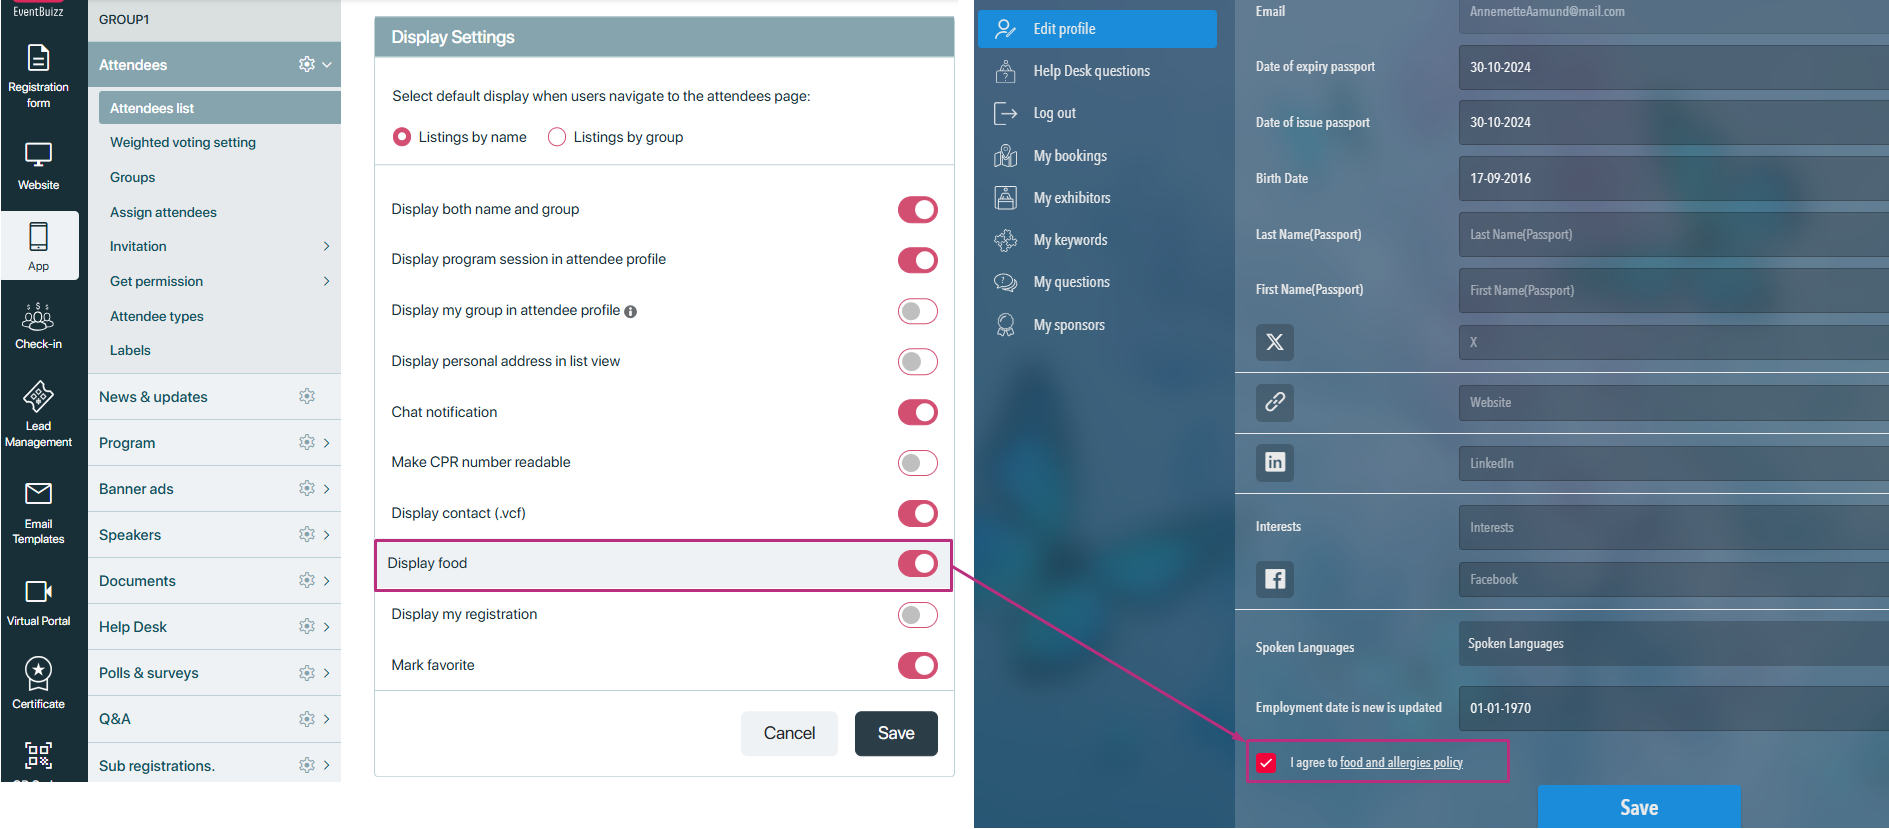
Display food policy
When organisers enable this setting:
- The disclaimer will appear on the edit profile page of the web app.
- At the bottom of the page, there will be a checkbox for the food policy.
- When attendees click on the URL, a modal will open displaying the subject line and description of the policy.
- If attendees check the box, they are consenting to the terms outlined in the disclaimer.
Before enabling the display food setting food disclaimer checkbox will not show in “edit profile”. Here is the view of it:
After enabling the display food setting food disclaimer checkbox will start showing in “edit profile”. Here is the view of it:
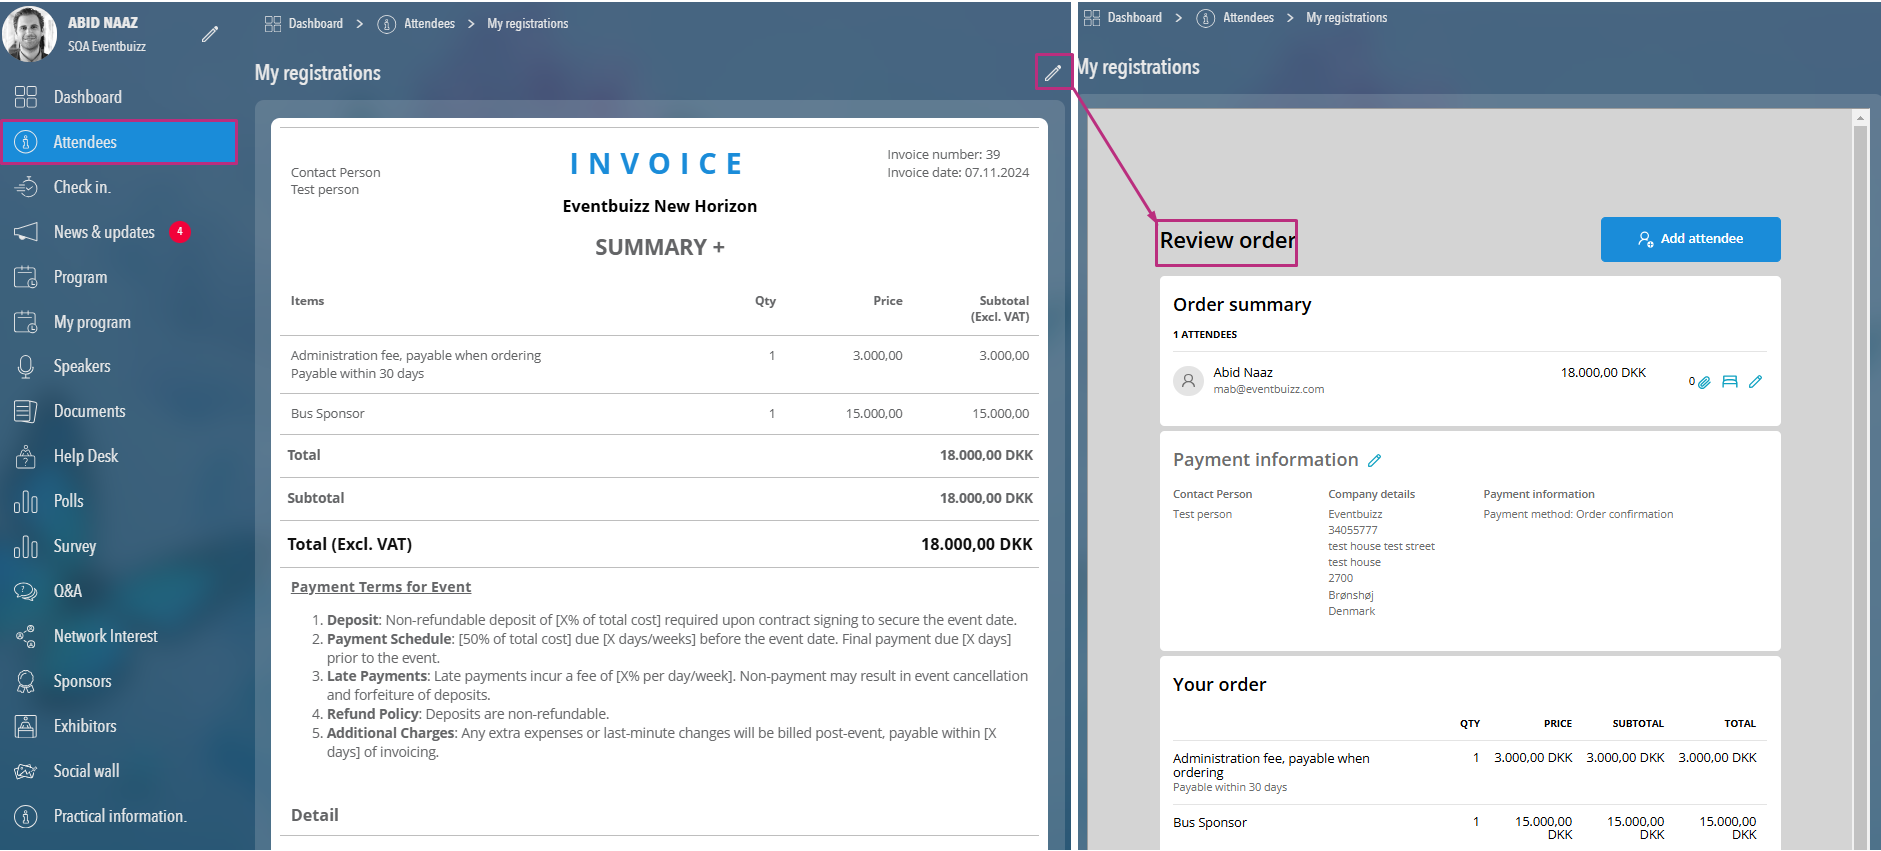
Display my registration
This setting allows attendees to view their own registration details in their profile, providing them with a quick summary of their registration status, and any other important order-related information.
- Purpose: Gives attendees easy access to their registration details, helping them stay informed about the order or registration details.
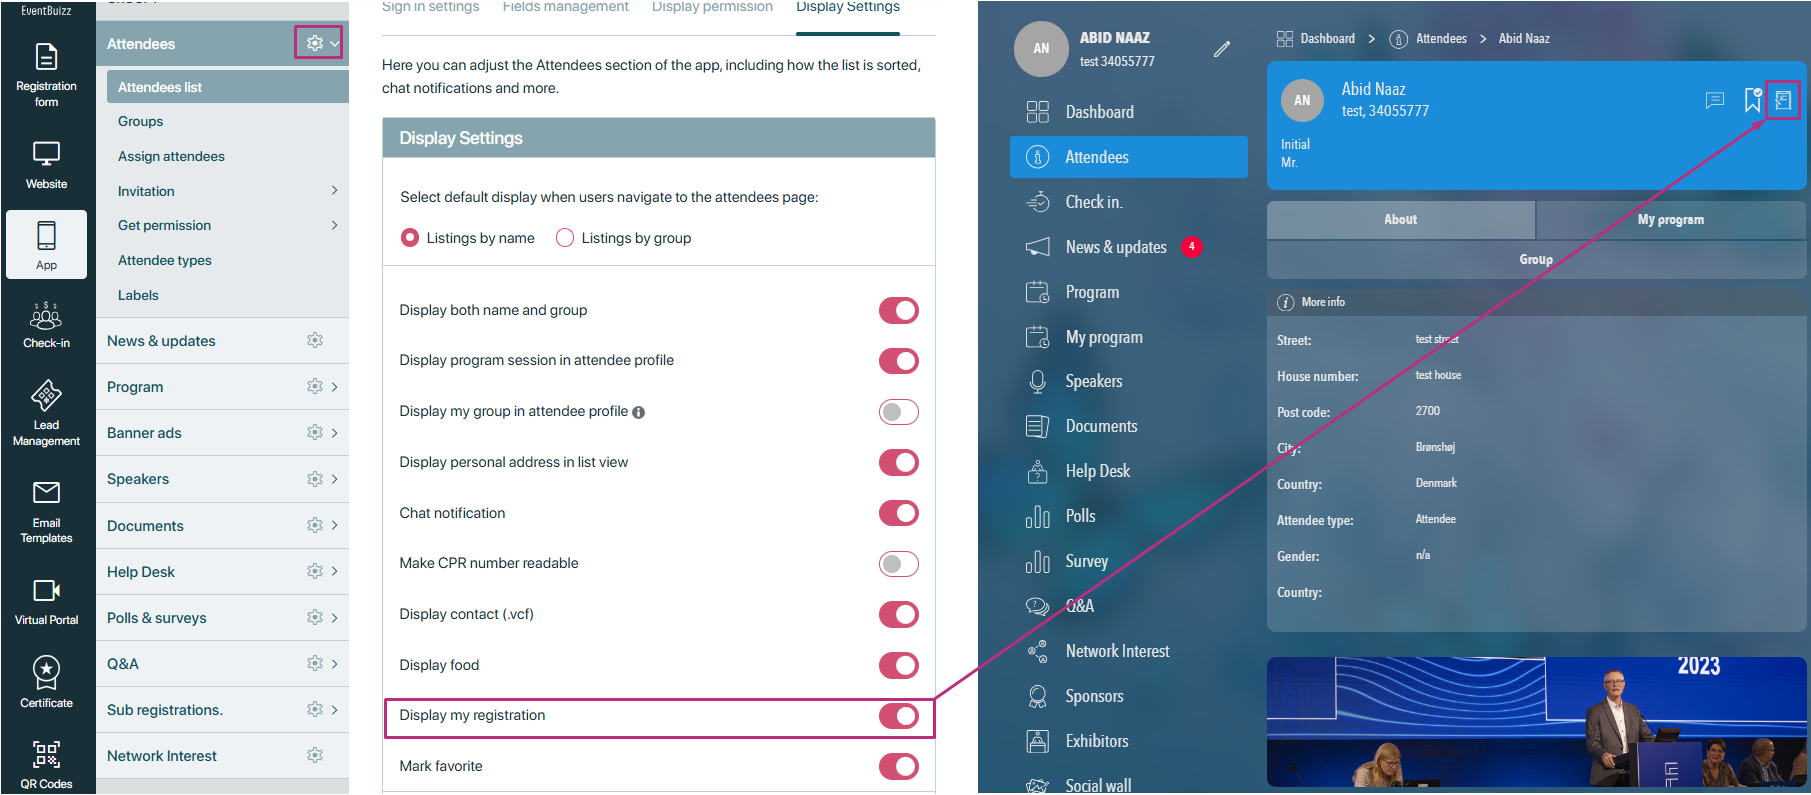
And by clicking on the my registration icon, detail invoice of the order will open, and attendee also can edit it by clicking on the edit icon.
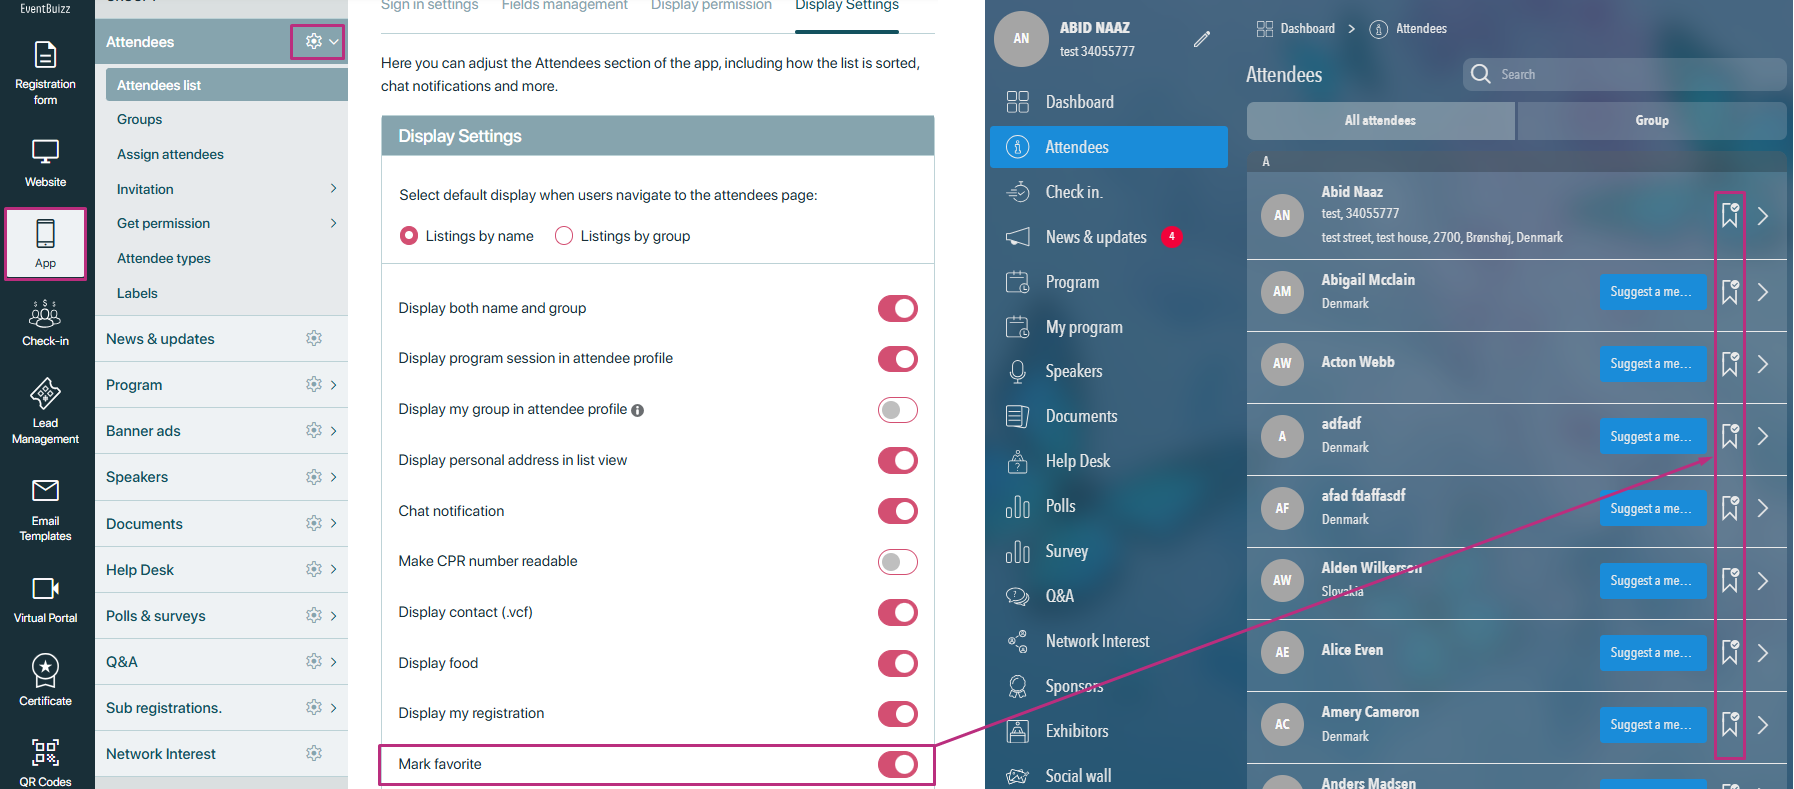
Mark favourite
Enabling this setting allows attendees to mark other attendees as “favourites” for easier access or reference later on.
- If this setting is on then in attendee listing and on attendee detail a favourite icon will display and by clicking on that icon attendee can make that attendee favourite.
- If this setting is off then in attendee listing and on attendee detail a favourite icon will not display and attendee not able to mark any other attendee favourite.
App attendee module(For user site)
App attendee module
The Attendee module in eventbuizz is designed to allow event attendees to interact with other event participants in a streamlined and efficient manner. The module offers attendees access to a comprehensive list of other attendees, along with various interactive features such as sorting, detailed profiles, and the ability to chat with other attendees.
Prerequisites for attendee module
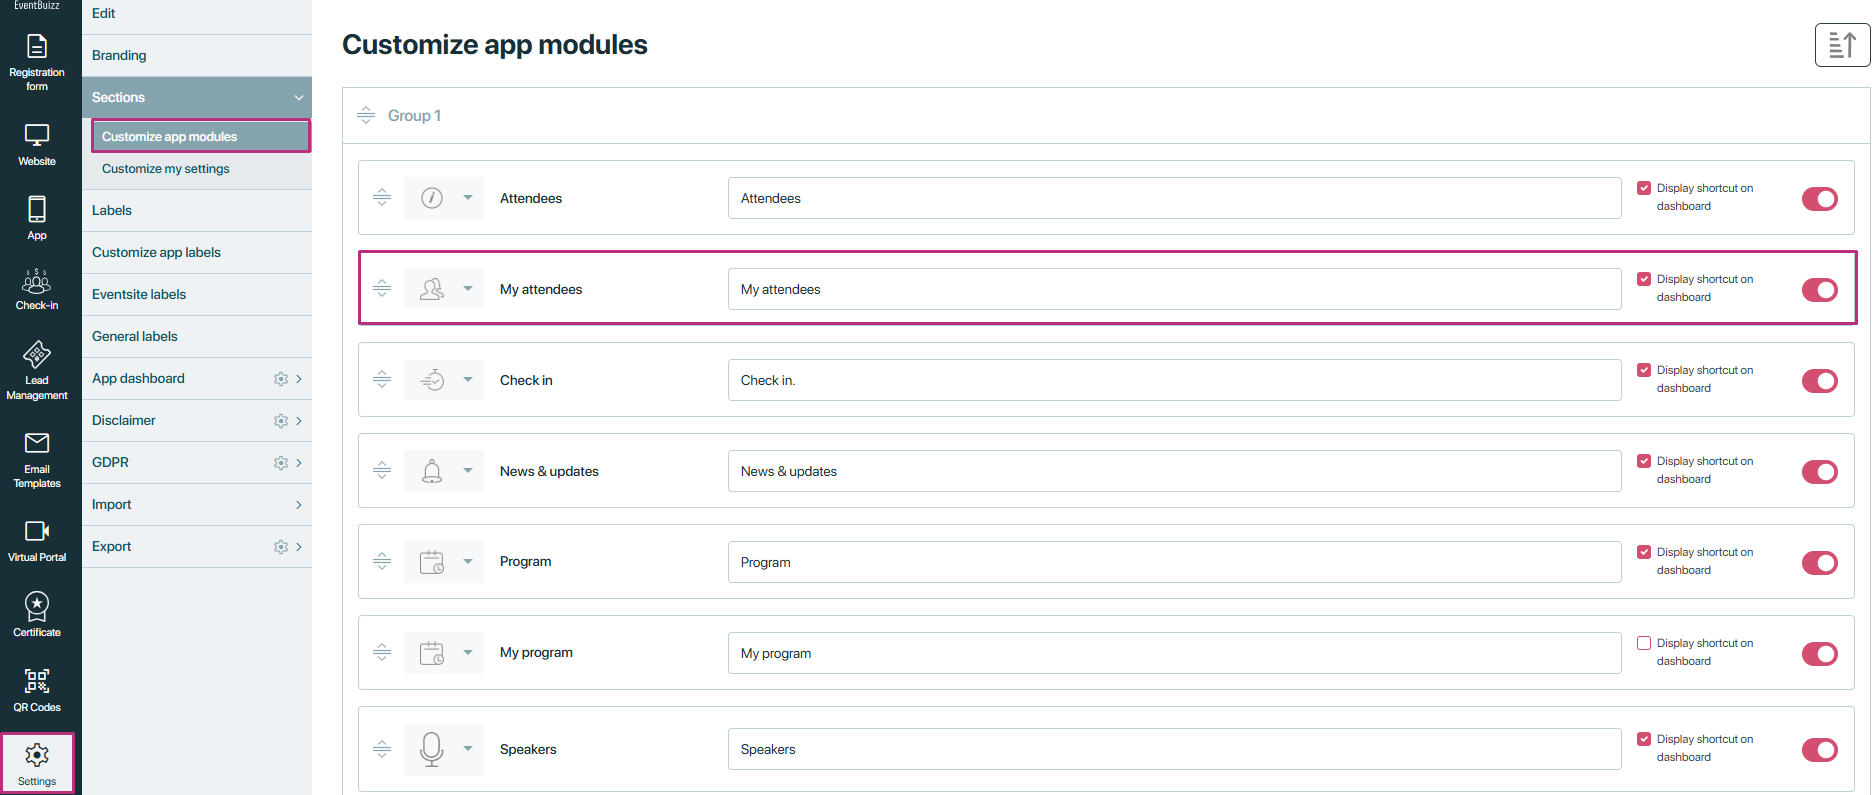
Before the Attendee module becomes available on the eventbuizz app, certain prerequisites must be met. These settings ensure that the module works as intended and that relevant features are enabled for both organisers and attendees.
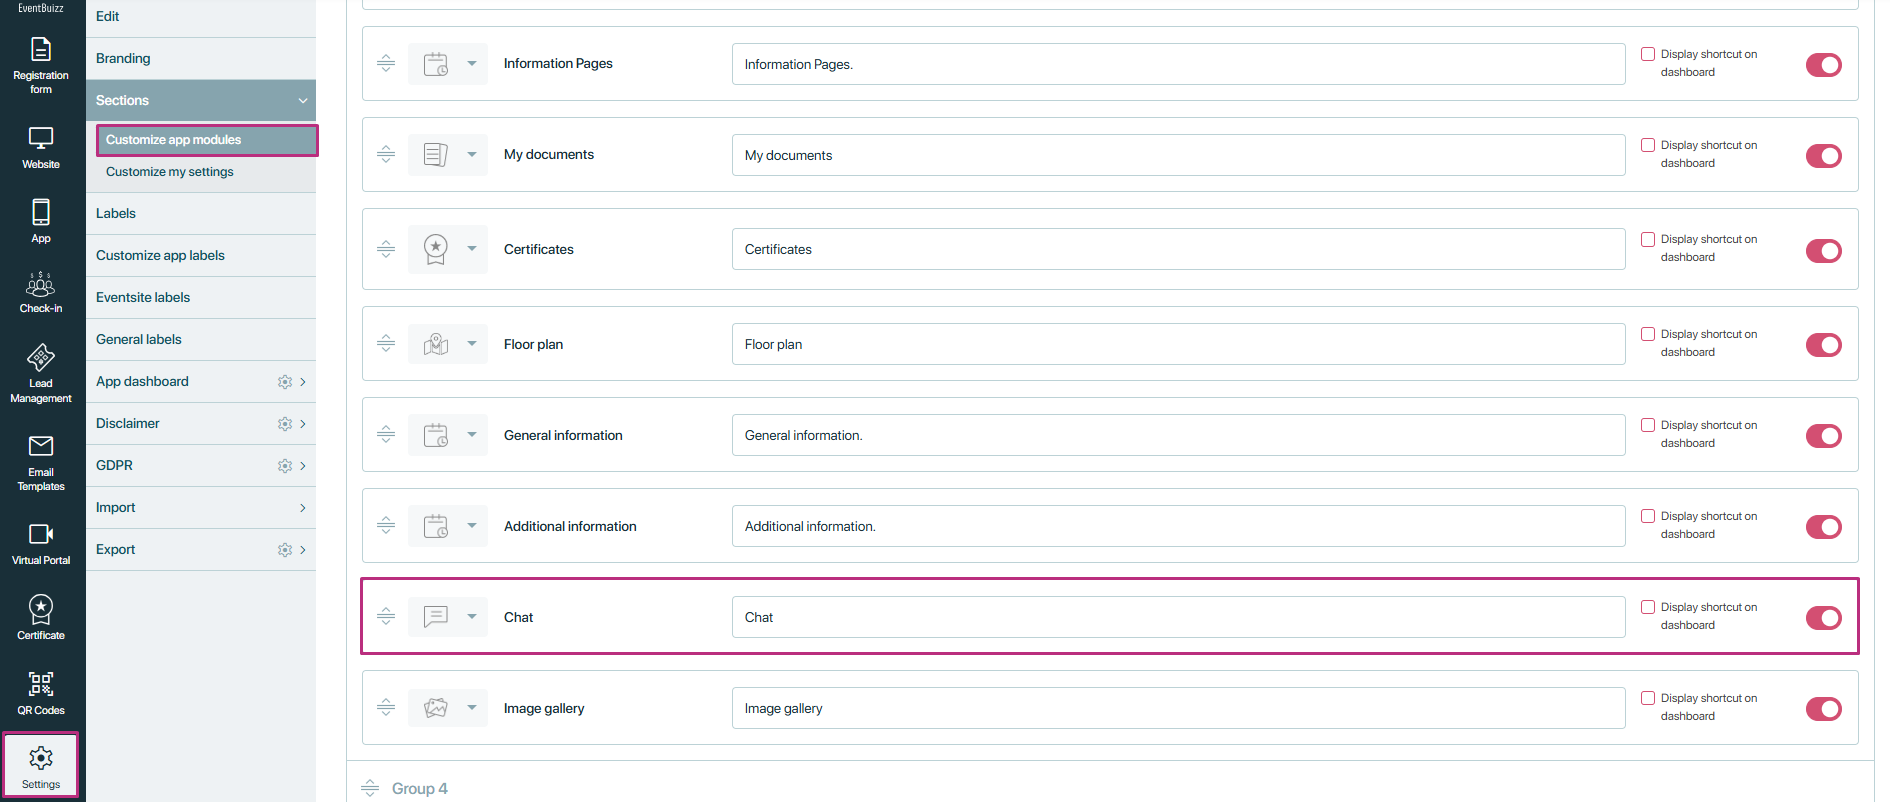
Eventcenter customization:
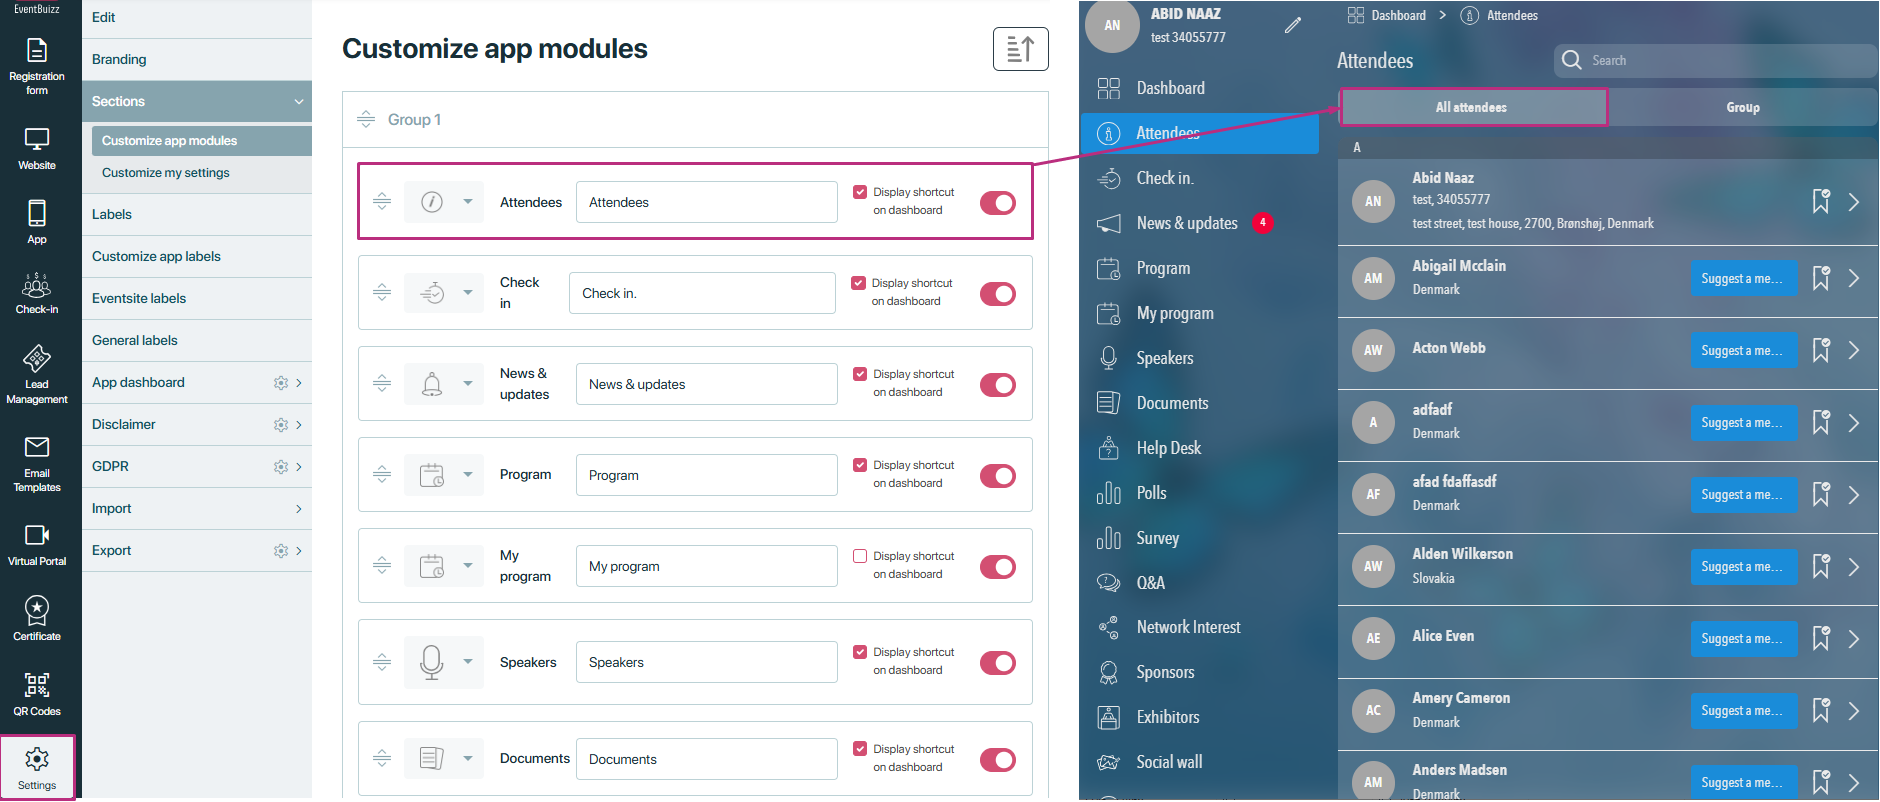
- The Attendee module must be activated in the eventcenter (via the “Customise app module” settings). If the toggle for this module is off, the Attendee Module will not be available in the app side.
-
organisers must enable the program module in the eventcenter. Follow these steps:
- Eventcenter->settings->customise app settings->Attendee->enable attendee from toggle button
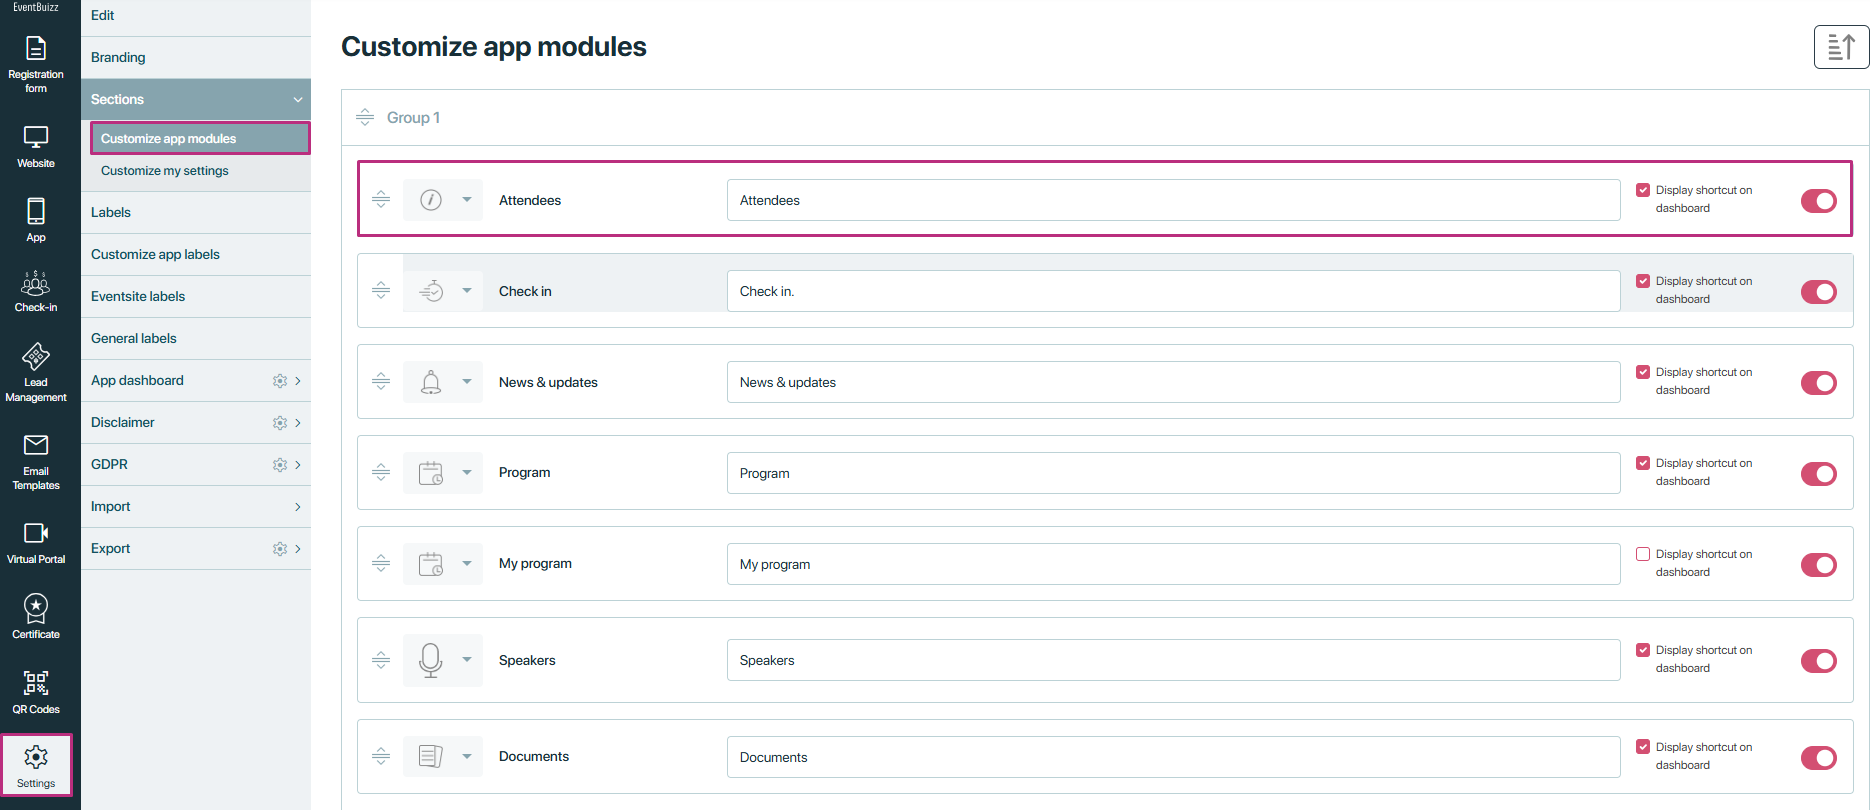
Once enabled, all added attendee from the organizer will be displayed in the web app under the attendee module, in all attendees tab.
Attendee module features in detail
The attendee module consists of a attendees listing divided into three tabs. Detail is given below about each tab:
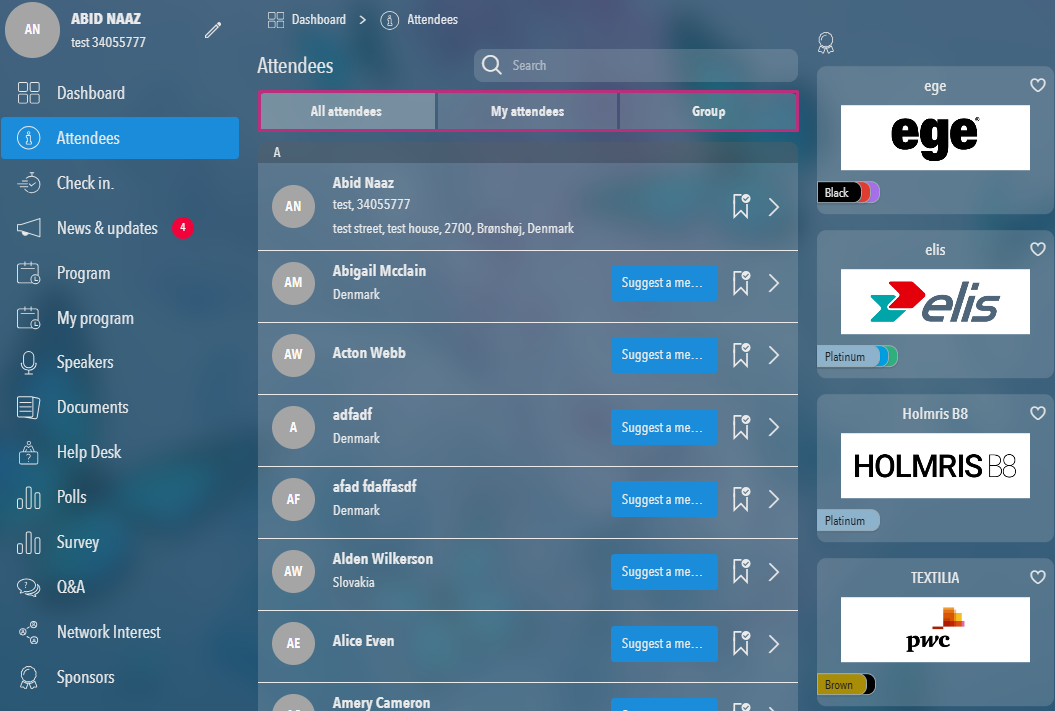
All attendees tab
The All attendees tab provides a complete listing of all event attendees. Here’s how the information is displayed:
Basic information:
- On attendee listing,by default attendee name, company, title, department and profile picture will be displayed.
- To manage the display of attendee information is based on roles and sorting fields, there are specific rules and settings that determine what data is shown on the attendee listing and detail pages. Here is a detailed explanation of these scenarios:
Attendee listing and detail rules
- Before going to attendee detail, let discuss how data will display on the listing of the all attendee tab.
Attendee listing
Default display:
By default, the attendee listing will display the following fields:
- Name
- Company
- Title
- Department
- Profile picture
- Private address
Important case – attendee listing & detail
Data display logic:
- If attendee role is given: The data shown is based on the sort fields activated for that role.
- If attendee role is not given but attendee type is provided: The data shown is based on the sort fields activated for that type.
- If neither attendee role nor type is provided: The data shown is based on the default sort fields settings.
Role-based sorting:
- The displayed data on the attendee listing is influenced by the attendee’s role.
- If specific sort fields (e.g., last name, company name, department, title, address) are activated for the role, those fields will be displayed.
Example:
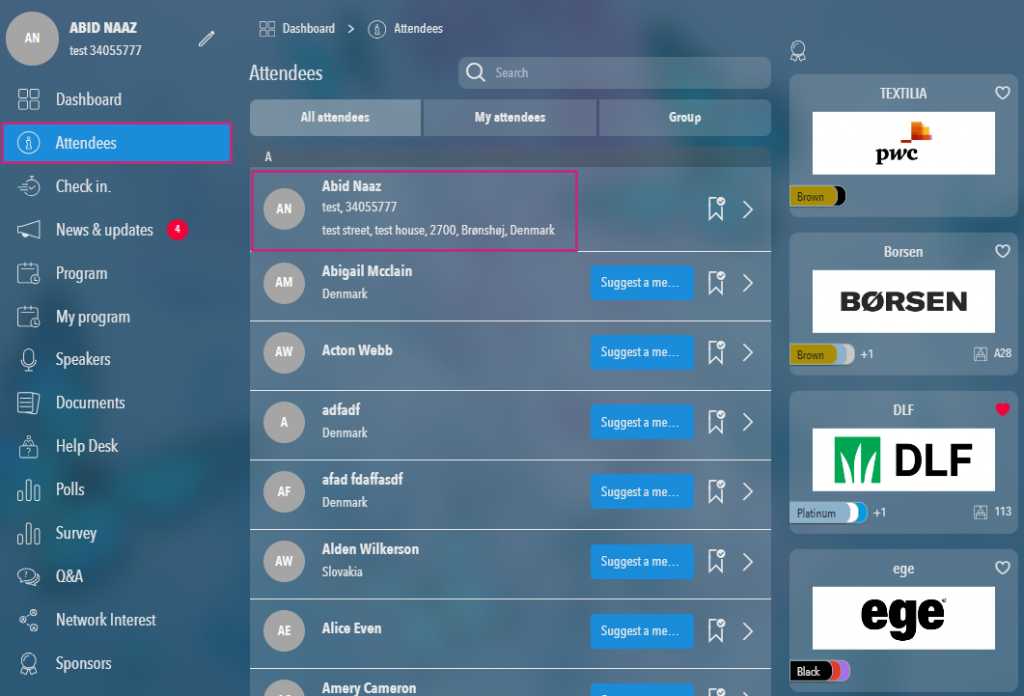
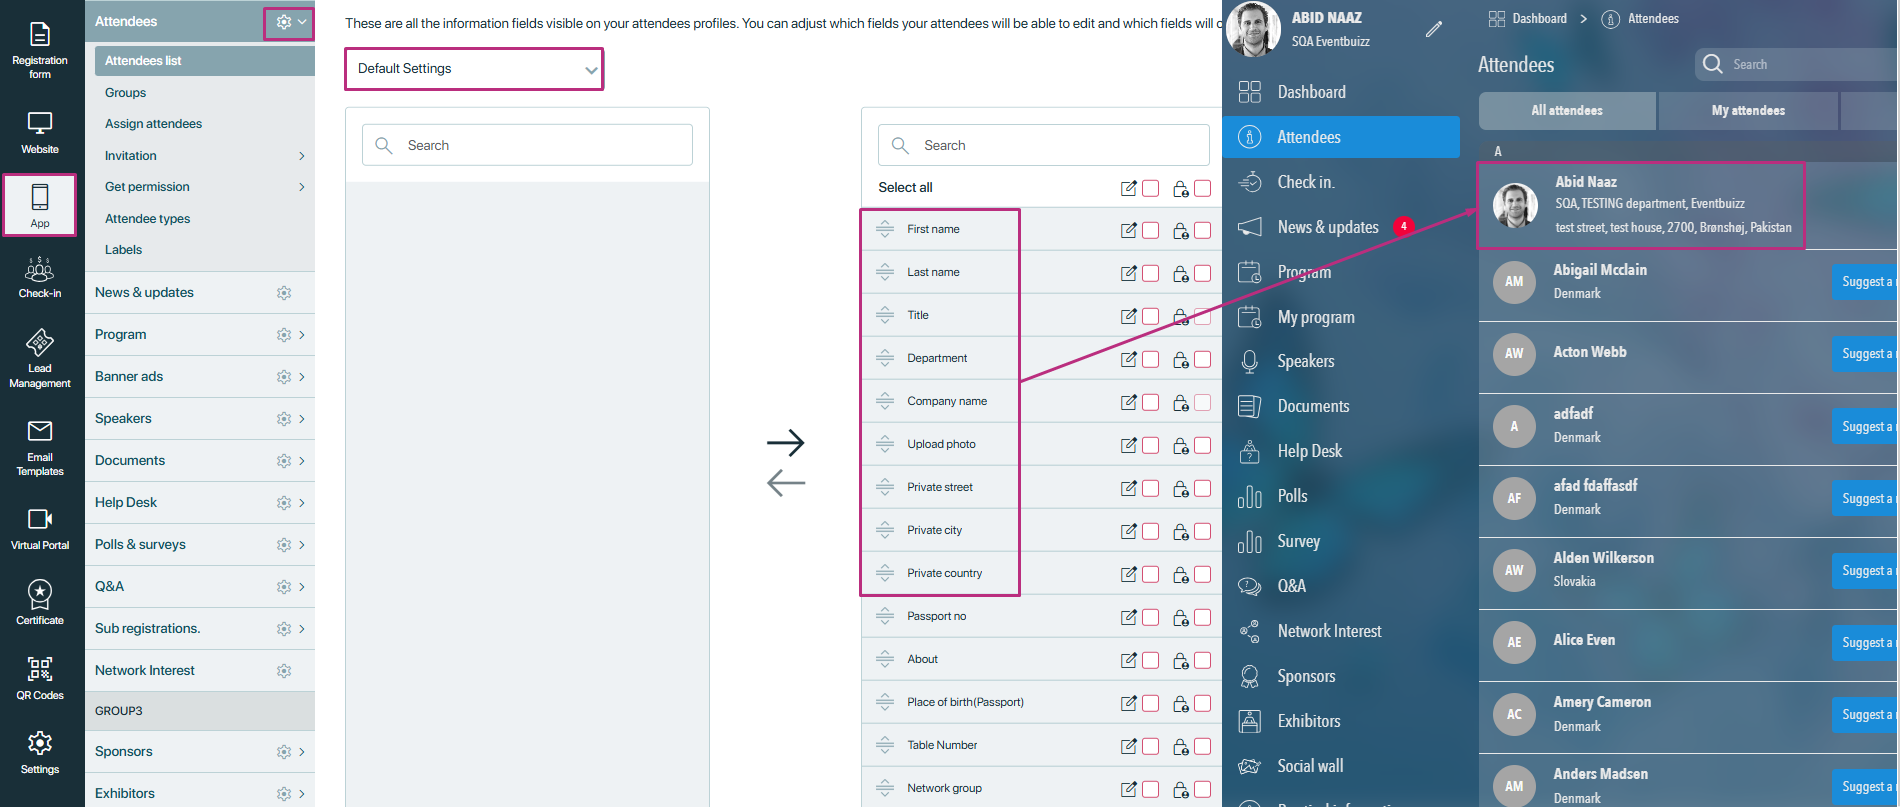
Here let see with example how data will display on attendee listing, base on role or type of the attendee. Below given example will show the attendee name “Abid Naaz” has the type attendee, and there is no role for that attendee, here important note is if role is not given then attendee type will run, and if attendee type is not given then default settings will implement.
- Attendee type is attendee in the eventcenter attendee listing.
- In sort fields against attendee type, there is no sort field active.
- If against that specific sort field there is no sort field active, then default settings will work.
Important note:
Now here attendee type is attendee, but in attendee sort fields there is not single sort field active, so that’s why on attendee listing and detail default settings will implement. Here below attachment will show that:
Private address handling:
Settings impact:
- If the “Display personal address in list view“ setting is off, private address fields will not be displayed on the attendee listing, even if those fields are activated sort fields for the role.
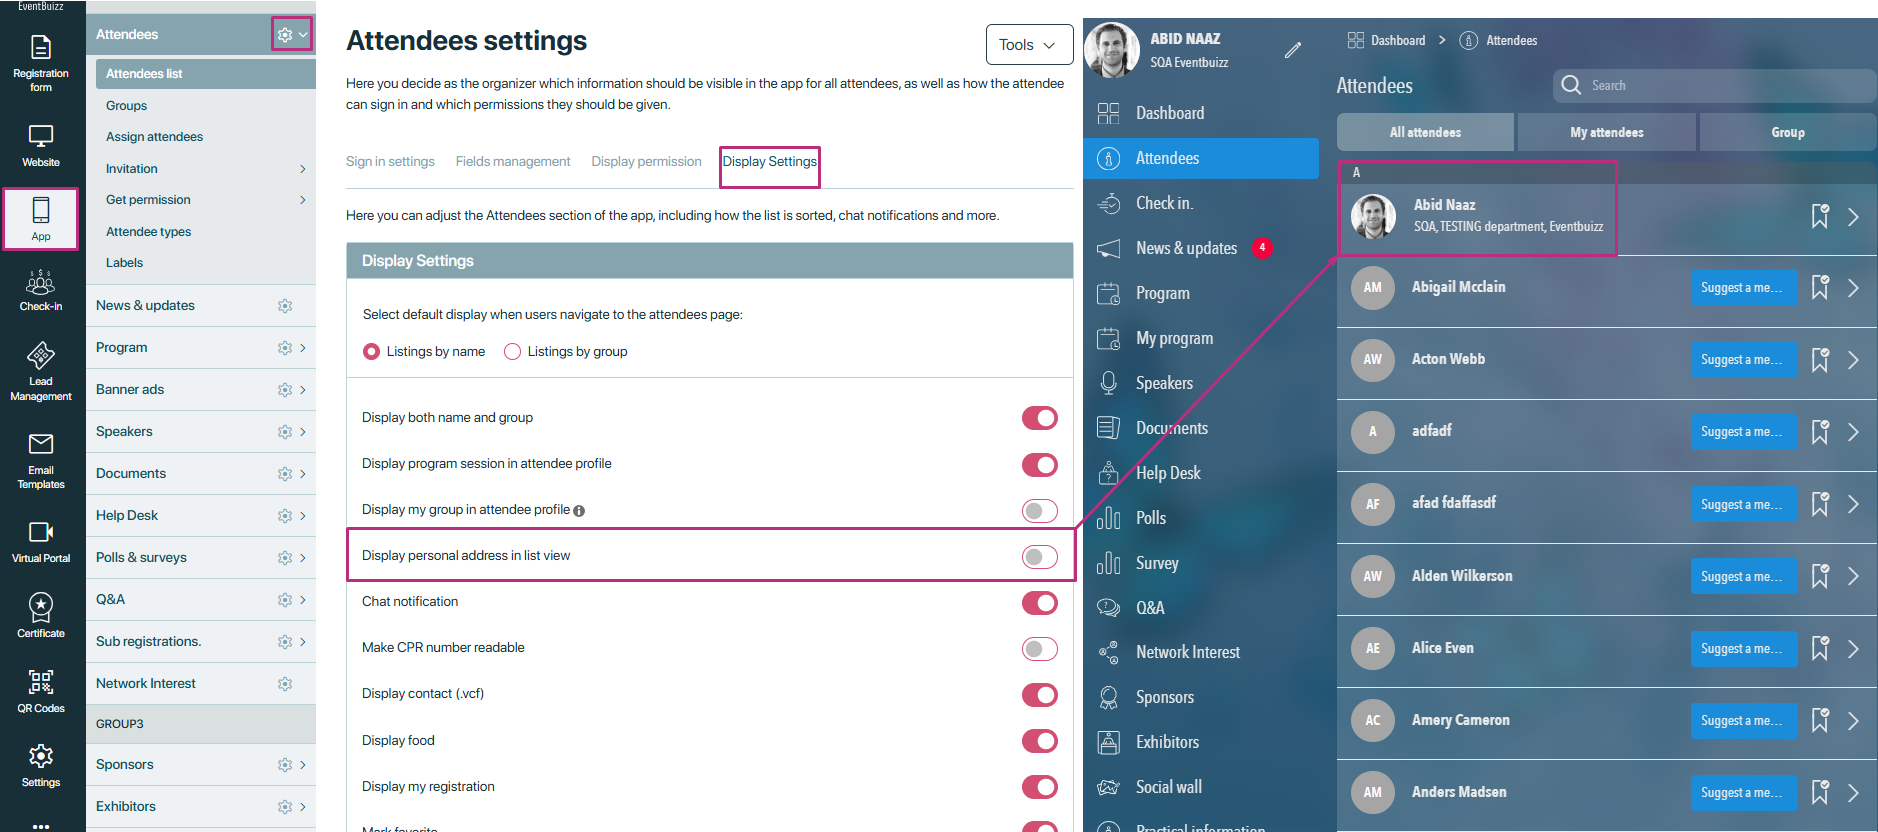
- If this setting is on, private address fields will be displayed on both the listing and detail pages if they are activated sort fields.
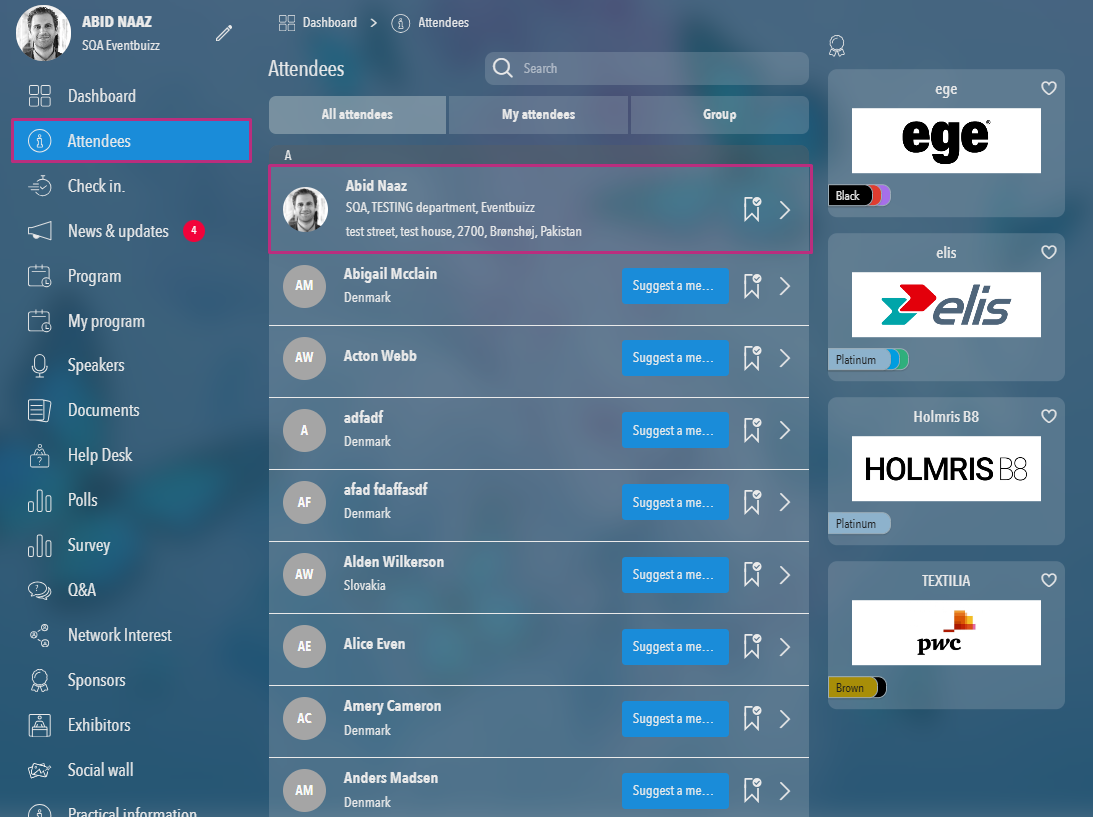
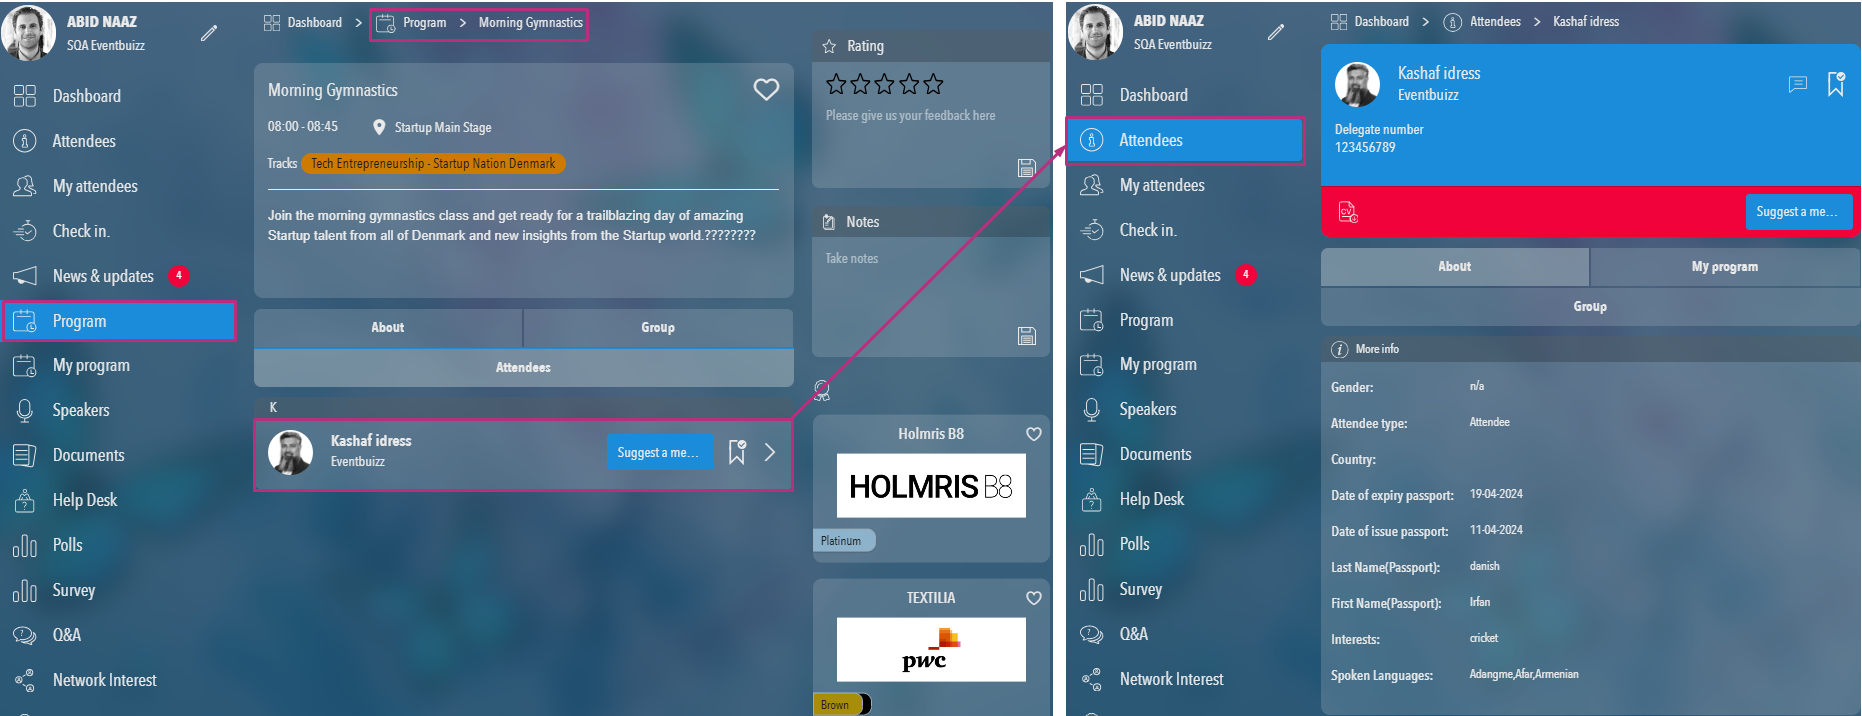
Important note: How data will display on attendee detail?
- Similarly as like listing, same rules will apply on the attendee detail and in attendee detail data will display base on the role.
- If role is not given then data will show base on the attendee type.
- If type is not given then default settings will work.
Below attachment is showing, attendee role is not given, and in attendee type no sort field is active, that’s why default settings are working and all sort fields are active, and in attendee profile all fields have data, that’s why everything is representing here.
Data visualisation in attendee detail
In attendee detail data is displayed in different tabs, and if there is no data available in that tab, then that tab will not display in attendee detail.
Detail of each tab is given below:
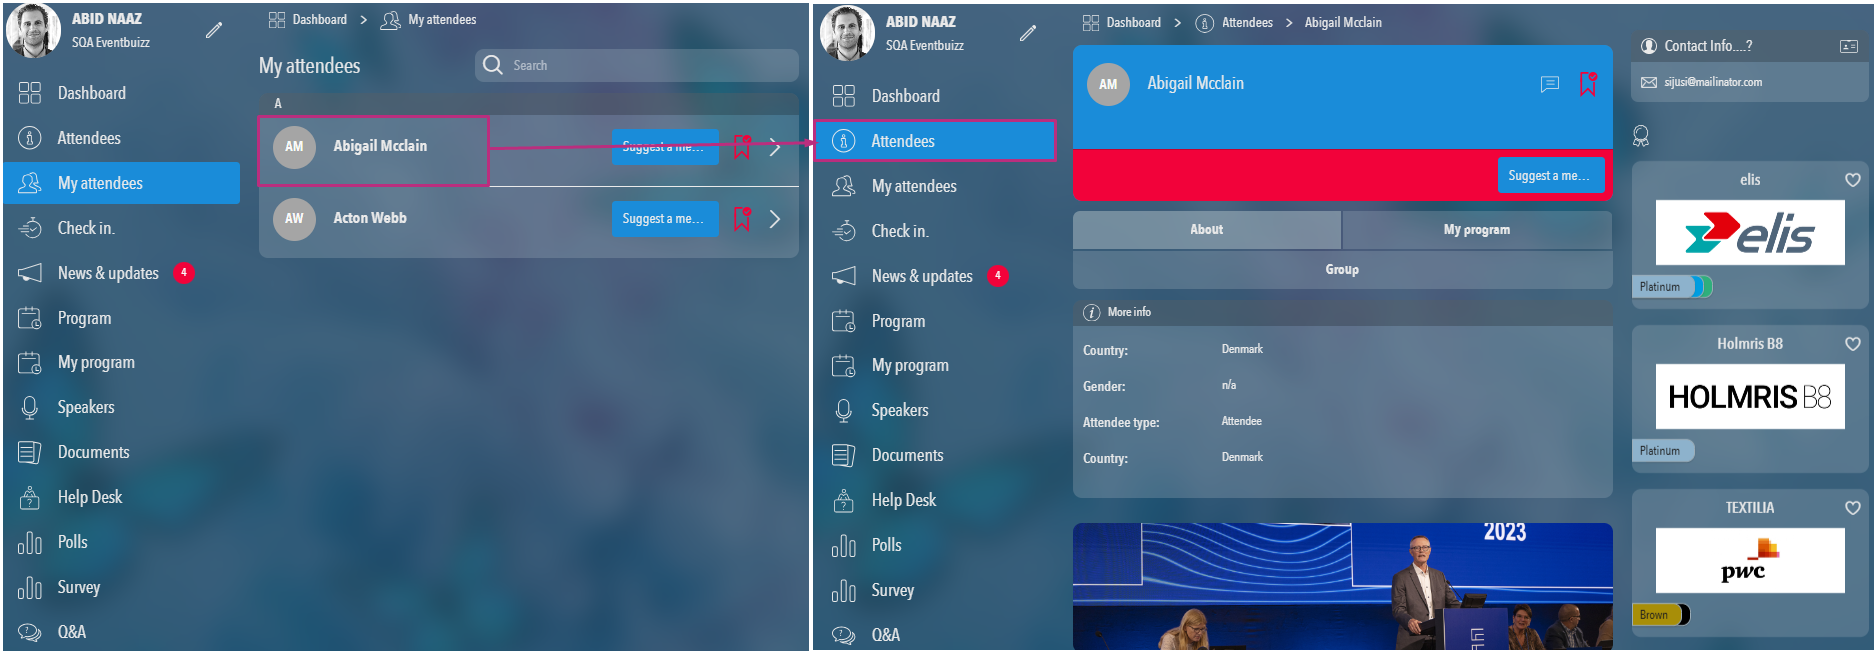
- About: About tab will represent the data related to attendee profile, all the fields which are the part of attendee profile will display in attendee tab except, phone, email and social fields.
- My program: This tab will show all the programs in which that attendee is attached.
- Group: This tab will show the listing of the groups in which attendee is attached.
- Contact info: This tab will show the data related to email, phone, and social fields, like Facebook, website etc.
- Sub registration: This tab will show in attendee detail, when attendee replied the sub registration, if attendee didn’t answer the sub registration, then it will not show.
Additional features on attendee listing and detail
Attendee listing and detail page have four additional features. Detail is given below about all available features.
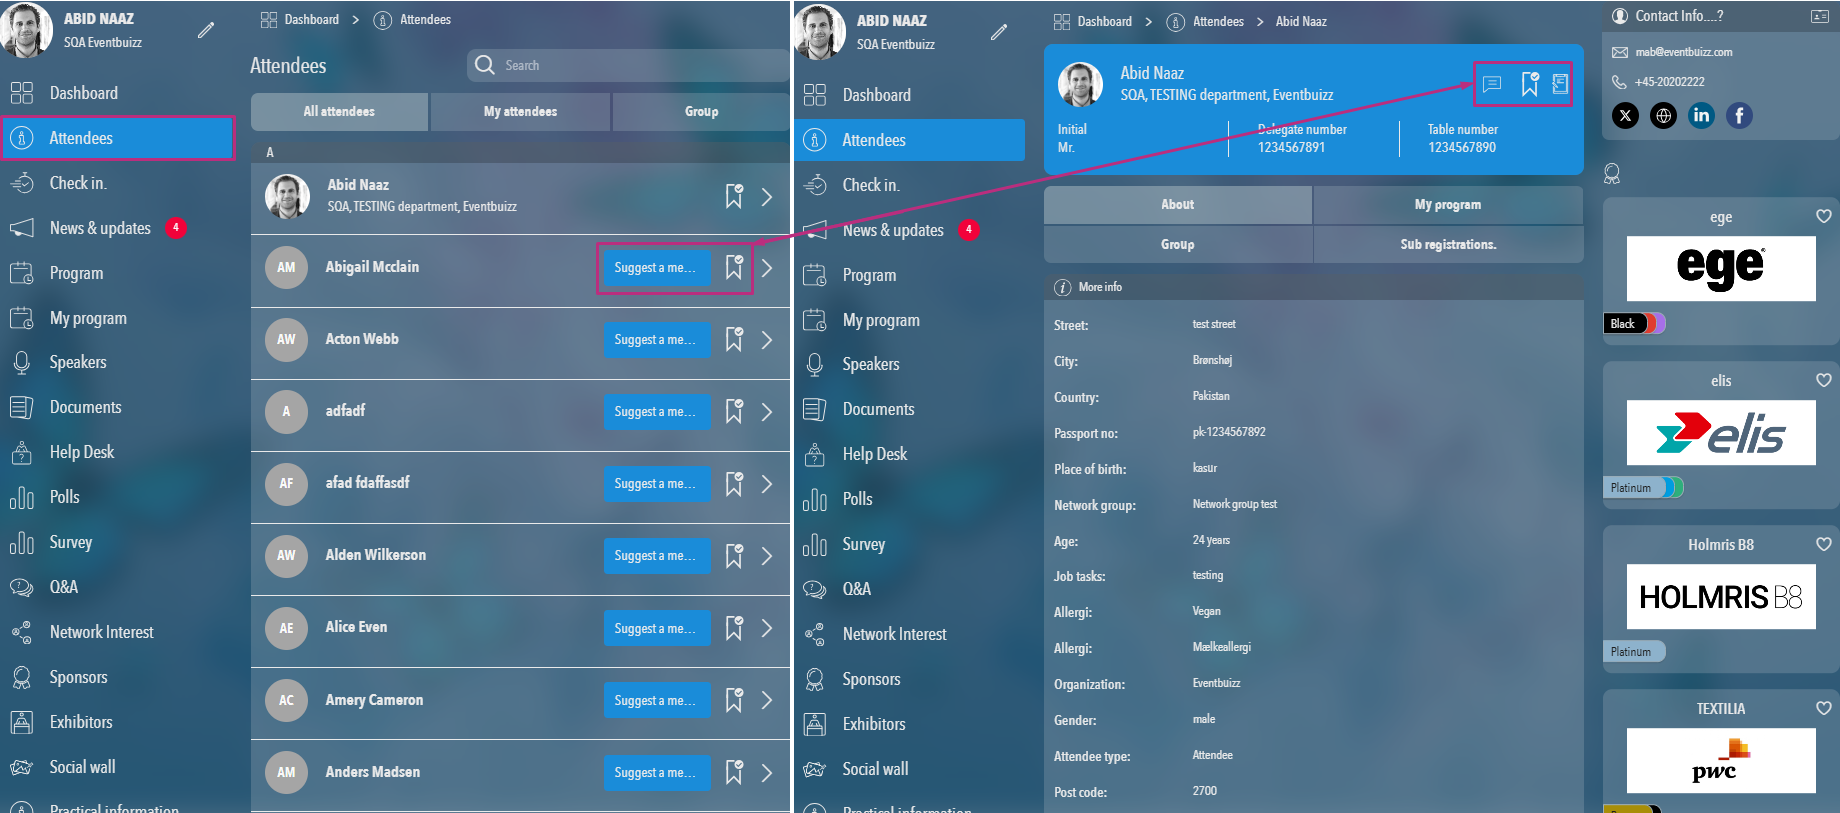
Suggest a meeting
Condition for display: Controlled by the “appointment tab” setting in field management under the native tab.
Implementation details
Attendee listing page:
- If the “appointment tab” setting is on, the “Suggest a Meeting” button will be displayed next to each attendee’s information.
- If the setting is off, the button will not be shown.
- How appointments are book, and how it works for further details please Click here
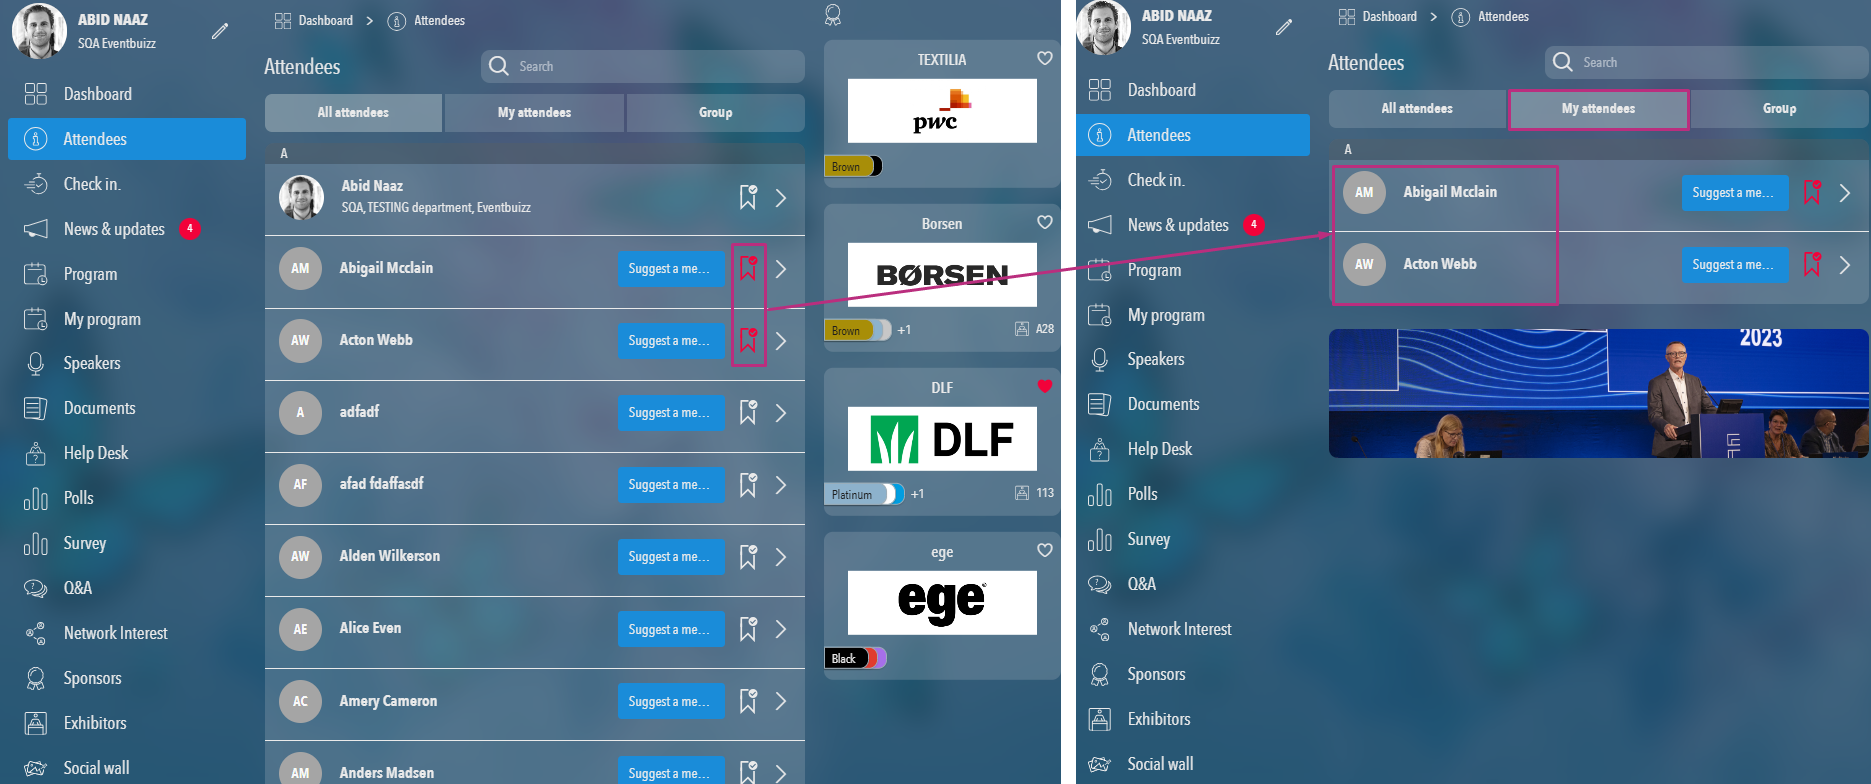
Favourite icon
- Purpose: Allows attendees to mark other attendees as favourites, and favourite attendees are shown in the “My attendee” tab listing.
- Condition for Display: Controlled by the “mark favourite” setting.
Implementation details
Attendee listing page:
- If the “Mark favorite” setting is on, the Favorite Icon will be displayed next to each attendee’s information.
- If the setting is off, the icon will not be shown.

Favorite attendees listing
- Marked favorite attendees will be listed in the “My Attendee” tab.

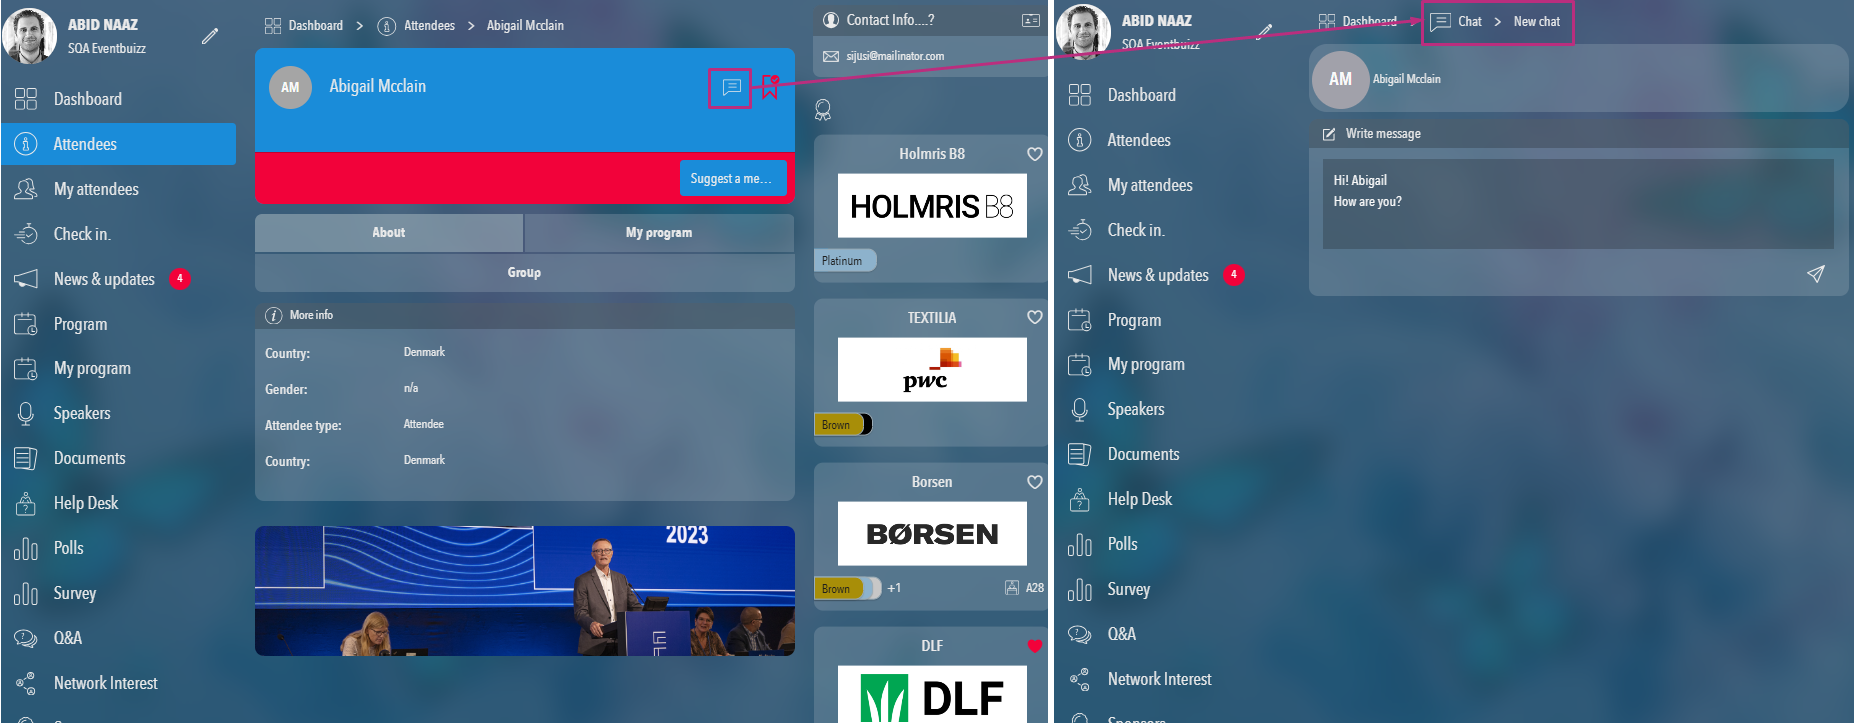
Chat icon
- Feature: Chat icon
- Purpose: Allows attendees to chat with other attendees personally.
- Condition for display: Always displayed on the attendee detail page, if chat module setting is on.
Implementation details
Attendee detail page:
- The chat icon will be displayed next to the attendee’s information.
- By clicking on the Chat Icon, the attendee can start a personal chat with the selected attendee.
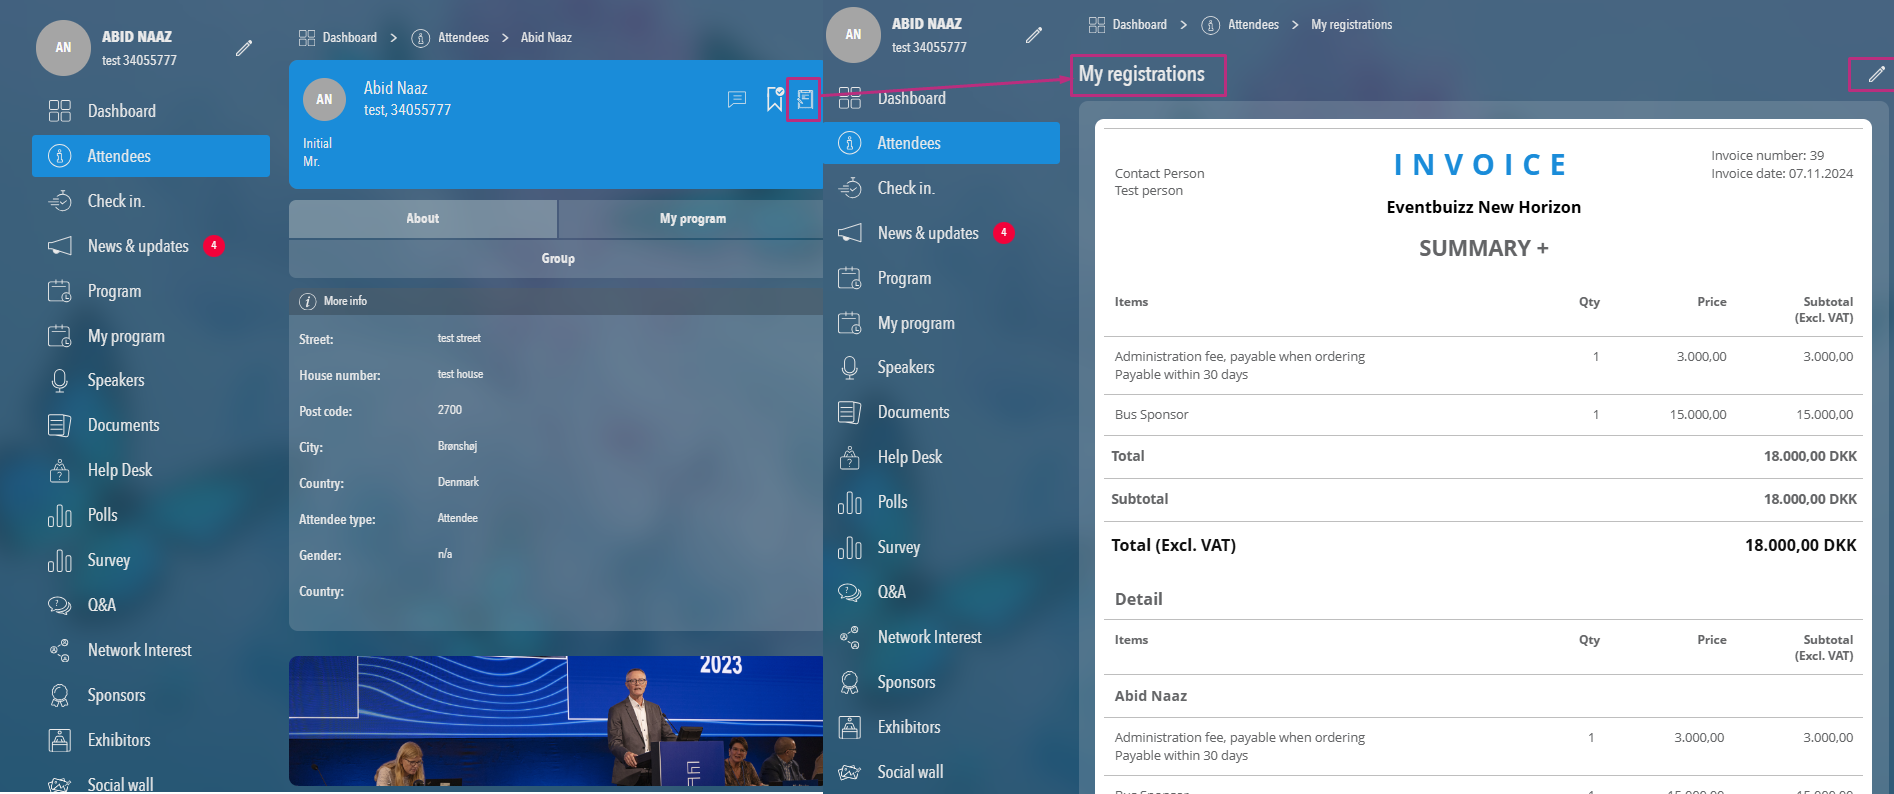
My registration icon
- Feature: My registration icon
- Purpose: Allows logged-in attendees to view and edit their order invoice.
- Condition for display: Controlled by the “My registration” setting and only visible to logged-in attendees.
Implementation details
Attendee detail page (Logged-in attendee):
- If the “My registration” setting is on, the my registration icon will be displayed in logged in attendee detail.
- If the setting is off, the icon will not be shown.
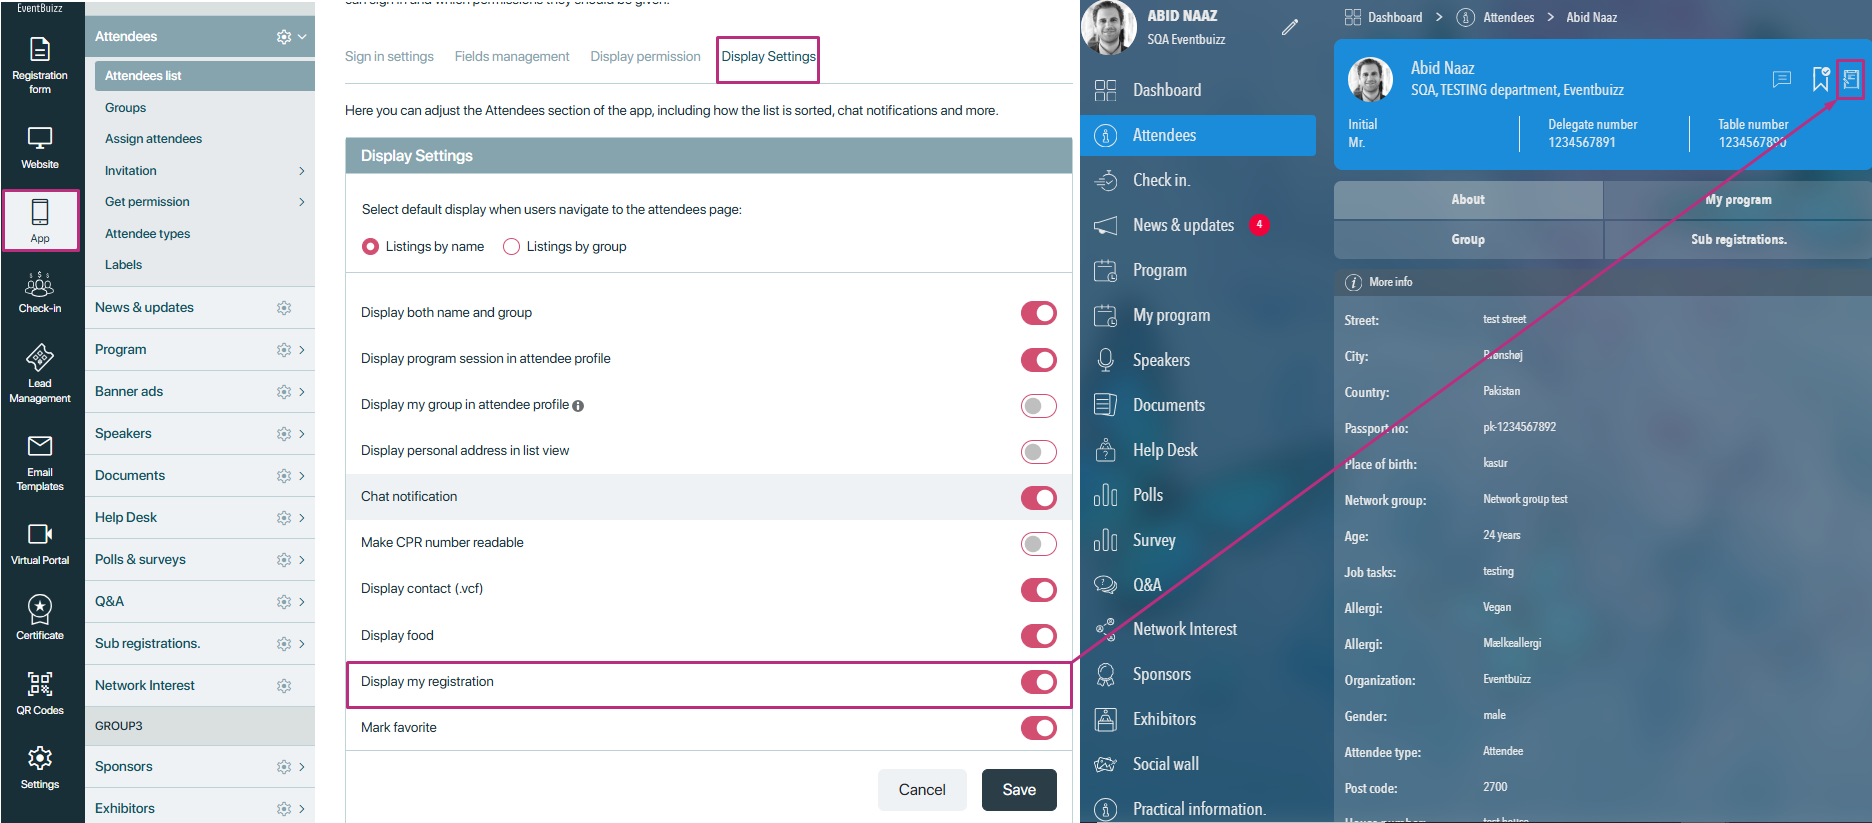
By clicking on the My registration icon, attendees can:
- View their order invoices if they exist.
- See a “No record found” message if there are no orders.
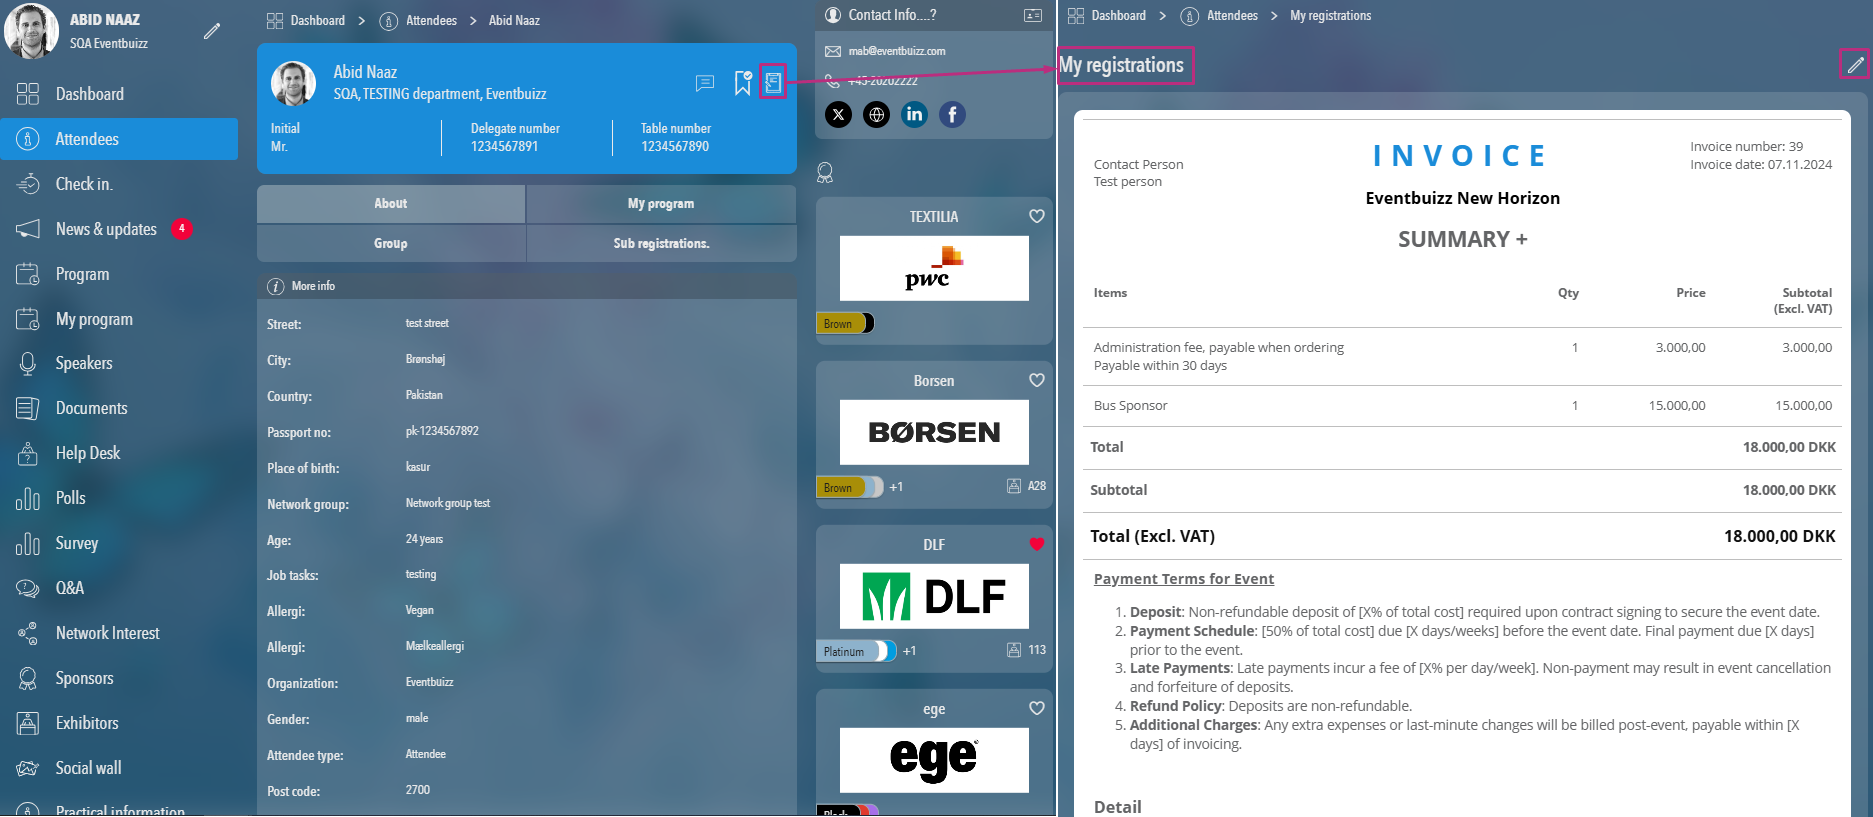
- Click the edit icon, will redirect to edit order, and attendee can edit their order.
My attendees
- This tab visibility is base on the setting of my attendee tab, in the customise app module.
- For enabling this tab organiser need to follow this path:
- Eventcenter->settings->sections->customise app modules
- If my attendee tab setting is on customise app module, then this tab will show in attendee tabs.
- If tab setting is off then this tab and in side menu of app it will not show.
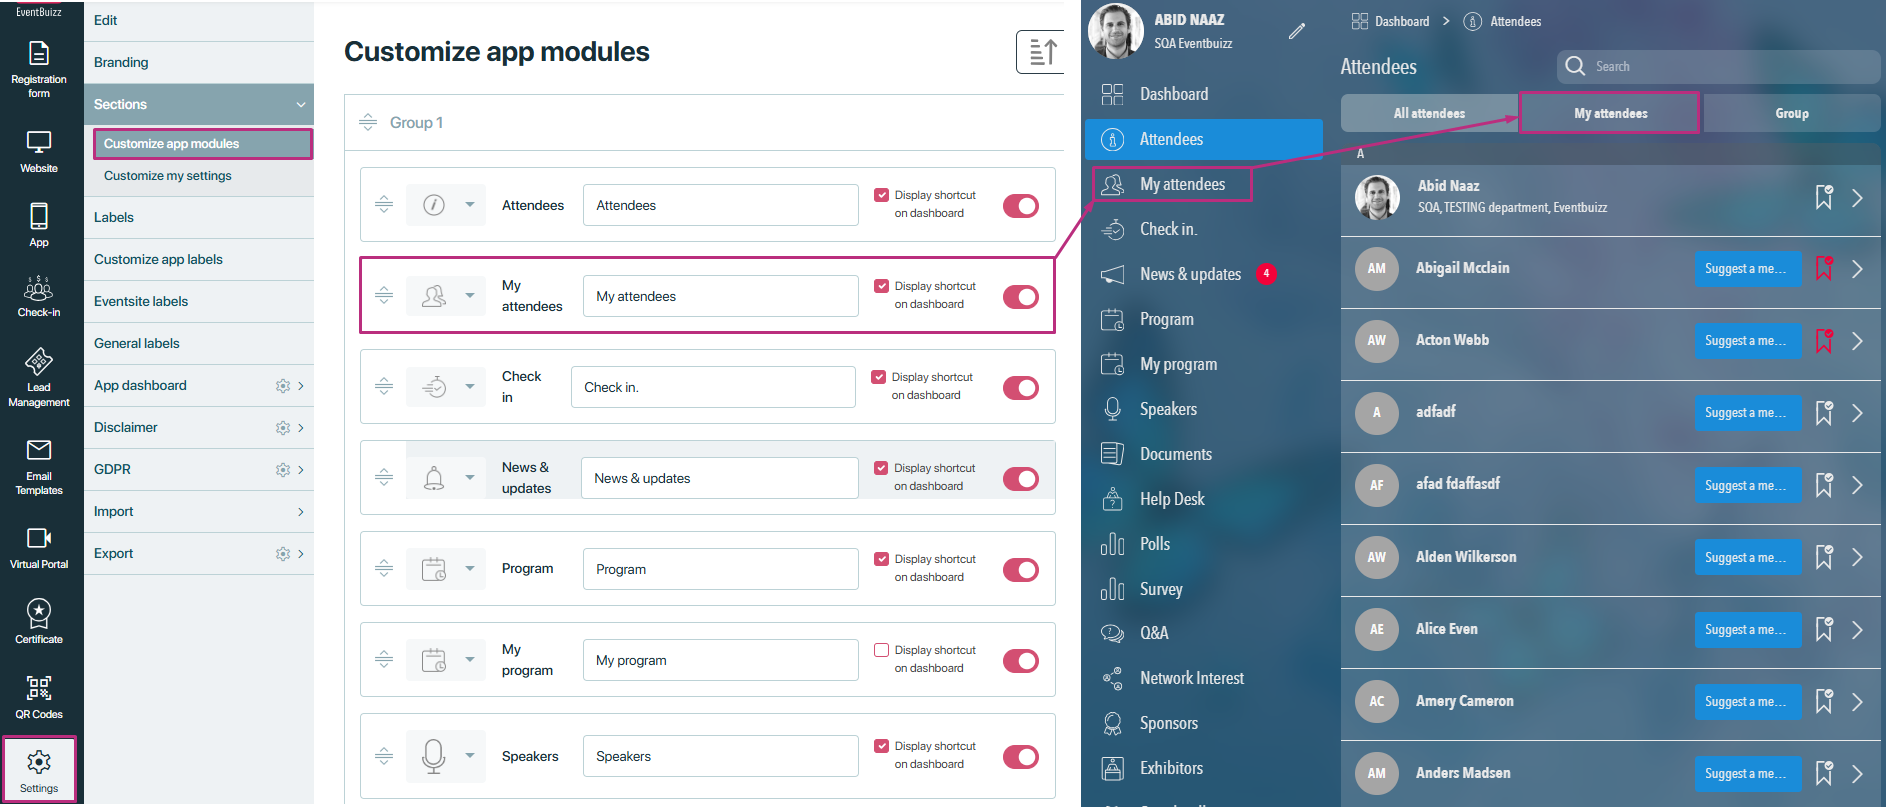
Favorite attendees listing:
- Marked favorite attendees will be listed in the “My attendee” tab.
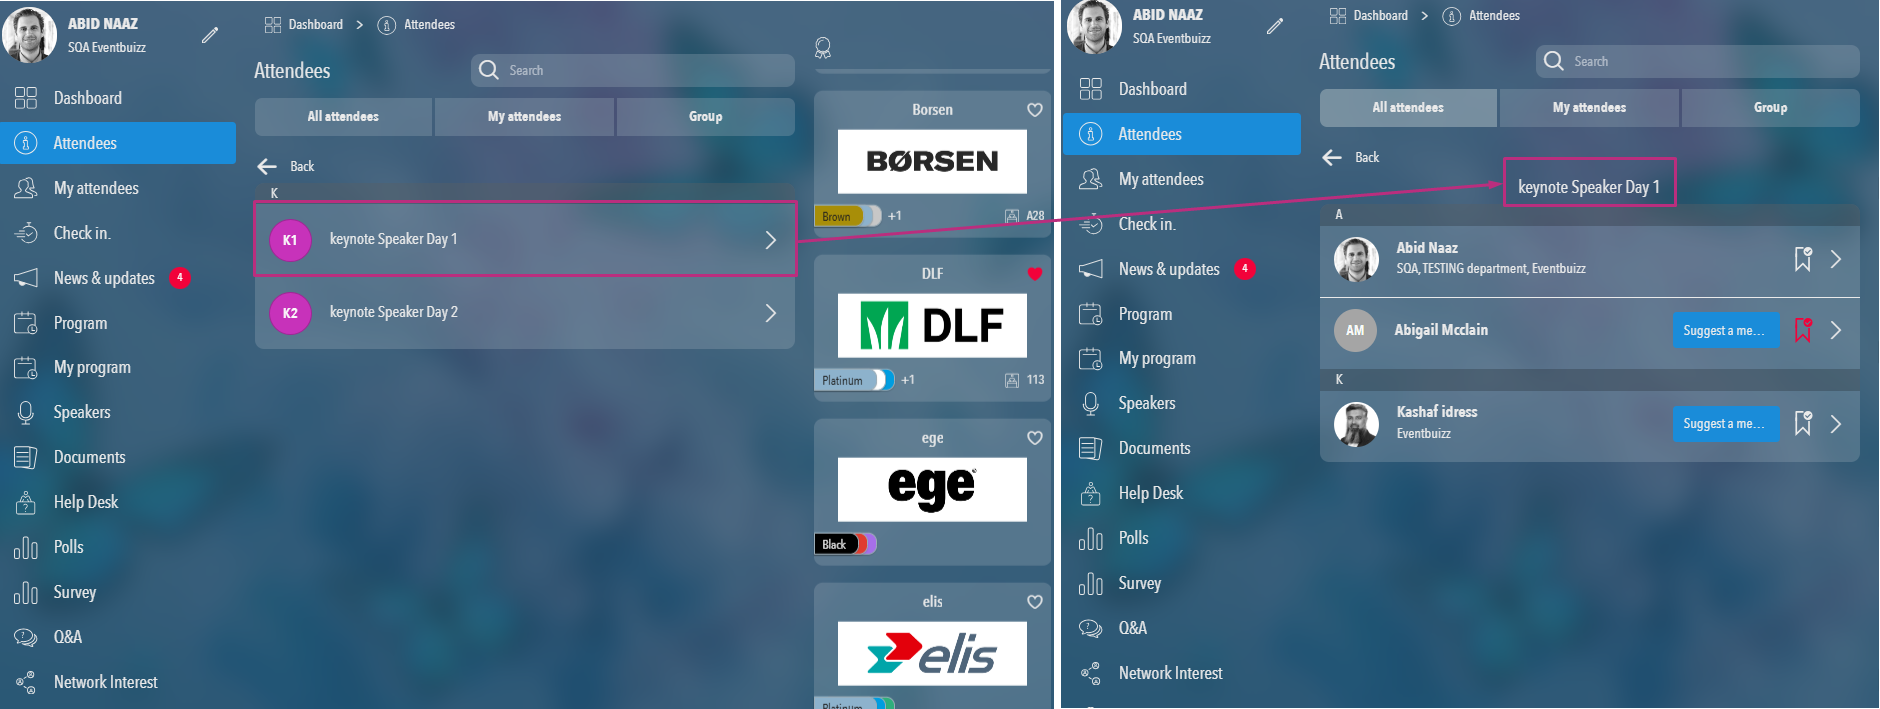
Group tab in attendee listing
Overview:
- Tab name: Group
- Purpose: To display all created groups, subgroups, and associated attendees.
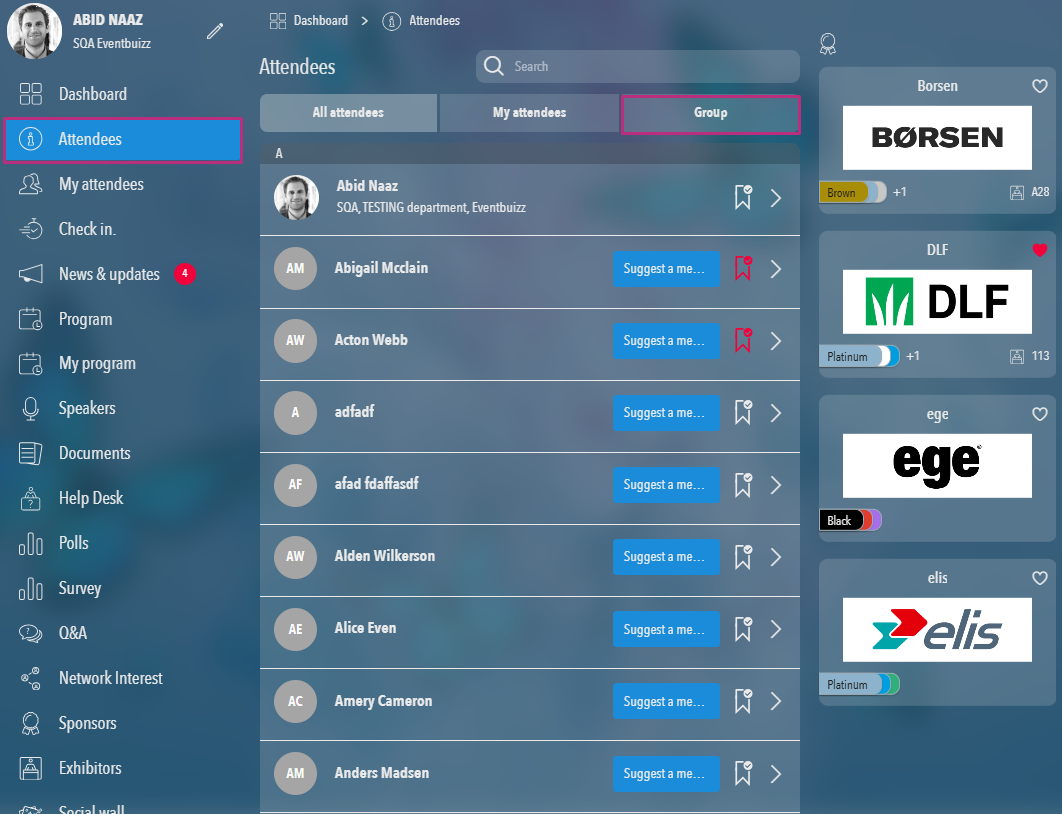
Functionality
Group listing:
- The “Group tab” will initially display a list of all created groups.
- Each group entry will include the group name on the listing.
Subgroup listing
- When a group is clicked, the system checks if subgroups exist for that group.
If subgroups exist:
- The subgroups will be listed under the clicked group.
- Each subgroup entry will include the subgroup name on the listing.
If no subgroups exist:
- The attendees associated with the clicked group will be displayed directly.
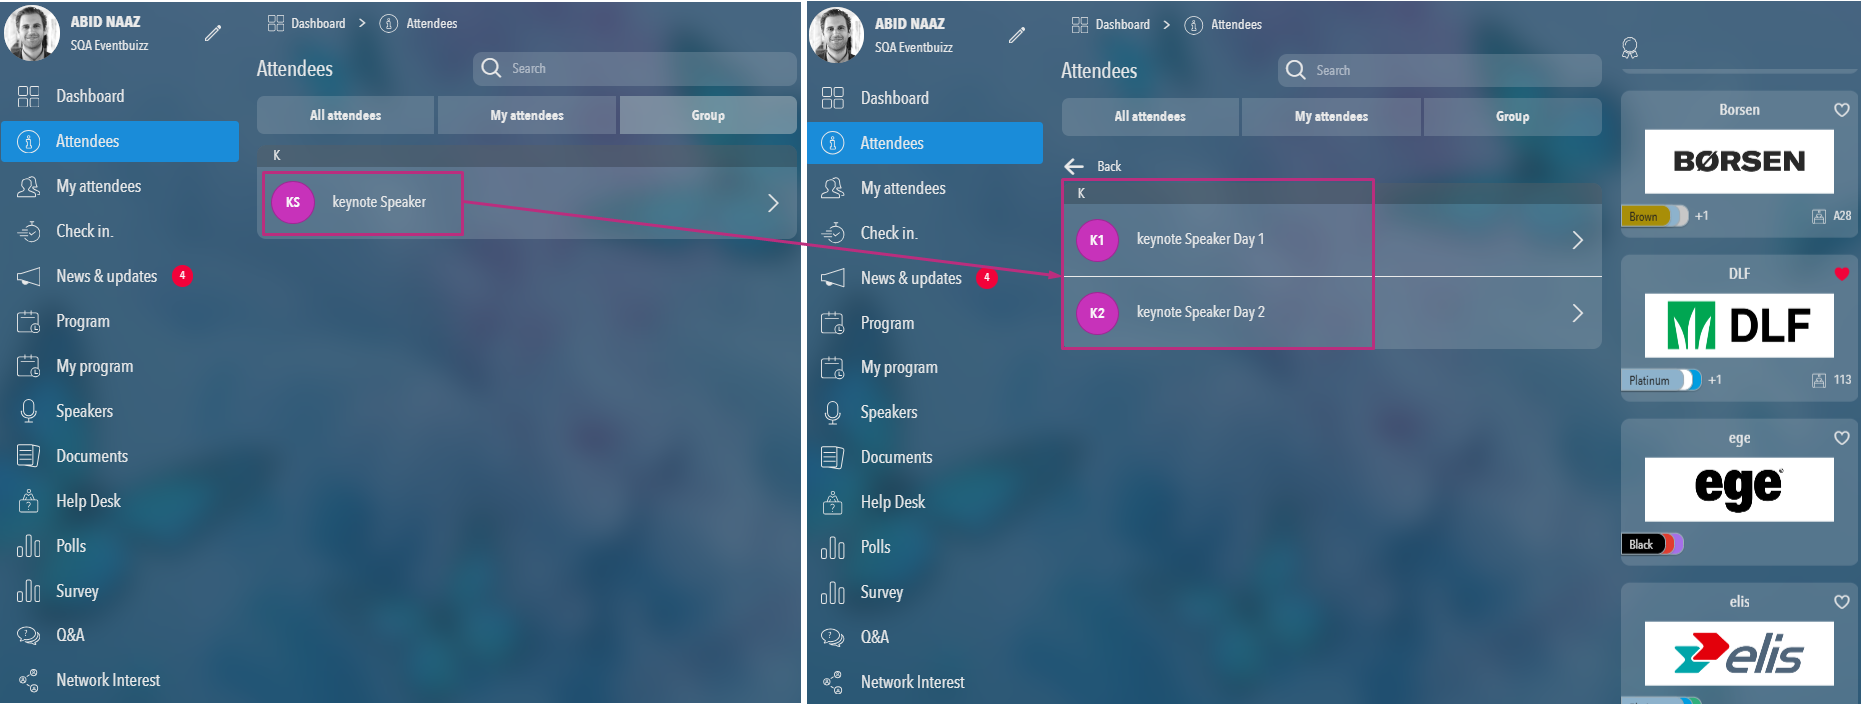
Attendee listing in subgroup:
- If subgroups exist and a specific subgroup is clicked, the attendees associated with that subgroup will be displayed.
- The attendee information displayed will follow the same format as the primary attendee listing, showing default fields like name, company, title, department, and profile picture.
The attendee module within the web application is designed to be highly accessible from various sections, ensuring that users can easily navigate to and interact with attendee information. Below are the detailed access points for the attendee module:
Access points for the attendee module
Attendee module itself
- Description: The primary access point where users can view, search, and interact with the full list of attendees.
- Functionality:
- Users can browse all attendees.
- Users can view attendee details by clicking on an attendee.
- Users can access additional features such as “Suggest a meeting,” “Favorite icon,” “Chat icon,” and “My registration icon” based on settings.
My attendee
- Description: A dedicated section that displays all the attendees marked as favorites by the user.
- Functionality:
- Lists all favorite attendees.
- Clicking on any favorite attendee redirects the user to the detailed view of that attendee in the attendee module.
- Purpose: Provides quick access to attendees that the user has marked as important or frequently interacts with.
Program’s attendee tab
- Description: Within the program section, there is a tab labelled “Attendees” that lists all attendees linked to a particular program.
- Functionality:
- Displays a list of attendees associated with the specific program.
- Clicking on any attendee within this tab redirects the user to the detailed view of that attendee in the attendee module.
- Purpose: Allows users to see and interact with attendees who are part of the same program, facilitating networking and collaboration.
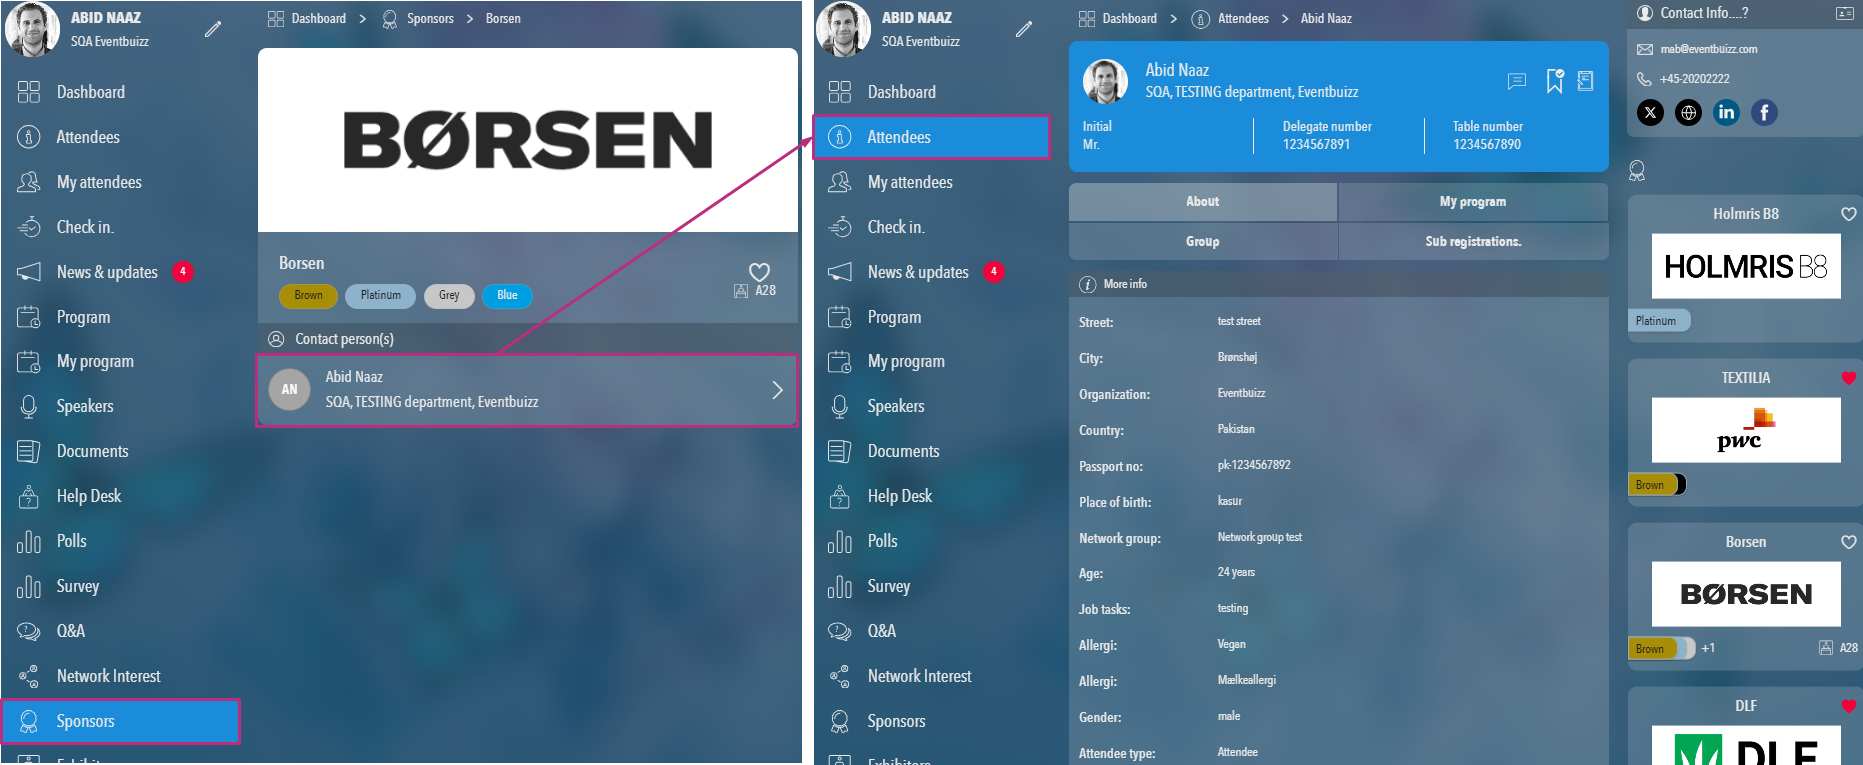
Sponsor/exhibitor contacts
- Description: Sponsors and exhibitors have assigned contact persons. These contact persons are essentially attendees.
- Functionality:
- Displays the contact persons associated with sponsors and exhibitors.
- Clicking on any contact person redirects the user to the detailed view of that contact person in the attendee module.
- Purpose: Provides direct access to the contact persons for sponsors and exhibitors, enabling easy communication and networking.