In Eventbuizz, “Registration items” typically refer to the different types of tickets, passes, or registration options that event organizers can offer to attendees. These registration items can vary based on the nature of the event and the preferences of the organizers.
Registration items are set up the same way for free and billing event, the only difference is that you cannot enter a price in registration items of free event.
Registration Item
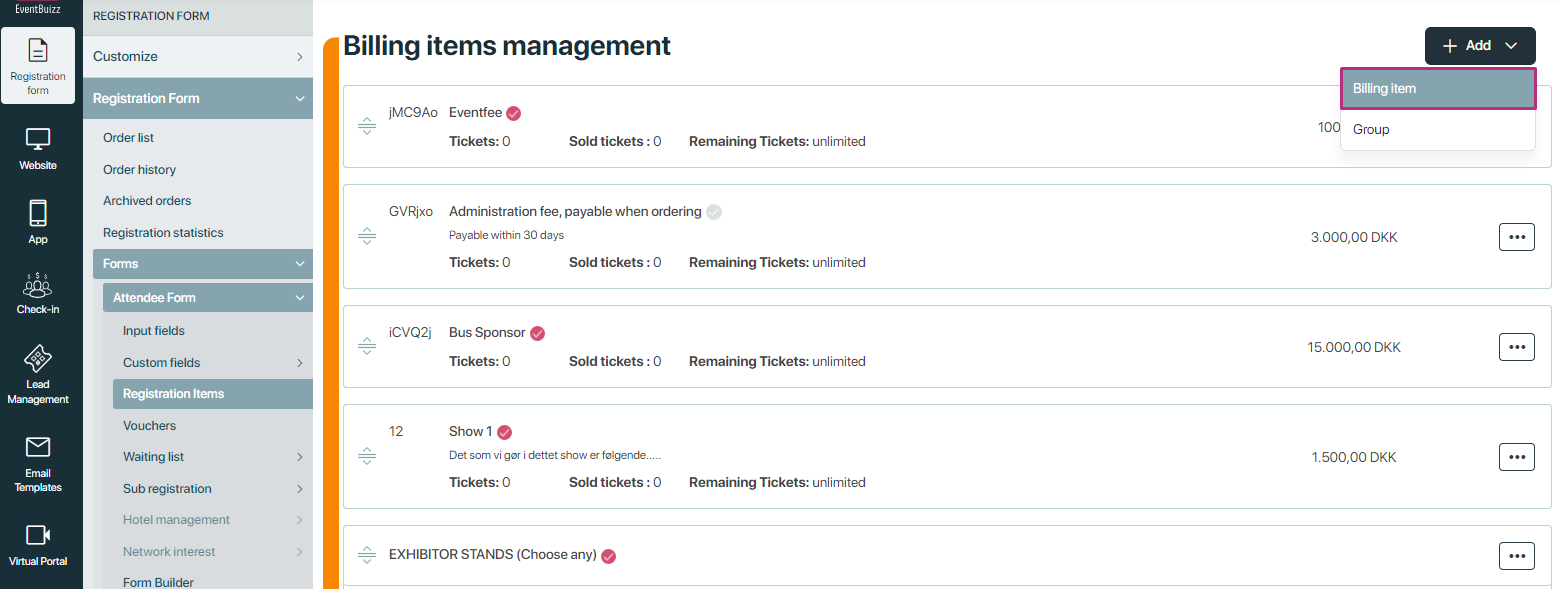
To add registration item, Click +Add button.
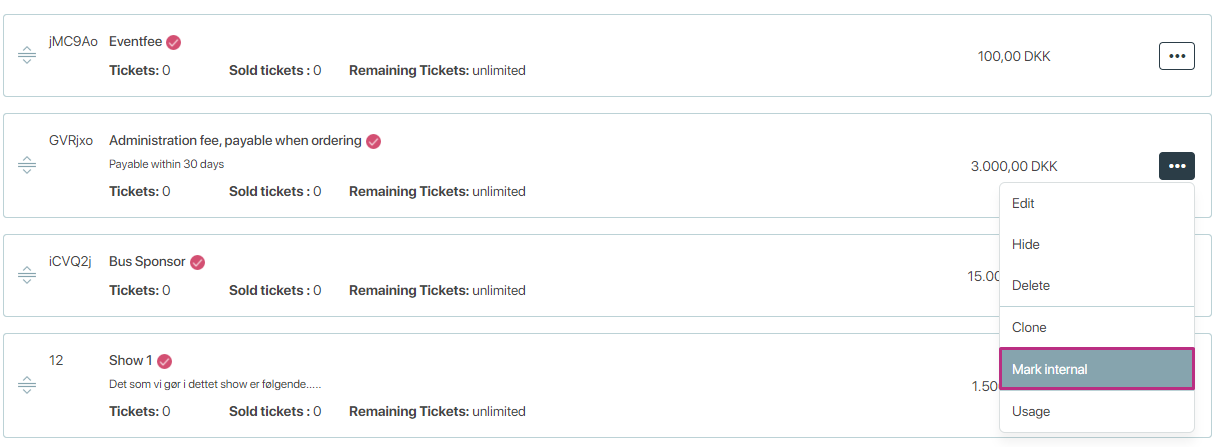
To edit, select the item. Click on the ![]() and edit.
and edit.
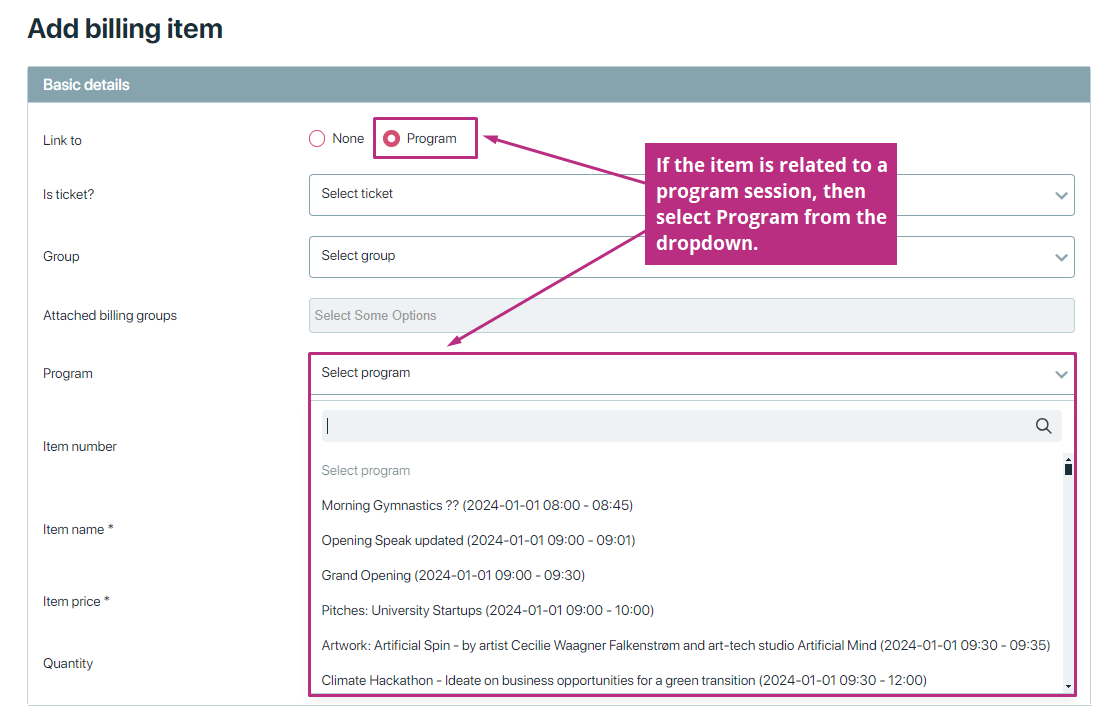
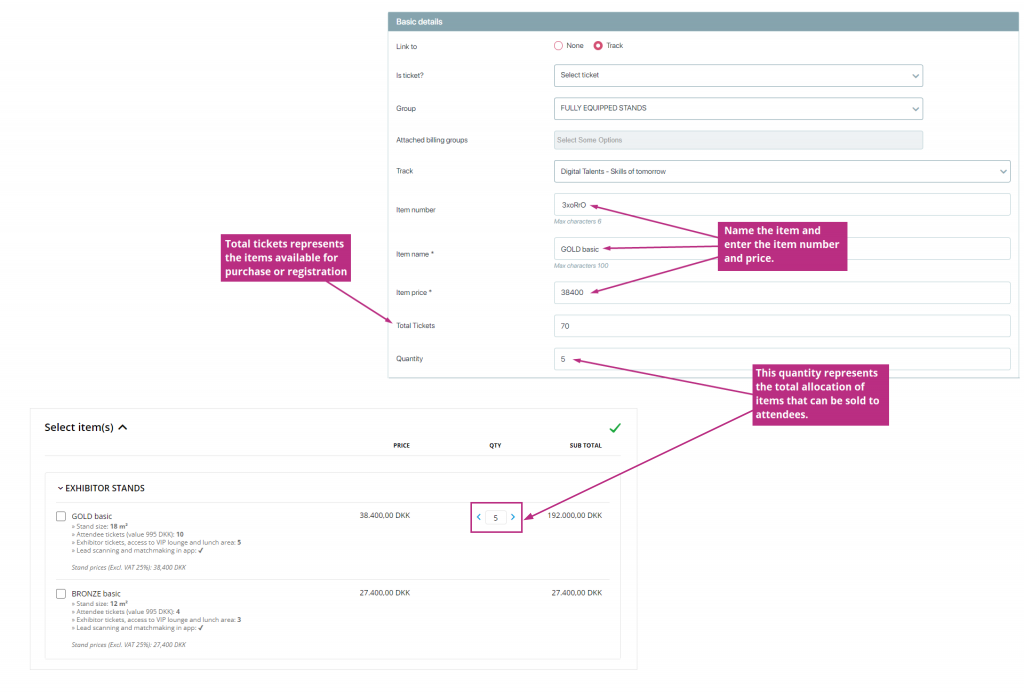
Organizer can link items to programs, tracks, groups and workshops. To change these settings visit Form Settings. whatever the link to option is selected, that same option will appear when you add/ edit items. For example, if organizer choose “Programs” you’ll see same thing when you add or edit items.
If the billing item is related to the program, choose which program session from the drop down menu. Fill out all mandatory fields.
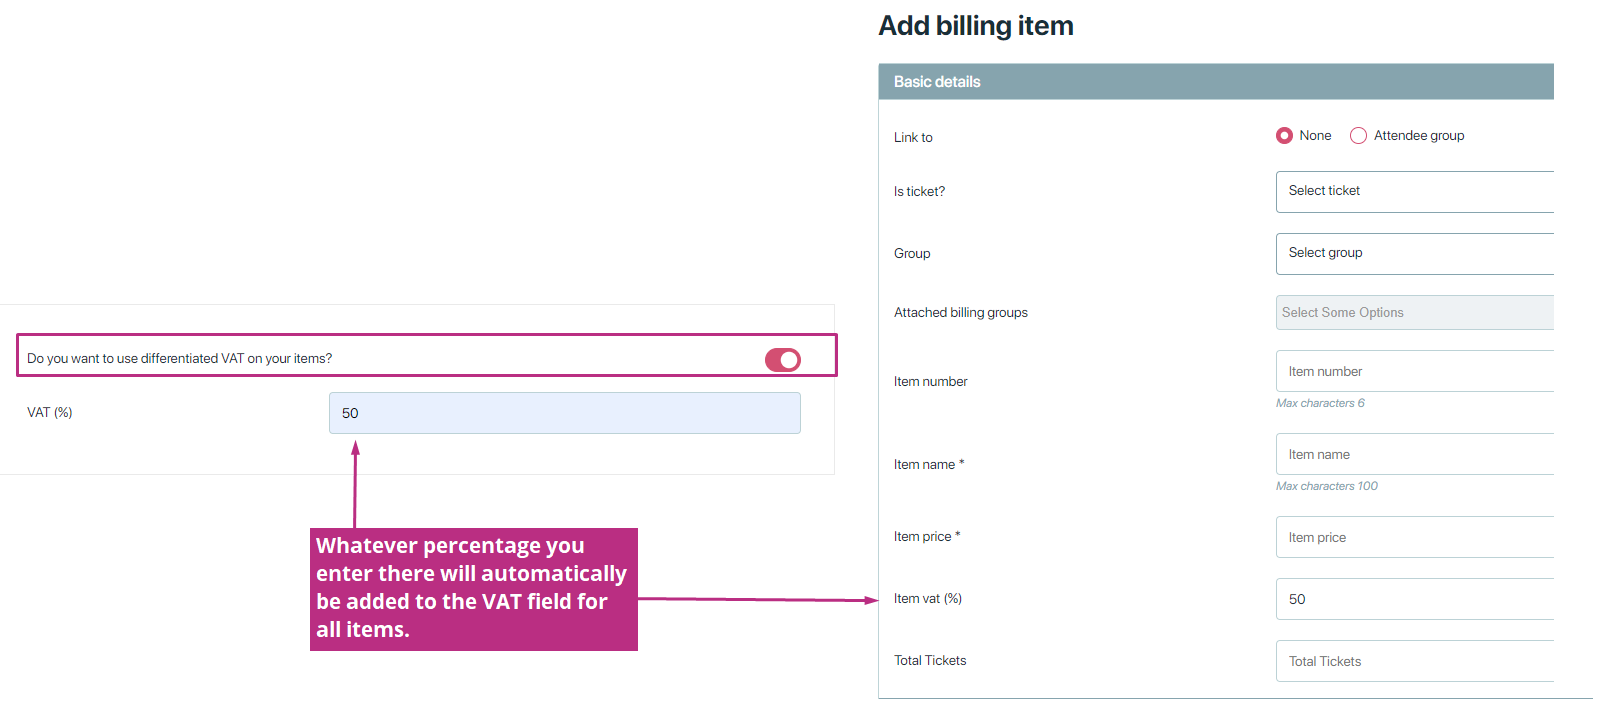
When “Do you want to use differentiated VAT on your items?” setting is ON. When you’re adding or editing a billing item, there’s a field where you can enter the VAT (%). Whatever percentage you enter there will automatically be added to the VAT field for all items. But if you want, you can also give different VAT amounts for each item.
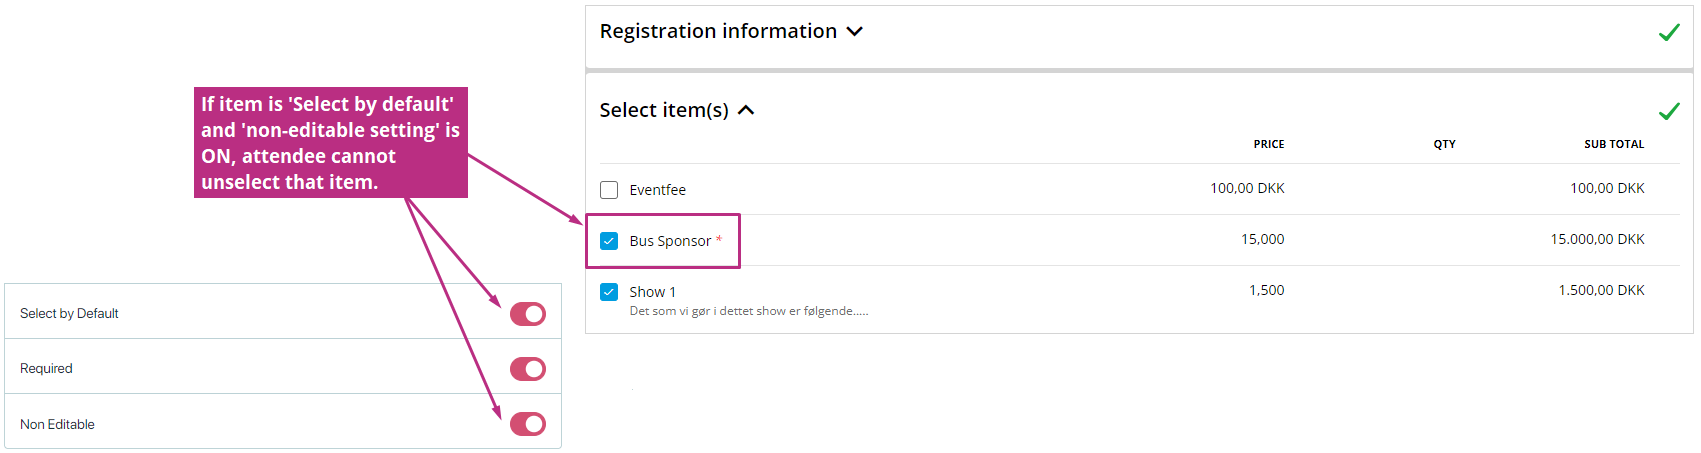
Select by default: This setting determines whether an option is automatically selected for the attendee when they reach the registration form. This can be useful for options that you want most attendees to choose, but they still have the option to uncheck if they prefer not to select it.
Required: This setting makes a registration item mandatory for all attendees to select before they can complete their registration.
Non – Editable: When a registration fields is marked as “Non Editable,” it means that attendees cannot unselect the registration item. This can be useful for certain details that organizers want to lock down, certain preferences selected during the registration process.
-
Rules for date based prices/ Early bird discount.
-
Rules for quantity based discounts/ Group discounts billing items
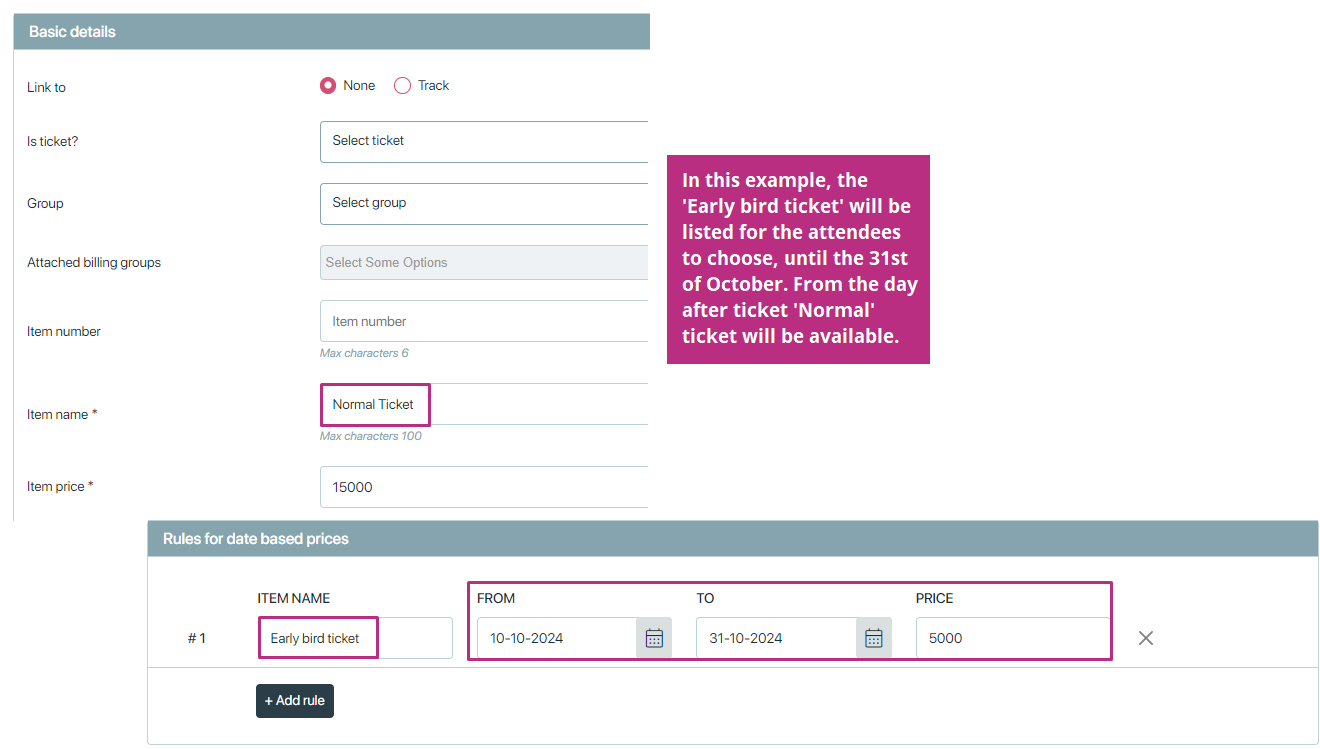
Rules for date based prices/ Early bird discount:
The early bird discount is a promotional offer where attendees receive a reduced price for registering or purchasing tickets within a specified early registration period. If you have a billing item with a reduced price for a certain period, event organizers can set up early bird discounts by defining a specific date range during which the discounted price applies. Attendees who register or purchase tickets during this early bird period will automatically receive the discounted rate. Once the early bird period expires, the regular or standard pricing will apply.
Early bird prices
First you set up the regular billing item, with the normal name and price. In the bottom of the billing item, you set the rules for the discounted prices.
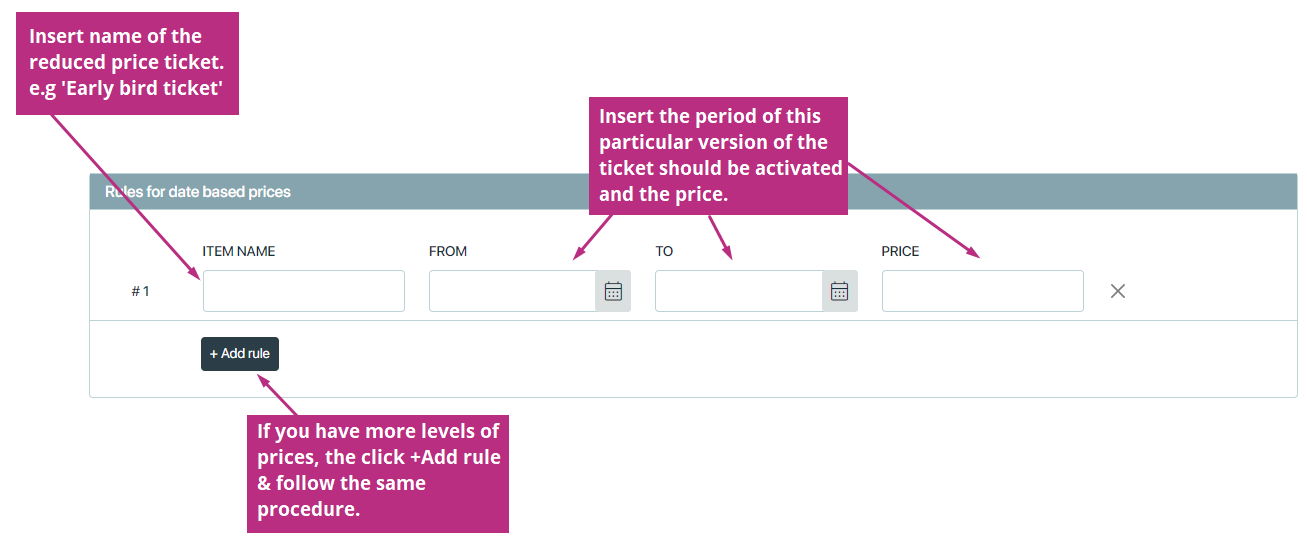
See the below example to better understand the set-up.
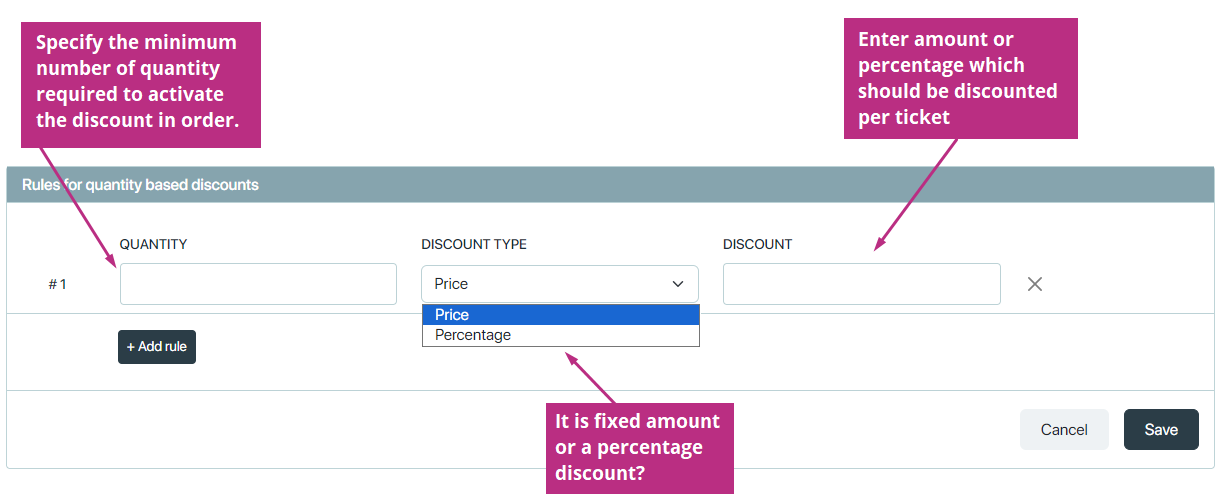
Rules for quantity based discounts/ Group discounts billing items:
If you wish to offer a discount on your conference tickets, based on a certain amount of attendees signing up, you can do so by setting a rule for quantity-based discounts per billing item.
The setting can be found here:
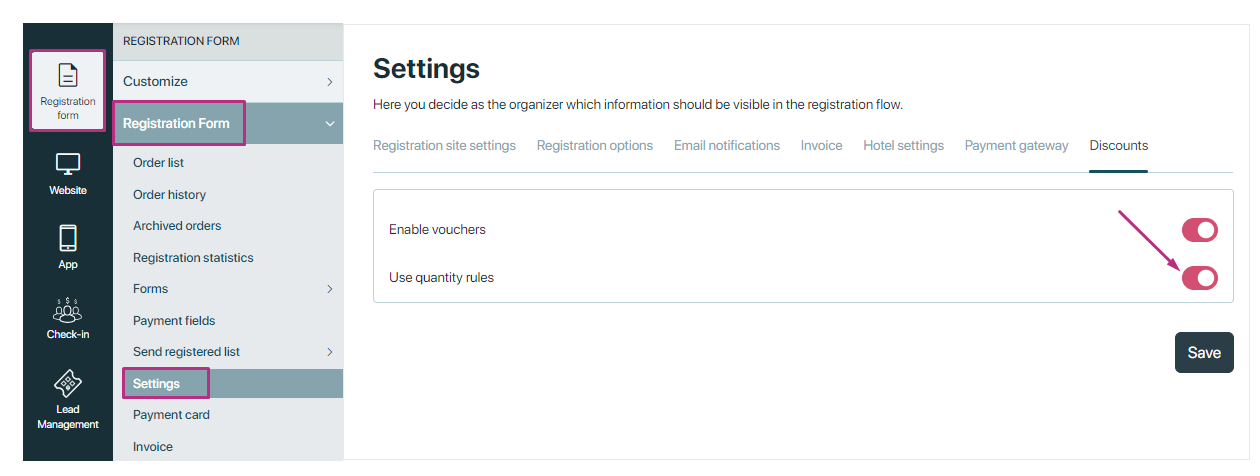
Once the detail is set for the billing item, you create the rule. If you have more than one type of discount, you just add another rule in +add rule
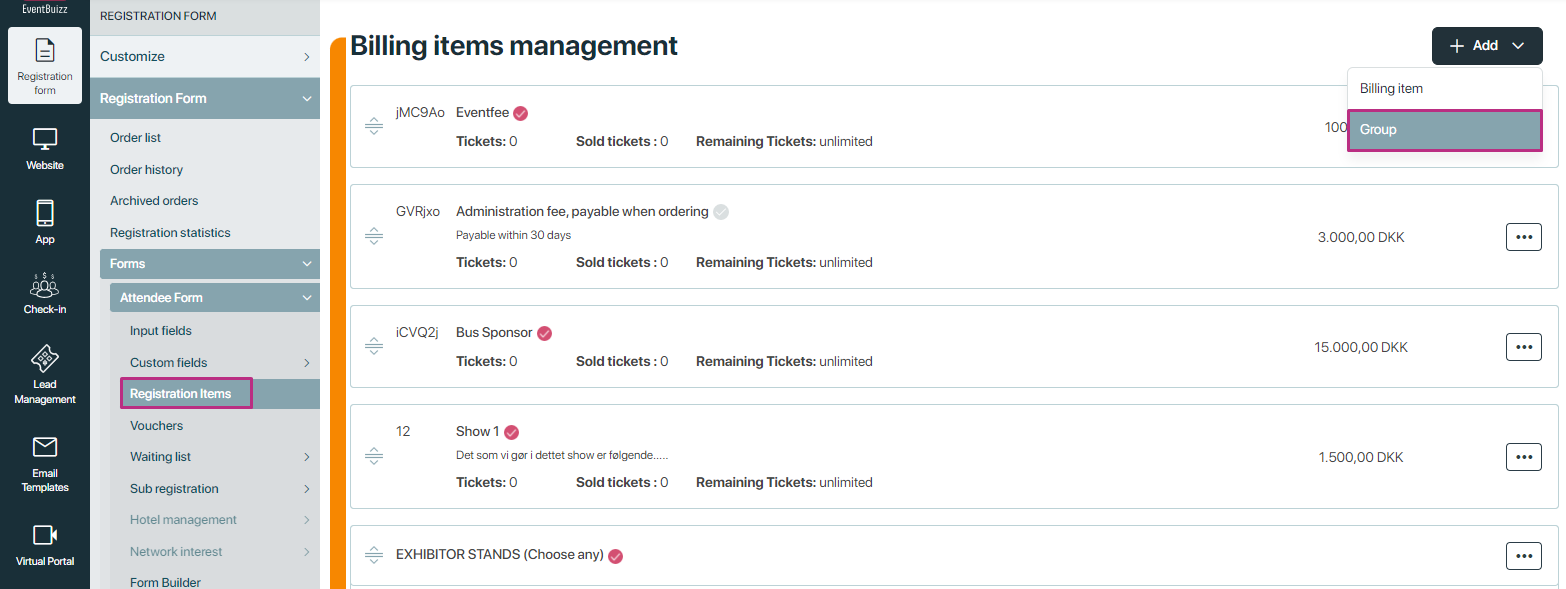
Add registration item group
Once you decide to add items in group. Click +add button and select group.
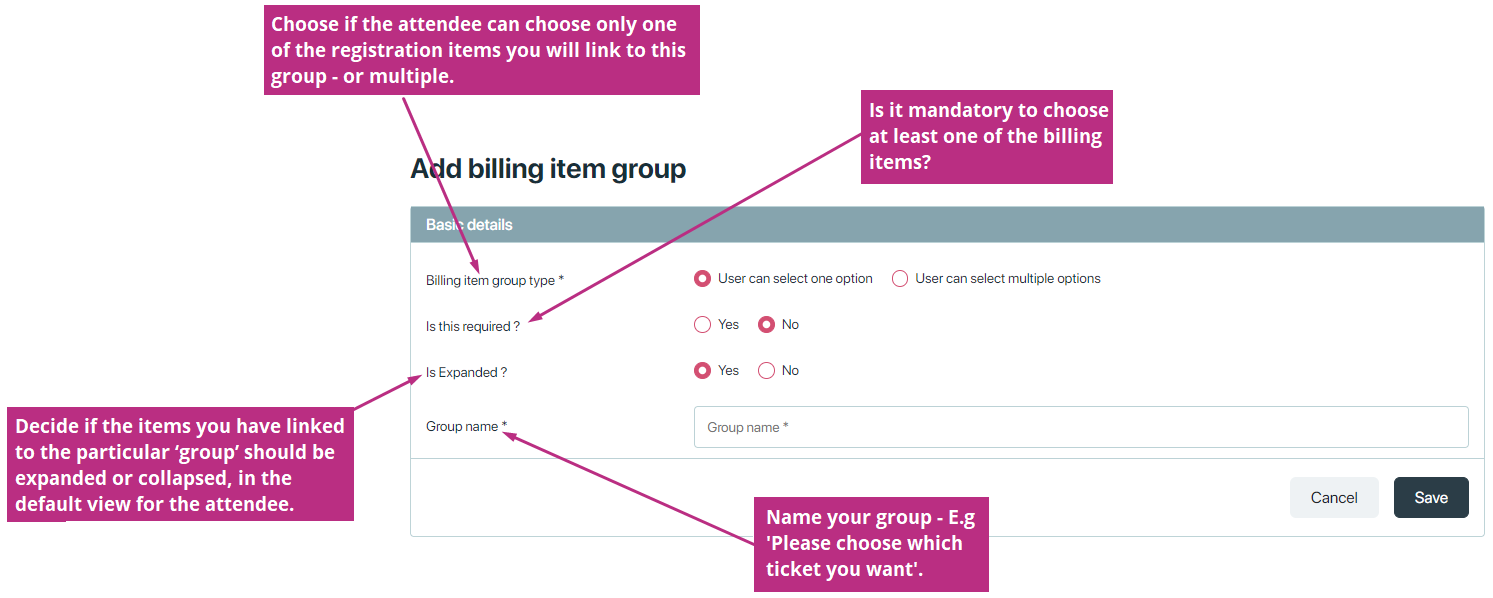
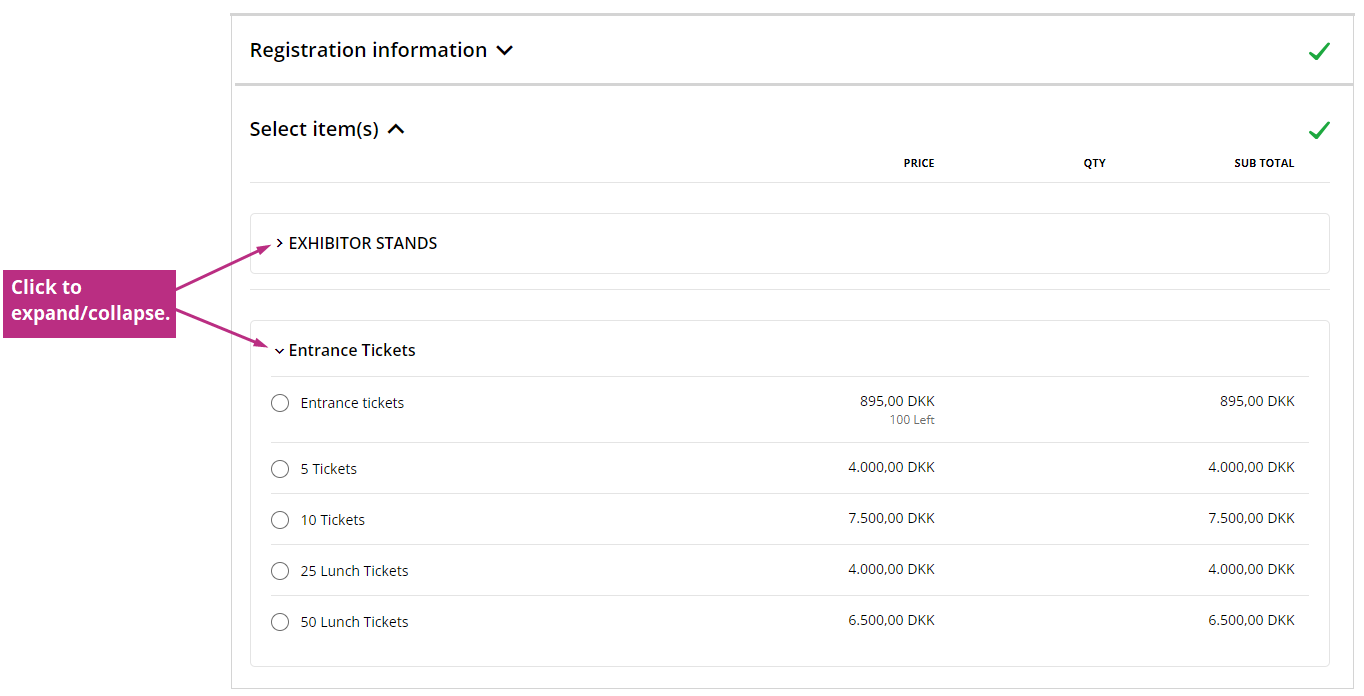
Is expanded ? Expand/ collapse group registration items
If you have an event – billing or free – and you use registration items, you are now able to decide if the items you have linked to the particular ‘group’ should be expanded or collapsed, in the default view for the attendee.
If you have very few groups/registration items, this feature might not be relevant for you. However, if you have many, this will make the overview for the attendee registering much better.
Here is an example, where the first group of items is collapsed and the second group of items is expanded:
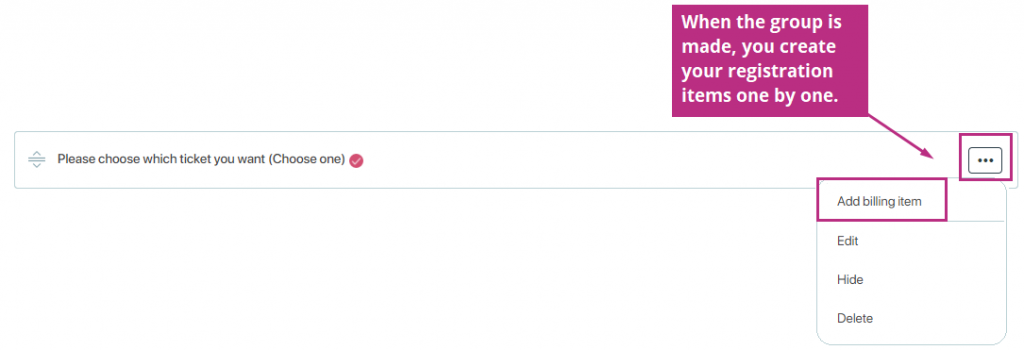
When the group is made, you can create your registration items one by one in the group by click on the icon ![]() , Add billing item.
, Add billing item.
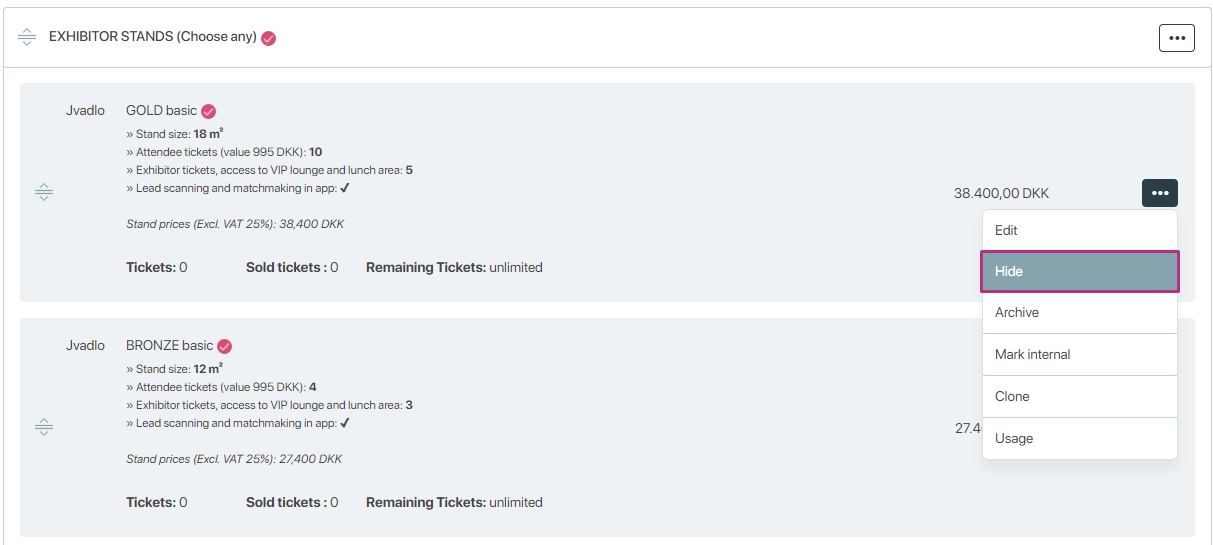
Hide/show
The “show/hide” functionality in registration items allows event organizers to control the visibility of specific items during the registration process. Here’s how it works:
-
Show:
When an item is set to “show,” it means that the item will be displayed to attendees as an option during the registration process. Attendees will be able to see the item and choose whether to select it or not.
When an item group is set to “show,” it means that all items within that group will be displayed to attendees during the registration process. Attendees will see the group and its contents as selectable options, and they can choose items from within that group. -
Hide:
When an item is set to “hide,” it means that the item will not be displayed to attendees during the registration process. Attendees will not see the item as an option, and therefore they will not have the opportunity to select it.
When an item group is set to “hide,” it means that the entire group and its contents will be hidden from attendees during the registration process. Attendees will not see any items within that group as options, and therefore they will not have the opportunity to select any items from that group.
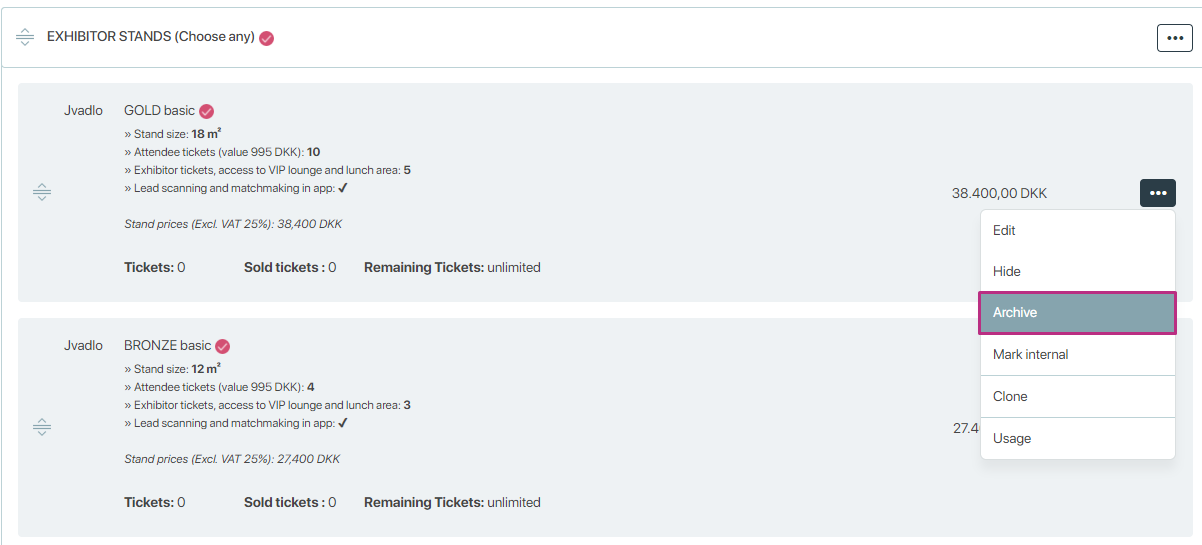
Archive/ Delete
The “Archive“ and “Delete” functions for items serve different purposes:
- Archive: When you archive an item, it means that you are removing it from active use but preserving its data and settings for future reference. Archived items are no longer visible or accessible to users during the registration process, but their information is retained in the system. This can be useful for records or if you may want to reactivate the item in the future.
- Delete: Deleting an item, on the other hand, permanently removes it, including all associated data and settings. Once an item is deleted, it cannot be recovered, and any information related to that item is permanently lost.
NOTE: When an item is marked as internal, it will only be visible in the edit order section and not in the registration flow.
Mark Internal/ Mark Public
The “Mark Internal/Mark Public” allow event organizers to categorize specific items as either
- Mark Internal: solely to event organizers.
- Mark Public: visible to all attendees or participants.
Note: When an order has been placed for a particular item, it cannot be deleted; it can only be archived. If an item is archived, it will hide from everywhere but will show if it was purchased in any order on order detail. While deleted item will not be displayed anywhere.
Clone
Cloning an item typically refers to creating an identical copy of a program. This process involves duplicating the content, layout, and formatting of the original item to reproduce it precisely.

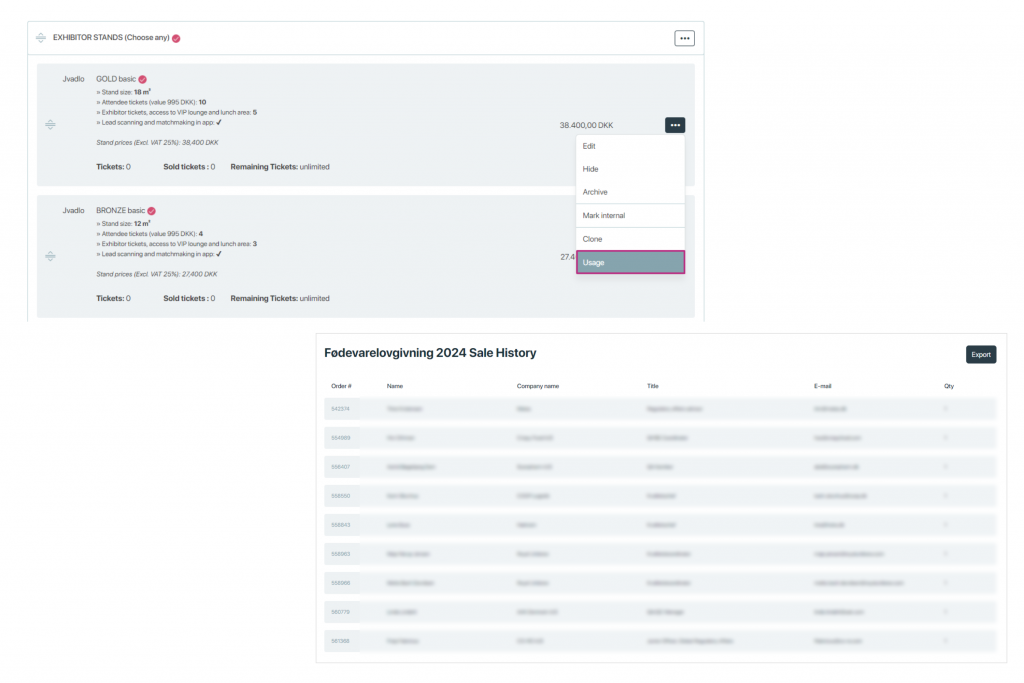
Usage
In terms of usage, organizers can access the sale history of any item. This means that organizers can view a comprehensive record of all transactions related to a specific item, including details such as order number of each sale, company, title, email and the quantity generated from those sales. Additionally, organizers have the ability to export this sales history data, typically in a downloadable format such as a spreadsheet or CSV file.