A form builder is a versatile tool that allows organisers to create custom registration forms for events. Organisers can use it to add various types of fields, such as text boxes, check-boxes, and drop-down menus, to collect specific information from attendees. This tool simplifies the process of gathering all necessary details and documents during the registration process.
Purpose and functionality of form builder
The primary purpose of a form builder is to streamline the creation of event registration forms. This tool provides organisers with a user-friendly interface to design forms that cater to the unique needs of their events. By using a form builder, organisers can efficiently gather information from attendees, ensuring a smooth registration process and the collection of relevant data.
Key features of form builder
- Customizable fields: Organisers can add various types of fields to their forms, including text boxes, check-boxes, drop-down menus, and more. This flexibility allows for the collection of diverse information from attendees.
- Easy data collection: The form builder makes it easy to gather all necessary details and documents during the registration process, ensuring that organisers have all the information they need.
- User-friendly interface: The intuitive interface of the form builder allows organisers to design forms quickly and efficiently, without requiring technical expertise.
- Versatile question types: There are ten types of questions available in the form builder, each designed to collect data in a different way. Organisers can choose the most appropriate question type based on the information they need to gather.
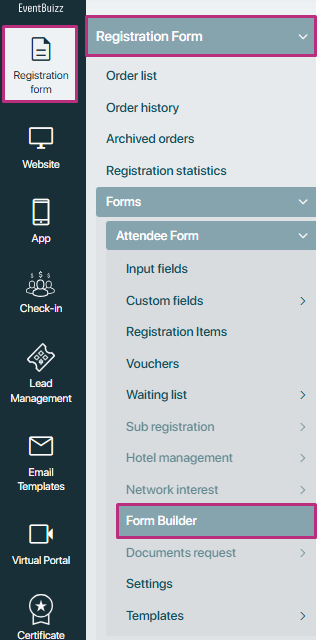
To navigate to the form builder as an organiser follow this path:
- Eventcenter: Start by accessing the eventcenter.
- Registration form: From the left-hand navigation, select registration form.
- Form: Choose the specific form you want to customise.
- Select attendee form: Select the attendee form from the available options.
- Form builder: Click on form builder to enter the form customisation interface.
By following these steps, the organiser can customise the registration form according to the event’s needs.
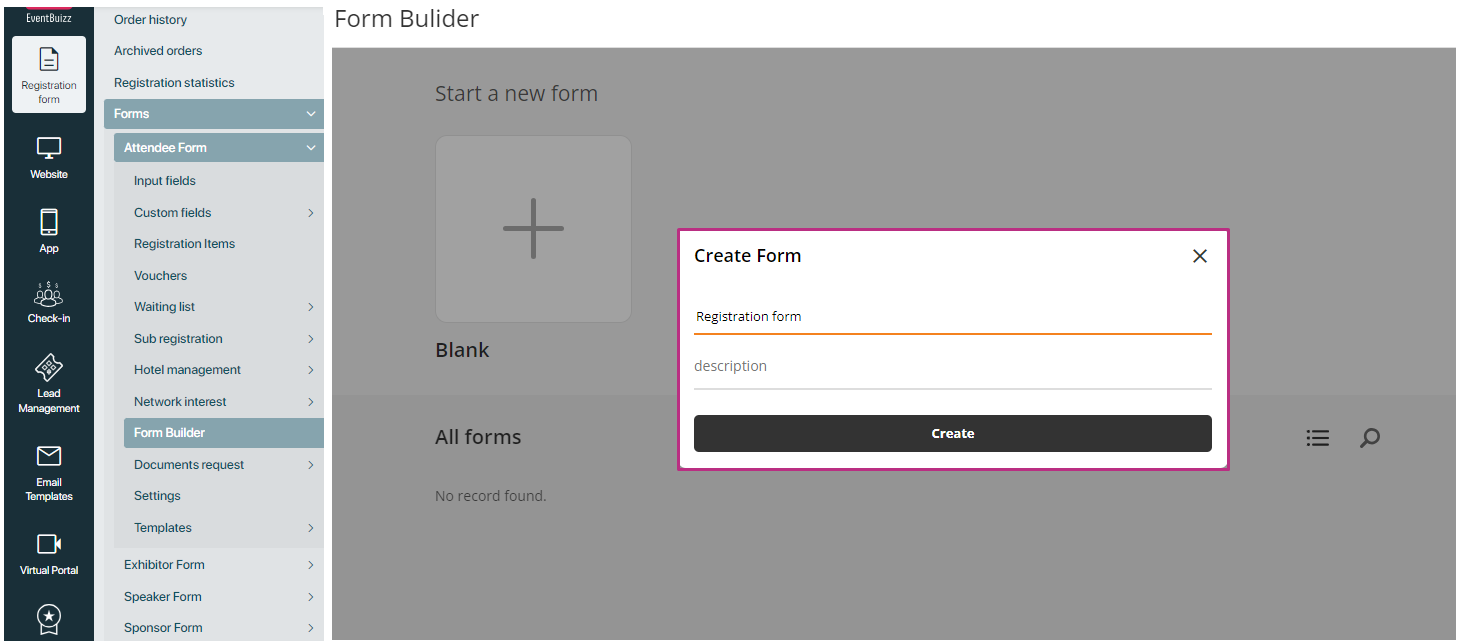
When an organiser first lands on the Form builder, there will be no records found by default. However, to start creating a new registration form, the organiser can follow these steps:
- Land on form builder: Upon entering the form builder for the first time, no pre-existing forms will be displayed.
- Click “Start a new form”: To create a new registration form, the organiser needs to click on the “Start a new form” button.
- Begin building the form: After clicking the button, the organiser can begin customising the new registration form by adding fields, adjusting settings, and defining the layout as needed.
This process allows the organiser to quickly begin designing a completely new registration form from scratch.

When the organiser creates a form in the Form builder, the newly created form will have three main menu options available to customise and structure the form. These are:
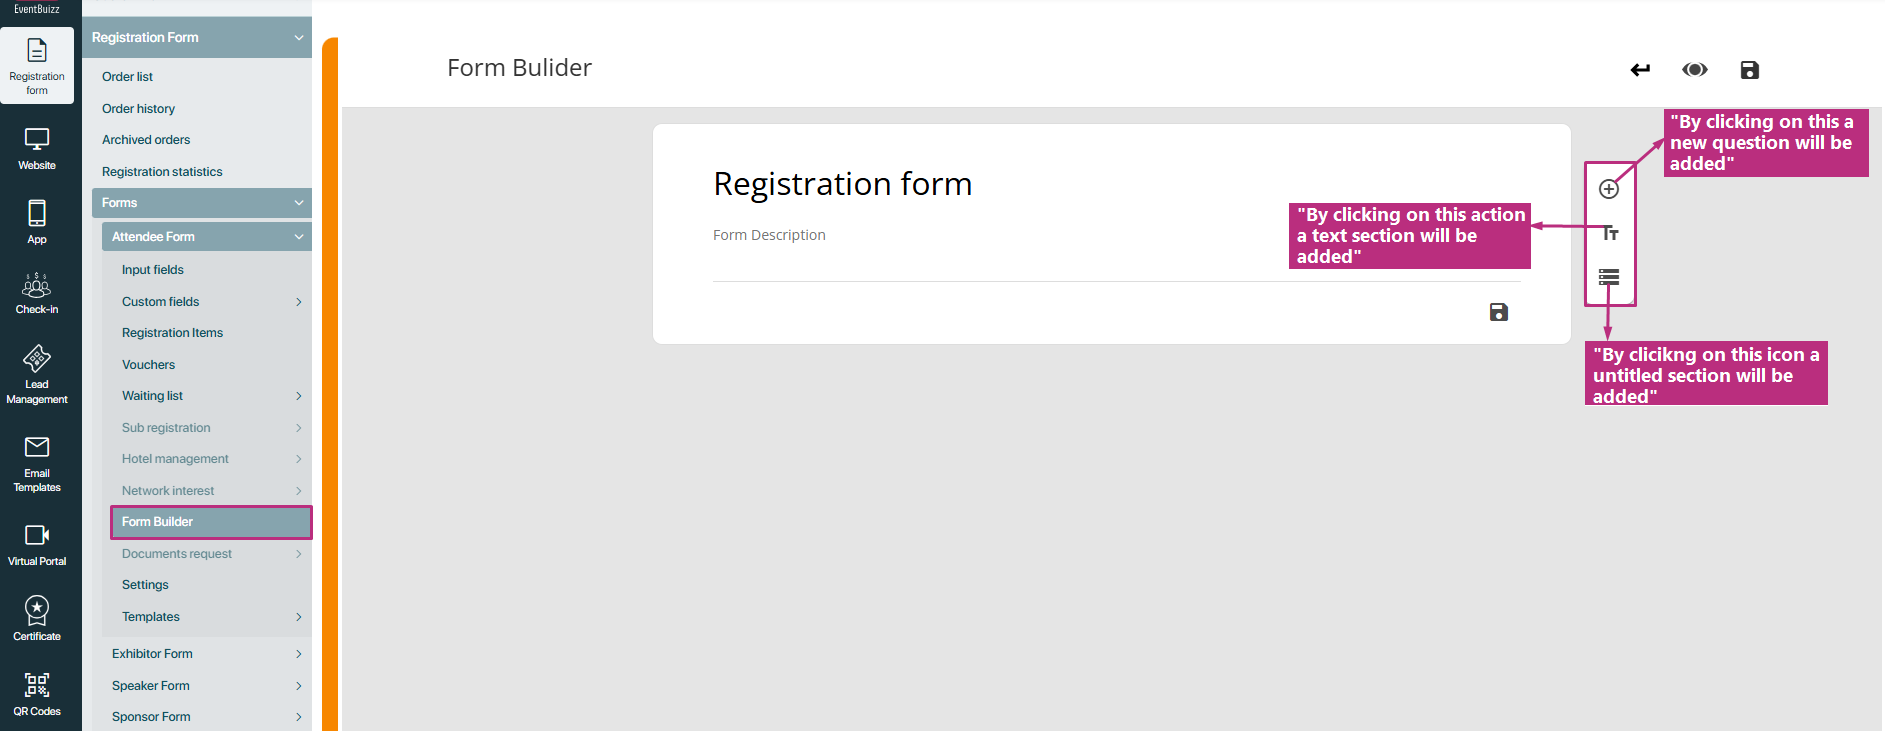
Add questions
- Purpose: This option allows the organiser to add various types of questions to the form. These can include different input fields like text boxes, multiple-choice questions, check boxes, drop-downs, and more.
How It works:
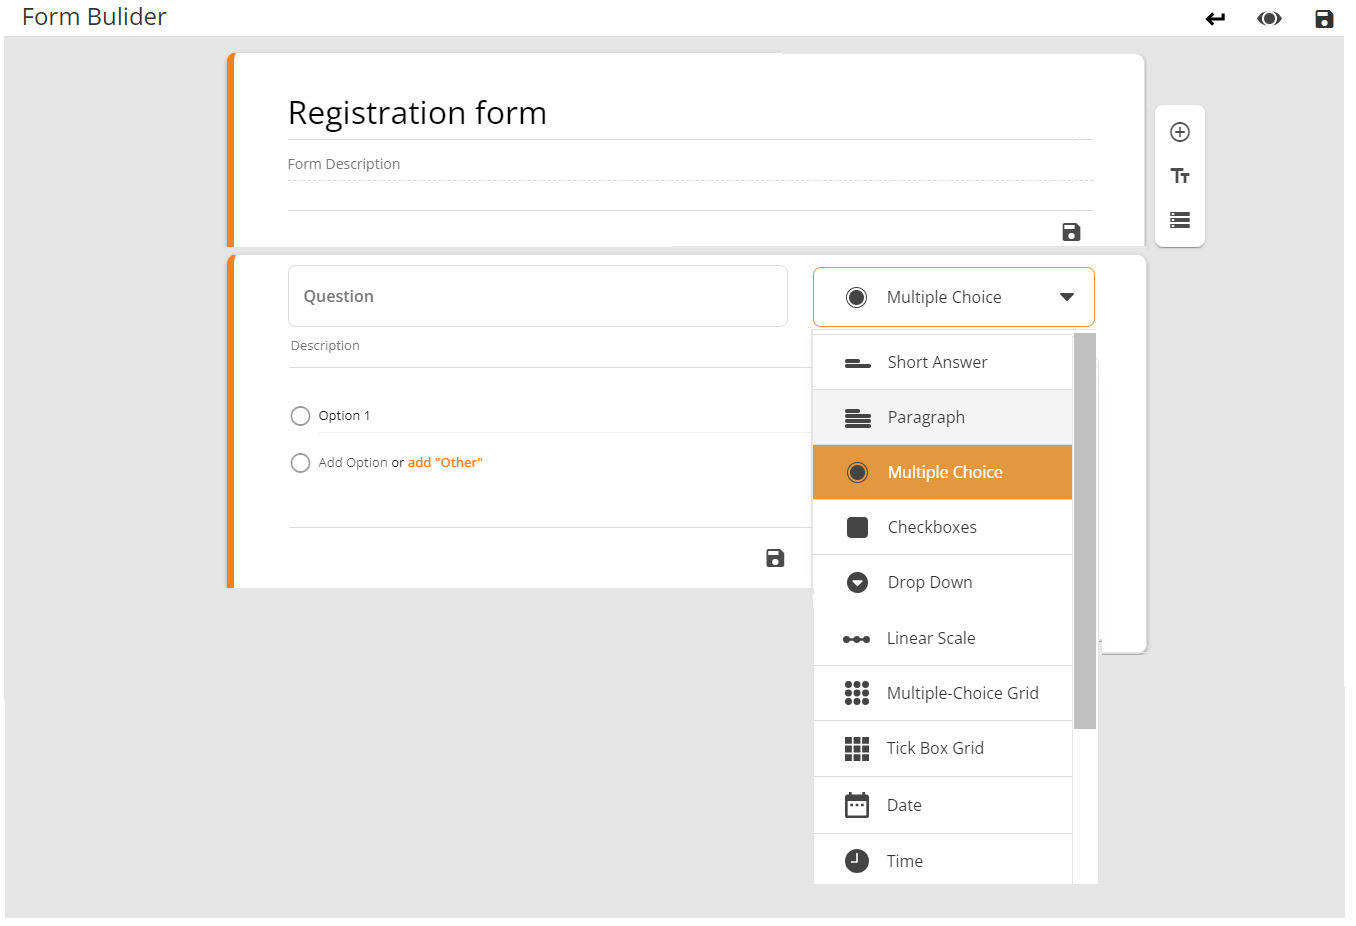
By clicking “Add questions”, a question will be added to the form and the organiser can choose from a variety of question types such as:
- Short answer (for text input)
- Multiple choice
- Check-boxes
- Drop-down menu
- Date Picker and others.
The organiser can configure each question by setting required or optional fields, adding options for multiple-choice questions, or customising the question label.
There are 10 types of questions in Form builder. Each is designed to collect data in a different way. The secret to designing a really good survey or quiz is to ensure you’re using the most appropriate type of question for the type of information you’re trying to gather.
So think about what information you’re trying to find out, then think about the type of data you’d need for it, and then consider which type of question will be most appropriate for gathering that data.
Also, when organiser are creating questions, note that each question type has specific features, found under the three-dot menu in the lower right.Take some time to explore these settings.
How to choose question types
Form builder offers ten different question types. Detail is given below about all the question types:
Here’s what each one question type does:
Short answer form questions
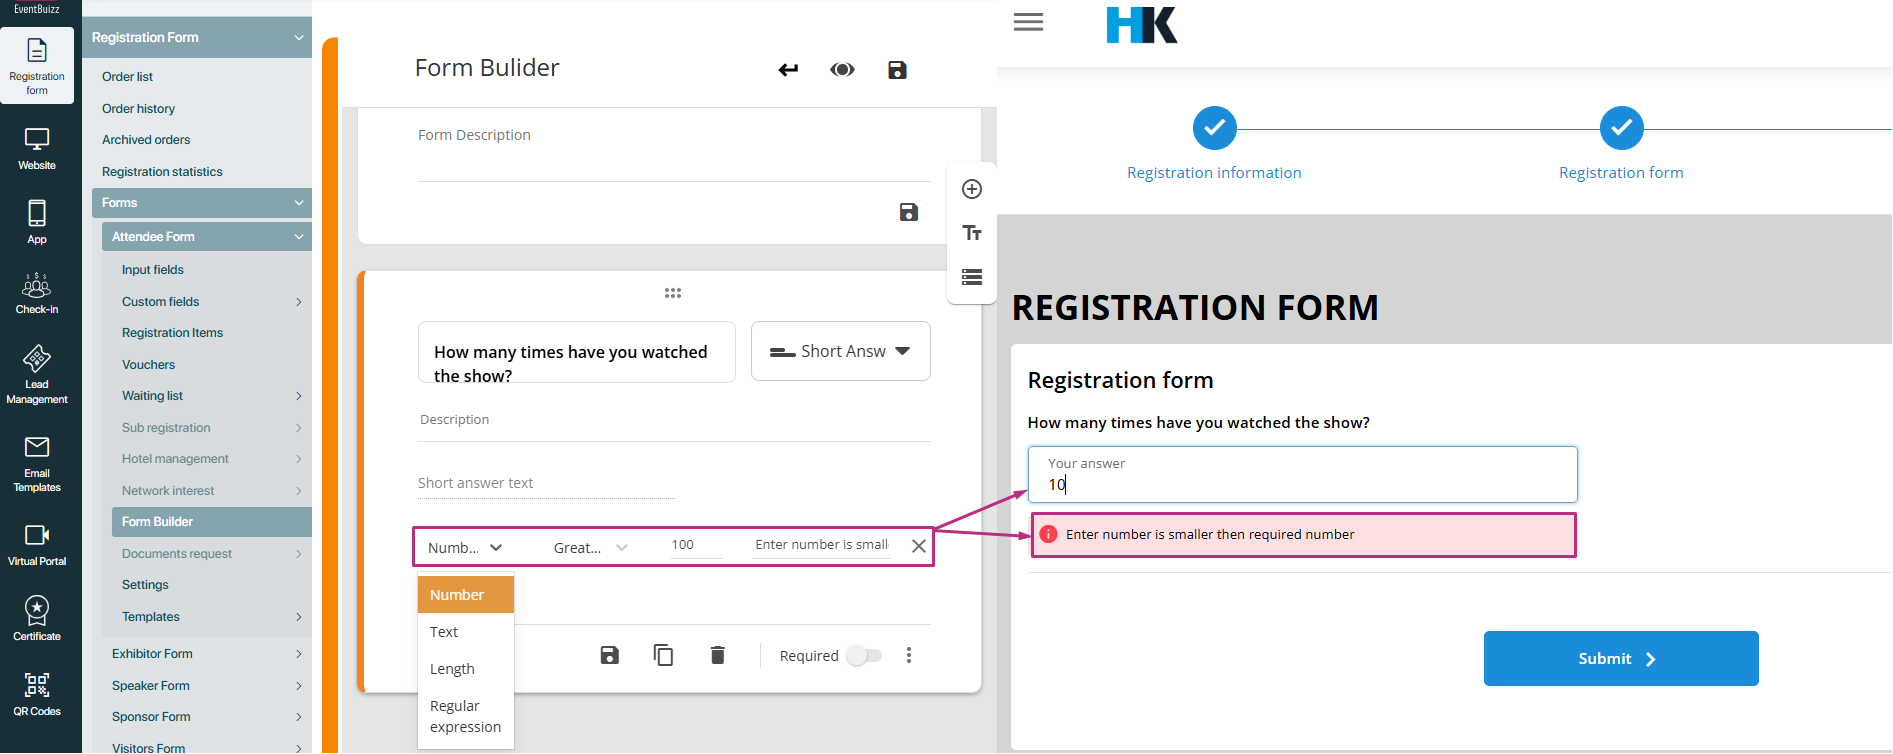
Short answer questions allow for a single line answer. From the three dots menu, this answer can be validated:
- as a number, and also with various possible constraints for which numbers are allowed,
- as text, constraining whether it contains or doesn’t contains something,
- as a URL or email address,
- using length, with a minimum or maximum length constraint,
- using regular expressions, which allows you to make personalised pattern validations.
You can set a custom error message to show when the answer fails the validation.
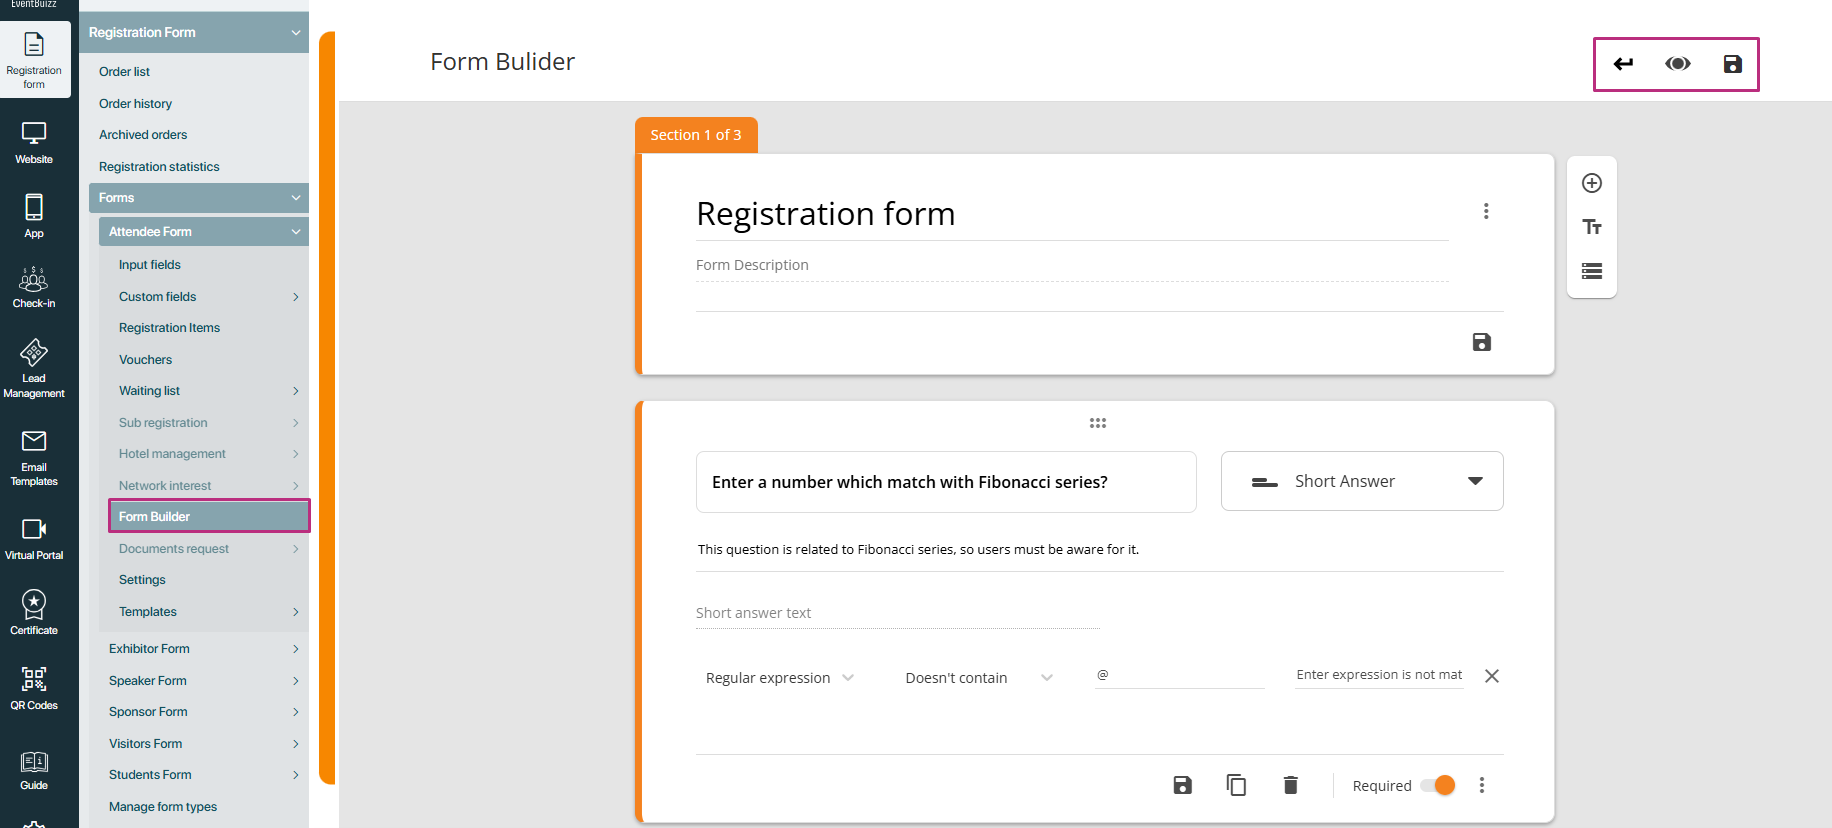
For example if organiser select the validation number and then he validate either enter number should need be greater, lower or in between to the given number and also can validate the message as well. Attachment is shown below:
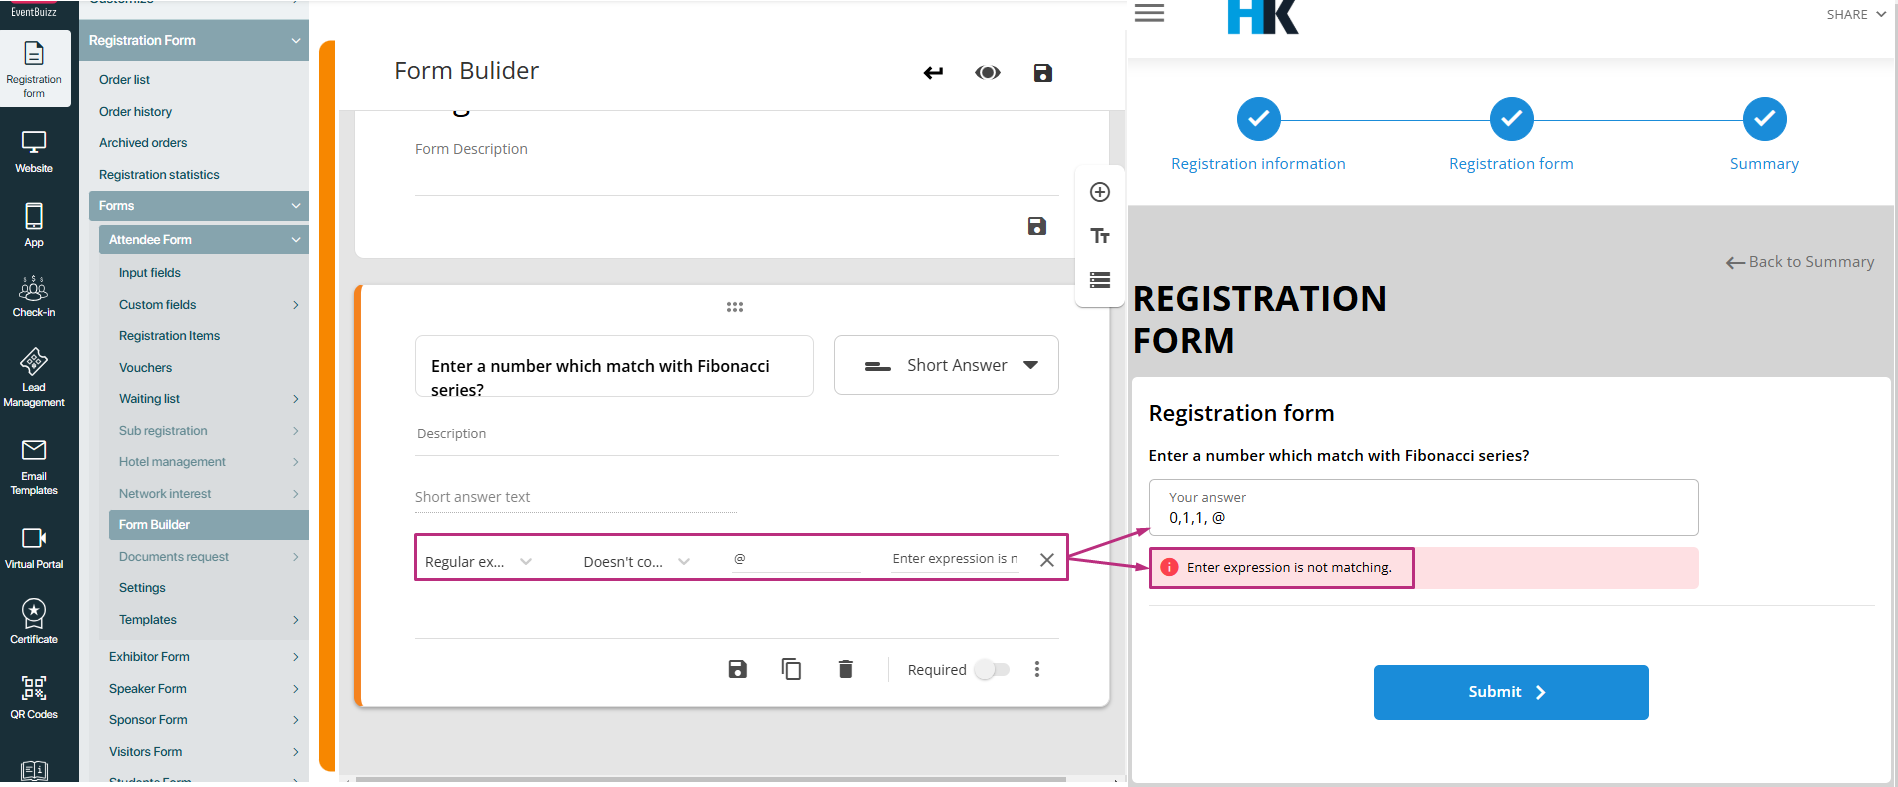
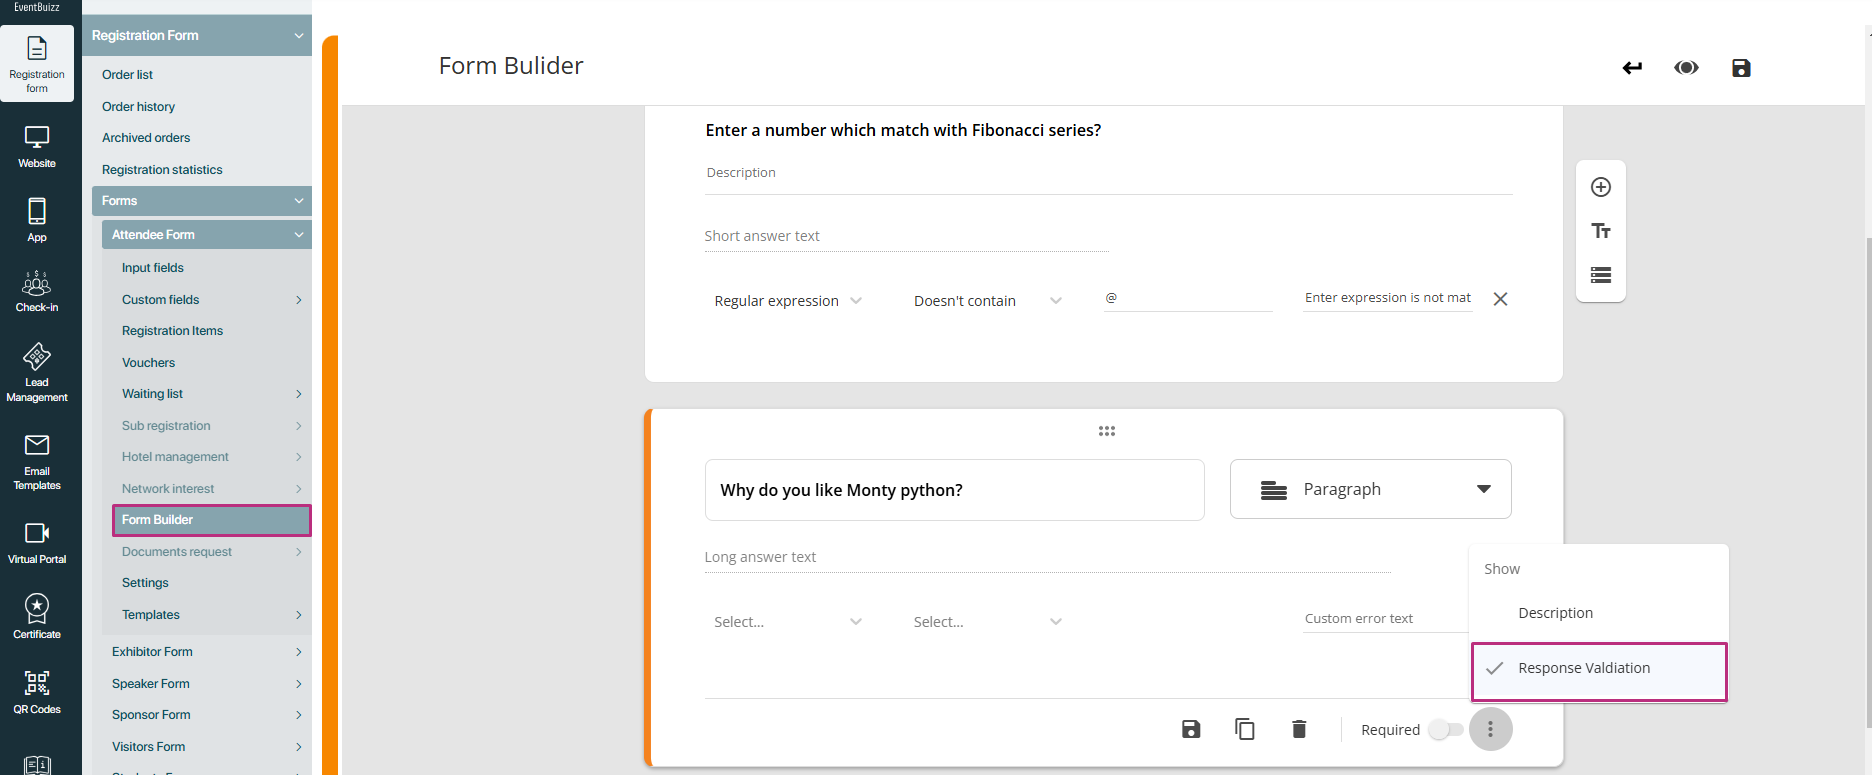
Similarly if organiser select the regular expression validation, and enter the type liked asked expression should constraint or doesn’t constraint etc. And further error message will show on the wrong input from user.
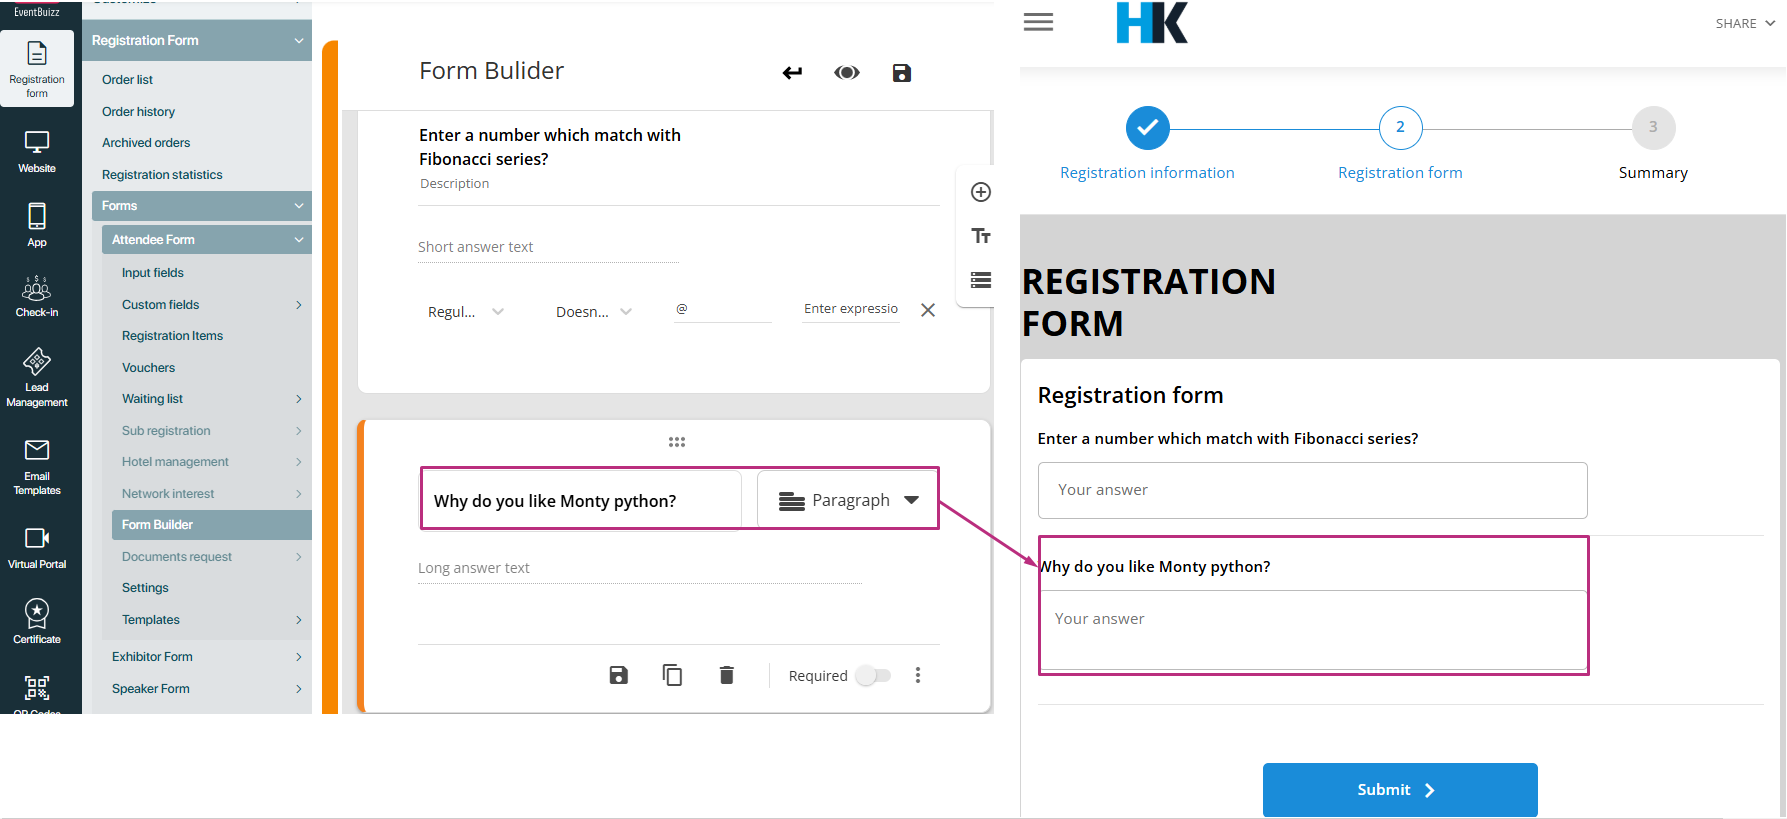
Paragraph form questions
The Paragraph form question is a type of input field that allows users to provide longer, multi-line text answers in a registration or survey form. This type of question is ideal for when the organiser needs detailed responses from the attendees, such as comments, feedback, or additional information.
The key features of the paragraph question include:
Multi-line text input:
Unlike a simple short-answer question, which typically allows for a single line of input, the paragraph question provides a larger text area where the respondent can enter multiple lines of text.
Validation options:
To ensure that the responses meet specific criteria, organisers can apply different types of validation for the paragraph question. These validations help control the length or format of the text entered and provide the option to customize error messages in case the validation fails.
Types of validation for paragraph form questions
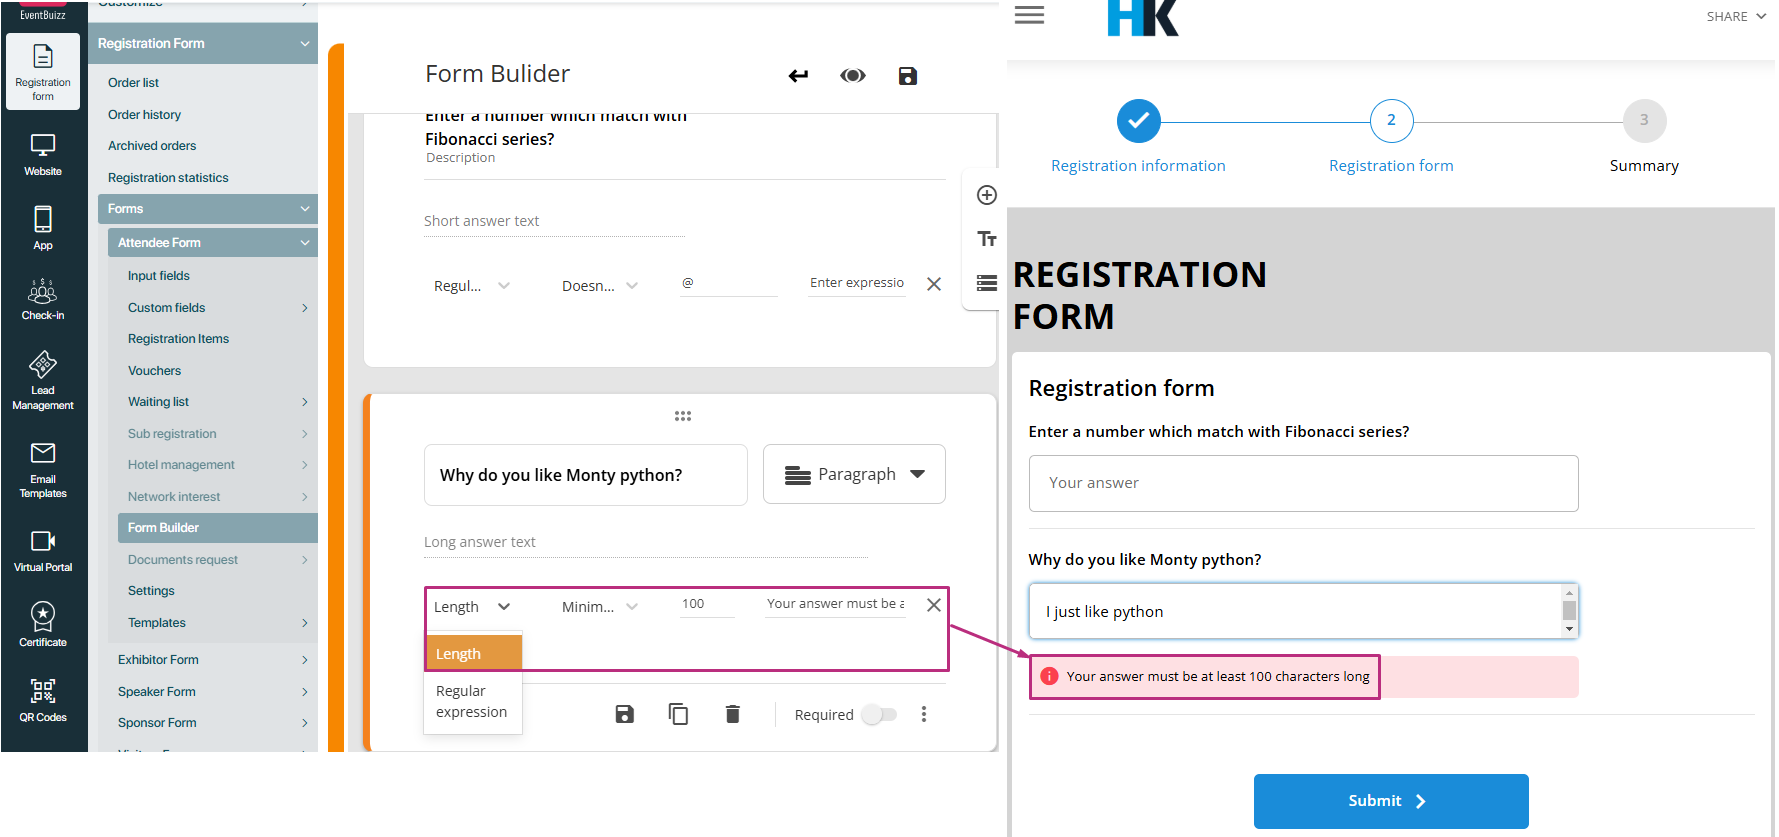
1. Length validation
- What it is: Length validation ensures that the respondent’s answer meets a specific number of characters. The organizer can define the minimum and/or maximum character count for the response.
How it works:
- The organizer selects Length from the validation options.
- The next step is for the organizer to specify either the minimum or maximum number of characters that the response must have.
- If the respondent’s answer does not meet the required length, the form will display a custom error message, guiding the user to correct their input.
- Steps for setup:
-
- Select Length validation.
- Enter the minimum and/or maximum character count.
- Provide a custom error message (e.g., “Your answer must be at least 100 characters long” or “Your answer must not exceed 500 characters”).
-
Use case: This is helpful when you want to ensure that the respondent provides enough detail but doesn’t overwhelm you with excessively long responses.
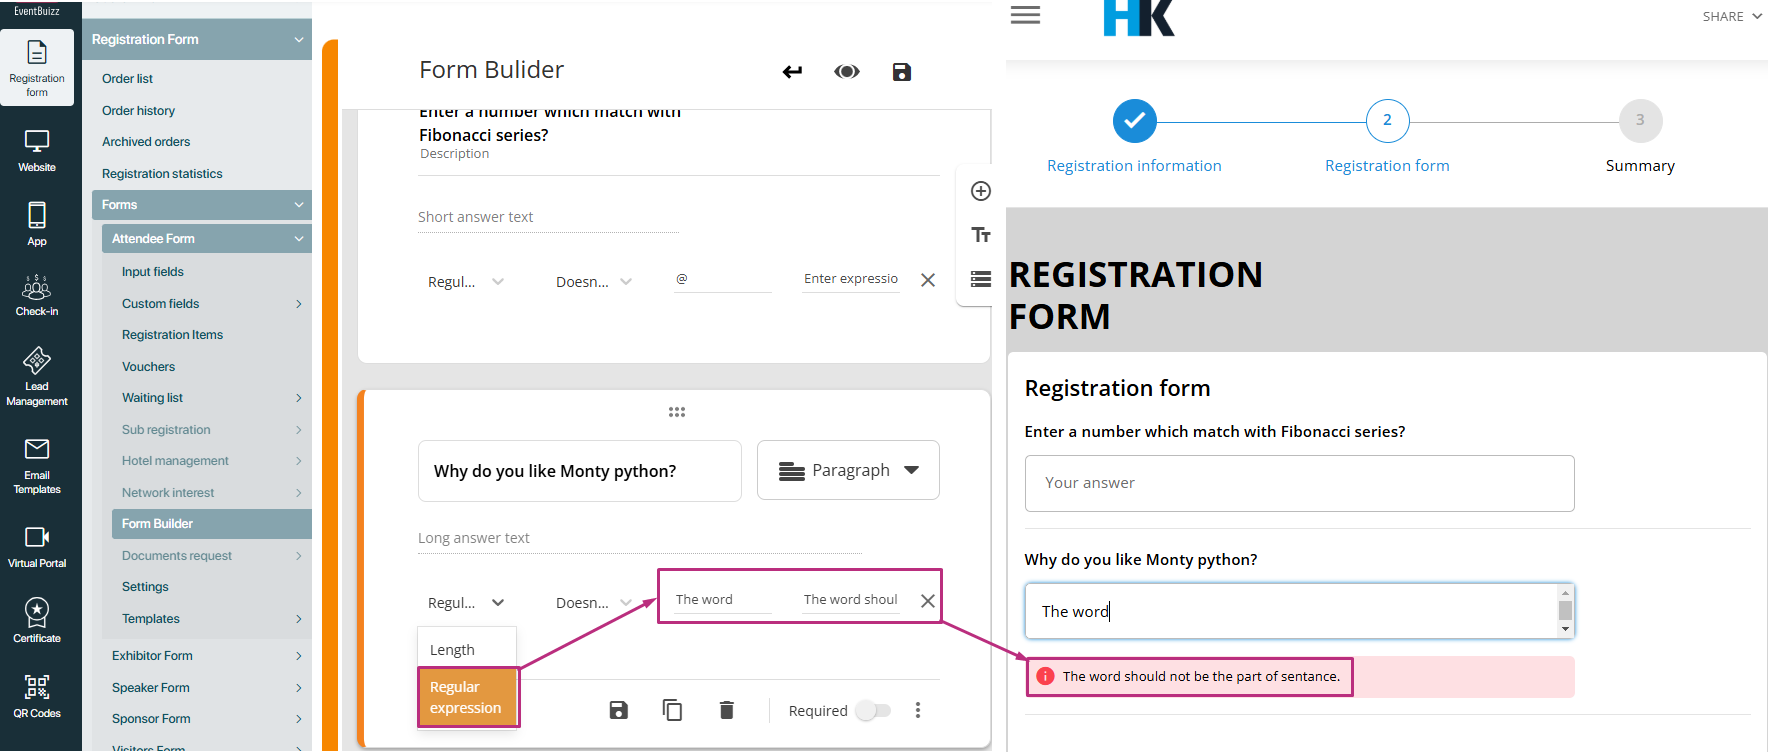
Regular expression validation
- What it is: Regular expressions (regex) are patterns used to match specific text formats. Organisers can use regex validation to ensure that the respondent’s answer follows a particular format or structure (e.g., an email address, phone number, or specific text pattern).
How it works:
- The organiser selects Regular expression from the validation options.
- Then, they define the type of validation to be applied to the answer:
-
- Contains: Ensures the answer includes a specific pattern or sequence.
- Not contains: Ensures the answer does not include a specific pattern or sequence.
- Matches: Ensures the entire answer matches a given pattern.
- Doesn’t match: Ensures the answer does not match the given pattern.
-
- After selecting one of these options, the organizer enters the required pattern (a regex expression) that the answer must conform to.
- If the answer does not match the pattern or fails the condition, a custom error message will be shown to the user.
- Steps for setup:
-
- Select regular expression validation.
- Choose one of the conditions: Contains, Not contains, Matches, or Doesn’t match.
- Enter the pattern (e.g., a specific format for a phone number like
\d{10}). - Provide a custom error message (e.g., “Please enter a valid phone number” or “Your answer should not include special characters”).
-
Use case: This is useful for enforcing specific formats like ensuring an email is entered correctly, validating phone numbers, or even checking that certain keywords are included or excluded.
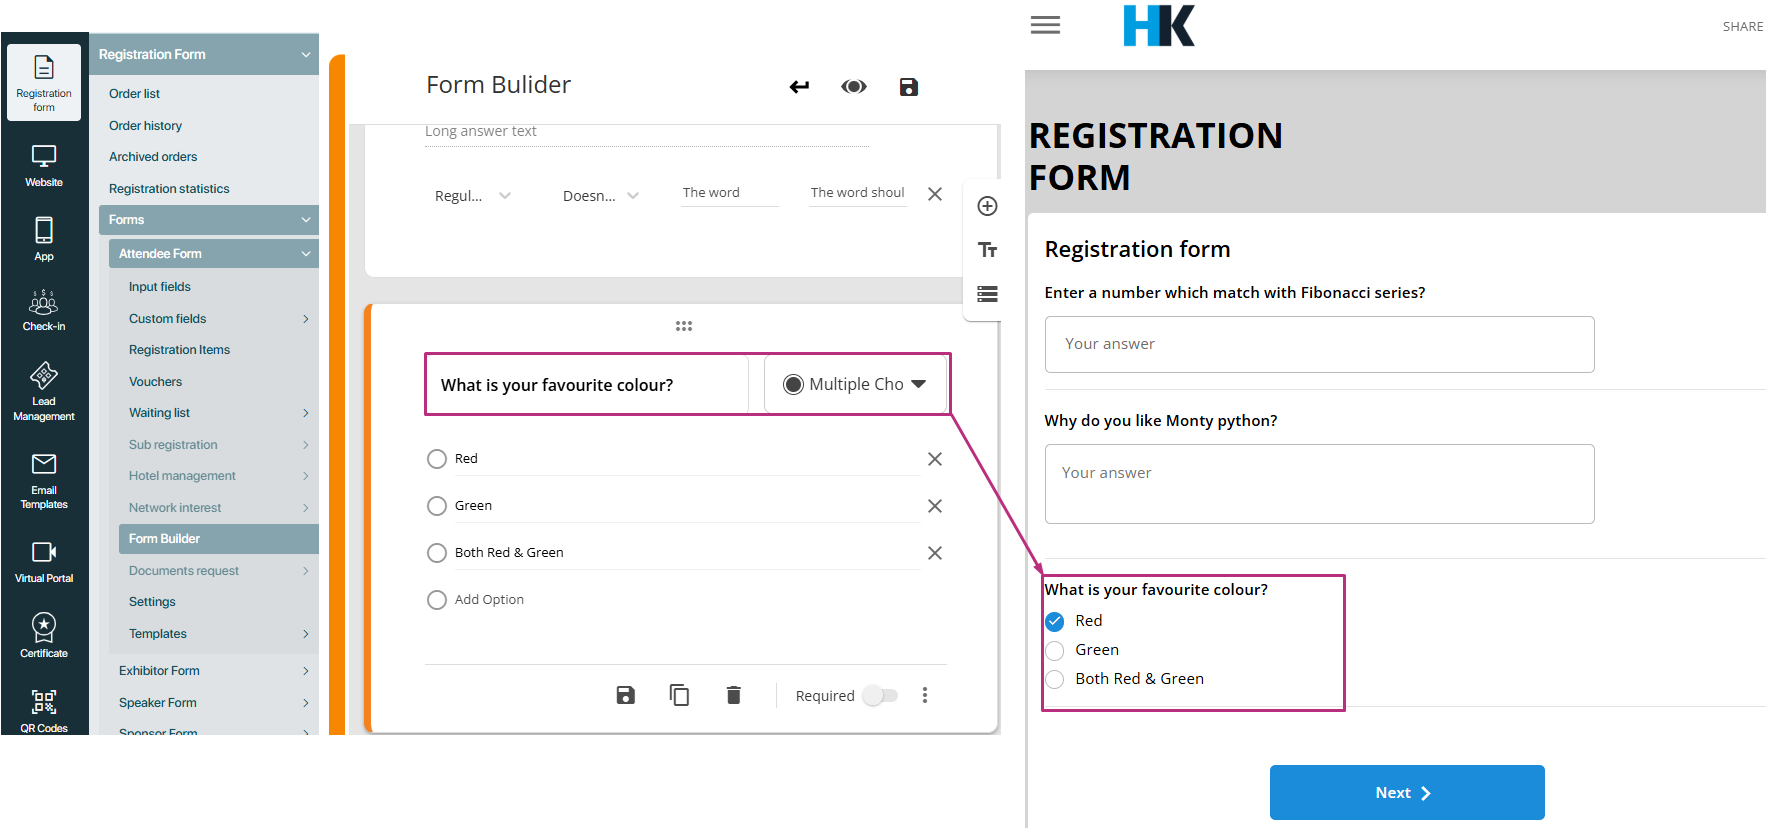
Multiple choice question
-
Purpose: A multiple choice question allows respondents to choose one answer from a set of predefined options. It’s ideal when you want to restrict the respondent to a single selection.
How It works:
- The question provides a list of options, and the respondent can only select one option from those choices.
- Once the respondent clicks on an option, that option is selected, and other options cannot be chosen at the same time.
- The options are displayed directly on the form, so the respondent can immediately see all available answers.
What if organiser did not validate the multiple choice question?
If organiser did not validate multiple choice question then simply user will select the answer from the options and submit the form.
Validation options for multiple choice questions:
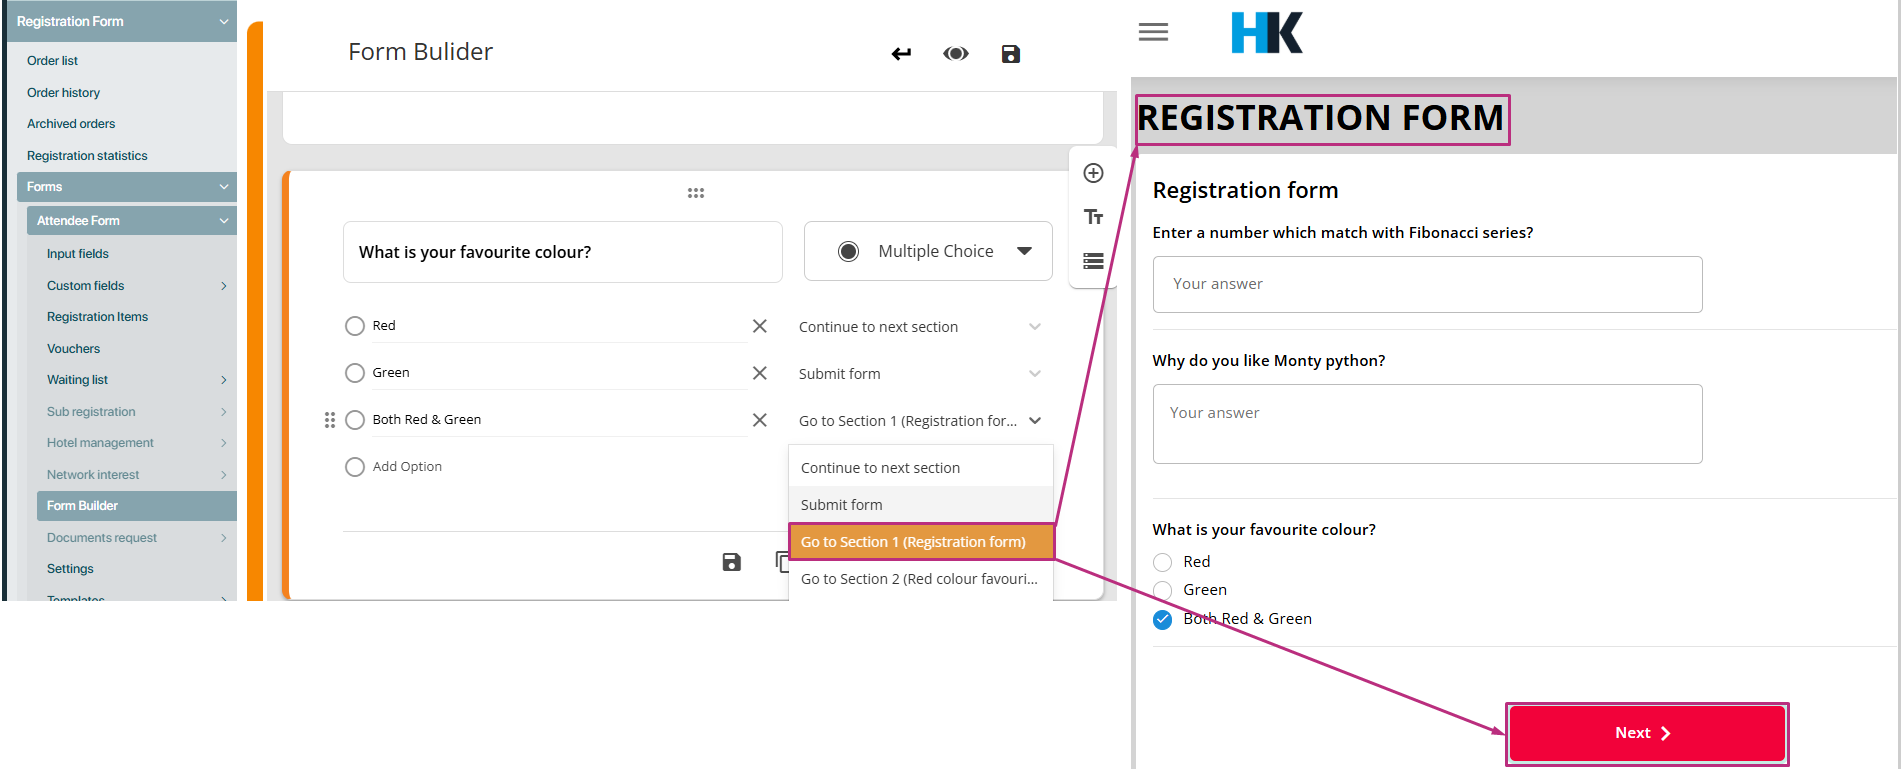
Organisers can add validations to the multiple choice question to guide respondents’ navigation based on their choice. The validation options allow the organiser to define what should happen after a respondent selects an option. There are three main validation options to choose from:
-
Continue to next section:
-
- What it does: If the respondent selects a specific option, the form will automatically move them to the next section. This is useful when the selection dictates which follow-up questions or sections are relevant.
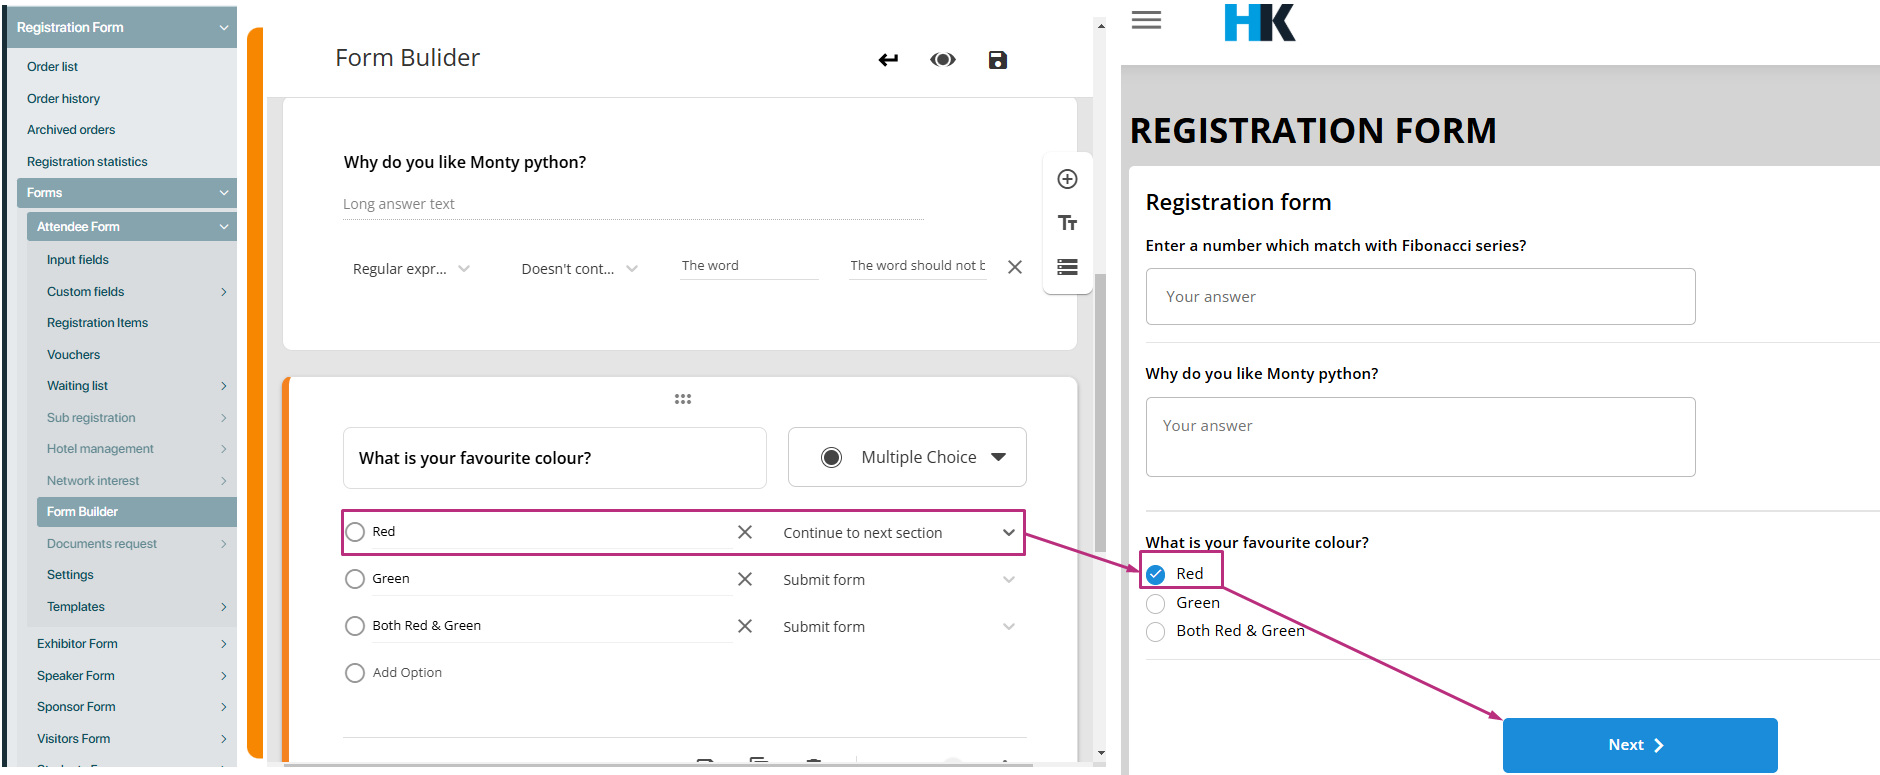
And by clicking on next button it will move to the next available section. Here attachment shown below:
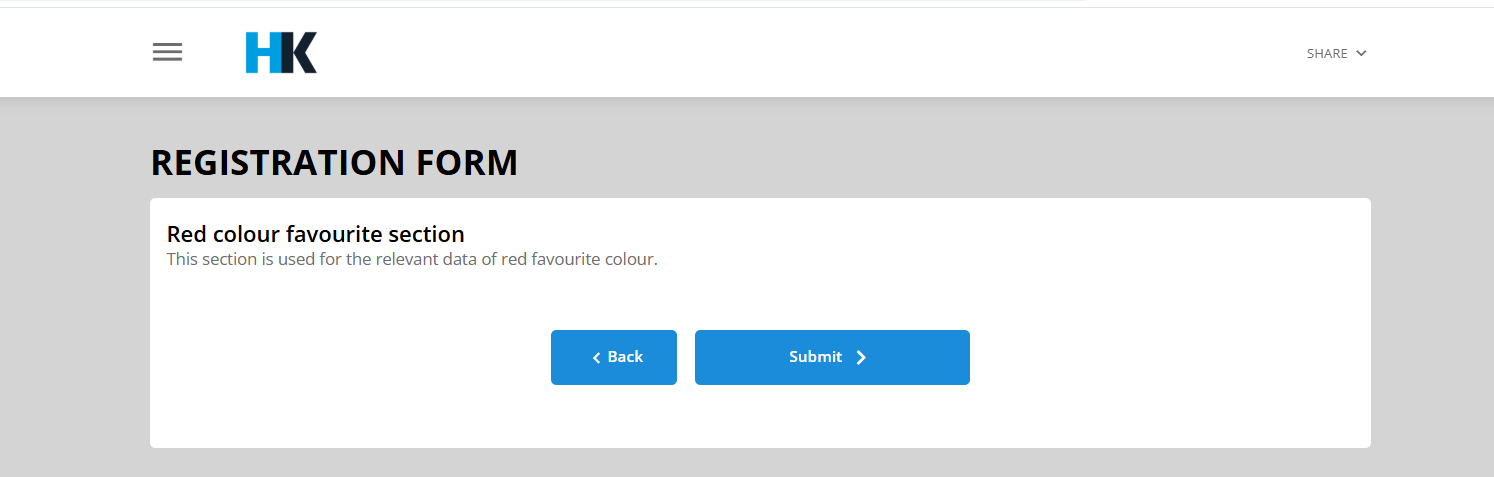
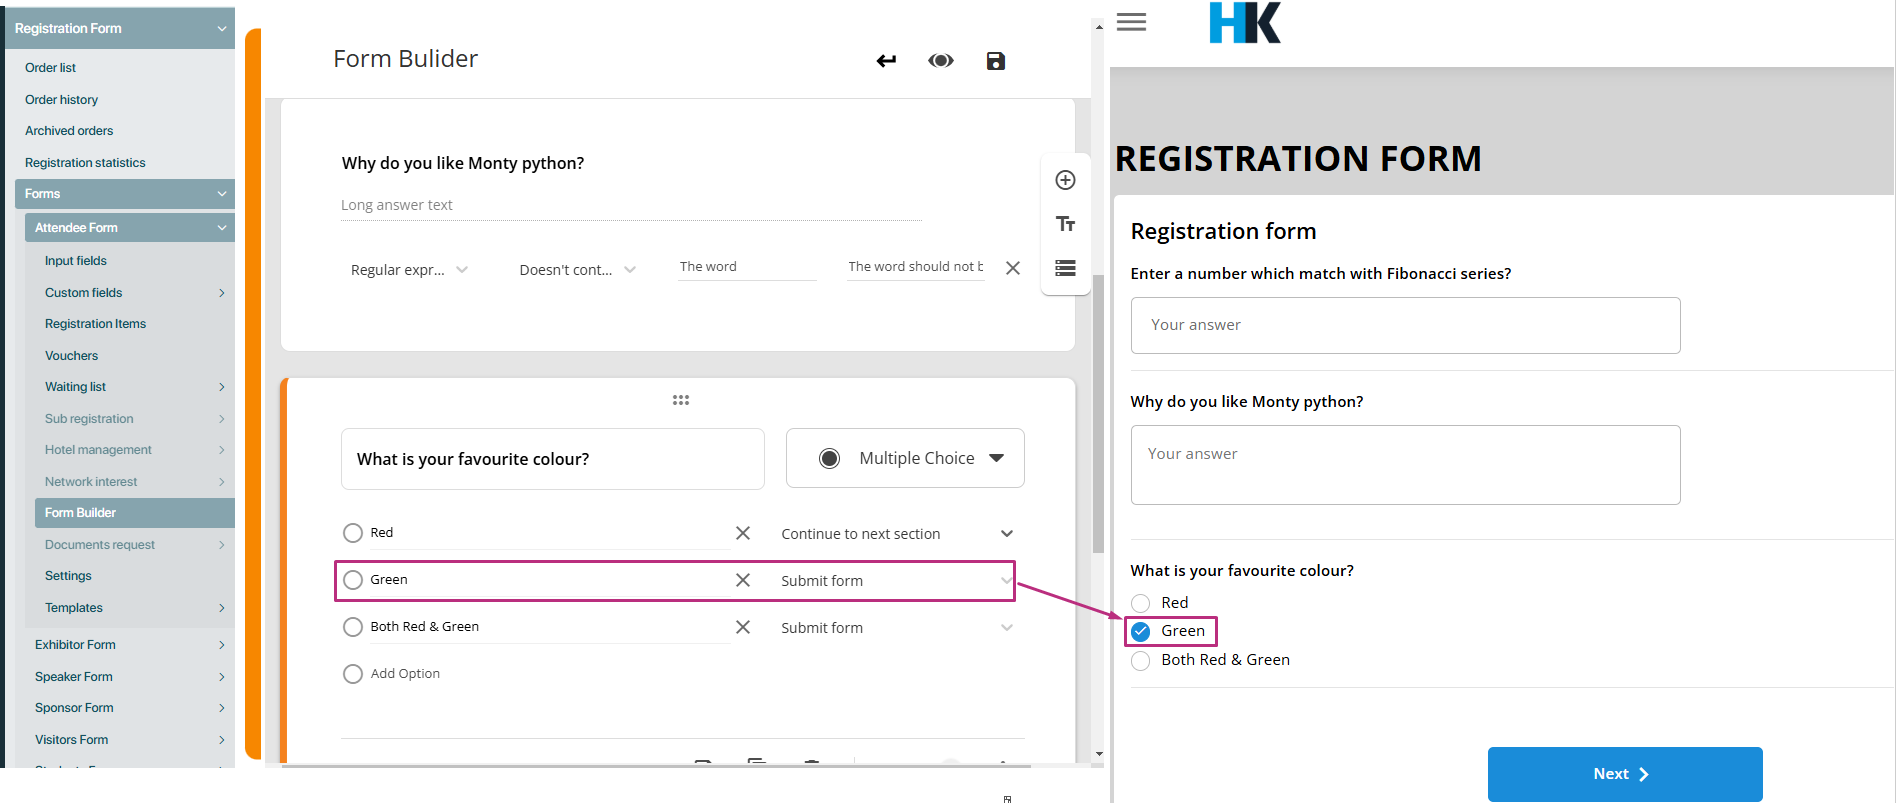
Submit form:
- What it does: If the respondent chooses a particular option, the form will submit immediately after selecting the option. This is typically used when the question represents the final choice or when no further input is needed.
- Example use case: If the respondent selects a “Yes” answer to confirm participation in an event, this could trigger an immediate form submission to finalise the registration.
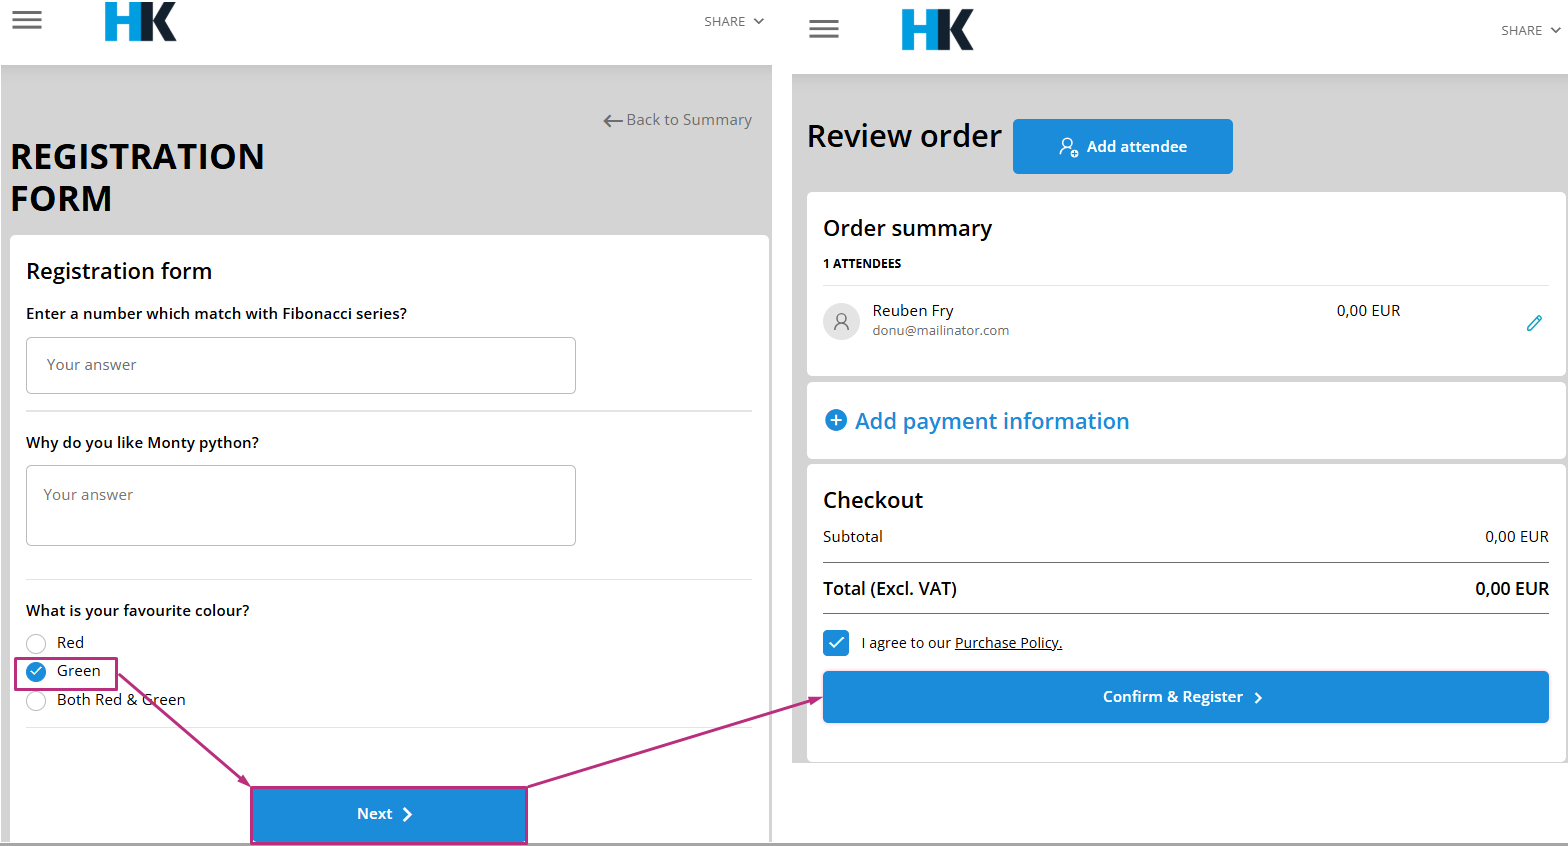
And after clicking that submit form option, if there is no further question available in the form the will click on next, it will immediately submit that step and will move to the next step of the registration process.
Go to registration form 1 (current form):
- What it does: This option allows the form to remain within the current form, and when user clicks on that option, and try to move next, next button will not perform any action and keep it, into the same registration form.
Check boxes question
-
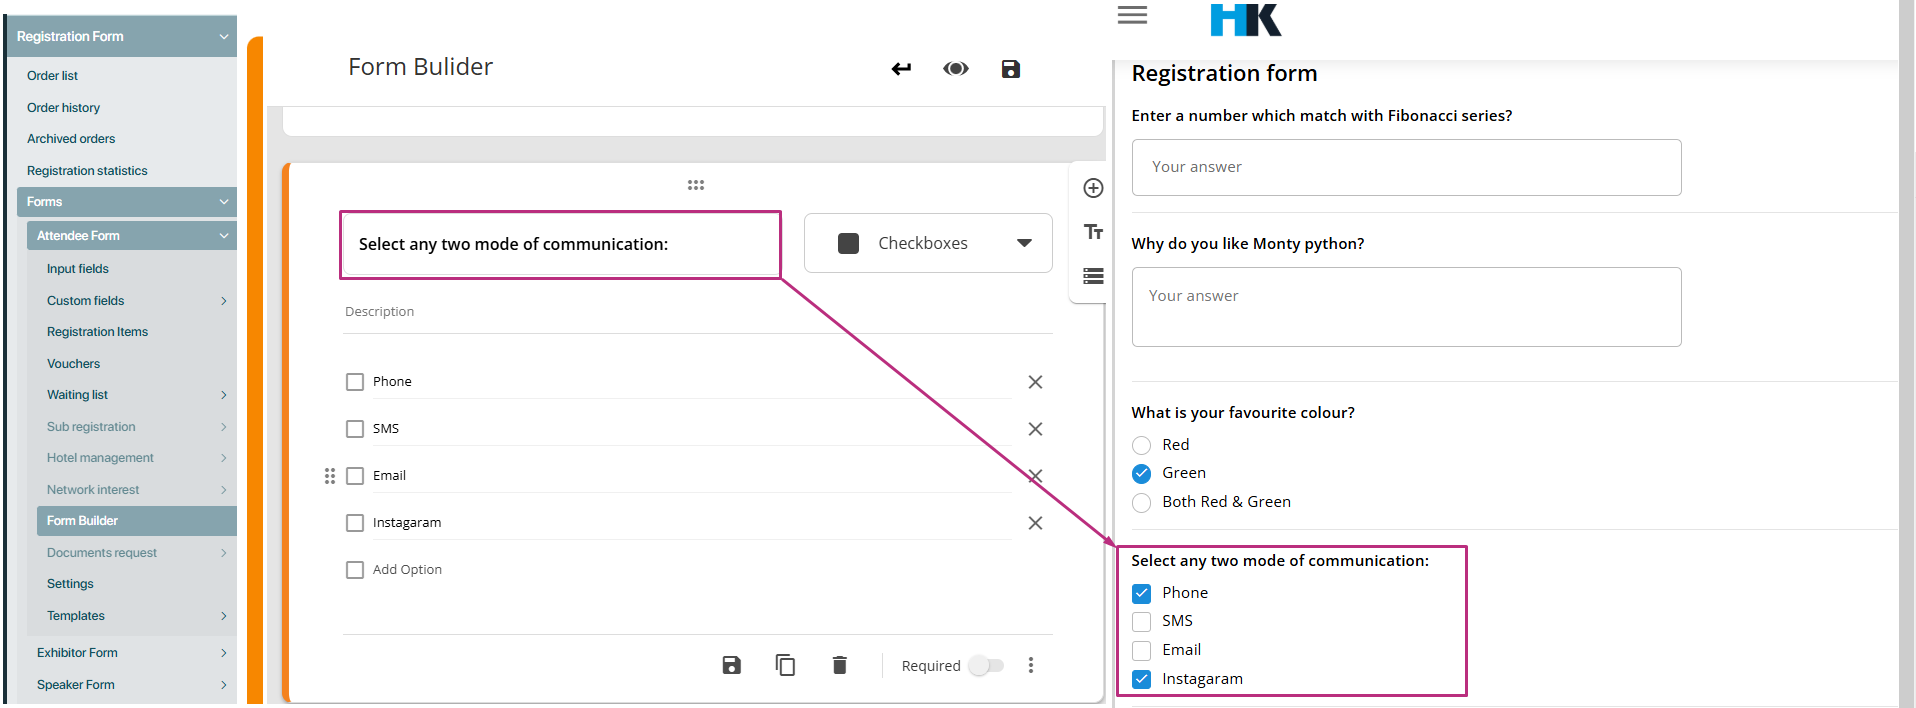
Purpose: A Check boxes question allows respondents to select multiple answers from a list of predefined options. This is useful when more than one choice is applicable.
How It works:
- Respondents are presented with a list of options, and they can select as many as they want by checking the box next to each option.
- This type of question is useful when the respondent might need to choose more than one answer.
Validation options for check boxes question:
While the check boxes question type allows for multiple selections, the organiser can also set validations to ensure the responses fall within specific criteria. There are three types of validation available for this question:
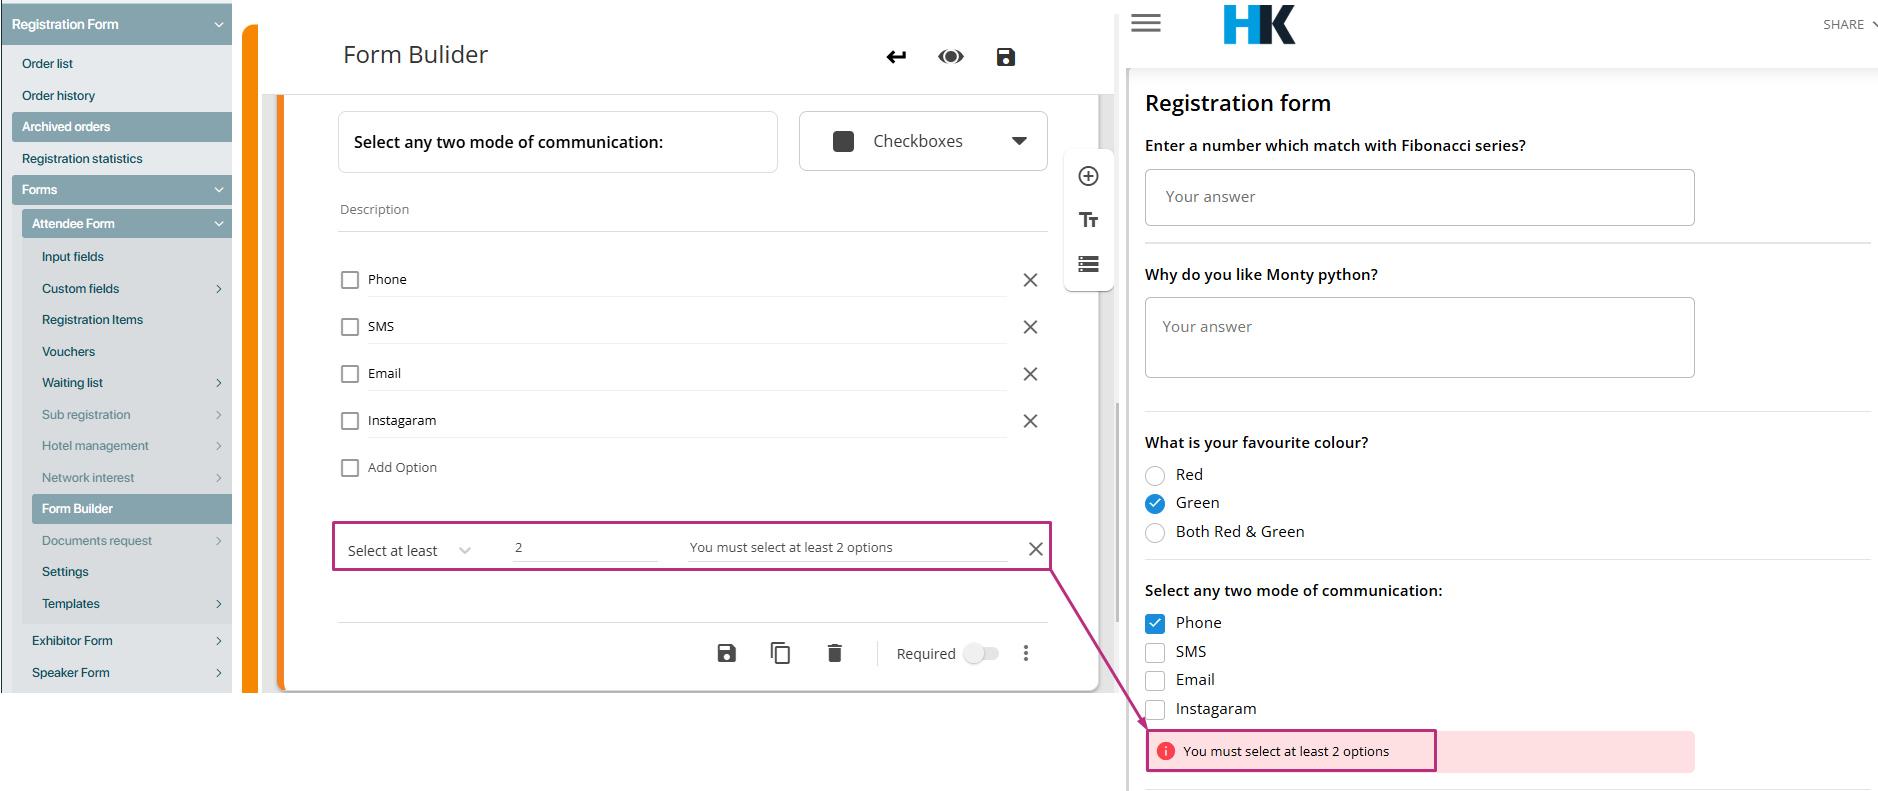
- Select at least:Ensures that the respondent selects at least a minimum number of options from the list.
- Select at most:Ensures that the respondent selects no more than a maximum number of options.
- Select exactly:Ensures that the respondent selects an exact number of options, neither more nor less.
How it works:
The organiser defines a maximum/minimum/exact number of choices the respondent can select. If the respondent exceeds this number, a custom error message will be shown, asking them to limit their selections.
Custom error validation message:
For all of the above validations, the organiser can customise the error message that will be displayed if the validation fails. This message will guide the respondent on how to correct their answer. Custom error messages can be clear and specific to ensure the respondent understands the problem.
- Example:
- For “Select at least” validation: “You must select at least 2 options.”
- For “Select at most” validation: “You can select no more than 3 options.”
- For “Select exactly” validation: “Please select exactly 3 options.”
Drop down question
-
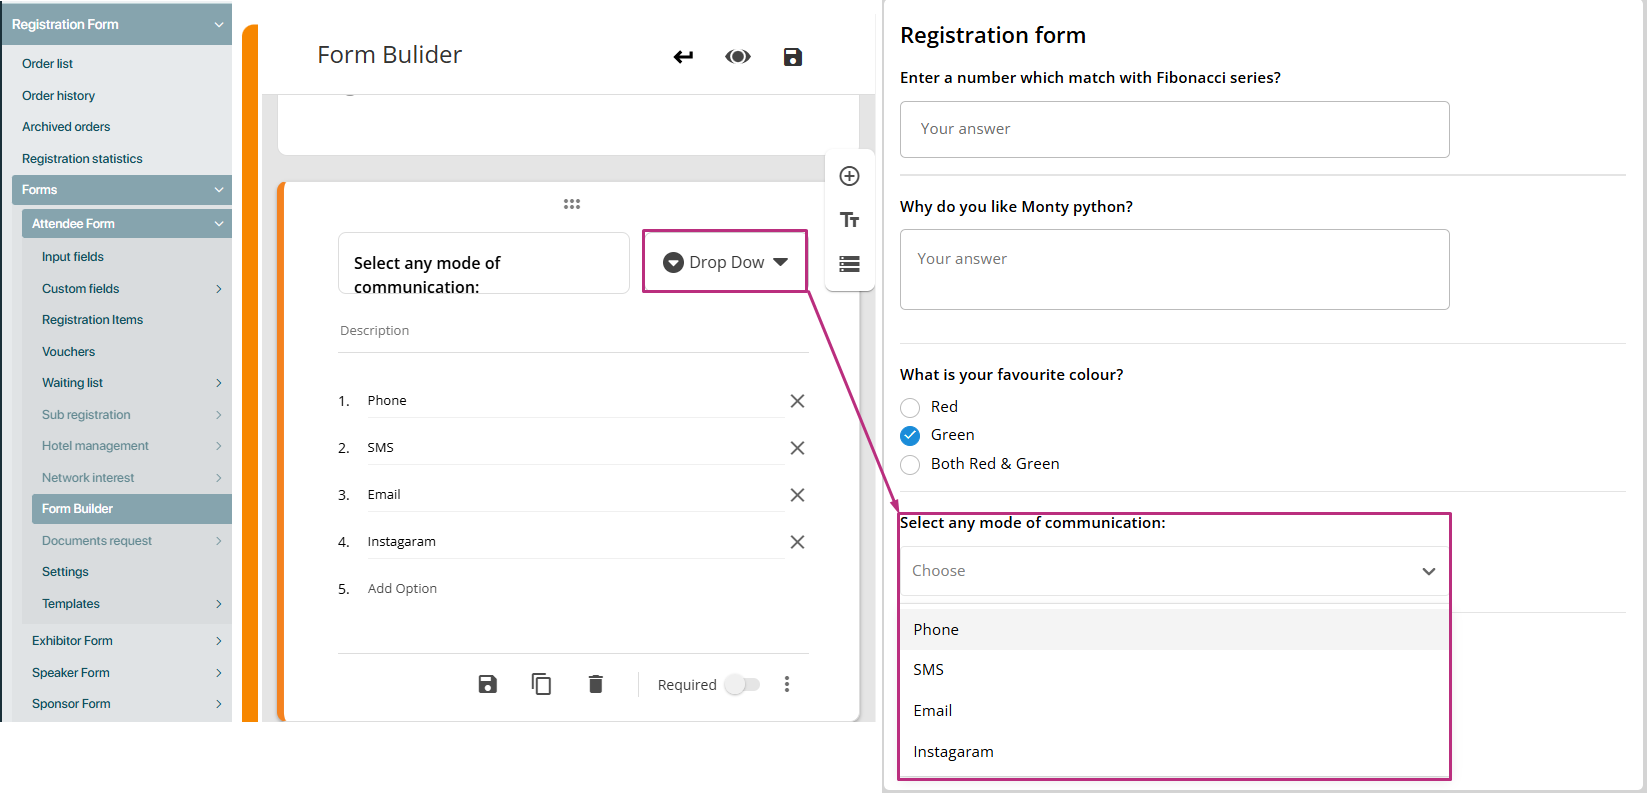
Purpose: A drop down question works similarly to a multiple-choice question but with a difference in how options are displayed. Instead of showing all the options at once, they are hidden in a drop-down menu, allowing the respondent to select one answer from a list of options.
How It works:
- The options are placed inside a drop down menu, and the respondent clicks to expand the menu and select one option from the list.
- The drop down reduces clutter on the form by showing only the question and a single button until the respondent interacts with it to reveal the options.
Validation options for drop down questions:
Organisers can add validations to the drop down question to guide respondents’ navigation based on their choice. The validation options allow the organiser to define what should happen after a respondent selects an option. There are three main validation options to choose from:
Continue to next section:
- What it does: If the respondent selects a specific option, the form will automatically move them to the next section. This is useful when the selection dictates which follow-up questions or sections are relevant.
Submit form:
- What it does: If the respondent chooses a particular option, the form will submit immediately after selecting the option. This is typically used when the question represents the final choice or when no further input is needed.
Go to registration form 1 (current form):
- What it does: This option allows the form to remain within the current form, and when user clicks on that option, and try to move next, next button will not perform any action and keep it, into the same registration form.
Important note:
- These validations are similarly work’s as like work in multiple choice questions, for further detail please review the multiple choice question validations.
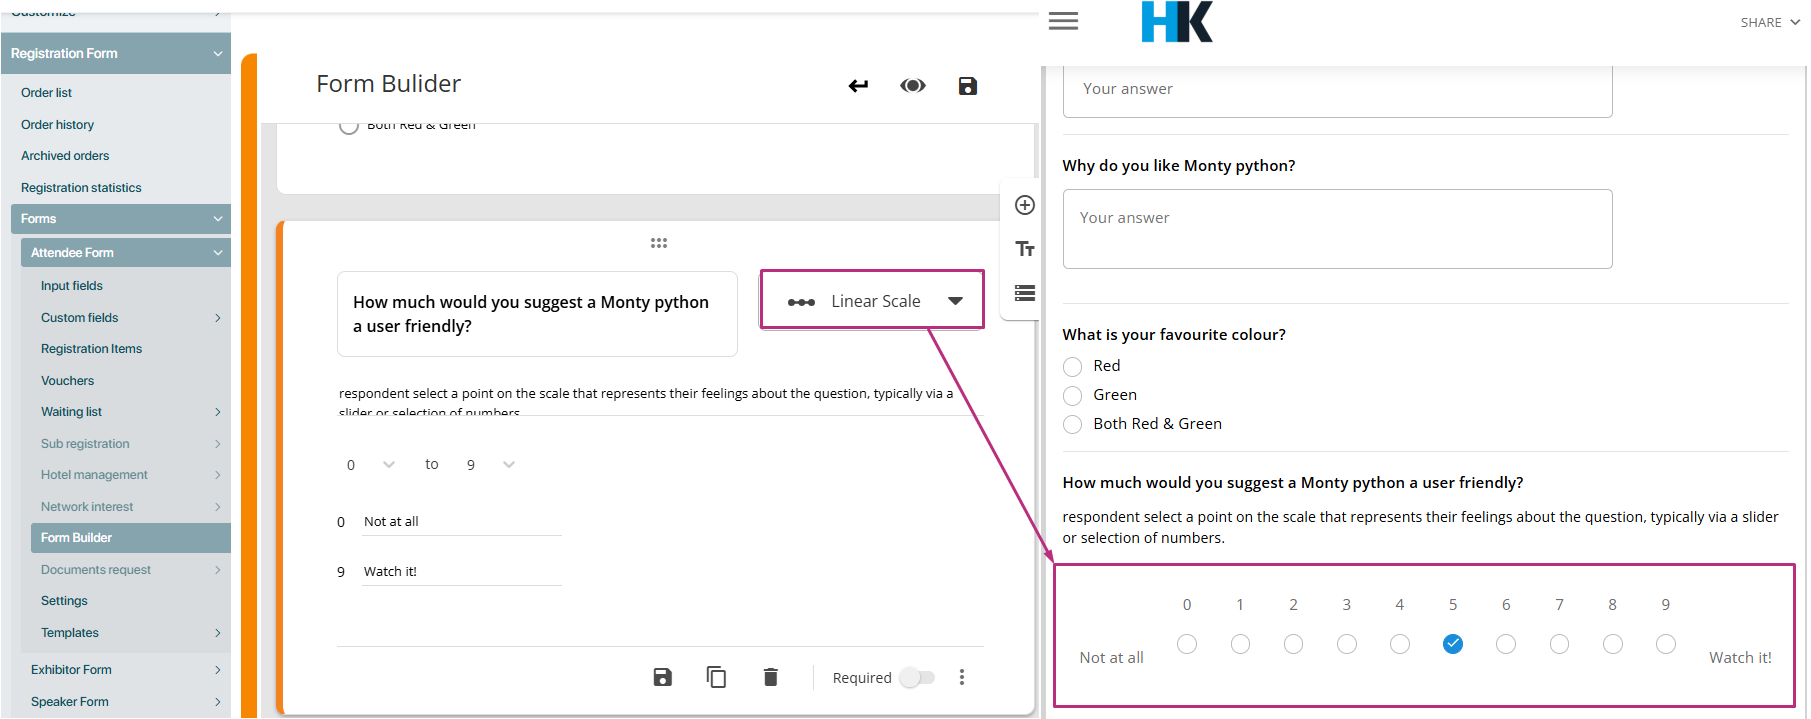
Linear scale form questions
A Linear scale question allows respondents to rate something on a scale, typically from 1 (or 0) to a maximum of 10. It’s useful for gathering feedback on attitudes, satisfaction, or preferences where respondents can choose a point that best reflects their opinion.
How It Works:
- Scale: A scale is presented with numbered values, often ranging from 1 to 10 (or any other predefined range), where the lowest value represents the least favourable and the highest represents the most favourable opinion.
- Response: Respondents select a point on the scale that represents their feelings about the question, typically via a slider or selection of numbers.
Key features:
- Customisation range: Organisers can adjust the minimum and maximum values (e.g., 1-5, 0-10).
- Labels: Custom labels can be added to endpoints (e.g., “Very dissatisfied” to “Very satisfied”).
- Likert Scale: Often used in Likert-style questions to measure agreement or satisfaction.
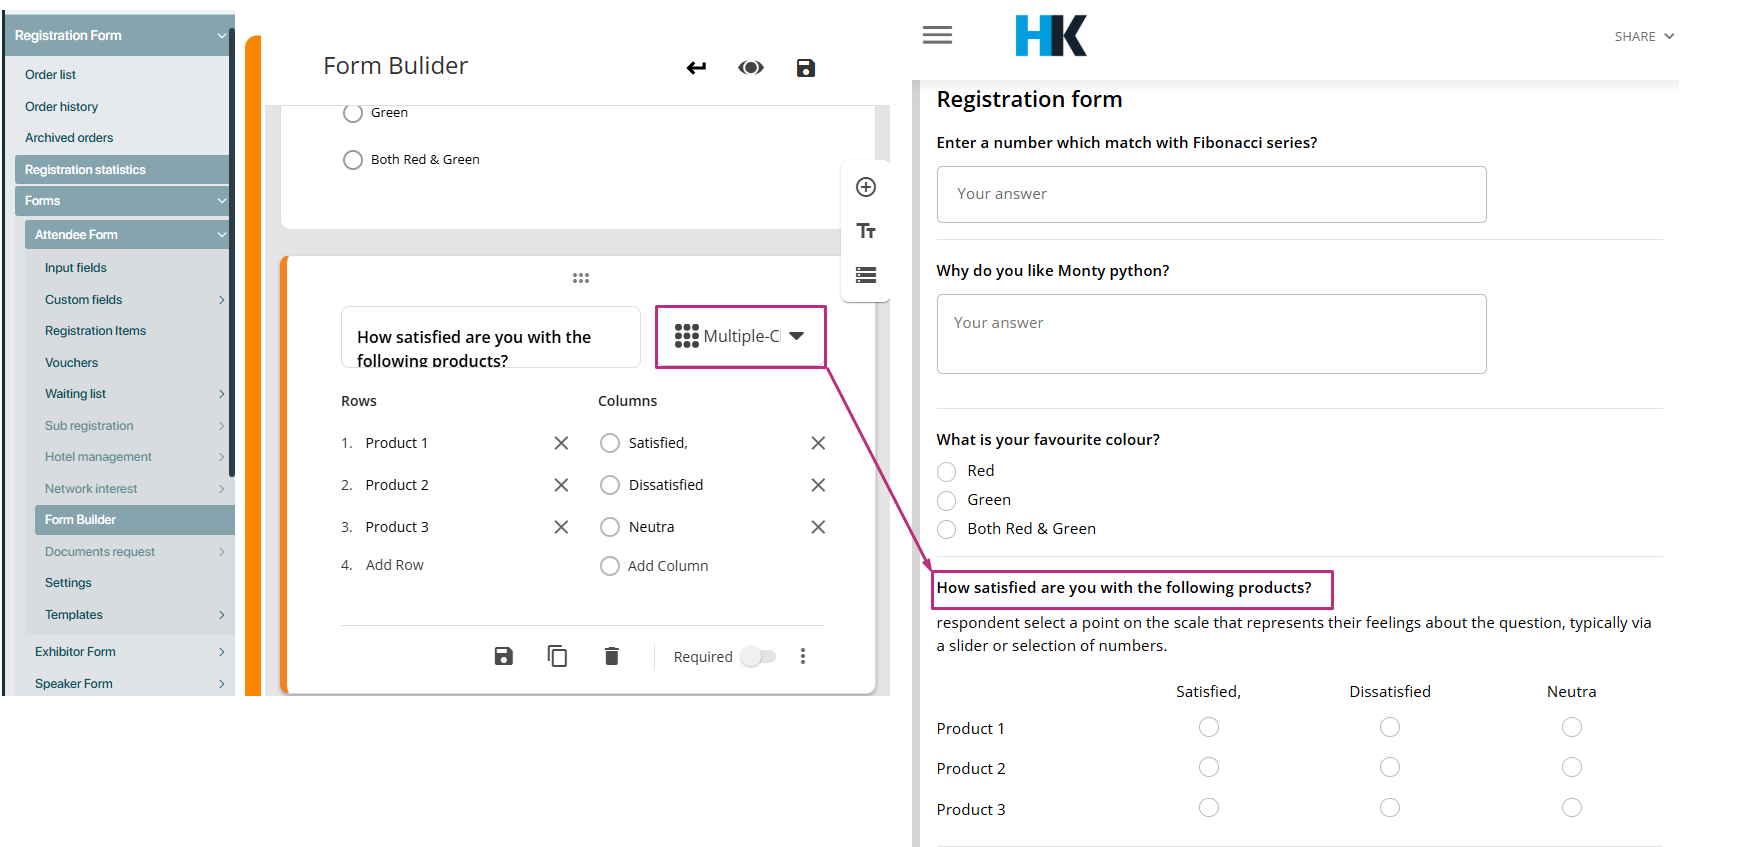
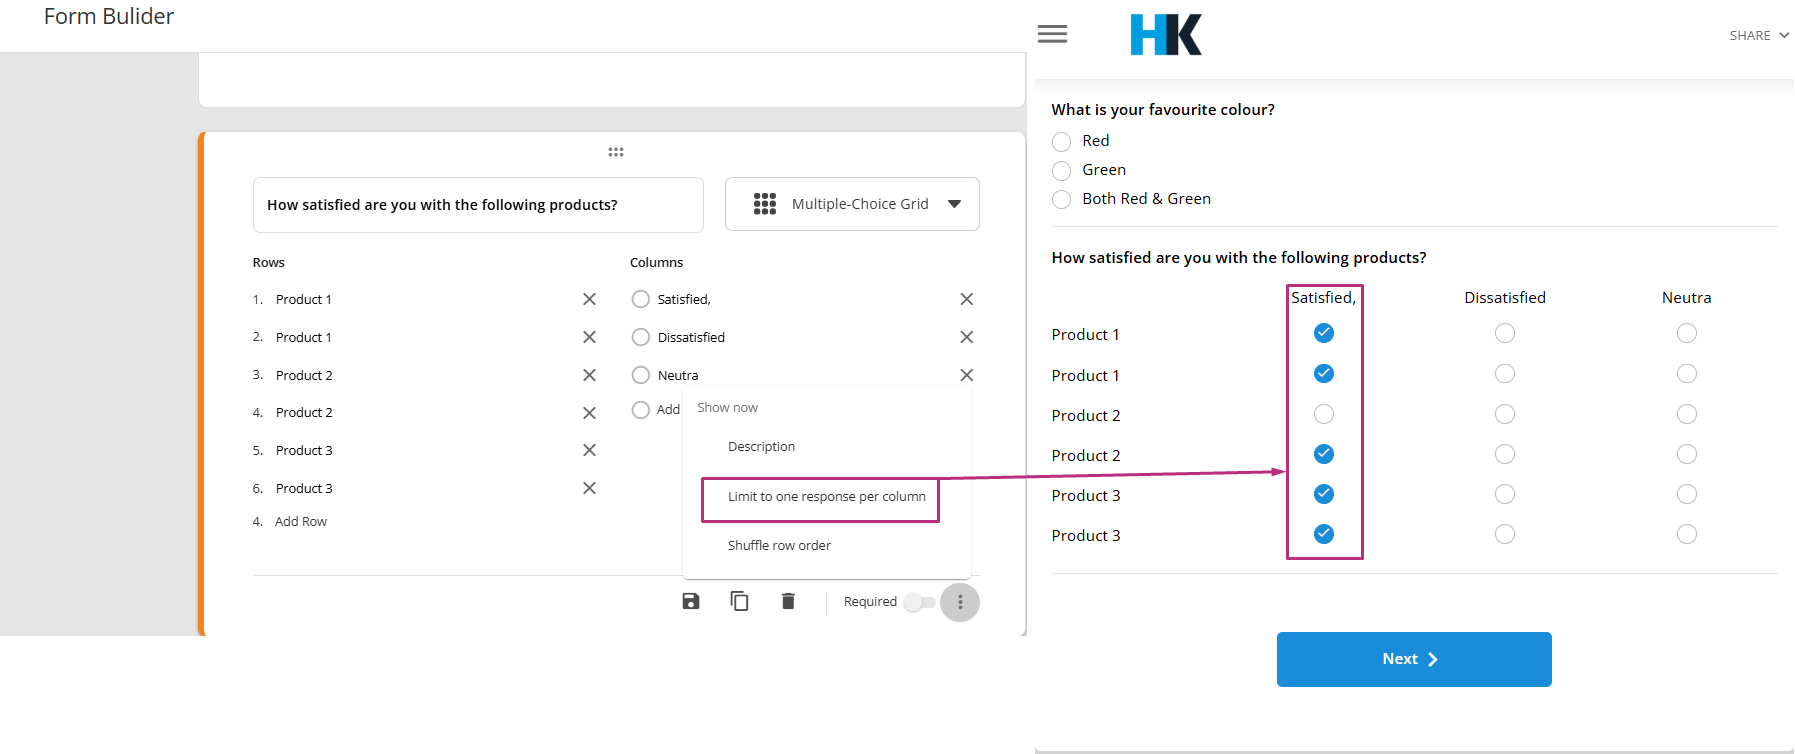
Multiple choice grid question:
A Multiple choice grid question is a type of question where respondents are presented with a grid layout. Each row represents a different question or statement, and the respondent can select one answer per row from a set of predefined options that appear in columns.
How It Works:
-
Grid layout: Each row corresponds to a specific question or statement, while the columns represent the answer options.
-
Single response per row: Respondents can select only one answer per row, ensuring they make a choice for each item listed in the grid.
Validation features:
There are two types of validation features are available in the multiple choice questions. Detail is given below about available validations.
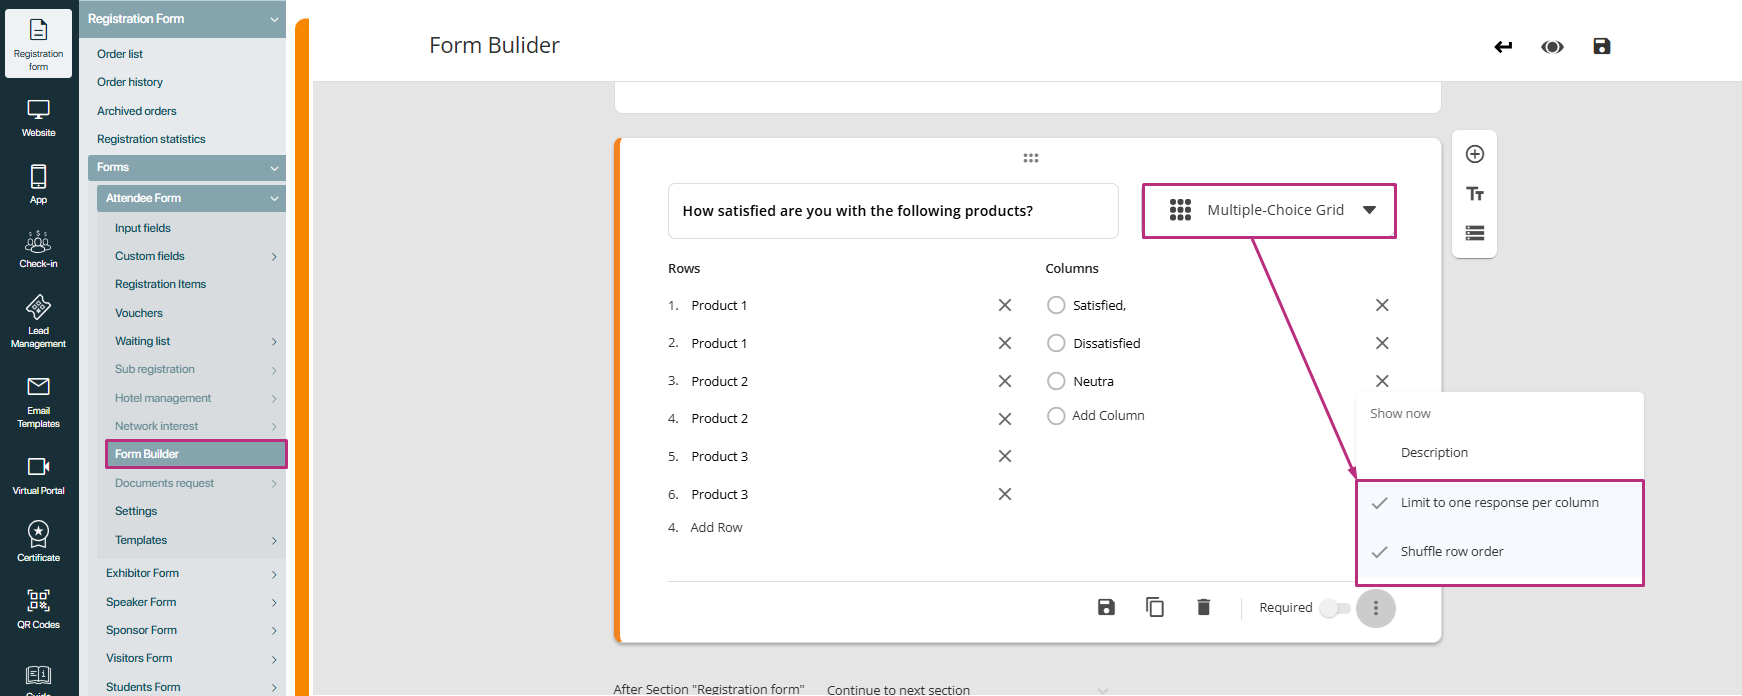
Limit to one response per column
When you enable the “Limit to one response per column” validation on a multiple choice grid question, it means that for each column, the respondent is allowed to select only one answer across all the rows in that column.
What this validation does:
- Restricts selection per column: If this validation is enabled, each column can have only one selected answer across all the rows. For example, if you’re asking respondents to rate multiple products (with each row representing a different product) and the columns represent different ratings, then only one product can be rated “very satisfied”, only one can be rated “Satisfied”, and so on.
- Prevents multiple selections: Without this validation, a respondent could potentially select multiple answers from the same column (e.g., they could choose “very satisfied” and “satisfied” for the same product), which may not be what you want. With the validation, only one selection per column is allowed.
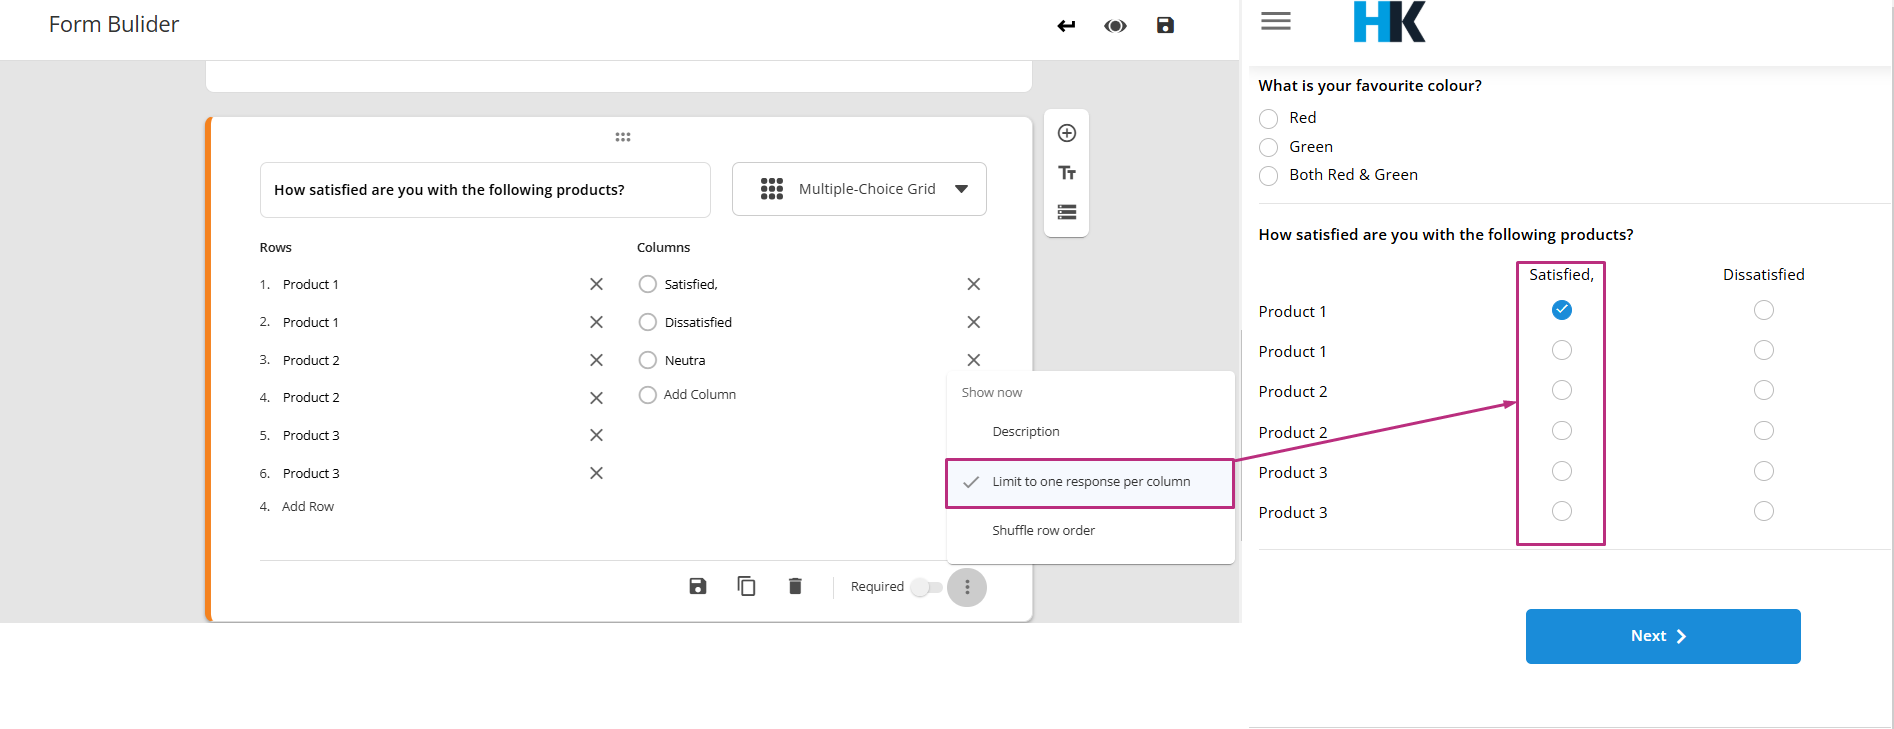
If the validation is not applied:
If the “Limit to one response per column” validation is not applied, respondents are free to select multiple answers from the same column across different rows. So, for example, if the column is “Very satisfied”, a user could select “Very satisfied” for both Product 1 and Product 2, and even for Product 3, depending on their responses.
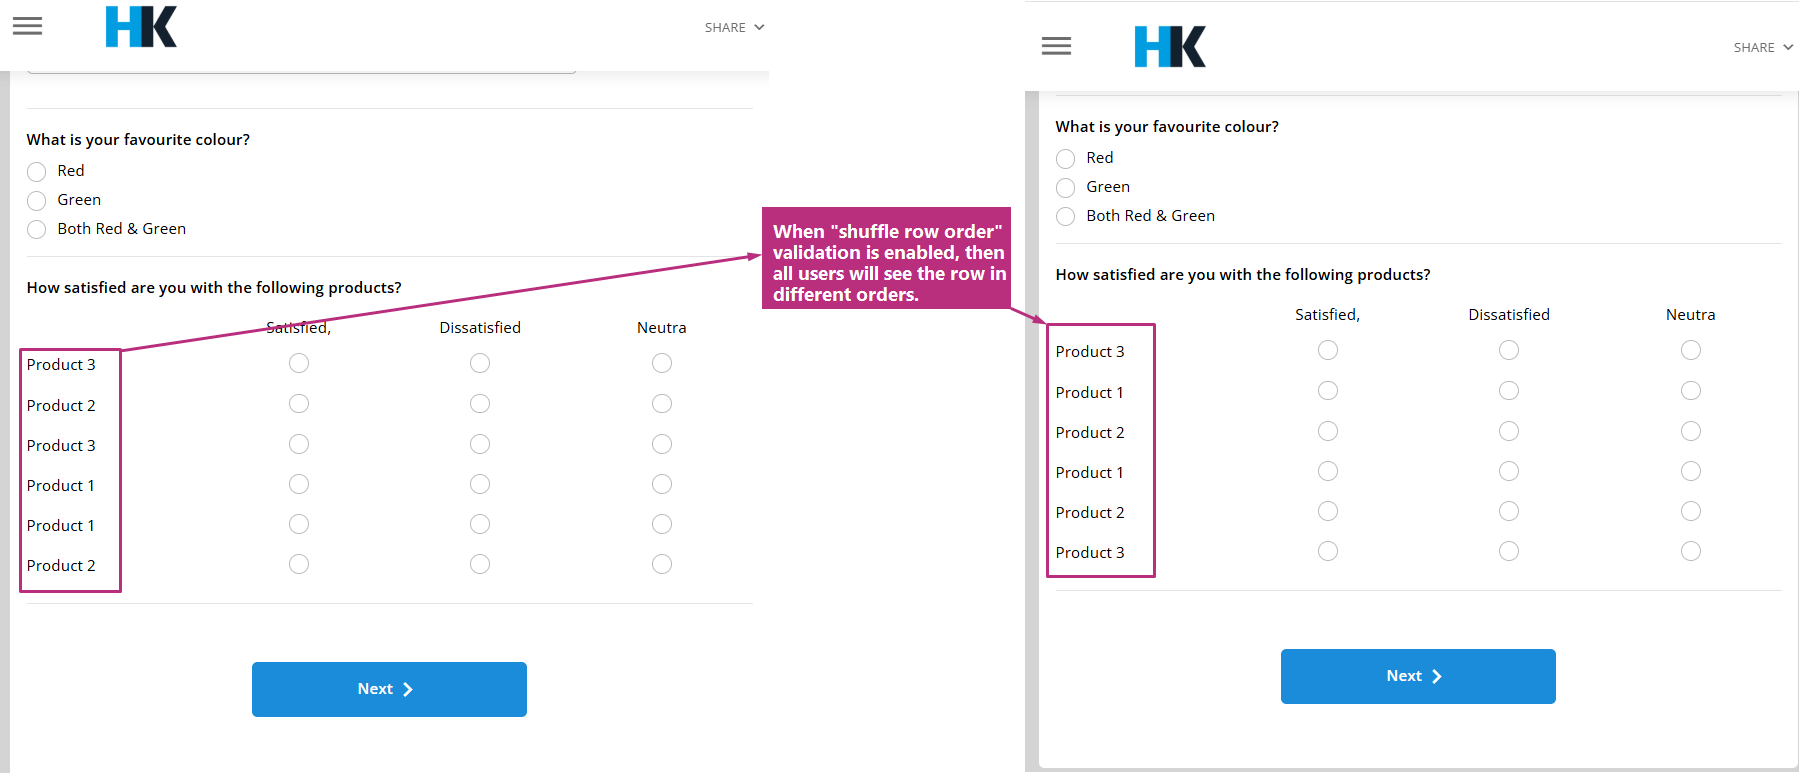
Shuffle row order:
-
For each user: The rows will be shuffled differently for every respondent who fills out the survey. This means that each respondent sees the rows in a different order, which helps prevent response bias caused by the order in which the questions appear.
-
Without shuffling: All respondents will see the rows in the same order (Product 1, Product 2, Product 3).
-
With shuffling: Each respondent will see the rows in a random order.
-
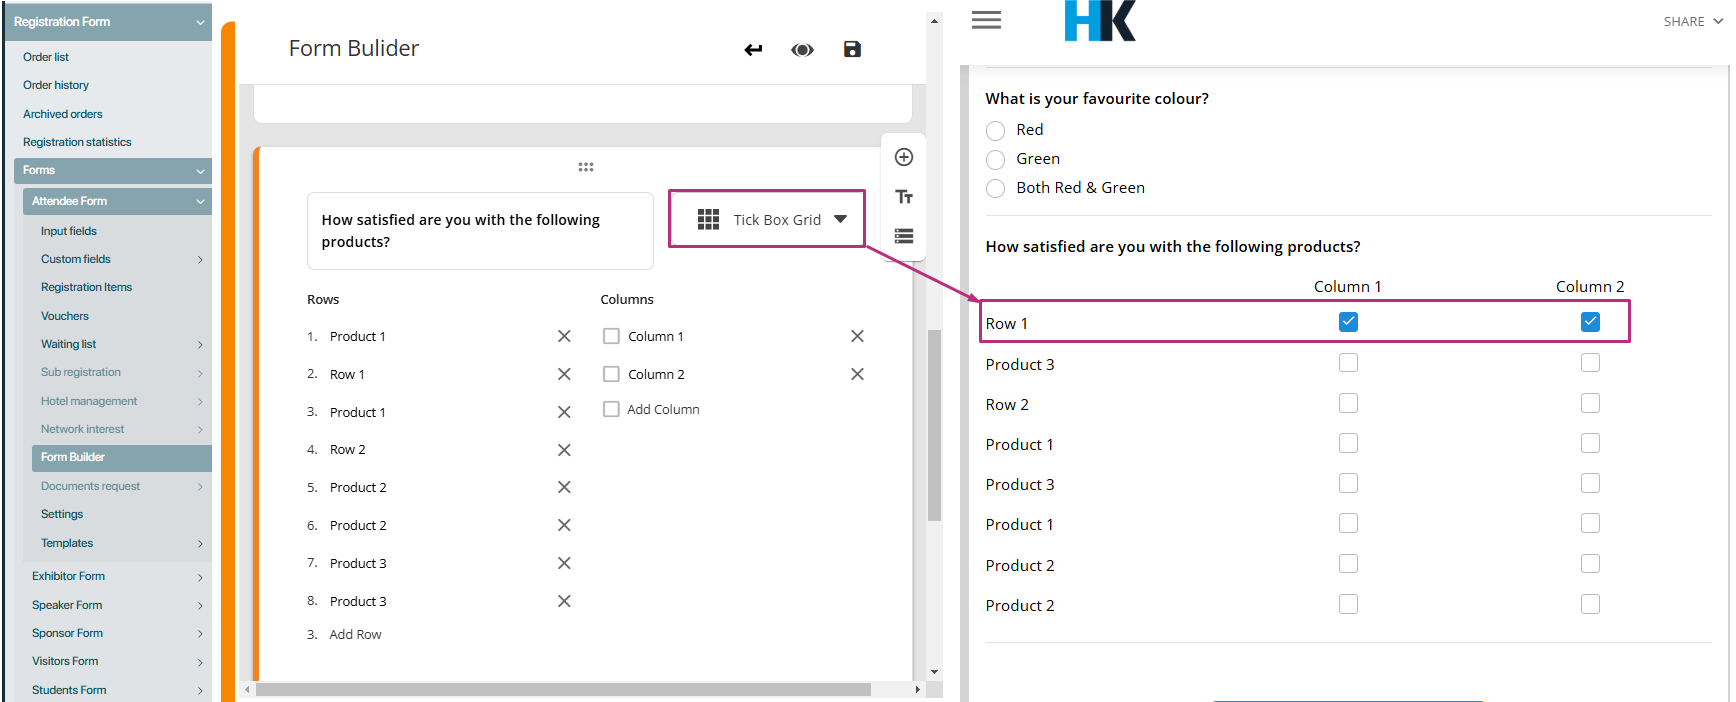
Tickboxes grid questions
The Tickboxes grid functions similarly to the multiple choice grid but allows for multiple selections per row. Respondents can check one or more boxes for each row question. Here’s how it works:
- Rows: As with the multiple choice grid, each row represents a different question.
- Columns: Columns provide a set of possible options (like multiple-choice answers). However, in a tickboxes grid, users are allowed to select multiple answers per row, meaning they can choose as many options as they deem relevant for each question.
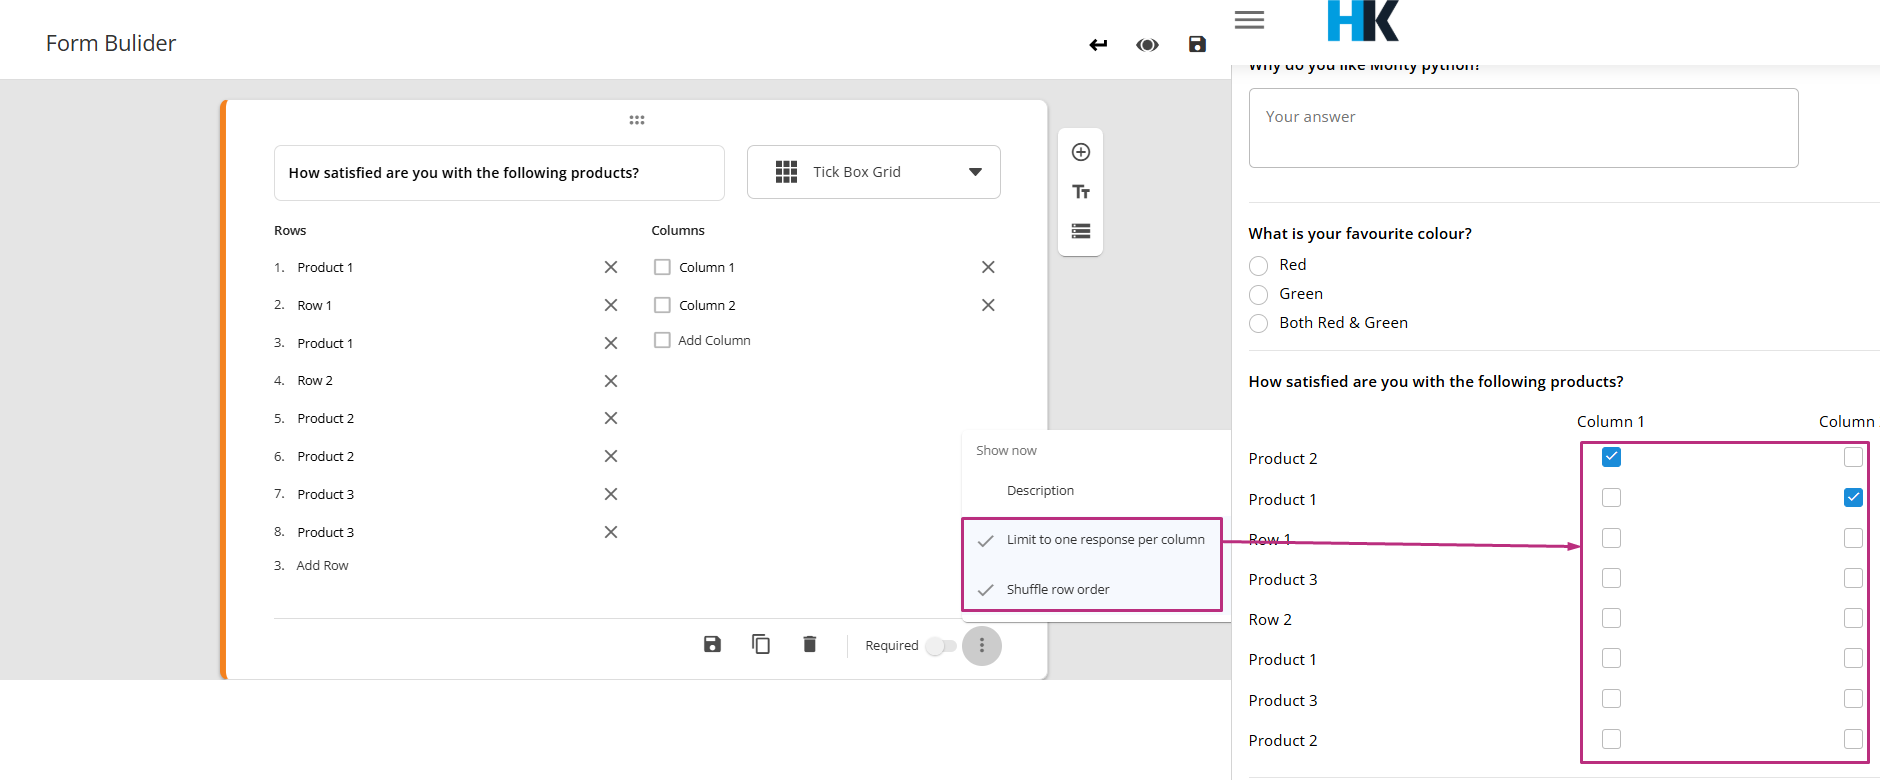
Validation features:
- Limit to one response per column: You can also limit respondents to choosing just one answer per column in a tick boxes grid, in which case it functions like the multiple choice grid (i.e., only one selection per row is allowed). However, if no such restriction is applied, respondents can select multiple answers from the available options for each column.
- Shuffle row order: The rows can also be shuffled, preventing bias in response patterns by altering the order of the questions.
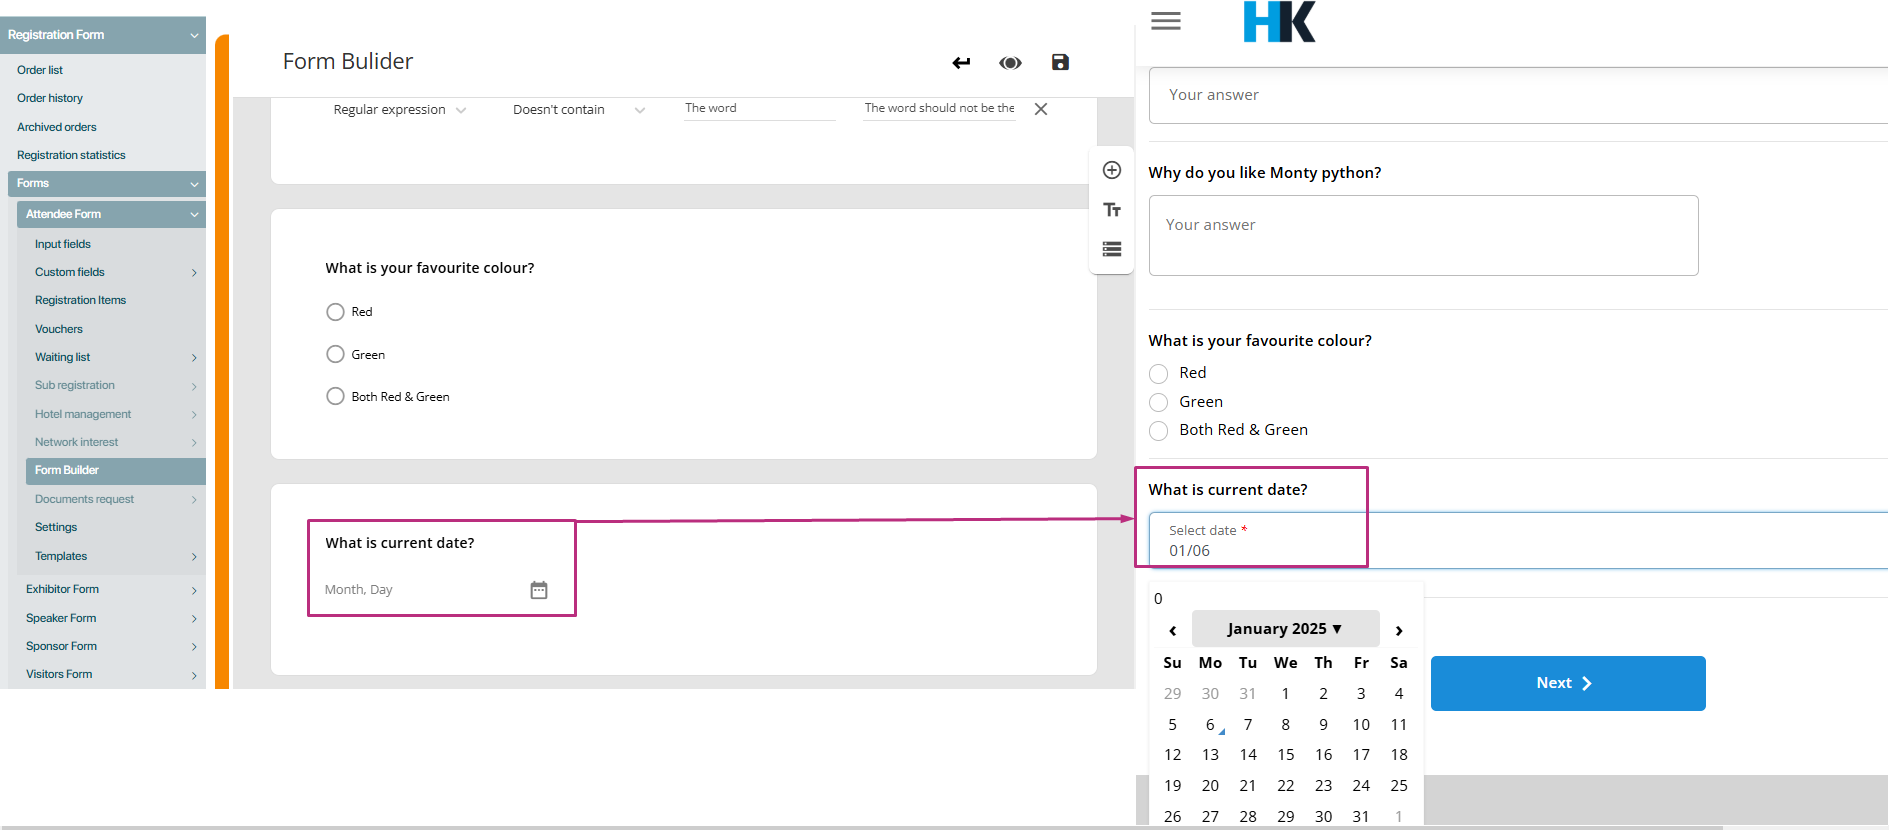
Date form question
The Date type question allows respondents to insert a specific date in a structured format. This question type is useful when you need to collect information about dates, such as birthdays, event dates, or deadlines
Validation features:
-
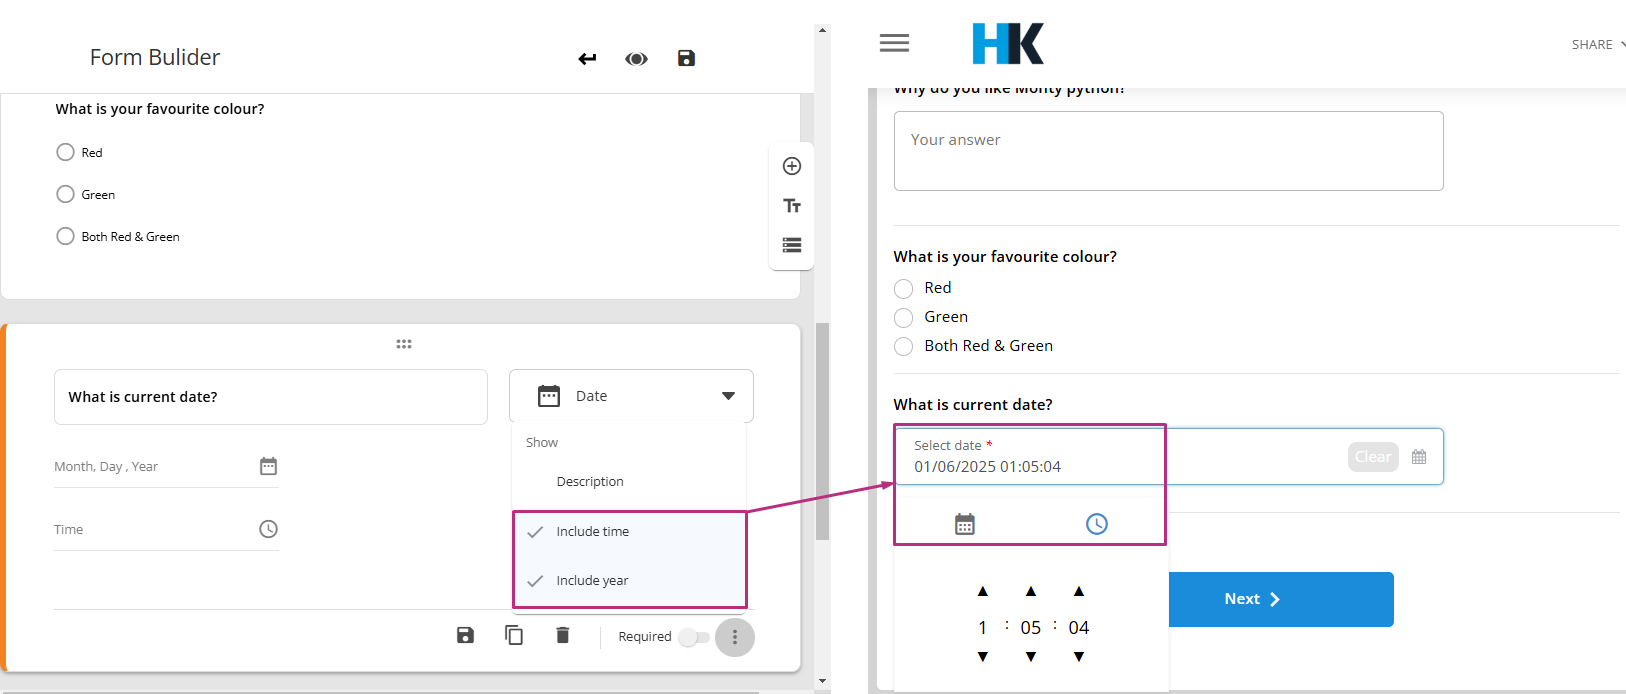
Options for including year: Organiser can customise the question to either include or exclude the year from the input field. This can be helpful when organiser collecting data like a birth date where the year might not be as important, or when it’s irrelevant to the question. If the year is excluded, the user only selects the day and month.
-
Options for including time: While the Date question typically focuses on capturing the calendar date, there’s an option to include the time as well. When enabled, this lets respondents specify a time of day (e.g., 3:00 PM) alongside the date. This is useful for situations like scheduling appointments or event planning, where both the date and the exact time are necessary.
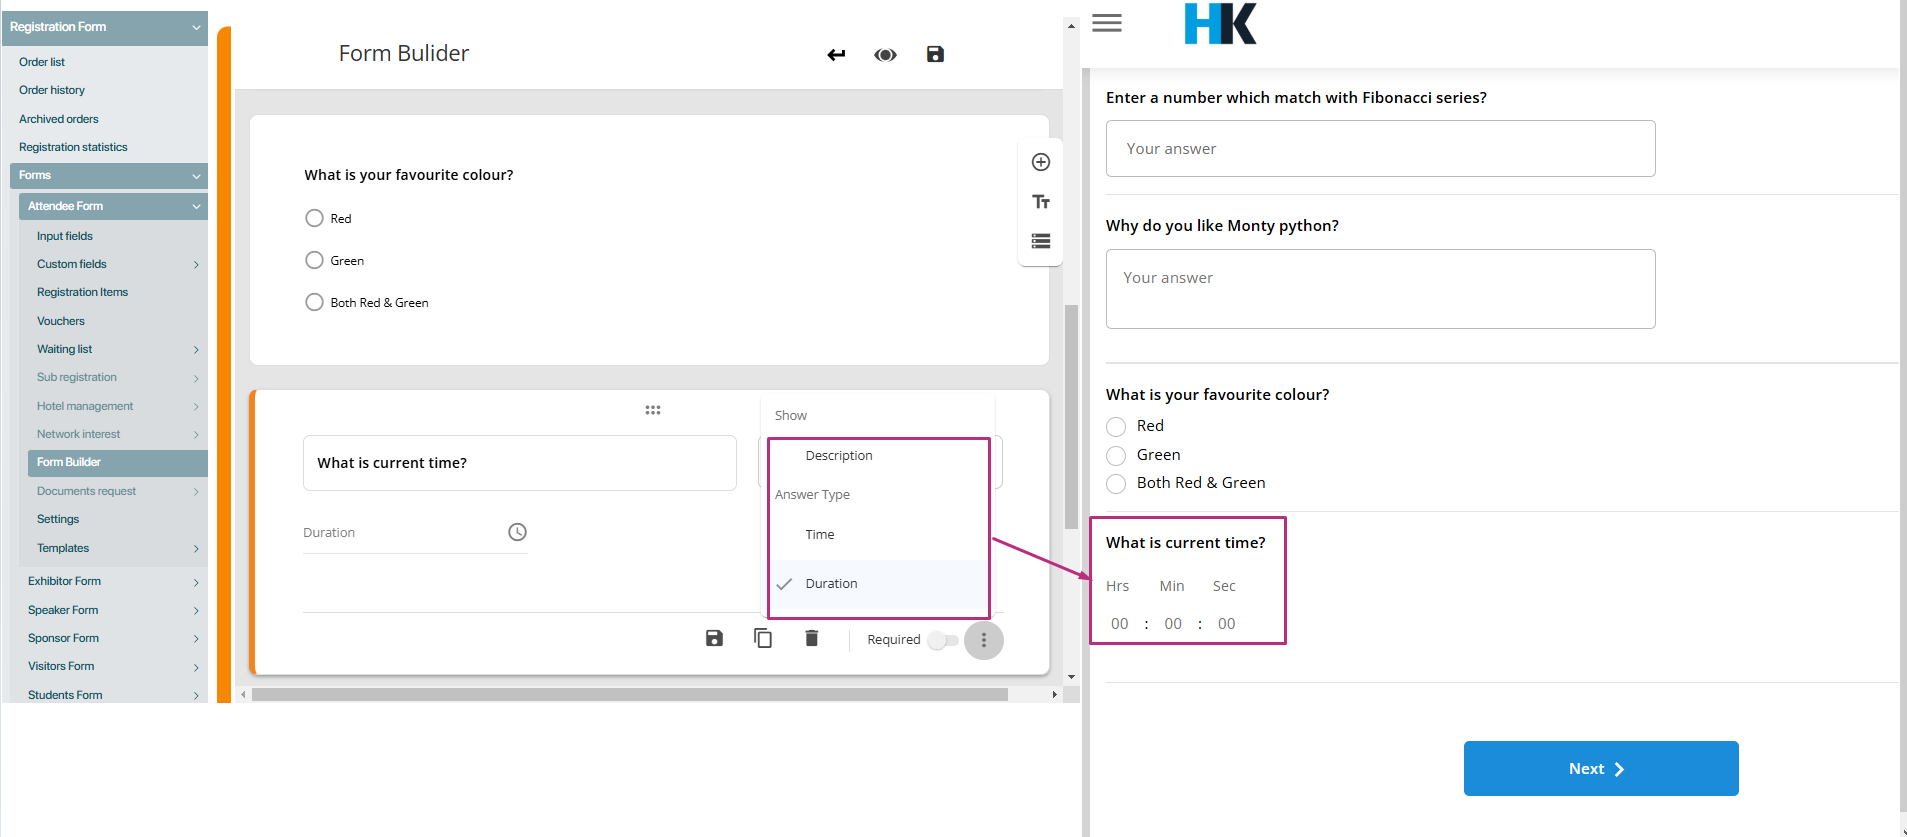
Time form question
The Time type question allows respondents to insert a specific time or a duration. This question type is useful for gathering time-based information, such as appointment times, event duration, or work hours.
Key features of a time question:
-
Time input: Respondents can input a specific time, often in a HH:MM AM/PM format (or in 24-hour time, such as HH:MM). This is used when you need to know an exact time of day, for example, when setting up a meeting or an event.
-
Duration input: In addition to specifying a specific time, some forms can ask for a duration instead. For example, rather than asking “What time will the event start?” you could ask, “How long will the event last?” and let the respondent input a time duration (e.g., 2 hours, 45 minutes). This feature is typically used in scheduling, planning, or time management contexts.
-
Customizable time format: You can set up the form to ask for the time in a 12-hour format (AM/PM) or a 24-hour format depending on the preference or region of the audience.
Common features for all question types
The form builder’s additional features provide flexibility, efficiency, and control, making it easier for organisers to create dynamic and user-friendly forms. Features like Save, Copy, and Delete streamline form management, while the Required toggle and Description options enhance user engagement and ensure clarity in form responses. These tools empower organisers to build customised forms tailored to their event needs.
Here’s a detailed description for the additional features available to organisers for all question types in the form builder:
Save icon
The Save feature allows the organiser to save individual changes made to a specific question. By clicking on the Save icon, any modifications to the question’s text, options, or settings are immediately stored without affecting the entire form. This provides granular control over saving updates.

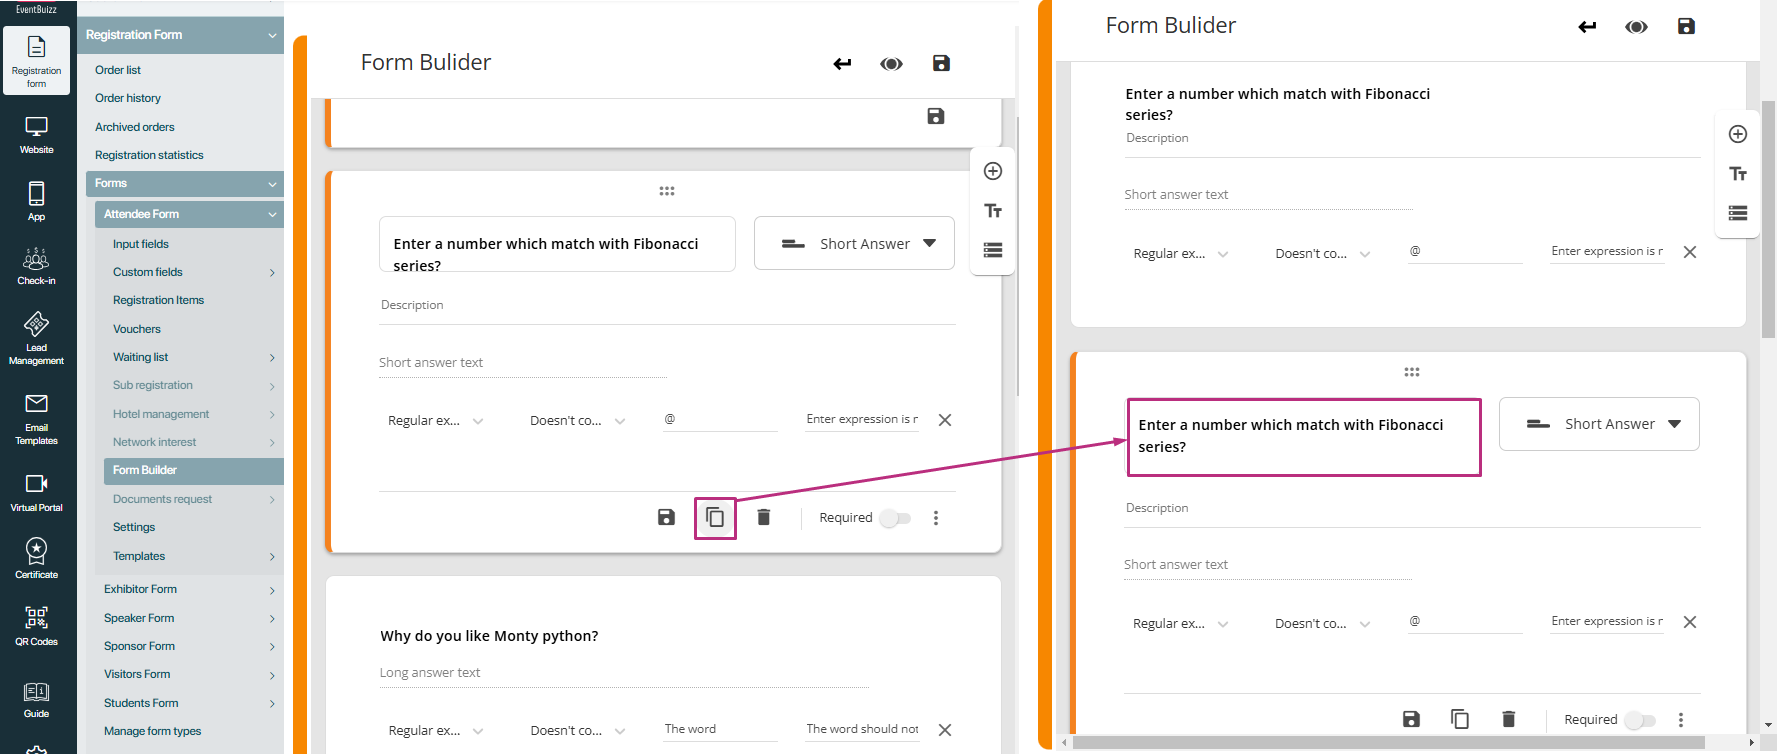
Copy icon
The Copy feature helps organisers quickly duplicate an existing question. By clicking on the Copy icon, a new question with the same content, settings, and structure is created. This reduces the need for repetitive configuration when adding similar questions multiple times.
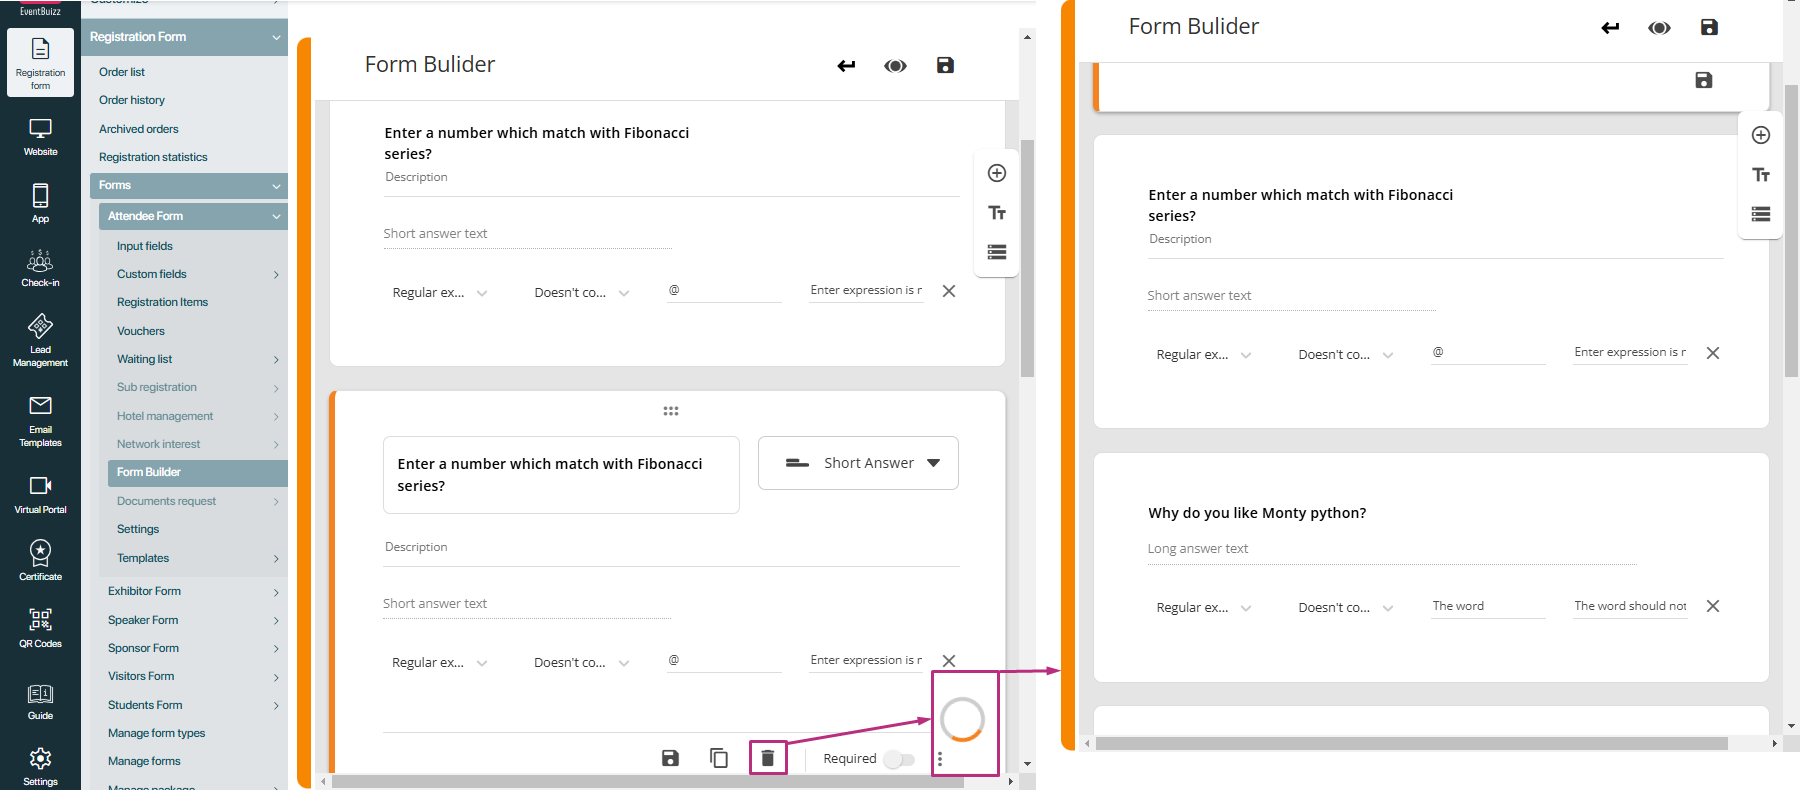
Delete icon
The Delete feature allows the removal of a specific question from the form. Clicking on the Delete icon permanently removes the selected question. Organizers should confirm the action to avoid accidental deletions.
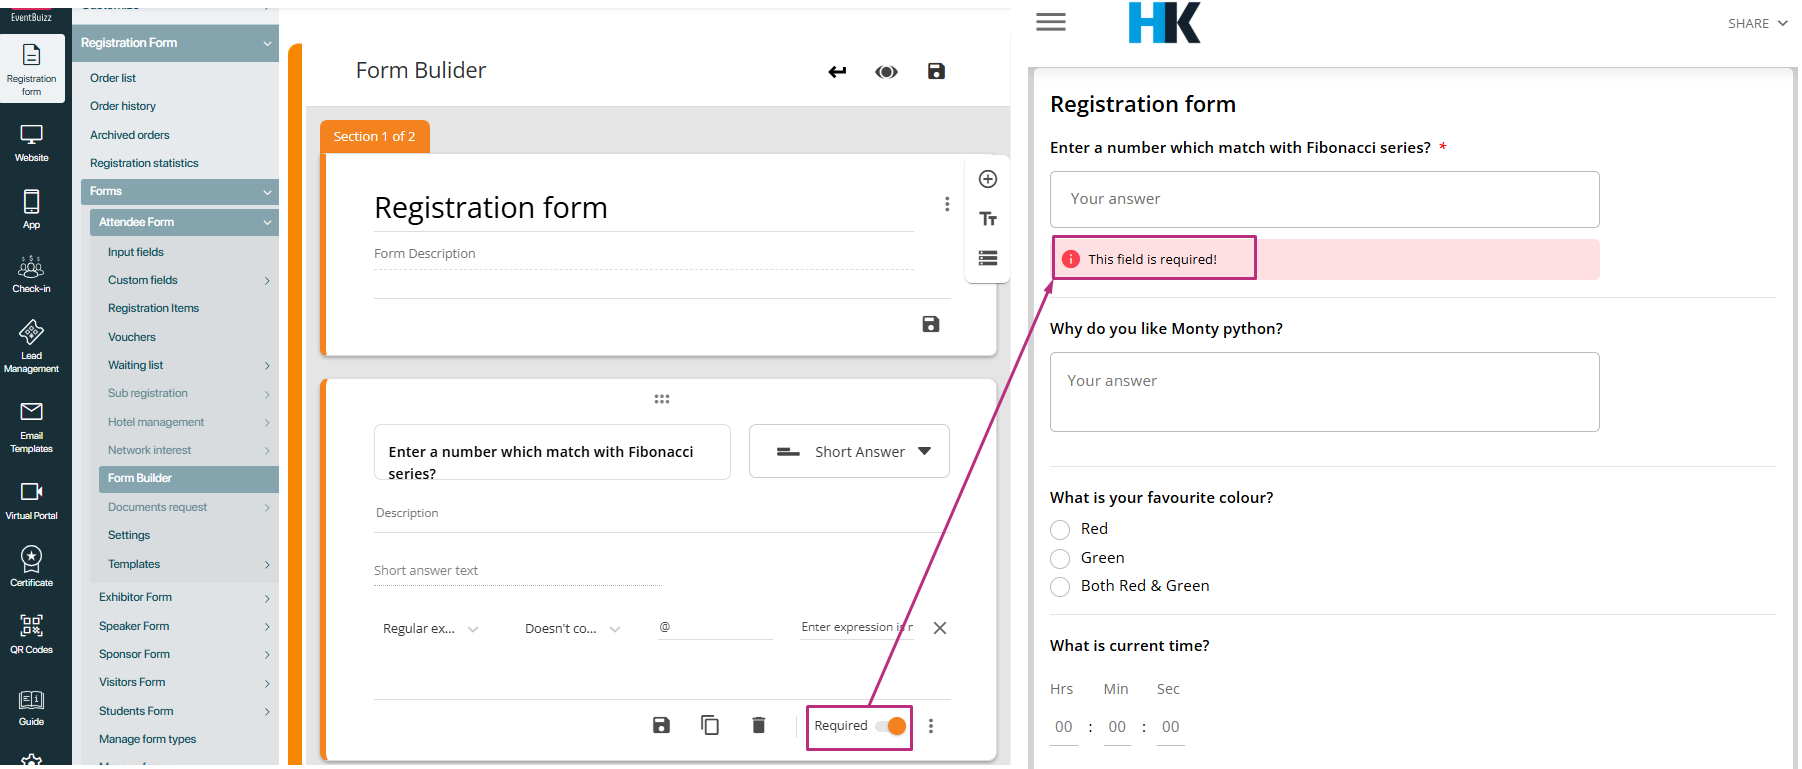
Required toggle
The Required toggle is used to enforce mandatory responses for specific questions. When the toggle is enabled, users must answer the question before submitting the form. By default, this toggle is set to disabled, giving organizers the flexibility to choose which questions are essential.
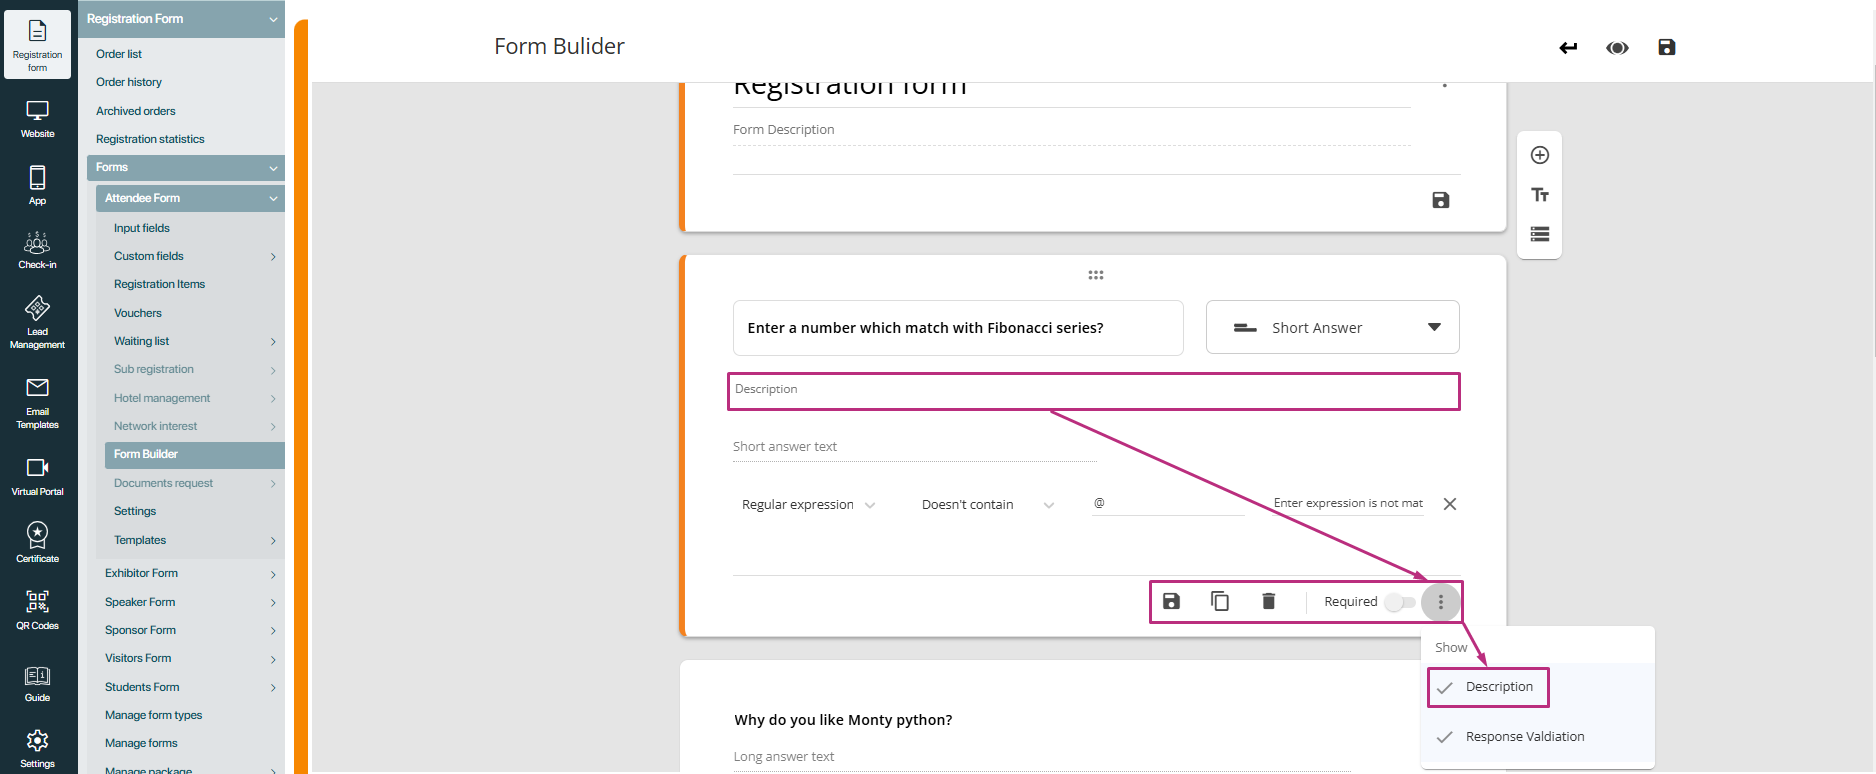
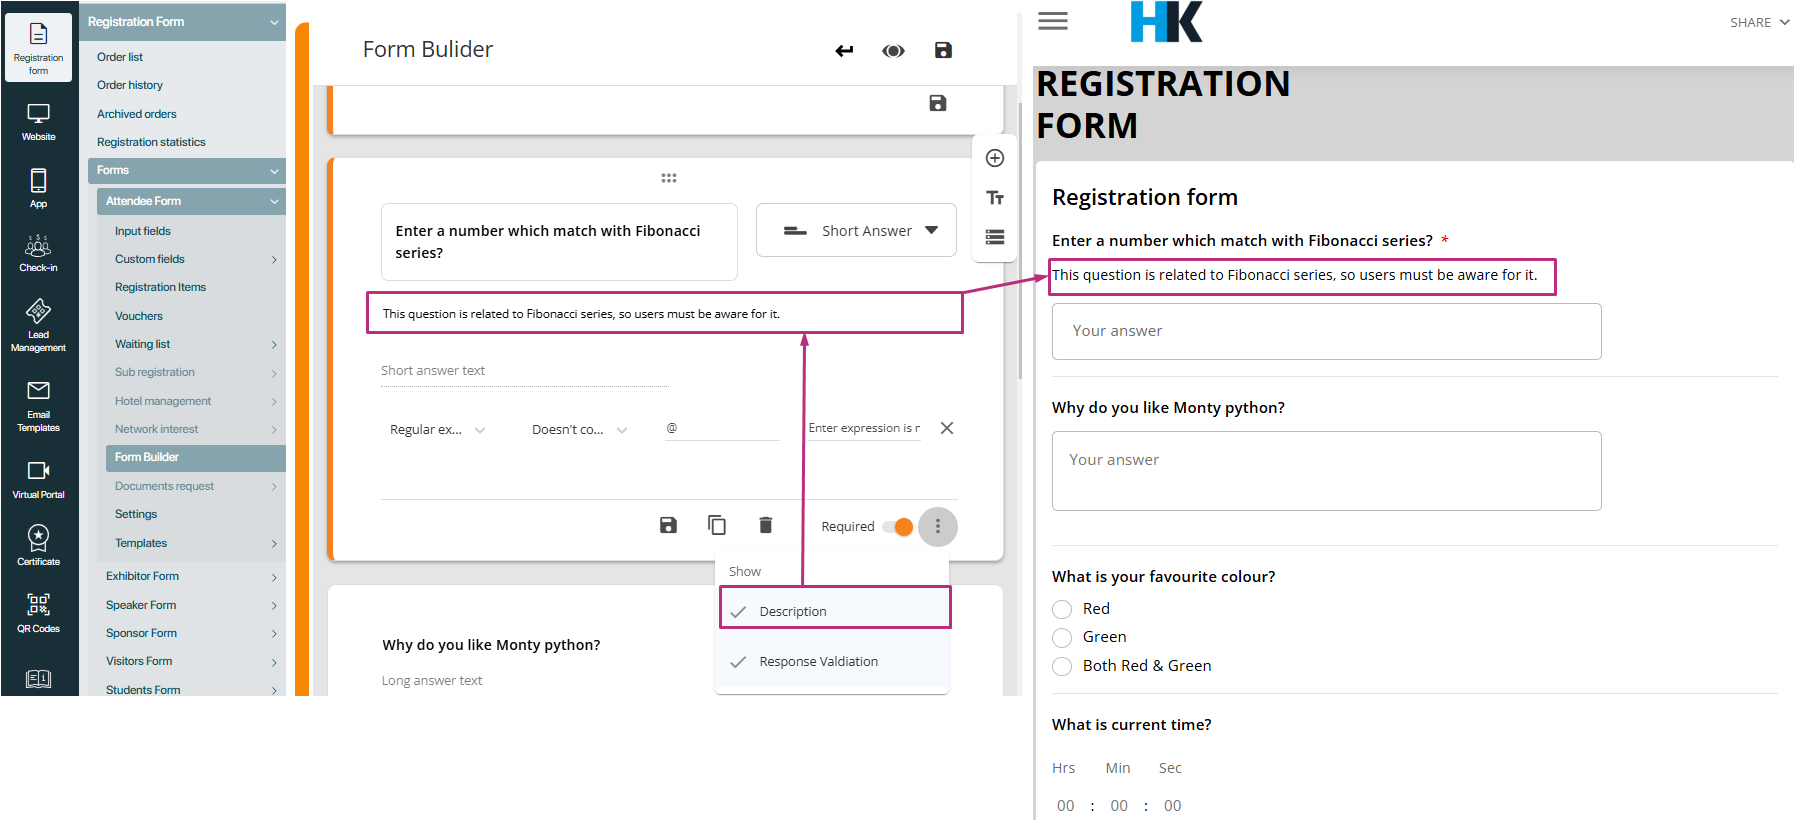
Description option
Each question type includes a Description option within its menu. When this option is selected, a Description field is added to the question container, allowing organizers to provide additional information or context for the question. Users can view this description while completing the form, ensuring clarity and reducing potential confusion.
Types of sections in the form builder
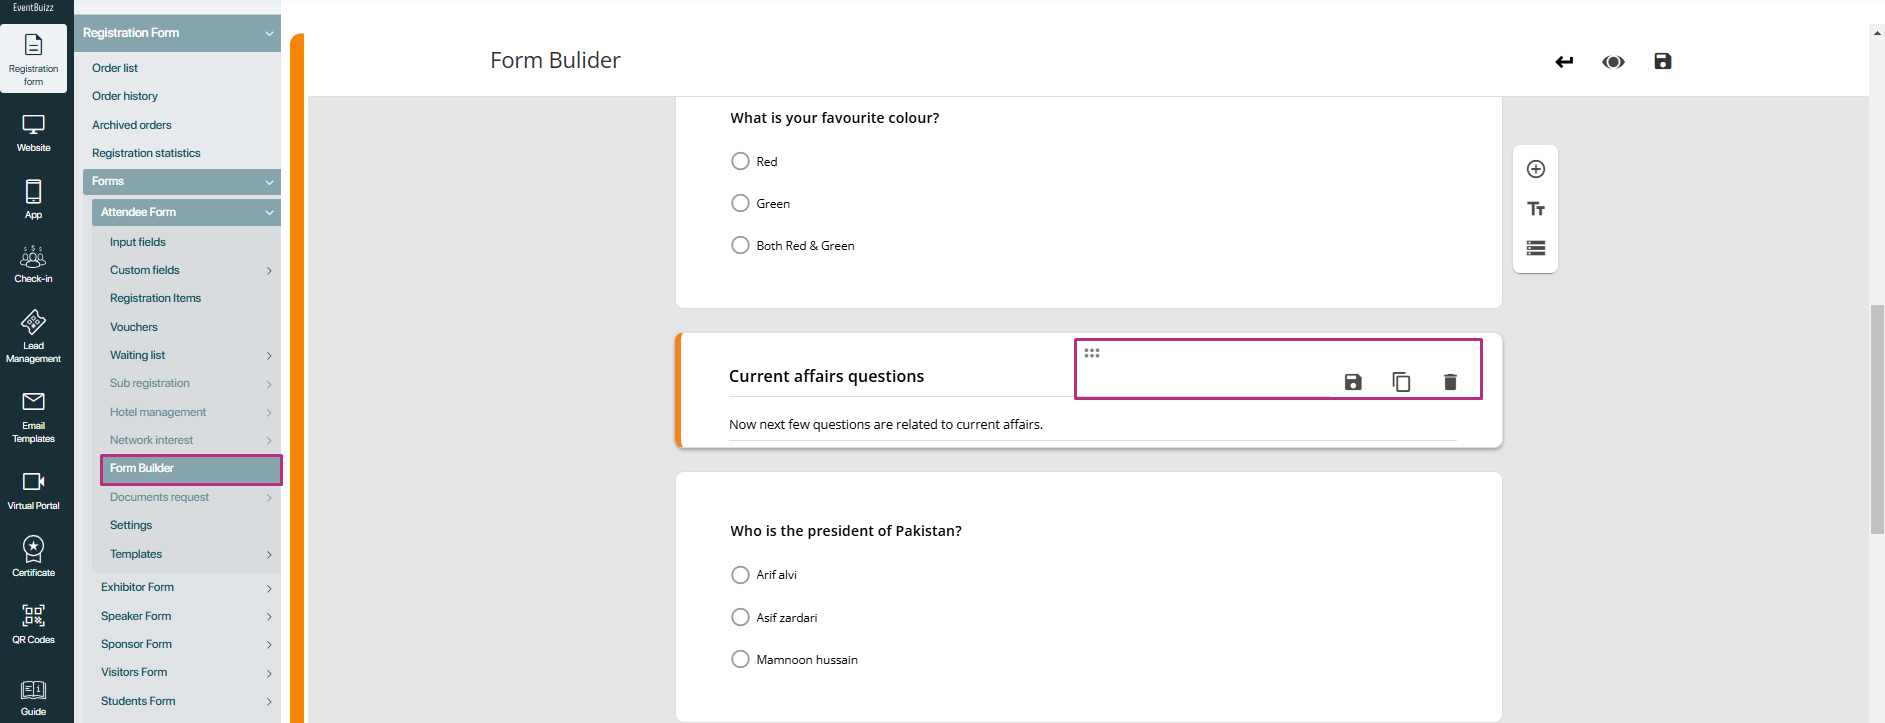
Text section
A Text section is a flexible section used to display static text or instructions within a form. It can be moved anywhere in the form, either within the current section or across different sections. This section helps organisers add context, headings, or information between questions to improve user understanding and flow.
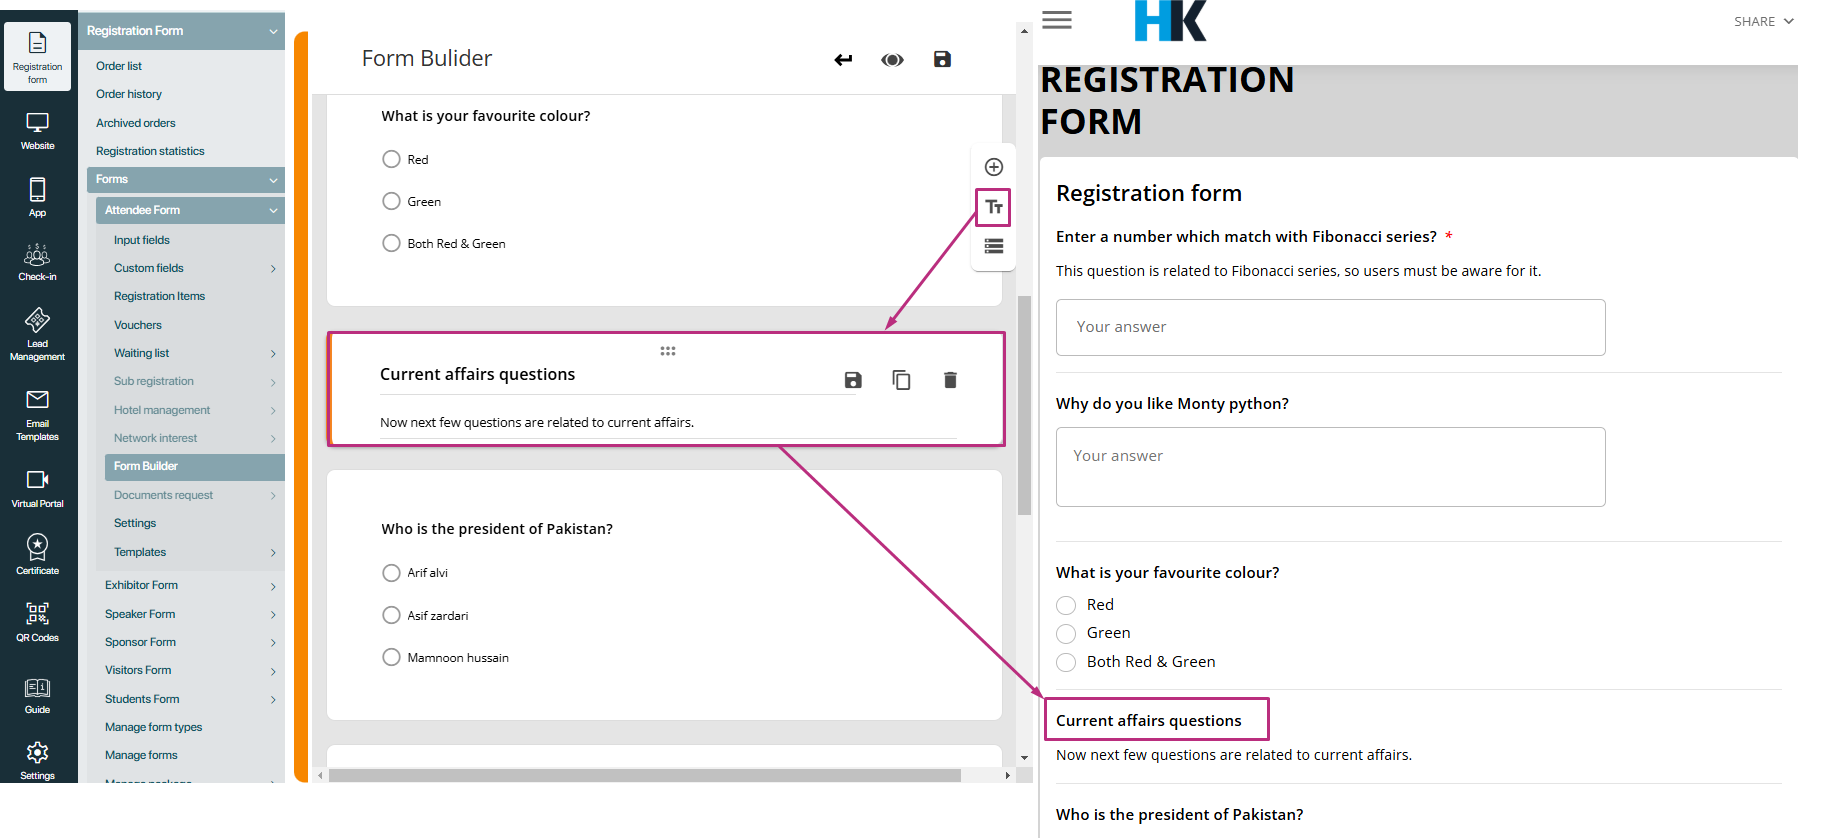
Features Available for text section:
- Save: Save the changes made to the content of the text section.
- Copy: Create a duplicate of the text section with the same content.
- Delete: Remove the text section from the form.
- Drag-and-drop icon: Easily reposition the text section within or between other sections by dragging it.
Example:
Imagine a form with multiple questions about an event registration. Before the payment information, a text section titled “Payment instructions” can provide details on accepted payment methods or deadlines.
How to divide the form into sections
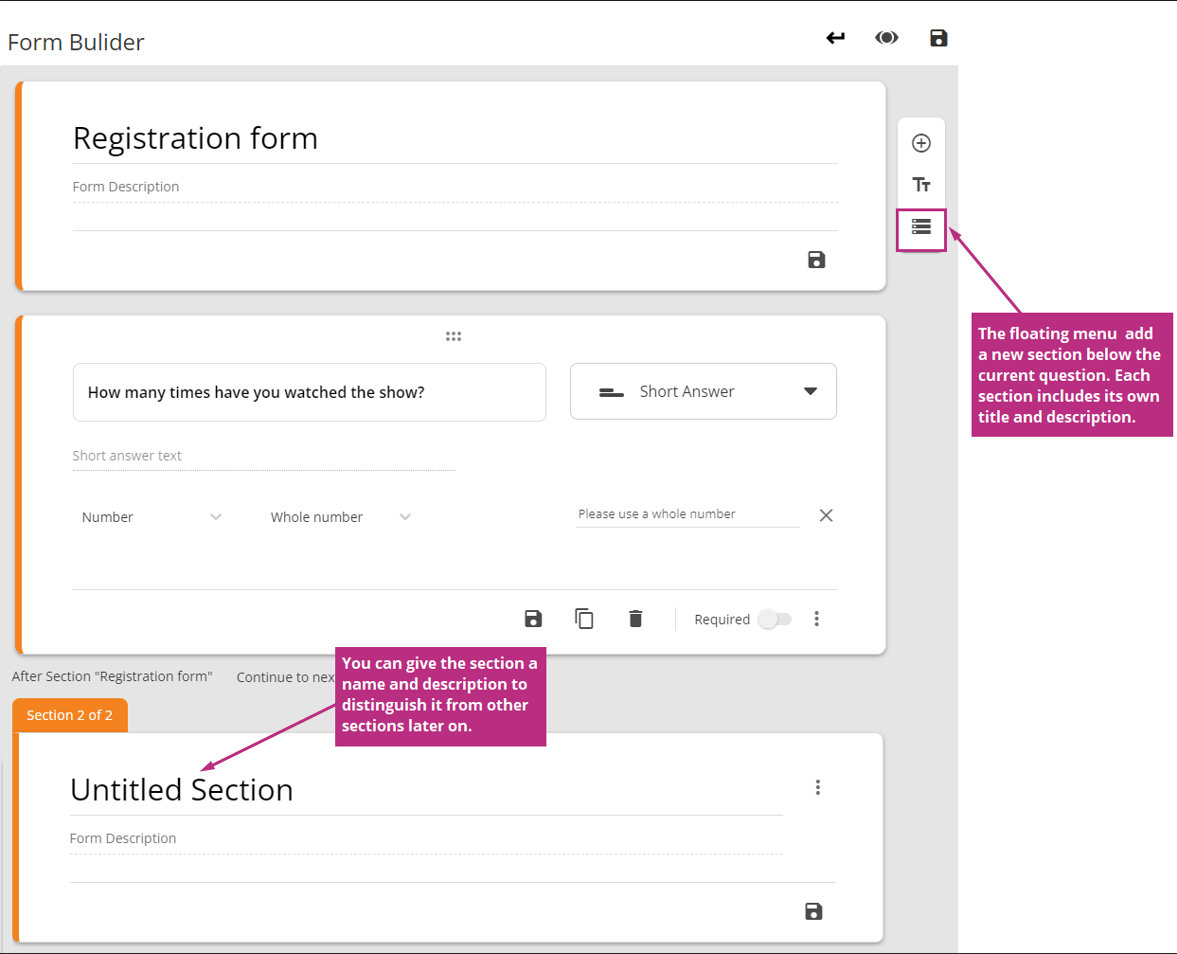
Untitled section
An Untitled section serves as a distinct division in the form where organisers can group related questions under a unique section title and description. This type of section is particularly useful for breaking down complex or long forms into manageable parts. Each section is shown separately to respondents, making the form more organized and user-friendly.
Organiser can create a new section from the last button in the floating menu to the right of the page. From the three dots menu near the title of the section, organiser can duplicate the current section, move it to another position in the document, or delete it. And organiser can customise each section with a description.
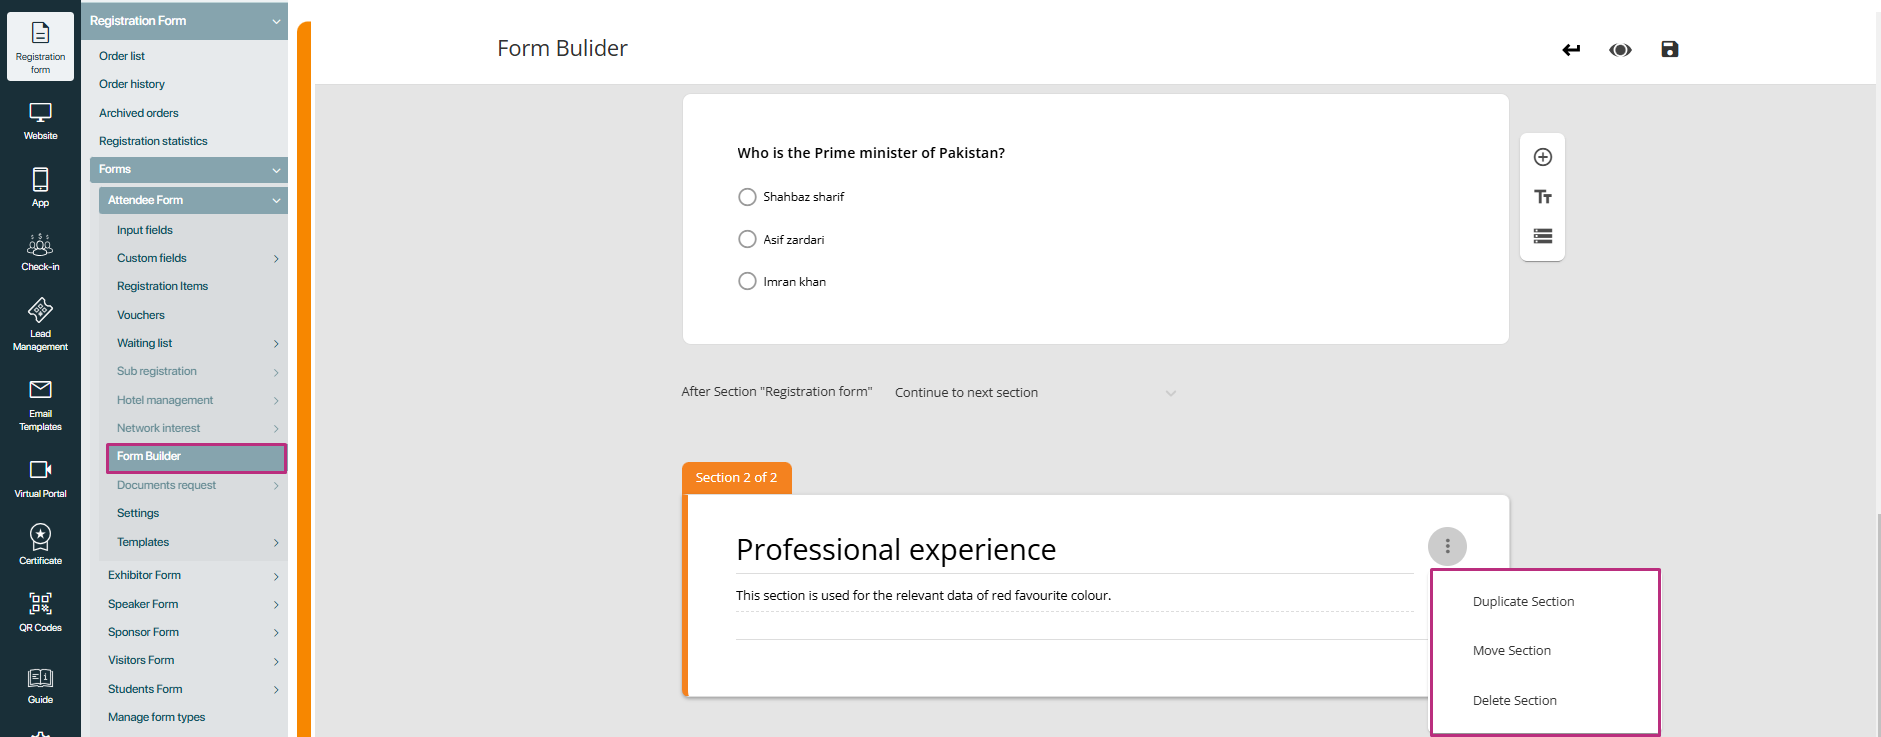
Options available for untitled section:
- Move section: Reposition the entire section to a different part of the form.
- Duplicate section: Create a copy of the section, including all questions within it.
- Delete section: Permanently remove the section and all its content from the form.
Example:
Consider a job application form divided into sections for Personal information, Education, and Work experience. Each section can be titled and described to guide the applicant.
Title: Personal information
Description: Please fill out your basic personal details. This information will be used to contact you about your application.
Questions:
1. Full name
2. Email address
3. Phone number
Title: Work experience
Description: Provide your recent work experience, including job titles, companies, and duration of employment.
Questions:
1. Job title
2. Company name
3. Duration of employment

How to navigate between two sections?
To improve user flow and create dynamic form experiences, organizers can configure navigation between sections based on user responses. This functionality is available for Multiple choice and Drop-down question types. By setting up conditional navigation, users are guided to different sections based on their selected answers, making forms more interactive and tailored to individual responses.
Question types supporting section navigation
-
Multiple choice questions
Allows users to select one option from a list of predefined choices. Navigation can be configured so that selecting a specific option leads the user to a different section of the form. -
Drop-down questions
Presents a list of options in a drop-down menu, where users choose one. Like multiple choice, organisers can define navigation rules based on the selected answer.
How to set up section navigation?
-
Create a multiple choice or drop-down question
Add a question of either type to your form. -
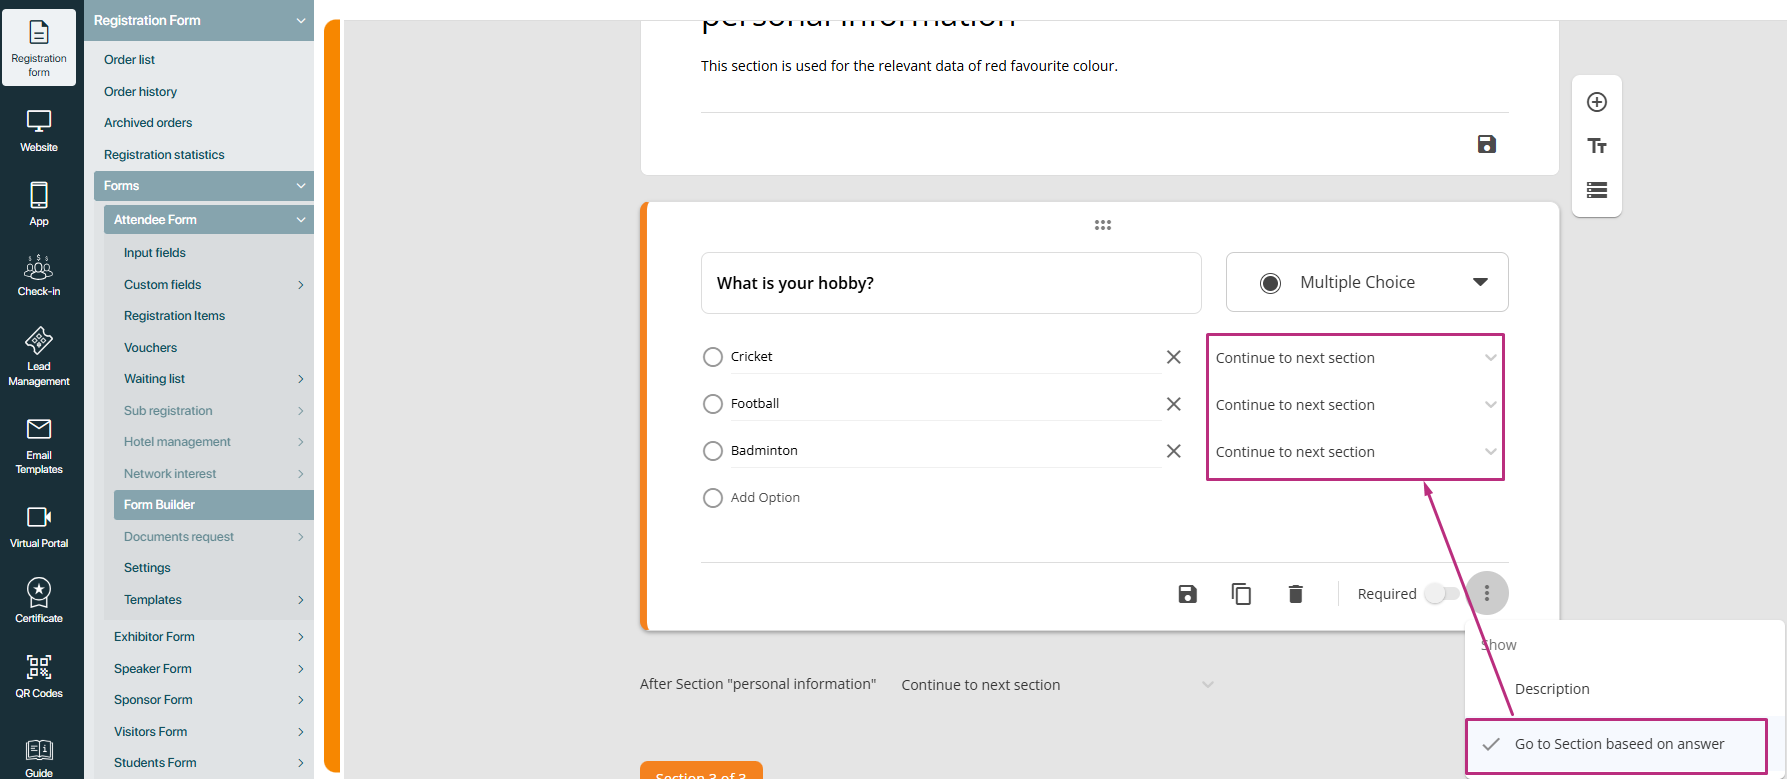
Access the “Go to section based on answer” Option
In the question’s menu, select the Validation option called “Go to section based on answer”.
-
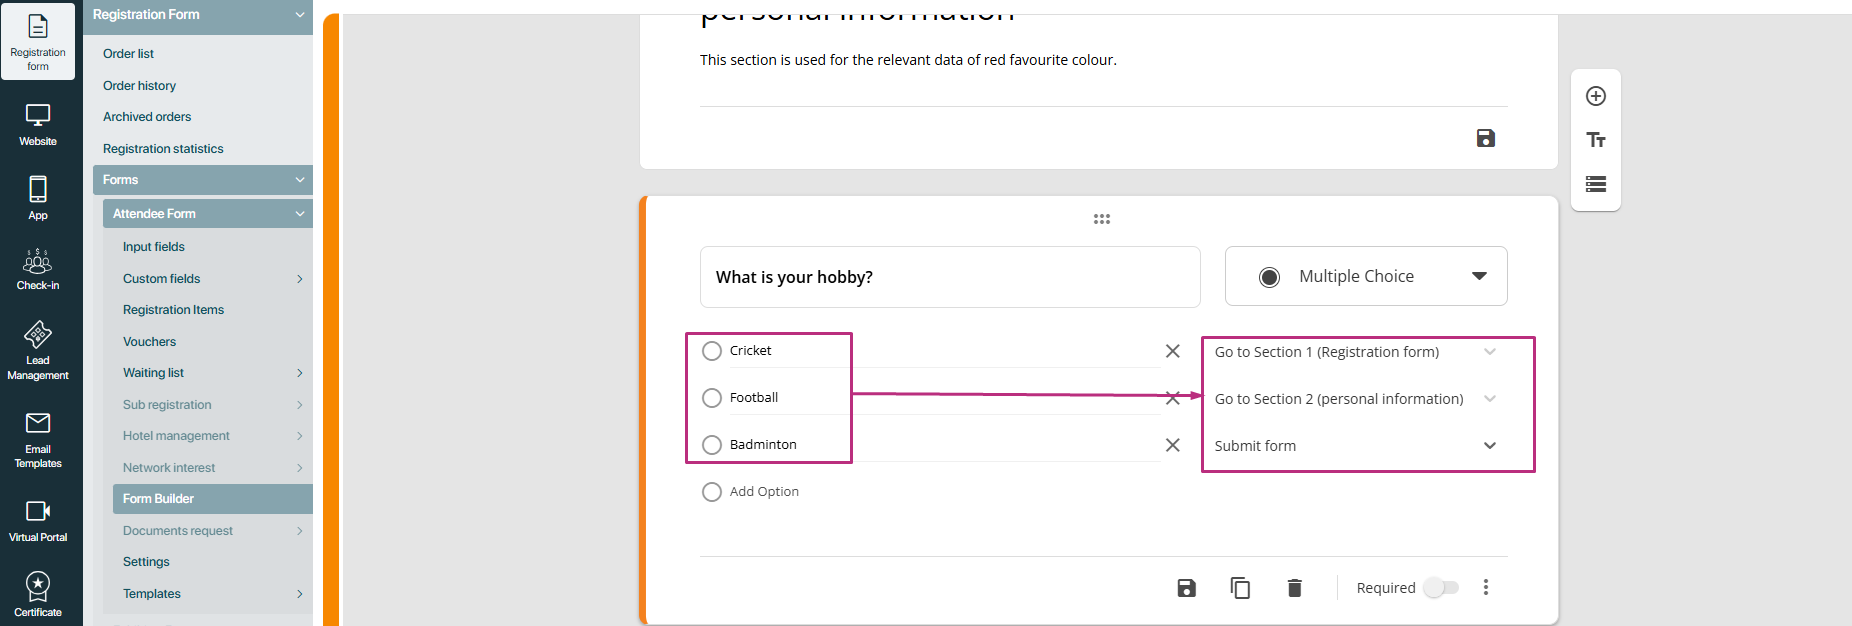
Assign sections to each option
- A field will appear next to each answer option, displaying a list of all created sections in the form.
- Click on the field next to an option to choose a section where users should be directed when they select that option.
-
Save the configuration
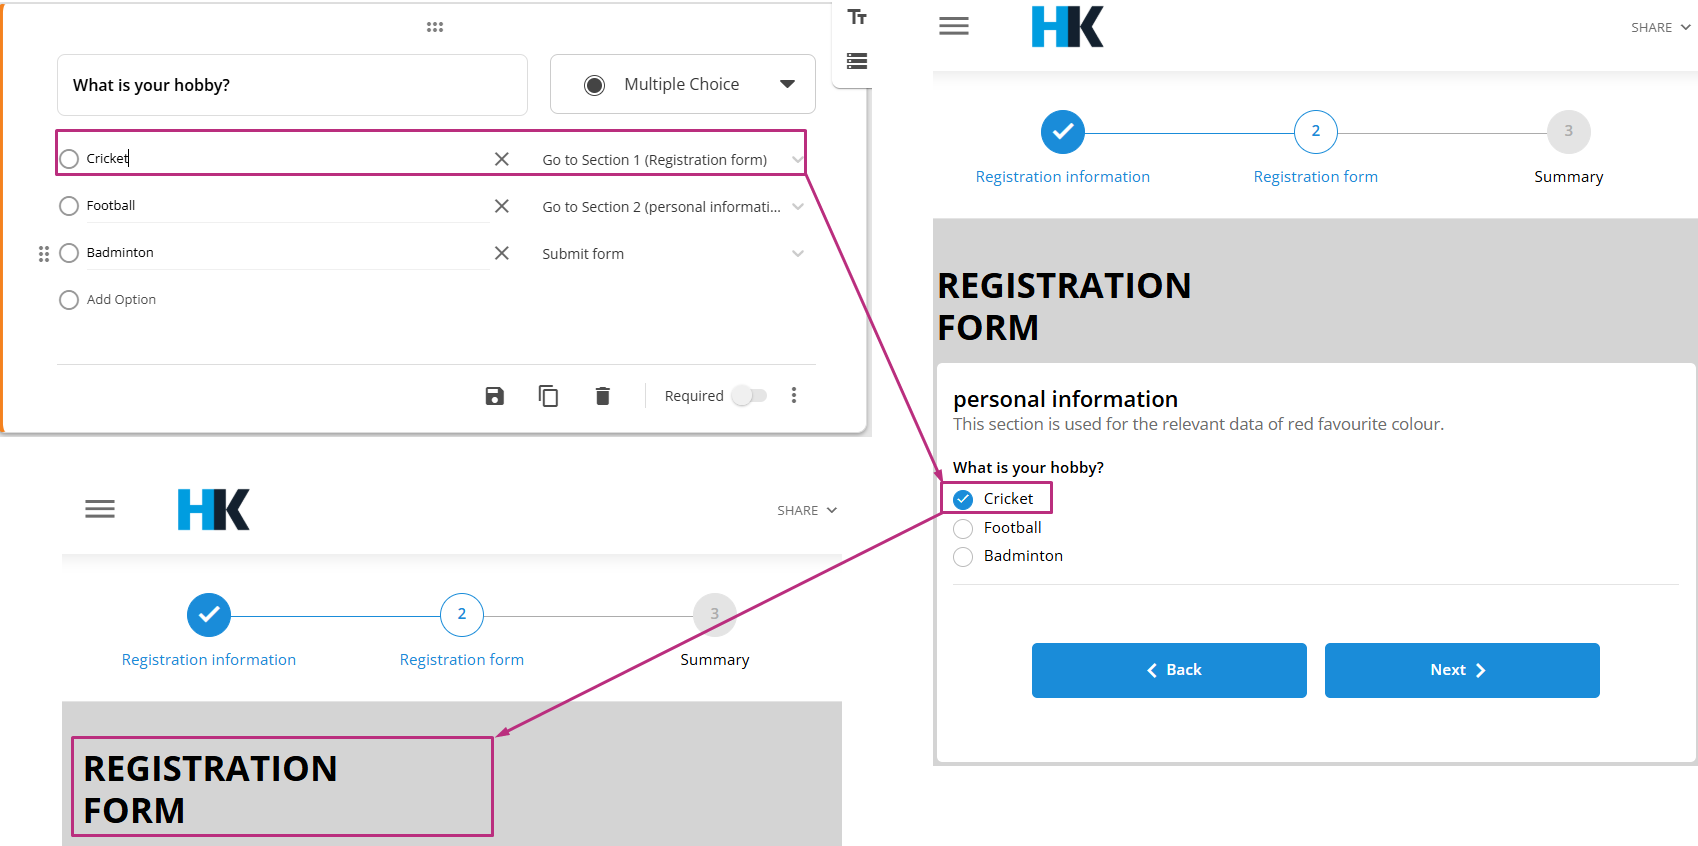
Once the navigation rules are defined for each option, save the changes. The form will now dynamically navigate users to the corresponding sections based on their responses.
Whatever the answer submit by the user, will navigate to user as per the form selection at back-end side by organiser
Note: Be sure to not select your current section’s name, or you’ll end up making a loop where respondents can never get to the end of your form.
Additional features in form builder header
At the top of every form, organisers have access to a set of essential controls that provide quick actions for managing and navigating the form. These features enhance usability, efficiency, and control while working on form creation and customisation.
Return arrow
The Return arrow icon allows organisers to navigate back to the main form builder listing page, where all previously created forms are displayed.
- Usage:
Clicking this icon exits the current form and returns to the list view without discarding any changes (if saved). This feature is useful for switching between different forms or exiting the form builder interface. - Example:
Suppose an organiser has multiple forms and is currently editing a registration form. By clicking the Return arrow, they are taken back to the main form listing, where they can select another form to edit.
Preview icon
The Preview feature lets organisers view the form as it will appear to end users.
- Usage:
Clicking the Preview icon opens a read-only version of the form, allowing organisers to test the layout, questions, navigation, and overall user experience without making any modifications. - Example:
Before finalising a survey, an organiser can click on Preview to ensure that all sections, navigation between sections, and required fields function as expected.
Save icon
The Save icon provides a global save function for the entire form.
- Usage:
Clicking the Save icon commits all the changes made across the form, including edits to questions, section navigation, and settings. It prevents data loss and allows organisers to continue working without losing progress. - Example:
If an organiser adds several new questions and configures navigation rules, clicking Save ensures all changes are stored in the system.