Banner management is a critical component of the event-site platform, designed to enhance the visibility of events and engage users effectively. By providing organisers with various tools and options to display promotional content, banner management helps drive attendance, promote offers, and communicate important messages. Here’s an in-depth look at its purpose, functionalities, and overall impact on event promotion.
Purpose of banner management
Visibility: Banners serve as a primary visual element on the event-site, ensuring that important messages capture the attention of visitors right away. They can highlight key events, special promotions, or announcements, making them crucial for effective communication.
Engagement: Well-designed banners can engage users, encouraging them to interact with the content. This could lead to increased registrations, ticket purchases, or participation in events.
Branding: Banners offer a platform for organizers to showcase their brand identity. By customizing banners with specific colors, logos, and messaging, organizers can create a cohesive brand experience that resonates with their target audience.
Flexibility: The banner management system accommodates a variety of content formats, including images, videos, and text, allowing organisers to tailor their messages according to their audience’s preferences.
Analytics and feedback: Effective banner management can be linked to performance metrics, enabling organisers to analyse engagement levels and make data-driven decisions for future promotions.
How banner management works?
Two main types of banners
Banner management is divided into two distinct parts:
-
Simple banners: This part includes variations that allow organisers to display straightforward promotional messages using a predefined set of layouts. Organisers can choose from 1 to 6 variations that dictate how the banners will appear on the event-site.
-
Advanced banners: This section provides a comprehensive editor for creating fully customisation banners. Organisers can upload images and videos, add layers for text and buttons, and tailor every aspect of their banners to create unique visual experiences.
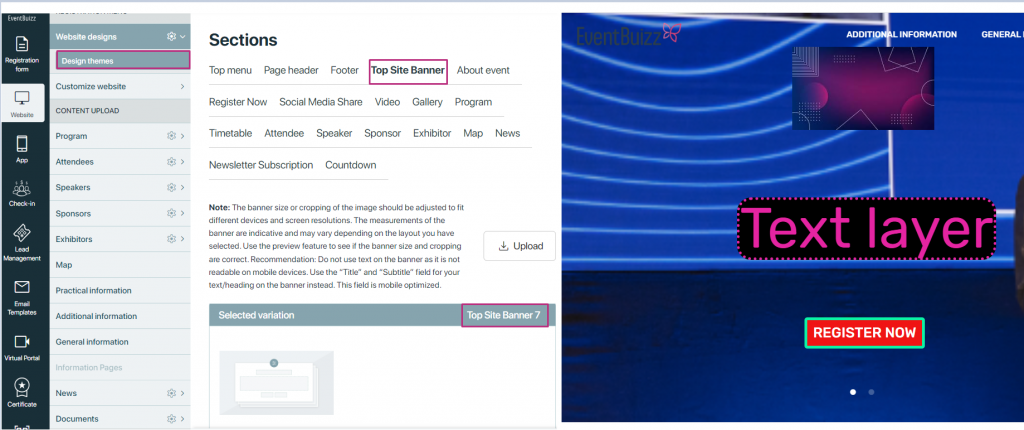
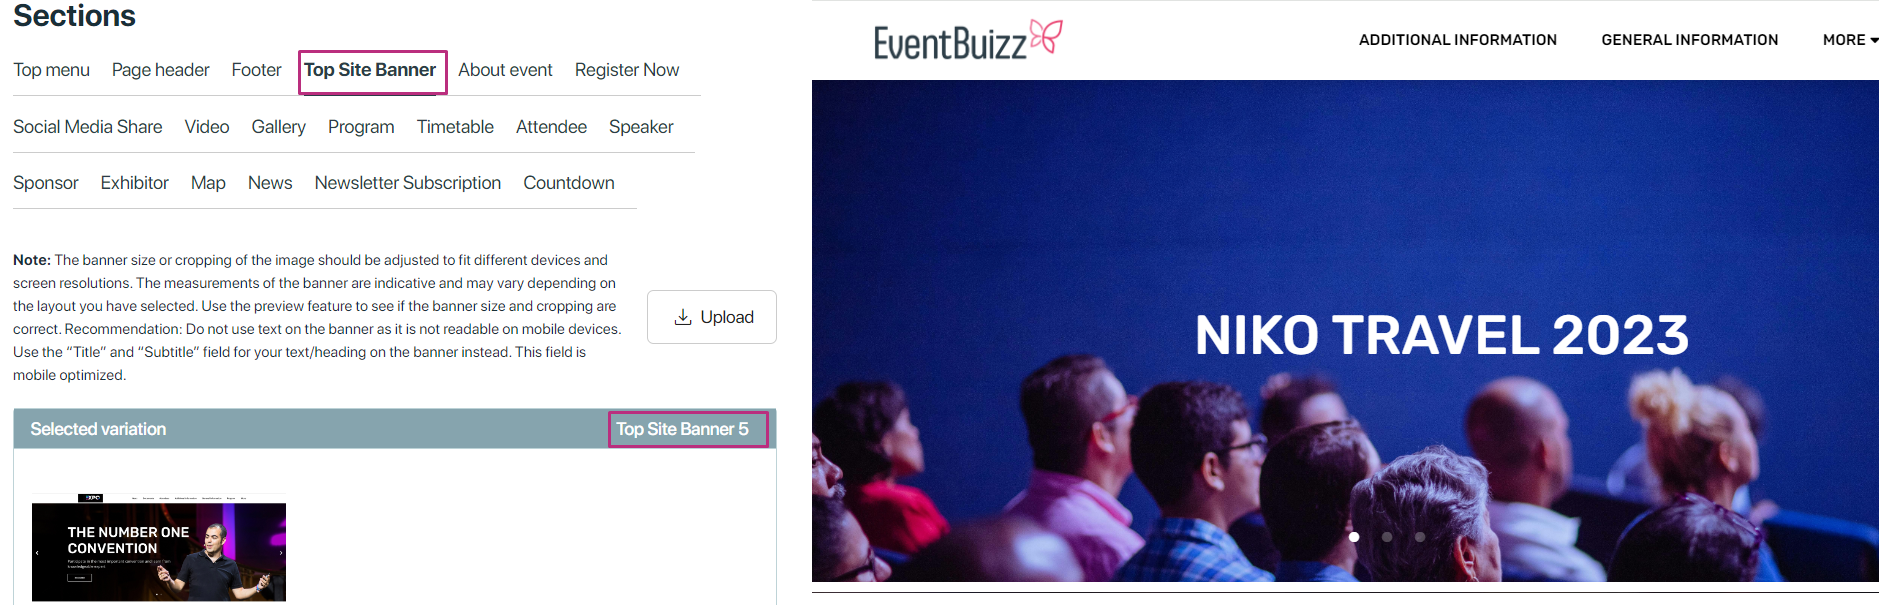
Simple banners
Simple banners
Simple banners
Customisation options:
To effectively display simple banners at the top of eve-site, it’s essential to follow a systematic approach. Below are detailed steps outlining how to create and manage simple banners, ensuring they appear correctly on the event-site.
Create top Site banners in eventcenter
-
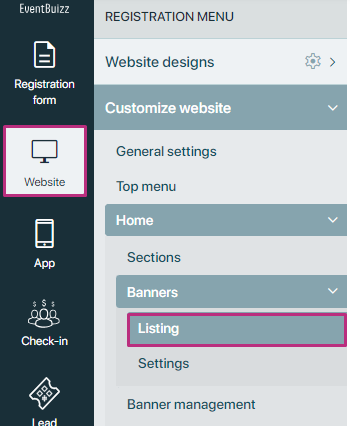
Access eventcenter: Log into eventcenter account and navigate to the following path.
- Eventcenter->website->customise website->home->banners->listing
Add a new banner
- Click on the “Add” button in the top right side.
- You will be prompted to fill in details for the banner.

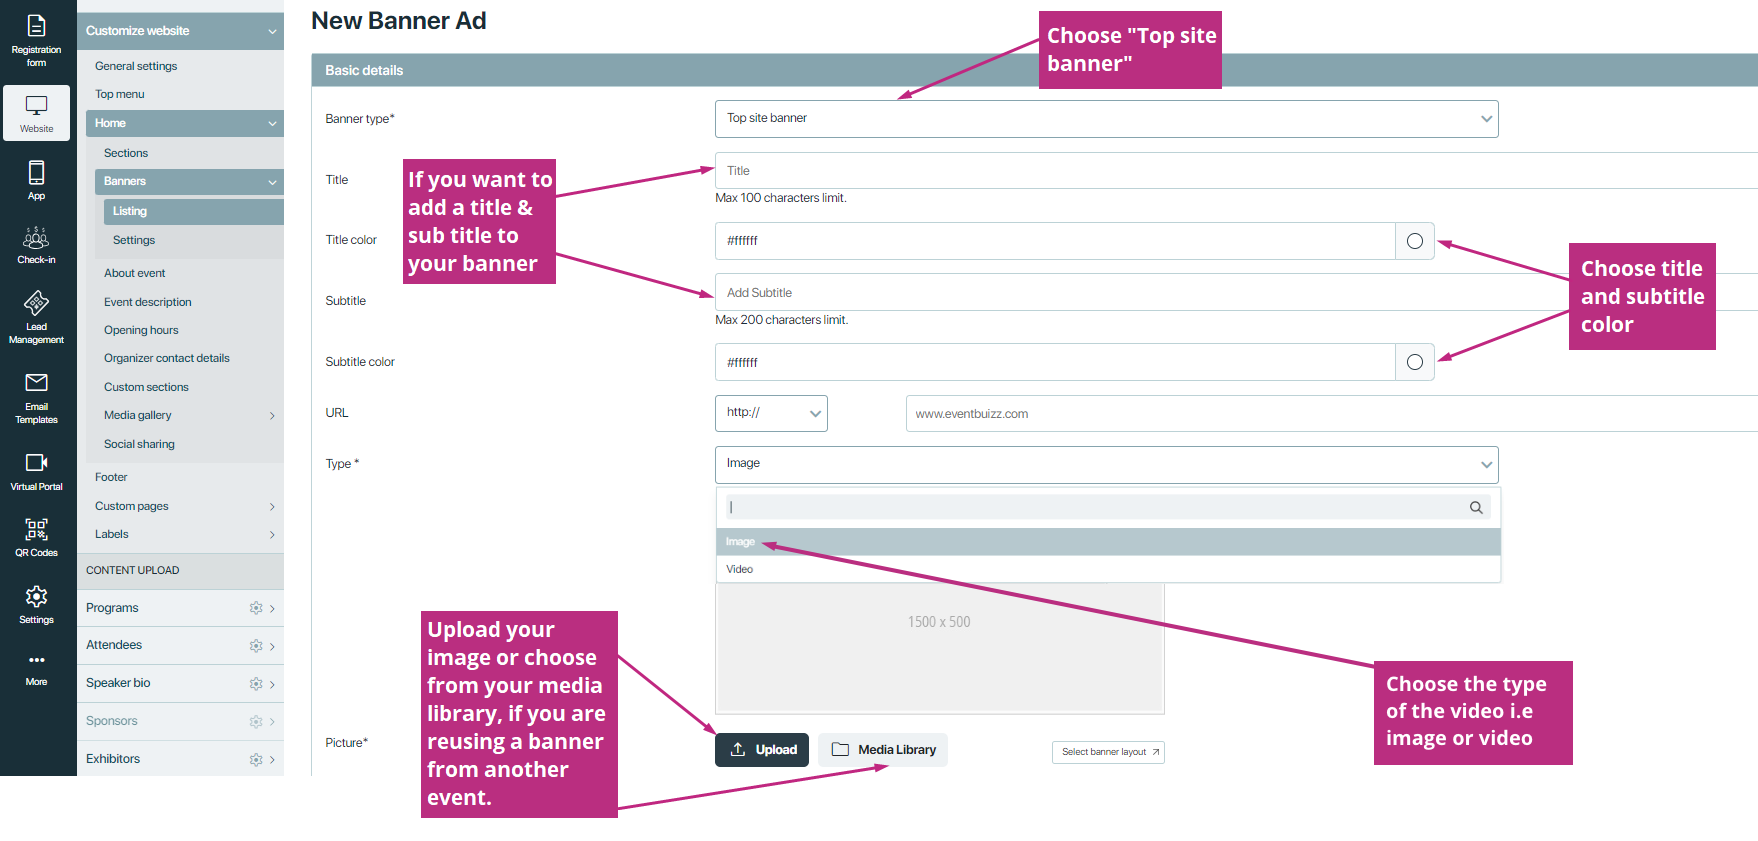
Enter banner details:
- Title: Provide a clear and engaging title for your banner.
- Subtitle: Optionally, add a subtitle for additional context or information.
- Banner type: Select the type of content for the banner. You can choose between:
- Image: Upload an image file to serve as your banner.
- Video: If opting for a video, you can either upload a video file or provide a link to a video hosted on platforms like YouTube.
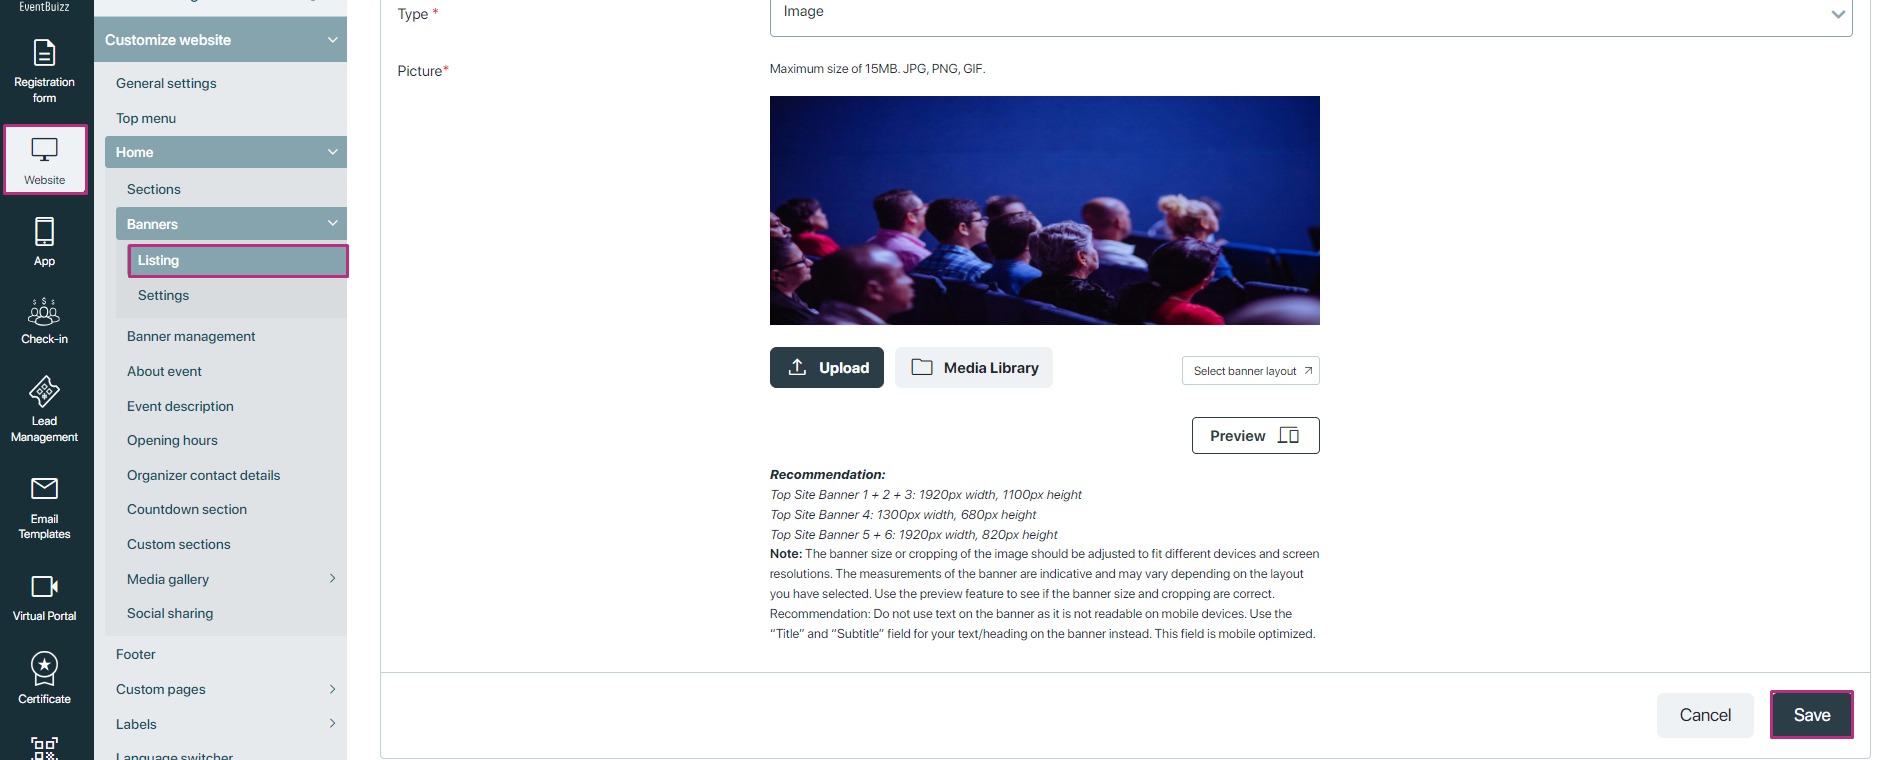
Save the banner:
Once organiser filled in the necessary details, click “Save” or “Create” to add the banner to banner listing.
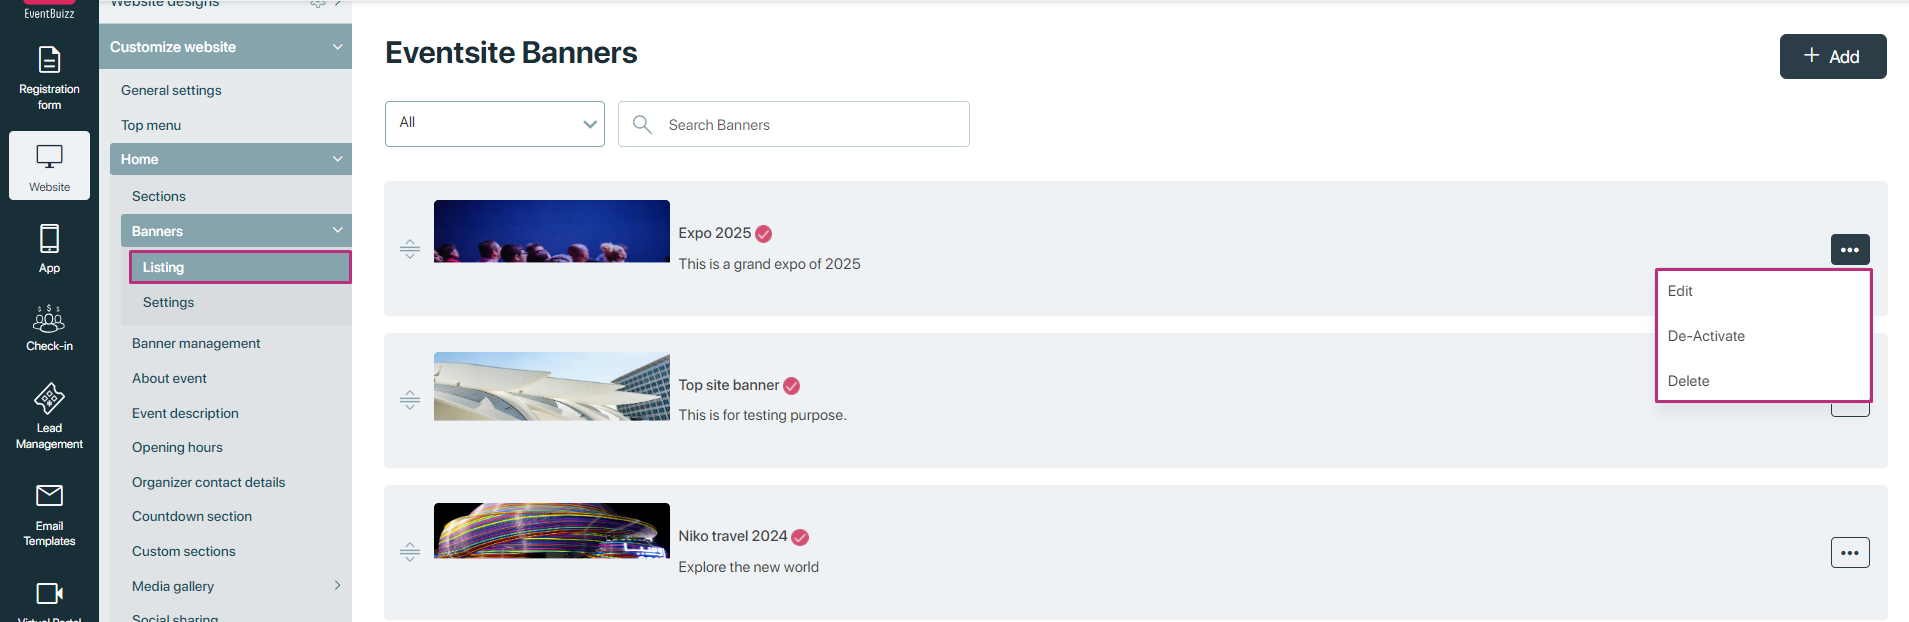
Listing
All the banners are listed in this section, by clicking on the icon ![]() you can edit, delete or activate/ de-activate banners.
you can edit, delete or activate/ de-activate banners.
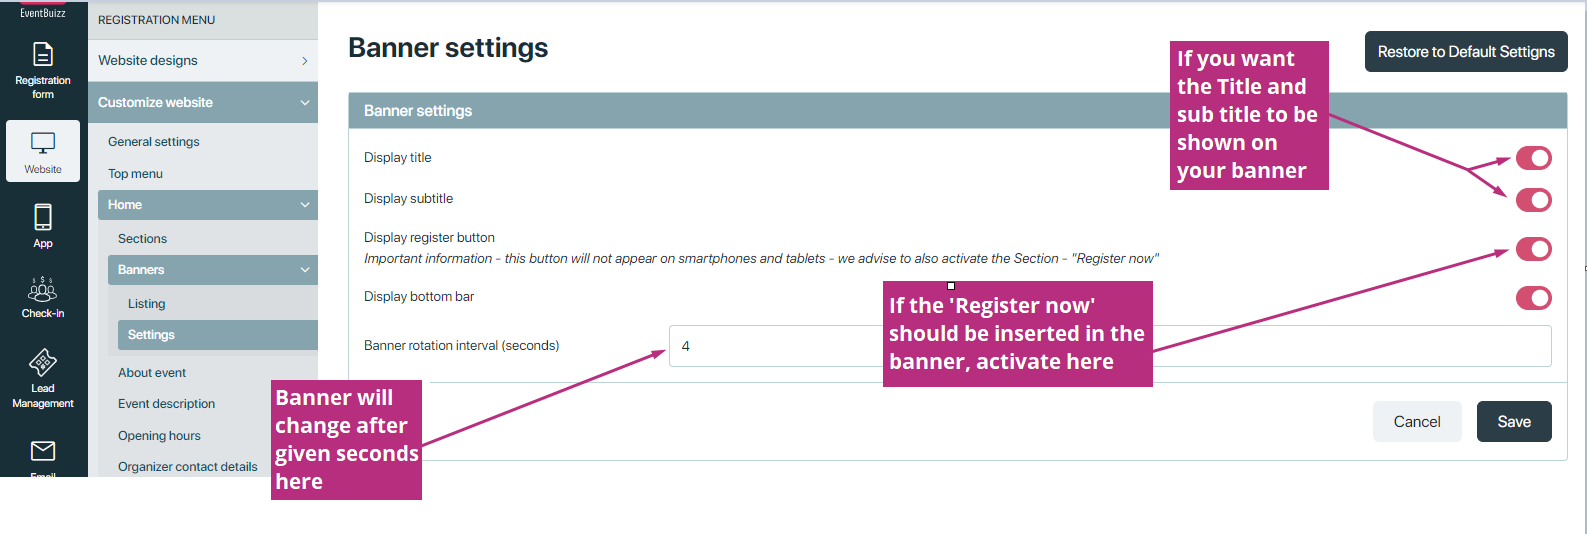
Settings
When you have uploaded your banner images, you need to check your settings.
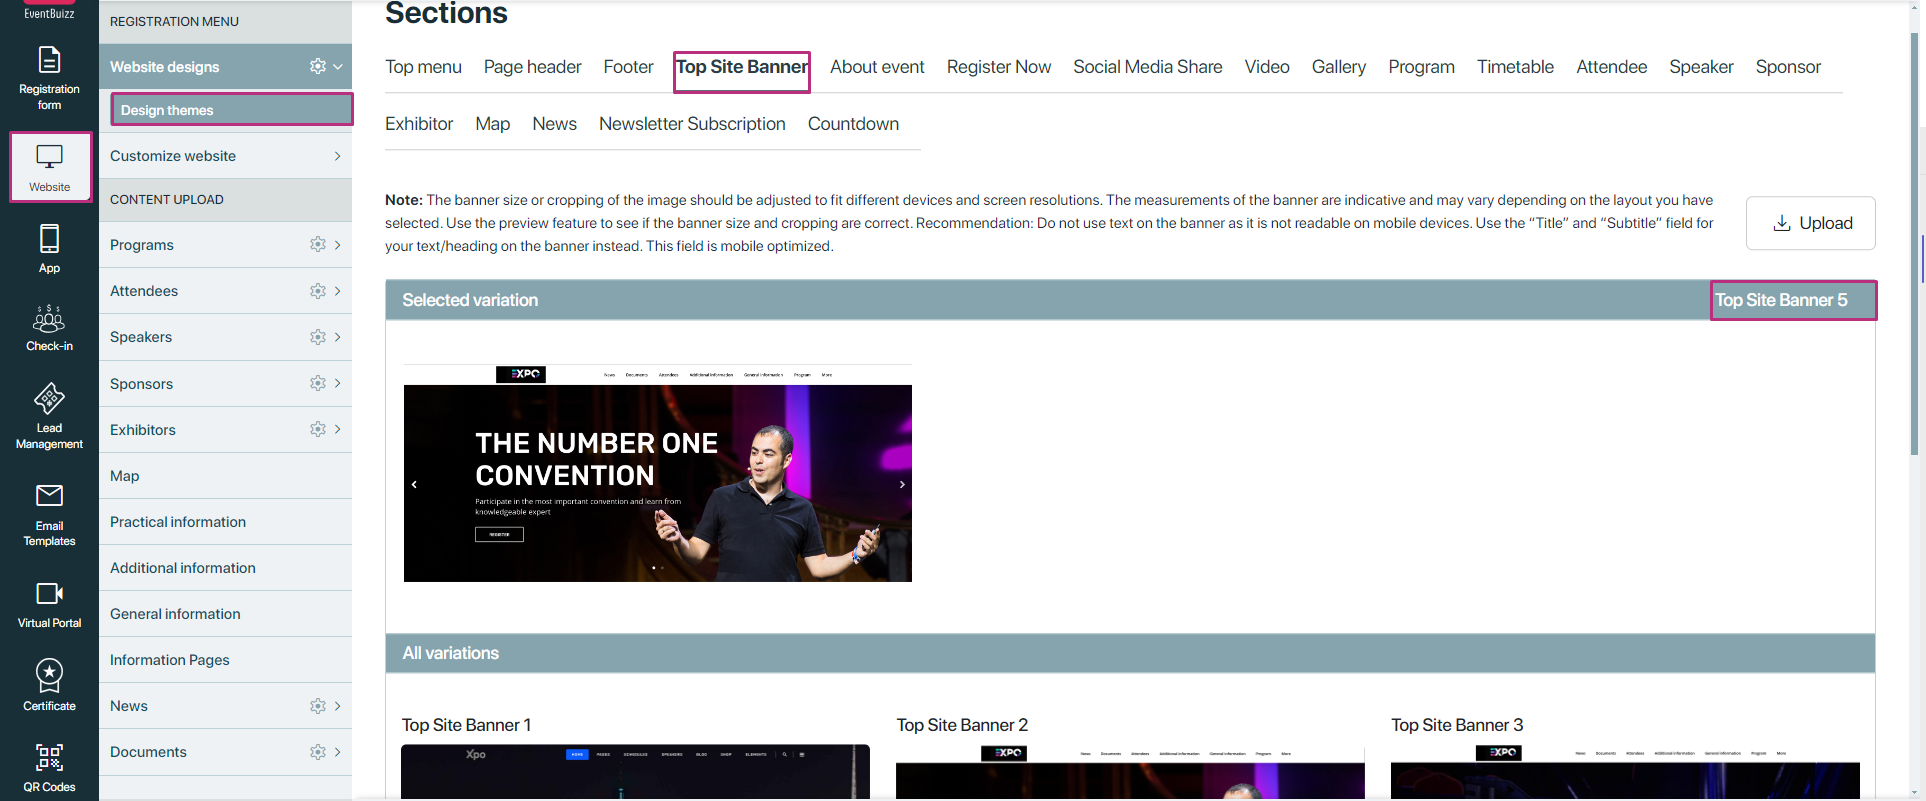
Select variations for display
Choose variation
After creating banners, organiser need to select a variation (1 to 6) for how organiser want the banners to display at the top of the event-site.
- Navigate to the section where organiser can select the banner variation.
- Choose the desired variation based on how organiser want to show banners simultaneously.
Check for existence of banners:
Ensure that at least one top site banner has been created. If you select a variation but no banners exist, the system will not display any banners on the event-site.
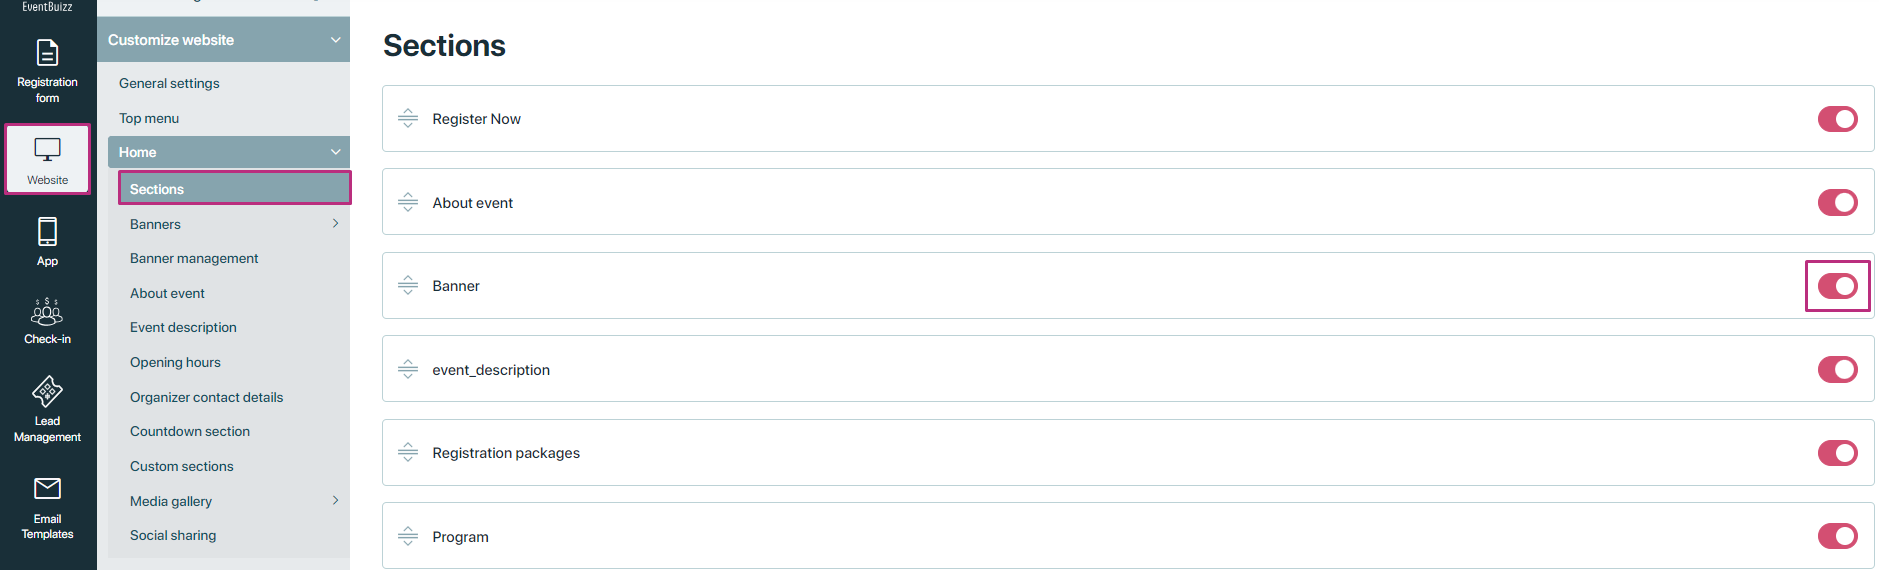
Configure banner section settings
-
Access sections module: Go to the “Sections” module in customise website home section module in eventcenter.
-
Enable Banner Section:
- Locate the setting for the banner section.
- Ensure that the banner section is turned ON. This setting controls whether the banner area is visible on the event-site.
- If this setting is disabled, the banner section will not display, regardless of the banners created.
-
Save Settings: After making changes, ensure you save the settings to apply them.
Verify banner display on event-site
-
Preview the event-site: After configuring everything, navigate to the event-site to see how the banners are displayed.
- Check that the top banner section is visible.
- Ensure that the selected banners appear correctly according to the chosen variation.
-
Test functionality: If applicable, click on any links or buttons in the banners to verify they direct users to the correct destinations (e.g., registration pages or additional information).
Advanced banners
Advanced banners
Advanced banners management in event-site
Overview of advanced banners
Advanced banners (Variation 7) are designed for organisers who seek greater flexibility and creativity in how they present their content. Unlike simple banners, which offer predefined layouts, advanced banners allow for extensive customisation through an intuitive editor, making it easy to tailor banners to specific branding and messaging needs.
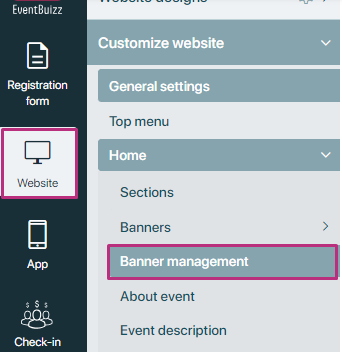
Navigation to Advance banner management
For navigation to the banner management organiser need to follow this following path:
- Eventcenter->website->customise website->home->banner management.
Key features
There are several key features are included in advance banners, detail is given below of all available features
Custom slide uploading
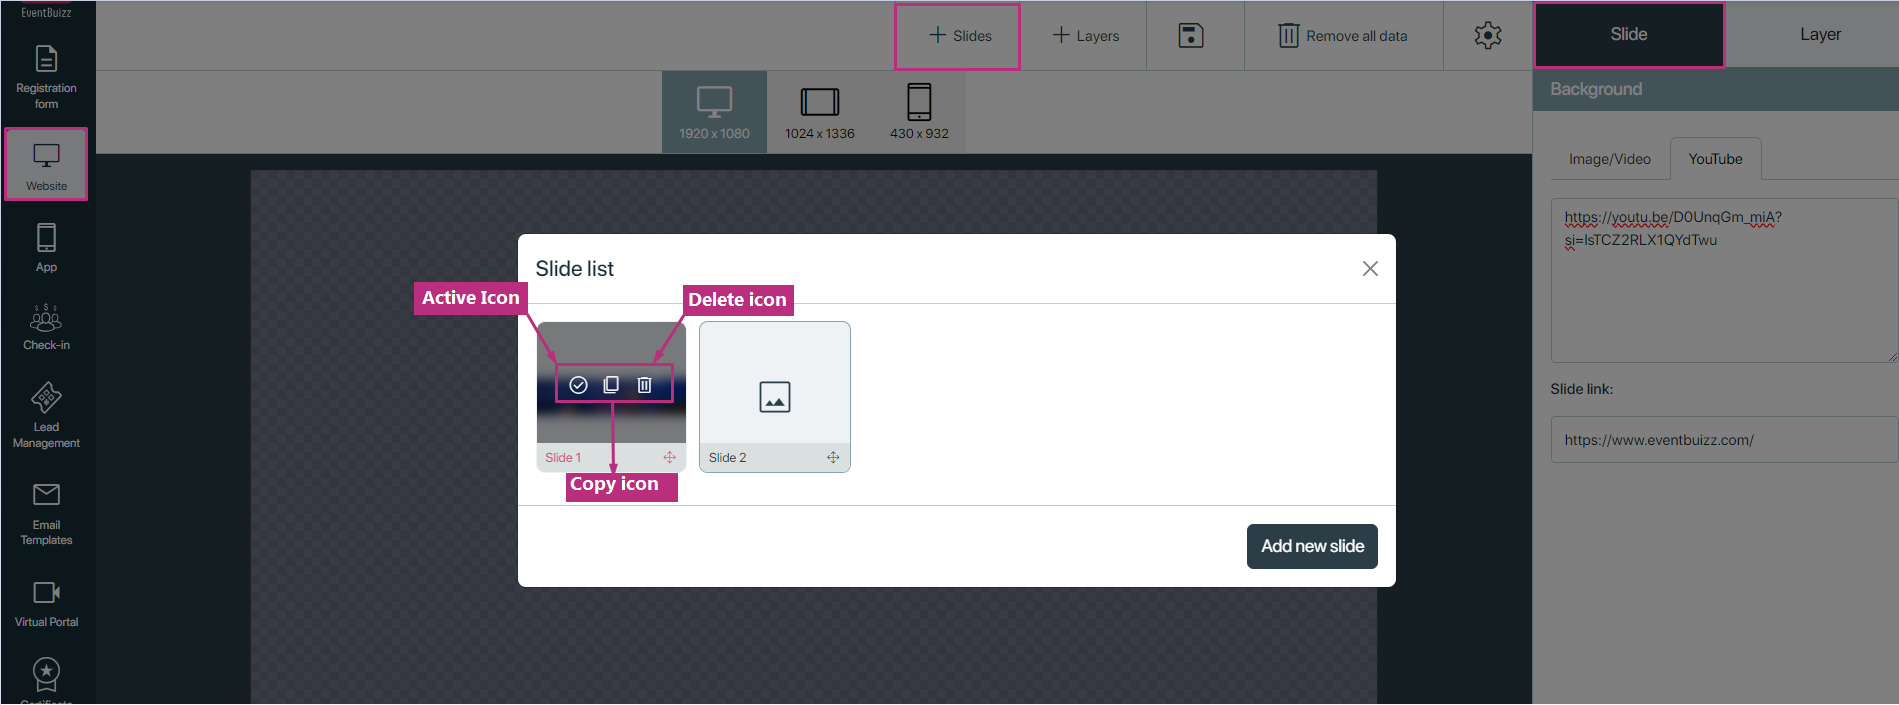
- Organisers can add multiple slides by clicking on “Add new slide” button.
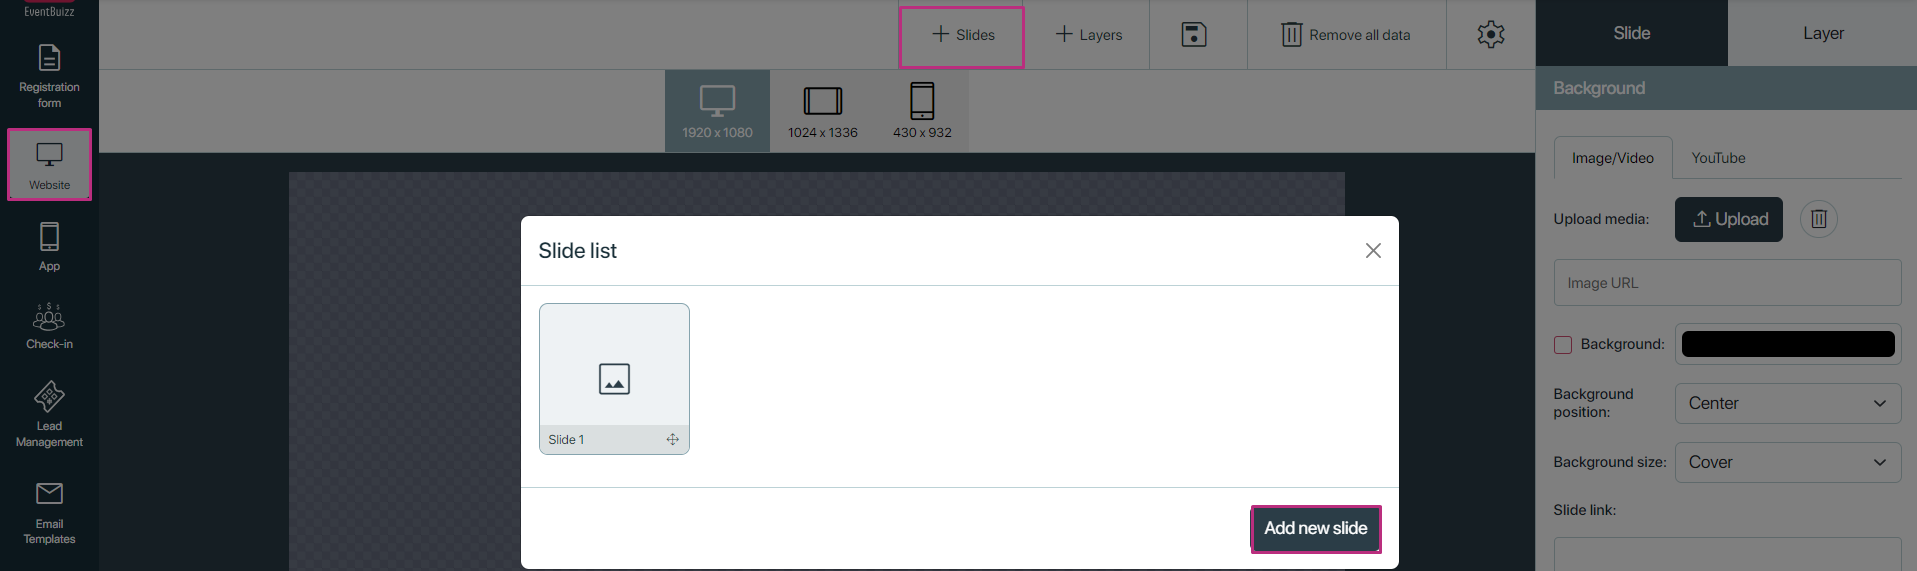
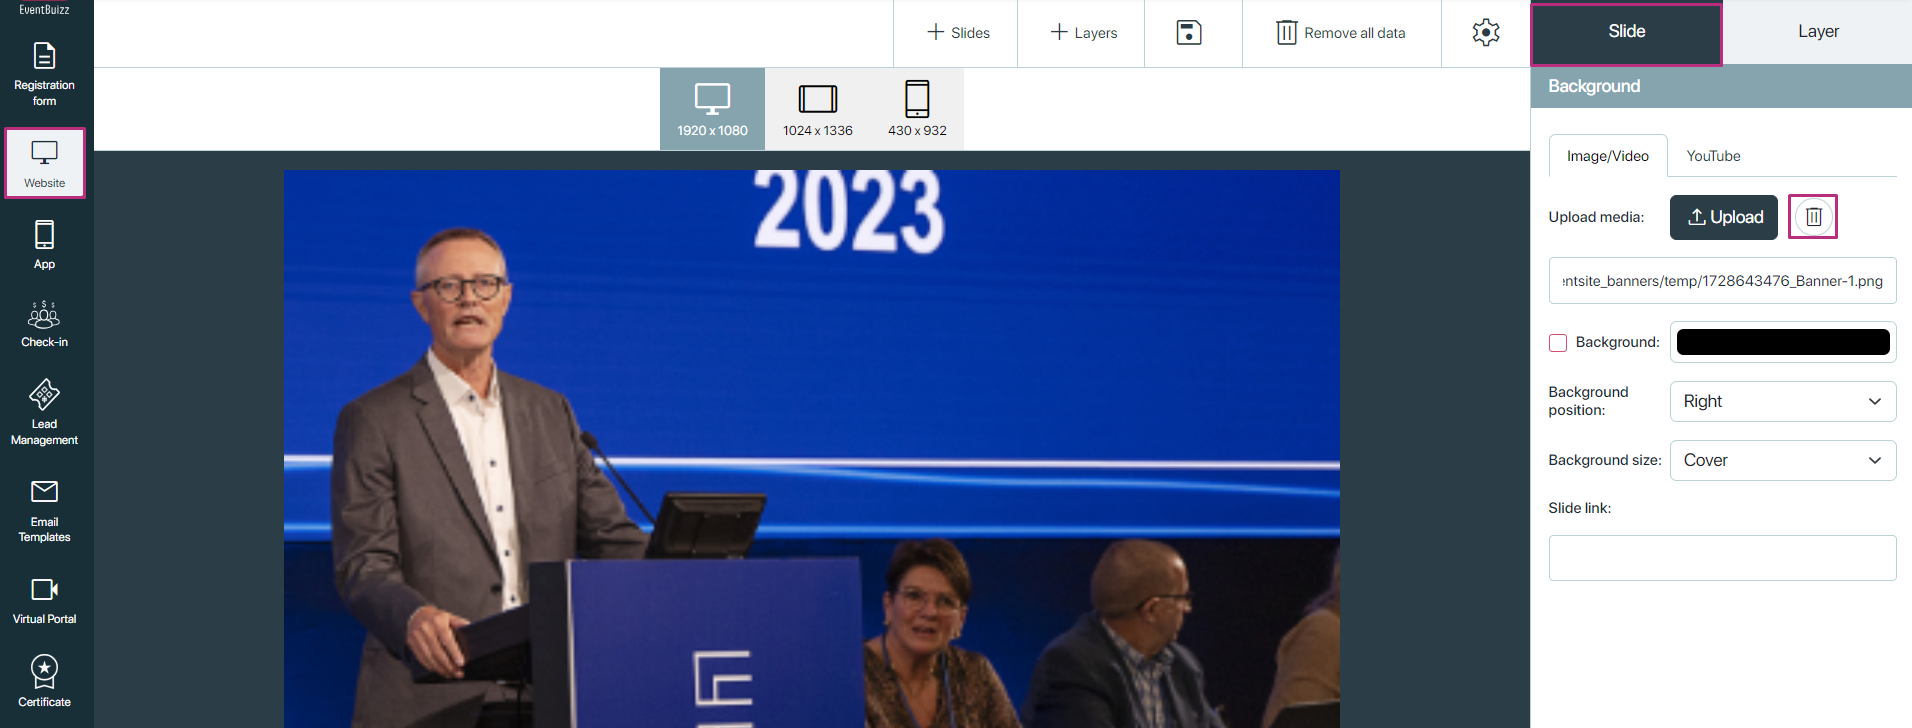
- Organiser can upload various content types, including images and videos.
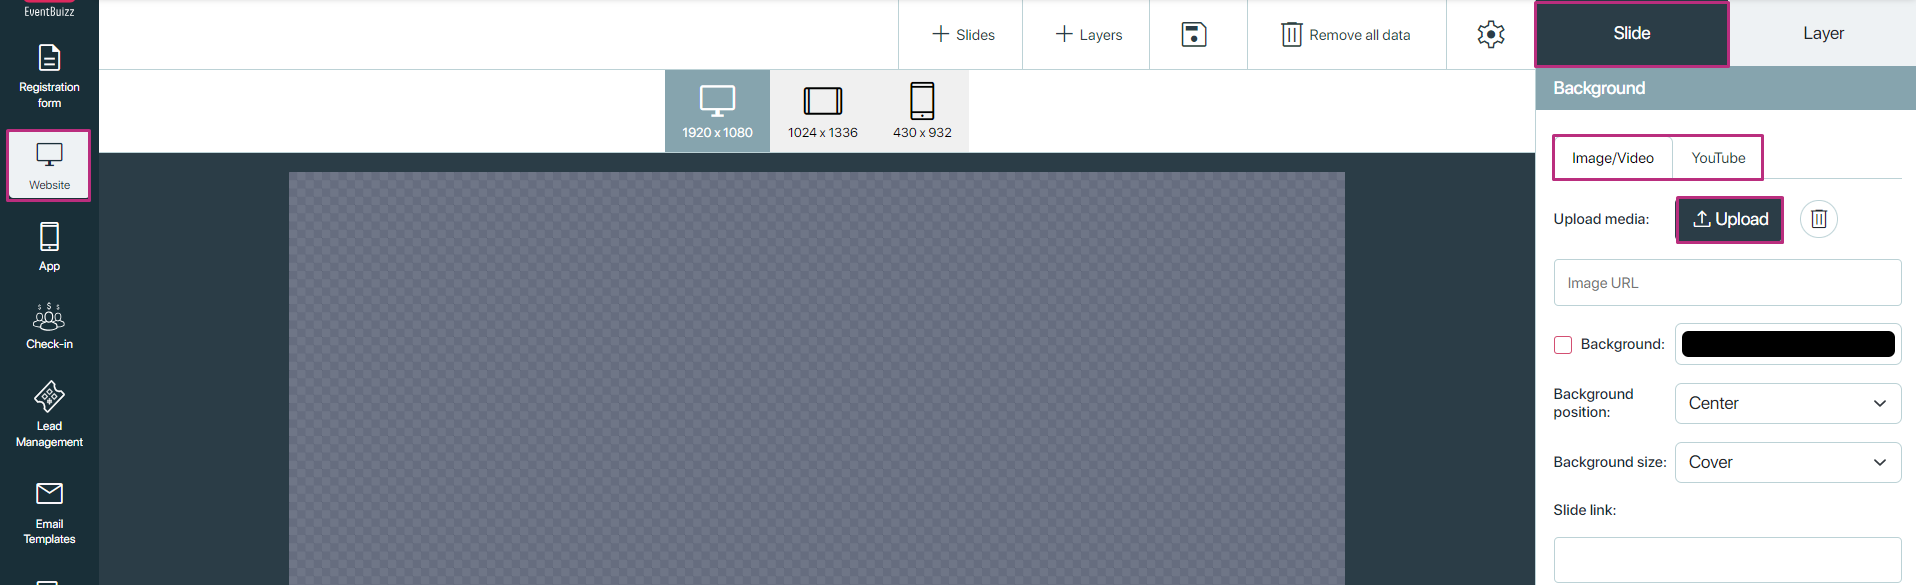
- Organiser can also delete the uploaded slide image or video, as well by clicking the delete icon.
Banner management editor give the several options to organiser for managing the slides or design the slides as per his own requirements, organiser can customise, detail is given below of all possible available options.
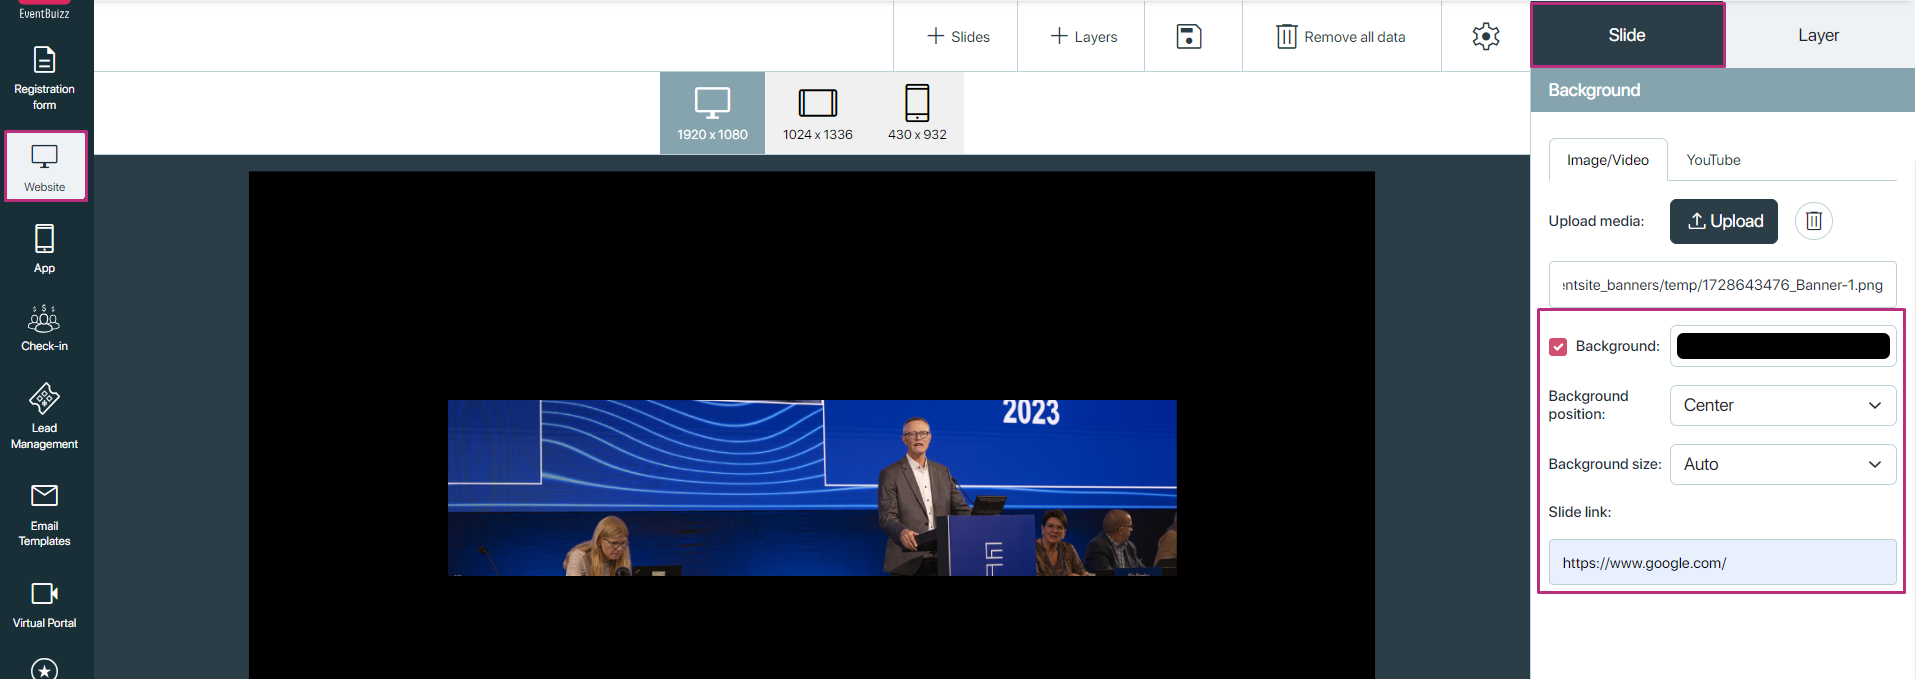
- Background colour: Organiser can set the background colour for slide from the colour picker.
- Background position: Organiser can set the background position for the slide, there are a lot of features or options available for the organiser to set the background position for the slides, like top, left, right, top-left,top-right etc.
- Background size: Organiser can set the background size of the upload slide,by his own choice, available options are auto, cover, stretch etc.
- Slide link: Organiser can give the URL in this field, and when user click on this slide in event-site, will navigate on the following given URL.
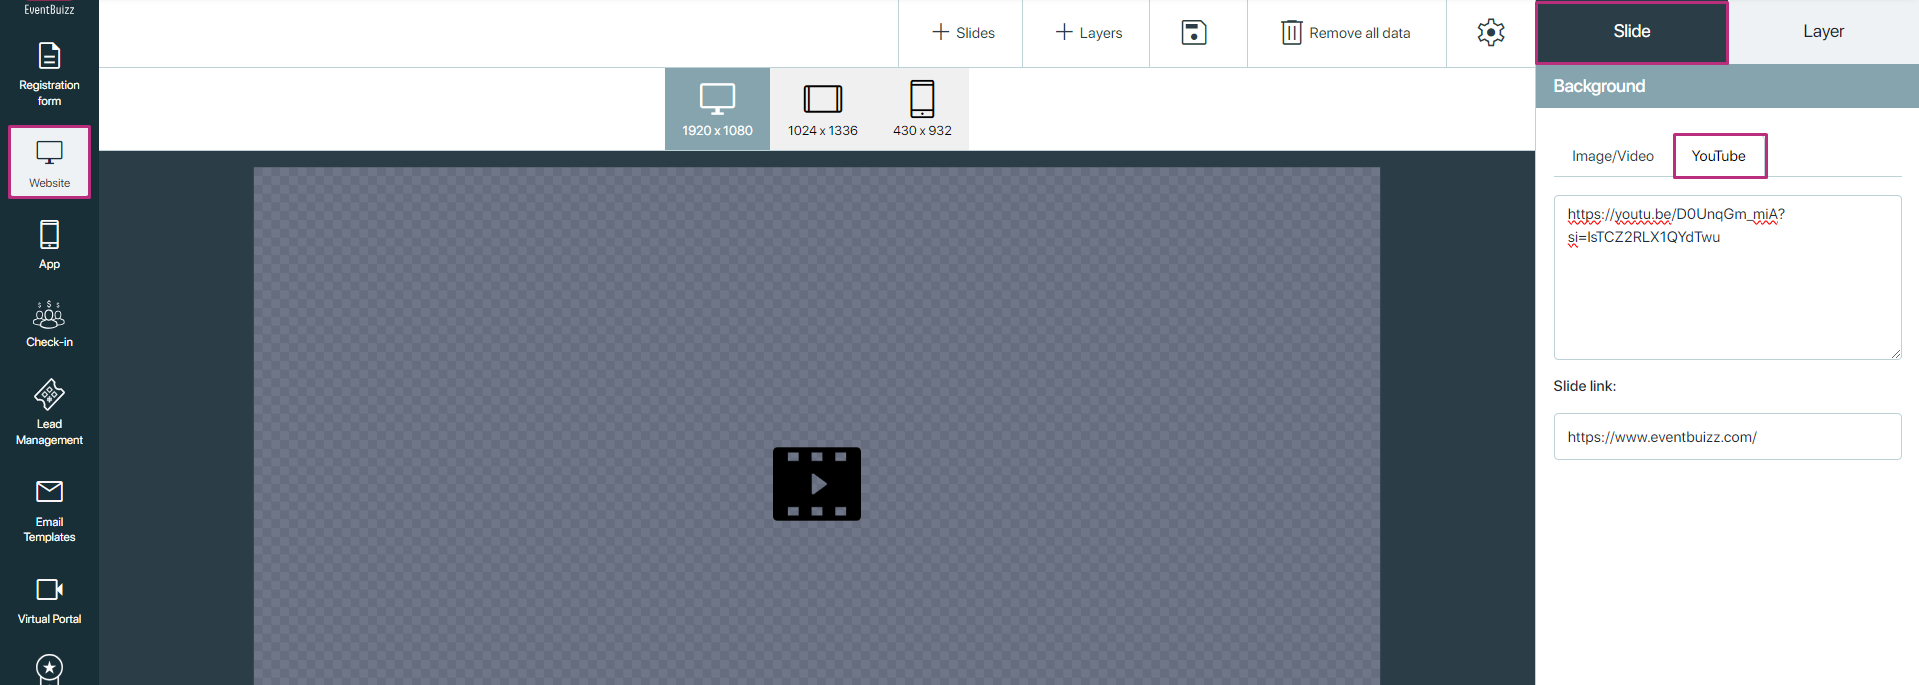
- For video content, organisers can either upload video files directly or provide links to platforms like YouTube
- If organiser upload the video from the device and also give the you-tube video URL, priority will be you-tube video.
Additional available features in slide model
There are three additional features in the slide model. detail is given below.
- Active slide icon: Organiser can make the any slide active from the list, by clicking this active.
- Copy slide: Organiser can make the copy of the existing slide by clicking on the copy icon.
- Delete slide: If organiser want to delete any slide, by clicking on the delete icon, organiser can delete it.
Layered content:
- This feature allows for multiple layers to be added to each slide, enhancing the overall presentation.
The three main types of layers include:
- Text layers
- Button layers
- Image layers
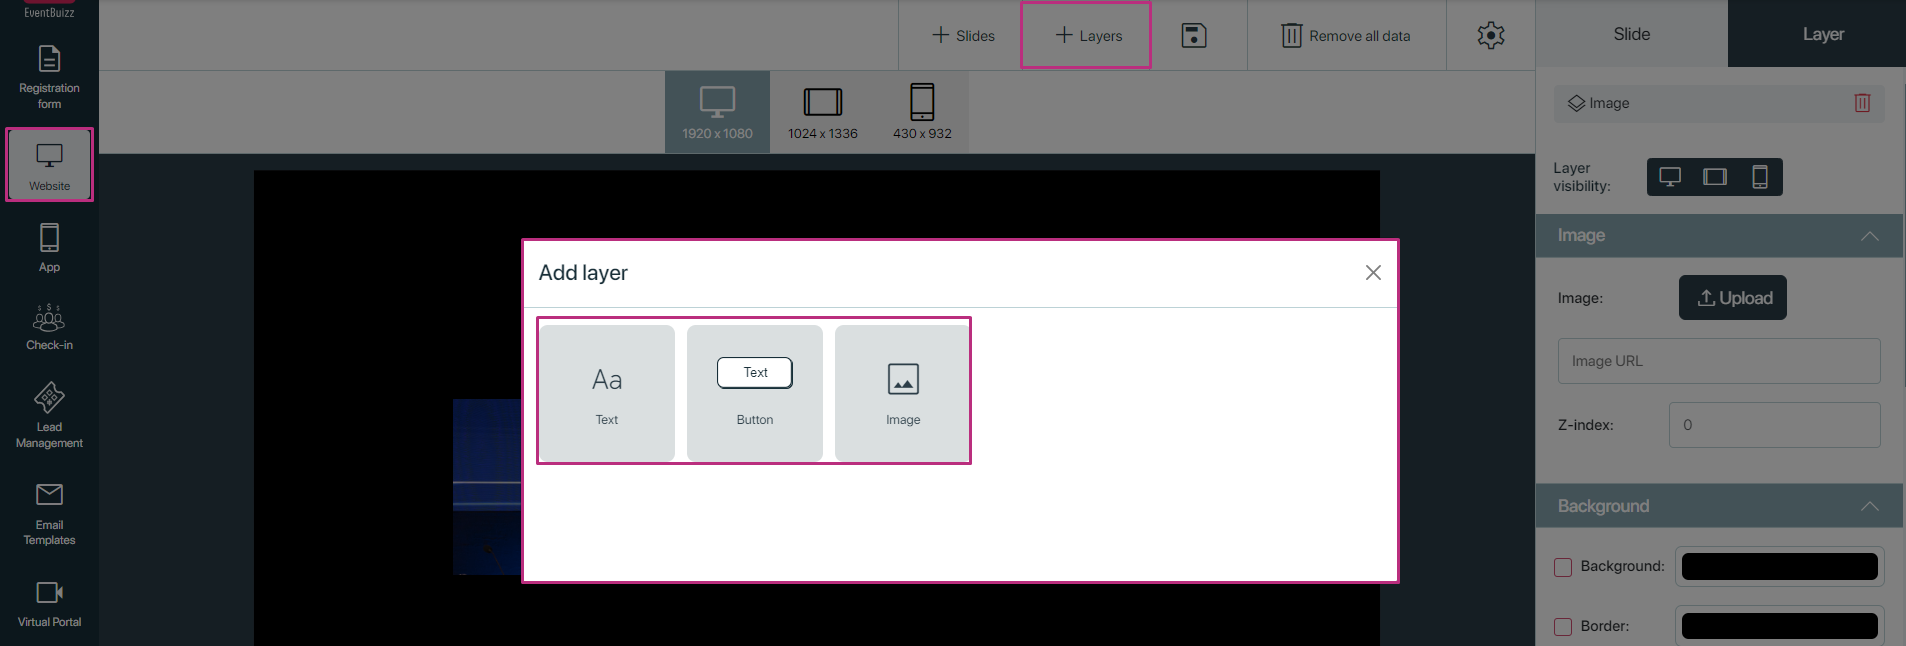
Adding layers to slides
Each slide can be enhanced with additional content through layers:
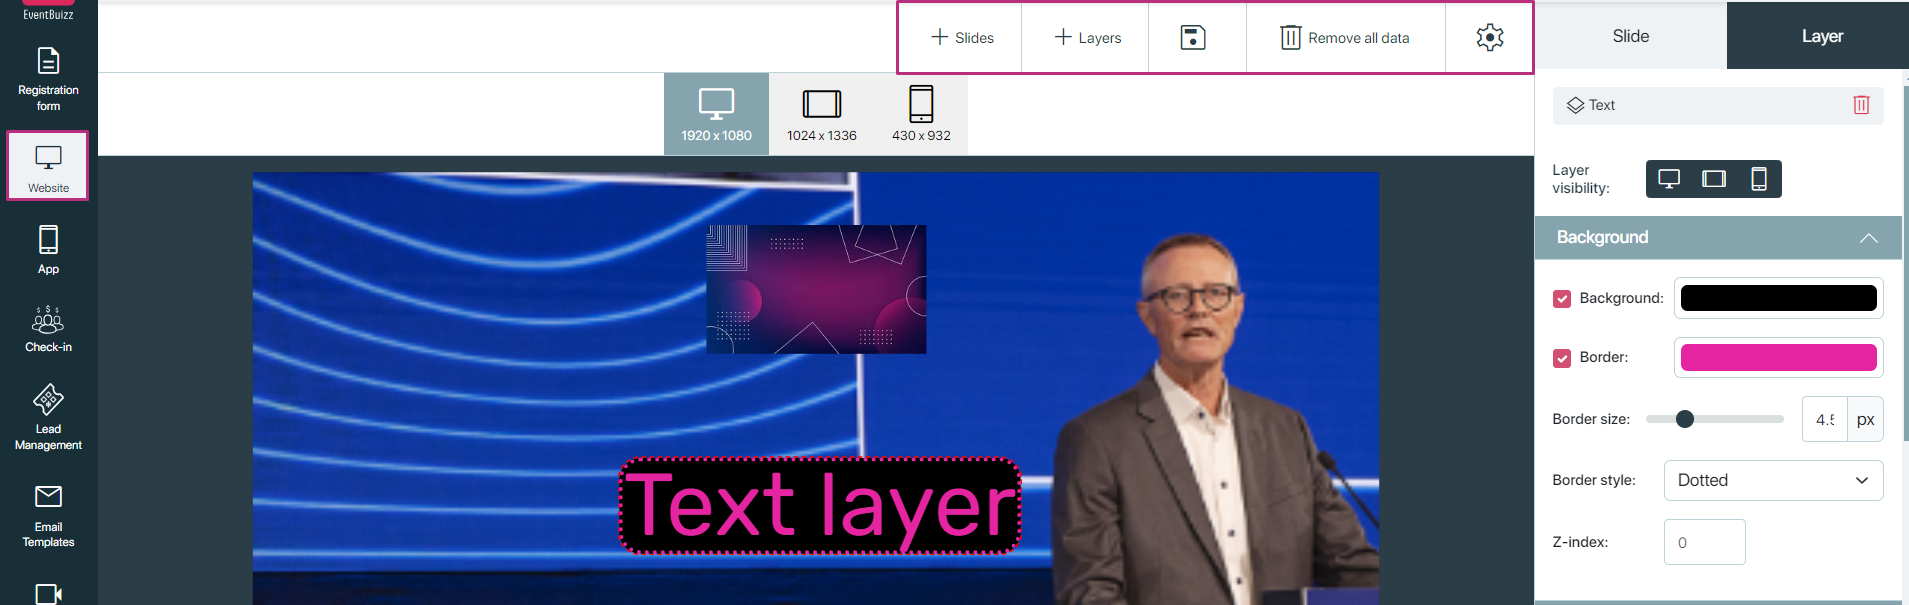
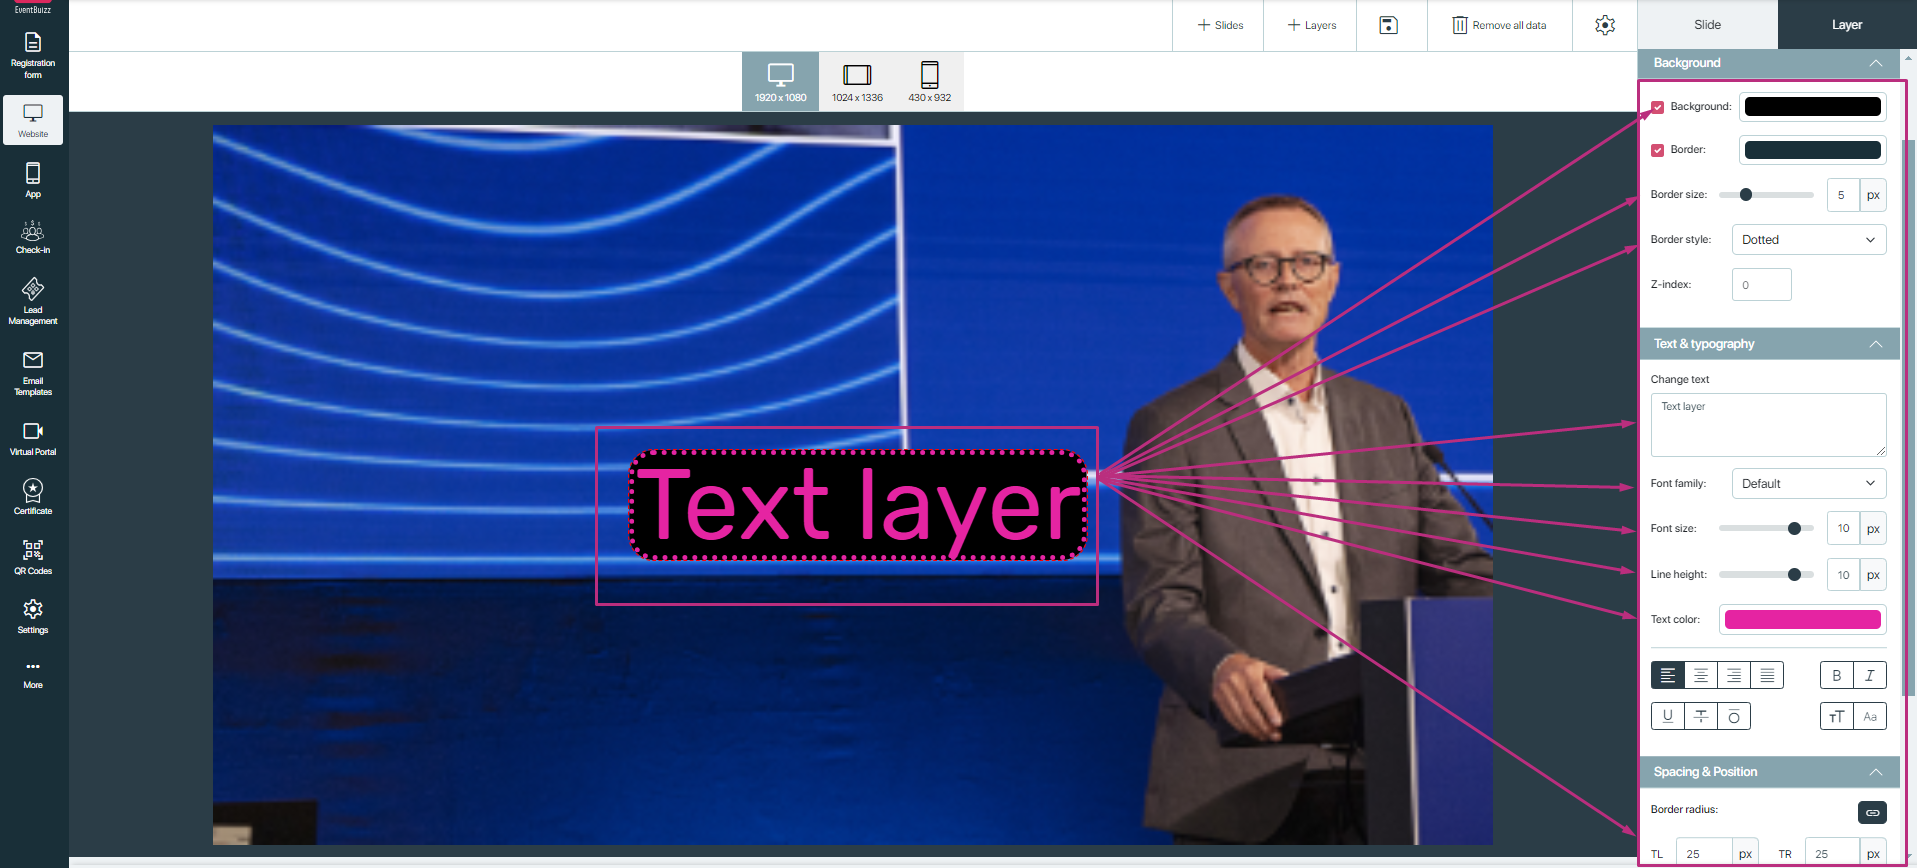
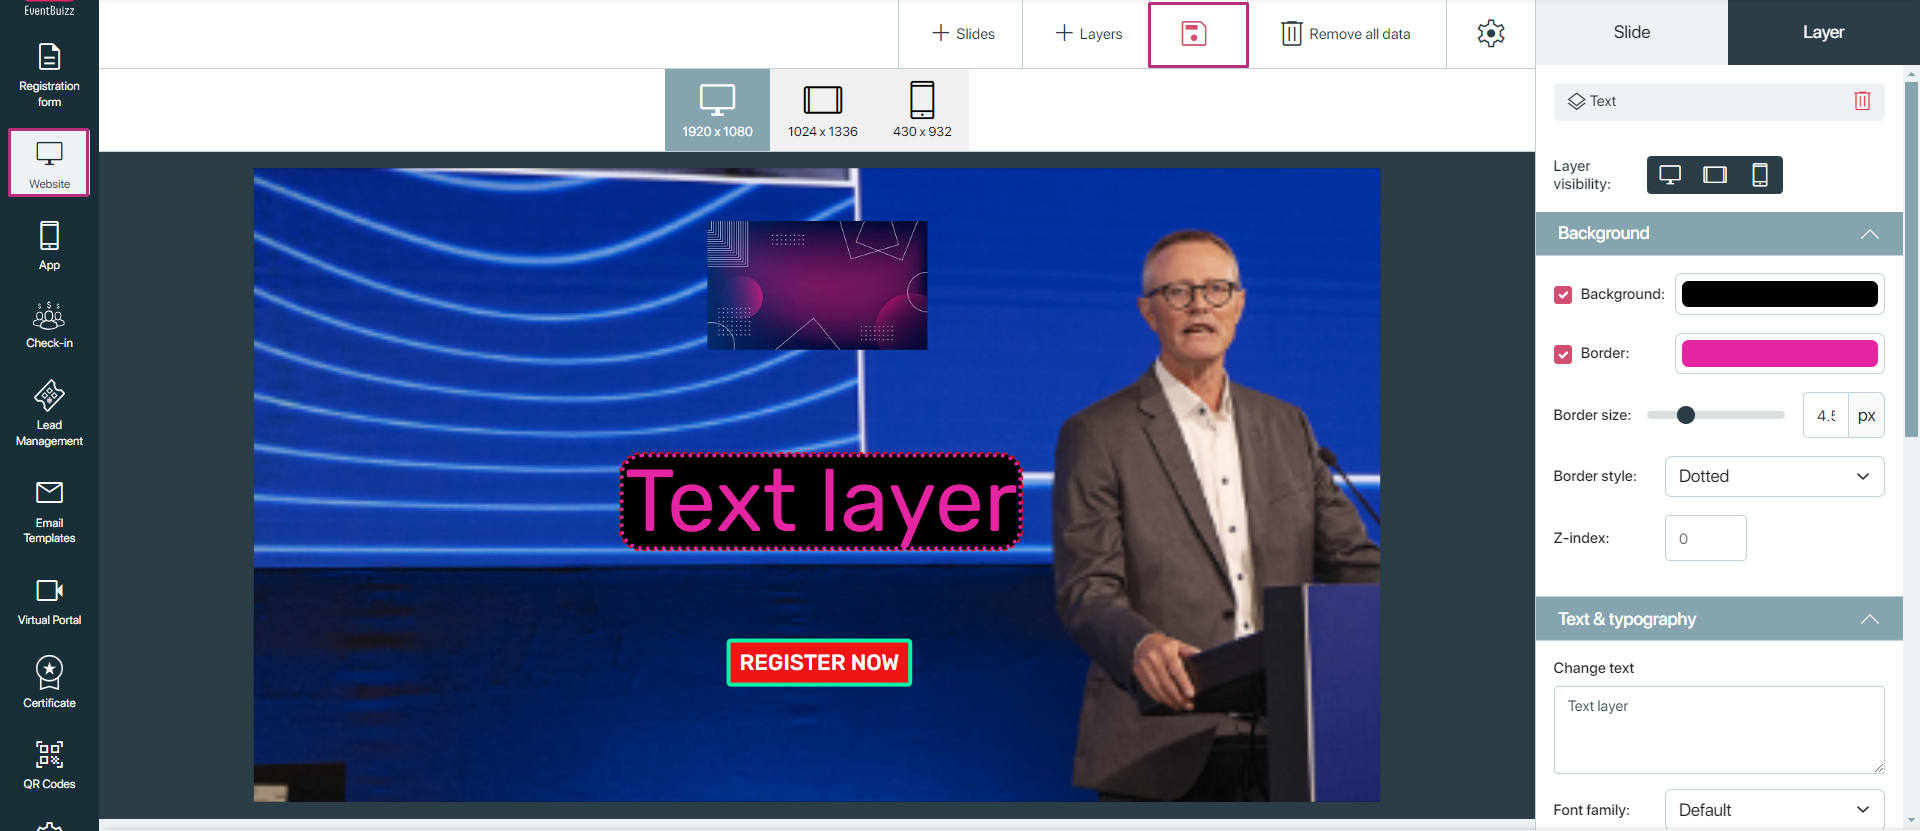
A. Text Layer
- Adding text: Click on the option to add a text layer, and a text box will appear on the selected slide.
- Customisation options:
- Organisers can input their desired text.
- Customise the font style, size, colour, and background.
- Set border radius for rounded corners if desired.
Button layer
- Creating a button: Select the option to add a button layer. A button will appear on the slide for further customisation.
- Button customisation:
- Enter the button text.
- Customise the button’s font, size, text colour, and background colour.
- Assign a link to the button, directing users to a specific page or using the built-in “Register Now” function for quick access to registration forms.
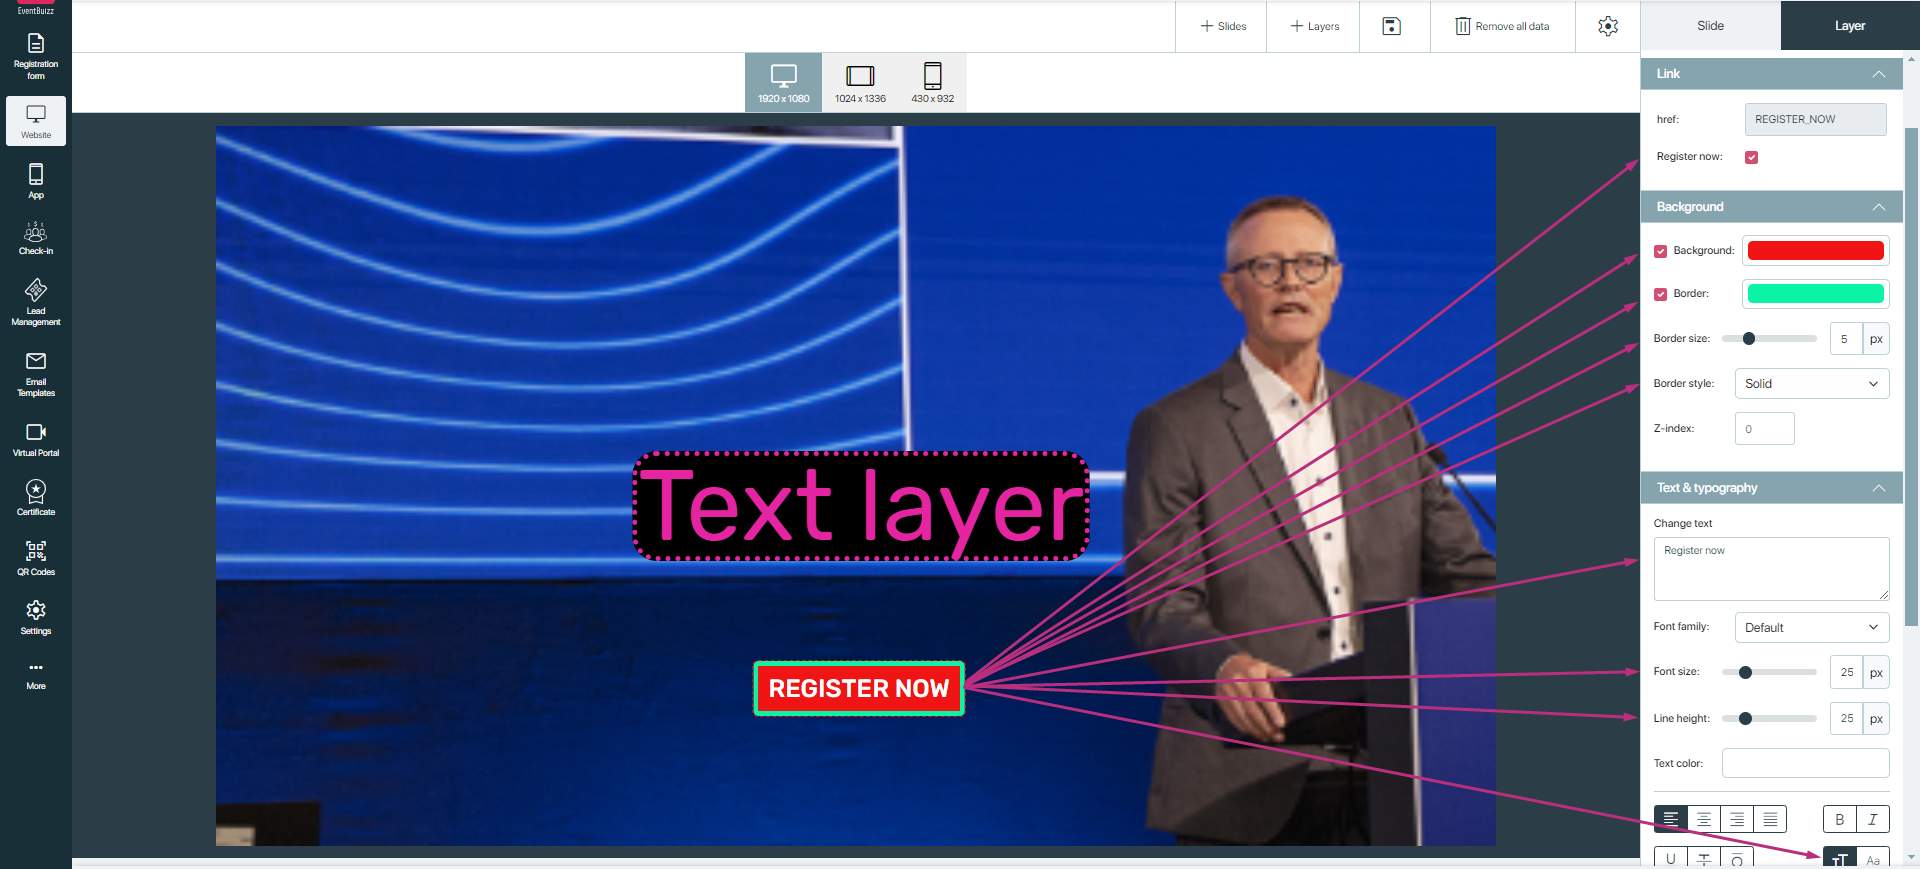
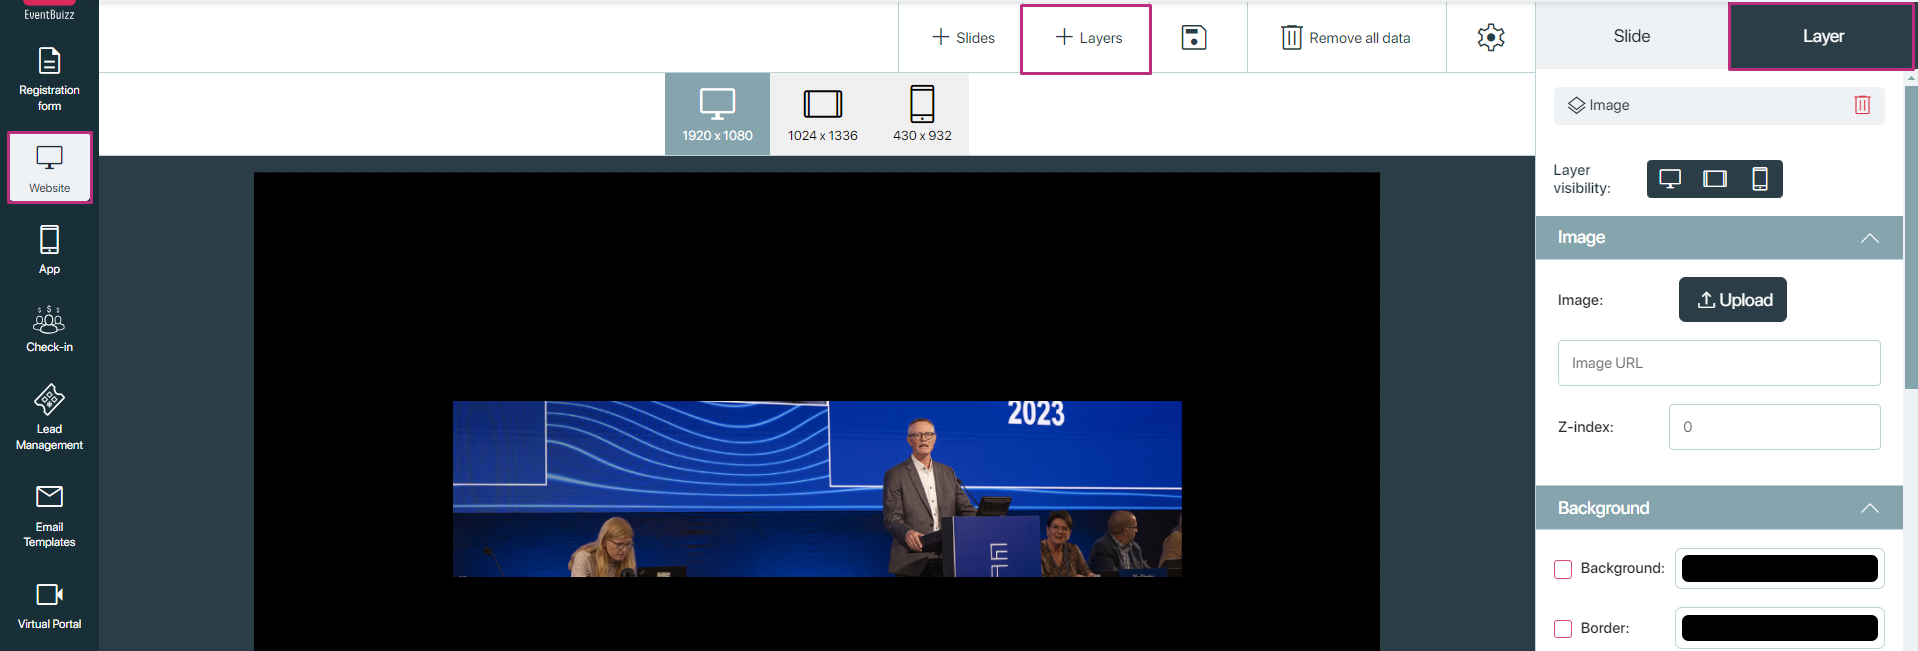
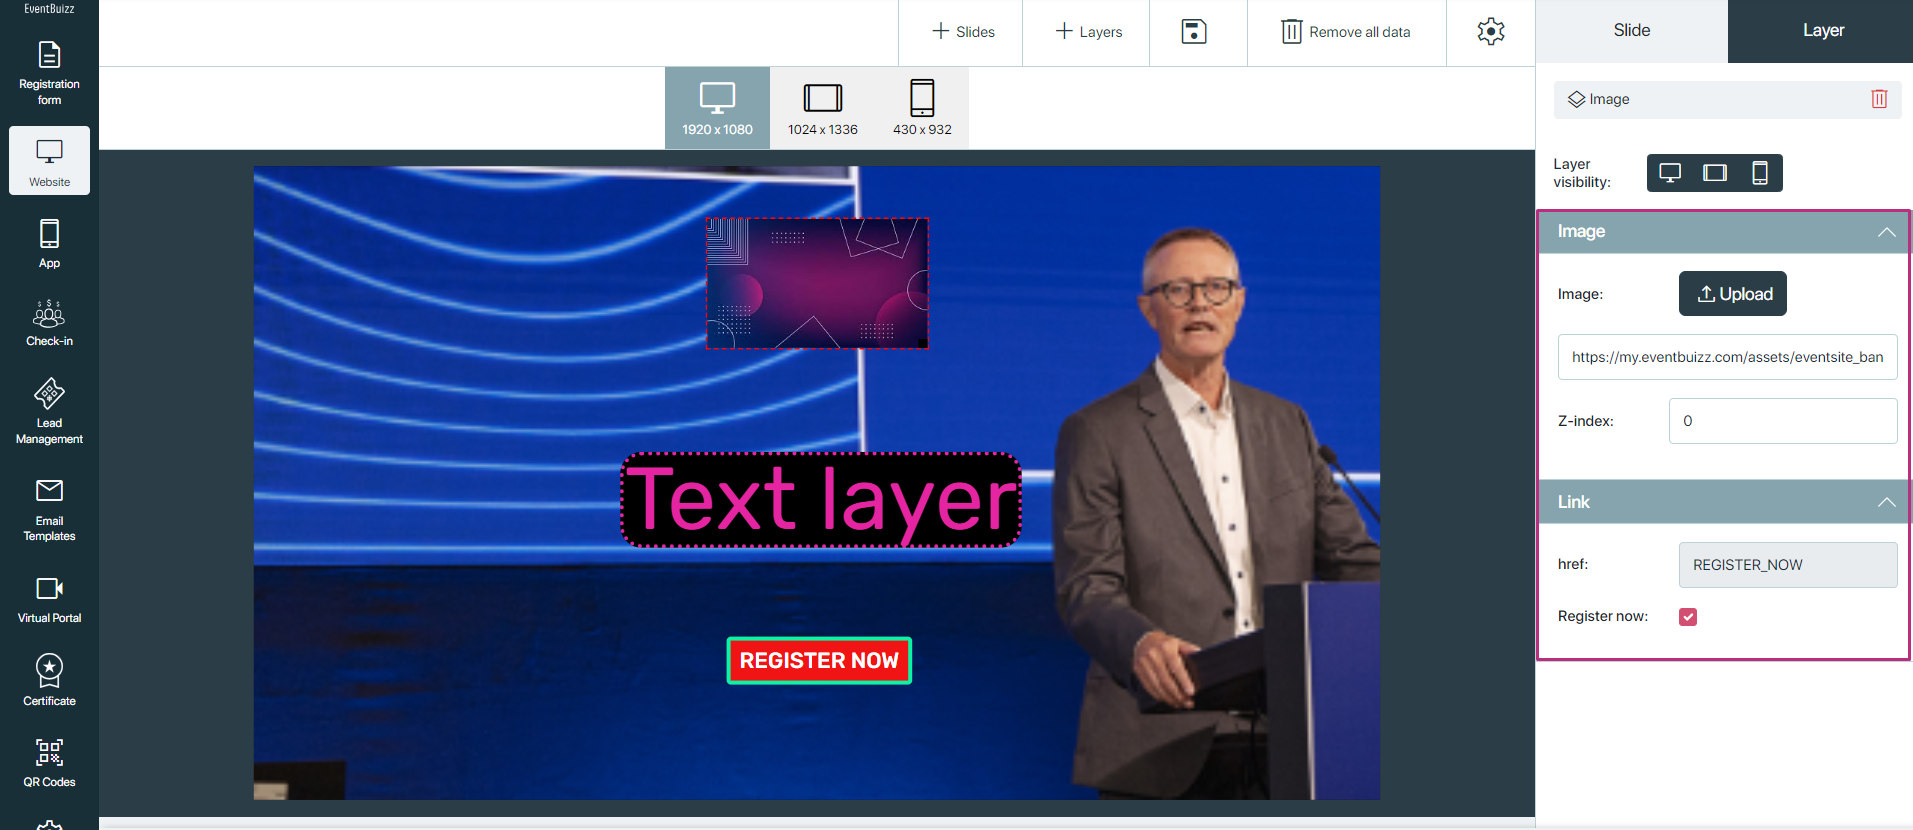
Image layer
- Adding images: Select the option to add an image layer to the slide.
- Z-index functionality: Organisers can control the order of images using the z-index setting, allowing for more complex visual presentations with overlapping images.
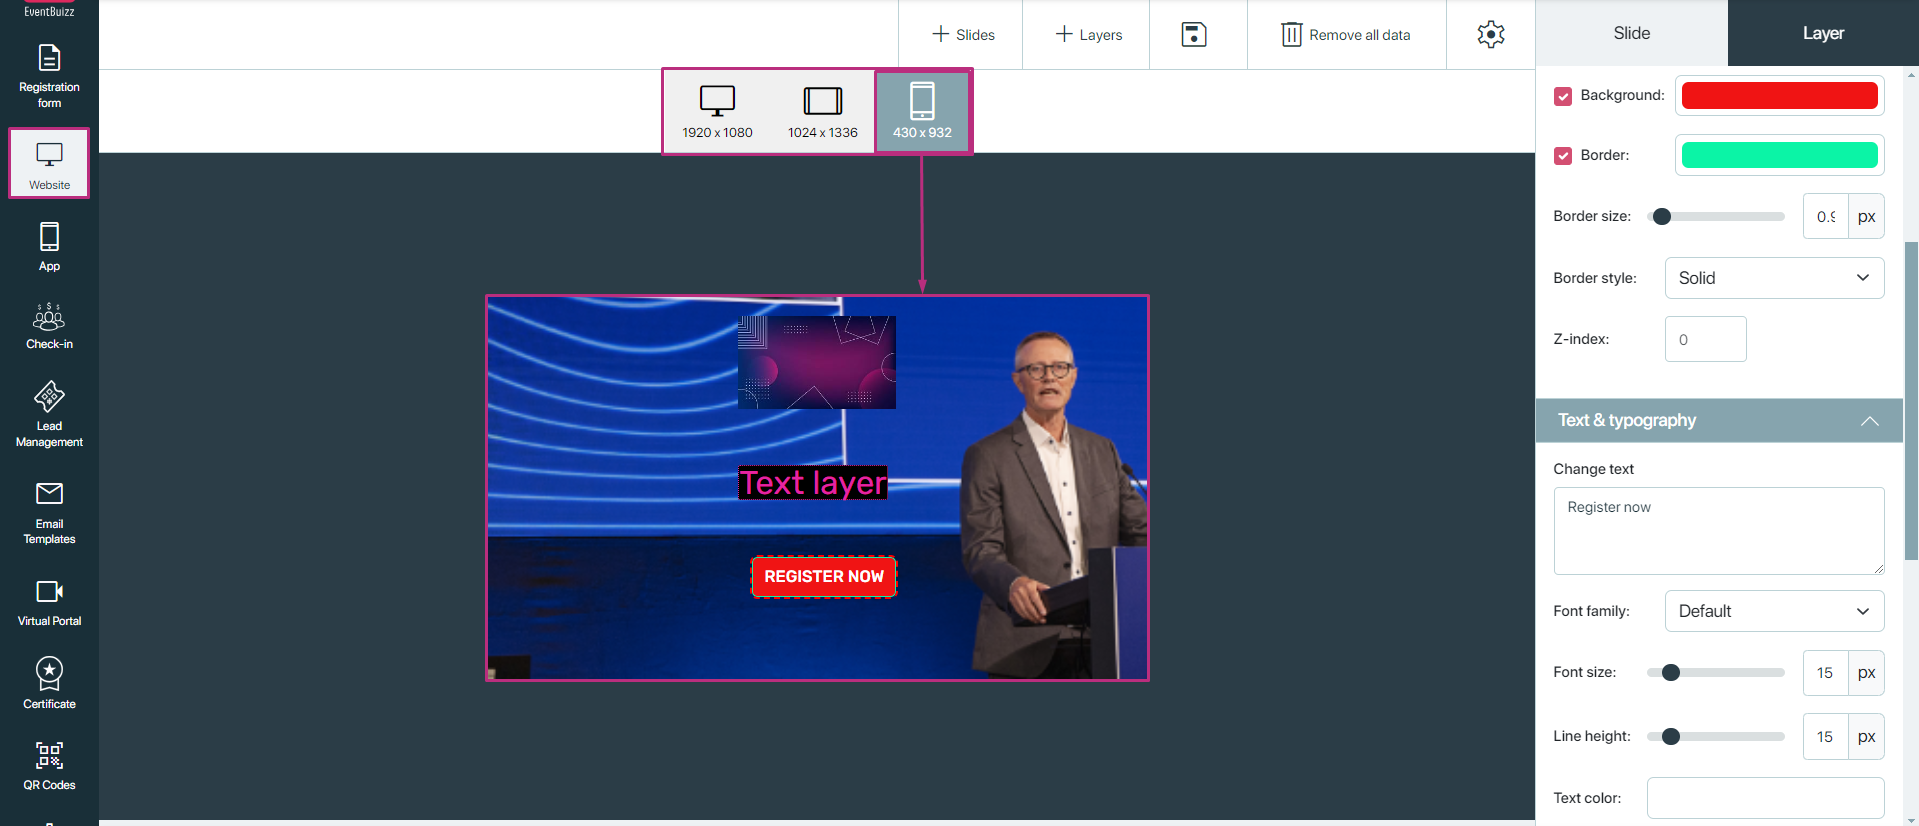
Setting layer visibility
Organisers can control how layers appear on different devices:
- Device-specific settings: In the editor, there are options to set visibility preferences for each layer based on device type. There are three types of device visibility organiser can set, in the editor, for Desktop, laptops, and mobile devices.
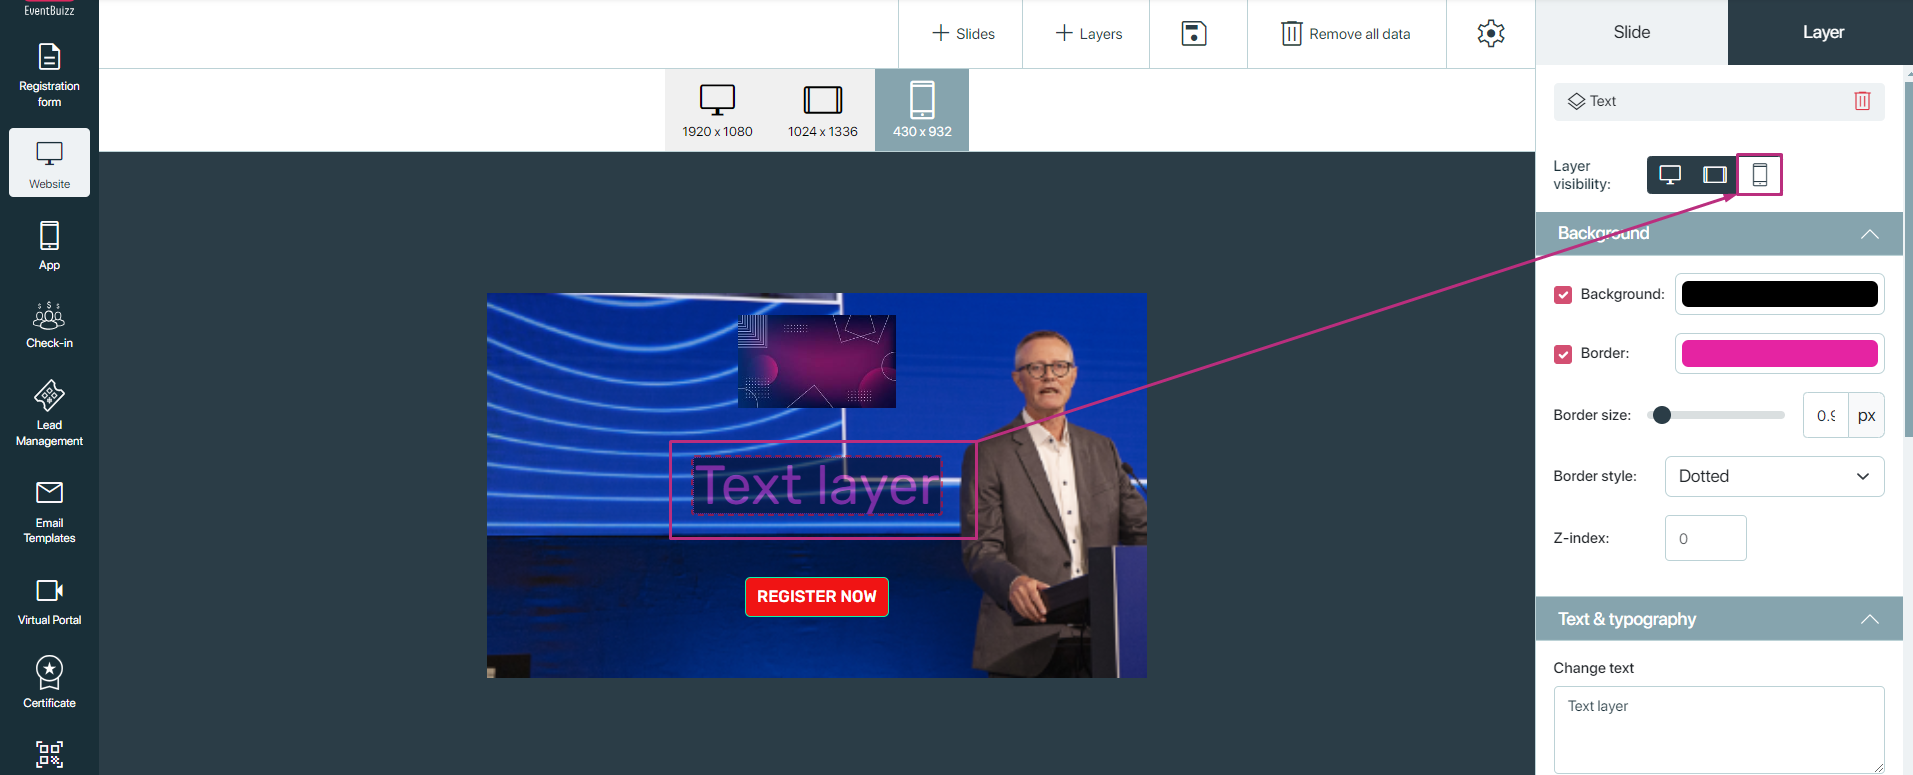
Layers visibility: By default, all layers are active. However, if an organiser wishes to hide a layer on a specific device, they can easily deactivate it through the settings.
- Organiser can select any layer and also select the device type, where he did not want to show that layer, and then just make the de-active from the layer visibility.
- Let suppose organiser did not want to show text layer in mobile devices, he simply can deactivate it.
Deactivated layer will be transparent in visibility, in the eventcenter.
Save feature
After making any changes in the editor, organiser need to save the each action, by clicking on the “save icon”. After saving the changes, a success message “Banner changes has been saved successfully” in toast.
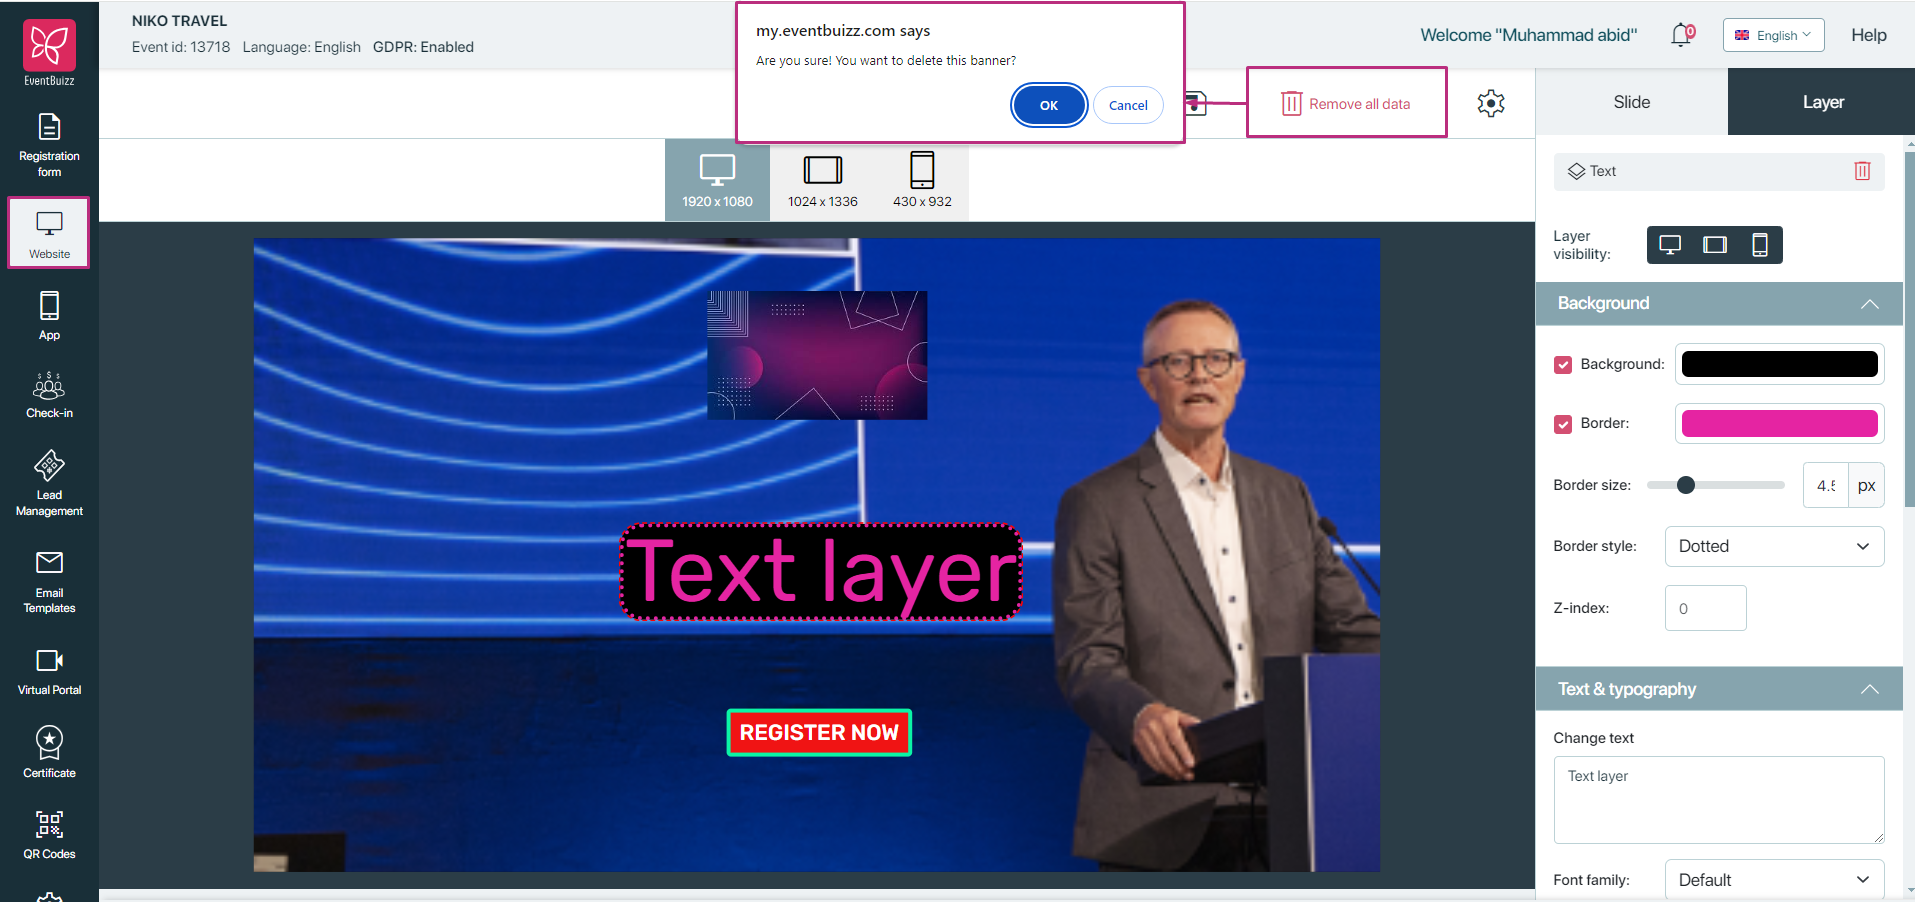
Remove all data
This features allow organiser to delete all data, in one go if no more needed, organiser can remove it. By clicking on the remove all data, it will show alert to user, “are you sure you want to delete all data”. If organiser want to remove then he will OK it, otherwise cancel it.
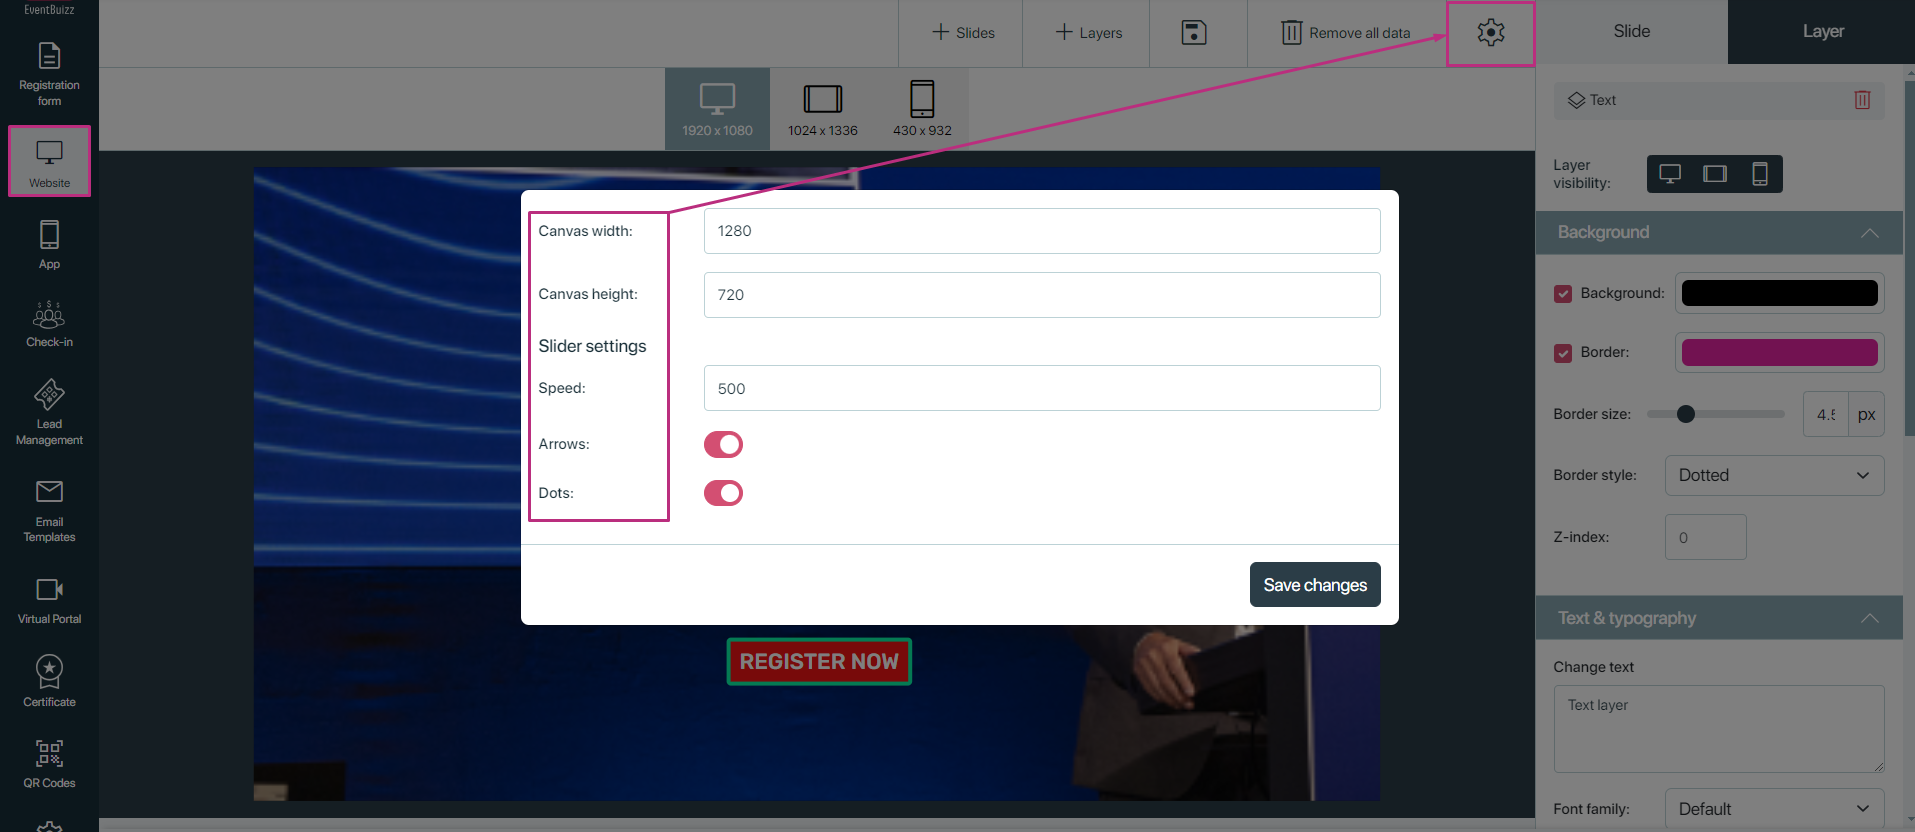
Setting feature
Advanced banners settings features
The advanced banners module includes key settings for customising the banner display. Here’s a concise overview of each feature:
Canvas width
- Description: Sets the width of the banner area.
- Functionality: Adjust in pixels (px) or percentage (%). Ensures proper fit within the event-site layout and enhances responsiveness.
Canvas height
- Description: Defines the height of the banner area.
- Functionality: Specify height in pixels (px) to maintain visual appeal and accommodate all layers (text, images, buttons).
Slider speed
- Description: Controls the transition speed between slides.
- Functionality: Set duration in milliseconds (ms). Affects user engagement; balance is key to keeping interest without frustration.
Slider arrows (Toggle button)
- Description: Enables or disables navigation arrows for manual slide control.
- Functionality: When enabled, users can navigate slides using arrows for an interactive experience.
Slider dots (Toggle Button)
- Description: Shows or hides pagination dots at the bottom of the banner.
- Functionality: Dots indicate the current slide and allow quick navigation to specific slides. Useful for multi-slide banners.
Displaying Advanced banners on the event-site
Once the banners are created and the section “banner” setting on, the final step is to verify that “variation 7” is selected, in top site banner variations.
- Once the variation 7, is selected and banners are also created in banner management, then users can access the created banners from the organiser in event-site.