Here you decide as the organizer which information should be visible in the registration flow.
Manage tickets and dates
Manage tickets and dates
Here’s an explanation of each setting:
Portal access
Managing access for exhibitors to their management portal.
-
- No exhibitor portal access: Exhibitors do not have access to the exhibitor portal.
- Exhibitor portal access: When the exhibitor portal is selected during registration, the name of the company provided by the main attendee becomes the sponsor/exhibitor. Based on the type selected, a sponsor/exhibitor corresponding to that type is automatically created. Additionally, the main attendee, as well as any additional attendees they add, automatically become contact persons for the sponsor/exhibitor.
Moreover, a hub admin account is automatically created using the main attendee’s name and email. After this process, an email is sent to the main attendee containing a link for accessing the exhibitor portal. - Stand Sale Mode: The attendee receives an email with a link to a form for creating a hub admin. Then the attendee themselves can create his/her hub admin.

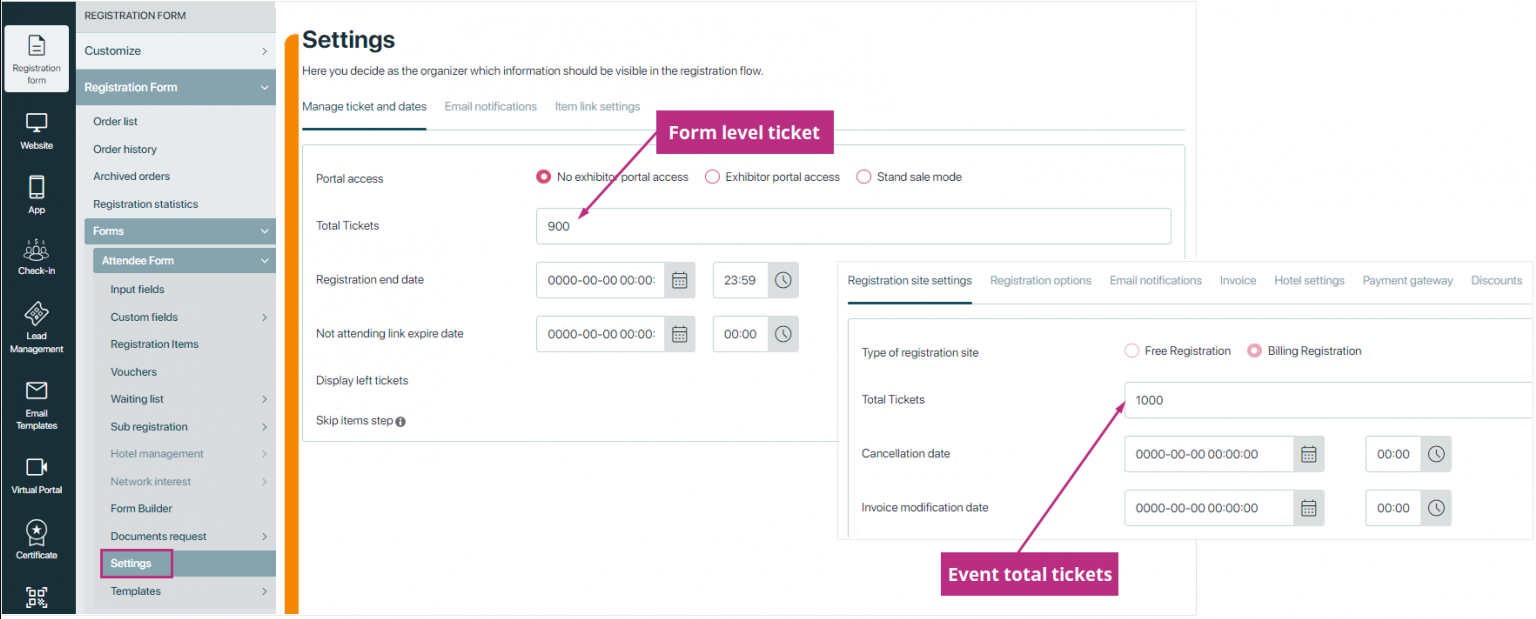
Total tickets:
Total ticket indicates that there are given number of tickets available for this form in event. It sets the total number of tickets that can be sold or registered for the event within particular form.
We can define ticket availability at two levels: To set up tickets for form level or event level, follow these steps:
- Form Level Tickets:
Go to Registration Form → Forms → Select a specific form → Settings. - Event Level Tickets:
Go to Registration Form → Settings.
Example Scenario
- Event Level: The total number of tickets available for the entire event is 100.
- Form Level: The total number of tickets available for a specific registration form is 50.
If 50 tickets are sold through this form, registration through this form will stop even if there are tickets available at the event level. Conversely, if 100 tickets are sold overall (event level), registration will stop for all forms, even if a specific form hasn’t reached its limit.
Important Note: You can set the total number of tickets at two levels: form level and event level. Registration will stop as soon as the ticket limit at either level is reached.
Important Note: If we have only one active form, we display its tickets on the event site. However, if there are multiple forms with their own tickets, we do not display any form-level tickets or event-level tickets on the eventsite.
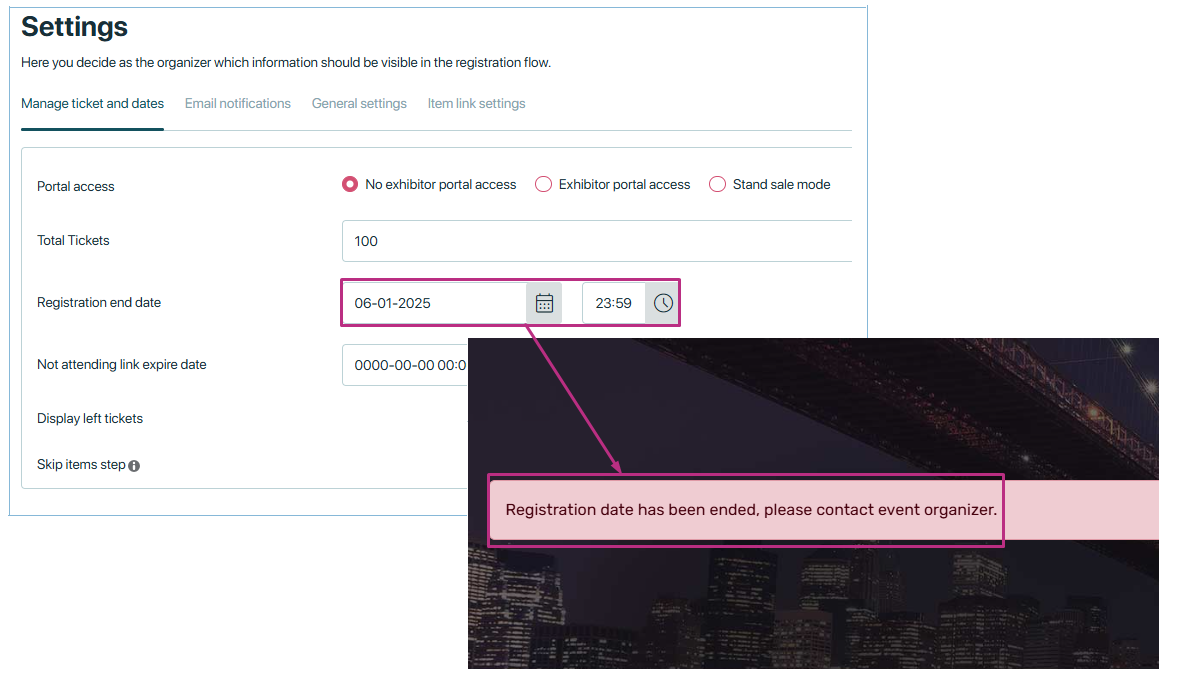
Registration end date:
Registration end date refers to the last day attendees can sign up for an event. After this date, the registration process will be closed, and no further entries will be allowed. It helps event organizers manage their attendee list and plan resources effectively.
How it works in eventbuizz:
Organizers can set the registration end date when configuring the event. Once the date and time are reached, the registration form automatically becomes inactive, preventing any new registrations. This ensures that only attendees who signed up before the deadline are included in the event.
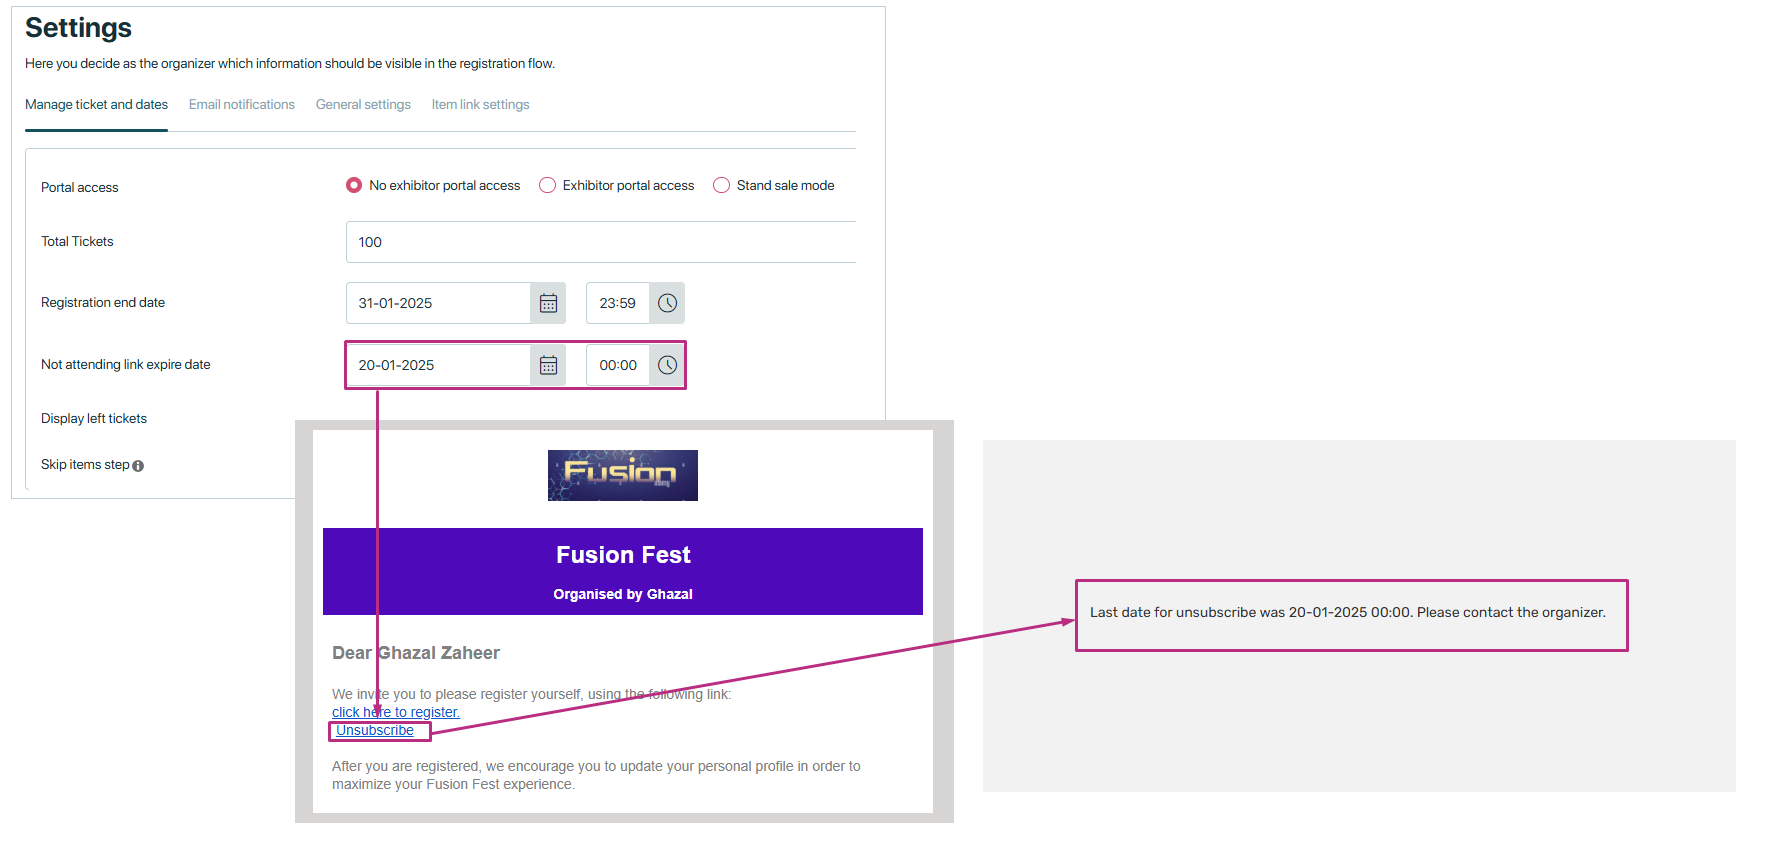
Not attending link expire date:
Not attending link expire date is the deadline for using a link that allows attendees to inform the organizer that they won’t be attending the event. After this date, the link will no longer work.
How it works:
-
- Organizers can include a “Not Attending” link in their invitations.
- When setting up the event, they specify an expiration date for this link.
- Once the expiration date is reached, attendees can no longer use the link to update their attendance status, and the option will be disabled automatically. This helps organizers finalize attendance records.
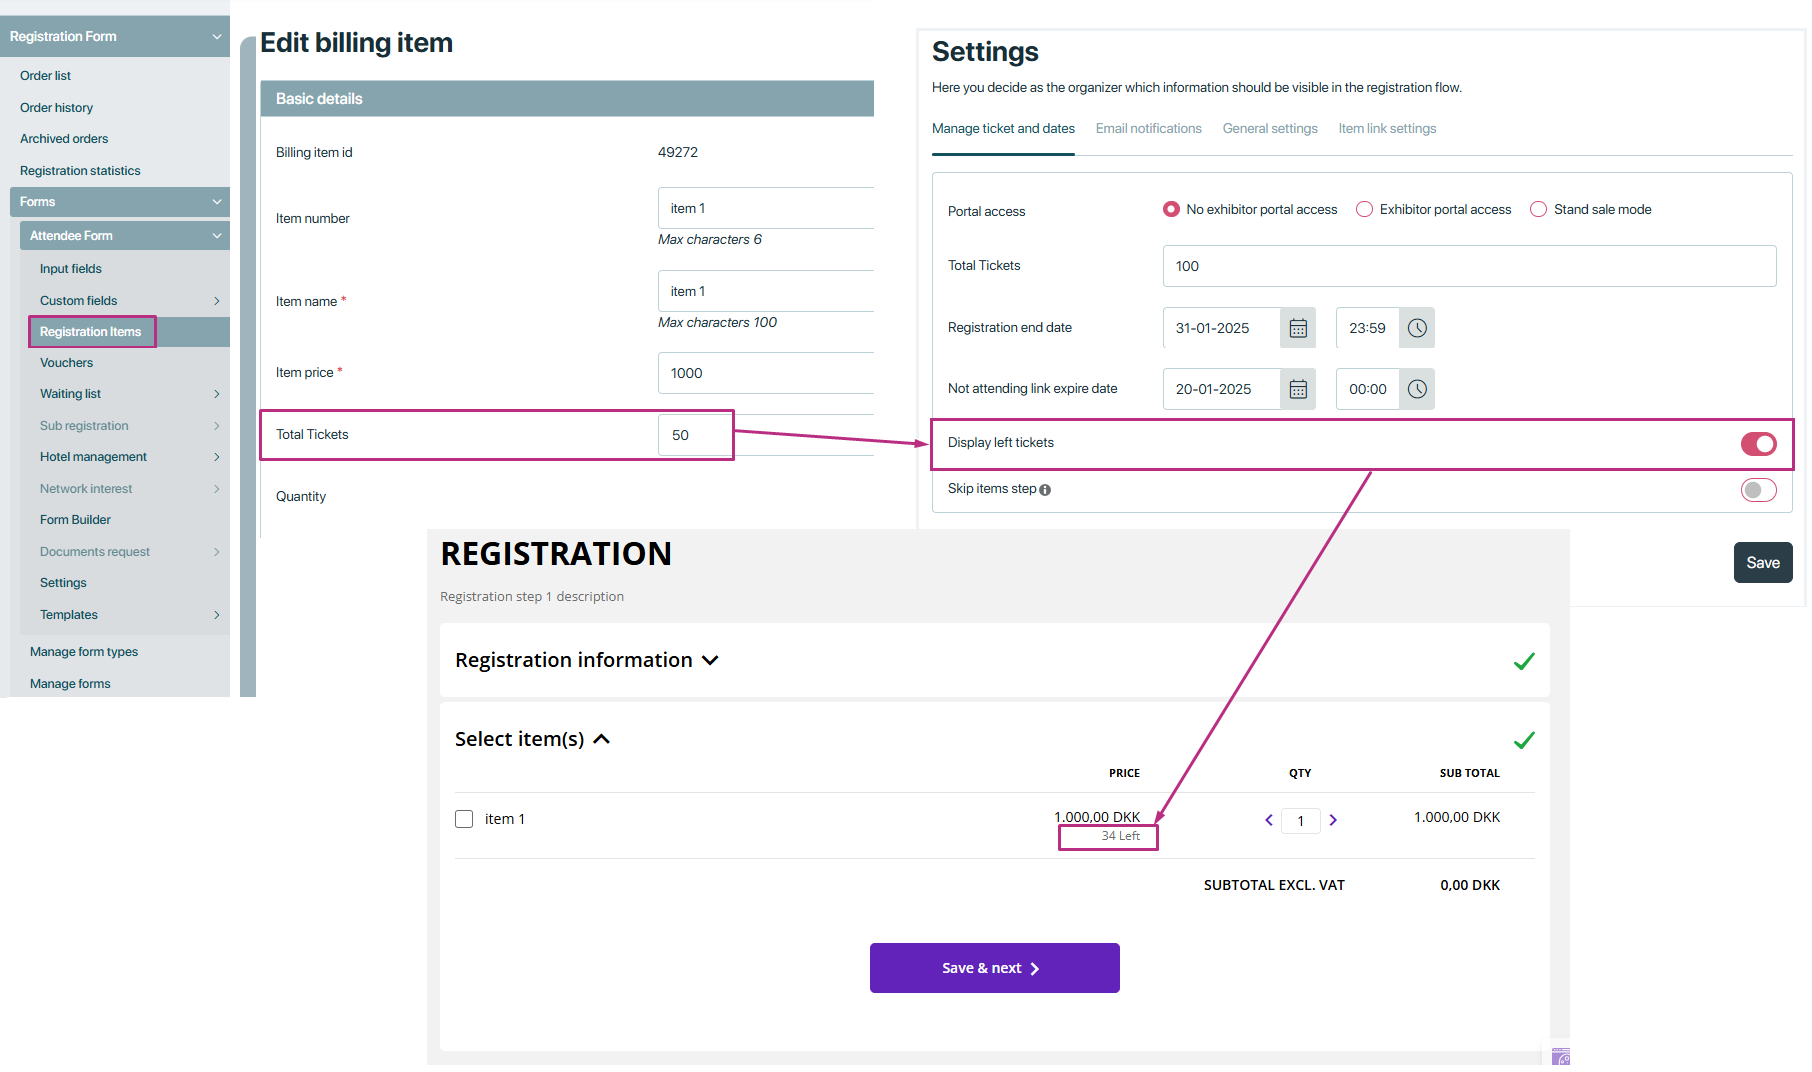
Display left tickets:
Display left tickets” in forms is a feature that allows you to show the number of remaining tickets for an item directly on the registration flow in items step. This can help attendees see how many tickets are still available, creating a sense of urgency or transparency.
How it works:
Enable Tickets for Items:
-
- Each registration item must have tickets assigned to it.
- If an item does not have tickets, the “left tickets” feature will not work for that item.
Set Total Tickets for Items:
-
- Go to registration items.
- Click on add/edit item for the specific item you want to configure.
- Add a value in the total tickets field to define the maximum number of tickets available for that item.
Enable “Display Left Tickets” Setting:
-
-
Ensure the “Display left tickets” setting is turned ON in the form.
-
Display on Registration Form:
-
- Once the setting is enabled and tickets are assigned to items, the number of left tickets will be displayed below the item’s price on the registration form.
- The count of left tickets updates in real-time as attendees register.
Example Workflow:
- If an item has total tickets = 50 and 16 tickets are sold, the registration form will show “34 tickets left” below the item’s price.
- As more tickets are sold, the number of left tickets decreases automatically.
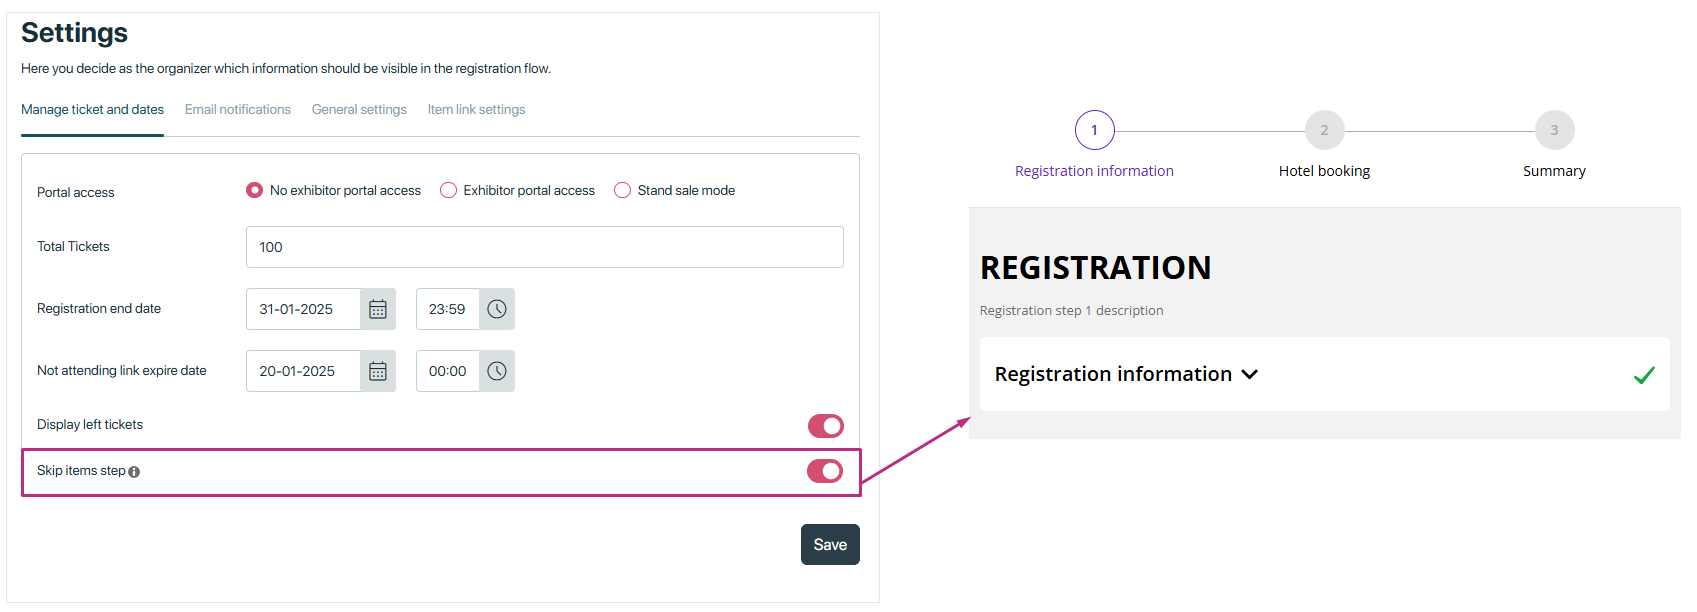
Skip Items Step:
The “skip items step” is a setting that controls whether attendees are required to select registration items during the registration process. This feature is useful for events where you want to simplify the registration process for attendees
How it works:
When “skip items step” is OFF: The registration form includes a step where attendees must select items. Attendees must select alteast one registration item before proceeding.
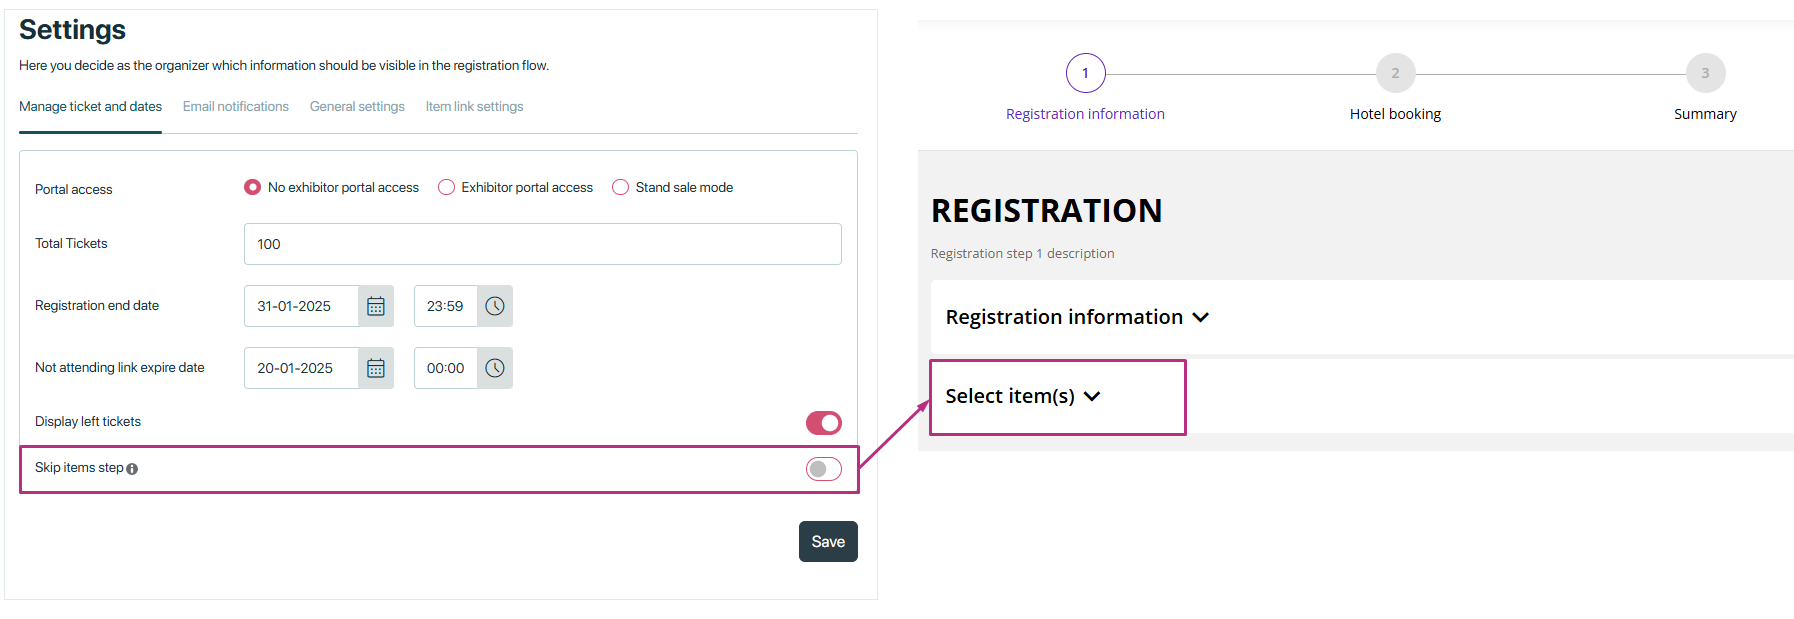
When “skip items step” is ON: The registration form skips the step where attendees select items. Attendees do not need to select anything; they just fill out their details and confirm registration.
Email notifications
Email notifications
In Eventbuizz, email communication is a crucial part of managing events and ensuring attendees are well-informed. Below is a detailed explanation of the email-related features you mentioned:
Send confirmation email:
- Automatically sends a confirmation email to attendees after they successfully register for an event.
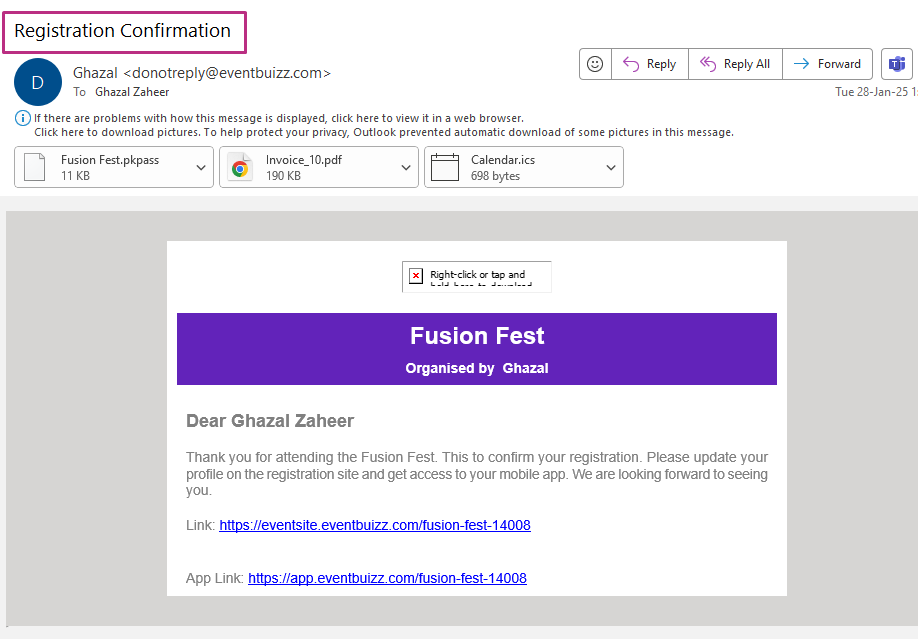
Attach invoice email
-
Automatically attaches an invoice to the confirmation email or a separate email for paid registrations.
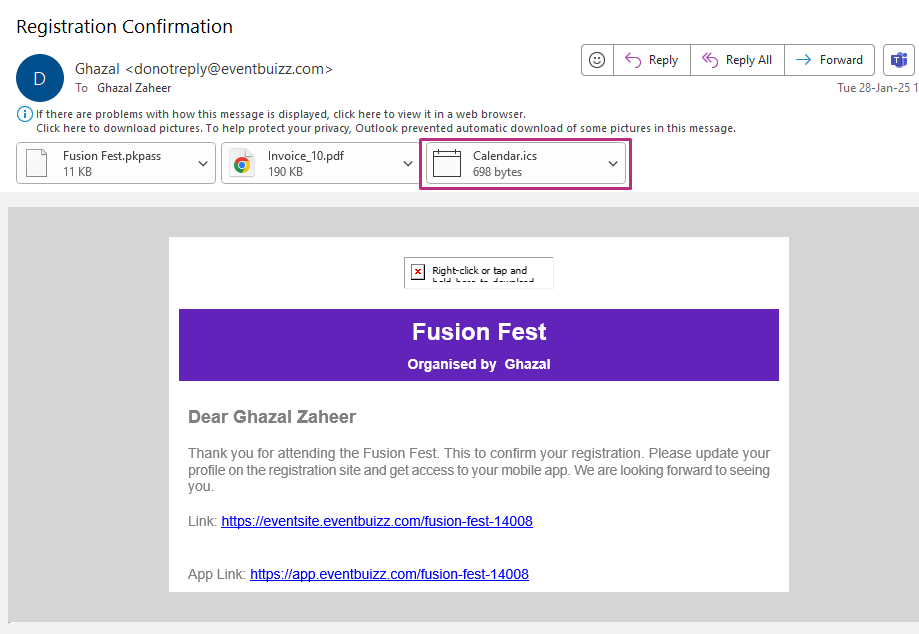
Attach calendar to email
- Attaches a calendar file (e.g.,
.ics) to the confirmation email, allowing attendees to add the event to their calendar (e.g., Google Calendar, Outlook, Apple Calendar). It help attendees remember the event by adding it to their calendar with a single click.
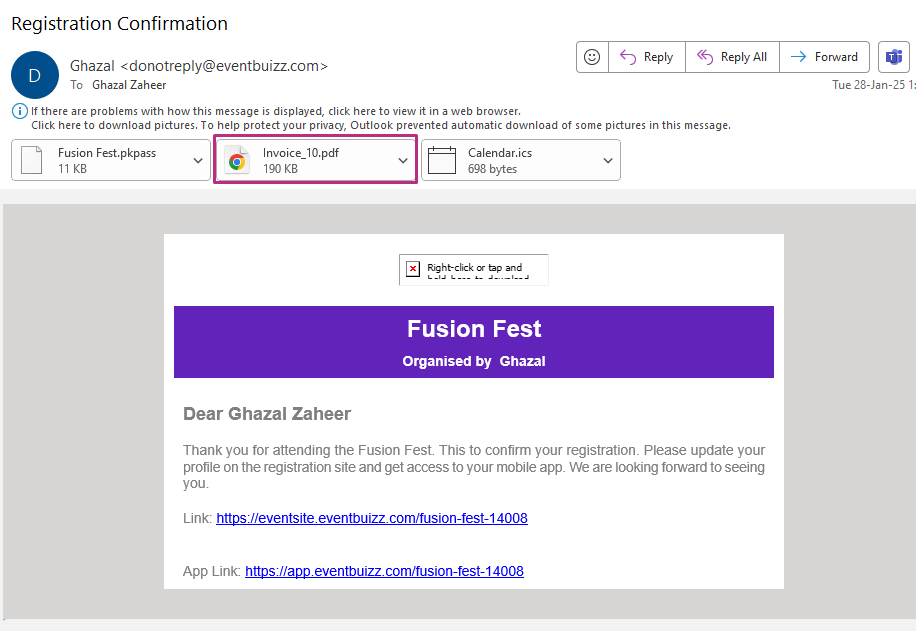
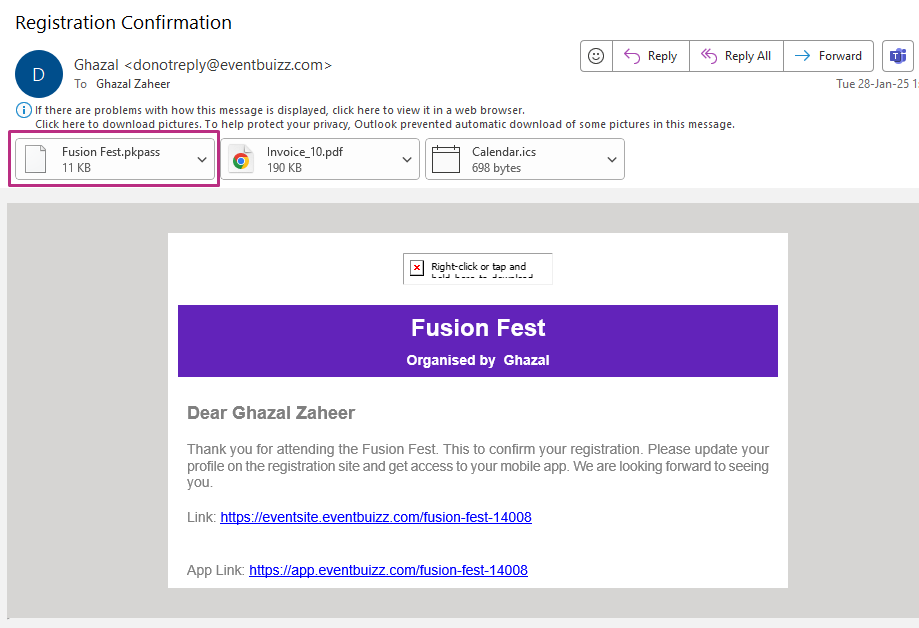
Attach apple pass to email
-
Attaches an Apple Wallet pass (.pkpass) to the confirmation email, which attendees can add to their apple wallet for easy access to event details like tickets, QR codes, or event schedules. It provides a convenient way for attendees to store their event tickets or passes on their apple devices.
Attach google pass to email
- Attaches a google wallet pass to the confirmation email, which attendees can save to their google wallet for easy access to event details, tickets, or QR codes. It offers a seamless way for Android users to store and access their event tickets or passes.
Send order cancellation email
-
Automatically sends an email to attendees when their registration or order is cancelled.

formgeneralsettings
General settings
In Eventbuizz, the settings for GDPR, disclaimer, and food can be applied in two ways:
- Main settings (It is valid for web app).
- form-based settings (It is valid for registration forms).
Form-based settings are specific to individual forms.
For example, if you enable GDPR or disclaimer for the attendee form, it will only apply to that form and not affect the sponsor form. This allows you to customize each form separately based on its purpose. For instance, you might enable food preferences for the attendee form but not for the sponsor form.
In short, form-based settings let you tailor settings for each form individually.
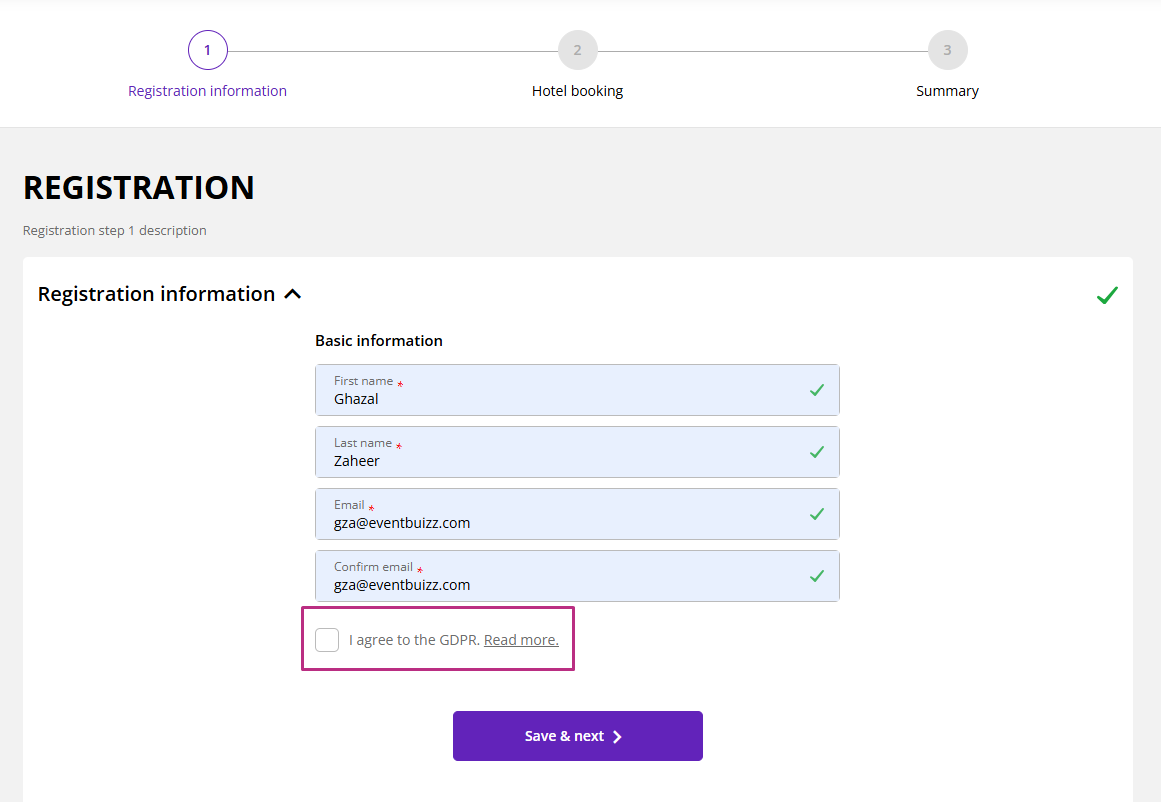
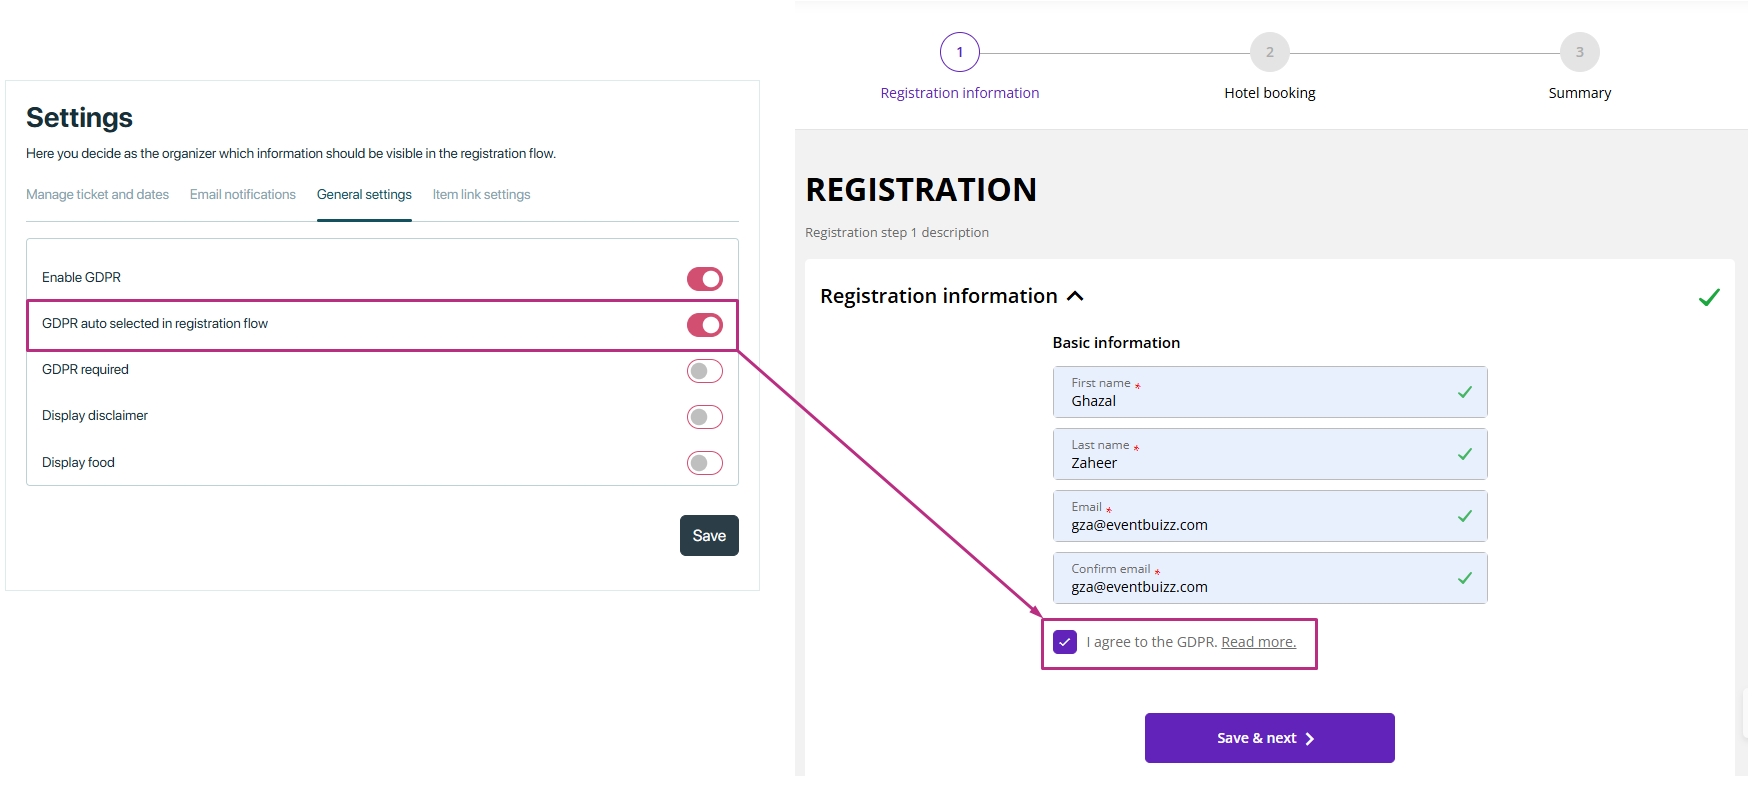
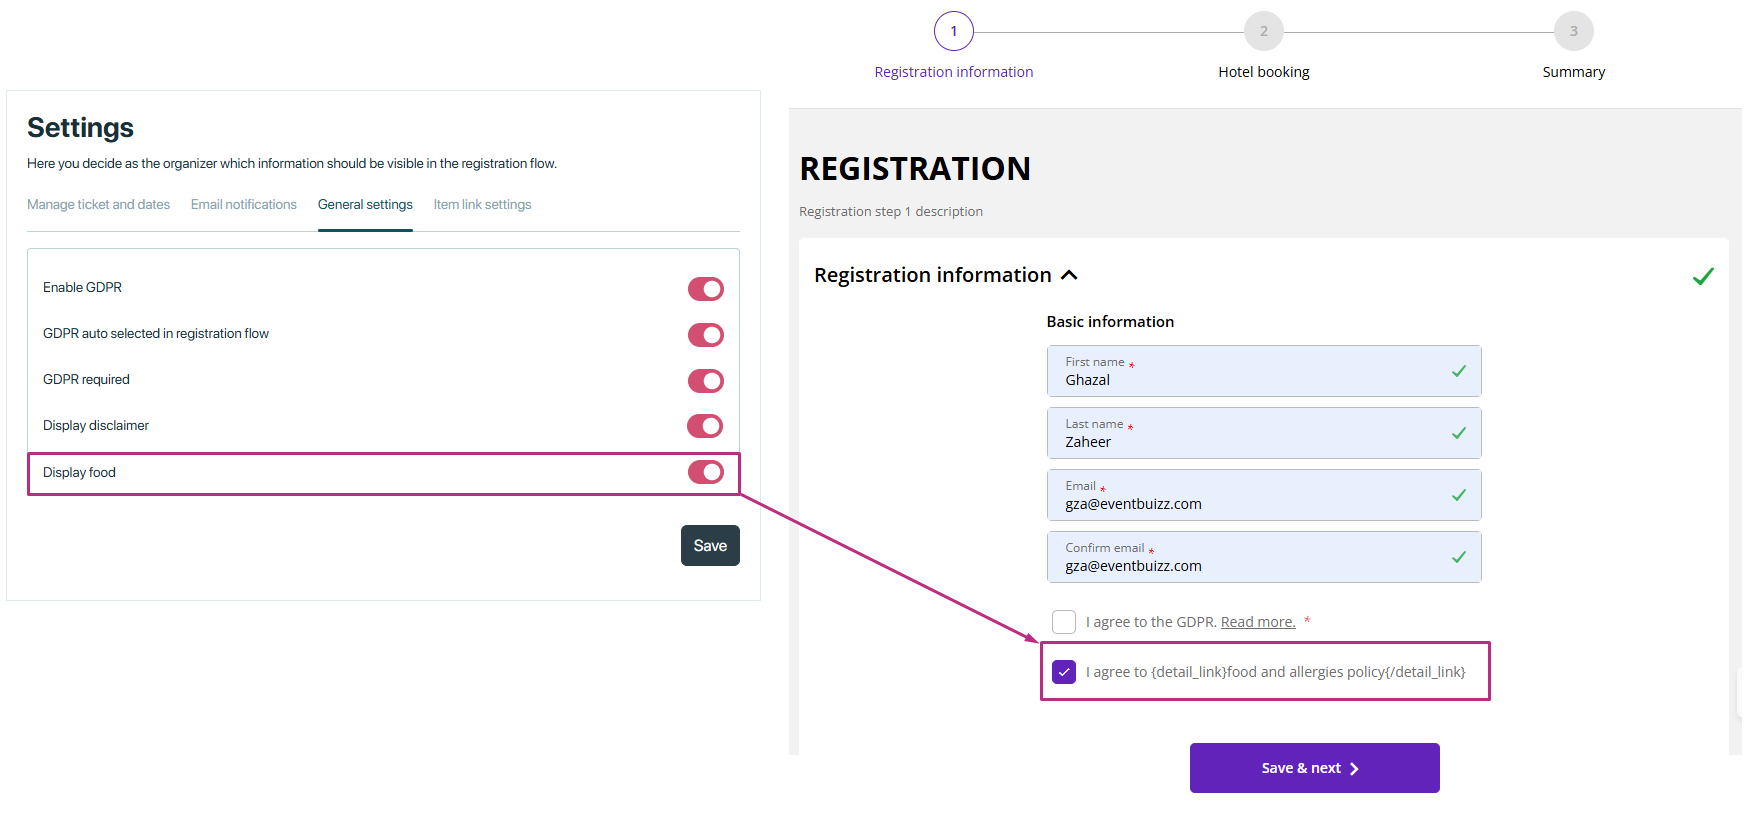
Enable GDPR
When GDPR is enabled, a GDPR checkbox will automatically appear in the registration flow. This means that during the registration process, attendees will see a checkbox asking them to agree to the GDPR terms.
GDPR auto selected in registration flow
- Automatically pre-selects the GDPR consent checkbox in the registration form.
- Attendees can still deselect the checkbox if they do not agree to the terms.
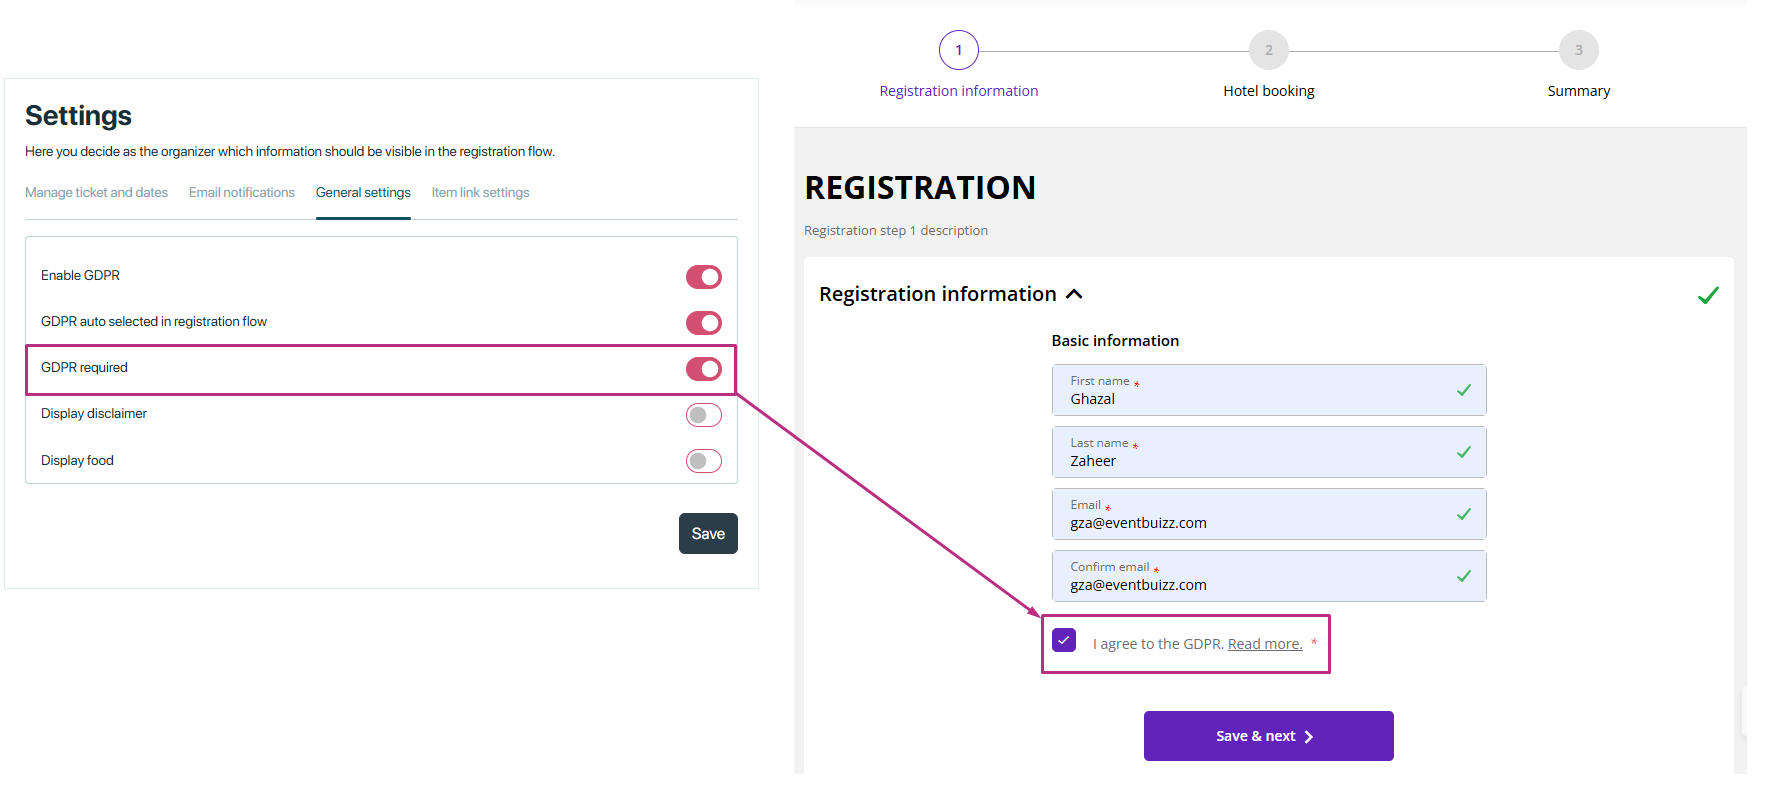
GDPR required
- Makes GDPR consent mandatory for registration.
- Attendees cannot complete the registration process without agreeing to the GDPR terms.
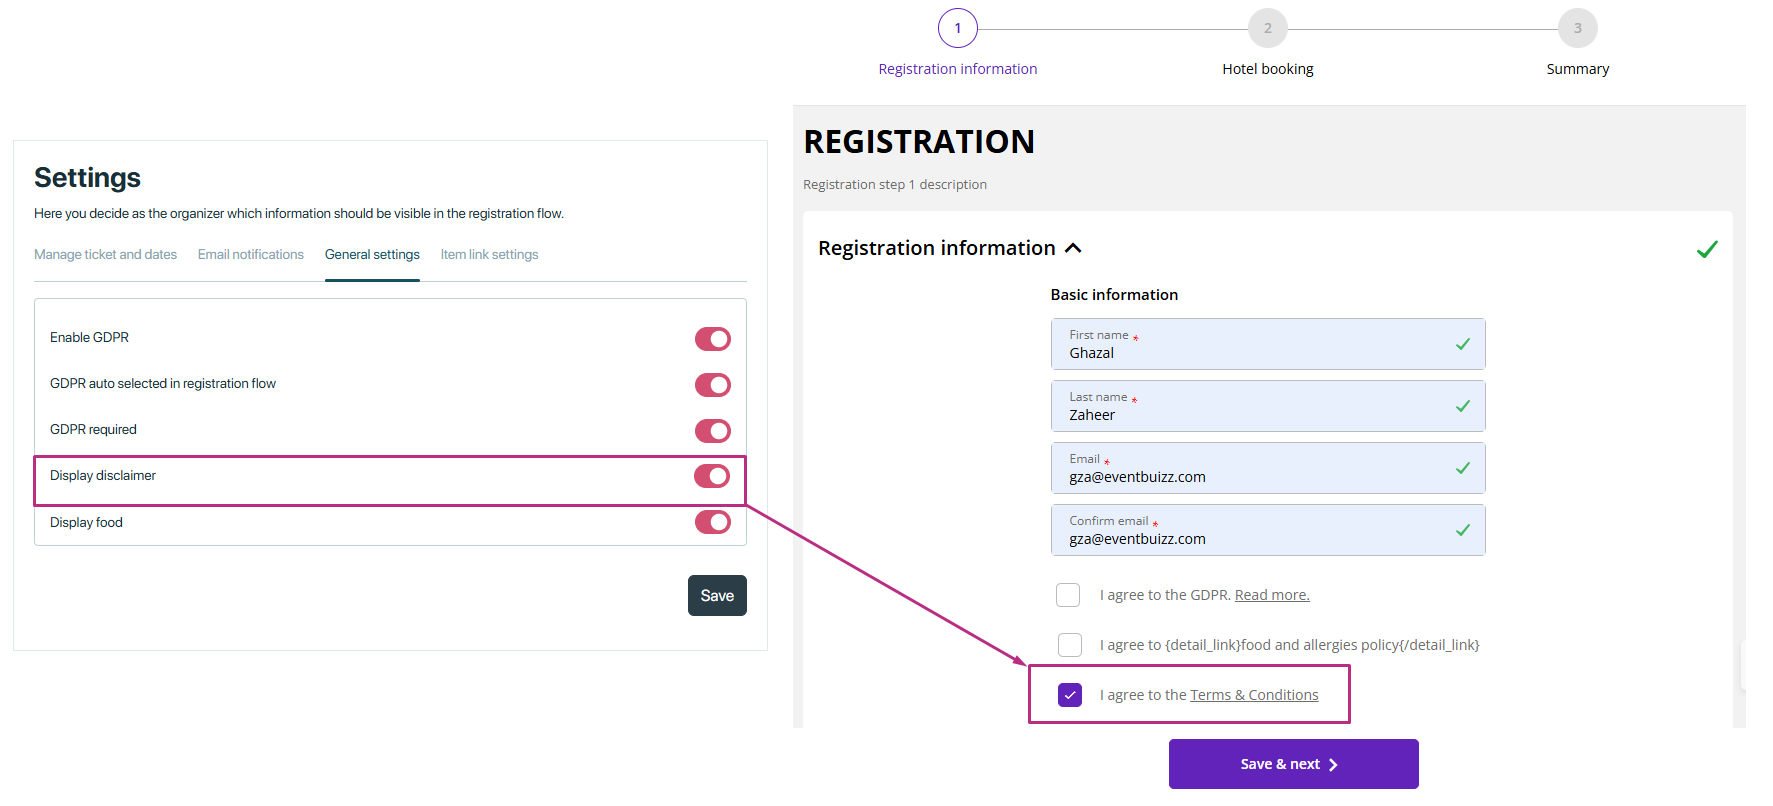
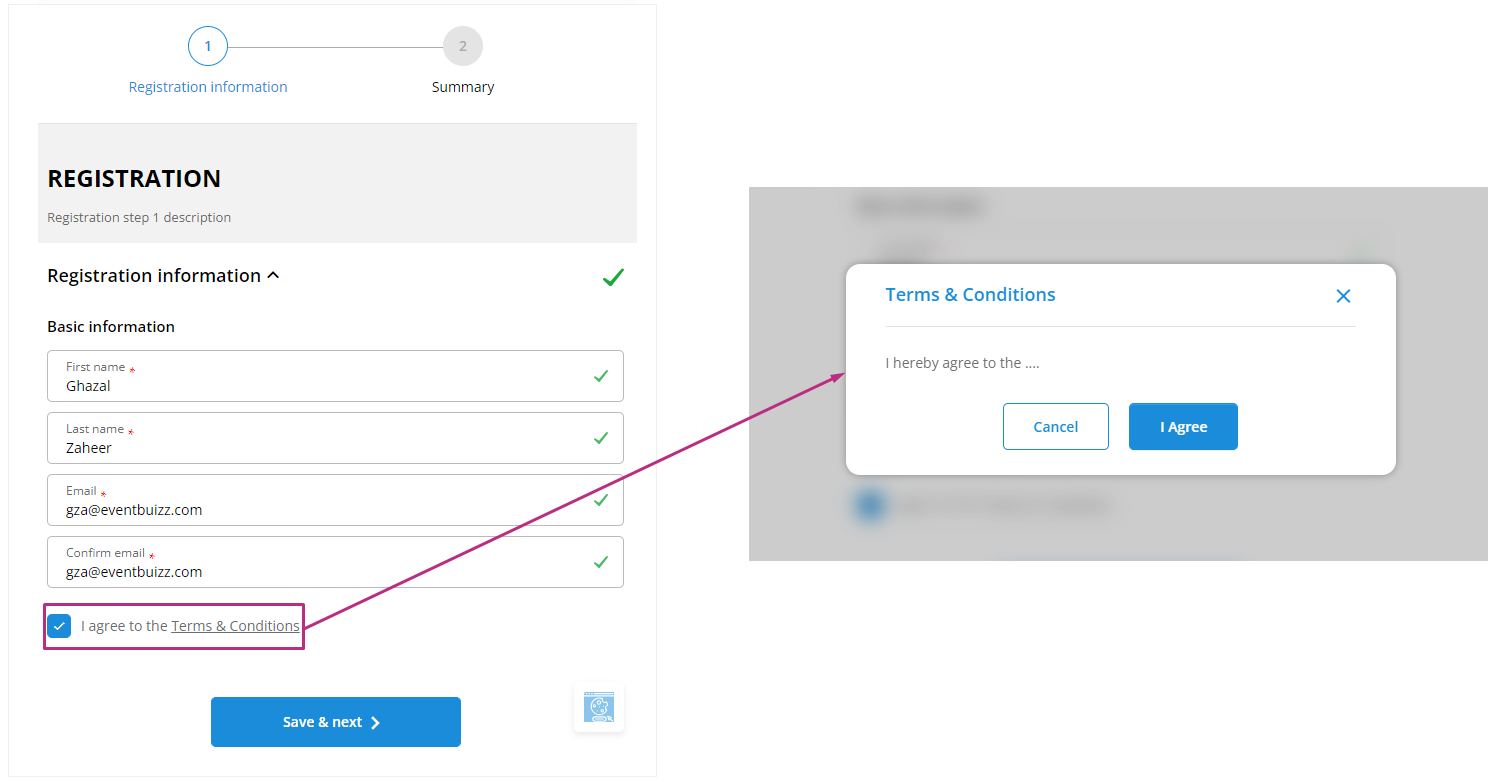
Display disclaimer
- Displays a disclaimer or terms and conditions on the registration form.
- Ensures attendees are aware of important information before completing their registration.
Display food
-
Displays food-related options or preferences on the registration form.
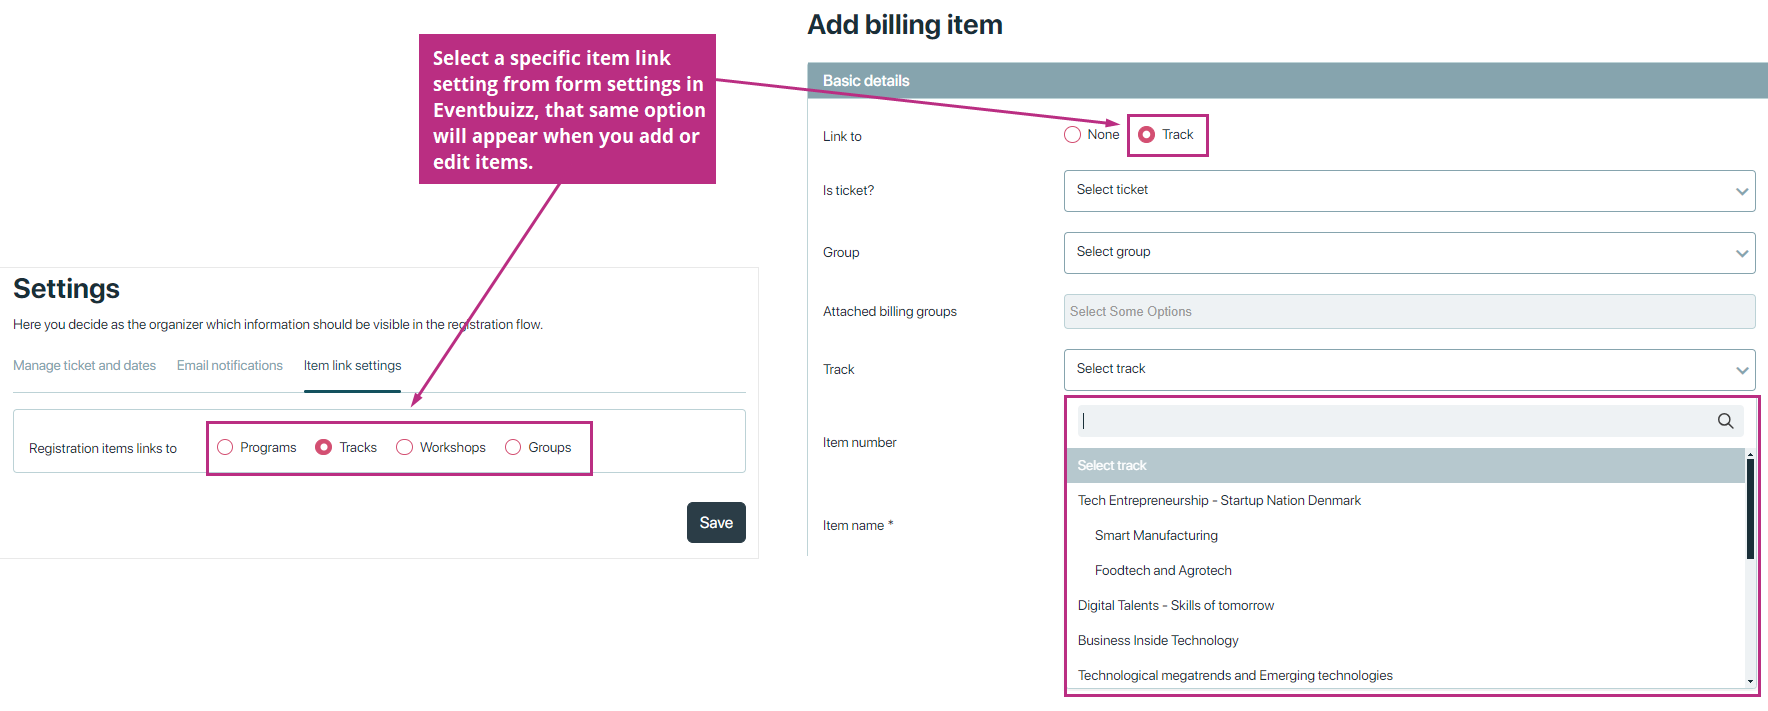
Items Link Settings
Items link settings
When you select a specific item link setting from form settings, that same option will appear when you add or edit items. For example, if organizer choose “programs/ tracks/ workshops or groups” you’ll see same thing when you add or edit items.
How to add/edit registration items. click registration items.