A network interest is a feature in eventbuizz, which is used as a matchmaking tool for event attendees. It is used to find the similar interest attendees.
Here’s how it works:
Imagine you’re attending a big conference or expo where there are lots of people with diverse interests. You might be interested in connecting with others who share your passions or professional interests, but it can be challenging to find them in a crowd.
That’s where the network interest feature comes in. It allows users to search for and connect with others who have similar interests. For example, if you’re passionate about artificial intelligence, you can use this feature to find and connect with other attendees who are also interested in AI.
This feature makes networking easier and more targeted. Instead of randomly approaching people and hoping to find common ground, you can use Network Interest to identify potential connections based on shared interests. This can lead to more meaningful conversations and collaborations during the event.
Overall, the network interest feature enhances the networking experience on eventbuizz by helping users find and connect with like-minded individuals, fostering valuable connections that can extend beyond the event itself.
Network interest module can be divided into two main parts, detail is given below about each one:
Admin site(Eventcenter)
Admin site(Eventcenter)
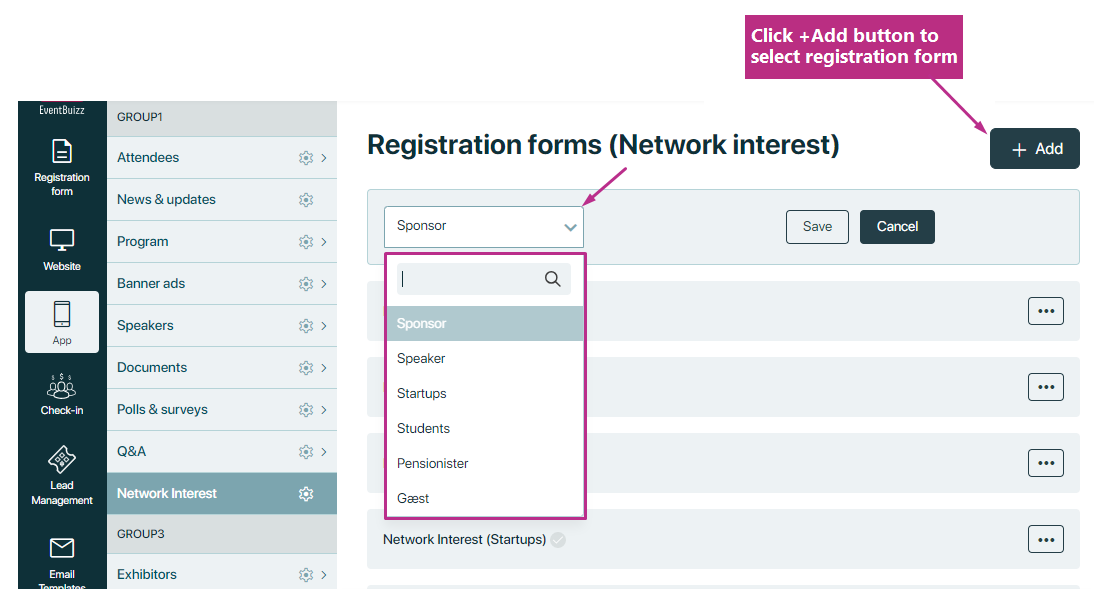
We can navigate to Network interest in eventcenter from two places;
- Registration Form -> Forms ->Form type in which type of form you want to create Network interest ->Network interest-> listing
- App -> Network interest -> Add network interest against which registration form you want to create
For better understanding you can see below attached screenshots:
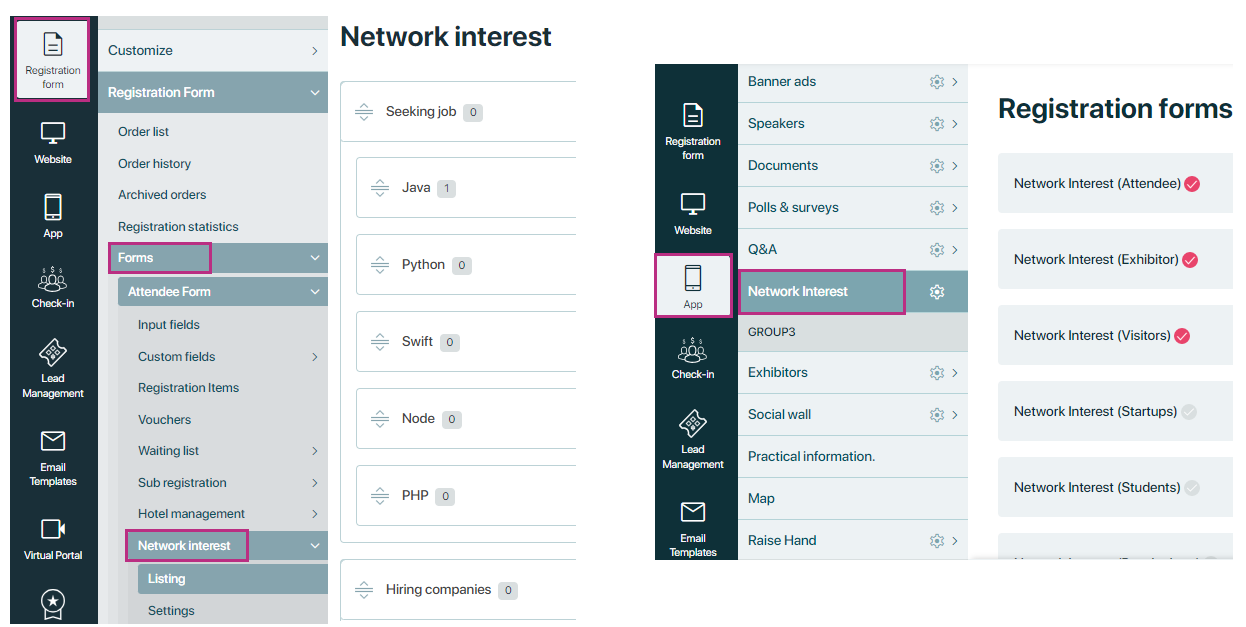
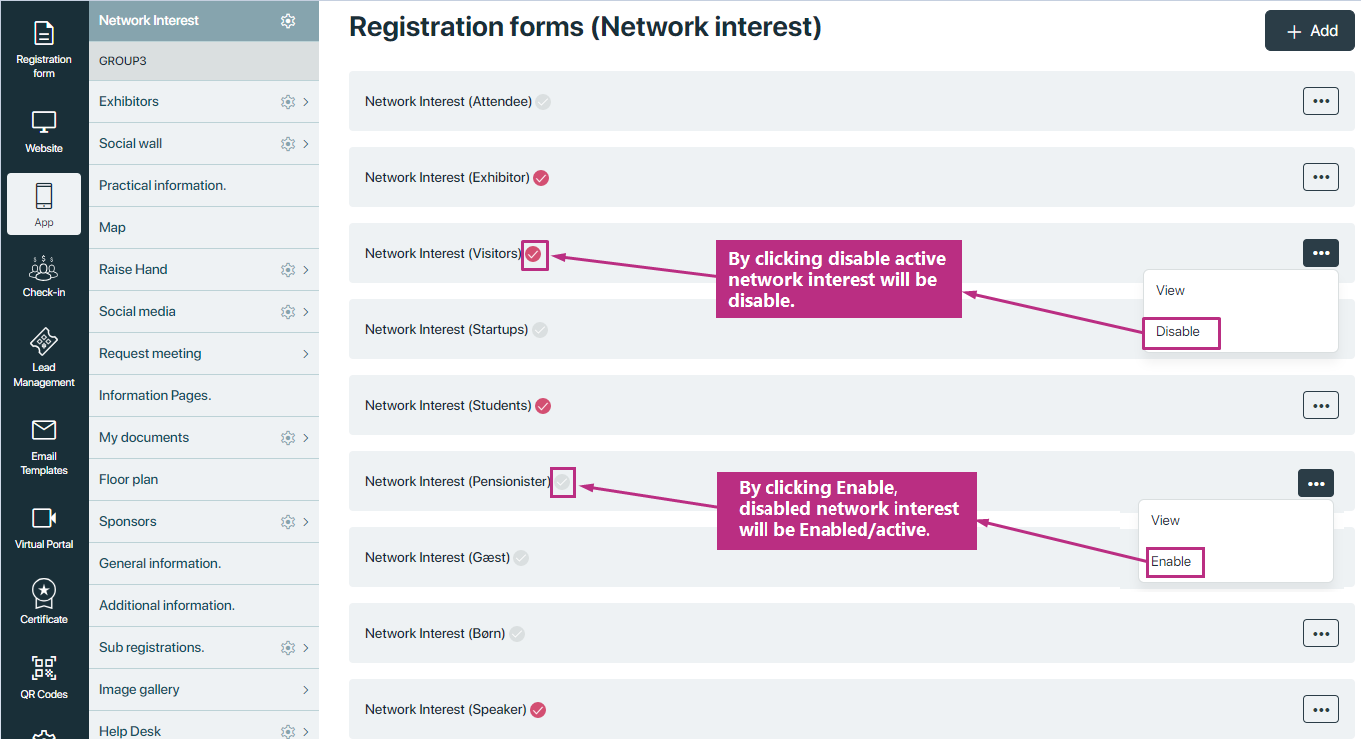
Listing
On network interest listing have three menus “Add”, “View” and “Disable/Enable”. Here is the explanation of each menus separately:
Add network interest for registration form
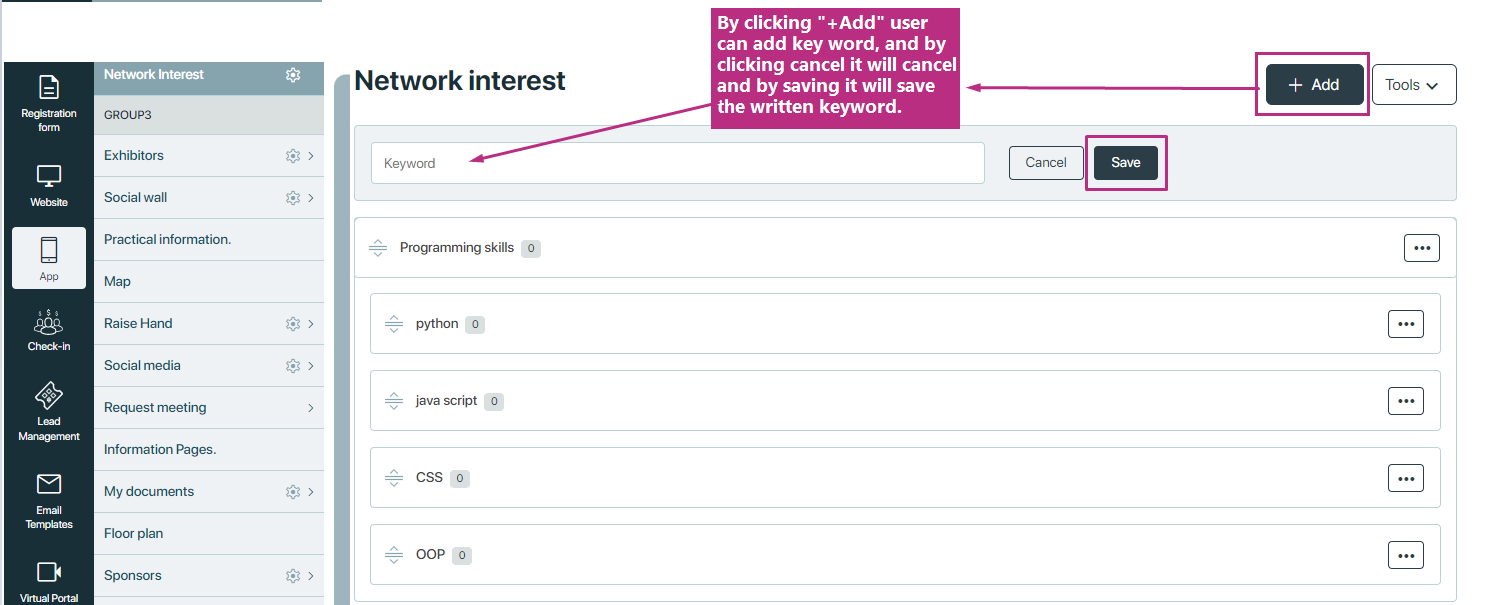
- The “Add” button allow users to add new network interest entries or connections to their network listing.
- when user will click on “+Add” button a drop down will open where user can select form type against which form type he want to create network interest
- User can create one Active network interest against each from type.
Check attached screenshot for better understanding:

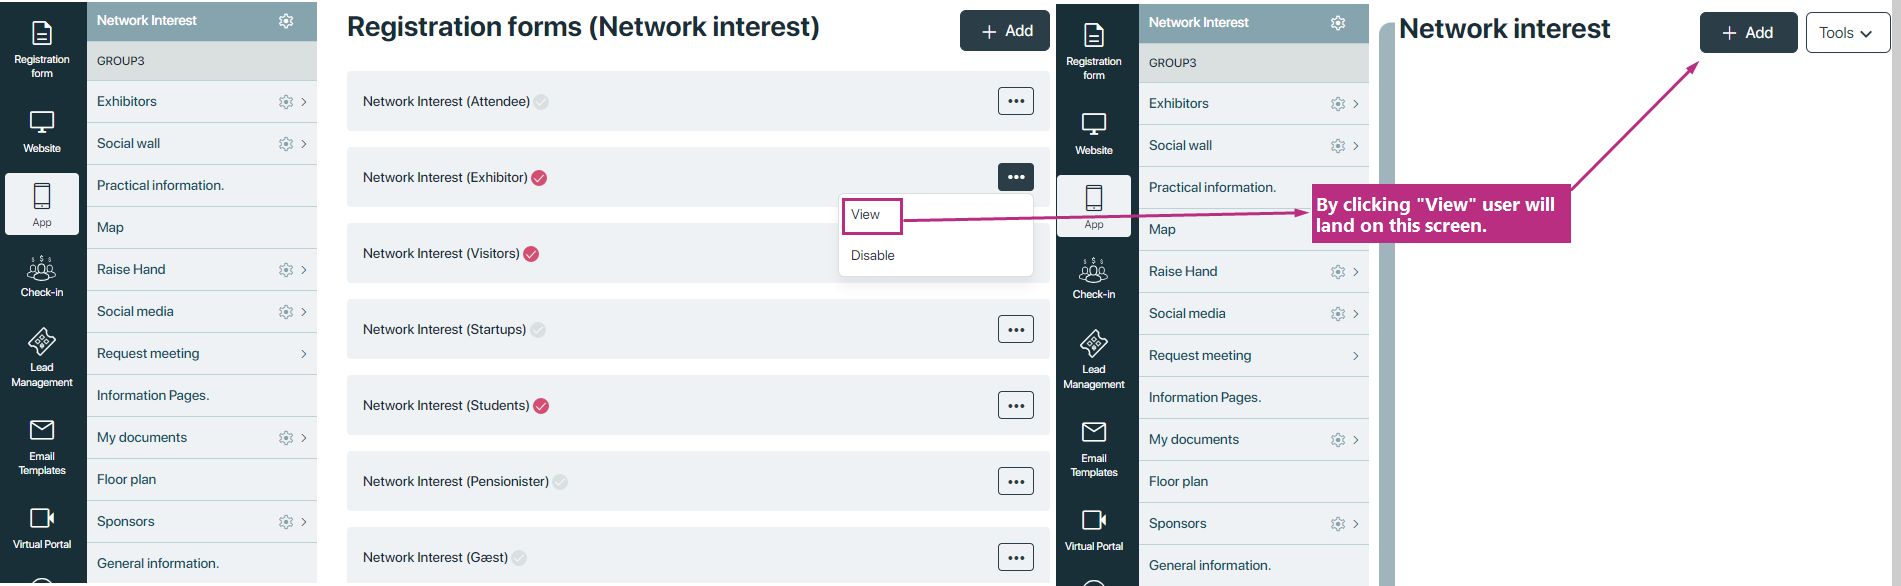
Click on the three dots icon ![]() , to disable and view.
, to disable and view.
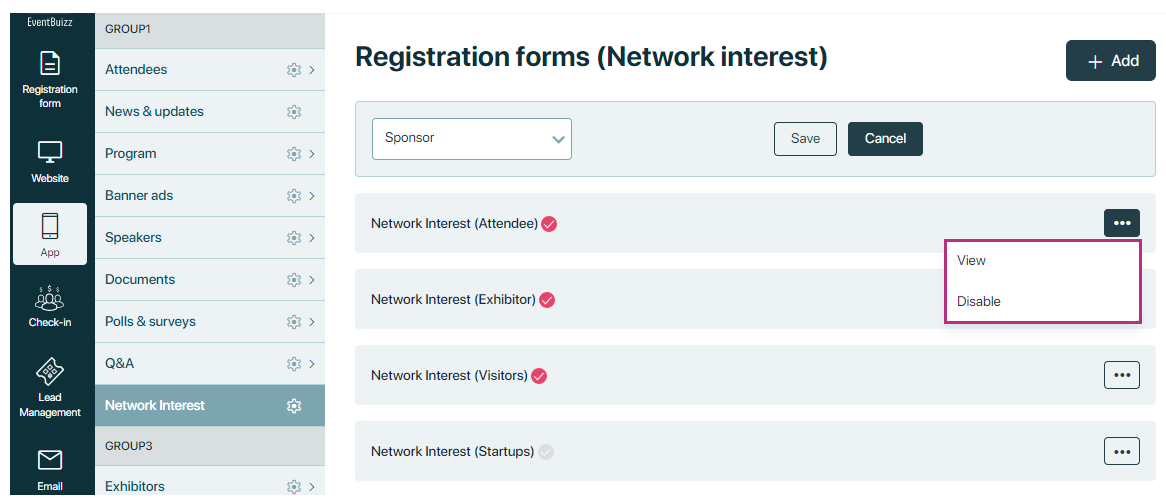
Disable/ Enable
- The “Disable” or “Enable” menu offers users the ability to temporarily disable or Enable that certain disable network interest/connections.
- Users may choose to disable connections for various reasons, such as if they no longer wish to communicate with a particular contact, need a break from networking, or want to limit access to their profile or information.
- Disabling typically hides or removes the network interest from the user’s active network listings, but it does not permanently delete the connection.
- Users can usually re-enable or reactivate disabled connections at a later time if it desired, from the same menu.

View
When users click on the “view” function, they’re taken to a screen where they can add network interest keywords against selected registration form.
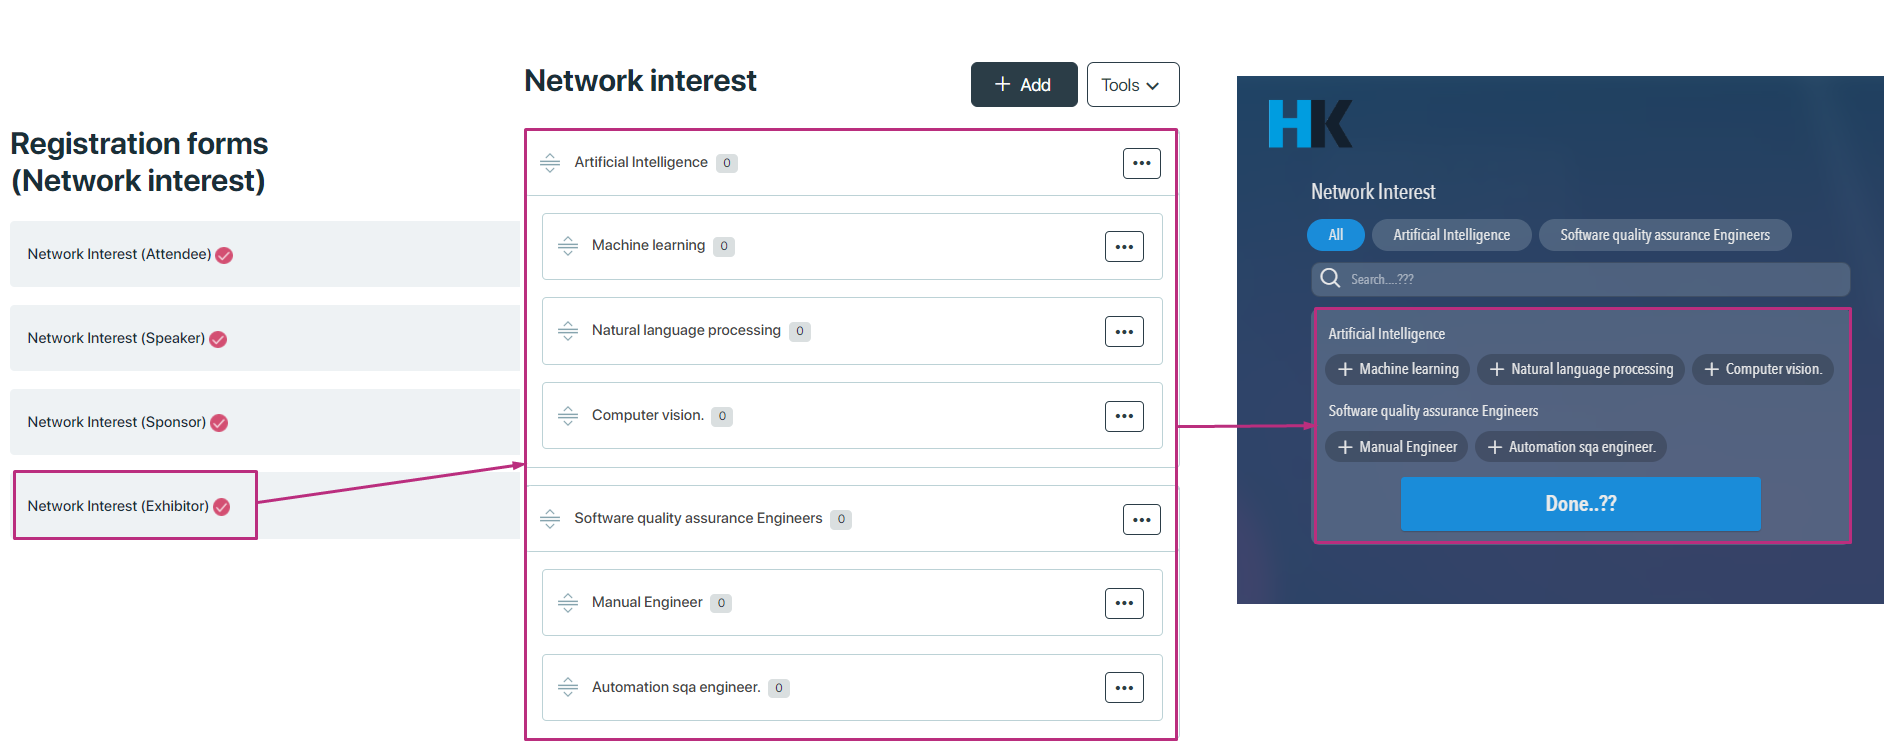
Add keywords
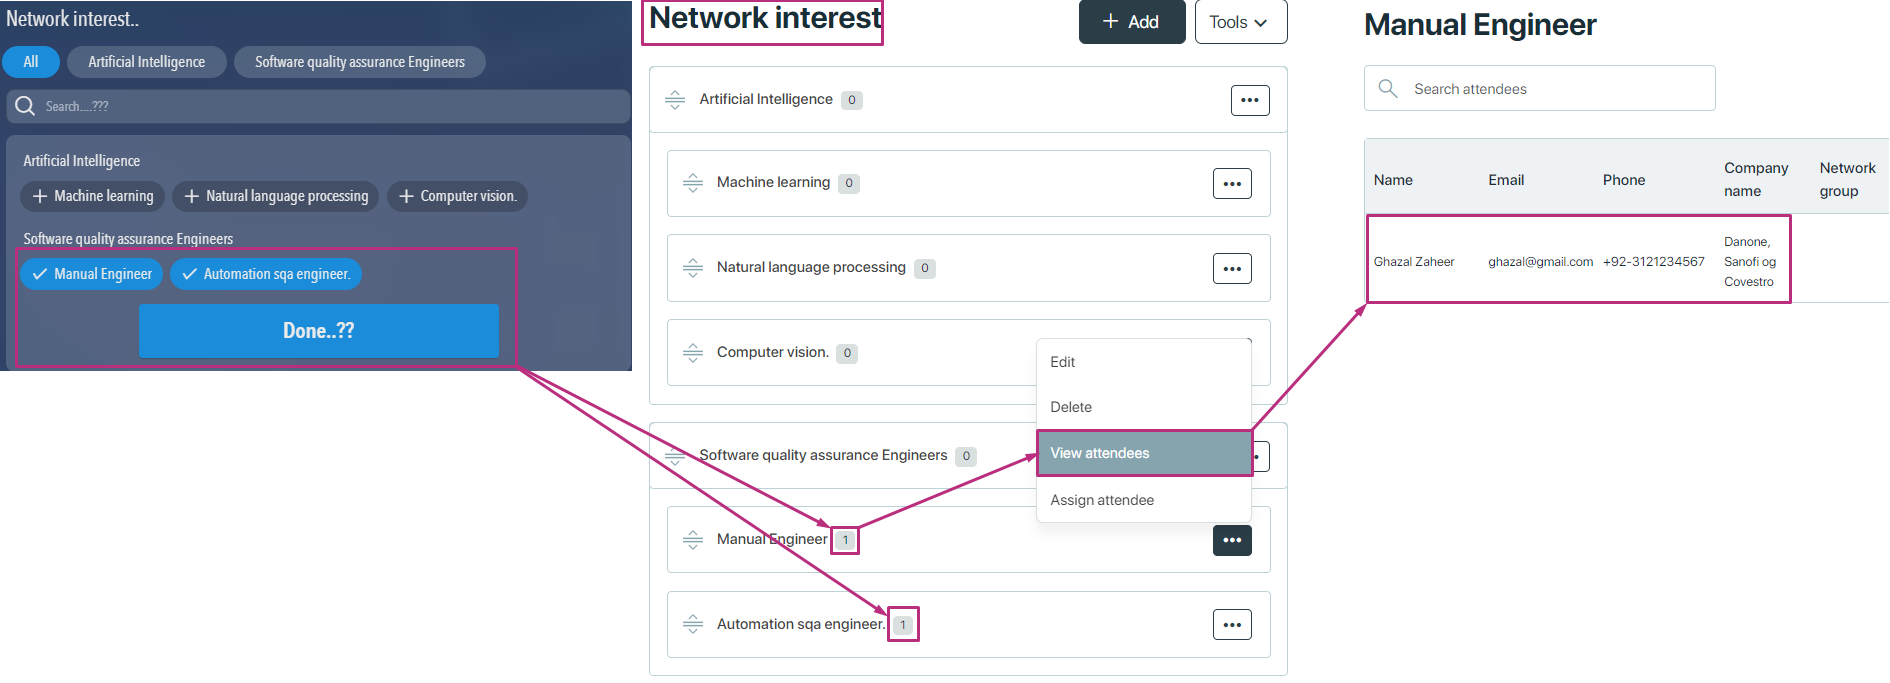
In the network interest module, users can add keywords that represent their areas of interest, expertise, or topics they want to connect over. For example, if someone is interested in “Artificial Intelligence,” they can add this as a keyword.
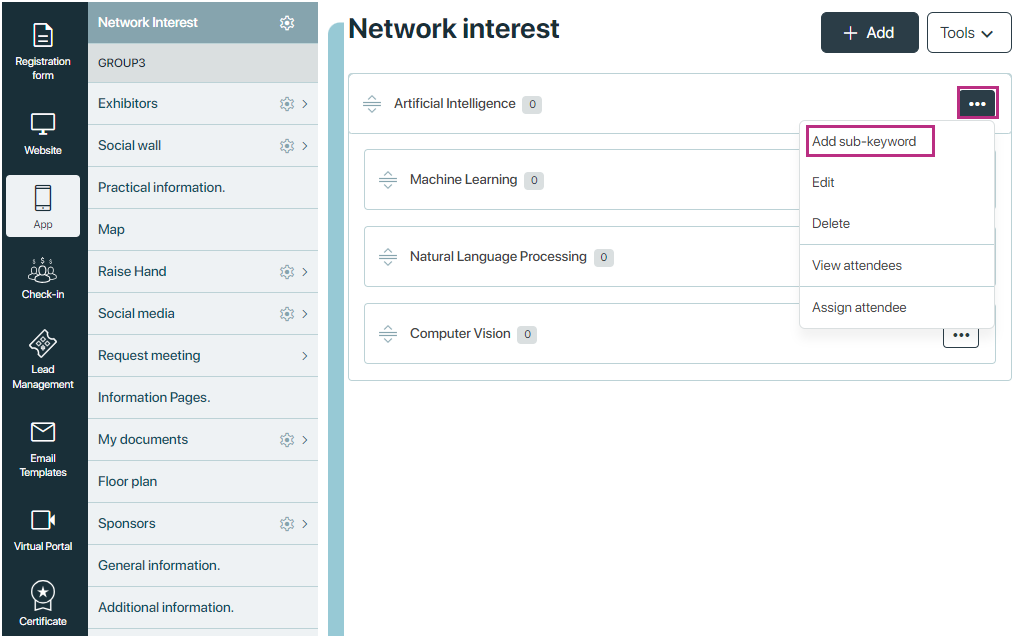
After adding keywords, user can see menu ![]() on the listing of keywords, when click on that three dot icon, user have different options like add sub keywords, edit, delete etc. Details are given below:
on the listing of keywords, when click on that three dot icon, user have different options like add sub keywords, edit, delete etc. Details are given below:
Add sub-keyword
- After adding a keyword, users can further specify their interests by adding sub keywords. Sub keywords provide more granularity and detail to the main keyword.
- For instance, if “Artificial intelligence” is the main keyword, users might want to specify sub keywords like “Machine learning,” “Natural language processing,” or “Computer vision.”
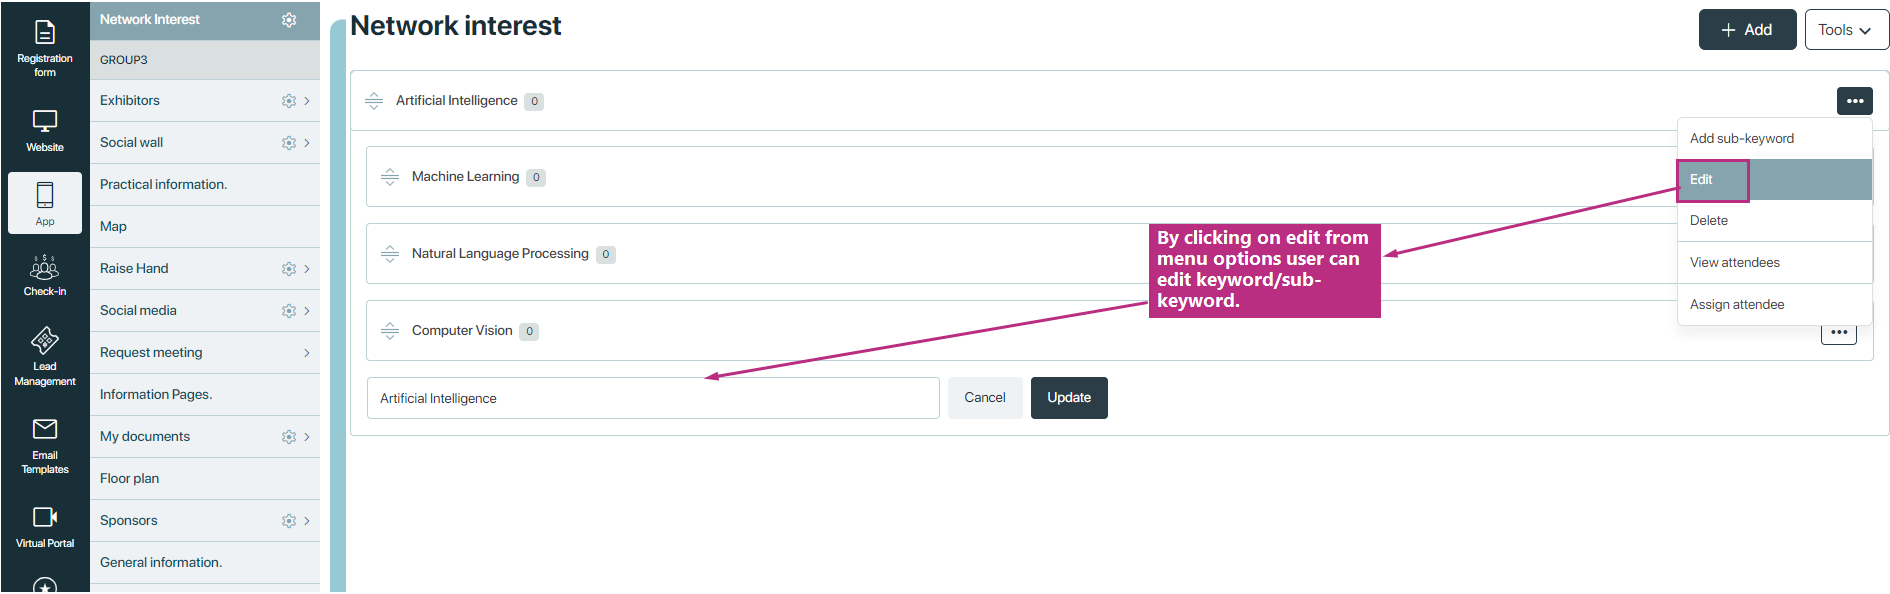
Edit keyword/sub-keyword
Clicking on the edit from menu or options associated with a particular keyword/sub-keyword allows users to manage or edit that keyword or sub-keyword.
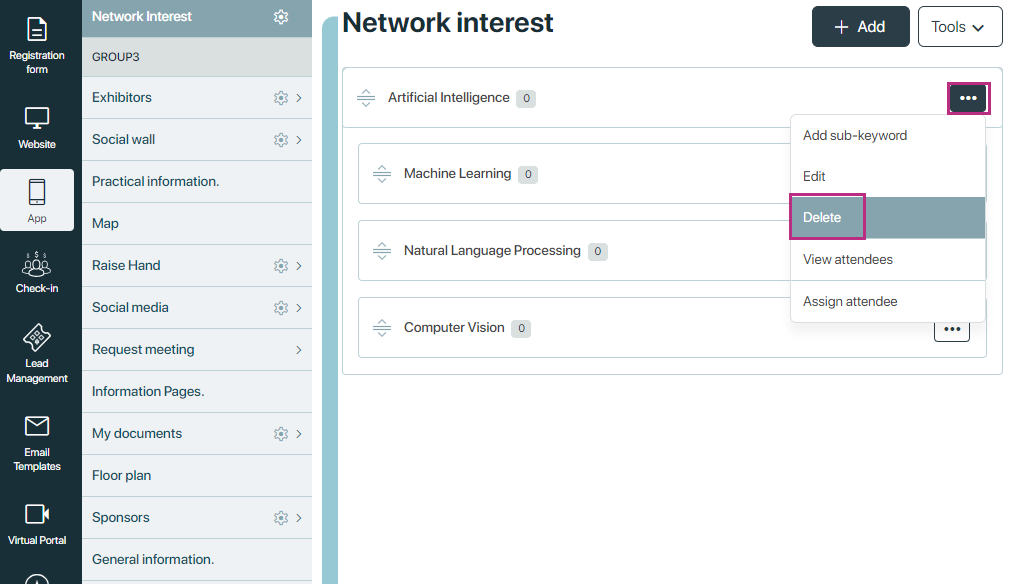
Delete keyword/sub-keyword
Clicking on the delete From menu or options associated with a particular keyword/sub-keyword allows users to delete that keyword/sub-keyword
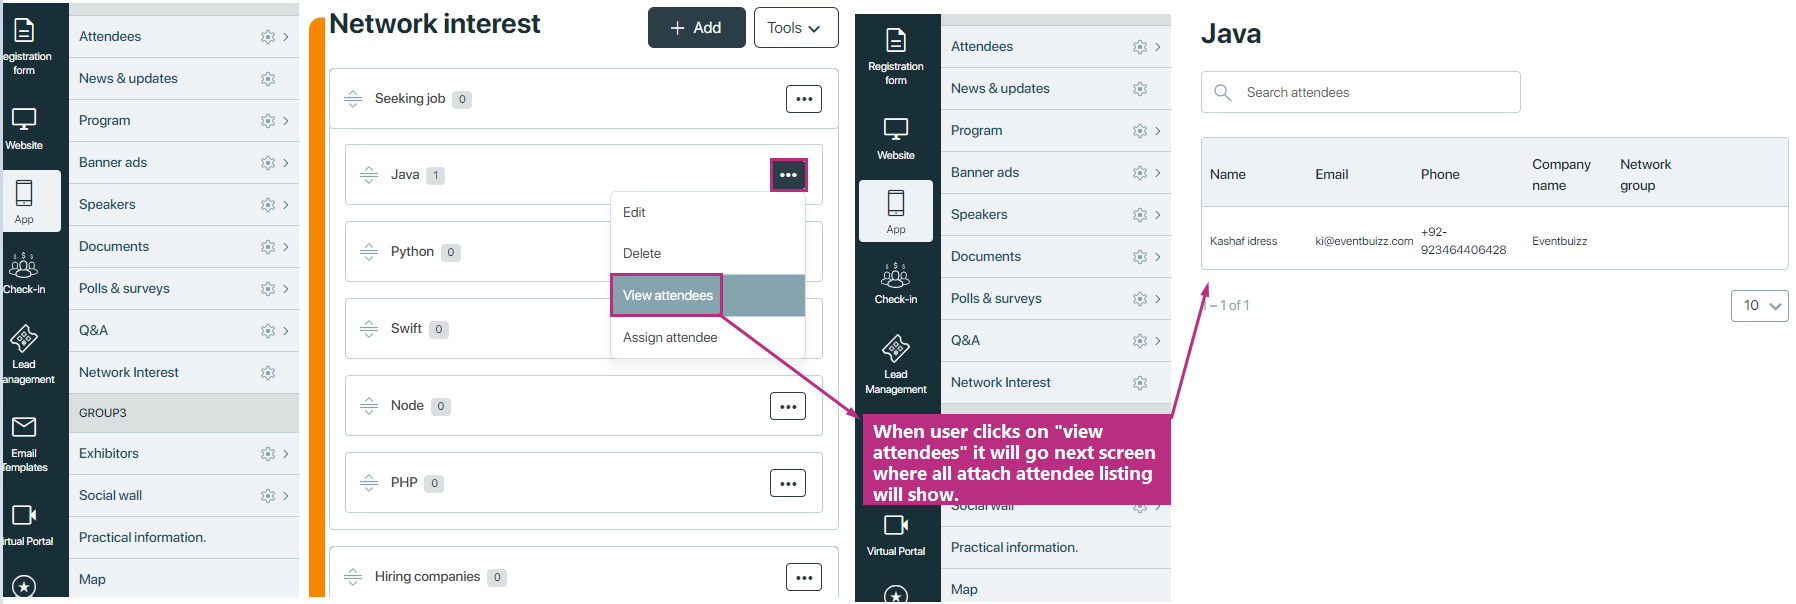
View attendees
Clicking on the view attendees menu or options associated with a particular keyword/sub-keywords allows users to view attach attendees of that keyword/sub-keyword, it will show the list of all the attendees which are associated with this keyword, it shows name of attendee, email, phone number company and network interest etc.
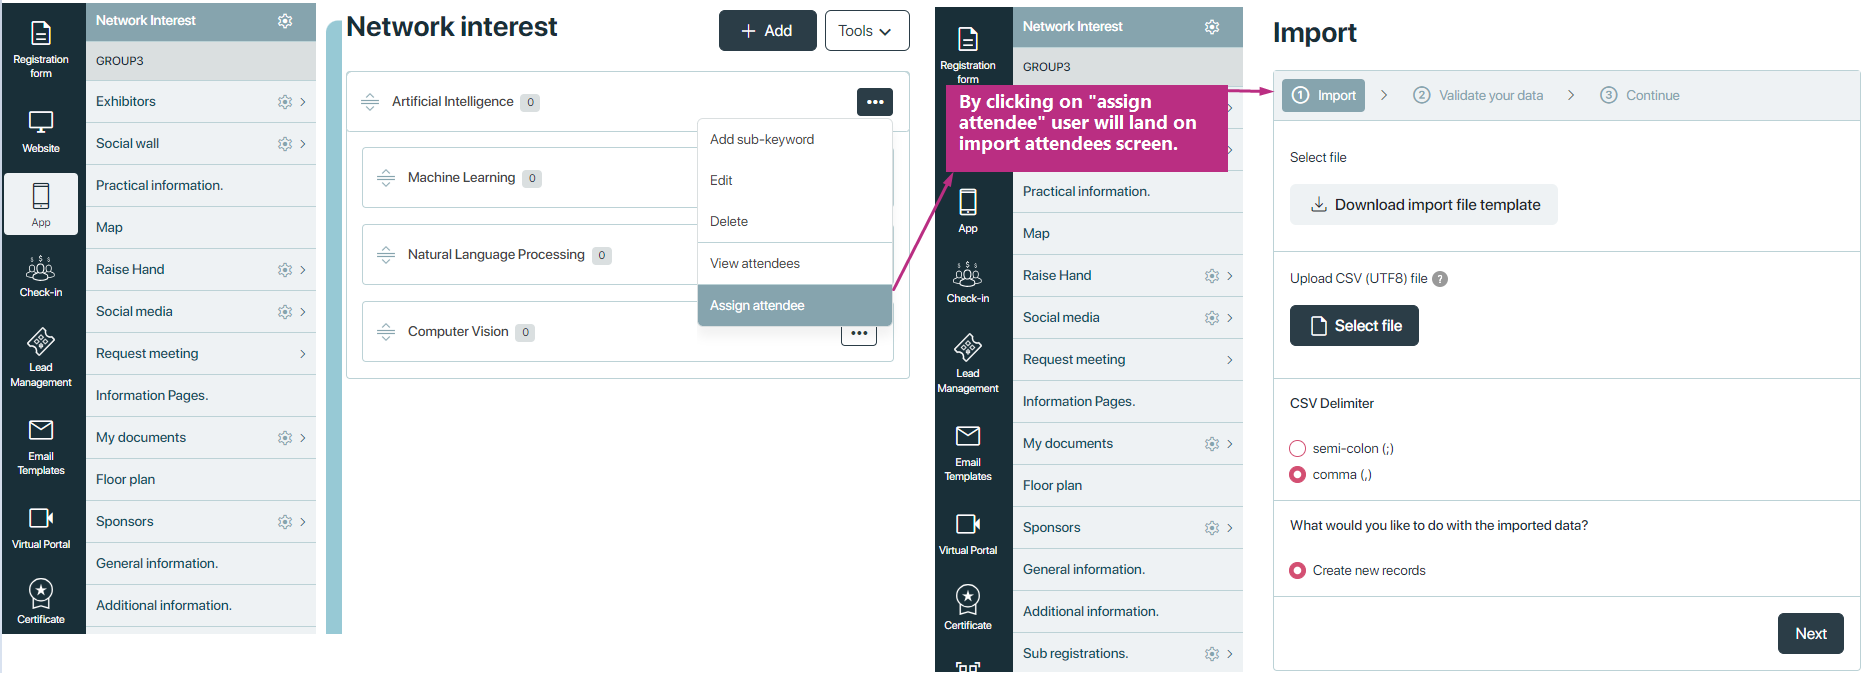
Assign attendees
Clicking on the assign attendees from menu or options associated with a particular keyword/sub-keywords allows users to assign attendees to that keyword/sub-keywords. For assigning attendees, these steps are mandatory:
- Attendees who only participating in the event can associate themselves with specific keywords to indicate their areas of interest.
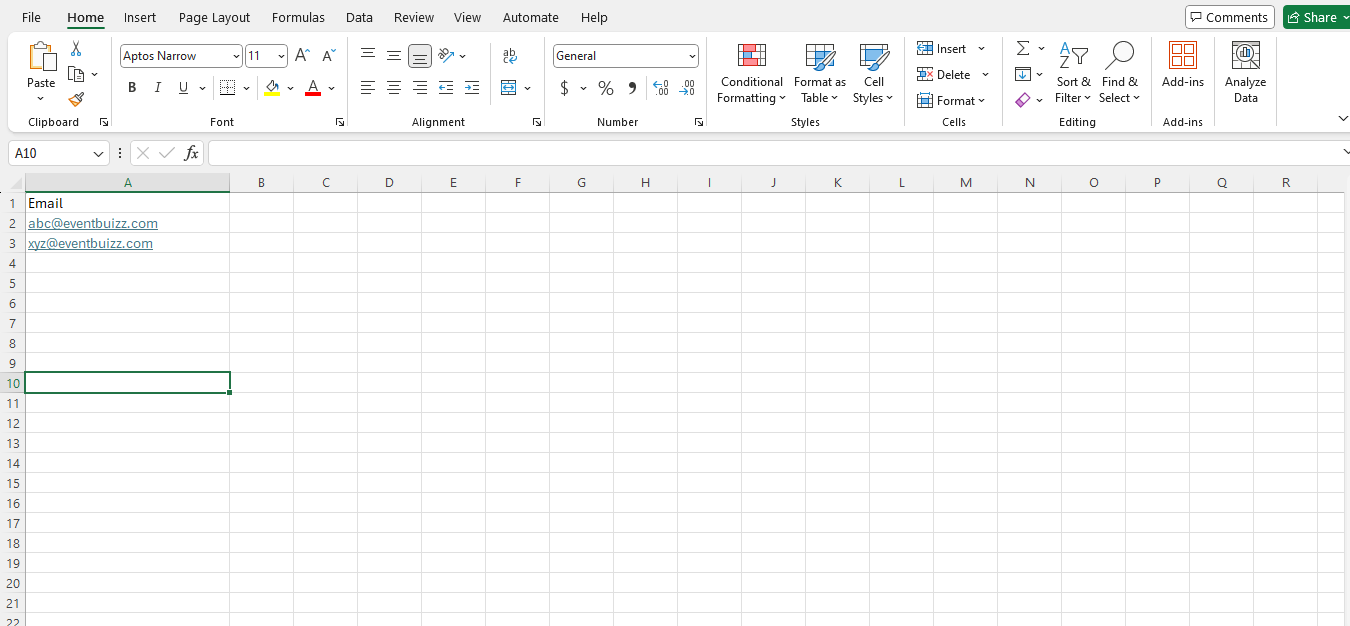
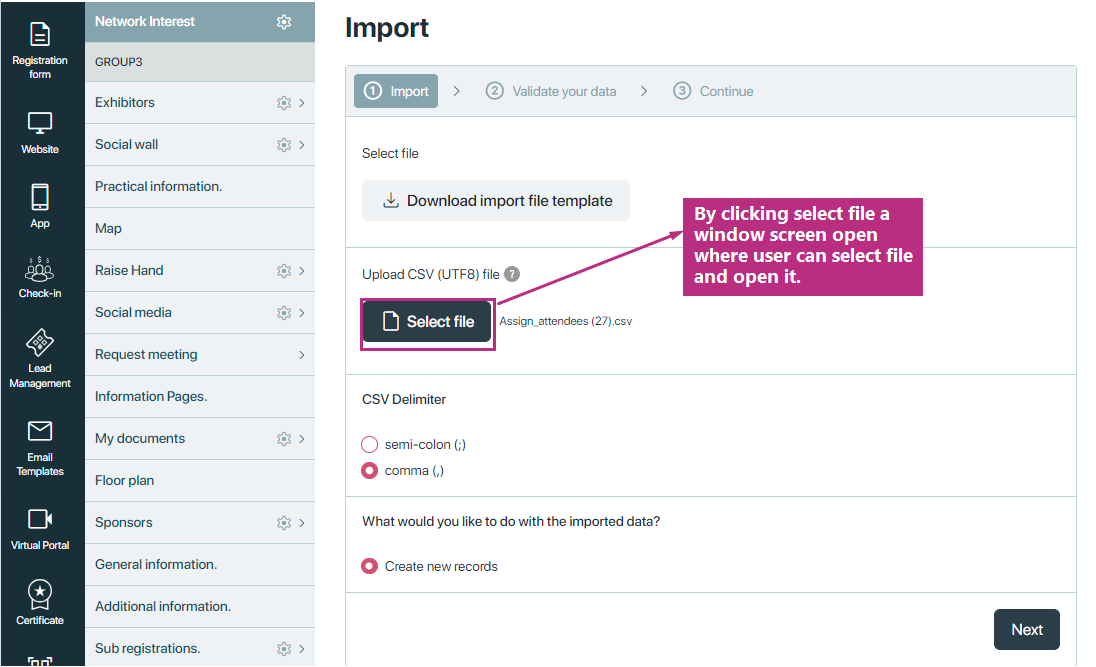
- To facilitate this process, there is an import screen available where users can upload a CSV (Comma-separated values) file containing attendee information. Each entry in the CSV file must include at least the email address of the respective attendee.
Download import file template
The “download import file template” feature serves as a tool to guide users on the required format for importing attendee information. Here’s an elaboration:
Template for Import:
-
- The “download import file template” function provides users with a standardised template in a downloadable format, typically in CSV (Comma-Separated Values) or Excel format.
- This template acts as a predefined structure that outlines the necessary fields and their formatting conventions for importing attendee data into the system.
Upload CSV
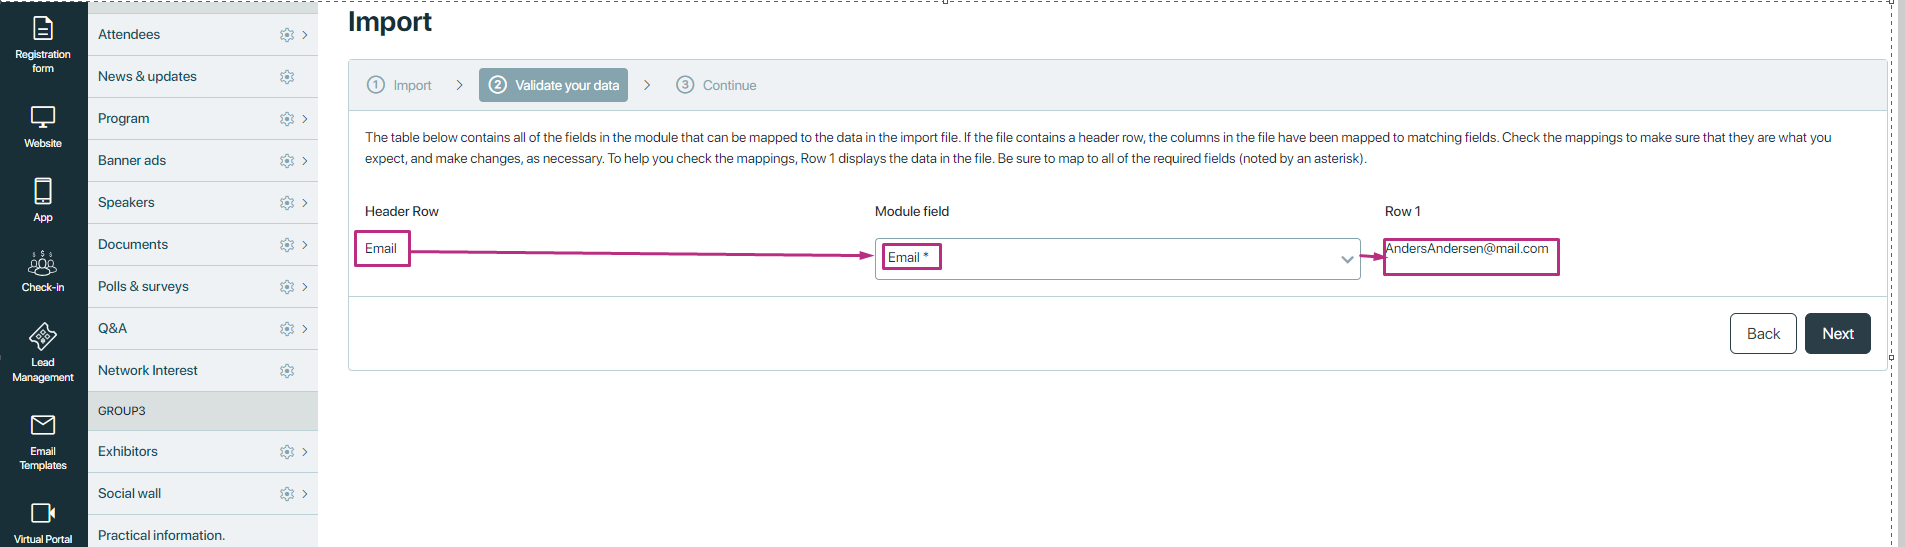
- Upon accessing the import screen, users are prompted to upload a CSV file containing attendee details. This CSV file acts as a structured data source, with each row representing an individual attendee and their associated information.
- The import process typically requires users to adhere to a predefined format, with email addresses being a mandatory field for attendee identification.
Validate your data
After uploading CSV file, user need to click on next button, and on next screen you can validate your data with all fields either fields are mapping or not, if not mapping then map fields as per data order.
Assignment to keywords
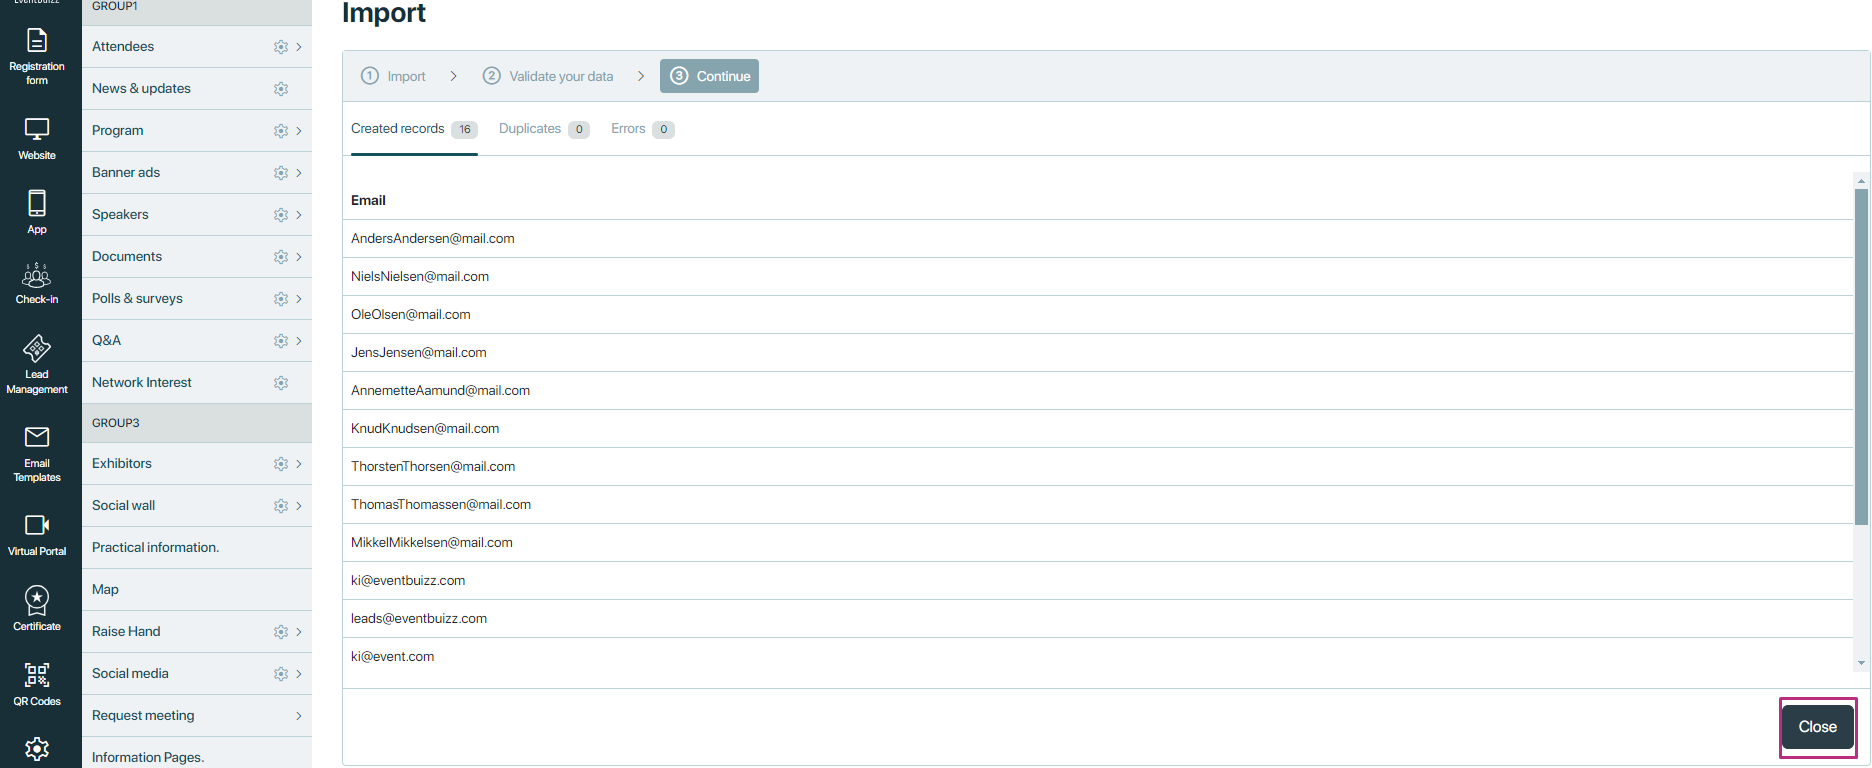
- Once the CSV file is uploaded, the system parses the data and associates each attendee with the specified keywords/sub-keywords based on the information provided.
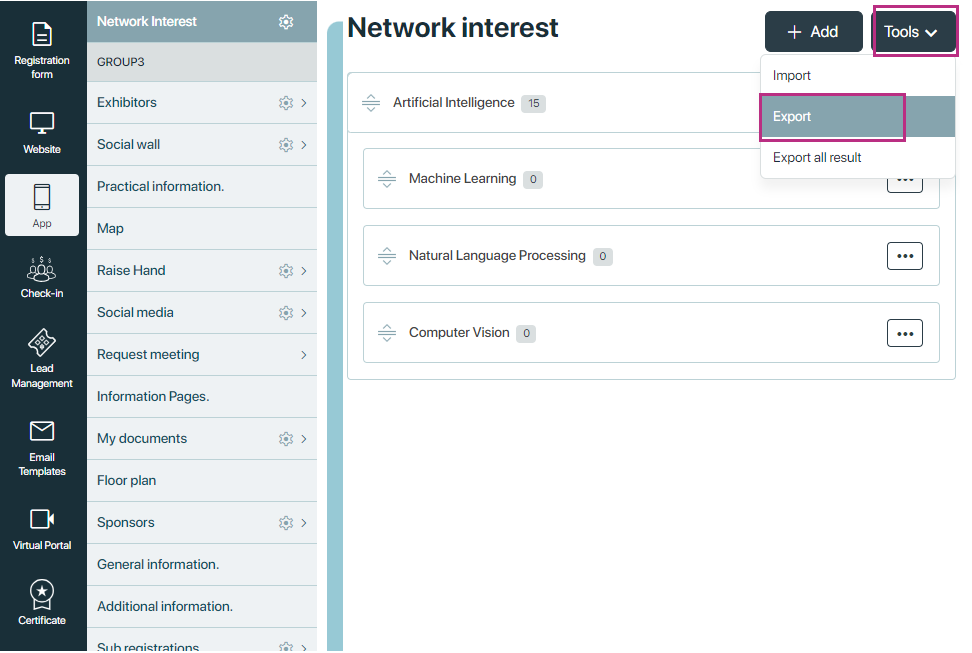
Tools
On each registration form network interest detail screen user have a “tools” box, in tools box user have three options:
Import
The import tools allows users to upload a CSV file, in which user can import network interest keywords and sub keywords.
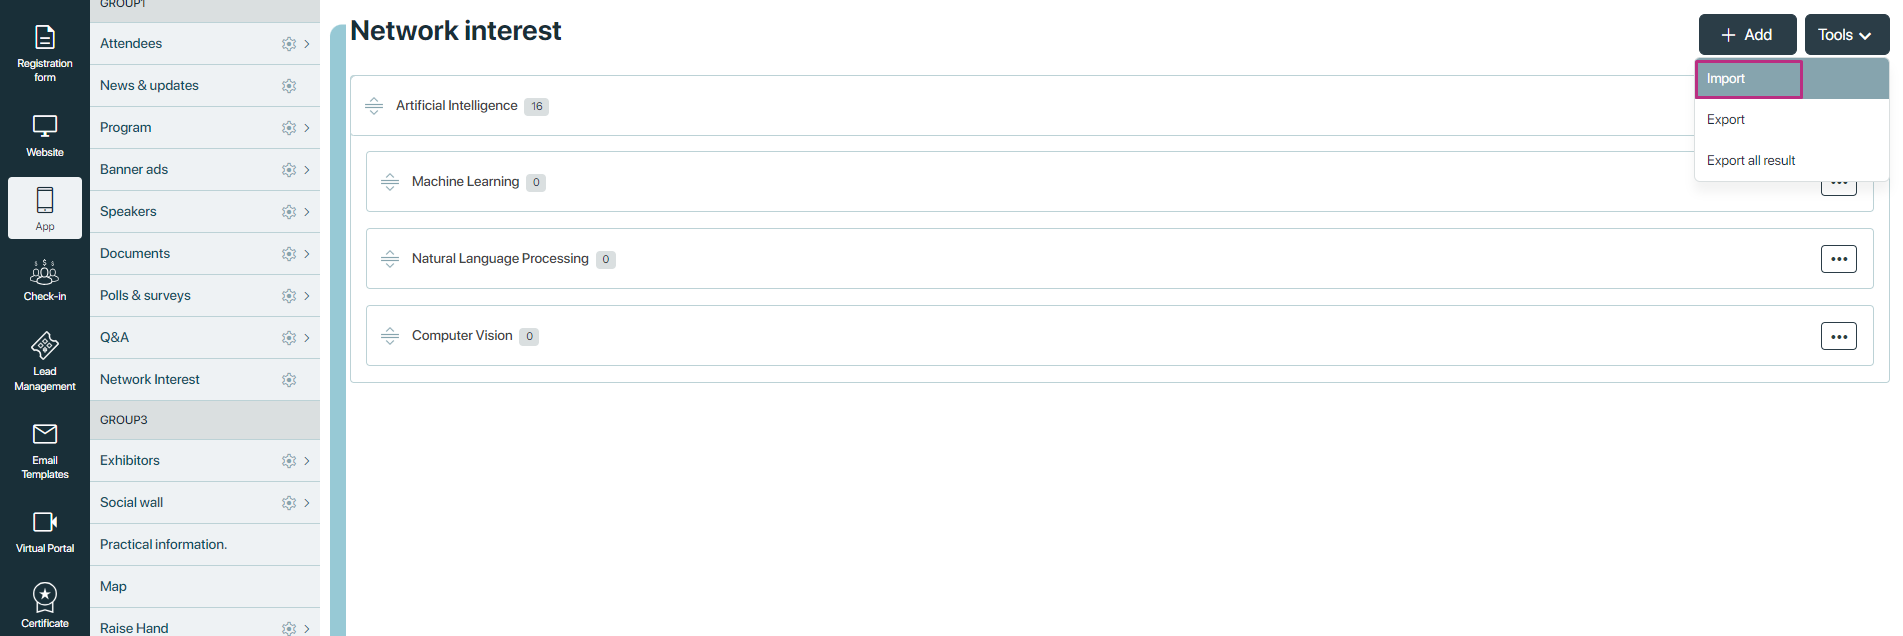
By clicking on “import” user will redirect on import screen, where user can upload CSV file which contain keywords and sub-keywords detail. Each CSV file have two columns “Parent” and “Value”.
Parent column:
- In the “Parent” column of the CSV file, each row contains the identifier “X”. This serves as a marker or placeholder to indicate the main category or parent keyword under which subsequent keywords and sub keywords will be organised.
- The “X” in this column acts as a reference point to delineate the hierarchy between main keywords and their associated sub keywords.
Value column:
- The “Value” column in the CSV file contains both main keywords and their corresponding sub keywords.
- Each row under the “Keywords” column represents a keyword or sub keyword associated with the main category identified by “X” in the same row of the “Parent” column.

Export
Upon selecting the export tool, a CSV file is downloaded containing comprehensive information about both main keywords and their associated sub keywords. This file comprises two columns: “Parent” and “Value”. And all related data of the keywords and sub-keywords will shown in this file.
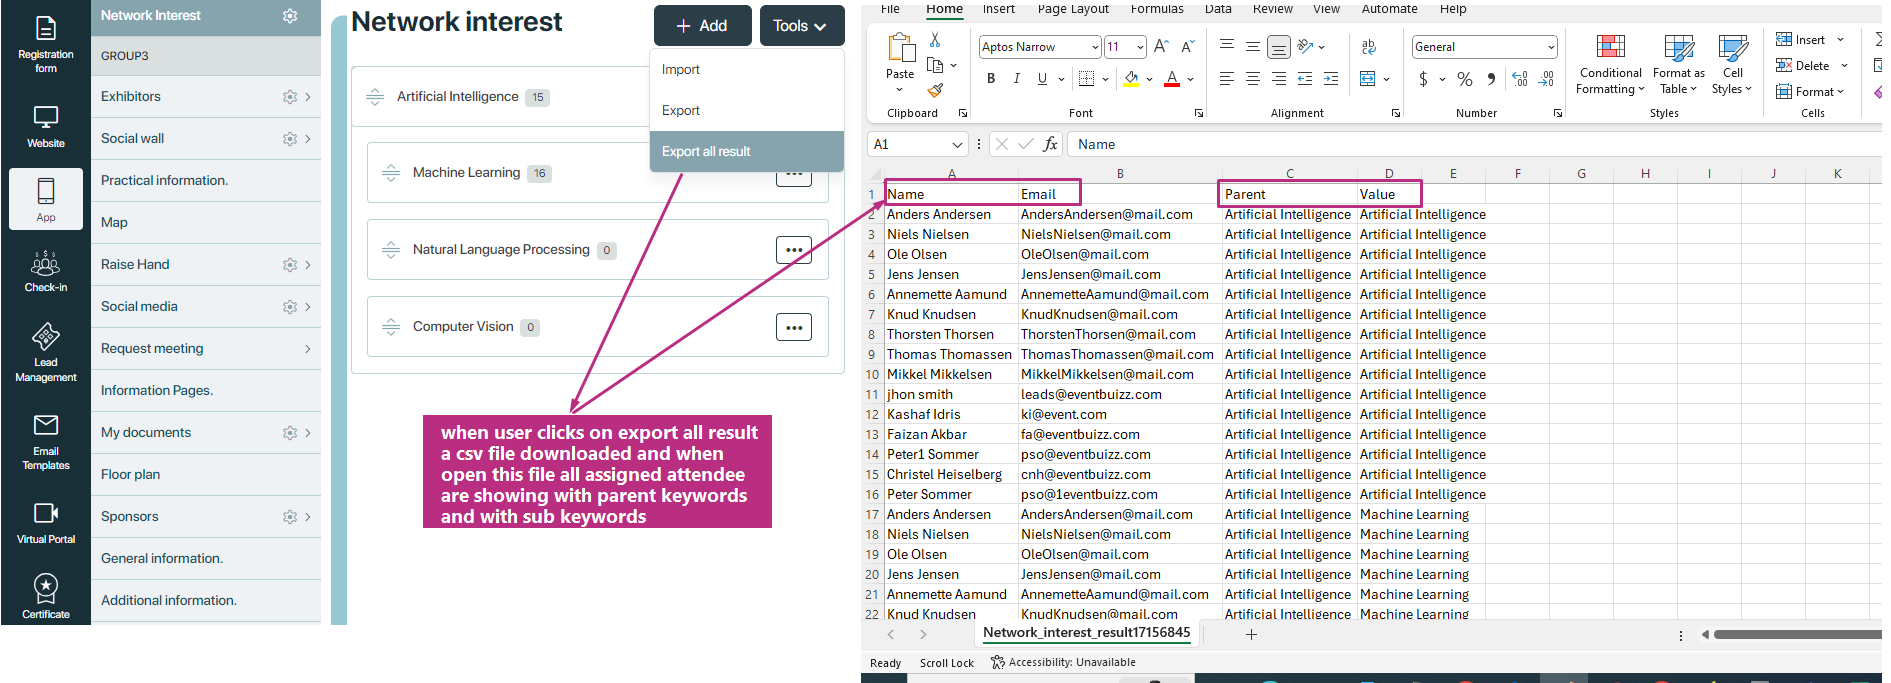
Export all results
When utilising the “Export All Results” feature, a CSV file is generated for download. This file contains comprehensive information about the assigned attendees to keywords or sub keywords within the network interest module.
Here’s how the exported CSV file is structured:
-
- Each row in the CSV file represents an attendee who has been assigned to keywords or sub keywords.
- The attendee information may include details such as name, email address.
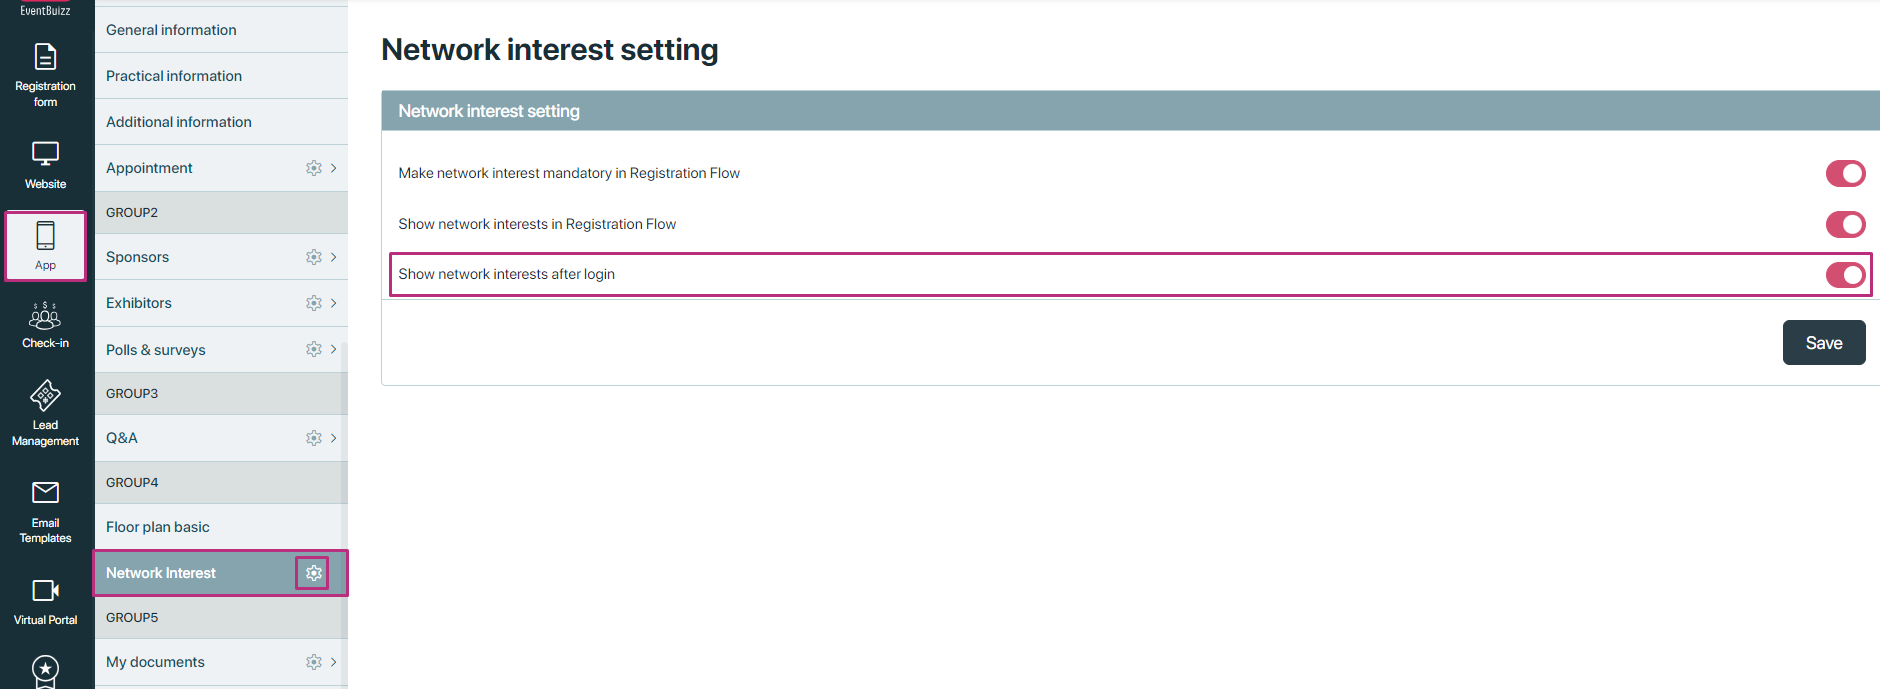
Network Interest Settings
We can navigate to Network interest settings in eventcenter from two places;
- Registration Form -> Forms ->Form type in which type of form you want to set setting->Network interest-> settings
- App -> Network interest -> settings
The only Difference in between both setting is that, in registration form we specifically applied setting on specific registration form, but in app module we applied setting for all type of network interest forms.
Here first describing, registration form base network interest settings:
User will navigate to specific registration form, against which registration form he want to apply network interest setting, when he land there, and open the setting of network interest in that form, following setting will display:
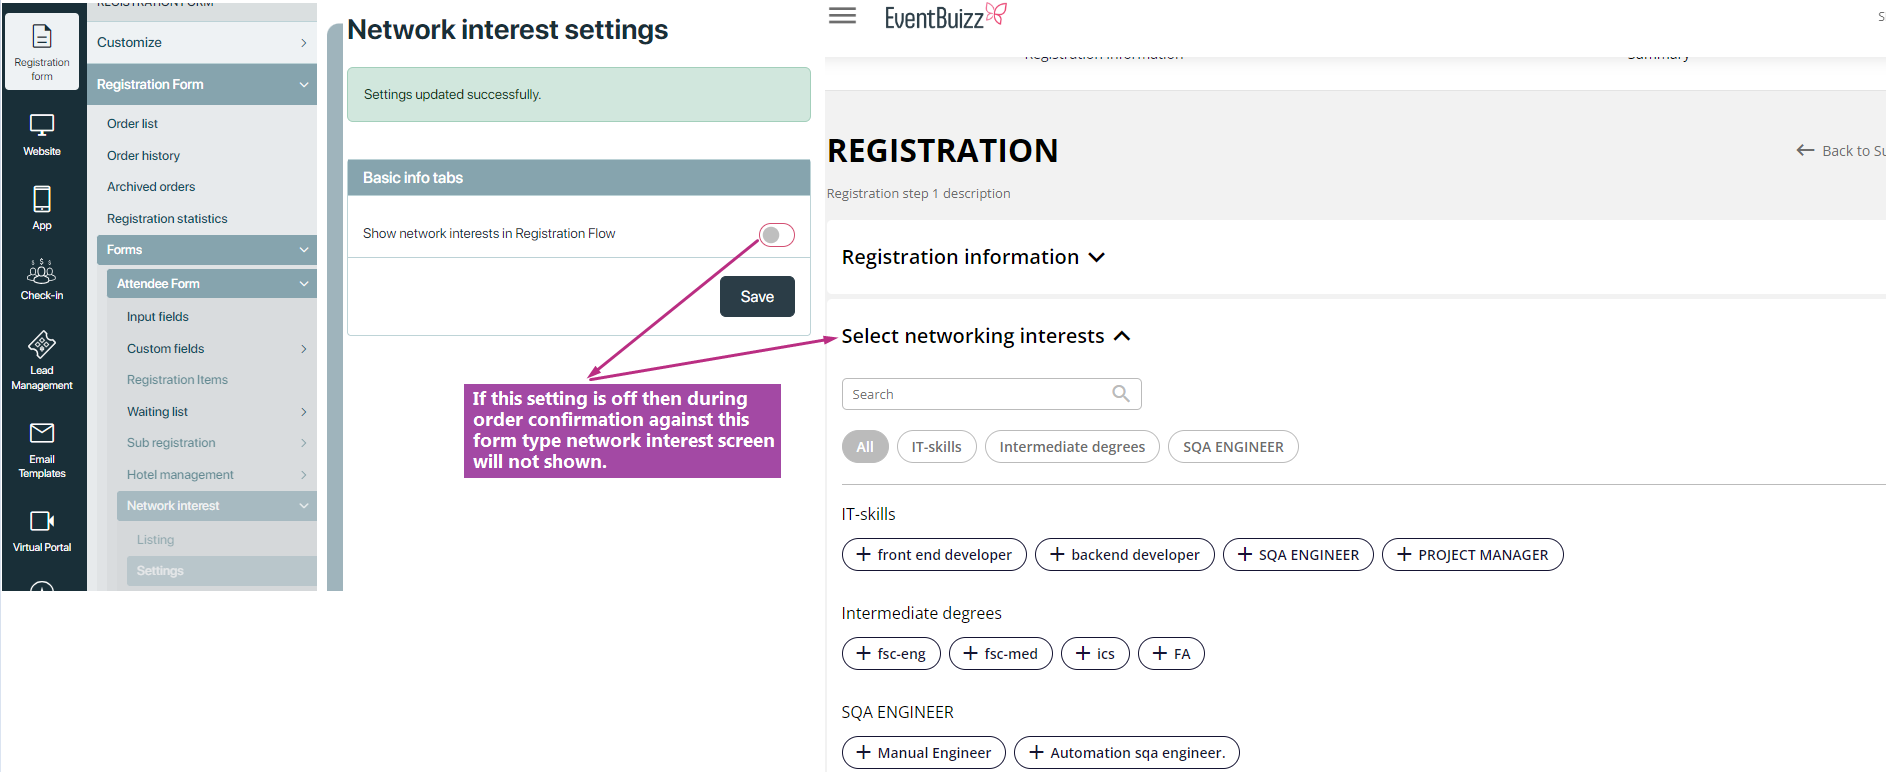
Show network interest in registration flow
This setting have the following characteristics:
- This setting is configurable individually for each registration form.
- If disabled for a specific registration form, the network interest module will not be shown during order registration for that particular form.
- Administrators can tailor the visibility of network interests based on the requirements of each registration form.
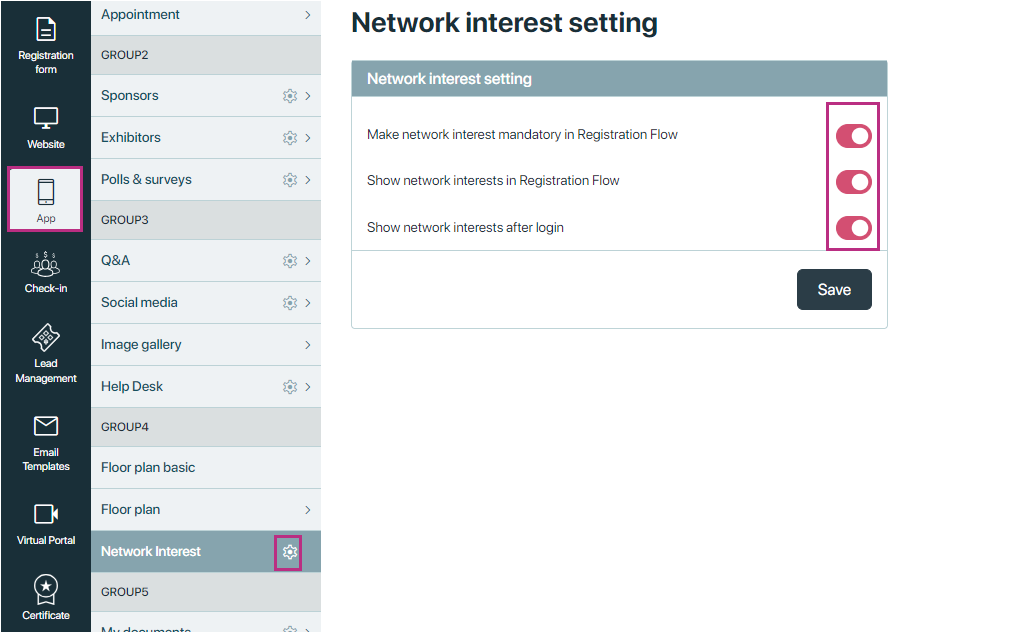
General setting of network interest
Generally we have three network interest setting, if registration form network setting is not applied, then general setting will apply on that form type. Here are the following general network interest settings we have:
Let’s break down each of these general settings for network interest module:
Make network interest mandatory in Registration Flow
- Users must select at least one network interest during the registration process to proceed.
- Implement validation to ensure that users cannot complete registration without selecting at least one interest.
Display Network Interests in Registration Flow
- If disabled this setting then network interest section will not shown during registration of order process.
Show network interests after login
- After a user has logged into their account, a network interest section will display in-front of him within the platform.
- Where user can select the sub-keywords of his area of interest, and submit it.
- If this setting is off then after login network interest section screen will not display, or if this setting is on then it will show right after login.
Client site(web app)
Client site(Web app)
The Network Interest feature provides a comprehensive and detailed approach to networking for attendees, allowing them to identify and connect with like-minded individuals easily. Let’s break down each aspect of the Network Interest feature in detail, focusing on how it impacts attendees at every stage of their event experience.
Detailed breakdown of network interest feature on client side
Here’s a detailed explanation of the prerequisites for attendees to access the Network interest feature in the web app:
Prerequisites for accessing network interest
Network interest creation against registration form (attendee type)
Definition:
Before attendees can utilise the network interest feature, specific interests must be created that correspond to the registration form or attendee types established for the event.
Implementation steps:
- Admin setup: Event organisers must create network interest entries that align with the various registration forms. This involves defining which interests are relevant to different attendee types, ensuring that the options are tailored to the audience.
- Form association: Each registration form should have designated network interests linked to it. For instance, if an attendee registers for a “Tech enthusiasts” track, network interests related to technology, such as “Artificial intelligence” or “Cyber-security,” should be available.
Impact on attendees:
If the relevant network interests are not created and linked to their registration type, attendees will not see the option to select or engage with network interests upon logging into the web app.
Activation of created network interest from eventcenter
Definition:
The option to create network interests must be enabled from the admin side of the event management system (erventcenter). This ensures that the feature is available for attendees.
Implementation steps:
- Organiser configuration: For created network interest against each form organiser will configure, either it is active or in-active.
Impact on attendees:
If this option is not activated, attendees will be unable to create or access network interests, effectively rendering the feature unusable. This step is critical to ensure that the networking functionality is operational for participants.
Enabling show network interest after login setting from eventcenter
Definition:
Show network setting after login setting in the eventcenter must be turned on to display the network interest model to attendees after they log in to the web app. This allows attendees to interact with the feature as soon as they enter the platform.
Implementation steps:
- Admin settings adjustment: The event organizer needs to access the settings in the eventcenter and ensure that the “show network interest after login” setting is enabled. This may involve a simple toggle or option selection in the settings menu.
Impact on attendees:
If this setting is disabled, attendees will not see the network interest model upon logging in, and thus they cannot engage with the networking features. This setting is essential for making the network interest functionality visible and accessible to users.
Access web app after network interest perquisite
When all the perquisite were taken from organiser, then after that who ever attendee will login in web app, or access the web app, after login they will see the network interest screen, where attendees can find the added sub-keywords from the organiser side, against each individual registration form.
Available options after login network interest screen
After login network interest screen attendee have two options, detail is given below of each available options
- Move forward without selecting sub keywords
- Move forward with selecting sub keywords
Move forward without selecting sub keywords
- If user did not want to select the sub keywords or want to ignore that screen, then just simply he will not select any keyword and move forward to the dashboard module.
- And if user did not select any sub keyword and move to the network interest module in web app, then on listing “no record found” message will show, which shows there is no attendee matching with your area of interest.
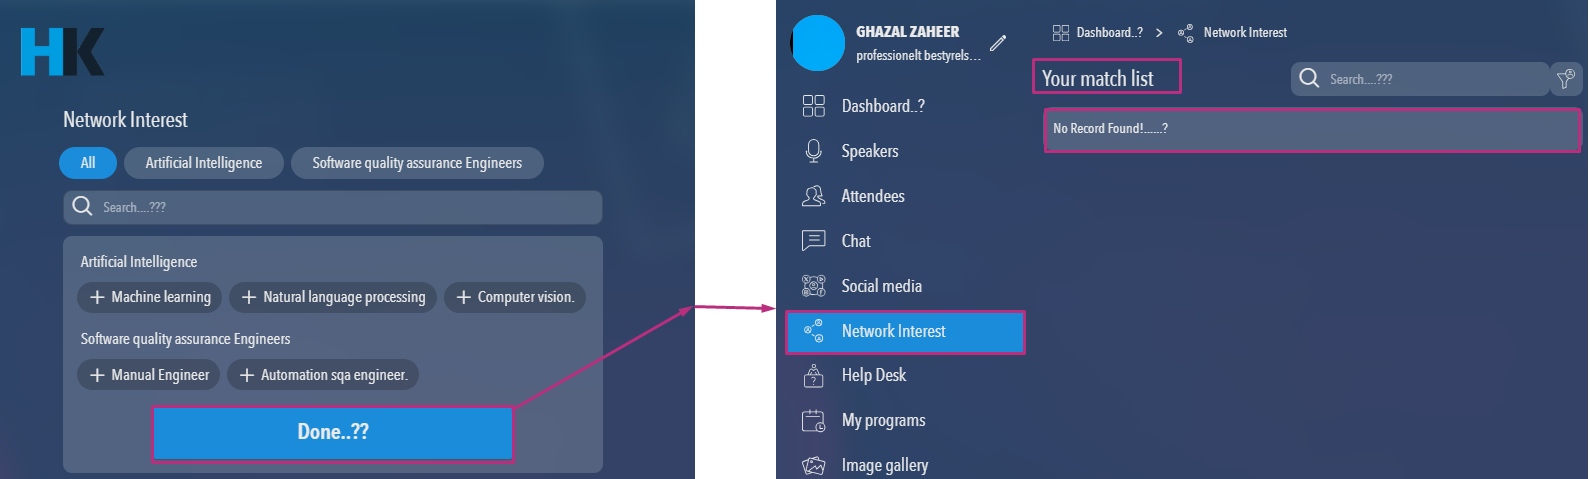
Move forward with selecting sub keywords
- If user select the sub keyword of his area of interest, then selected keyword will store and when user will move to the network interest module, in web app on listing of the network interest, all the attendee with same interest will show on the listing of network interest.
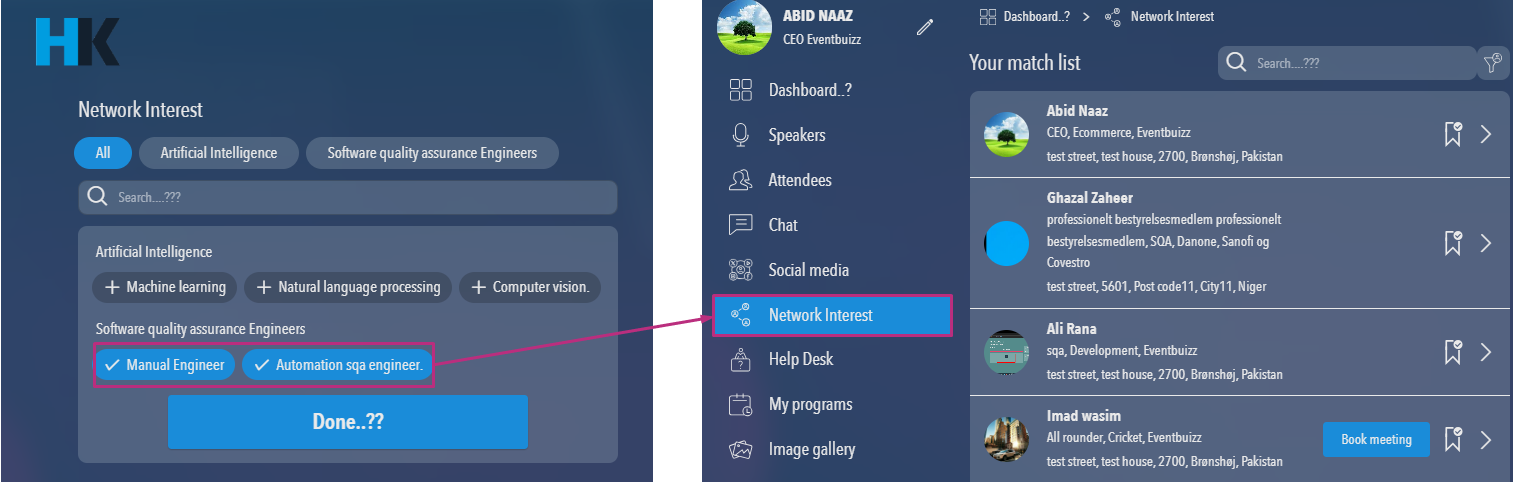
Additional features on network interest listing
If user want to see other area of interest attendees, he can simply click on the filter icon on network interest top right corner, and then simply just select the sub-keywords against them, he want to know the assigned attendees. Here is the example how it works:
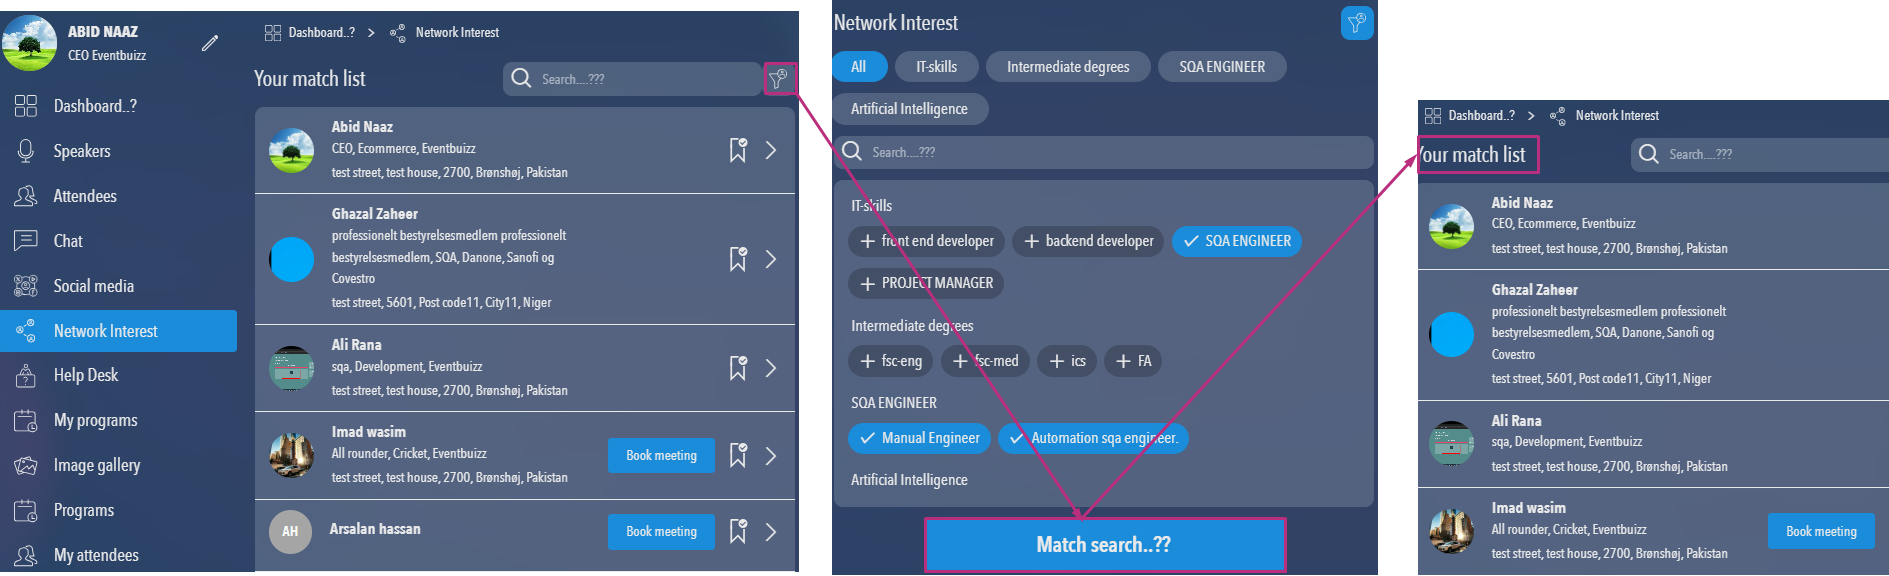
How user can change or update his selected keywords?
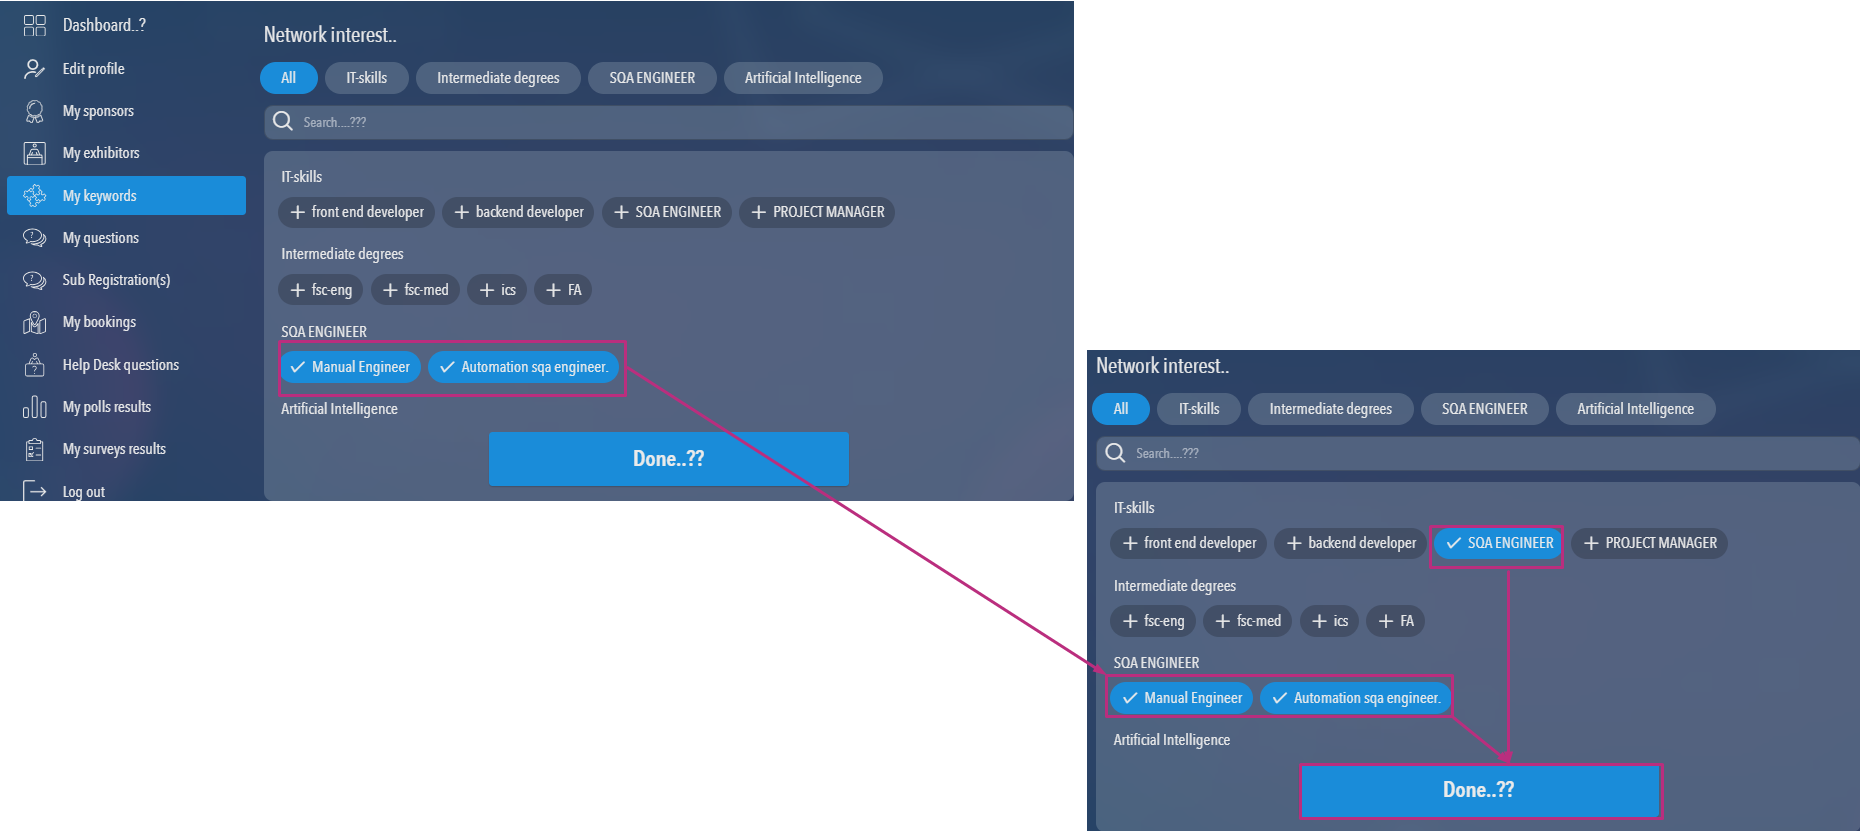
If user want to change or update the already selected keywords, then he will simply navigate to the settings menu in web app and will select the following menu:
- Web app->settings->side menu-> my keywords
My keywords will show the already selected keywords by attendee, if attendee want to un select all the selected keywords then simply he will double click on the selected keywords, and after un-selected will save the changes.
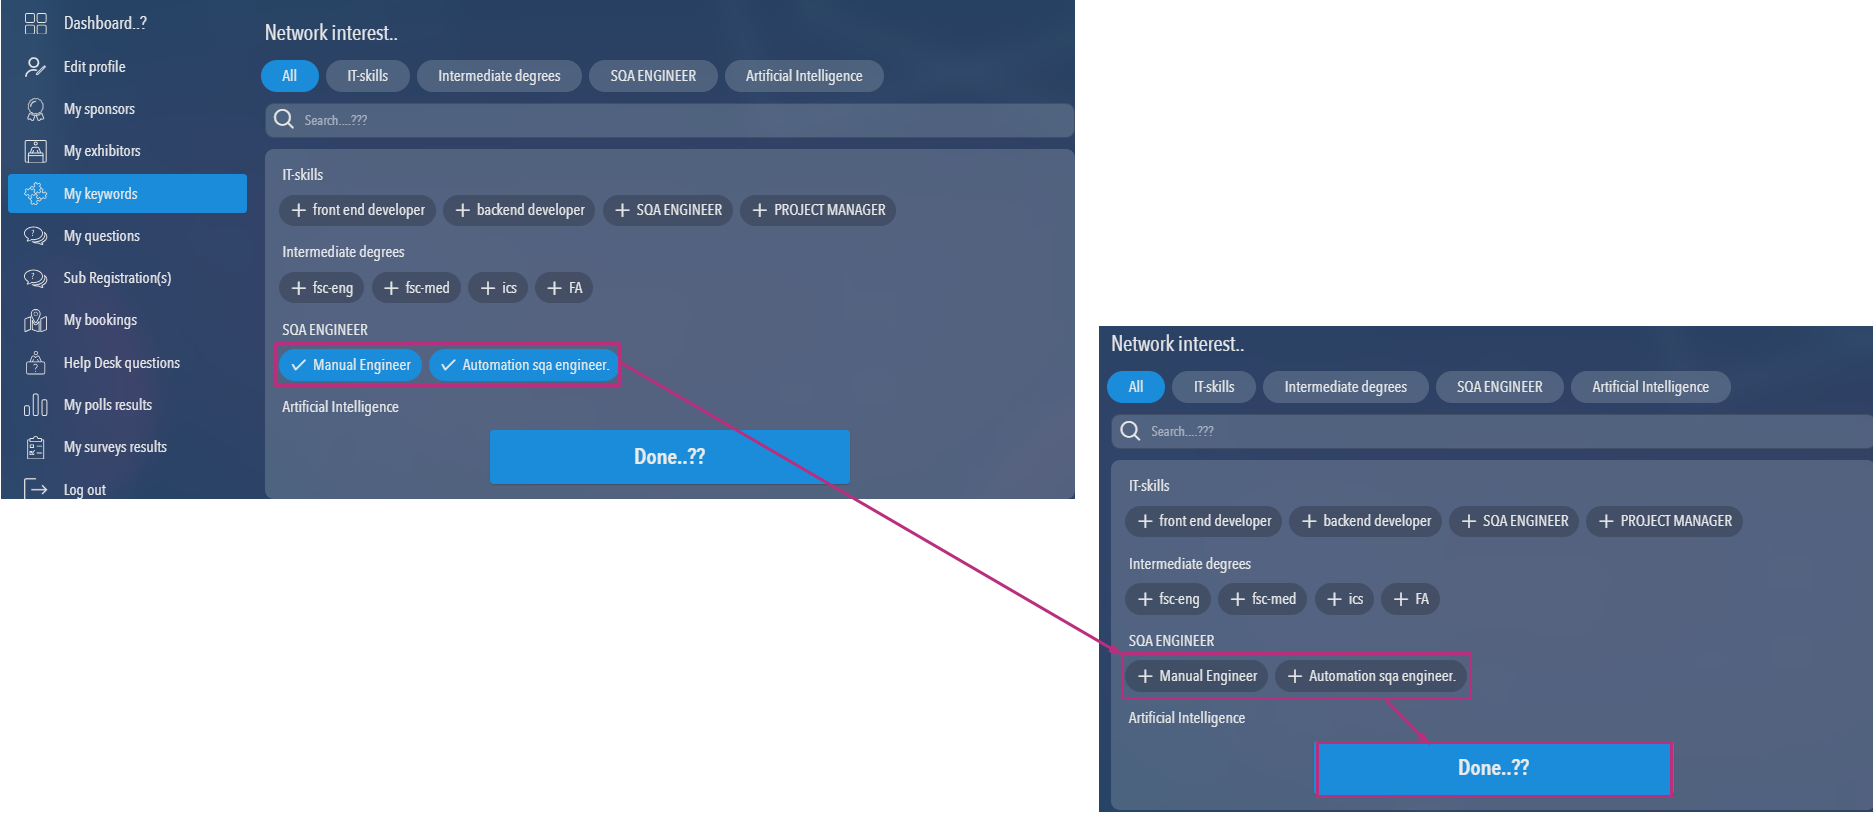
- And if user want to keep the current keywords and also want to add additional keyword, then also can select the required one and can save the changes.
All the attendees who selected the keywords, will also show in the eventcenter, organiser can view attached attendees to the specific keywords.