These features is to gather subscribers for your newsletters using “Eventbuizz newsletters” subscription.
If you’re interested in acquiring the Newsletter module, please feel free to reach out to support@eventbuizz.com for assistance with purchasing.
This feature allows event organizers to manage email communications with participants. It includes tools for creating, scheduling, and sending newsletters to subscribed participants, helping keep them informed about event updates, news, and announcements.
newslettermodulesubscriberlist
Subscriber list
This is a collection of email addresses and contact information of individuals who have subscribed to receive newsletters. It allows organizers to segment and target specific groups of subscribers for more personalized and effective communication.

Once the organizer adds subscriber information, it starts appearing in the subscriber listing.

Click on the three dot icons ![]() , you can edit, delete, get embedded code and can view subscriber list with detail.
, you can edit, delete, get embedded code and can view subscriber list with detail.
Edit and Delete
Edit: Enables users to modify or update the details, such as subscriber list name and default sender name.
Delete: Permanently removes a subscriber list.

Subscribers
Clicking on “Subscriber” displays a list of all subscribers, including their email, first name, last name, bounced and subscription status (subscribed/unsubscribed), and the date and time they were added to the list.
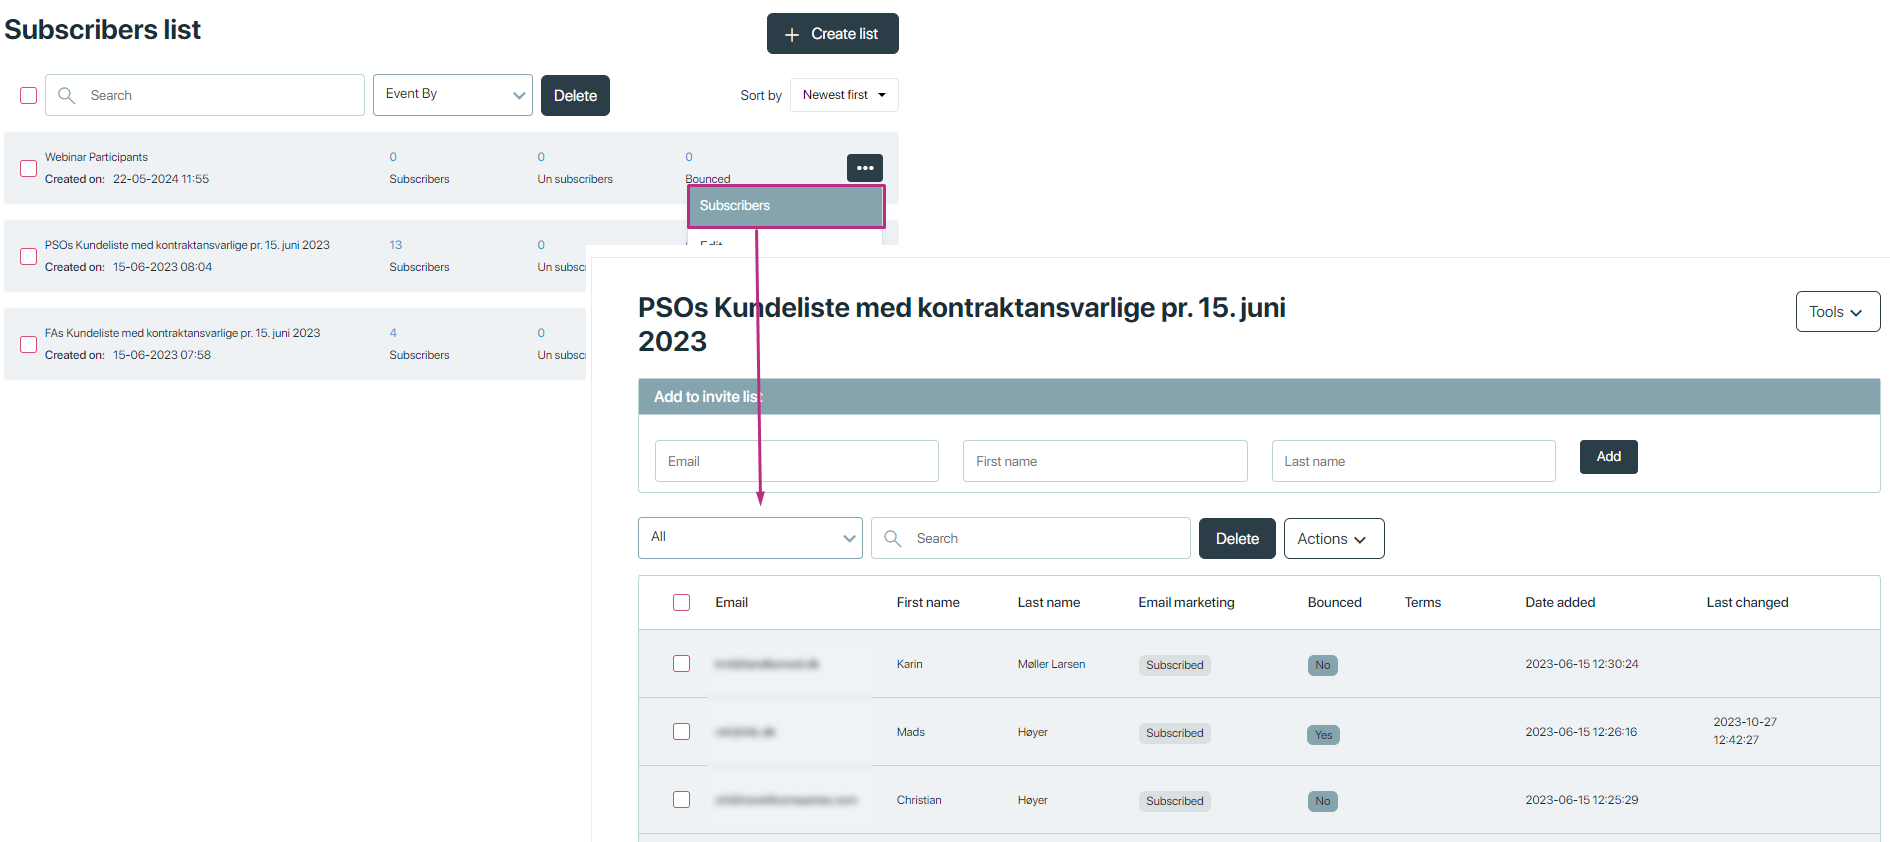
There are three main methods for subscription for subscriber list, detail is given below about all these subscription methods.
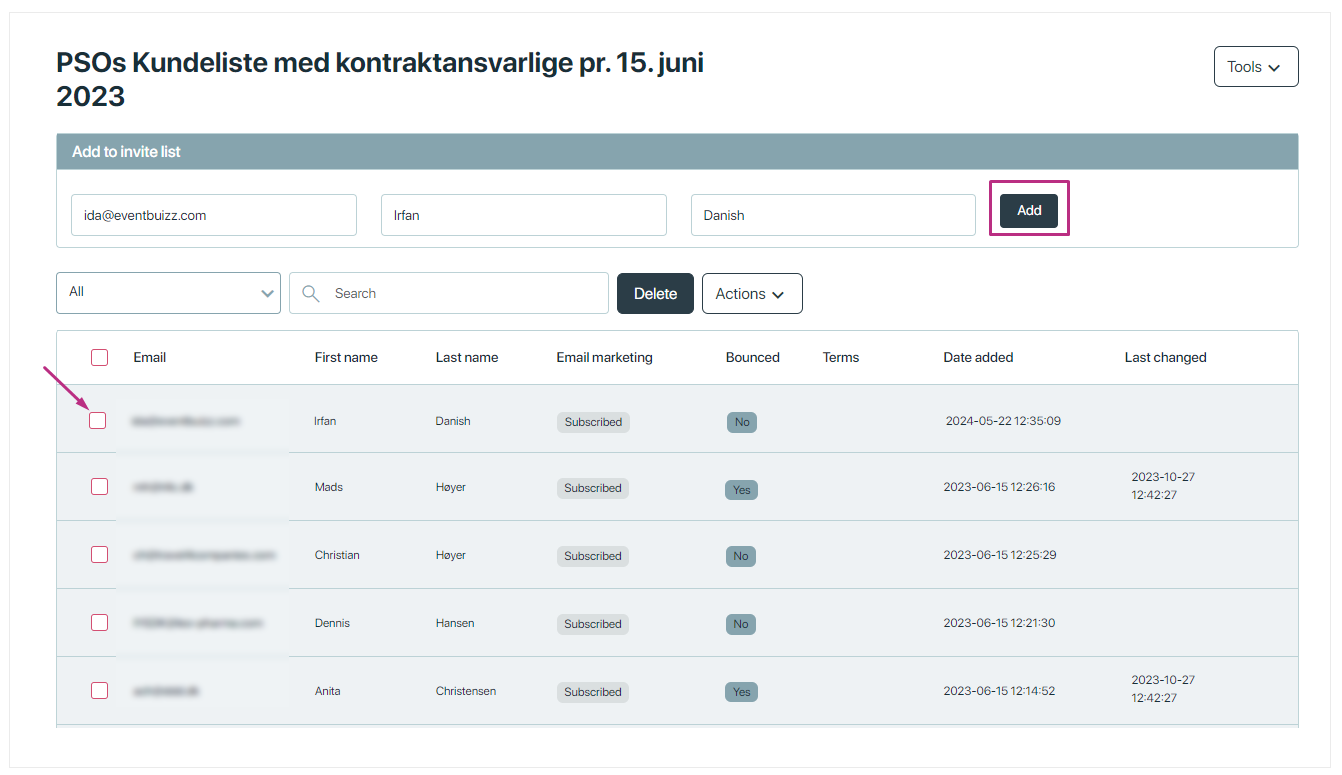
Manual addition by organisers
Organisers can manually add subscribers directly in the eventcenter. This method is useful for including participants who may not have subscribed through other means.
Steps:
- Navigate to the “Add to invite” section.
- Enter the first name, last name, and email address of the participant.
- After adding, the participant will be included in the subscriber list with a status set to “subscribed” by default.
Subscription through the event website
Subscribers can sign up through the event website if the newsletter subscription setting is enabled. This method allows attendees to subscribe independently.
Steps to enable subscription form:
- Navigate to: Eventcenter -> website -> news -> news settings
- Enable: Newsletter subscriber setting

By default the setting of “Enable newsletter subscriber” will off, but when organiser make it enable, then a new field(drop down) will show, which have the all subscriber list, which are created by organiser in marketing newsletter module, and organiser will select the subscriber list, against which subscriber list organiser want attendee subscribe using eventside.

- Once enabled, a subscription form will appear on the event-side homepage. Attendee can subscribe using subscriber form, in eventside. All the attendee which subscribed, will show in that selected newsletter subscriber list.
Subscription form fields:
- First name
- Last name
Attendees who fill out this form will be automatically added to the subscriber list in the eventcenter.

Subscription during conference registration
Attendees have the option to sign up for the newsletter when they register for a conference. This integrates the newsletter subscription with the registration process.
For more detail how organsier can setup newsletter module for the attendee during registration, and how attendee can subscribe, for complete detail please click here.
Additional action features
The newsletter subscriber module includes various action features that provide organisers with flexibility and control over managing their subscriber lists. Here is a detailed explanation of the available features:
Manually unsubscribe
Description: This feature allows organisers to manually remove a subscriber from the list, effectively opting them out of receiving any further communications.
Usage: If a subscriber no longer wishes to receive newsletters or other communications, the organiser can use this feature to ensure the subscriber’s email is removed from the active list. This action respects the subscriber’s preference for privacy and compliance with communication regulations.
Important note:
- If organiser click on unsubscribe action from the listing, without selecting the subscriber, it will give alert to organiser, “please select subscriber to unsubscribe.”

- After selecting subscriber when organiser will click on the unsubscribe, all the selected subscriber will be deactivated from the list, and will includes into unsubscribe list.

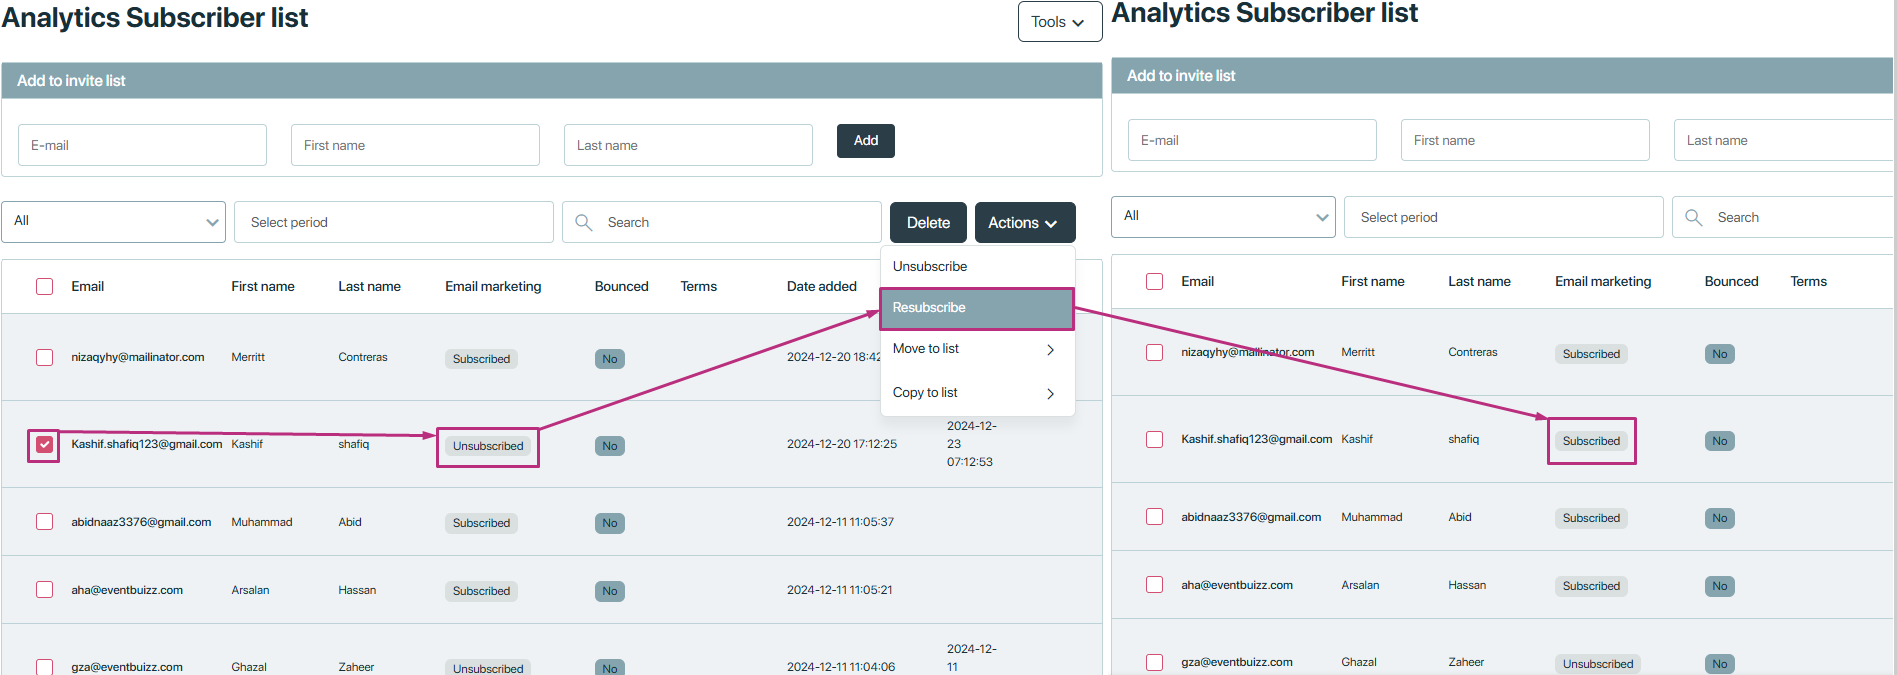
Re-subscribe
Description: This feature enables organisers to re-add a previously unsubscribed subscriber back to the list, changing their status to subscribed.
Usage: If a subscriber has changed their mind or unsubscribed by mistake, the organiser can use the re-subscribe feature to restore the subscriber’s status. This ensures the subscriber will start receiving communications again.
Move to list
Description: This feature allows organisers to transfer subscribers from one list to another within the system.
Usage: Organisers can use this feature to reorganise their subscriber data by moving subscribers to more relevant lists based on their preferences or behaviours. For instance, moving a subscriber from a general list to a more targeted list can help in delivering more personalised content.
Important note:
- When organiser clicks on move to list, it will show the all the available subscribers list, and organiser simple select the subscriber whom he want to move from one list to another.

Copy to list
Description: This feature enables organisers to duplicate a subscriber’s information from one list to another.
Usage: If an organiser wants to include a subscriber in multiple lists without removing them from the original list, they can use the copy to list feature. This facilitates easier management and segmentation of subscriber data, allowing for more precise targeting in communications.
These features collectively enhance the management and organisation of subscriber lists, providing organisers with robust tools to tailor their communication strategies effectively.

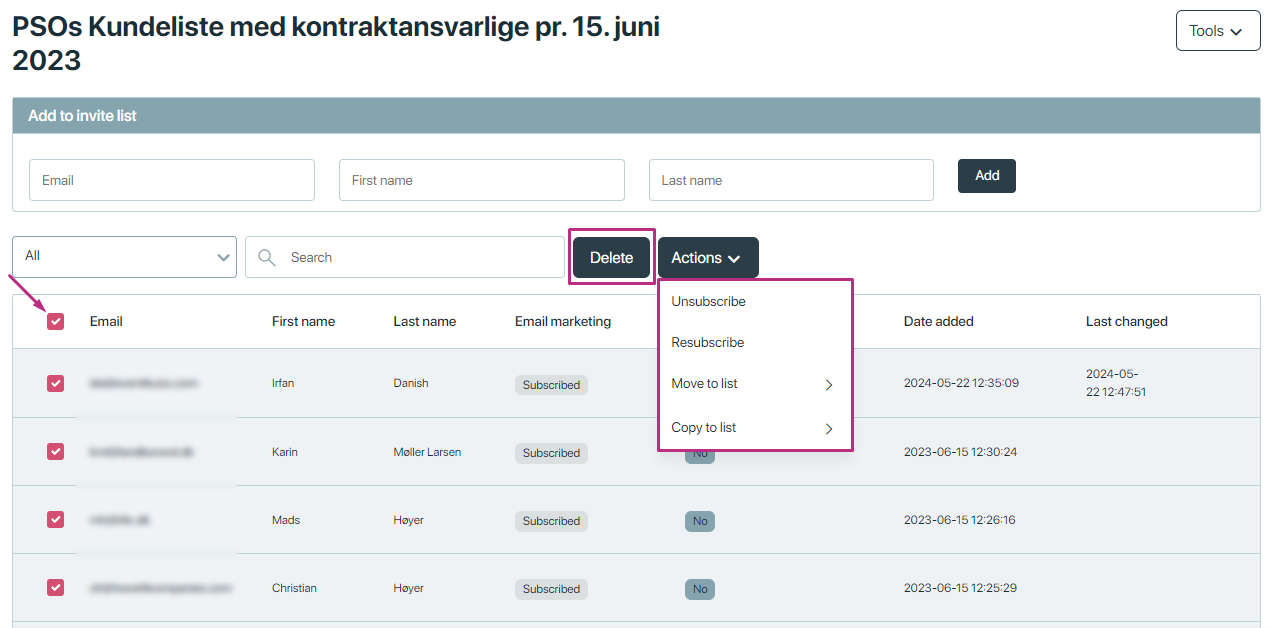
You can manage subscriptions, unsubscribe, delete, move, and copy attendees in bulk. Simply select the attendees and choose the desired action from the relevant section.
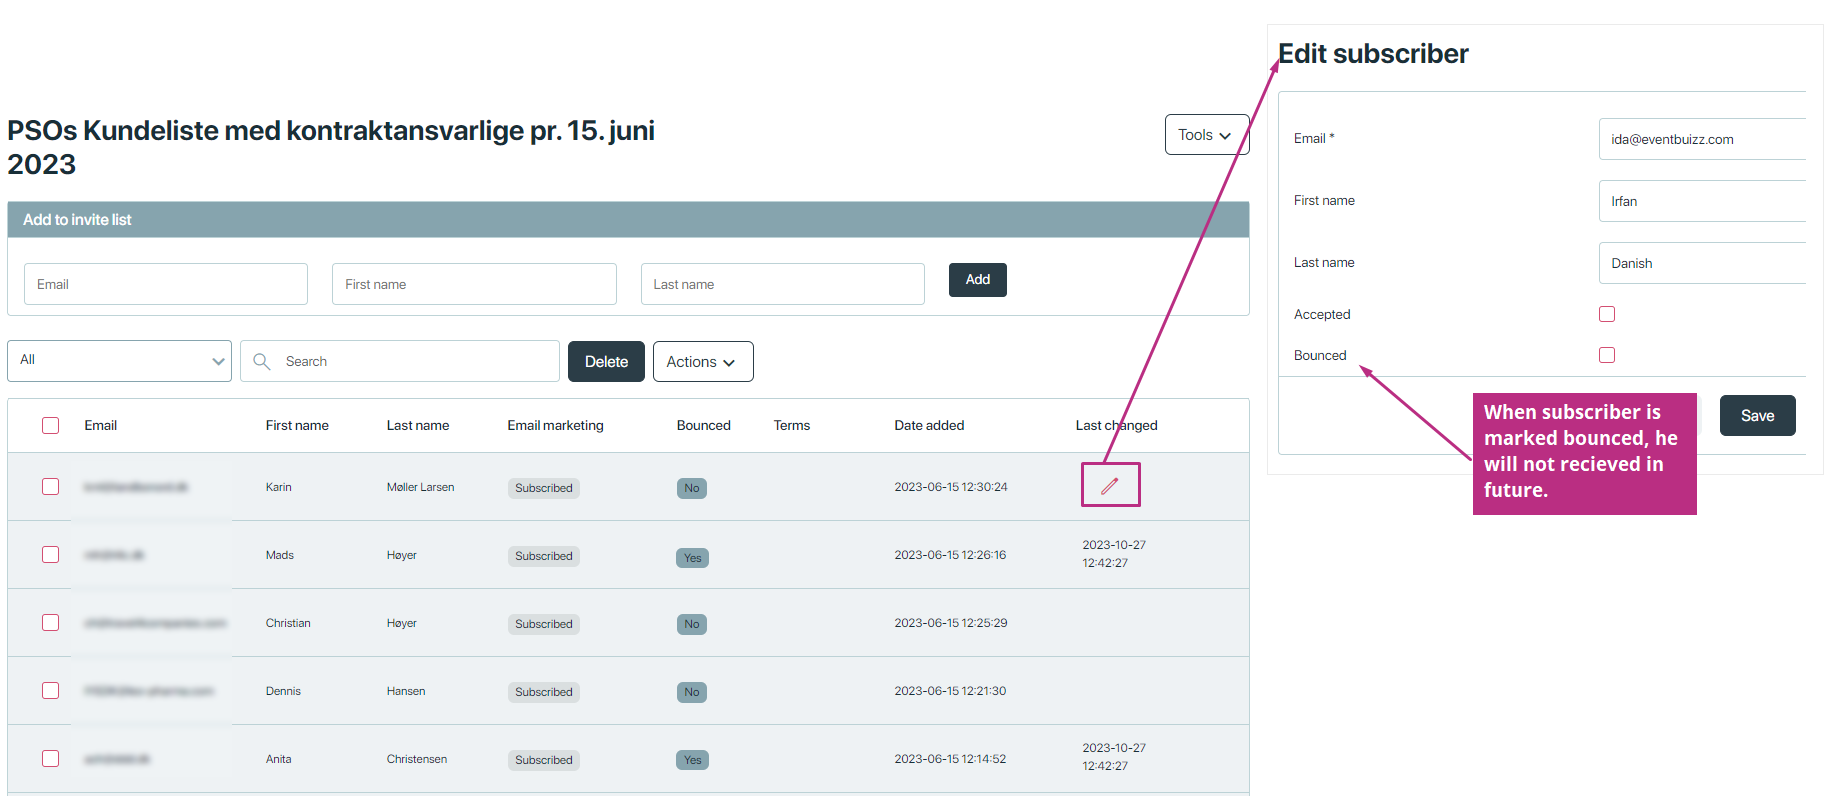
Get embedded code
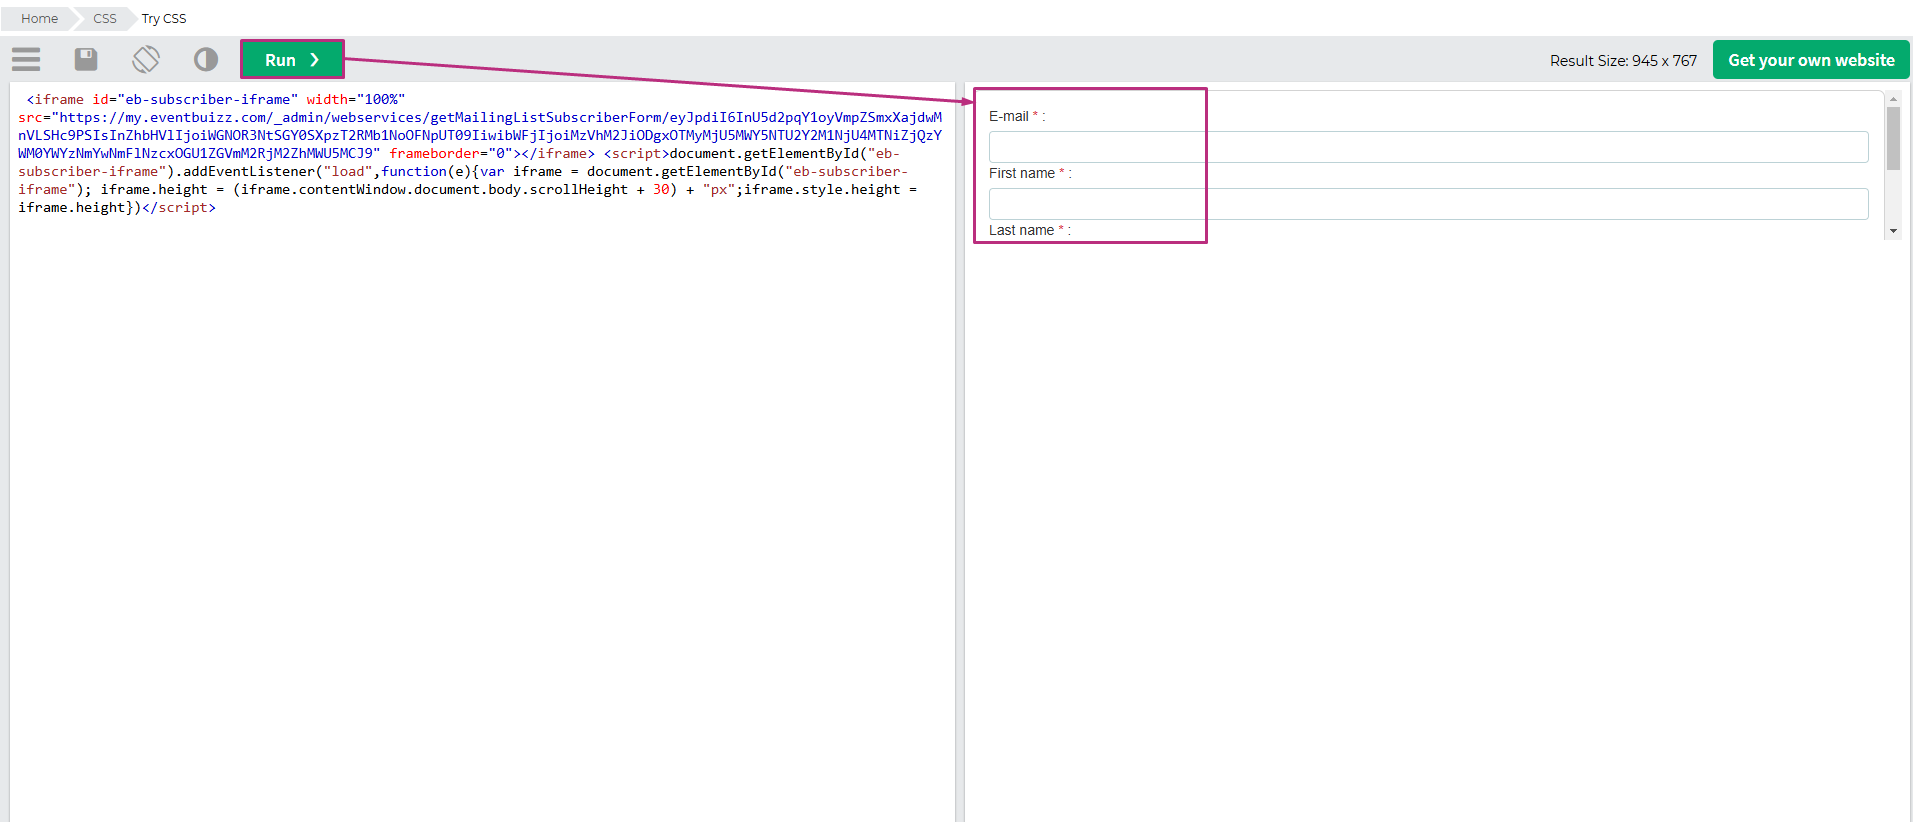
The “Get embed code” feature is a powerful tool for organisers who wish to integrate their subscriber forms into third-party applications or other platforms. This allows users to subscribe directly through these external forms, with their details automatically added to the organizer’s subscriber list. Here’s an overview of the purpose, functionality, and customisation options available for this feature:
Purpose
The primary purpose of the “Get embed code” feature is to facilitate the integration of subscriber forms into external applications or websites. By embedding the subscriber form, organizers can seamlessly collect subscriber data and ensure it is added to their designated subscriber list.
Functionality
When organisers select the “Get embed code” option from the menu, a new screen is displayed with two main sections:
- Customise subscriber list
- Preview section
Customise subscriber list
This section provides various fields and options for organisers to tailor the subscriber form to their specific needs. Below are the details of the available customisation fields:
- Background colour
-
- Description: Set the background colour of the form.
- Default: White
- Customisation: Organisers can select a different colour using the colour picker.
-
First name field Label
- Description: Customise the label for the first name field.
-
Last name field label
- Description: Customise the label for the last name field.
-
Email field label
- Description: Customise the label for the email field.

Subscribe successfully message
- Description: Set the message or alert that will be displayed when a user successfully subscribes.

-
Email already used message
- Description: Set the message or alert that will be displayed if the email is already in use.
-
Button label
- Description: Customise the label of the subscribe button.

-
Content
- Description: Add any additional content to be displayed at the header of the form.
-
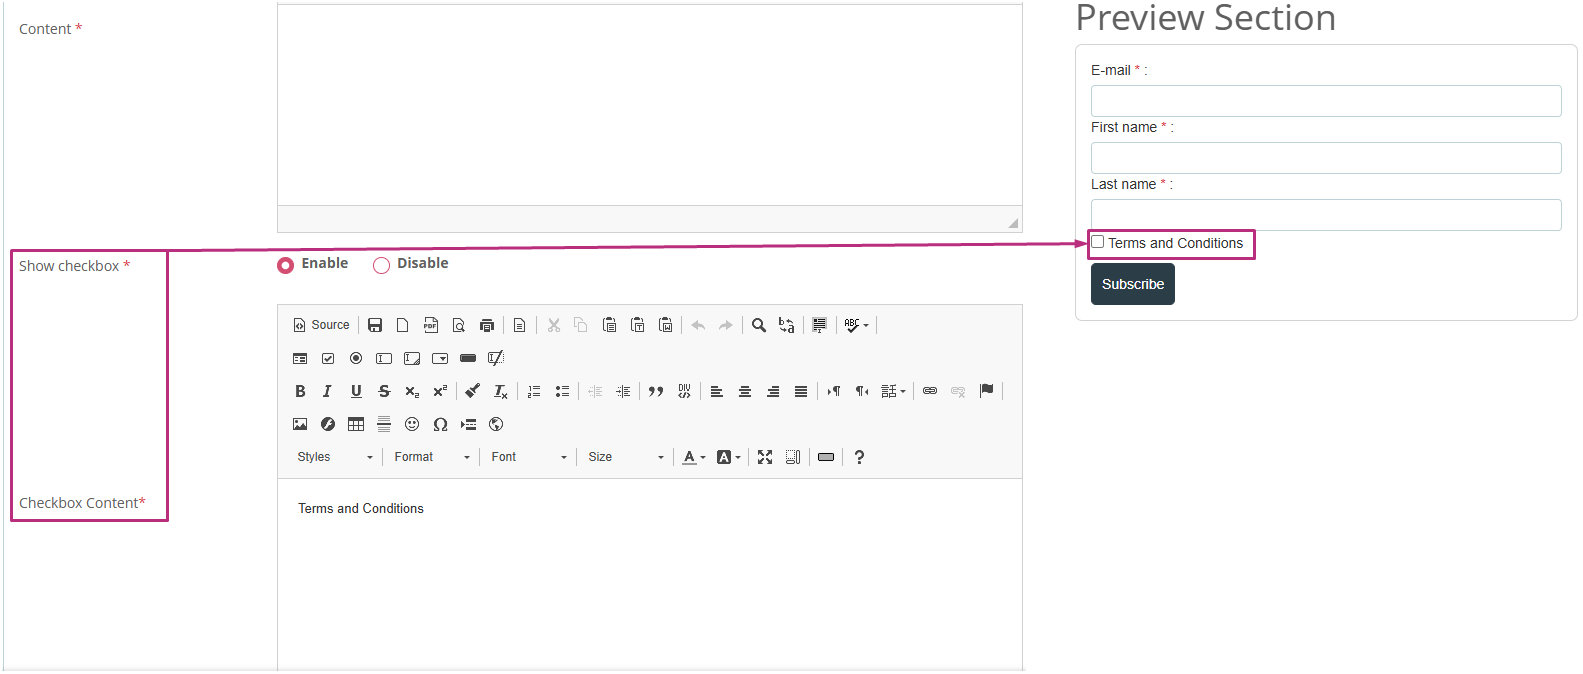
Show checkbox
- Description: Enable or disable the terms and conditions checkbox.
- Options: Show or hide the checkbox.
-
Checkbox content
- Description: Set the content for the terms and conditions checkbox.
- Send email on subscribe
-
- Description: Customise the email template, including subject and content, that will be sent to subscribers upon subscription.
- Options: Enable or disable this feature.
-
Send email on unsubscribe
- Description: Customise the email template, including subject and content, that will be sent to subscribers upon un-subscription.
- Options: Enable or disable this feature.

Preview section
This section provides a real-time preview of the subscriber form, reflecting all the customisation made in the “Customise subscriber list” section. Organisers can see how the form will look to users and make adjustments as needed.
Additional feature:
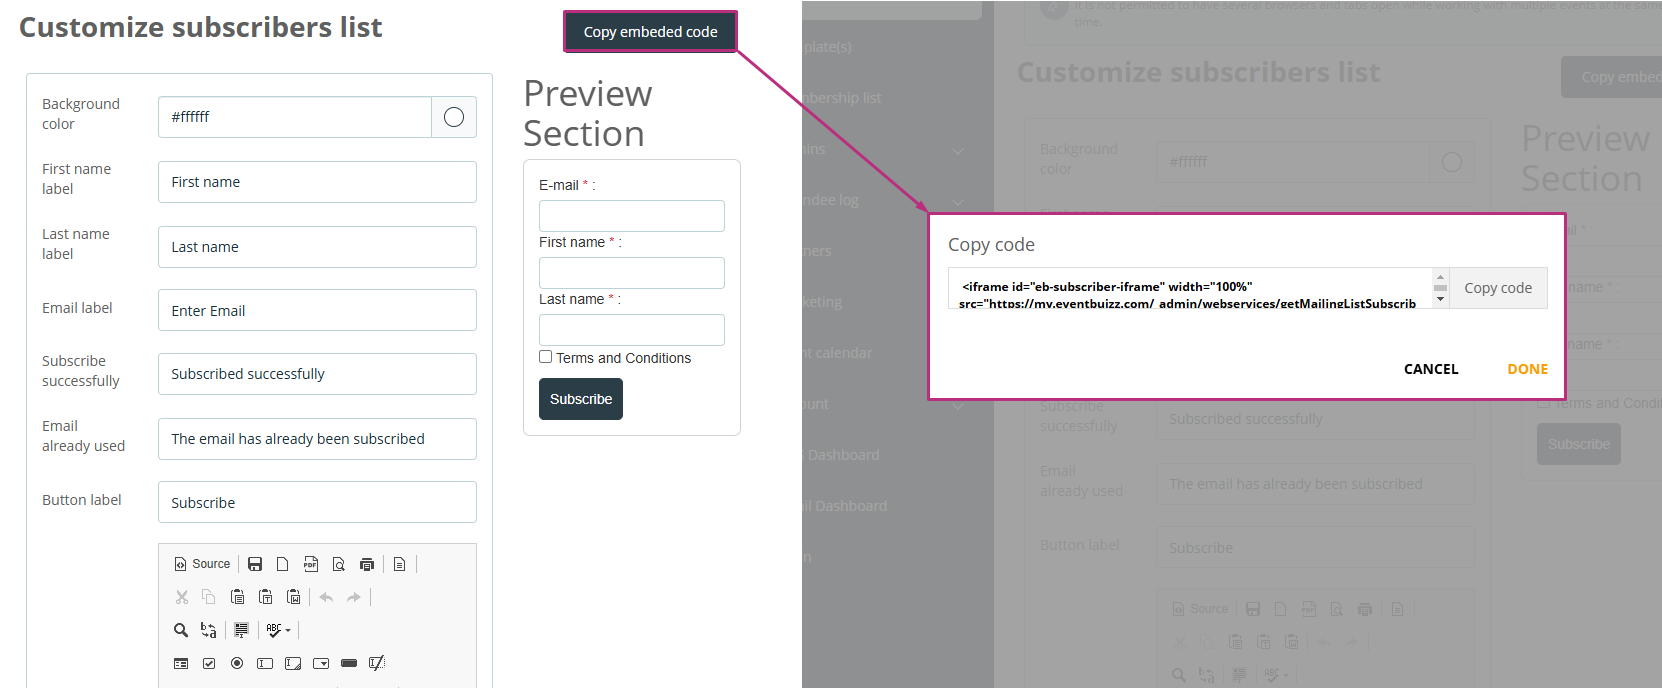
Copy embed code button
An additional feature available in this section is the “Copy embed code” button. Here’s how it works:
Functionality:
-
- When the organiser clicks on the “Copy embed code” button, a new window opens displaying the option to copy the embed code.
Copy success alert:
-
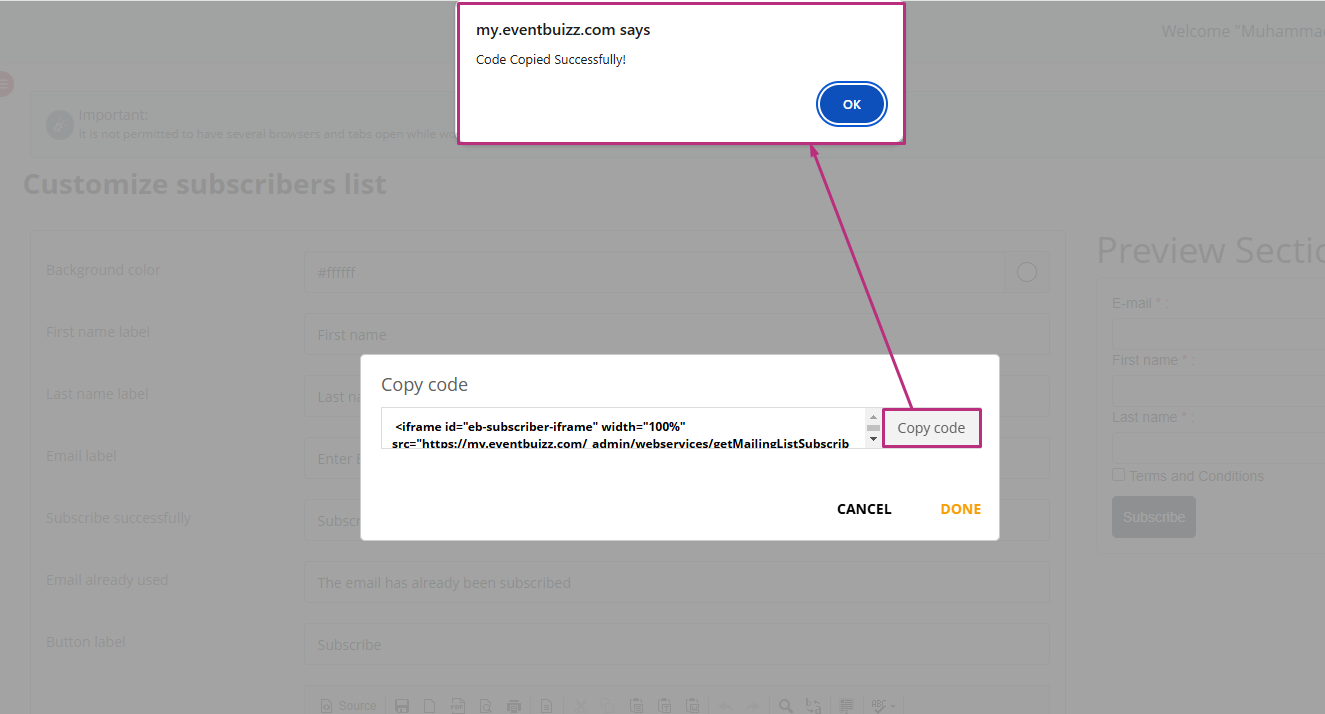
- By clicking the copy button, the embed code is copied to the clipboard, and a success alert message is displayed.
Usage:
- Organizers can then paste the copied embed code into any third-party application or website, allowing them to embed the customised subscriber form and start collecting subscriber data.
Analytics reports
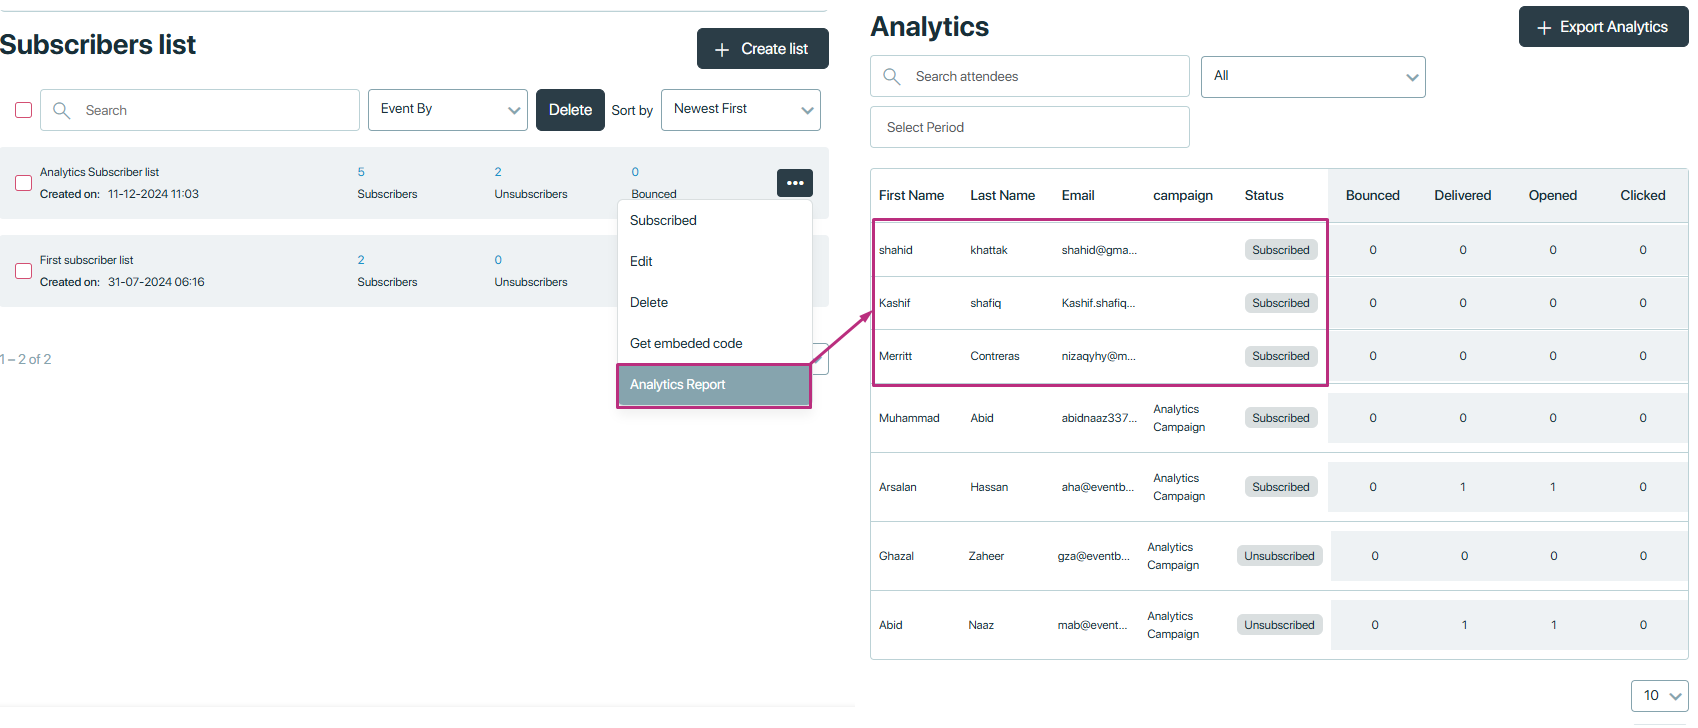
The Analytics reports feature in the subscriber list module is designed to provide organisers with comprehensive insights into subscriber activity. This feature helps organisers understand subscriber behaviour, track campaign performance, and manage subscriber engagement effectively.
Purpose
The primary purpose of the Analytics Reports is to analyse subscriber interactions, including how many subscribers have signed up, unsubscribed, or experienced email delivery issues (bounces). This data is crucial for organisers to optimise their communication strategies and improve subscriber engagement.
Functionality
The analytics reports feature operates across all subscriber lists and displays two types of data:
Without campaign
This data is shown when subscribers sign up through the subscriber form without being part of any specific campaign.
Important note:
All the subscriber’s which used the subscriber form, either used through embedded code, either used in preview section or used in event-side.

Campaign-based
This data is generated when organisers create a campaign and select a subscriber list. Subscribers in the list receive an email with options to subscribe or unsubscribe, and the analytics report tracks their actions.
- Here is the detail explanation how organiser will creates campaign and select the subscriber list.
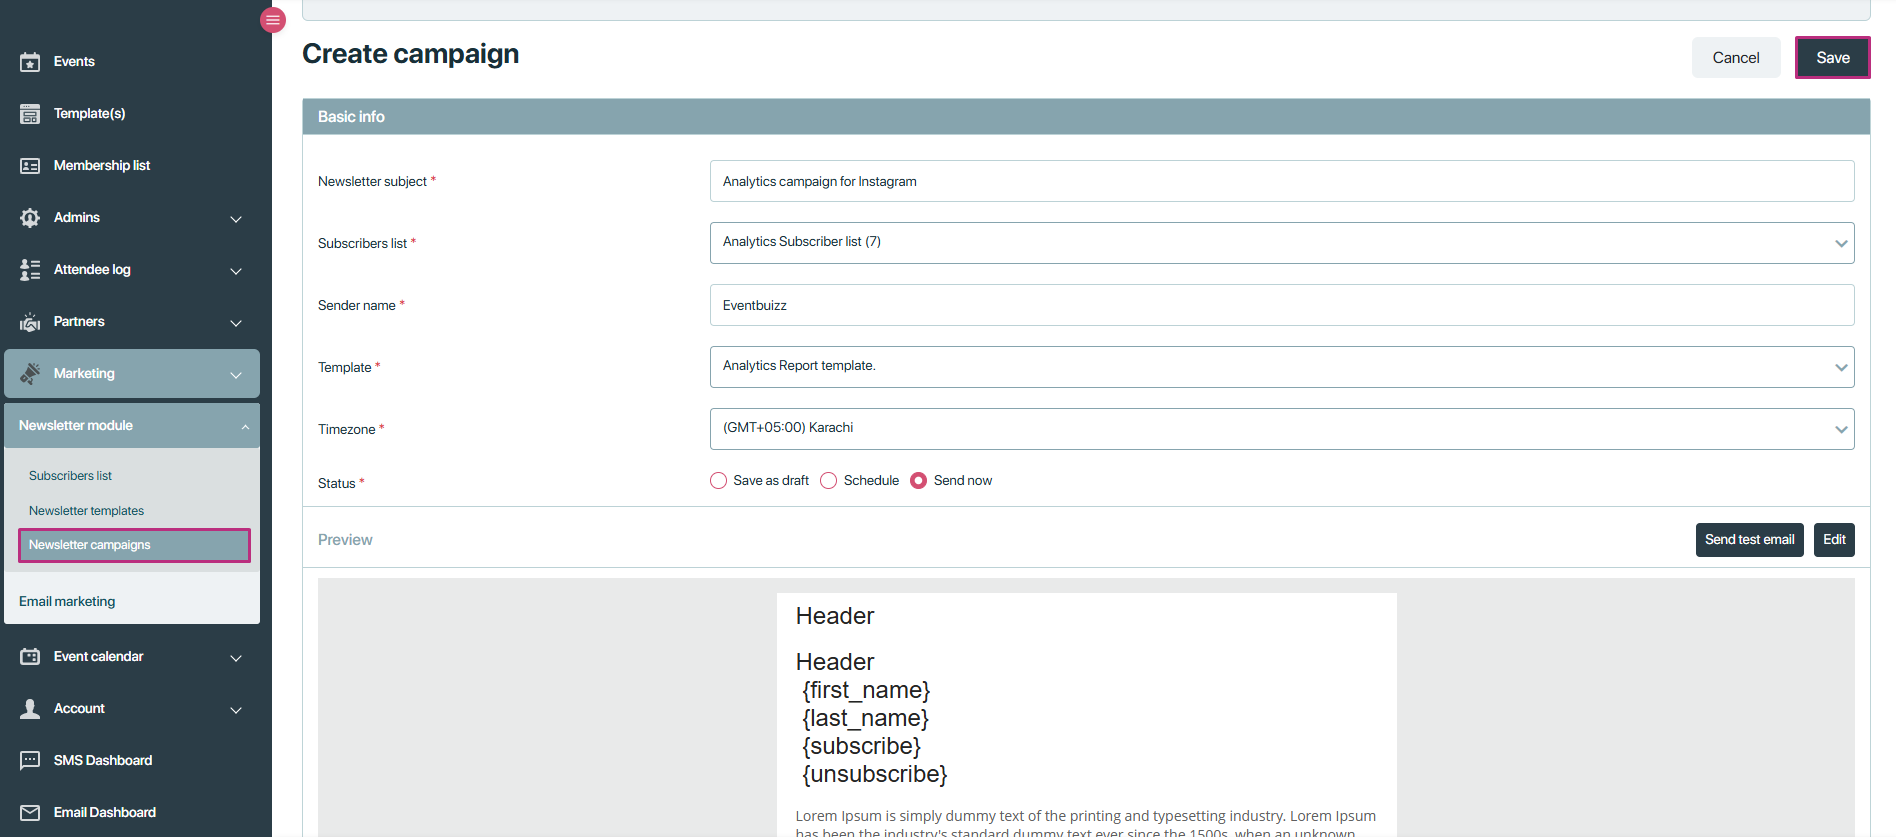
- After creating campaign all subscribers in the subscriber list will received an email. And In campaign listing related campaigns will show all the states, like how many have received the mail, and how many opens, clicks etc.

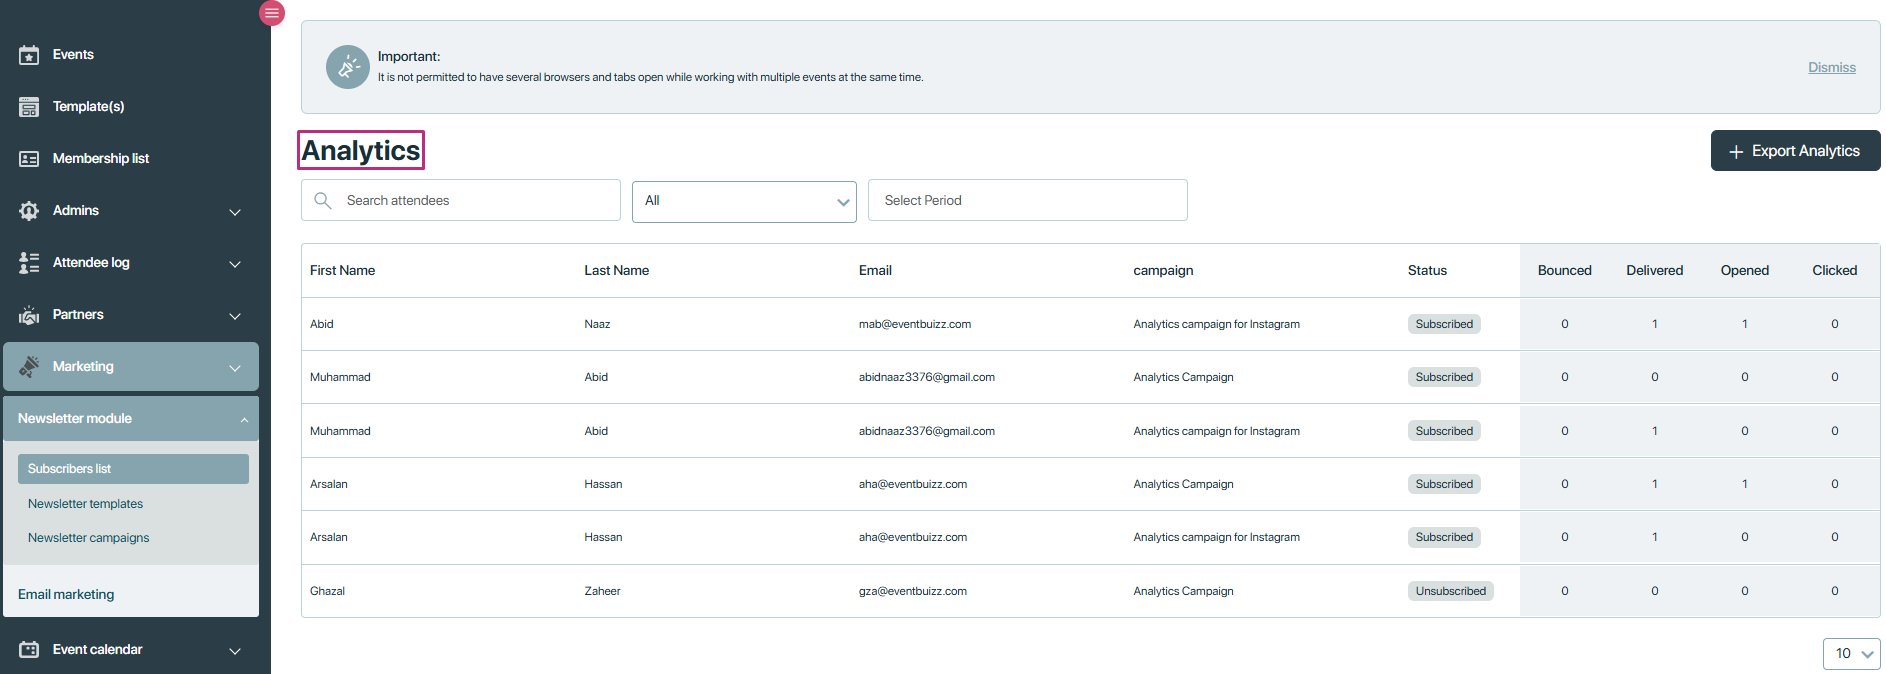
- All the subscribers which are in the subscriber list will creates the record in the subscriber list analytics report section.
Analytics record fields
Each analytics record includes the following fields:
- First name: The subscriber’s first name.
- Last name: The subscriber’s last name.
- Email: The subscriber’s email address.
- Campaign: The name of the campaign if the subscription/un-subscription occurred through a campaign; otherwise, this column remains empty.
- Status: Indicates whether the subscriber is currently subscribed or has unsubscribed.
- Bounced: Indicates if the email bounced (not delivered) or was not sent for any reason. A value of
1signifies a bounced email, while0signifies no bounce. - Delivered: Indicates whether the email was successfully delivered to the subscriber during the campaign. A value of
1signifies successful delivery, while0signifies delivery failure. - Opened: Indicates if the subscriber opened the email. A value of
1signifies that the email was opened, while0signifies it was not opened. - Click: Tracks the subscriber’s action within the email. If the subscriber performed any action such as subscribing or unsubscribing, this column will be updated accordingly.

Additional options
Search and filter
The Analytics reports feature includes powerful search and filtering options to help organisers find specific records and analyse data effectively:
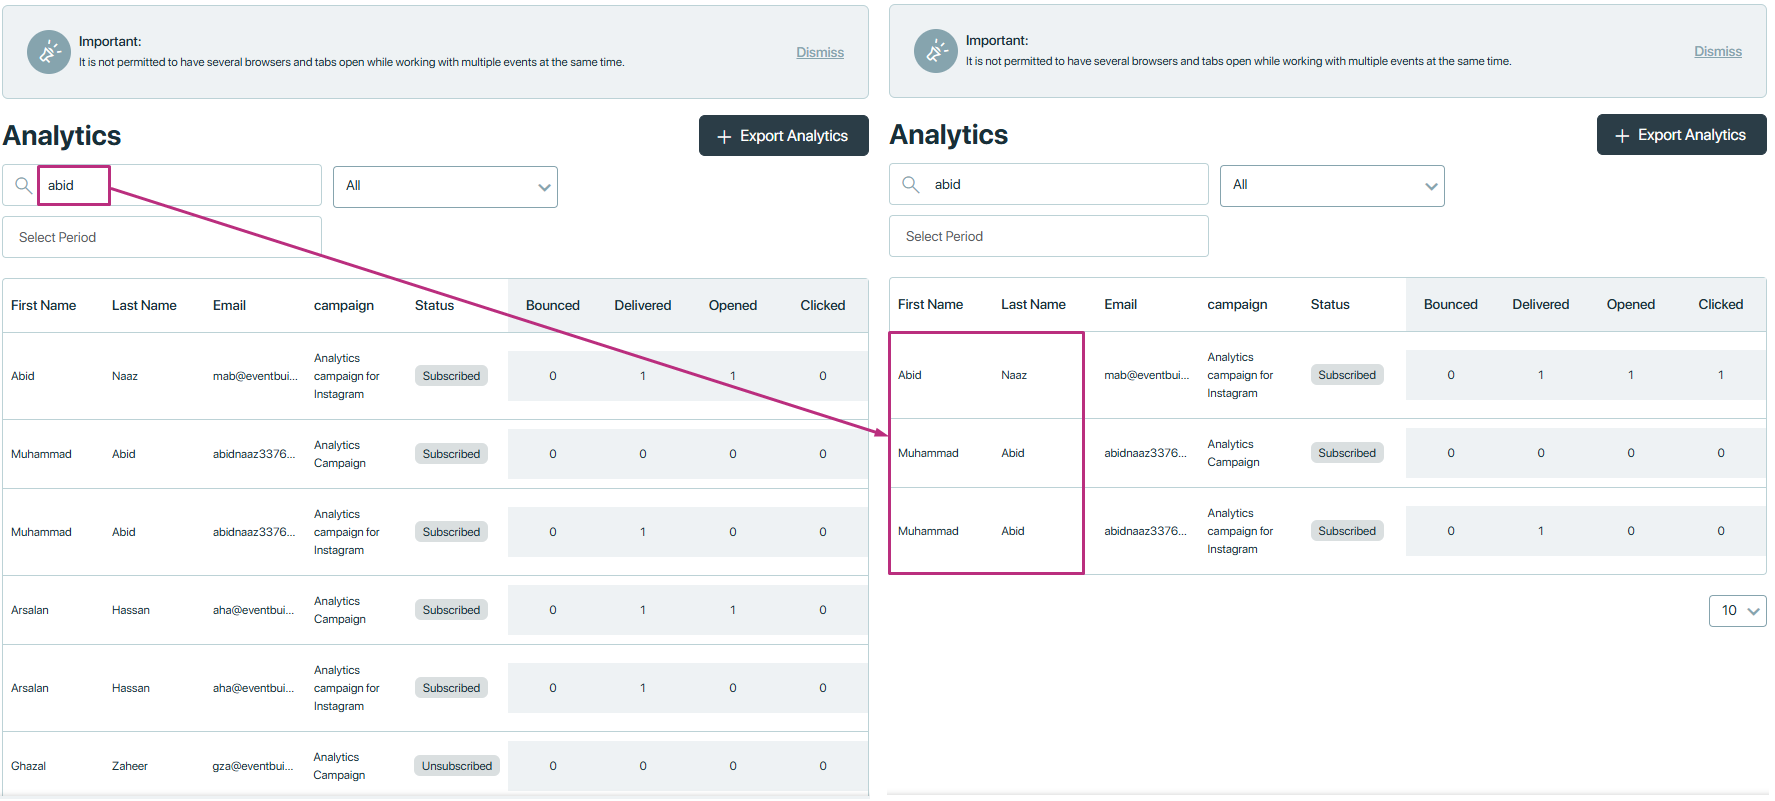
Search records:
-
- Organisers can search for any record by entering keywords related to any of the analytics record fields (First name, Last name, Email, etc.).
Filter by period:
- Organisers can filter the data based on a selected time period. This allows them to view analytics for a specific date range, making it easier to track performance over time.

Filter by status:
-
- Subscribed: Filters the data to show only records where the status is “Subscribed.”
- Unsubscribed: Filters the data to show only records where the status is “Unsubscribed.”
- Bounced: Filters the data to show only records where emails have bounced.

Additional feature:
Export analytics
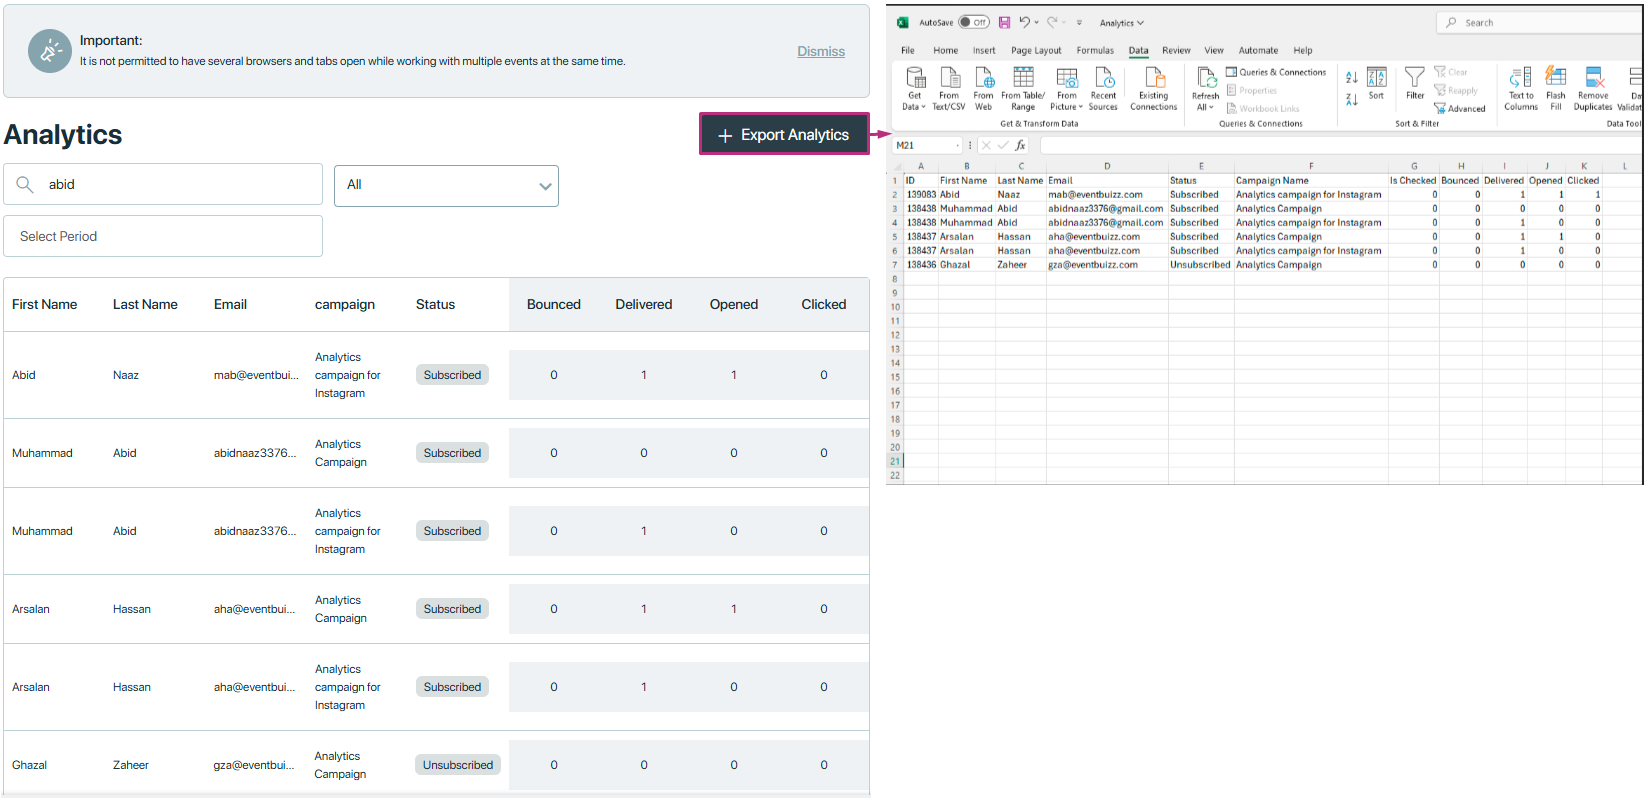
The Export Analytics feature allows organisers to download all analytics data in CSV format, including all the fields mentioned above. This exported data can be used for further analysis, reporting, or integration with other tools and systems.

Newsletter templates
Newsletter Templates
In Eventbuizz, a newsletter template is a pre-designed layout or format that organizers can use to create visually appealing and consistent newsletters. These templates often include placeholders for text, images, logos, and other elements, making it easier for organizers to customize and send out newsletters to subscribers.

Click on the three dots icon ![]() to explore more options.
to explore more options.
It has following options:
- Create campaign: It will create a campaign for created template.
- Edit: The Edit option allows you to modify or change existing content.
- Delete: This option allows you to remove a selected item or content permanently.
- Preview: This option lets you see how the content will appear before it is finalized or published.
- Copy: This option allows you to duplicate the selected text, file, or item, enabling you to paste it elsewhere.

newslettercampaigns
Newsletter Campaigns
A campaign for a newsletter refers to a planned series of email communications sent to a specific group of subscribers. The purpose of a newsletter campaign is typically to inform, engage, and build a relationship with the audience.
When you are ready, click create campaigns.

Certainly! Here is an explanation of the fields typically required when setting up a newsletter campaign:
- Newsletter subject: This is the subject line of the email that will be sent to your subscribers.
- Subject: This is essentially the same as the “Newsletter subject” and serves to capture the main topic or purpose of the email.
- Subscribers list: The list of email addresses to which the newsletter will be sent. This allows you to target a specific group of people who have subscribed to your newsletter.
- Sender name: The name that will appear in the “From” field of the email. It helps recipients recognize who the email is from and can increase the likelihood of them opening it.
- Template: The pre-designed layout and style that you have created in the newsletter templates.
- Time zone: The time zone in which the scheduling of the email is based. Ensuring the email is sent at the optimal time for your audience, based on their location.

We have three types of status which indicates the current state of the newsletter campaign:

Save as draft:
Save your current work on the campaign without sending it. This option allows you to come back and edit or finalize the newsletter later. You can use this option if you need to gather more information before sending the newsletter.
Schedule campaign
These settings provide more control over the timing and frequency of your scheduled newsletter.Set a specific date and time for the newsletter to be sent. Plan the sending time to maximize engagement, such as sending during business hours or when your audience is most active.

We have a repeat setting that allows you to make the newsletter a recurring campaign that is sent at regular intervals. It is useful for ongoing communications like weekly updates or monthly newsletters.

These settings provide more control over the timing and frequency of your scheduled newsletter.
Repeat every:
-
-
- Description: Defines the interval at which the newsletter should repeat.
- Example: “1 Day(s)” means the newsletter will be sent every day.
-
Ends:
- Never: The newsletter will continue to be sent at the specified interval indefinitely. For example: If set to repeat daily, it will be sent every day forever.
- On: Specifies a date when the recurring newsletter should stop. For example: If the end date is 23-05-2024, the last newsletter will be sent on May 23, 2024.
- After: The newsletter will stop after a certain number of occurrences. For example If set to “After 1 occurrences,” the newsletter will be sent only once.
-
Send Now
This option will send the newsletter immediately to the selected subscribers list. Use this when your newsletter is ready and you want it to be delivered without delay.
