In Eventbuizz, registration forms refer to the digital forms that attendees fill out to register for an event. These forms typically collect information such as the attendee’s name, contact details, company or organization affiliation, job title, and any other relevant information required by the event organizer. Registration forms help organizers manage attendee data effectively and streamline the registration process for events hosted on the Eventbuizz platform.
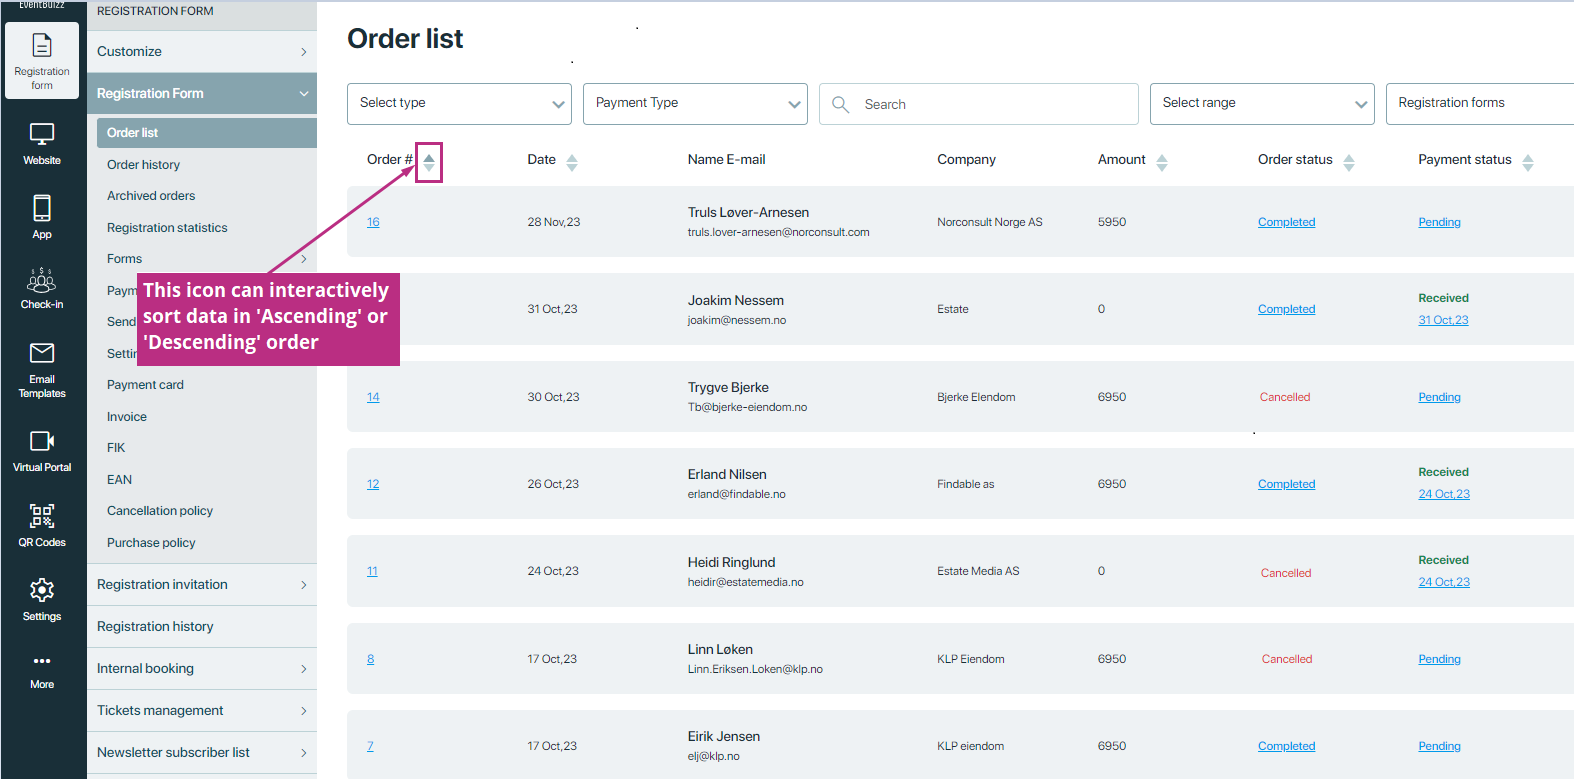
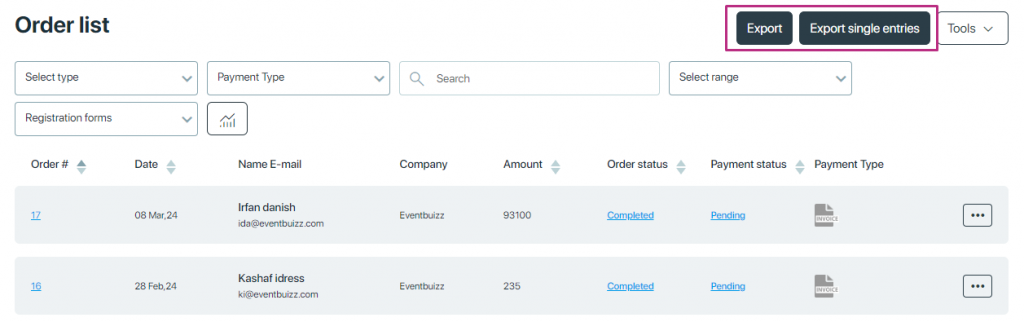
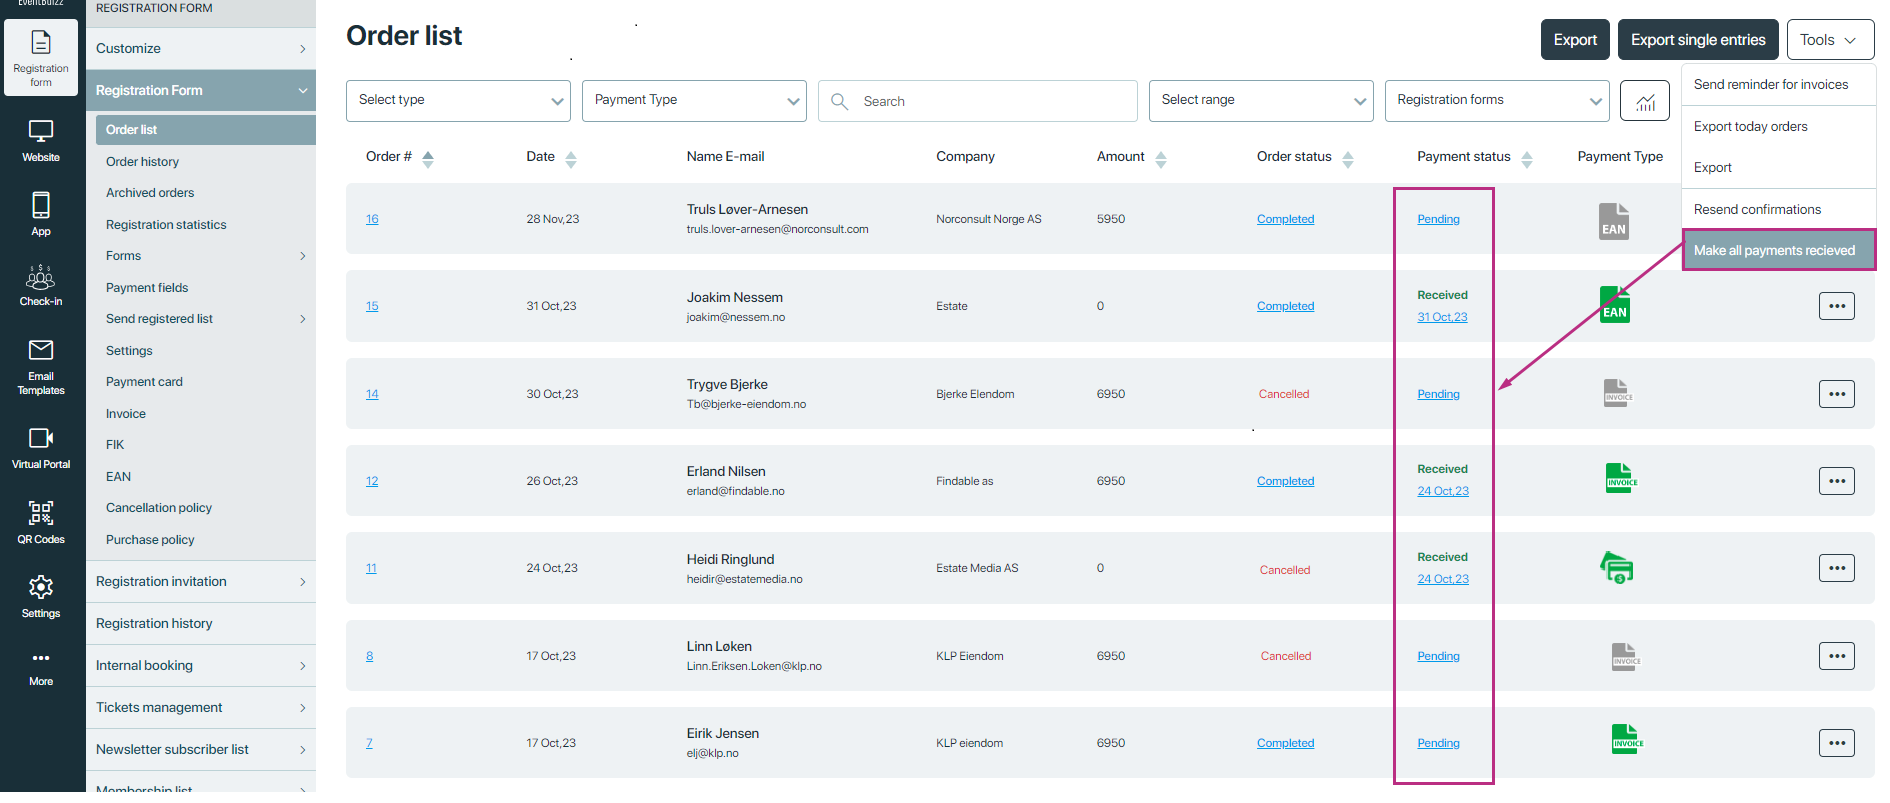
In Eventbuizz, an order list typically refers to a list of orders placed by users for various services or products related to an event. This list may include details such as the order ID, the name of the user who placed the order, the items or services ordered, quantities, prices, payment status, and any other relevant information pertaining to the orders made through the Eventbuizz platform. This feature helps event organizers and administrators keep track of all transactions and manage the logistics of fulfilling orders efficiently.
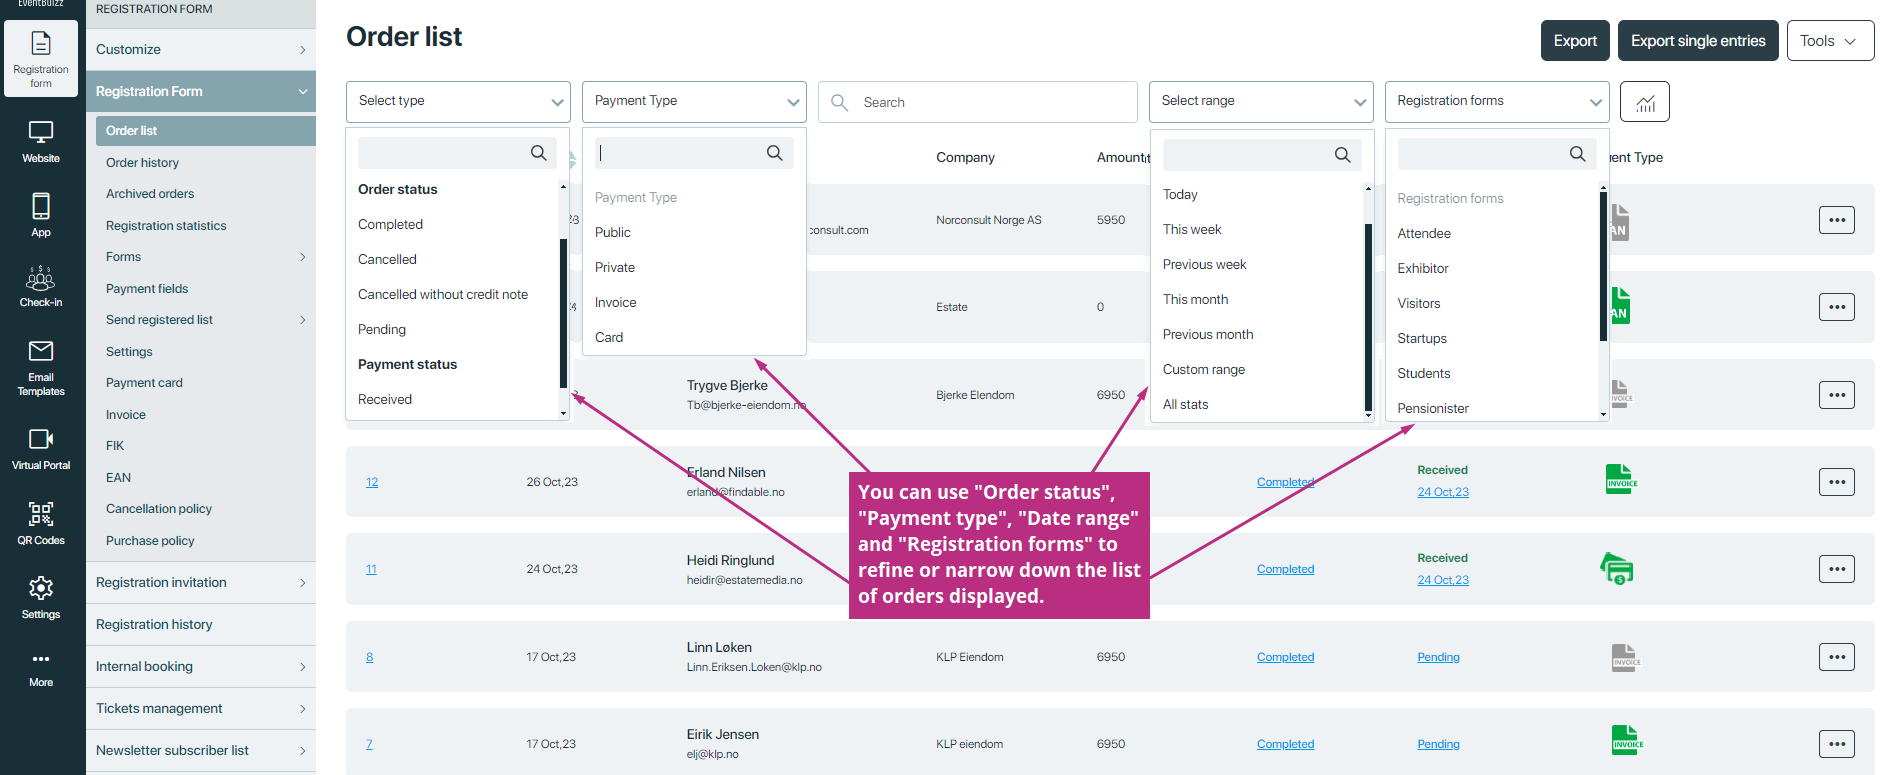
- Order status: Users can filter orders based on their status, such as pending, processing, completed, cancelled, or cancelled without credit note.
- Payment status: Users can filter orders based on their payment status, such as received or pending.
- Payment types: The “Payment Type” filter users with a list of different payment methods or types available. Common payment types might include Public, Private, Invoice and Card.
- Date range: Users can filter orders based on the date range in which they were placed or processed. This allows users to narrow down orders to a specific time frame, such as today, this week, this month, or a custom date range.
- Registration form: This filter list all the orders based on “Form type”.
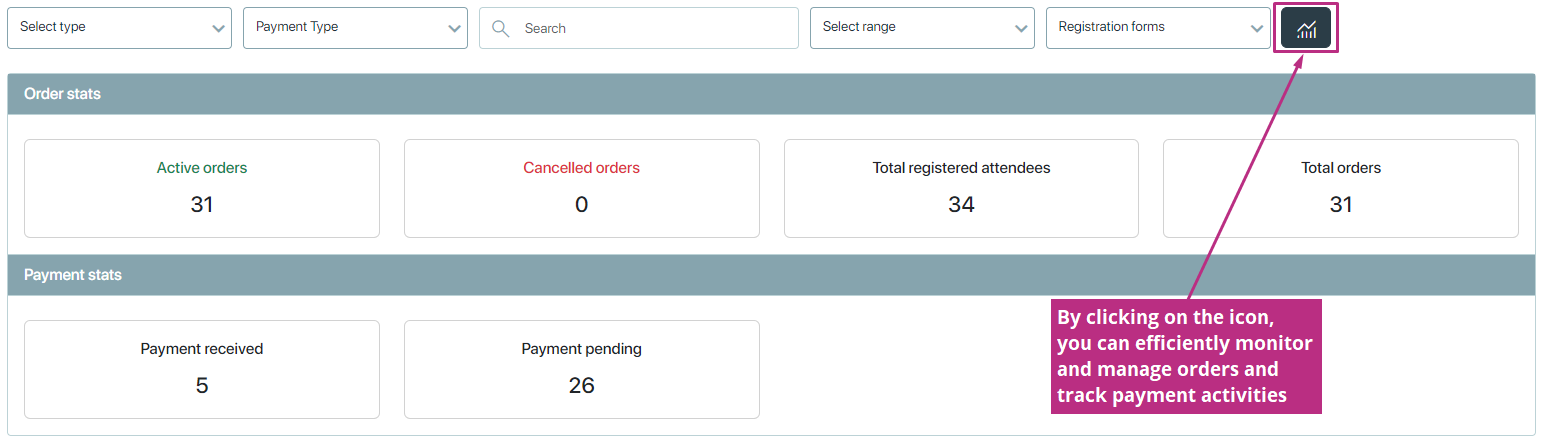
- Order and payment stats: By clicking on stats icon, you can efficiently monitor orders and track payment activities.
Order Number:In Eventbuizz, the “order number” refers to a unique identifier assigned to each transaction or purchase made within the platform. It serves as a reference number that helps organizers and attendees track and manage their orders. The order number is typically generated automatically by the Eventbuizz system when an order is placed, and it remains associated with that specific transaction throughout its lifecycle.
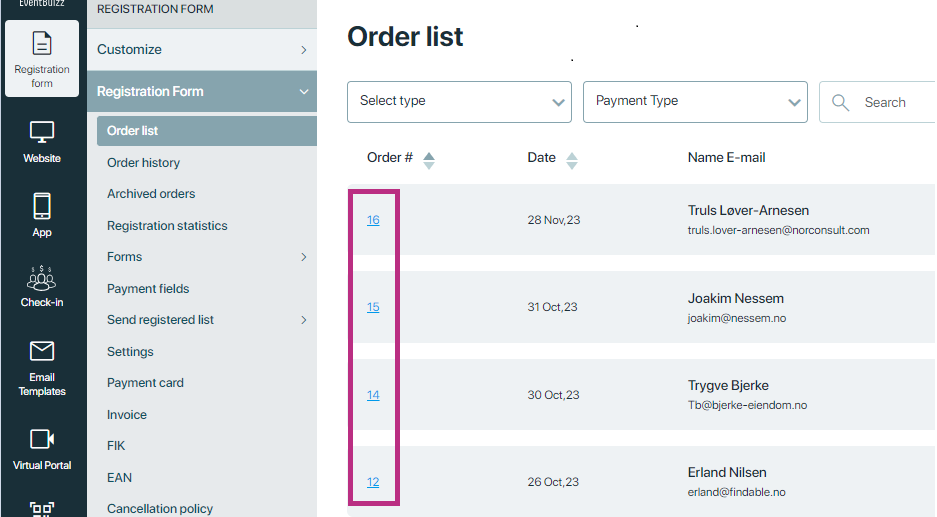
We can sort order #, date, amount, order status and payment status in ascending and descending order by clicking on arrows.
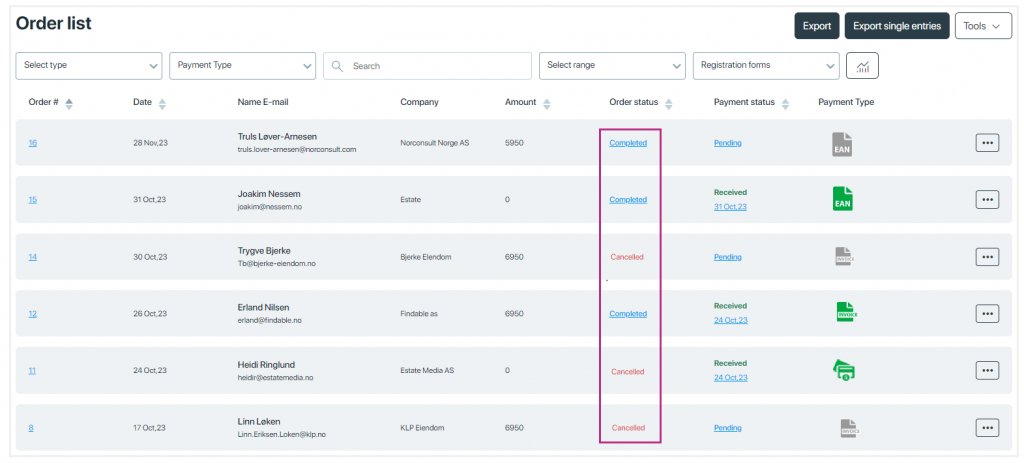
Order status:In Eventbuizz, the order status refers to the current state or condition of an order placed by an attendee. This status typically includes stages “completed,” or “cancelled,” indicating the progress of the order through the system. Users can track their orders and monitor their status to stay informed about the progress of their purchases or registrations within the Eventbuizz platform.
Here, Organizer can cancel an order any time – just click on completed to cancel an order.
Payment status:In Eventbuizz, the payment status refers to the state or condition of a payment associated with an order or transaction within the platform. This status indicates whether the payment has been successfully processed, is pending, or has encountered any issues.
- Pending: The payment is awaiting processing or needs confirmation. This status typically occurs when the payment method is public or invoice, Once the payment is done by an attendee it requires manual verification.
- Received: When the payment method is card, the order has been successfully processed, and the transaction is complete.
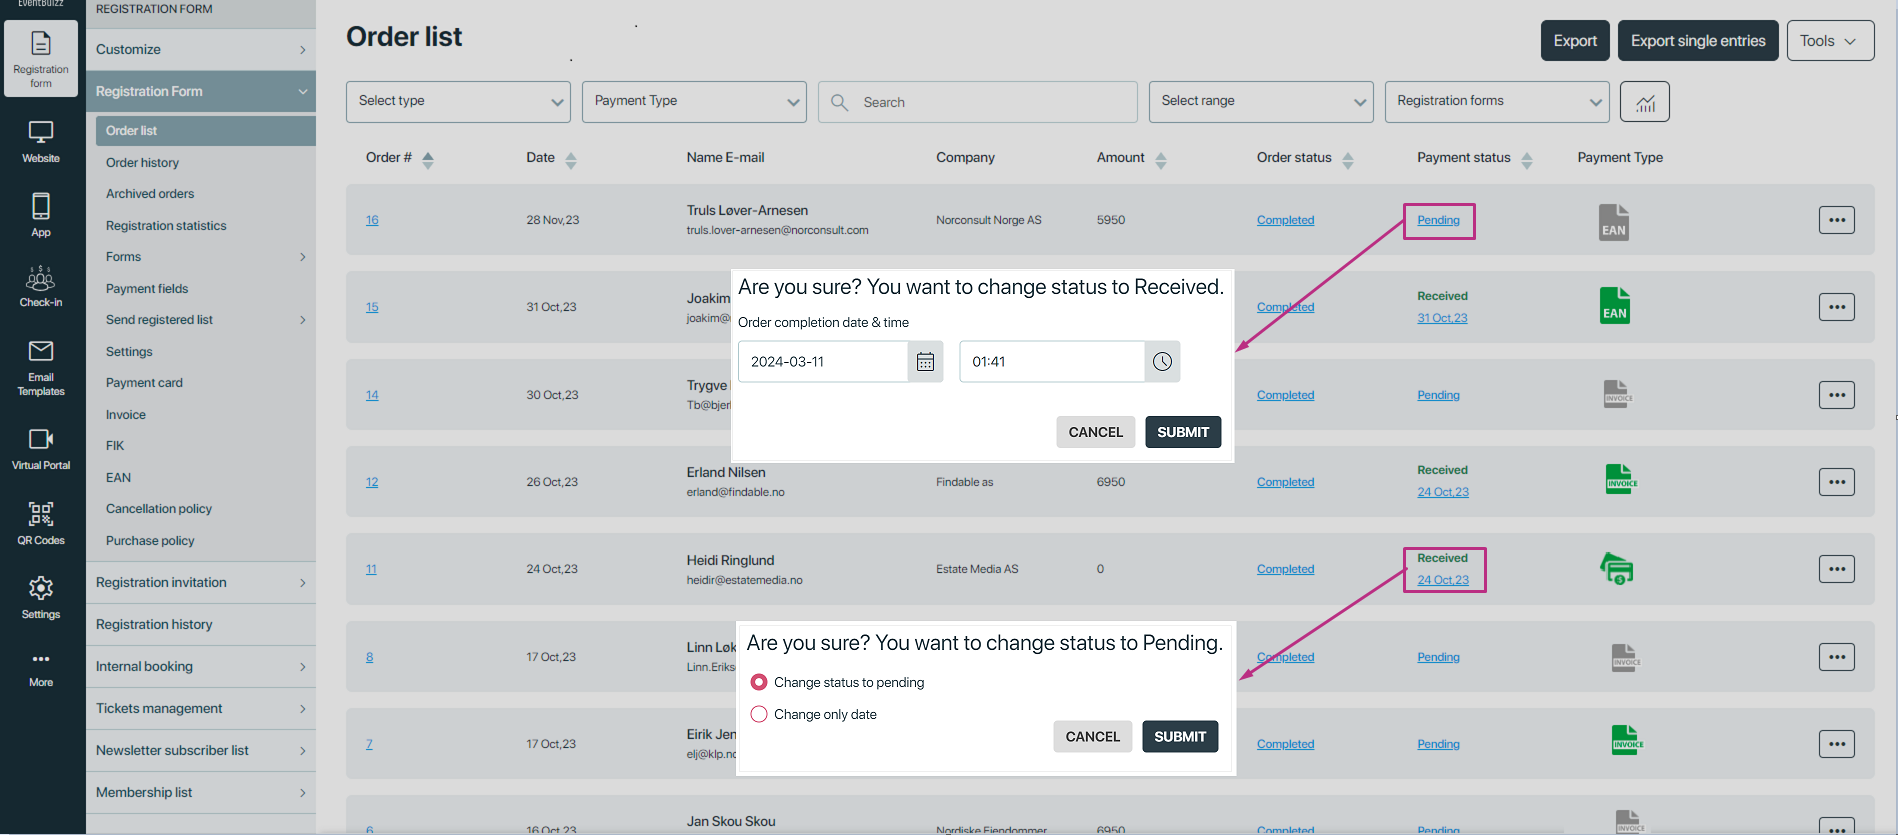
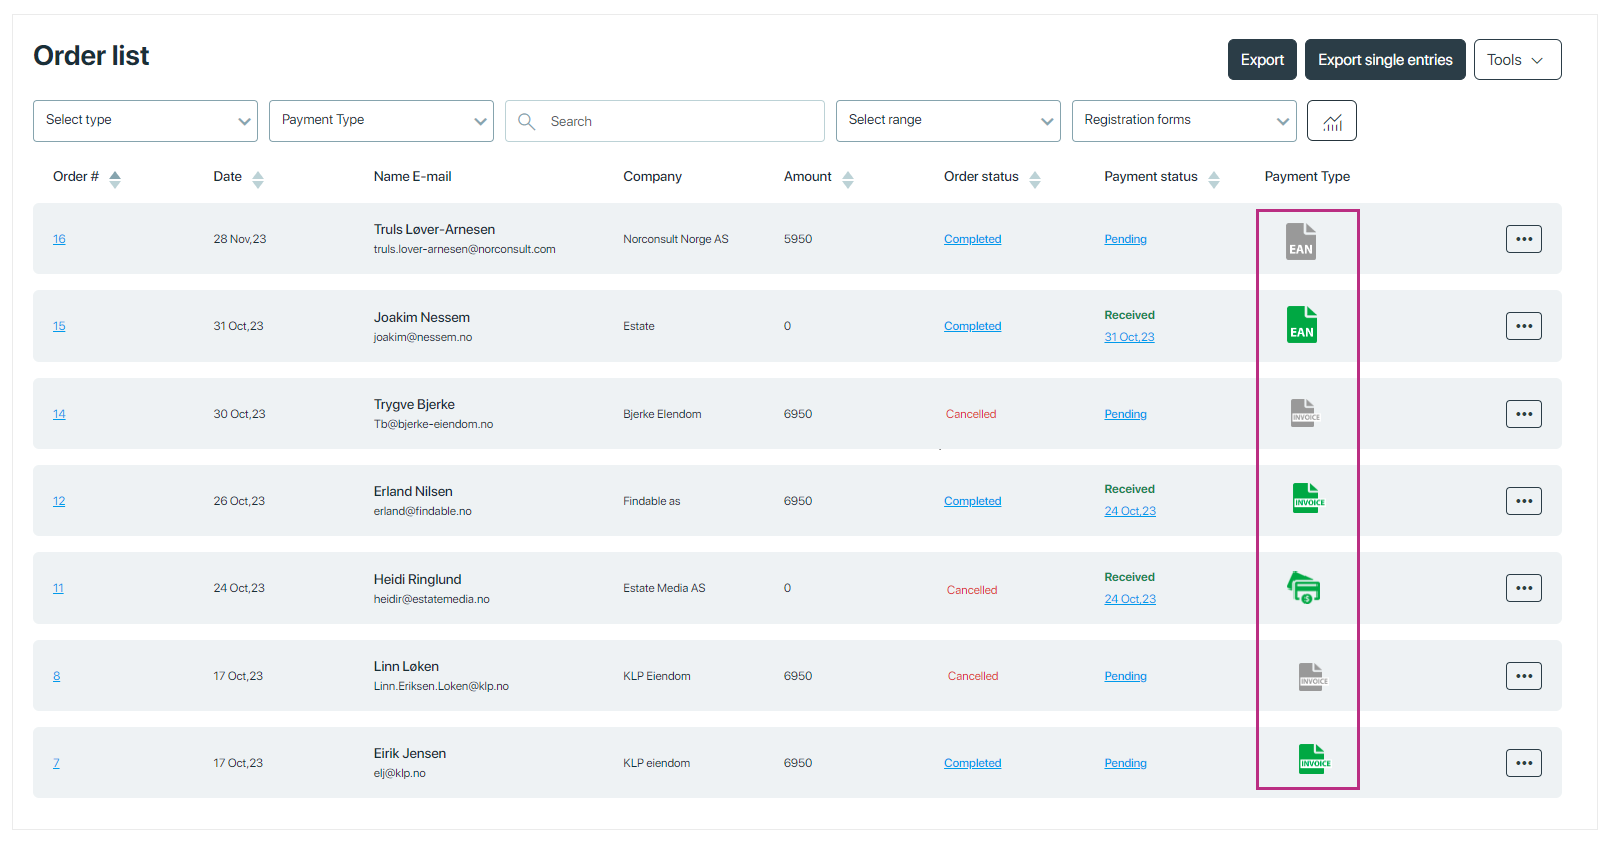
Payment Type:The “Payment type” refers to the method or mode of payment used by a user to complete a transaction within the platform. Common payment types in eventbuizz may include credit/debit card, Public (EAN) or invoice. If the payment is received, the payment icons will turn green.
Click on the
 icon, you can archive and cancel order from there.
We have following export options Export, Export single entries and Tools.
The major difference between export and single entries is:
- In Export: all orders, billing items, or any form of data are displayed separately in separate sheets.
- In Export single entries: In exports, we view the complete information of attendees and all sub-registrations on the same sheet.
Tools
In tools we have following options:
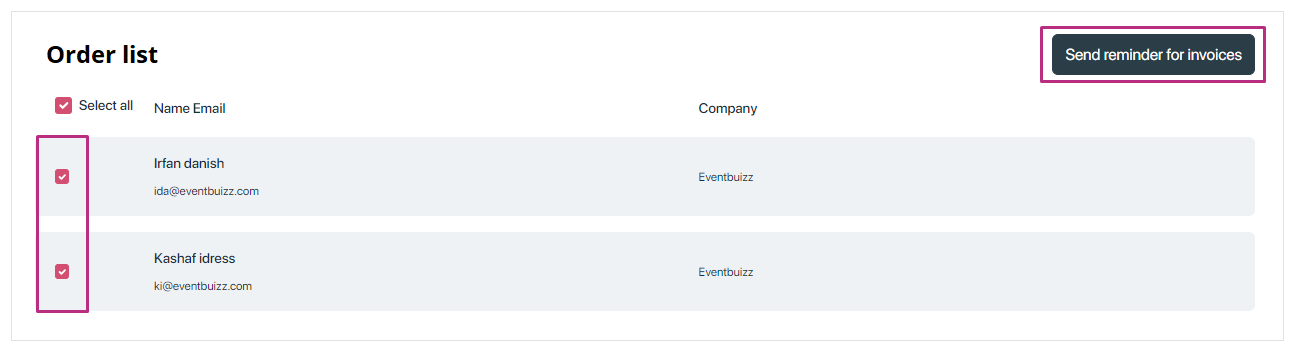
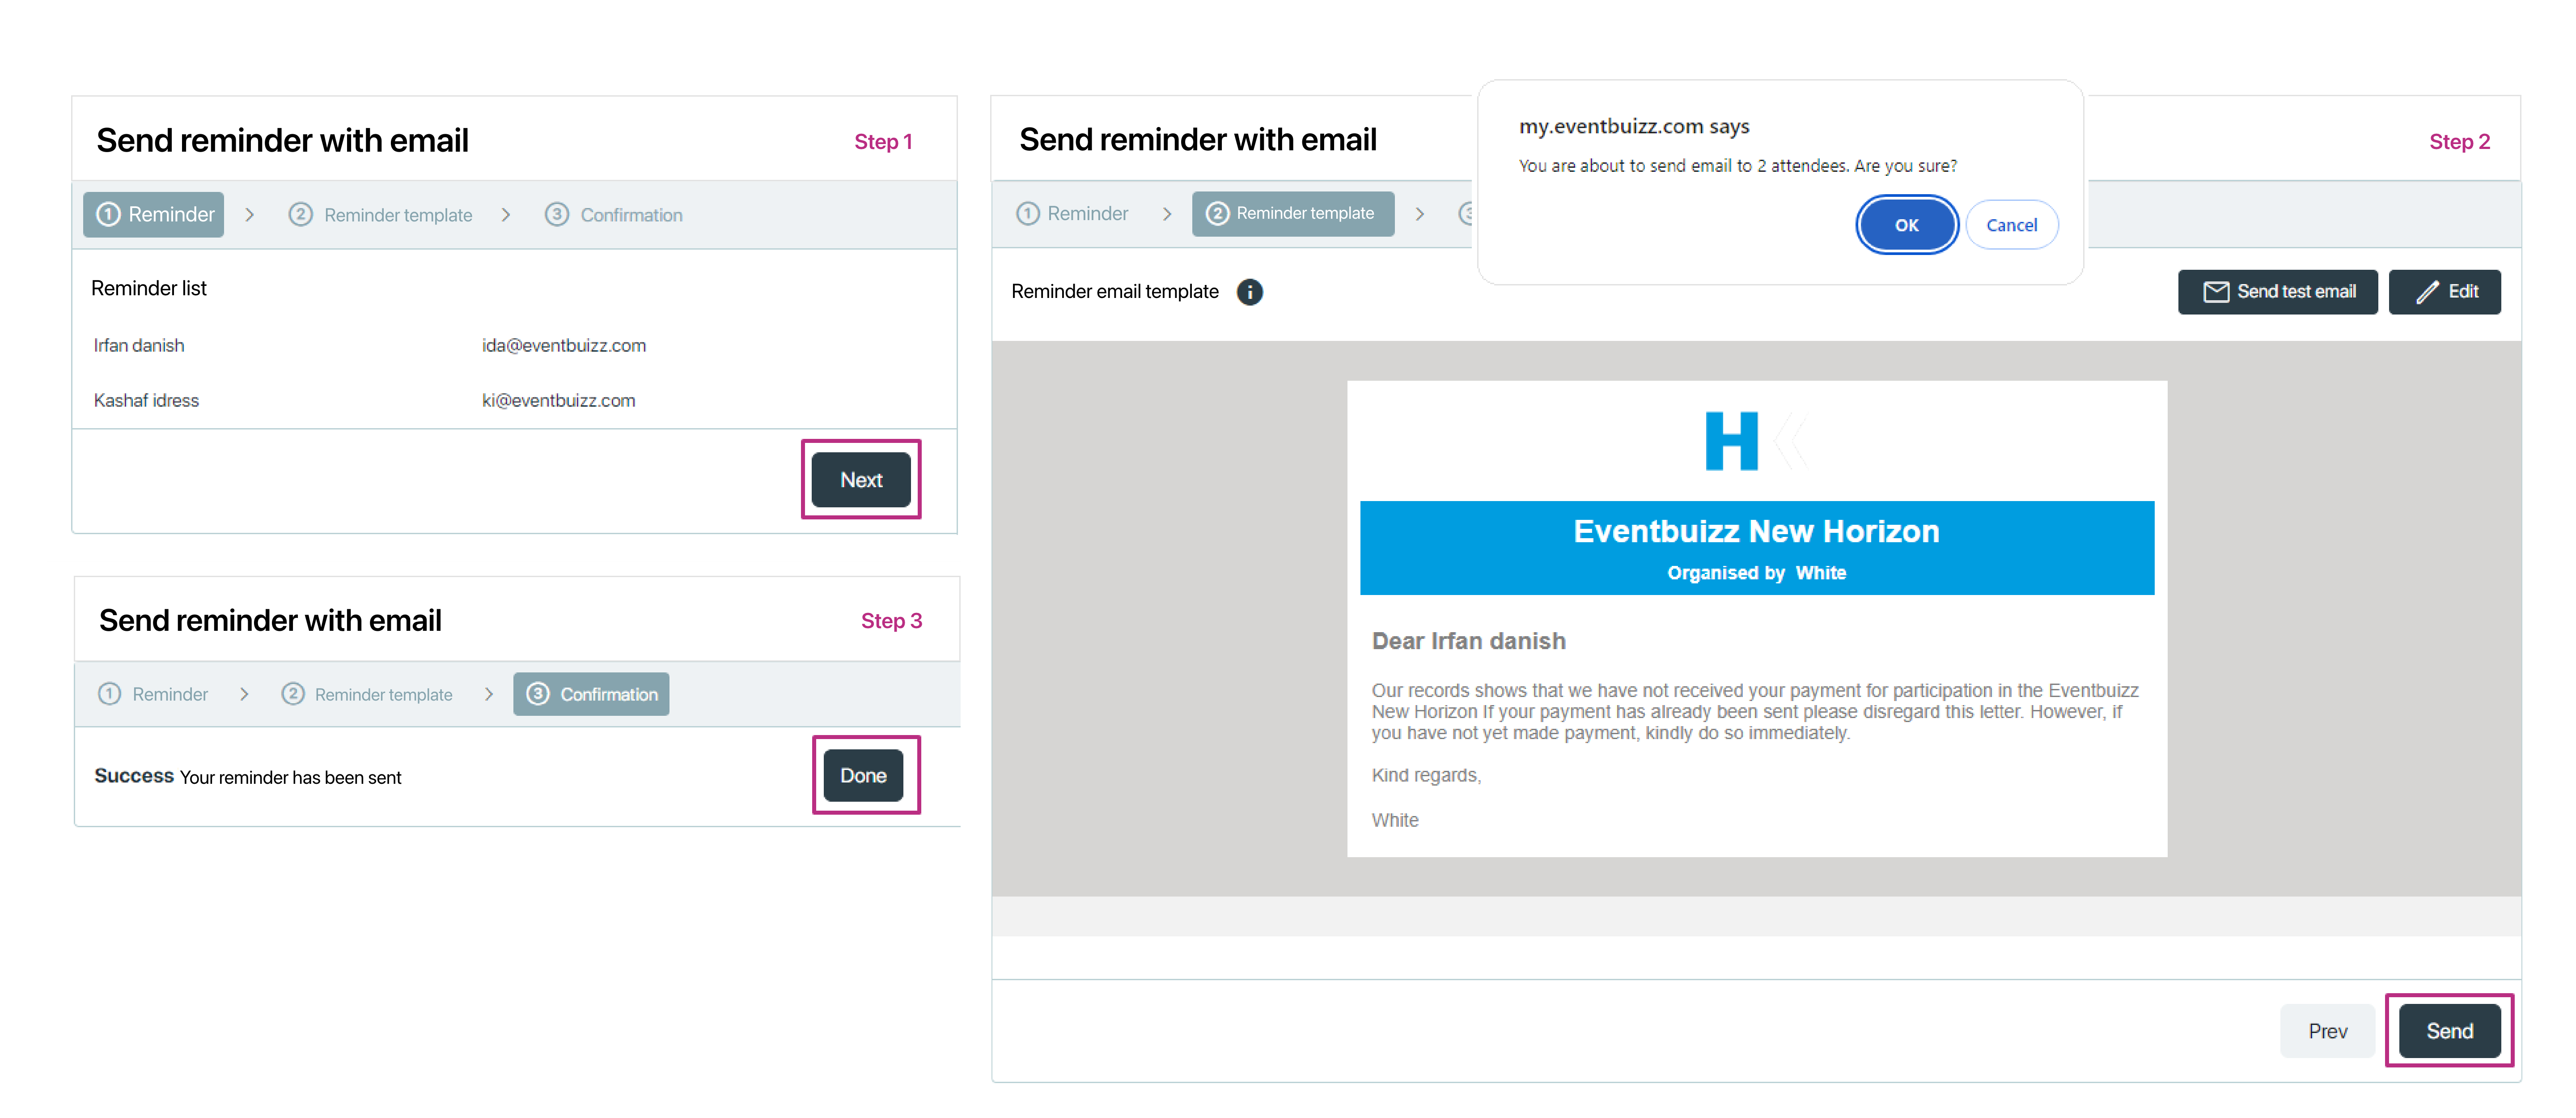
Send reminder for invoices
Send reminder invoices allows the system to send reminders to attendees who have outstanding invoices or payments due for their event participation. This feature can help event organizers to prompt attendees to settle their financial obligations before the event or within a specified timeframe. It helps streamline the payment process and ensures that all financial transactions related to the event are completed in a timely manner.
Export today orders
This export enables event organizers to quickly generate a report or file containing information about orders that were made specifically on the current day.
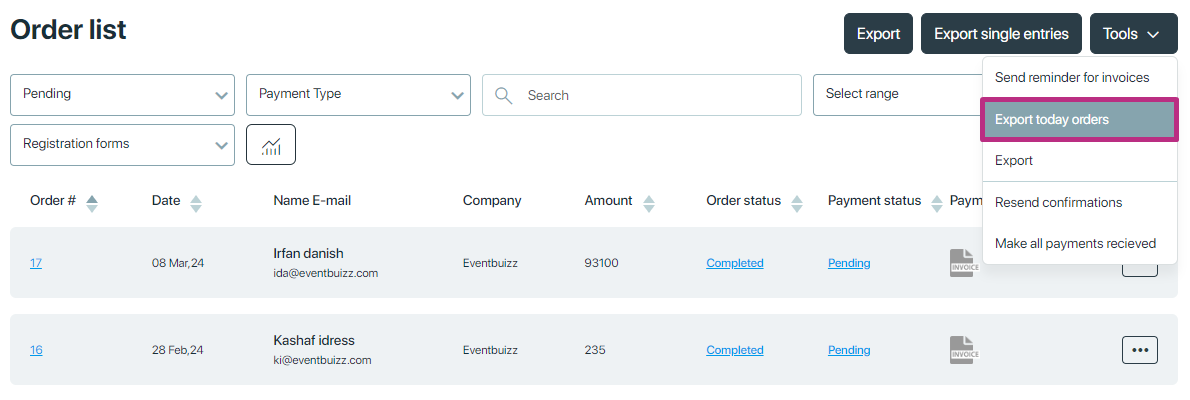
Resend confirmations
Event organizers can resend confirmation emails to attendees or participants who have registered for an event. These confirmation emails typically contain important details such as event date, time, location, registration information, and any other relevant instructions or materials.
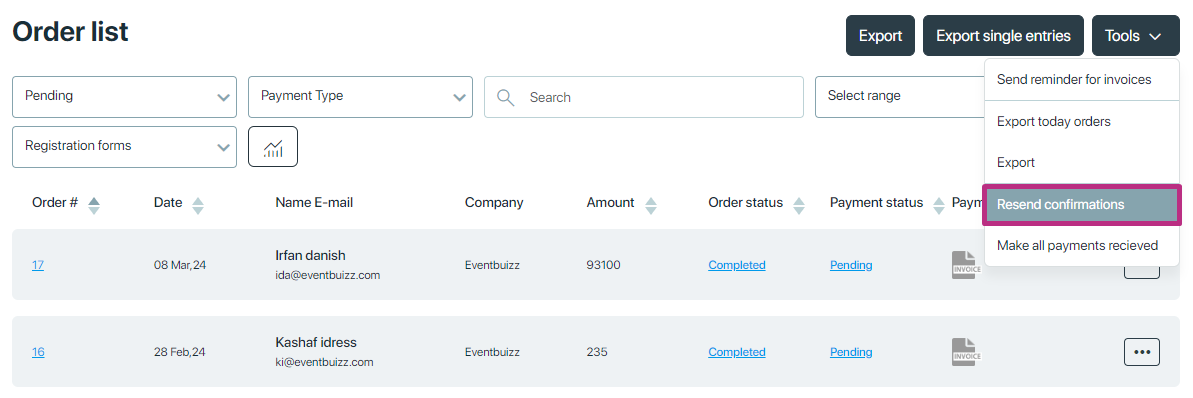
Make all payment received
Event organizers can mark all pending payments associated with an event as received in the system at once.
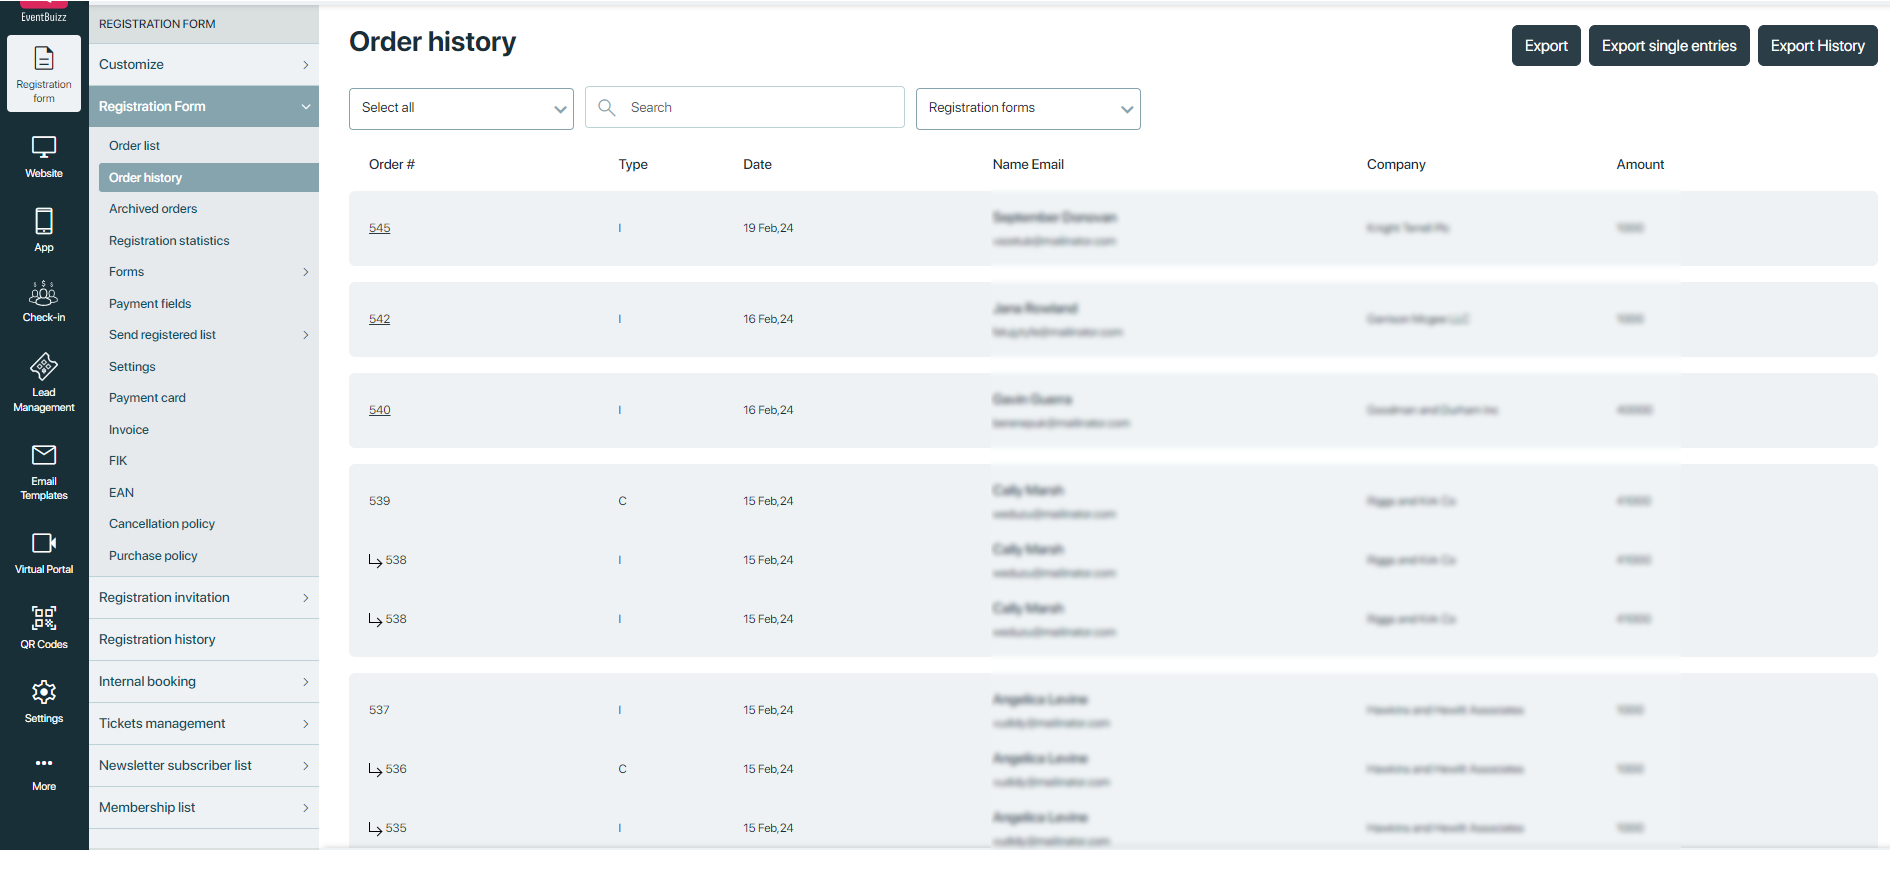
Order history is a complete change log of your orders. It contains orders, credit notes logs.
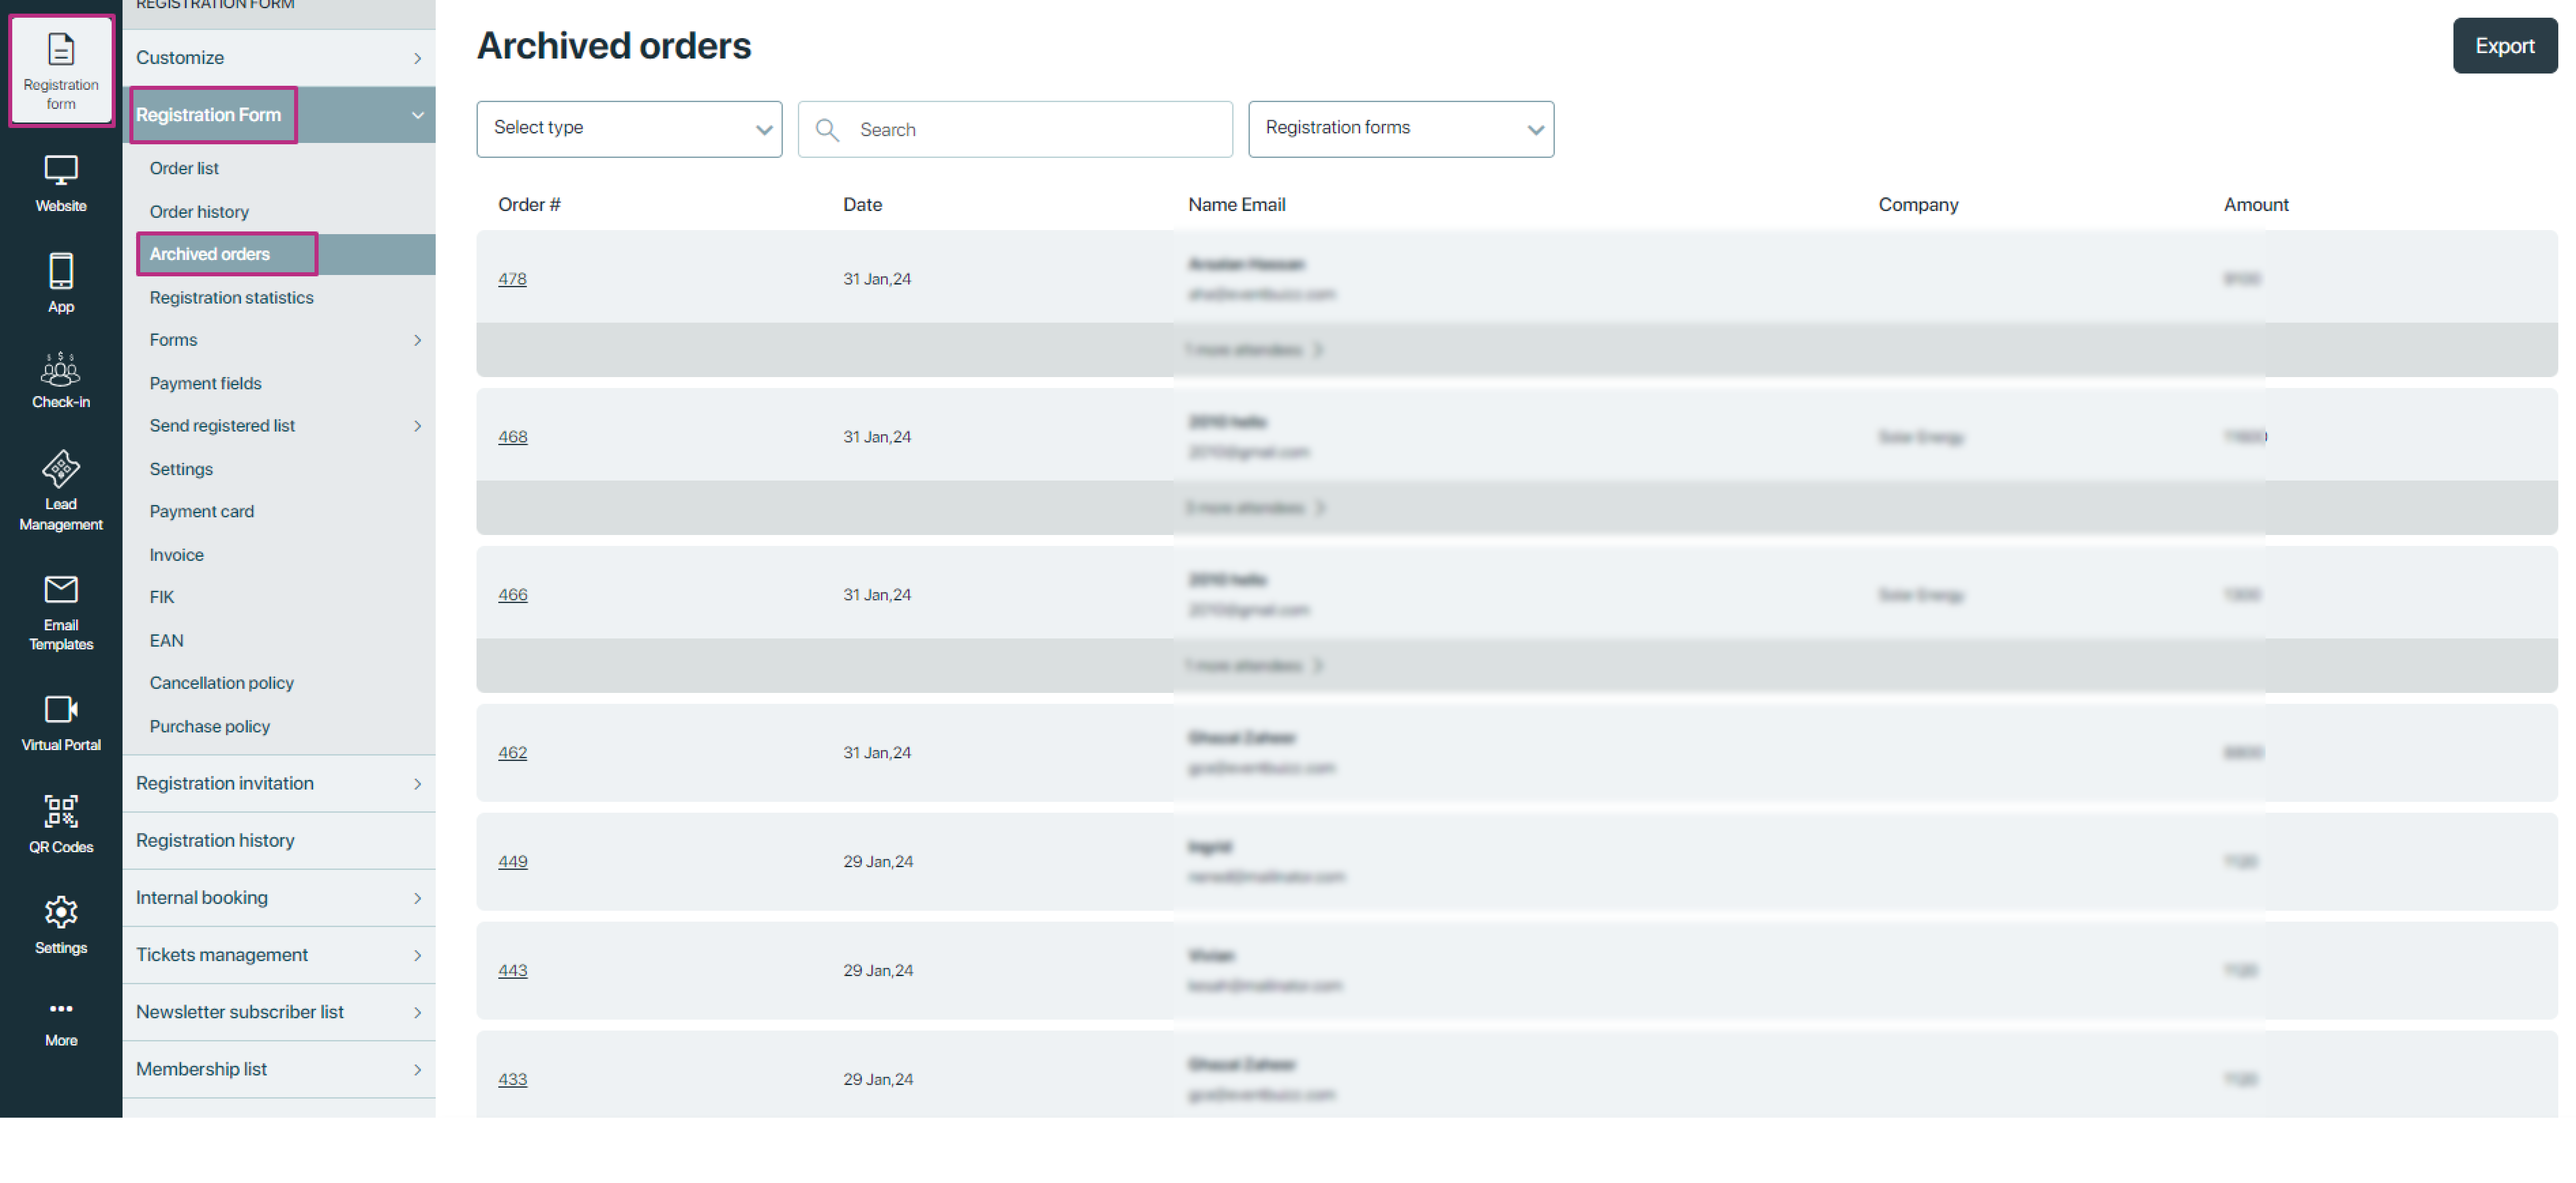
Archive Order feature likely refers to the ability to move completed or inactive orders to an archive or storage area within the system.
When an order is archived, it means that it is no longer actively displayed in the main order list interface but is still accessible for reference or historical purposes. This feature helps keep the order management interface organized by removing completed or older orders from the primary view without deleting them entirely from the system.
It is now possible to have a quick overview of your registration statistics without having to export a csv file first. You find the statistics under Registration form > Registration statistics.
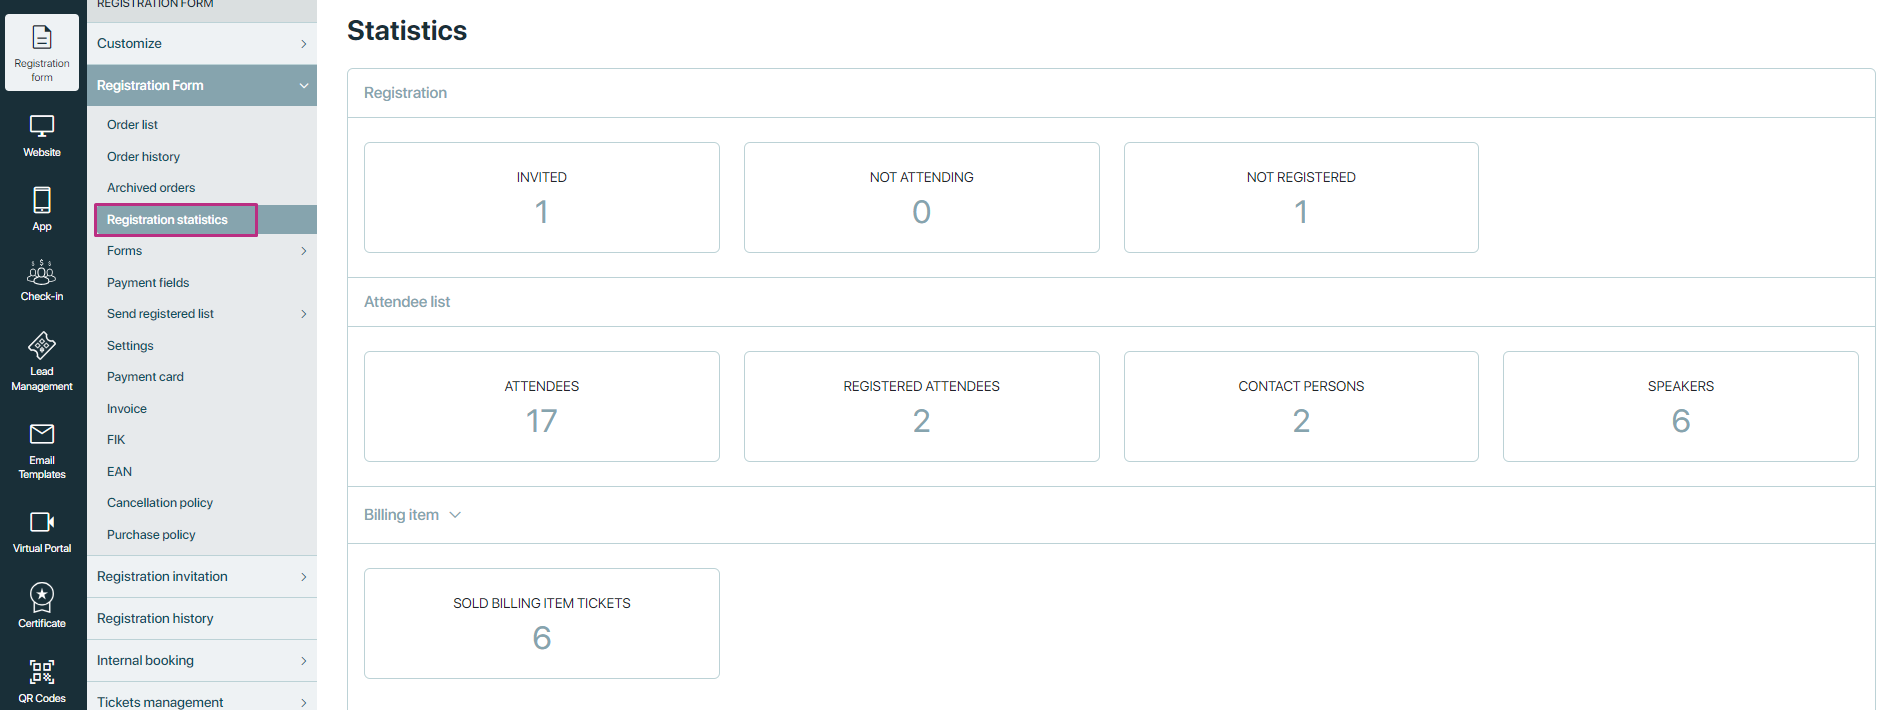
Registration – how many was invited, who declined and how many still haven’t responded.
Attendee list – how many in total are on the attendee list and how many of them have registered through the registration site. If you have assigned Speakers or Contact persons to your event you know that they appear on your attendee list. Here you can have a quick overview of how many there are.
Voucher – how many vouchers have been applied and if you click the arrow, you will see the specific vouchers that were applied.
Billing item/ Registration item – how many items have been chosen by the registered attendees, and if you click the arrow you will see the specific items.
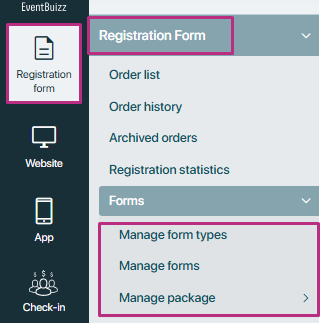
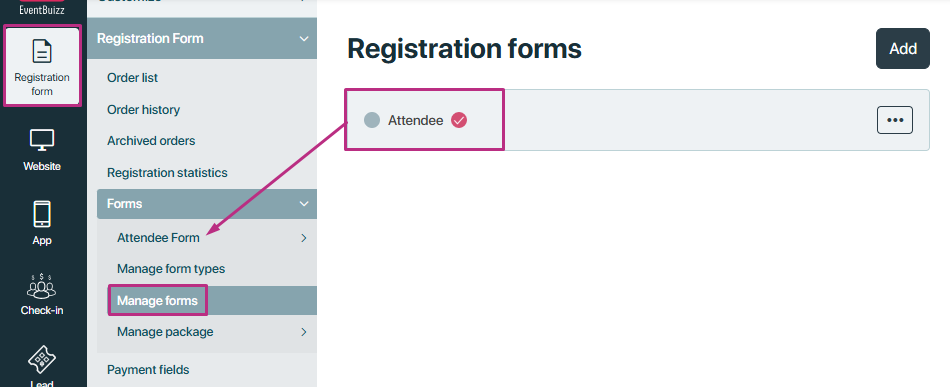
In Eventbuizz, the forms section within the registration system allows users to create, customize, and manage various forms used for event registrations. Forms are used to collect attendee information during the registration process for an event. This may include personal details, contact information, preferences, and any other relevant data required for event participation.
In Forms section, you can create and manage different forms used for registrations. Here’s how it works:
Manage Form Types
Manage form types is a feature that allows event organizers or administrators to customize and organize different types of forms used within the platform.
- You can create various types of forms to collect different kinds of information from attendees. For example, you might have a form for regular attendees, one for VIPs, or any other group you want to target.
- Add name of the form type. This area lets you choose which forms are active (visible and usable in the registration process) and which forms are inactive (hidden from users).
- You can also select form as the default – this is the main form used for most registrations.

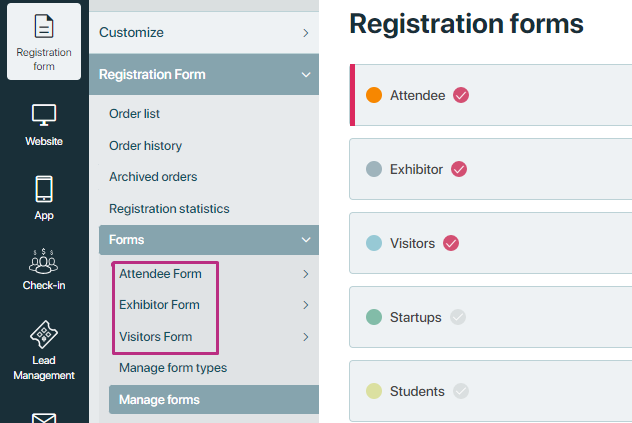
After a form is added and marked as active, it becomes visible in the listing menu, allowing event organizers to view, access, and manage it as part of the event’s registration setup. The listing menu acts as a centralized hub for all active forms, displaying each form’s name and provides an organized overview of all forms associated with an event, streamlining the management process and enhancing administrative efficiency.
Click on the three dots icon
to edit or mark it any form as inactive.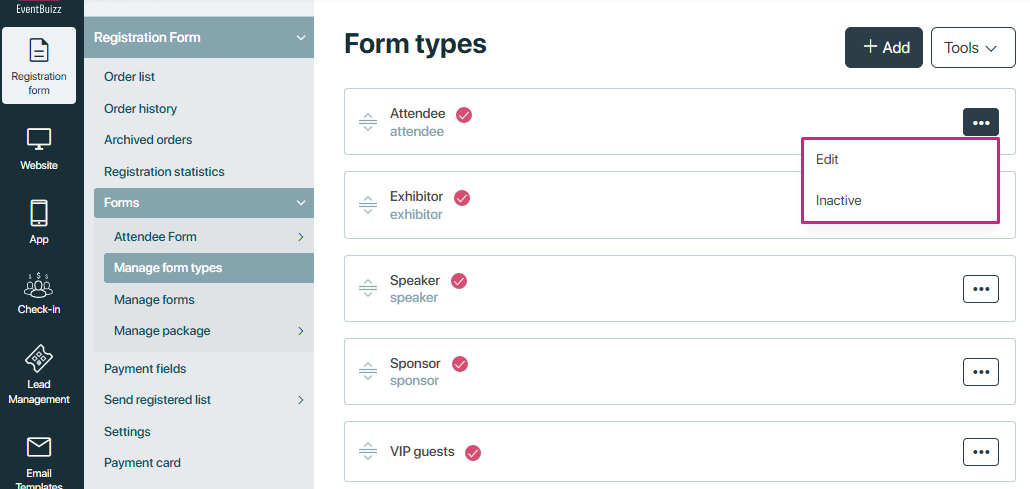
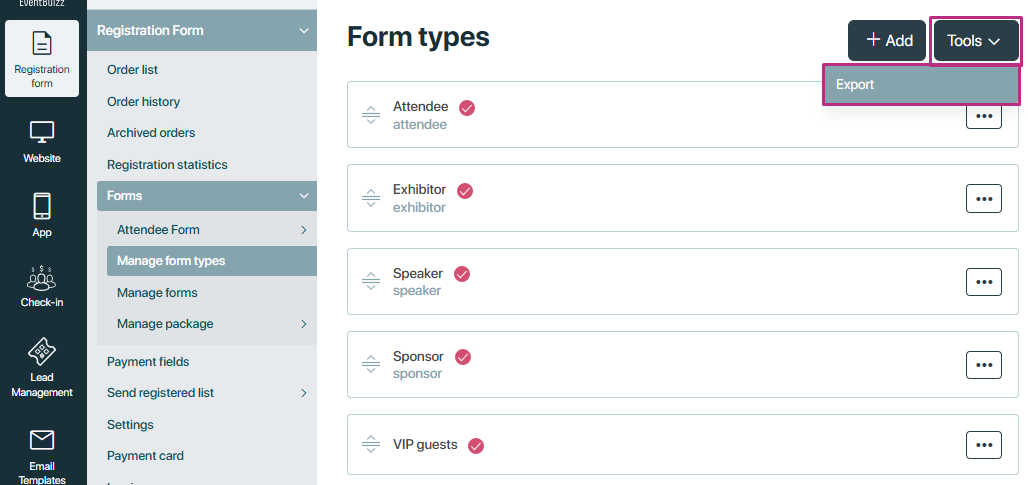
You can export all form types from Tools -> export.
Manage Forms
In this section, we handle registration forms. All forms are listed here. After forms are added in manage form types, they start showing up in the manage forms. By default, there is already an “Attendee Form” that is active and selected automatically. This default form is visible in the left menu, meaning it’s ready for use right away.
After forms are added, they start showing up in the manage forms. By default, there is already an “Attendee Form” that is active and selected automatically. This default form is visible in the left menu, meaning it’s ready for use right away.
If you want to add another form besides the default attendee form, you need to follow two steps.
- First, go to the “Manage form type” section and create the new form type.
- Once the form type is created, go back to the “Manage Forms” section to add it.
Upon clicking the “Add” button, A dropdown menu will appear showing all the form types that you have added in your managed forms type section. After selecting a form type from the dropdown, a separate registration form will be created, which can be used for the registration process.
Here, you can customize, activate, or deactivate the form as needed, making it available alongside the default form. This setup helps you keep all forms organized and ready to be used as part of your event registration process.
You can click on the
icon, to enable/disable it or set any form as the default option.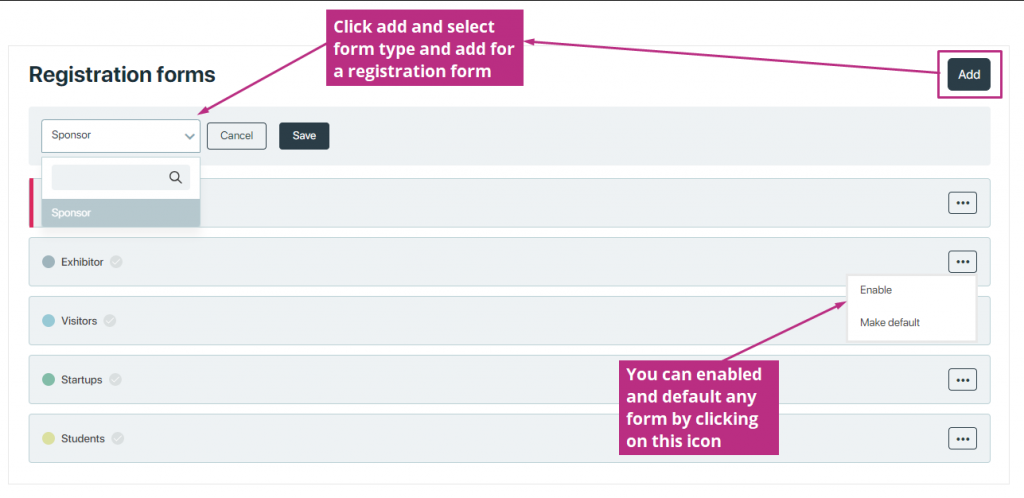
Once the form has been enabled, It will appear under Registration forms > forms section.
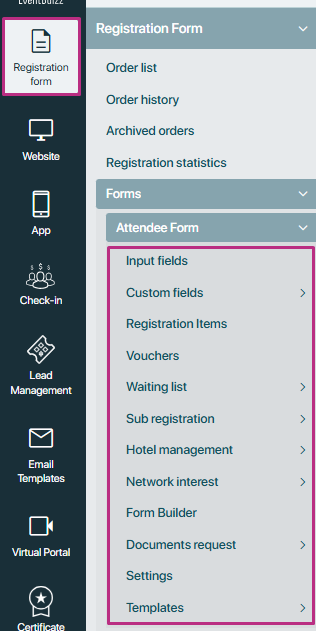
IMPORTANT NOTE: The default attendee form and all other forms have the same sub-menus. To learn more about these details, click here.
Impact on registration site
In the manage forms section, the form marked as “default selected” will automatically be the primary form displayed on the registration site. Any other available forms will show up in a dropdown menu, allowing users to choose a different form if they wish.
Users can select a different form depends on the settings.
- If the setting is turned ON, users can freely change their attendee type by selecting a different form from the dropdown.
- If the setting is turned OFF, a lock symbol will appear next to the attendee type option, indicating that users are not allowed to change their type. This setup gives organizers control over whether or not users can switch their registration type during the signup process.
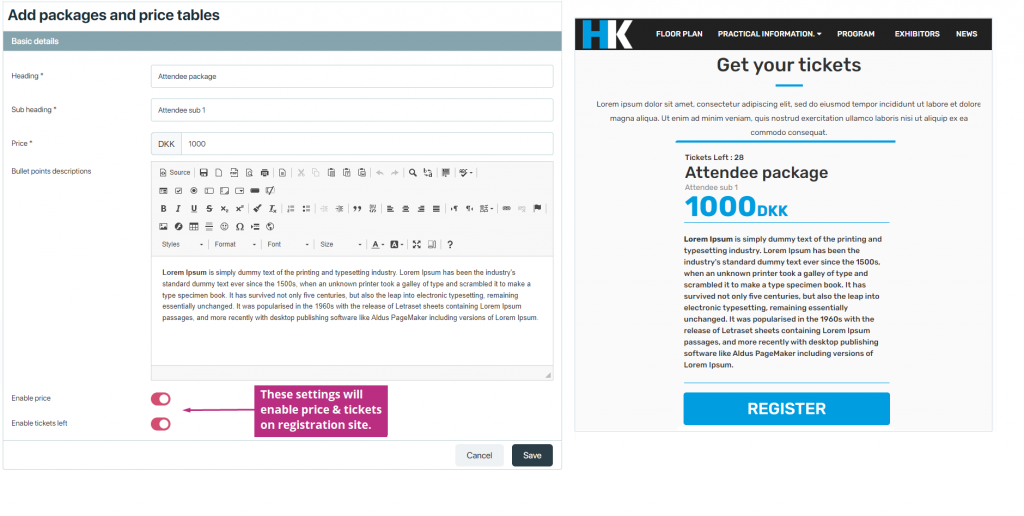
Manage Package
In this section you can manage your registration and price packages, with or without prices. These are only displayed if you have multiple participant types, each of which has its own registration form.
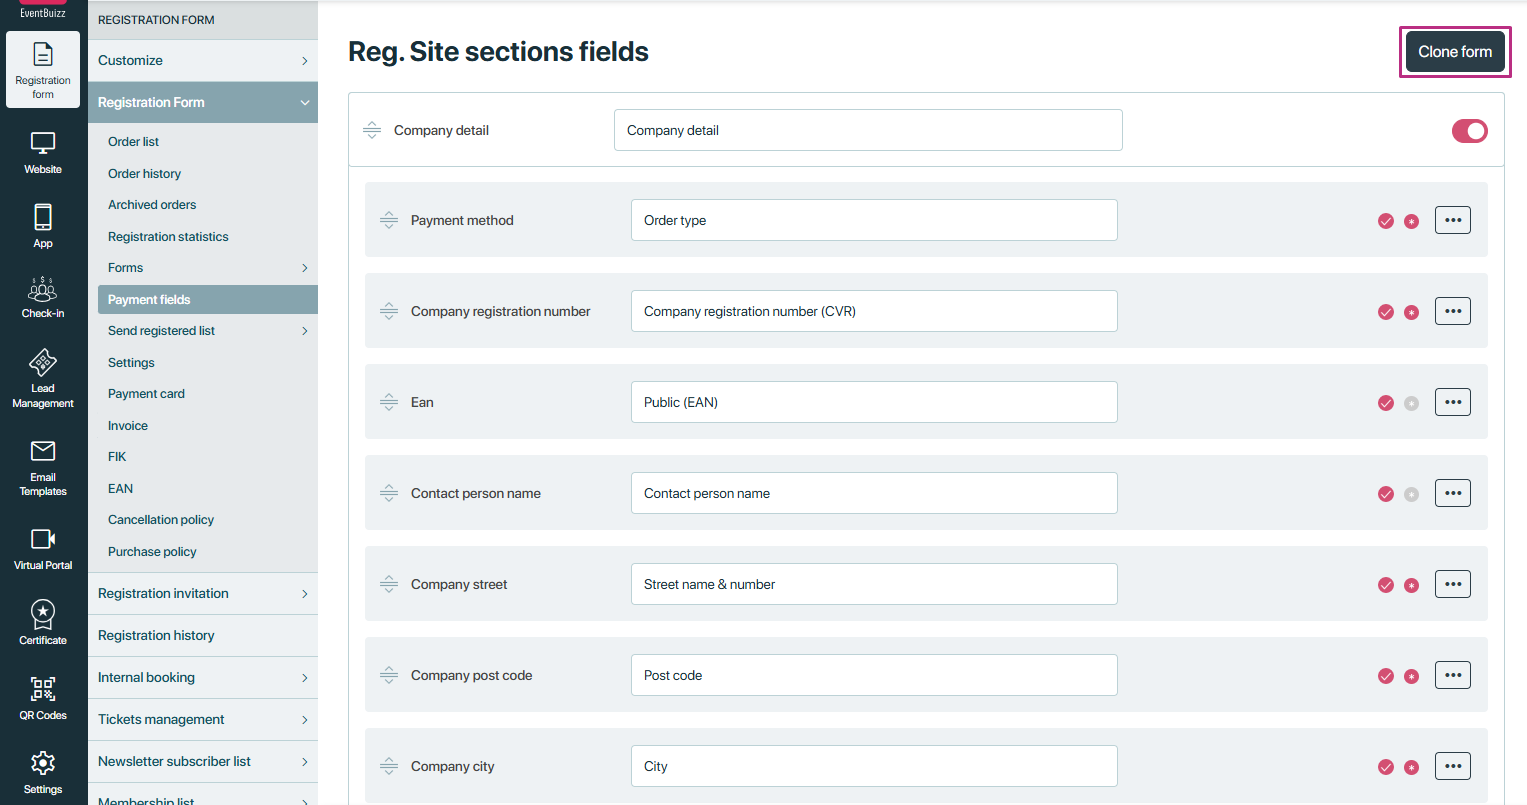
Payment fields refer to the sections or forms where attendees can input their payment information to purchase tickets or register for events. These fields usually include information such as credit card details, billing address, and any other relevant payment information required to complete the transaction securely.
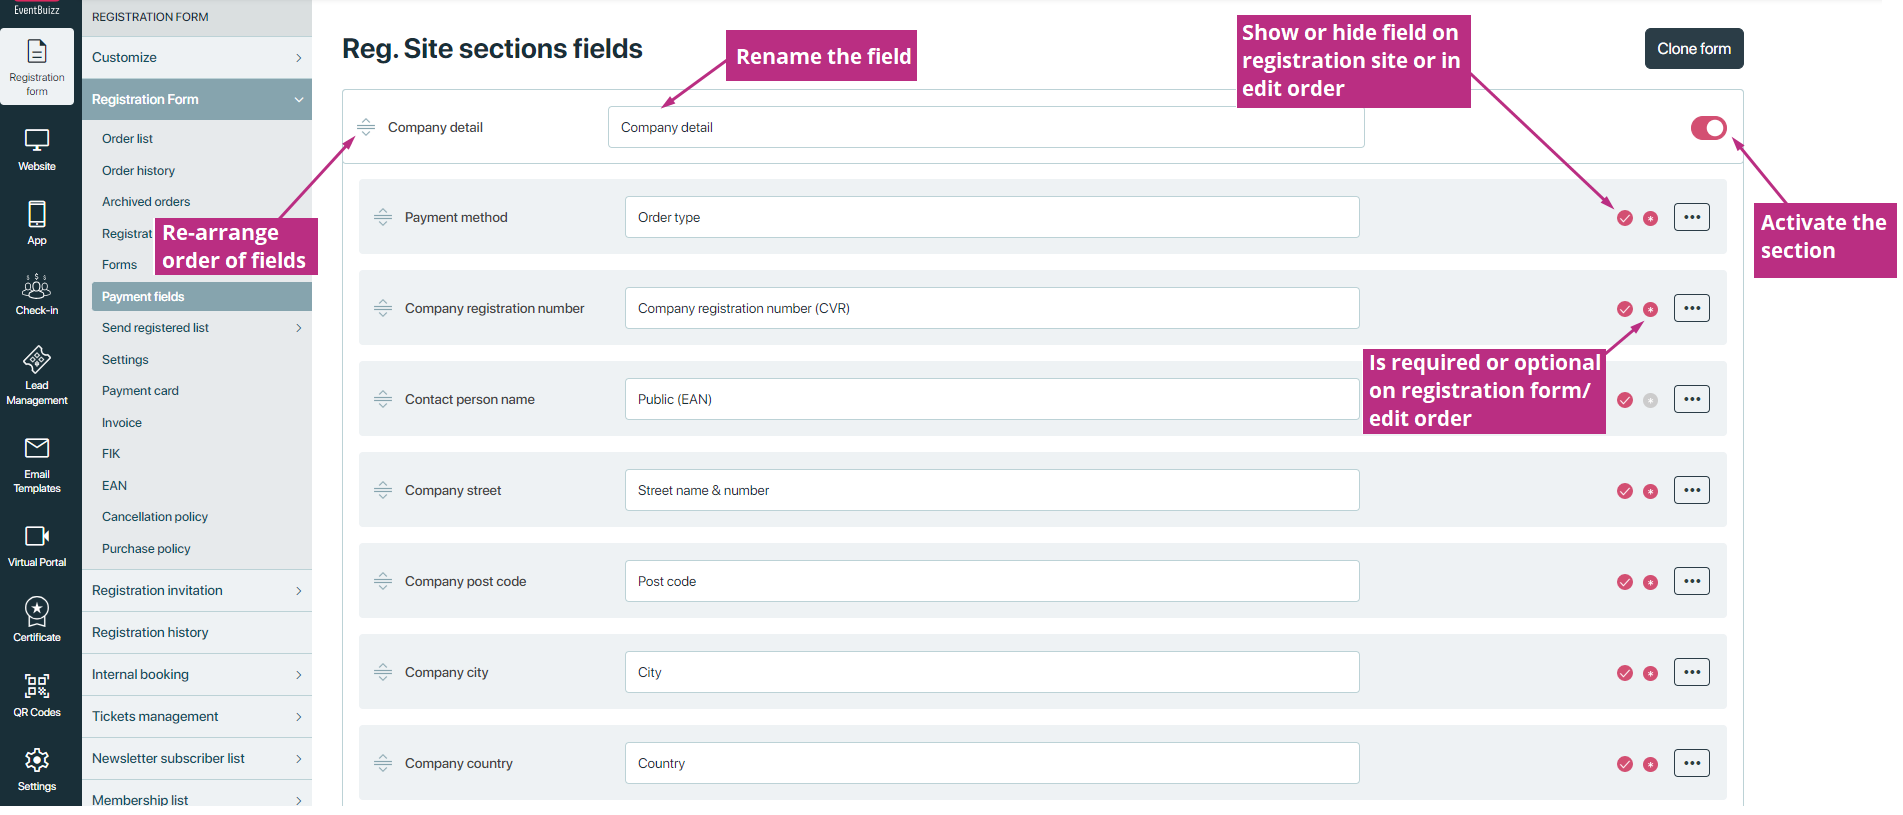
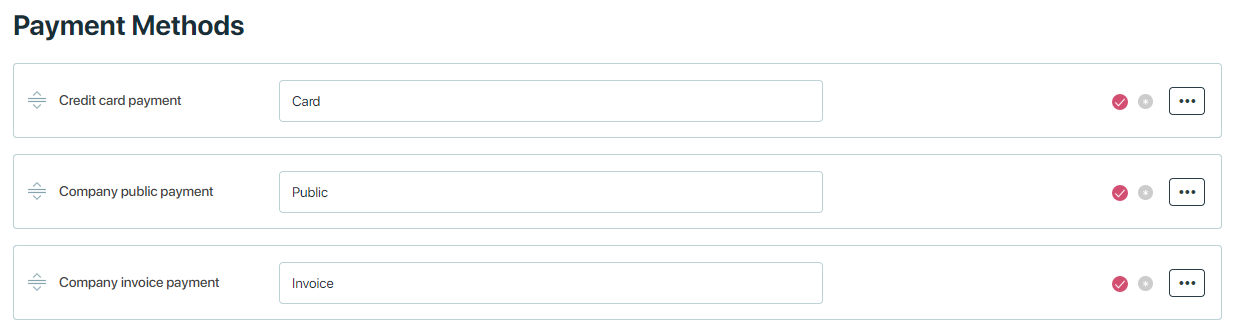
Payment Methods:
Eventbuizz supports 3 payment methods:
- Card: Card payment allows attendees to use credit or debit cards for instant payment during event registration
- Public: Public payment methods encompass widely-used options like credit/debit cards , ensuring convenience for attendees.
- Invoice: The invoice payment method permits attendees to request invoices for their registration fees, catering to those preferring offline payment or needing invoicing for organizational purposes.
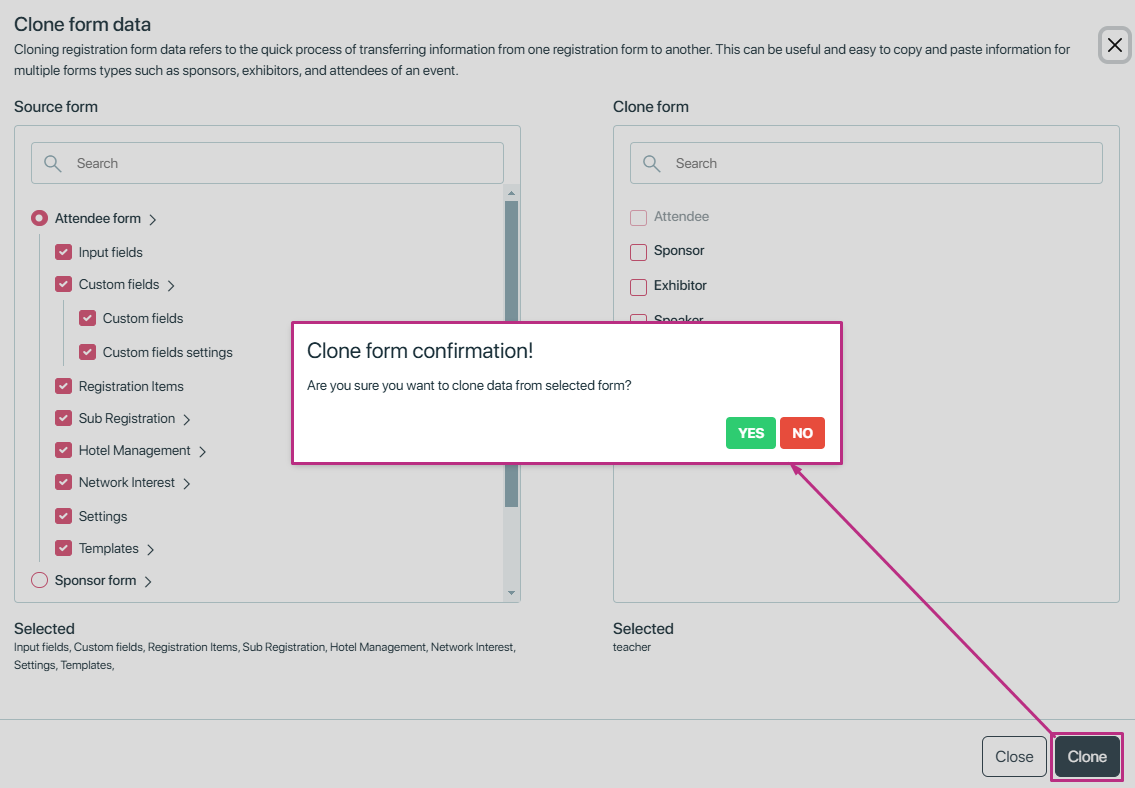
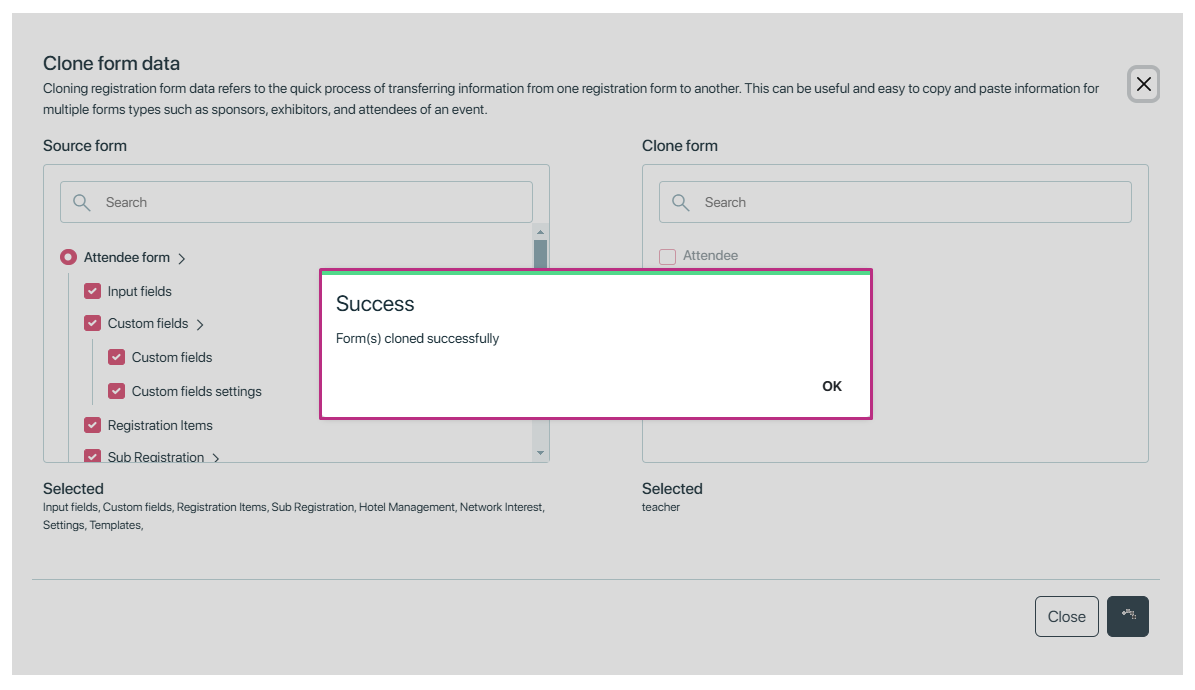
Clone Form
The clone form feature allows you to easily duplicate an existing payment fields of registration form, making it quicker to set up a similar form without starting from scratch. When you clone a form, it copies over all the key sections, including the input fields where attendees fill in their details, and any custom fields you’ve created for additional information. It also duplicates registration items like ticket types or extra options, as well as sub-registration sections for adding additional participants. If the original form includes hotel management details for booking, network interest options for connecting attendees, and specific settings or conditions, these are all copied as well. Additionally, any templates used for the layout or design are replicated, helping you create a new form with the same structure and style as the original.
You can clone form usually by clicking a button “Clone form”.
When you click the clone button, a new form will open. In this form:
- On the left side, you’ll see a list of forms that have all sections available.
- On the right side, you’ll see a list of forms where the data can be copied.
In the cloning process:
- From the source form, we can select only one form at a time to copy from.
- For the target forms (the forms where we want to copy the data), we can choose multiple forms at once.
This means that all form data, including Input fields, custom fields, registration items, sub registration, hotel management, network interest, settings, templates,, can be copied from one source form to several target forms in a single step. Once cloned, all the hotels in the target forms will share the same availability. This helps if we want to use the same form setup across different forms quickly and keep availability in sync.
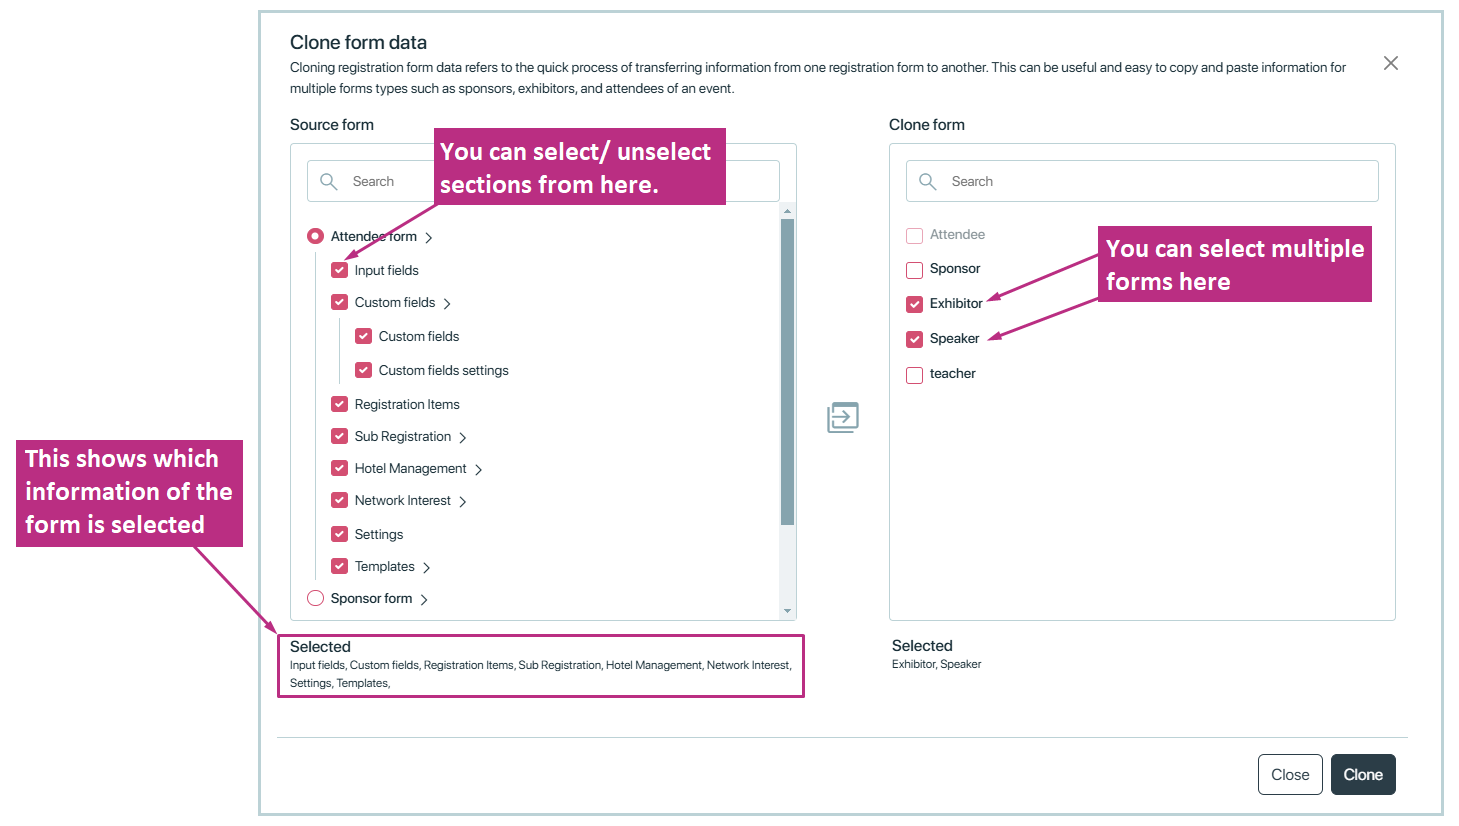
After selecting everything, click the clone button. A new confirmation popup will appear. When you click Yes on this popup, all events and details from the source form will be copied to the selected destination forms.
This means that everything from the source form, including all details, will be duplicated exactly in the destination forms.
Add people from your organization or business partners who want to keep track of the number of people registered for your event. Mark the people who should receive the WEB link/web address. The recipient simply needs to click on the link to get an updated list of participants in excel format. It is a good idea to encourage the recipients to save the link. In that way they can retrieve an updated list themselves as often as they wish.
Note: This list does not include manually registered participants which are created from Event Center.
The purpose of registration form settings is to provide flexibility and control over how the registration process works for an event. These settings allow event organizers to customize and manage various aspects of the registration forms to meet specific needs.
Registration site settingsRegistration optionsEmail notificationsInvoiceHotel settingsPayment gatewayDiscountsLet’s break down these settings:
Type of registration site:
- Free Registration: Users can register for the event without any payment.
- Billing Registration: Users need to provide billing information during registration, indicating that there might be a cost associated with attending the event.

NOTE: Once the type of an event is defined, it cannot be changed after orders are placed. If there is a need to change the event type, then all orders associated with that event must be cancelled.
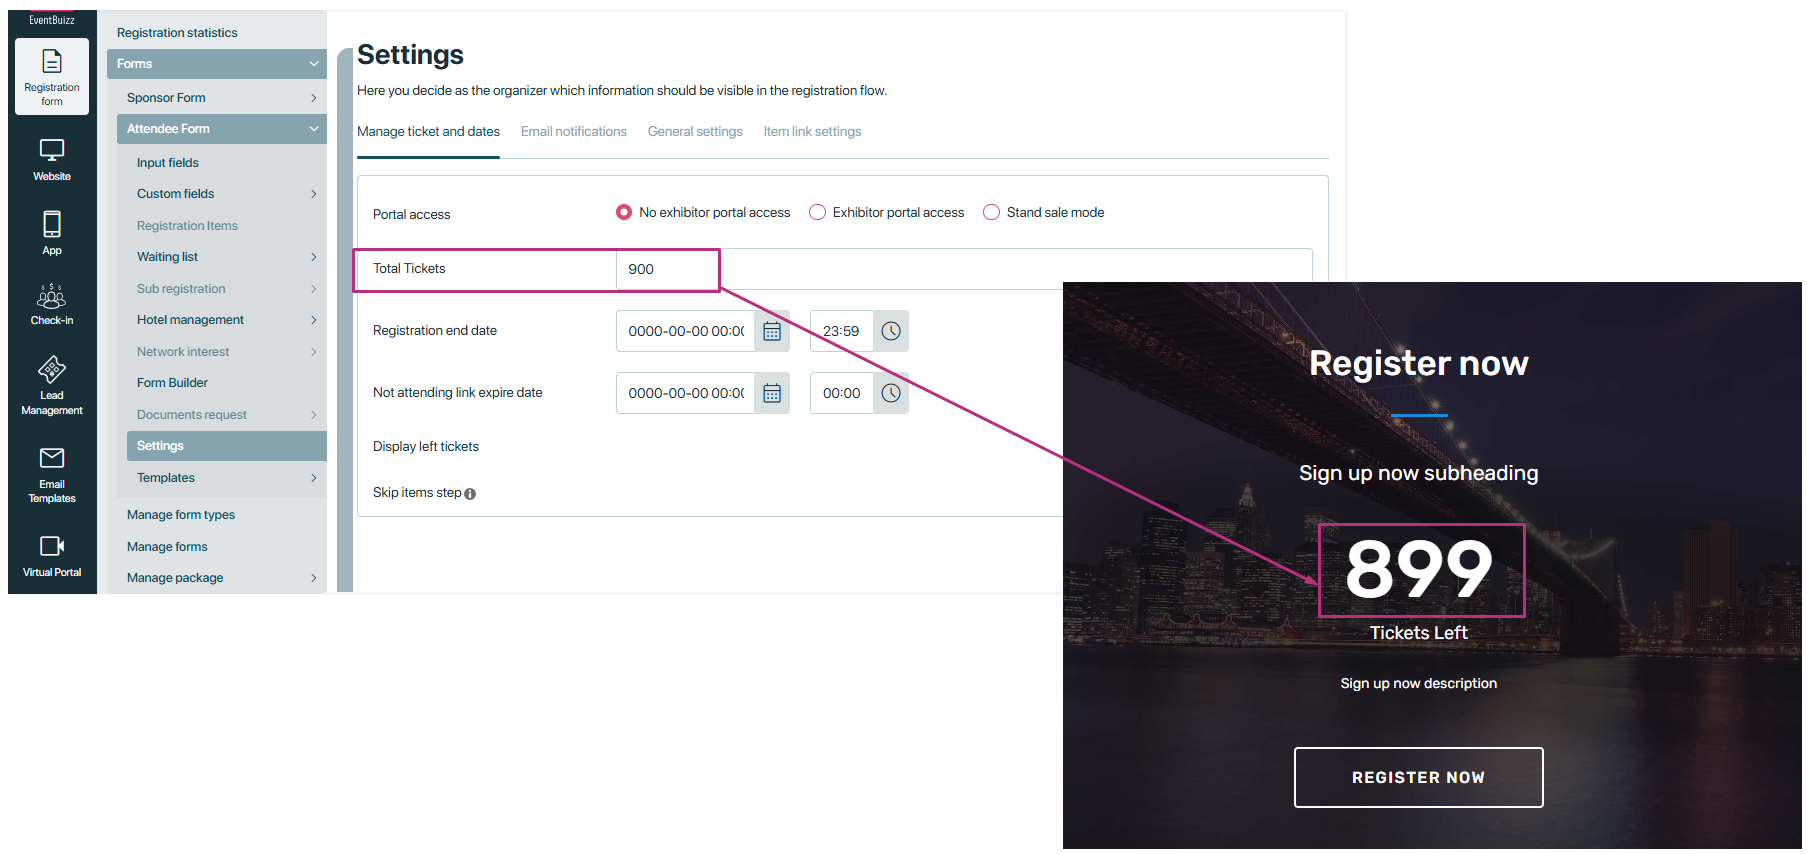
Total Tickets:
Indicates the total number of tickets available for the event. We can define ticket availability at two levels: To set up tickets for form level or event level, follow these steps:
- Form Level Tickets:
Go to Registration Form → Forms → Select a specific form → Settings. - Event Level Tickets:
Go to Registration Form → Settings.
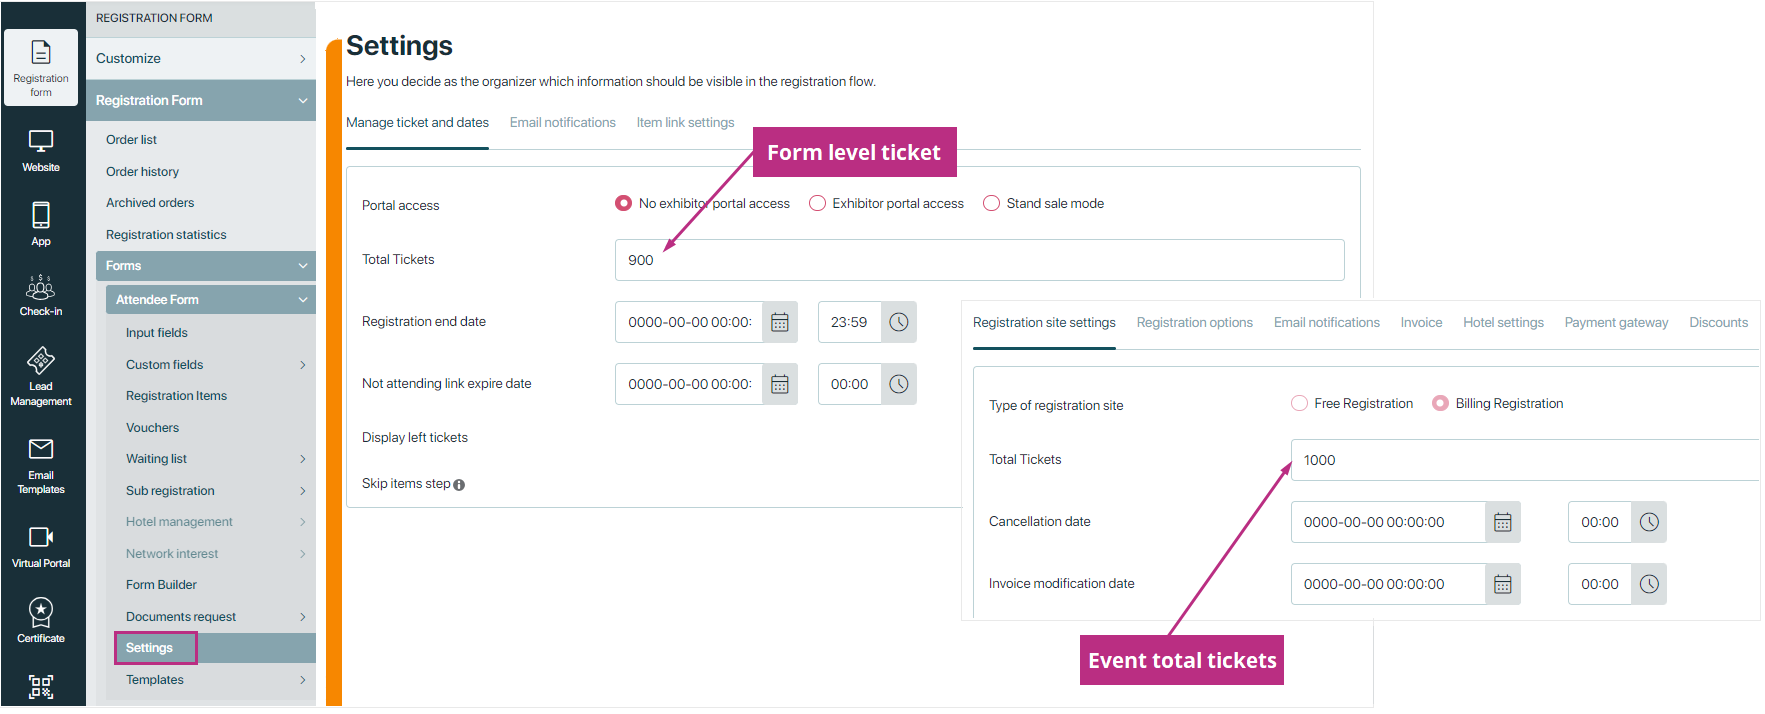
Important Note: If we have only one active form, we display its tickets on the event site. However, if there are multiple forms with their own tickets, we do not display any form-level tickets or event-level tickets on the eventsite.
How many attendees can register?For example, if the event has 1,000 tickets and a form has 900 tickets, the registration limit will depend on whichever level (form or event) reaches its ticket limit first. Only the number of attendees that fall within the lower ticket limit will be able to register. This ensures ticket availability is managed efficiently and prevents exceeding the overall event capacity.
Important Note:
The registration limit will depend on whichever level (form or event) reaches its ticket limit first.
These total ticket count is only available for the order from registration site, it will not include tickets of assigned and imported attendees
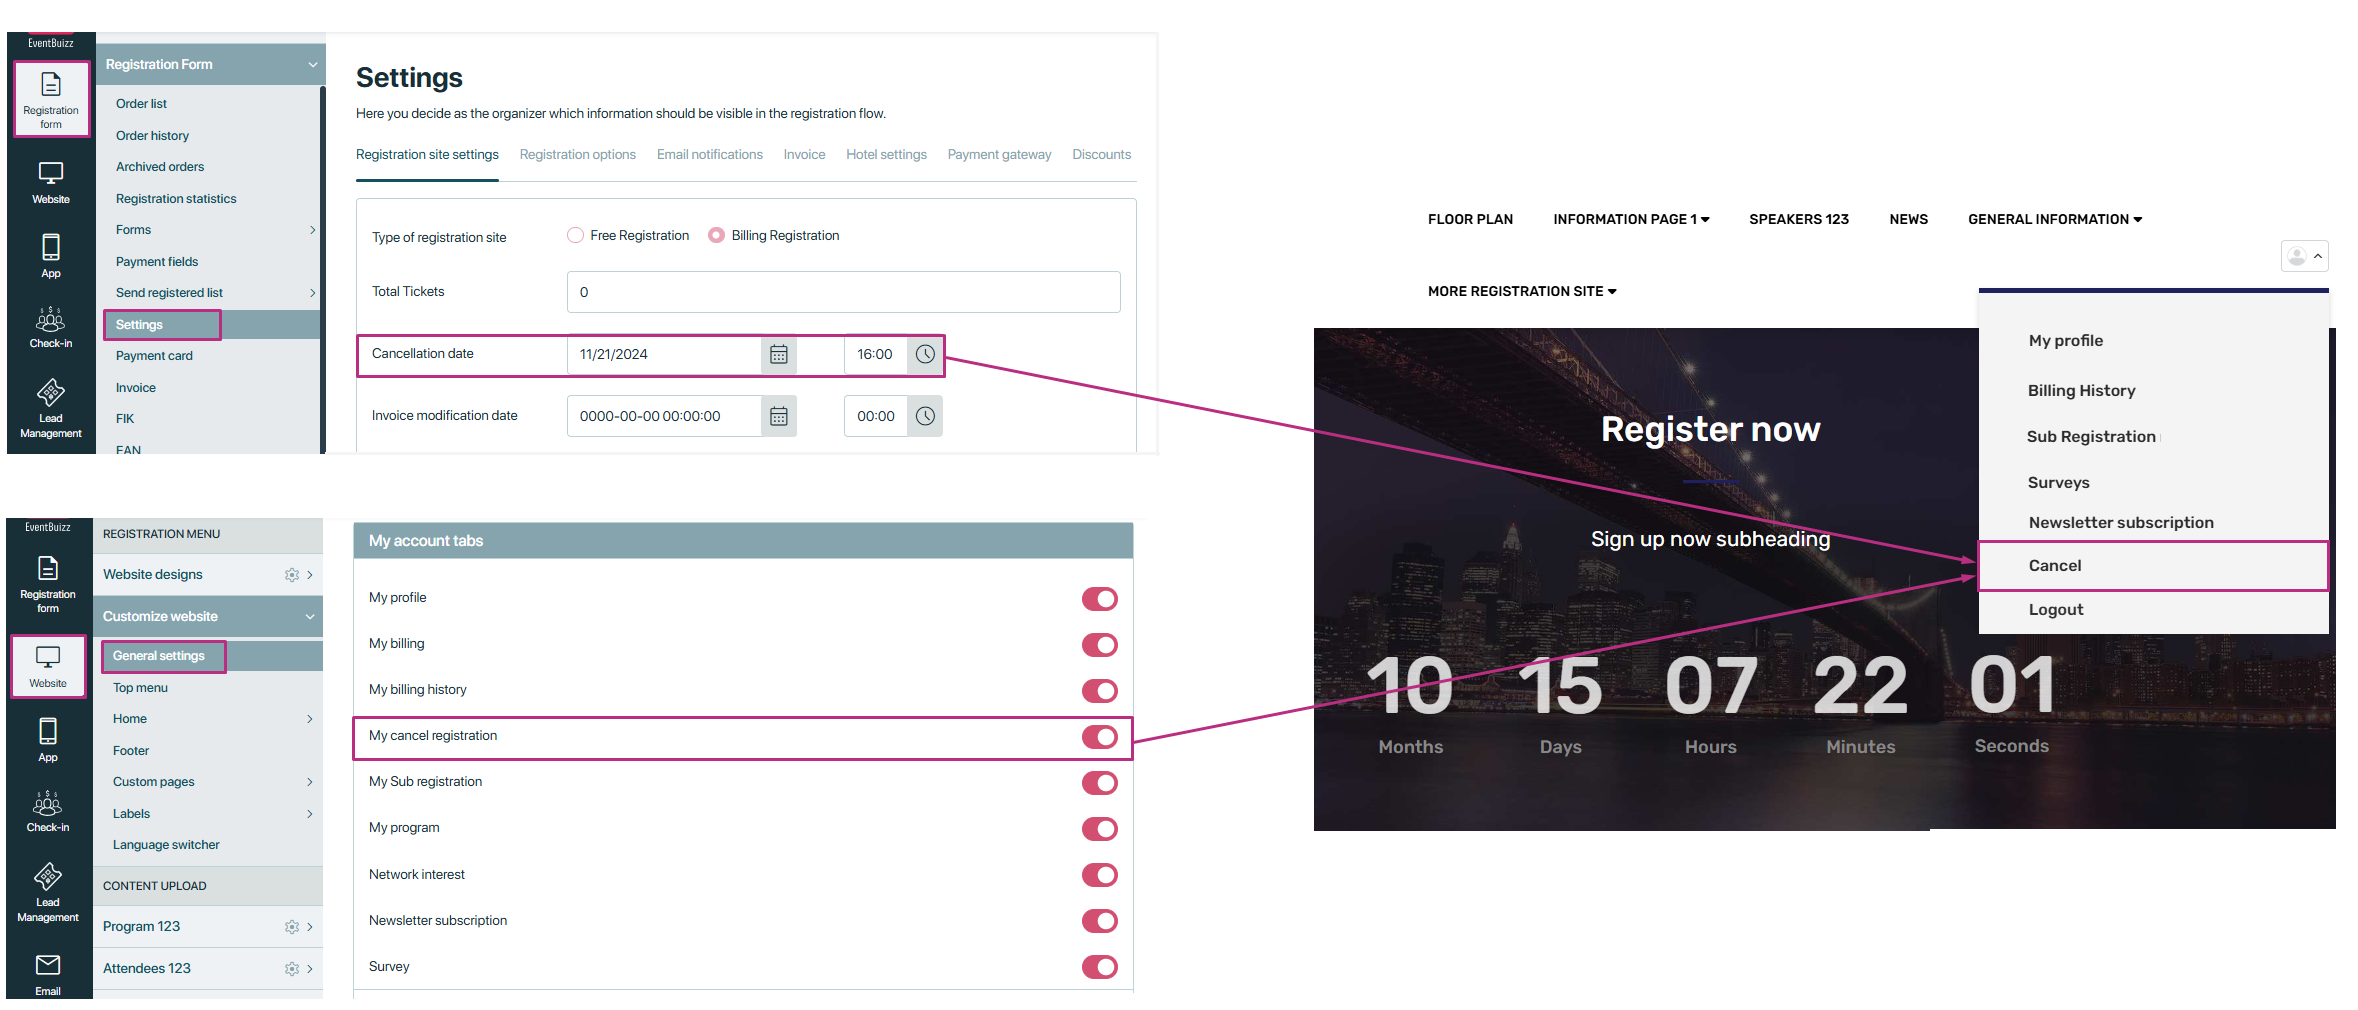
Cancellation dateCancellation Date refers to the deadline set for attendees to cancel their registrations. It is a specific date and time configured by the event organizer to manage cancellations effectively.To set the cancellation date, follow these steps:
- Go to Registration Form.
- Click on Global Settings.
- In the Registration Site Settings, find the Cancellation Date option.
- Set the date from there.
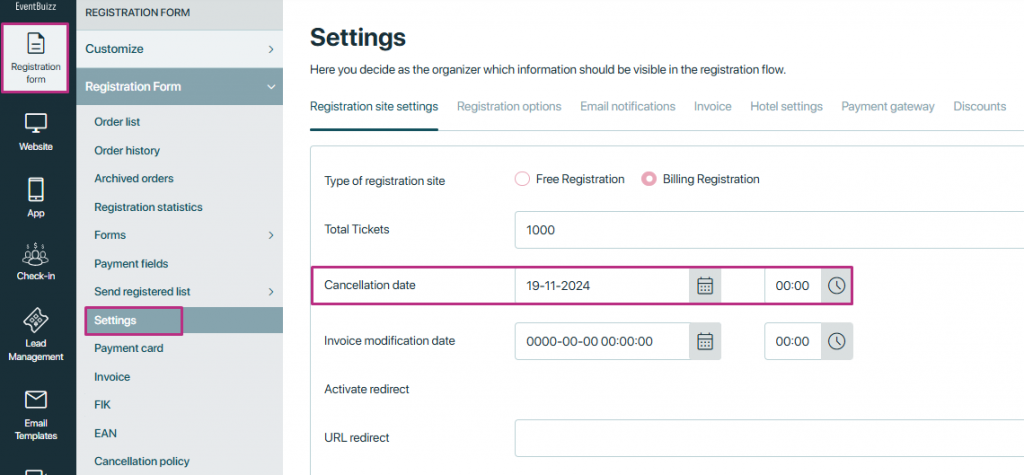
How cancellation date works:
-
Set the cancellation date:
The organizer sets a specific cancellation date in the system. This is the deadline until when attendees can cancel their registration or order. -
Enable my account tab:
In the customize website settings, the organizer turns on the my account tab. This allows attendees to access their accounts and manage their registrations. -
User cancellation:
If both conditions are met (cancellation date set and my account tab enabled), users can log in to their account and cancel their order or registration before the cancellation date passes. -
Post deadline:
After the cancellation date, users will no longer be able to cancel their order or registration.
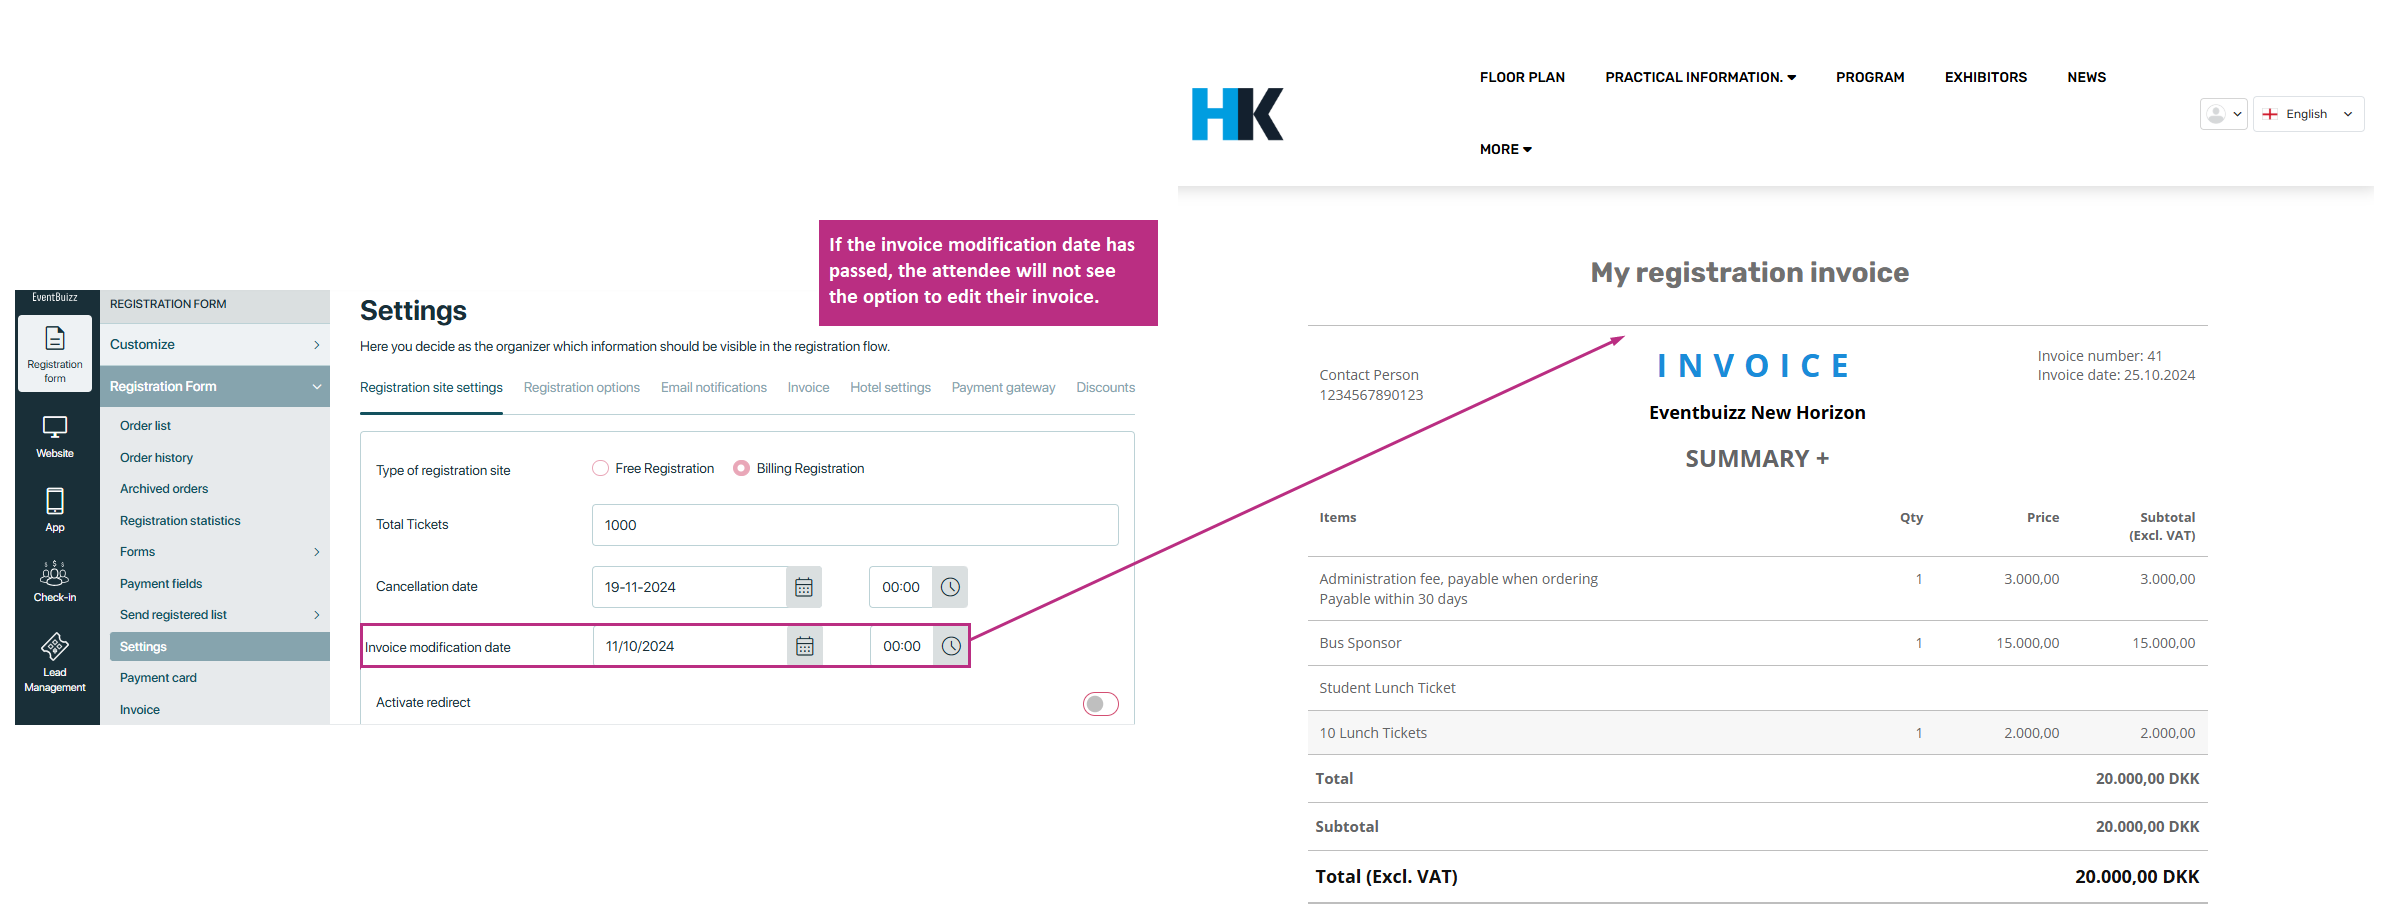
Invoice modification date:The Invoice modification date is a deadline set by the event organizer, which defines the last date attendees can request changes to their invoices. This ensures that any modifications to billing information, such as attendee names, addresses, or payment details, are made before the specified date.
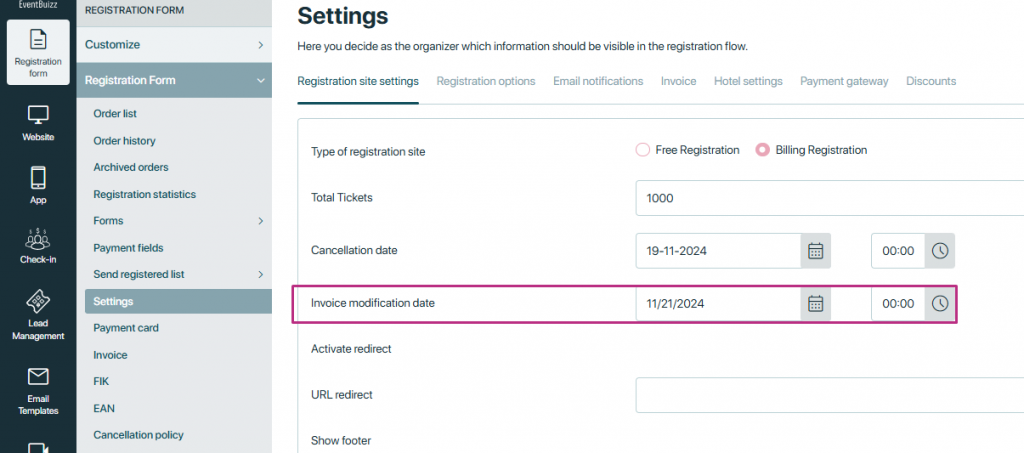
How invoice modification date works-
Setting the date:
The event organizer configures the invoice modification date in the system during event setup. -
Notification to attendees:
Attendees are informed about the invoice modification deadline, ensuring they request any changes within the set timeframe. -
Modification period:
Attendees can make changes to their invoice details through their account or by contacting the organizer until the modification date. -
Post deadline:
Once the modification date has passed, invoices become locked, and no further edits are allowed.
If the invoice modification date is set in the future, the attendee will have the option to edit their invoice.
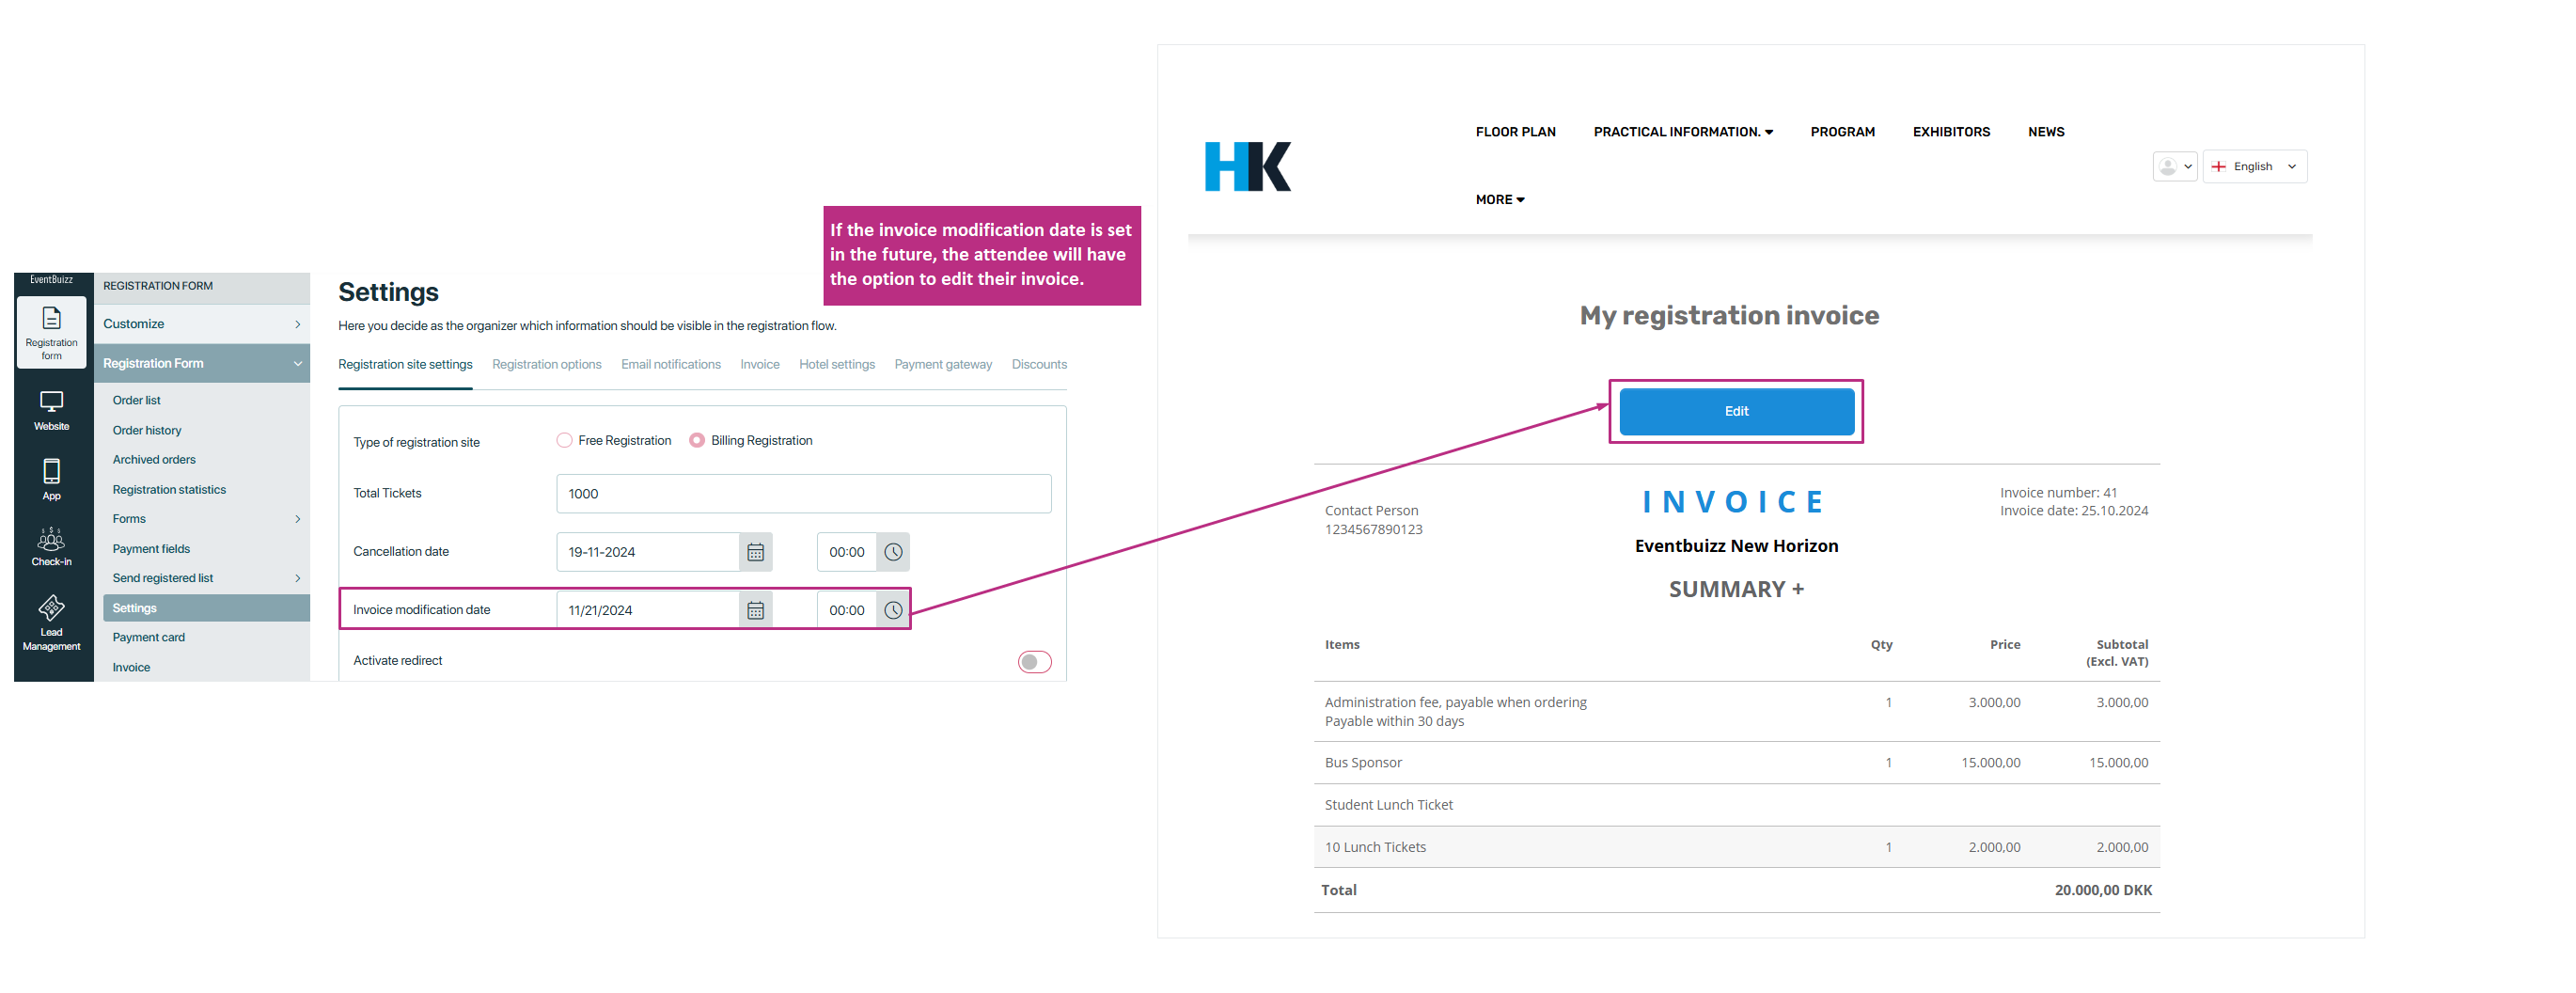
Important Note: If the invoice modification date has passed, the attendee will not see the option to edit their invoice.
Activate redirect
Activate redirect is a feature that enhance user experience by automatically redirects attendees to a specific page or URL after they complete a particular action. This could include actions like submitting a registration form. The redirect ensures that attendees seamlessly move to the next step without needing to manually navigate. For instance, after registering for an event, attendees might be redirected to a thank-you page, an event schedule, or additional options like accommodation booking or event updates.
URL redirect
Specifies the destination URL for redirection if the ‘Activate redirect’ setting is enabled.
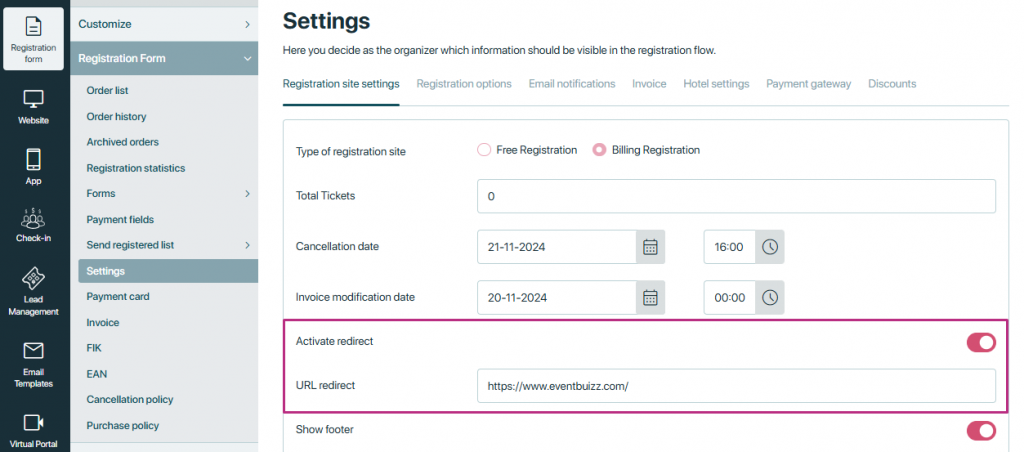
How activate and URL redirect works:- You first need to turn it on by enabling the activate redirect URL setting.
- Enter the desired URL in the URL Redirect field. This is the web address where attendees will be redirected after they complete an action, like registration or placing an order.
- The redirect happens without any manual steps, saving time and ensuring attendees get the required information instantly.

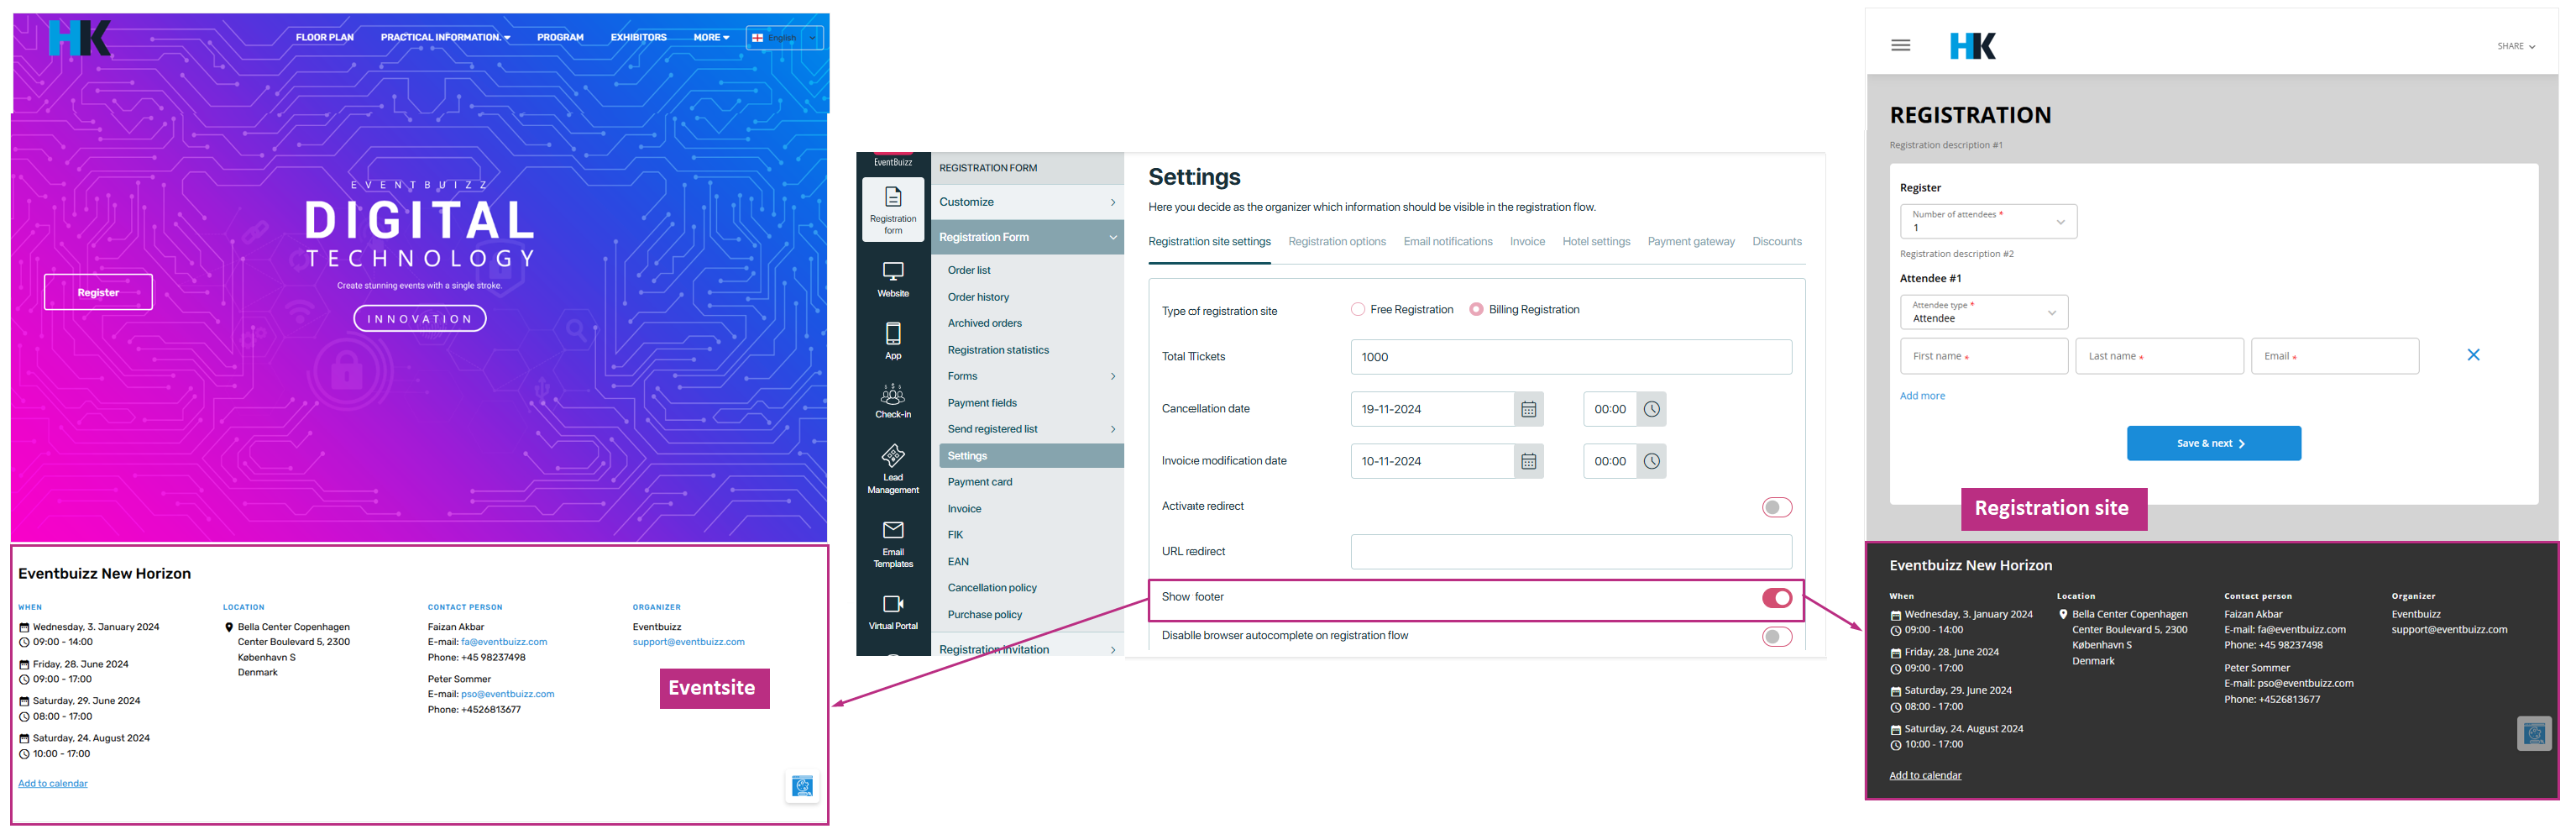
Show footer
The footer typically refers to the section located at the bottom of pages, which usually contains important information such as:
- Contact details such as Contact person, Organizer name,
- Opening days and hours,
- Location
- Privacy policy and Terms and conditions.
By enabling this setting, the footer will appear on both the event site and the registration site. Disabling it will hide the footer from these sites. This allows customization based on the event’s needs or preferences.
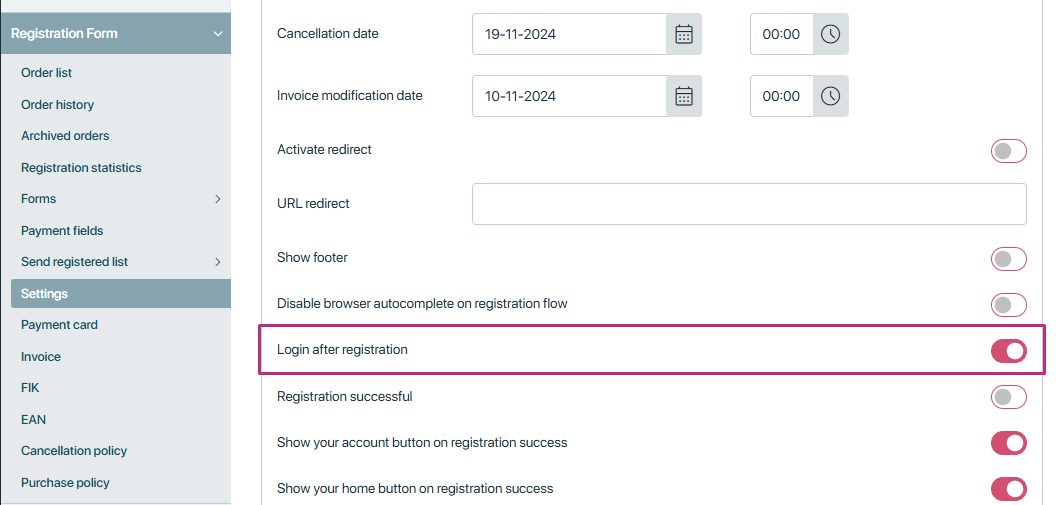
Login after registration
This login after registration automatically authenticates a user and logs them into their account as soon as they successfully complete the registration process for an event or platform.
How login after registration works:
- The user completes the registration form and place an order.
- The system verifies the input data (e.g., unique email, valid details) and stores it in the database.
- Upon successful registration, the system programmatically logs in the user by generating a session or authentication token for them.
- After logging in, the user is redirected to their personalized dashboard or any specific landing page designated by the organizer.
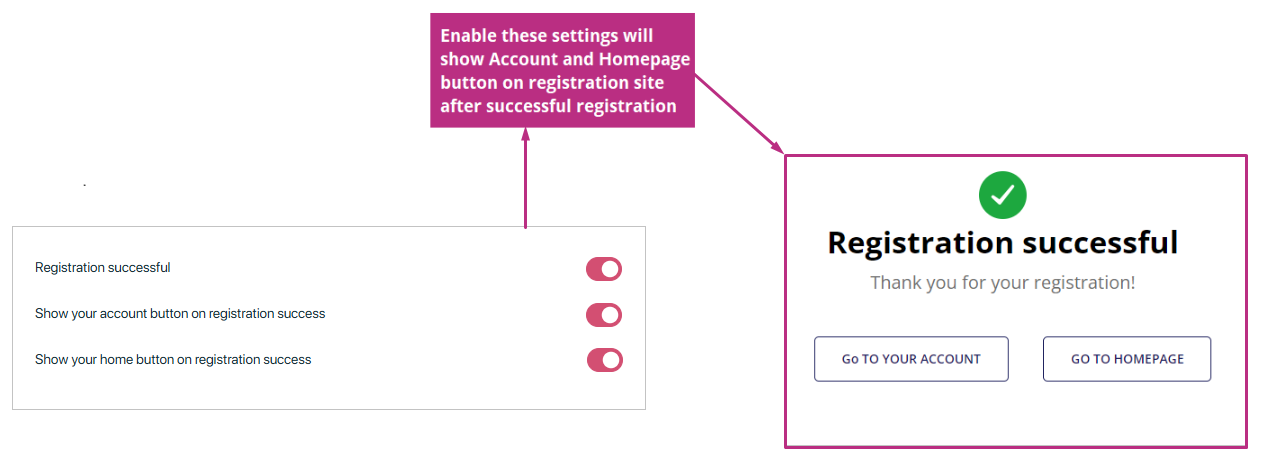
Registration successful
This is a notification or message displayed to users after they register successfully. It confirms that the registration process is complete. Once the registration form is submitted and validated, the system displays a success message like “Registration Successful” on the screen.
Show your account button on registration success
This setting adds a button on the registration success screen that links users to their account or profile page.
- After the registration success message is displayed, a button (e.g., “Go to My Account”) appears.
- Clicking the button redirects users to their account dashboard or profile page.
Show your home button on registration success
This setting adds a button on the registration success screen that directs users to the event or platform’s home page.
- After the registration success message, a button (e.g., “Go to Home”) is displayed.
- Clicking the button takes users to the platform’s homepage.
Registration flow embed linkThe “Registration flow embed link” allows event organizers to integrate the registration process seamlessly into external websites or webpages.

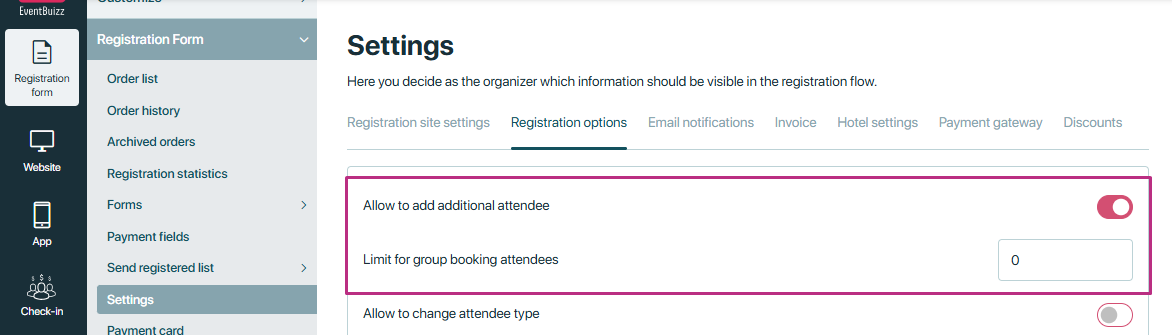
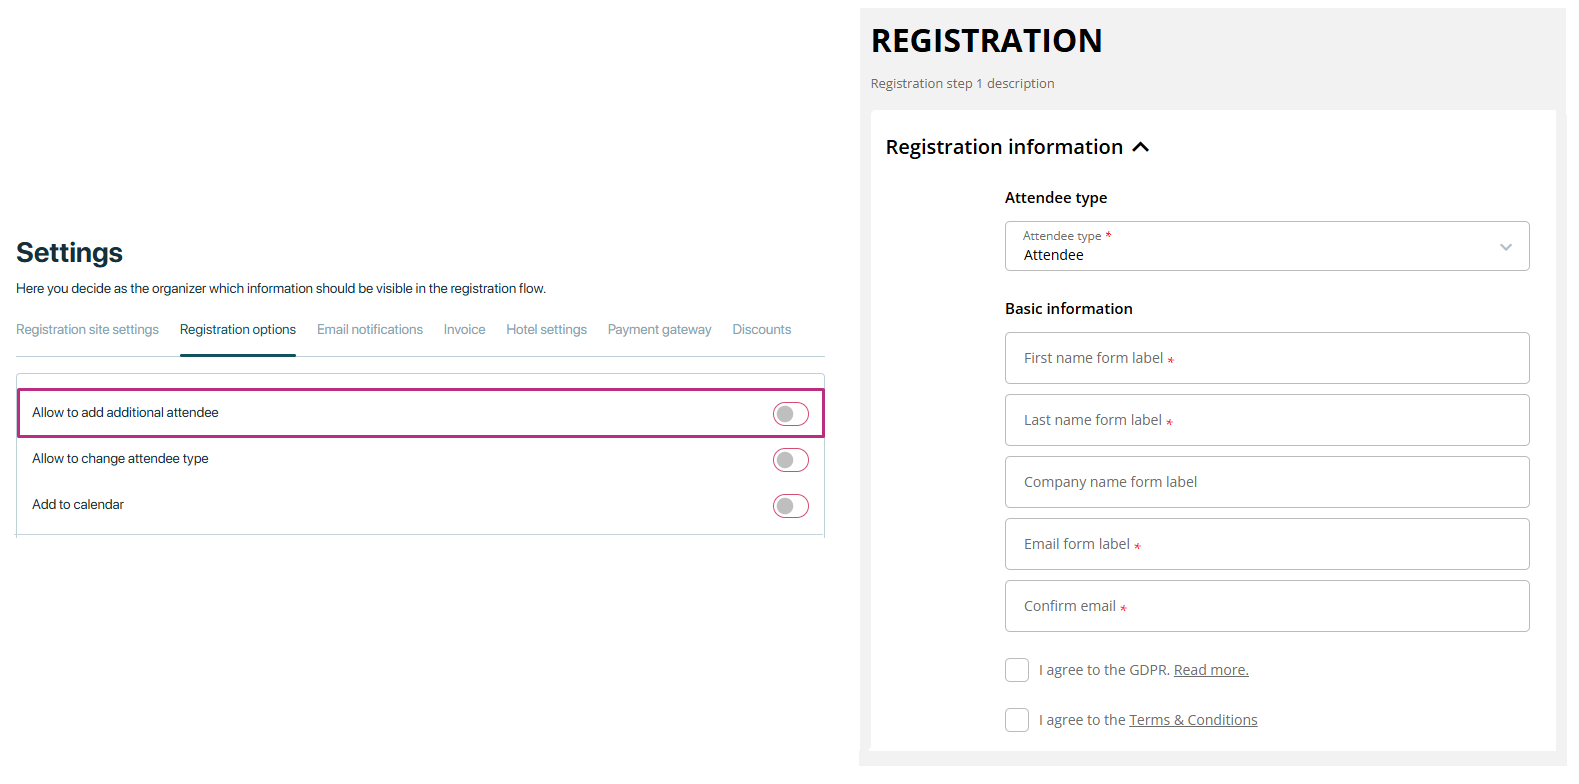
Allow to add additional attendee
The allow to add additional attendee setting lets the main registrant (the person filling out the registration form) add extra attendees as part of their booking. This is useful for group registrations or when one person is signing up on behalf of others. This setting allows a single user to register multiple attendees in one go, saving time and effort.
When this setting is turned ON, a field called limit for group booking attendees appears. This lets the organizer set the maximum number of additional attendees that can be added during one registration.
How it works:
-
When the Setting is Turned ON:
- The registration form will include an option to add additional attendees.
- If the user does not enter a value in the “group booking attendees limit” field, the default limit will be 20. This means the user can add up to 20 additional attendees at a time.
If the user enters a value in the “limit for group booking attendees” field, the additional attendees field in the registration flow will show that same number as the limit.
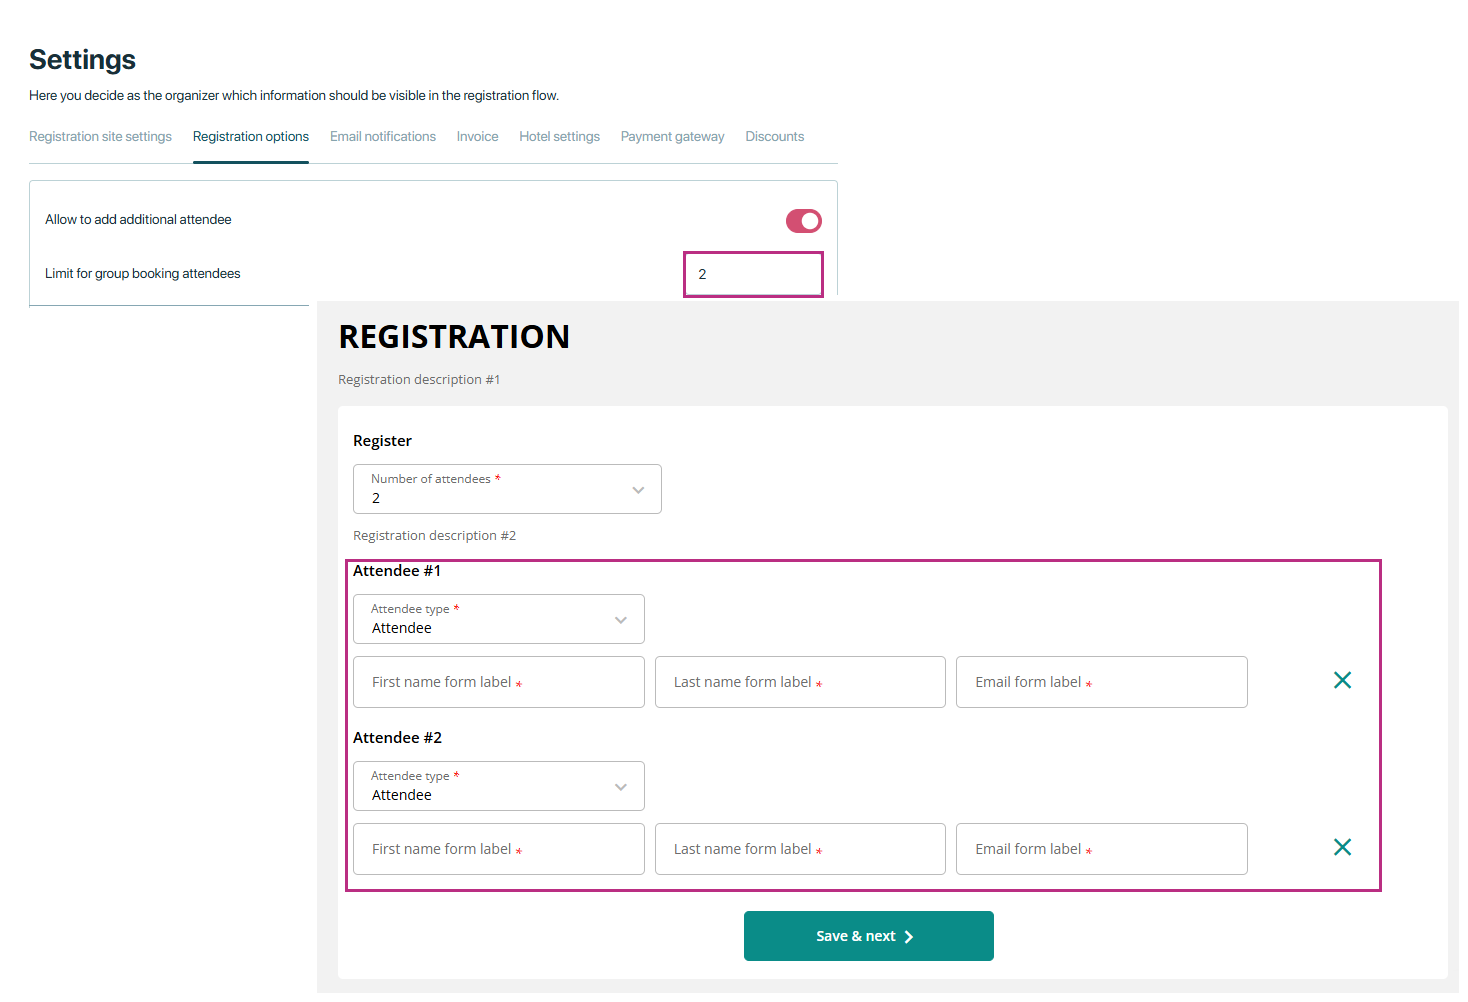
The “Add Attendee” button also appears on the summary step of the registration flow.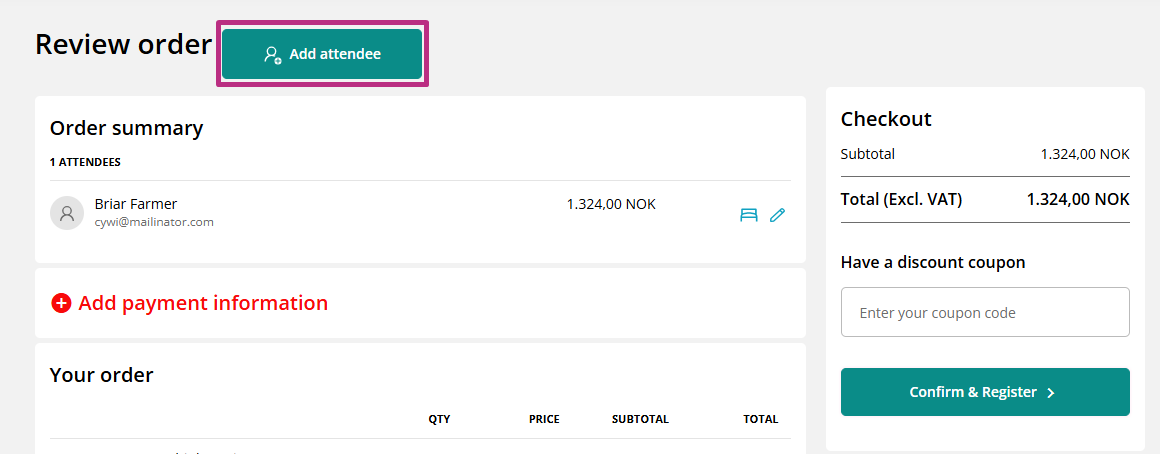
If the “allow to add additional attendee” setting is OFF, no dropdown will appear in the registration flow, and the additional attendee button will not show on the last step. In this case, only one attendee can register at a time.
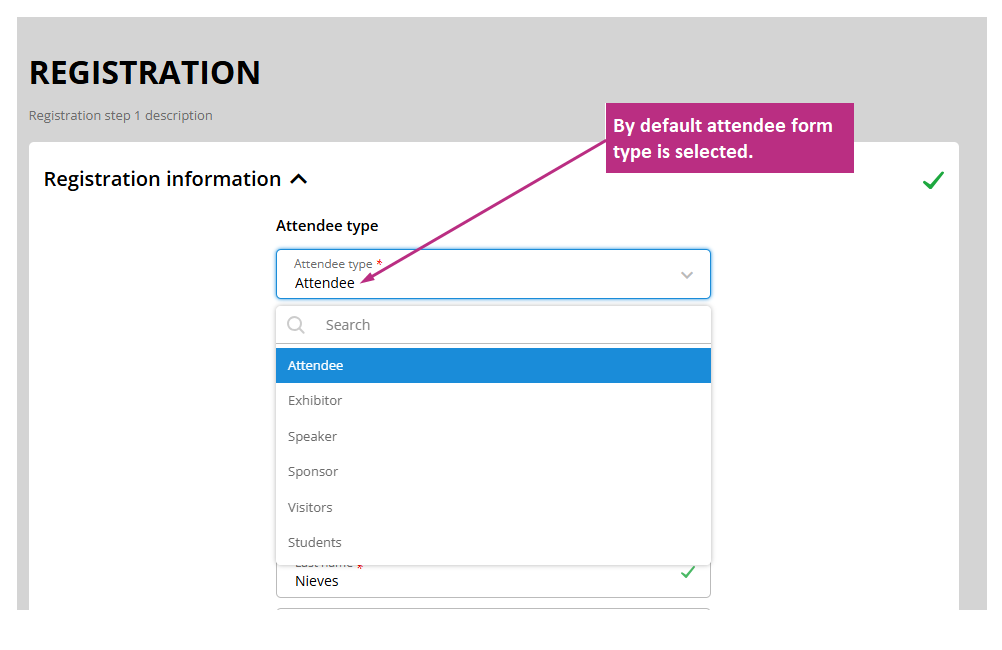
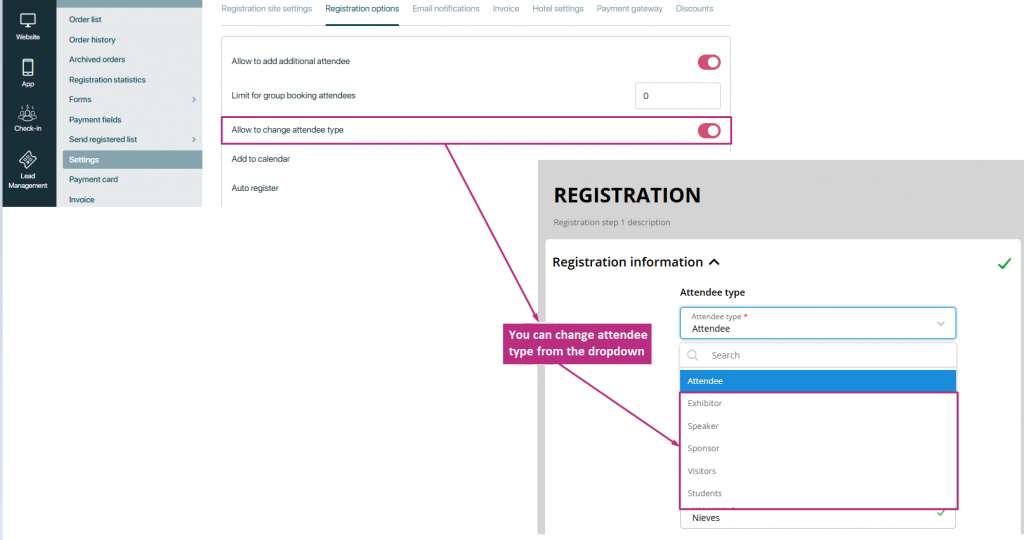
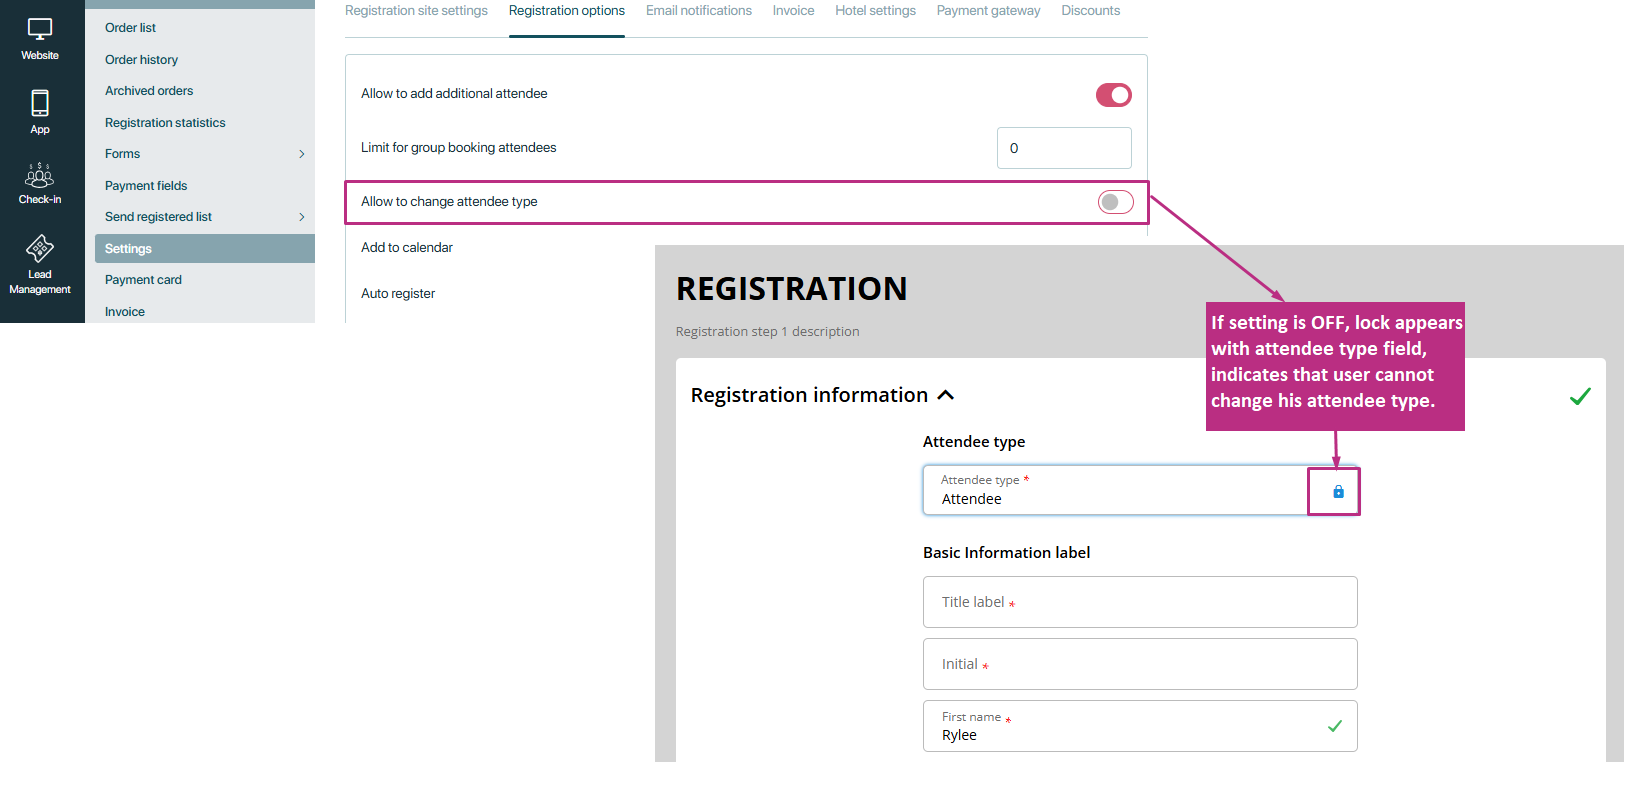
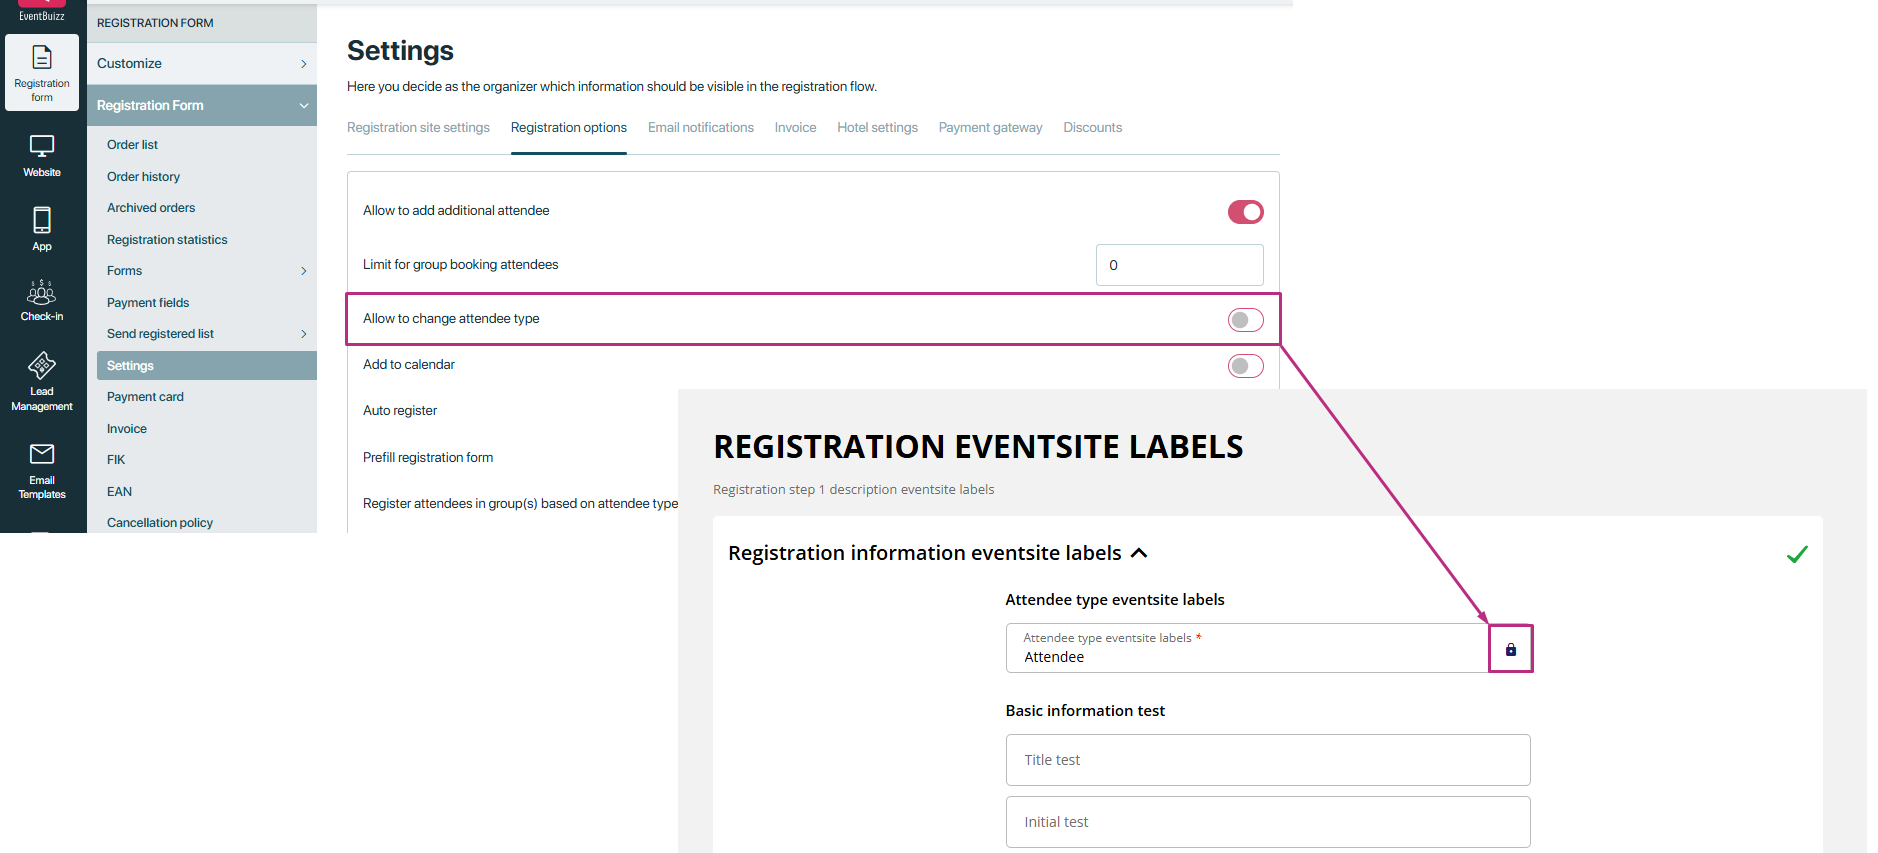
Allow to change attendee type
Allows changing the type of attendee during registration.
If the “Allow to change attendee type” setting is ON, attendees can change their attendee type during the registration process. For example, they can switch from one form type to another, like from attendee to exhibitor and sponsor to speaker etc. based on their preference or needs. This provides flexibility to attendees and allows them to make adjustments before completing their registration.
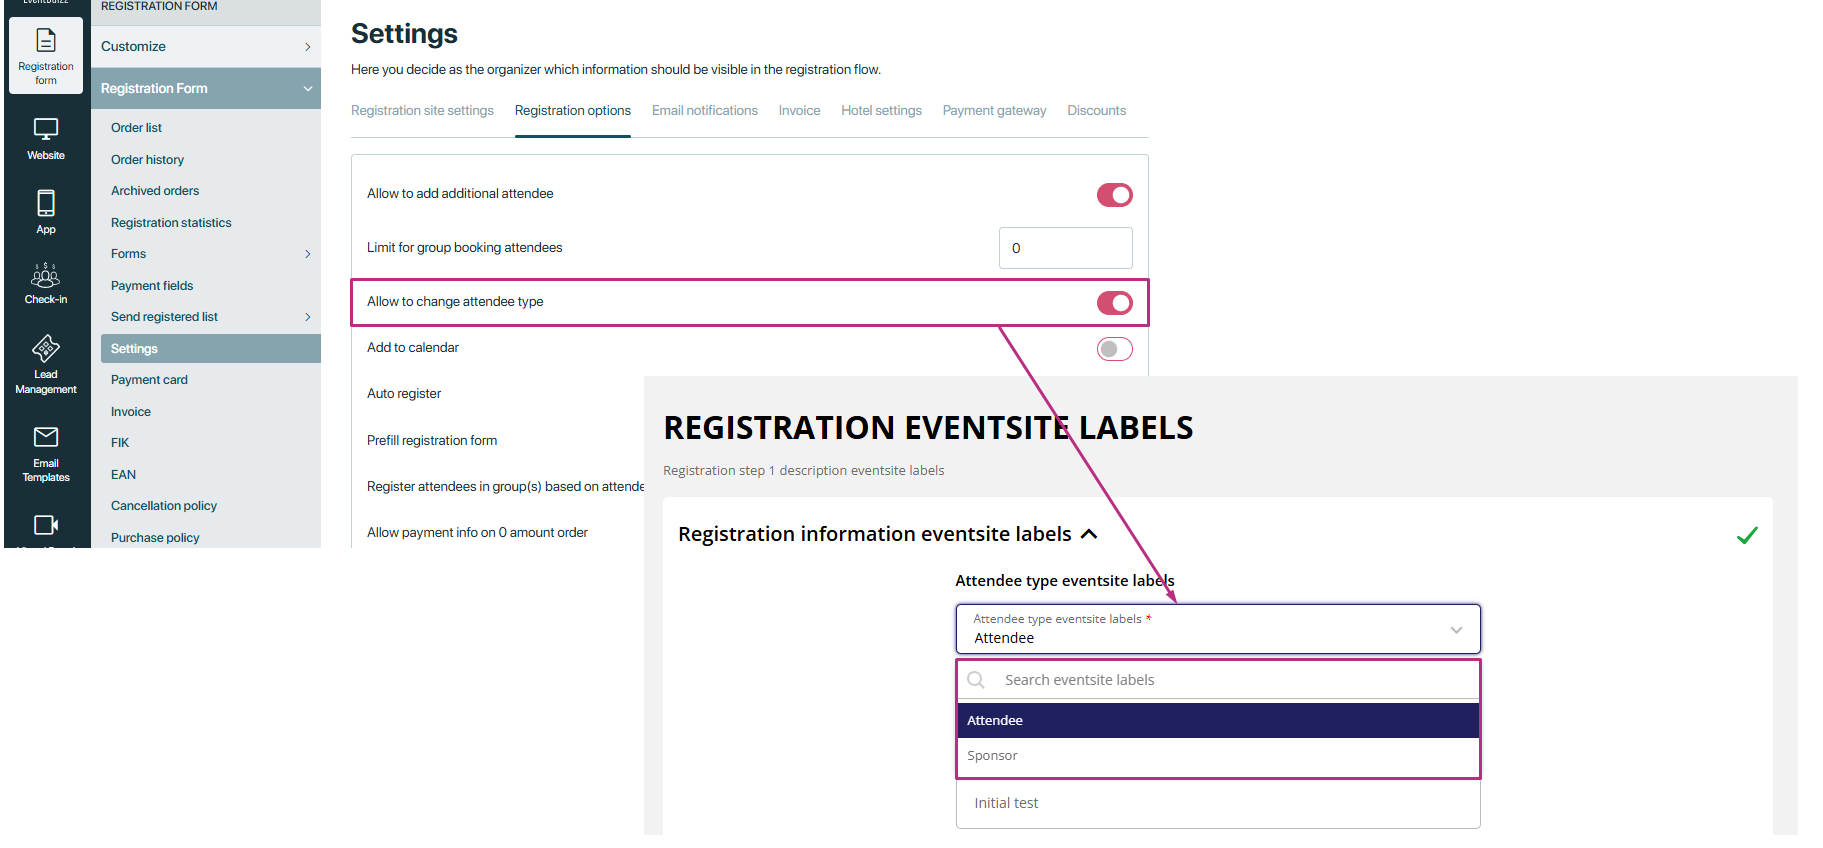
However, if the “Allow to Change Attendee Type” setting is OFF, attendees will not be able to change their attendee type during registration. The selected attendee type will appear locked, with a lock symbol next to it, indicating that it cannot be modified. This ensures that the attendee type remains fixed and avoids any accidental or unauthorized changes during the registration process.
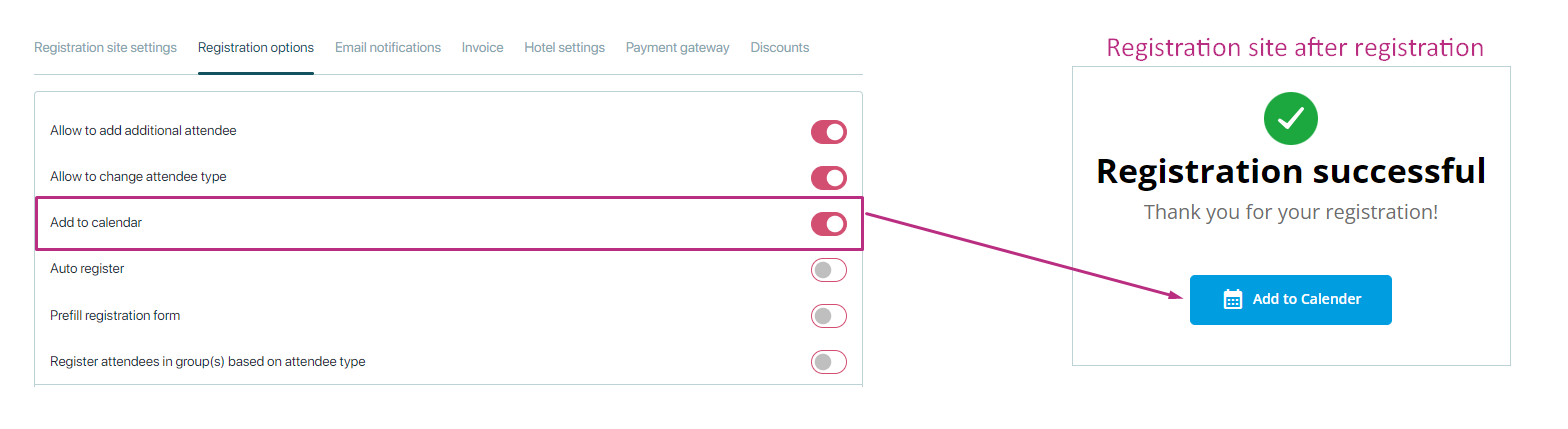
Add to calendar
“Add to calendar” allows the user to add the event to their personal calendar. This feature helps the user easily save the event date and time on their calendar so they can remember it.
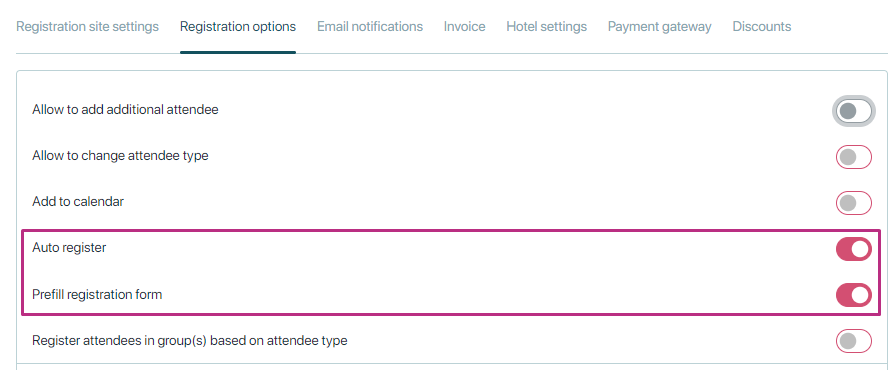
Auto register/ Prefill registration form
Following 2 settings are streamline the attendee in registration process.
- Auto register: It signs up attendees automatically without anyone needing to do it manually.
- Prefill registration form: This feature allows event organizers to pre-populate the registration form with known information about the attendees. When attendees access the registration form, fields such as name, email address, company name, or any other relevant details may already be filled in based on information gathered from previous interactions or registration steps.
When auto register setting is enabled, attendees may be registered automatically based on certain criteria, such as receiving an invitation link.
Steps to follow auto register and prefill registration form:
- You must have a pre-approved list of attendees.
- Import all participants for registration invite.
- Send them invite with registration site link with {register_link} .
- Attendees have to access the registration site through given URL without needing to manually process each registration request.
Note: The auto register settings are applicable only when there are no items and sub-registrations. They are designed to function solely for personal information.
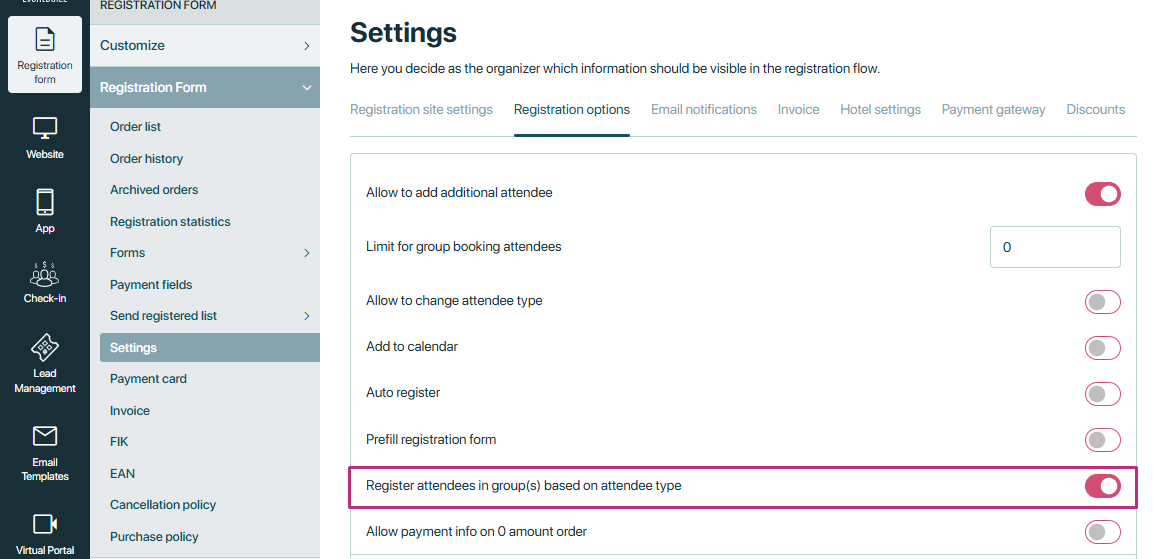
Register attendees in group(s) based on attendee type
When the “Register Attendees in Group(s) Based on Attendee Type” setting is ON, attendees are automatically assigned to specific groups based on the attendee type they select during registration. For example, if an attendee selects a “VIP” form type, they will automatically added to the group having “VIP form type.” Similarly, if they choose a “Student” form type, they will be attached to the group having “Student form type.” This process happens automatically, ensuring that each attendee is categorized correctly without any manual effort. It helps organizers manage and organize attendees more efficiently, as groups can be used for communication, reporting, or providing specific benefits to each attendee type. This setting ensures a smooth and structured registration process while keeping groups aligned with attendee types.
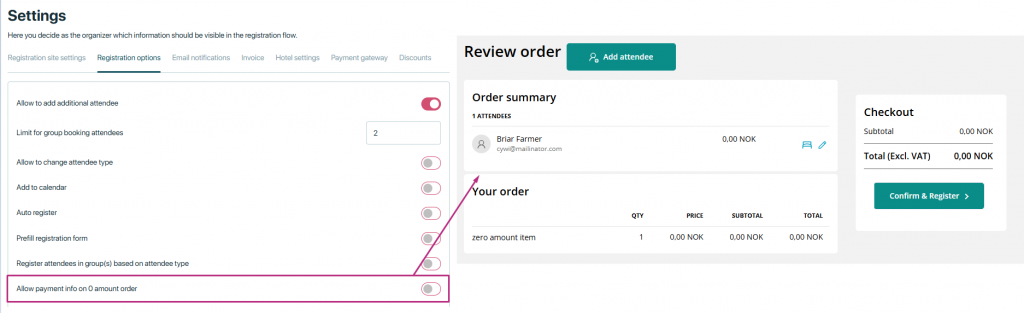
Allow payment info on amount 0 amount order
The “Allow payment info on 0 amount order” setting lets users enter their payment details even if the total order amount is zero.
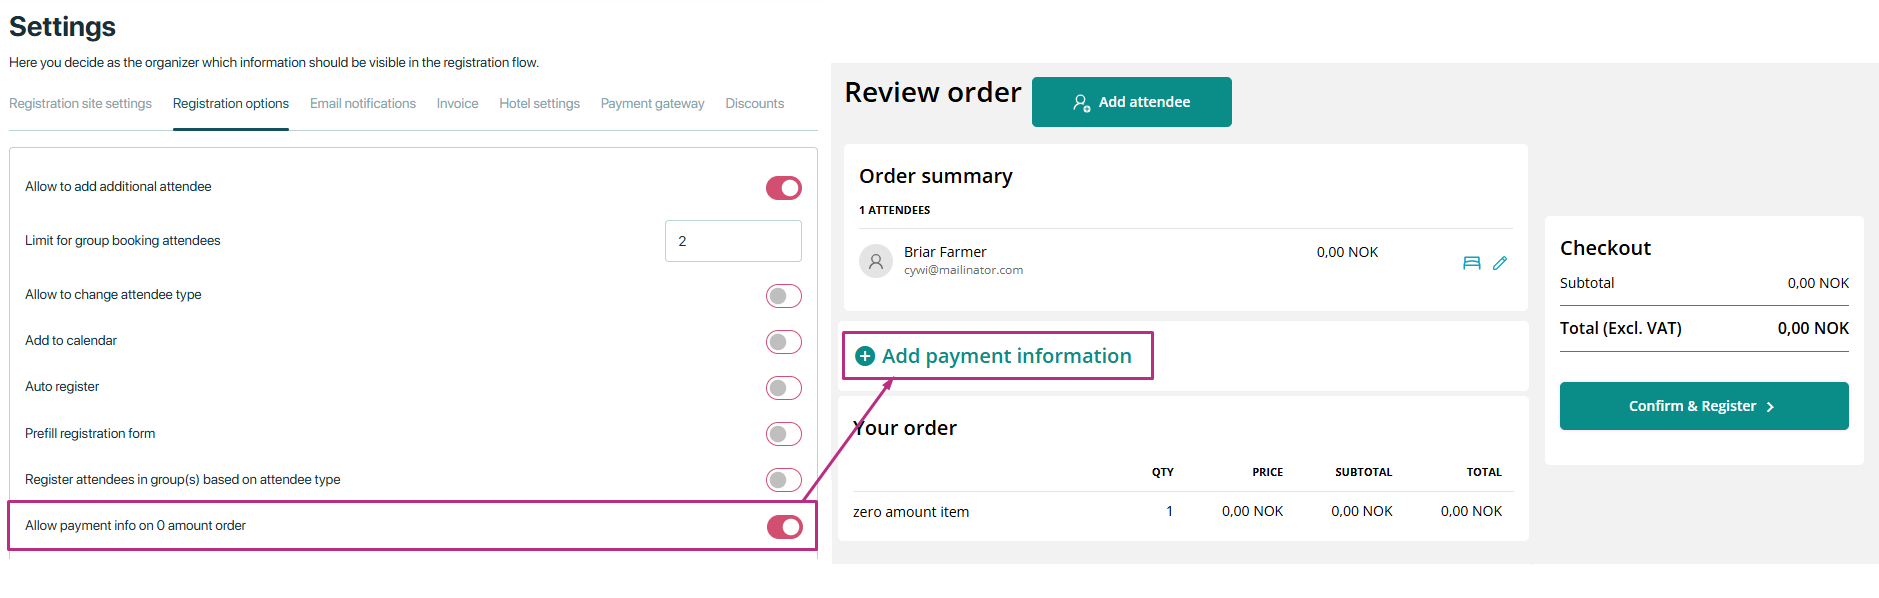
If the “Allow payment info on 0 amount order” setting is OFF, the payment information section will not appear in the registration flow. This means users won’t be asked for payment details if the total order amount is zero.
Edit order settings
Adjusts settings related to editing orders, including credit notes.
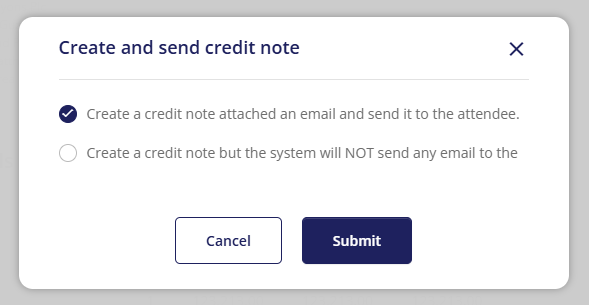
Create and send credit note upon edit to create new invoice without Popup confirmation:
Automatically generates and sends a credit note when editing an order.
-
- When this setting is off, and you edit an order, a popup will appear asking if you want to create and send a credit note, create only, or do both actions.
- If the setting is on, no popup will appear, but the attendee who placed the order will receive a new email with the invoice attached.
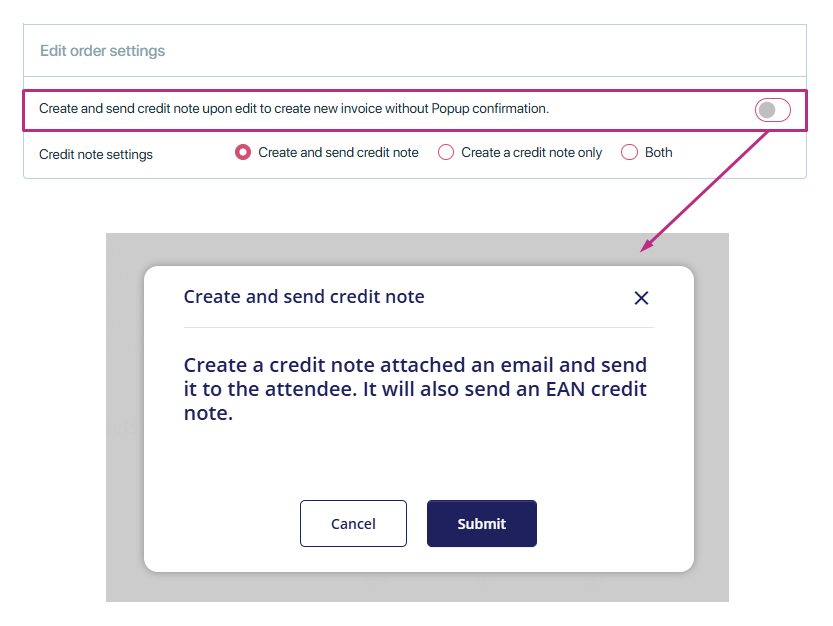

If you also want to attach the credit note to the Email, you need to enable the “Attach credit note to credit note email” setting in Email notifications settings.The “Create and Send Credit Note upon Edit to Create New Invoice without Popup Confirmation” setting controls the behavior of the popup when an order is edited. This depends on the credit note setting selected. Here’s how it works:
Credit note settings

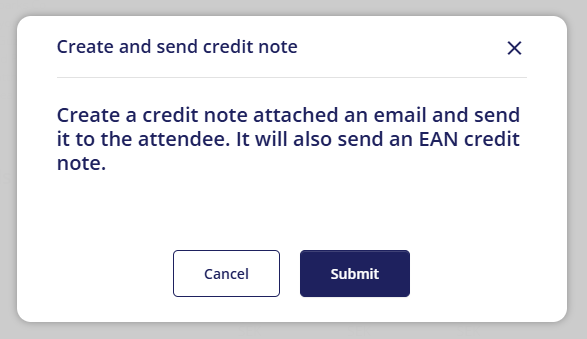
If “Create and Send Credit Note” is selected:
- When editing an order, a popup will appear showing that a credit note will be created and automatically sent.
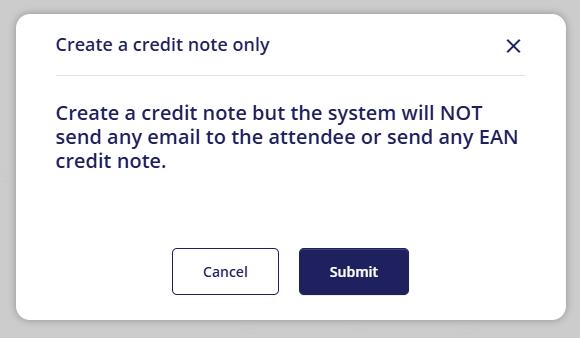
If “Create a Credit Note Only” is selected:
- When editing an order, a popup will appear showing that a credit note will be created but not sent automatically. The note is saved within the system, and you can choose to send it later or keep it for records.
If Both Options are Selected:
- A popup will appear asking the user to choose between:
- Creating and sending the credit note.
- Creating the credit note only (without sending).
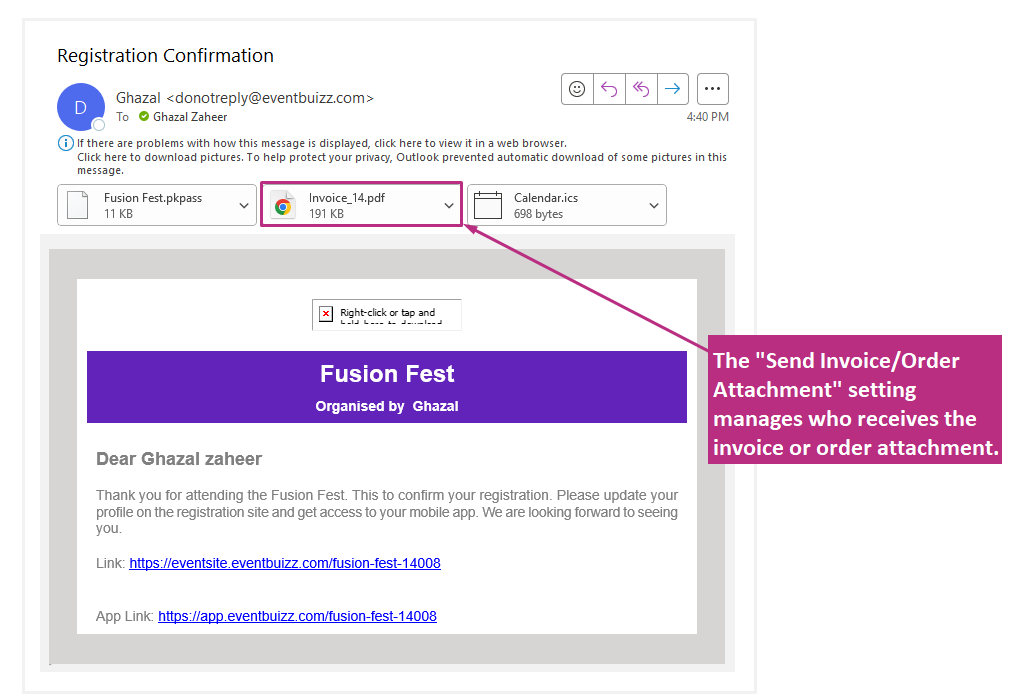
Send invoice/ order attachment to
This setting determines who will receive the invoice/ order attachment when an order is placed. There are three options available:
- Main attendee: If this option is selected, only the main attendee will receive the invoice/order attachment via email.
- Contact person and main attendee: If this option is selected, both the main attendee and the contact person will receive the same invoice/order attachment with order details, ticket info, and other relevant details.
- Only contact person: If this option is selected, only the contact person will receive the invoice/order attachment. excluding the main attendee. It is suitable for scenarios where the contact person handles all communications and the attendees do not need direct invoice attachment.
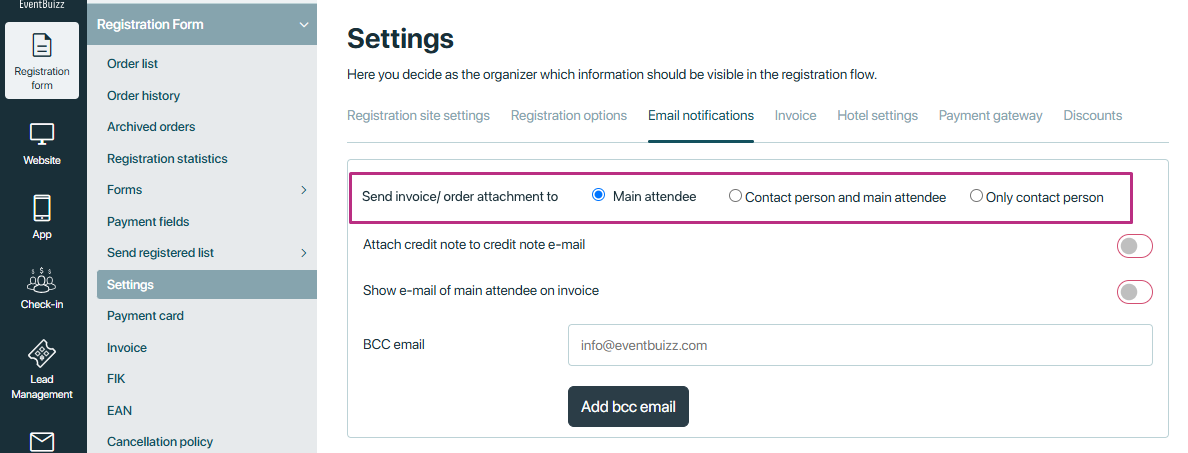
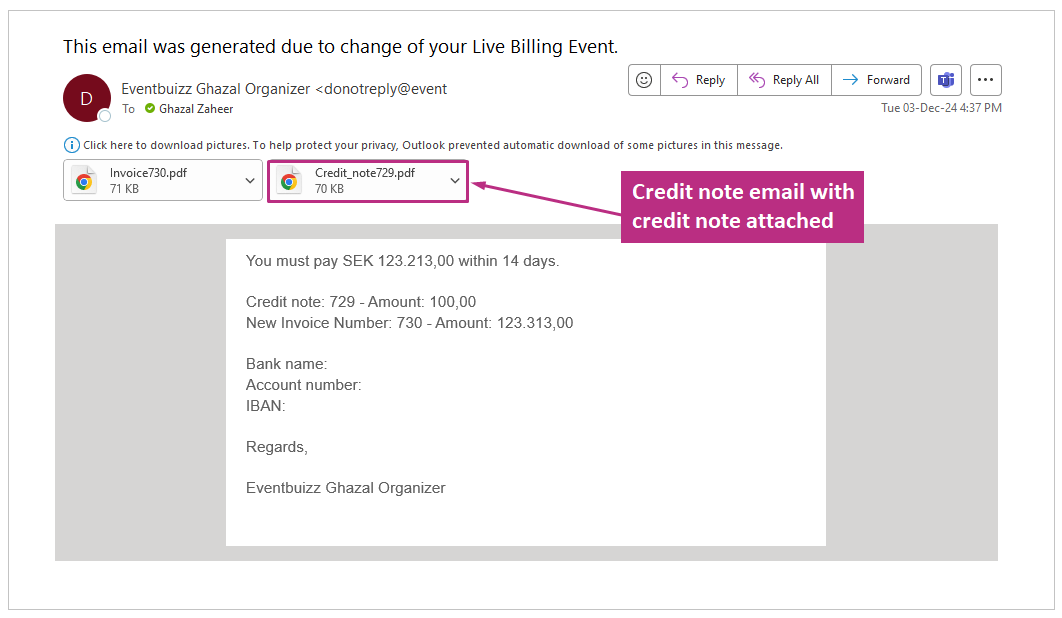
Attach credit note to credit not email
The “Attach credit note to credit note email” setting determines whether a credit note is automatically included as an attachment in the email sent to users when a credit note is issued. This ensures that the customer receives a copy of the credit note directly in their email, offering transparency and documentation of the adjustment. It eliminates the need for customers to request the credit note separately or for organizers to send it manually.
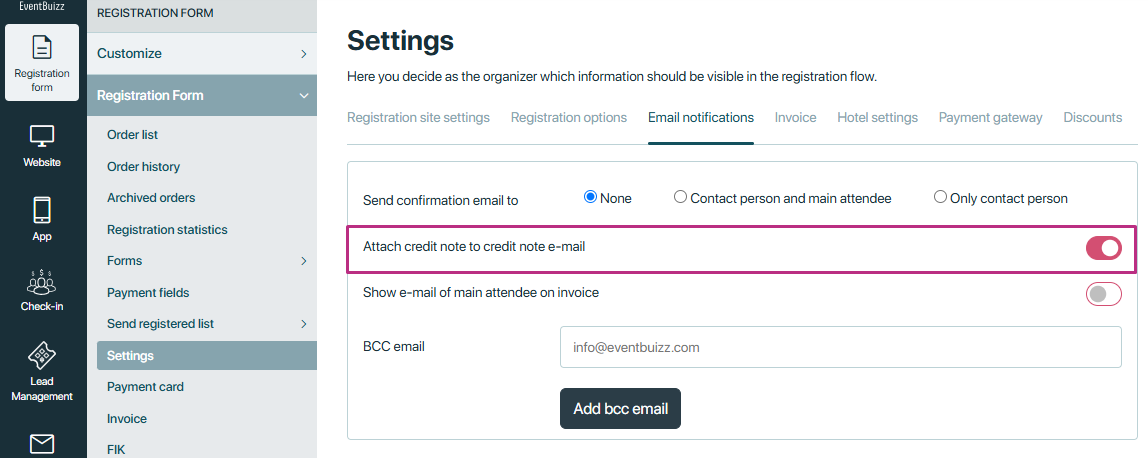
How the setting works
-
Setting Enabled:
- When this setting is turned ON, the system automatically attaches the credit note as a PDF file to the email sent to the customer.
- The email includes a message explaining the reason for the credit note along with the attached document for their records.
-
Setting Disabled:
- When this setting is turned OFF, the credit note is not attached to the email.
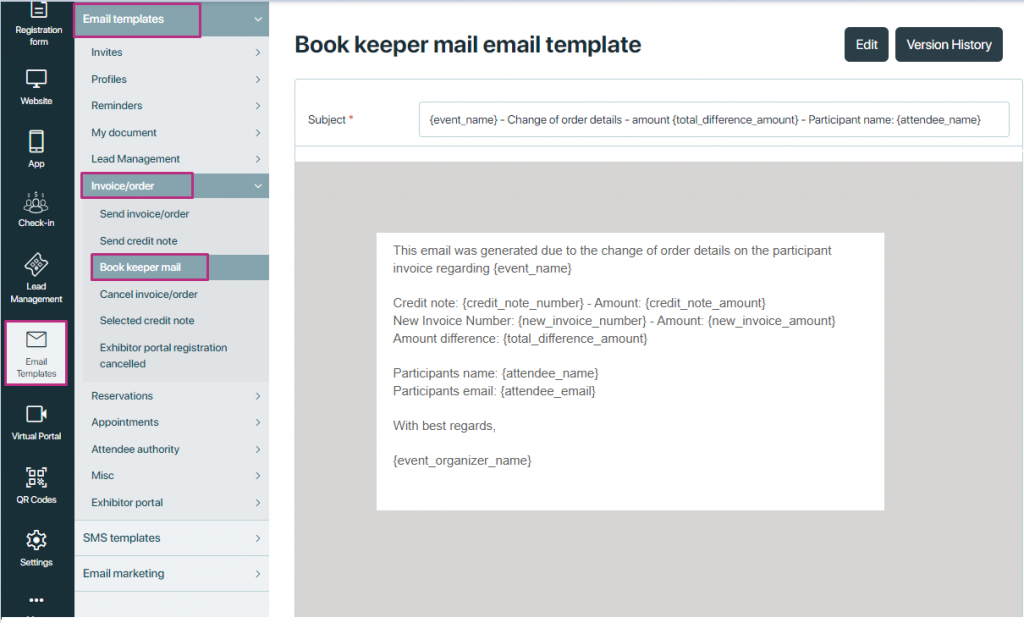
BCC email
When an attendee modifies their order – such as updating personal information, changing ticket details, or adding additional items—the system generates a notification to inform relevant parties about these updates. Along with the primary notification, a copy of the information can be sent to the email address specified in the BCC field.
When attendees make any changes in order, the email address specified in the BCC email will receive the book keeper’s email.
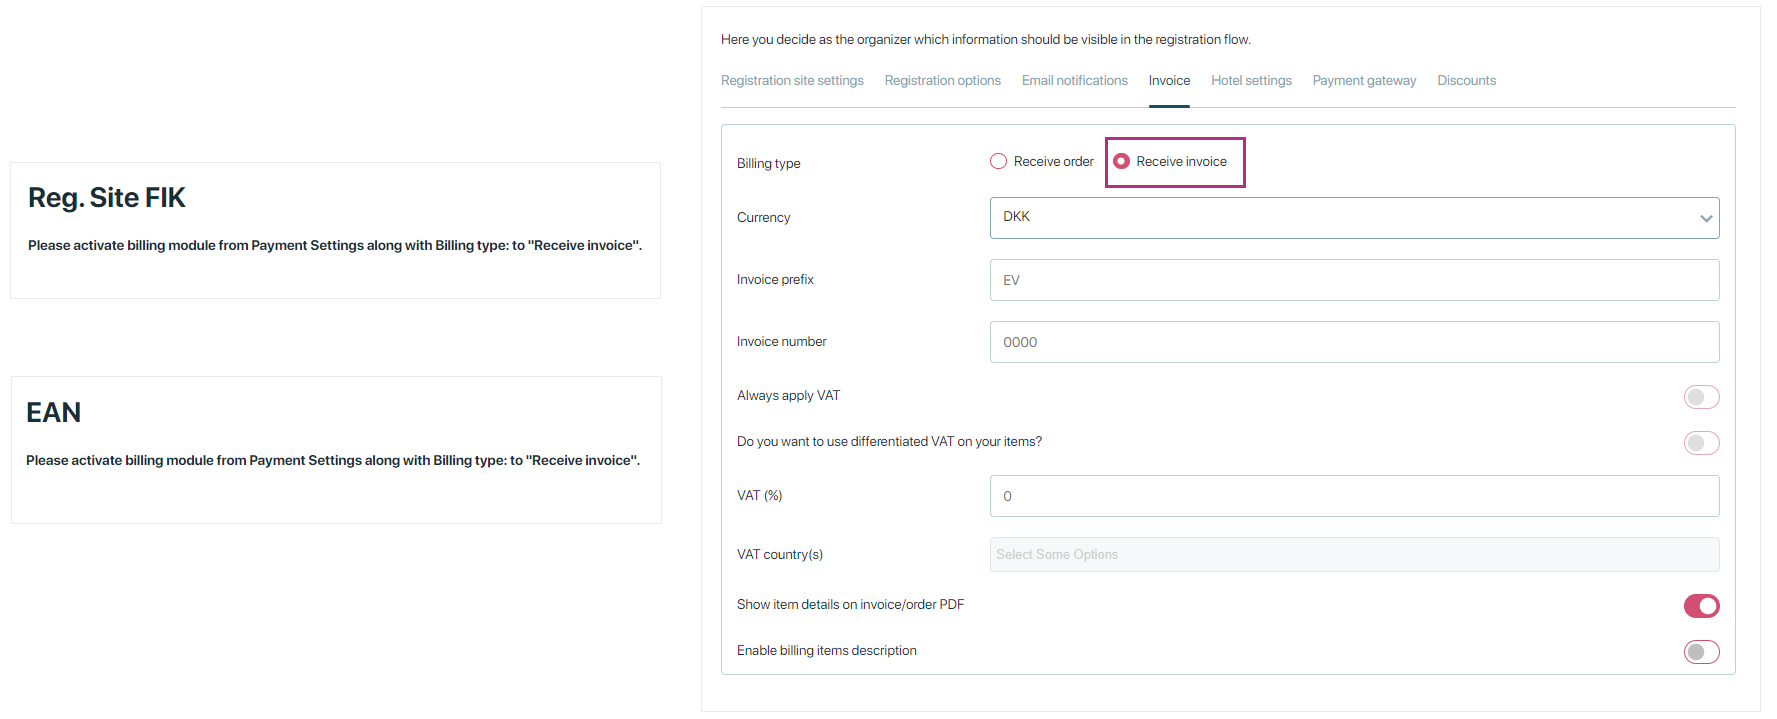
Billing type
The billing type defines how payment is processed and received for an event or service. The two types are:
Receive Order:
- This billing type is used when an order is created and payment is immediately required.
- It is suitable for scenarios where the client or attendee is confirm with order and pay immediately.
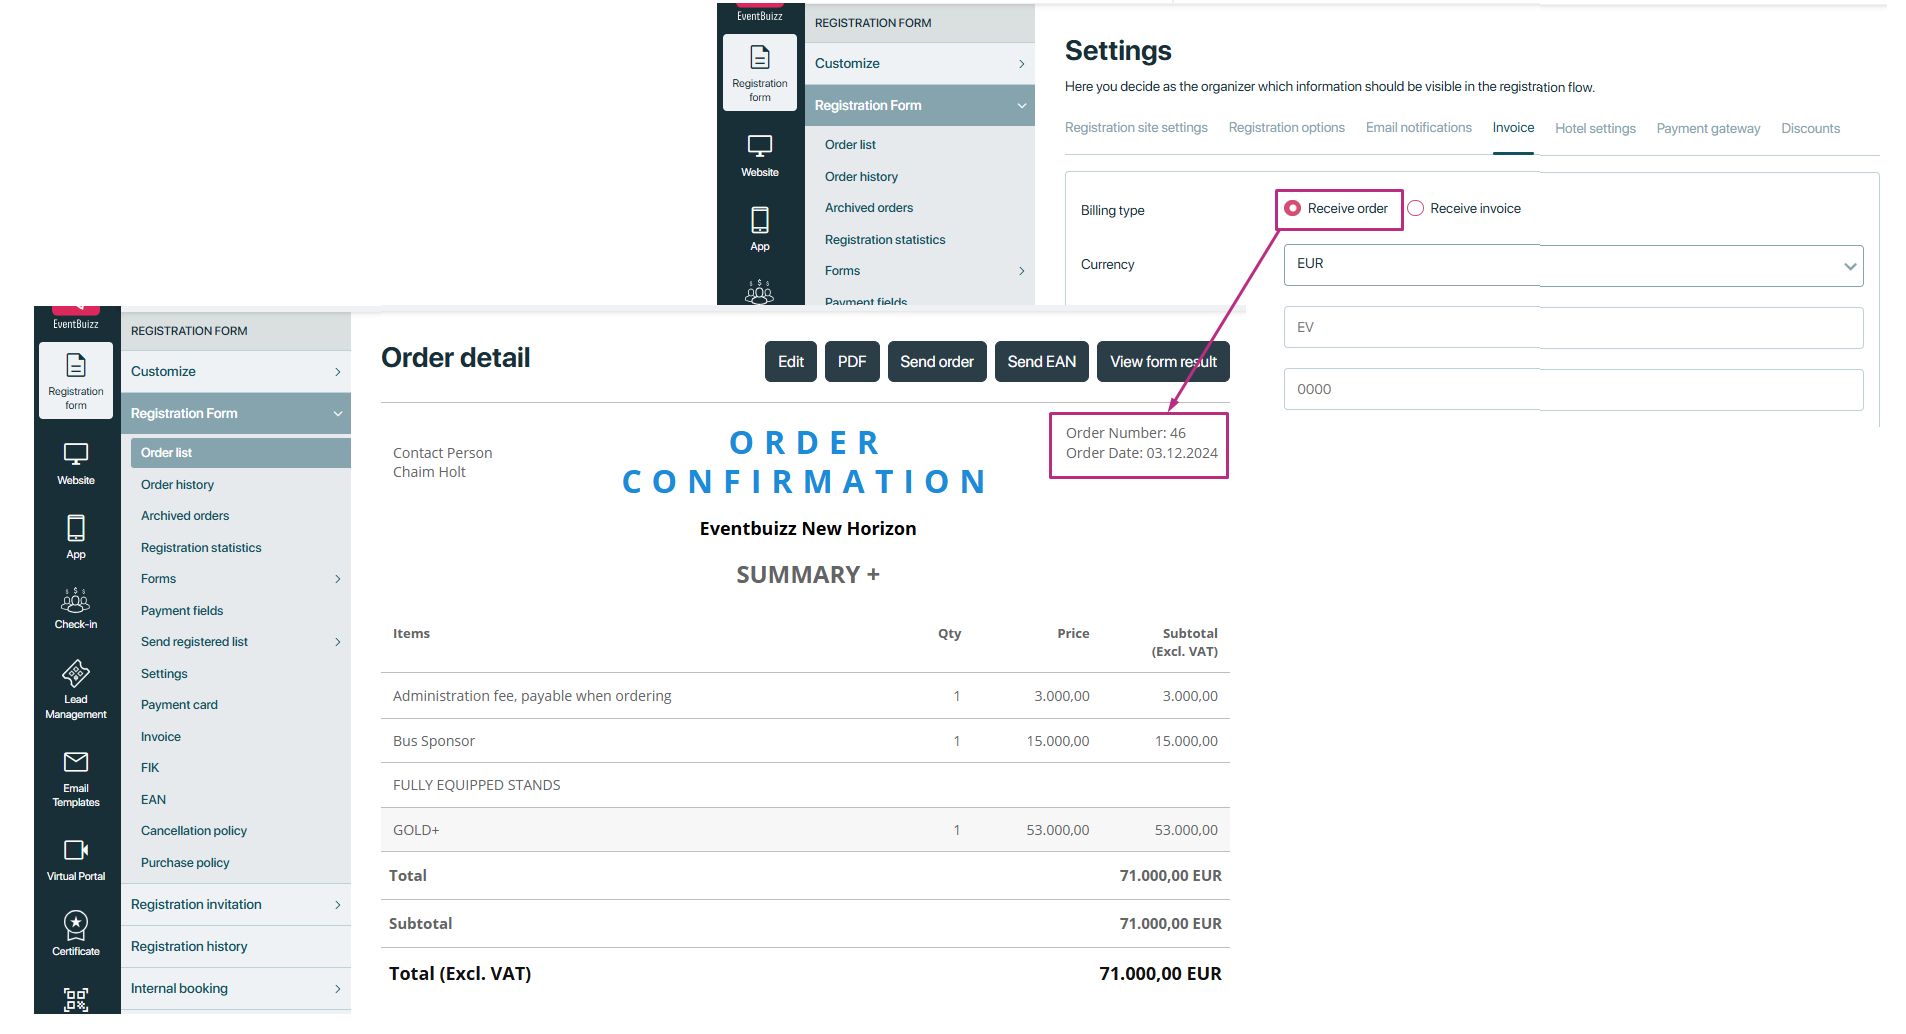
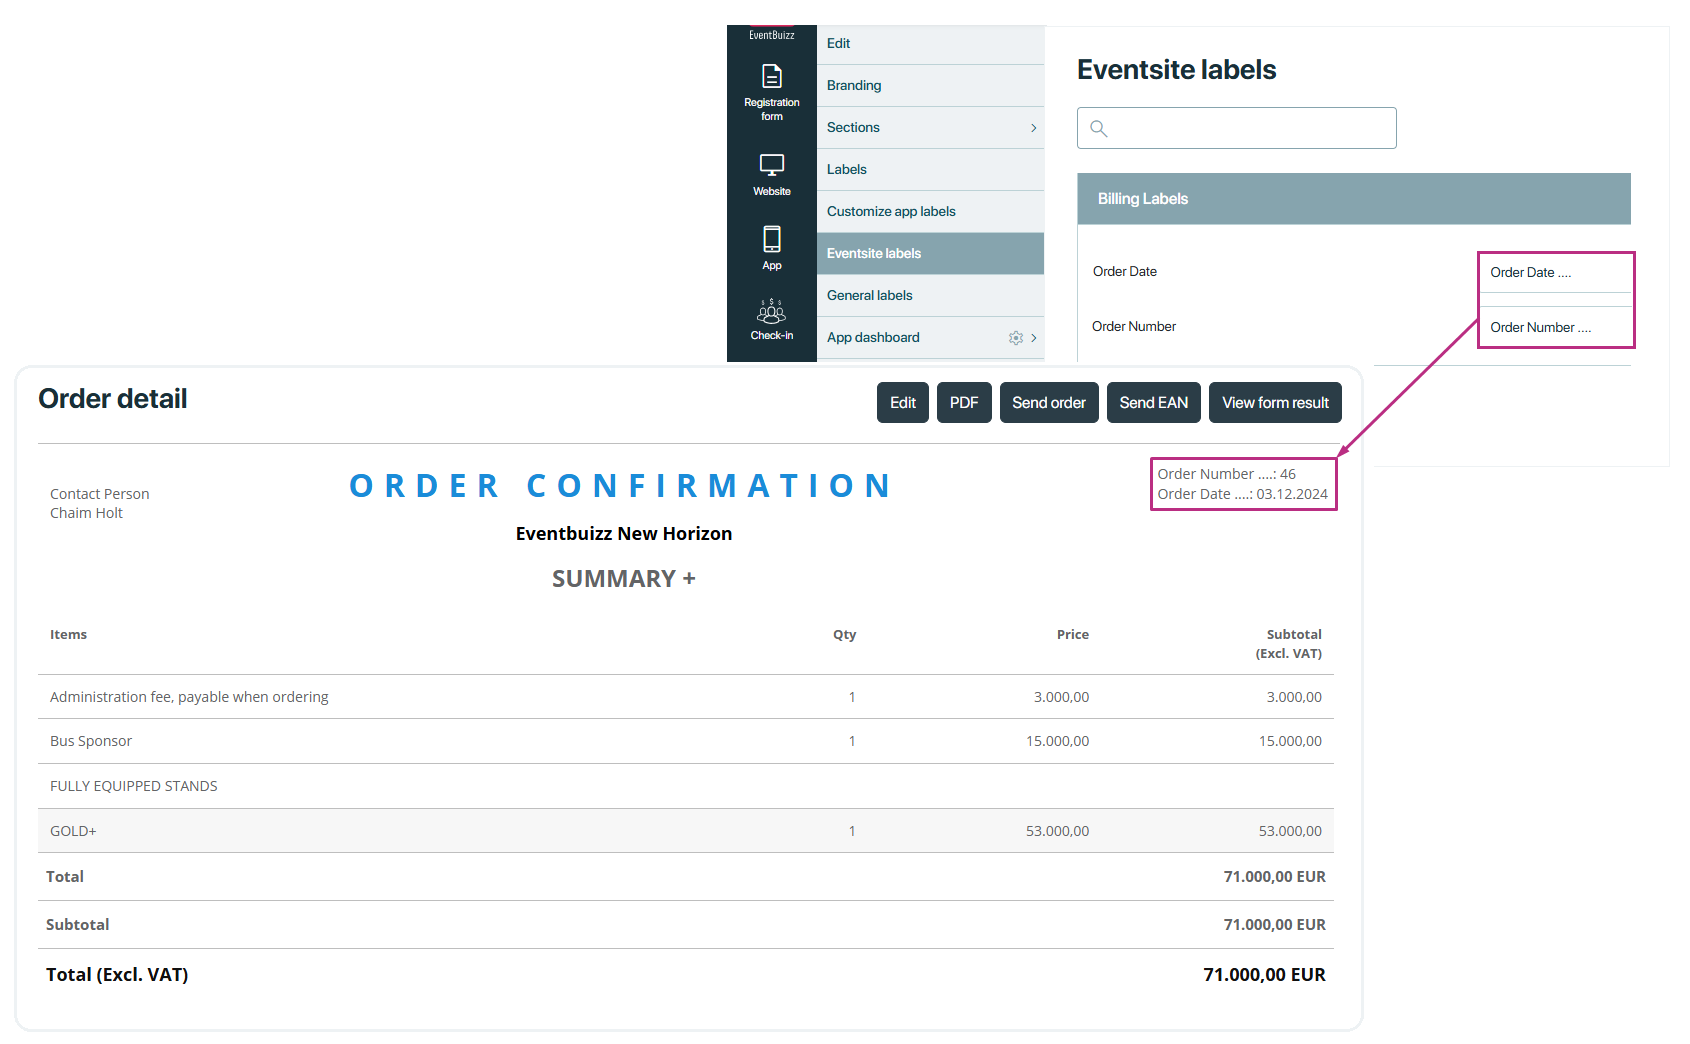
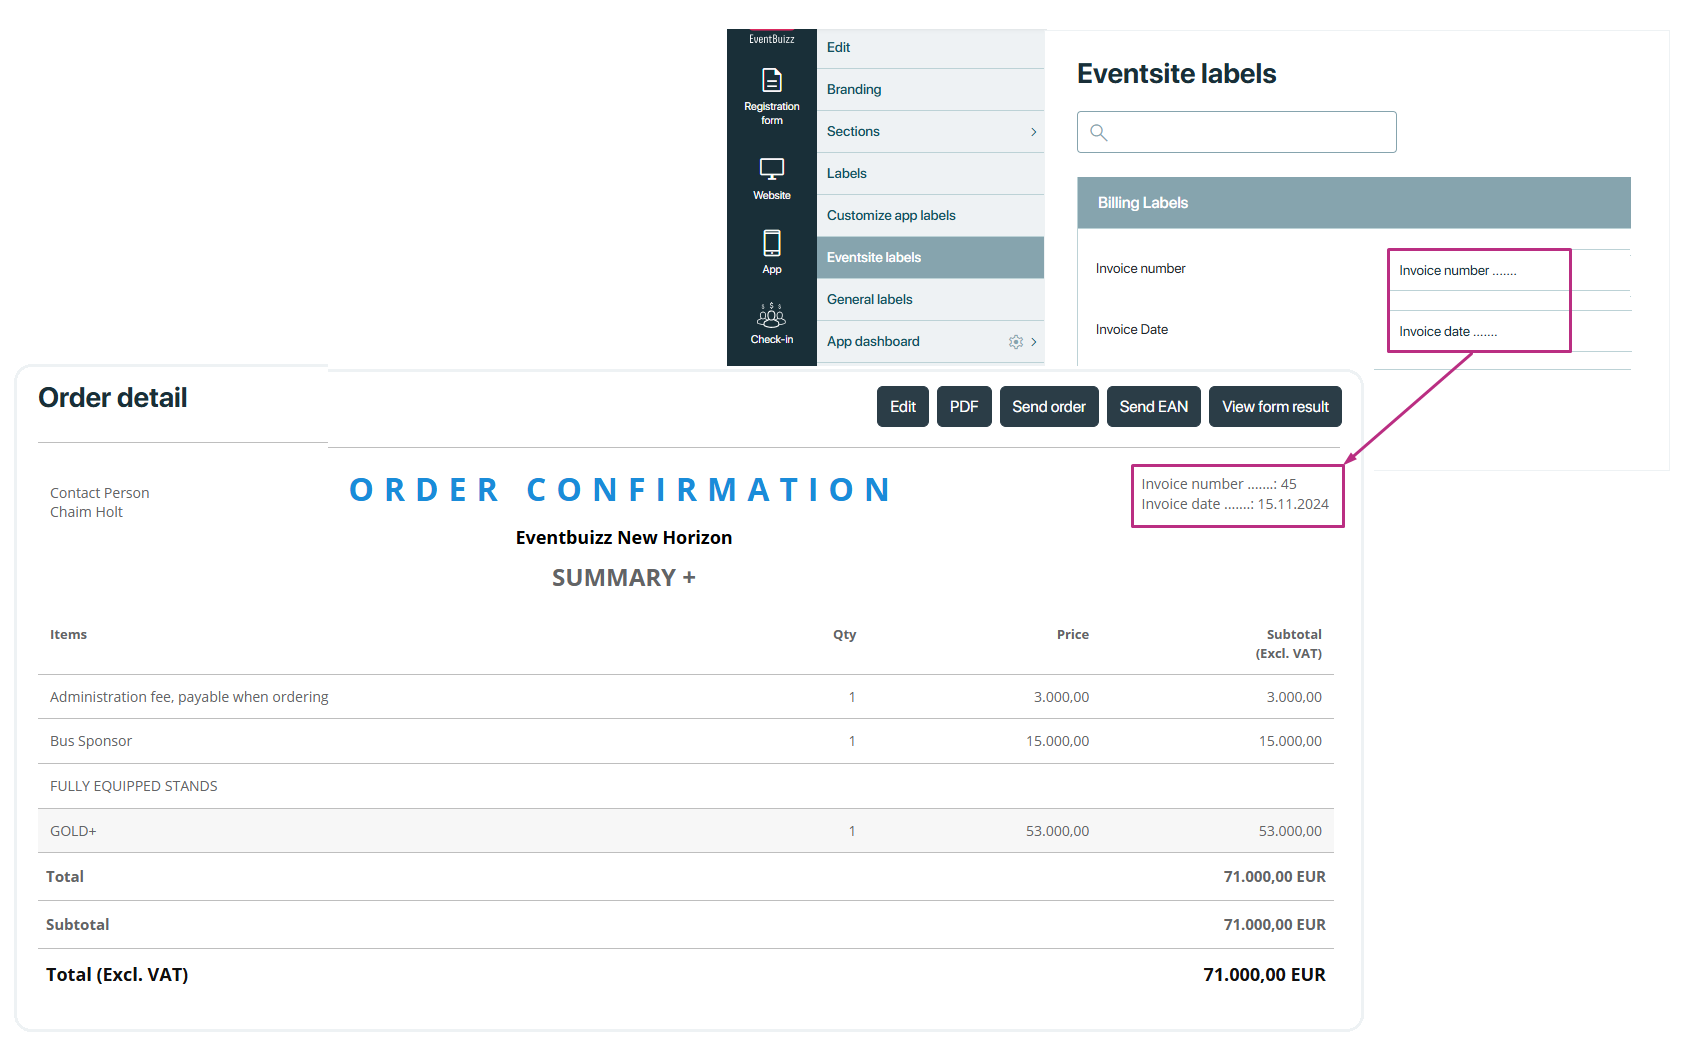
IMPORTANT NOTE: It affects the labels in the order details. If the billing type is set to “Order,” the label will show as “Order.” These labels are dynamic and can be changed from Eventsite Labels -> Billing Labels.
Receive Invoice
- This billing type involves generating and sending an invoice to the customer for payment.
- The invoice includes details such as the order summary, VAT, and payment instructions.
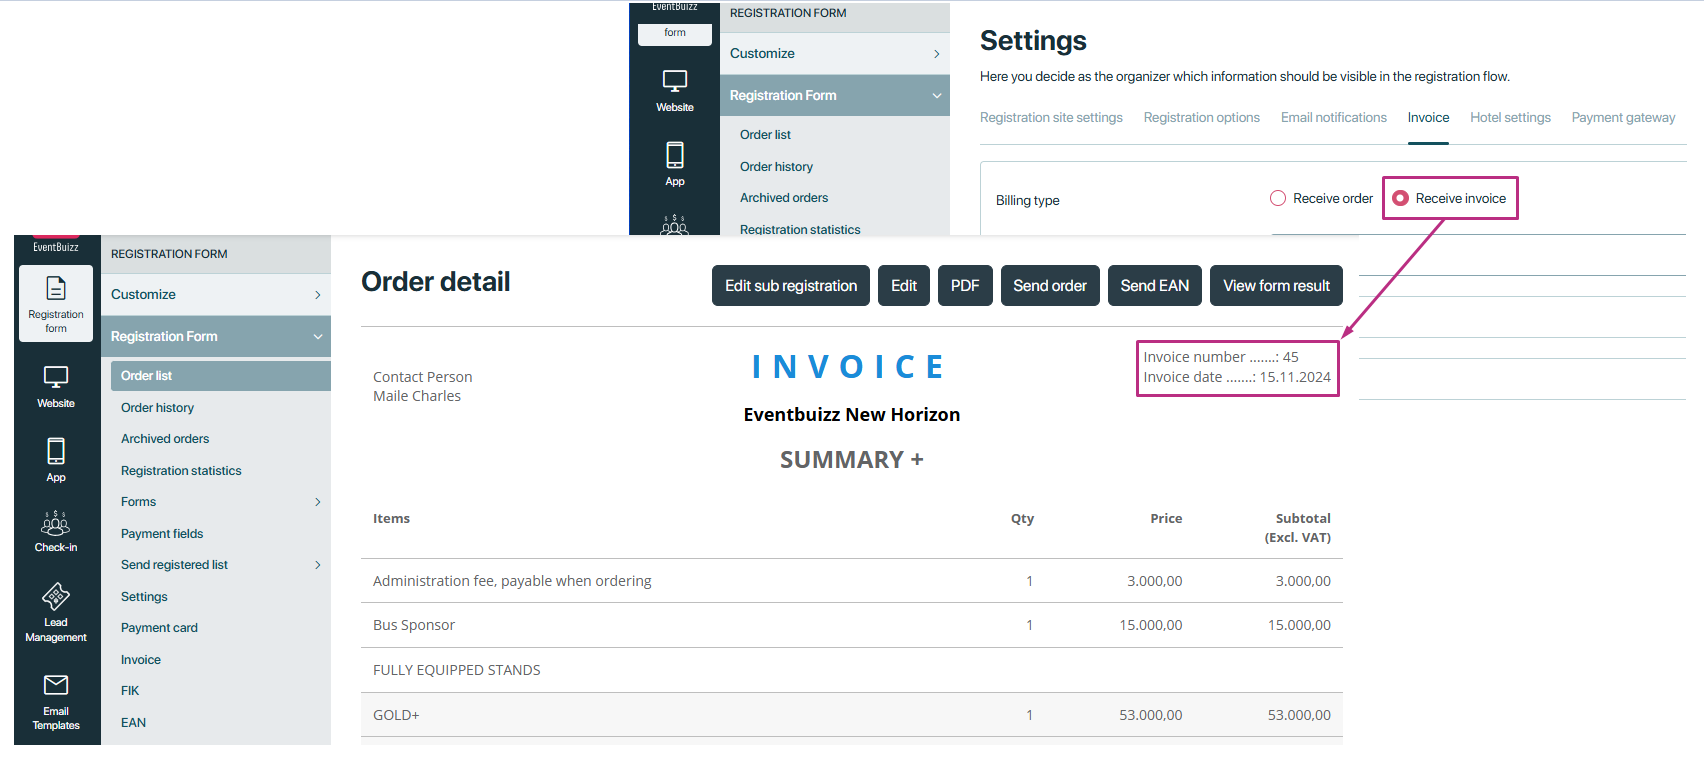
IMPORTANT NOTE: It affects the labels in the order details. If the billing type is set to “Order,” the label will show as “Order.” These labels are dynamic and can be changed from Eventsite Labels -> Billing Labels.
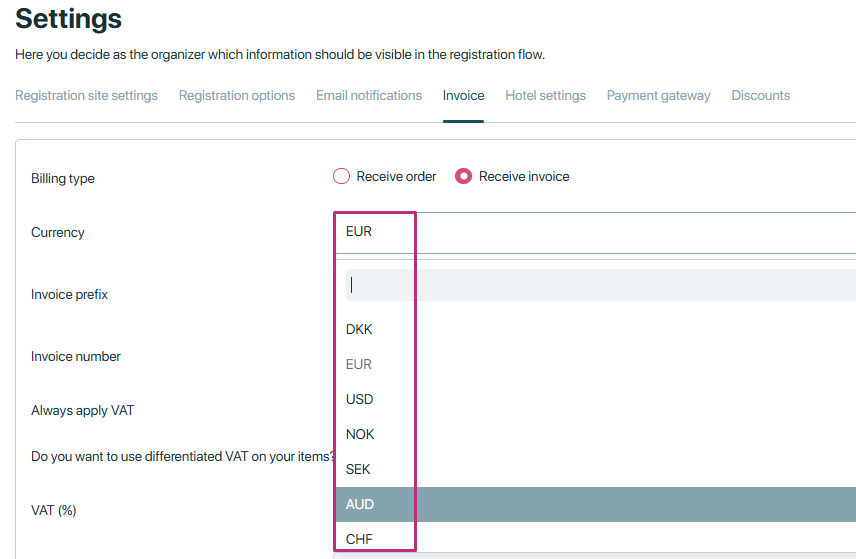
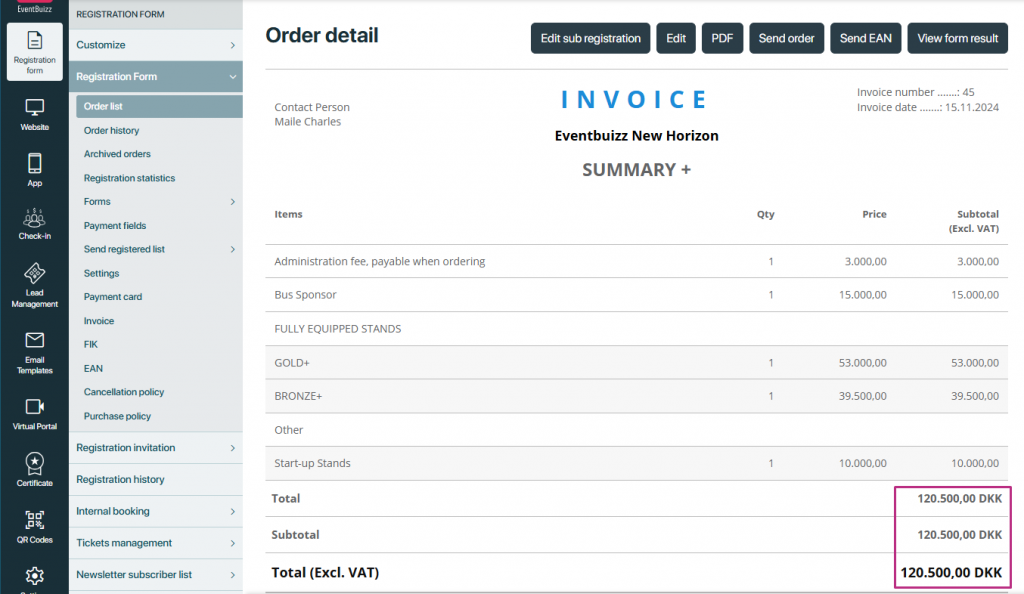
Currency
Defines the currency for transactions. Only one currency can be select per event. If you are using “Dankort” as one of your credit card option, then it is mandatory to set the currency to “DKK” according to NETS requirement. Following currencies are available DKK, EUR, USD, NOK, SEK, AUD, CHF, GBP.
It shows on the invoice like this
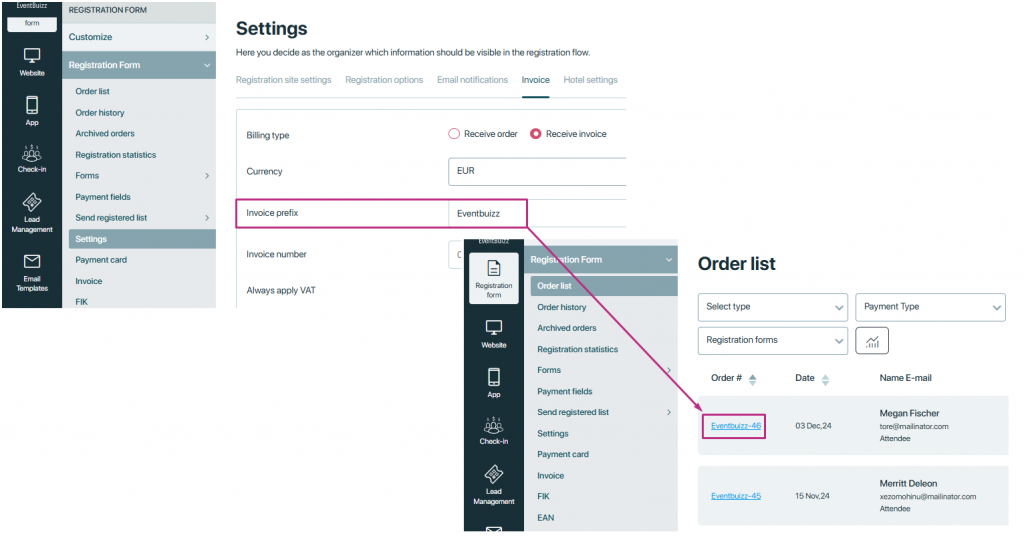
Invoice prefixThe Invoice Prefix is a setting that allows event organizers to customize the initial part of their invoice numbering system. The prefix is a unique identifier or code added to the beginning of each invoice number, helping to categorize or organize invoices for different events or registrations. For example, an organizer could use a prefix like “EVT-2024-” to indicate invoices for a specific event or year.
Invoice number
The Invoice Number is a unique identifier assigned to each invoice generated for event registrations, ticket bookings, or other services. It serves as a reference number to track and manage transactions. The invoice number is automatically generated by the system, ensuring that each invoice has a distinct and sequential identifier, which helps in organizing financial records.
Specifies the starting number for invoices. Enter a number and the invoice will start from the specific number that has been entered.
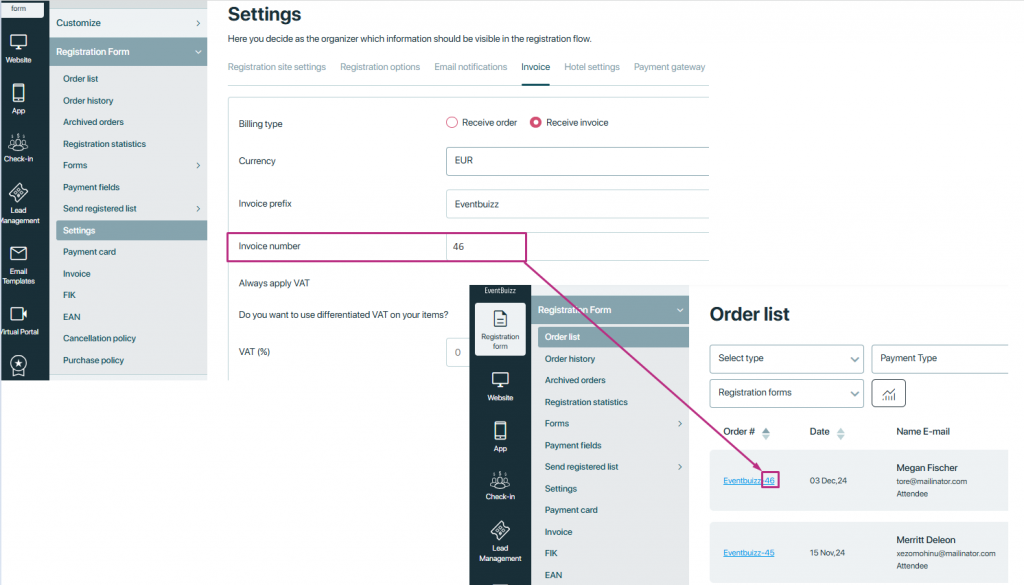
IMPORTANT NOTE: All invoices created before must be removes (archived) before the invoice numbering will be active. Once the Invoice prefix and number are set and an order is placed, they cannot be changed. To modify them, all orders must be canceled.
VAT settings
VAT can be applied on Order level and Items level.
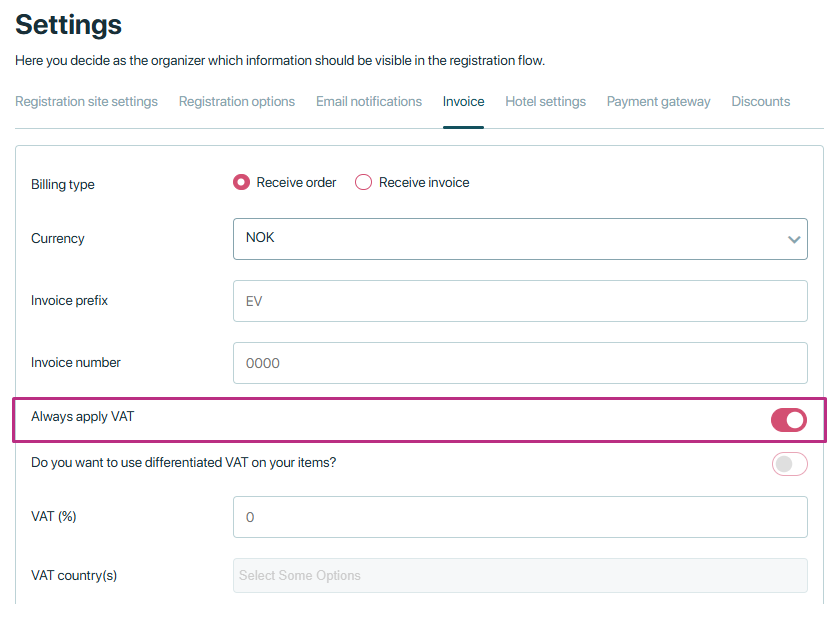
Always apply VAT
Always apply VAT setting is applied at the order level, meaning that the tax is calculated on the total order amount rather than individual items
VAT Setting Activation:
- The VAT setting needs to be turned ON to enable VAT calculation for the order.
- When this setting is activated, the system will apply the VAT percentage to the entire order.
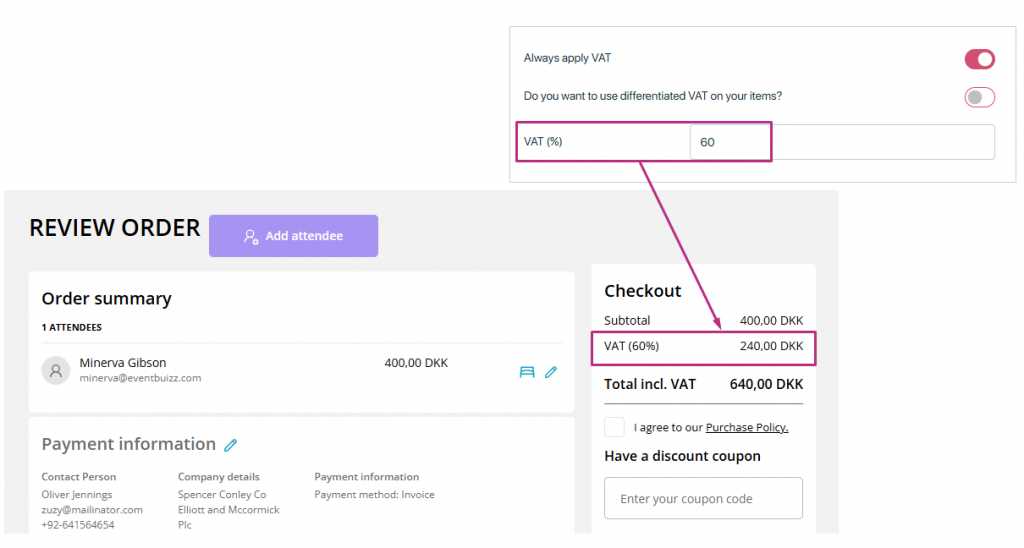
VAT Percentage Configuration:- The percentage rate for VAT is predefined in the system. This can be set by the admin or event organizer, according to the required VAT rate for the region or country.
- Once the VAT setting is activated, the specified percentage will be applied to the total value of the order (the sum of all items in the order).
Calculation of VAT:
- The total amount for the order will be calculated first, including any products or services that the customer has selected.
- Then, the VAT percentage is applied to this total amount.
- For example, if an order totals 1000 DKK and the VAT rate is 10%, the VAT applied would be 100 DKK, making the final order amount 1100 DKK.
IMPORTANT NOTE: If Always apply setting is ON, VAT country field will get hide.
Items level VAT
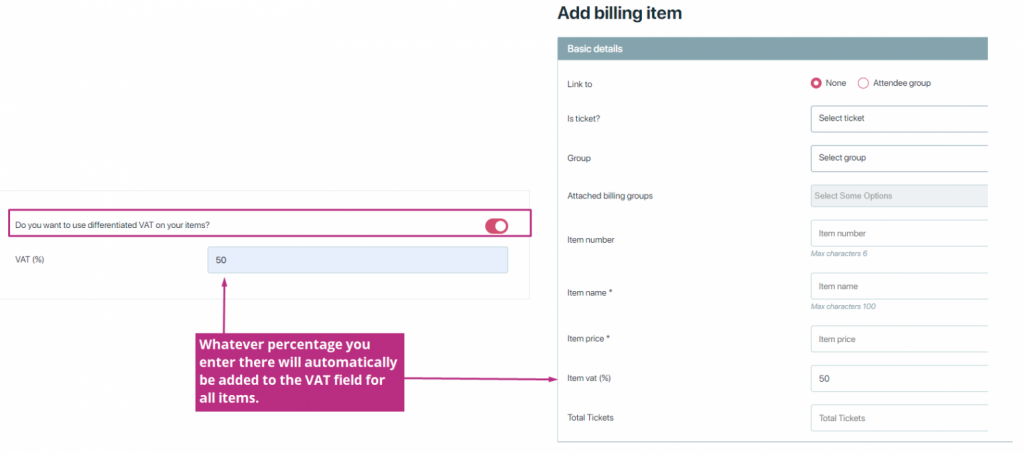
To use VAT on items, Differentiate VAT on items setting must be ON.
- Differentiated VAT on items: Allows for the application of varying Value Added Tax (VAT) rates to different items or services within the billing system. This means that each item or service can have its own specific VAT rate applied, accommodating situations where different products or services may be subject to different tax rates based on regulatory requirements or other factors. You can follow this guide to set up your billing items,
- VAT country(s): Selects countries where VAT applies.
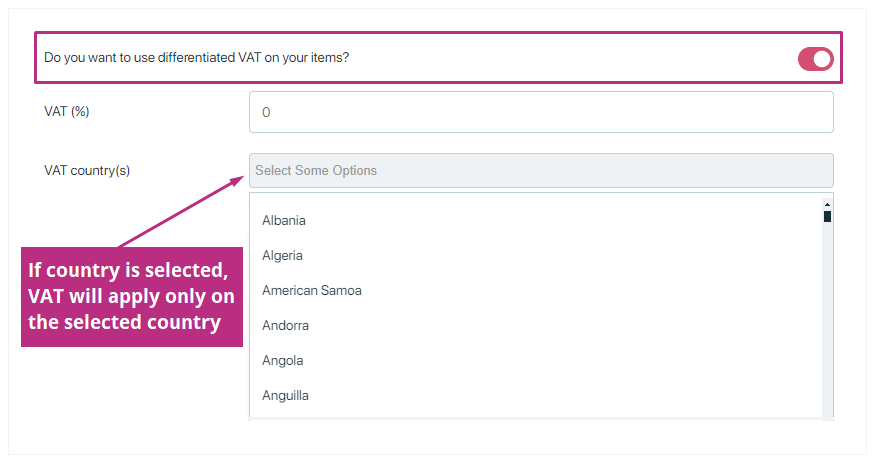
When “Do you want to use differentiated VAT on your items?” setting is ON. When you’re adding or editing a billing item, there’s a field where you can enter the VAT (%). Whatever percentage you enter there will automatically be added to the VAT field for all items. But if you want, you can also give different VAT amounts for each item.
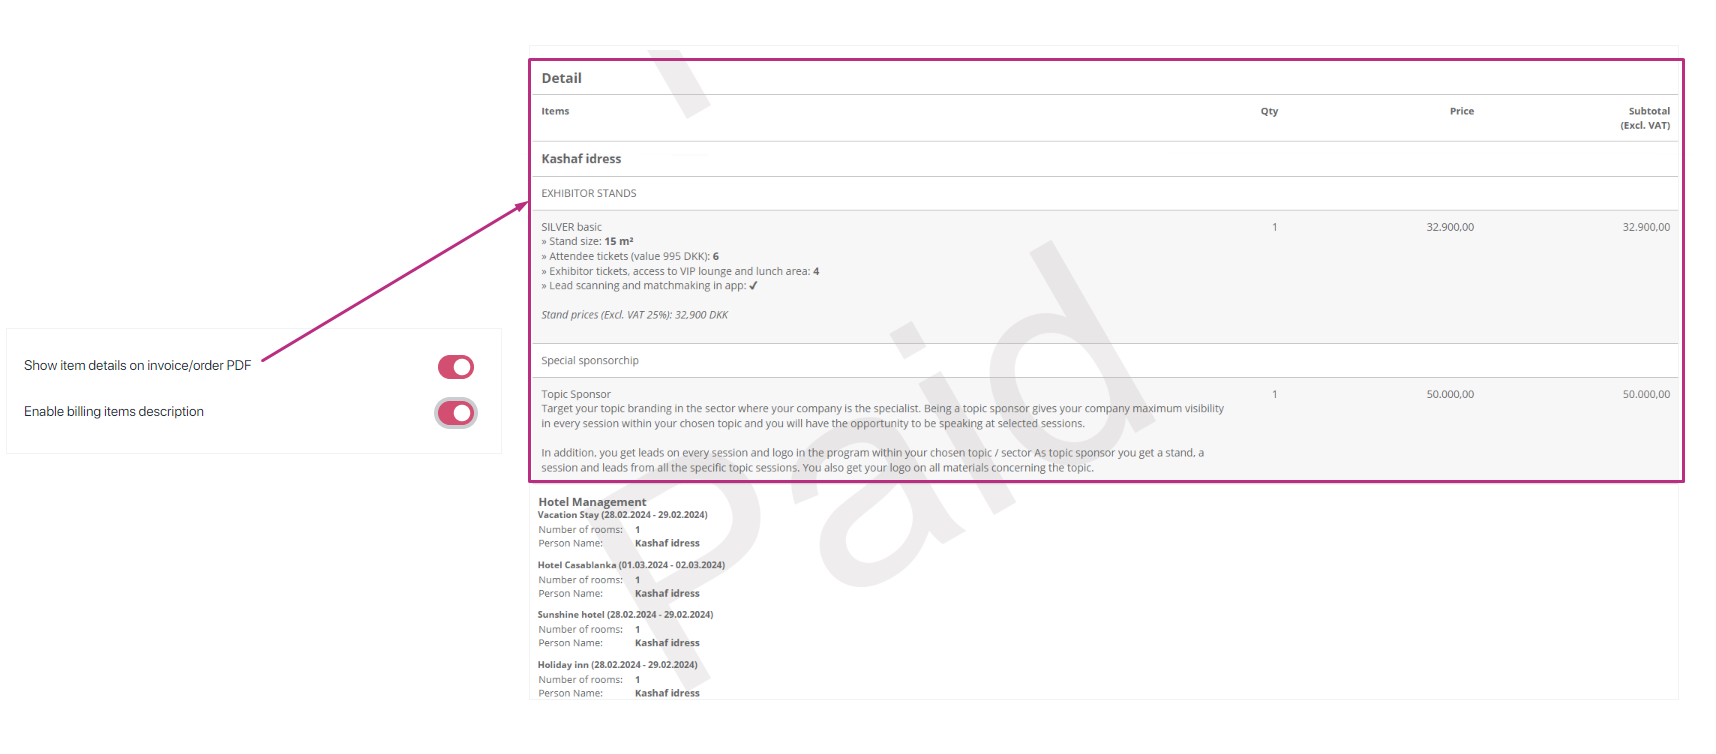
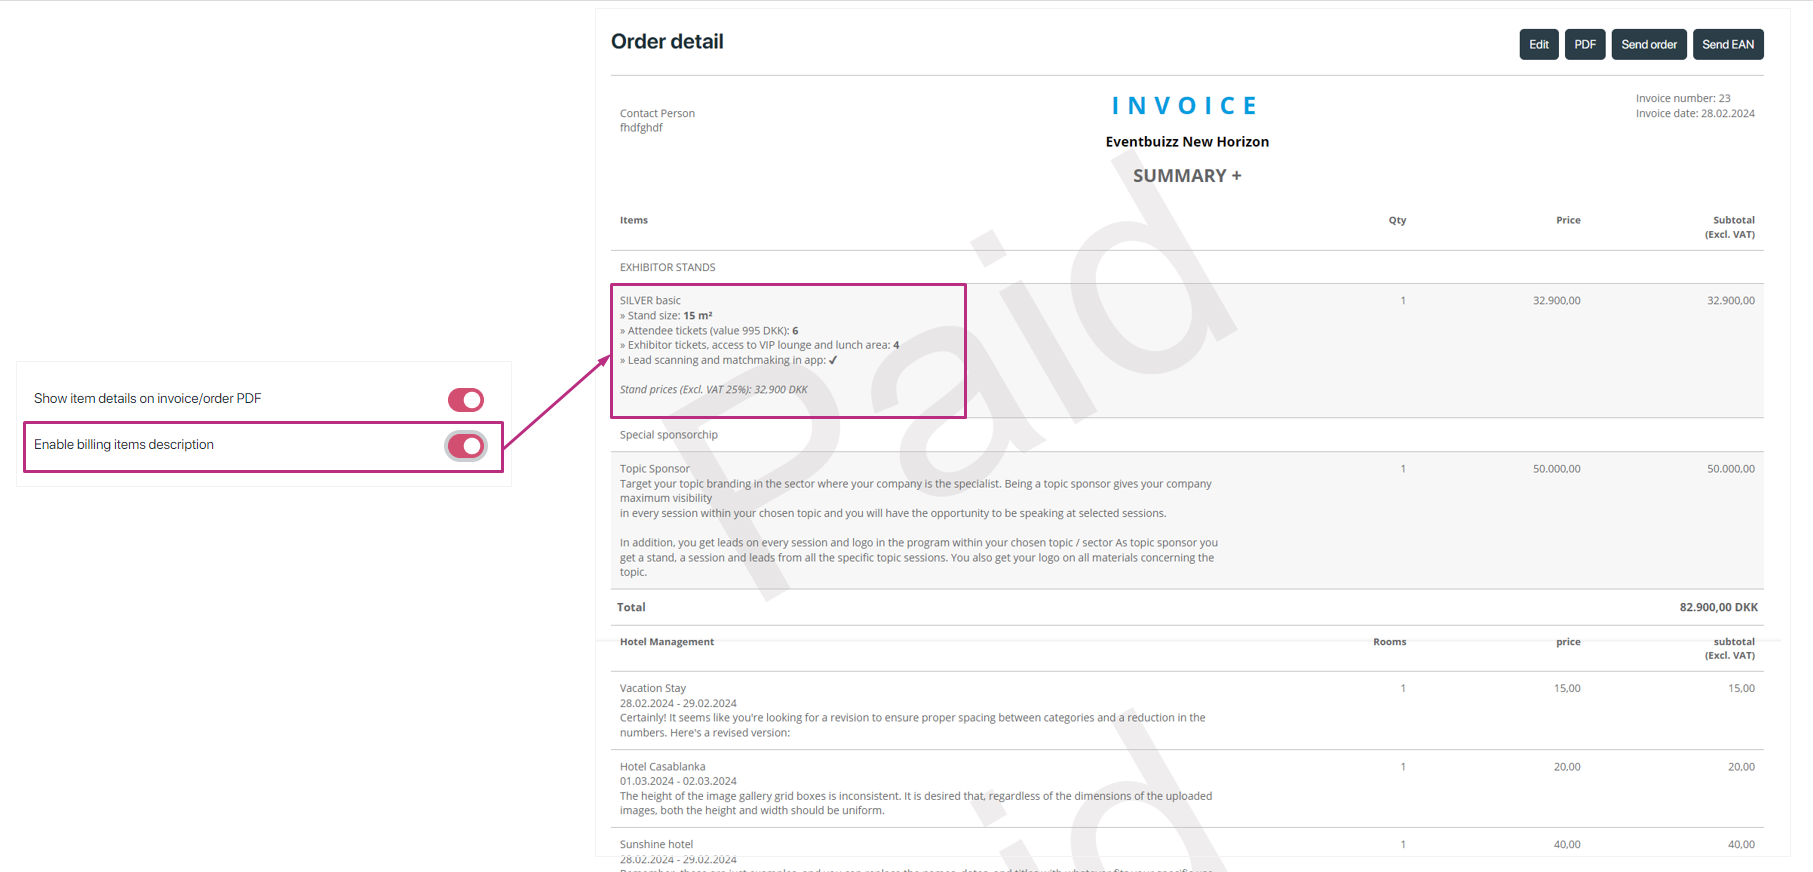
Show item details on invoice/order PDF
The “Show item details on invoice/order PDF” setting allows event organizers to display detailed information about the items or services purchased on the invoice or order PDF. This can include details such as product name will be displayed on the generated PDF files for invoices and orders. By enabling this setting, organizers ensure that the invoice or order summary clearly reflects the specific items purchased by the attendee, providing transparency and clarity.
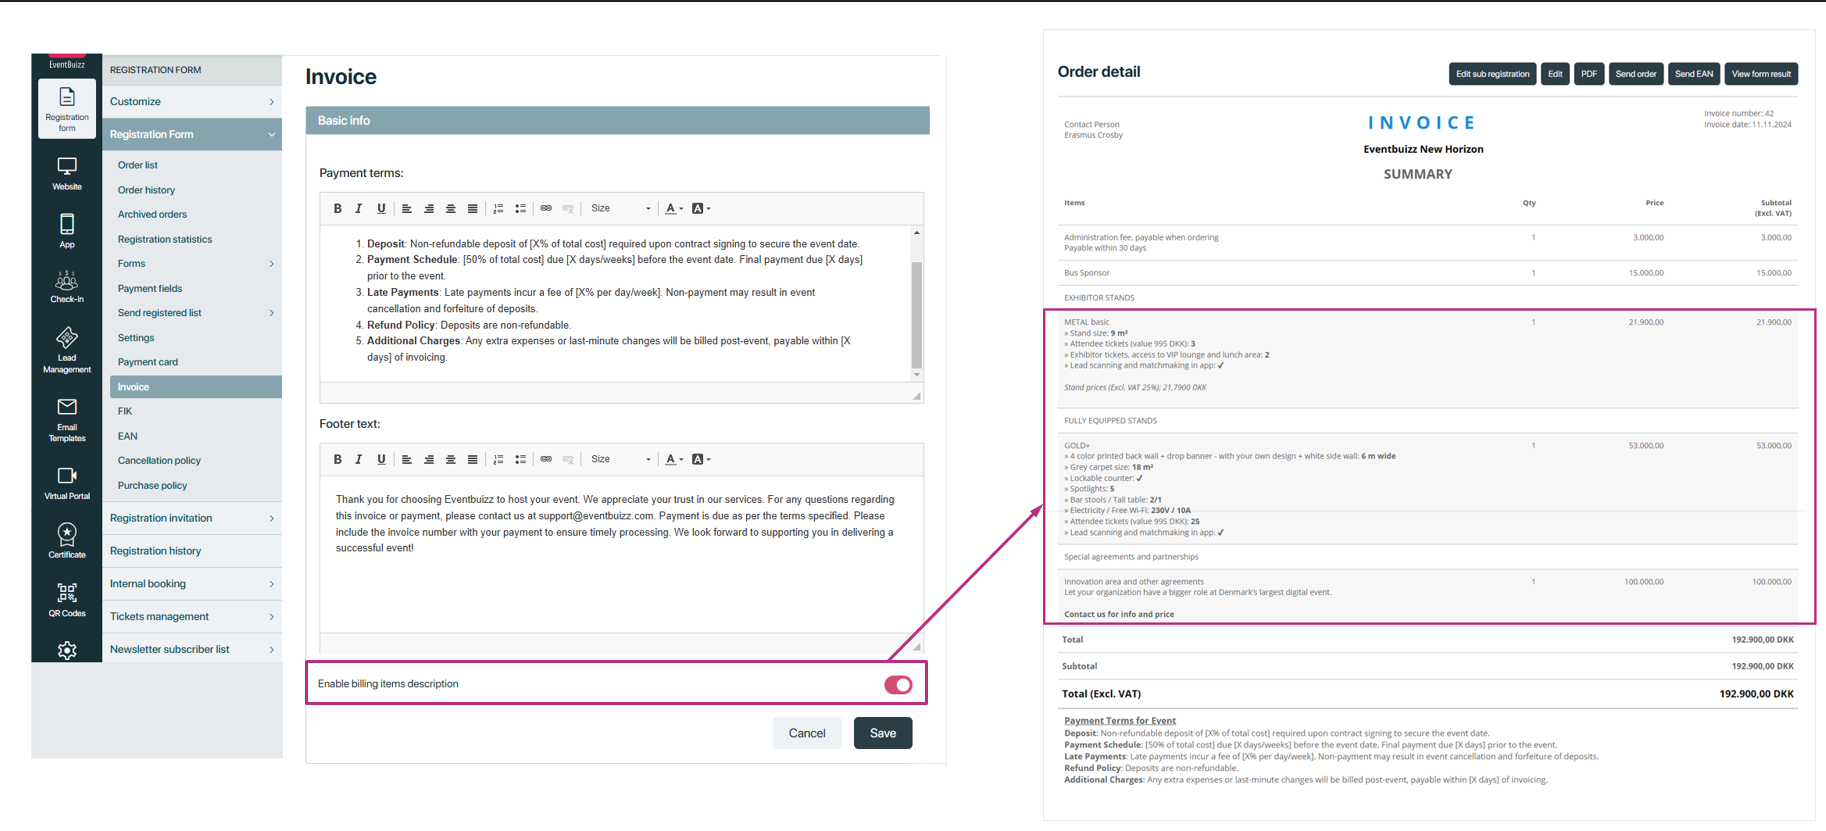
Enable billing items description
When enabled, users can provide detailed descriptions for each item , enhancing clarity and providing recipients with more information about the items being billed for.
Enable Prices:
The “Enable Prices” setting for hotels allows organizers to display pricing information for hotel accommodations associated with an event. This feature ensures that attendees can view the costs of different room types, packages, or durations during the booking process, enabling transparency and informed decision-making. By integrating pricing directly into the registration system, it simplifies the booking experience for attendees while helping organizers manage accommodation options and financial tracking efficiently.
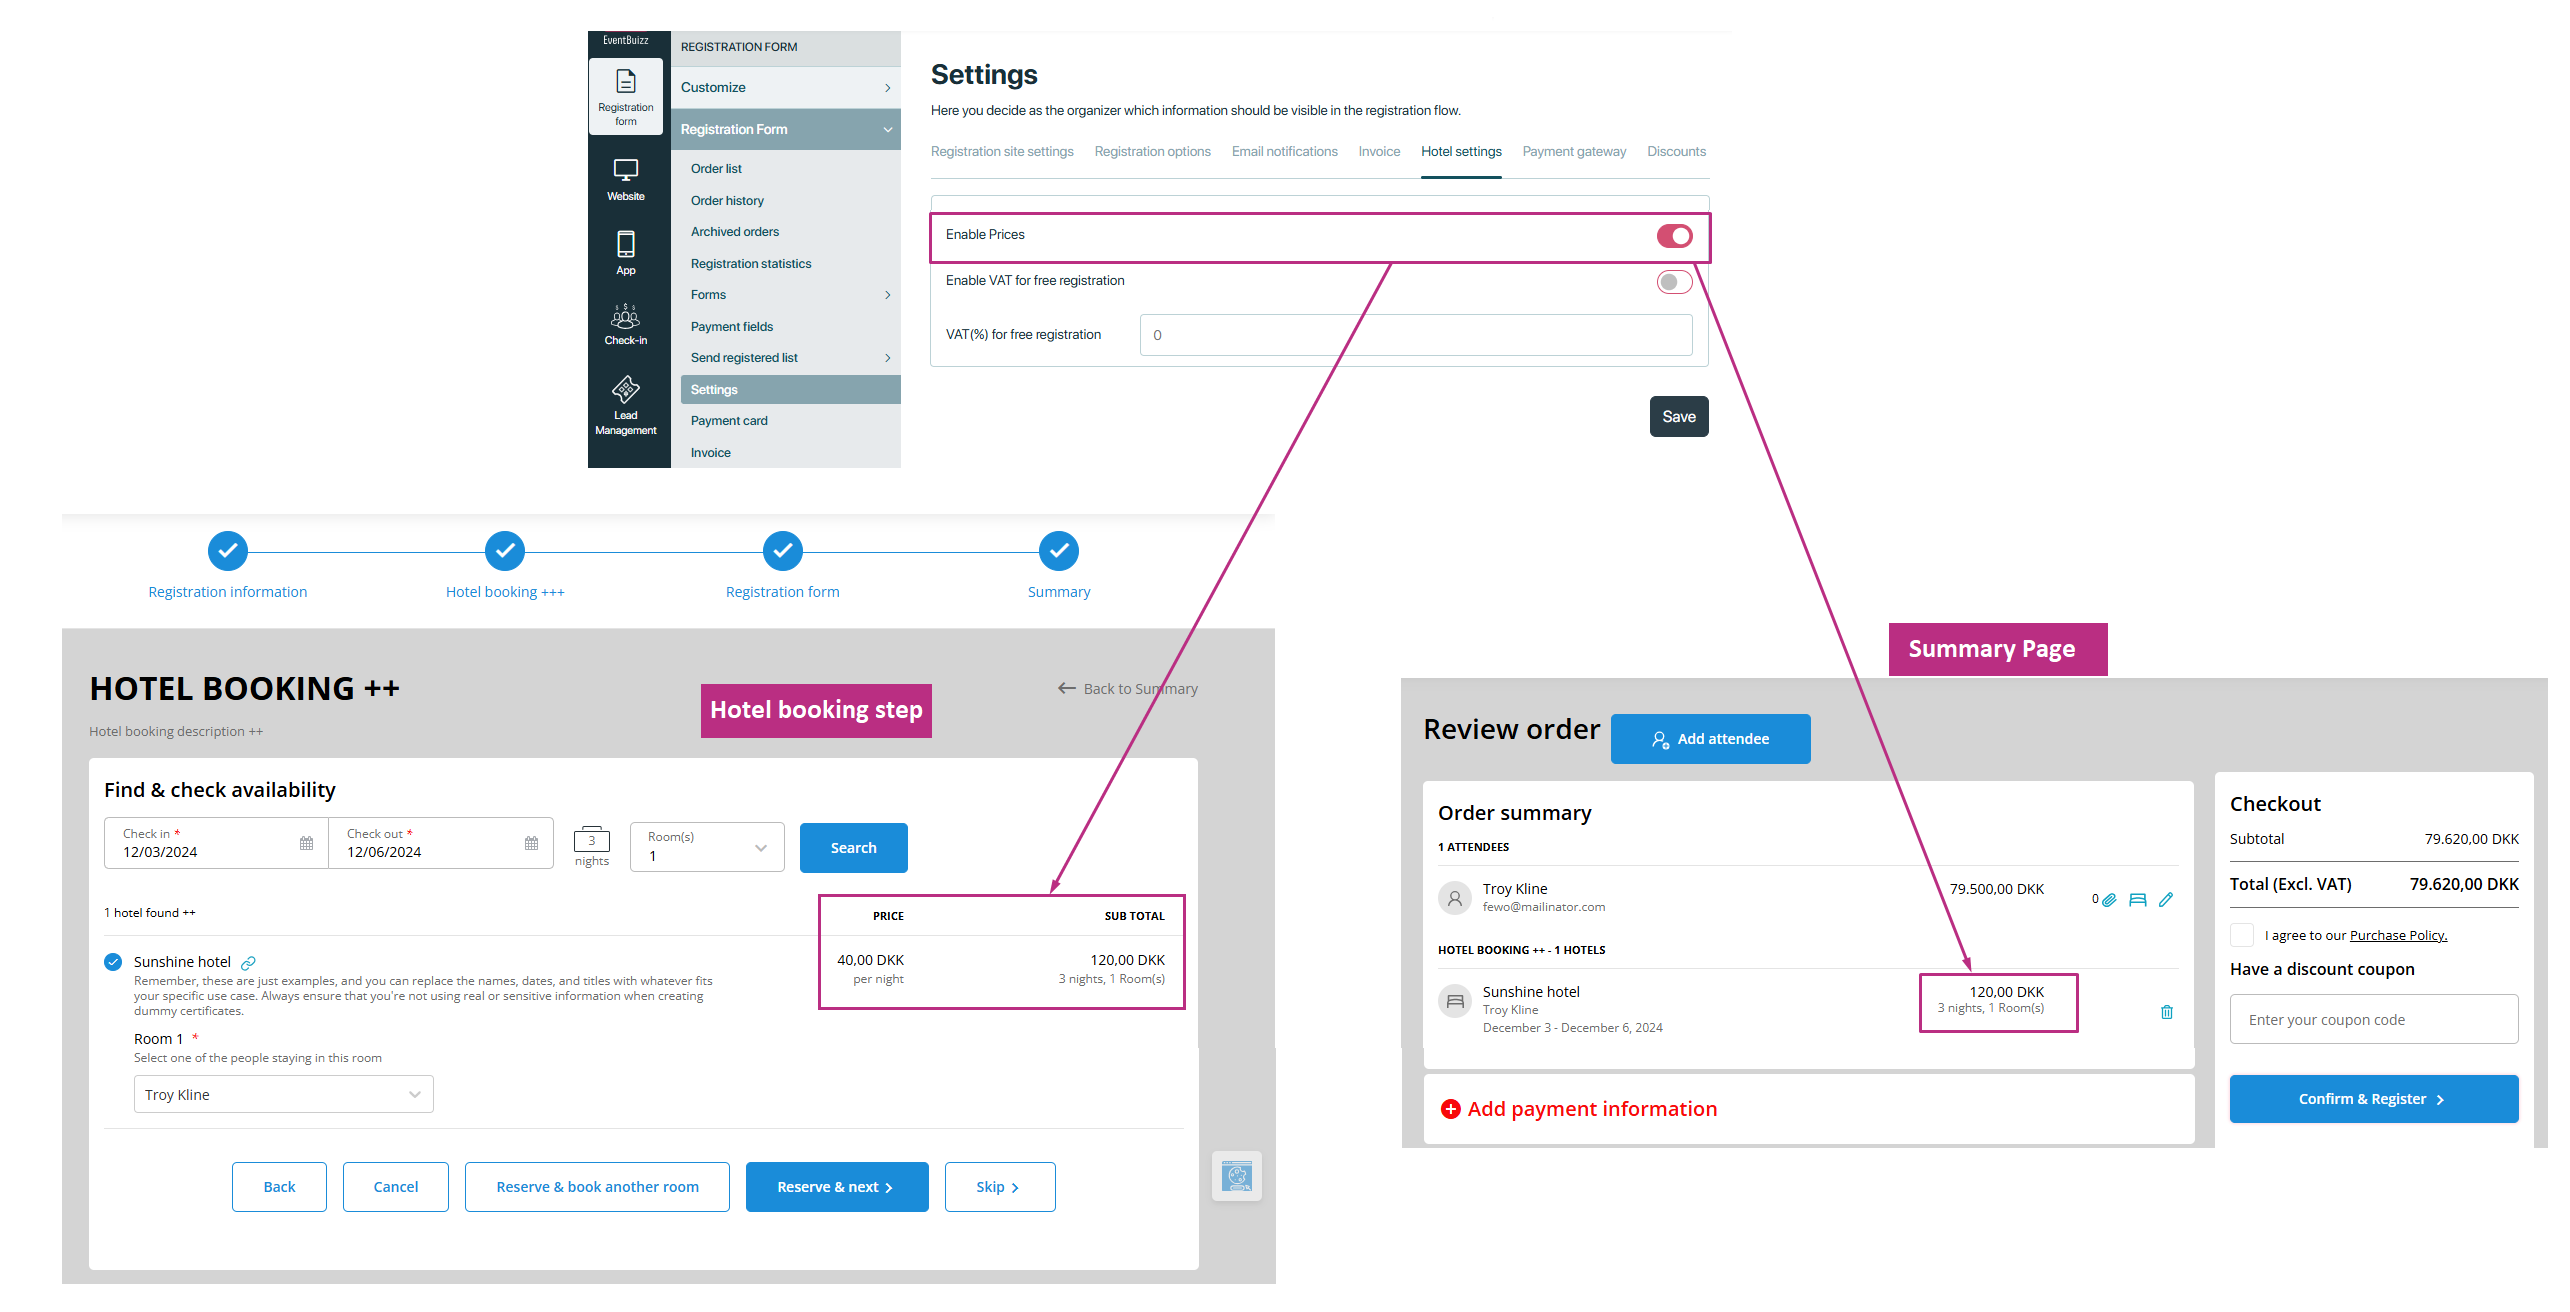
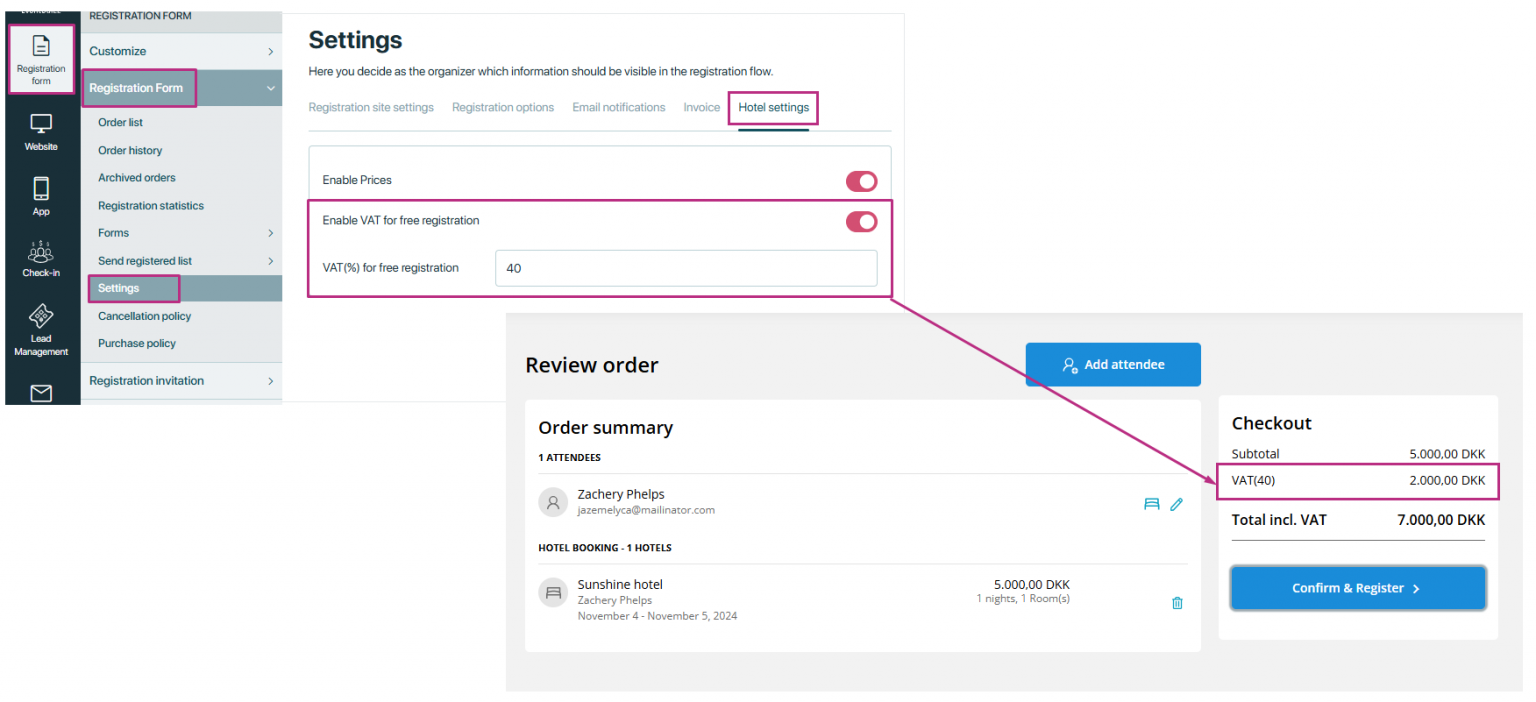
Enable VAT for free registration
We have a separate VAT setting for free registration.
- Enable VAT for free registration: Enabling this setting allows organizers to manage the application of Value Added Tax (VAT) on hotel accommodations, even when attendees register for the hotel booking as part of a free event.
- VAT(%) for free registration: The VAT field is where you enter the VAT percentage that applies to the hotel services. When you set a value in this field, it determines how much VAT will be added to each booking based on that percentage. For example, if you enter “40%” in the VAT field, the system will automatically add 40% to the total cost of each booking to cover the VAT.
For more details, go to Hotel management > Hotel in registration flow > VAT for hotel (free registration).
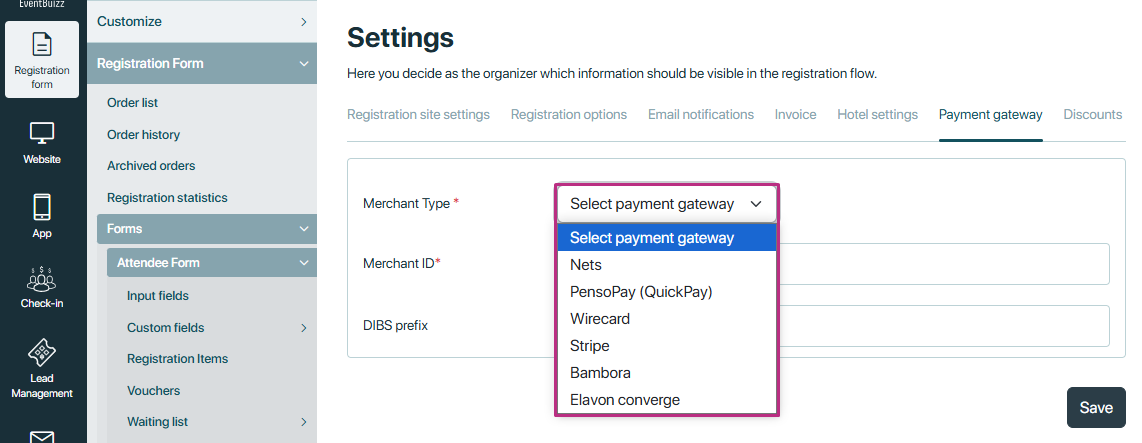
Payment Gateway
Payment gateways are secure online platforms that facilitate the processing of payments for events, registrations, or purchases made through the system. These gateways act as intermediaries between the event organizer’s account and the attendee’s payment method, such as credit/debit cards, digital wallets, or bank transfers. By integrating payment gateways, Eventbuizz ensures that financial transactions are processed efficiently, securely, and in compliance with relevant regulations.
Payment Gateways Used by Eventbuizz
Eventbuizz supports various popular payment gateways to cater to global and regional needs. These typically include:
- Nets
- Pensopay (Quickpay)
- Wirecard
- Stripe
- Bambora
- Elavon coverage
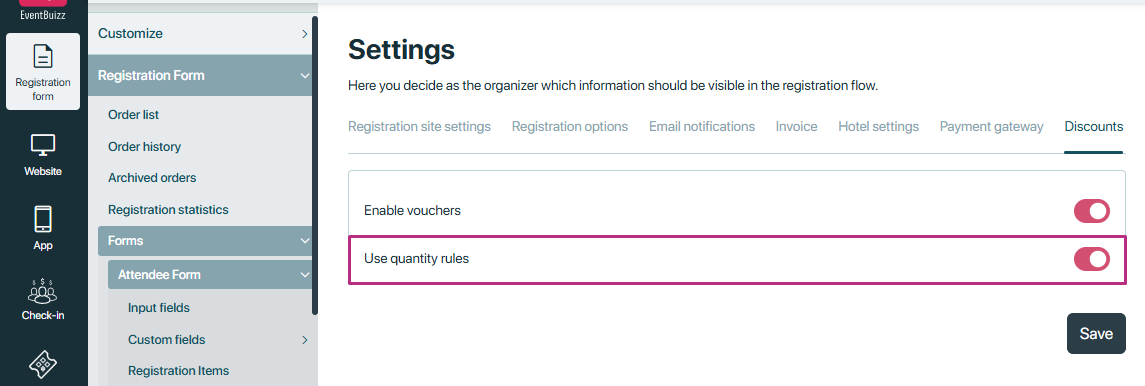
Enable vouchers
The “Enable Vouchers” setting is a feature that allows a system to accept and apply discount vouchers or promotional codes. Its purpose is to provide businesses with a way to offer discounts, rewards, or special offers to their customers during the checkout process.If this setting is enabled, this will show voucher field on the registration site. Users can enter a voucher code, which the system validates against predefined conditions such as expiration dates, eligible products or categories, and minimum purchase requirements.For more details click, Vouchers.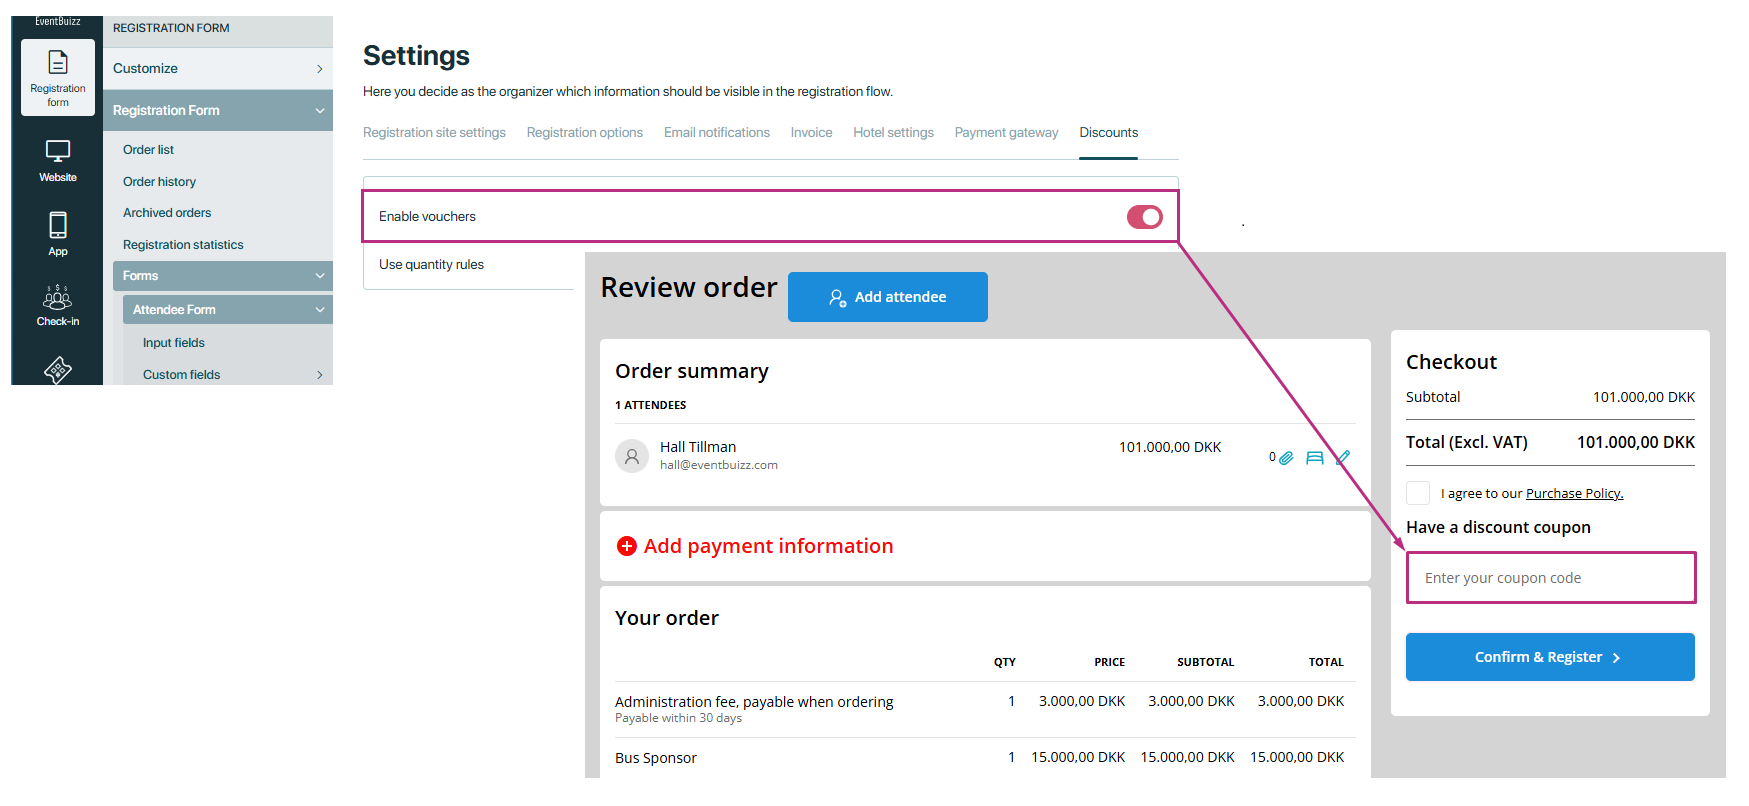
Use quantity rulesThe “use quantity rules” setting controls how discounts, vouchers, or promotions are applied based on the number of items a customer purchases. Its purpose is to encourage bulk buying or reward customers for purchasing specific quantities of products.
When this setting is enabled, the system enforces rules tied to item quantities in the shopping cart.
For example, a promotion might require customers to buy a minimum of three items to receive a discount or offer escalating benefits like “Buy 5 items, get 10% off; Buy 10 items, get 20% off.” During checkout, the system checks the quantity of eligible items in the cart and validates whether they meet the specified rules. If the conditions are met, the discount is automatically applied. This feature allows businesses to design flexible promotions that align with sales goals and inventory strategies.
For more details, click Registration items > Quantity based discount.
-
Select cards that within your agreement with the service provider. These card(s) will be displayed on the registration so the attendee can see which card(s) are valid for payment.
Payment cards refer to the types of credit or debit cards that attendees can use to pay for event registration fees or other services offered through the platform. When setting up payment options, you select specific card types (such as Visa, MasterCard, or American Express etc.) that are supported by your payment service provider and allowed within your service agreement.
These selected cards will then be displayed as accepted payment methods during the registration process, so attendees can clearly see which cards are valid for payment. This setup ensures that attendees know their payment options upfront, preventing issues with unsupported cards and providing a smooth, reliable payment experience.
IMPORTANT NOTE: If the user chooses the card payment method in the payment information, only card options will be shown at checkout.

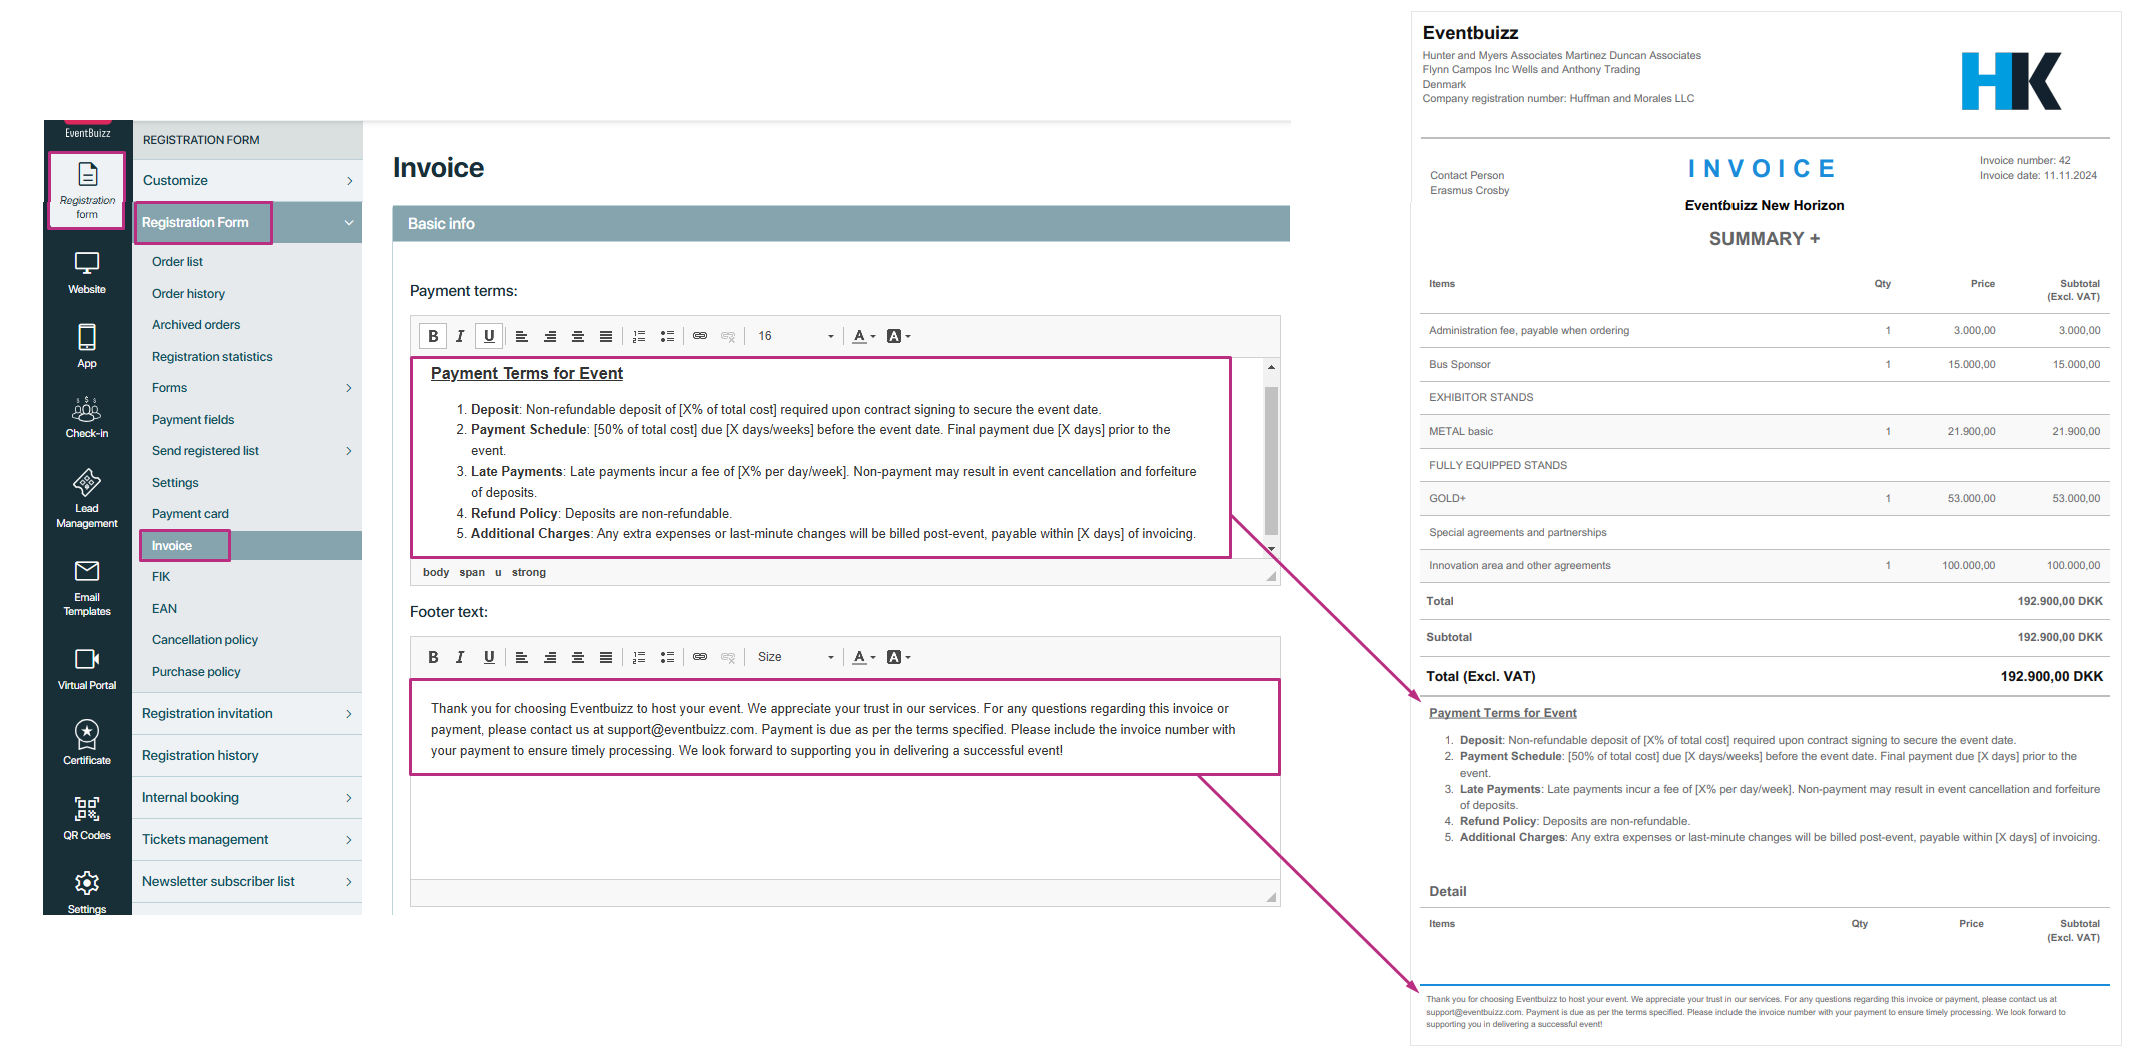
Payment terms: outline the conditions under which the payment for the invoice should be made. This includes information about due dates, accepted payment methods, late fees, discounts for early payment, or any other relevant terms and conditions governing the payment process.
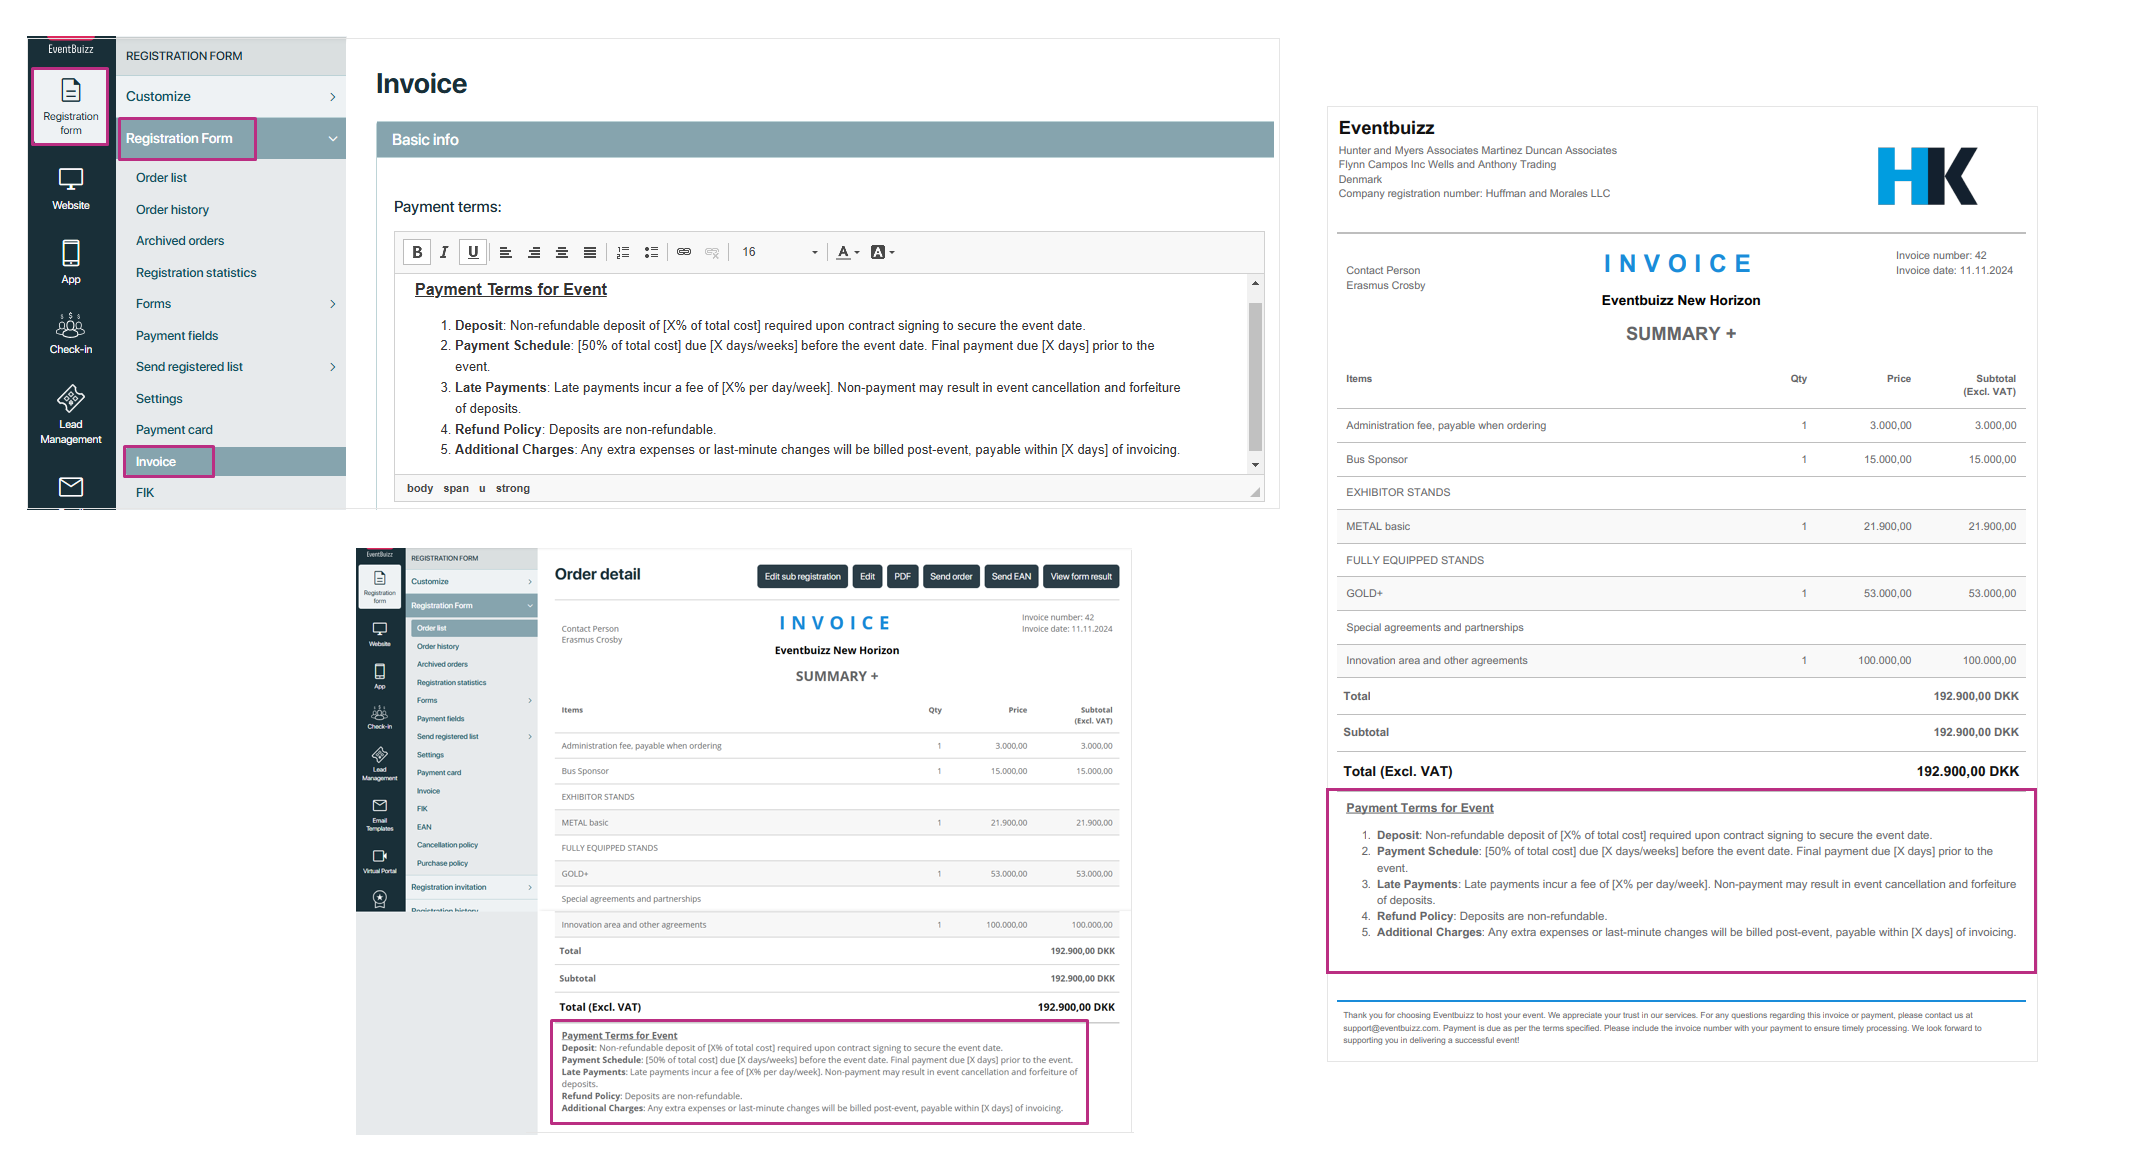
Footer text: allows for customization of the content displayed at the bottom of the invoice. It can include additional information such as contact details, company policies, legal disclaimers, thank you messages, or any other personalized messages deemed necessary by the event organizer.
Important Note:
- Payment terms will appear on both the order details and the invoice, while the footer text will only appear on the invoice.
- If there is text in both the payment terms and the footer, both will appear on the invoice.
Enable Billing Items Description: This setting enables the inclusion of detailed descriptions for billing items on the invoice. It ensures that each line item on the invoice is accompanied by a clear and concise description, providing transparency and clarity regarding the products, services, or fees being charged.
These sections collectively contribute to creating professional and informative invoices that accurately reflect the details of the event transactions while facilitating clear communication between the event organizer and the recipient of the invoice.
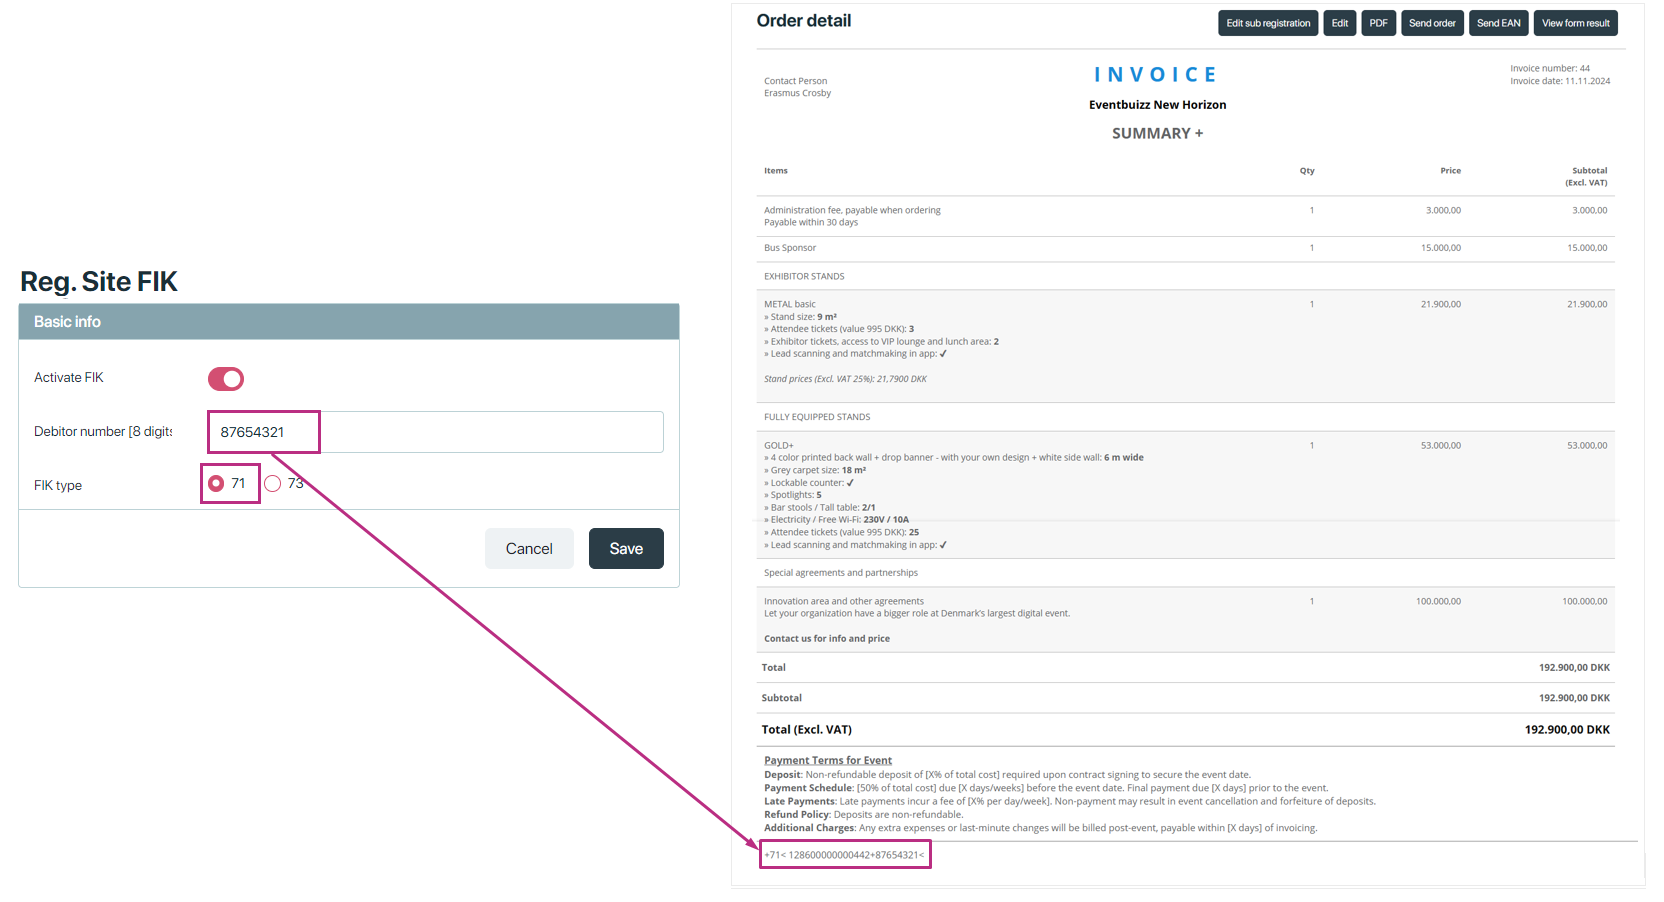
To activate FIK and EAN, the event should be billing and billing type must be “Receive Invoice”.
- Activate print of the FIK on the invoice.
- Once all the settings are configured, enter your 8 digits customer number.
- Select the system FIK of types 71 and 73. The system will automatically generates the FIK code based on the type and print this on the invoice under payment terms.
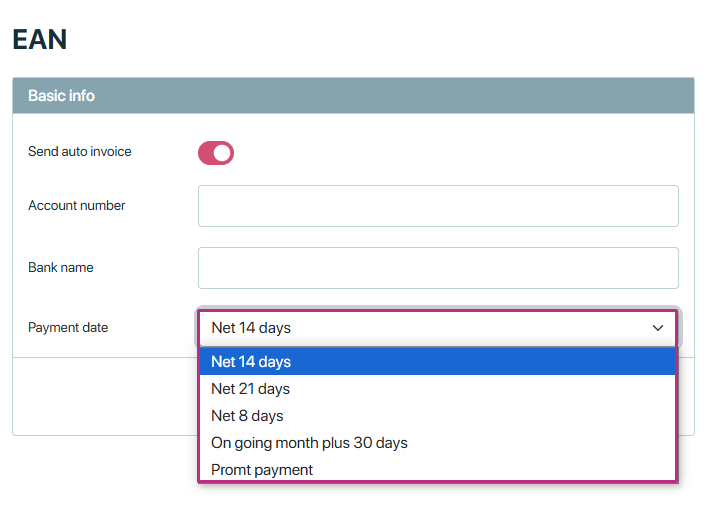
EAN
When you choose the public (EAN) option during registration, any payments will start going to the account you’ve set up with the provided account number and bank name. The timing of these payments depends on the Payment date option you select. This setting allows you to decide when you want payments to be sent to your account.
In the image:
-
Send auto invoice toggle: If this option is turned on (red toggle), invoices will be automatically sent without needing to do it manually.
-
Account number and Bank name fields: Here, you enter the details of the bank account where you want the payments to go.
-
Payment date dropdown: This dropdown offers several choices for when the payments will be processed:
- Net 14 days: Payment will be sent 14 days after the invoice date.
- Net 21 days: Payment will be sent 21 days after the invoice date.
- Net 8 days: Payment will be sent 8 days after the invoice date.
- Ongoing month plus 30 days: Payment will be sent 30 days after the end of the current month.
- Prompt payment: Payment is sent as soon as possible after the invoice is issued.
Choosing a payment date option helps control when funds will be transferred to your account based on your preferences.
The cancellation policy in Eventbuizz typically refers to the terms and conditions regarding the cancellation of event registrations or tickets. This policy outlines the rules and procedures that attendees must follow if they wish to cancel their registration and potentially receive a refund.
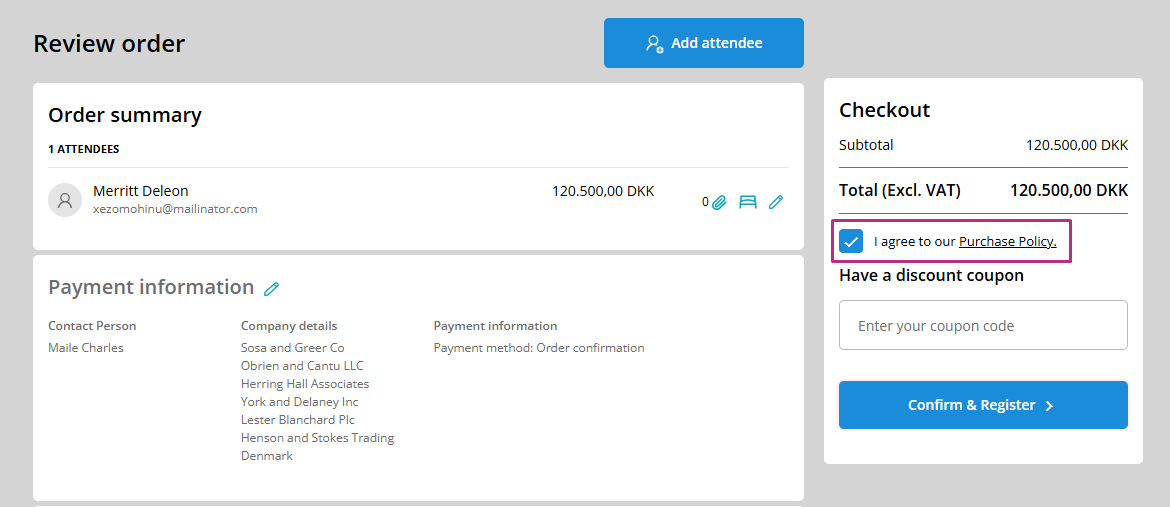
The purchase policy in Eventbuizz outlines the terms and conditions related to purchasing tickets, products, or services offered through the platform. This is required information and should be maintain by the organizer. The default text is just a template for you to customize.
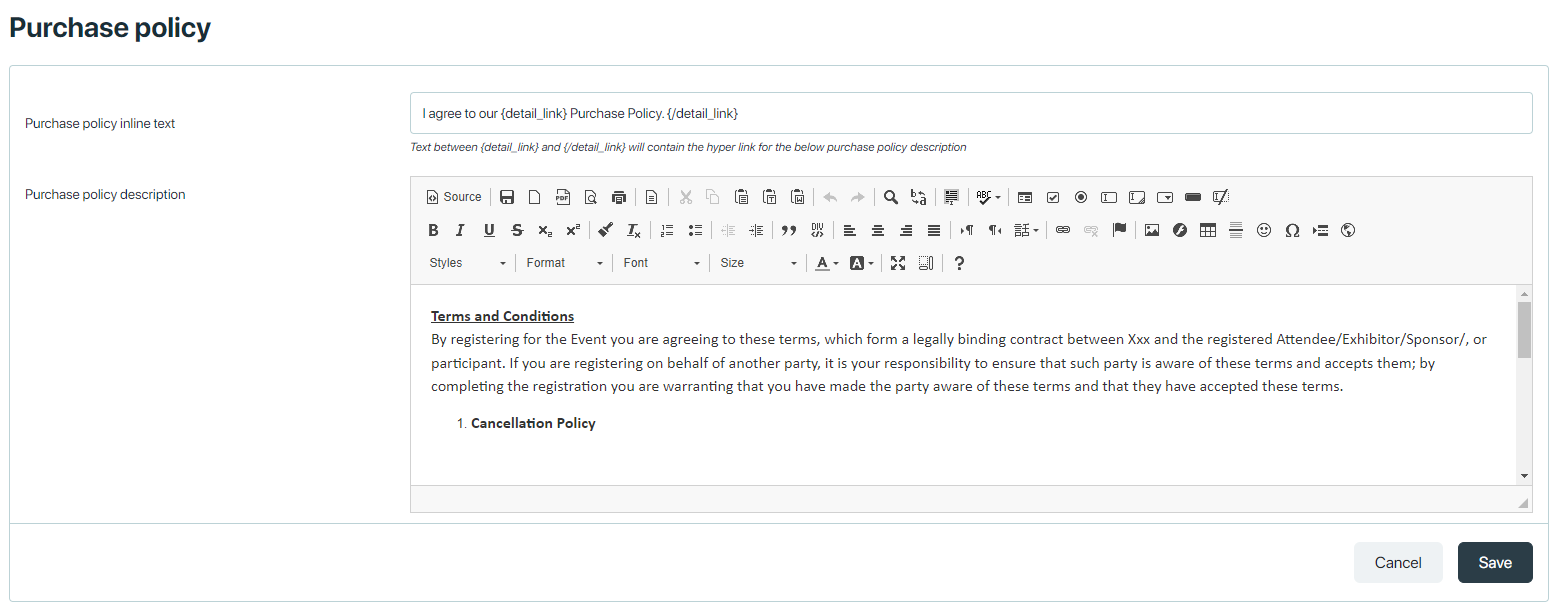
The attendee need to accept the policy in order to complete the registration. Click on “Purchase policy” and read your text.