In Eventbuizz, “request to speak” refers to a feature that allows event attendees to signal their desire to speak or ask a question during an event, such as a conference or webinar.
Ways to add program for request to speak:
You can add the program for request to speak by two ways:
-
- Request to speak -> Speaker listing -> Tools -> Add program.


To activate its session, go to session speaker listing.
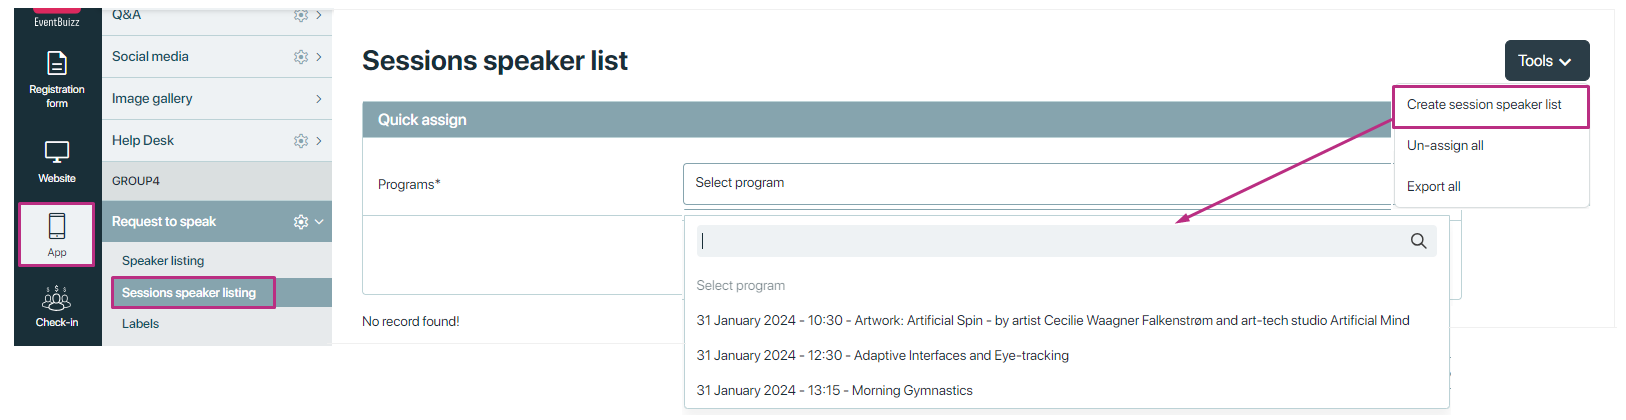
2- Request to speak -> session speaker listing -> Tools -> Create session speaker listing

The only difference between the two methods is that if you add a speaker through the speaker listing, their session will be disabled by default, and you will need to create their session separately. However, if you add a speaker directly through the session speaker list, their session will be created automatically.
Speakerlisting
Speaker Listing
You can add programs from tools → Add programs for ask to speak.
Once the program has been added. It is in-active by default. You can enable it by creating a session in session speaker listing.
To get a quick overview from the listing, you can see the live, accepted and pending speakers of the program. Organizer can also active/in active session, open projector preview and activate json just by clicking on the icon for quick access.
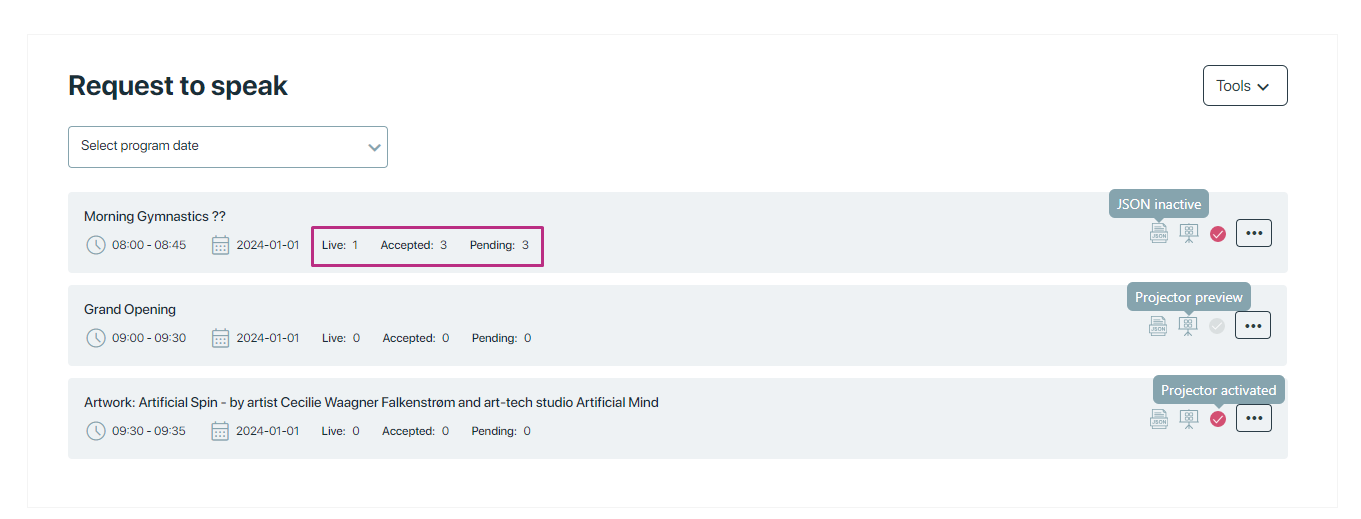
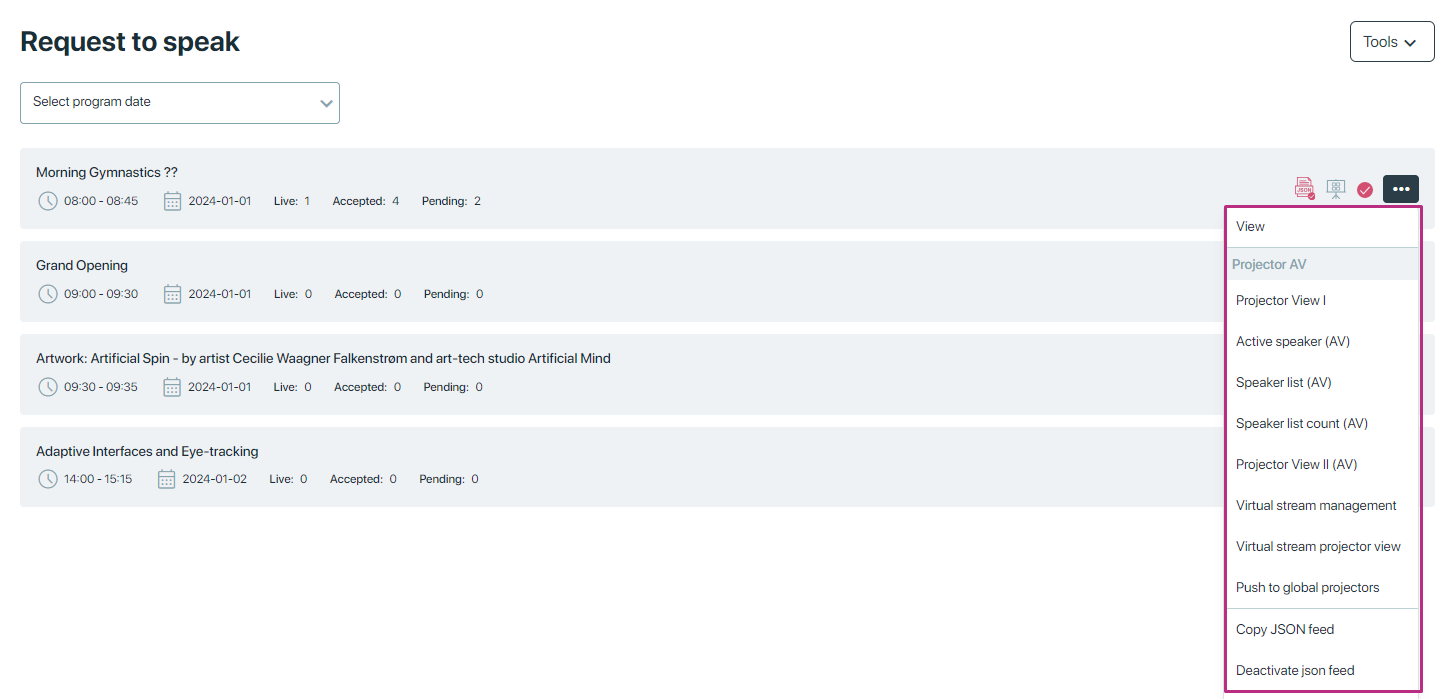
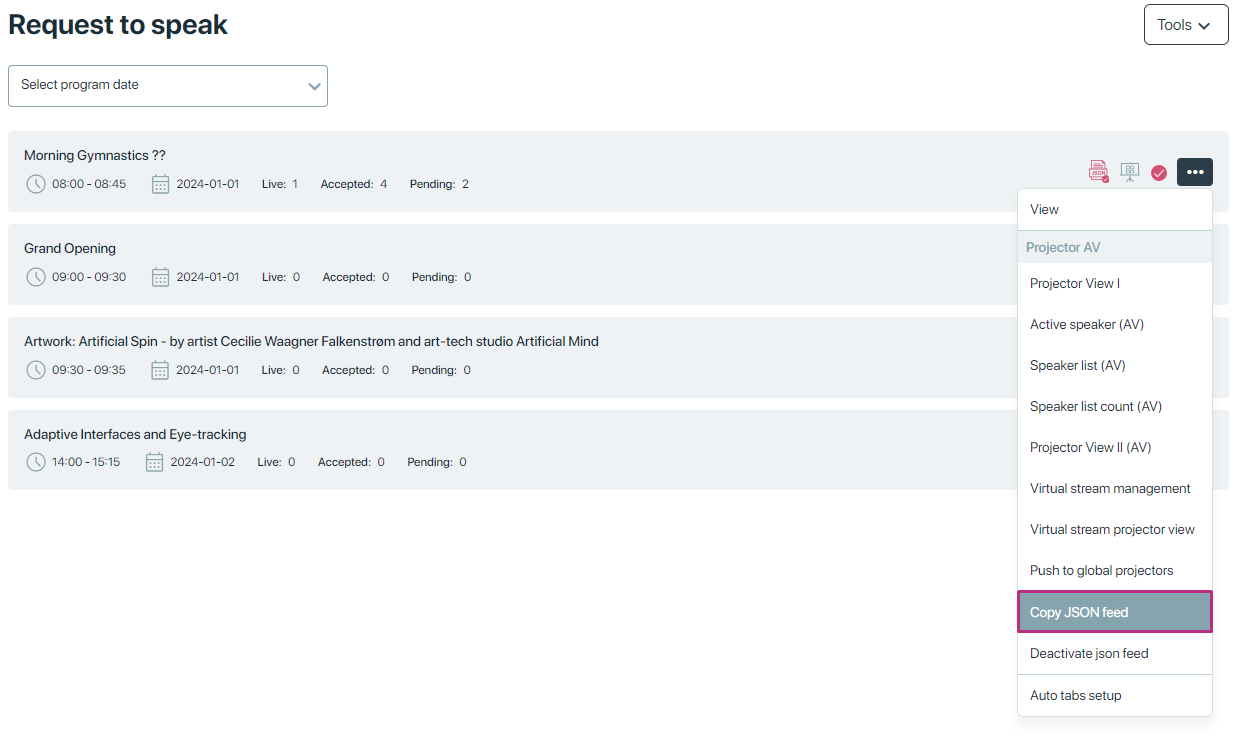
Click on the three dots icon ![]() to explore more options.
to explore more options.
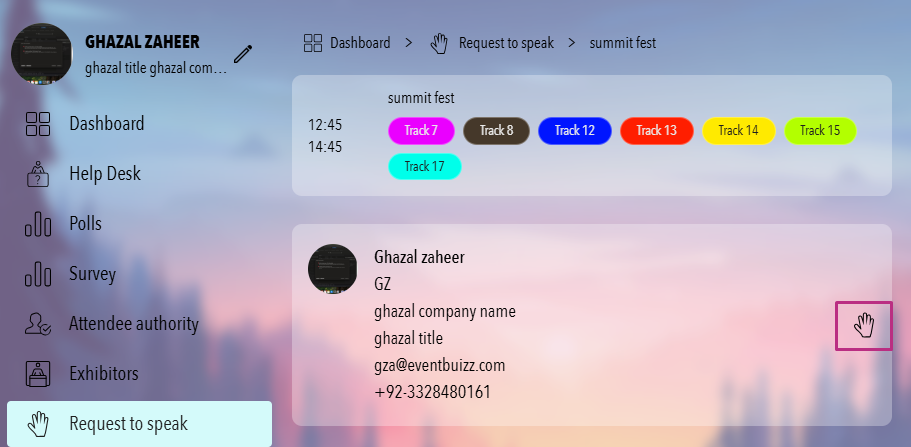
By clicking on “view” from the menu list user will redirect to Moderator View screen, where organizer have numerous functionalities.
Moderator View screen will look like this:

Let’s discuss all sections in detail:
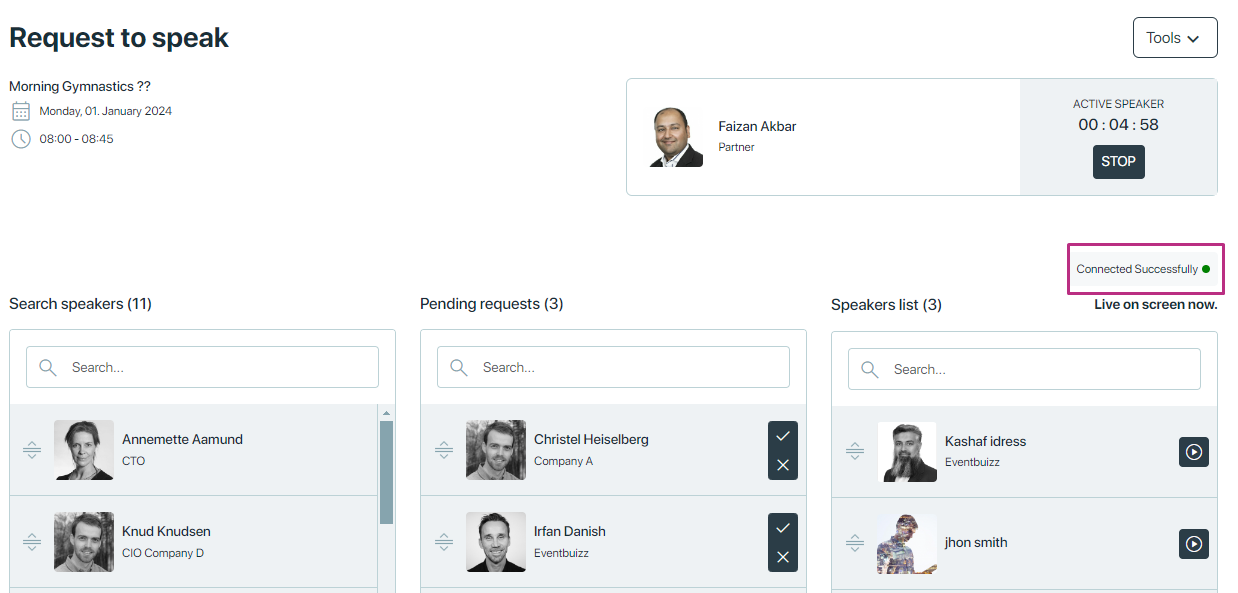
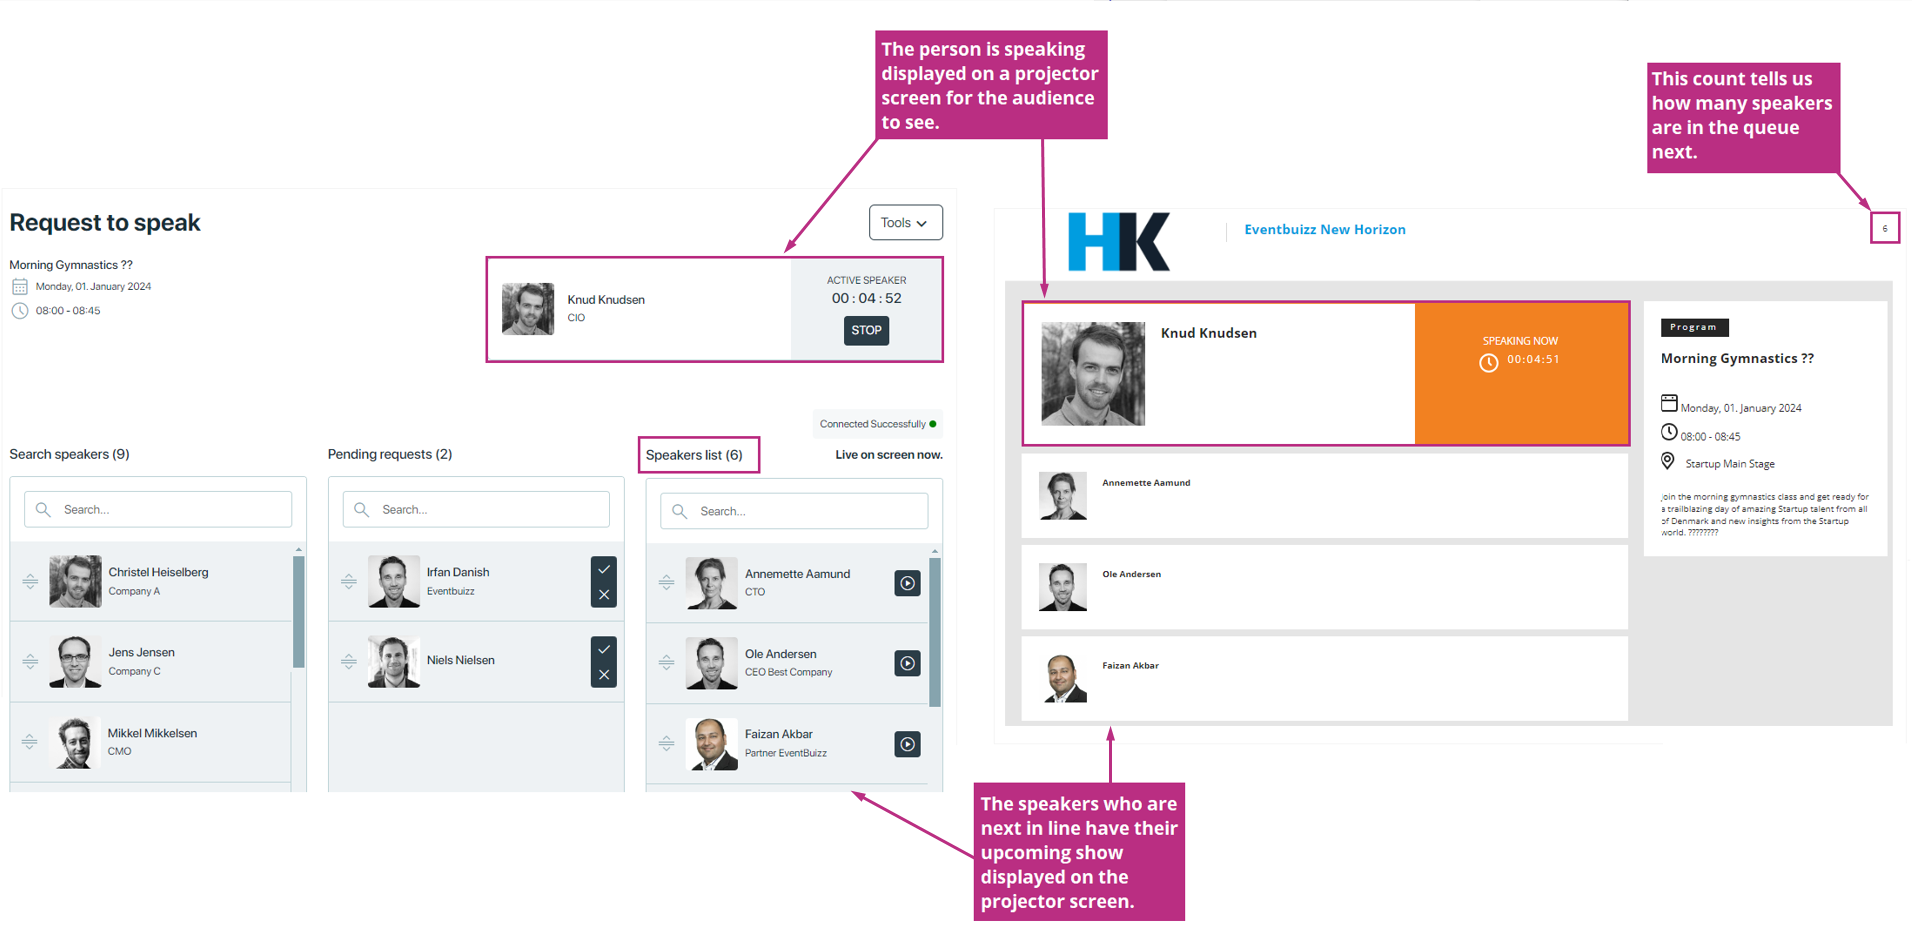
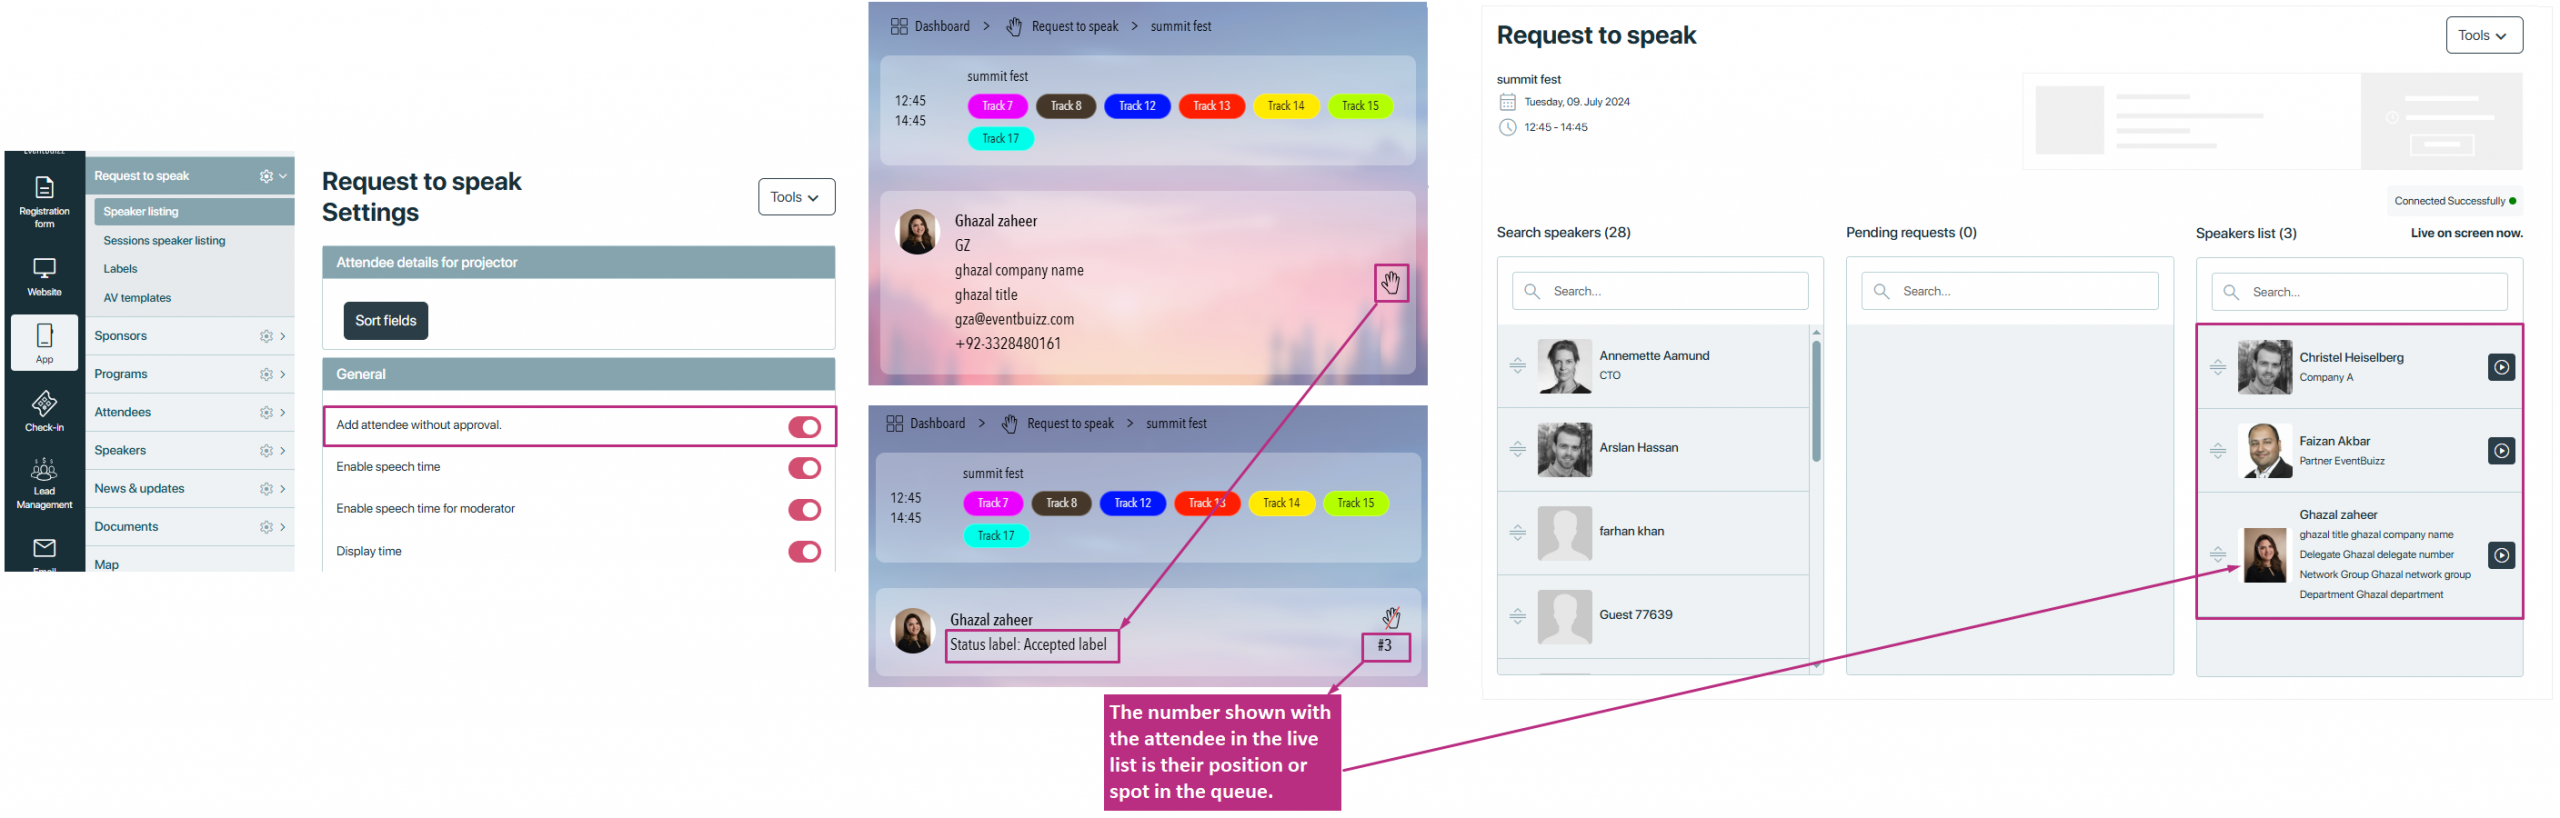
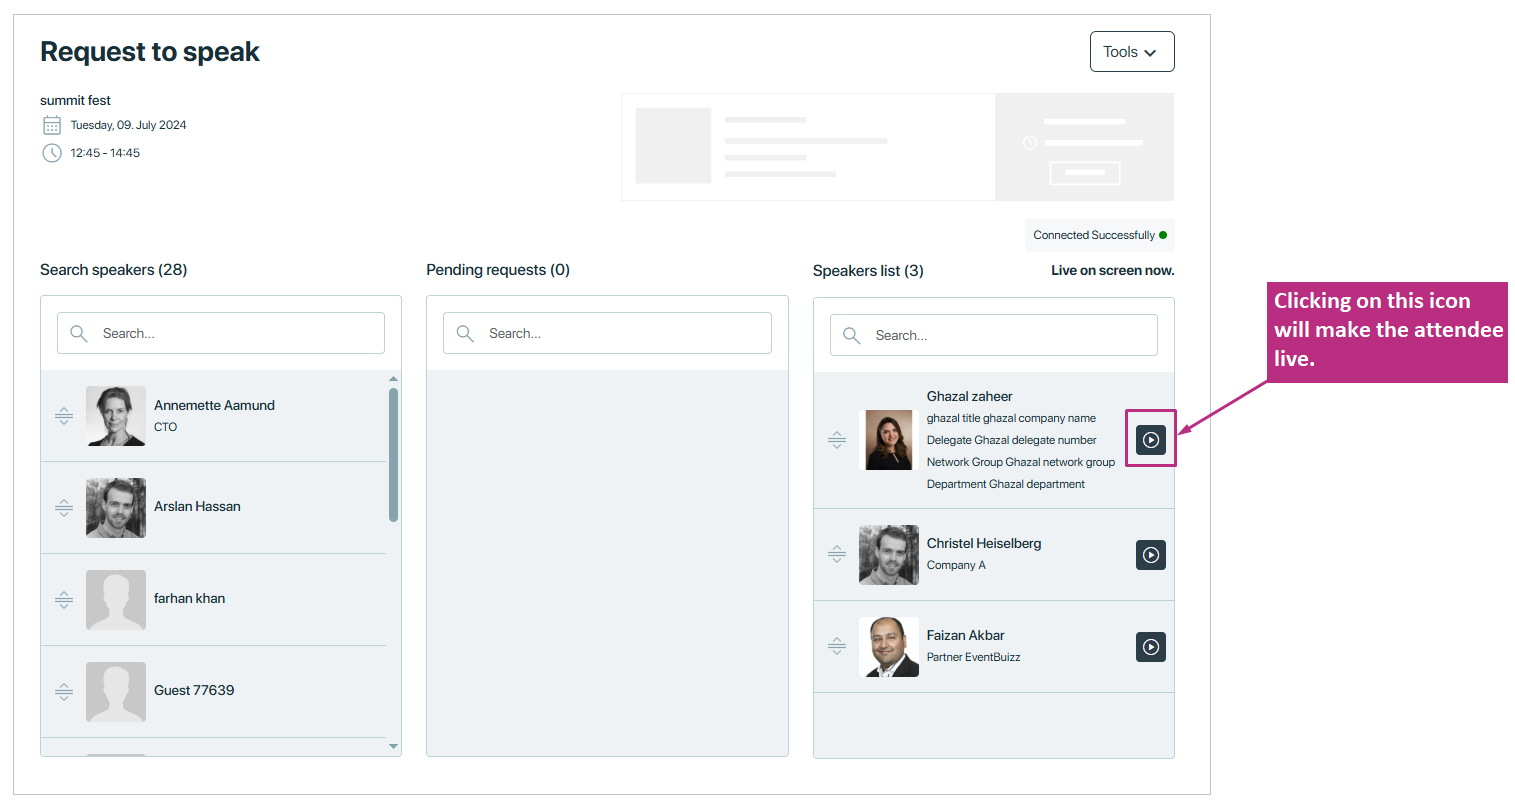
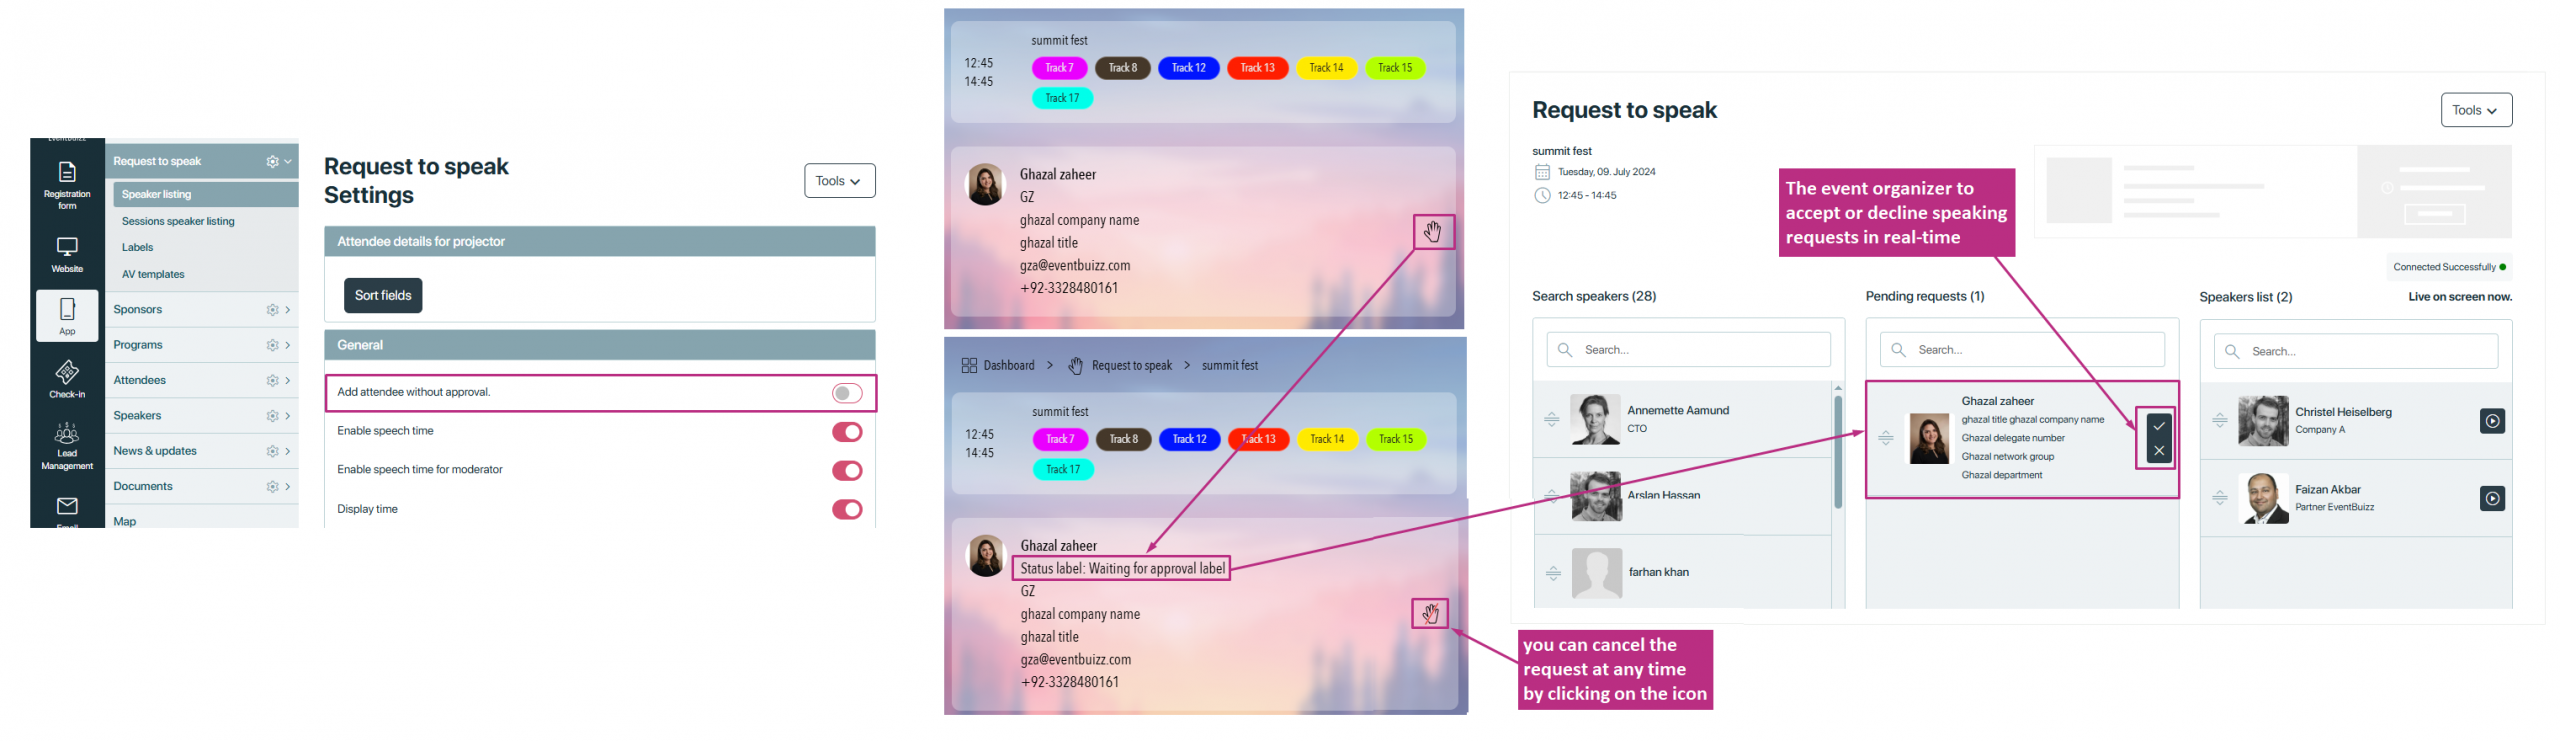
1- Search Speakers (Left Section):
-
-
- Search Bar: A search field to find specific speakers by name or other criteria.
- Speaker List: All attendees in the left column have the option to request to speak from web app. Depending on the settings (Ask attendee without approval), those who request to speak will be moved to either the “Pending Requests” column (middle) or the “Speakers List” column (right).
Additionally, the organizer can also manages this list from the event center. They can move any speaker to the “Pending Requests” column or directly to the “Speakers List” column.
-
2- Pending Requests (Middle Section):
-
-
- Search Bar: A search field to find pending requests by name or other criteria.
- Pending Requests List: Enables the event organizer to accept or decline speaking requests in real-time. If the “ask attendee without approval” setting is ON, all attendee requests will go to the “Pending Requests” list. The organizer has two options: accept (checkmark) or decline (cross).
-
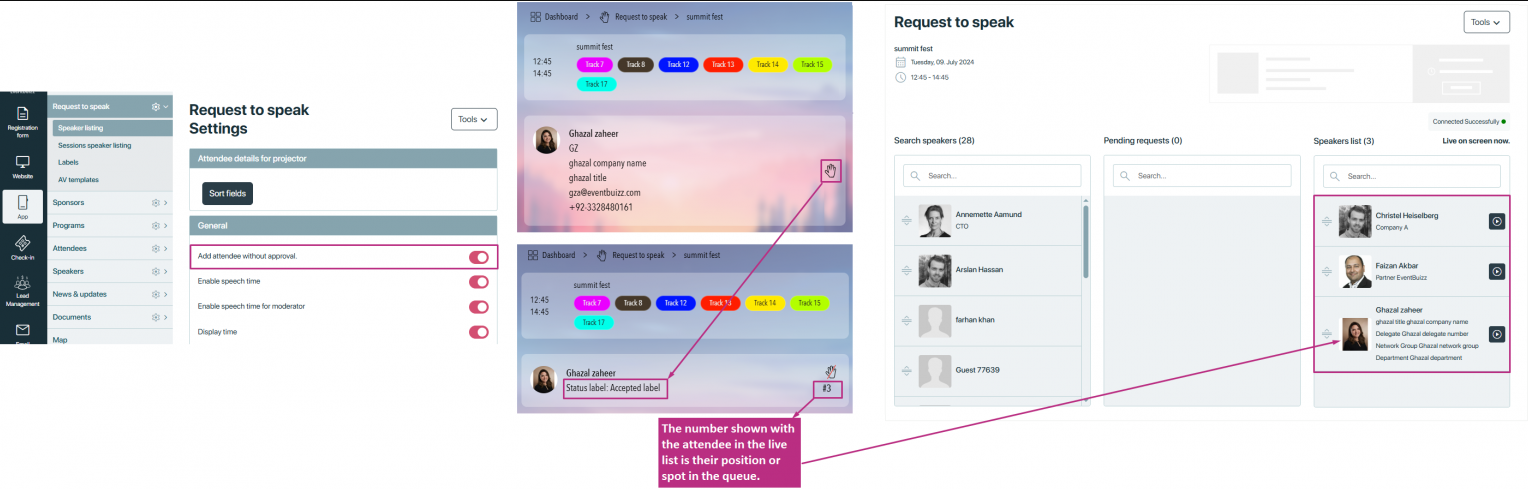
3- Speakers List (Right Section):
-
-
- Search Bar: A search field to find speakers in the list by name or other criteria.
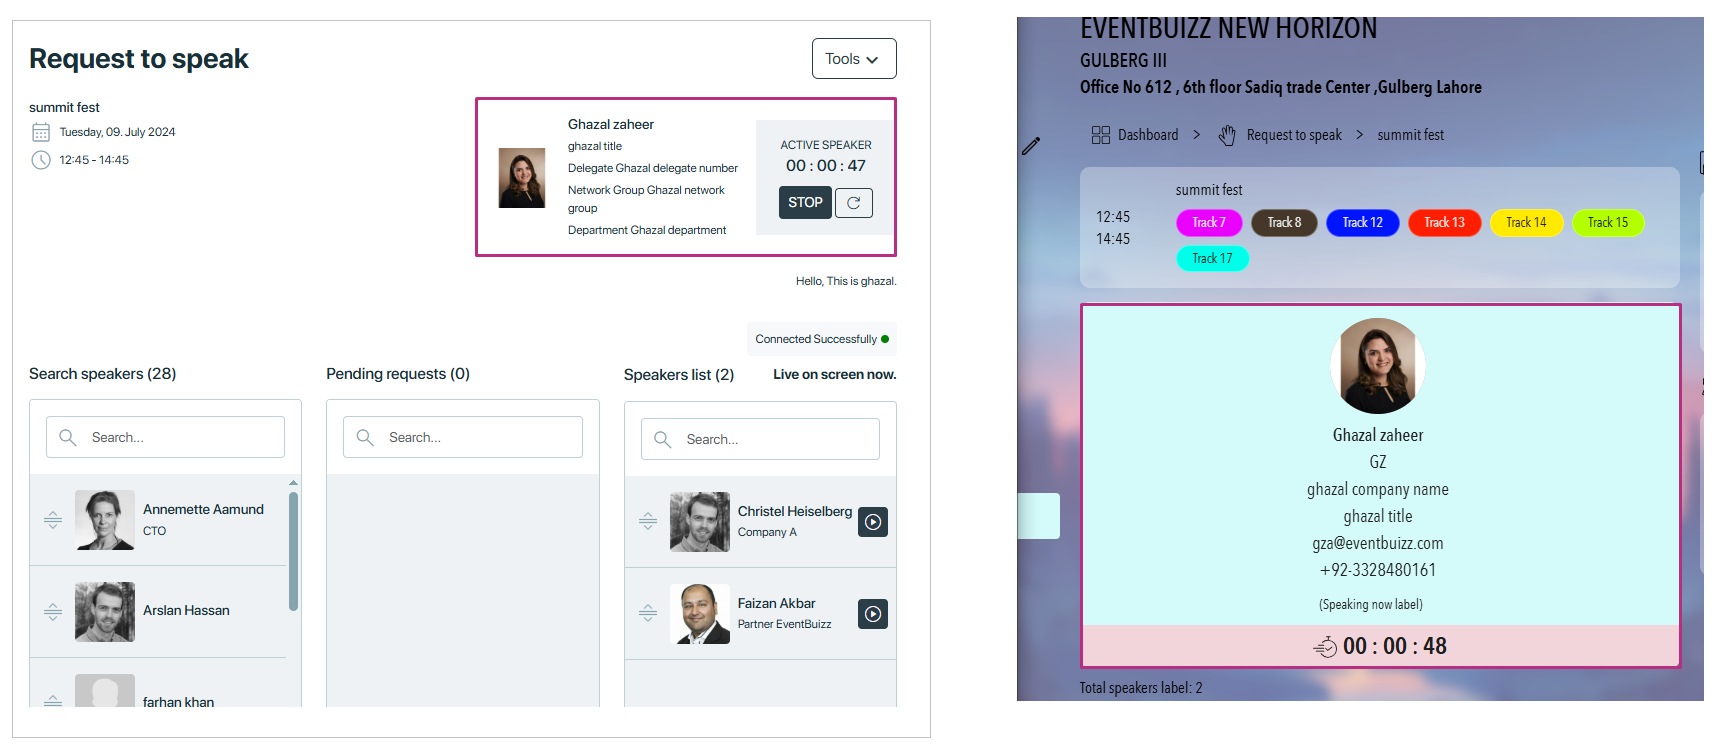
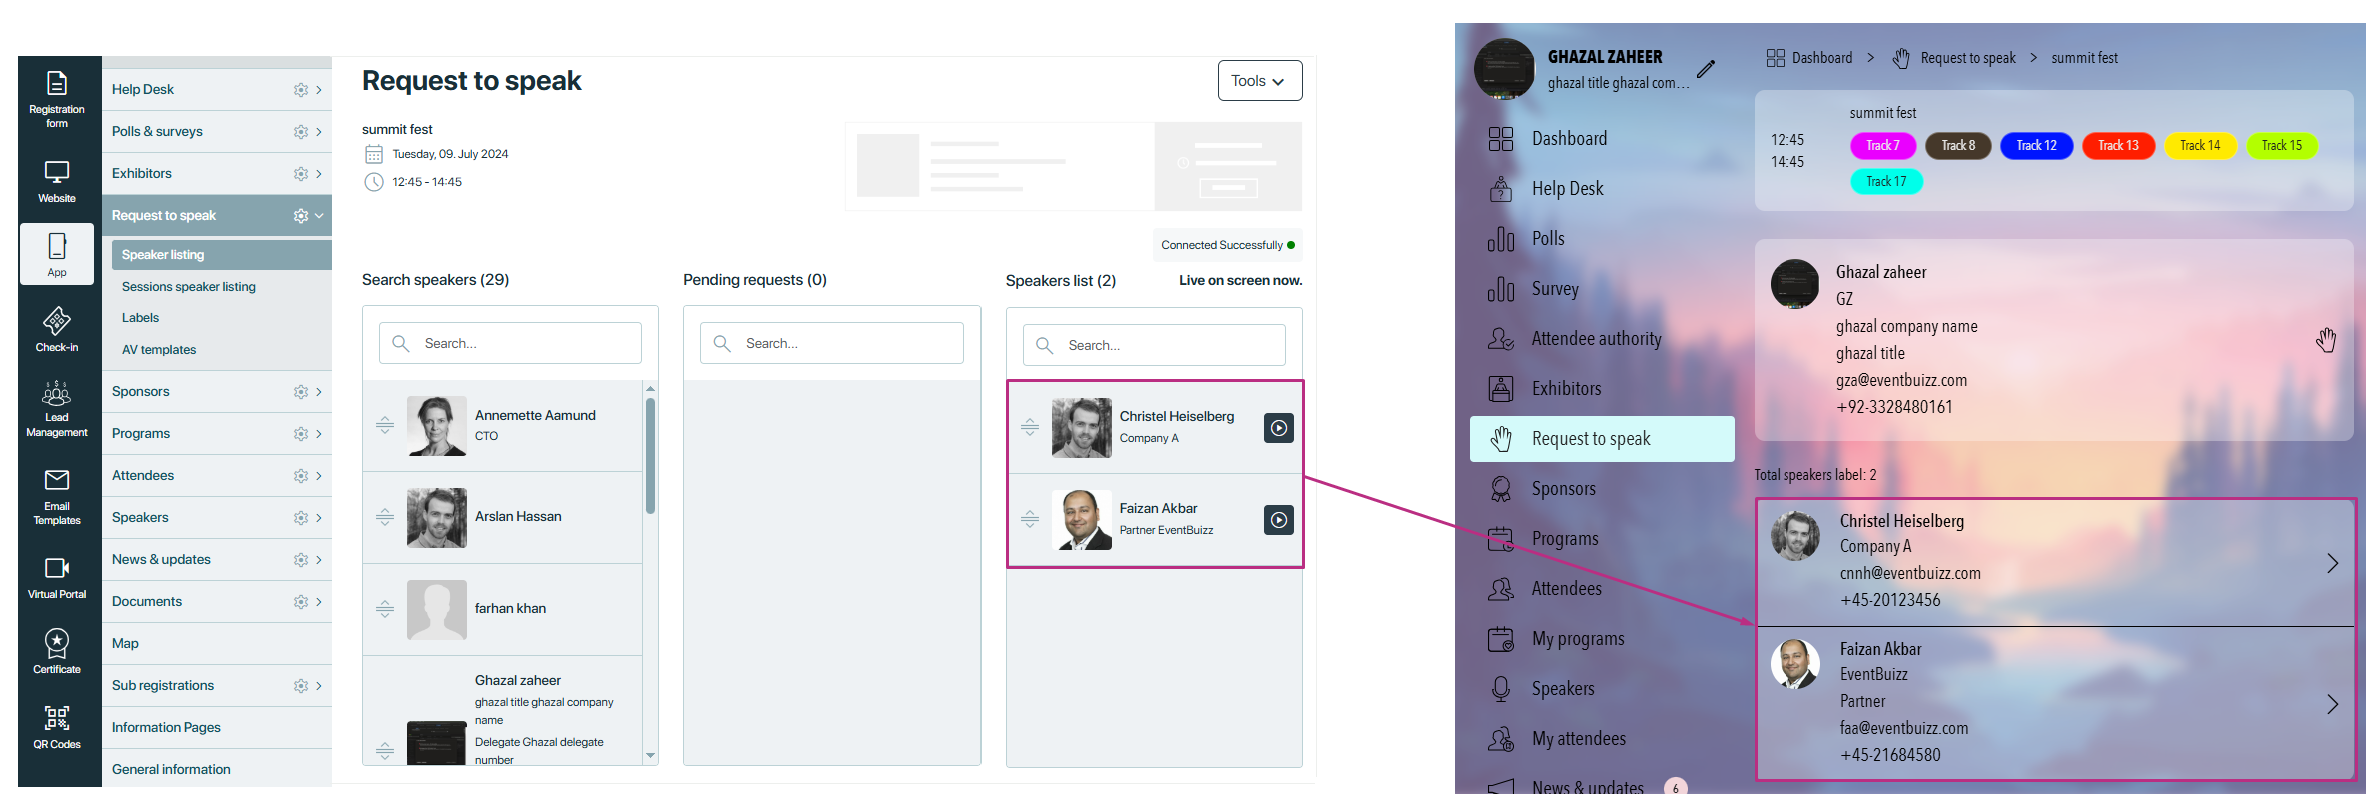
- Speakers List: Displays the list of confirmed speakers who will speak at the event, with the ability to see who is currently live. Each speaker entry includes an image, name, role, and a play button indicating they are live on screen.
-
4- live speaker: Clicking the play button next to a speaker in the speaker list means it’s their turn to speak. They will be shown on the projector. The organizer has the authority to stop the speaker at any time by clicking the stop button.
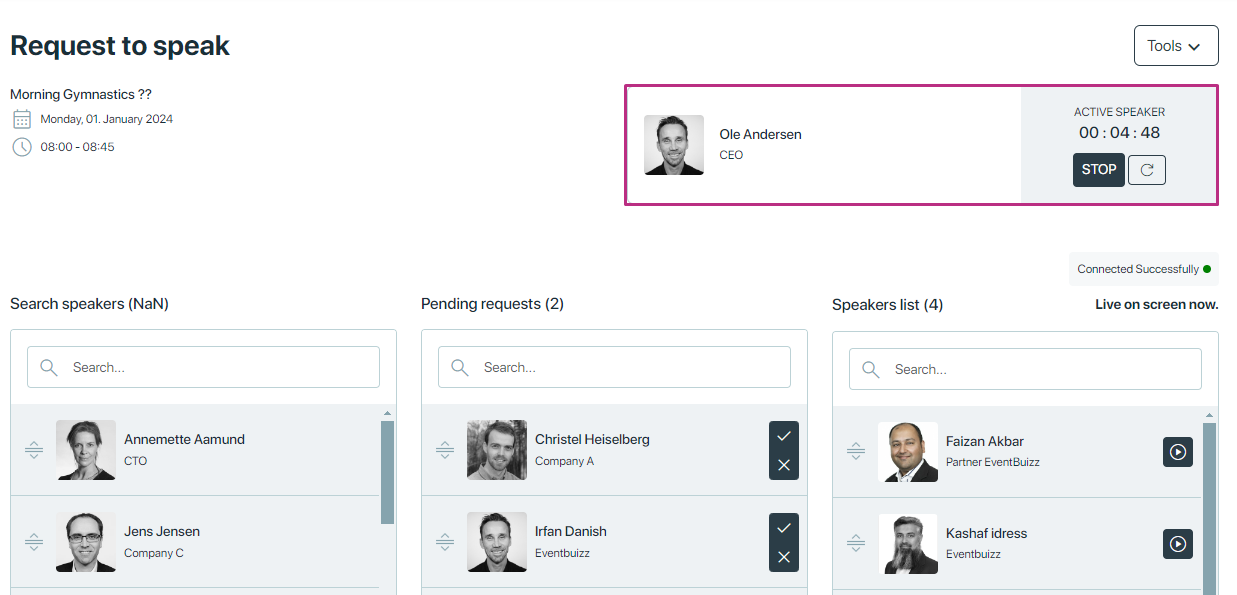
Connected Successfully: Indicates that the system is connected and functioning correctly, with a green dot showing successful connection status.
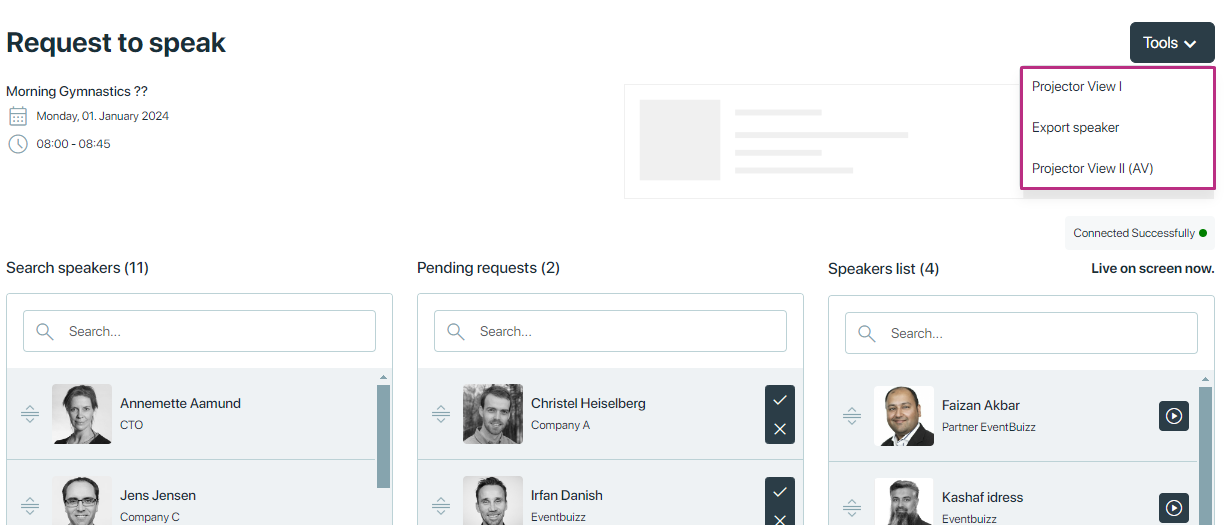
Tools
In tools, you have following options
-
-
- Projector view | and Projector view || (AV): explained in projectors section.
- Export speaker: Provides a way to export the pending requests of speaker list for record-keeping or further use.
-
-
We have following projectors:
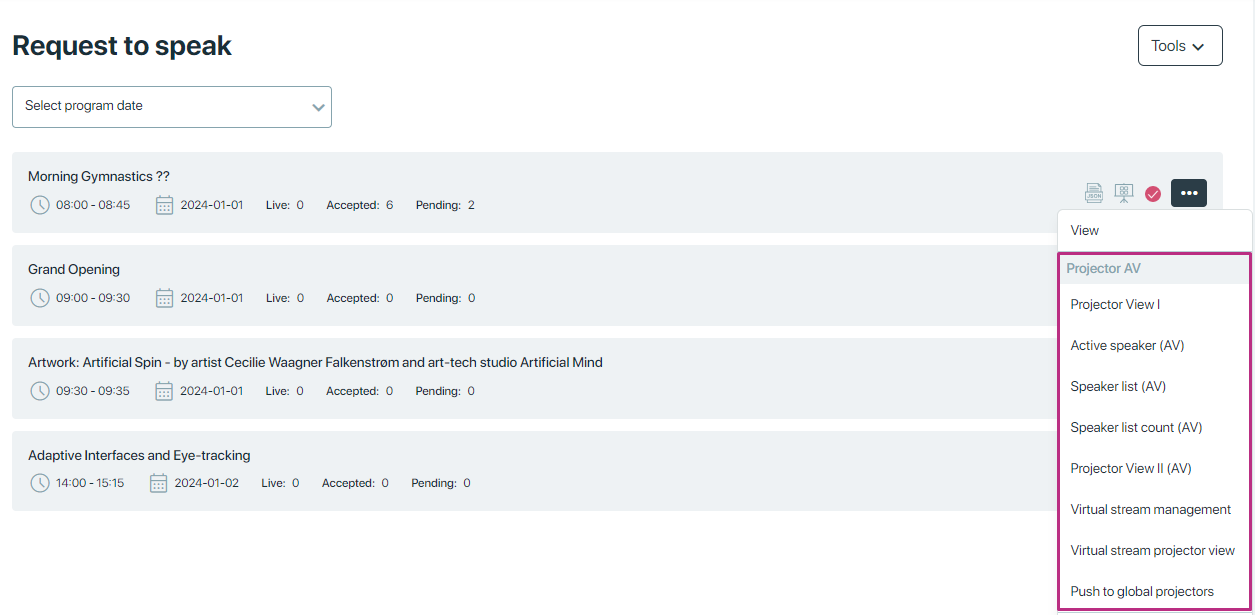
Projector View 1
In Eventbuizz, “Projector View 1” likely refers to a specific layout or display configuration designed for presentations during sessions where speakers have requested to speak. Projector View 1 could be a predefined layout optimized for projector screens or large displays, ensuring that presentation content is effectively showcased to the audience.
Active Speaker (AV), Speaker List (AV), Speaker list count (AV), Projector View || (AV)
“Active Speaker (AV)” refers to the speaker who is currently speaking or presenting in an audiovisual (AV) setup.
“Speaker List (AV)” is a list that displays all the speakers scheduled to present or speak during an event in an audiovisual setup.
“Speaker List Count (AV)” indicates the number of speakers listed to present or speak during an event in an audiovisual setup.
“Projector View || (AV)” is a feature that enables the projection of the current speaker’s presentation or content onto a screen in an audiovisual setup.
You can customize the layout of these projectors according to your preferences. You can add/ delete dynamic fields to the AV templates for the data you want to display. Click here to add/edit AV templates.
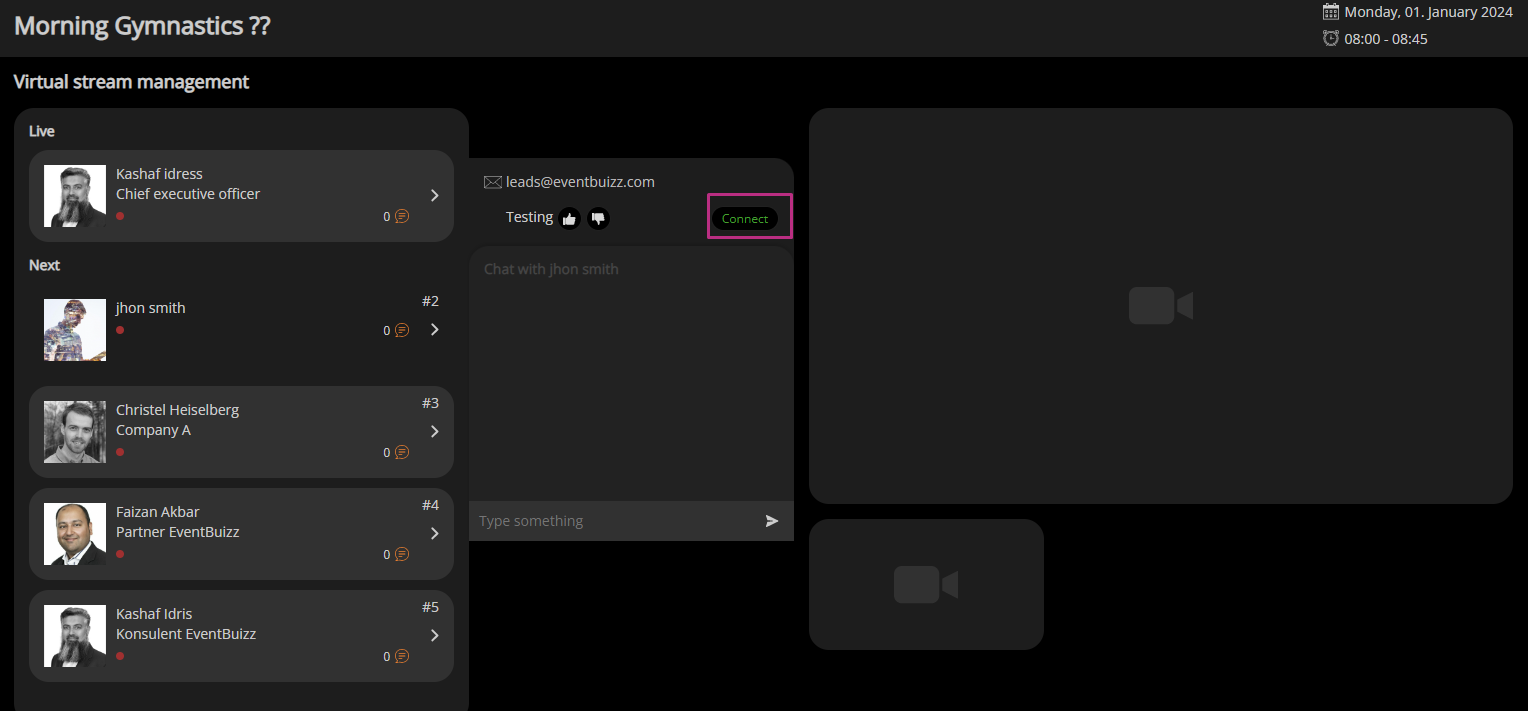
Virtual steam management
Eventbuizz might have a feature for managing virtual event streams.
“Before going live on a projector during any event, if you need to check the mic/camera, use virtual steam management.”
In simpler terms, it means that if you want to test your microphone or camera before presenting something live on a projector, you can use a virtual streaming platform. This allows you to make sure that your audio and video are working properly before you start your presentation.
Virtual stream management will look like this
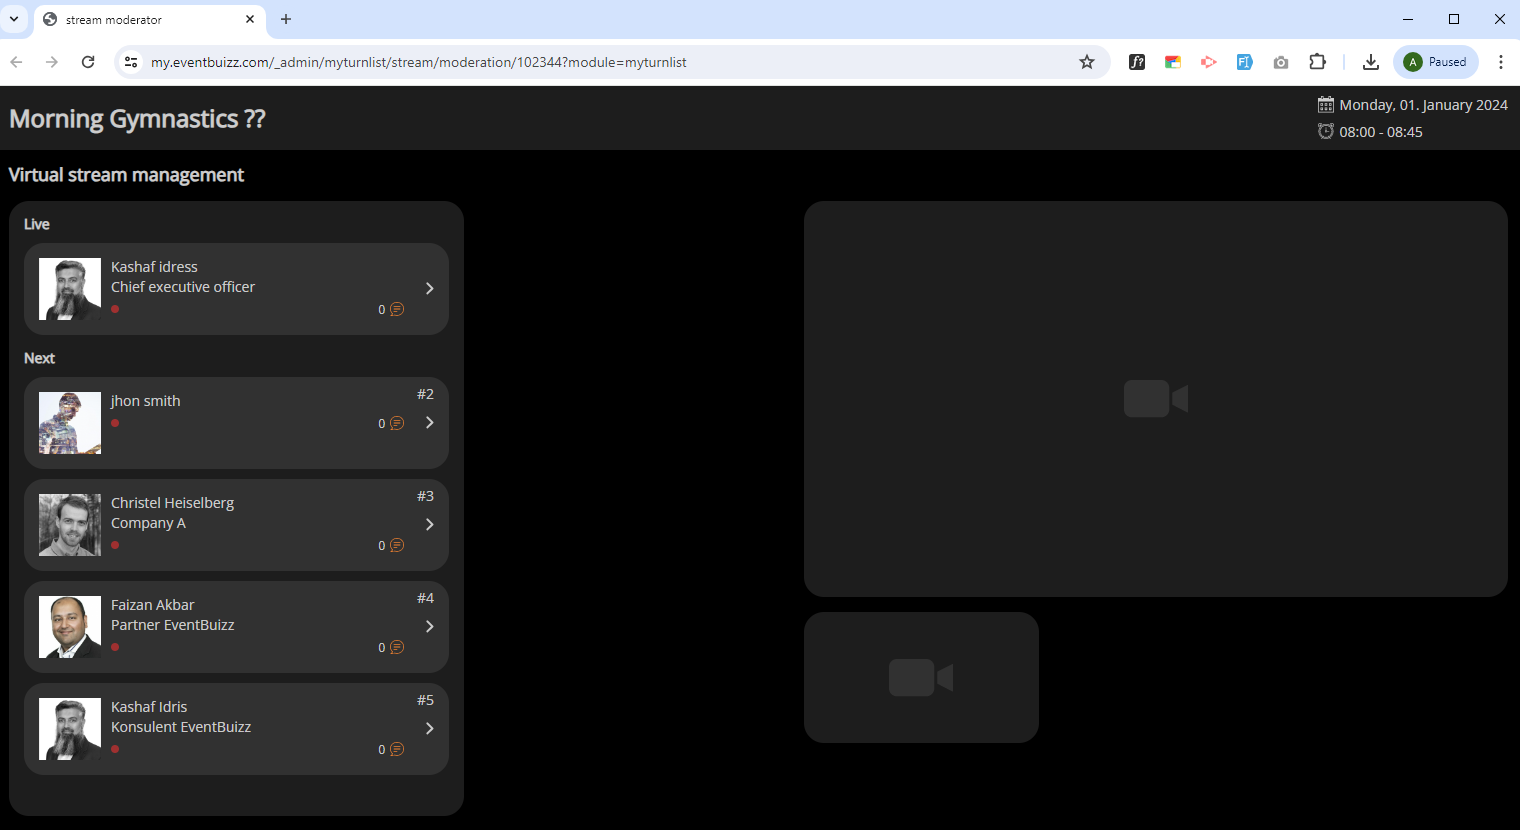
Select the speaker you want to review by clicking on their icon. A new window will pop up, where you can click on the CONNECT button to start a video call and test the microphone and camera. You can also have chat with the speaker.
Virtual steam projector view
Audio video team uses a cart for live broadcasting during events and shows for better quality and production value.

Push to global projectors
“Push to global projectors” involves broadcasting content simultaneously to all projectors in an event or venue. This action ensures that the same information or presentation is displayed on every projector, allowing all attendees to view it regardless of their location within the space. It facilitates consistent communication and ensures that important information reaches everyone in the audience effectively and efficiently. It will push the data of the required program to the global projectors which are in Tools -> projectors.

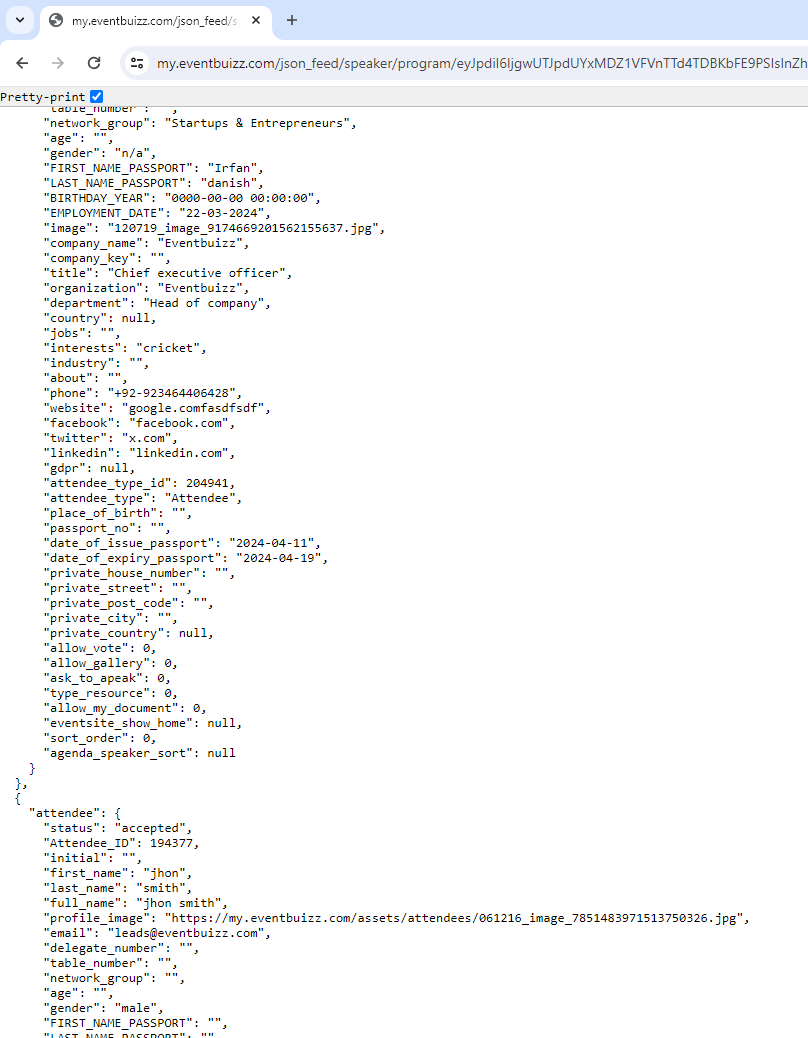
Activate json and copy json feed
The json feed is widely used by Audio/Video team. You first have to activate json feed. Go to the three dots icon, and click on Activate json feed. Once json is activated you get success message on screen and the Icon got activated.
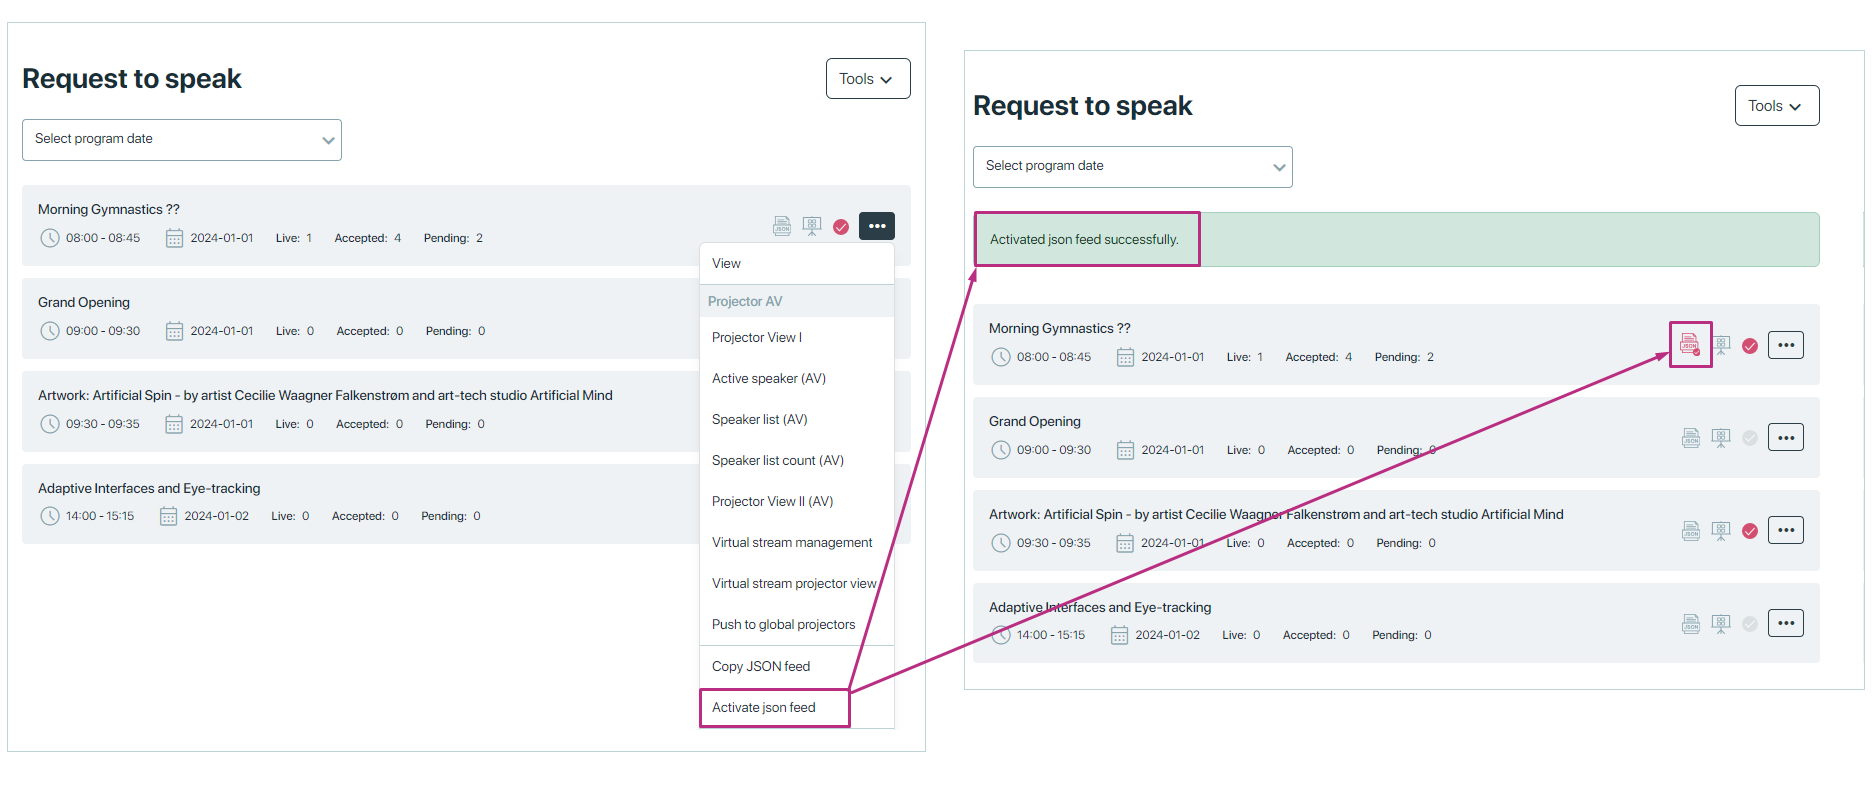
Then the next step is to copy the JSON feed and open in the new tab of the browser. you can get the JSON data which is used by AV team.
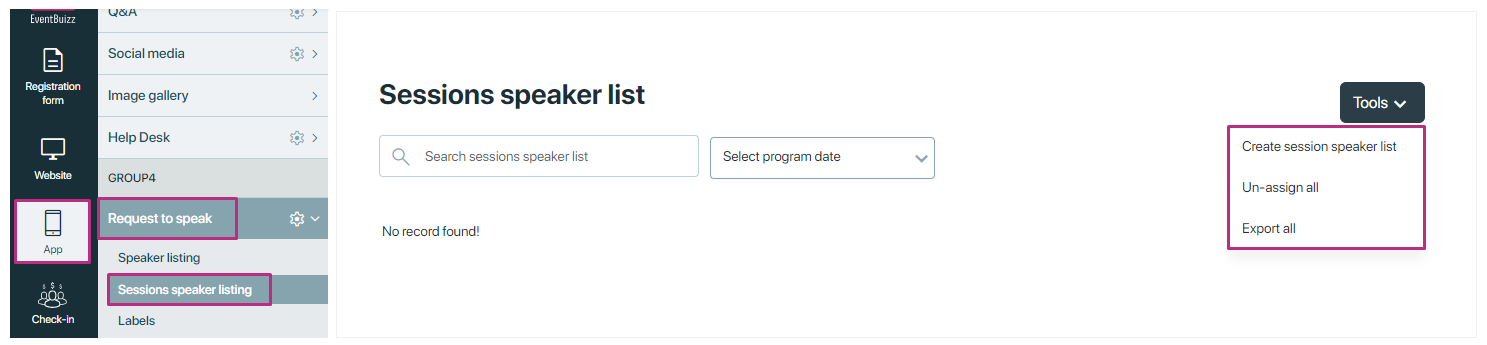
Sessionspeakerlisting
Session Speaker Listing
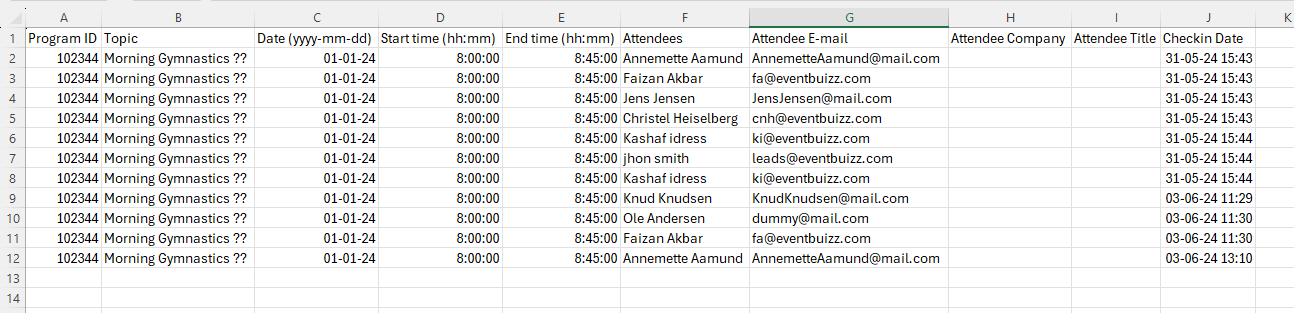
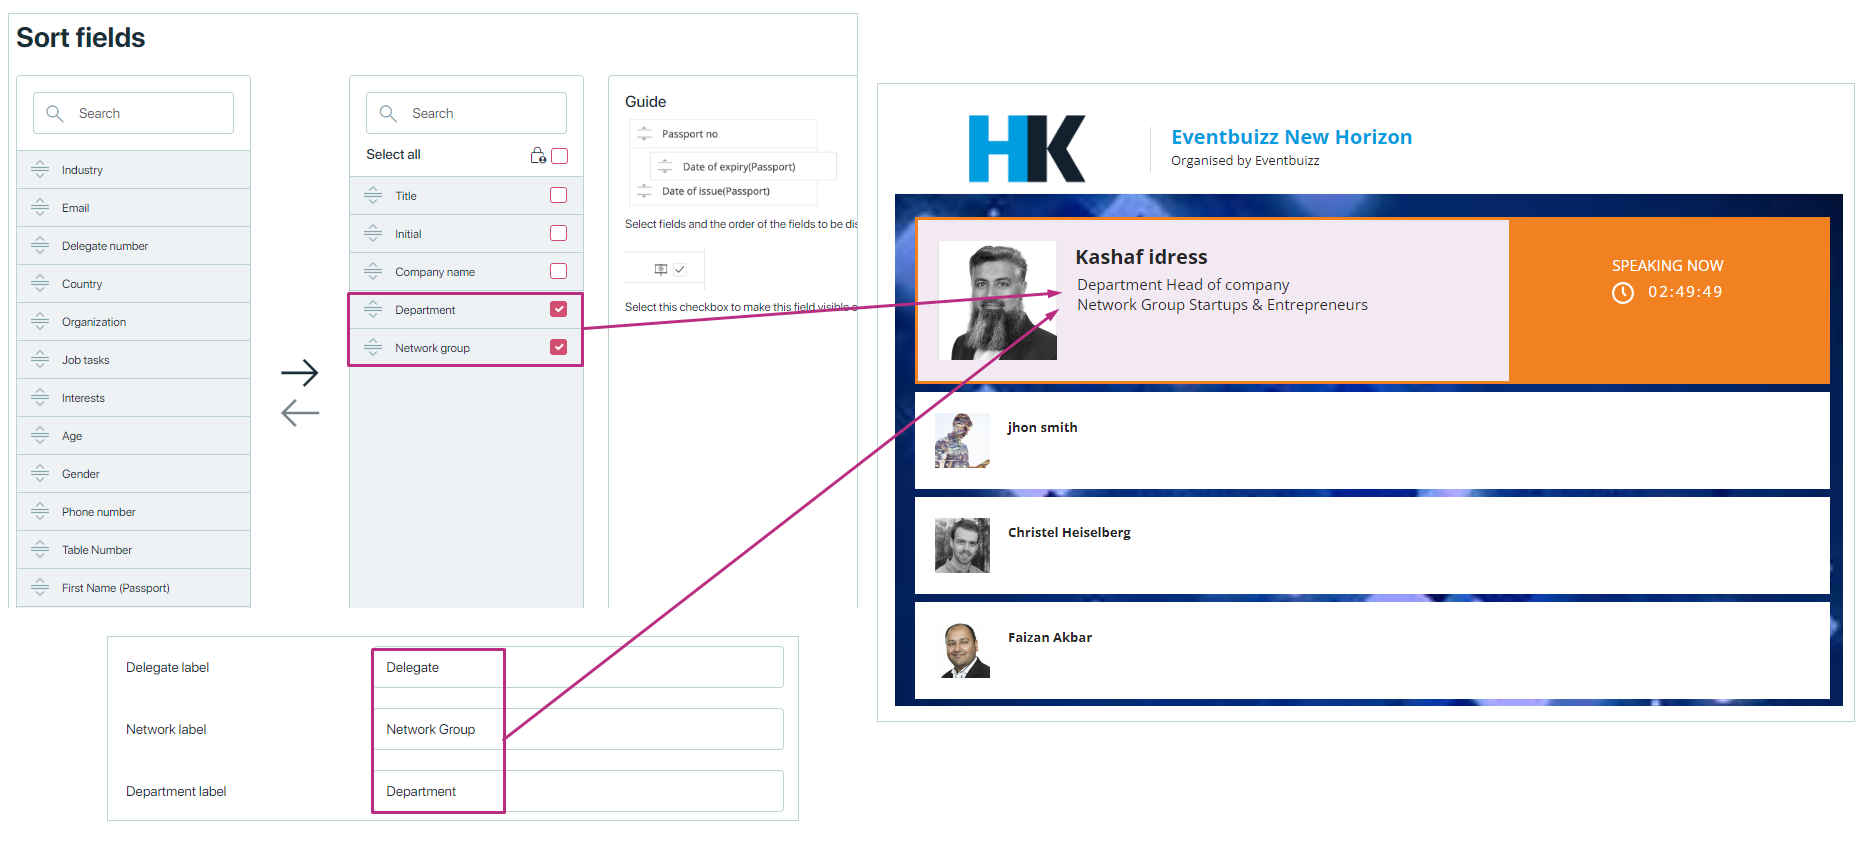
This feature helps event organizers manage and review speaker requests efficiently. This usually collects details such as the speaker’s email, delegate number, department, company, job title date/time and duration.
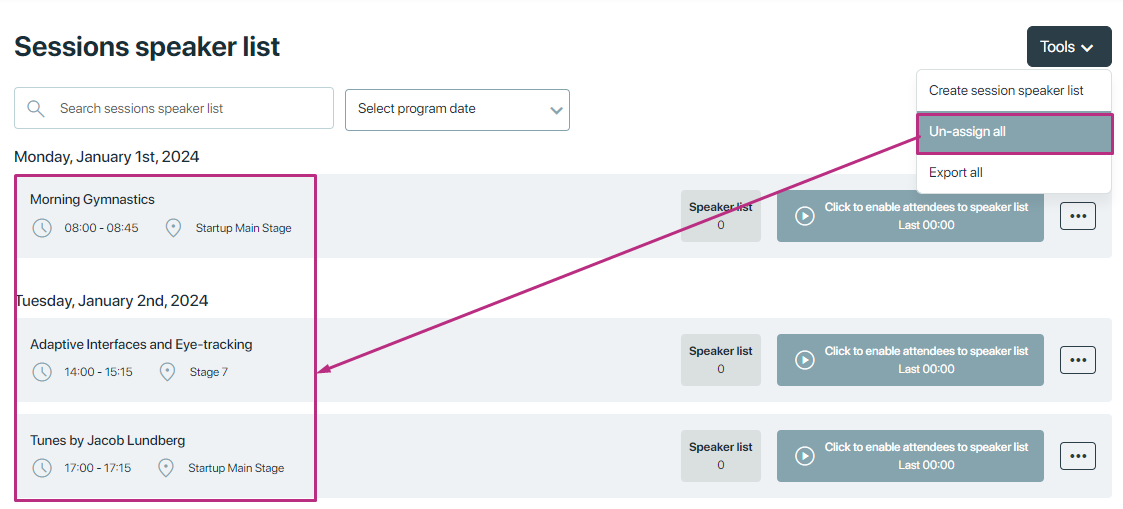
You can Create session speaker list, Un-assign all and Export all.
Un-assign all
This will un-assign all the session created and logs deleted from the list.
Export all
Organizer can see a section of “Tools” and by clicking on tools drop down user will find a key feature of “Export”, which allows them to generate a comprehensive file containing essential information related to attendee questions. This feature is designed to streamline data management and analysis processes for event organizers.
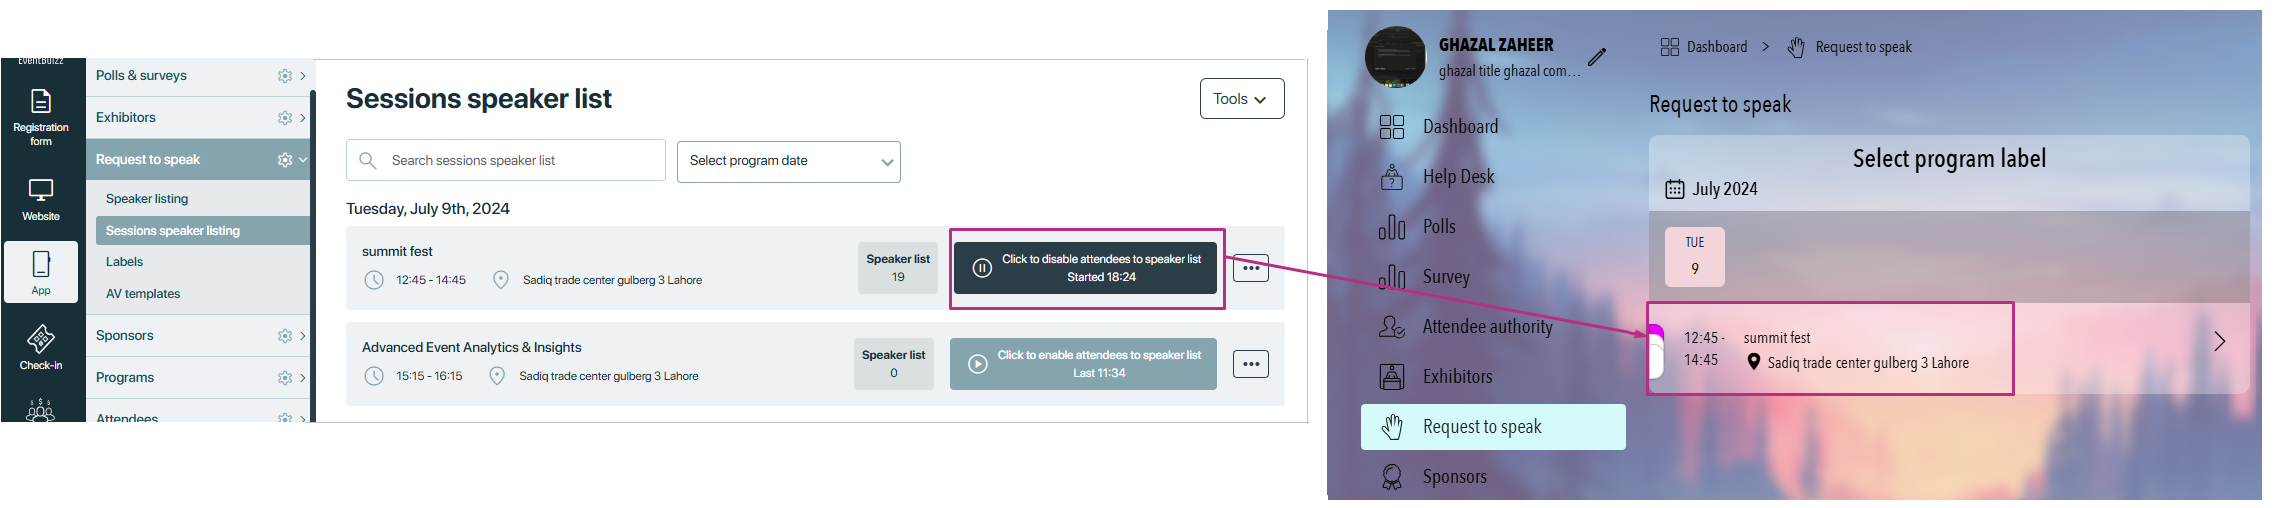
Create session speaker list
Click tools -> select program and click ‘Save’ button to create a session for a program.
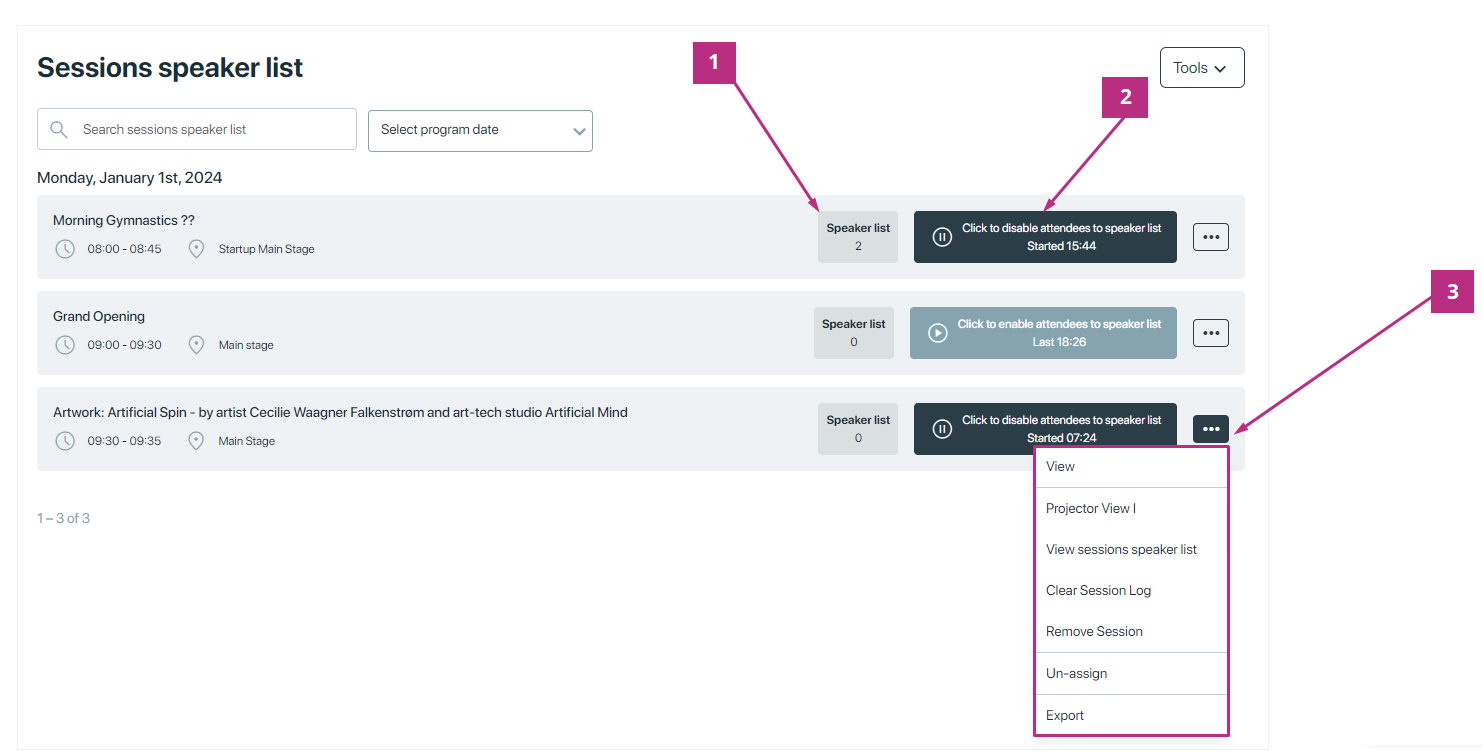
After creating session, the session start appearing in a listing. You can get the idea
-
-
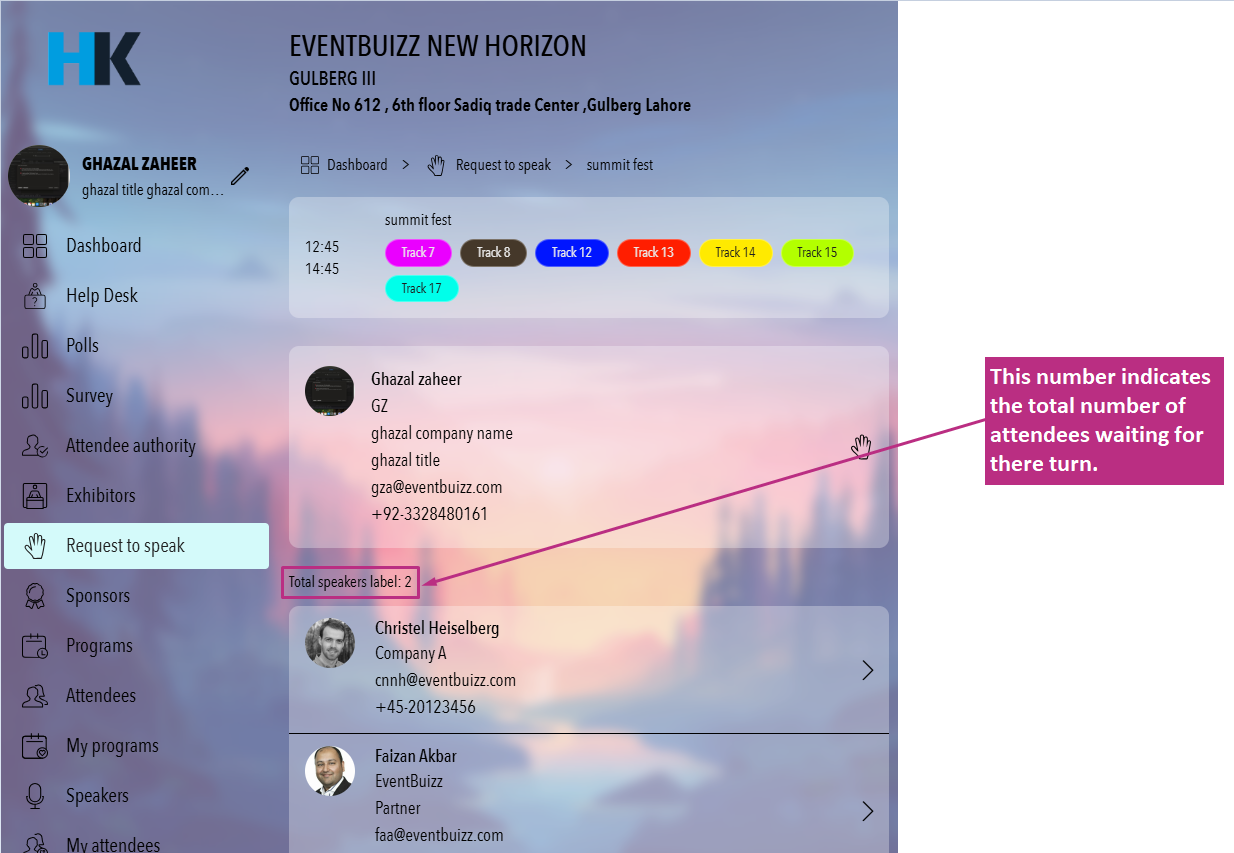
- It shows the total number of speakers within specific session time period.
- You can use this button to enable or disable the session. The time displayed on the button indicates when the session started or ended.
- Click on three dots icons, to view more options.
– View:
– Projector View 1:
– View sessions speaker list: Explained below.
– Clear session log: This allows you to delete or reset the record of past sessions.
– Remove session: This action of ending or deleting a current session which ends a user’s active session.
– Un-assign: Un-assign will remove or cancel an assignment of a session to a particular program.
– Export: An option to export all session speaker lists, likely in a file format such as CSV, to view all session logs.
-
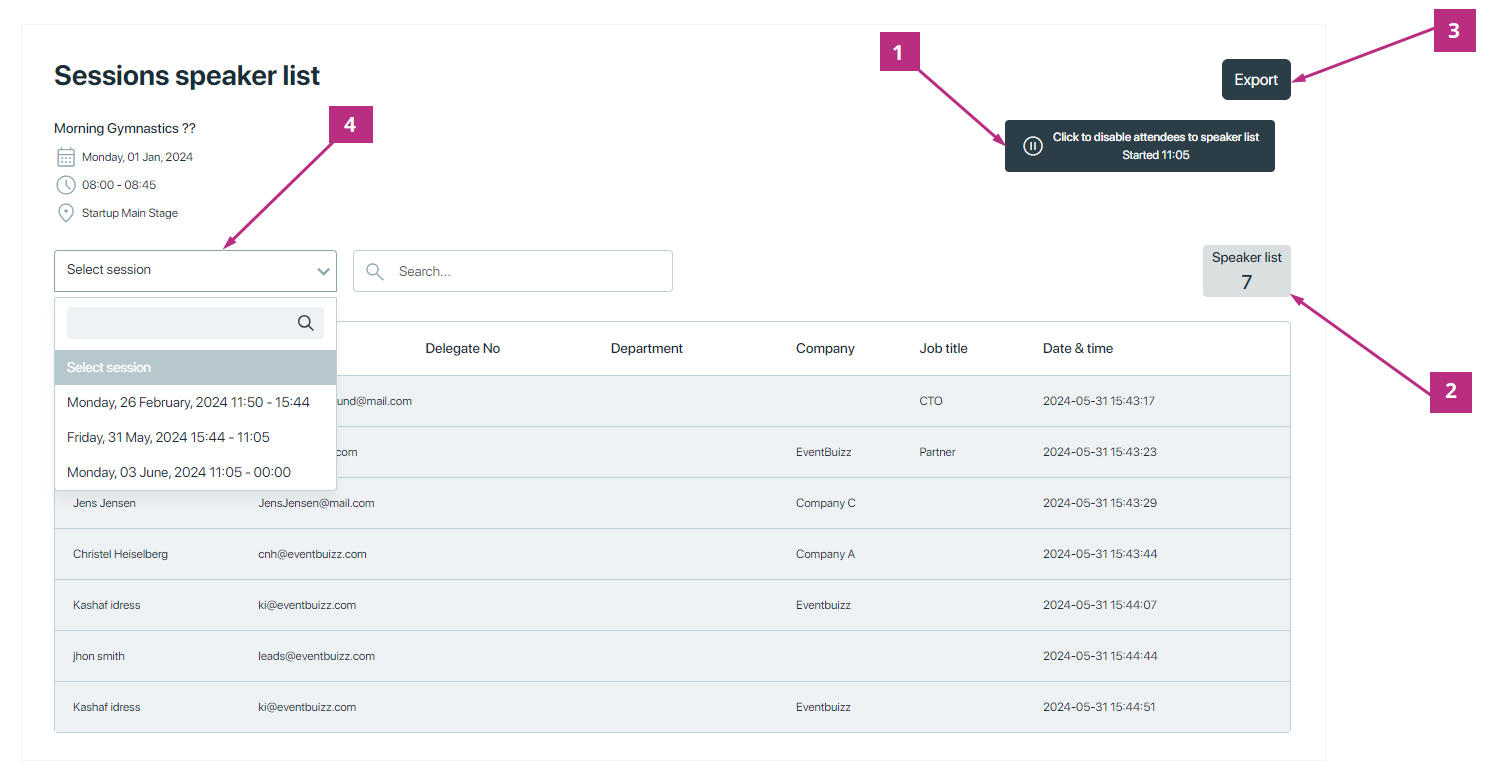
View session speaker list
“View session speaker list” refers to a feature that allows users to see a list of speakers for a particular session of an event. This list typically includes details such as the names and bios.
-
-
- You can enable/ disable the session from this button.
- This is the total speaker list count within the session selected from dropdown.
- You can export all sessions details in CSV file.
- Use session filter to get the detail of specific filter.
-
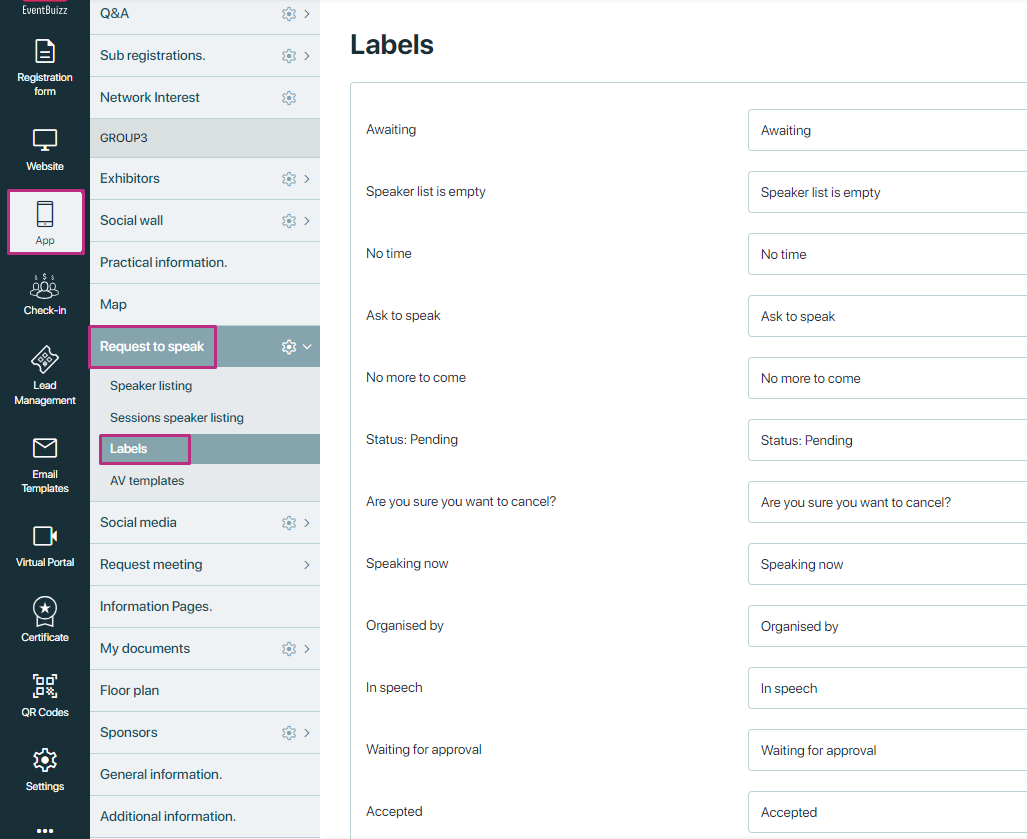
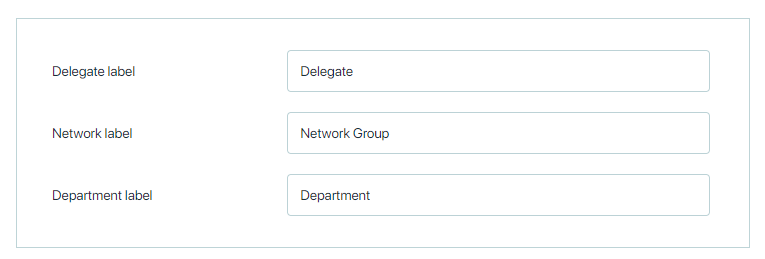
requesttospeaklabels
Labels
Within the Request to speak module, organizers have access to a section called “Labels.” This feature enables organizers to customize and manage the labels used throughout the module on web app dynamically. These labels are integral to the user interface and help convey information effectively to attendees.
Any changes made to the labels in the Labels section are immediately reflected in the web app Q&A module. This real-time synchronisation ensures that attendees and organisers always see the most up-to-date and accurate information, fostering seamless communication and interaction during the event.
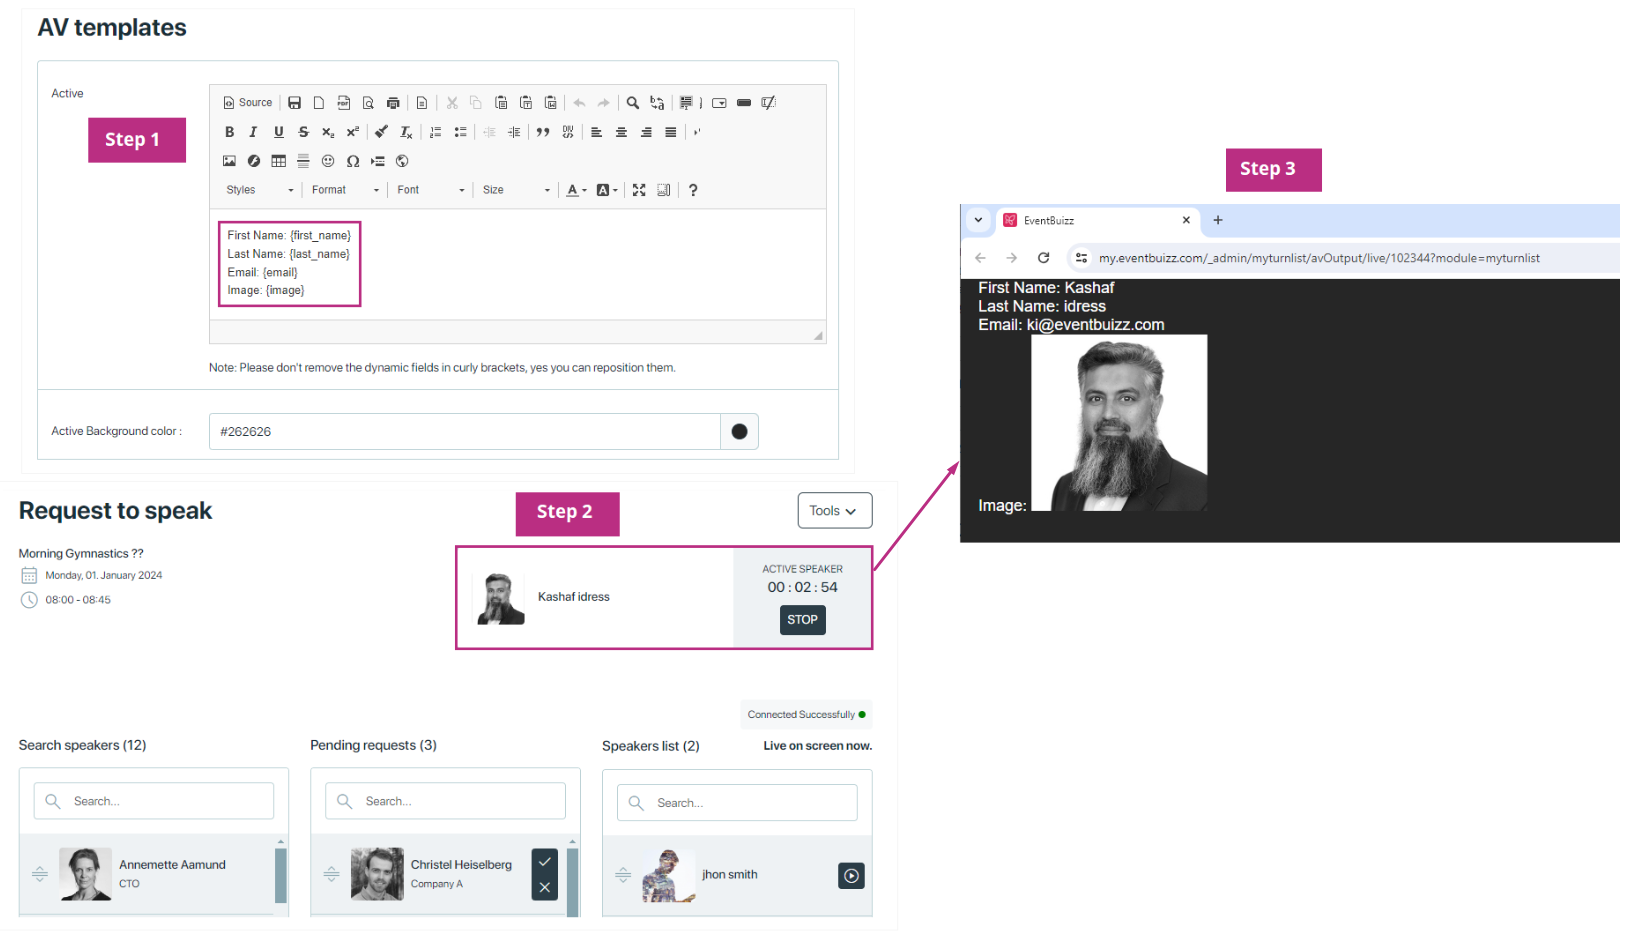
AVtemplates
AV Templates
“AV templates” likely refers to Audio-Visual (AV) templates or formats that speakers can use when submitting their presentation materials or content for a session. This help to optimize the presentation experience for both speakers and attendees by providing clear guidelines for preparing and submitting presentation materials.
You can customize the layout of these projectors according to your preferences. You can add/ delete dynamic fields to the AV templates for the data you want to display. There are many dynamic fields given at the end of all sections. You just have to place them in the required section and your template is ready.
Let’s make a Active Speaker (AV) template as an example. so you can have better understanding.
Add the data you want to show on the Active Speaker’s projector to the dynamic fields template. Then, make the speaker live from the moderator view. Check the Active Speaker’s projector to see the required data displayed.
apprequesttospeak
App request to speak module
The app side “Request to speak” module in eventbuizz allows attendees to access and interact with programs for request to speak associated with an event. This feature provides a structured way to manage multiple activities, enabling users to ask to speak for the program that align with their interests.
Prerequisites
Before attendees can access the “request to speak” module in the web app, organizers must enable the program module in the eventcenter. Follow these steps:
- Eventcenter > settings > customize app settings > program > enable “request to speak” from toggle button.

Once enabled, request to speak module will be displayed in the web app’s left menu.

Request to speak module interface
The request to speak module consists of a program listing.
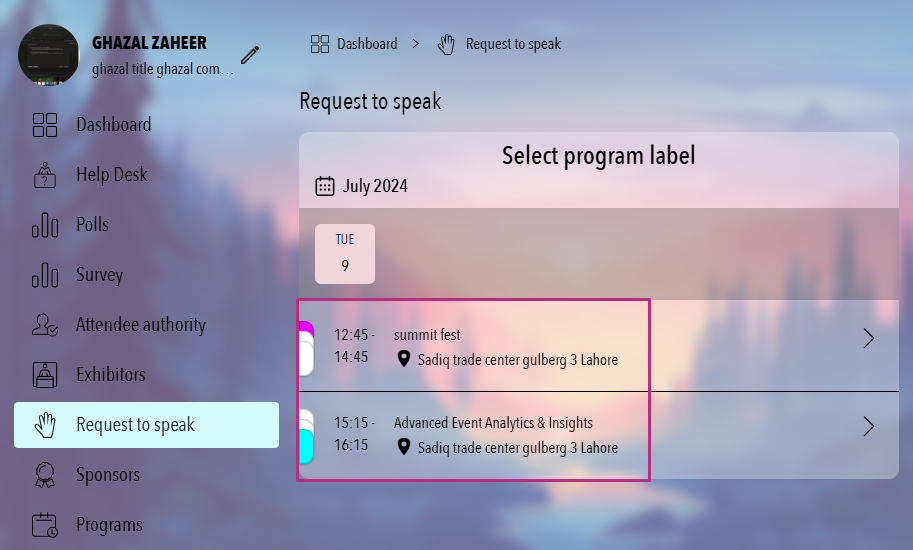
Not every program will show up automatically. A program will only appear in the “Request to speak” list on the web app if a session has been created for that program.
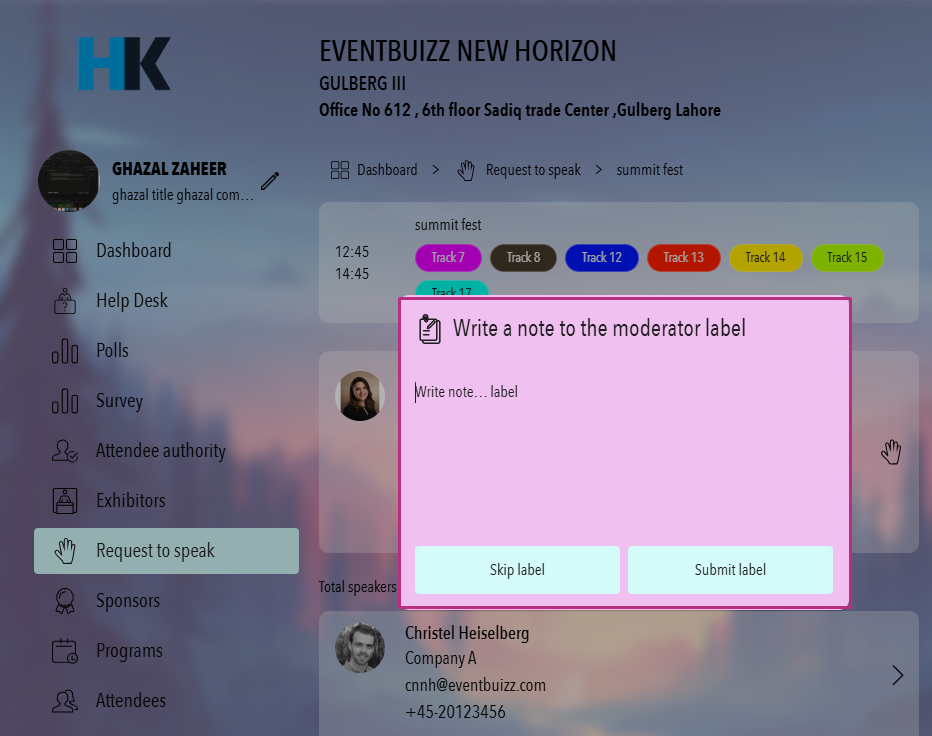
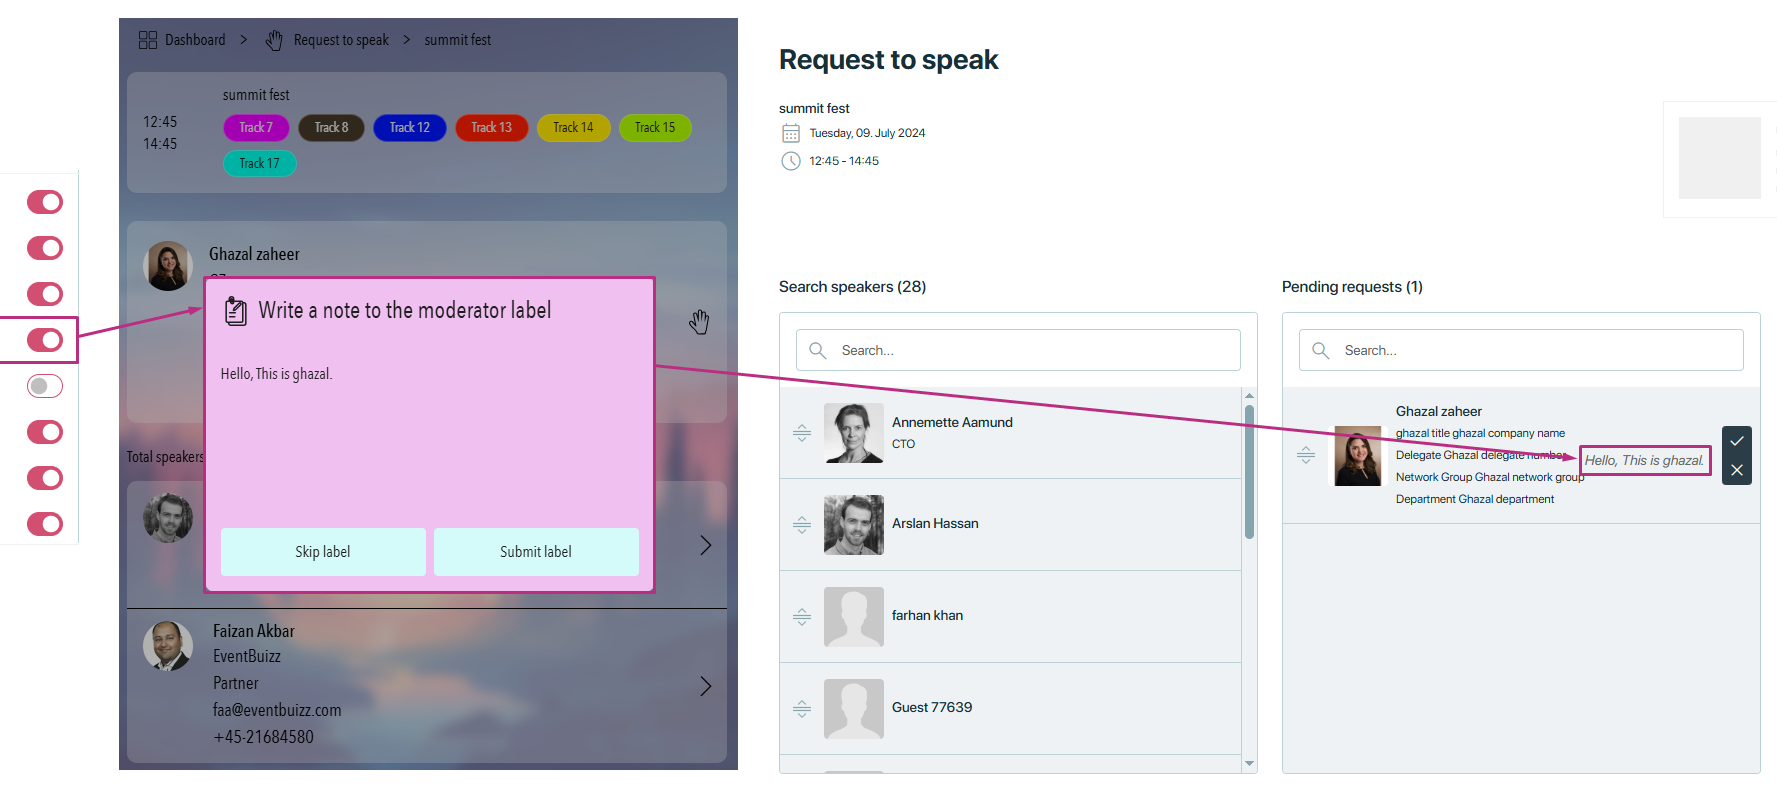
If a user clicks on any program, it will show more information about that program. The logged-in user will see a “Raise Hand” icon with it. This icon is likely used when the user request to speak for that program.
When a user clicks the “raise hand” icon, the attendee will either go to the pending list or be directly moved to live, depending on a setting.
-
If the “Add attendee without approval” setting is OFF, then the attendee will go to the pending requests column in the event center, and their status on the web app will be shown as “waiting for approval”.

- If the “Add attendee without approval” setting is ON, it means attendees do not need manual approval to join the live session. When a user clicks the “raise hand” icon, they are automatically approved and are moved directly to the live column in the event center. there status on the web app will be shown as “accepted”.
This helps speed up the process, especially during busy or large events, as organizers don’t need to review and approve each attendee manually. It allows attendees to participate immediately without waiting.
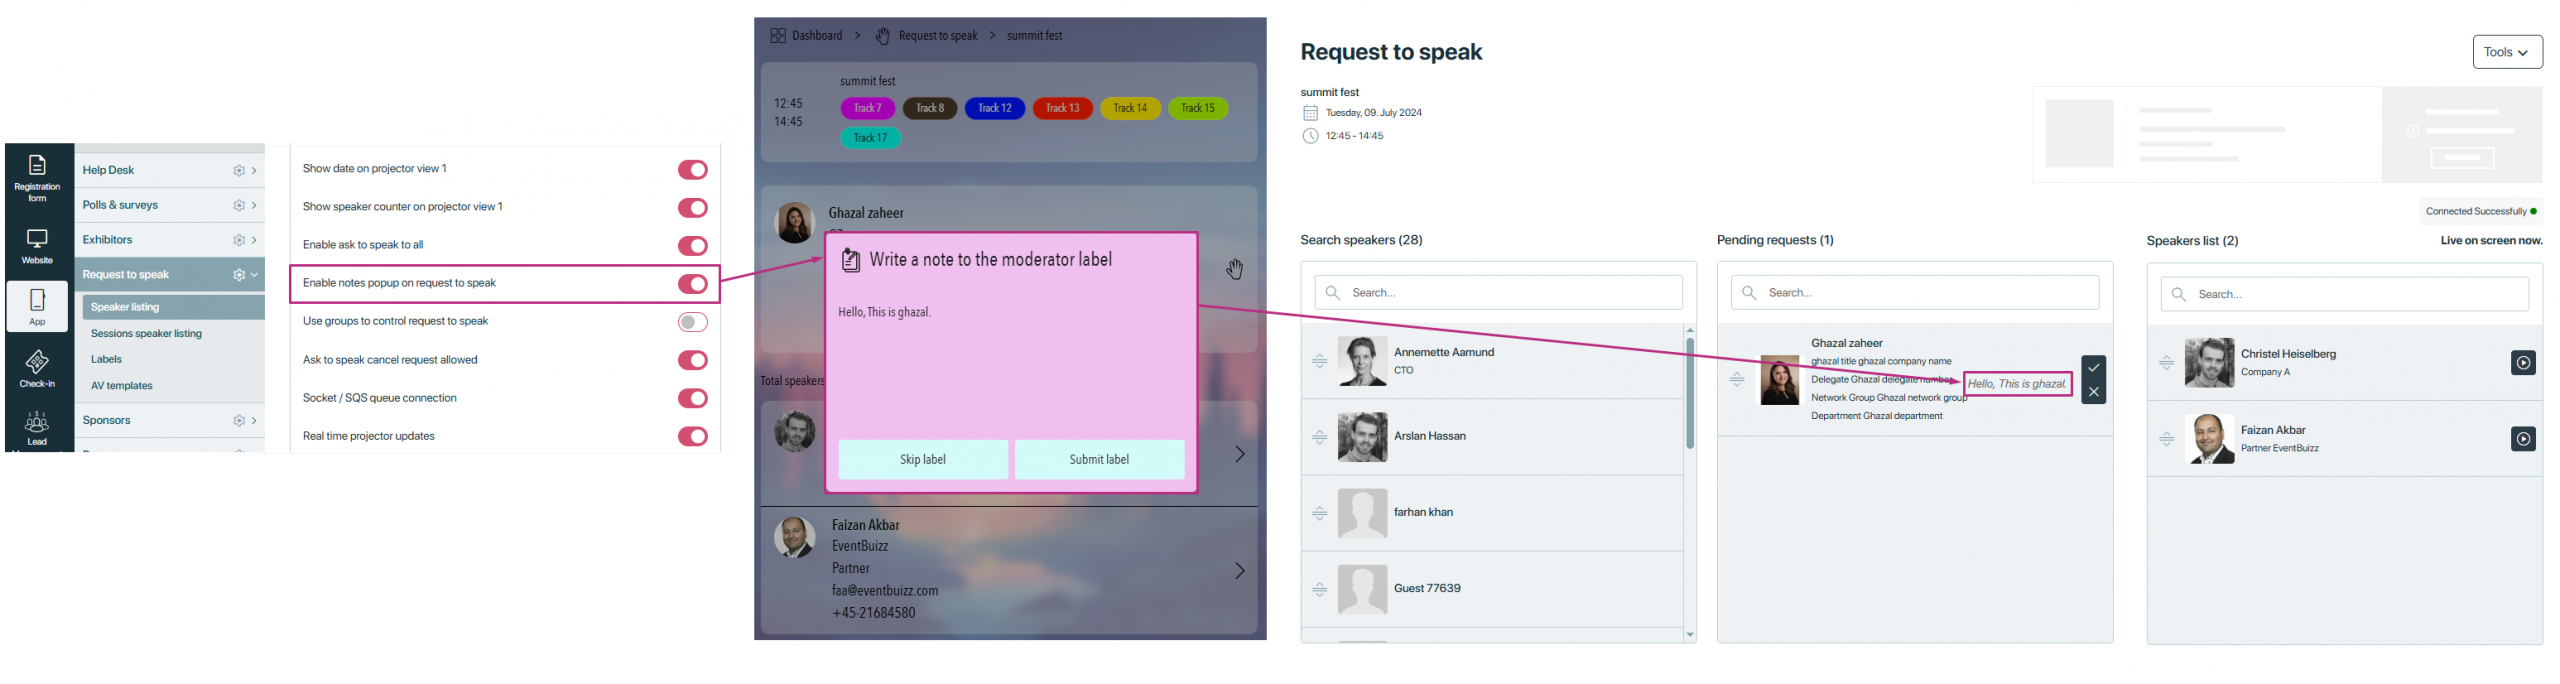
Also, when the user clicks “raise hand”, a notes popup may appear. This also depends on another setting.
-
If the “Enable notes popup on request to speak” is ON, then the popup will appear, allowing the user to write a note. These notes will be shown to the organizer in the event center.
Once a user is in the live list, the organizer can give them permission to speak by clicking on the icon.
When the organizer allows an attendee to speak:
- That attendee will be highlighted on the web app to show they are speaking.
- Their speaking time will also start counting.
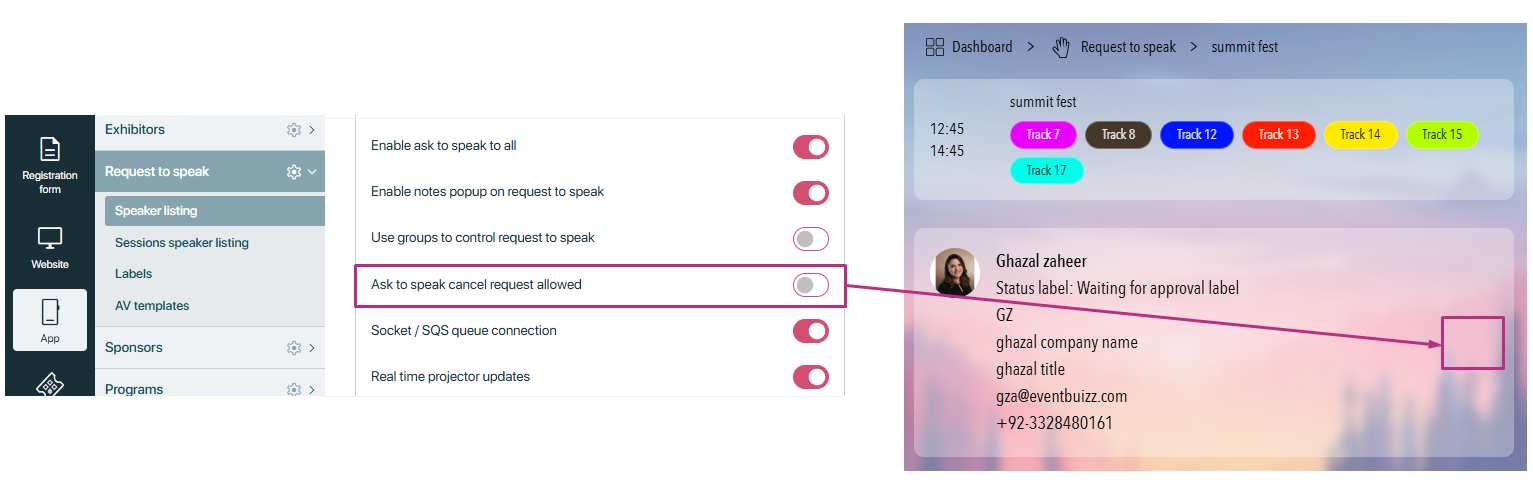
If the “Ask to speak cancel request allowed” setting is ON, then the cancel icon will be visible to the user after they click the “raise hand” button. This means the user can cancel their request to speak at any time before being approved or going live.

However, if this setting is OFF, the cancel request icon will not appear. This means once the user clicks the “raise hand” icon, they cannot take it back or cancel their request. They must wait until the organizer either approves or ignores the request.

You can see the attendees who have already shown interest by sending a request. These attendees appear in the same list because they have clicked the “raise hand” icon, indicating they want to participate during the session.
Once a request is made, their name is added to the live list in the event center – a panel or backend area used by event organizers or moderators to manage live interactions. This list shows all the users who have already made requests and are now waiting in line to interact live during the session.
Settings
Here’s a detailed explanation of the “Request to Speak” settings in Eventbuizz:
Add attendee without approval
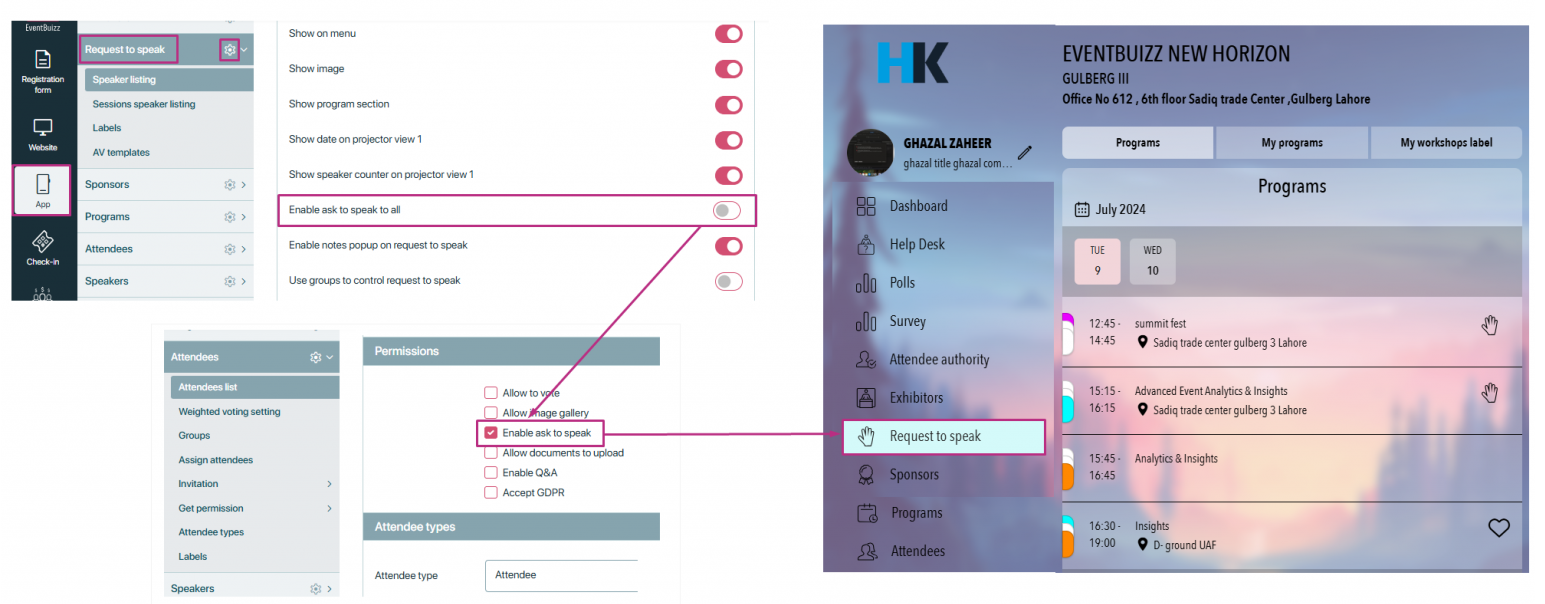
This setting allows attendees to be added to the event without requiring prior approval from the organizer.
- If “Add attendee without approval” setting is OFF, then the attendee will go to the pending requests column in the event center, and their status on the web app will be shown as “waiting for approval”.
- If the “Add attendee without approval” setting is ON, it means attendees do not need manual approval to join the live session. When a user clicks the “raise hand” icon, they are automatically approved and are moved directly to the live column in the event center. there status on the web app will be shown as “accepted”.
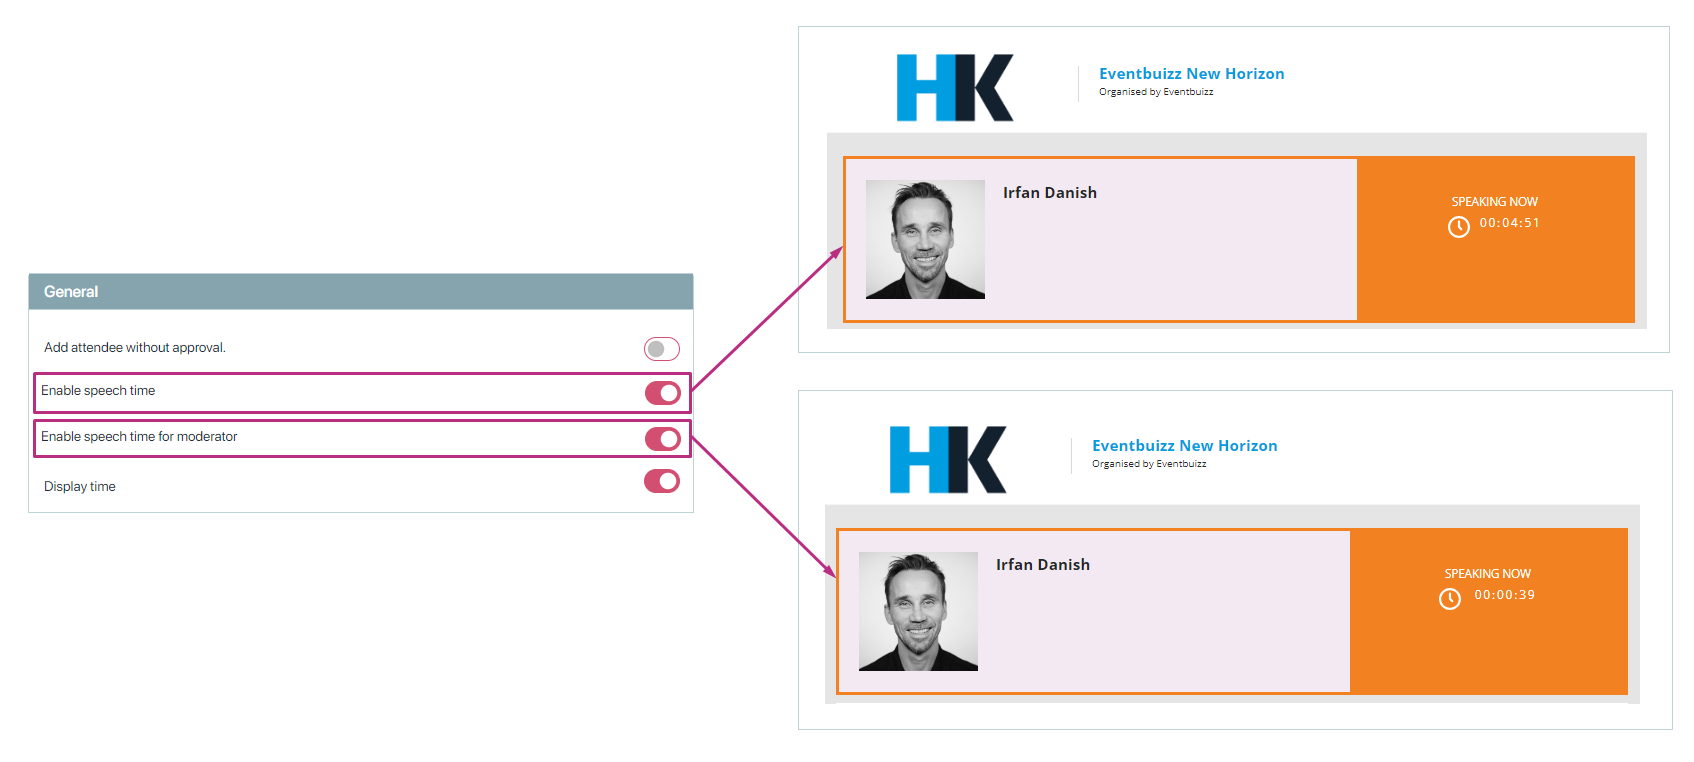
Enable speech time and Enable speech time for moderator:
“When the Enable speech time is ON, the counter will count down. If the moderator’s setting is to enable speech time, the counter will count up instead and the speaker can continue talking until the organizer stops them.
Display time
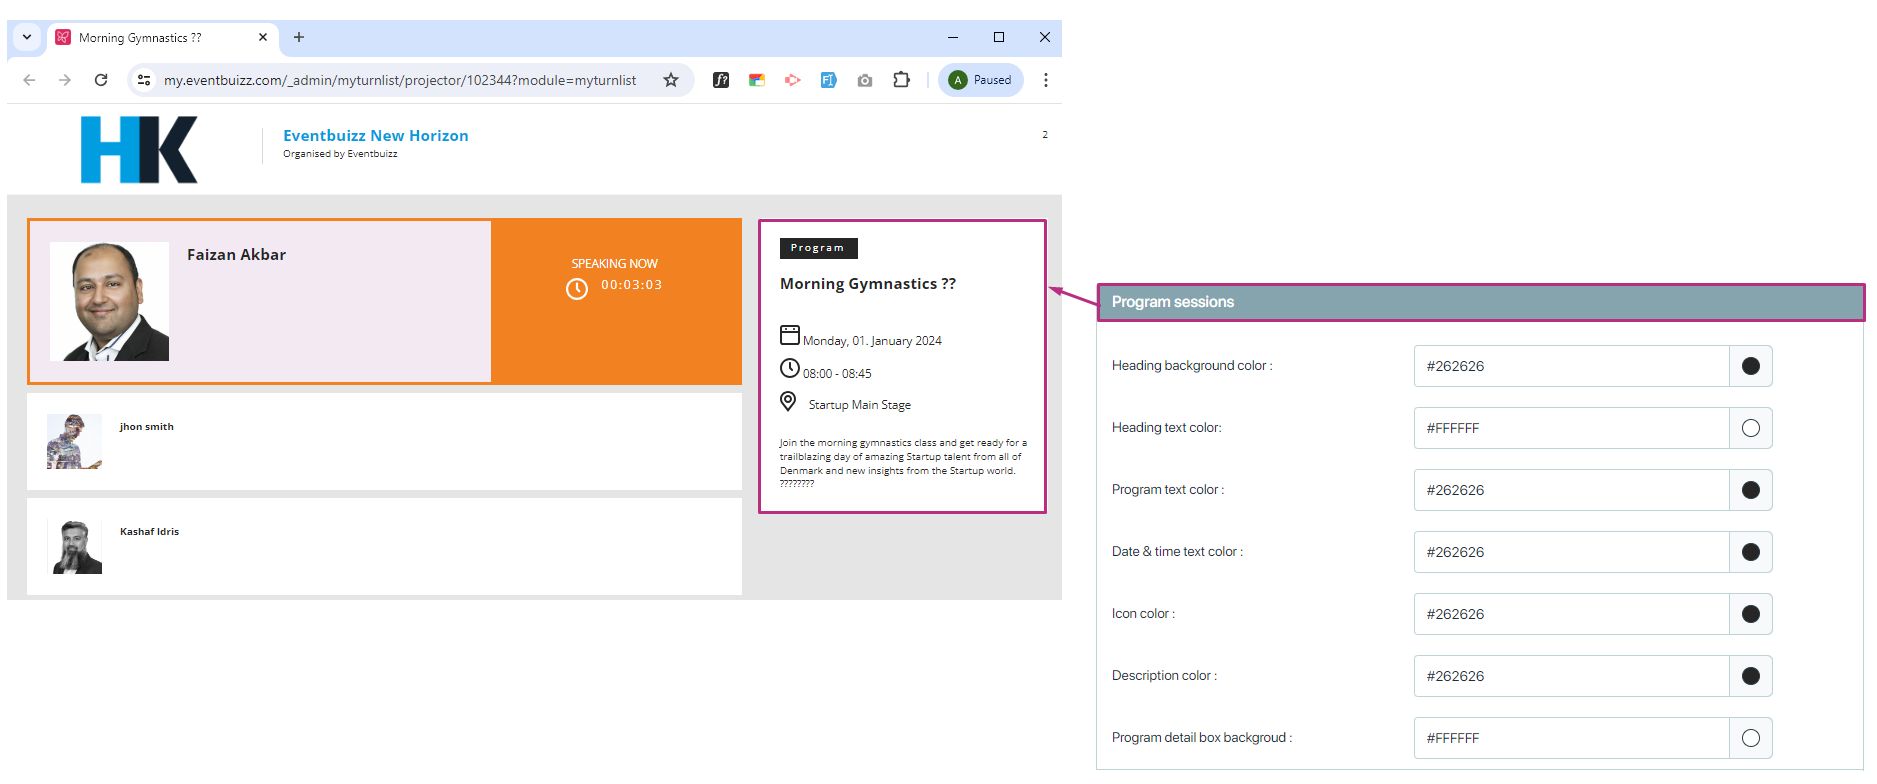
Shows the current time on the projector or display screens.
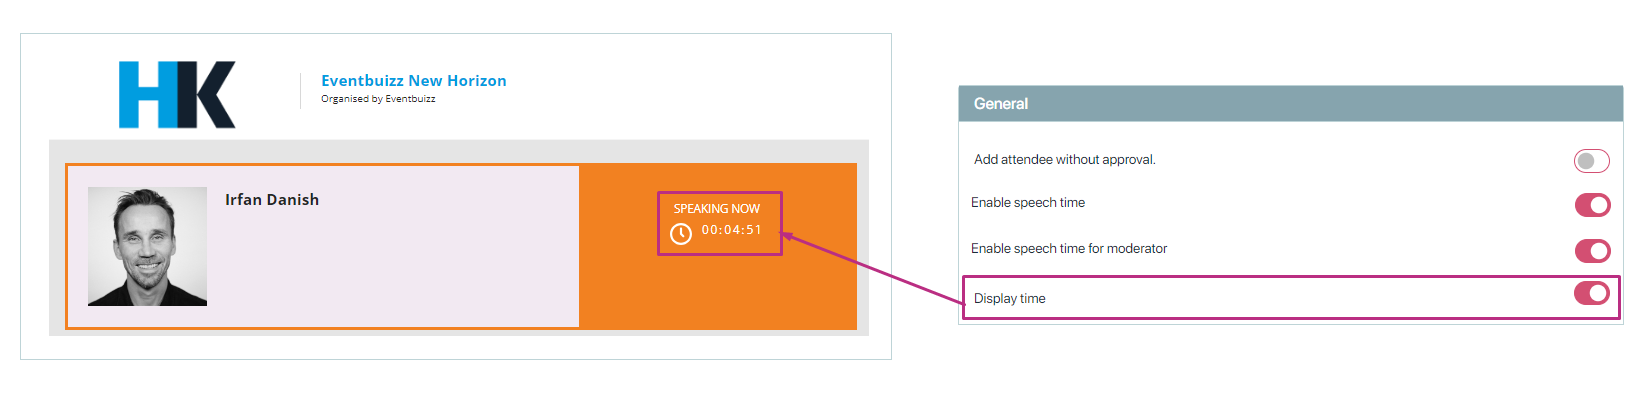
Enable organizer info on projector
Displays information about the event organizer on the projector.
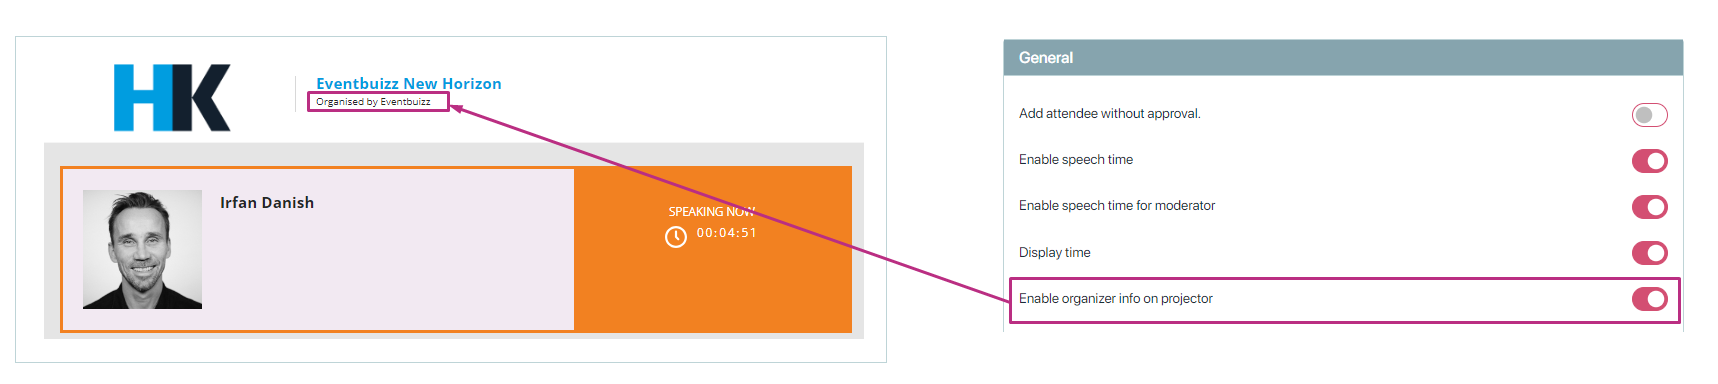
Show image
Displays an image on the projector or screen.
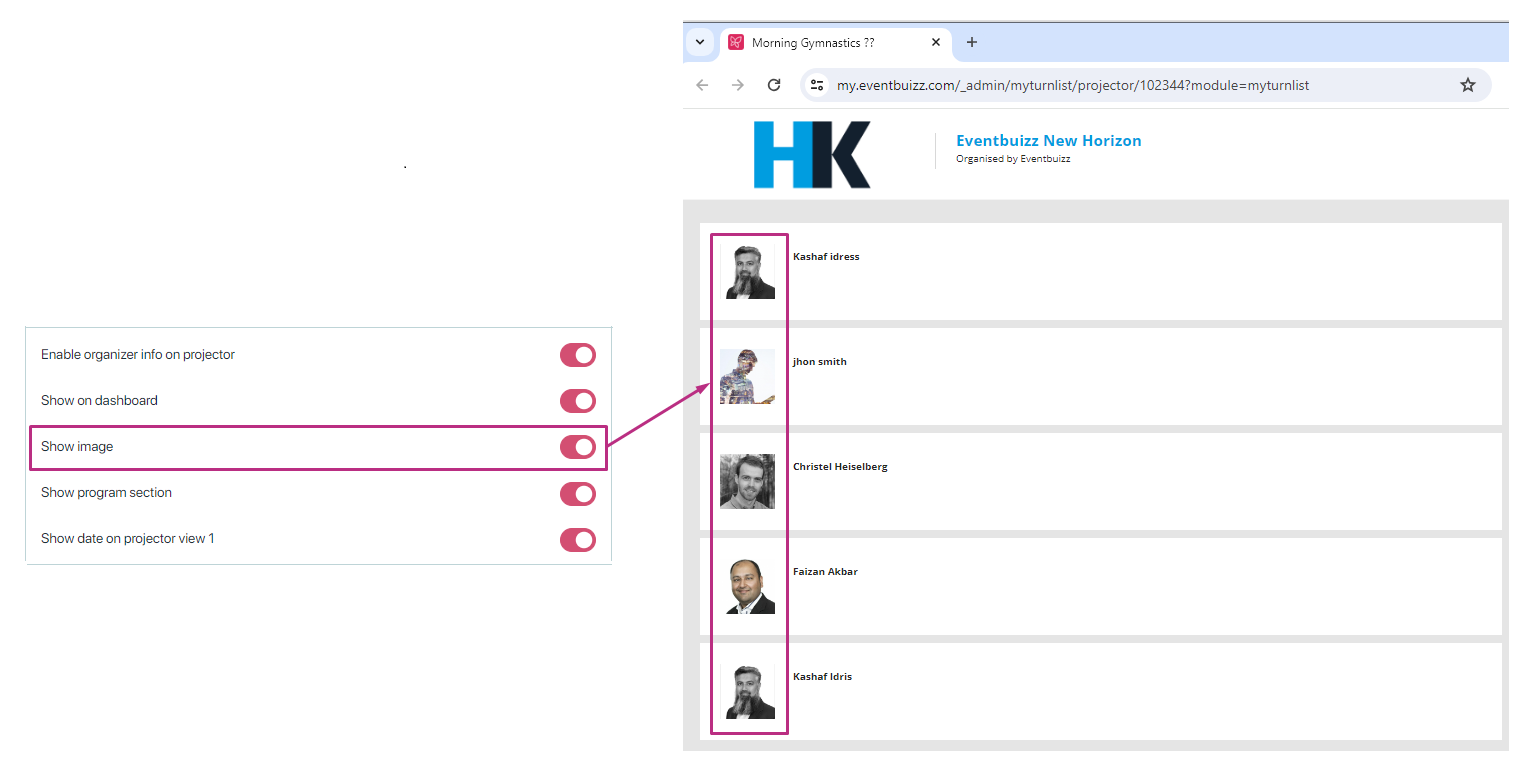
Show program section
Displays the current section or part of the program on the projector.
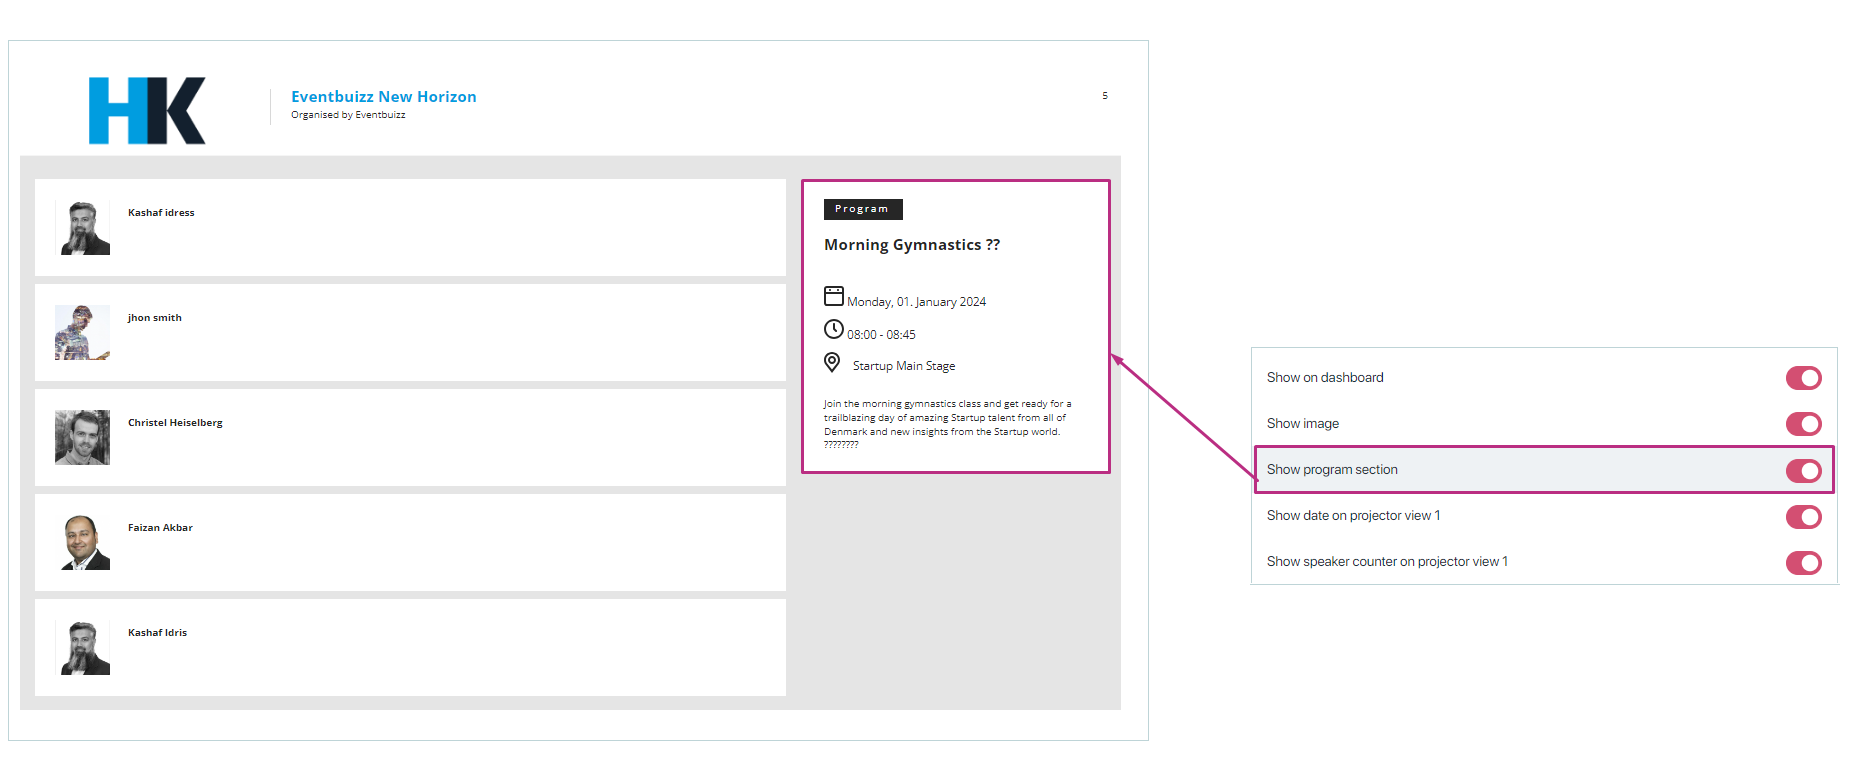
Show date on projector view 1:
Displays the current date on the projector in a specific view mode. It will keeps the audience aware of the date, useful for multi-day events.
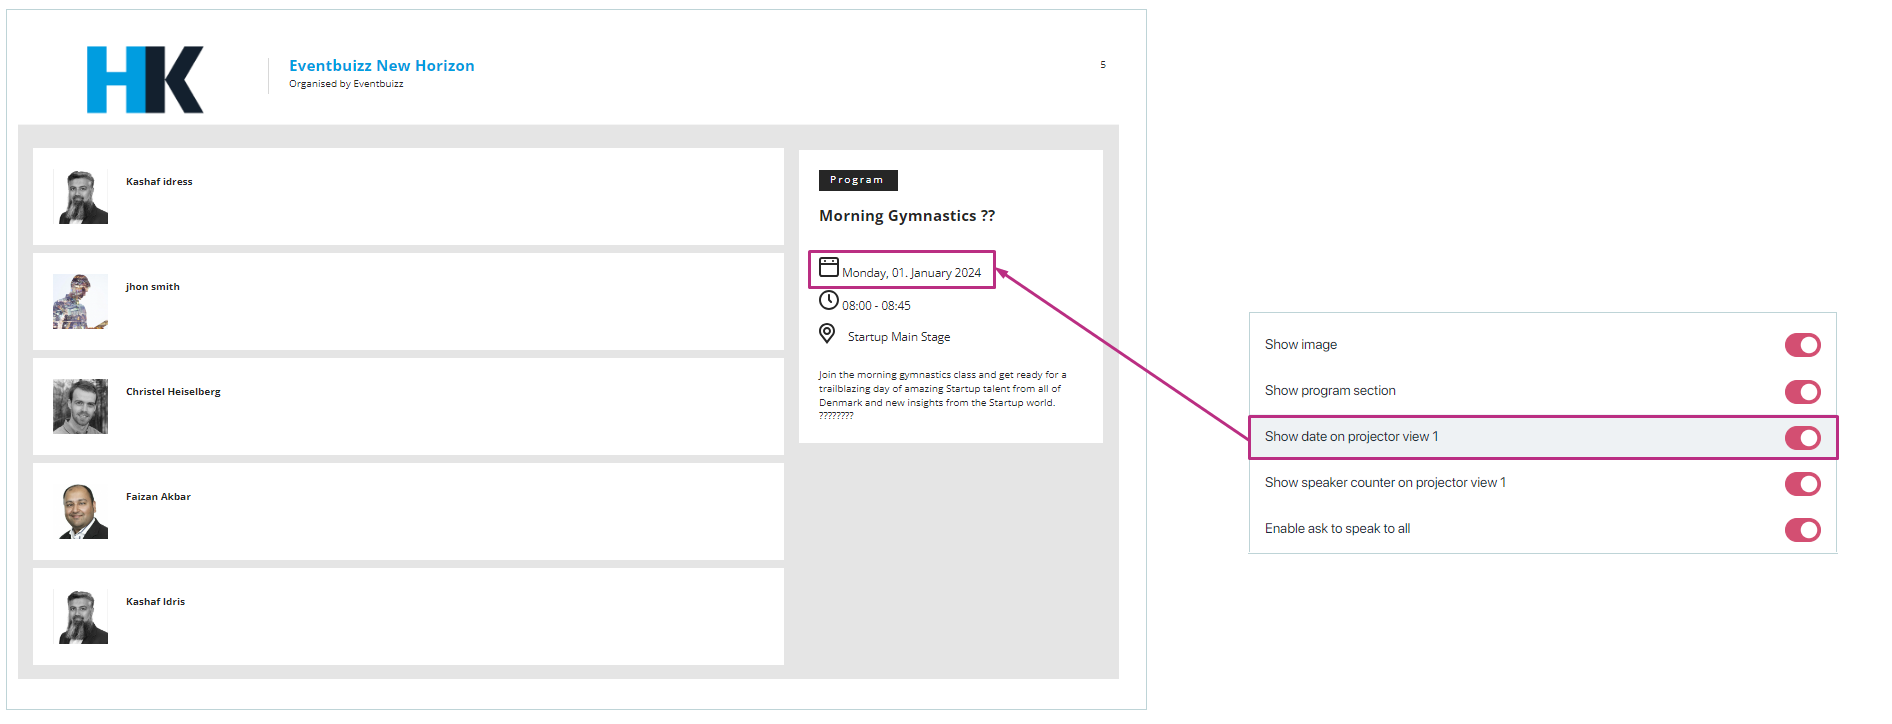
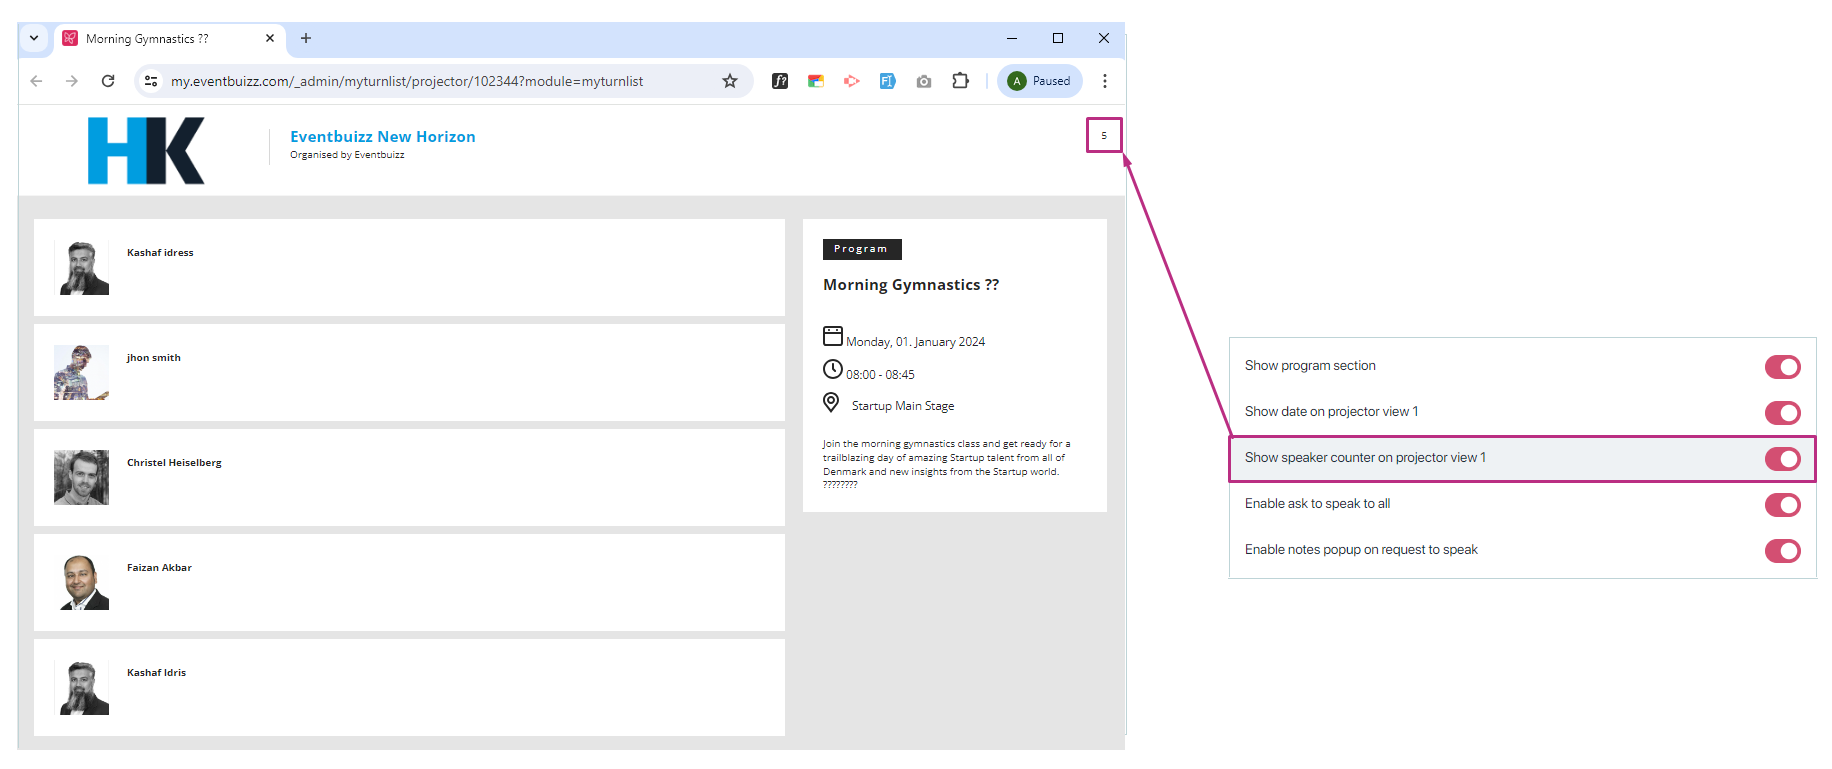
Show speaker counter on projector view 1
Displays a counter of the number of speakers in a specific view mode on the projector which help the organizers and attendees track the number of speakers.
Enable ask to speak to all
If “Enable ask to speak to all” setting is ON, then all attendees will see the request to speak module. If this setting is OFF, then no one will see the module.
However, there are also individual settings for each attendee. If “Enable ask to speak to all” is OFF but an attendee’s individual setting is ON, then only that attendee will see the request to speak module. All other attendees (whose individual setting is OFF) will not see the module.
Enable notes popup on request to speak
If the “Enable notes popup on request to speak” is ON, then the popup will appear, allowing the user to write a note. These notes will be shown to the organizer in the event center.
Use groups to control request to speak
The “Use groups to control request to speak” setting in Eventbuizz allows event organizers to manage and streamline the process of attendees requesting to speak during an event by grouping participants.
Organizers can create different groups of attendees (In attendee module) based on various criteria such as role (e.g., speakers, VIPs, general attendees), session type, or interest areas. Attendees are assigned to these groups either manually by the organizers or automatically based on registration details or predefined rules.
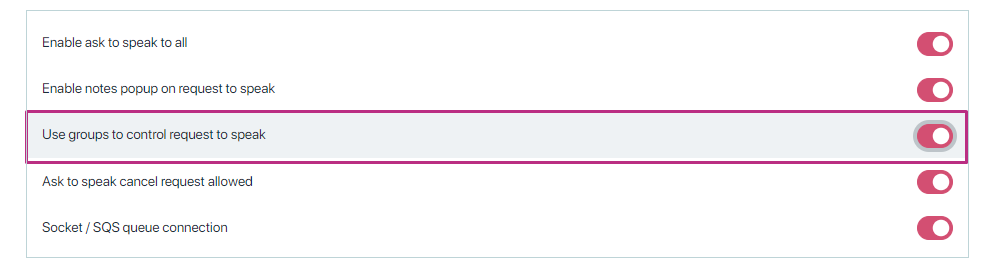
Ask to speak cancel request allowed
If “Ask to speak cancel request allowed” setting is ON, then the cancel icon will be visible to the user after they click the “raise hand” button. This means the user can cancel their request to speak at any time before being approved or going live.
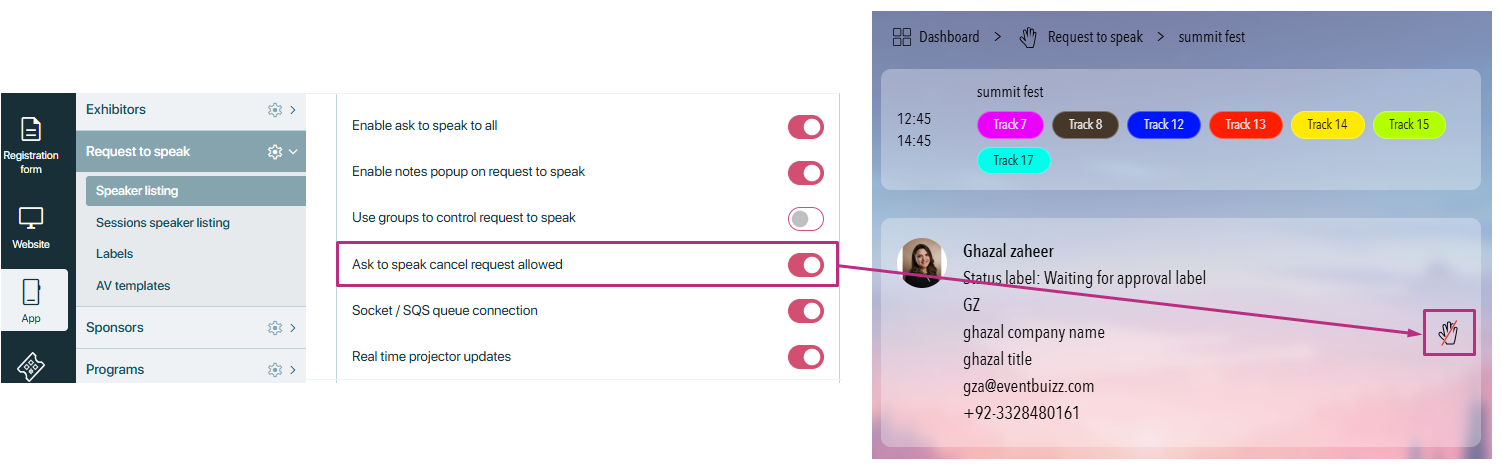
However, if this setting is OFF, the cancel request icon will not appear. This means once the user clicks the “raise hand” icon, they cannot take it back or cancel their request. They must wait until the organizer either approves or ignores the request.
Socket / SQS queue connection
The “Socket / SQS queue connection” setting would be relevant for managing real-time interactions and asynchronous communications during events. A socket connection allows attendees to request to speak in real-time. As soon as an attendee sends a request, it is immediately transmitted to the event organizers or moderators. This connection allows instant feedback. For example, if the moderator approves or denies the request, the attendee receives immediate notification.
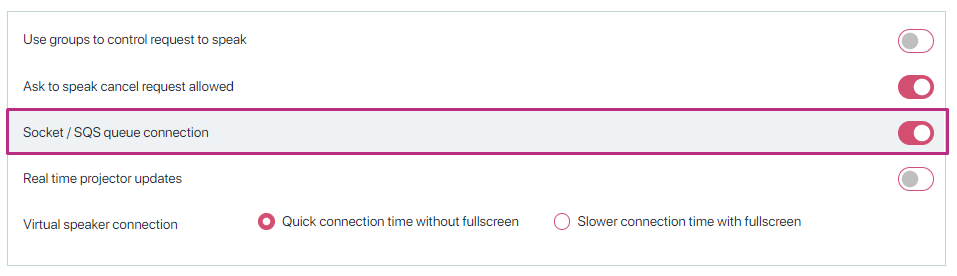
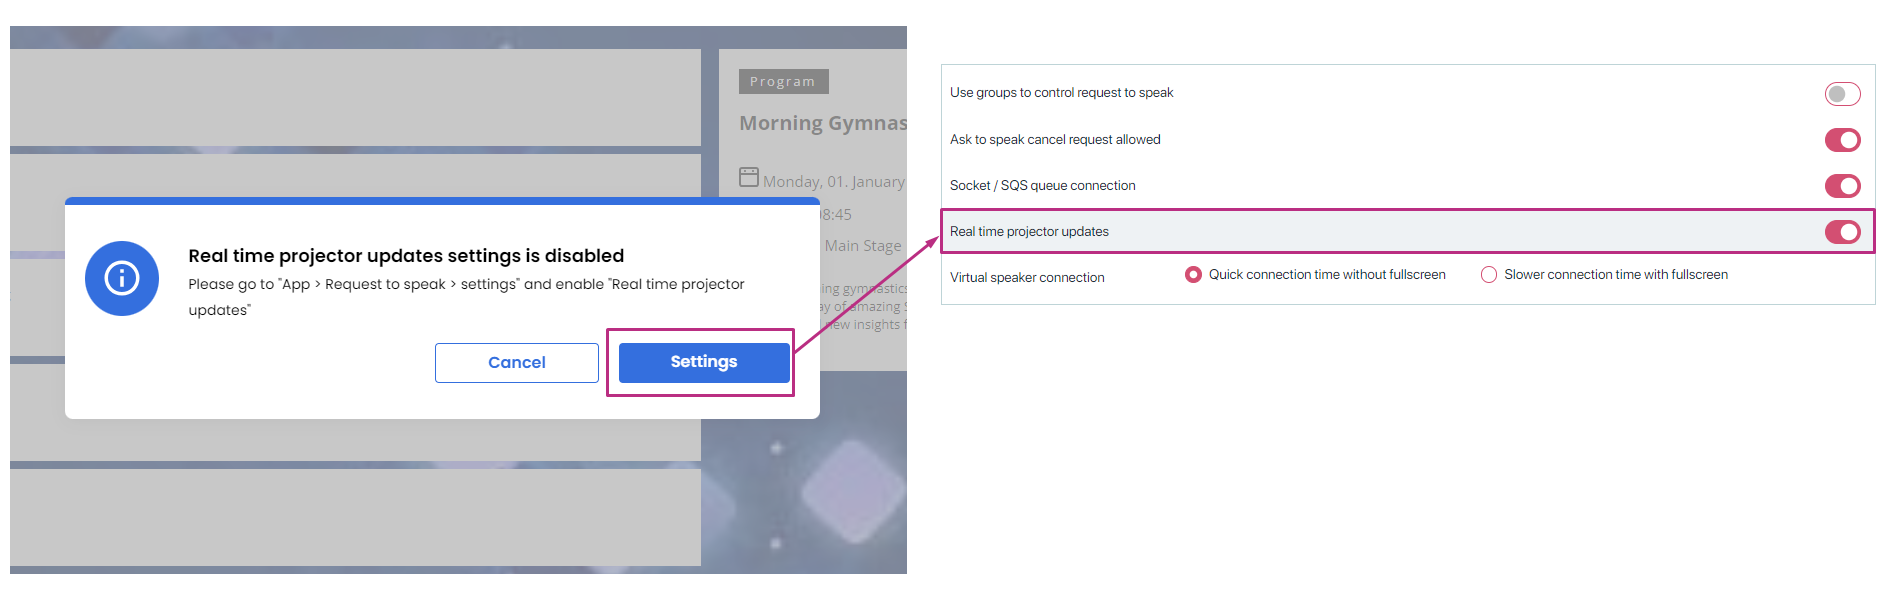
Real time projector updates
Enabling this setting ensures that the projector display updates in real time as new responses come in. This provides a dynamic and interactive experience for the audience. If setting is disabled, Please go to “App > Request to speak > settings” and enable “Real time projector updates”
Time settings
Time allowed for speaking (In seconds): Sets the maximum time allowed for each speaker. Default time is 300 seconds (5 mints). You can change this time this time ensures speakers keep within a time limit.
Time for projector list refresh (In seconds): The interval at which the projector list refreshes. Default time is 5 seconds which keeps the projector information up-to-date.
Time in between attendees (In seconds): The time gap between one attendee’s speech and the next. Default time is 0 seconds which controls the flow of speakers.

Labels settings
Other settings
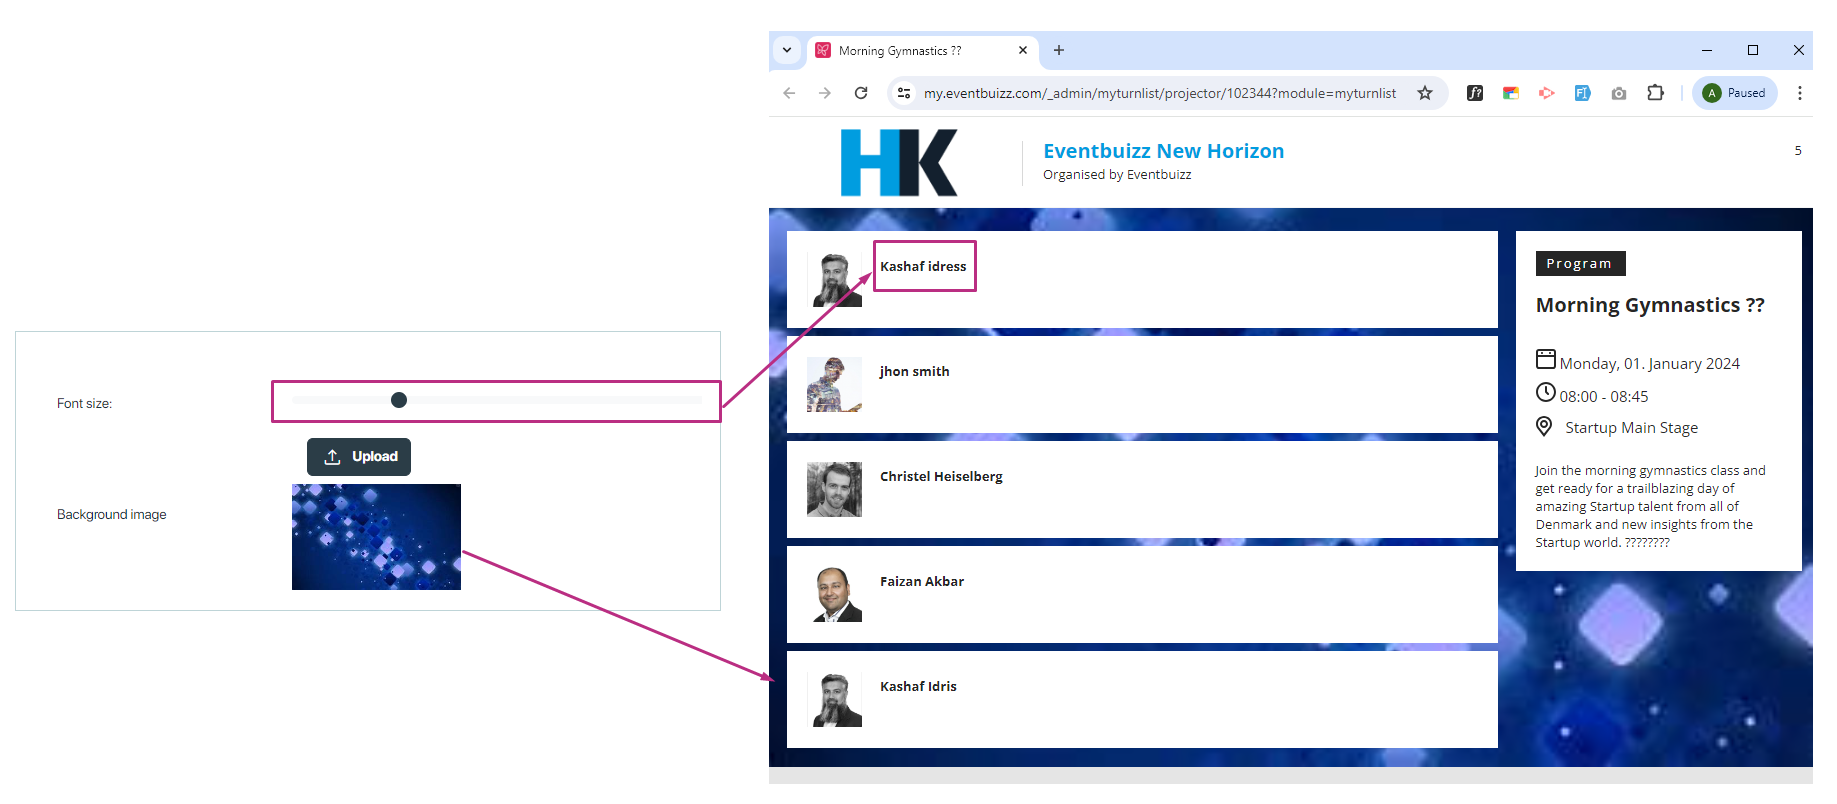
Font size: Sets the font size for the text displayed on the projector or screen which ensures the readability for all attendees.
Background image: Allows setting a background image for the projector display. This enhances visual appeal and branding.
Lobby URL
Sets a URL for the lobby or main page of the event which provides a central online location for event attendees.
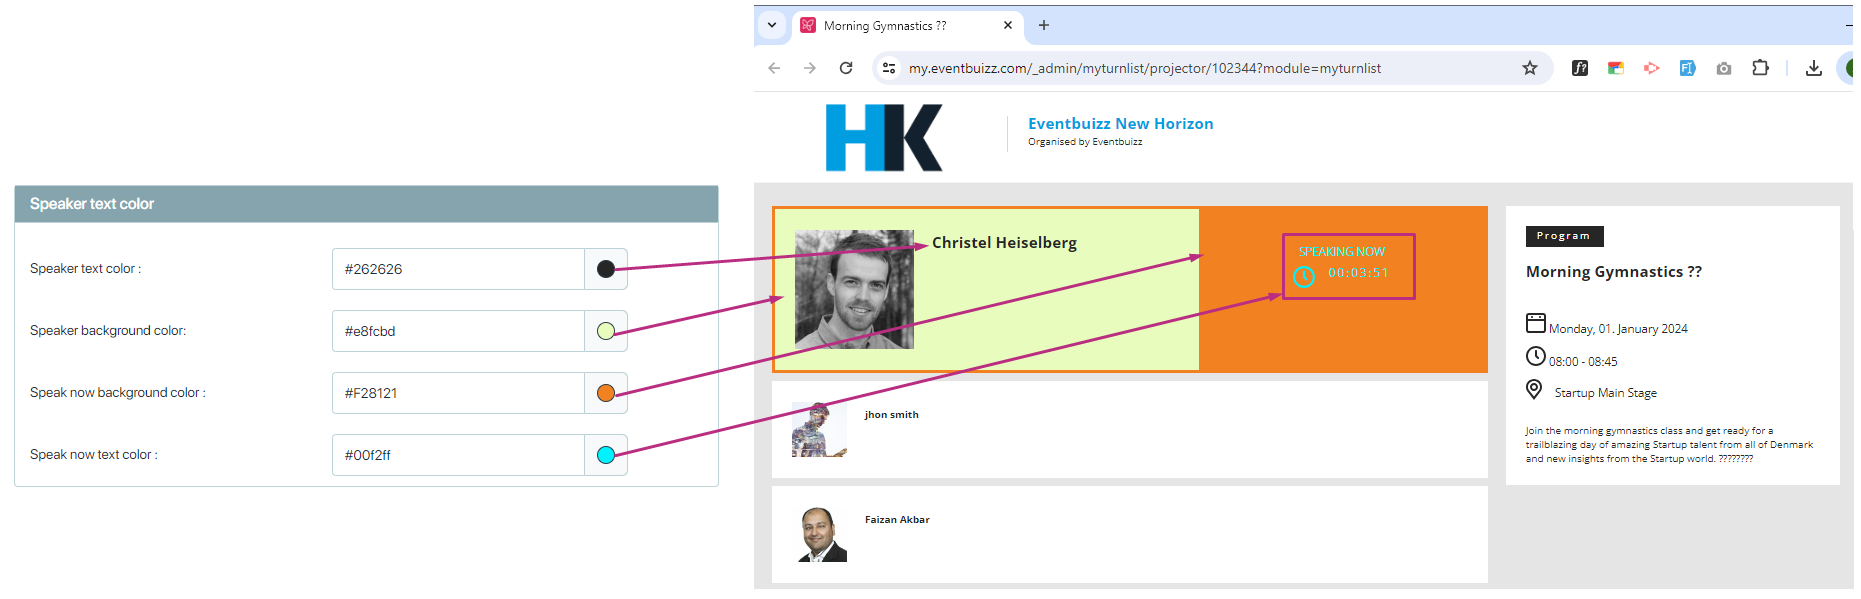
This projector settings effect the background color, text color and attendee detail background color of the projector.
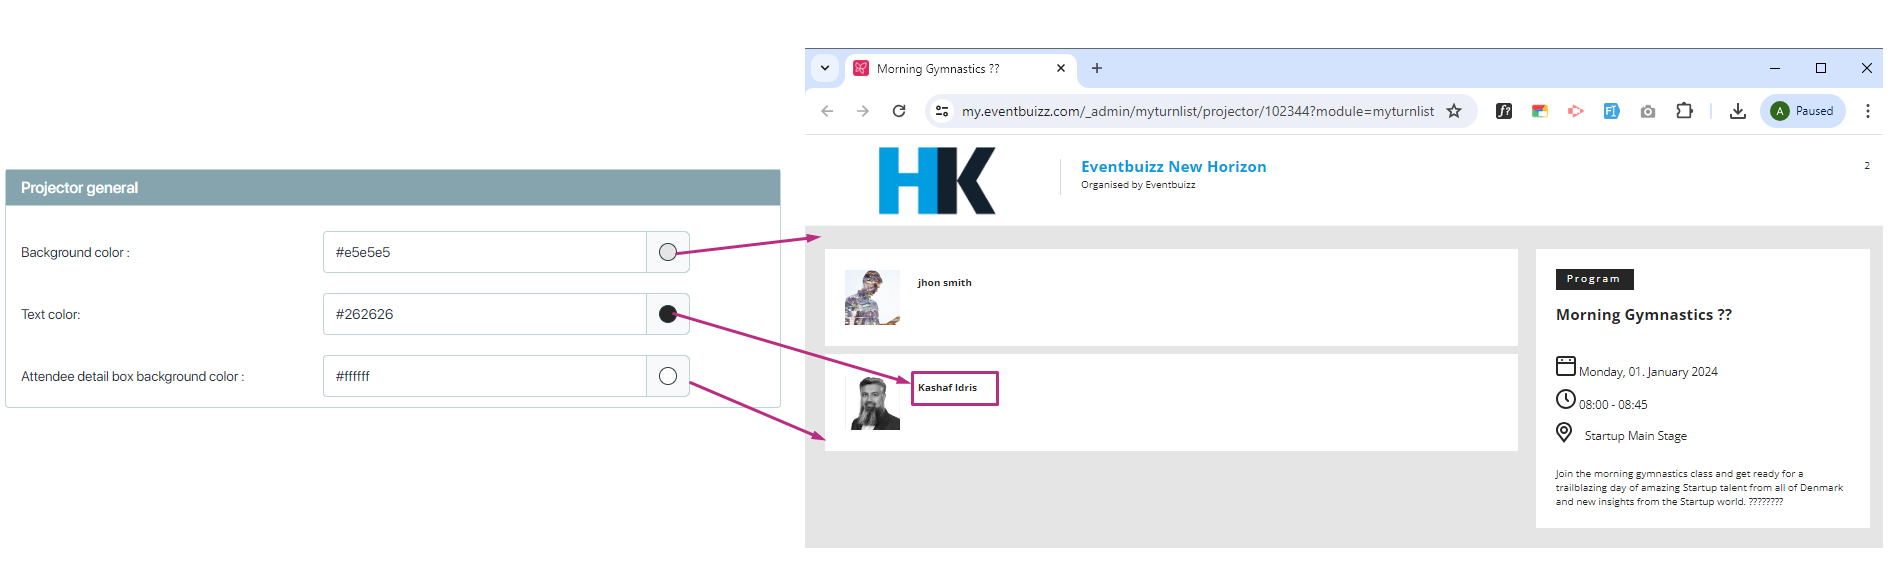
You can change the colors in the section of the live speaker. Any changes you make will directly affect what is shown on the projector.