The modules Sponsors/Exhibitors are identical, but can also be used to present Partners, Products etc. The Sponsors/Exhibitors module in Eventbuizz offers comprehensive tools for managing partnerships, product showcases, and promotional opportunities within events. It streamlines the process of engaging with sponsors, exhibitors, partners, and showcasing products, enhancing the overall event experience for both organizers and attendees.
Sponsors are organizations or companies that provide financial support to the event in exchange for exposure and promotional opportunities. The Sponsors module allows event organizers to manage sponsorships efficiently.
Exhibitors are organizations or companies that showcase their products or services at the event.The Exhibitors module enables organizers to handle exhibitor registrations, booth assignments, and logistics. Exhibitors can upload information about their products or services, including descriptions, images, and videos, which attendees can access through the event app or website.
The Sponsors/Exhibitors module can also be used to manage partnerships with other organizations, media partners, or community sponsors. In addition to sponsors and exhibitors, the module can be utilized to showcase specific products or services.
sponsor/exhibitorlist
Sponsor/ Exhibitor List
A clear overview of categories, contact persons, etc. Well-defined branding of the company. Description, logo and all important details, with the possibility for contact and dialogue.
Add Sponsor/ Exhibitor
1- Access the sponsor/ exhibitor: Begin by selecting your event. From the left-hand navigation, click Apps, then Sponsor/ Exhibitor -> Sponsor/ Exhibitor list. Click Add.
2- Edit Attendee: Locate the Attendee you would like to edit. Hover over the arrow to the right of its name by clicking the icon. then click Edit from the dropdown.

You’ll be presented with a form where you can input details for the sponsor/ exhibitor.
As a minimum, you need to add a name to the exhibitor, but the logo is also very important. If you want to offer activities or meeting management, there must be contact persons assigned.
To assign a contact person, this person must be on the attendees list. click on the search bar, all the attendees will be listed, select your desired attendee as a contact person.


Change any information you want. When you’re finished, click Save. This will automatically add/update the sponsor’s/ exhibitor details.
3- Contact info: The contact information for sponsors or exhibitors typically includes details such as the company name, address, phone number, email address, and possibly a website URL. This information allows event attendees or organizers to reach out to sponsors or exhibitors for inquiries, partnerships, or collaborations related to the event.

4- Redirect to external profile: “Redirect to external profile of sponsor/exhibitor” refers to a feature that allows users to be directed to an external webpage or online profile of a sponsor or exhibitor. This could be a link to the sponsor’s website, social media page, or any other online platform where they showcase their products or services. It’s a convenient way for event attendees to learn more about the sponsor or exhibitor beyond what’s provided within the Eventbuizz platform.

5- Select categories:
During the process of adding or editing, we have visibility of all available categories. From here, you can assign categories to sponsor/ exhibitor. Click Categories to see how to create it.

Delete
Delete will permanently remove an sponsor/ exhibitor from the list.

Import contact persons
In this option, You can import contact persons to the particular sponsor/ exhibitor one by one.
This import is explained in more detail here

Show in app (right column)
This option lets users manually select which sponsors they want to see in the right column of the web app. It provides users with the flexibility to customize their experience by choosing sponsors that are of interest to them.
When you select this option, a new option will appear in the menu when you click on the three dots icon next to the sponsor/exhibitor list. The name of this new option will be show in right app (right column).

Email profile
If the organizer wants to share the sponsor’s/ exhibitor’s profile, then should click on the “Email Profile” option.

Tools:
You can perform following action from Tools.

Import
If you want to import sponsor/ exhibitor directly to the list, you do like this:- Click “Tools” and choose “Import”.
Use our csv template to copy/paste your data. You must have at least exhibitor name.
If you are updating information on existing attendees, then choose “create new records and update existing records”.

Download Import file template. Copy pastes all the relevant data you have. Save the CSV file on your pc.
NOTE: Sponsor/Exhibitor name is required. Importing sponsor/exhibitor is not possible unless you include this information during the import process.

VALIDATION
| FIELDS | DESCRIPTION |
| Sponsor/ Exhibitor name | Sponsor/ Exhibitor name is required |
Select file and then you are asked to either import new records or also update existing records.

- Choose “Create new records” when you added exhibitor/ sponsor to the total sponsor/ exhibitor list. Then it is only the new records that are imported, meaning no duplicates.
- Choose “Create new records and update existing records” when you will also need to update changes to existing sponsor/ exhibitor records.
-
If you have used our template, you do not need to do any changes in mapping, just click ‘Next’. If you use your own CSV file – where the columns are name differently, please map the relevant information.
Import a file -> by clicking on Select File

If you have used our template, you do not need to do any changes in mapping, just click ‘Next’. If you use your own CSV file – where the columns are name differently, please map the relevant information.

When you click ‘Next’ you can see how new records are created and if there are some errors, the system will show this too.
Export
The export is designed to help you obtain a comprehensive list of sponsors and exhibitors along with their associated details. This can be particularly useful for record-keeping, analysis, reporting, and sharing information with other stakeholders.
Import Contact Persons
Now you can do some excel magic, and easily import the contact persons for all exhibitors and/or sponsors at once.
This is to make the process easier when you have many exhibitors or sponsors and/or contact persons. You can still add them per exhibitor/sponsor or by typing the name of the contact person when editing the single exhibitor or sponsor.
Remember to have all the contact persons on your attendee list before importing them to the specific exhibitors and/or sponsors.
In the following guide, we show how to import contact person to exhibitors, and then you will know, that you do it the exact same way for the sponsors.
- First of all, go to the Sponsors/ Exhibitors list and export the list of exhibitors in order to have the Exhibitors ID:


- Then choose “import contact persons” from Tools:

…and ‘download import file template’
- Fill in the exhibitors ID, Exhibitors Name and contact persons information

- Save as csv-file and import the list
- Go to one exhibitor and ‘edit’ to see the contact person for a specific one (Contact person):

Export Contact Persons
This option allows you to download the list of contact persons assigned to sponsors or exhibitors. This is useful for organizing communication, and managing relationships.
Delete all
This action will remove all the data related to sponsors and exhibitors from the system. It is a bulk delete option that should be used with caution, as it will erase all relevant records permanently.
Download all survey results
If surveys have been conducted among sponsors and exhibitors, this option allows you to download all the responses. This could include feedback on the event, suggestions for improvements, or data about their experience and satisfaction levels.
Each of these tools is designed to help you efficiently manage the data related to sponsors and exhibitors, ensuring that you can easily import, export, analyze, and maintain accurate records.
sponsor-exhibitorcategory
Category
If you want to divide the exhibitors in categories. It could be Gold, Silver etc. or relevant industries.
Categories for sponsors and exhibitors help in organizing and managing these stakeholders effectively. These categories might vary depending on the specifics of the event and how the platform is configured.

Once the main category are set – you create the sub-categories.

Edit and Delete category and sub category
You can edit and delete main or sub category.

Select all and delete categories
- The “Select All” function is typically used to quickly select multiple or all items in a list.
- The “Delete Categories” function allows users to remove specific categories that have been created to organize sponsors and exhibitors.

Tools
We have two option in tools.

Import
If you want to import attendees directly to the attendees list, you do like this:- Click “Tools” and choose “Import”.
Use our CSV template to copy/paste your data. You must have at least a category name and id.
Download Import file template. Copy pastes all the relevant data you have. Save the CSV file on your pc.

Select file and then you are asked to import new records
If you have used our template, you do not need to do any changes in mapping, just click ‘Next’. If you use your own CSV file – where the columns are name differently, please map the relevant information.
Import a file -> by clicking on Select File


When you click ‘Next’ you can see how nay new records are created and if there are some errors, the system will show this too.
Export:
All categories will be downloaded into your system in CSV file.

sponsor-exhibitorlabels
Labels
If relevant, you can customize the text fields to match your specific terminology and event wording. Titles, headings, messages, answer buttons and labels can be renamed quickly and easily.

sponsor-exhibitorsettings
Sponsor/ Exhibitor tabs have following tabs settings which will show/ hide data in sponsor/ exhibitor detail.

About
The about feature displays the description of each sponsor’s/ exhibitor’s detail within the event app.

Contact person
The “Show contact person” feature displays the contact person associated with each sponsor or exhibitor in detail within the event app.

Documents
The Document tab displays the documents added for each sponsor’s/ exhibitor’s in their detail within the event app.

Contact Info
This shows the contact info such as email, phone, website, Linked in, Facebook and Twitter profile if the link is given in detail.

Notes
The Notes tab activate the notes section in web app for attendees.

Show sponsors on app right column
These settings seem to pertain to managing how sponsors are displayed within an app’s right column. Let’s break down each option:
None: This option likely means that no sponsors will be displayed in the right column of the app. Users selecting this option won’t see any sponsor/ exhibitor content in the right column of the app.

Show all: Choosing this option will display all available sponsors in the right column. It means that every sponsor/exhibitor associated with the app will be shown to users in that section, without any filtering based on categories or specific selections.

Show by category: This setting allows users to view sponsors based on specific categories. For example, if there are different types of sponsors (e.g., technology, fashion, food), users can select a category, and only sponsors belonging to that category will be displayed in the right column.
-
-
-
- After selecting one of these options, users may be prompted to further specify their preferences, such as selecting a category or choosing specific sponsors, depending on the option they’ve chosen.
- The “Category” dropdown likely allows users to filter sponsors based on predefined categories, enabling them to narrow down their choices and view sponsors that align with their interests or preferences.
-
-

Show selected sponsors: This option lets users manually select which sponsors they want to see in the right column of the web app. It provides users with the flexibility to customize their experience by choosing sponsors that are of interest to them.
When you select this option, a new option will appear in the menu when you click on the three dots icon next to the sponsor/exhibitor list. The name of this new option will be show in right app (right column).

Overall, these settings offer users control over the type and extent of sponsor content they see in the app’s right column, providing them with a more personalized experience.
Display contact [.vcf]
The “Display contact [.vcf]” feature for sponsors and exhibitors allows event participants to download a virtual contact file (VCF) from webapp. This file format is commonly used for sharing contact information digitally.
When an attendee clicks on the “Display contact [.vcf]” link, they can download a VCF file that contains the contact details of the sponsor or exhibitor. This file can then be easily imported into their contact management software or address book on their device.

Display name in listing
The “Display name in listing” setting for sponsors and exhibitors determines whether or not the name of a sponsor or exhibitor will be visible in various public listings.

Display email and Display phone
When this setting is enabled, the email address of the sponsor or exhibitor will be visible to attendees in the event’s platform.

Display contact person email and Display contact person phone
“Display contact person email” and “Display contact person phone,” allow sponsors to share specific contact details of a designated representative with event attendees.
When both settings are enabled, the email address and phone number of a designated contact person from the organization will be visible to attendees.
NOTE: Ensure that the email and phone sort fields are active for the attendee’s role. It might be speaker, sponsor, exhibitor, attendee etc.

Display both name and category
The Display both name and category setting in the web app controls whether the tabs for name and category are shown or hidden.

Display category in list view
This setting decides if the category (such as Technology, Healthcare, Finance, etc.) of each sponsor or exhibitor is visible in the main list where all sponsors or exhibitors are displayed.

Hide contact persons from attendees list
The Hide contact persons from attendees list setting prevents the names and contact information of the contact persons representing sponsors or exhibitors from showing up in the attendees list. This keeps their details private and helps prevent them from receiving unwanted messages or spam.

Show booth
Booth includes the booth number or location, a description of the booth, and sometimes a map showing where the booth is located within the event venue.
The Show booth setting for sponsors or exhibitors determines whether the booth information for each sponsor or exhibitor is displayed to the attendees within the event app or website..

Show on native app dashboard
The “Show on native app dashboard” setting determines whether certain sponsors or exhibitors are prominently displayed on the main dashboard of the event’s native mobile app.

Mark favorite
The “Mark favorite” feature allows users to designate certain sponsors or exhibitors as their favorites within the event app. By marking a sponsor or exhibitor as a favorite, users can easily access and prioritize their preferred vendors, making it convenient to revisit their profiles, booths, or contact information during the event.

GDPR accepted
The “GDPR accepted” feature indicates that the sponsor or exhibitor has agreed to comply with the General Data Protection Regulation (GDPR) requirements.

All these settings on the portal are used to control the menus. Turning them on or off will hide or show the menus.

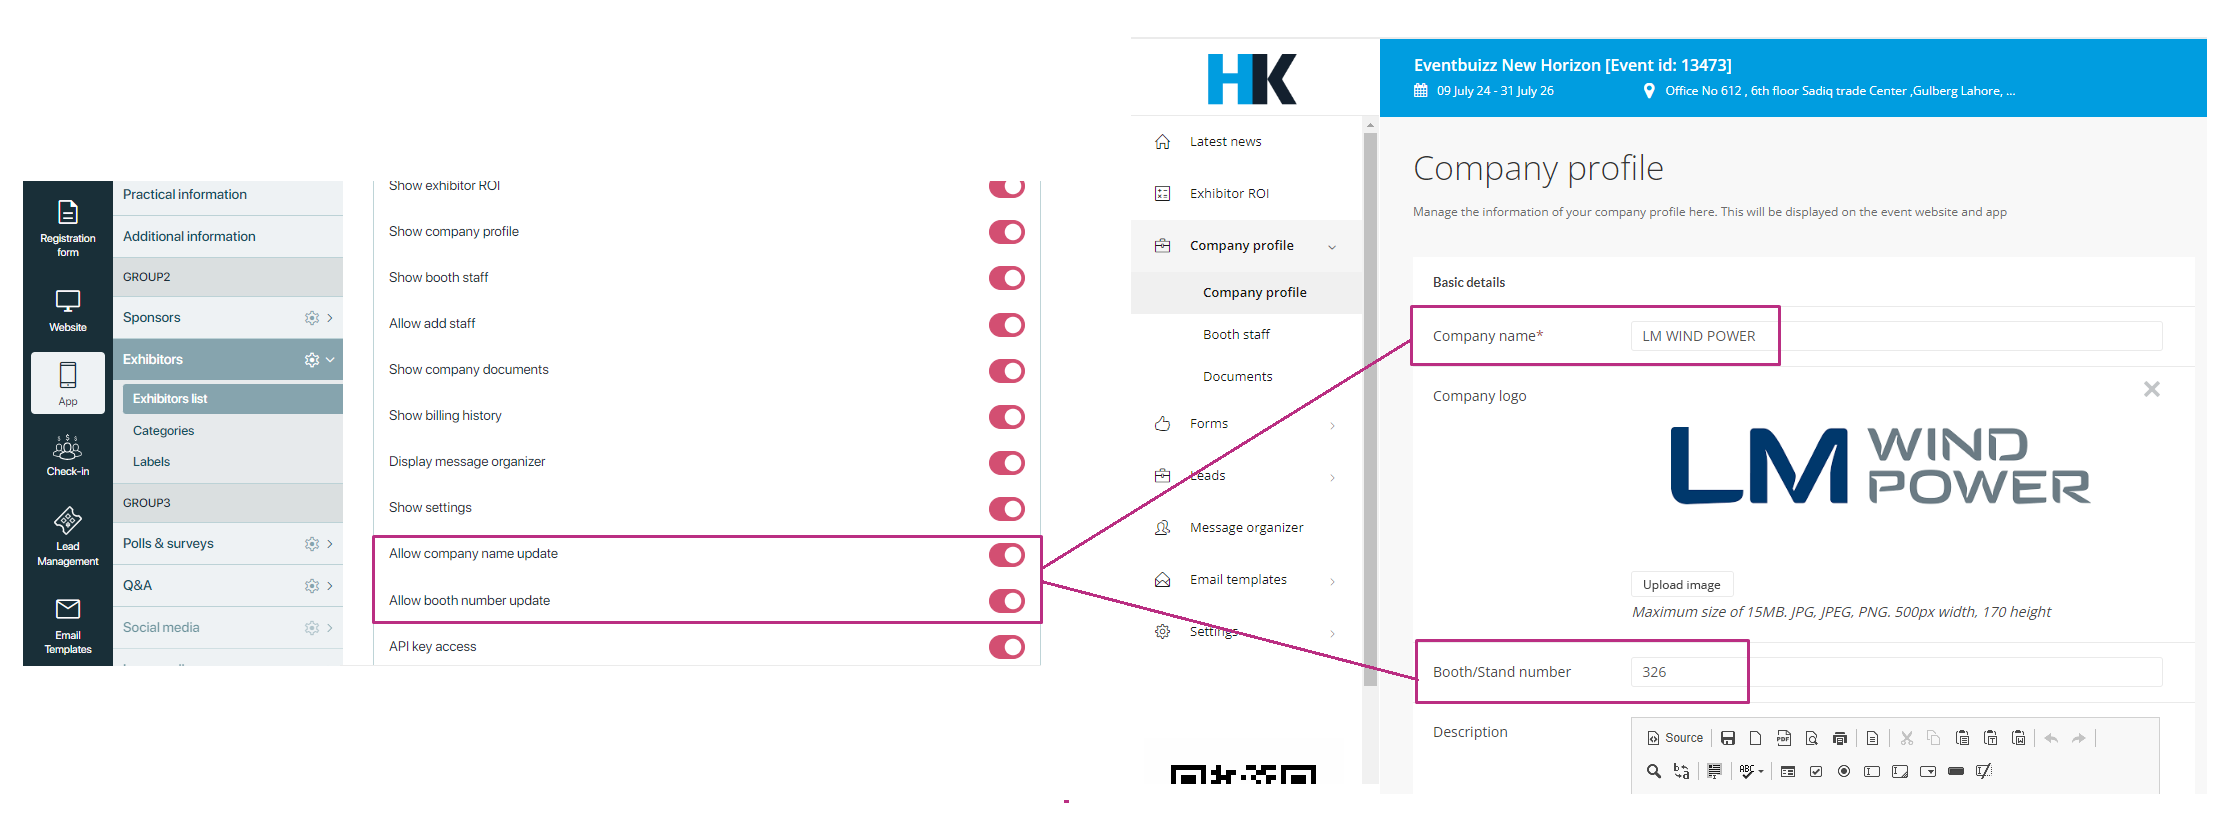
Allow add booth staff
The “Allow add booth staff” setting in the portal is used to give permission for adding new staff members to a booth. When this setting is enabled, users can add or assign staff to manage or assist at the booth. If it’s disabled, no new staff can be added.

Allow company and booth name update
- Allow company name update: This setting lets users update or change the company name associated with the booth or profile. If enabled, users can modify the company name. If disabled, the company name cannot be changed.
- Allow booth number update: This setting allows users to update or change the booth number. If enabled, users can modify the booth number. If disabled, the booth number will remain fixed and cannot be updated.

API key access
When you turn on the API key access setting, the API key starts showing in the sponsor or exhibitor’s profile. With this key, you can fetch or collect specific leads related to that particular sponsor or exhibitor.

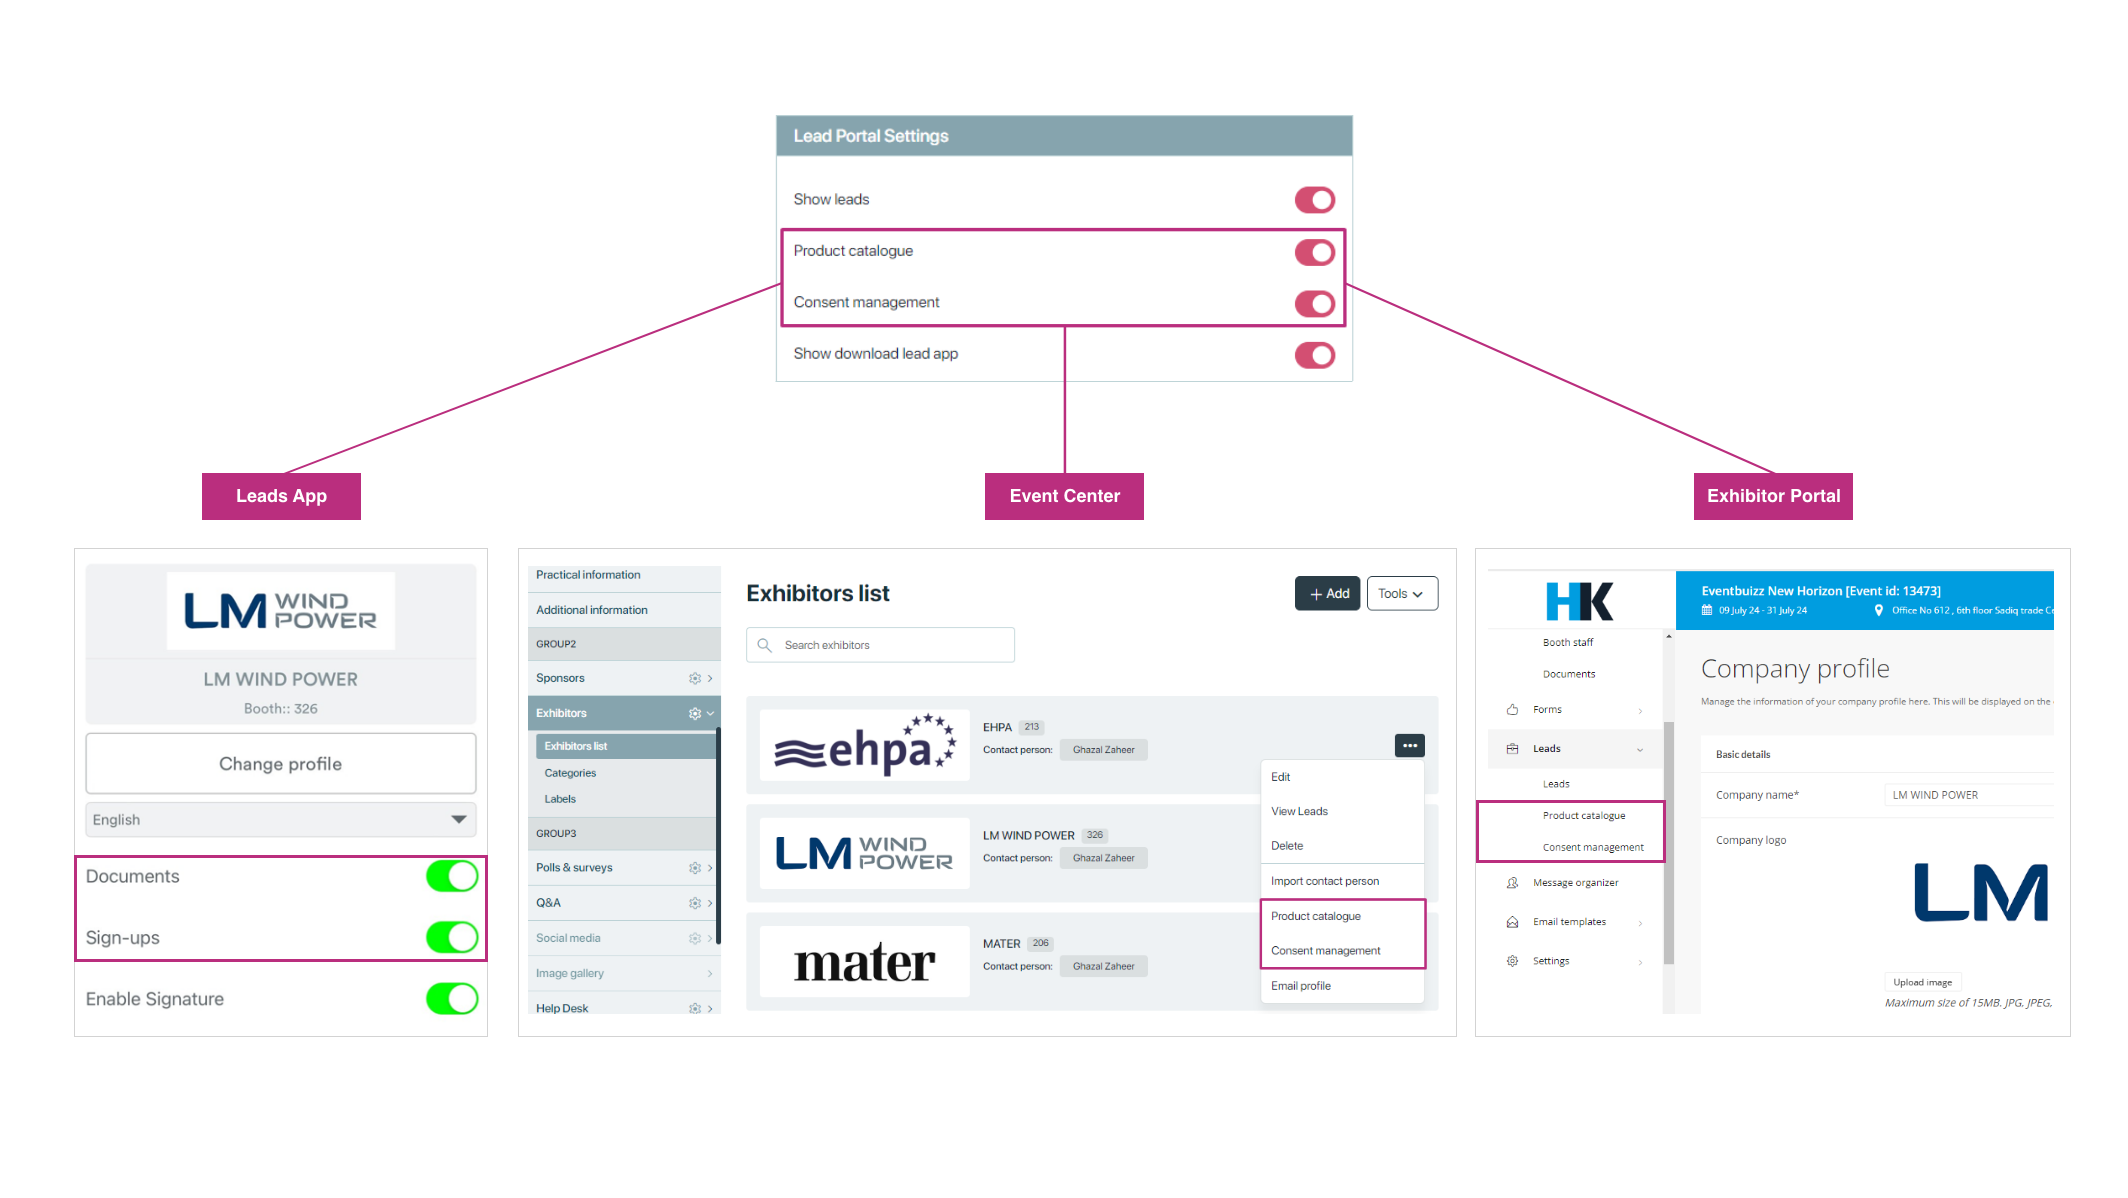
The leads portal settings for sponsors/exhibitors will only be activated if the leads app mode “With Exhibitor Portal” is selected.
How to select Leads app mode. Click Leads Settings.
Some of these settings are for Exhibitor Portal and some are for both Exhibitor Portal and Leads app with exhibitor portal.

Show Leads
This setting, when enabled, allows users to view the leads section in the exhibitor portal.

Product Catalogue and Consent Management
Enabling this setting allows users to access and view the product catalog and provides users with options to manage consent and data privacy preferences for their leads within the portal and the leads app.

Show Templates, Show leads scan conformation and leads user promotions
When turned on, allows users to view and use different email templates in the portal.

Show Survey Form and Show survey response overview
Show survey form -> Allows users to access and view survey forms within the portal.
Show survey response overview -> Allows users to view an overview of responses to surveys conducted through the portal.

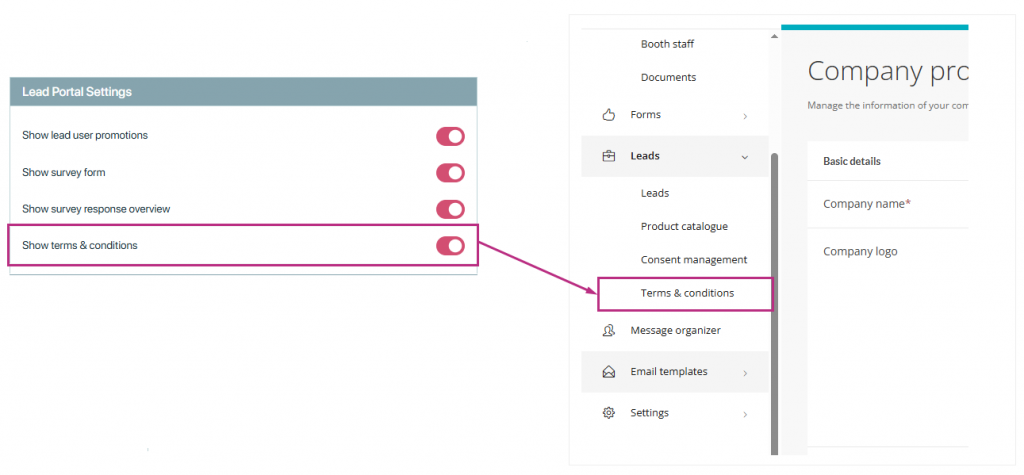
Show terms and conditions
When this setting is ON, exhibitors can see the terms and conditions in the portal. If it’s OFF, the terms and conditions will not be visible to them.

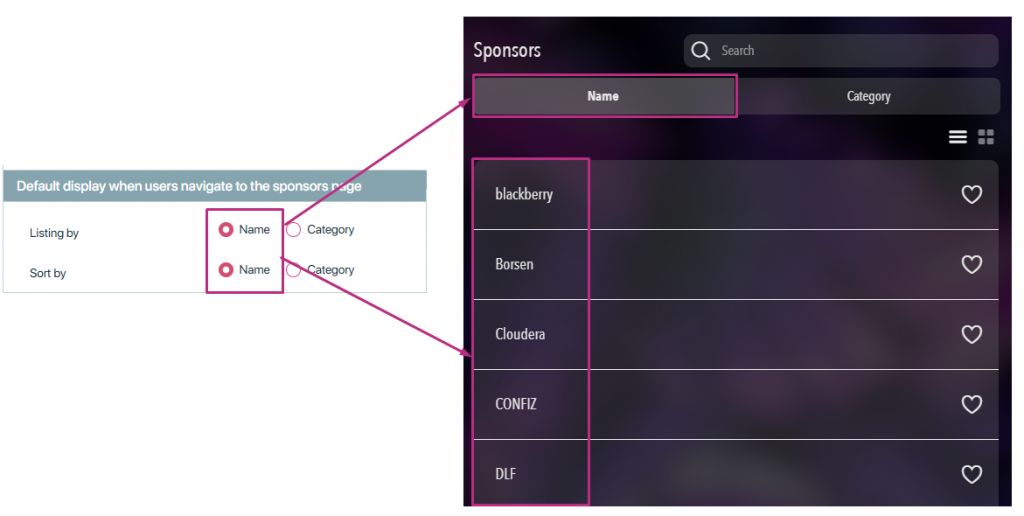
The settings for the default display when users navigate to the sponsors page are crucial for organizing and presenting sponsor information effectively. Here’s a detailed explanation of these settings:
Default Display Settings for Sponsors Page
Listing by:
- Name: When this option is selected, sponsors will be listed alphabetically by their names. This is useful if users are likely to search for sponsors by their company or brand name.
- Category: When this option is selected, sponsors will be grouped and listed by their category (e.g., technology, healthcare, education). This is useful if users are interested in finding sponsors within a specific industry or type of service.
Sort by:
- Name: Within the chosen listing method, sponsors can be sorted alphabetically by their names. This ensures a straightforward, alphabetical order that is easy for users to navigate.
- Category: Within the chosen listing method, sponsors can be sorted by their category. This will organize sponsors within each category alphabetically, providing a structured and logical flow for users looking within specific sectors.

If “Listing by Name” and “Sort by Name” are Selected:
- The “Name” tab in the web app will be active.
- Sponsors will be displayed in alphabetical order based on their names (A to Z).

If “Listing by Category” and “Sort by Name” are Selected:
- Sponsors will first be grouped by their category. Category tab will be active.
- Within each category, the sponsors will be displayed in alphabetical order based on their names (A to Z).


This setting is used to automatically send a blind carbon copy (BCC) of emails containing leads generated through the app to a specified email address.
When an email is sent to a sponsor or exhibitor with leads (potential customer or client information), a copy of this email is also sent to the BCC email address without the primary recipient knowing.
Example Scenario
Imagine during an event, several attendees visit a sponsor’s booth and share their contact information to learn more about their products. When the app sends out emails to the sponsor containing these leads, the info@eventbuizz.com email address will receive a BCC of each of these emails. This allows event organizers to keep a record of all leads distributed to sponsors and exhibitors, ensuring that no lead is missed or lost in communication.
By configuring this setting, event organizers can effectively manage and oversee the lead generation process, ensuring efficient follow-up and maximizing the event’s impact for sponsors and exhibitors.
You can add multiple BCC email by clicking on Add bcc email button.
