Vouchers are discount or promotional codes that organizers can offer to attendees as part of an event registration or sales process. These codes can be applied during checkout to provide attendees with benefits such as:
- Discounts on ticket prices or registration fees
- Free or discounted add-ons (like workshops, meals, merchandise)
- Reduction in VAT or taxes
- Incentives like early bird discounts or loyalty rewards
They are a powerful marketing tool to boost registrations, increase attendee engagement, and improve overall event revenue.
Purpose of Vouchers in the Registration Process
Vouchers are used for several important business and marketing goals:
- Increase registrations: By offering discounted prices, you lower the barrier for potential attendees to sign up.
- Promote early sales: Limited-time vouchers can encourage early commitment, helping organizers secure attendees sooner.
- Reward loyalty: Offer special codes to returning attendees or VIP customers as a thank-you.
- Drive targeted marketing campaigns: Use vouchers in email campaigns, social media, or partner promotions to attract specific audiences.
- Clear inventory or upsell: Apply discounts to specific sessions, workshops, or merchandise to boost sales.
- Reduce abandonment at checkout: Attendees are more likely to complete the registration process if they feel they are getting a deal.
Types of Vouchers
There are three types of vouchers in the system. All three can be configured to apply either a percentage discount (e.g., 10% off) or a fixed amount discount (e.g., $20 off).
How to enable vouchers in event center
Before you can create vouchers, you need to turn on the voucher feature in your event settings.
Here’s how:
Go to registration forms
- In the Event Center, open your event.
- Navigate to Registration forms.
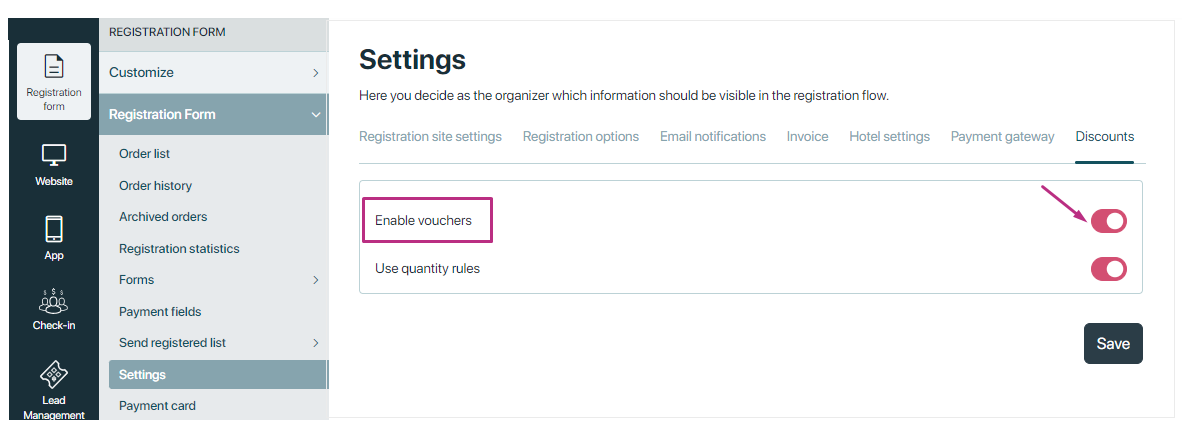
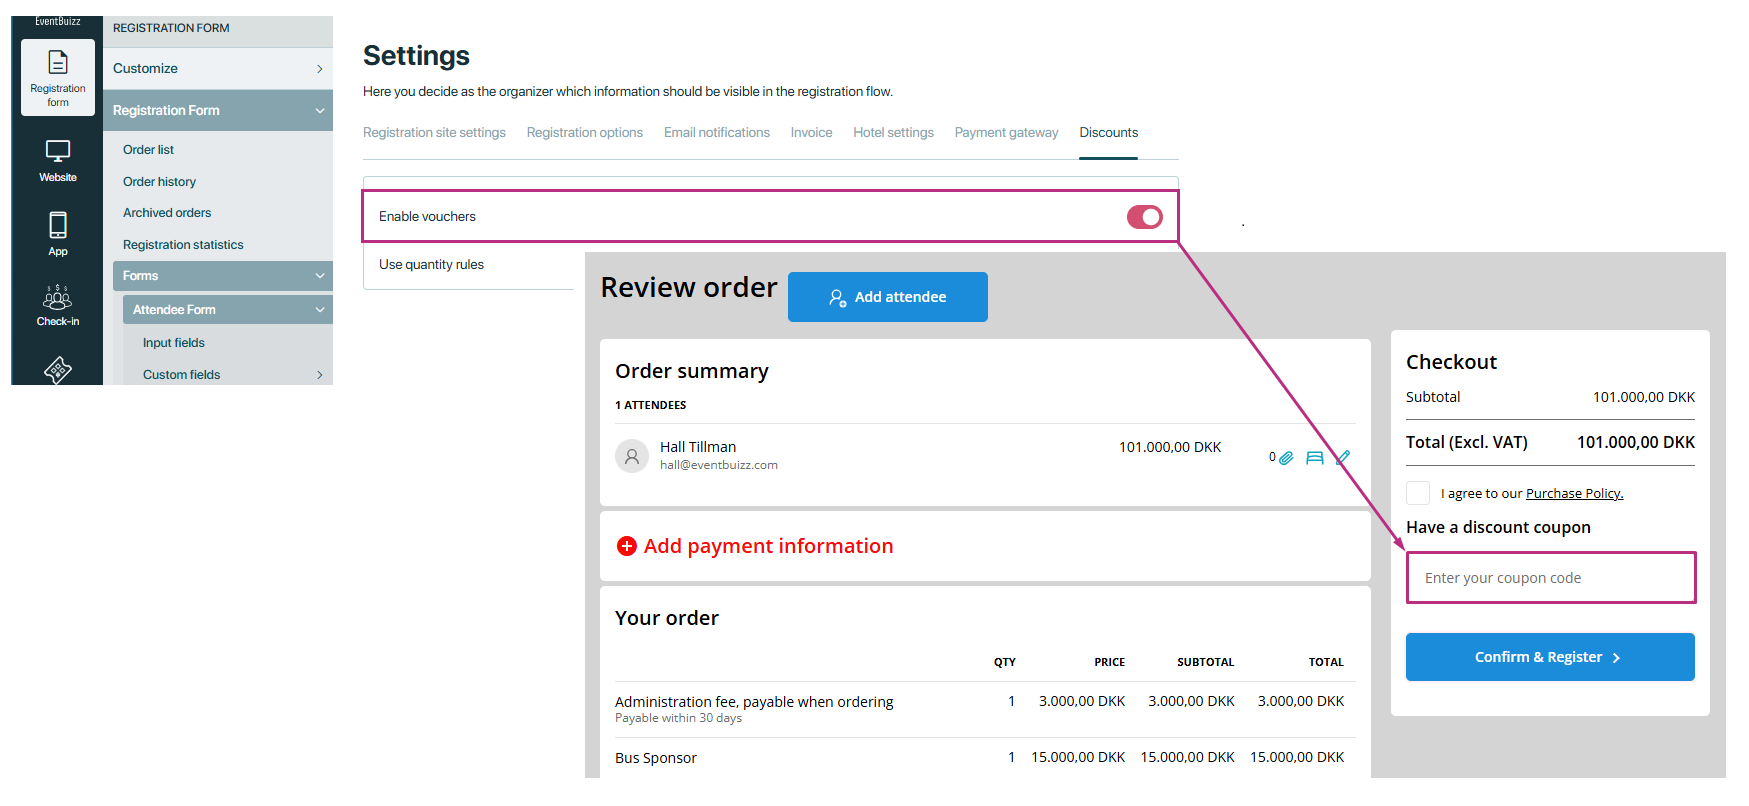
Enable vouchers
- Inside Registration Forms, go to → Settings → Discounts.
- Find the option Enable vouchers (or Activate use of vouchers) and switch it ON.
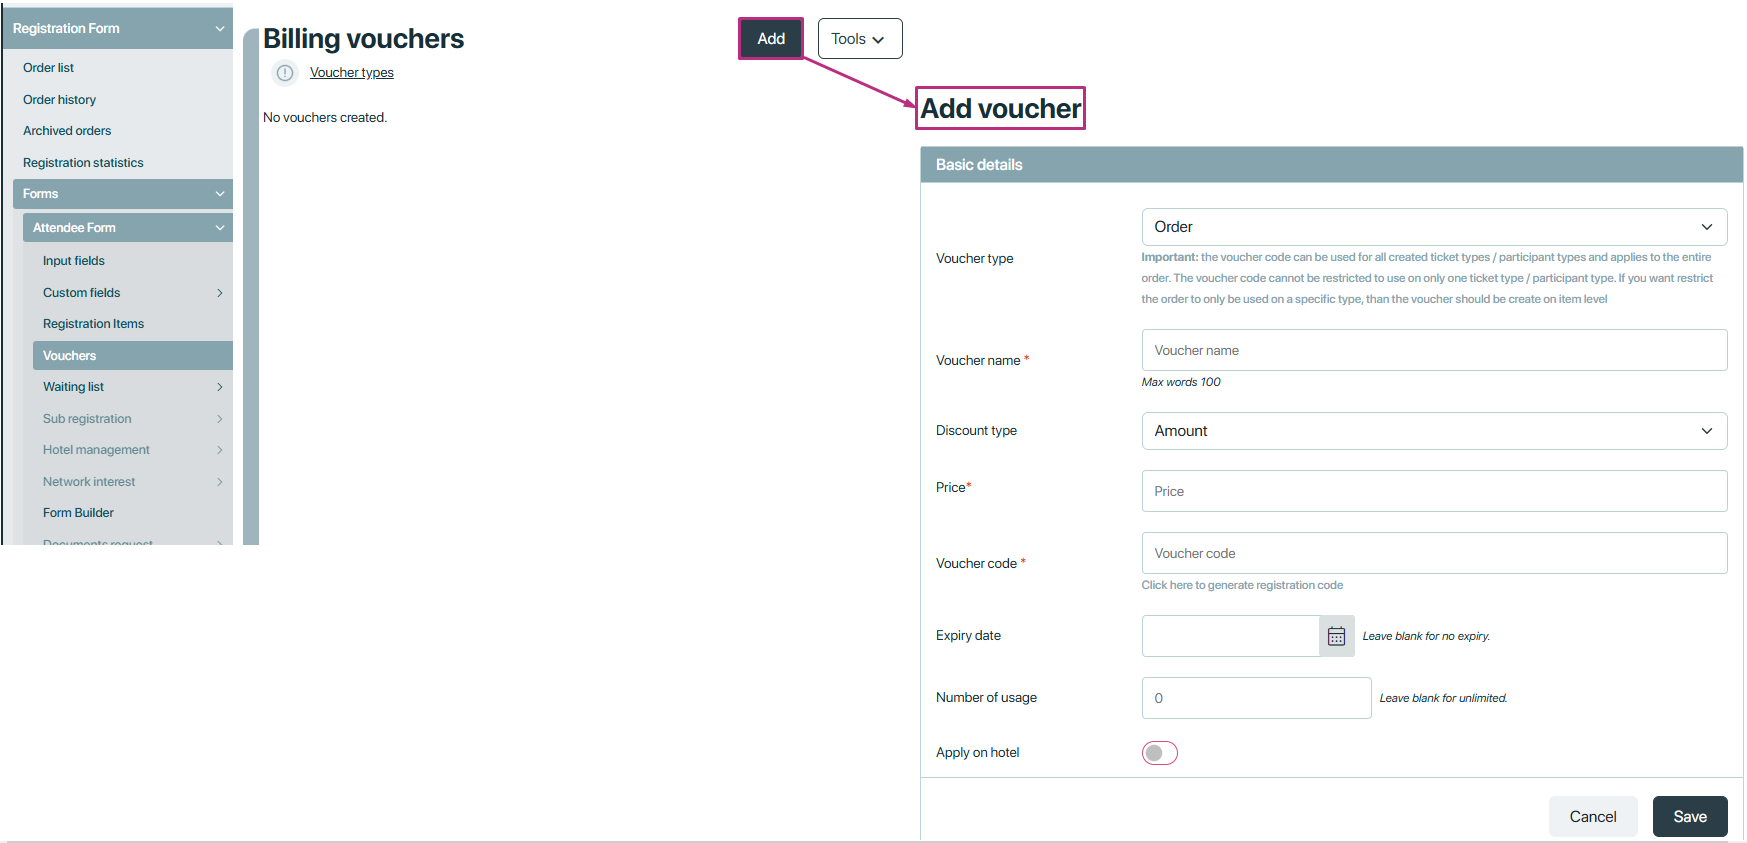
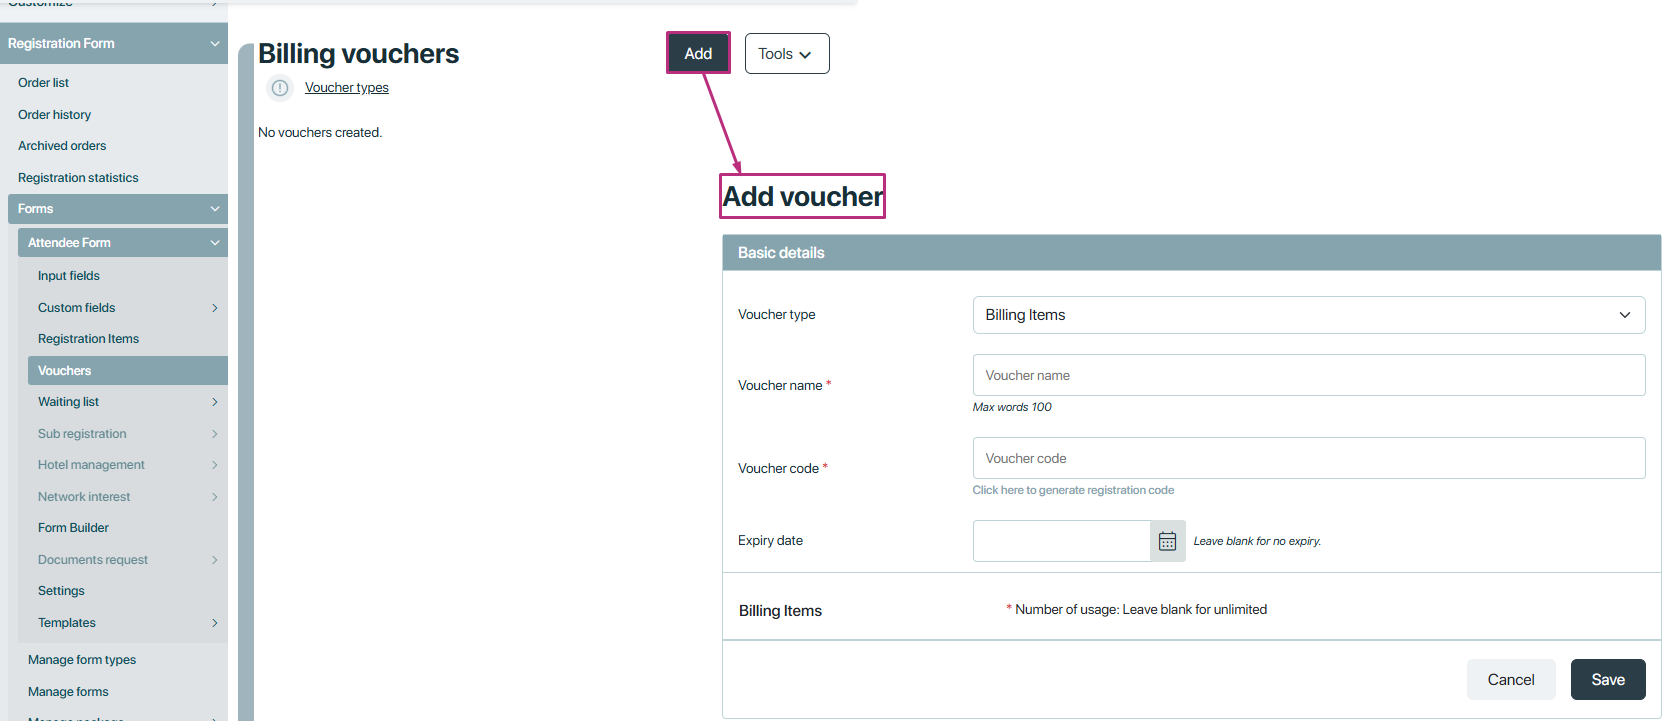
Create vouchers
- Go to the Vouchers section (often under Discounts or Marketing).
- Click Create Voucher.
- Choose the type: Order, Billing Item, or VAT.
- Set up the details:
- Voucher code (like EARLYBIRD10)
- Discount type (percentage or amount)
- Discount value
- Expiration date
- Eligible items or categories
- Minimum order value, if needed
Share the voucher code
- Promote your voucher in emails, on your event website, via social media, or through partners.
- Make sure attendees know where to enter the code during registration.
If this setting is enabled, this will show voucher field on the registration site. Users can enter a voucher code, which the system validates against predefined conditions such as expiration dates, eligible products or categories, and minimum purchase requirements.
Now you are ready to create the voucher.
Order Voucher
For creating the voucher organsier will navigate to this path:
To add/edit voucher > Navigate registration form > Form > Select form in which you want to add a voucher > click Voucher->add/edit
Voucher types available (by default)
By default, when you create vouchers in a form, you can choose from two types:
-
Order Voucher
→ Applies to the entire order total
Example: 10% off the whole registration, covering all selected items. -
Billing Item Voucher
→ Applies to specific items in the order
Example: $20 off a VIP ticket, workshop, or dinner item.
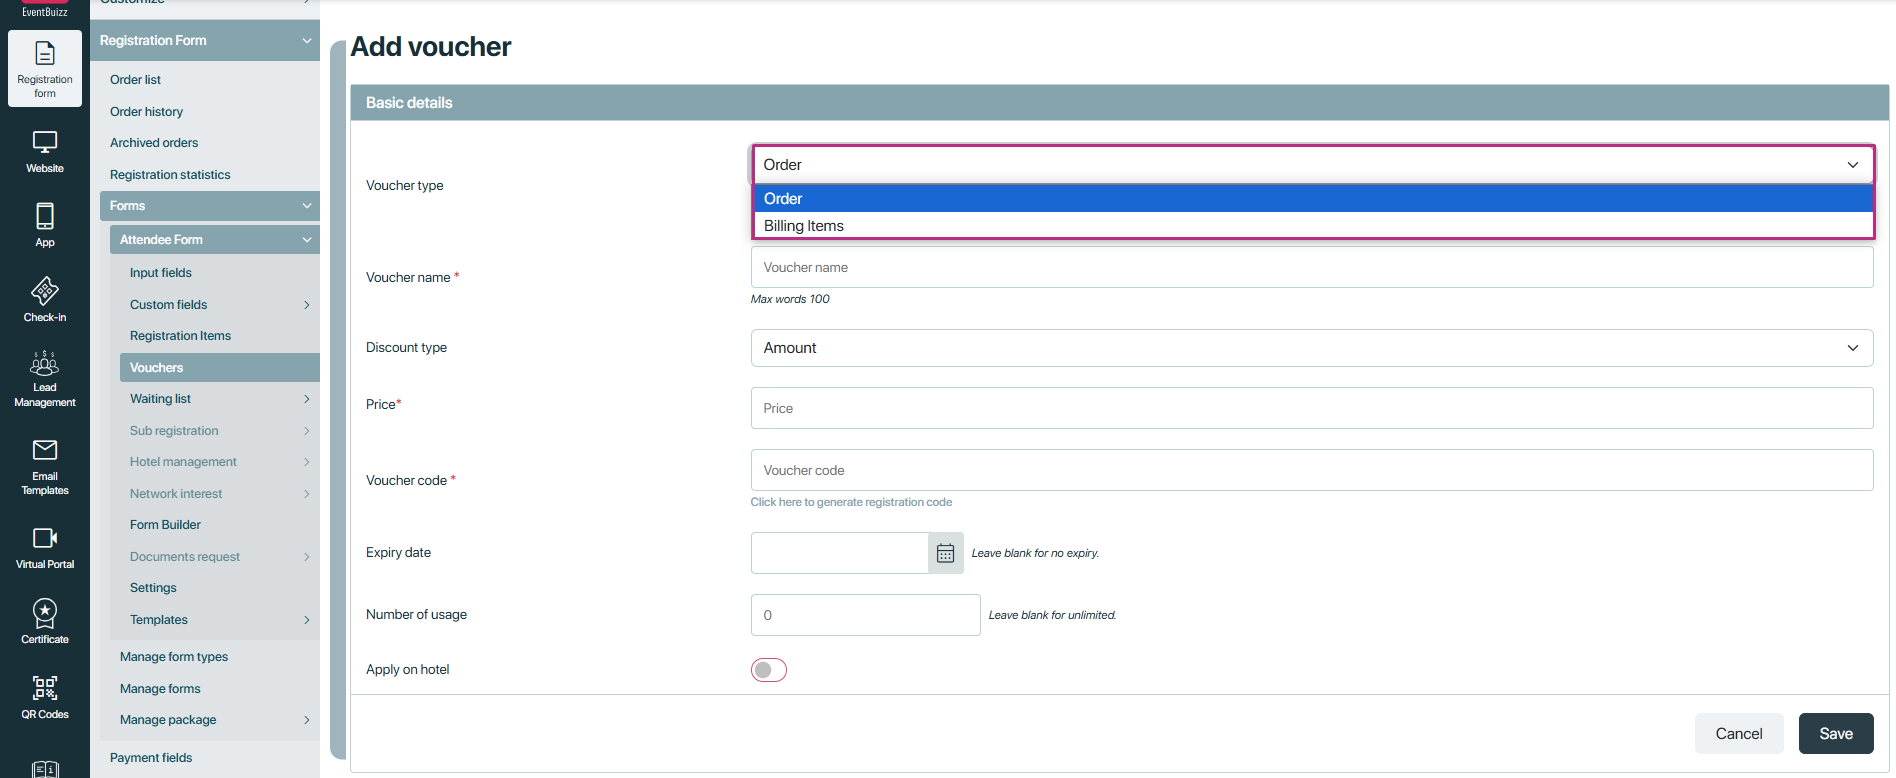
Required fields when creating a voucher
When you click Add to create a voucher, you’ll see a form with several important fields. Here’s what they mean and how to use them:
Voucher type
Choose the type of voucher you want:
- Order → Discount applies to the full order.
- Billing Item → Discount applies to specific items.
- (With differentiated VAT enabled) VAT Voucher → Discount applies to the VAT amount.
Discount type
Define how the discount will be calculated:
- Fixed Amount → e.g., $10 or €20 off.
- Percentage → e.g., 20% off the price.
Note: The actual discount value (for example, “10” for $10 or “20” for 20%) will be entered in the Price field that appears next to this.
Voucher code
Create a unique code (for example: EARLYBIRD20, VIPPASS, SUMMER25).
This is what attendees will type in during checkout to apply the discount.
Expiry date
Set the last valid date for the voucher.
- If you set a date, the voucher will stop working after that day.
- If you leave it blank, the voucher will never expire.
👉 Use expiry dates to create urgency (for example, “Register before June 30 to get 20% off!”).
Number of usage
Set how many times the voucher can be used:
- Example: If you enter 100, the code can be used a total of 100 times across all users.
- If you enter 0, the voucher will have unlimited uses and never run out.
👉 This is useful if you want to limit how many discounts are given away.
Apply on hotel
Decide if the voucher will also apply to hotel-related expenses:
- If ON, the discount will apply to registration fees, item prices, and hotel costs.
- If OFF, it will apply only to registration and item prices.
👉 This is useful if you want to offer discounts on hotel bookings as part of a package deal.
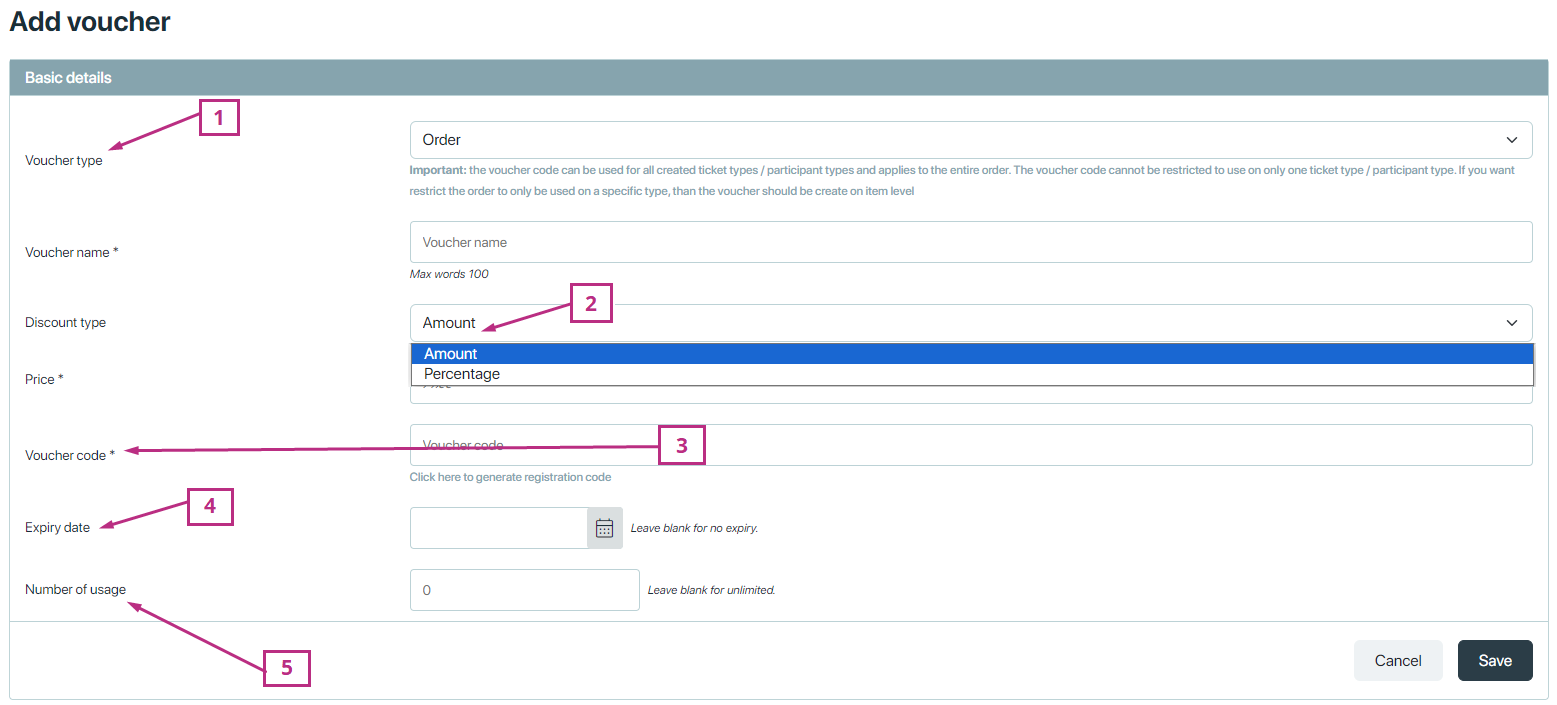
Once a voucher is created, organiser can edit/usage/delete the voucher
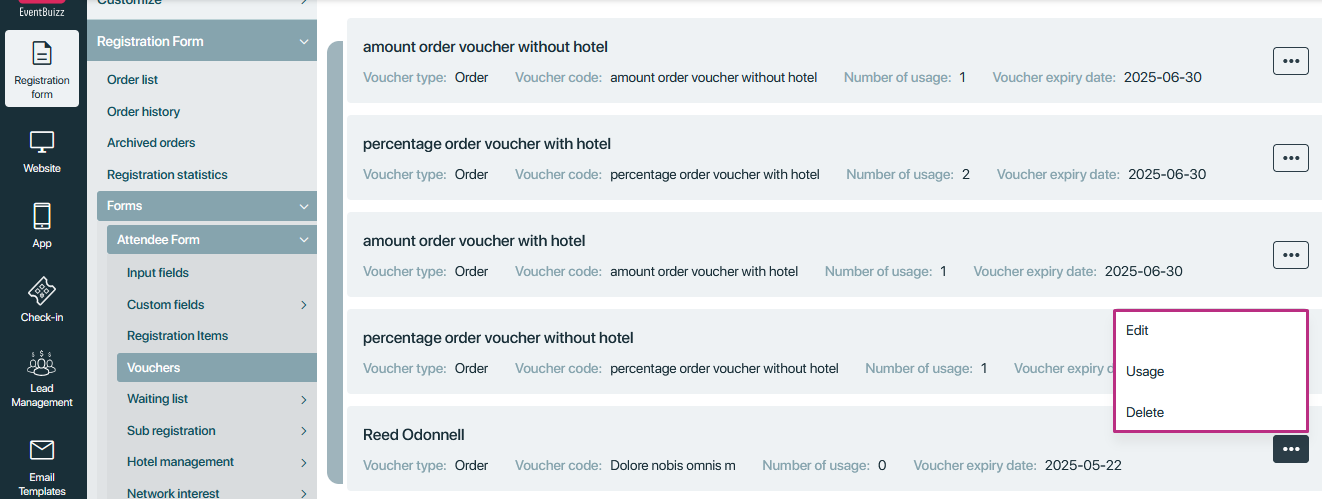
But if a voucher is used then it can not be delete or edit just only can view or see the usage detail. Like which user is used this voucher.
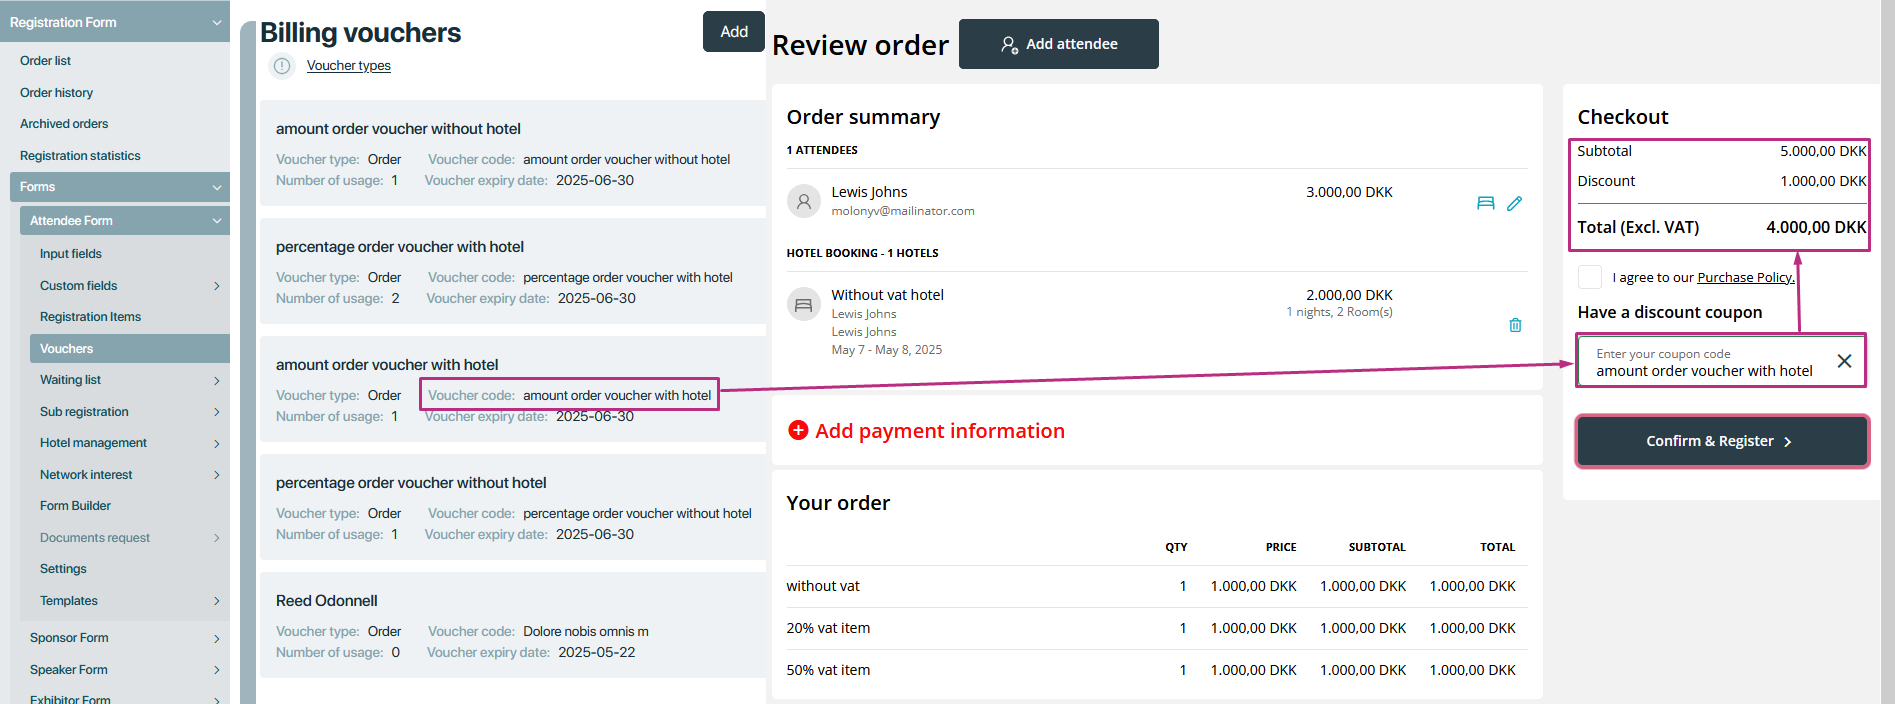
When voucher applied with hotel, discount will be applied on total amount of the order, right now in below mentioned attachment total bill is 5000 with 3000 registration items, and 2000 for hotel booking. And after applying discount voucher with hotel of 1000, now my total amount is 4000. Here can see.
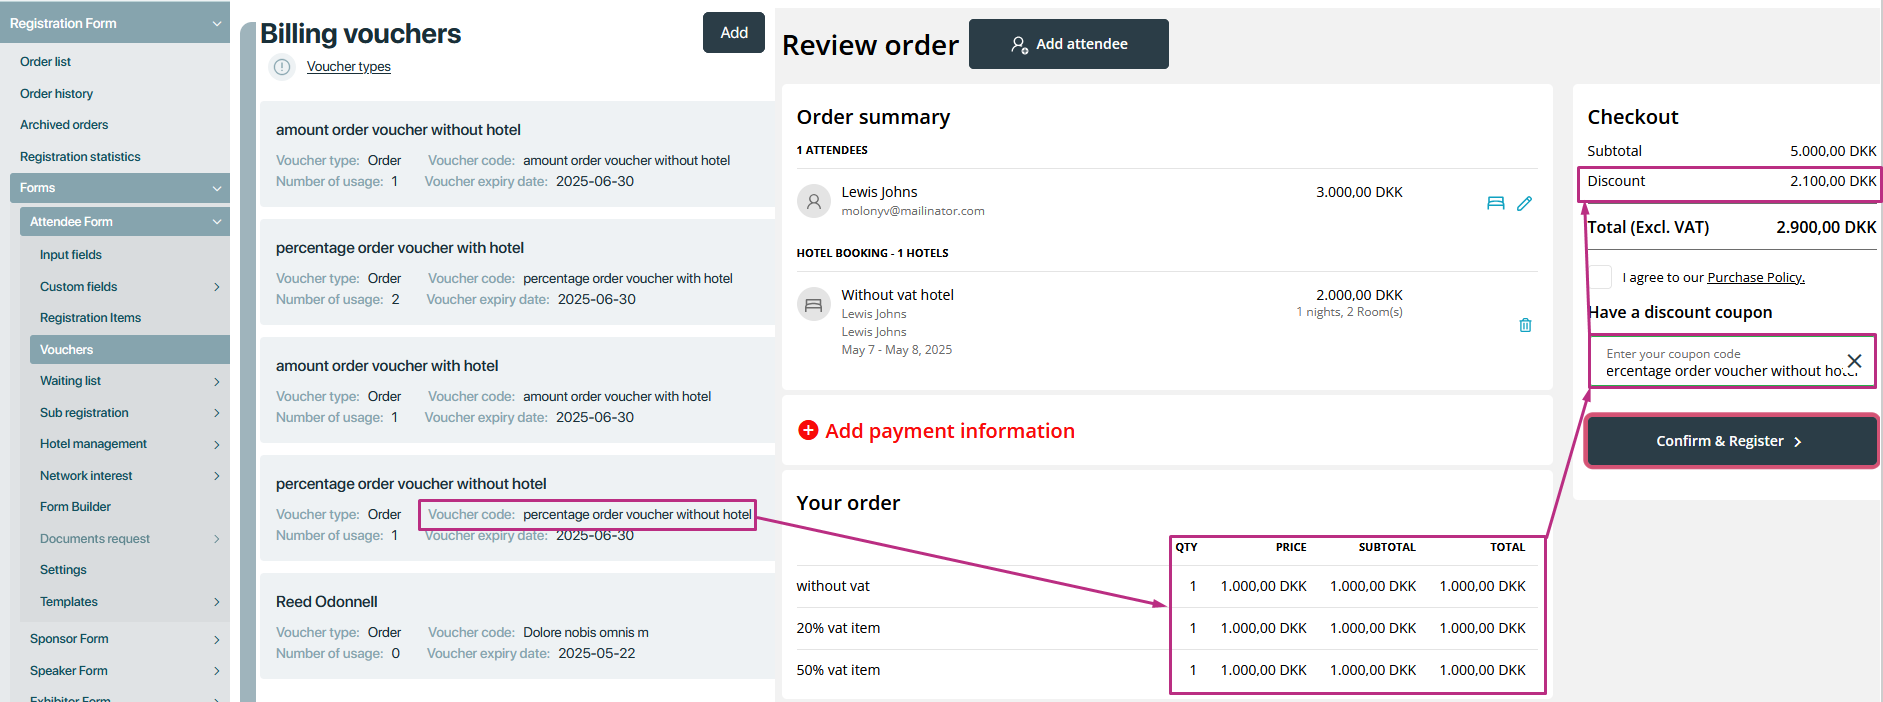
When voucher applied without hotel, discount will be applied on registration items only. Hotel amount will not be included in discounted price.
Example:
Lets take an example in a order where three items are selected and each item have the price of 1000, and total is 3000 for three items and for hotel is price 2000, not total bill is 5000, after applying the percentage voucher without hotel, it will be applied discount only on items, e.g voucher have the 70% off on items, then 3000-2100=900. And add the hotel price 2000, now total will be 2900.
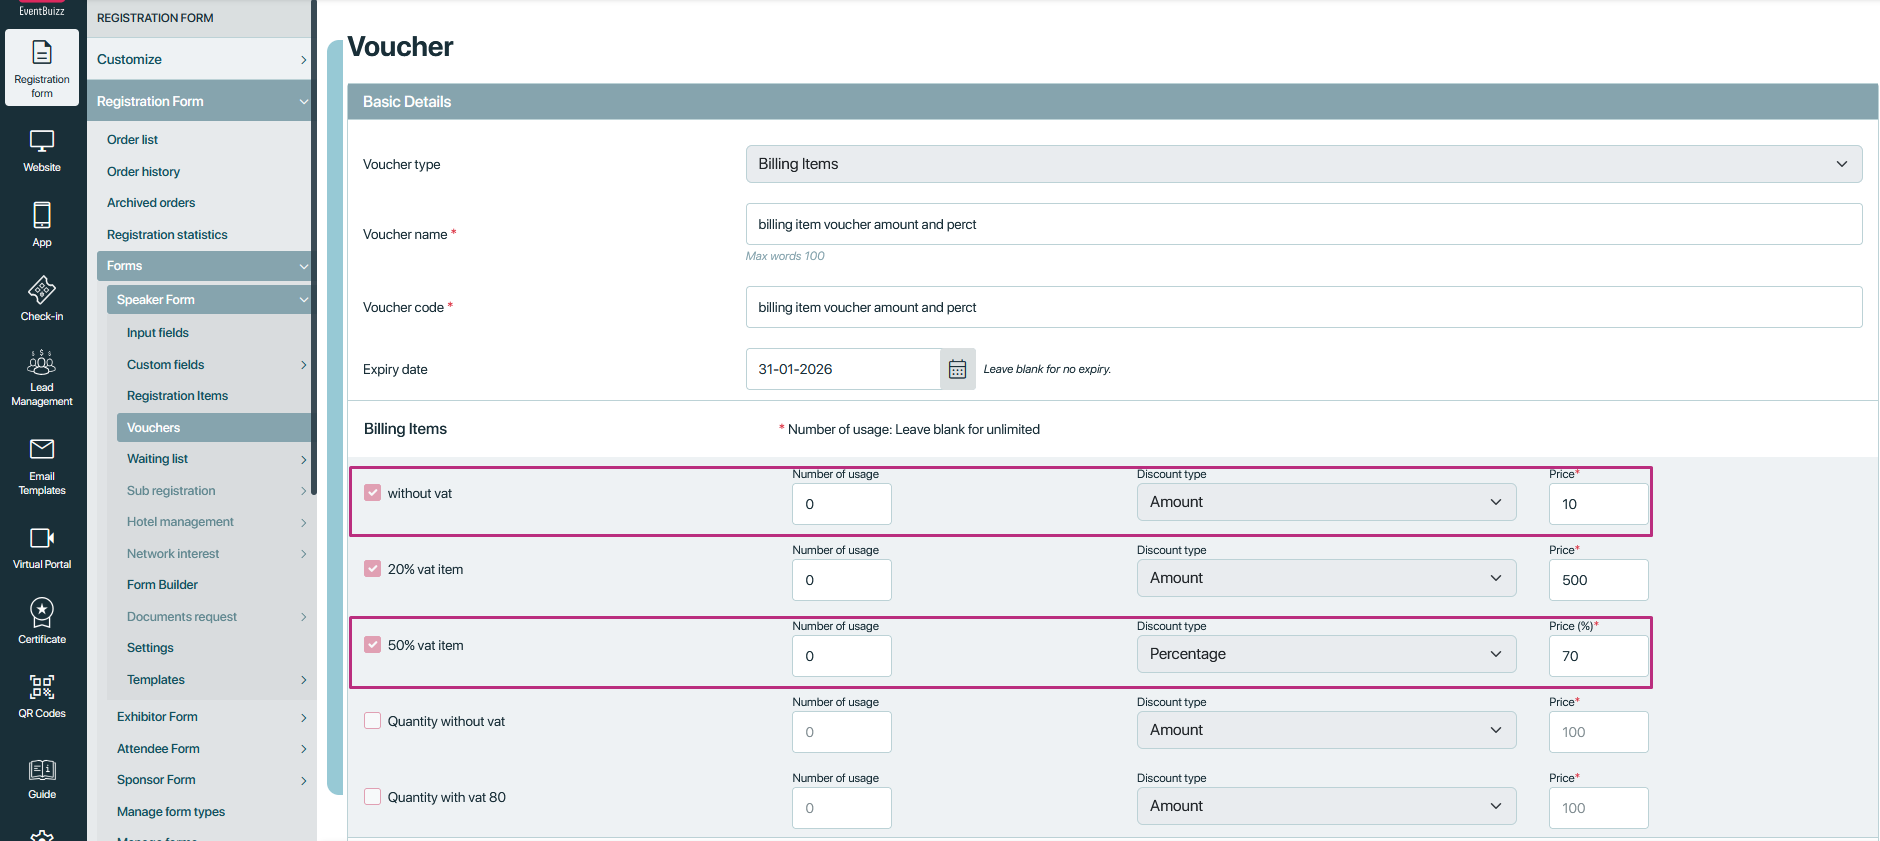
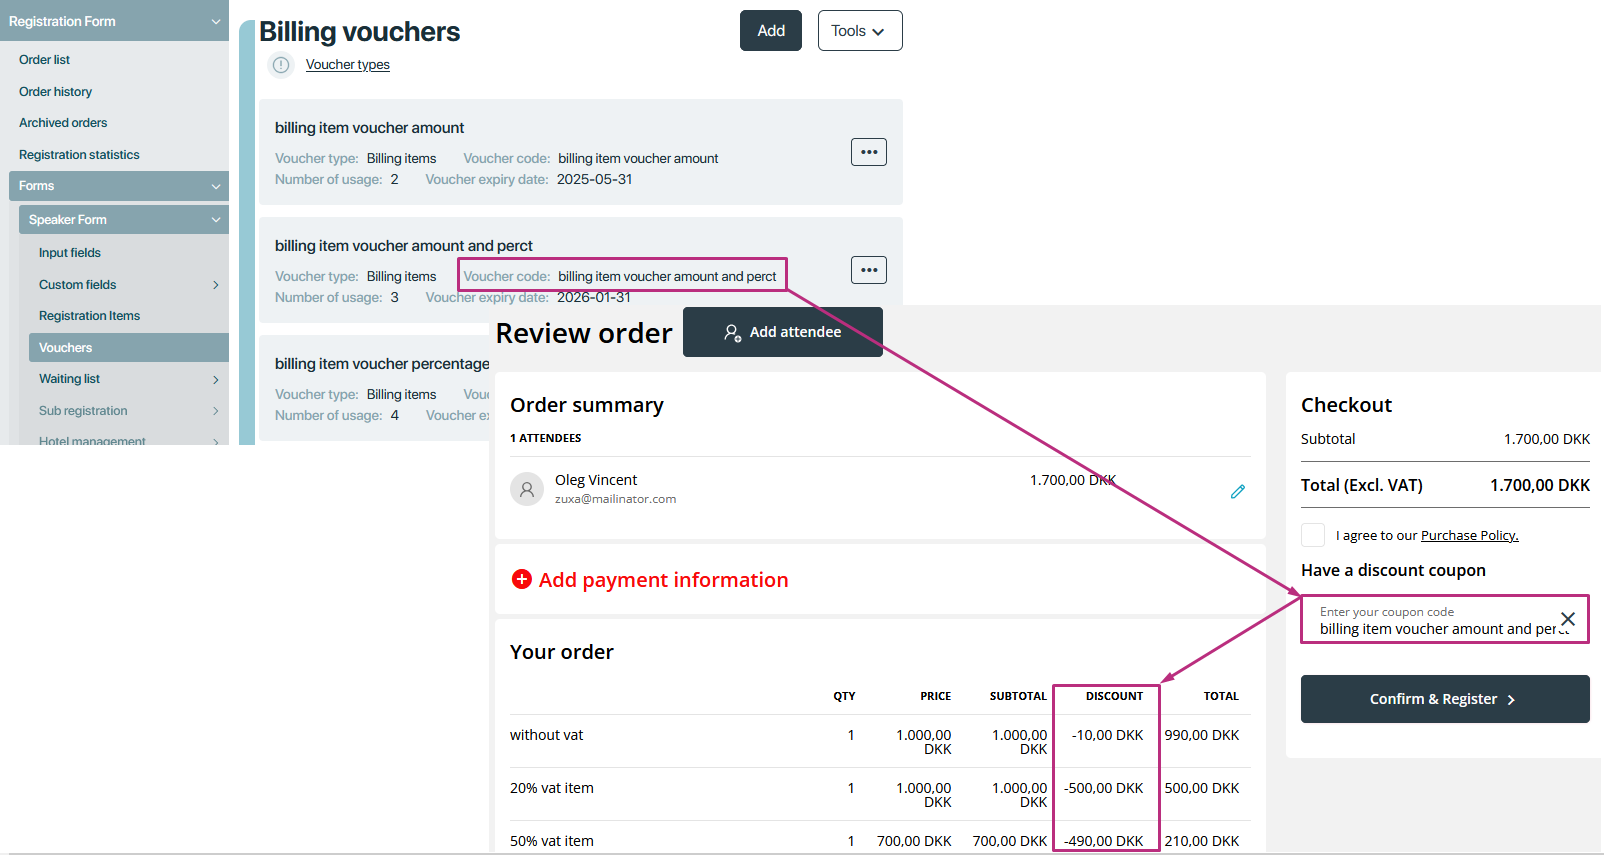
Billing item voucher
The Billing voucher is a flexible type of voucher that allows organizers to offer discounts on specific registration items — such as tickets, workshops, meals, merchandise, or any other item added in the registration form.
This is especially useful when you want to promote or incentivize certain items without discounting the entire order.
When can you create a billing voucher?
A Billing voucher can only be created if:
-
You have already set up registration items in the selected registration form.
Without registration items, you won’t be able to use the Billing Voucher option, because it needs those items to apply the discounts.

How to create a Billing Voucher
Follow these steps:
- Go to Eventcenter → Registration forms
- Select the form where you want to add the voucher
- Go to the Vouchers section
- Click the Add button
- Choose Voucher type → Billing item
- Fill in the top-level fields:
- Voucher name → The name you give the voucher for internal reference.
-
- Voucher code → The code attendees will enter at checkout.
- Expiry date → The last date the voucher is valid.
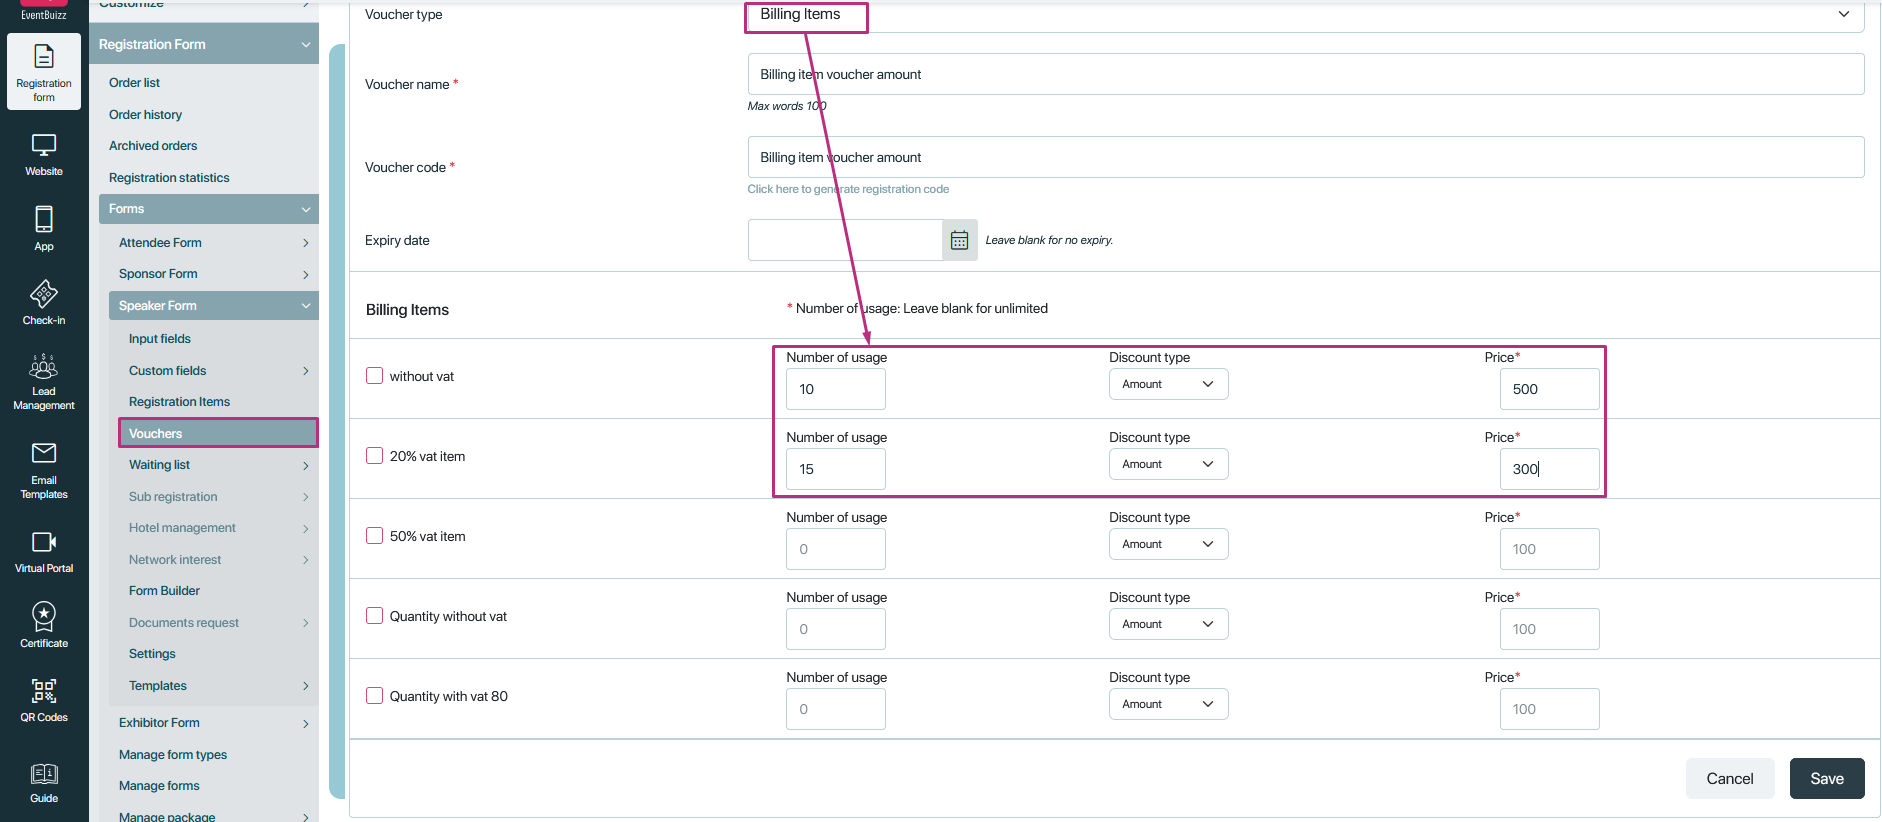
Setting discounts for each registration item
Once you select Billing item as the voucher type, the system will automatically show all registration items you have created for that form.
For each item, you will see the following fields to configure:
-
Number of usage →
Set how many times this voucher can be used for that specific item.
Example: You might allow 50 uses for a VIP ticket but unlimited uses for a workshop. -
Discount type →
Choose if the discount is:- Fixed → e.g., $10 off
- Percentage → e.g., 15% off
- Price →
Enter the discount value (either the fixed amount or the percentage, depending on what you chose).
Flexible discount setup
The Billing Voucher gives organizers full control over how discounts are applied:
- You can mix fixed and percentage discounts across different items.
- You can apply discounts only to selected items — it’s not mandatory to offer a discount on every item.
- Example setups:
-
- Fixed discount on early bird tickets
- Percentage discount on workshops
- No discount at all on dinners or merchandise
In short: You decide where and how the discounts are applied.
Important to know: Hotel costs are excluded
When attendees apply a Billing Voucher during checkout:
- The discount only applies to the selected registration items you configured in the voucher.
- Hotel amounts are not affected — the voucher will not reduce hotel or accommodation prices, even if the “Apply on Hotel” toggle exists in other voucher types.
Vat voucher
The VAT Voucher is a powerful tool that allows organizers to remove VAT (Value-Added Tax) from an attendee’s order.
When a VAT voucher is applied, any VAT included in the order — whether it’s on items, hotels, or at the order level — will be reduced to zero. The customer will only pay the actual base amount without any VAT.
This can be useful for special promotions, tax-exempt customers, or business clients who should not be charged VAT.
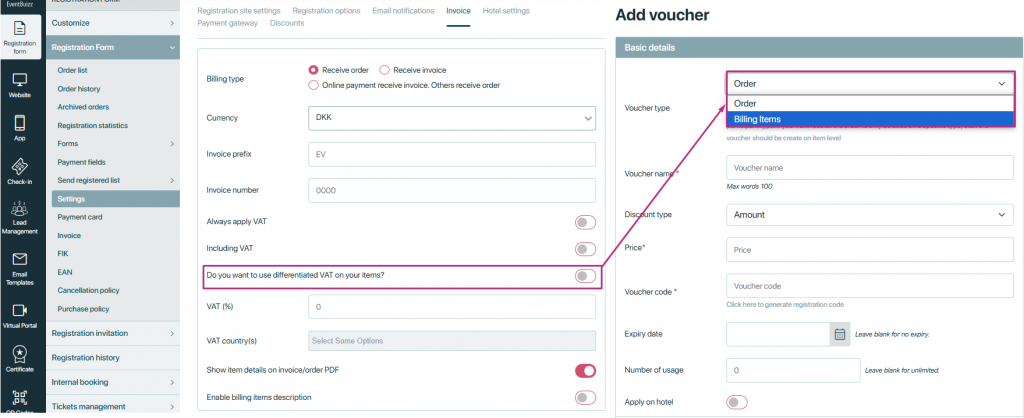
Important: How to enable VAT vouchers
By default, VAT handling in the system is simple — but to allow VAT-specific vouchers, you need to turn on a special setting:
-
Go to Registration Forms → Forms → Settings → Invoice.
-
Find the setting:
“Do you want to use differentiated VAT on your items?” -
Turn this setting ON.
By default “Do you want to use differentiated VAT on your items?” setting will be disabled, and user can create the “order and billing voucher”
Once enabled:
- You can create Billing item Vouchers (item-specific discounts)
- You can create VAT vouchers (to remove VAT)
- Order vouchers will no longer be available, because discounts need to be applied more precisely — either on items or VAT, not on the total order.
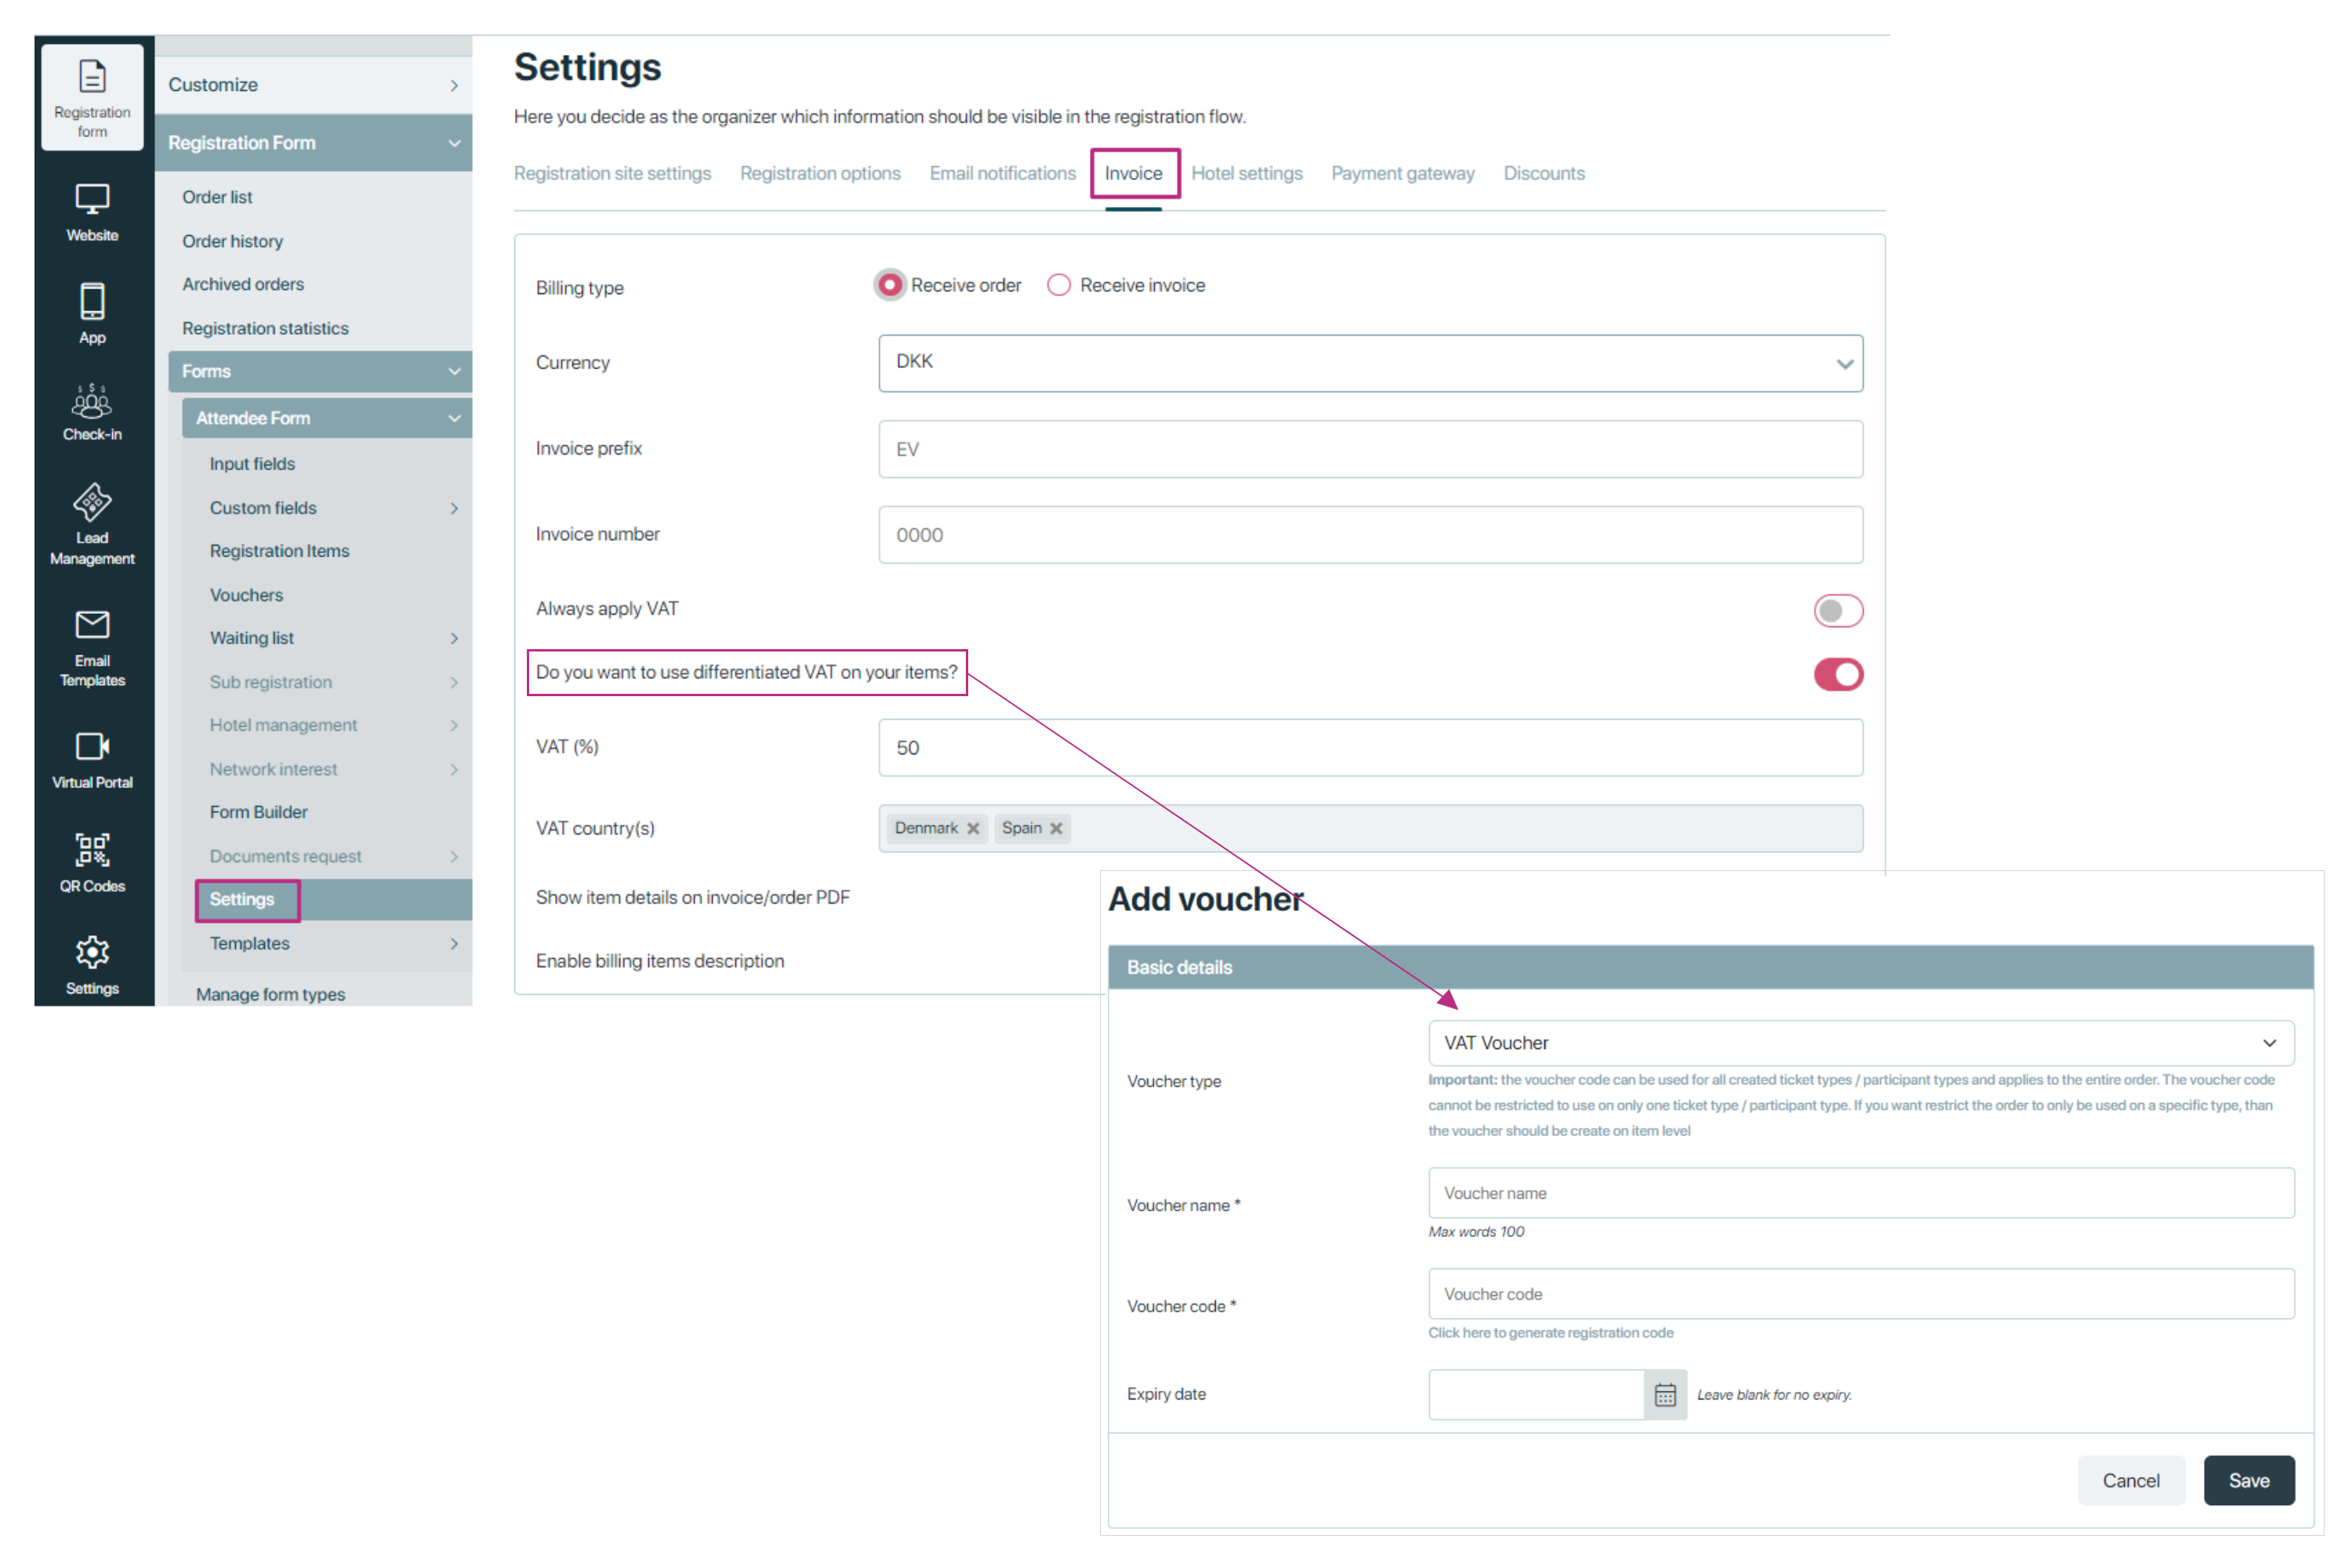
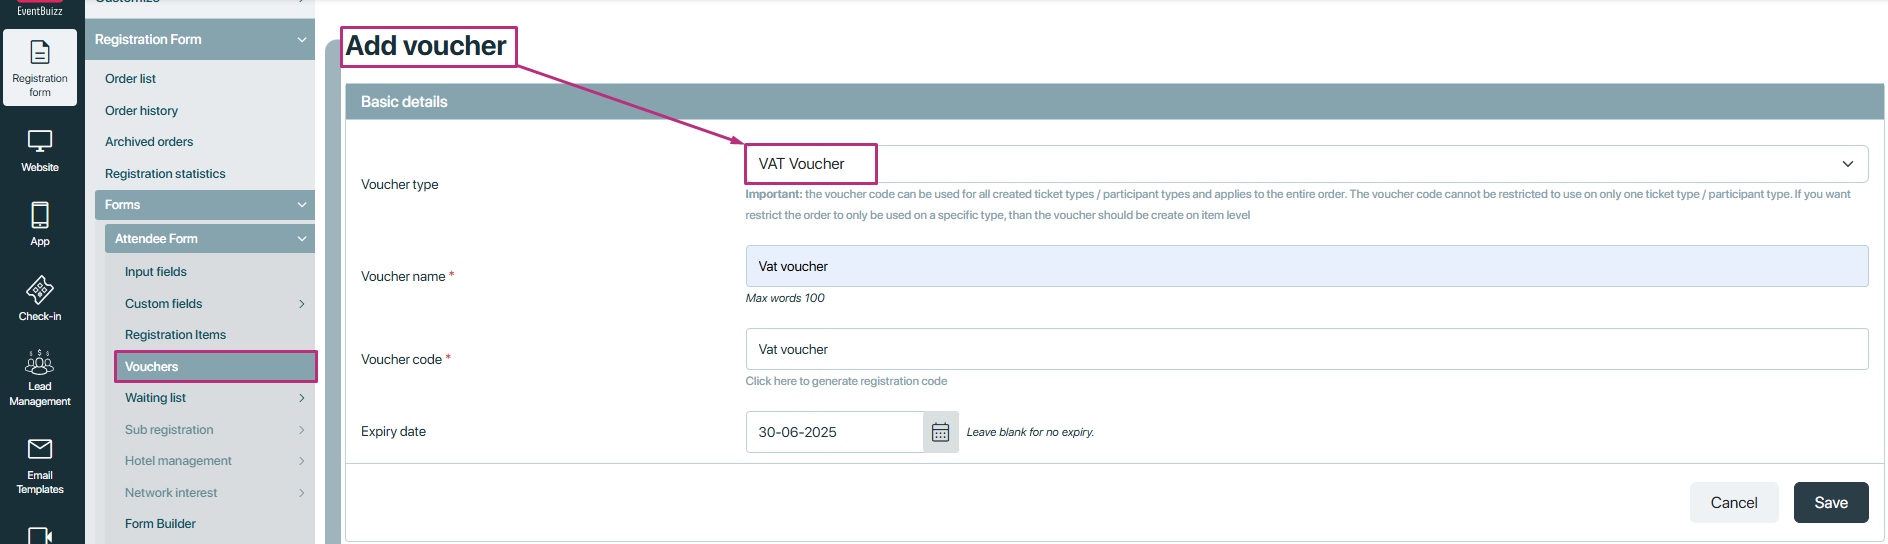
How to create a VAT Voucher
Follow these steps:
- Go to Eventcenter → Registration forms.
- Select the form you want to work on.
- Go to the Vouchers section.
- Click the Add button.
- Select Voucher type → VAT voucher.
- Fill in the following details:
-
- Voucher name → Internal name for your reference.
- Voucher code → The code attendees will enter during checkout.
- Expiry date → Last date the voucher is valid.
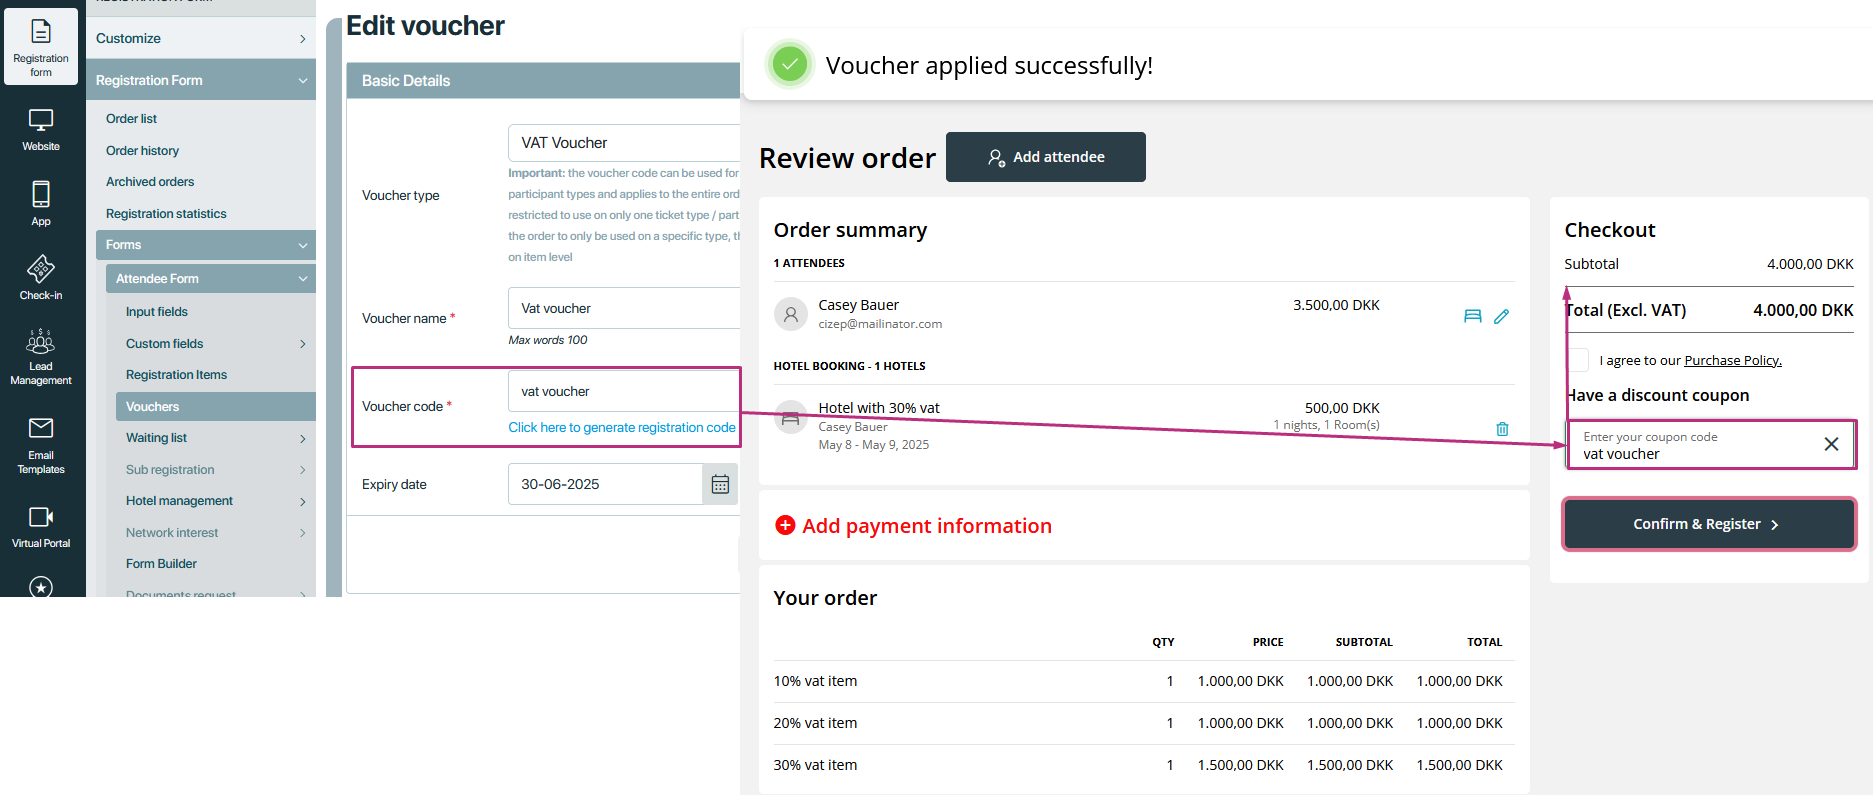
What happens when users apply the VAT Voucher?
- Attendees enter the voucher code in the coupon code field during registration or checkout.
- The system removes all VAT charges from the order:
- VAT on items → removed
- VAT on hotel expenses → removed
- VAT at the order level → removed
- The attendee pays only the base (net) prices without any VAT.
Before applying the VAT voucher check vat is applied on all items and hotels, because organiser already set the vat percentage against the items and hotels.

After applying the VAT Vouchers code, check all the VAT is removed.
Import Vouchers:
If you have many vouchers at your event, then you can create a csv UTF8 file, and import many in one single upload.
Go to tools -> import -> download import file template and start to build up your file.

When filled in, it could look like this example:
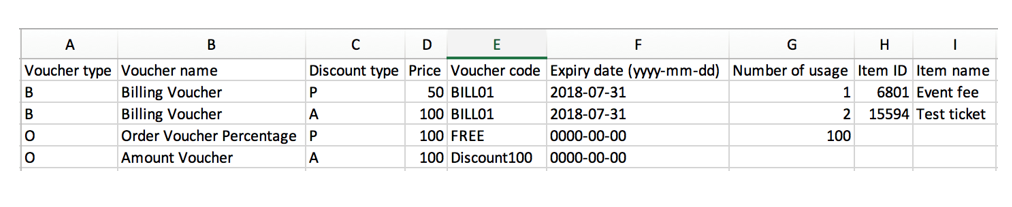
- Voucher type – this indicate if the voucher you are creating is on billing item, order or VAT Voucher. ”B” = billing item. “O” = Order. “V” = VAT voucher.
- Voucher name – name of the Voucher, so you as an organizer can identify it in the Event Center.
- Discount type – This indicate if the discount should be a percentage or an amount. “P” = percentage. “A” = amount.
- Voucher code – Voucher code that must be used by the attendee, when they register, to activate the discount.
- Expiry date – If the voucher has an expiry date, then this date must be entered. If left blank/0000-00-00, the voucher will not expire.
- Number of usage – Enter how many times the voucher code can be used. Empty is equal to unlimited.
- Item name – name of the billing item (not mandatory)
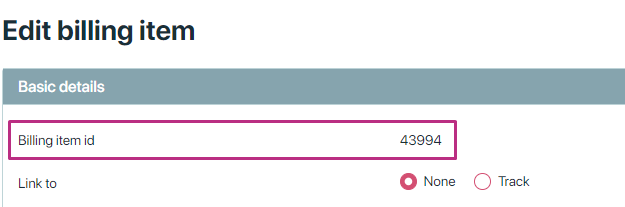
- Item ID – Only used for Voucher type “B” and is referring to the billing item id. The billing ID, you find here: Billing items -> click edit on the relevant billing item.