In the eventbuizz management system, a program is essentially an event within an event. It allows event organisers to create and manage multiple, distinct activities or sessions that occur as part of a larger event. Each program can encompass its own set of details, such as schedule, speakers, topics, and attendees. This feature is particularly useful for complex events that have various tracks, workshops, or seminars running concurrently.
Purpose of programs in eventbuizz
Enhanced organisation: Programs allow event organisers to structure their events more effectively. By segmenting the main event into smaller programs, organisers can provide attendees with clear options and make it easier to navigate the overall event.
Customizable experience: Each program can cater to different interests or skill levels, enabling attendees to choose sessions that align with their preferences. This customisation enhances attendee satisfaction and engagement.
Efficient management: Organiser can manage each program independently, allowing for tailored logistics, scheduling, and resource allocation. This flexibility is crucial for handling events with multiple activities happening simultaneously.
Attendee engagement: By enabling the setting “Enable attach attendee on program sessions detail page,” organisers can link specific attendees to programs, facilitating better communication and engagement. This feature allows for targeted information sharing and follow-ups, ensuring attendees are kept informed about the sessions they are interested in.
Data collection and analysis: Programs help in gathering data on attendee preferences and engagement levels. This information can be invaluable for future event planning, enabling organisers to refine their offerings based on participant feedback and attendance patterns.
Networking opportunities: Each program can create unique networking opportunities, allowing attendees to connect with others who share similar interests. This fosters community-building and enhances the overall event experience.
Program module have two main parts, program can be divided into two main parts. Detail is given below about each available part:
Eventcenter program module(for admin site)
Eventcenter program module
Organiser program management
This part of the program module is designed for event organisers and focuses on managing all aspects related to the event. Key features include:
-
Program creation and management: Organisers can create program, set dates, define venues, and manage schedules. This includes adding sessions, speakers, and other relevant details.
-
Workshops handling: Organiser can create, work shops and can handle them, through the available options
-
Tracks management: Facilitates organiser to reach at the event or program location.
-
Settings: Provides wast range of the settings to handle and manage the program, from the organiser site.
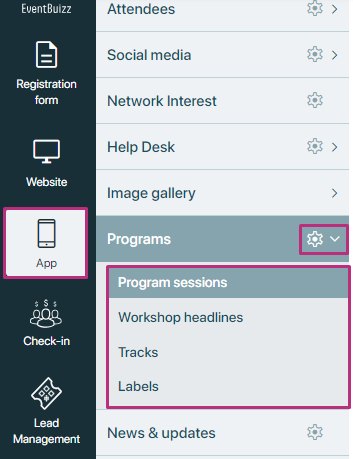
Accessing the program module in eventcenter
Organiser can access the program module by following this path:
- Eventcenter->app->program
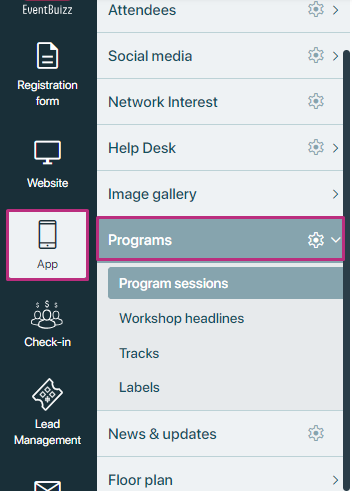
In eventcenter side, program module consist of the four main sub sections, detail is given below about each available section.
Program sessions
Program sessions
Program sessions refer to the individual segments or activities that make up an event, such as conferences, workshops, seminars, or festivals. Each session is designed to deliver specific content, facilitate discussions, or provide learning opportunities for attendees. The management of these sessions is critical for ensuring a well-organised event that meets the needs of both participants and speakers.
Certainly! The program sessions module on the admin side is a crucial component for managing events effectively. Here’s a detailed breakdown of its features and functionalities:
Detail of each available feature or option is given below:
Add a program
Add a program
Add a Program
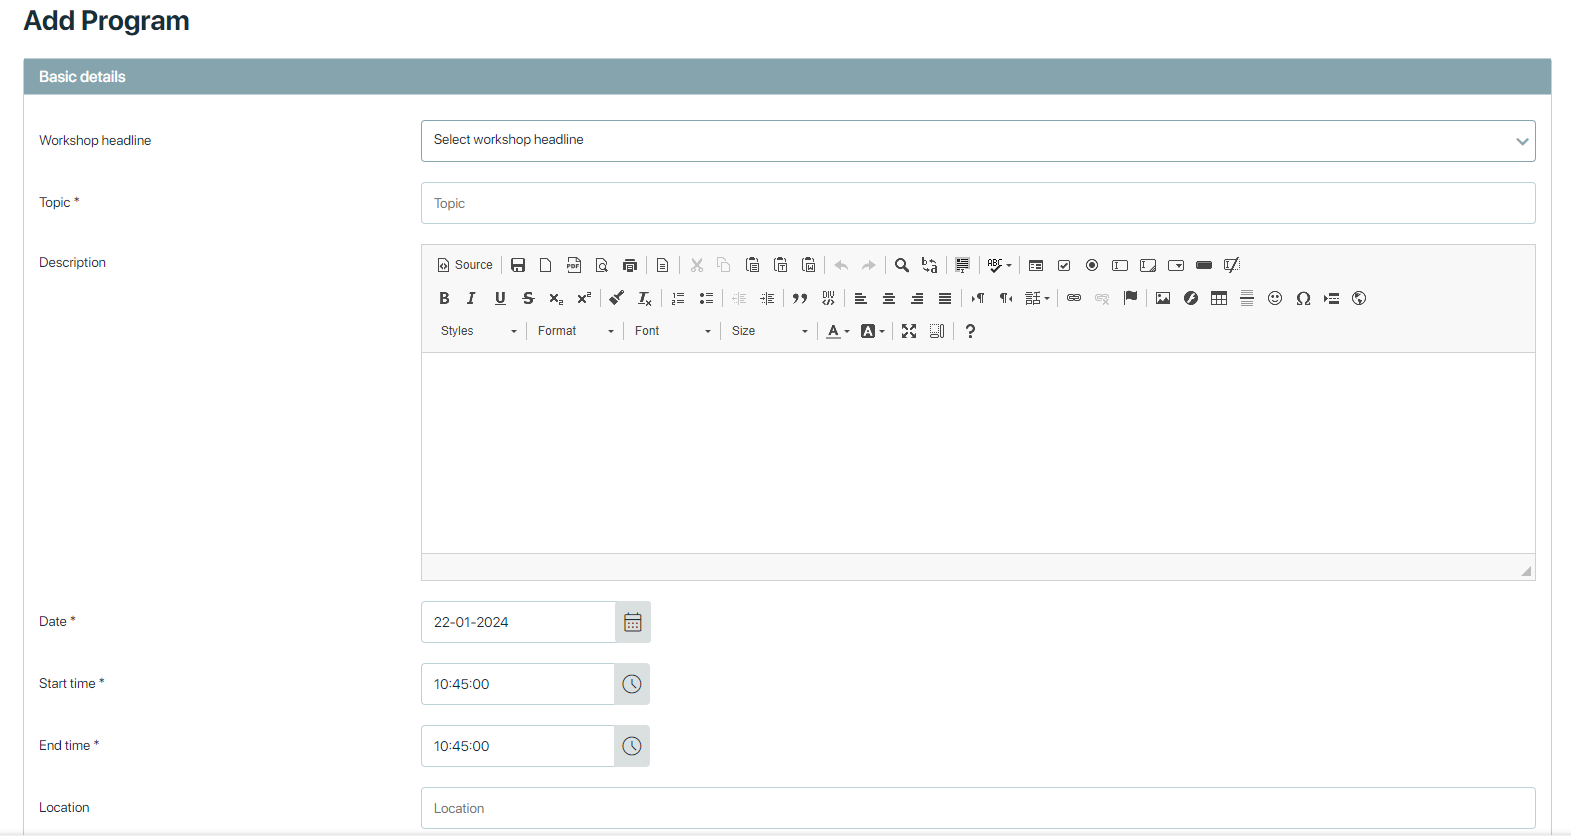
1- Access the session details page: Begin by selecting your event. From the left-hand navigation, click Programs, then Program sessions. Click Add program.
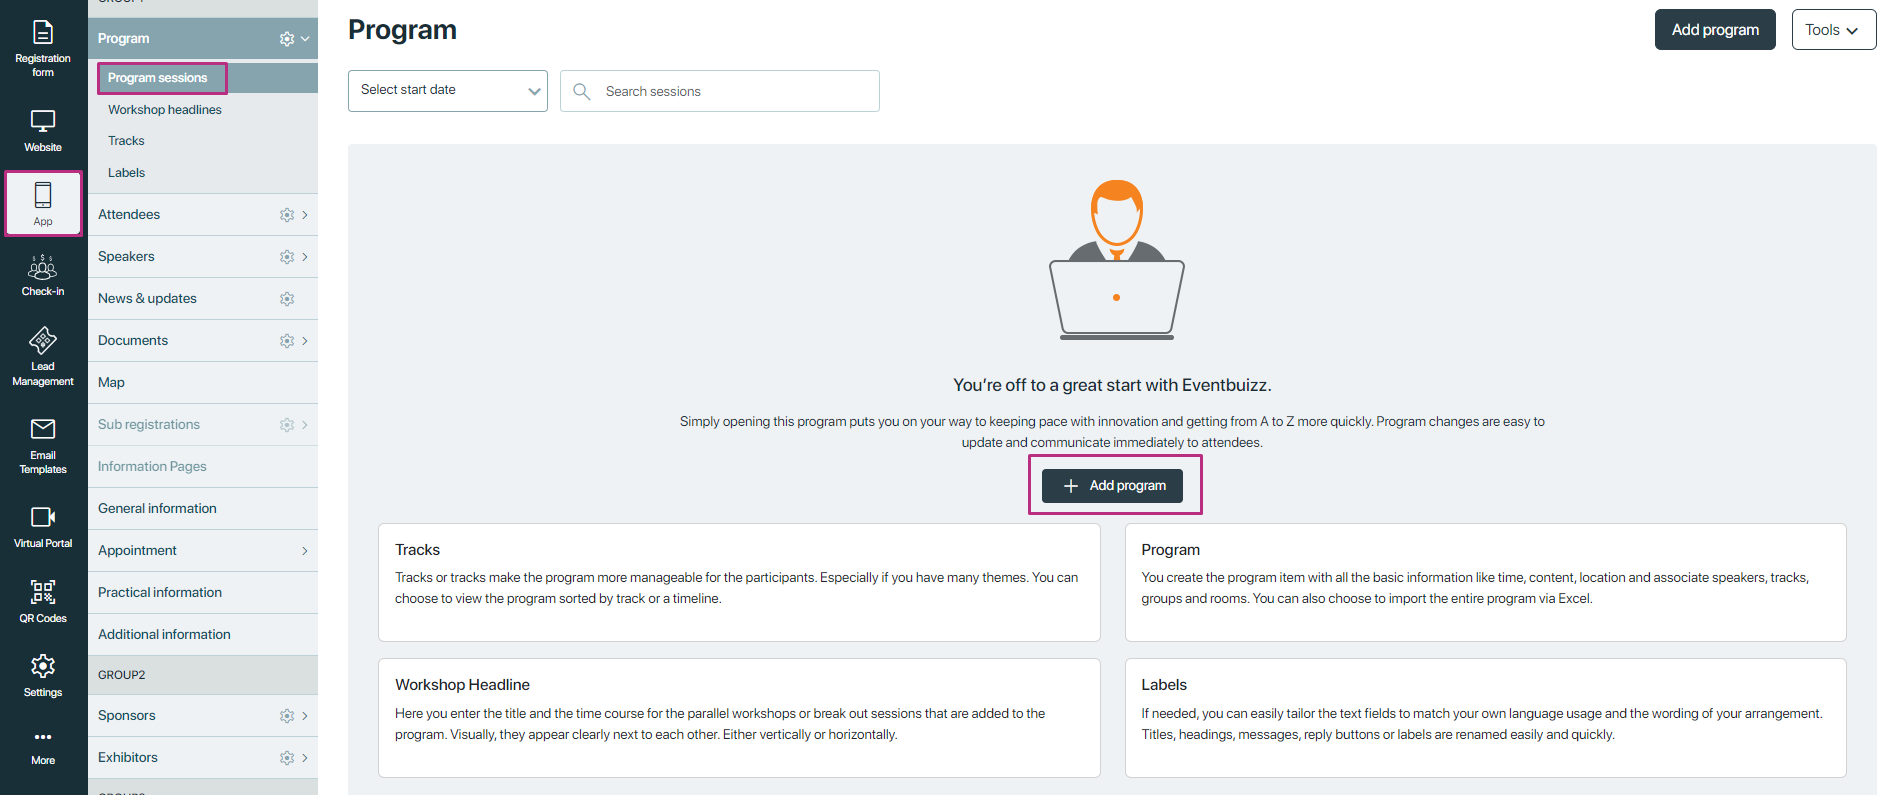
2- Enter the session details: Name your topic. Decide on the date, start time and end time. Add the location of a program. Click Save after entering name, date and time.
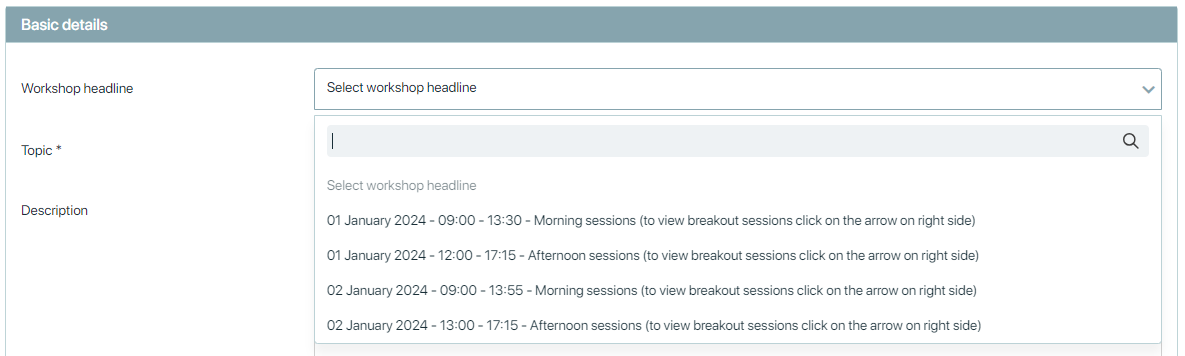
3- Select workshop heading. Here you can select workshop, a list of workshops will appear select any workshop from the list. Or add a new workshop by clicking on the Program > Workshop Headings.
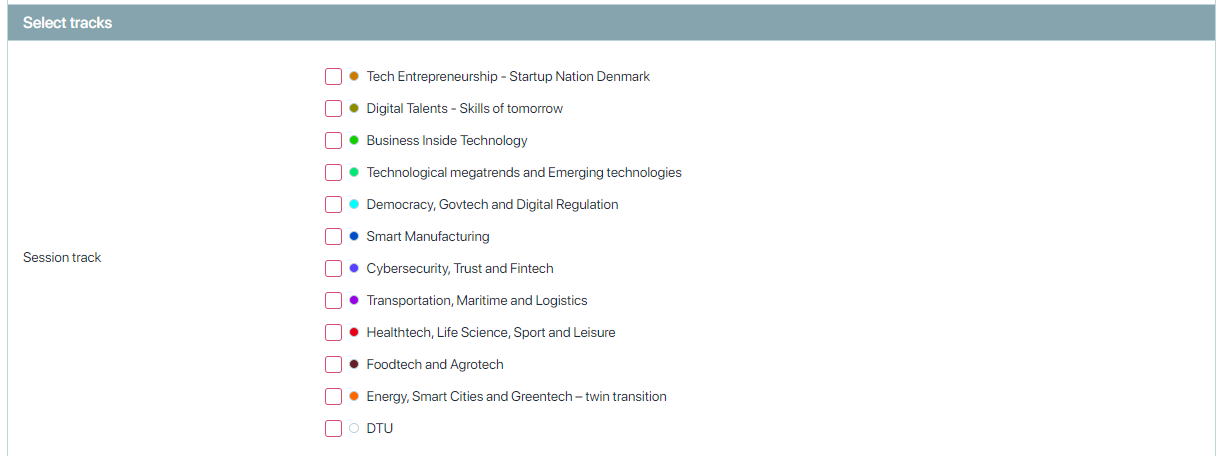
4- Select Tracks, if necessary: Tracks or tracks make the program more manageable for the participants. Especially if you have many themes. You can choose to view the program sorted by track or a timeline. Or add a new Track by clicking Programs > Tracks
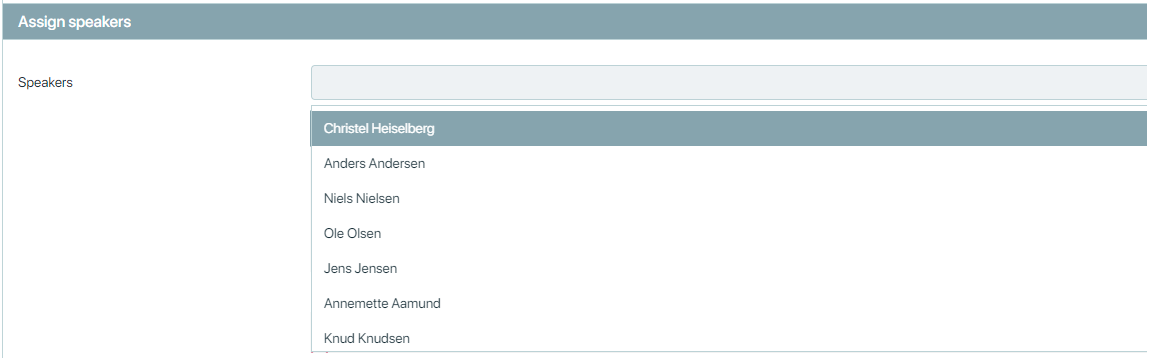
5- Assign a speaker, if necessary: Let your attendees know who’s presenting by clicking Assign Speaker. A list will appear. Click next to the speaker’s name or add a new speaker by clicking Speakers > Speaker List entering required information and clicking Save.
6- Assign Groups, if necessary: If you need to make a table plan for the evening’s dinner, a division of attendees by department or similar, then you can create groups in the event centre. Click Groups to create Groups.

7- Permissions:
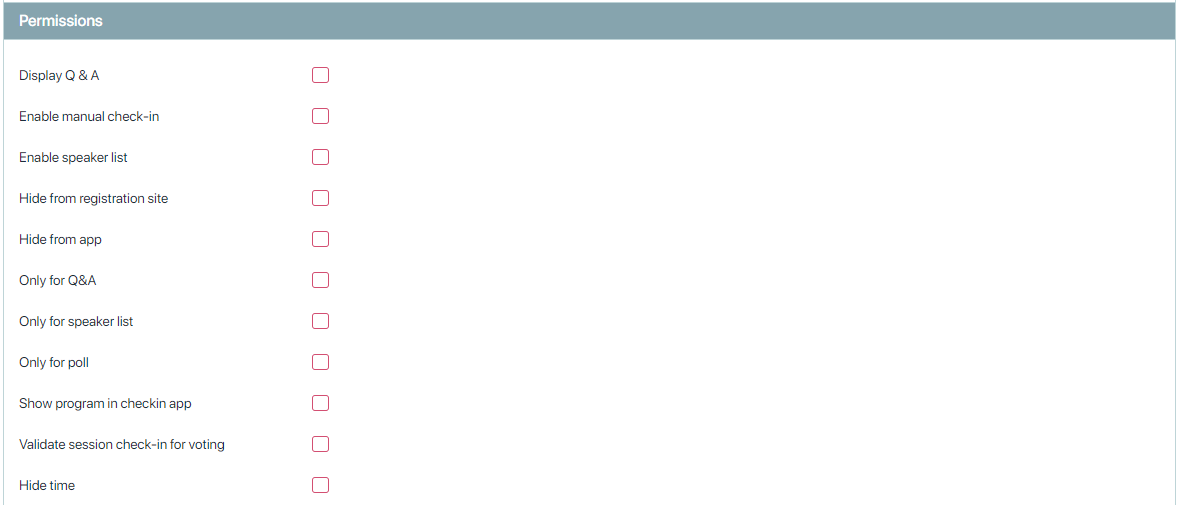
Display Q & A
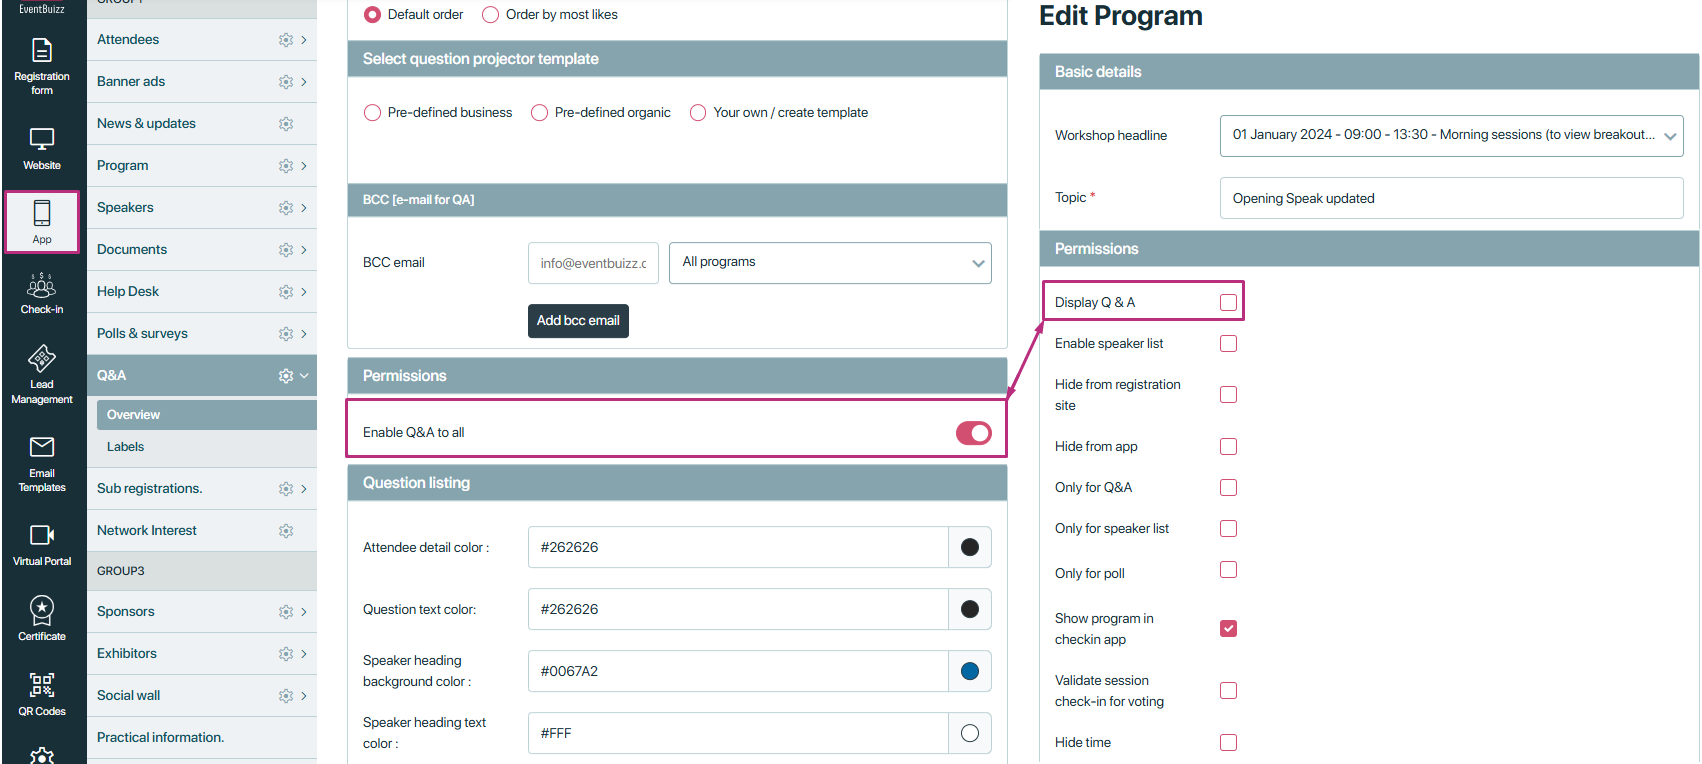
The “Display Q&A” setting controls the visibility of the Q&A section within individual program details. This setting allows users to enable or disable the Q&A module for specific programs. Here is a detailed explanation of how this setting interacts with the “Enable Q&A to all” setting in the Q&A module.
Definitions:
- Display Q&A: A setting available for each individual program. When enabled, it allows the Q&A section to be displayed in the program details.
- Enable Q&A to all: A global setting within the Q&A module that determines whether the Q&A section is displayed for all programs universally.
Behavior:
- Enable Q&A to all – ON:
- When this global setting is enabled, the Q&A section will be displayed in all program details regardless of the individual “Display Q&A” setting.
- Impact: The individual “Display Q&A” setting is overridden, and the Q&A section is shown for every program.
- Enable Q&A to all – OFF:
- When this global setting is disabled, the Q&A section’s visibility for each program depends on the individual “Display Q&A” setting.
- Impact: The Q&A section will only be displayed for programs where the “Display Q&A” setting is enabled. For programs where this setting is disabled, the Q&A section will not be shown.
Detailed example scenarios:
Global setting on:
-
- If “Enable Q&A to all” is turned on, the Q&A section will appear in every program’s detail page.
- Example:
- Program A: Display Q&A is OFF.
- Program B: Display Q&A is ON.
- Outcome: Both program A and program B will display the Q&A section because the global setting is ON.
Here below can see “Enable Q&A to all” setting is on and individual “display Q &A” permission is off, but will display the Q&A section because the global setting is ON.
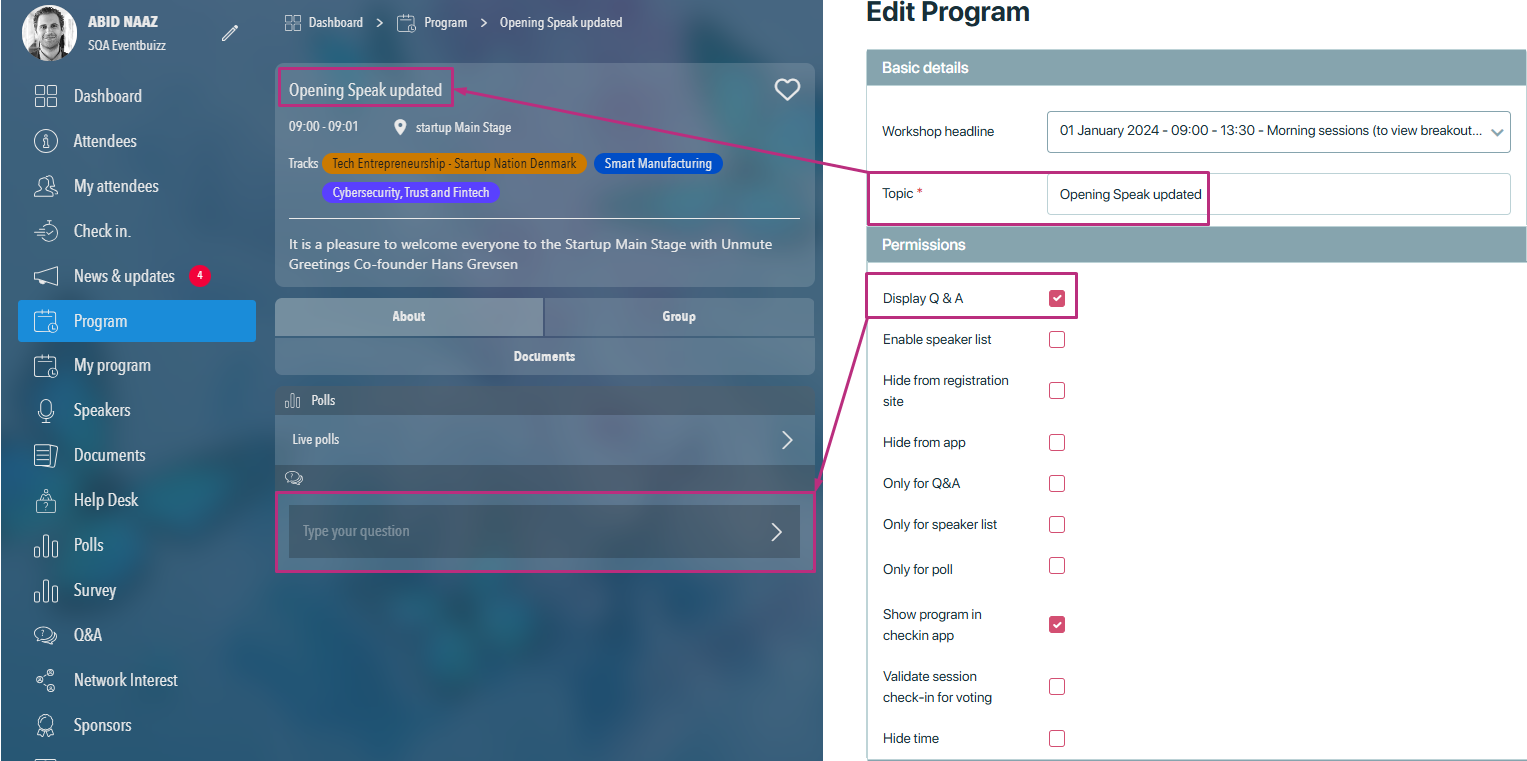
Here also can see the Q & A section in program detail, because global setting is on.

Global setting off:
-
- If “Enable Q&A to all” is turned off, the Q&A section will only appear based on the individual program’s “Display Q&A” setting.
- Example:
- Program A: Display Q&A is OFF.
- Program B: Display Q&A is ON.
- Outcome: Only Program B will display the Q&A section because the global setting is OFF, and Program B’s individual setting is ON.
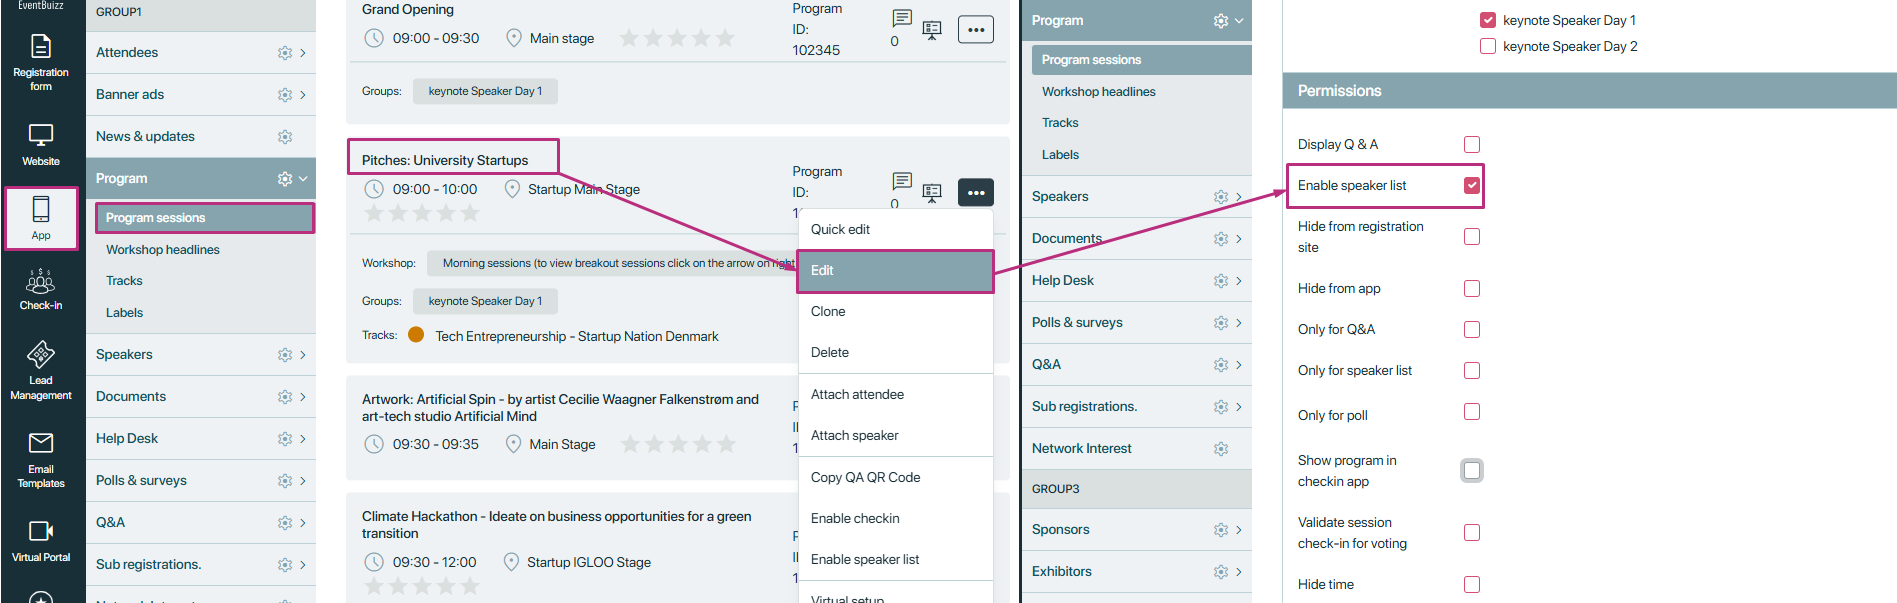
Enable speaker list
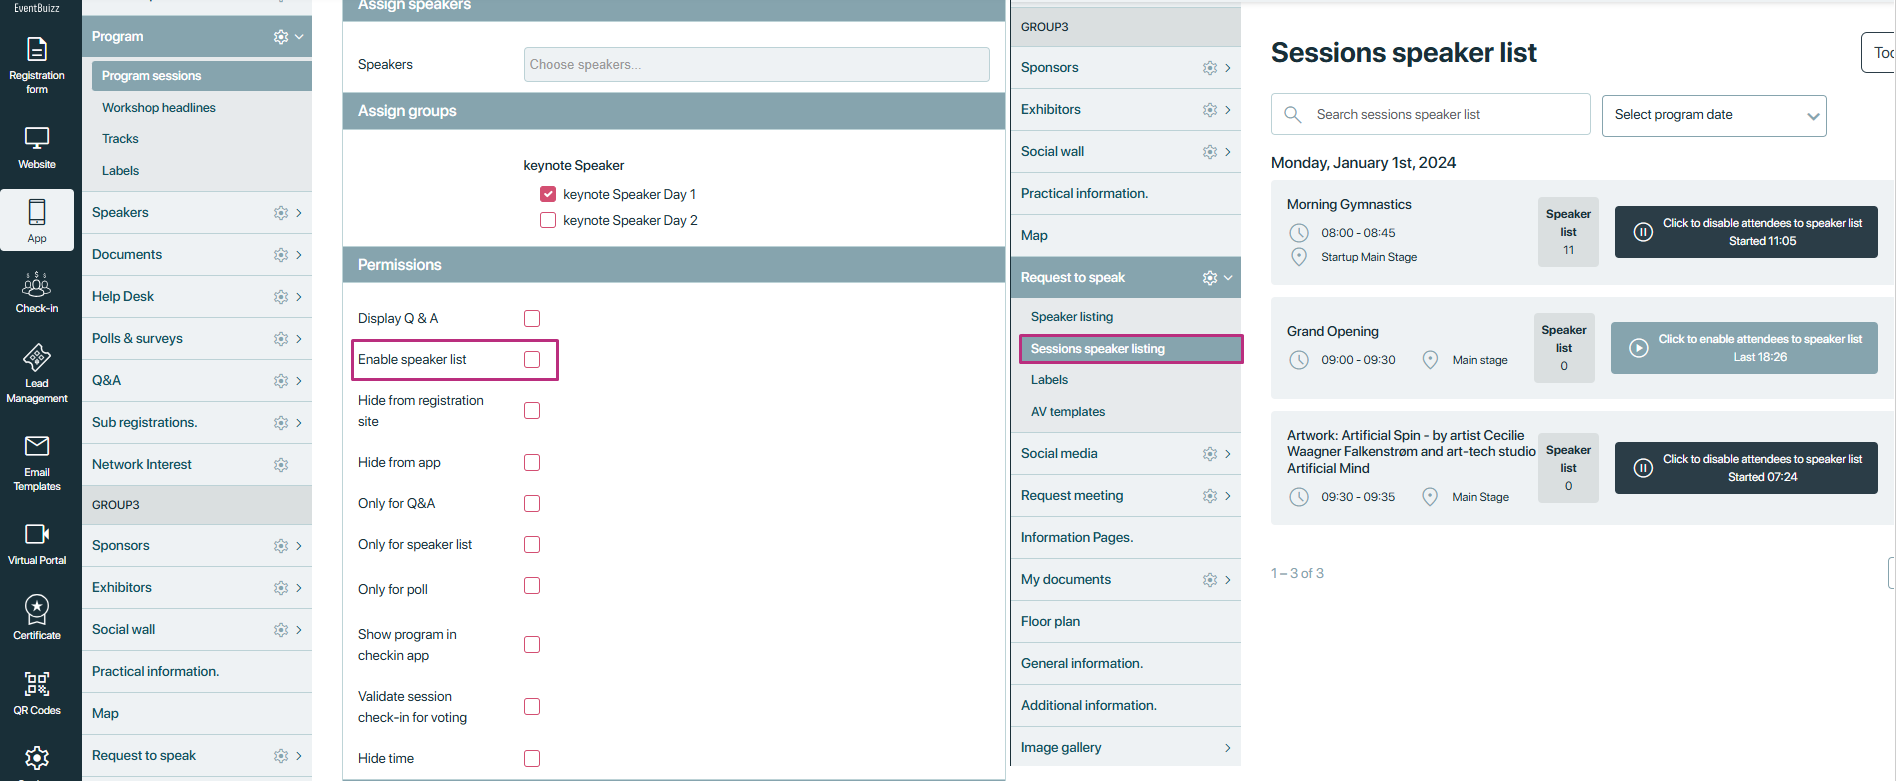
The “Enable speaker list” permission allows the program to utilise the request to speak module. This setting enables a structured process for organising and managing speaking requests within a program. Below is a detailed explanation of how this permission works and the steps involved.
How the permission works:
Enabling the permission:
- The first step involves the organiser enabling the “Enable speaker list” permission for a specific program.
- Steps:
-
- Go to the program permissions .
- Enable the “Enable speaker list” permission for the desired program.
-
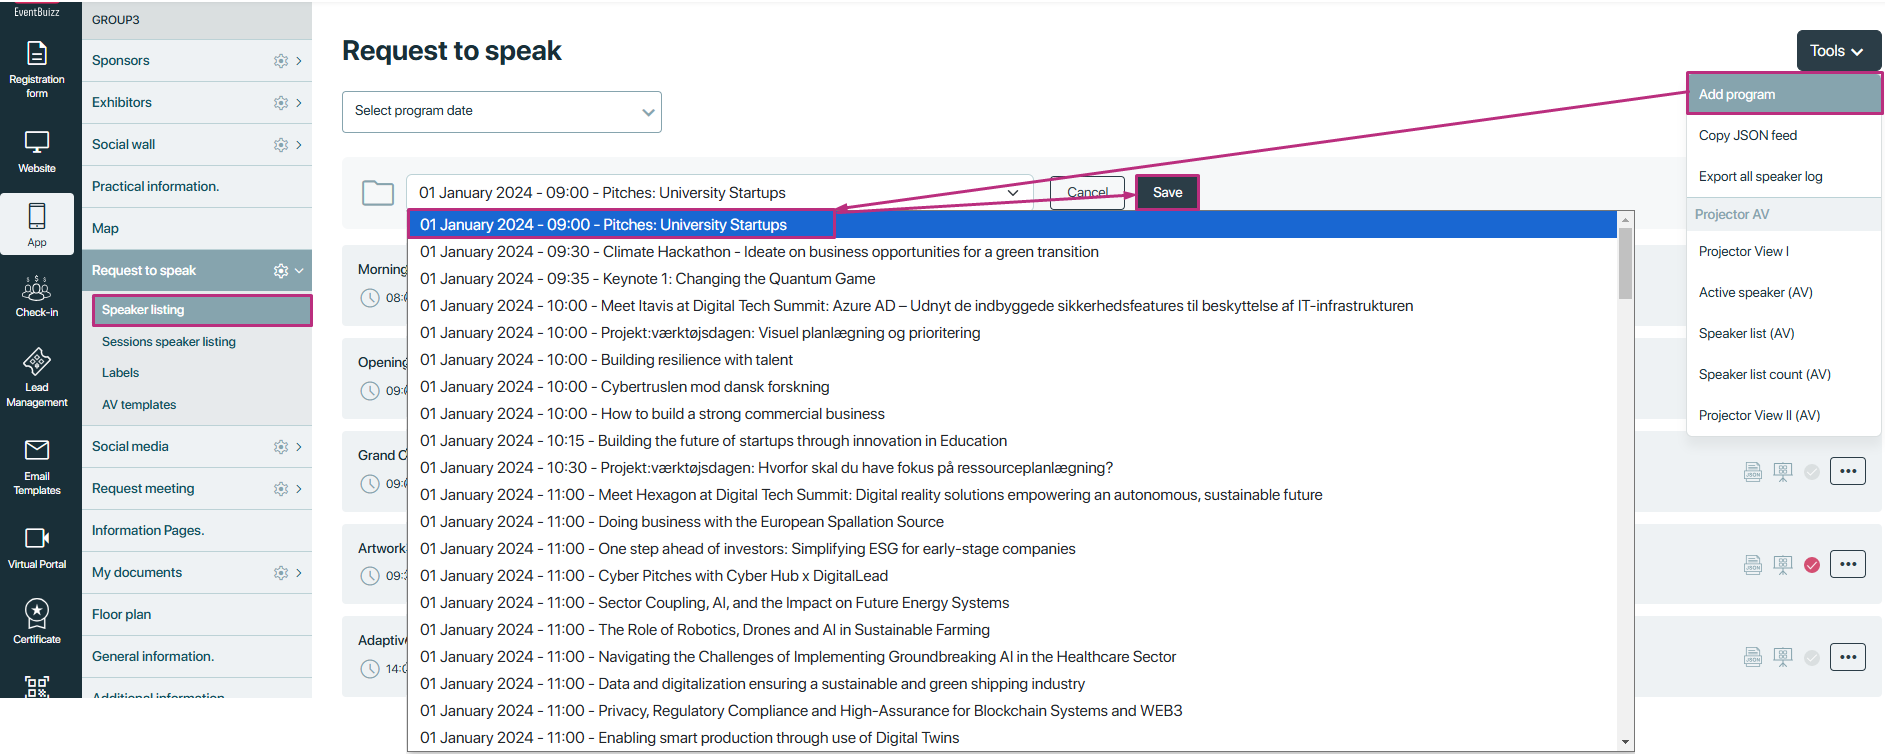
Adding the program to the request to speak module
- After enabling the permission, the organiser needs to add the program to the Request to Speak module.
- Steps:
- Navigate to the “Request to speak” module.
- Go to the “Speaker listing” section.
- Add the program for which the “Enable speaker list” permission has been enabled.
Creating a session speaker list
- Next, the organiser moves to the “Session speaker listing” section within the request to speak module to create sessions.
- Steps:
- Navigate to the “Session speaker listing” section.
- Use the “Create session speaker list” tool to create sessions for the program.
- Once a session is created, it will be associated with the program.

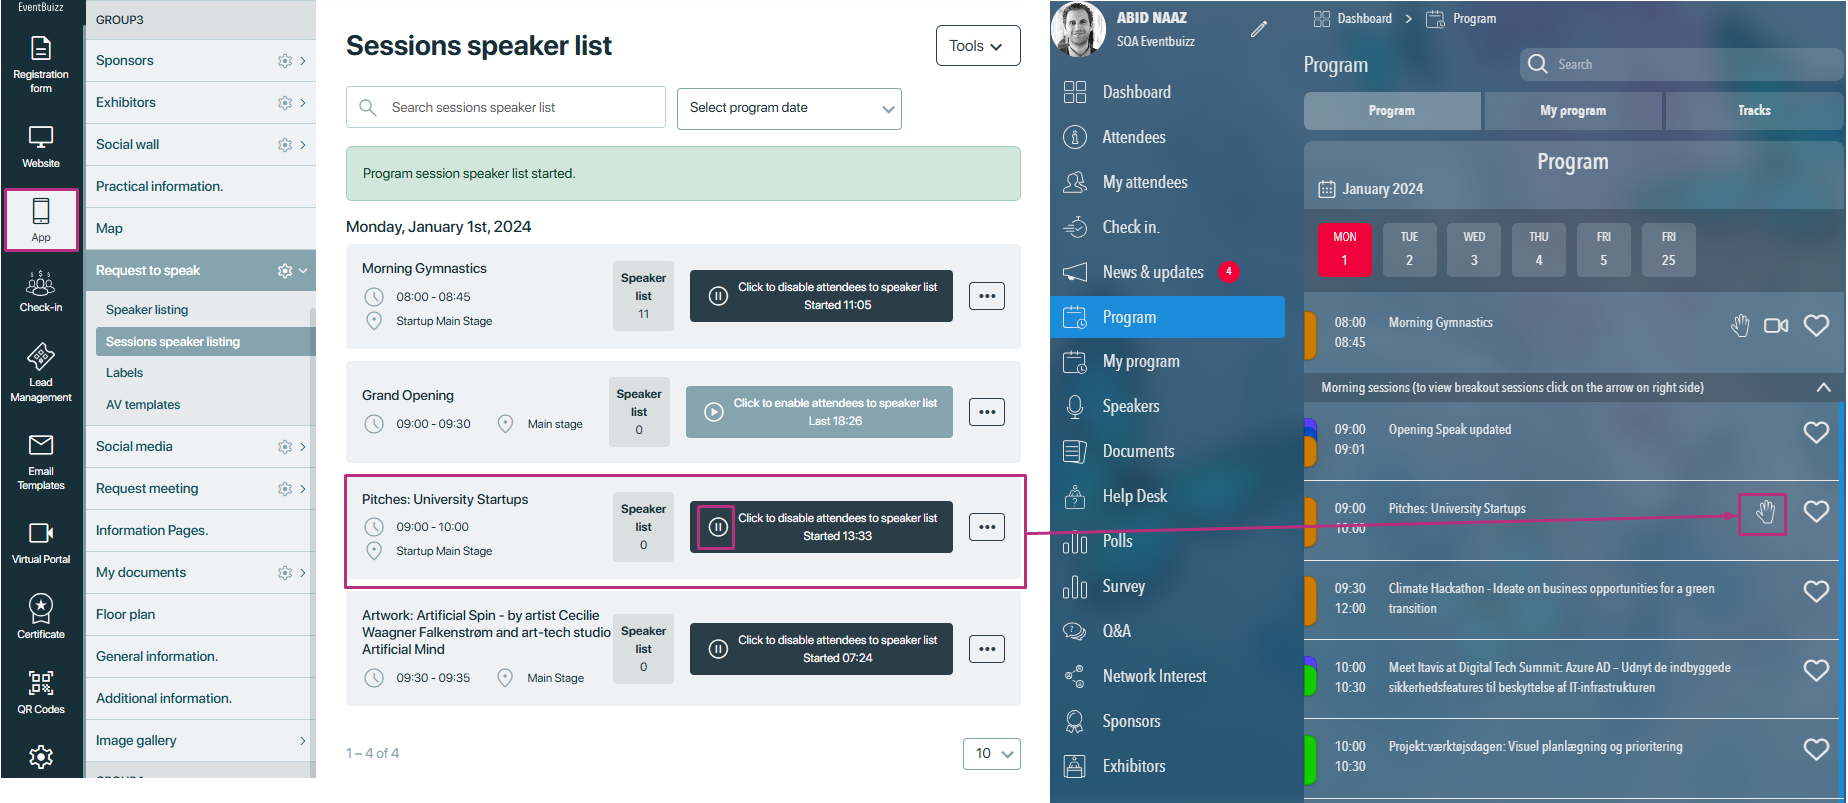
Displaying the hand icon and request to speak section
- When a session is created against a program:
- A hand icon will appear on the program listing in the web app.
- The “Request to speak” section will be displayed in the program details.
- Users can then use this section to submit their speaking requests for that program.
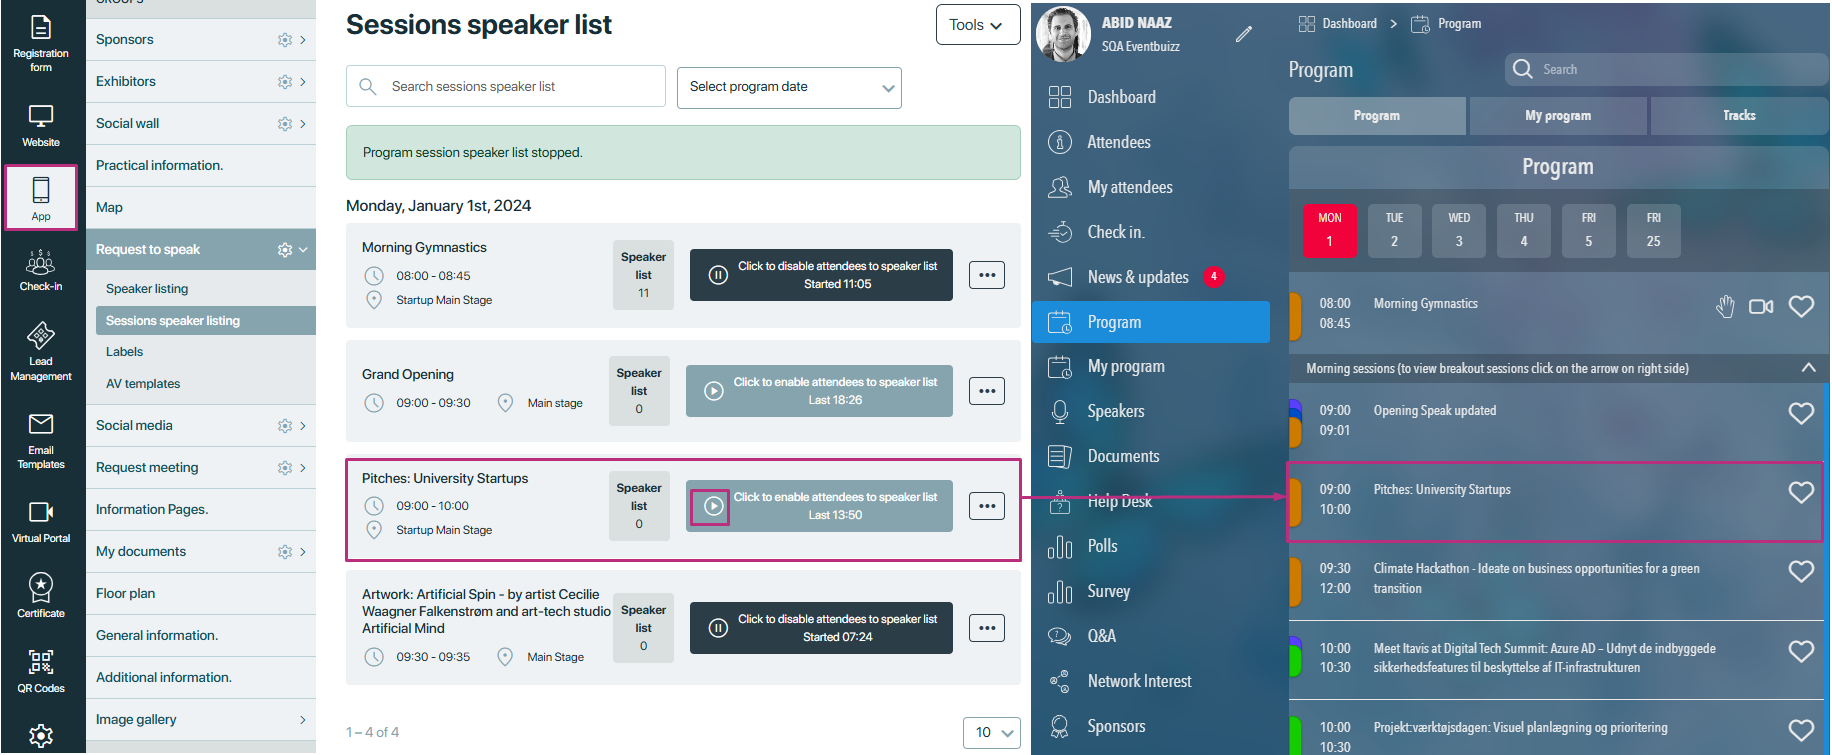
Managing sessions
Pausing a session:
- If the organiser pauses the session, the “Request to Speak” section will no longer be displayed for that program.
Disabling the permission
- If the organiser disables the “Enable speaker list” permission from the program profile:
- The session will be deleted automatically.
- The hand icon and the “Request to speak” section will be removed from the web app.
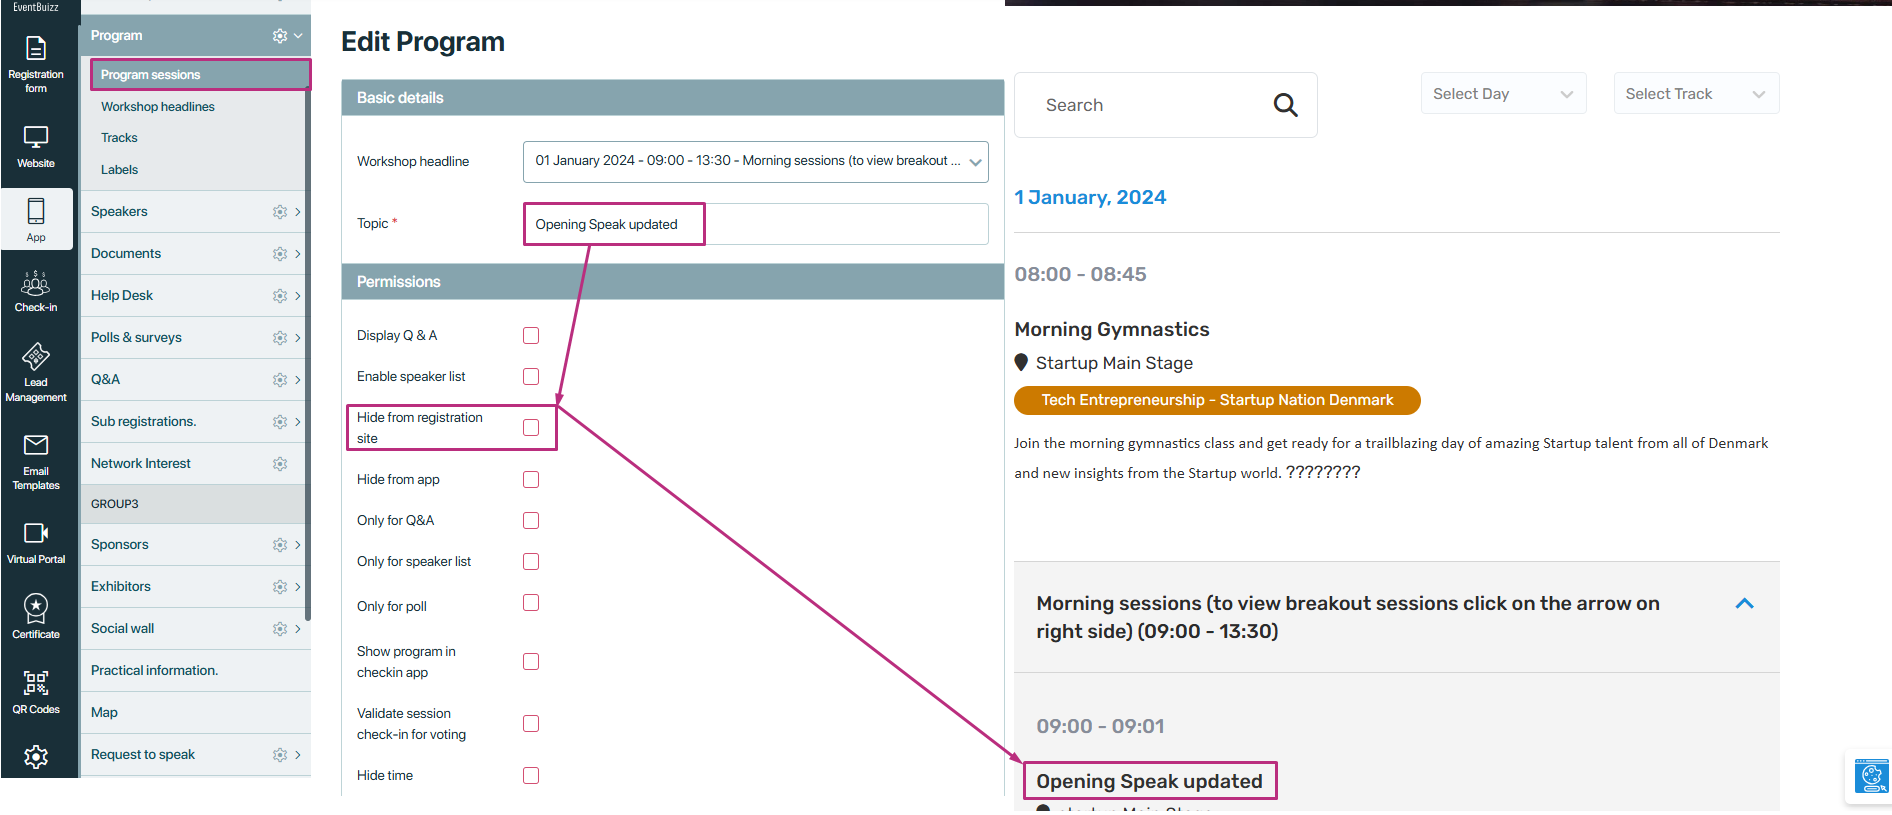
Hide from registration site
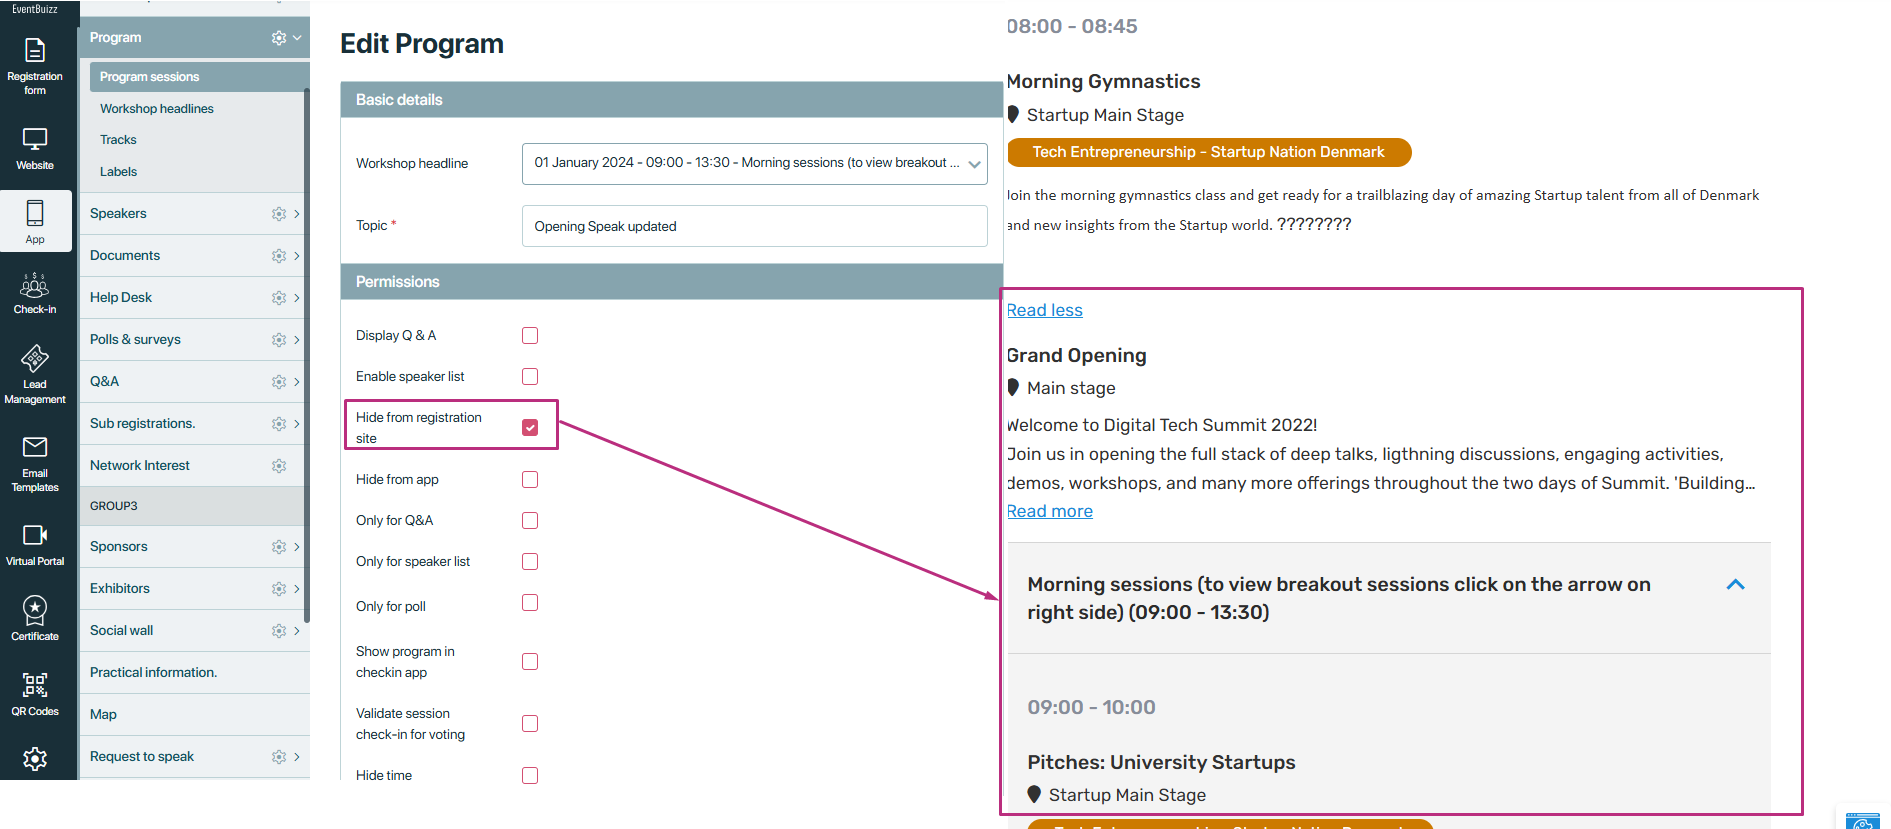
Purpose: This permission hides the program from the registration site, preventing potential attendees from seeing or registering for the program.
How it works:
-
Enabling the permission:
- The organiser navigates to the program settings.
- The “Hide from registration site” permission is enabled for the specific program.
-
Effect:
- Once this permission is enabled, the program will not be visible on the registration site.
- Potential attendees visiting the registration site will not see the program listed and will not be able to register for it.
Before enabling the “Hide from registration site”, permission program is visible in event site on home page listing and program module listing.
After enabling the permission, program will be hide from registration site.
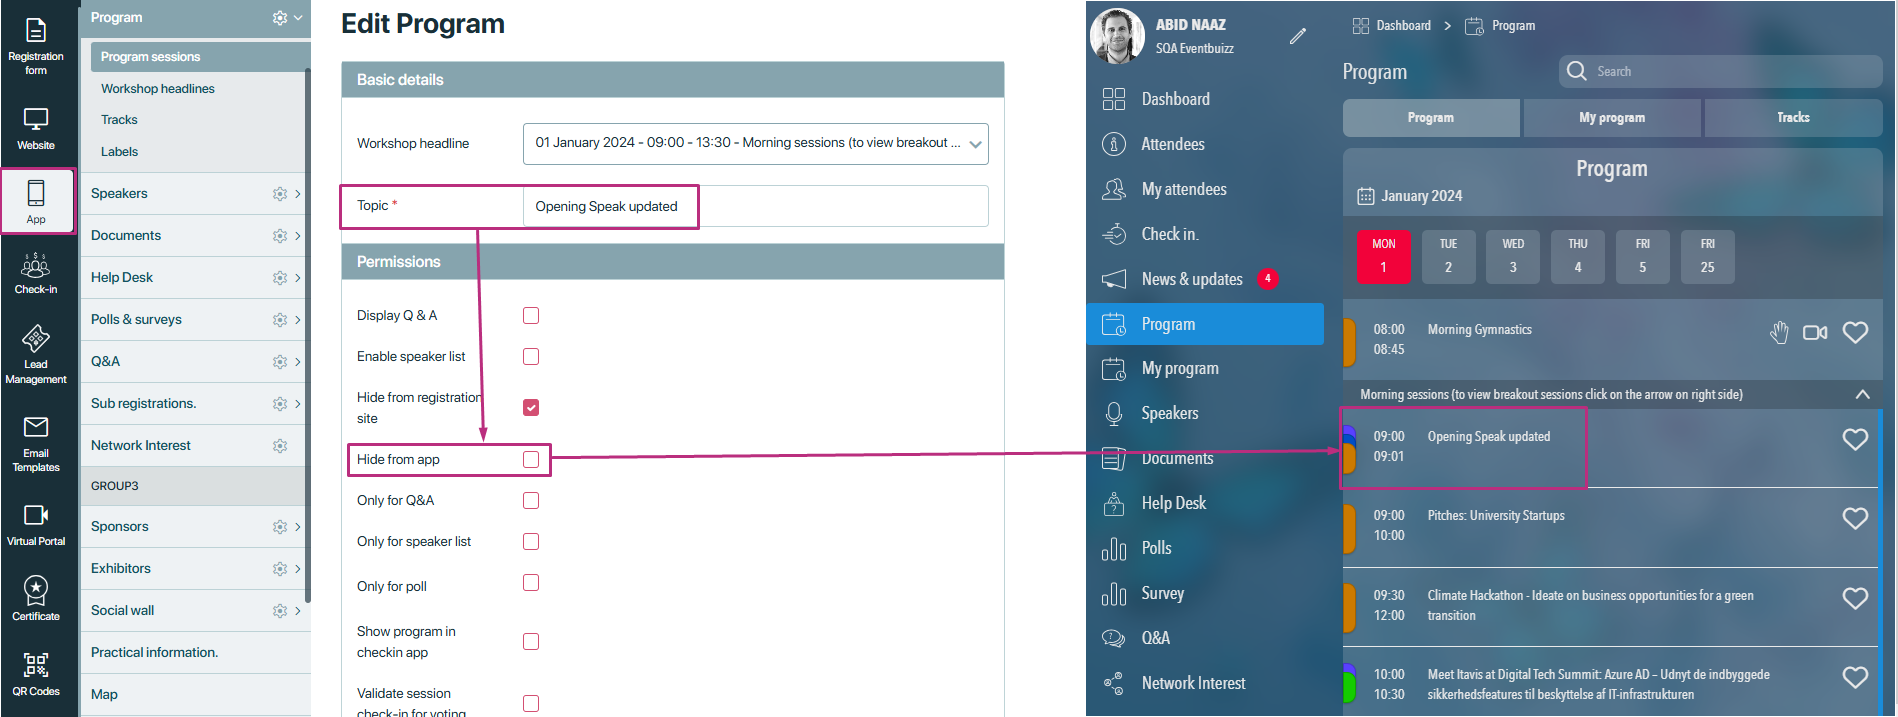
Hide from web app
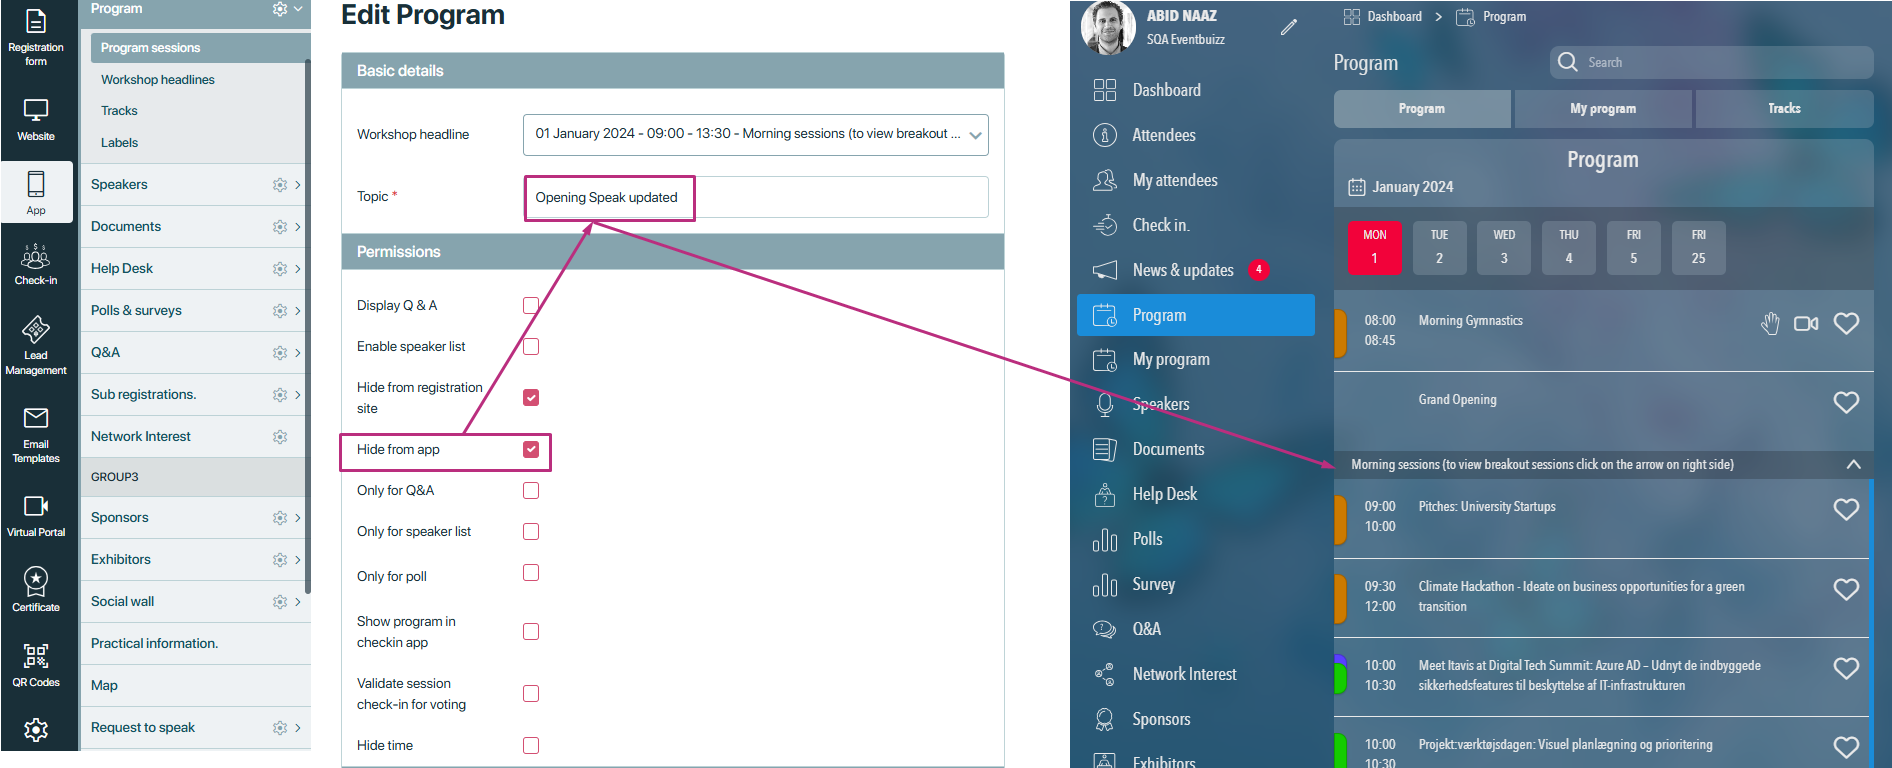
Purpose: This permission hides the program from the web app, preventing users from seeing the program details or interacting with it through the web app.
How it works:
-
Enabling the permission:
- The organiser navigates to the program settings.
- The “Hide from Web app” permission is enabled for the specific program.
-
Effect:
- Once this permission is enabled, the program will not be visible in the web app.
- Users accessing the web app will not see the program listed and will not be able to view its details or interact with it.
Before enabling the “Hide from app”, permission program is visible in app side, on home page listing and program module listing.
After enabling it, program will hide from the app side.
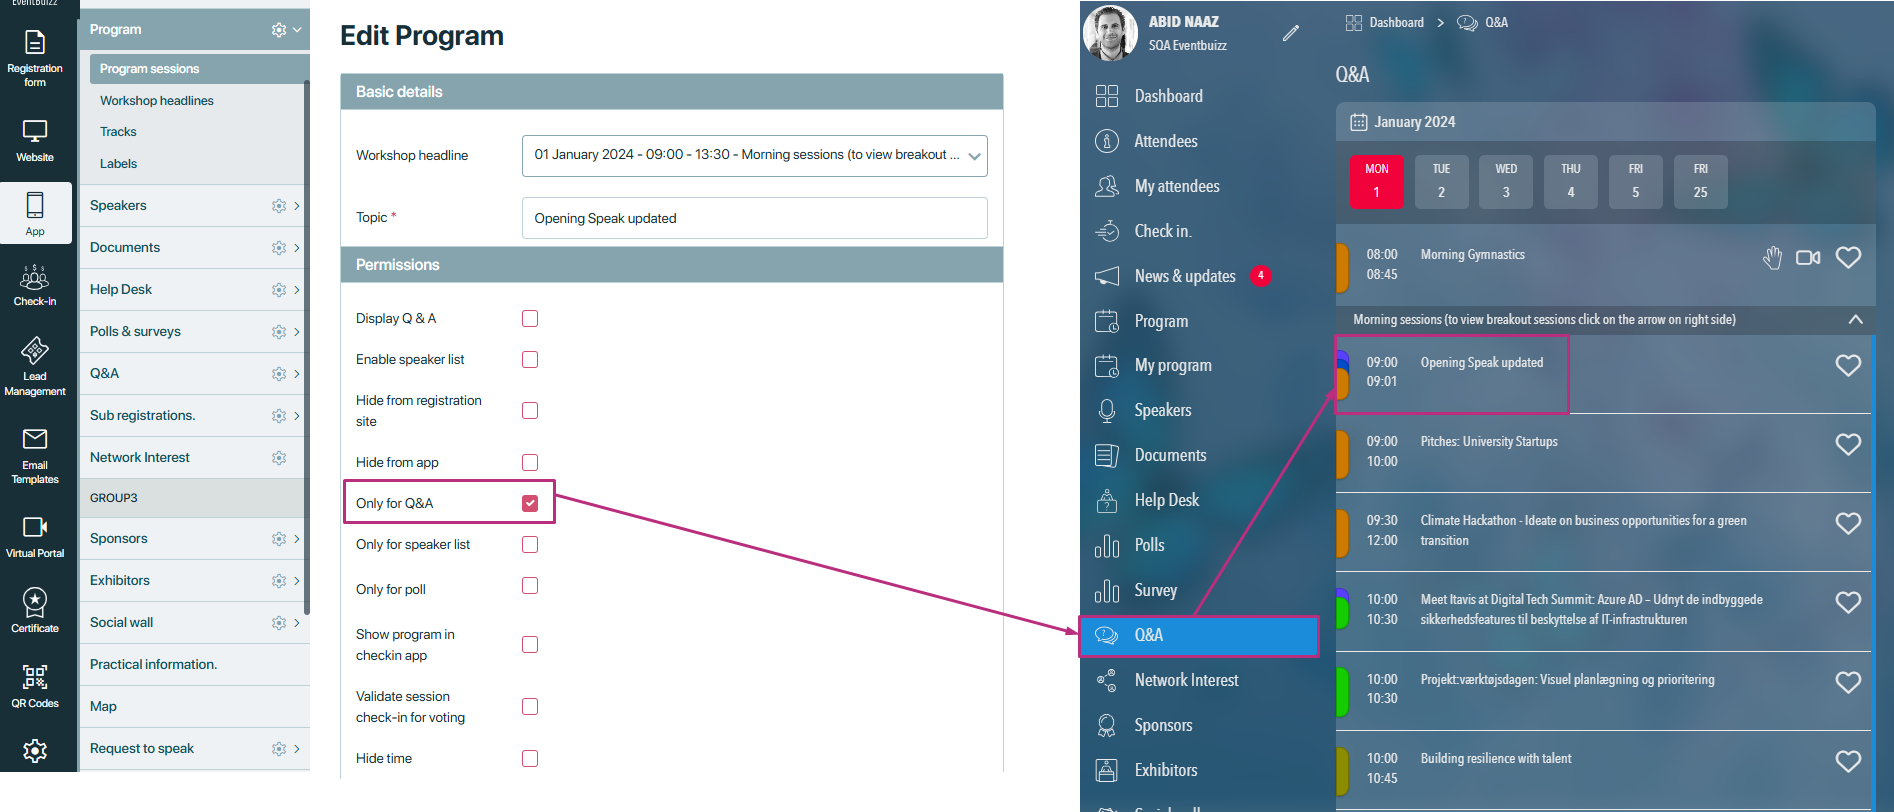
Only for Q&A
The “Only for Q&A” permission is designed to restrict a program’s visibility across all modules, ensuring it only appears within the Q&A module. This feature allows organizers to make a program available exclusively for the Q&A section, hiding it from other parts of the platform.
How it works:
-
Enabling the permission:
- The organiser goes to the program’s settings and enables the “Only for Q&A” permission.
-
Effect:
- Once the permission is enabled, the program becomes hidden from all modules, such as the registration site, web app, and other program-related sections.
- The program will not be displayed in any other part of the system except within the Q&A module.
-
Visibility in the Q&A module:
- While the program is hidden from all other modules, it will still appear in the Q&A module. Users can interact with the program through Q&A, such as asking questions or viewing answers.
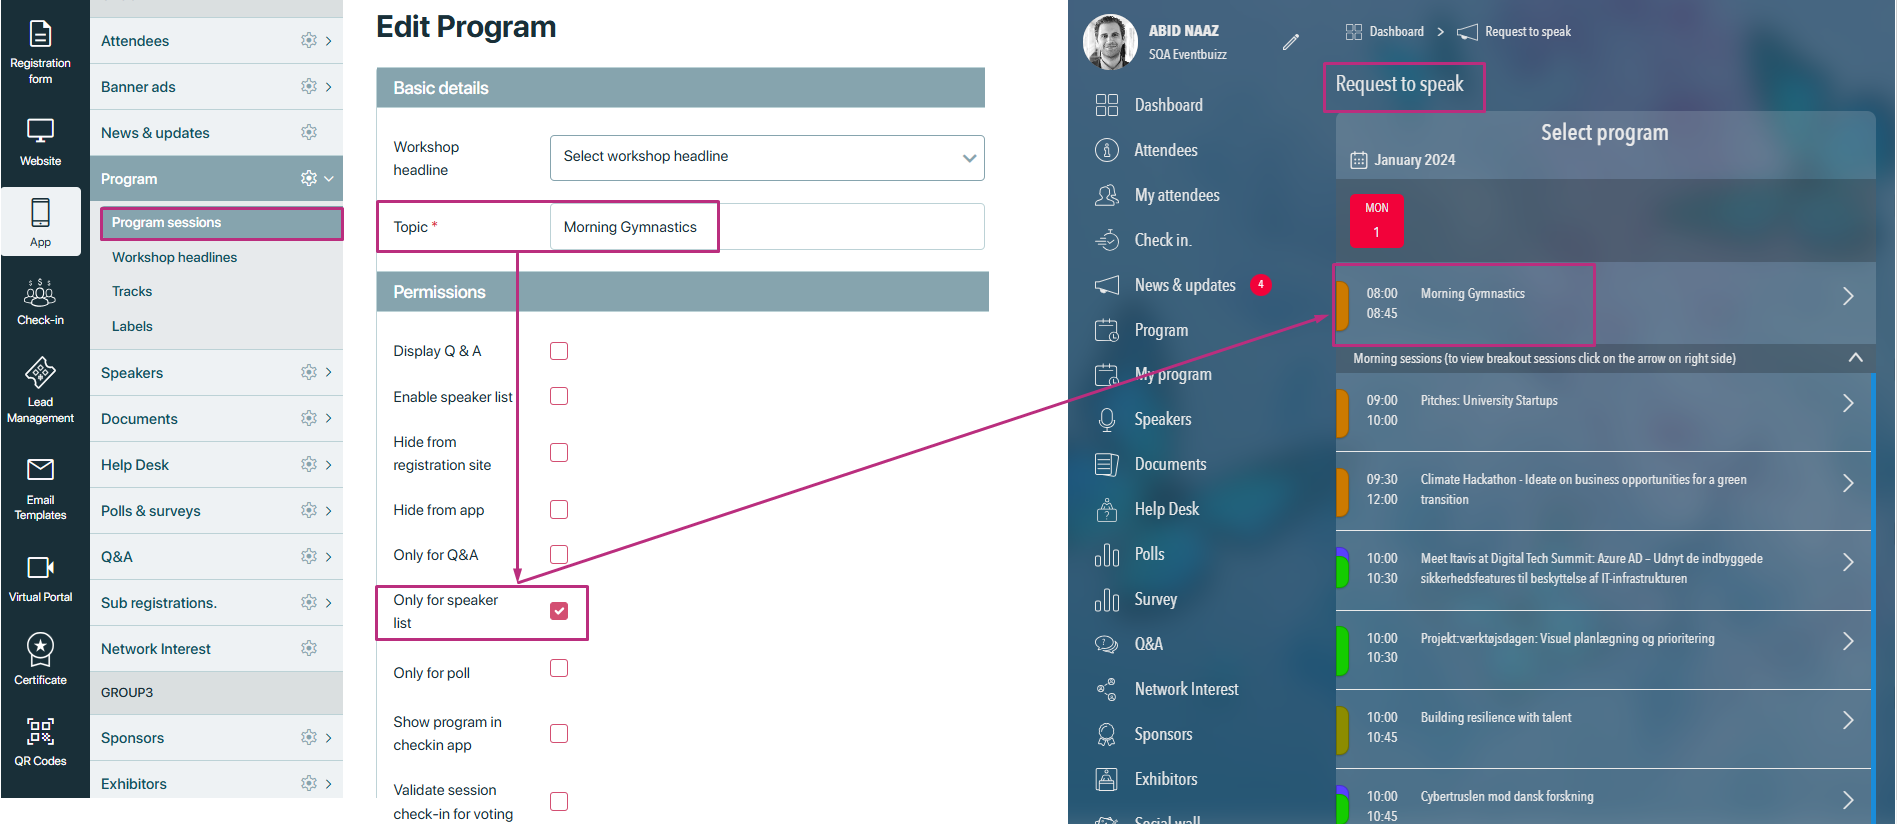
Only for speaker list
The “Only for speaker list” permission ensures that a program is exclusively visible within the Request to speak module and hidden from all other modules and sections of the platform. This setting allows organisers to restrict a program’s visibility so that it can only be accessed by users interacting with the speaker list or the related speaking request functionality.
How it works:
-
Enabling the permission:
- The organiser enables the “Only for speaker list” permission in the program’s settings.
- This action restricts the program’s visibility to the Request to speak module only.
-
Effect:
- Once the permission is enabled:
- The program is hidden from all other modules, such as the registration site, web app, and other program-related sections.
- The program will only appear in the Request to speak module, where users can see it and submit speaking requests.
- Visibility Limitation: Users who are not interacting with the Request to Speak feature will not see or interact with the program elsewhere on the platform.
- Once the permission is enabled:
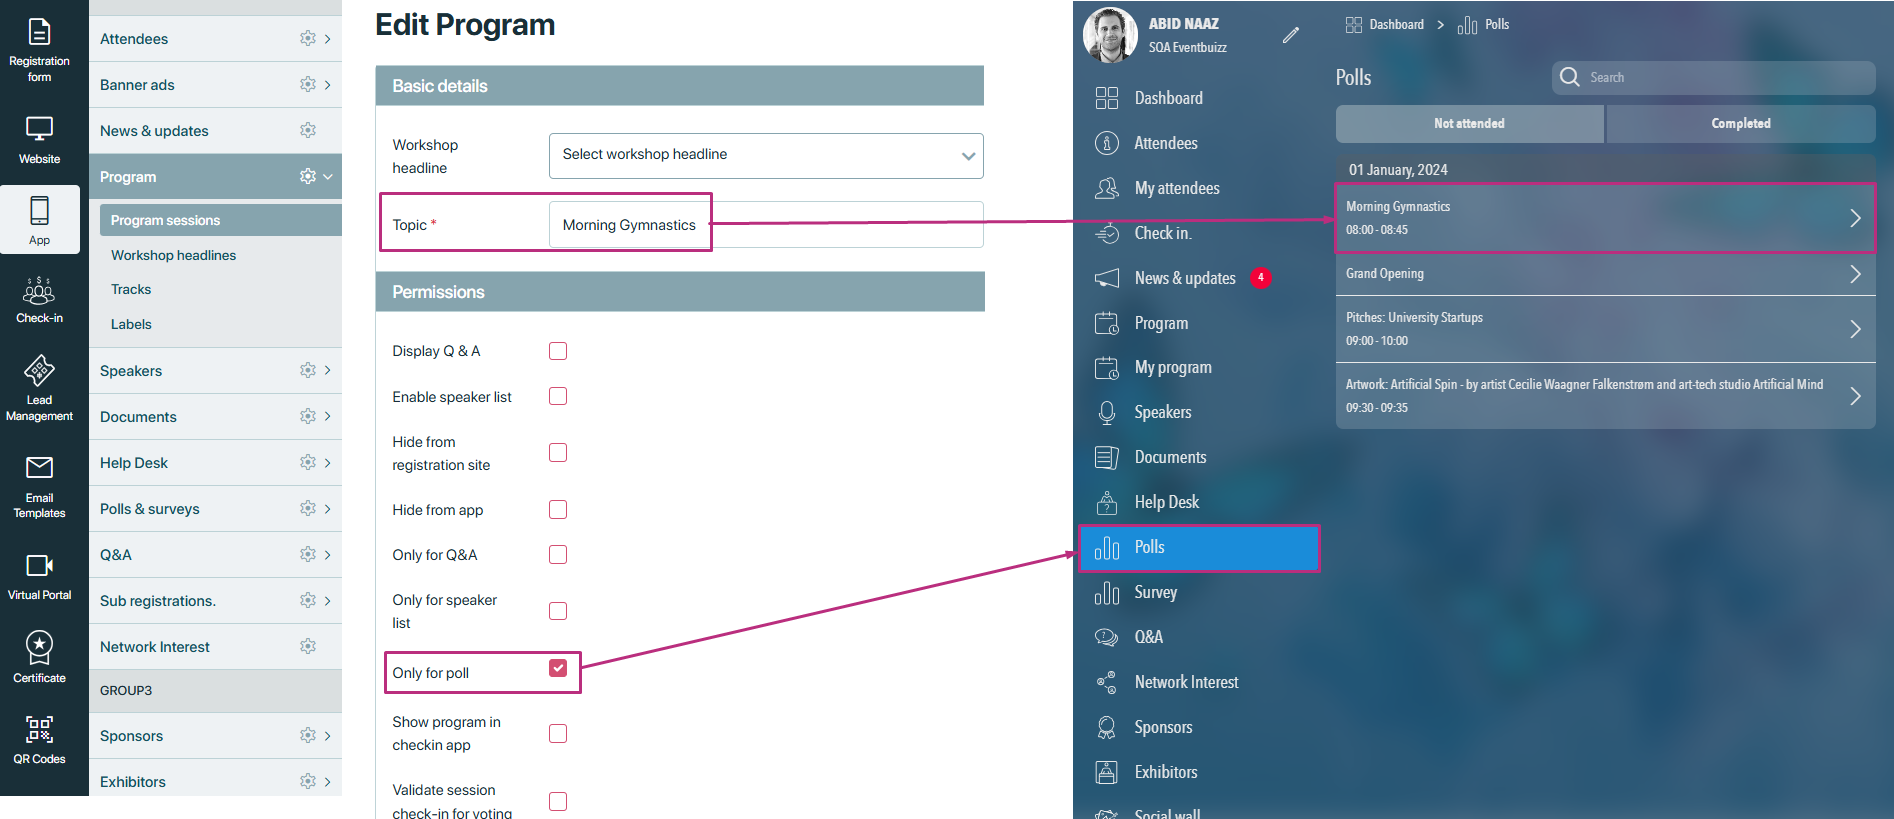
Only for poll
The “Only for poll” permission ensures that a program is exclusively visible within the Polls module and hidden from all other modules and sections of the platform. This setting allows organisers to restrict a program’s visibility so that it can only be accessed by users interacting with the Polls module or related polling functionality.
How it works:
Enabling the permission:
- The organiser enables the “Only for poll” permission in the program’s settings.
- This action restricts the program’s visibility to the Polls module only.
Effect:
- Once the permission is enabled:
- The program is hidden from all other modules, such as the registration site, web app, and other program-related sections.
- The program will only appear in the Polls module, where users can see it and participate in polls.
Visibility limitation:
- Users who are not interacting with the Polls module will not see or interact with the program elsewhere on the platform.
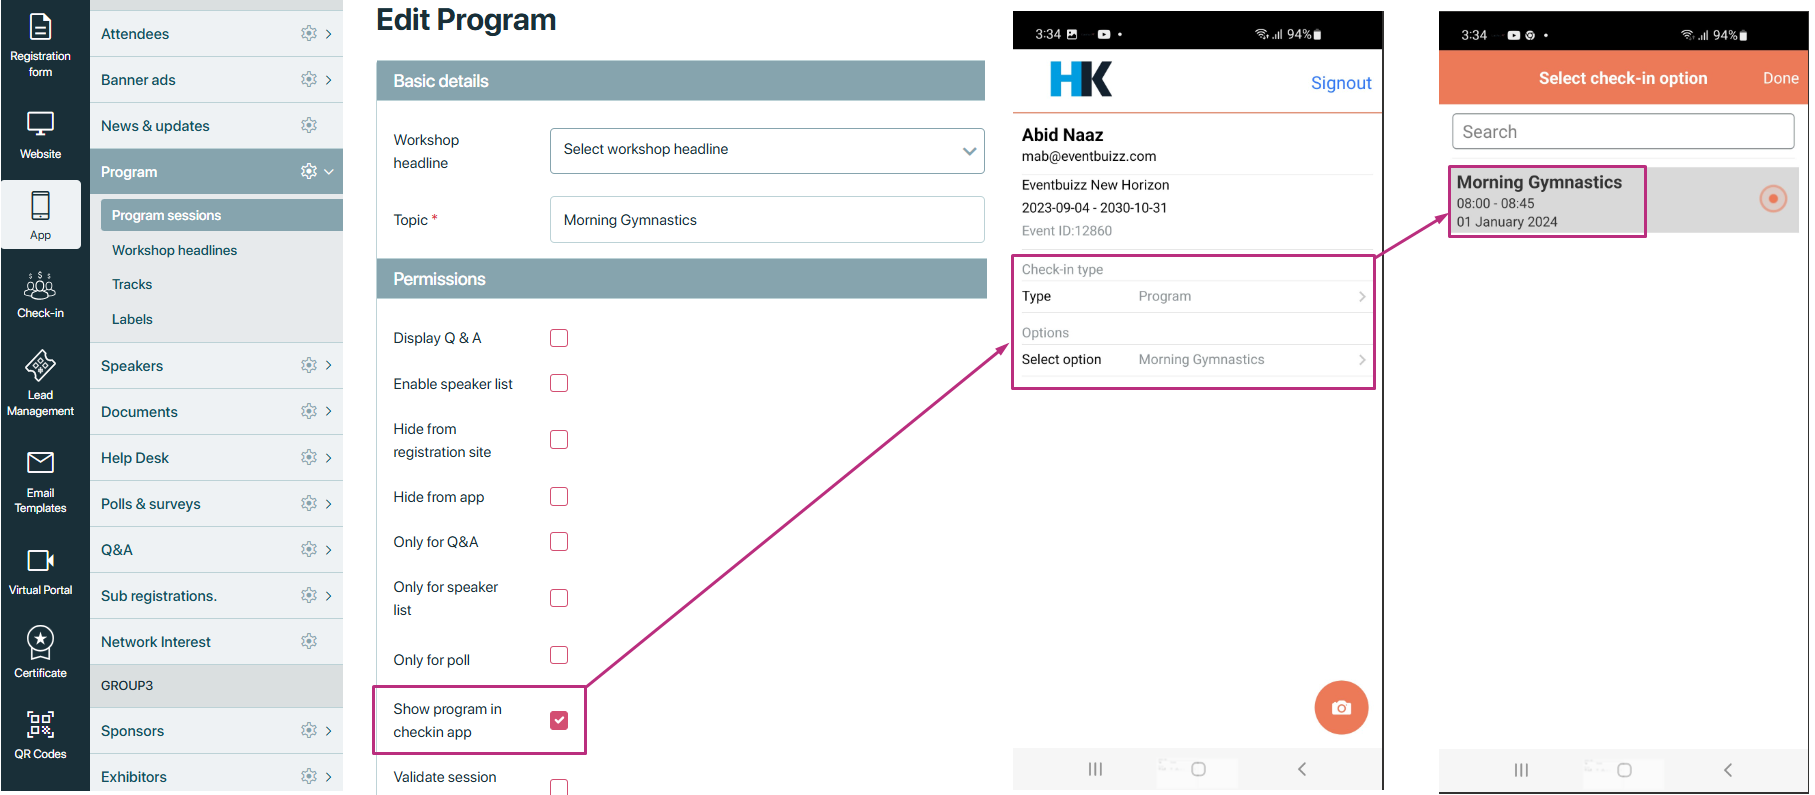
Show program in check-in app
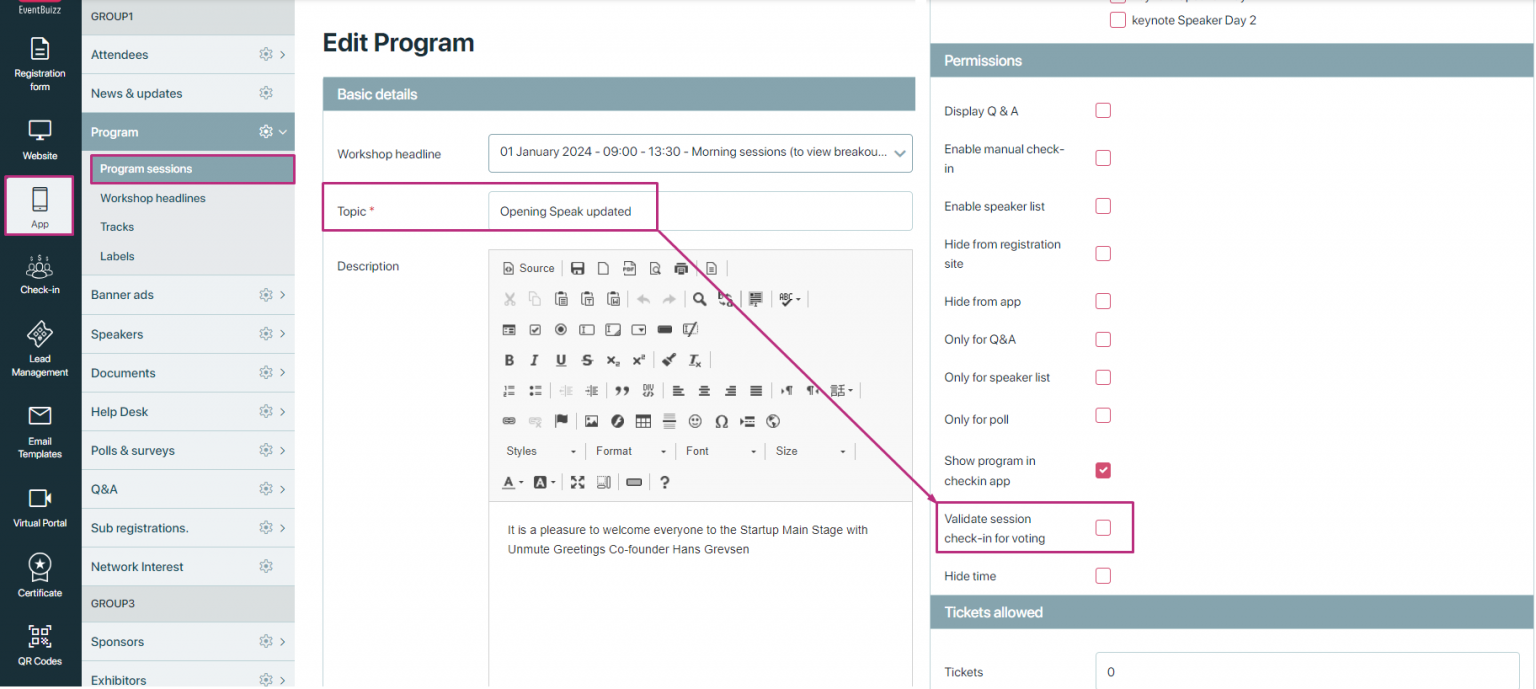
Validate session check-in voting
The “Validate session check-in voting” permission ensures that only users who have checked in to the program can participate in polls. This setting enforces check-in validation, restricting poll access to verified participants.
How it works:
Enabling the permission:
- The organiser enables the “Validate session check-in voting” permission in the program’s settings.
- This action enforces a check-in requirement for users before they can access and participate in polls.
- For complete detail of all steps, like how it works step by step please click here. Short detail is given below.
Effect:
- Once the permission is enabled:
- Only users who have completed the check-in process for the program can participate in polls.
- Users who have not checked in will be restricted from voting in polls.
- The system checks the user’s check-in status before allowing access to poll functionalities.

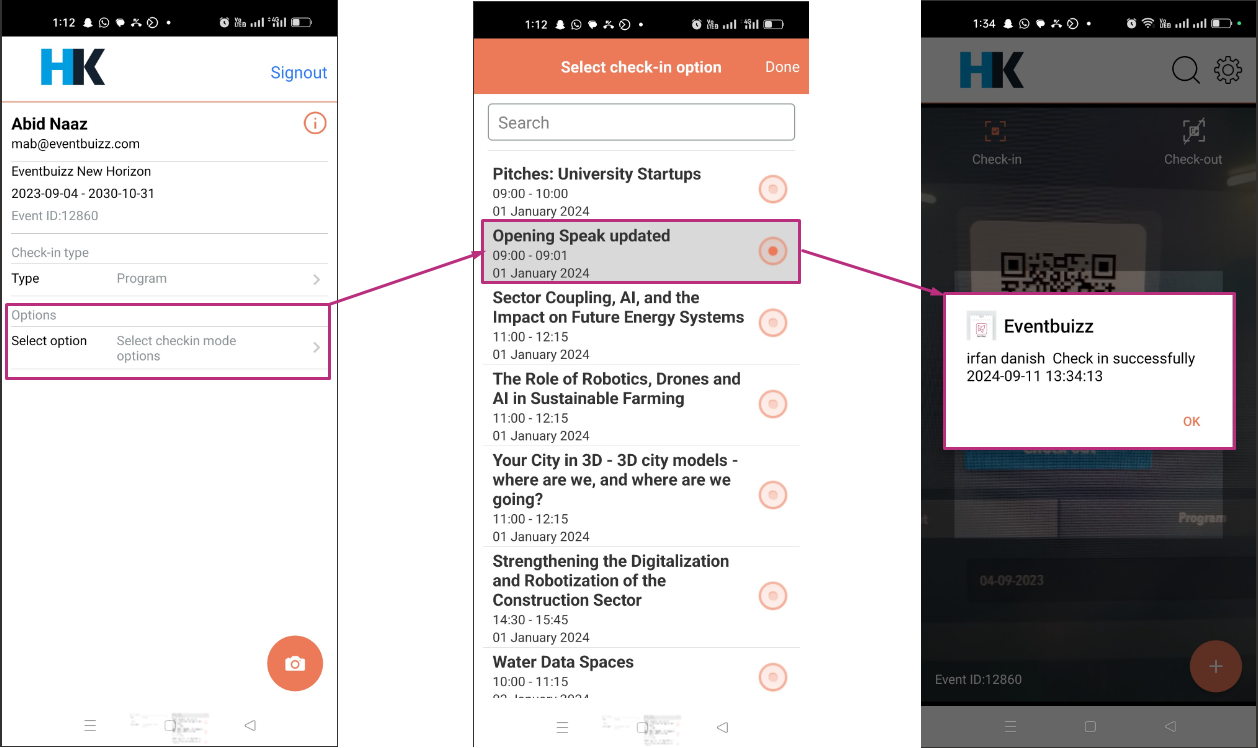
Check-In participants:
- Locate and check in participants who are attached to the selected program. All the attendees which are attached to the program, will check-in successfully.
- Confirm successful check-ins with success message.
User access and poll participation
Purpose: To allow participants who have checked in to the program to access and respond to the poll.
Steps for users:
Access the app:
- Users log in to the app and access the program module, by following this path
- Web app->login->side menu->program
- Search that program against poll created and attendee check-in successfully.
Check-in requirement:
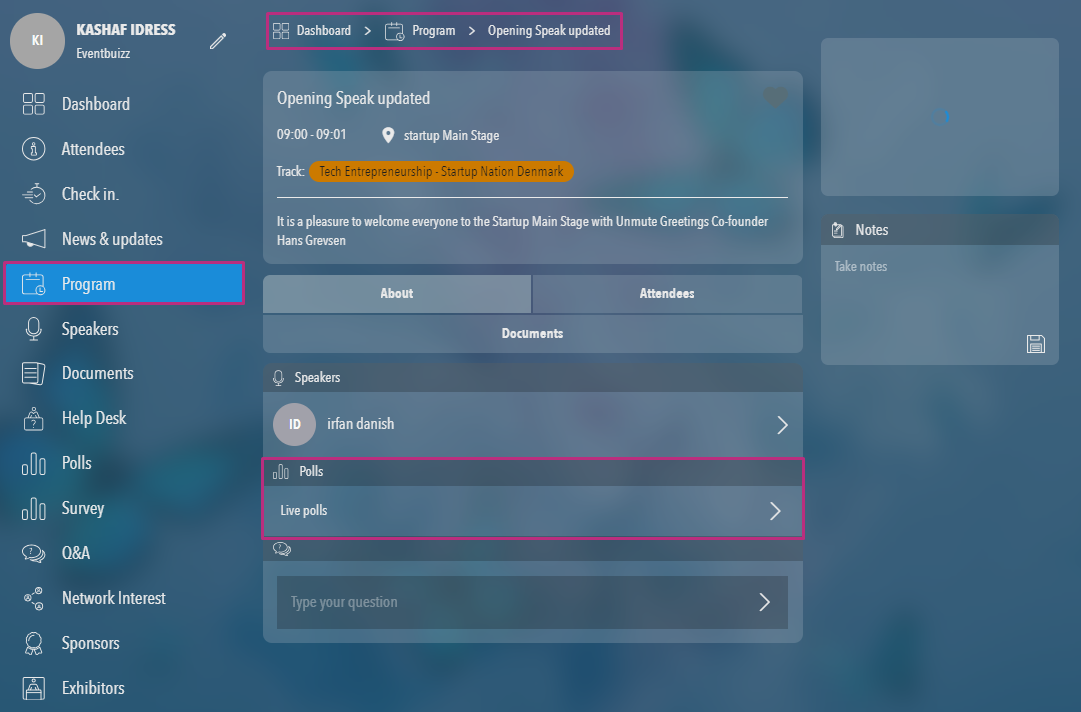
If check-in validation is enabled:
- Users must be checked in to the program by the user admin to access the related poll.
- If a user is not attached to the program or has not checked in, then program will not be visible to the users.
If check-In validation is disabled:
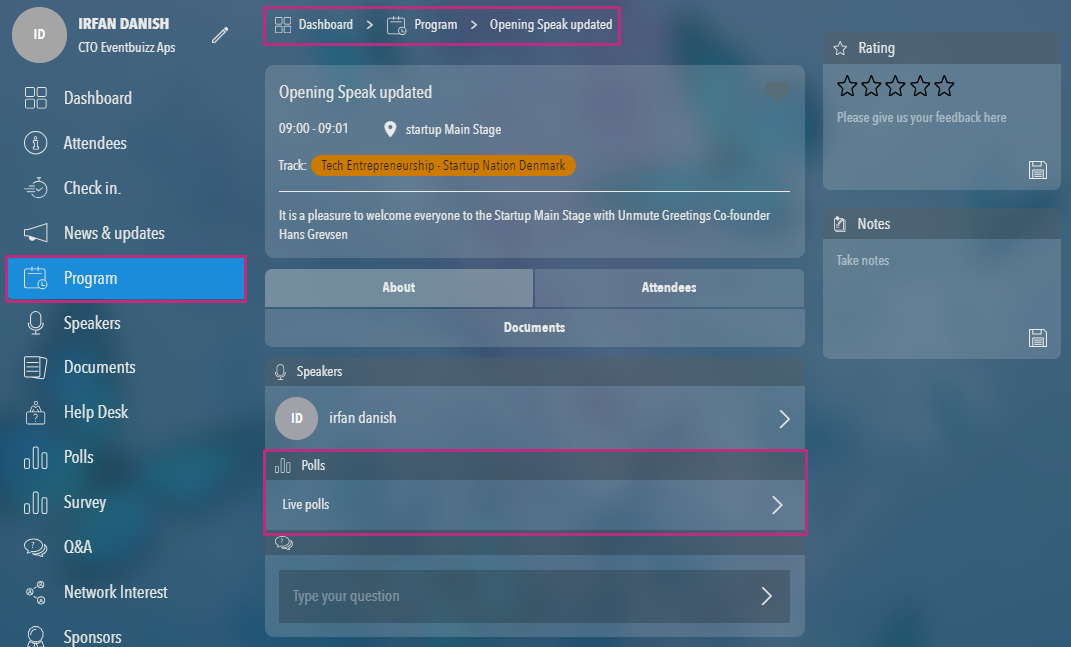
All users can access the program and participate in the poll without needing to check in. Here is the view validate session check-in for voting permission is disabled, and all users now can access the program without check-in, in web app and answer the polls.
Here is the view all users can access the program and can answer the polls. Login user not checked-in but still can answer the polls.
Hide time
The “Hide time” permission ensures that the program’s time is hidden from all modules and sections of the platform. This setting allows organisers to conceal the scheduled time of the program, preventing it from being displayed anywhere.
How it works:
Enabling the permission:
- The organiser enables the “Hide time” permission in the program’s settings.
- This action hides the program’s scheduled time from all parts of the platform.
Effect:
- Once the permission is enabled:
- The program’s time will not be displayed in any module, such as the registration site, web app, check-in app, or any other program-related sections.
- Users will not see the scheduled time of the program in any listings, schedules, or details.

8- Tickets allowed: A program can be linked to the registration items and sub-registrations. The number given in this ticket allowed field only to allow the limited number of attendees. The numerical value entered in the “Ticket Allowed” field restricts the number of attendees attached to a particular program.

NOTE: A program can only be linked with one registration item or sub registration at a time.
For more details, Click Registration items or Sub registration.
Edit/quick edit a program
Edit/quick edit a program
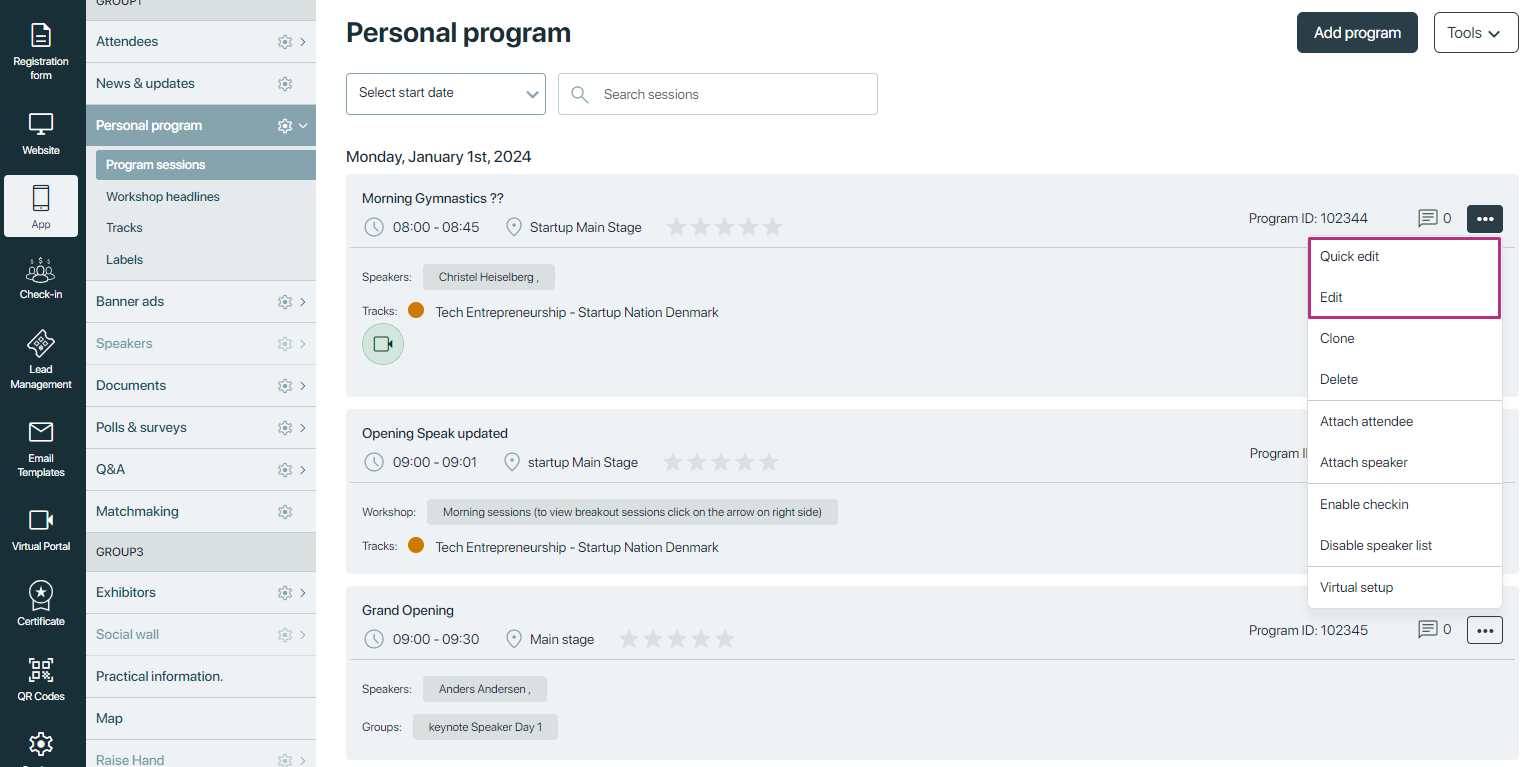
1 -Access the program session page. Locate the Program session you would like to edit. Hover over the arrow to the right of its name by clicking the ![]() icon. then click Edit/ quick edit from the drop-down.
icon. then click Edit/ quick edit from the drop-down.
2- Edit/quick edit: Change the program’s name, description, or any other information you want. When you’re finished, click Save. This will automatically update the program’s details for in your account.
Delete a program
Delete a program
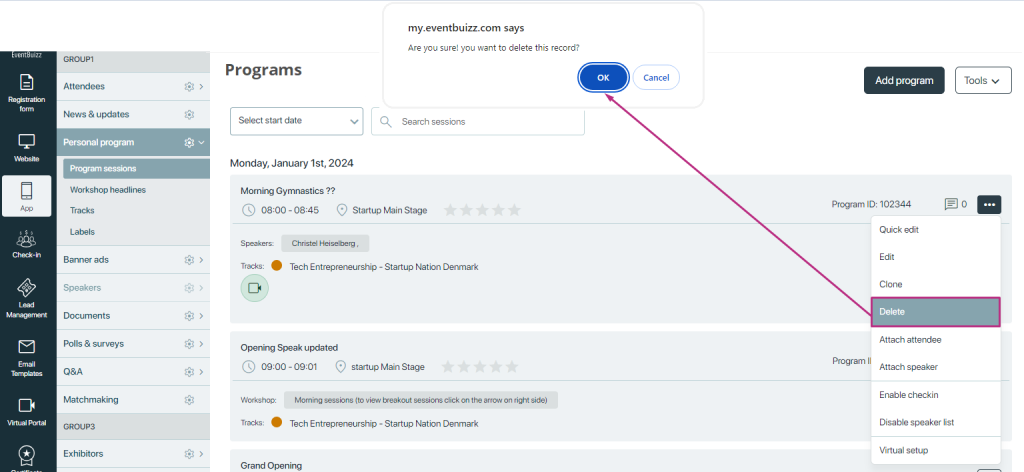
Locate the program you would like to delete. Hover over the arrow to the right of its name, then click Delete. Click OK.
Clone a program
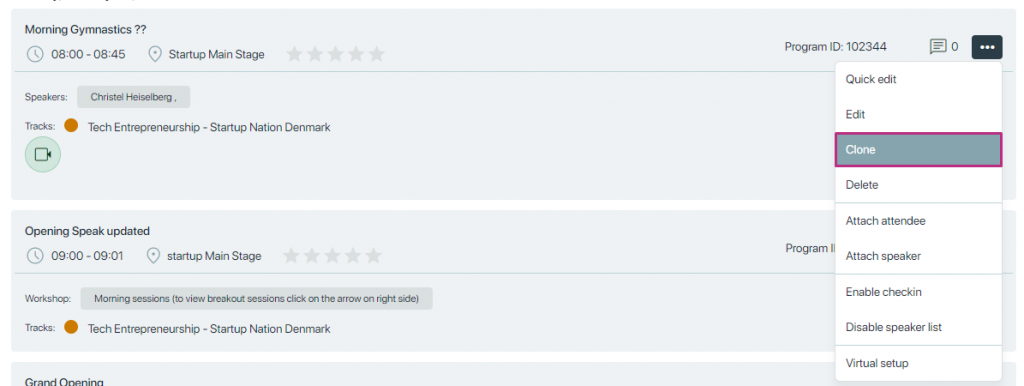
Clone a program
Cloning a Program typically refers to creating an identical copy of a program. This process involves duplicating the content, layout, and formatting of the original program to reproduce it precisely.
Attach attendee
Attach attendee to program
If you have a program where not all participants are in the same program session, you can assign participants to the relevant program session and enable only My Programs in the app. This means that each participant can see their personal program within the app, rather than the full program.
There are two ways to assign participants to program sessions
- Assign Manually
- Importing a CSV file. Which method you prefer depends on the total number of participants you want to allocate.
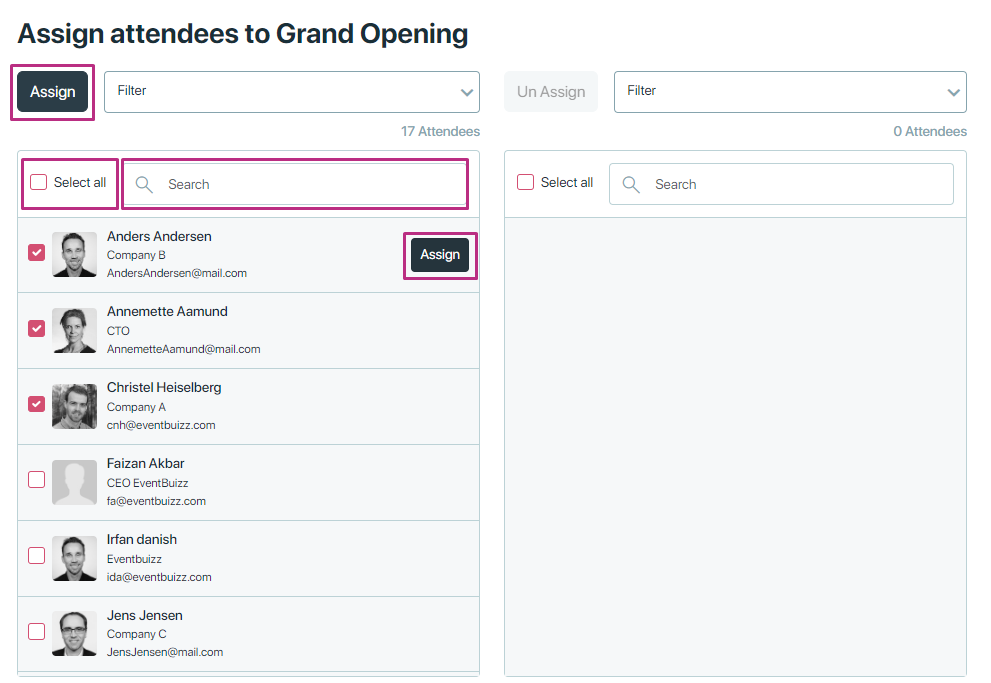
Assign Manually
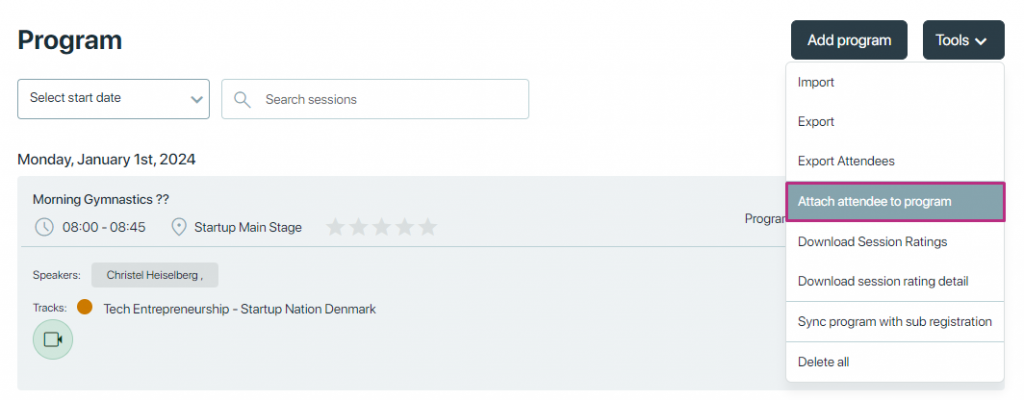
- Go to the program > program session > Tools > click Attach attendee.
- Go to the relevant program session, click
 -> Attach attendee.
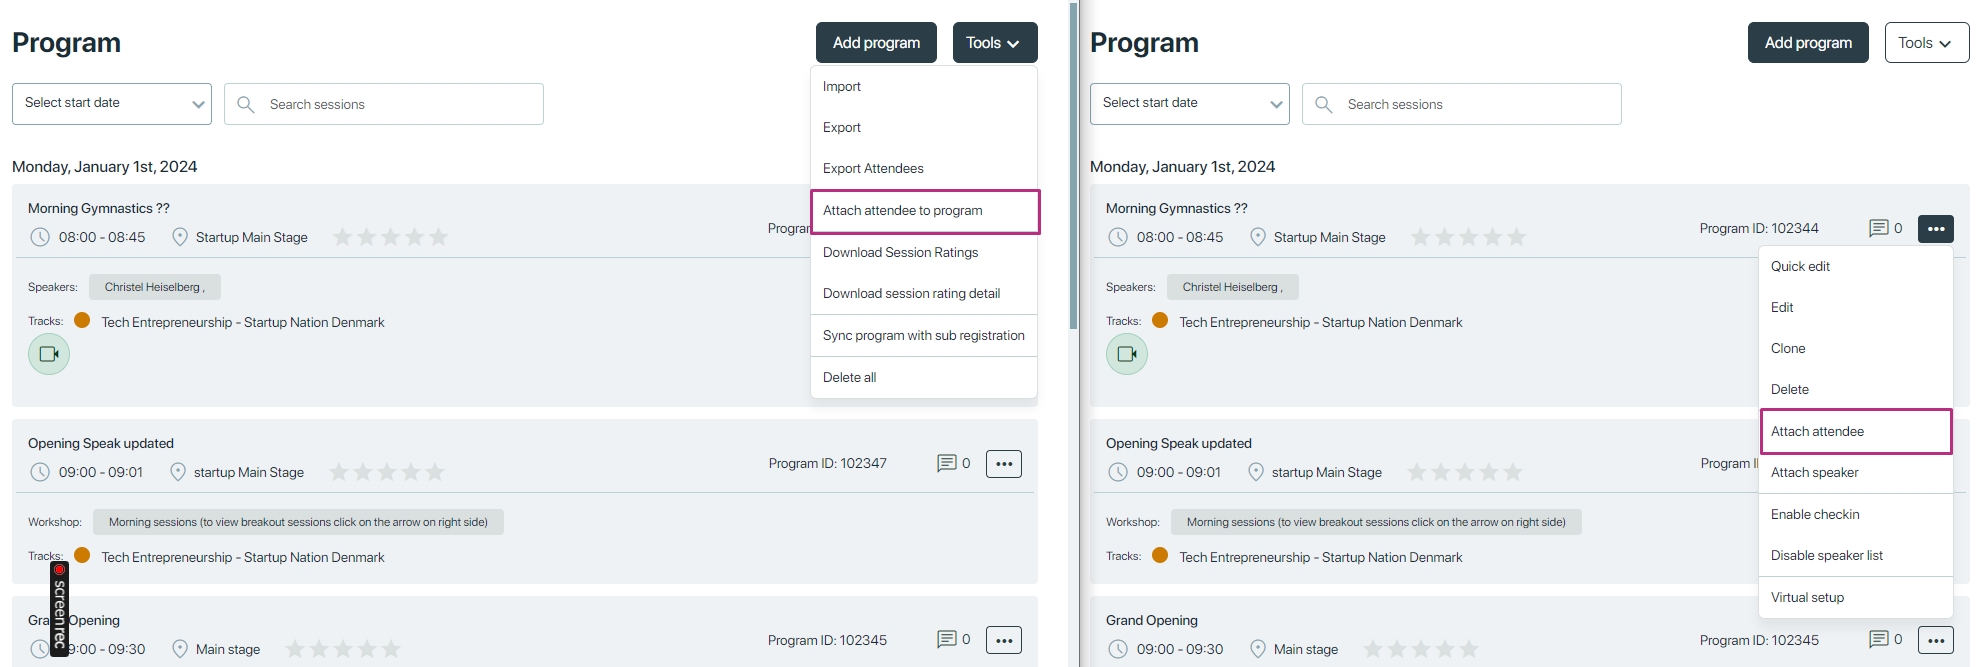
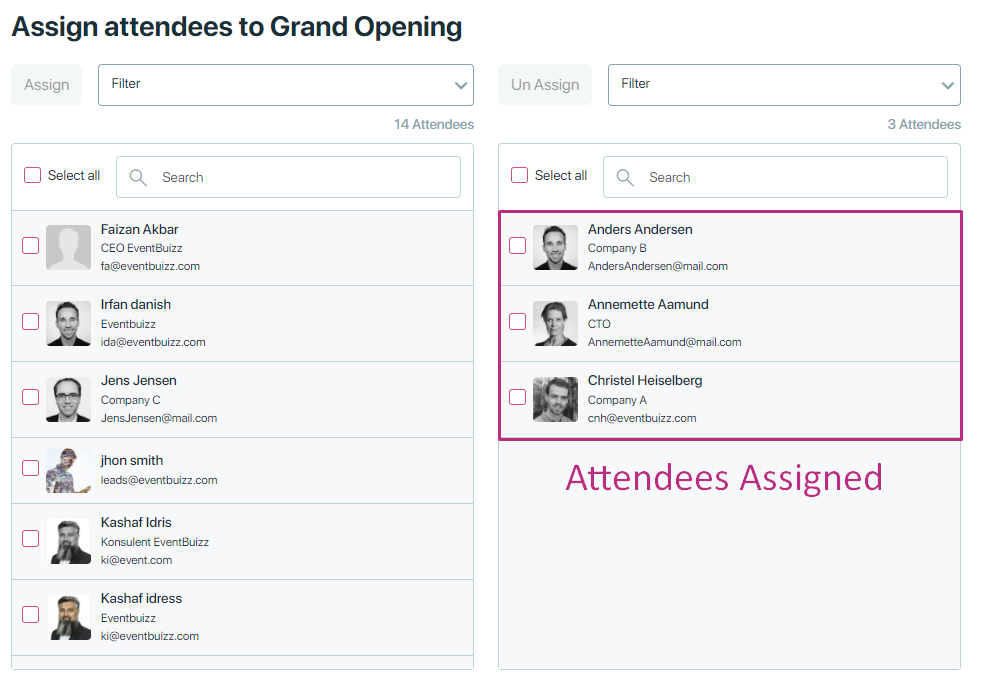
Assign all the relevant attendees, either by scrolling down, searching or select all. Finish by clicking Assign.
If you only want to keep the attendees’ program personal, then you deactivate ‘Program’ from the app and activate ‘My program’. Remember to assign everybody to all the common sessions, or else they won’t be able to see these sessions in ‘My program’.
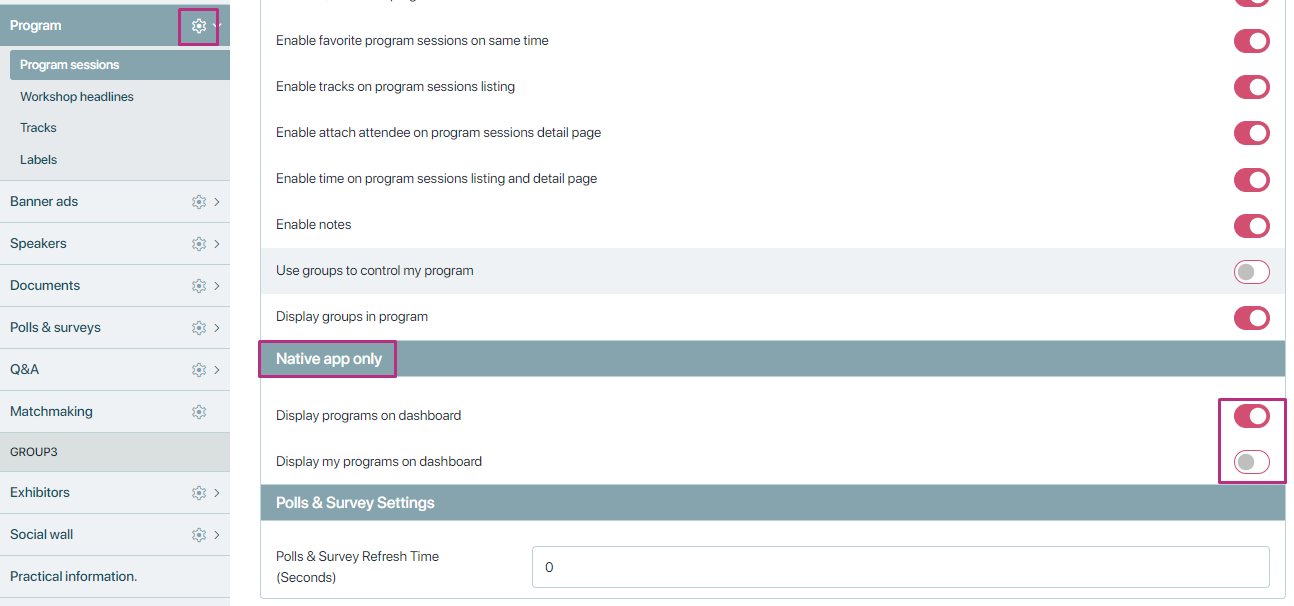
Native app – if you are using the native app – then remember to set the settings for ‘my program’ under ‘Program settings’:
NOTE: Once a program is associated with a sub registration /registration item, attendees cannot be assigned or unassigned. Consider this feature before attaching sub-registrations or items.
Import a CSV file
In order to assign by importing a csv file, you need to have the program id’s. You extract these by exporting your program.
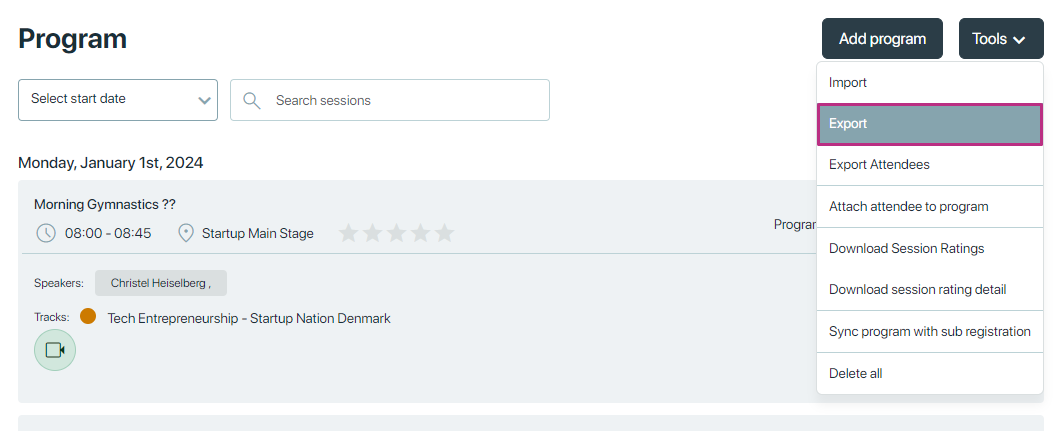
Each program session has its unique program id.
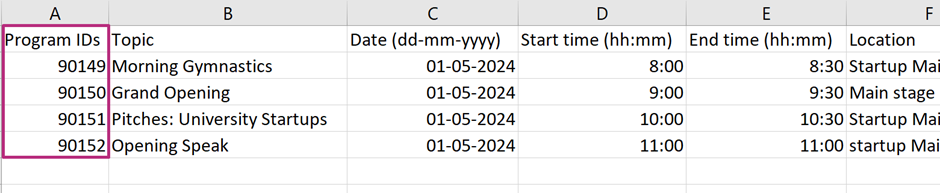
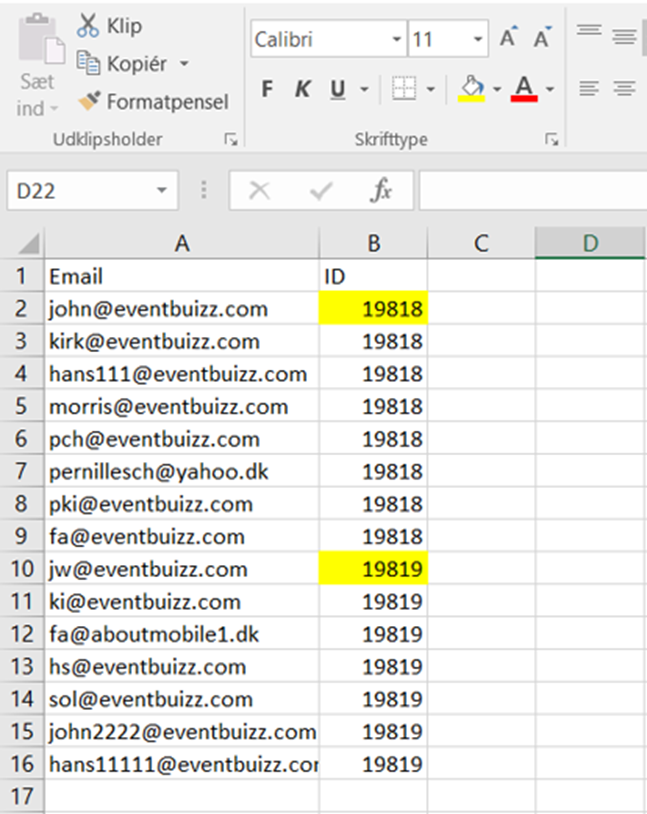
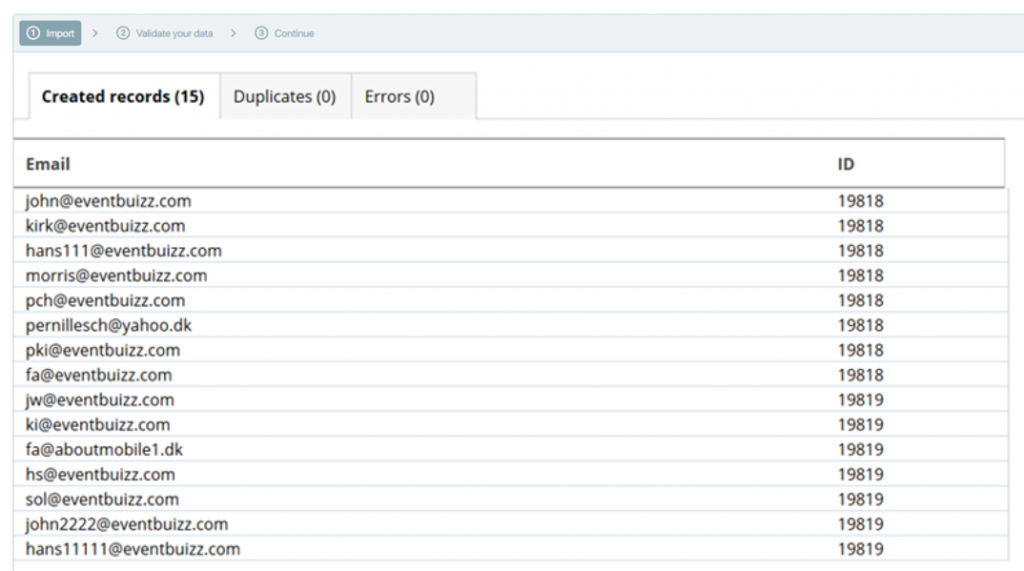
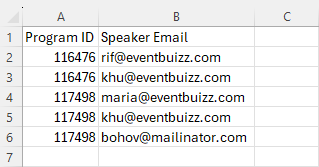
You are now ready to create your csv file (Excel sheet, saved as the format CSV). To get the email addresses of the attendees, you can export your attendees list, and sort them so you can easily copy/paste.
Make one column called ‘Email’ and one called ‘ID’. You can either make one sheet per program session if you like – or you just do as below, keep adding as many email ids in the same sheet – it’s faster to do it this way, since you only must upload the file one time.
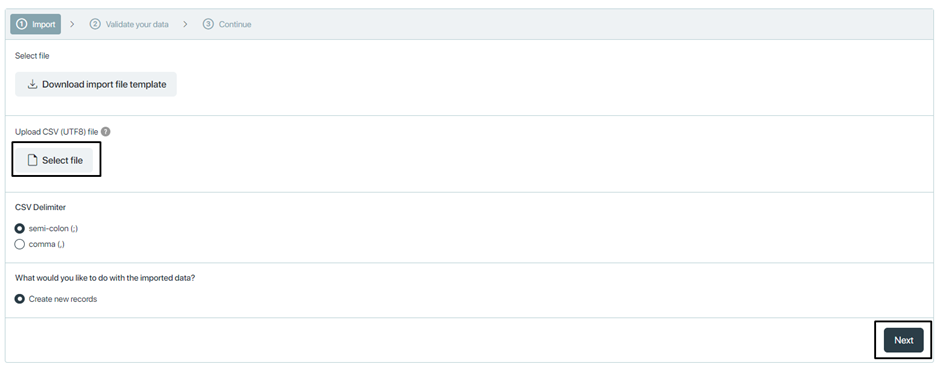
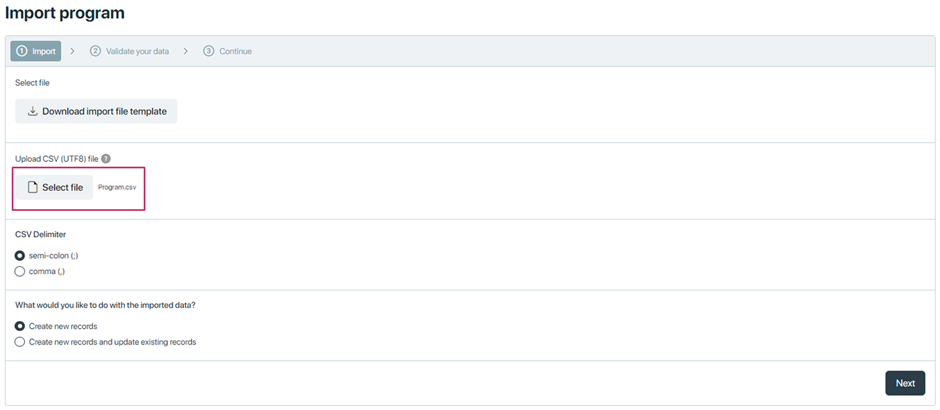
When your file is ready, you can now import the file here:
click Select File… to locate the file on your computer or network. Once you’re done, click Next.
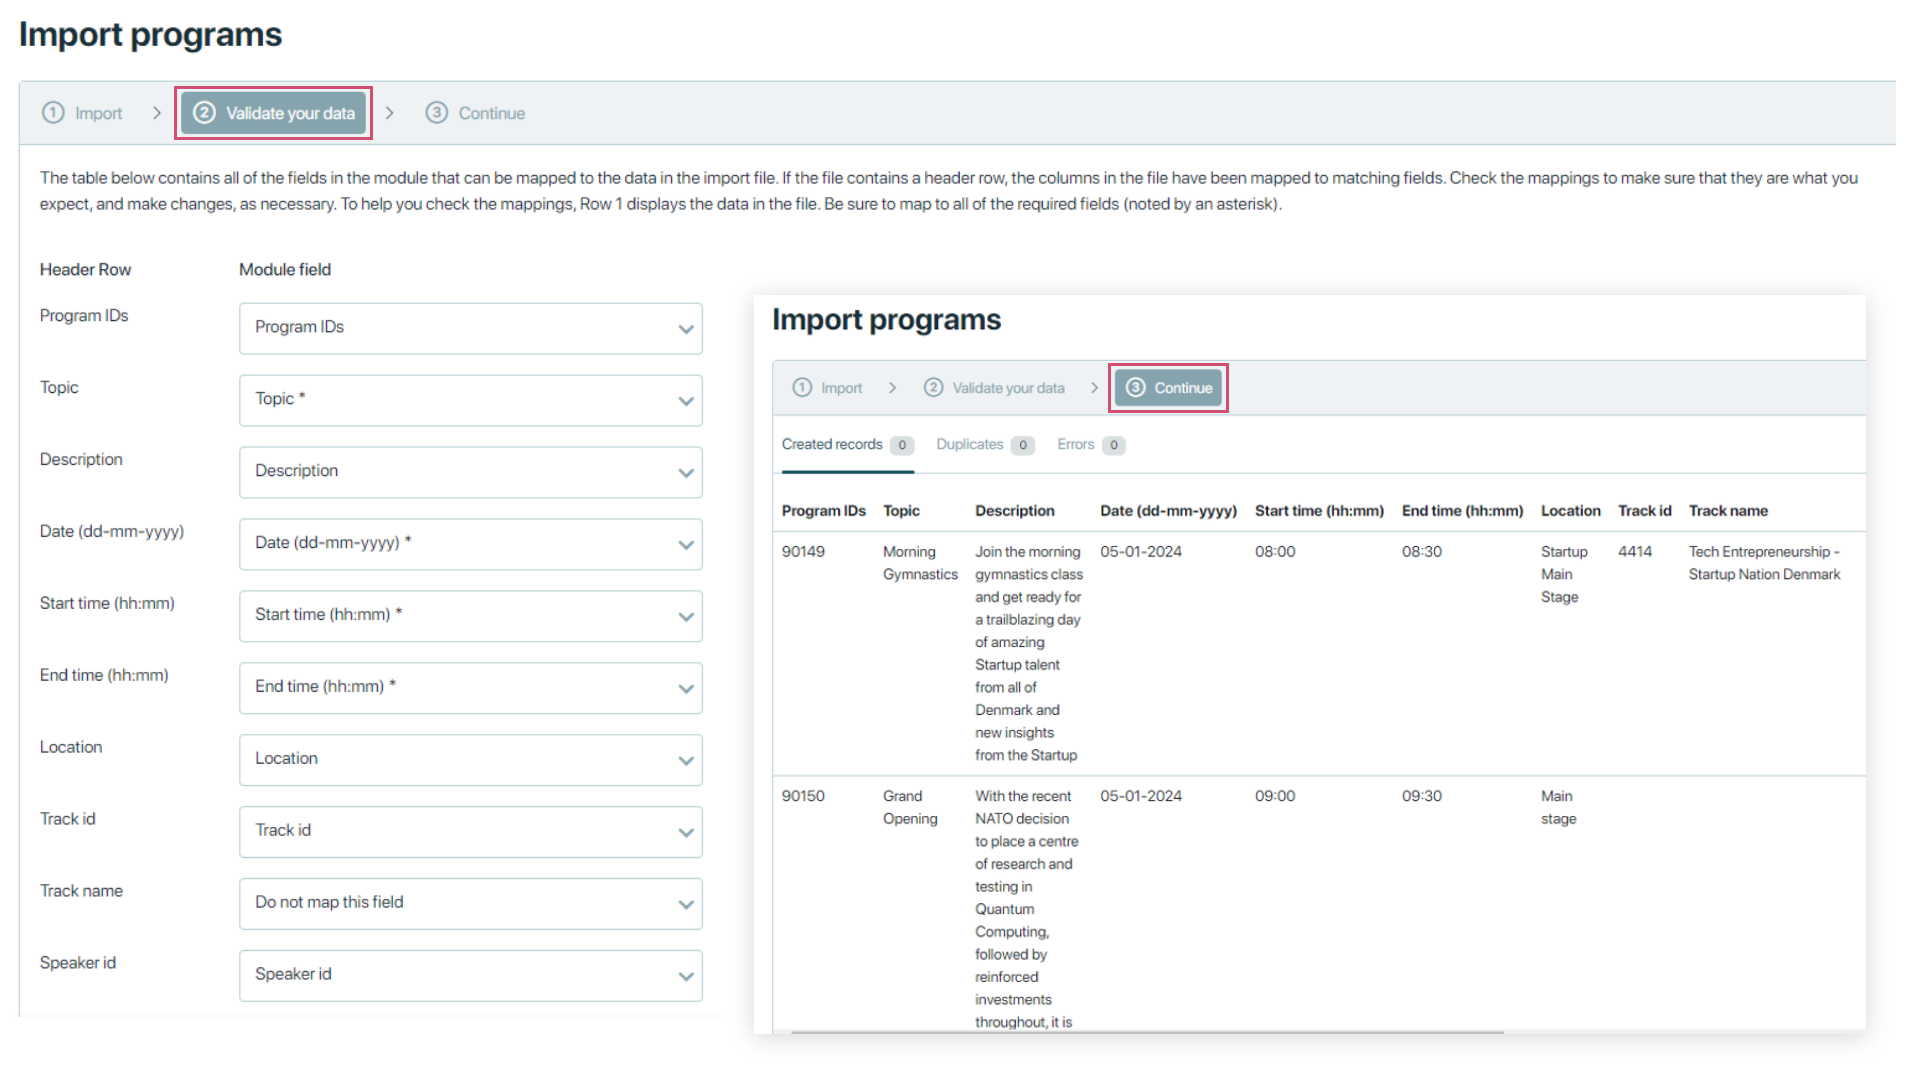
Before the file can be updated, you just need to ‘map’ your information – telling the system that ’email’ is equal to ‘attendee email’ and ID is equal to ‘Program id’.
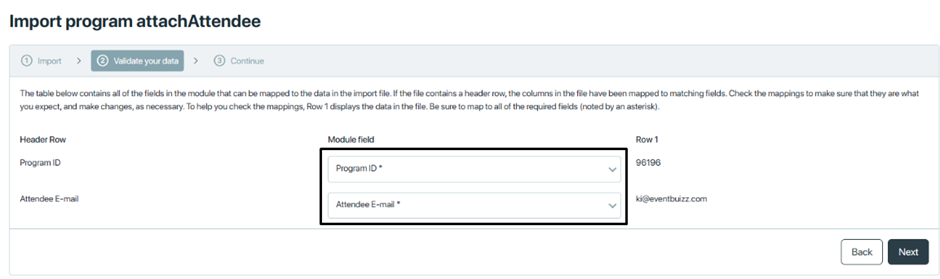
Your file is now successfully imported.
Attach speaker
Attach speaker
We can attach speakers in the same way as we attach attendees. For more details, under Speakers you can see how speakers are created and assigned to a program.
Enable check-in/Enable speaker list
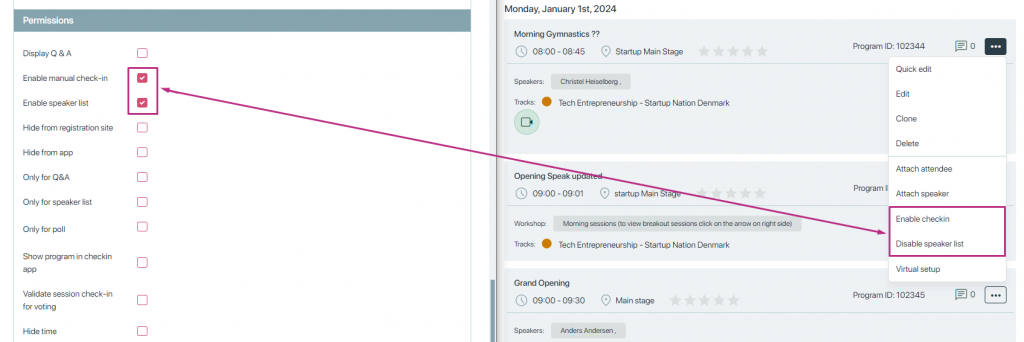
Enable check-in/Enable speaker list
These settings are in the program’s permissions, and we can enable/disable it from program listing too.
- Enable Check-in: This check allows check-in admin to use this program for check-in.
- Enable Speaker list: This check enables the program to use the Request to speak module.
Virtual setup
Virtual setup
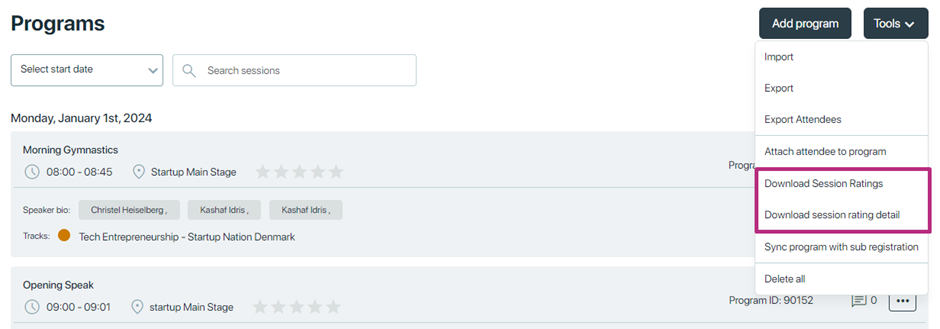
Tools
Tools
We possess various tools options.
- Import
- Import speakers
- Export/ export attendees/ export attached attendees count
- Download session rating and session rating details
- Delete all

Import
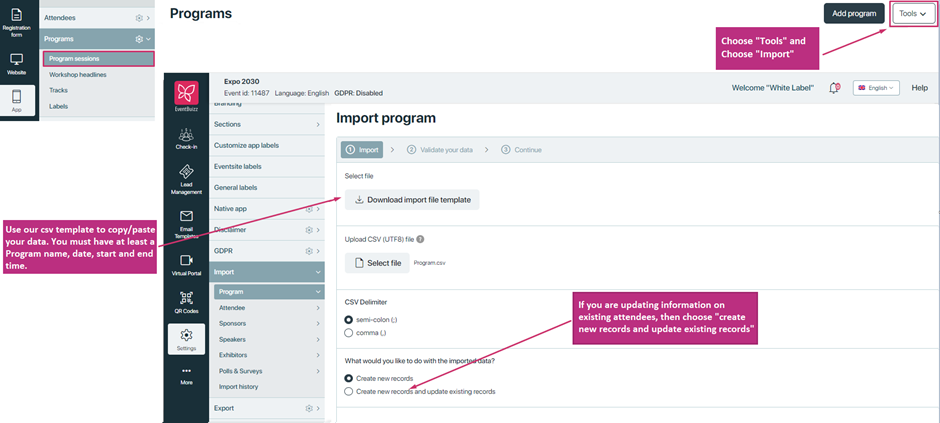
Download Import file template. Copy pastes all the relevant data you have. Save the CSV file on your pc.
NOTE: Topic, date, start time and end time is required. Importing a program is not possible unless you include this information during the import process.

VALIDATIONS
| FIELDS | DESCRIPTION |
| Date (dd-mm-yyyy) | Program import implies a validation requirement for dates in a program, indicating that any date entered or processed within the program must adhere to the format of day-month-year (dd-mm-yyyy)→ dd (day): This part of the date should be represented by two digits, ranging from 01 to 31, to cover all possible days in a month. → mm (month): The month should also be represented by two digits, ranging from 01 to 12, covering the twelve months of the year. → yyyy (year): The year should be represented by four digits, providing a comprehensive range for years. This format is often used to avoid ambiguity, especially when dealing with different date formats globally. For example, a date like “15-03-2024” would be valid according to this format, as it follows the dd-mm-yyyy pattern. On the other hand, a date like “2024-15-03” would not be valid because it does not adhere to the specified format. Implementing this date format validation ensures consistency and standardization in the way dates are handled within the program. It helps prevent errors that may arise from users entering dates in different formats and ensures that the program processes dates consistently, enhancing data integrity and usability. |
| Start time (hh:mm) and End time (hh:mm) | Start and end time must be in hh:mm. It will be in 24-hour format. Indicates a validation rule for time entries in a program. →hh (hour): The hour part of the time should be represented by two digits, ranging from 00 to 23 in a 24-hour format. This ensures that hours are expressed in a 24-hour clock, where midnight is 00:00, and the last minute of the day is 23:59. → mm (minute): The minute part of the time should also be represented by two digits, ranging from 00 to 59, covering all possible minutes in an hour. For example, a valid start time might be “09:30,” representing 9:30 AM, and a valid end time might be “17:45,” representing 5:45 PM. This validation rule ensures consistency in the representation of time and adherence to the 24-hour clock format. It helps prevent errors related to time entries and facilitates standardization in time-related data processing. Additionally, using the 24-hour format eliminates ambiguity between AM and PM designations, as each time is uniquely represented within a 24-hour cycle. |
Select file and then you are asked to either import new records or also update existing records.
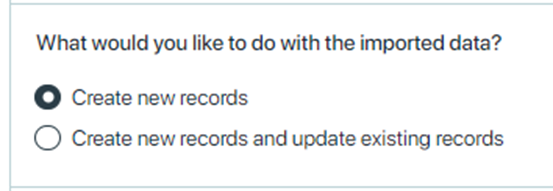
- Choose “Create new records” when you added attendees to the total Attendee list. Then it is only the new records that are imported, meaning no duplicates.
- Choose “Create new records and update existing records” when you will also need to update changes to existing attendee records.
Import a file -> by clicking on Select File
If you have used our template, you do not need to do any changes in mapping, just click ‘Next’. If you use your own CSV file – where the columns are name differently, please map the relevant information.
Import speakers
This feature allows you to import speaker information in bulk using a CSV or excel file against required programs. It saves time compared to adding each speaker manually.
How the Process Works:
- Download Template: Eventbuizz usually provides a sample import file or you can export existing speakers for reference.
- Fill the Template: Populate the fields in Excel/CSV with accurate data. Make sure:
Typical Data Includes:
-
-
- Program ID: The assigned program ID matches exactly with the session titles already present in the system.
- Speaker email: Emails are unique for each speaker.
-
3. Upload via “Import speakers” Option
Once filled, upload it via the “Import speakers” option from the Tools menu.

4. System Validation & Import
- The system checks for formatting issues.
- If sessions are found with matching emails, speakers will be auto-linked to them.
- New speaker profiles are created under the Speakers module.


⚠️ Important Tips
- If you need to link a speaker to multiple sessions, separate session names with a delimiter (ask your admin or support which delimiter is configured — usually
;or,). - Avoid typos in Assigned Program Title — it must match exactly with session names.
- If an Email already exists, the system may update the speaker info instead of creating a duplicate.
After importing speakers, they appear in the program listing, and you can also see the same speakers in the “Attach speakers to a program” section.

Export/ export attendees/ export attached attendees count
- Export: It exports all session (program) data into an Excel file.
- Export attendees: Exports a list of attendees who are assigned to or have registered for each session.

3. Export Attached Attendees Count: Exports a simple count of how many attendees are attached to each session (not the attendee details).

Download sessions ratings/ Download sessions ratings details
Attendees may have the opportunity to rate or provide feedback on individual sessions or presentations. These ratings are valuable for organizers as they help assess the quality, relevance, and success of each session.
After the event or during its course, event organizers may want to collect and store this feedback for analysis or reporting purposes. “Download sessions ratings” and “session rating detail” implies retrieving this data in csv file from the event management platform and saving it locally.

Delete all
The “Delete all” option permanently removes all sessions/programs from the event.
What It Does:
- Deletes every session listed under the Program module.
- Removes all related data for those sessions, including:
- Linked speakers
- Attached attendees
- Session ratings and feedback
- Session visibility in the app/website
⚠️ Important Notes:
- This action is irreversible. Once deleted, you cannot recover the sessions unless you have an export or backup.
- If a program/session is linked to a billing item or sub-registration, it cannot be deleted.
Workshop headlines
Workshop headlines
Programs and parallel sessions/ workshops typically refer to the various activities or sessions taking place concurrently. Instead of having a single, linear schedule, an event may offer multiple sessions or programs happening at the same time in different locations or rooms. Attendees can then choose which specific sessions they want to participate in based on their interests or preferences. This approach allows for a more diverse and customizable experience for attendees, as they can select the sessions most relevant to their needs or preferences.
Enter the title and the time course for the parallel workshops or breakout sessions that are added to the program. Visually, they appear clearly next to each other. Either vertically or horizontally.
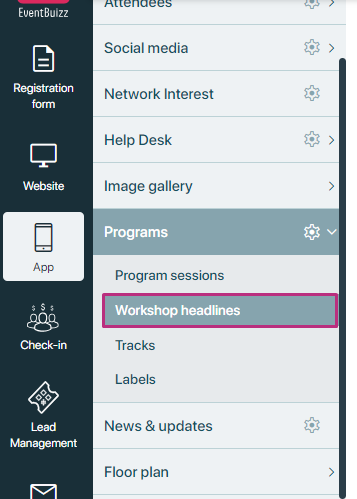
Access the workshop headlines menu
Organiser can access the workshop headlines section by following this path:
- Evenetcenter->app->program-> workshop headlines
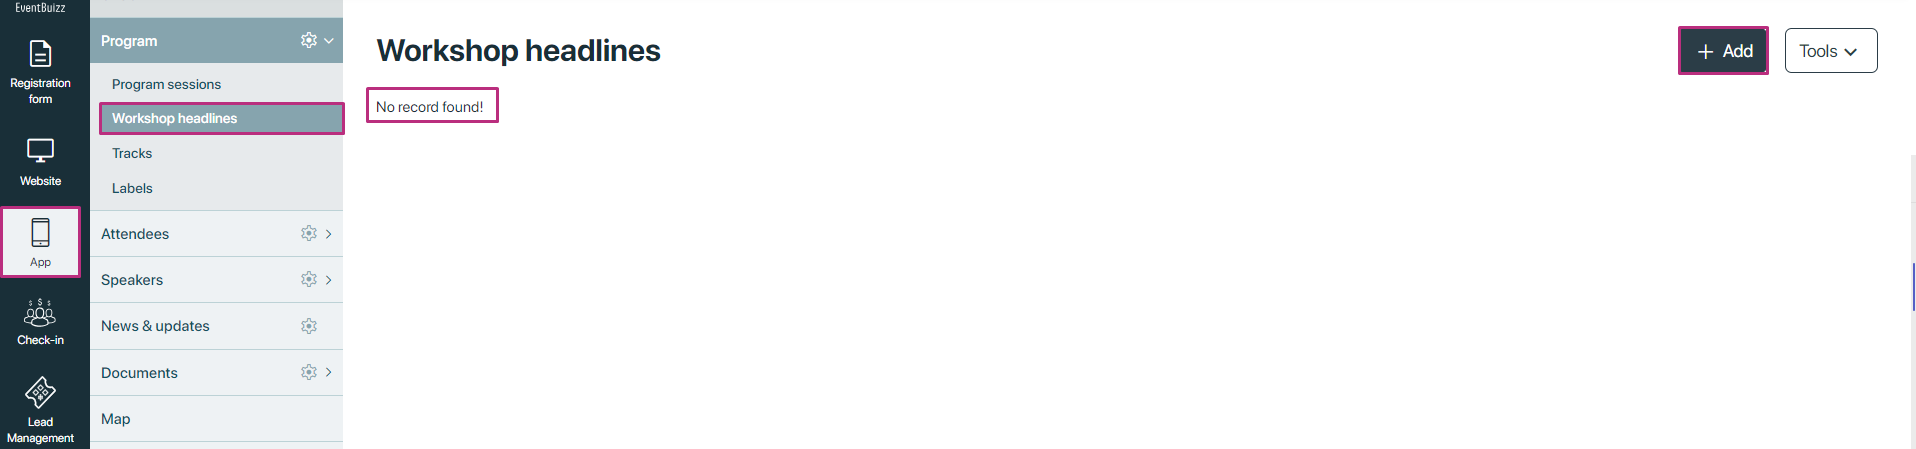
By default when organiser will land on the “workshop headlines” there will be “no record found” message will show, and also there will be a “add” button at top right of the page.
Workshop creation and management interface
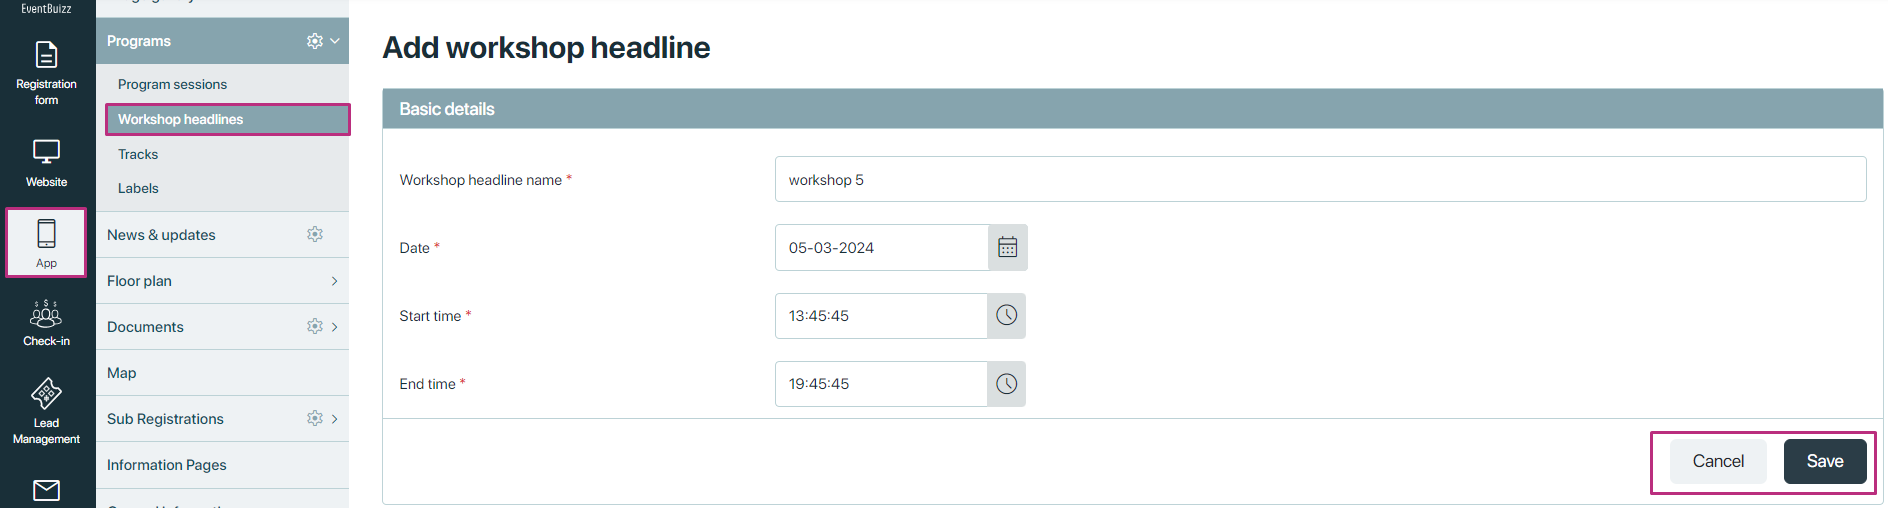
When an organiser clicks on the “+ Add” button, they are directed to a new page designed for creating and managing workshops. Here’s a detailed overview of this interface and its functionalities:
Workshop creation page
Required fields for creating a workshop
- Workshop headline name:A text input field where the organiser specifies the title of the workshop.
- Date:A date picker to select the day the workshop will take place.
- Start time:A time picker to set the starting time of the workshop.
- End time:A time picker to set the ending time of the workshop.
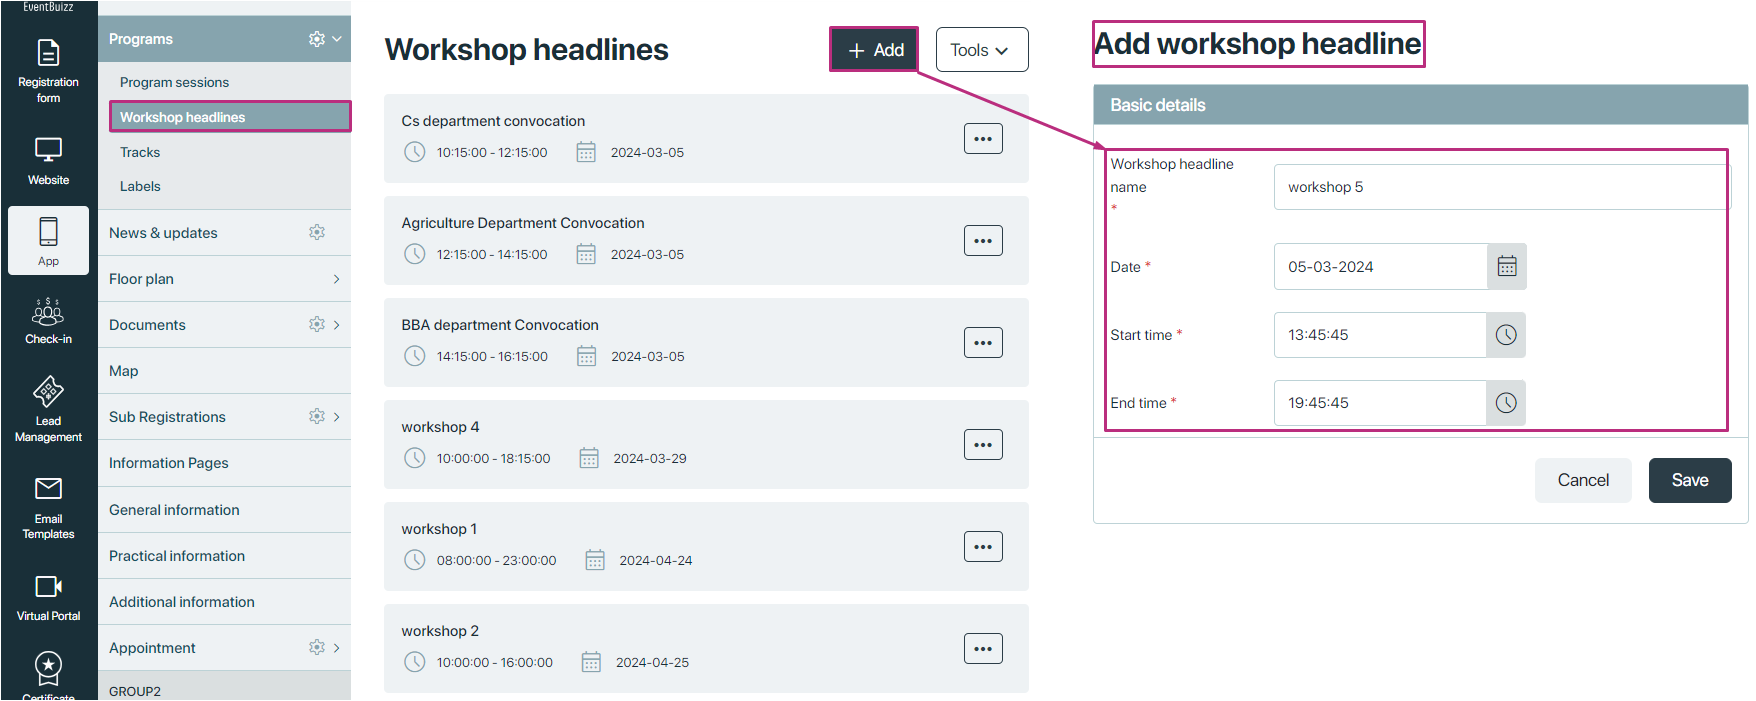
Action Buttons
Save
- Clicking this button will create the workshop using the provided details. Upon successful creation, the organise will receive a confirmation message, and they will be redirected to the workshop listing page.
Cancel
- This button will discard any unsaved changes and redirect the organiser back to the workshop listing page without creating a new workshop.
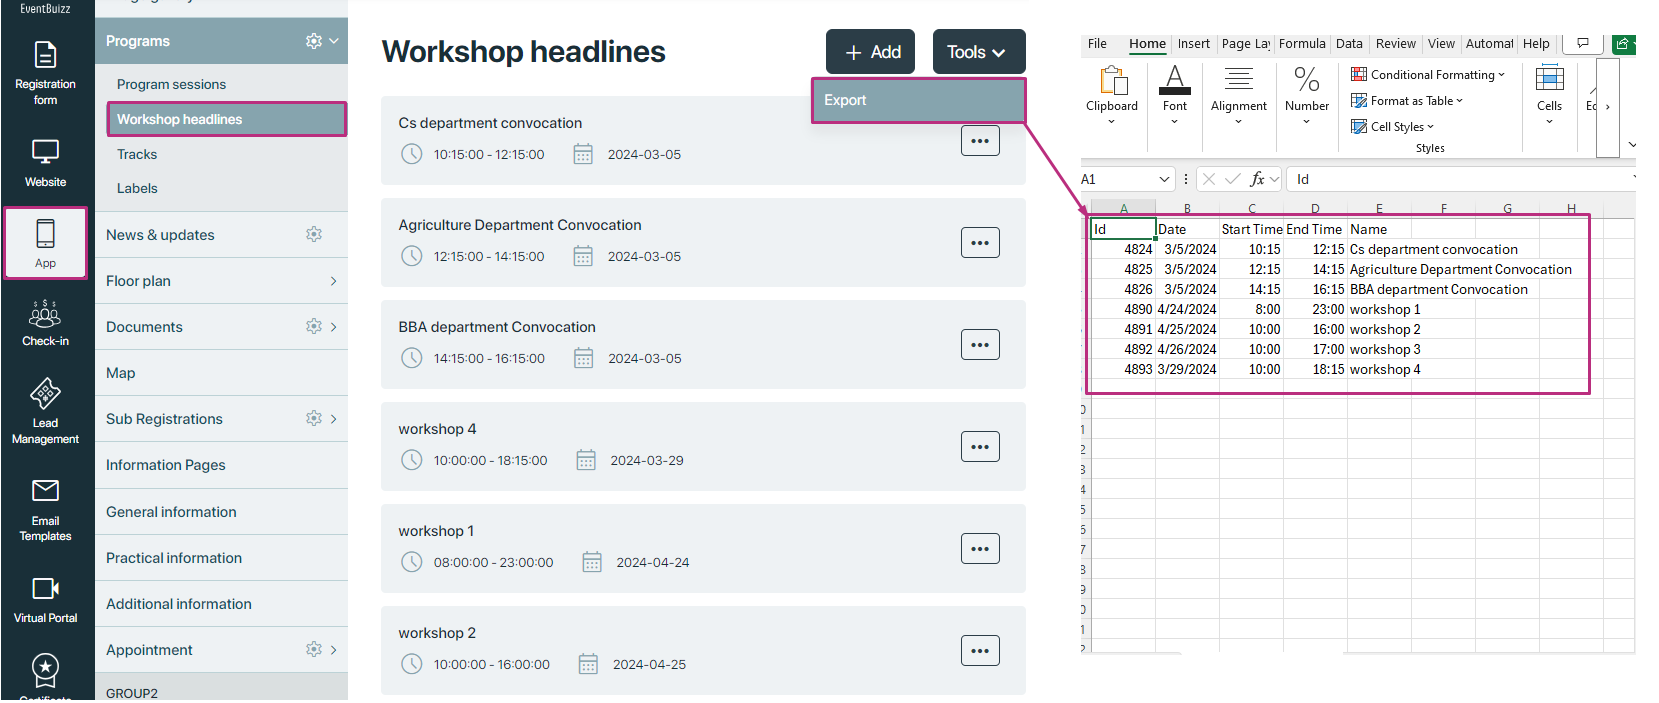
Workshop listing page
After creating workshops, the organiser will be taken to the “workshop listing” page, which provides a summary of all workshops created.
Features of the workshop listing
Workshop overview
- A table or list displaying all workshops with relevant details, including the workshop headline, date, start time, and end time.
Tools option
- An additional option labeled “Tools” allows organizers to export all created workshops. This can be in various formats, such as CSV or PDF, for easy sharing or record-keeping.
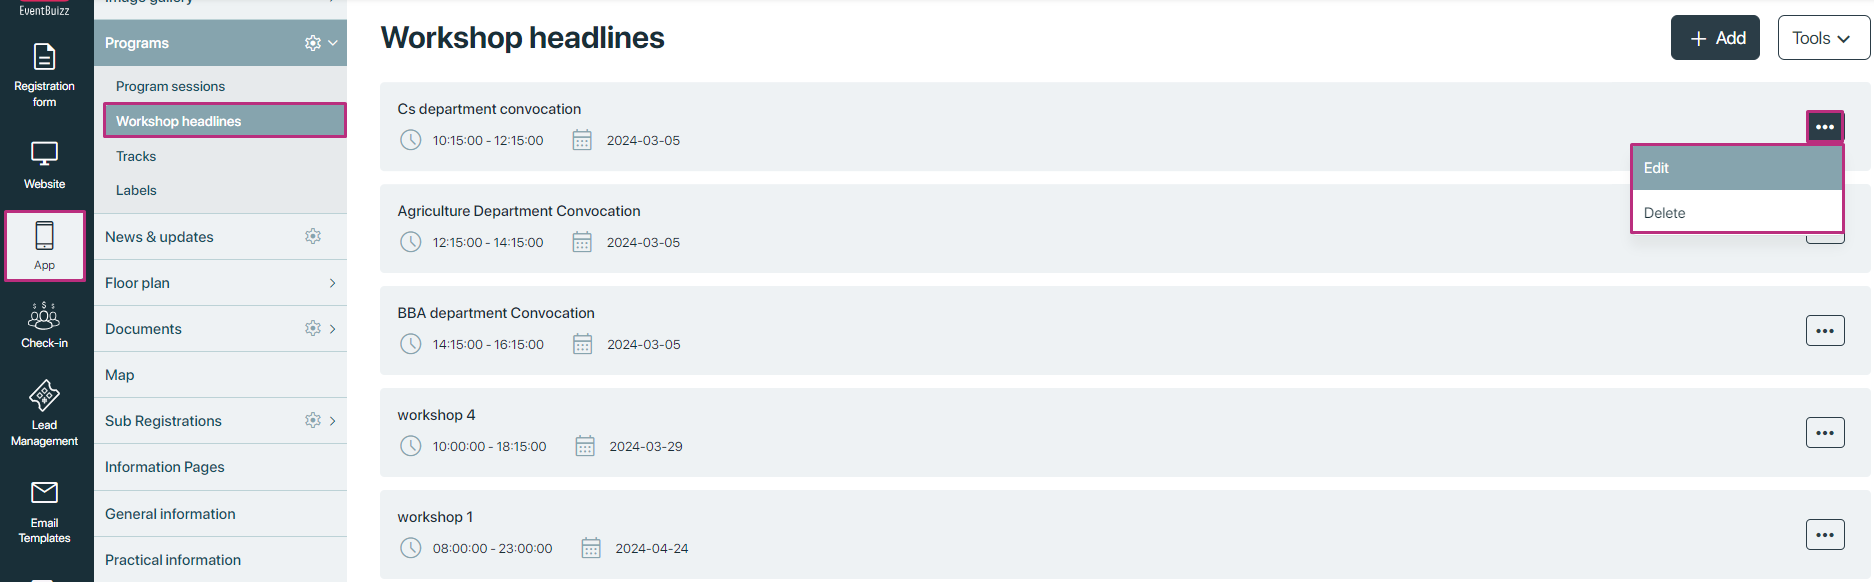
Menu options for each workshop
For each workshop listed, there is a menu option that includes:
Edit
- Selecting this option allows the organizer to modify the details of the workshop. They will be redirected back to the workshop creation page, pre-filled with the existing information for easy editing.
Delete
- This option enables the organizer to remove a workshop from the list. A confirmation prompt may appear to prevent accidental deletions.
Tracks
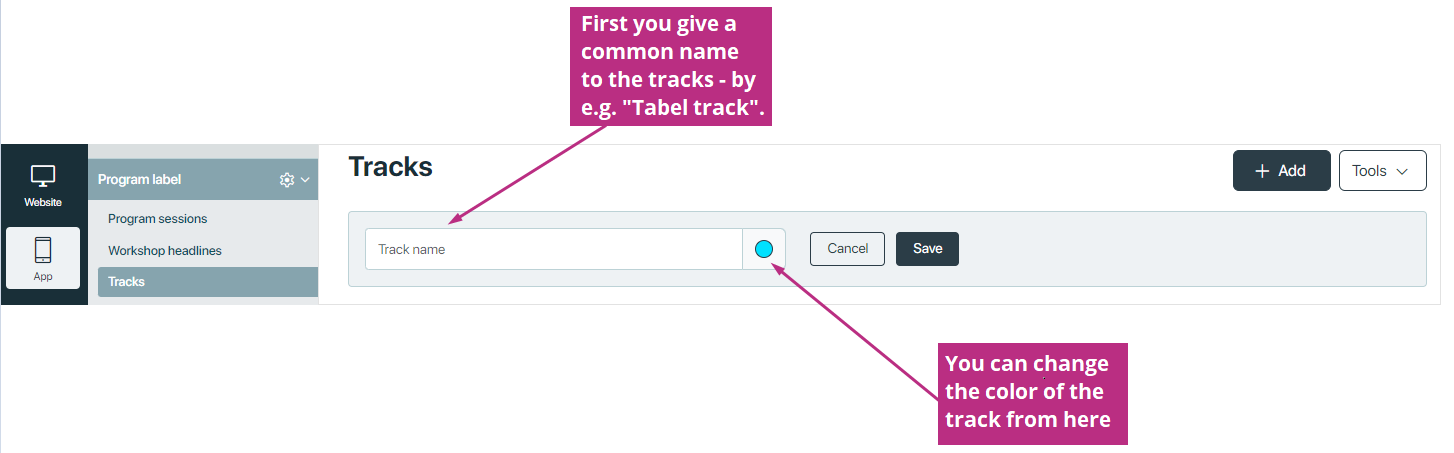
Tracks
“Tracks” refer to thematic or specialised categories within the overall program. Each track is a distinct pathway or series of sessions that focus on a specific topic, theme, or area of interest. These tracks are designed to cater to different audience preferences or to provide a structured way for participants to navigate through the event content.
Begin by selecting your event. From the left-hand navigation, click Programs, then Tracks. Click Add. These tracks or sub tracks make the program more manageable for the attendees. Especially if you have many agendas to discuss.
Tracks listing
After adding tracks, they will all be displayed in a single listing. Within the tracks, you can also add sub-tracks. To edit or delete tracks or sub tracks, simply click on the ![]() icon.
icon.
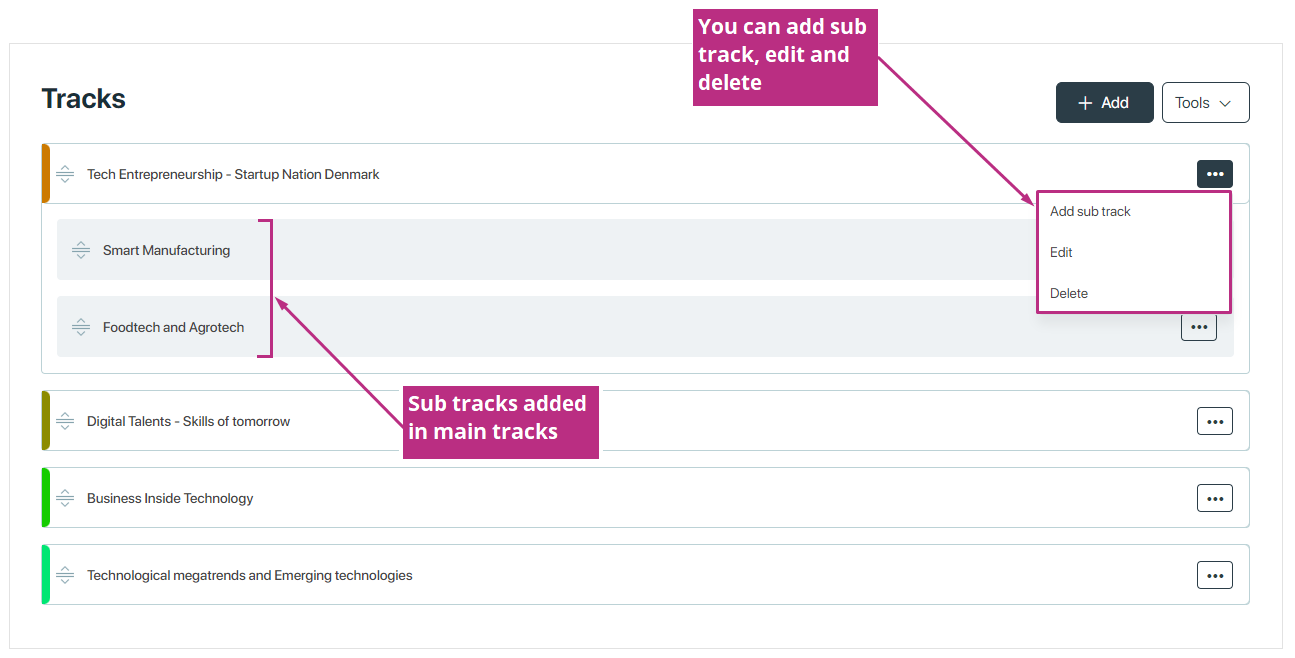
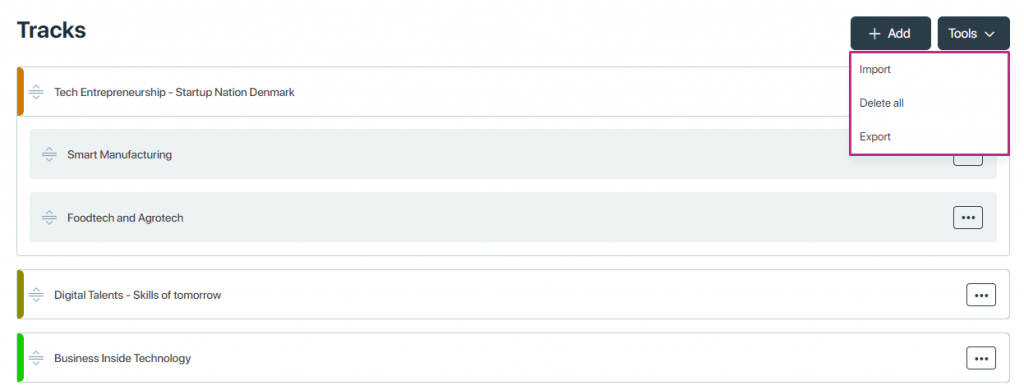
Tools
We can Import, Export and delete all tracks from Tools.
By clicking on export, system will download a csv file having all tracks and sub tracks in it.
Delete all will remove all tracks from listing permanently.
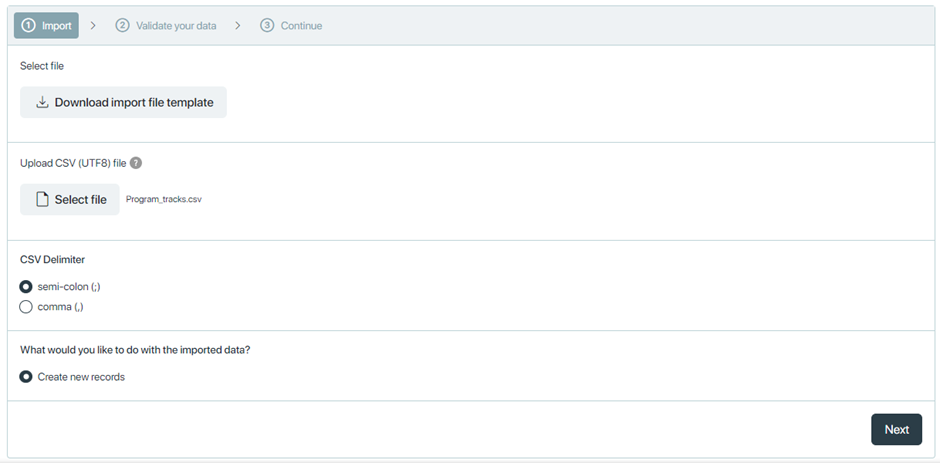
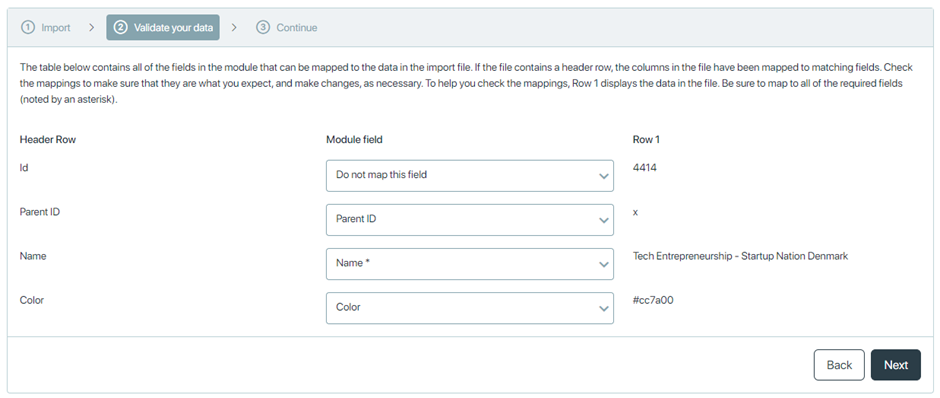
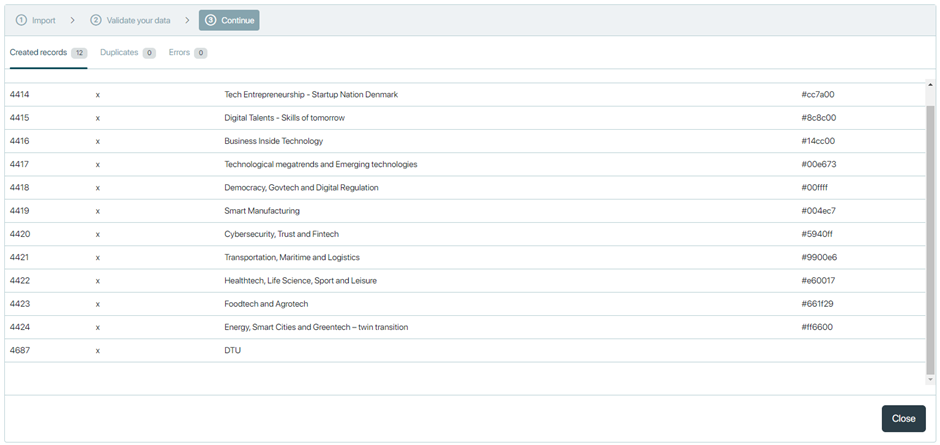
Import
If you want to import tracks directly to the list, you do like this:
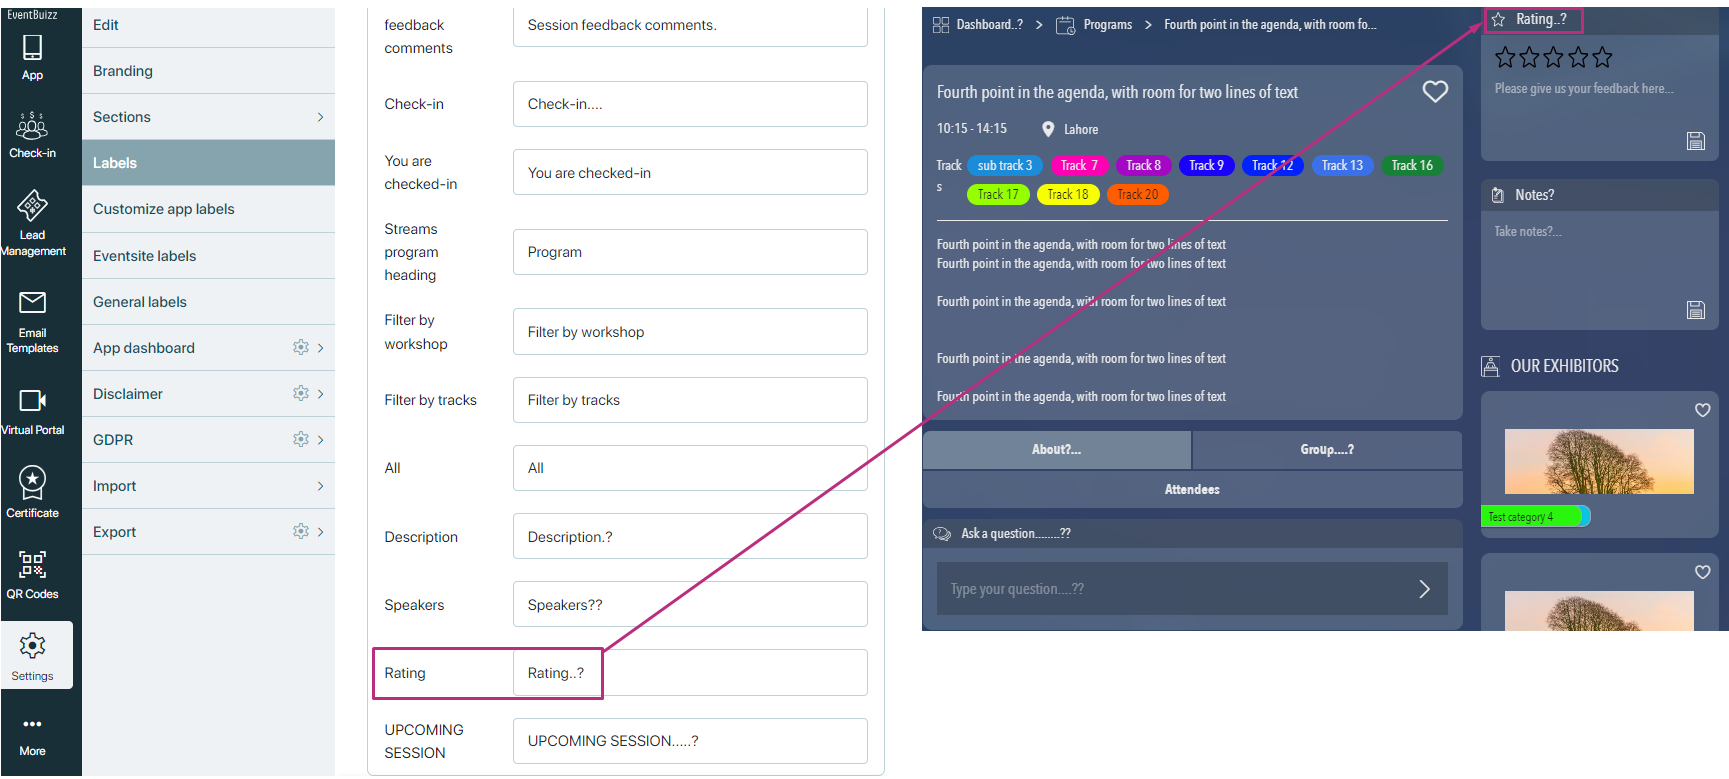
Labels
Labels
Labels serve as customisation tags or descriptors that provide context and organisation to various components within the program module. They are essential for enhancing user experience, allowing both organisers and attendees to better understand and navigate the event’s offerings. Labels can be used for categorising workshops, sessions, speakers, and other elements of the event, making information easier to find and understand.
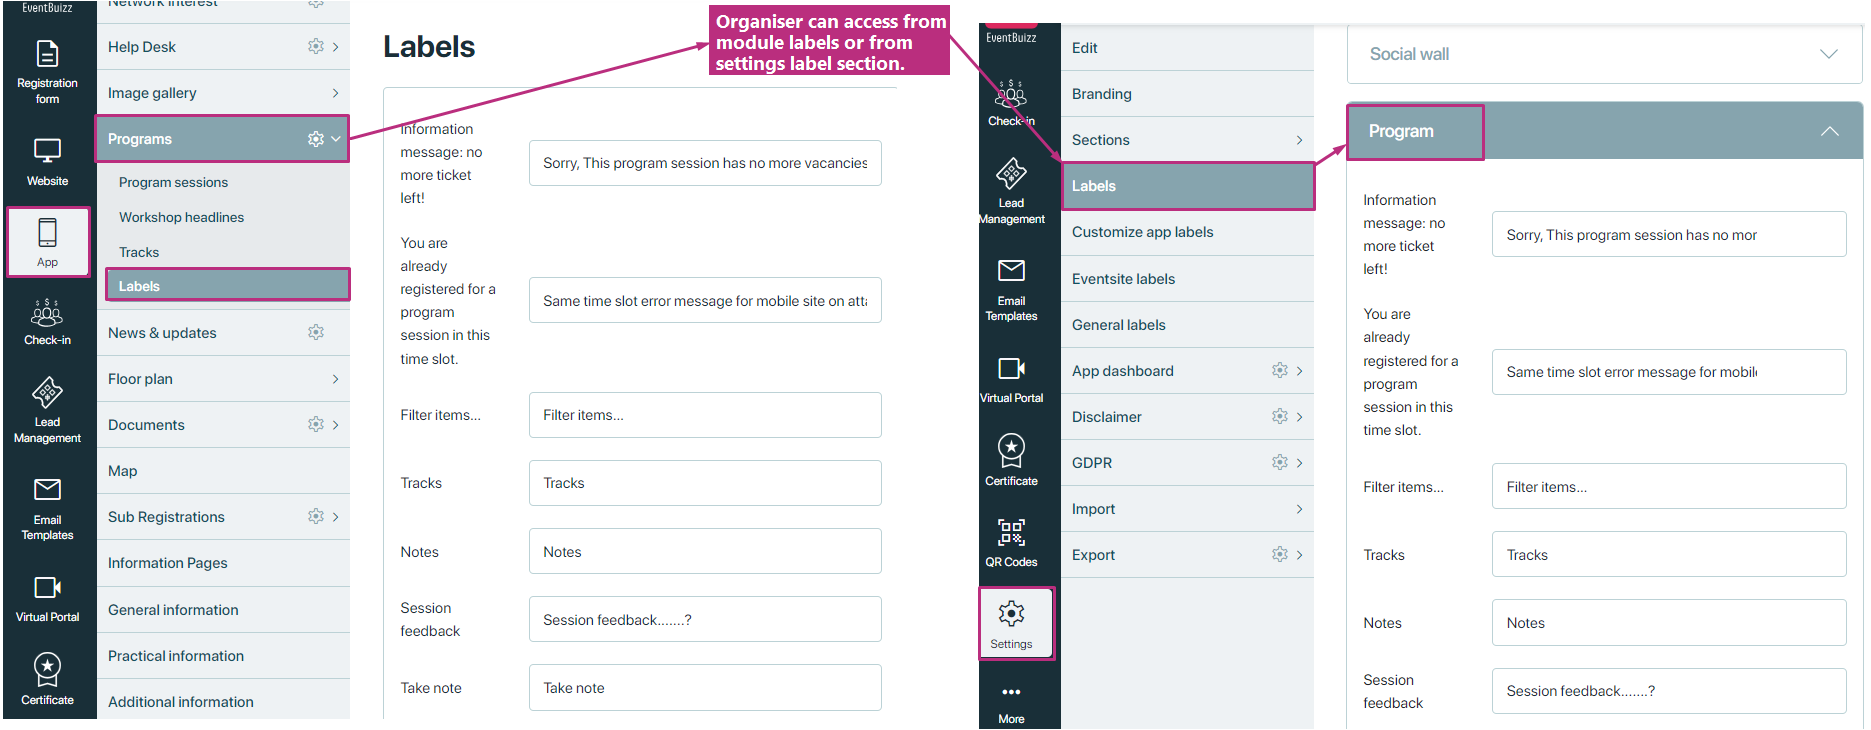
Accessing labels
Organisers can access the program module labels from two main locations:
Program Module Subsection
- Within the main program module, there is a dedicated subsection for managing labels. This area allows organiser to view, edit, and create new labels specifically related to the program’s content.
Settings Menu
- Organisers can also navigate to the settings menu in the event center. From there, they can select the Labels option, where all labels used across the event center are listed. This provides a centralised location for managing labels used in various modules, ensuring consistency and coherence throughout the event.
Dynamic nature of labels
One of the key features of the label system is its dynamic nature:
Real-time updates
- Any changes made to labels within the event center settings will automatically reflect in the web app. This ensures that both organisers and attendees see consistent terminology and labelling throughout all platforms.
Dynamic text replacement
- Labels are not static; they are designed to adapt based on changes made by organisers. For instance, if an organizer decides to change the term “Workshop” to “Session” in the labels section, this change will propagate across the entire program module, updating all instances where that label is used. This dynamic feature minimizes confusion and enhances the overall user experience.
Importance of labels
Clarity and consistency
- Labels help maintain clarity in communication, ensuring that attendees understand the content and structure of the event. Consistent labelling across different modules reinforces branding and event identity.
Organisational efficiency
- Organisers can categorise and organise content effectively, making it easier to manage large amounts of information and enhancing the user experience.
Customisation
- Labels allow for a tailored experience, enabling organisers to adapt terminology to better fit the specific context or audience of their event.
Settings
Program settings
The Program settings section is a critical component of the program module that allows organisers to manage and customise how program-related information is displayed across various platforms, including the web app, native app, and registration site. Essentially, it acts as a control management system, enabling organisers to tailor the attendee experience and optimise information presentation.
Purpose of program settings
- Customisation: Organisers can modify how program information is presented, ensuring that it aligns with the event’s branding and objectives.
- User experience enhancement: By managing visibility and functionality, organisers can create a more intuitive and engaging experience for attendees.
- Control and flexibility: Settings provide organisers with the flexibility to enable or disable features based on the event’s specific needs and audience preferences.
Access the program module settings
Organiser can access the program settings in eventcenter by following this path:
- Eventcenter->app->program->setting icons
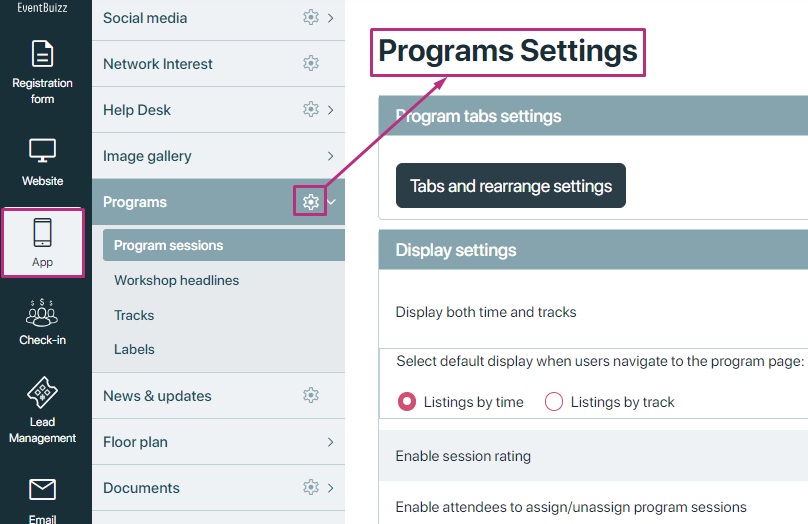
Subsections of program settings
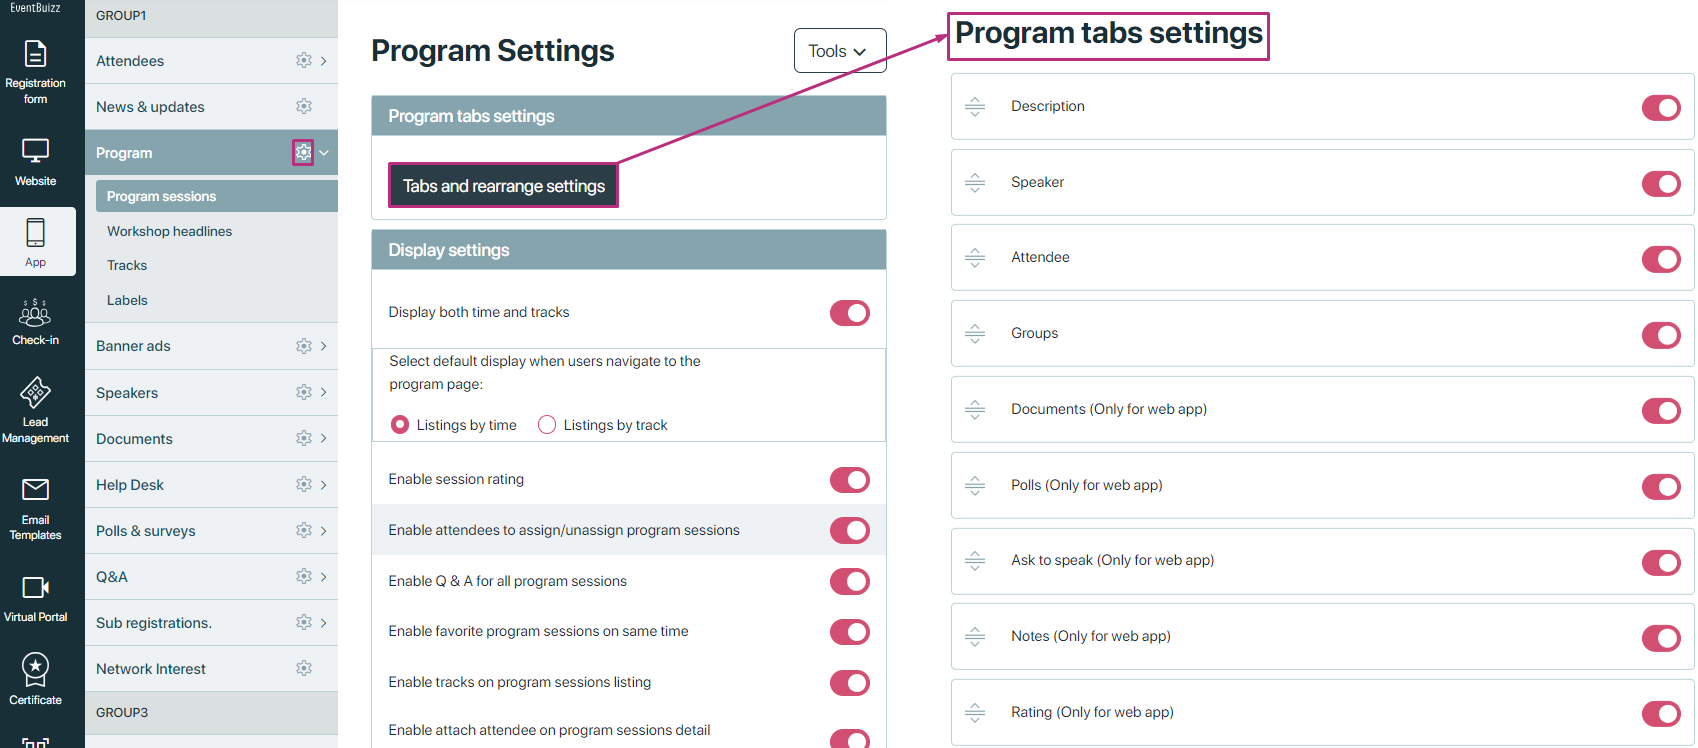
1. Program tabs settings
-
Functionality: This subsection allows organisers to enable or disable specific tabs that appear in the web application where programs are listed. For instance, tabs for rating, speakers, or notes can be shown or hidden based on relevance.
-
Purpose: By customising tab visibility, organisers can streamline navigation and focus attendees’ attention on the most important aspects of the program.
By clicking on the “Program tabs settings” organiser will move to the next page, where all the tabs will be listed, and also against each tab, organiser have the toggle button, if toggle button is on then that particular tab will show in the web app program detail, otherwise it will not show.
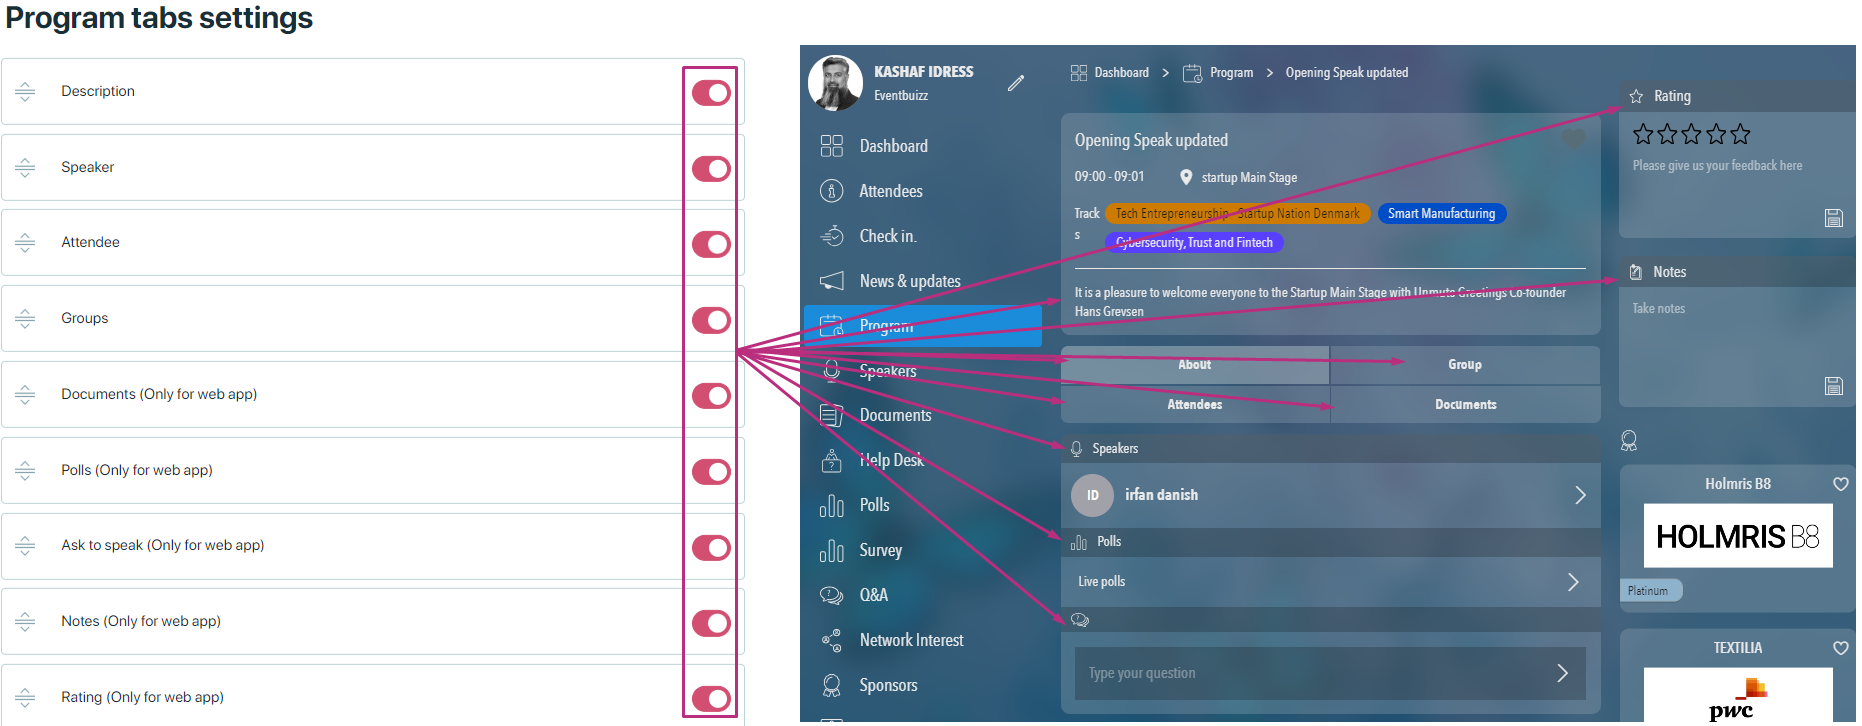
When all the data is given in program profile, and attendee or speaker are attached with program, and also documents are also attached with program, then as per the tab status all the given data will show in program details, as per above screenshot all tabs toggle is on, now see all detail is showing in web app.
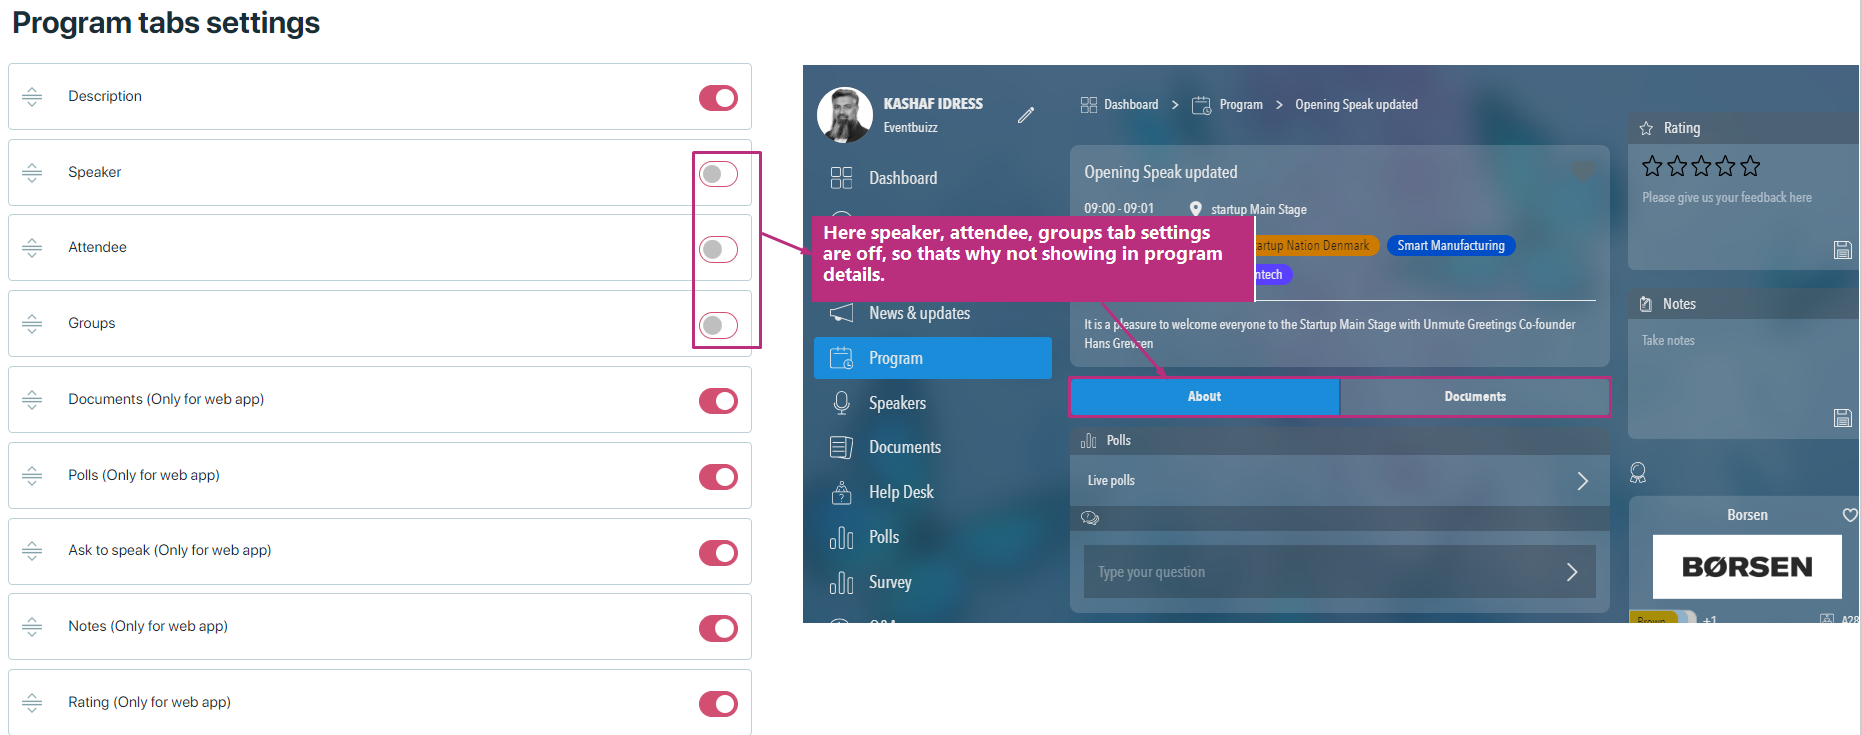
If organiser don’t want to show any tab in program detail, then simply he will disable from the settings of tab, here is the view of it:
Display settings
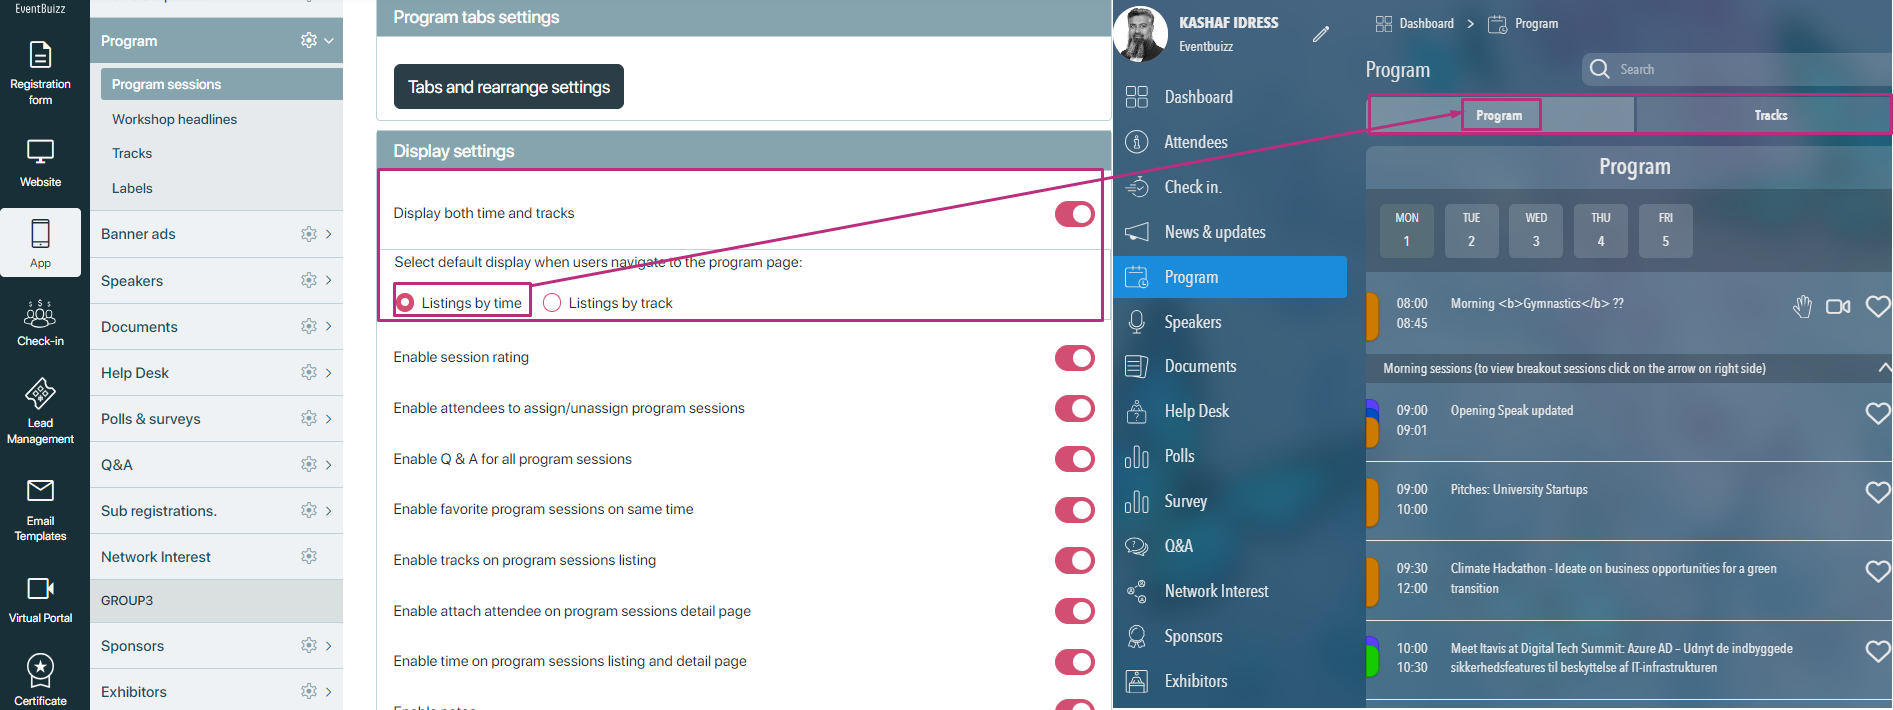
Display both time and tracks
Select default display when users navigate to the program page:
- Listings by time
- Listings by track
If this setting is “on” then in program listing both time and track tabs will be shown and also on the basis of the “default display” a tab will be selected, like if listing by track radio button is selected then in program listing time tab will be active by default.
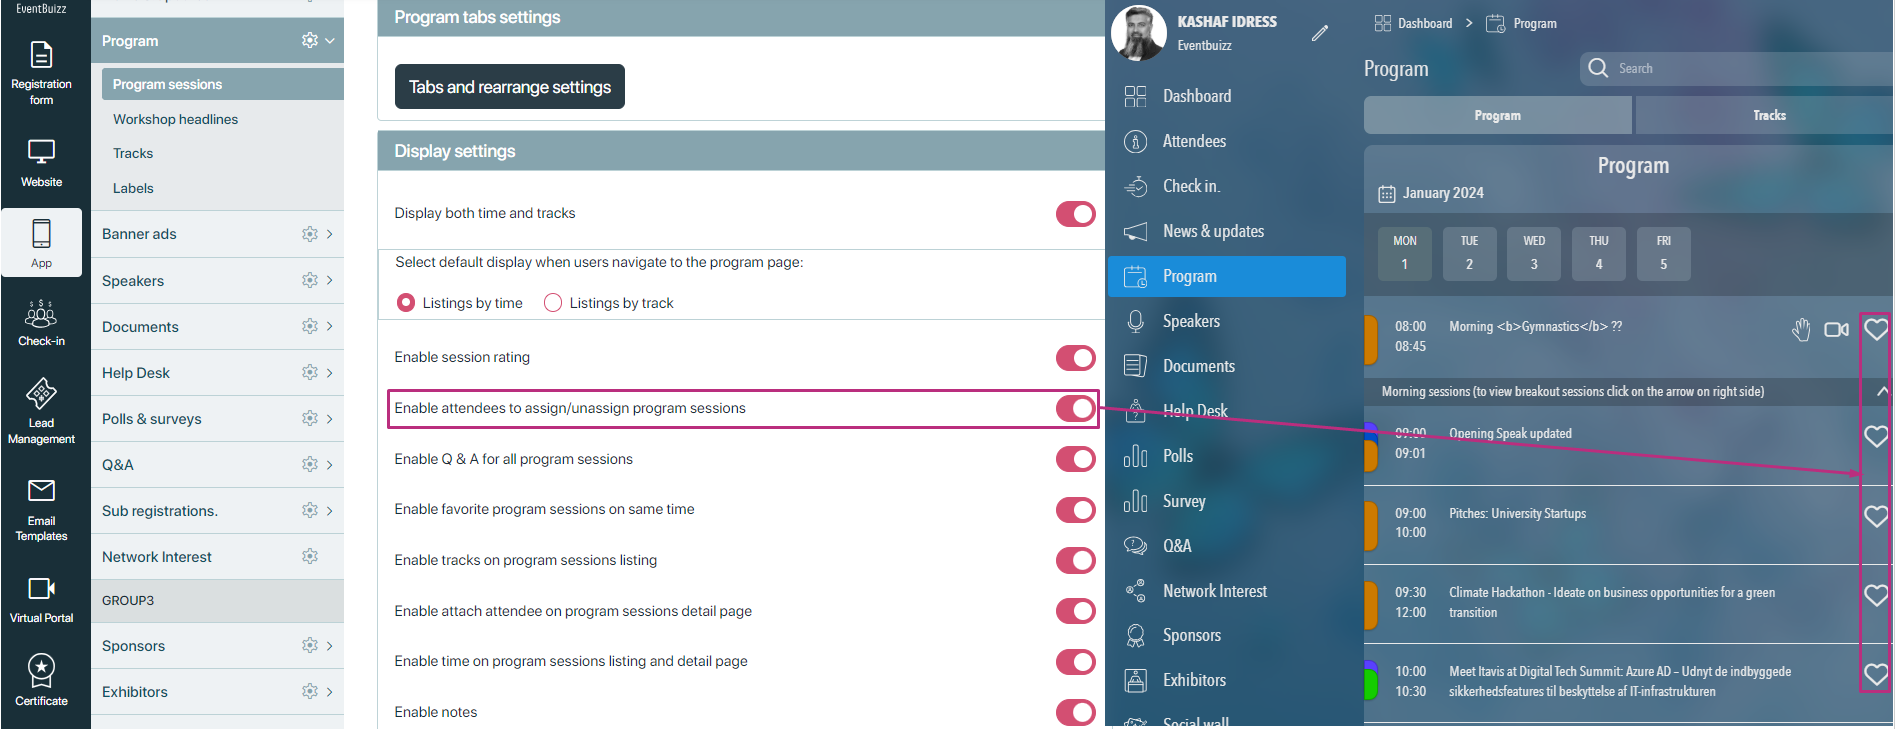
Enable attendees to assign/un-assign program sessions
Attendees can mark sessions with a heart icon to create a personalised agenda, enhancing their engagement and satisfaction. All the program which marked favourite will move into my program listing as well.
Enable Q & A for all program sessions
Enabling a Q&A option for sessions encourages interaction between speakers and attendees, fostering a more dynamic environment.

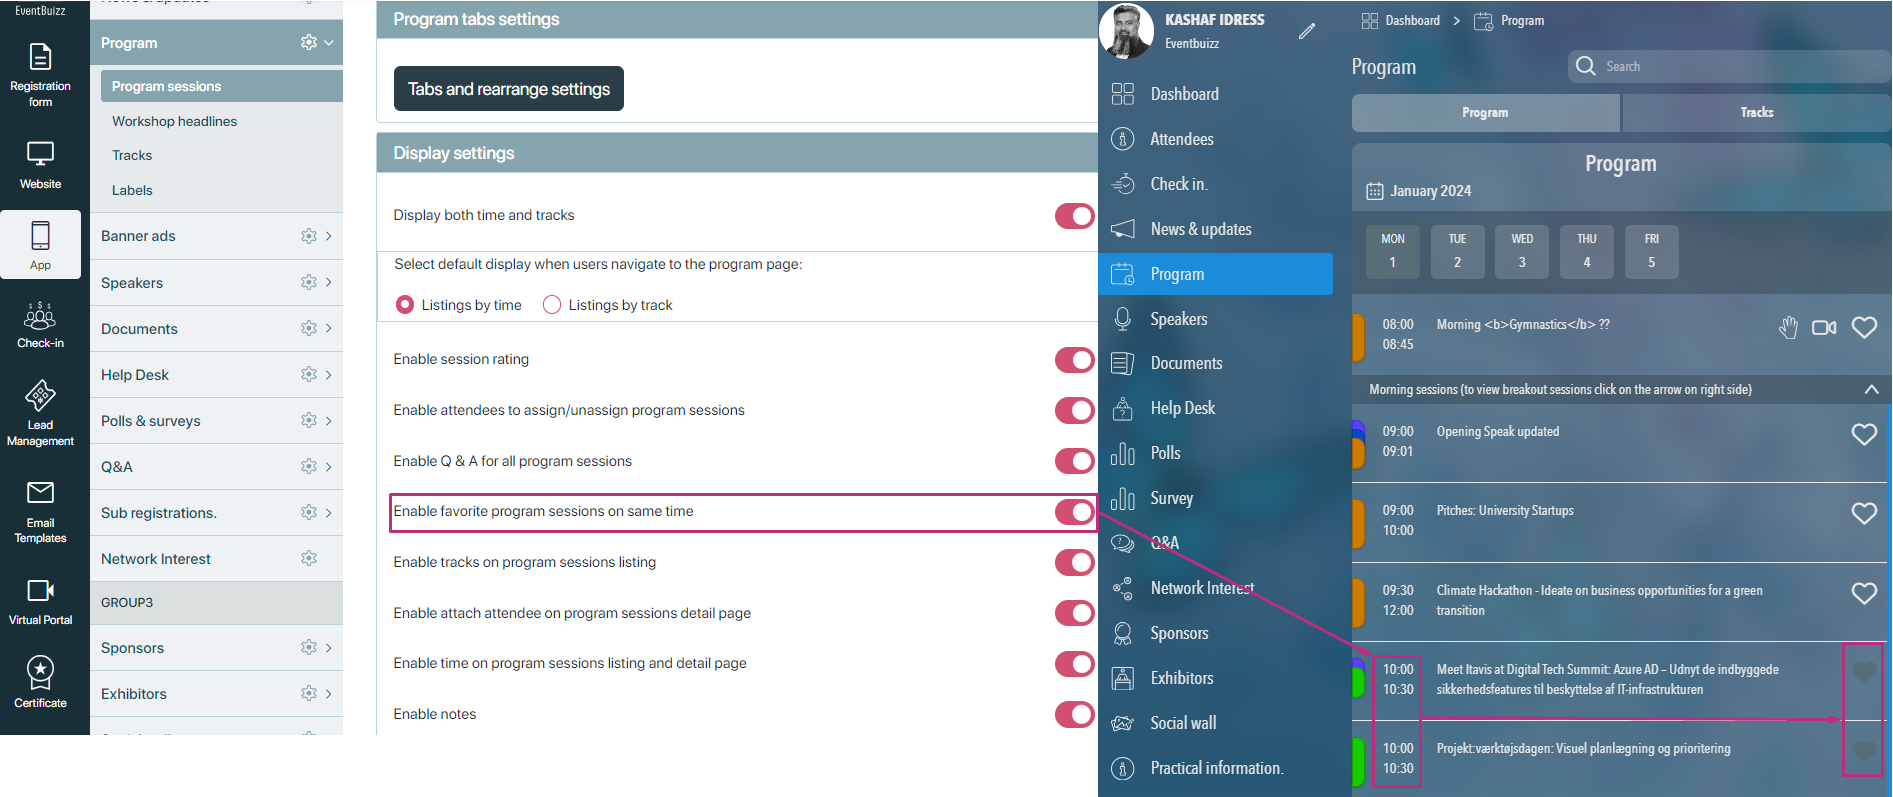
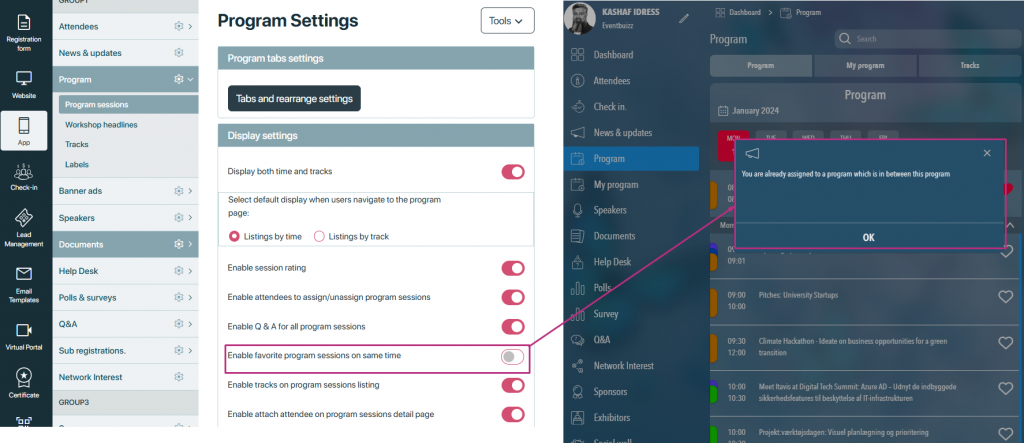
Enable favourite program sessions on same time
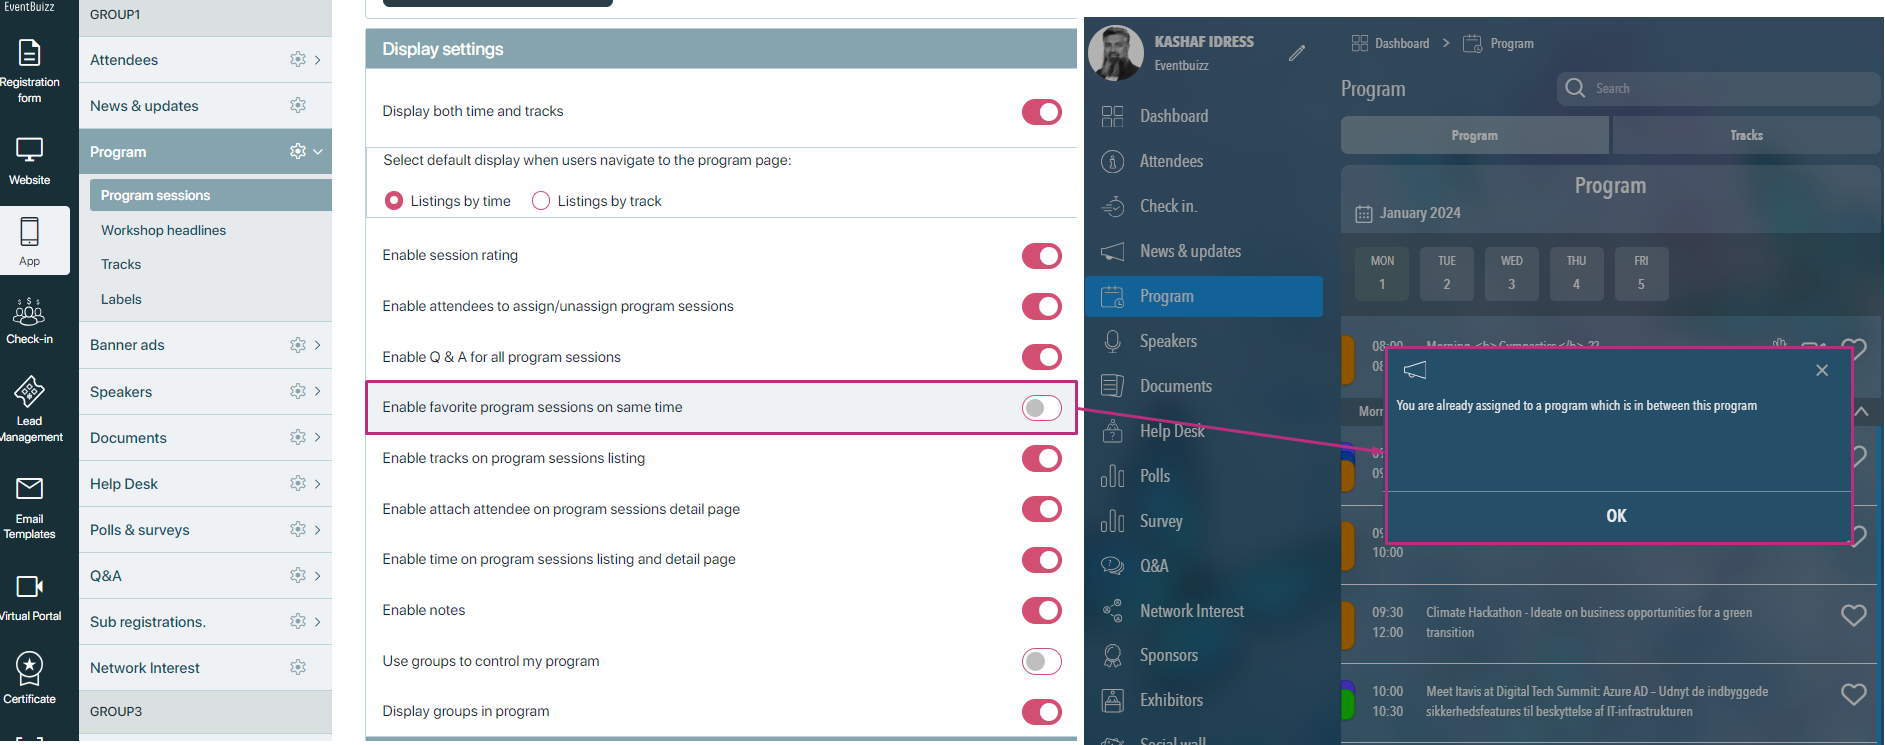
This setting allow attendees to make more than one program favourite at same time, if more then one program have the same time, if this setting is in then only attendee can make them favourite.
If this setting is off, and attendee want to make favourite program with the same time, then it will give alert popup to attendee “You can’t make same time program favourite”. Here is the view of it:
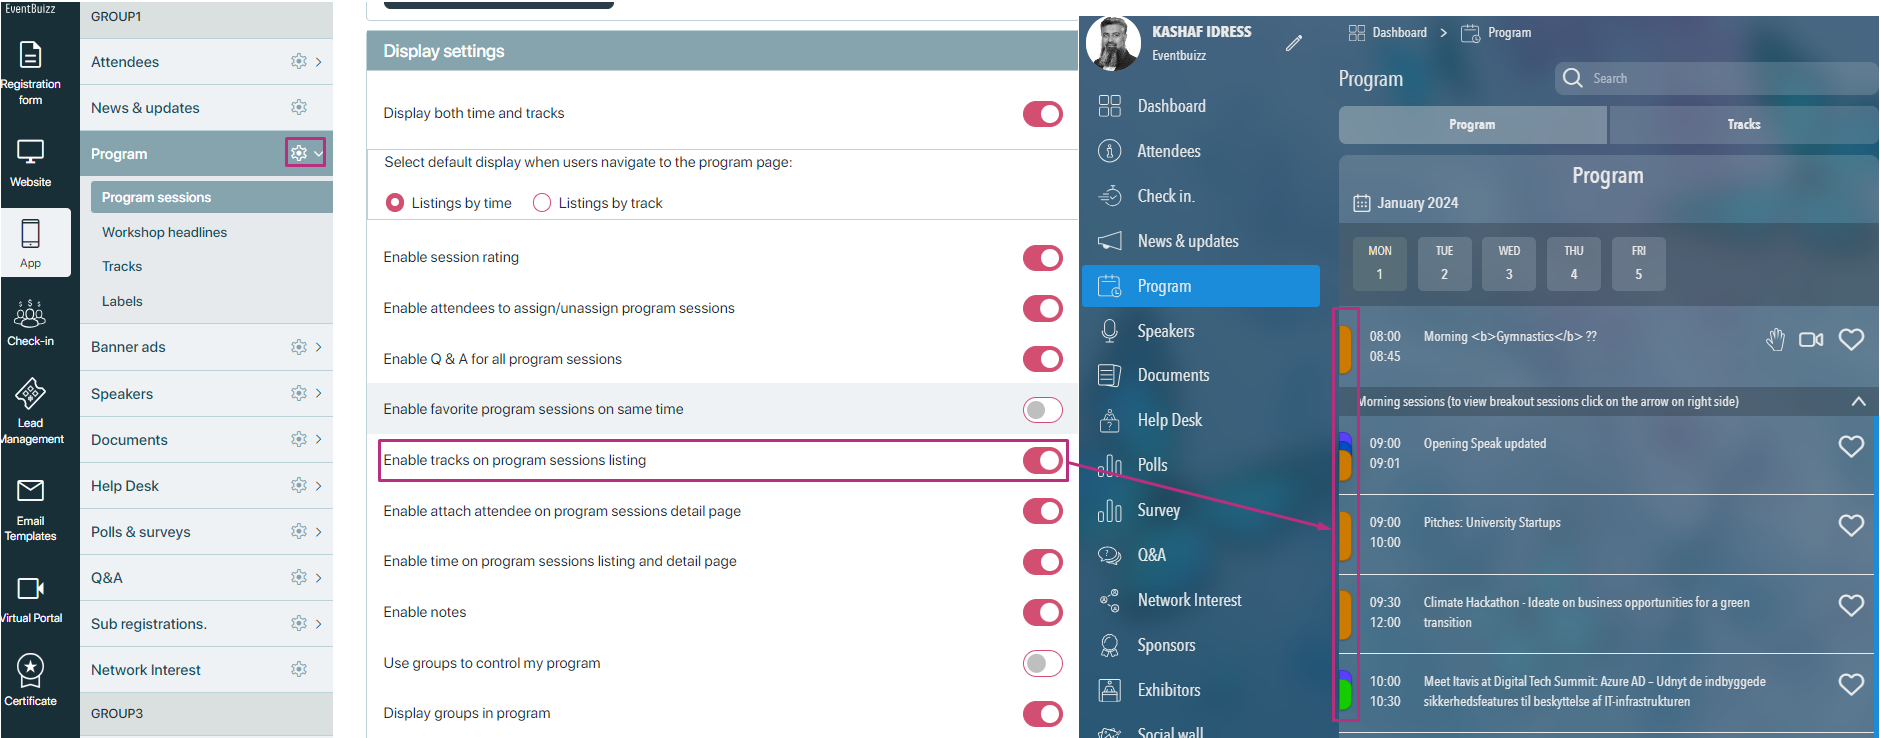
Enable tracks on program sessions listing and details
This settings shows the tracks on the program listing and detail of the program, if this setting is off then this tracks will not show on the listing and details of the programs.
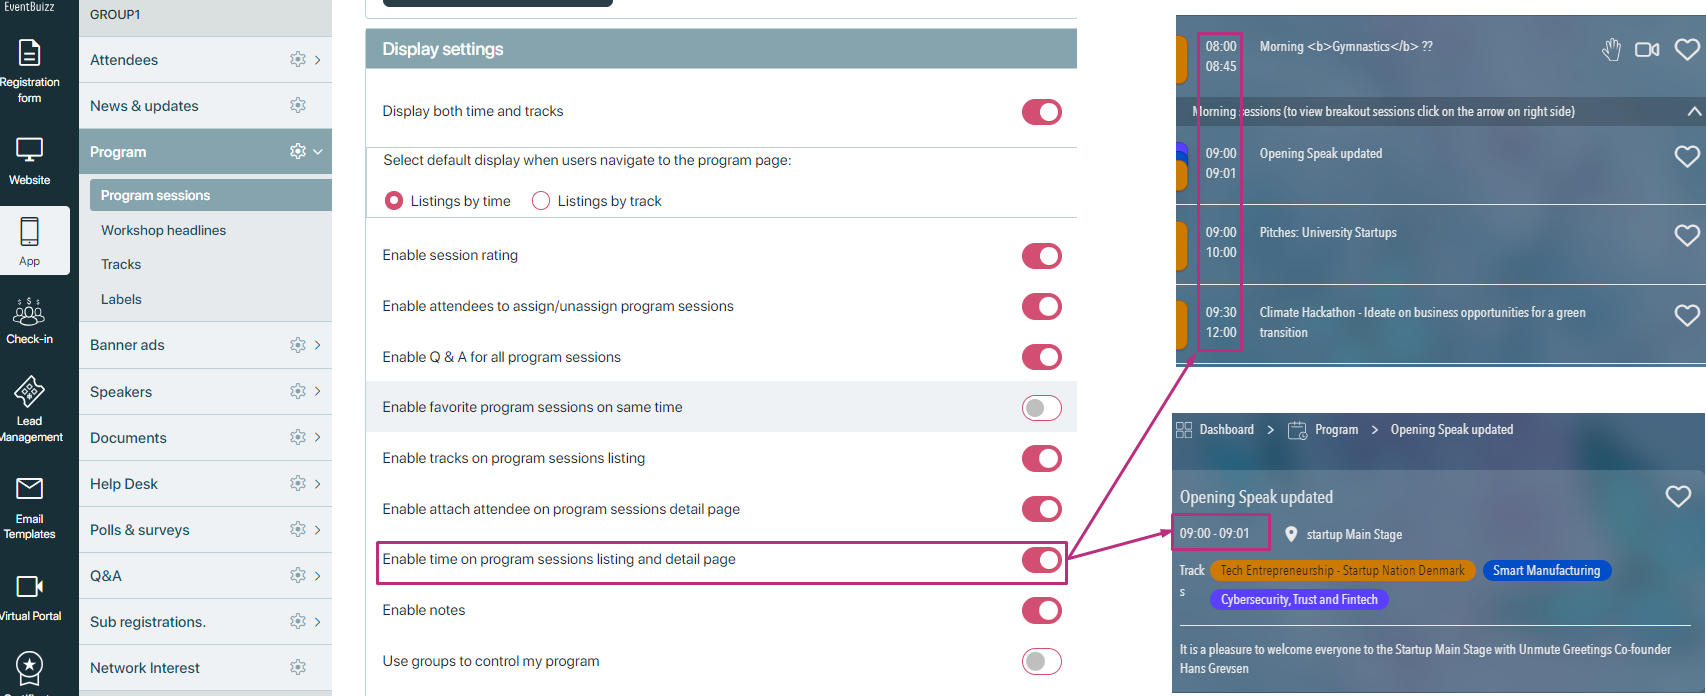
Enable time on program sessions listing and detail page
This setting will enable the program time on the listing and detail of the program, if this setting is off then program start and end time will not display on the listing and detail of the program, otherwise it will display in case on enabled status.
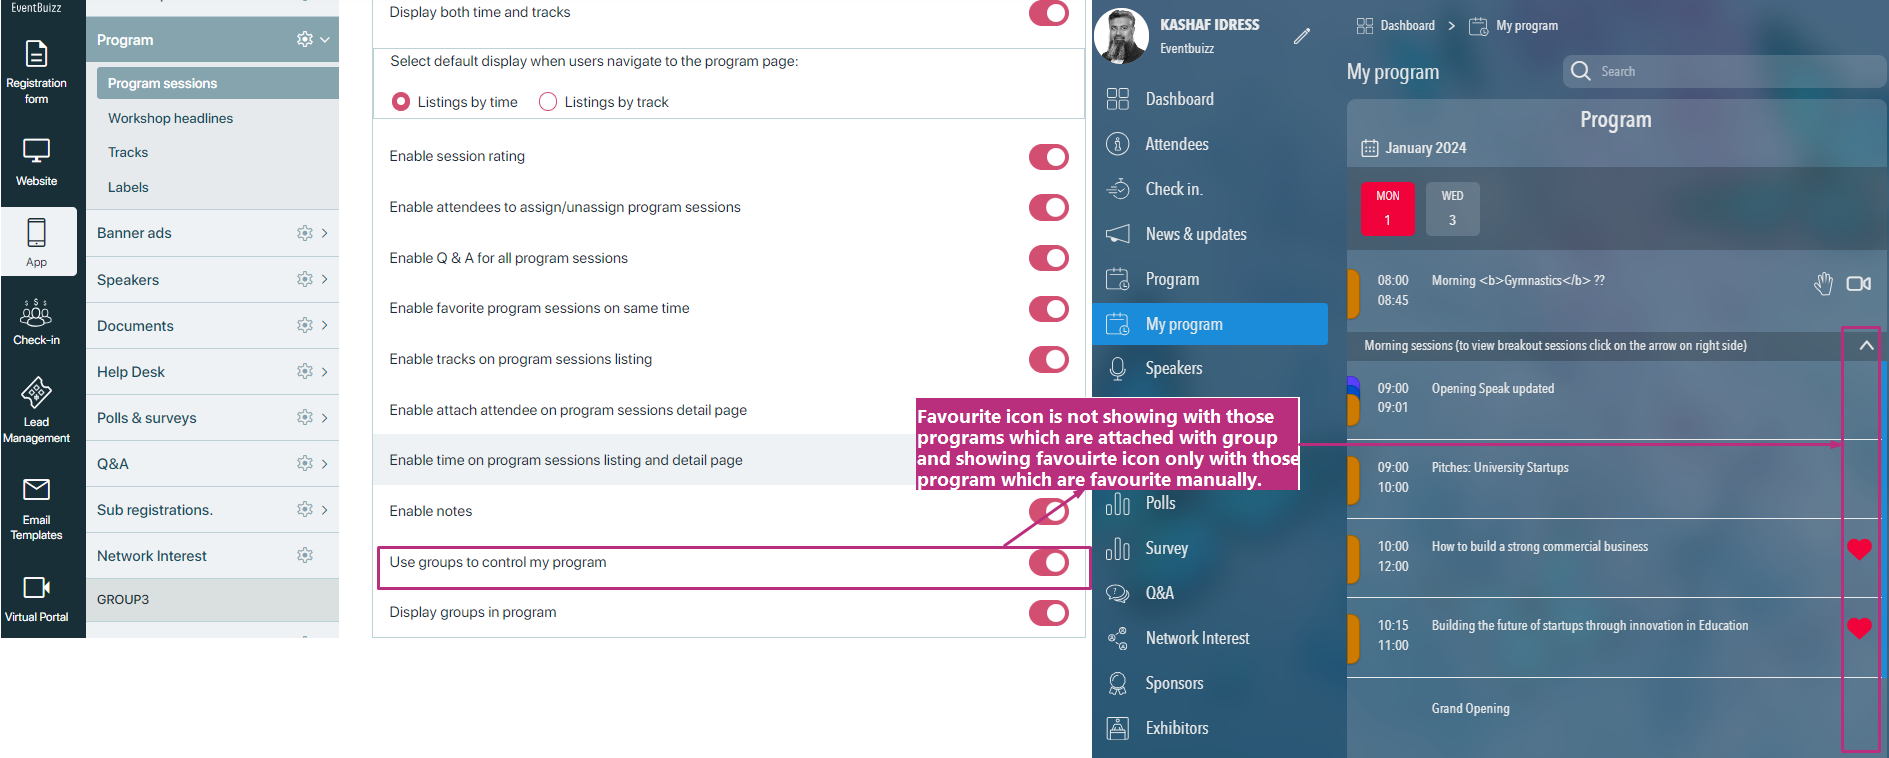
Use groups to control my program
All the program which are attached to a group, and attendee is also attached with that group, and when this setting will “on”, automatically those program will start showing in my program, and on program listing heart icon will not show against those programs.
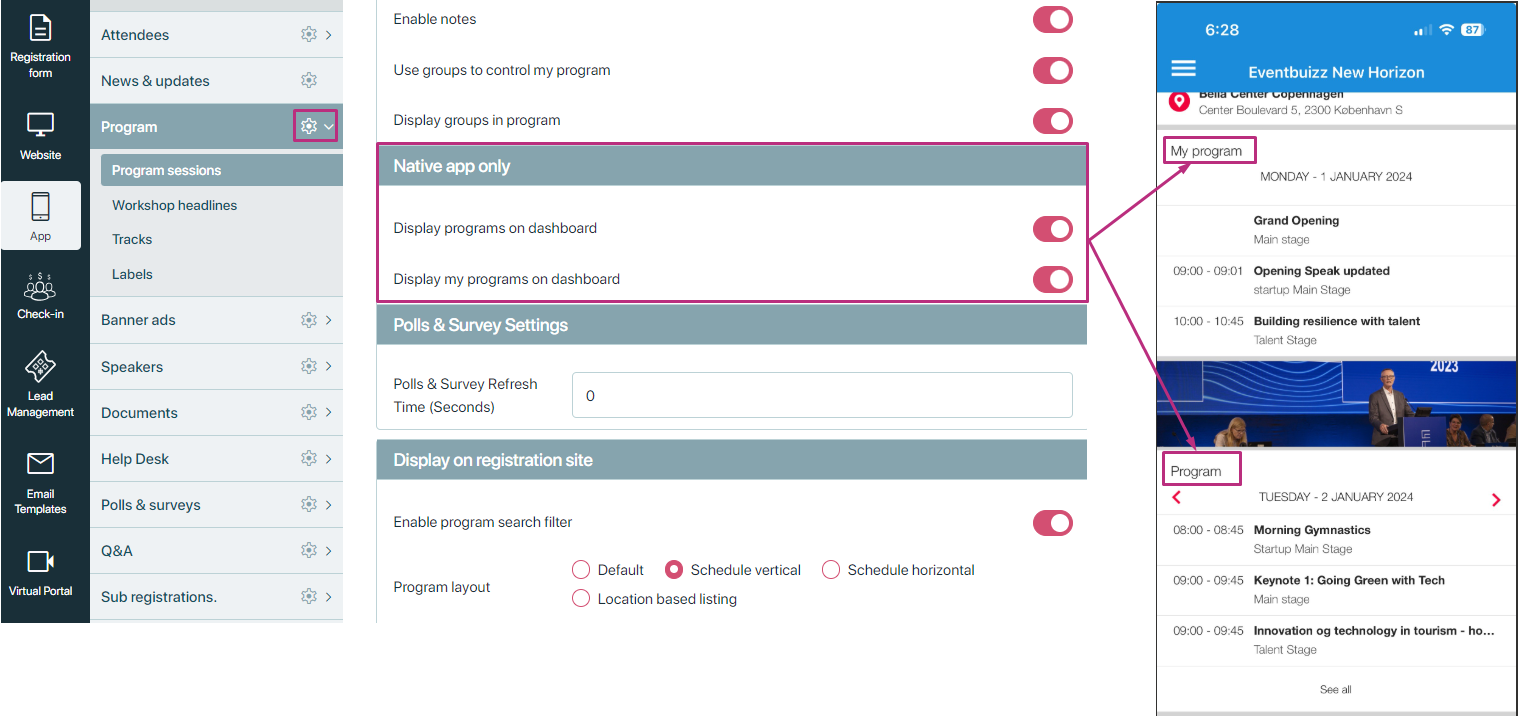
Native app only
This section is settings is basically used to manage the program and my program module, in native app. Following are the available settings organiser have in native app settings.
Display programs on dashboard
This setting will enable the program module on the dashboard of the native app, if this setting is enable the program module will show on the native app dashboard, otherwise it will not display there.
Display my programs on dashboard
This setting will enable the my program module on the dashboard of the native app, if this setting is enable the my program module will show on the native app dashboard, otherwise it will not display there.
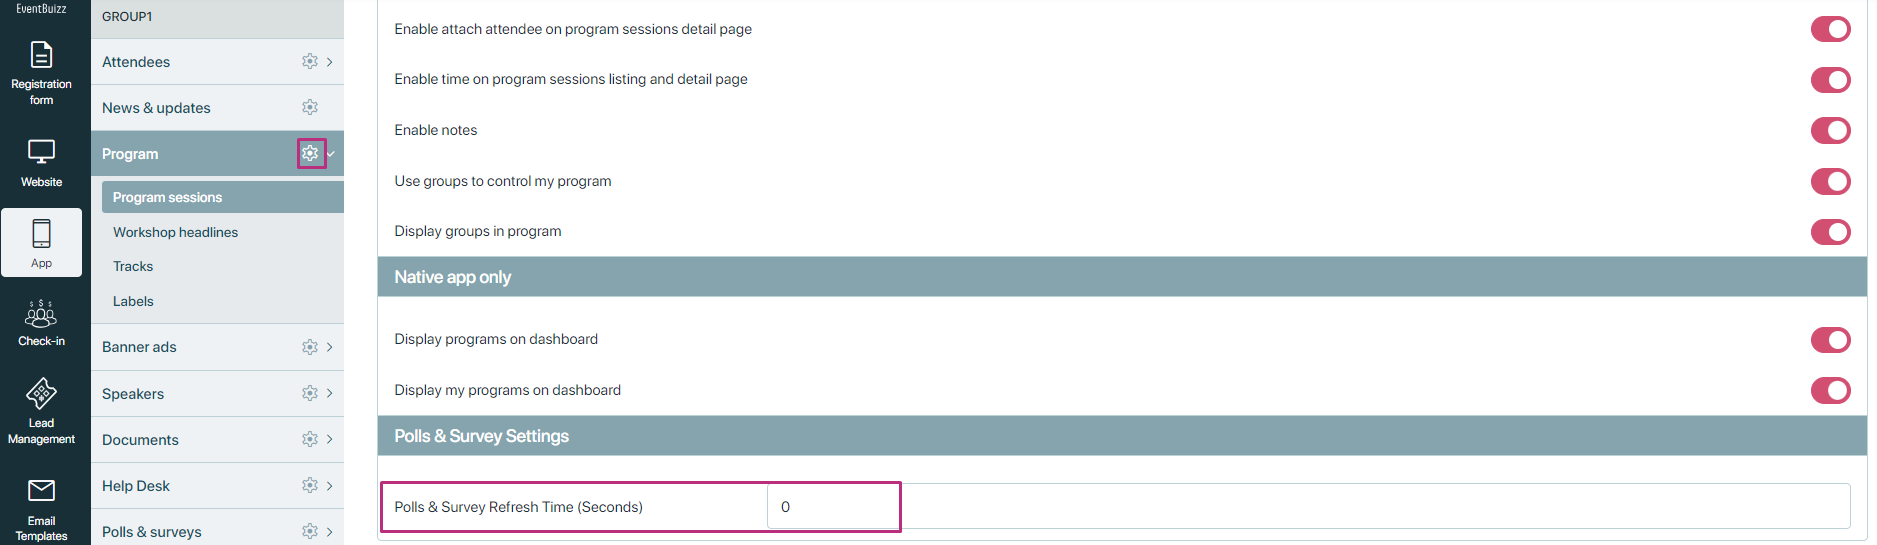
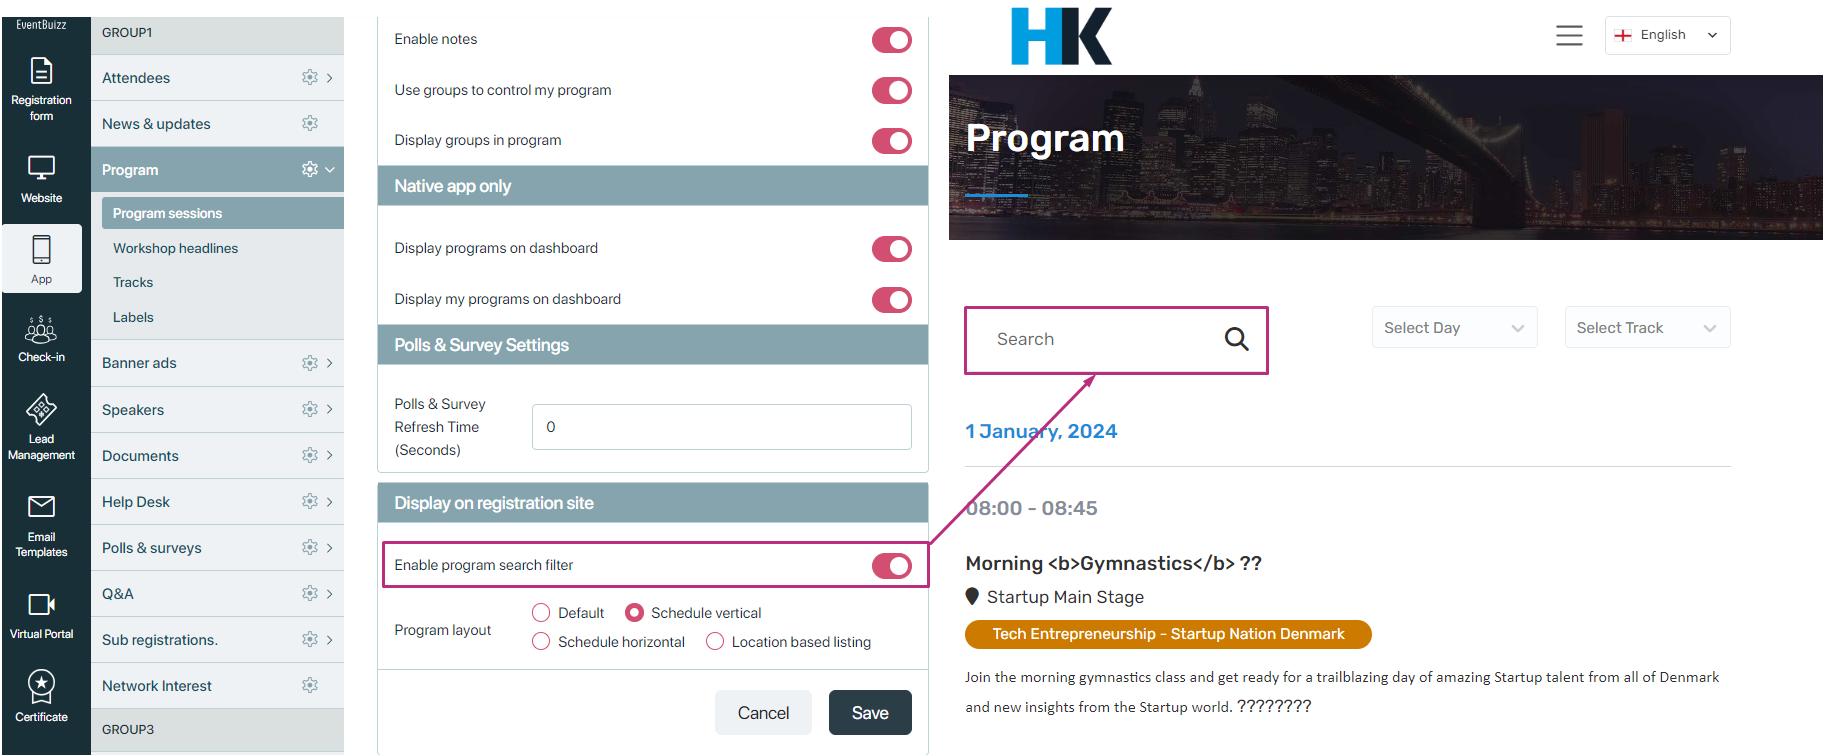
Polls and survey settings
- Poll refresh rate: Organisers can determine how often polls displayed on common monitors (e.g., at the event venue) should refresh. This setting ensures that attendees receive real-time feedback and keeps engagement high during sessions.
Display on registration site
- Program search filter: This feature allows for the activation of search and filter options on the registration site. Organisers can enable attendees to easily search for specific sessions or topics, making it easier to navigate through the program offerings.
App program module(for client site)
App program module
The App side program module in eventbuizz allows attendees to access and interact with programs associated with an event. This feature provides a structured way to manage multiple activities, enabling users to select sessions that align with their interests and enhancing their overall event experience.
Prerequisites
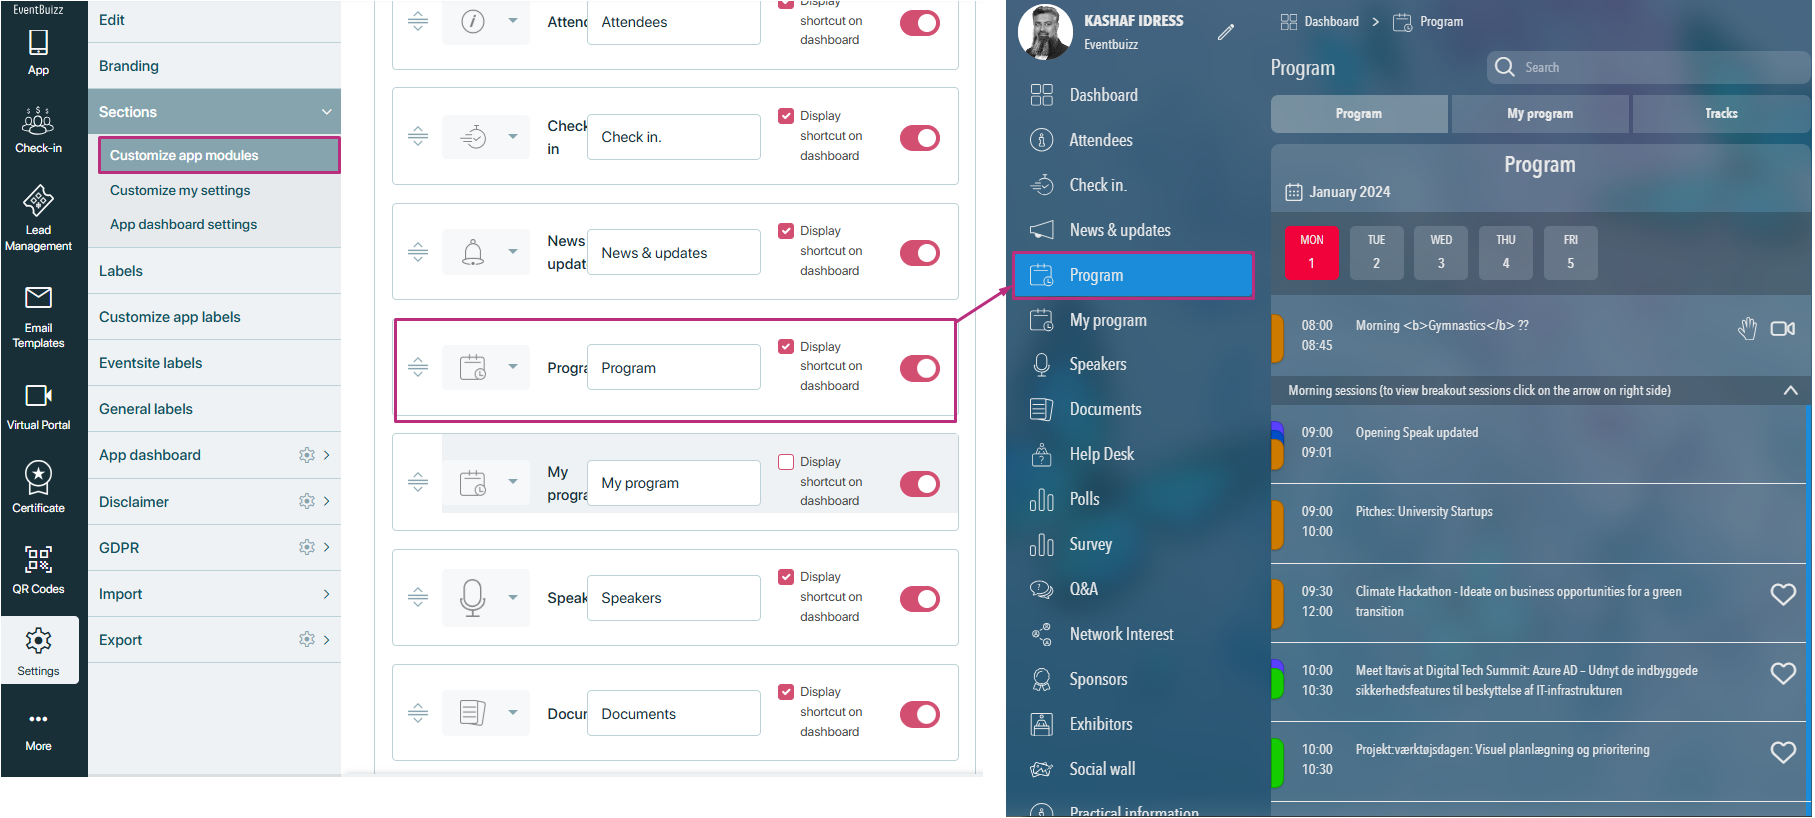
Before attendees can access the program module in the web app, organisers must enable the program module in the eventcenter. Follow these steps:
- Eventcenter->settings->customise app settings->program->enable program from toggle button
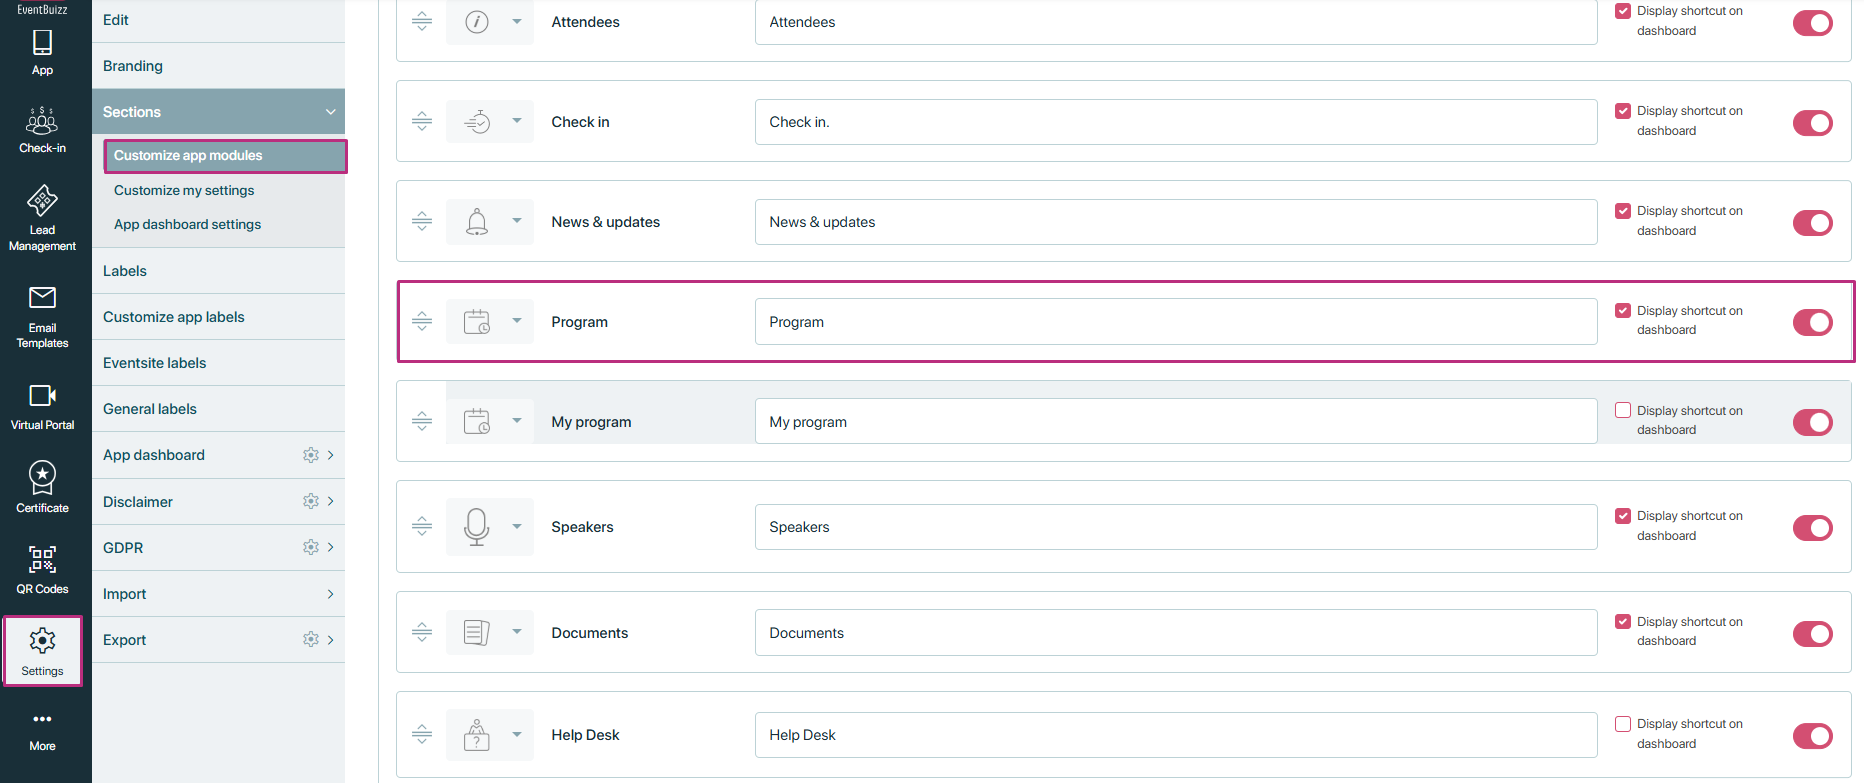
Once enabled, all added programs from the organizer will be displayed in the web app under the program module.
Program module interface
The program module consists of a program listing divided into three tabs. Detail is given below about each tab:
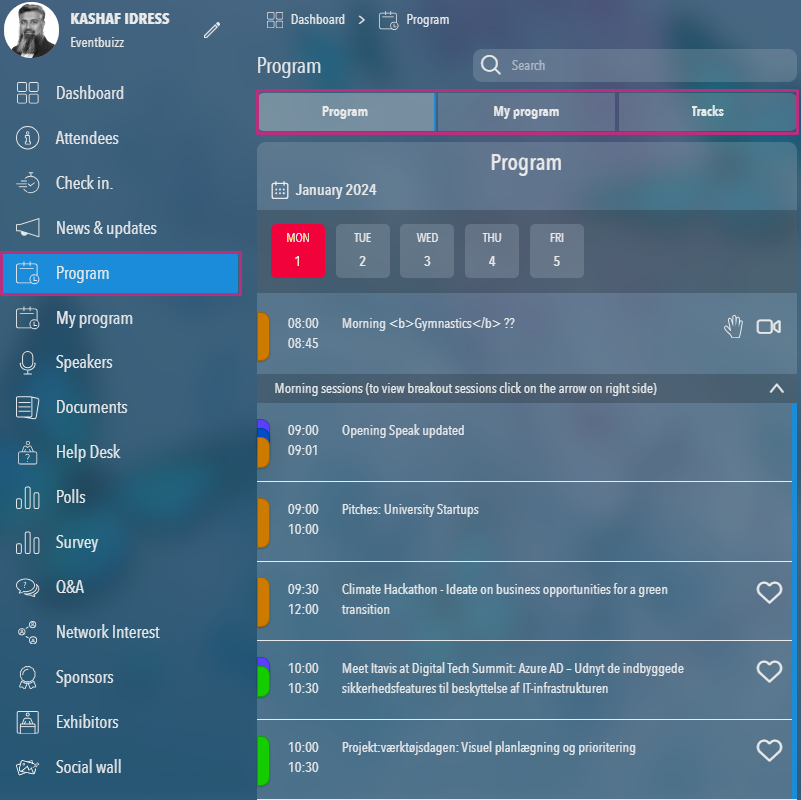
Program tab
- Overview: This tab displays a list of all programs added by the organiser.
Date navigation
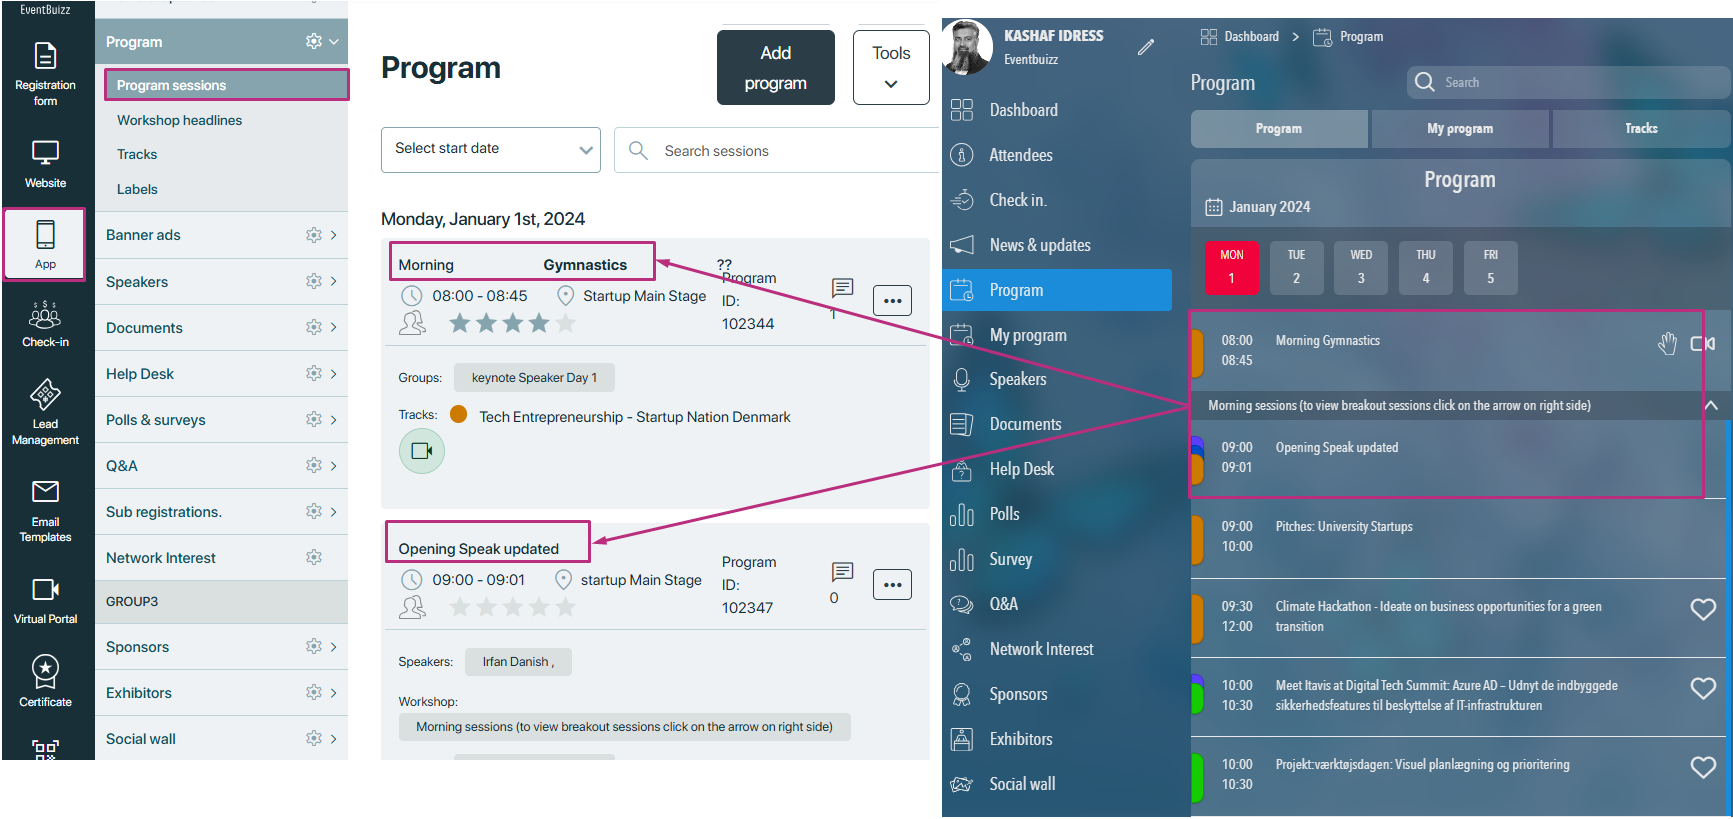
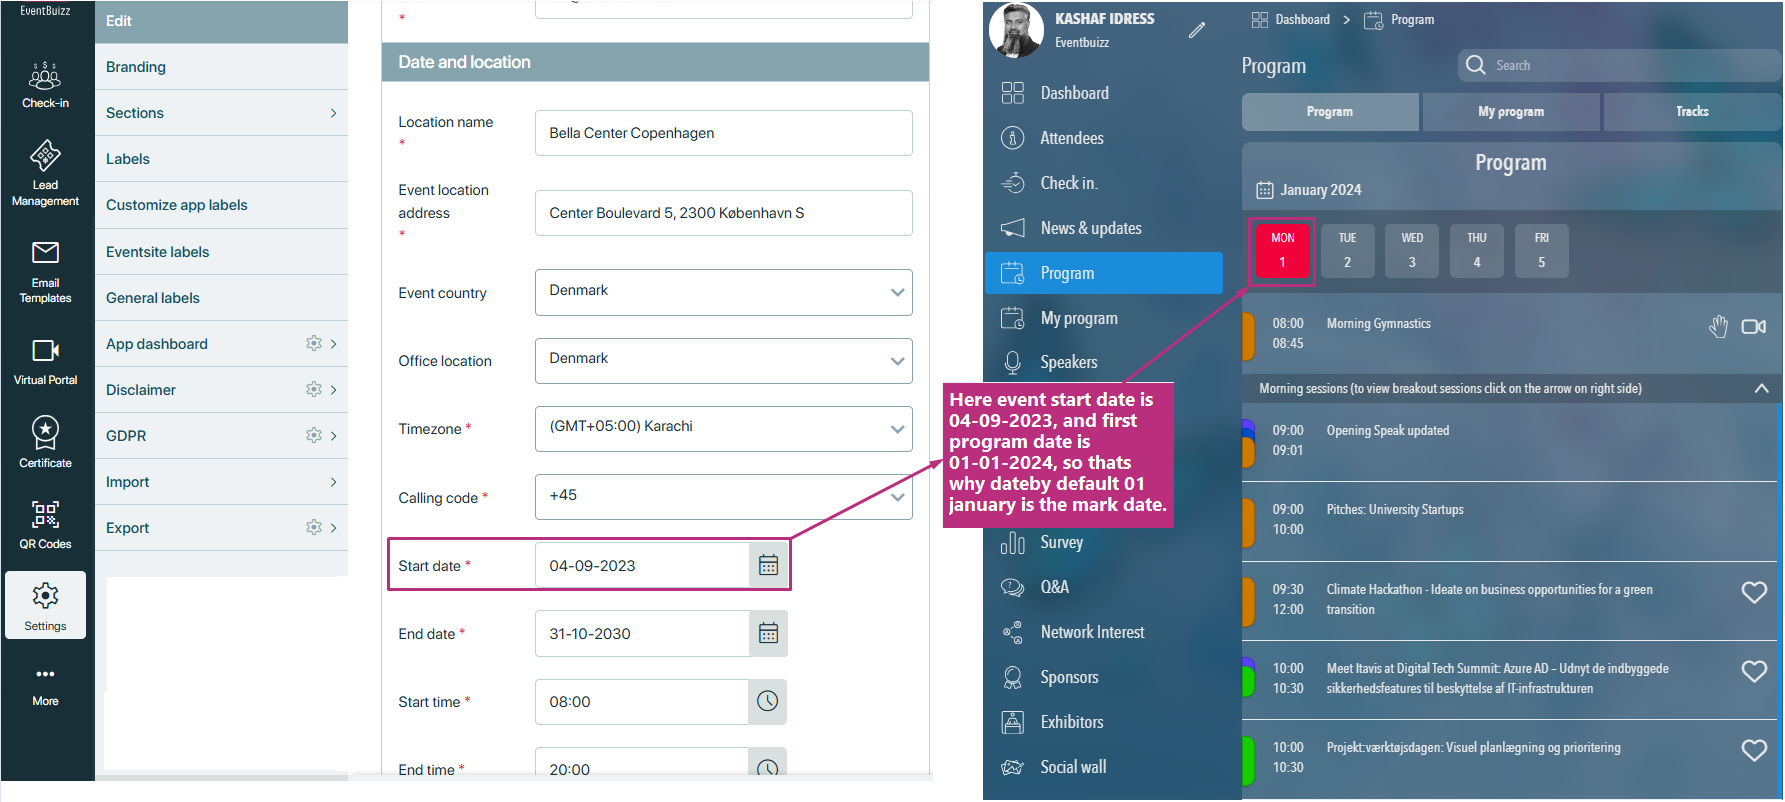
At the top, all relevant dates will be shown, displaying day names. By clicking on any date, the corresponding programs for that date will be listed.
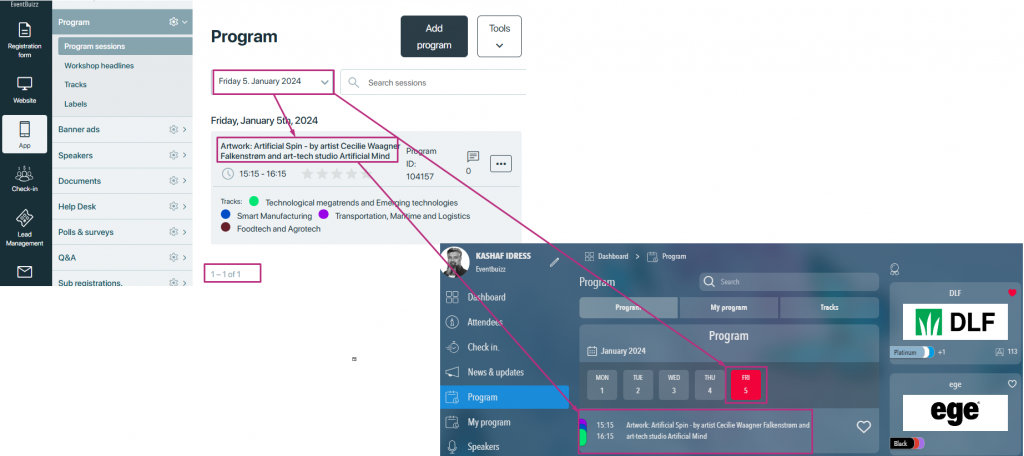
Default date selection logic
The default date selection is based on the following conditions:
- If the event starts but programs are scheduled for future dates, the first date of the upcoming program is selected.
- If the event and program dates coincide, the current date’s programs are displayed.
- If the event has started and all program dates have passed, the last available program date is selected.
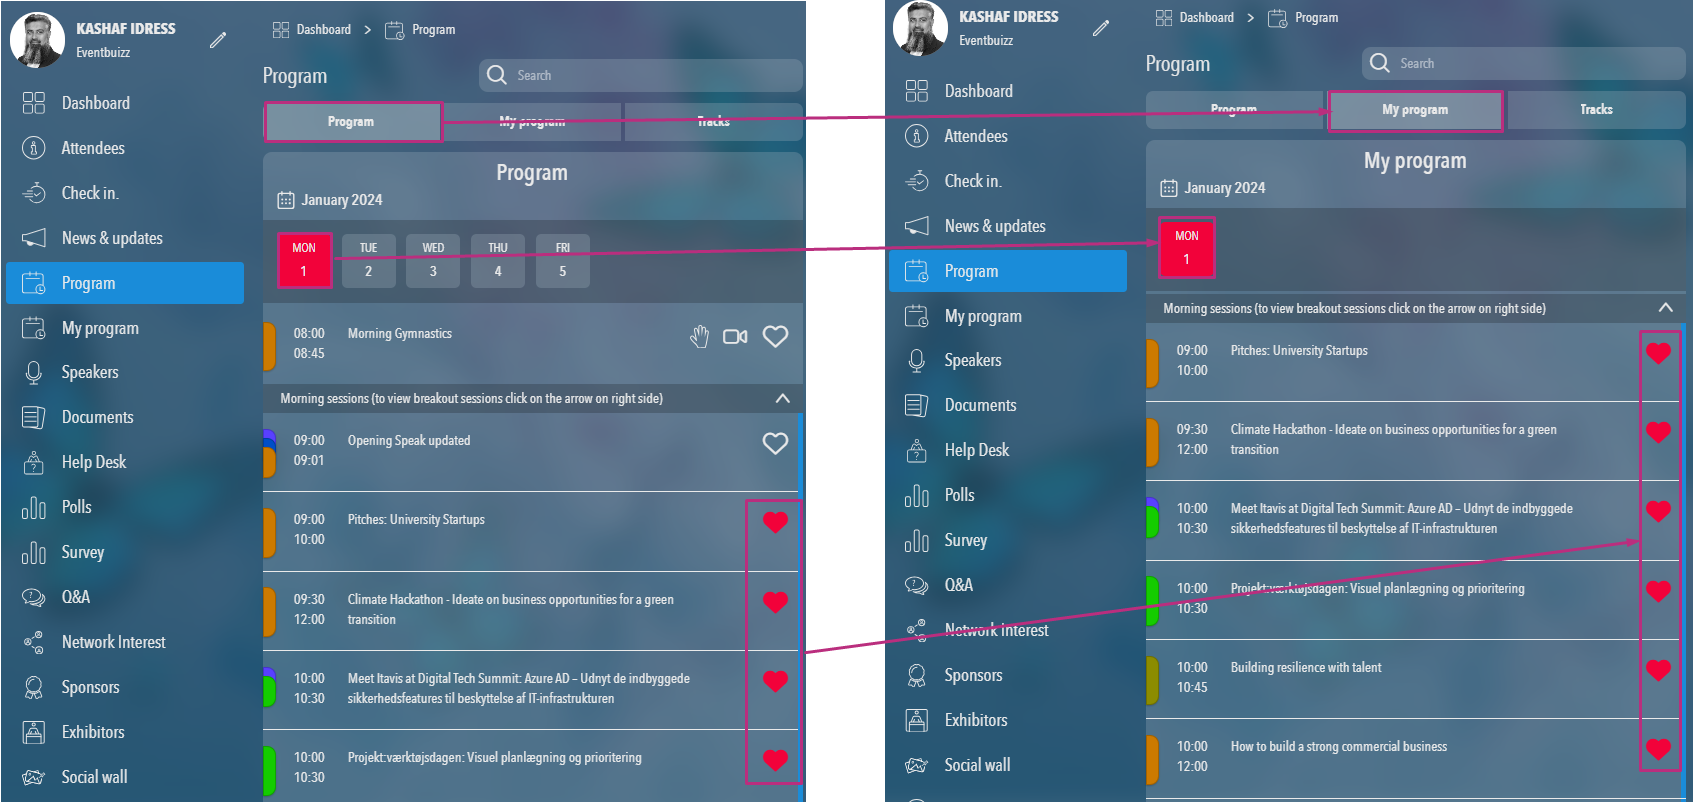
My programs tab
- Overview: This tab shows all the programs marked as favourites by the logged-in attendee. This allows users to easily access sessions they are interested in.
Tracks tab
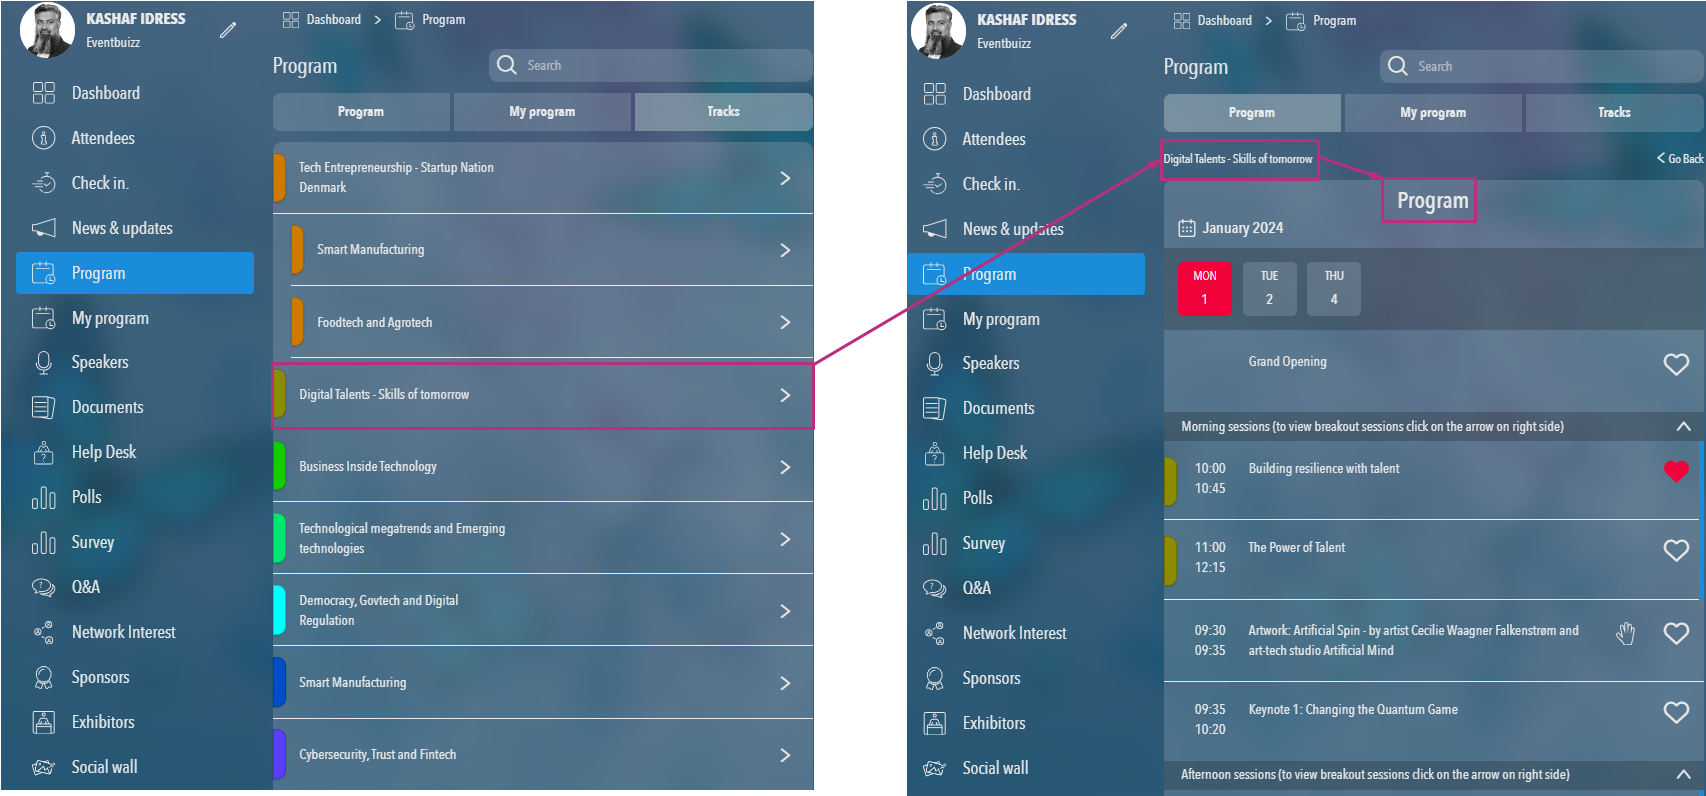
- Overview: This tab lists all the tracks and sub tracks created by the organiser.
- Navigation: By clicking on a track tab, in program listing will displayed all the tracks and sub tracks, and it will show the tracks and sub tracks listing.
- Programs Display: By clicking on any tracks and sub tracks all the program listing will displayed which are attached to that tracks or sub tracks.
Program favourite functionalities
- Each program features a heart icon for marking it as a favourite. When a user favourites a program, the heart icon becomes highlighted.
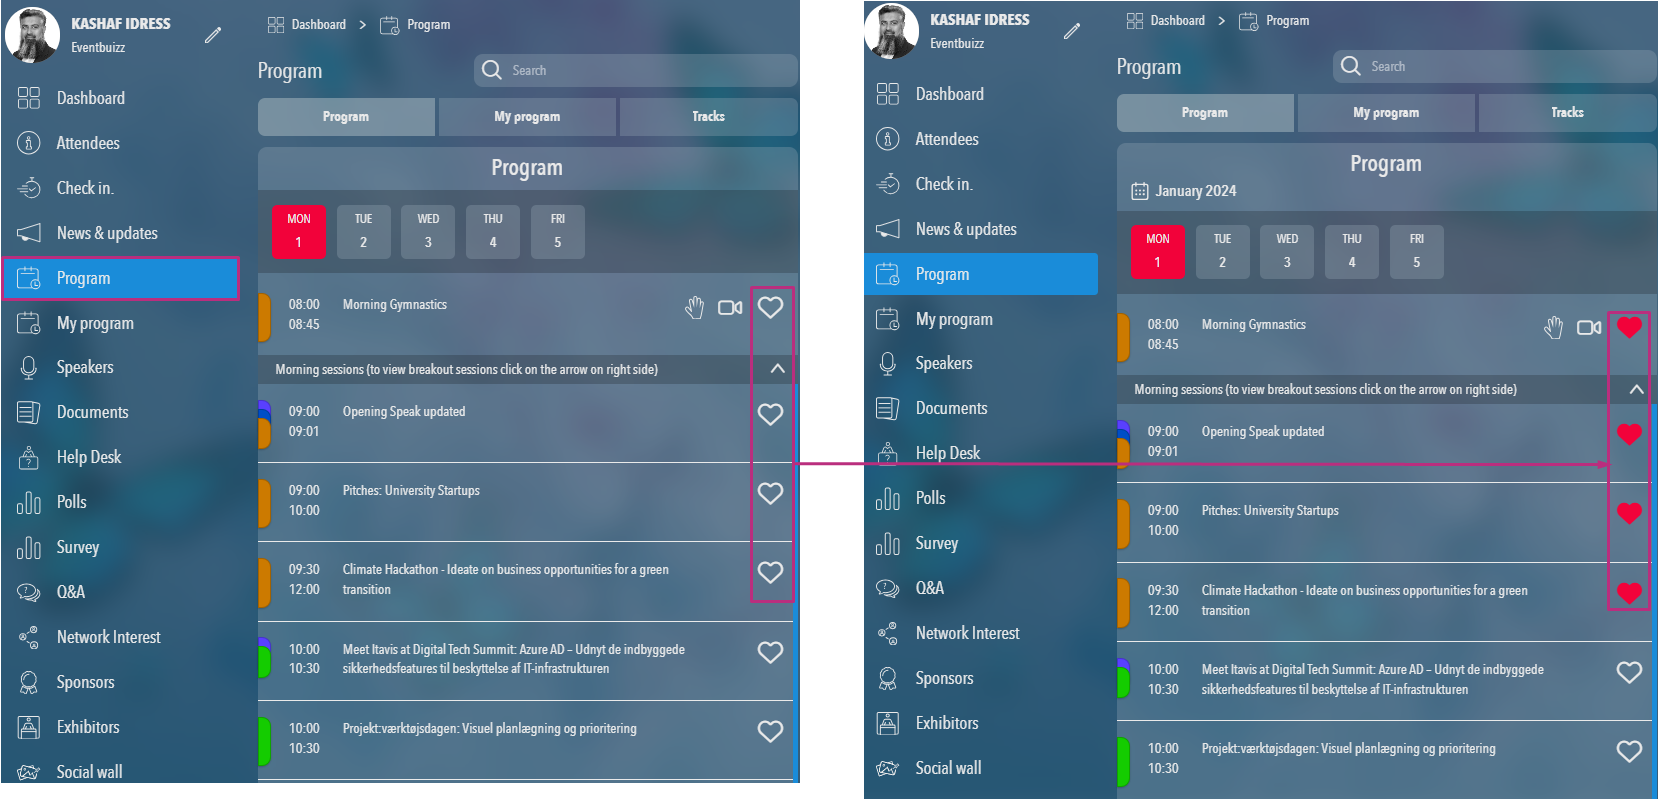
- If the organiser has enabled the “Enable Favourite Program Sessions at the Same Time” setting, users can mark multiple programs as favourites simultaneously.

- If “Enable favorite program sessions on same time” setting is off then it will not allow to make same time program favourite.
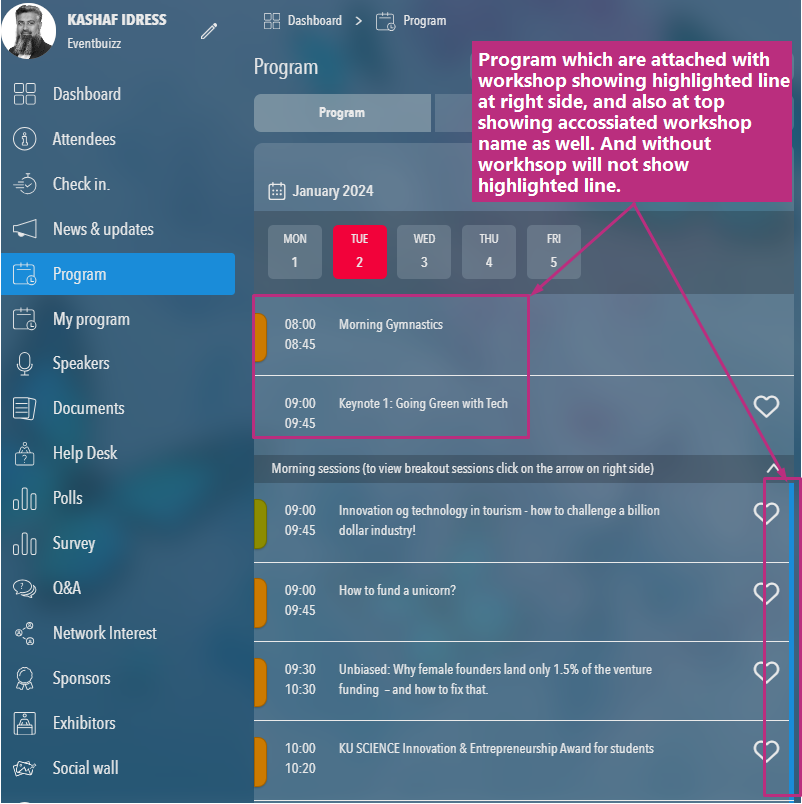
Difference between attached workshop program and without workshop program
- Programs associated with workshops are highlighted in the listing, while those not linked to any workshop remain unmarked.
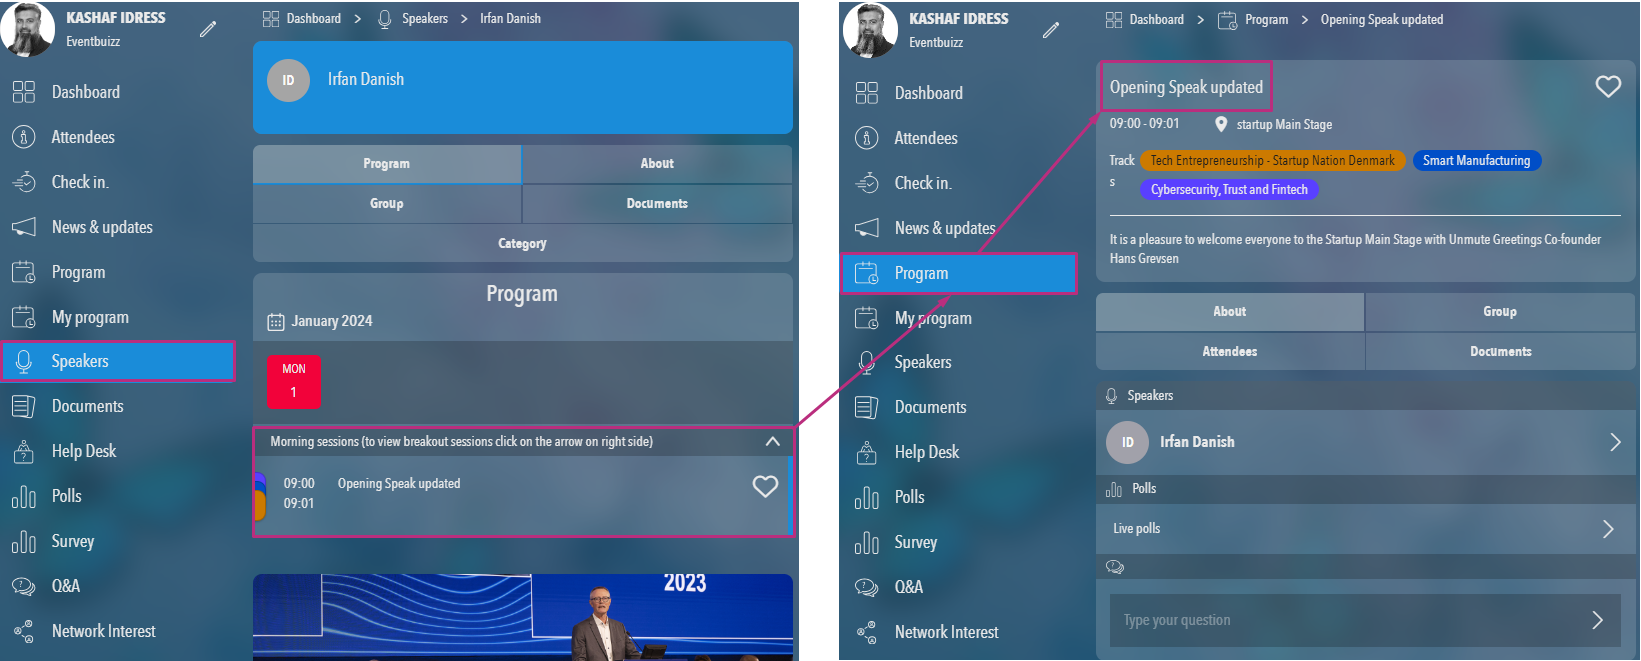
Program details
By clicking on a program, attendees can access detailed information, including:
- Program description
- Schedule (time)
- Location
- Attached documents
- Notes
- Rating options
- Speaker information
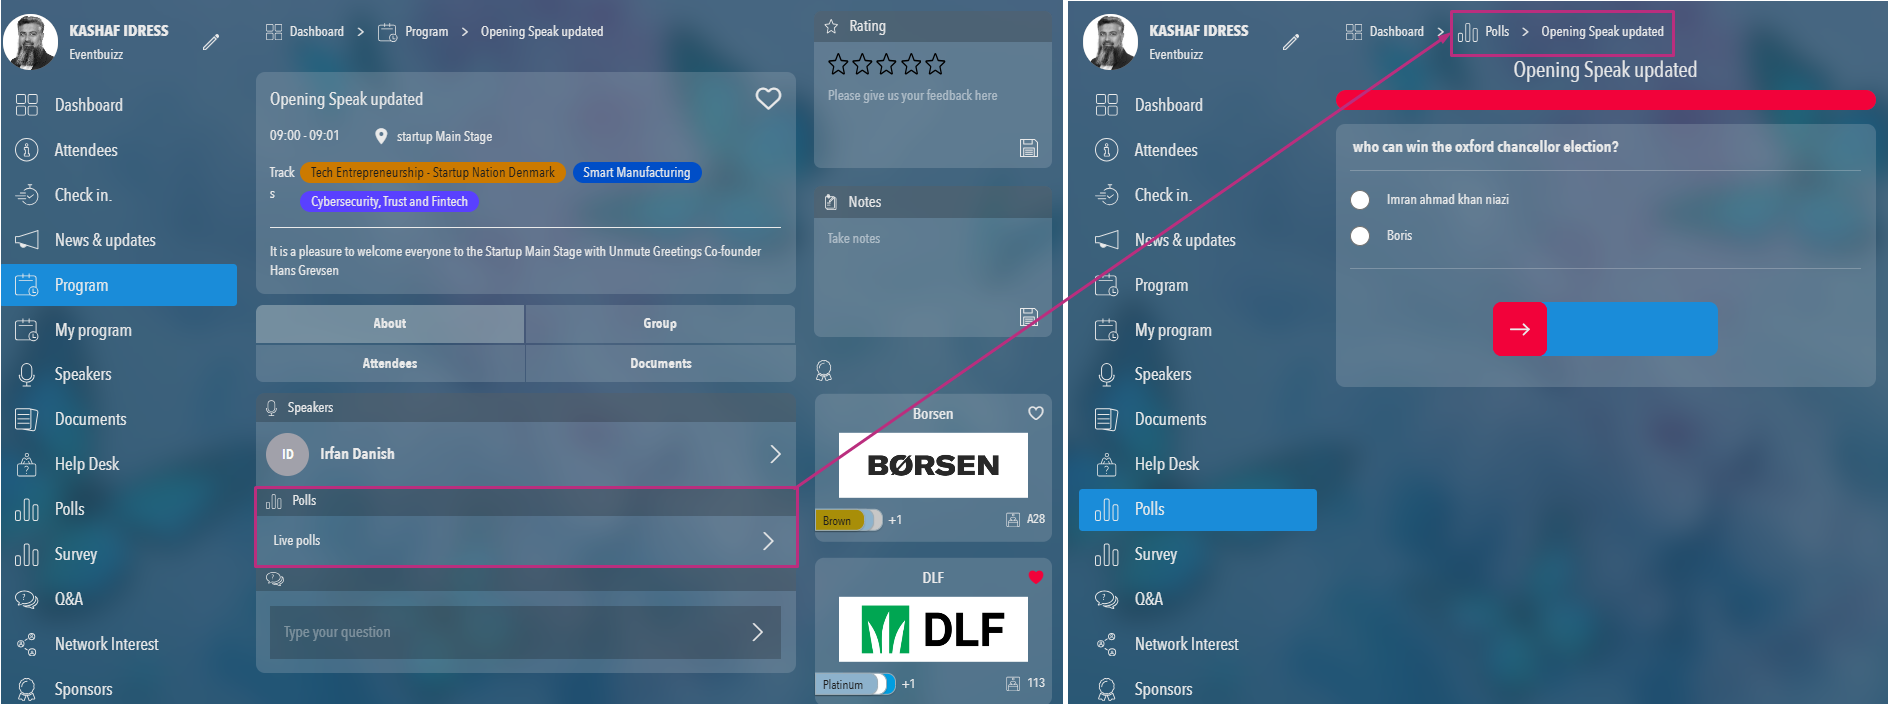
- Polls associated with the program
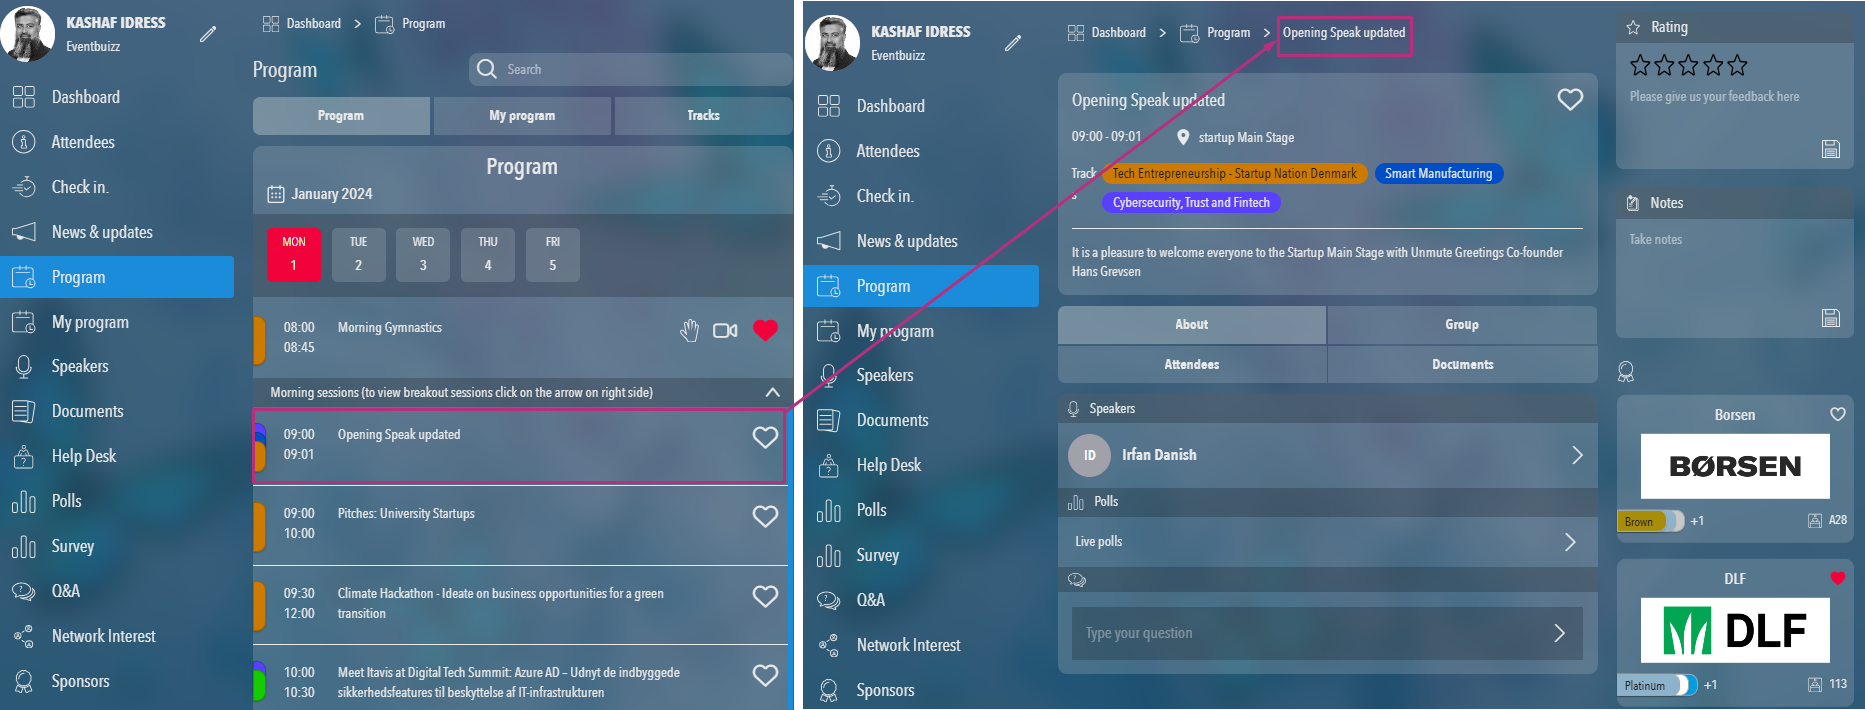
If there are any polls linked to the program, attendees can click on them to participate directly.
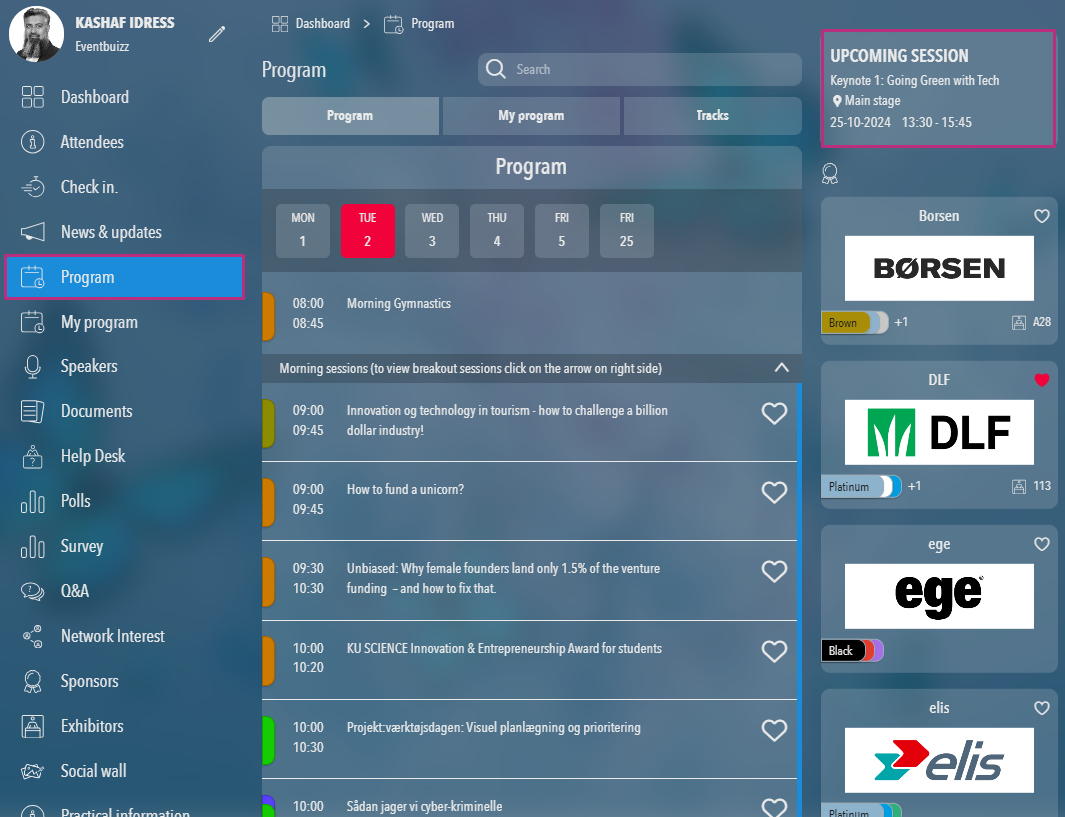
Upcoming sessions feature
- The upcoming sessions feature displays the next program scheduled for the current date.
- As the time for the first program approaches, the next upcoming program will take its place, ensuring users are always informed about what’s next.
Access points for the program module
The program module can be accessed from various locations within the web app:
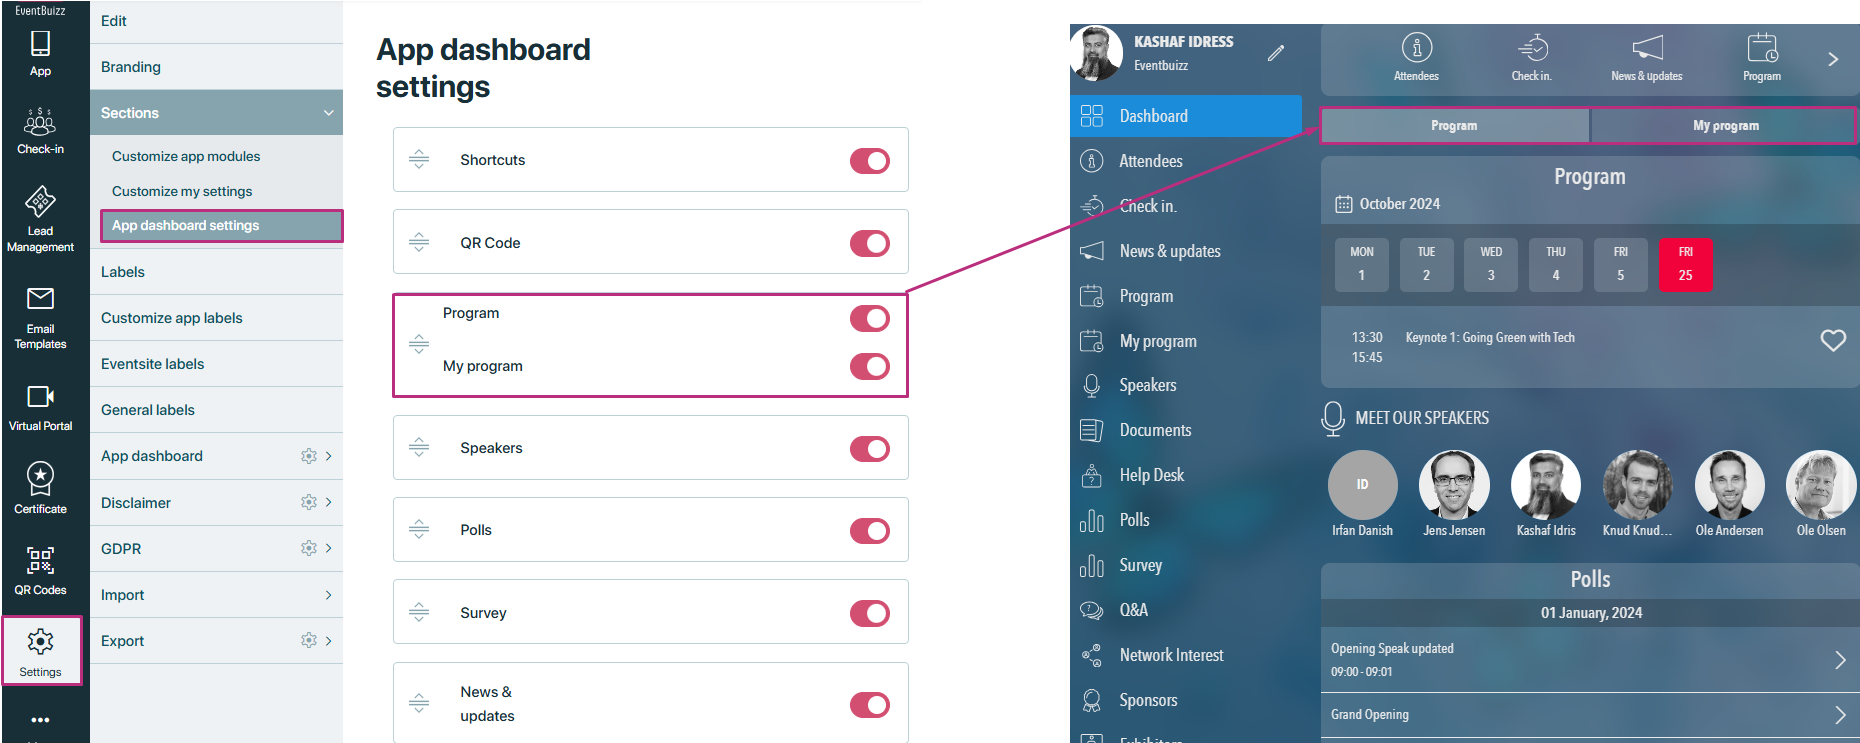
Dashboard
Both the program and my programs modules are displayed based on the toggle settings in the customise app dashboard settings. If both modules are enabled, they will appear; otherwise, they will be hidden.
Attendee detail
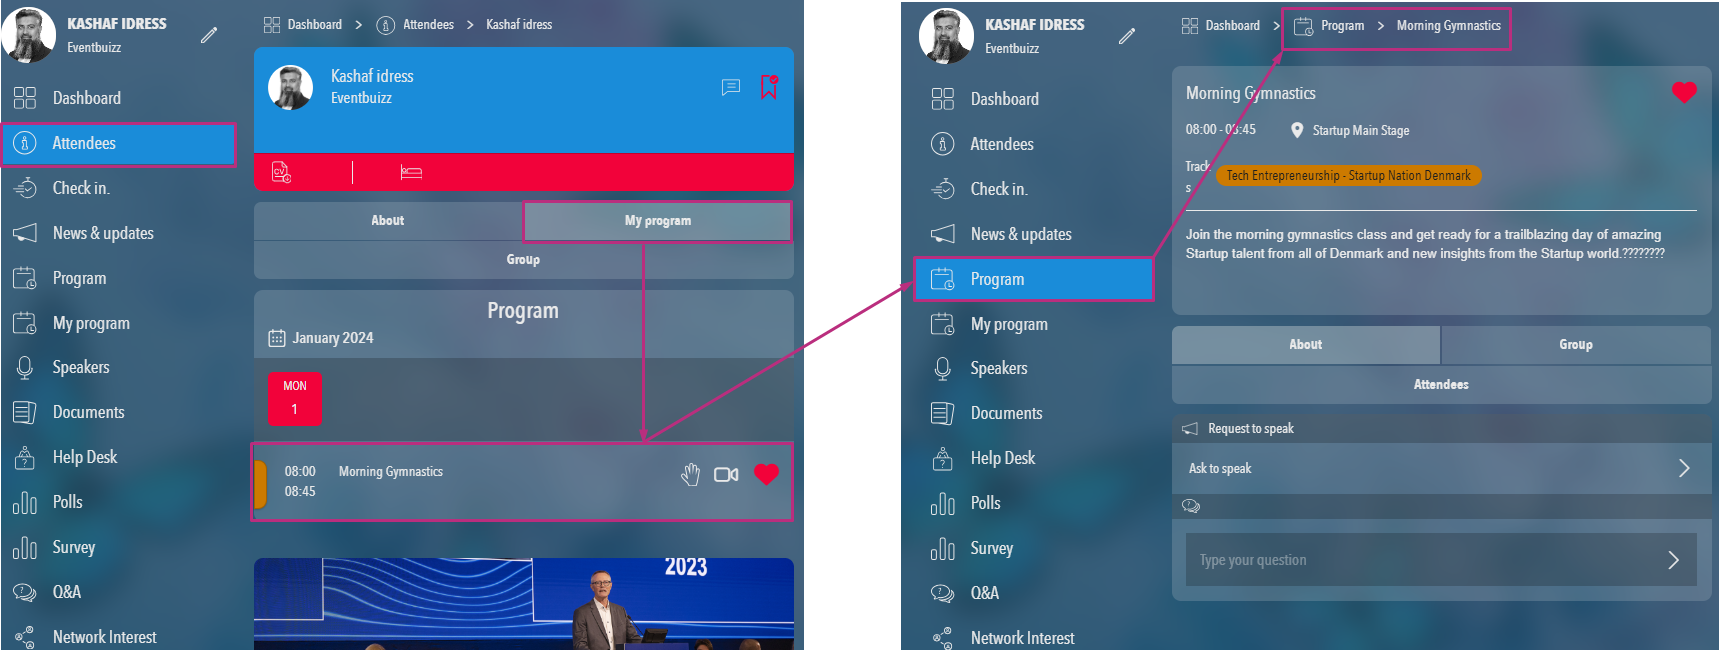
- There is a dedicated tab for my programs in the attendee detail view, allowing easy access.
- If login attendee will click on his own detail , then he will see the my program tab, which will shows the favourite program done by attendee
- If attendee go in other attendee details and can see the my program tab, which show that attendee is linked(favourite) with this programs.
- And by clicking any program will move forward to program modules.
Speaker detail
- Similarly, the speaker detail view includes a tab for Programs.
- All the programs will show in the program tab, in which that speaker is attached.
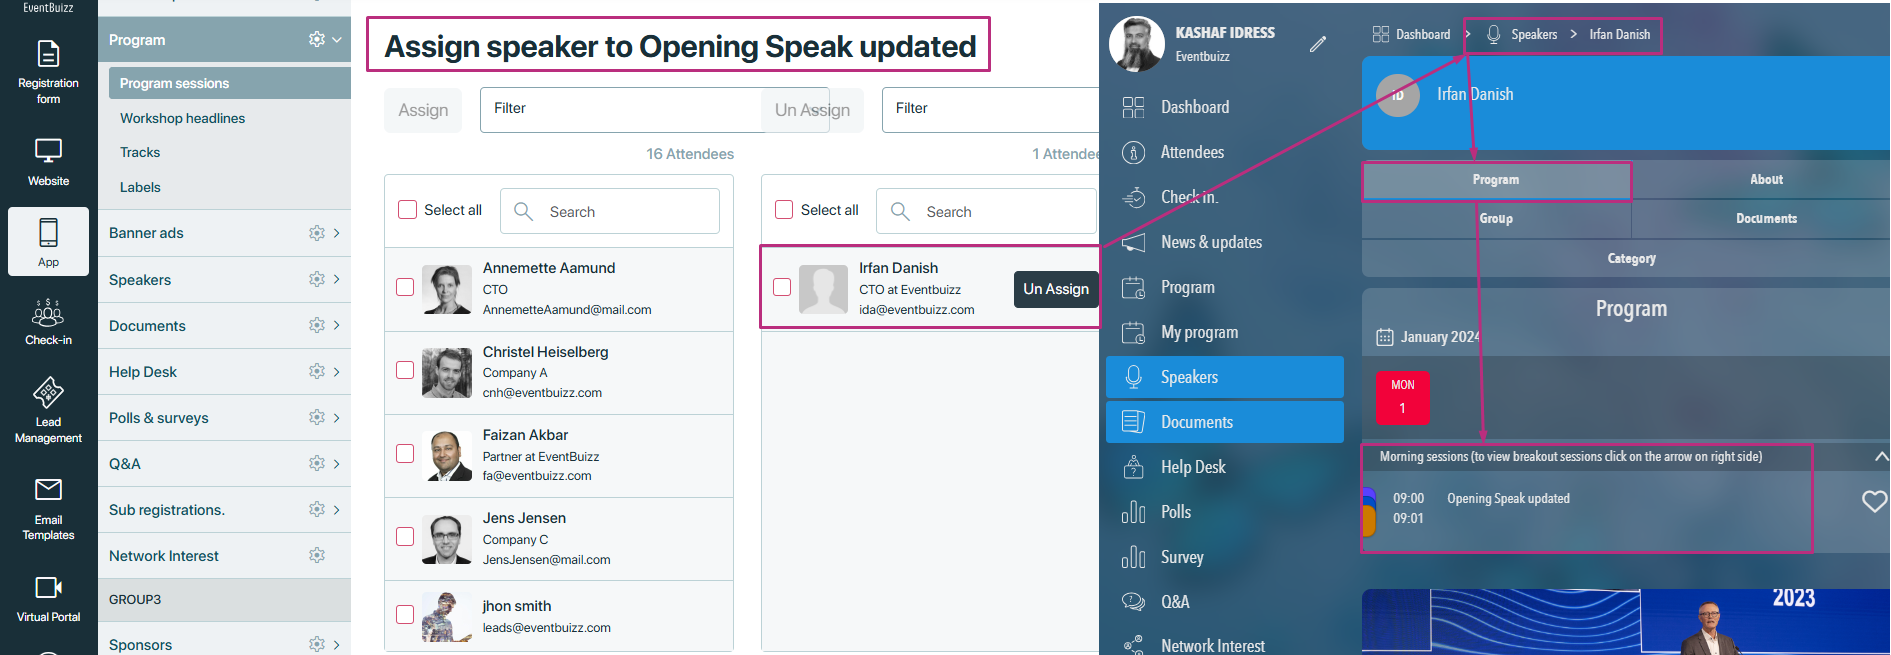
- And by clicking on any program detail is speaker program listing, will redirects to the program detail in program modules.