The eventcenter check-in module is used by organisers to manage and oversee the entire check-in process and related activities.Check-in module in event center have multiple key features for organiser to manage, and oversee the entire things related to check-in process. Below is the listing of the key Features:
Dashboard
Dashboard
The “Dashboard” section provides organisers with a comprehensive overview and analysis of attendees check-in data, user admin performance, and registration site activity. It is divided into three main subsections:
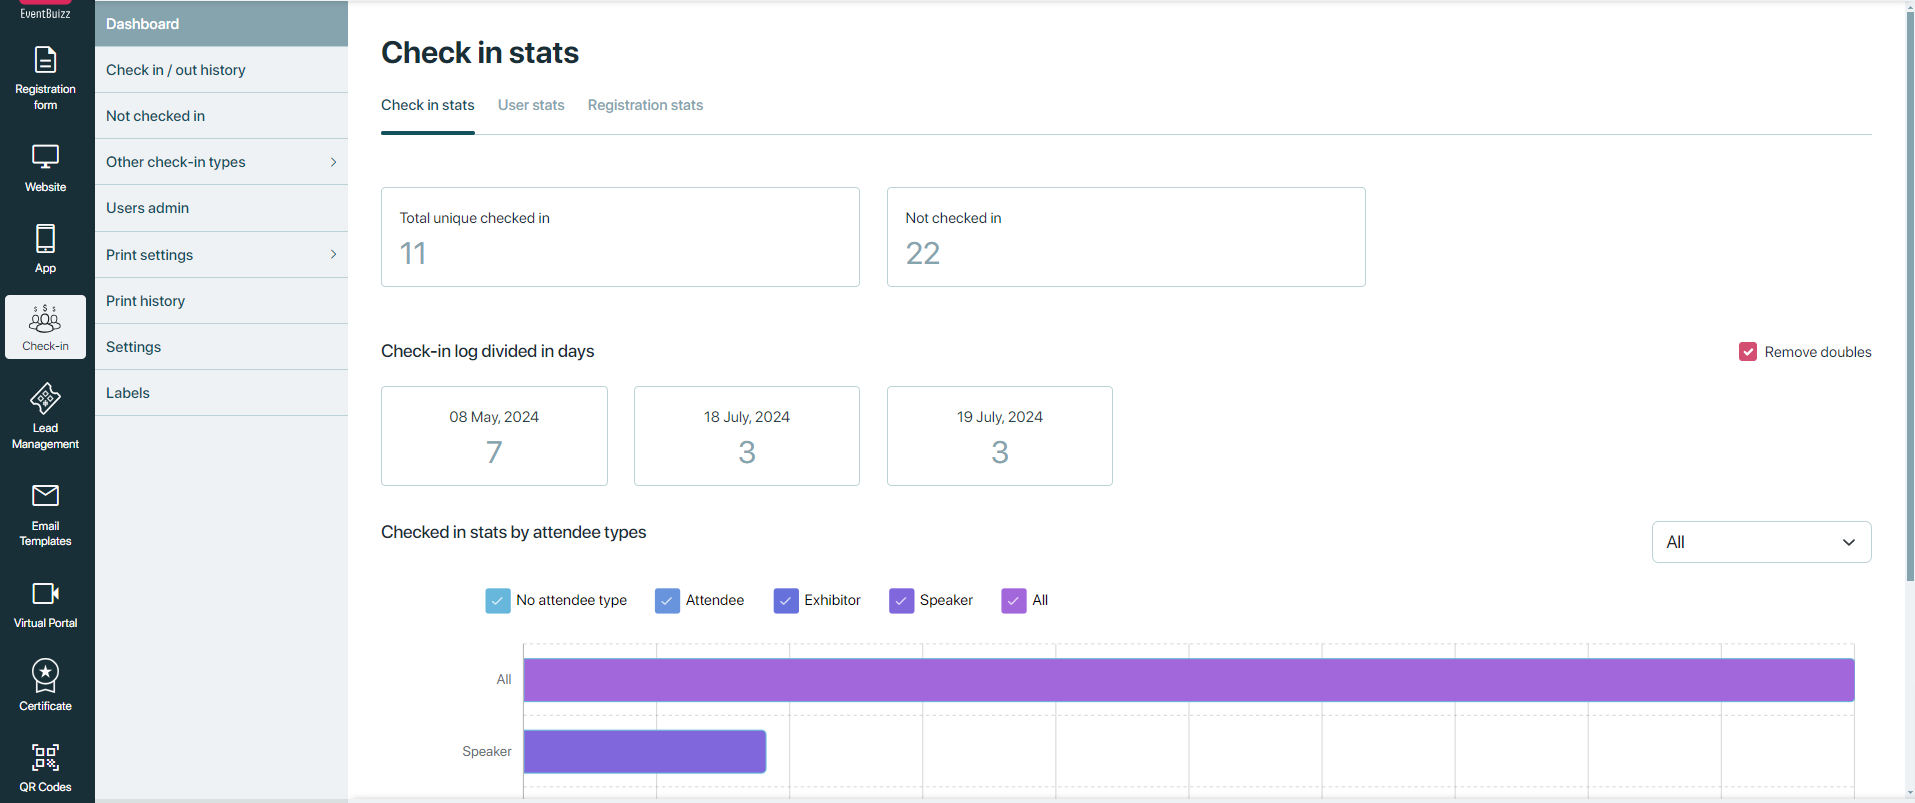
Check-in stats
Purpose: Provides insights into attendee check-in activities and statistics.
Key features:
- Total attendees checked in: Displays the total number of attendees who have checked in to the event.
- Not checked in: Shows the number of attendees who have not checked in yet.
- Attendee types graph: Graphical representation of different attendee types and the number of attendees checked in for each type.
This page is basically divided into three parts, in first part organiser can see two widgets first show the how many attendees, check-in and second widgets show how many attendees still pending and not check-in.

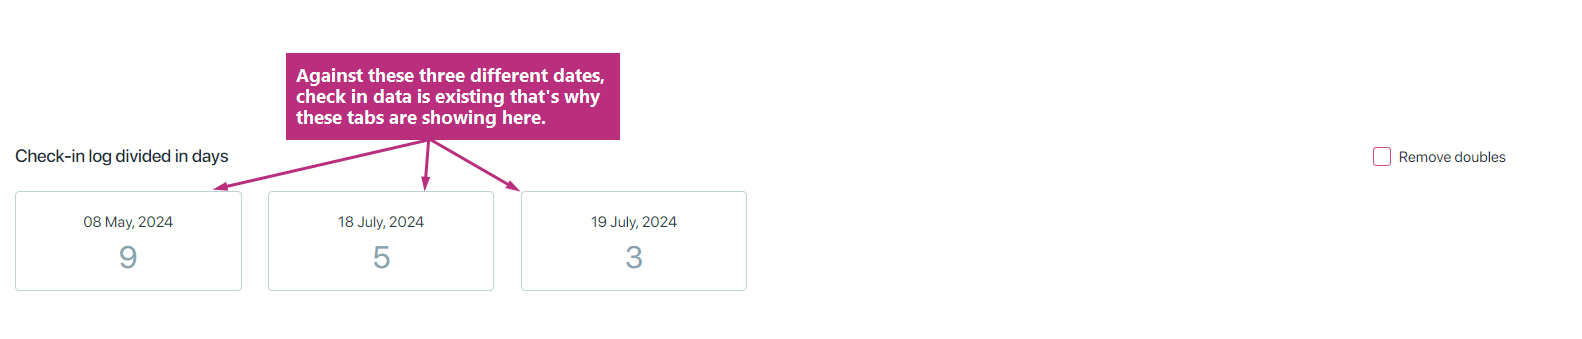
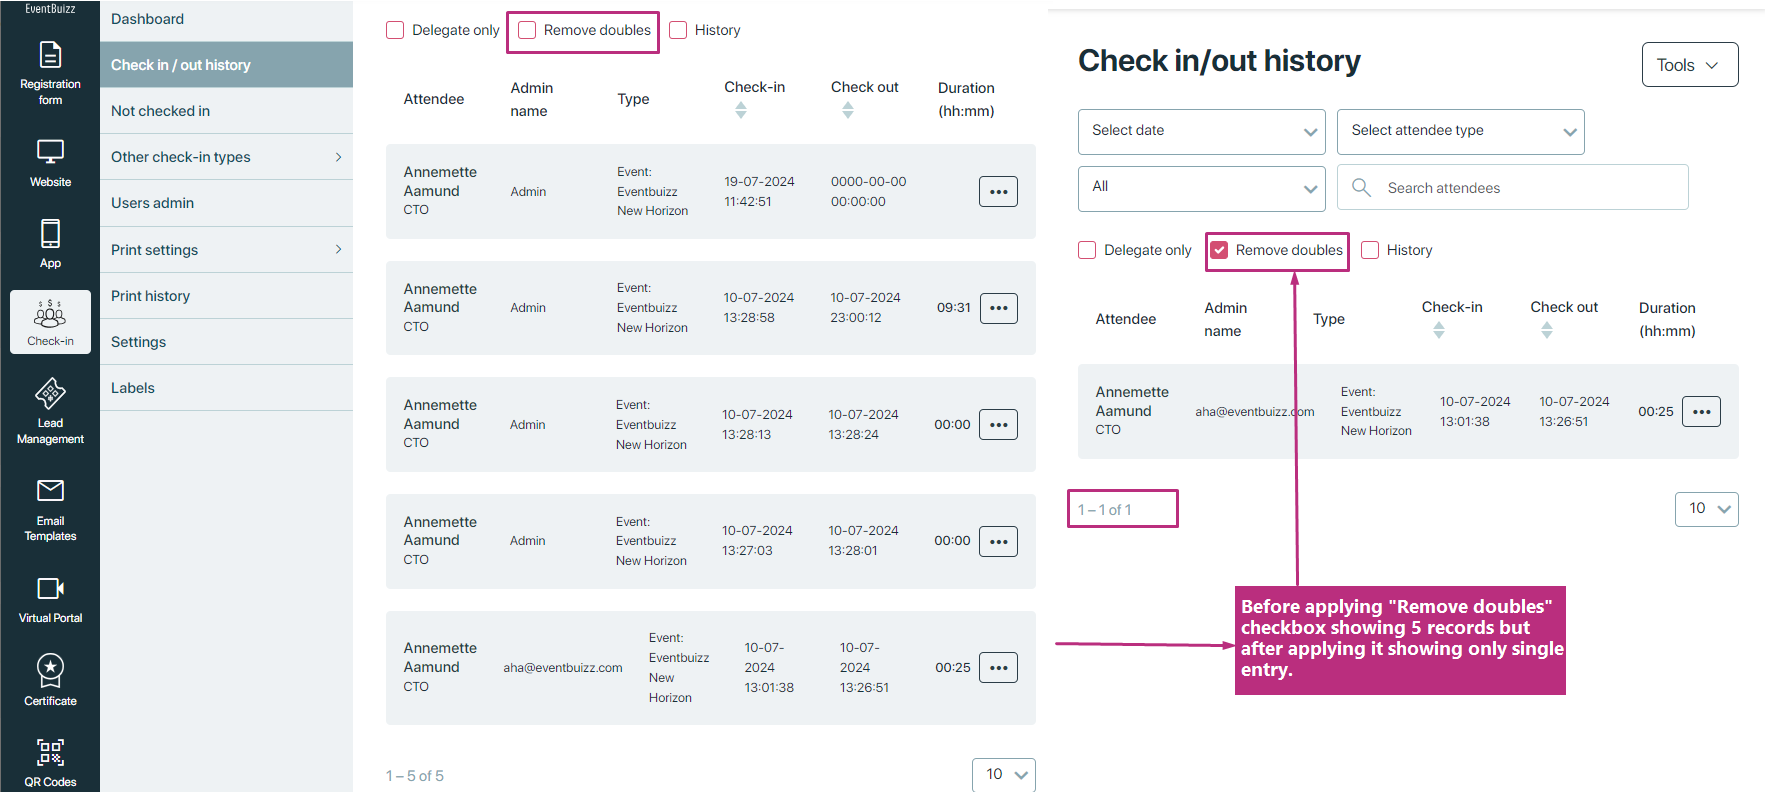
Second part shows the check-in log divided in days, it shows the different date tabs which show against these dates, attendees check-in into the system. Also here organiser can find a check box of remove doubles, which is basically a filter by enabling them, organiser can see the single entry of all the attendees.
By default “remove double” check box is not enabled, but if organiser want to enable it, just need to select the checkbox and data will filter automatically.
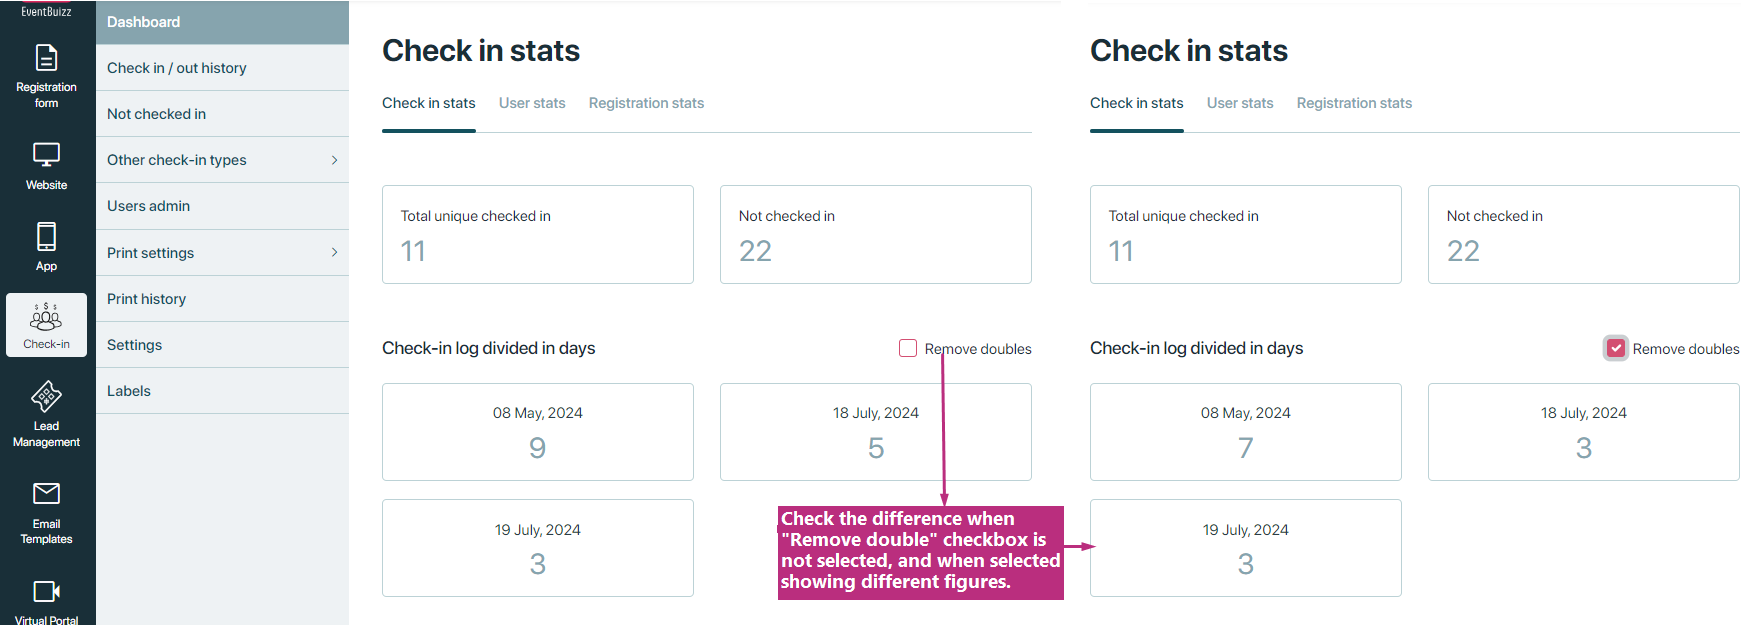
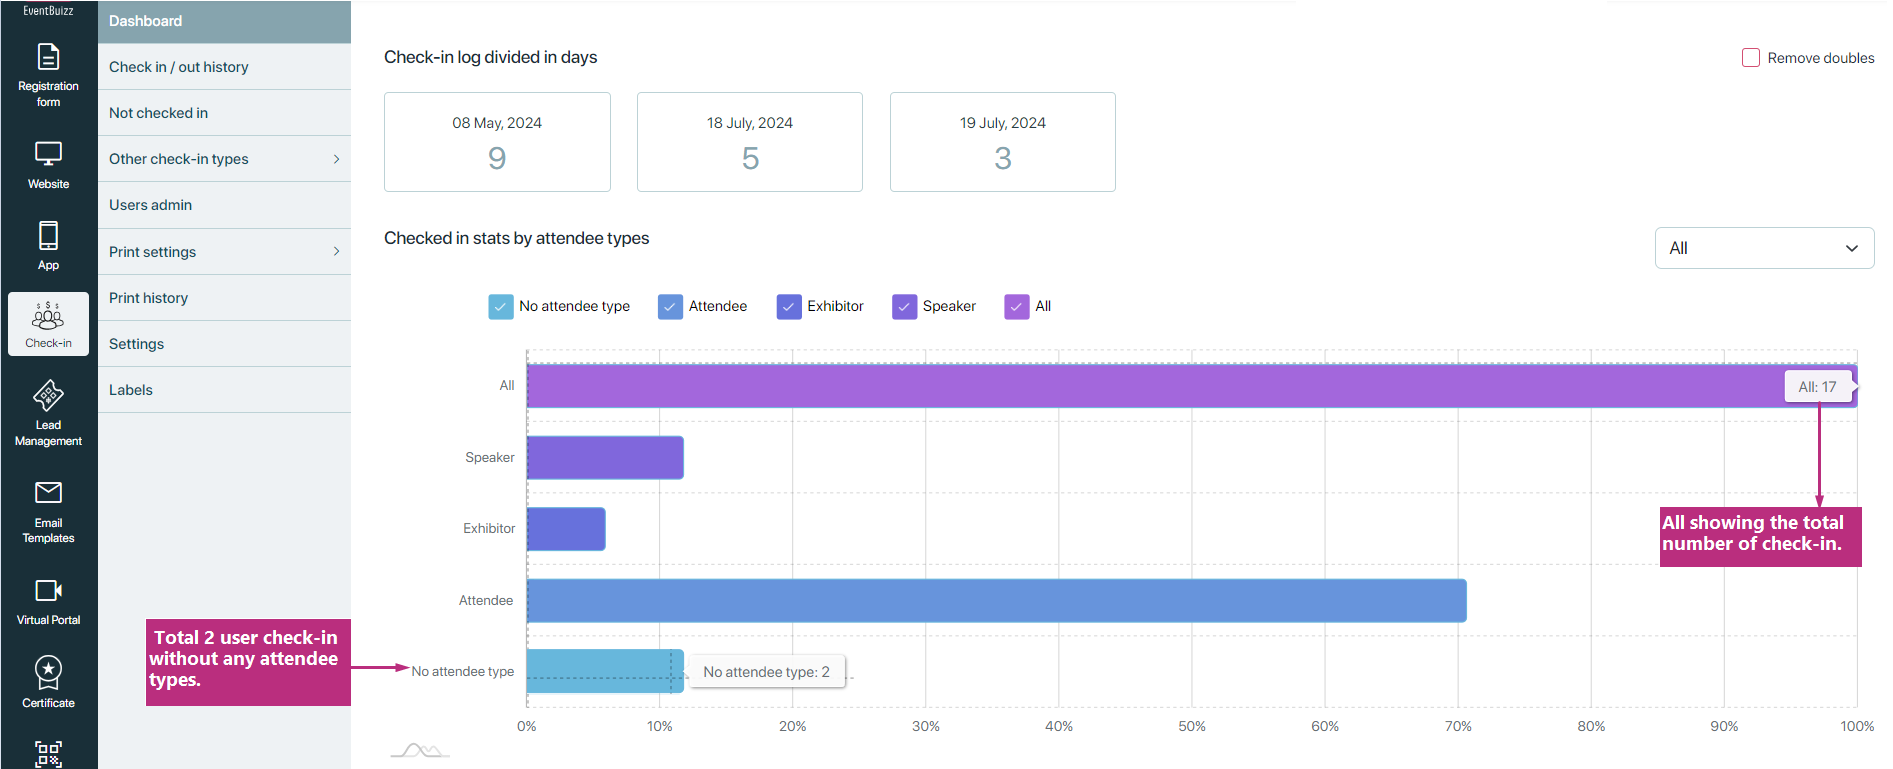
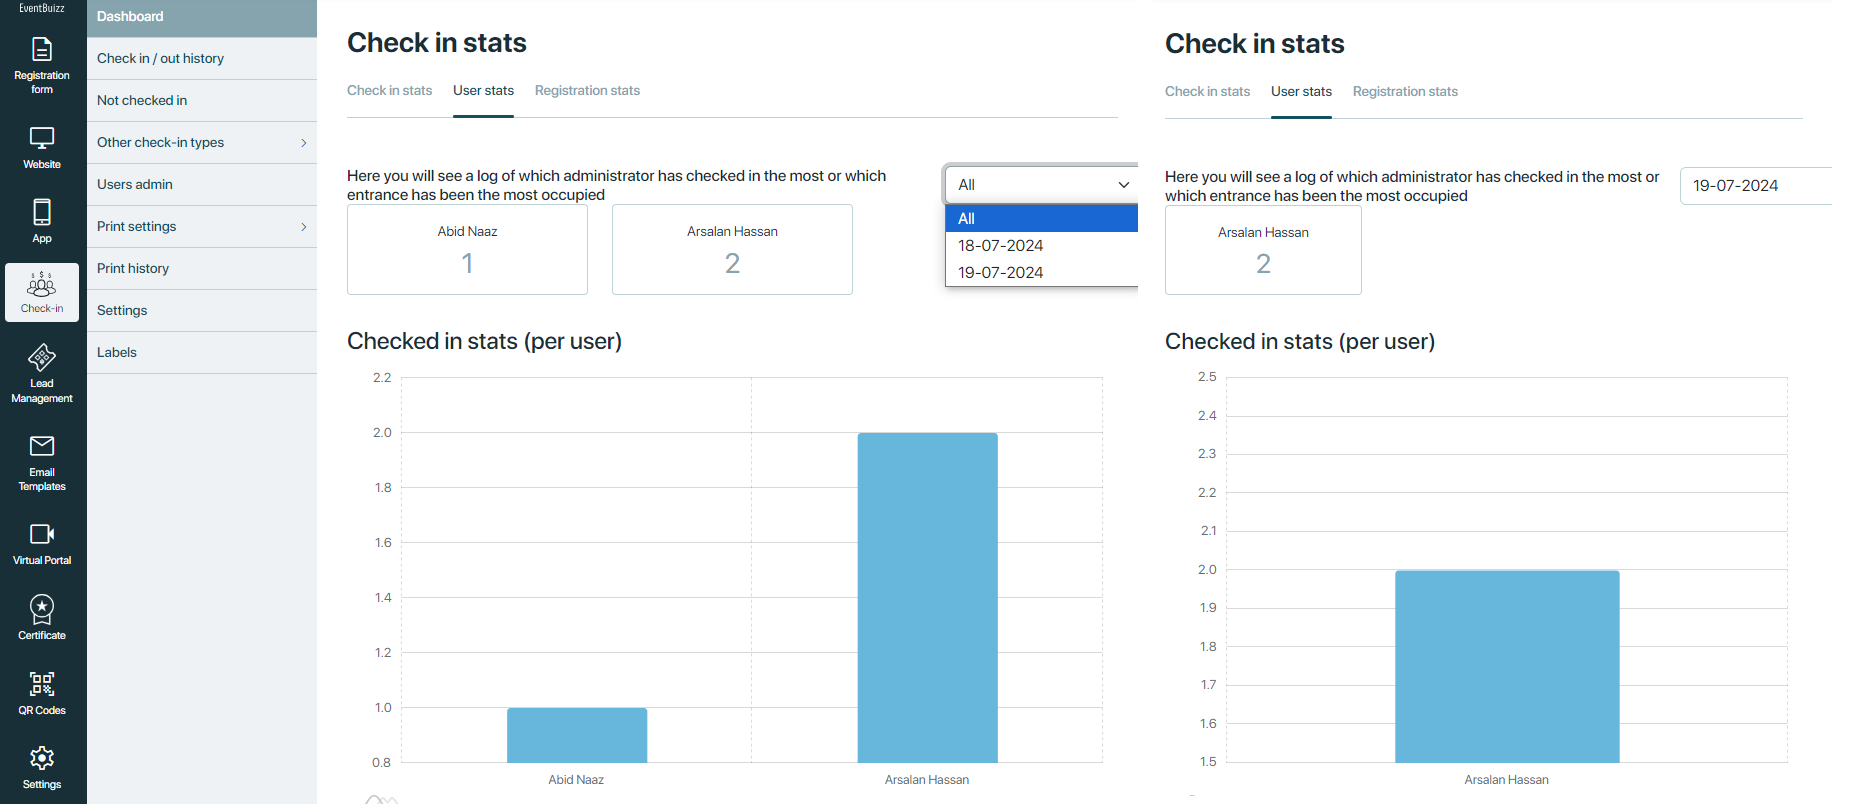
Third part of the check-in stats shows the checked in stats by attendee types, a graph show separate line all attendee types, here is the look of it.
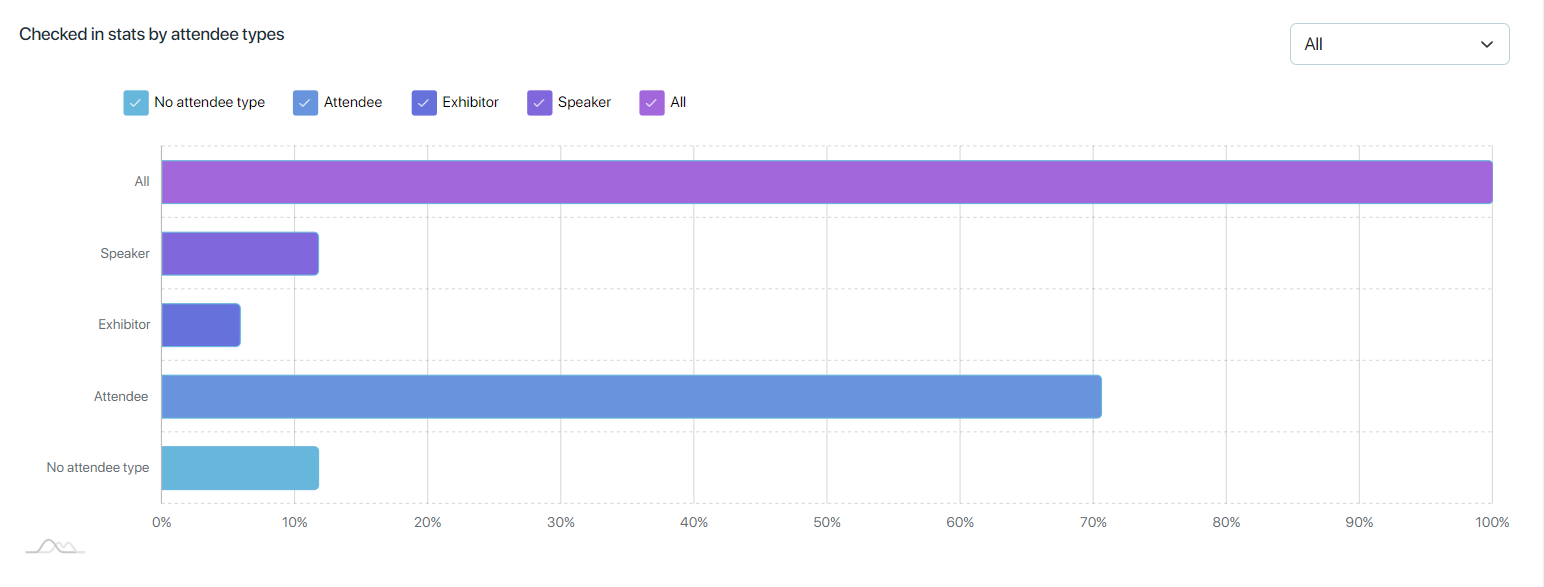
Here in above graph “All” graph line shows the total number of attendees check-in, and also “no attendee type” show’s the number of users check-in without attendee types.
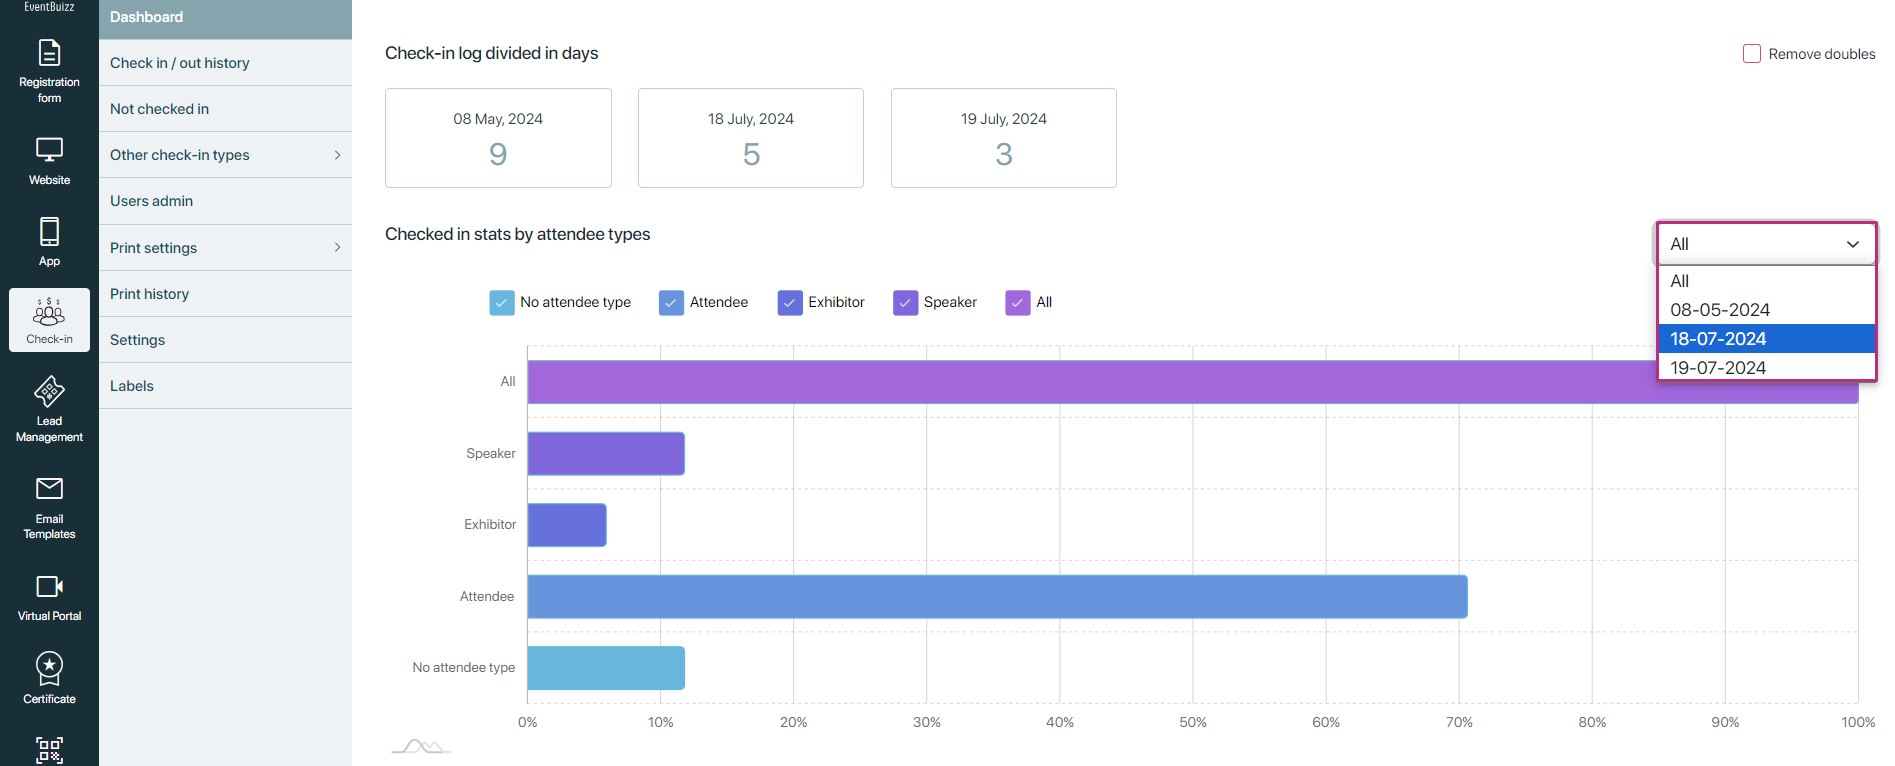
Also on check-in stats page organiser found a date drop down, only those dates shows in the drop down against those dates check-in data is existed. Organiser can select any date from drop down and can filter the data.
User stats
Purpose: Analyses user admins performance in checking attendees using the check-in app.
Key features:
- Total attendees checked in by user admins: Calculates and displays the total number of attendees checked in by each user admin.
- Performance comparison: Provides comparative statistics showing which user admins have checked in the most attendees.
- Graphical representation: Graphs or charts illustrating the distribution of check-ins among different user admins.
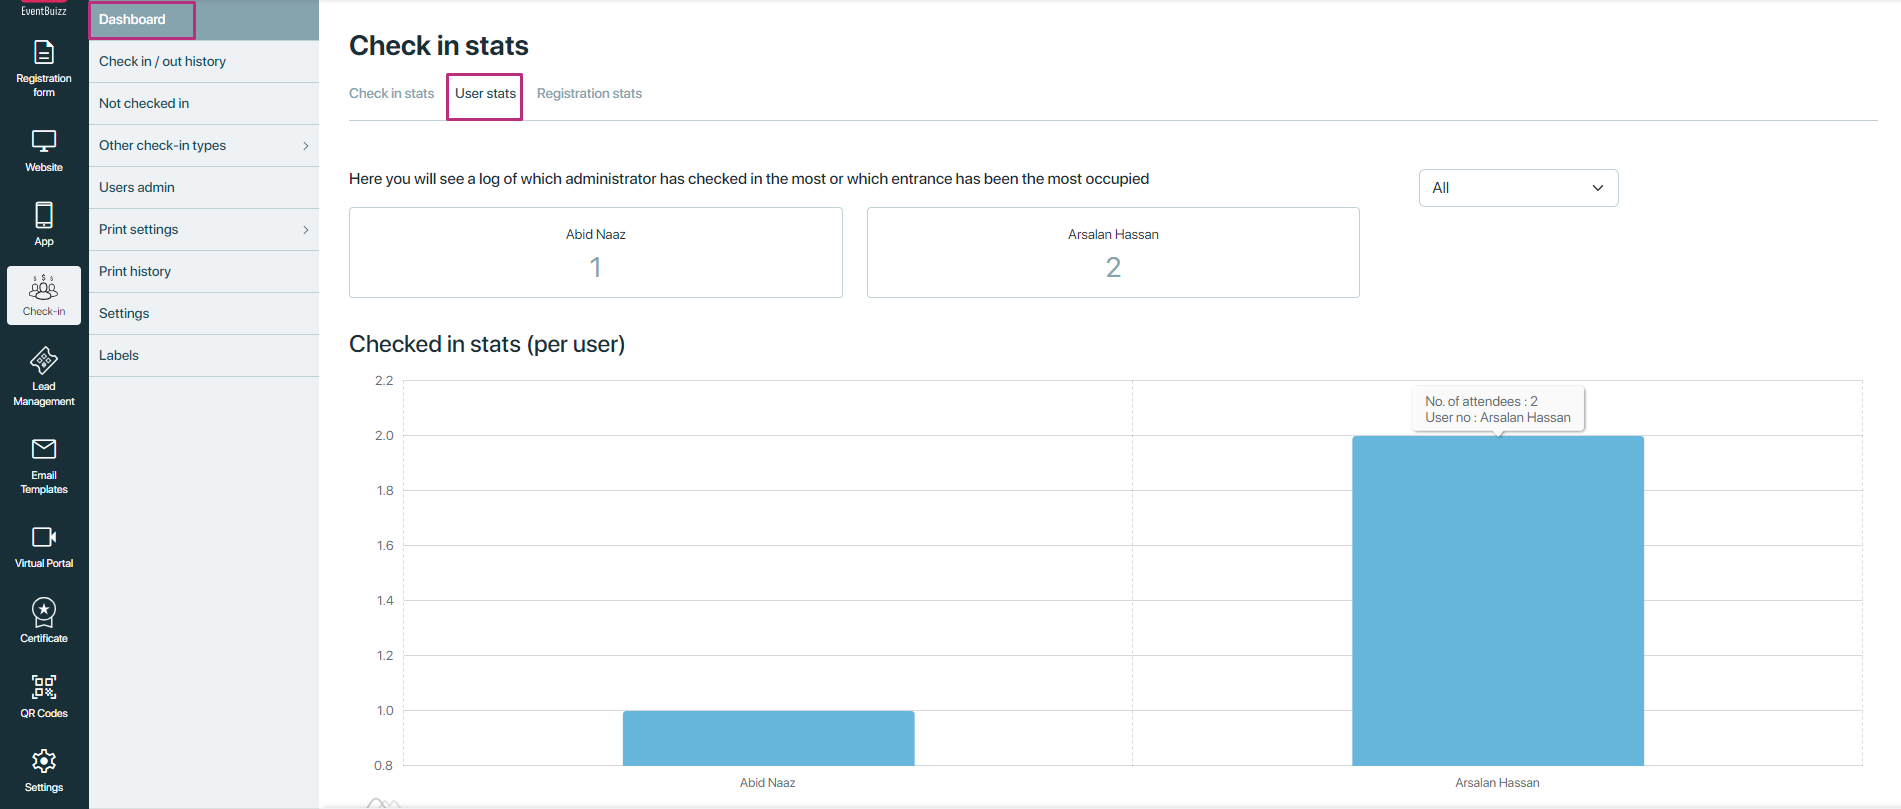
Also on “user stats” sub section, organiser will found a date filter drop down, where all the check-in dates are showing in the drop down, by applying filter or selecting any date from drop down, organiser can see the performance of user admins on such particular date.
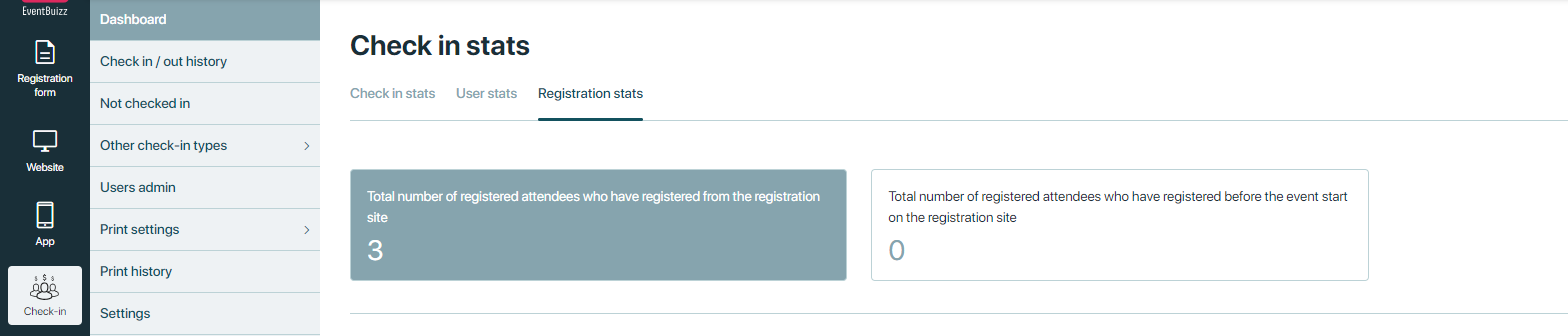
Registration stats
The “Registration state” section provides organisers insights about attendees registrations using registration site.
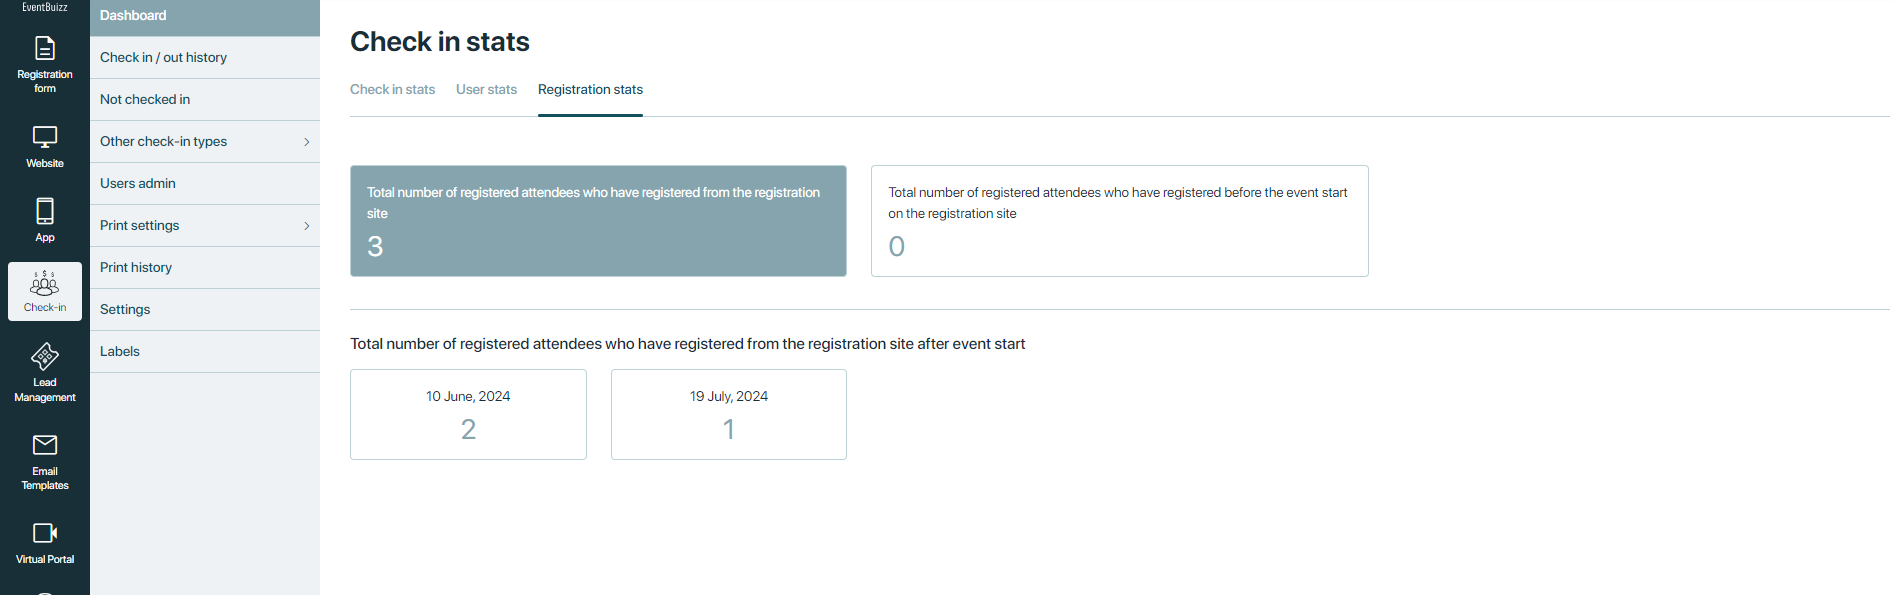
It includes widgets and date tabs to facilitate detailed analysis.
Widgets
Total registered attendees:
- Purpose: Displays the total number of attendees who have registered via the registration site.
- Usage: Provides an overview of the overall registration volume handled through the site.
Pre-event registrations:
Purpose: Shows the total number of attendees who registered before the event start date using the registration site.
Date tabs
Purpose: Lists dates corresponding to attendee registrations from the registration site.
Attendee count: Displays the number of attendees registered for each date.

Check-in/out history
Check-in/out history
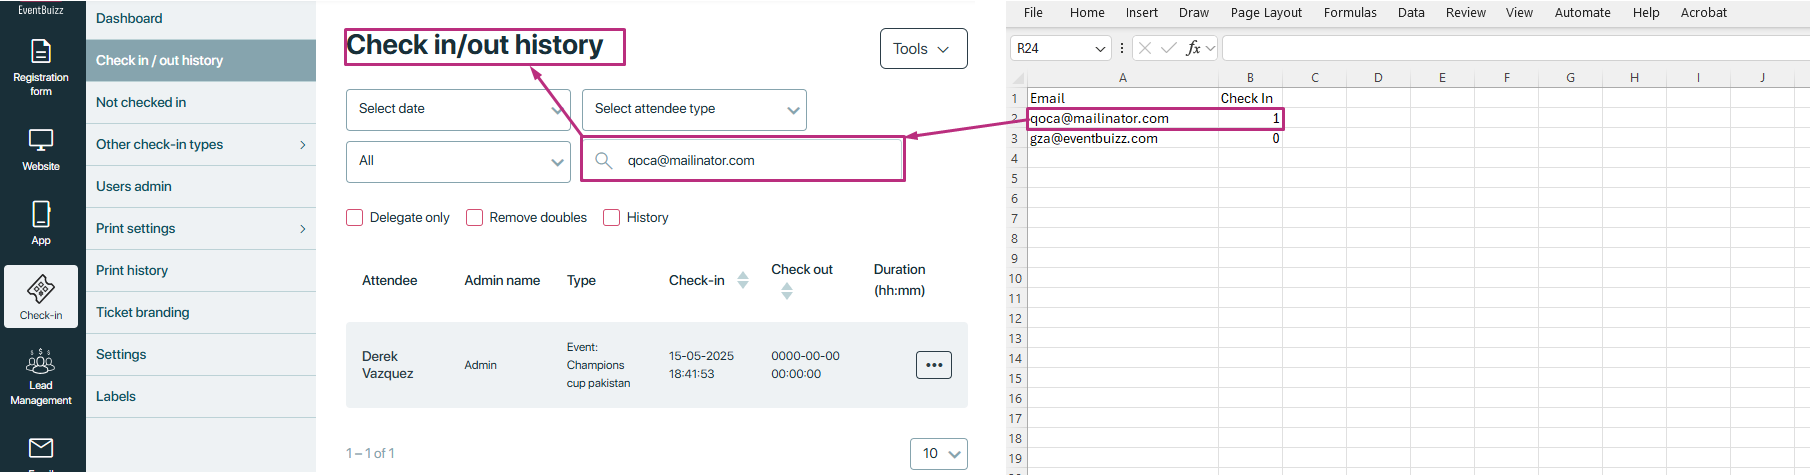
The “Check-in/out history” section provides organisers with a comprehensive record of all attendees who have checked into the event. This listing displays essential attendee details and offers management options to facilitate efficient event oversight. Here is the view of the listing.
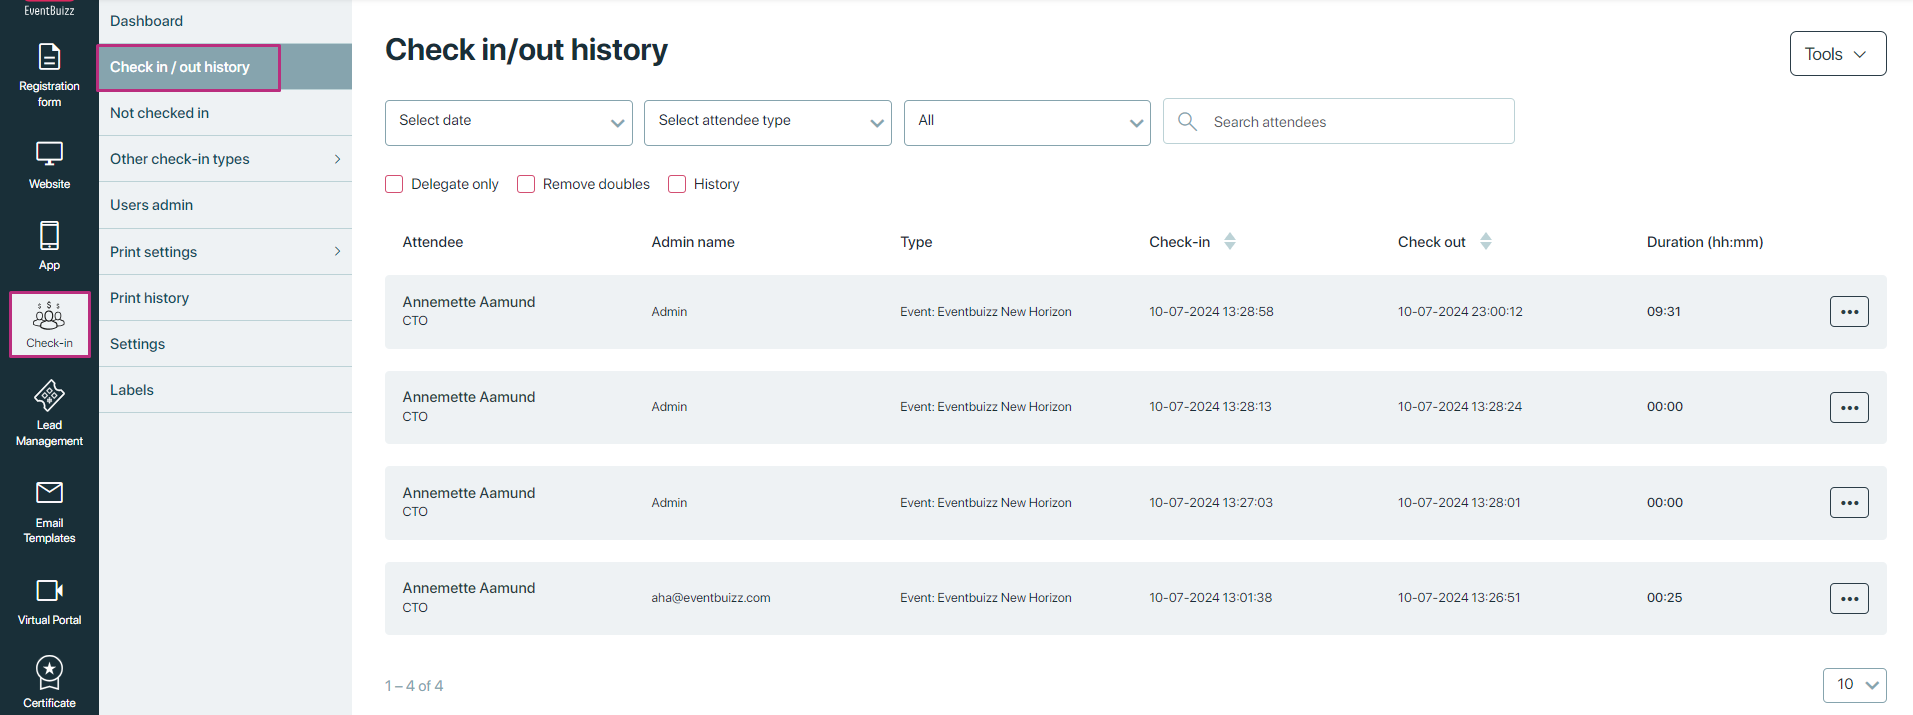
Attendee listing details
Each attendee entry in the history listing includes the following fields:
- First name: The first name of the attendee.
- Last name: The last name of the attendee.
- Title: The professional title or designation of the attendee.
- Company: The name of the company the attendee represents.
- Email: The email address of the attendee for communication purposes.
- Department: The department or division within the attendee’s organisation.
- Organisation: The name of the organisation to which the attendee belongs.
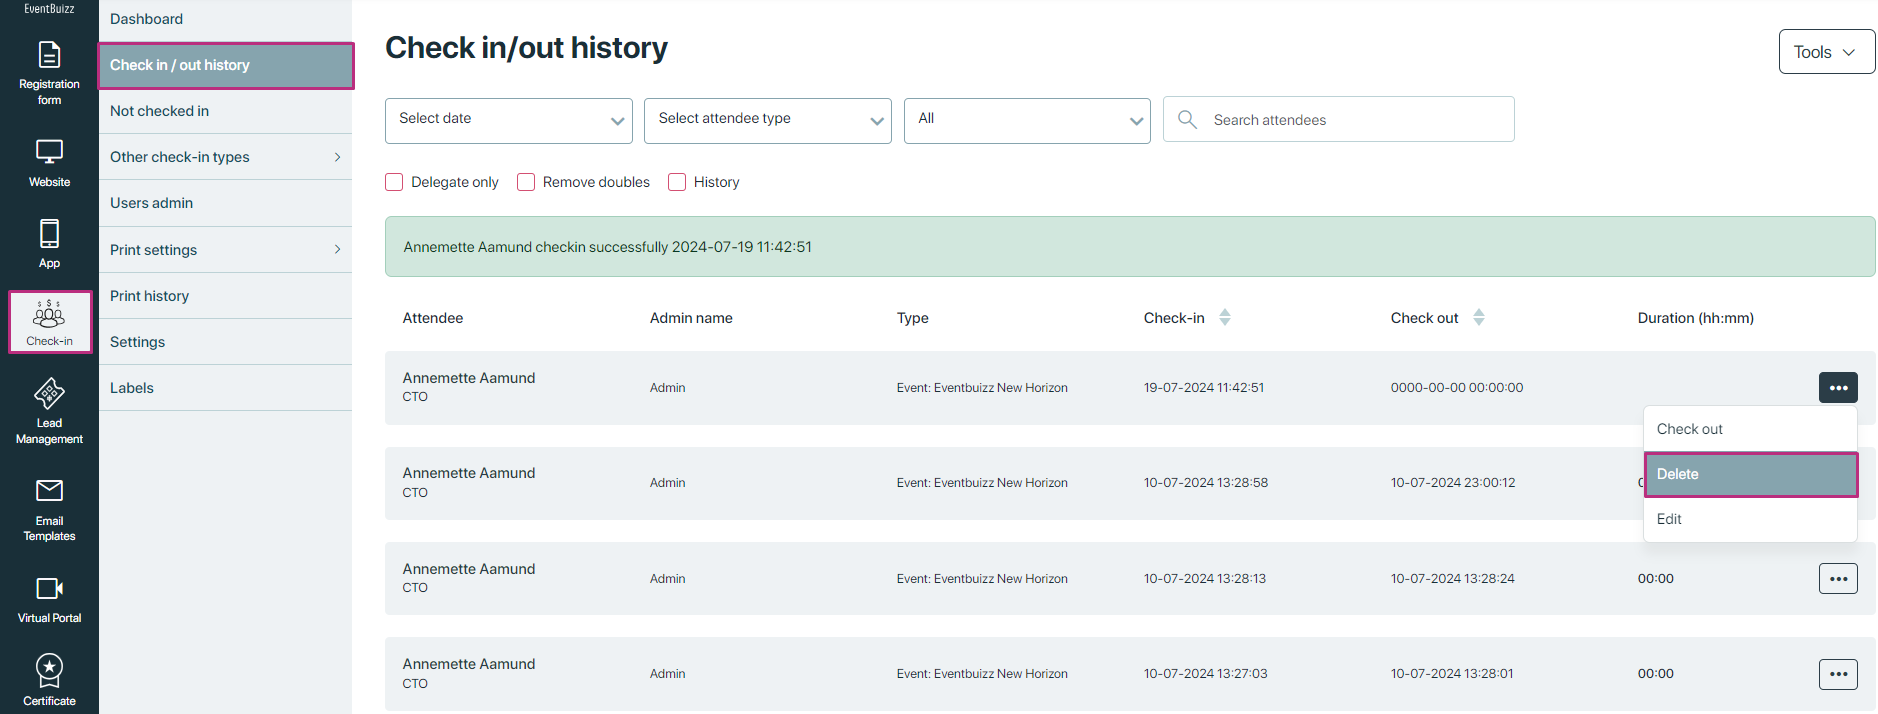
For each attendee listed, the organiser has access to a menu![]() , here is the look of it:
, here is the look of it:
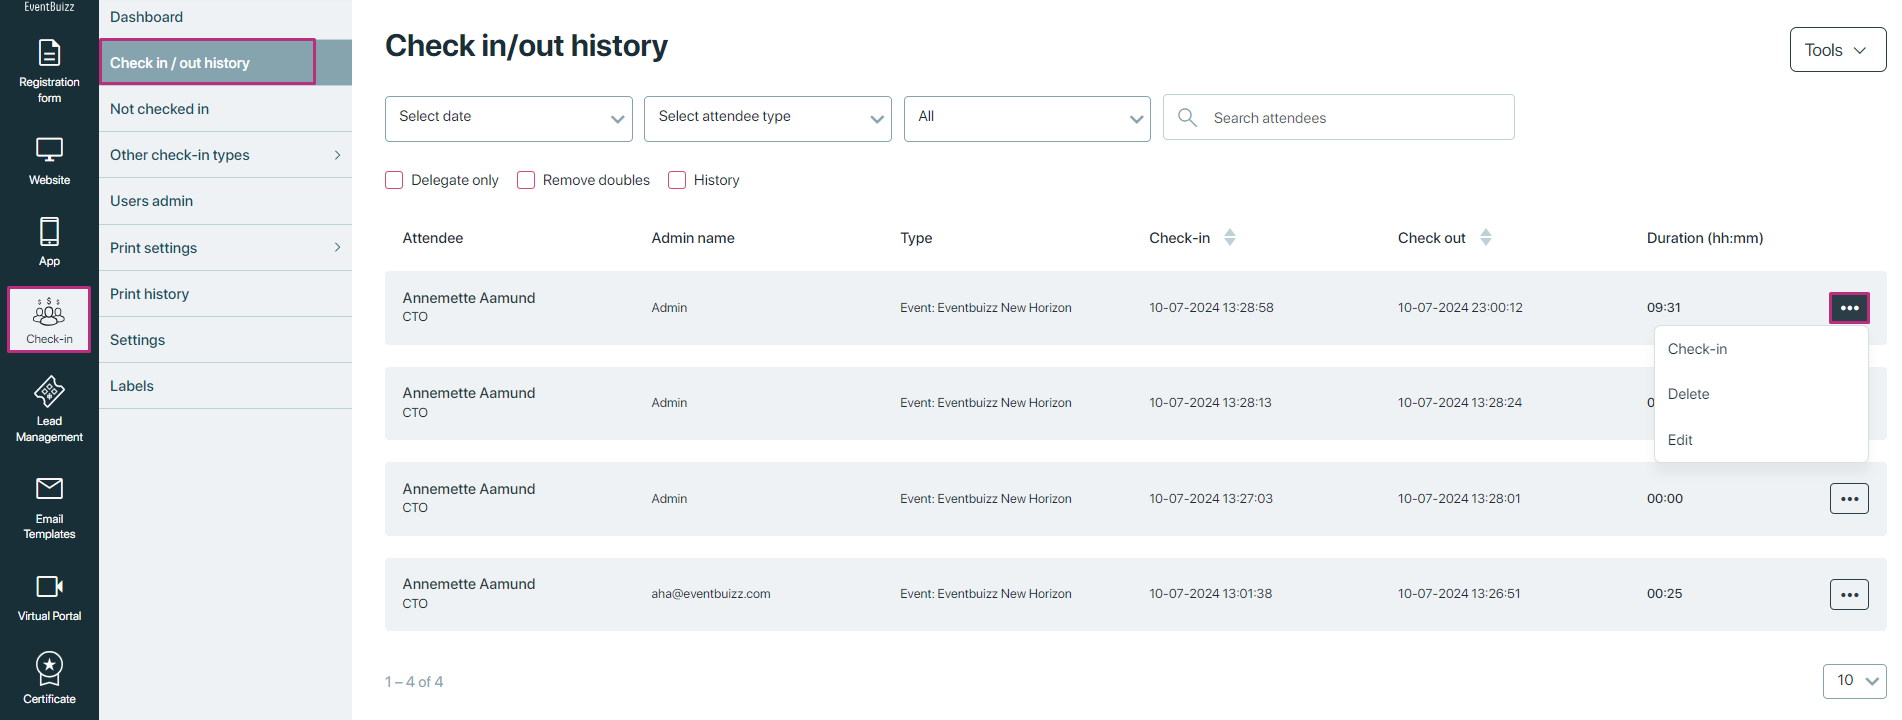
Each menu![]() offering the following options:
offering the following options:
Menu options:
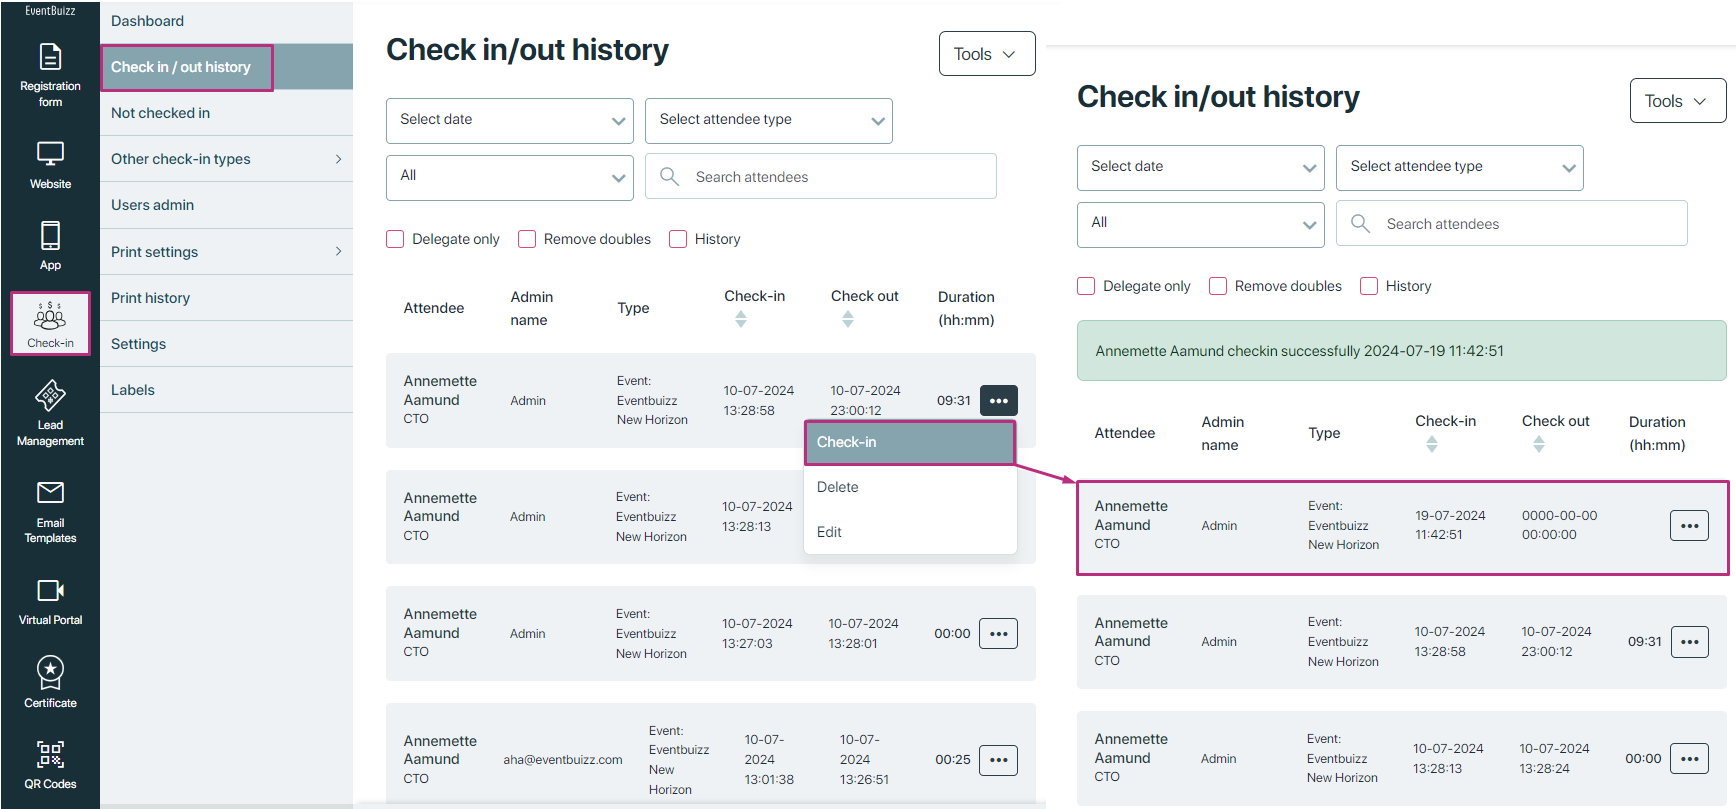
Check-in/check-out
Allows the organiser to manually check-in or check-out an attendee if necessary. Once actioned, the system immediately generates a new entry in the Check-in/out history listing, recording the precise timestamp of the check-in or check-out event. This ensures that every attendee’s movement is accurately documented, maintaining the integrity of attendance records. It also allows organisers to uphold event access control, even in exceptional cases, and provides a reliable backup method for ensuring all attendee interactions with the venue are properly logged.
Delete
The Delete function allows organisers to remove an attendee’s record from the Check-in/out history when necessary. This feature is particularly useful for correcting mistakes, such as accidental , or when an entry was created in error. By selecting the Delete option, organisers can ensure that the check-in data remains clean, accurate, and reflective of the actual attendance. Removing unnecessary or incorrect records helps maintain the integrity of the event’s attendance tracking and reporting.
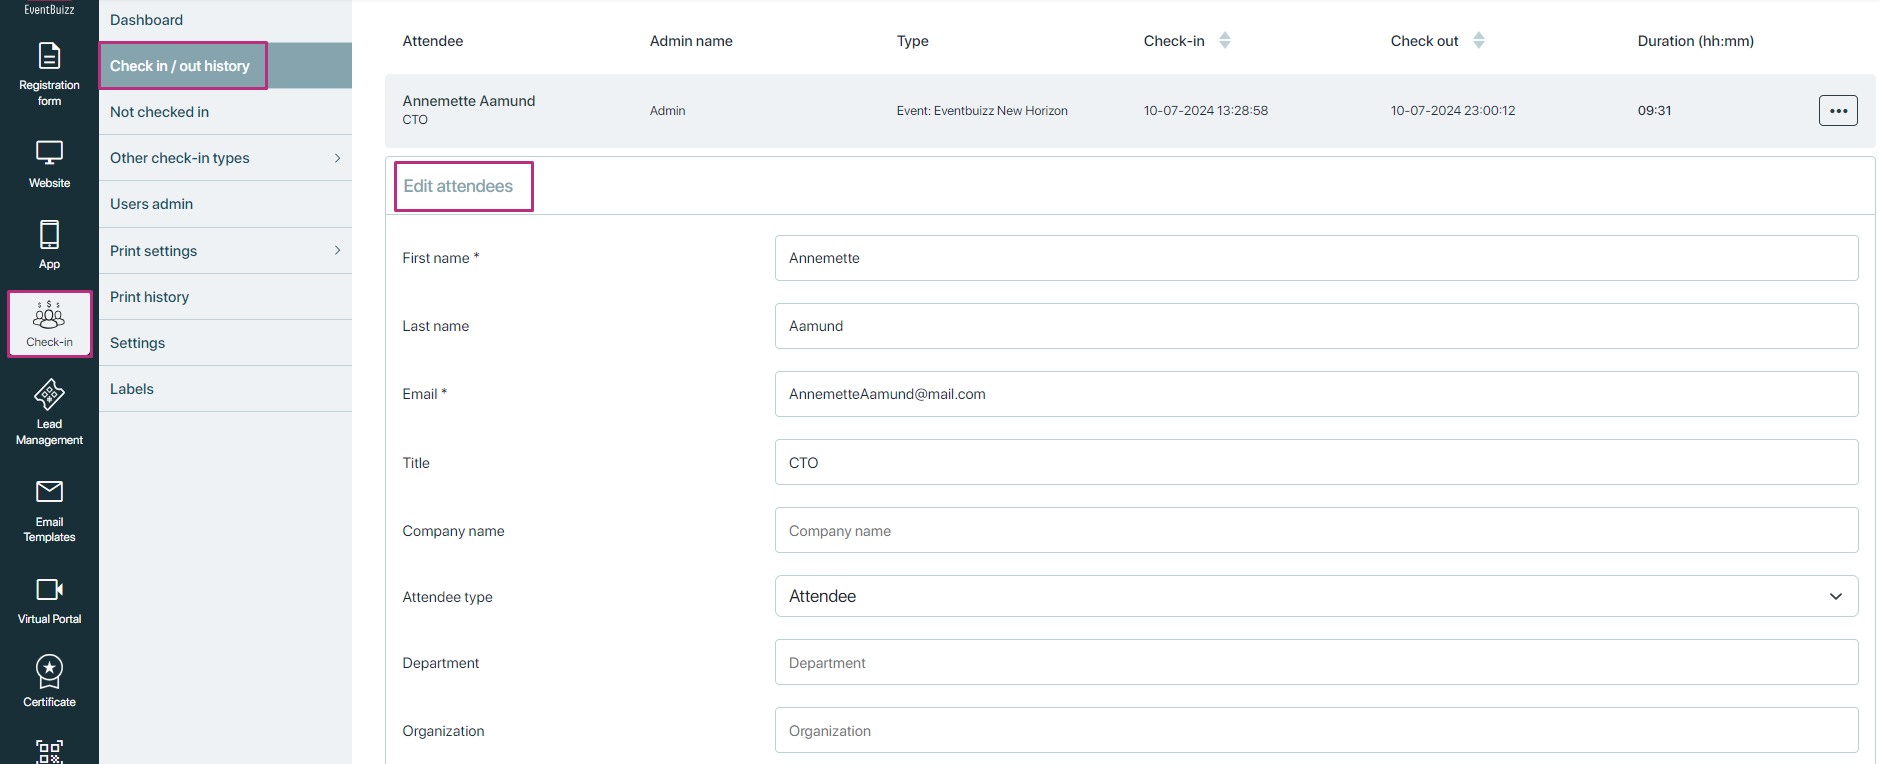
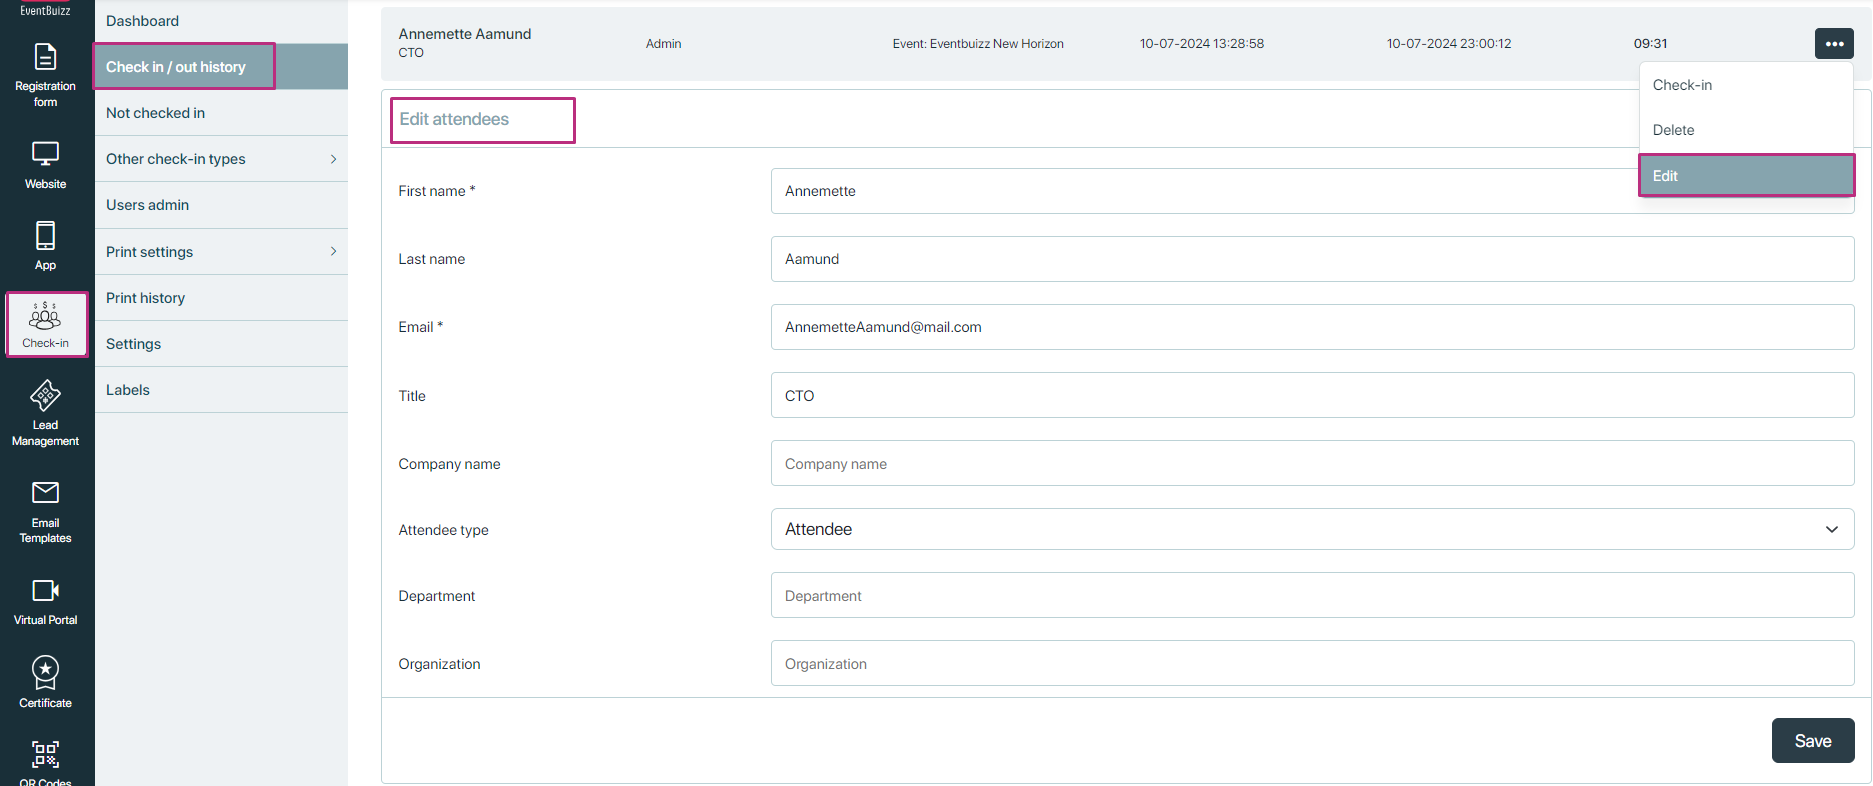
Edit
The Edit function allows organisers to update specific attendee details within the Check-in/out history, helping ensure that the recorded information remains accurate and properly maintained. Organisers can modify fields such as the attendee’s name, title, company, department, and organisation to correct errors, reflect recent changes, or maintain consistency across records. However, it is important to note that the email address is not editable, as it serves as a unique identifier within the system and is often tied to the attendee’s registration and communication history
The “Check-in/out history” section provides powerful filtration tools to help organisers efficiently manage and analyse attendee records. These tools include both drop down filters and checkbox filters, offering flexibility in narrowing down specific data sets.
Drop down filters
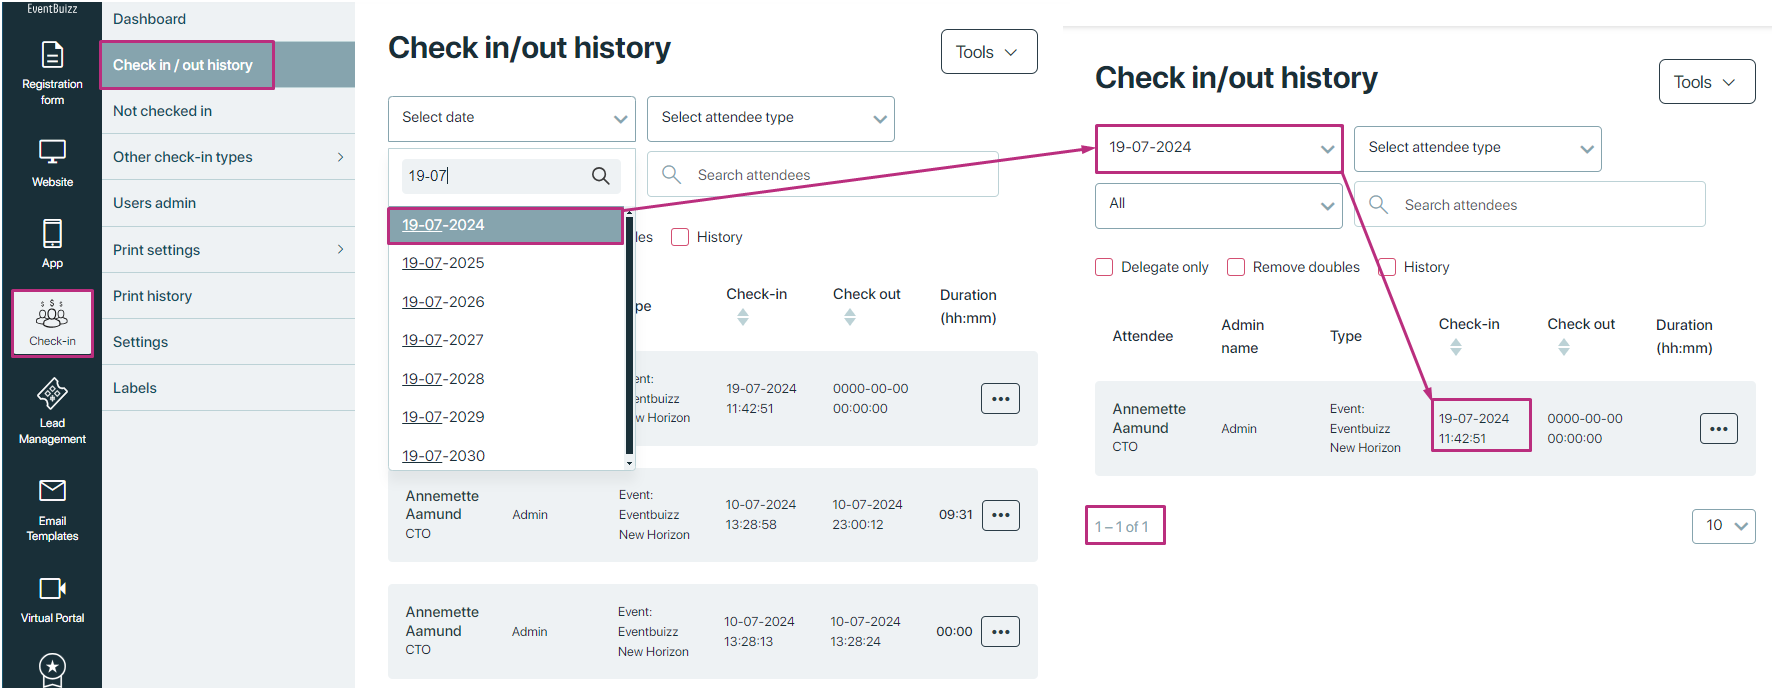
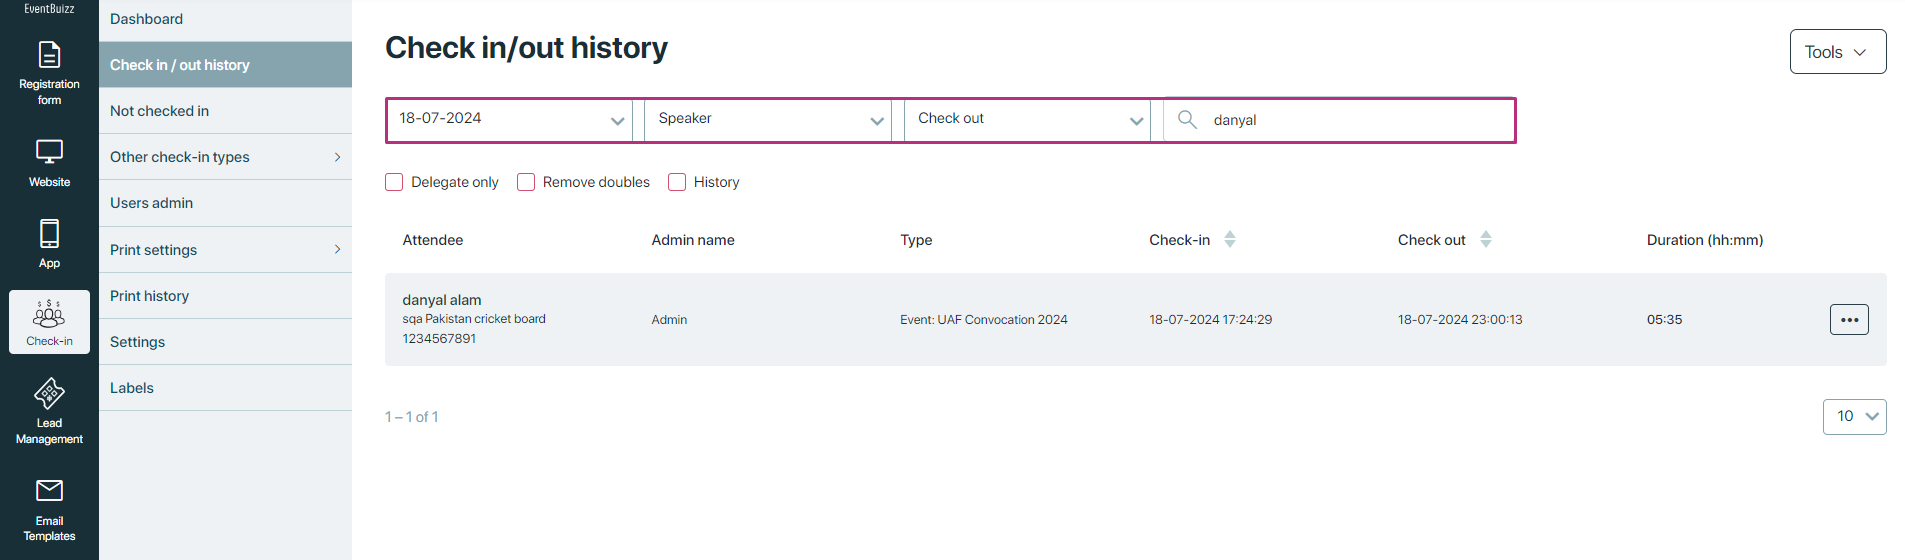
Date filter:
The Date filter within the Drop down filters section provides organisers with a convenient way to narrow down check-in/out records based on a specific date. By selecting a date from the drop-down list, organisers can instantly filter the attendee history to display only those who checked in or out on the chosen day. This feature is especially useful during multi-day events or when reviewing historical attendance data for reporting, auditing, or troubleshooting purposes. It enables organisers to quickly identify trends, manage daily attendance logs, and focus on relevant records without having to scroll through the entire event history
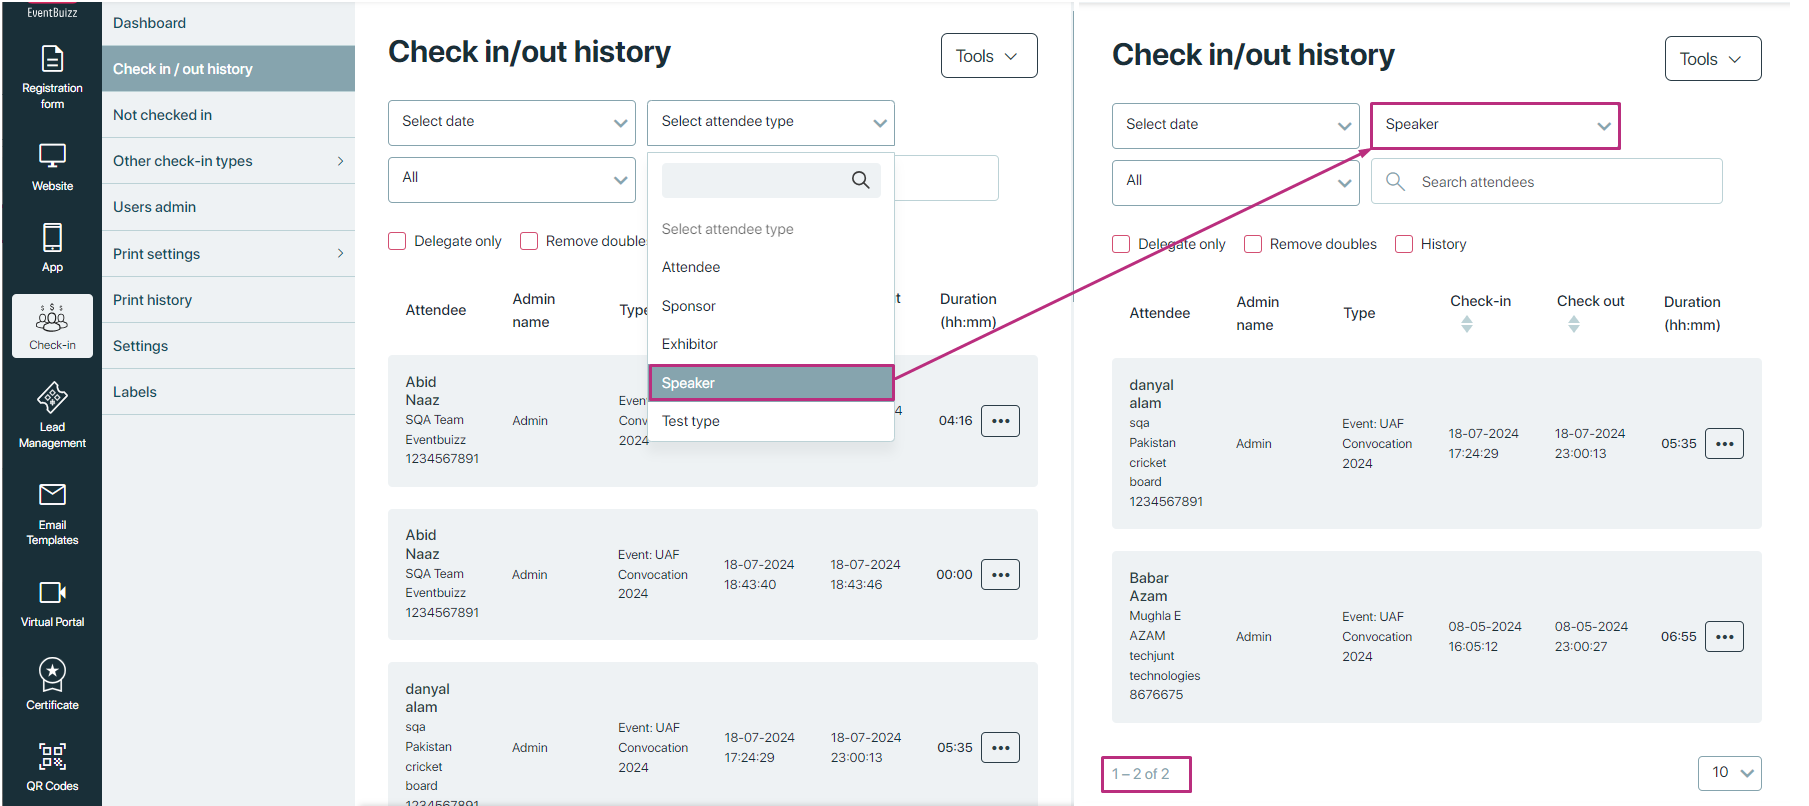
Attendee type filter:
The Attendee type filter is a valuable tool within the Drop down filters section that allows organisers to refine check-in/out records based on specific categories of attendees. This feature presents a drop-down list containing predefined attendee types—such as attendee, speaker, VIP, exhibitor, or other custom roles—enabling organisers to quickly isolate and view records relevant to a particular group. It is particularly useful for large or complex events where multiple attendee categories are involved, as it helps streamline data analysis and monitoring.
For example, an organiser may want to check if all speakers have arrived or verify the check-in times of VIP guests. By filtering records in this way, the organiser can manage each group more effectively, ensure timely arrivals, and make informed decisions without manually sorting through all attendee data. The Attendee type filter thus enhances operational efficiency and supports targeted event oversight.
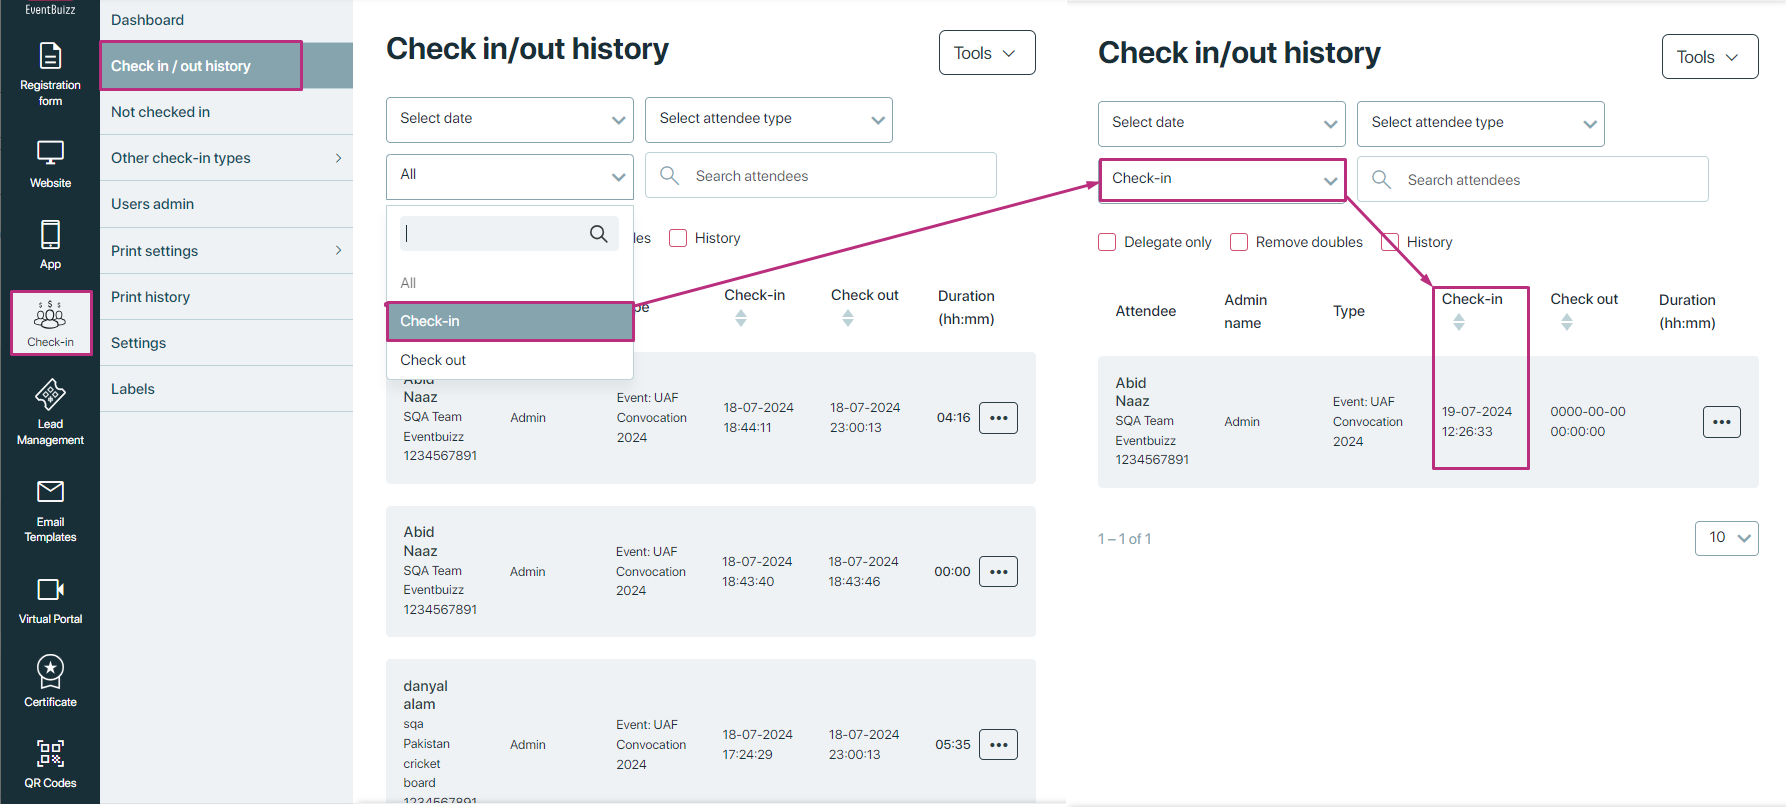
Check-in/check-out filter
Offers options to filter records based on check-in status:
- Check-in: Displays records of attendees who have checked into the event.
- Check-out: Displays records of attendees who have checked out from the event.
- All: Displays both check-in and check-out records.
Search functionality
Attendee information search:
The Attendee information search feature provides organisers with a powerful and efficient way to locate specific attendee records within the Check-in/out history. By entering key information—such as the attendee’s name, email address, or other identifiable details—into the search bar, organisers can instantly retrieve matching results without having to manually scroll through the full list of records. This functionality significantly speeds up the process of managing individual attendee queries, verifying check-in status, or resolving disputes related to attendance. It is particularly valuable during busy event periods when quick access to attendee data is essential. The search is typically designed to handle partial matches and auto-suggestions, making it user-friendly and responsive. Overall, the Attendee information search enhances the organiser’s ability to manage data efficiently, ensure accuracy, and provide timely support during the event.
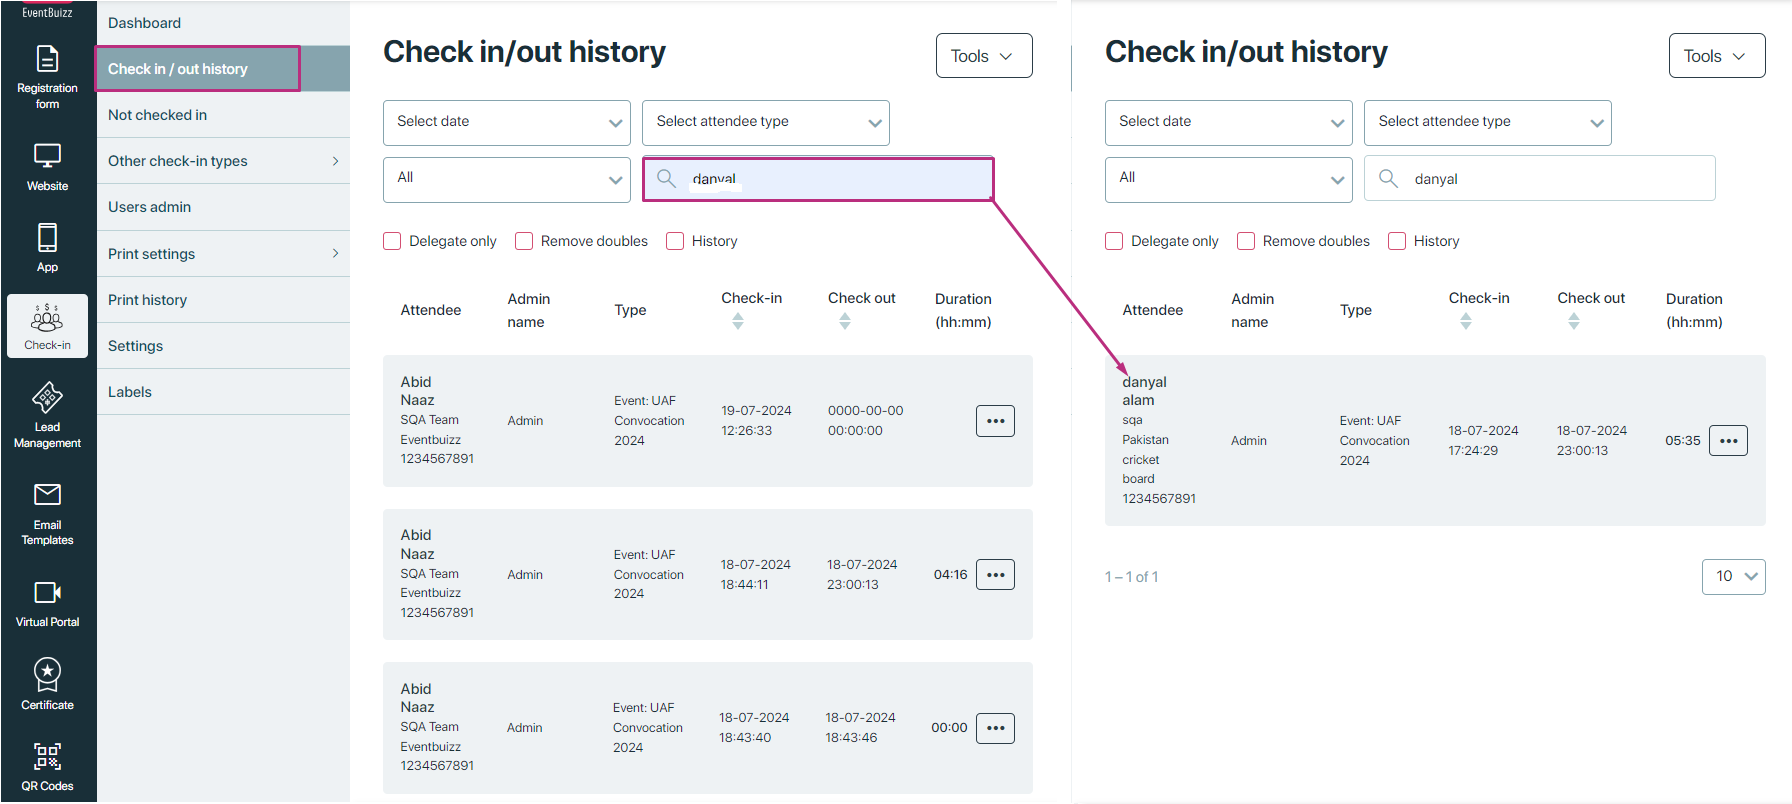
Organisers can apply multiple filters simultaneously to refine and narrow down search results with greater precision. For instance, they can select a specific date, choose an attendee type (such as speaker or VIP), and apply a check-in status filter (e.g., checked-in or not checked-in) all at once. This multi-filter capability allows for highly targeted data views, making it easier to manage specific attendee groups, monitor attendance trends, and perform detailed audits. It is especially beneficial for large-scale or multi-day events where vast amounts of check-in/out data are generated. By combining filters, organisers can quickly access the exact information they need without unnecessary manual searching, leading to more efficient event oversight and improved decision-making.
Checkbox filters
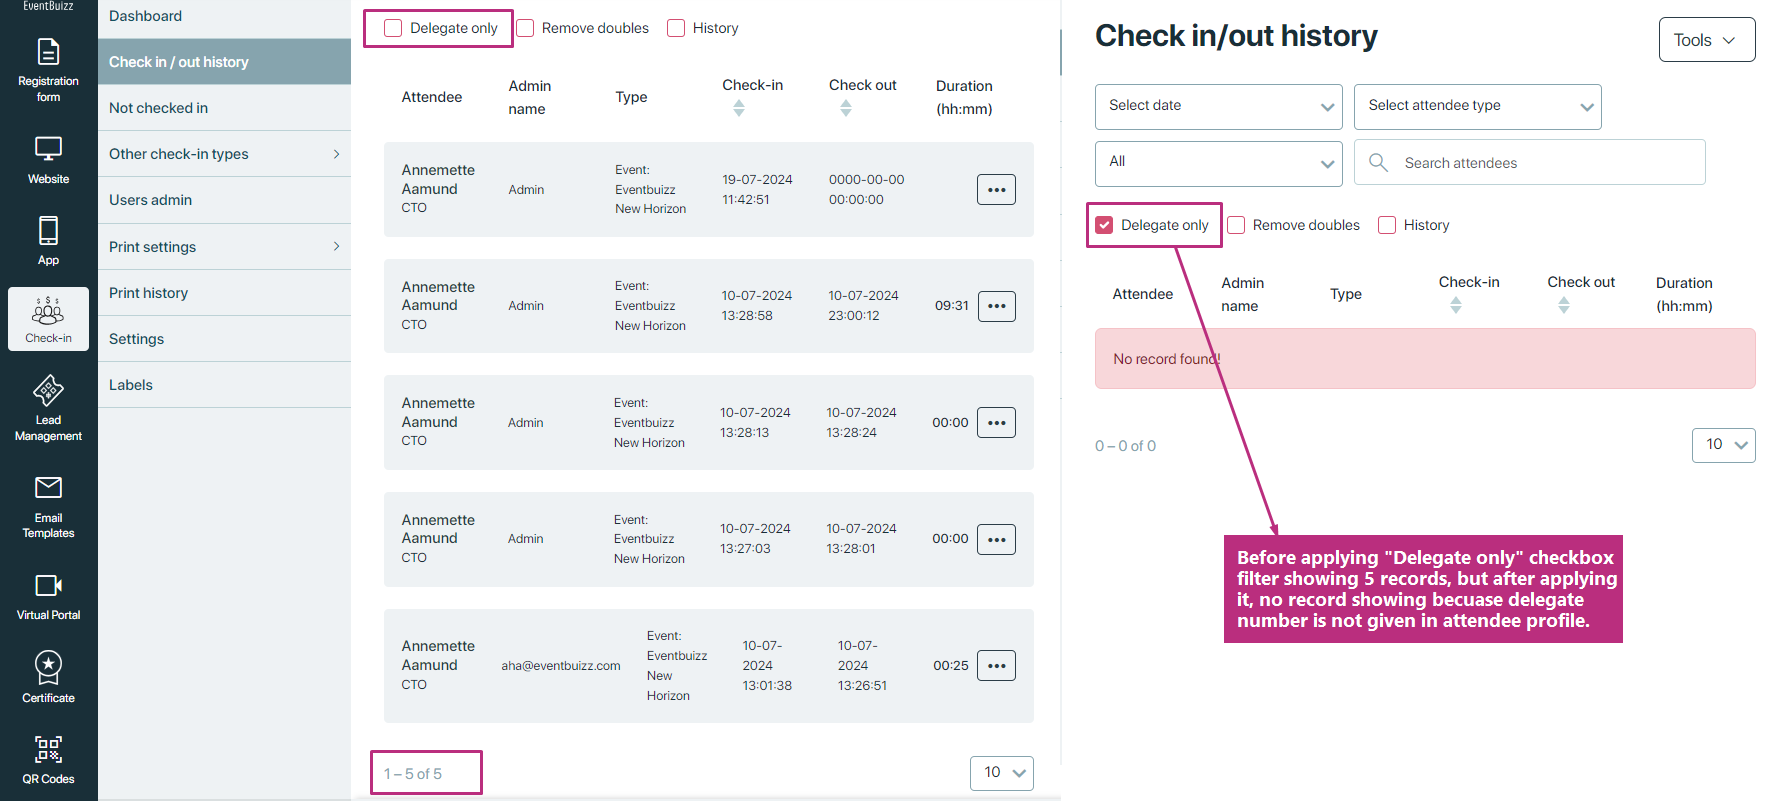
Delegate only:
The Delegate only checkbox filter allows organisers to quickly narrow down the check-in/out records to display only those attendees who have been assigned a delegate number during their creation or registration process. This filter is especially useful in events where delegate numbers are used to identify specific categories of attendees, such as official participants, voting members, or individuals with special access privileges. By selecting this checkbox, organisers can easily isolate and monitor delegate activity, verify their attendance, and ensure they have fulfilled event participation requirements.
Remove doubles:
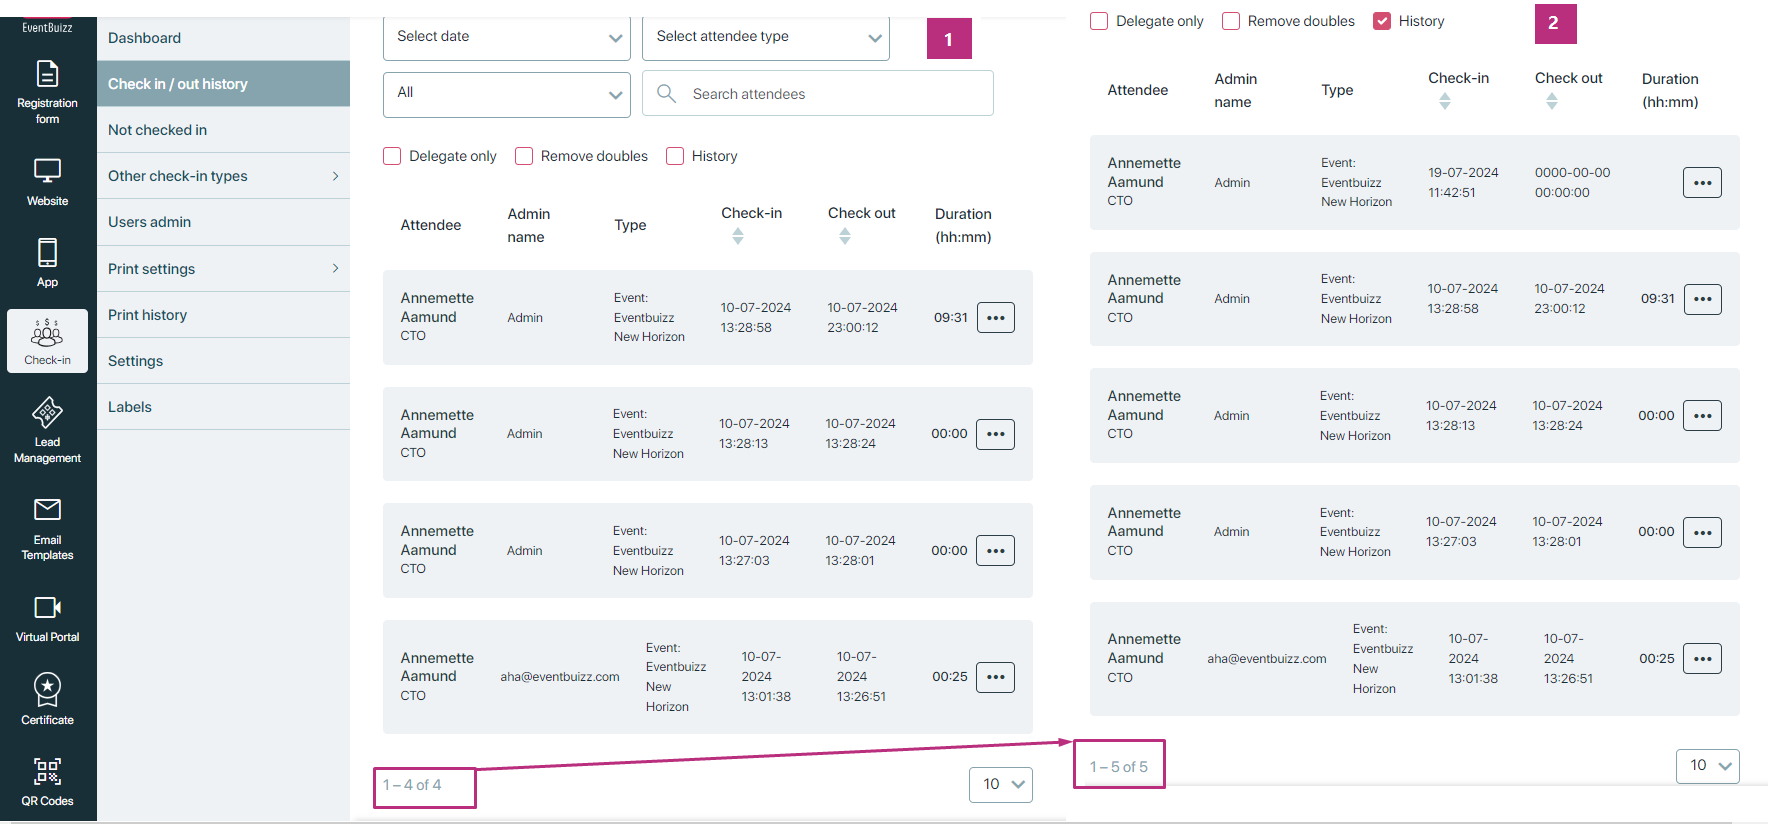
The Remove doubles checkbox filter is designed to simplify the Check-in/out history by eliminating repeated records and displaying only a single entry per attendee. When this option is selected, the system automatically filters out duplicate check-ins or check-outs that may have occurred due to multiple scans, system errors, or re-entries. This helps organisers view a clean and concise list of attendees without clutter or redundancy, making it easier to analyze attendance data accurately. It is particularly useful during high-traffic events where rapid scanning may lead to duplicate entries. By presenting only unique attendee records, the Remove doubles filter improves clarity, reduces confusion, and ensures that reports and overviews reflect a more accurate snapshot of actual event participation.
History:
The History checkbox filter provides organisers with the option to include deleted records from past check-in/out activities in the listing, offering a more comprehensive and transparent view of each attendee’s full history. When this filter is enabled, entries that were previously removed—whether due to error corrections, duplicates, or manual deletions—are restored for viewing purposes. This feature is especially valuable for audit trails, internal reviews, or post-event analysis, as it ensures that no data is permanently hidden and all actions taken on attendee records can be tracked. By giving organisers access to the complete historical log, including both active and deleted entries, the History filter enhances accountability, supports accurate reporting, and strengthens event data integrity.
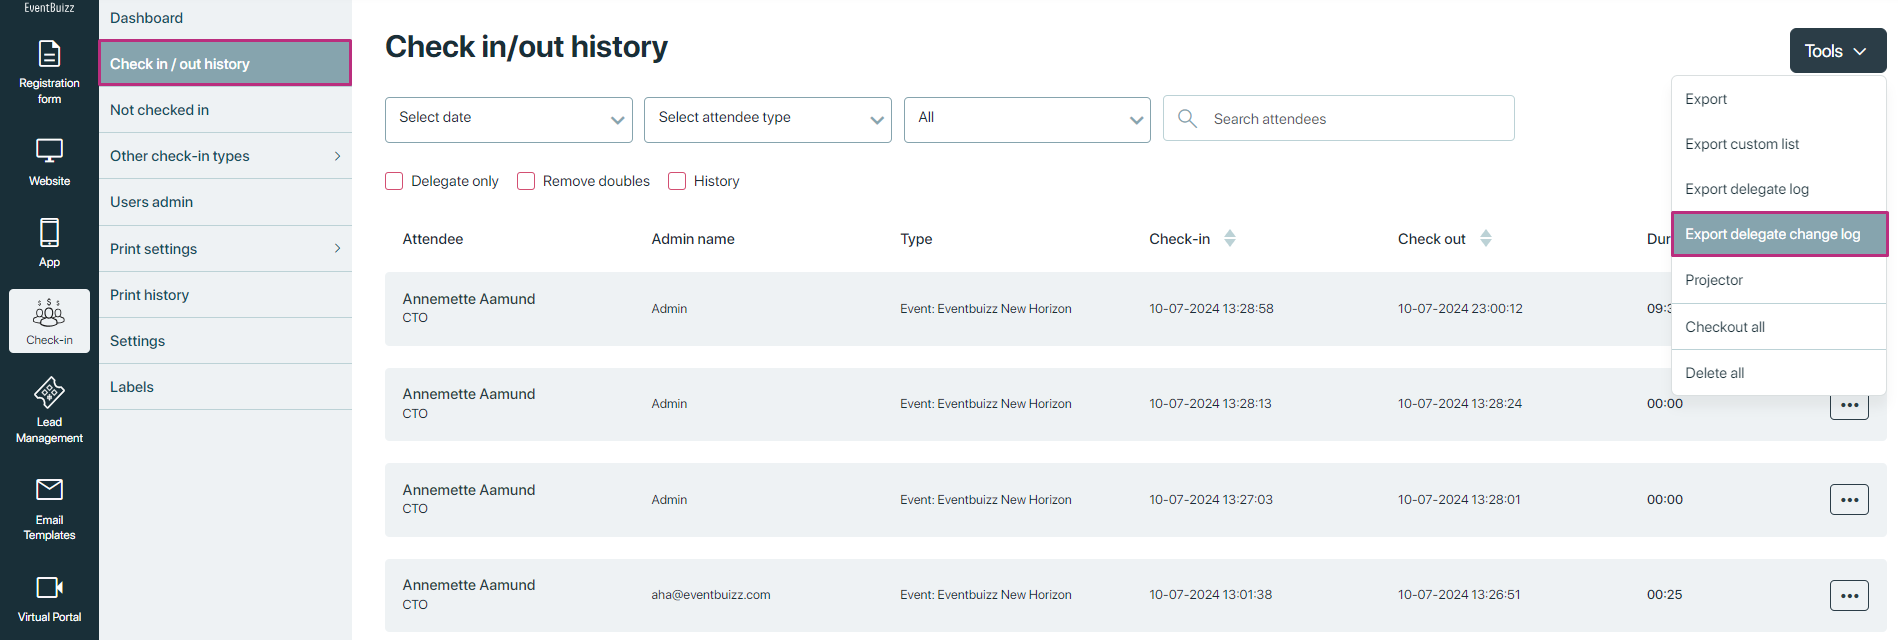
Tools in check-in/check-out history
The “Tools” section offers organisers additional functionalities to manage attendee records and export data efficiently. Here’s an overview of each tool available:
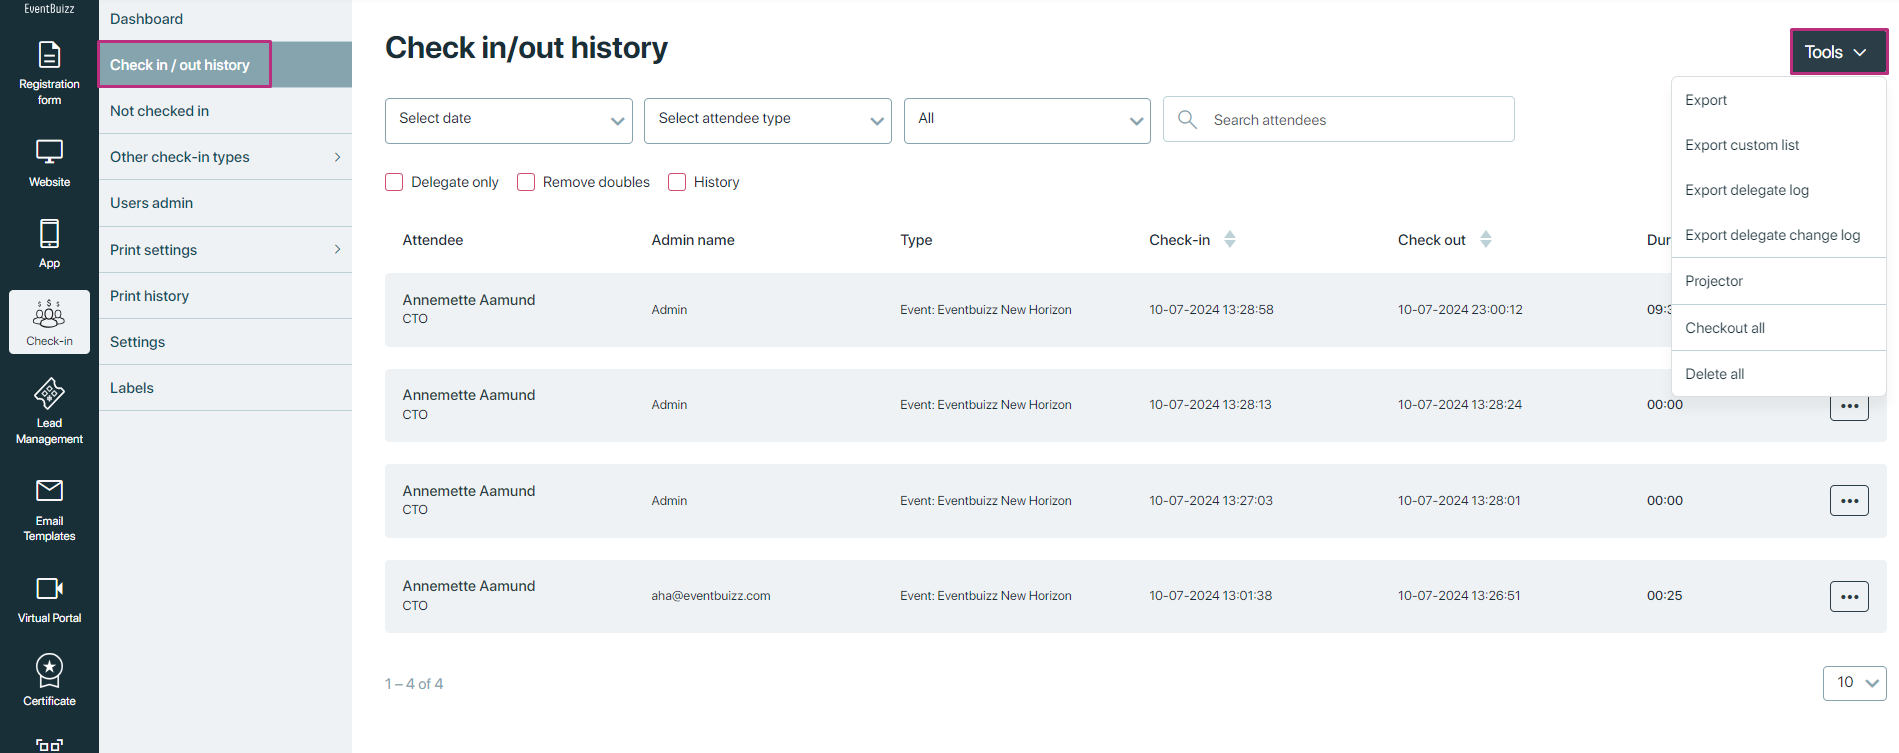
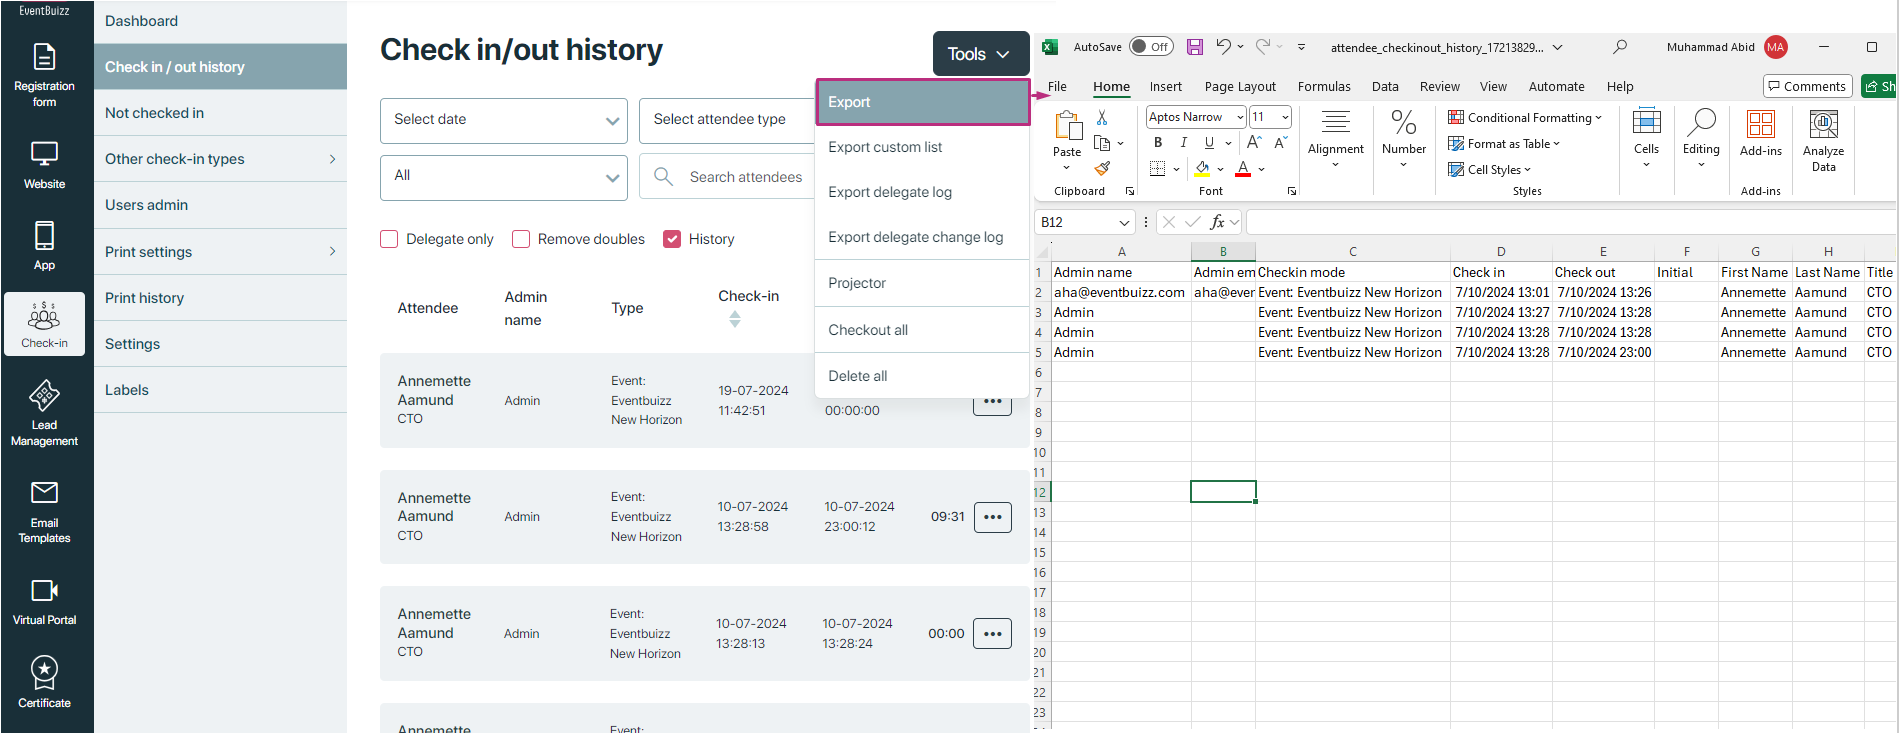
Export
- Purpose: Allows organizers to export the complete list of attendee check-in/check-out history.
- Functionality: Generates a downloadable file (e.g., CSV, Excel) containing all attendee records and their corresponding check-in/check-out details.
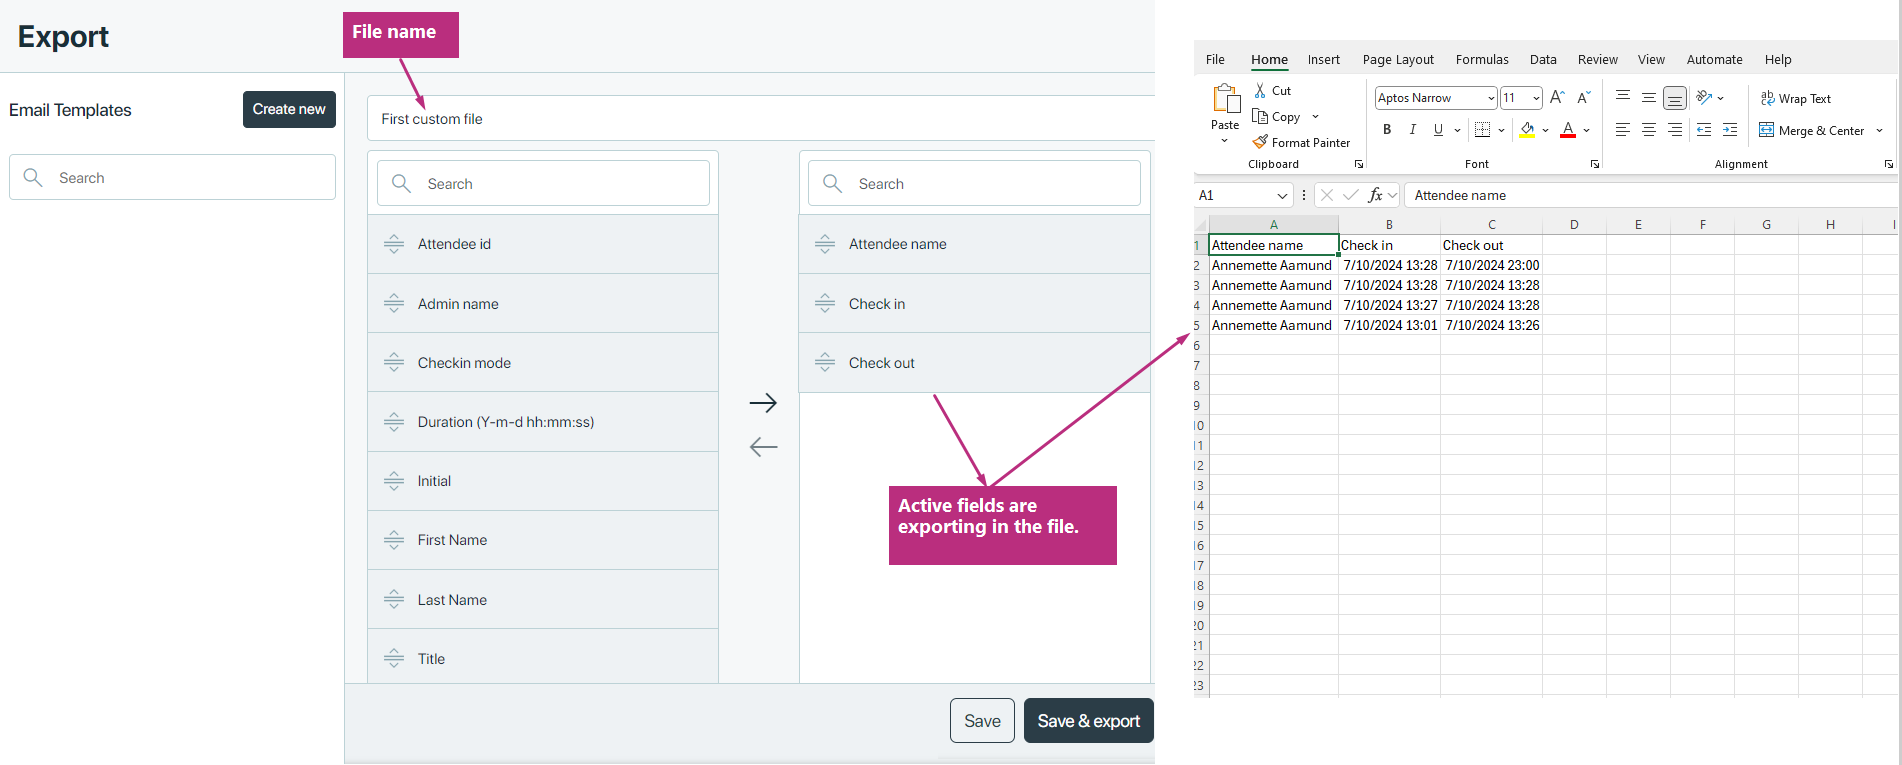
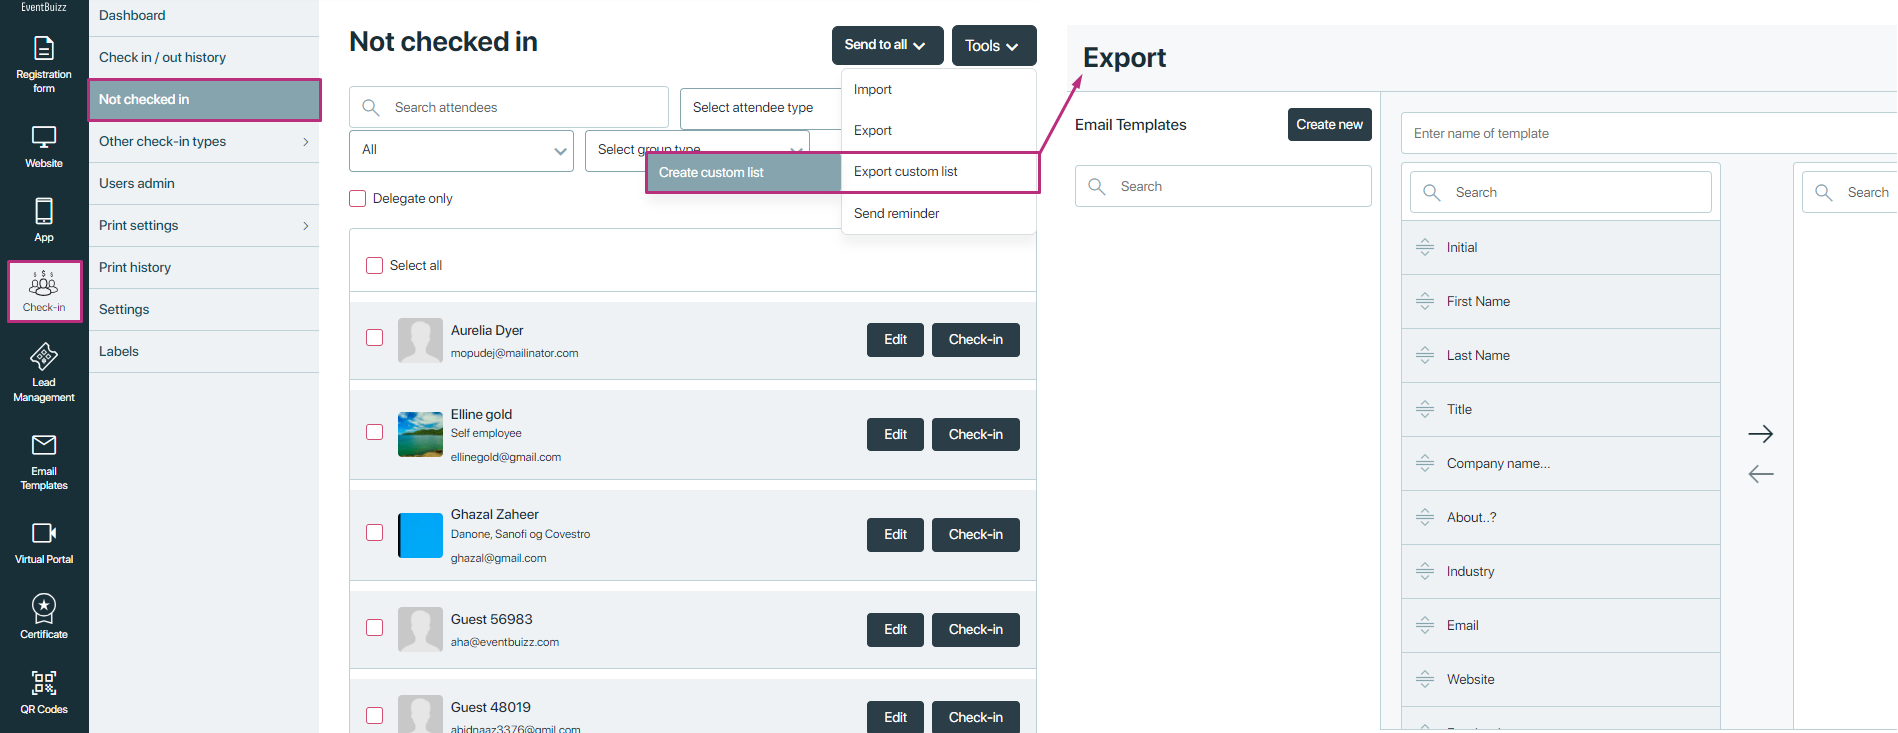
Export custom list
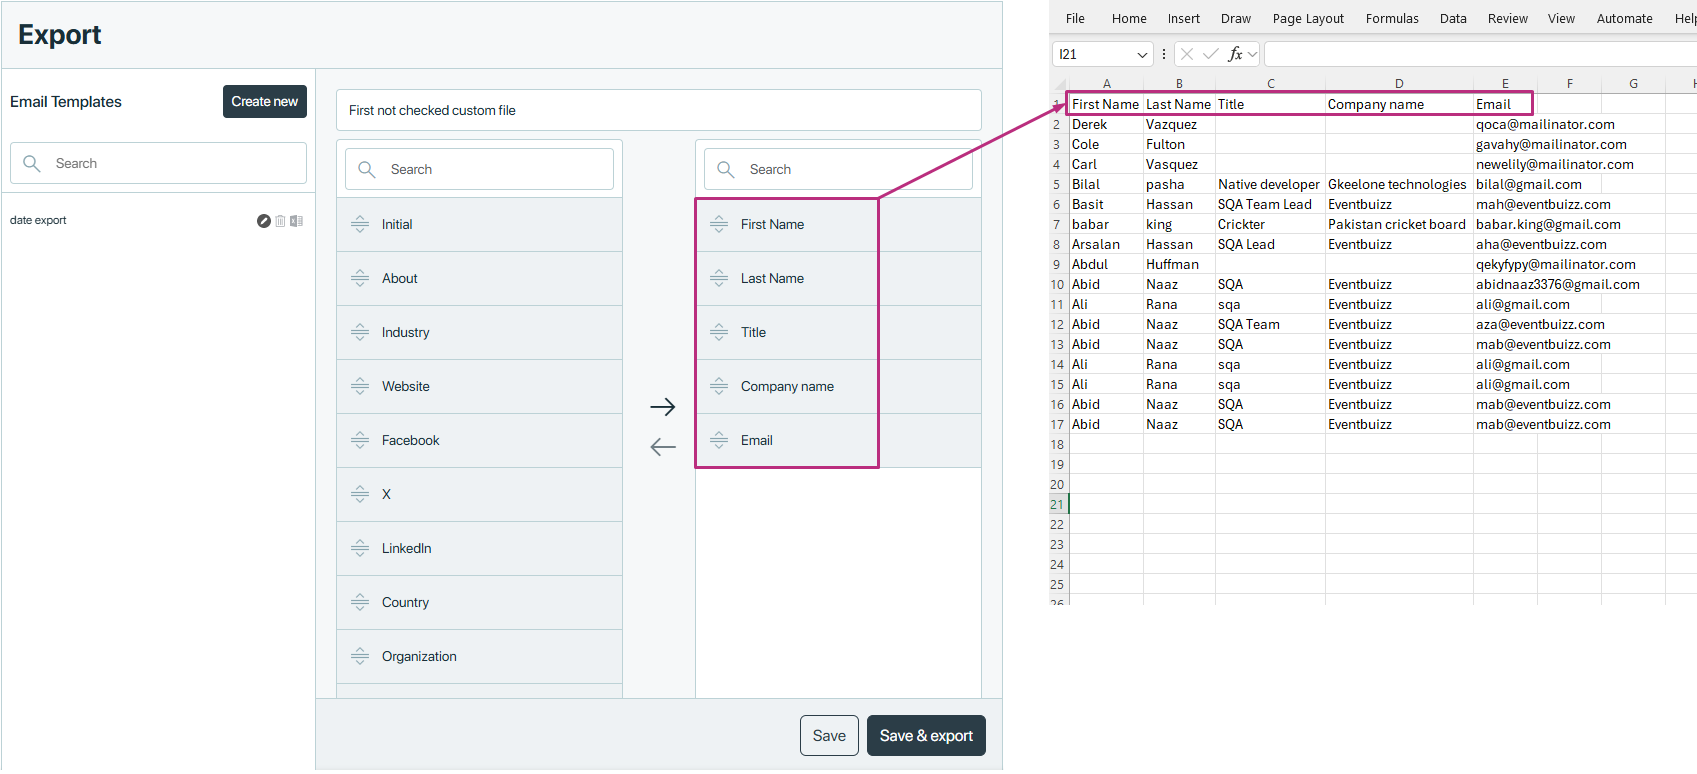
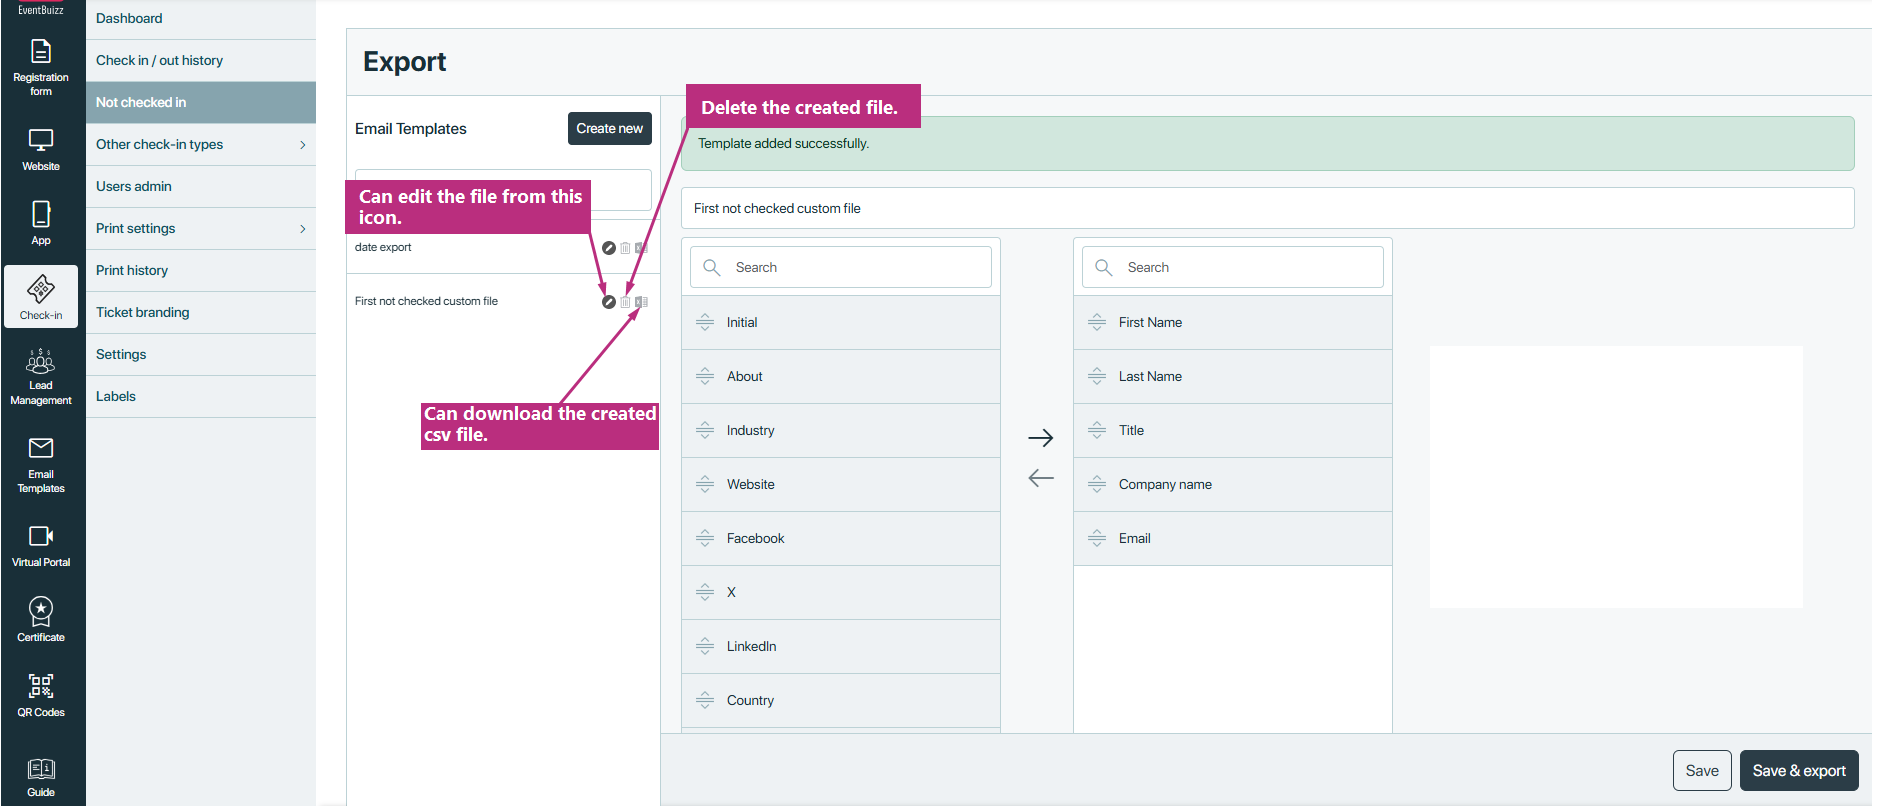
The Export custom list feature offers organisers enhanced flexibility by allowing them to export a customised subset of attendee records based on their specific needs. Unlike the standard export, which includes all available data, this feature lets organisers select only the fields they wish to include in the export—such as attendee name, check-in time, check-out time, attendee type, and more.
- Purpose: Enables organiser to export a customised subset of attendee records based on selected fields.
- Functionality: Organisers can active the specific field (such as name,email, attendee type) and export only the relevant subset of attendee data.
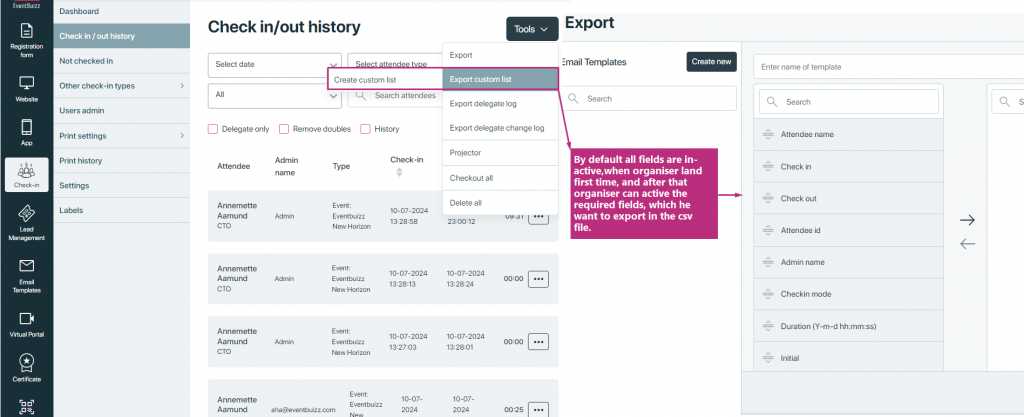
For example, if an organiser only needs a report showing attendee names along with their check-in and check-out times, they can simply activate those fields, assign a custom file name, and export the file accordingly. This helps avoid unnecessary data clutter and ensures the report is tailored to the exact requirements.
Additionally, once a custom export template is created and saved, it is stored under the Email Templates section for future use. From there, organisers can edit, delete, or download any previously created templates, making it easy to manage and reuse export configurations for different events or reporting purposes. This feature not only streamlines the data export process but also enhances efficiency by reducing the need to reconfigure export settings each time.

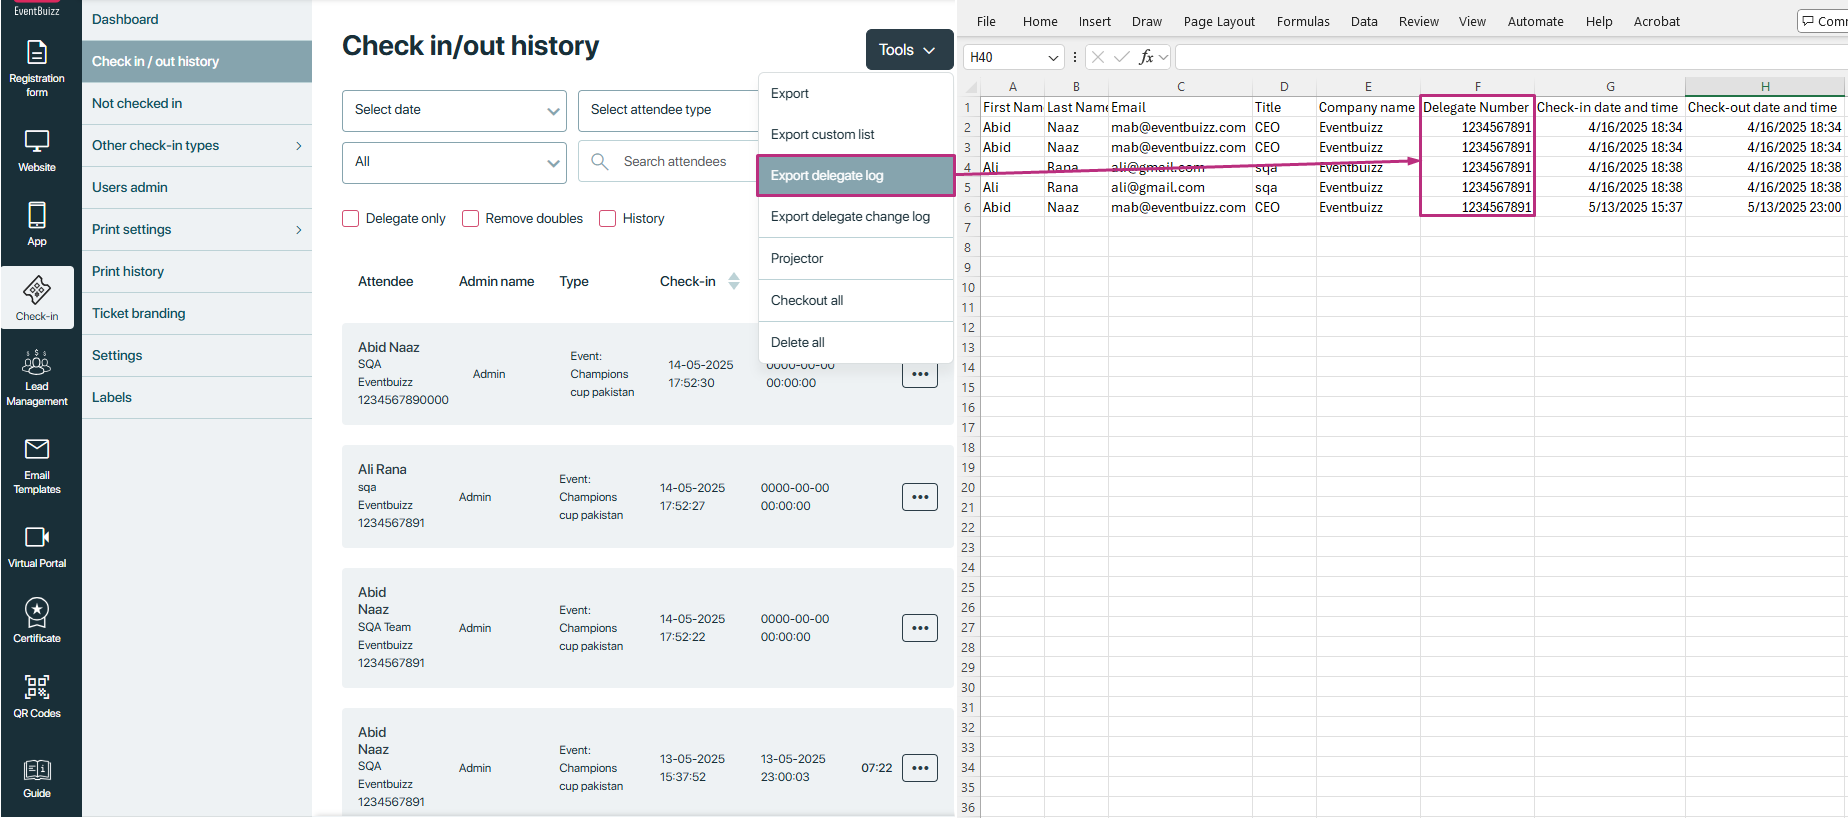
Export delegate log
The Export delegate log feature is specifically designed to generate a file that includes only those attendees who have been assigned a delegate number in their profiles. This export option is ideal for organisers who need to track or report on official delegates separately from general attendees. When this function is used, the system filters the check-in/out history and compiles a file—typically in CSV or Excel format—that contains relevant details of delegate participants only, such as their name, delegate number, check-in and check-out times, and other associated information.
This targeted export helps streamline tasks like verifying delegate attendance, managing voting rights, or preparing formal records for meetings or conferences where delegates hold special roles. It ensures organisers can easily access and manage delegate-specific data without manually sorting through the entire attendee list.
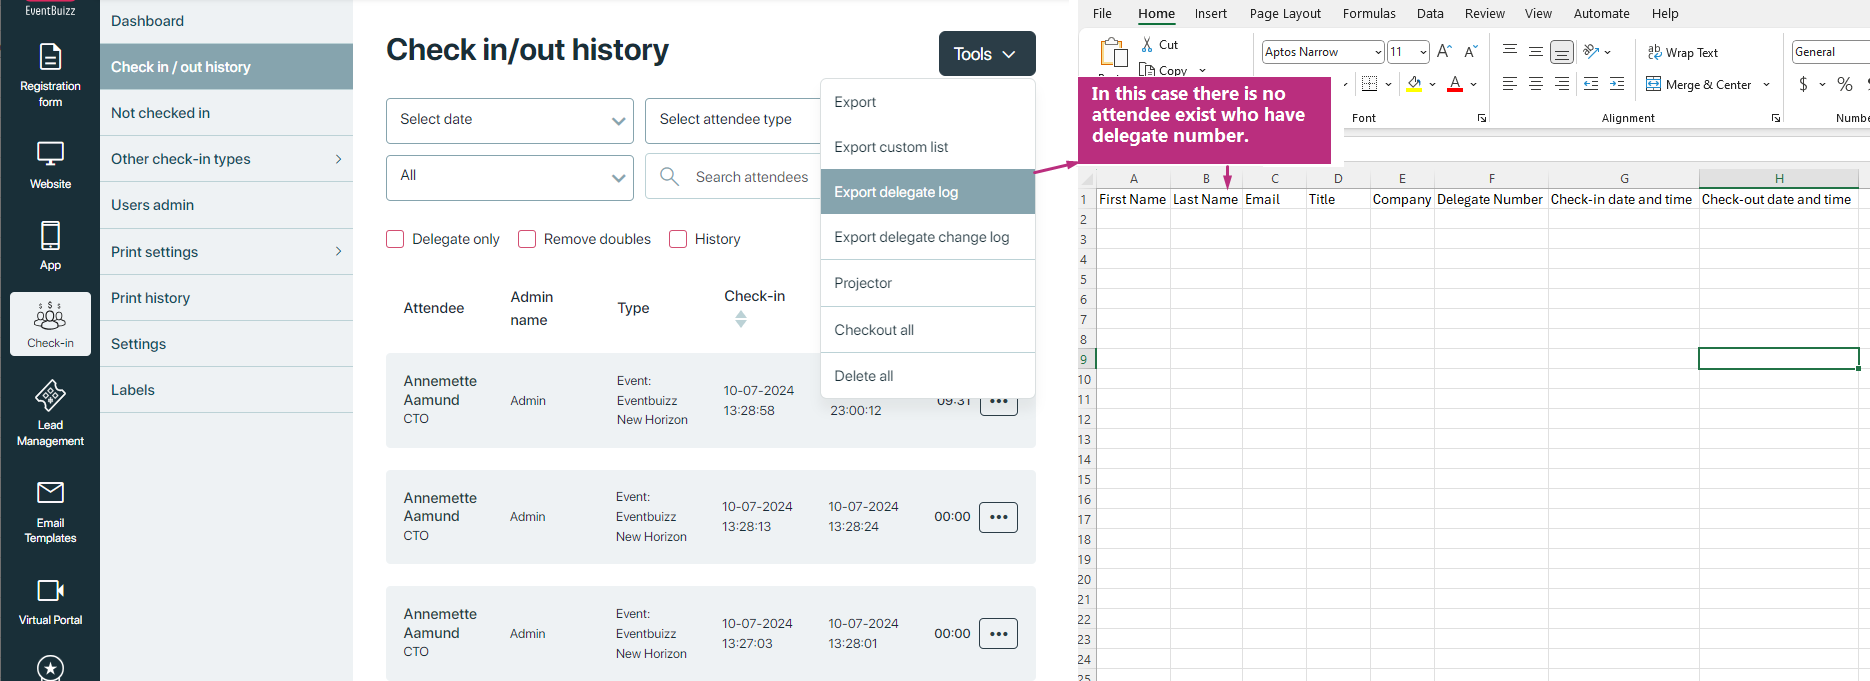
If there is no record for exporting then csv file will look like this.
Export delegate change log
The Export delegate change log feature provides organisers with a detailed record of all changes made to delegate statuses or permissions throughout the event. Its primary purpose is to maintain transparency and accountability by tracking any modifications to delegate profiles, such as upgrades to delegate status, downgrades, or changes to specific delegate-related permissions.
- Purpose: Offers a log of all changes made to delegate statuses or permissions.
- Functionality: Generates a log file recording modifications to delegate statuses (e.g., upgrades, downgrades) during the event.
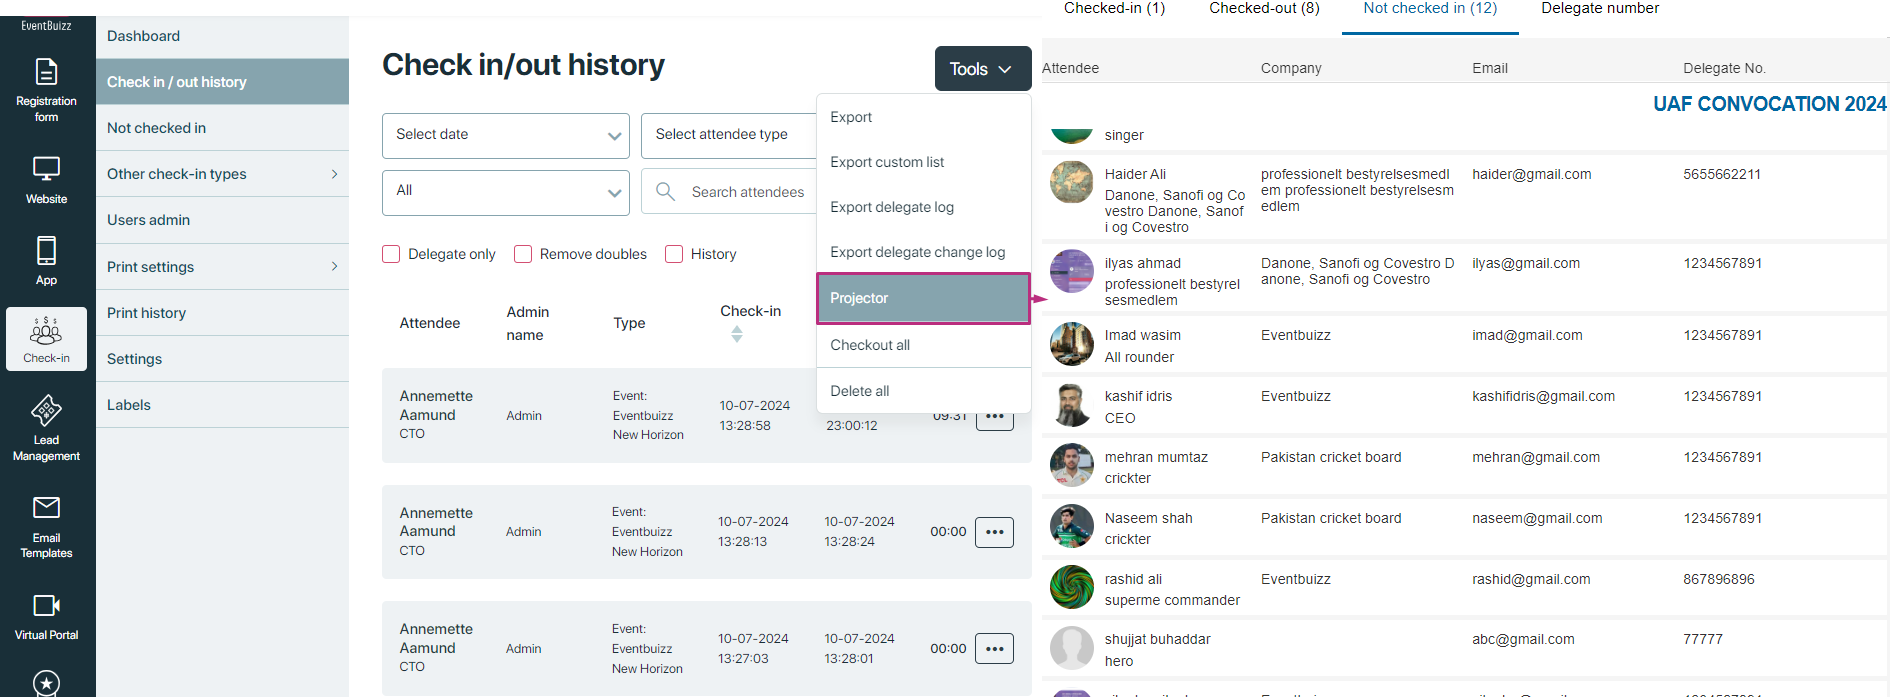
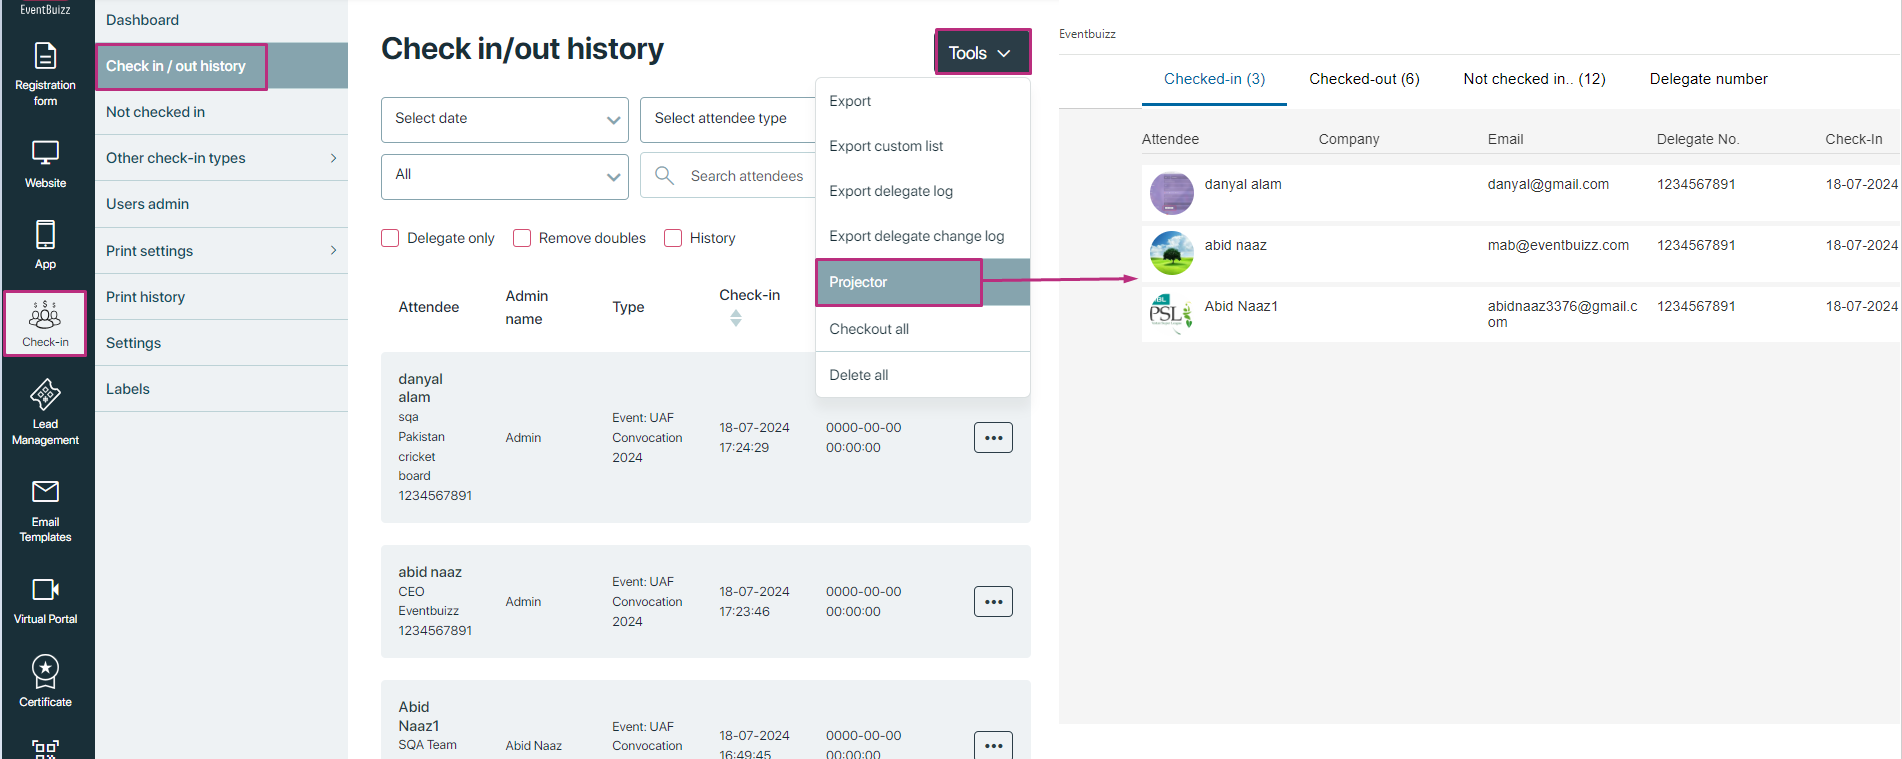
Projector
The Projector feature is designed to facilitate the visual display of attendee check-in/check-out statistics on a projector or external screen, making real-time event data easily accessible for public or staff viewing. Its primary purpose is to enhance event transparency and engagement by showing live or regularly updated statistics, such as the total number of check-ins, number of attendees currently present, or other key participation metrics.
- Purpose: Facilitates display of attendee check-in/check-out statistics on a projector or external screen.
- Functionality: Shows real-time or updated attendee statistics (e.g., total check-ins, current check-in status) for public viewing.
- Usage: Useful for providing live event updates or displaying attendee participation metrics to event attendees or staff.
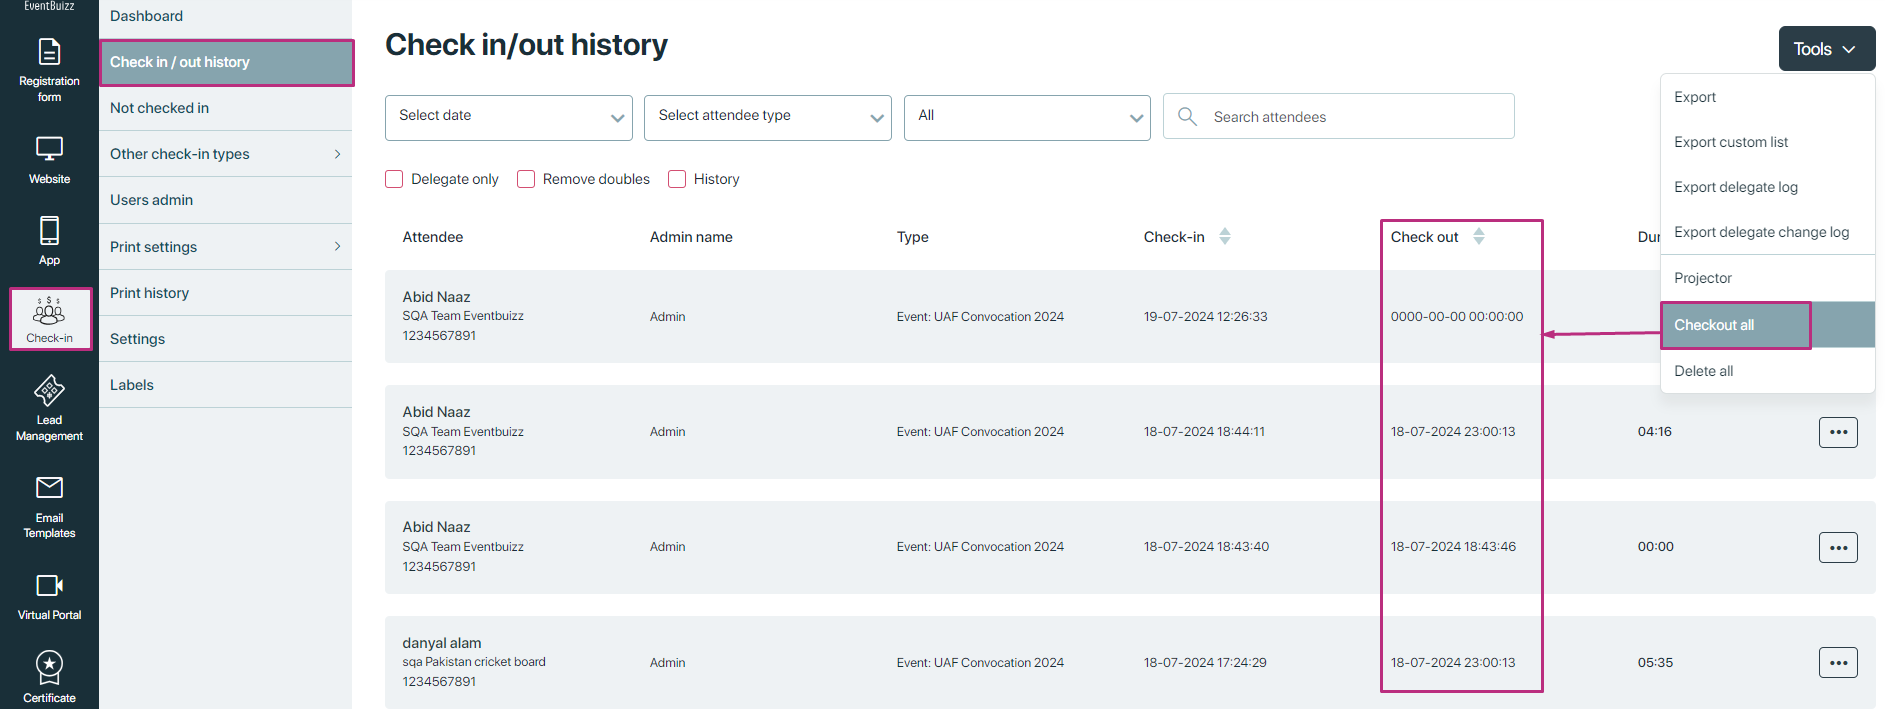
Checkout all
The Checkout All feature is a convenient tool that allows organisers to mark all attendees as checked out in bulk, eliminating the need to update each record individually. Its main purpose is to streamline the event closure process by providing a fast and efficient way to record the departure of all attendees at once, especially useful at the end of an event day or when the event has officially concluded.
- Purpose: Allows organisers to mark all attendees as checked out in bulk.
- Functionality: Provides a quick way to update the check-out status of all attendees, useful for streamlining the event closure process.
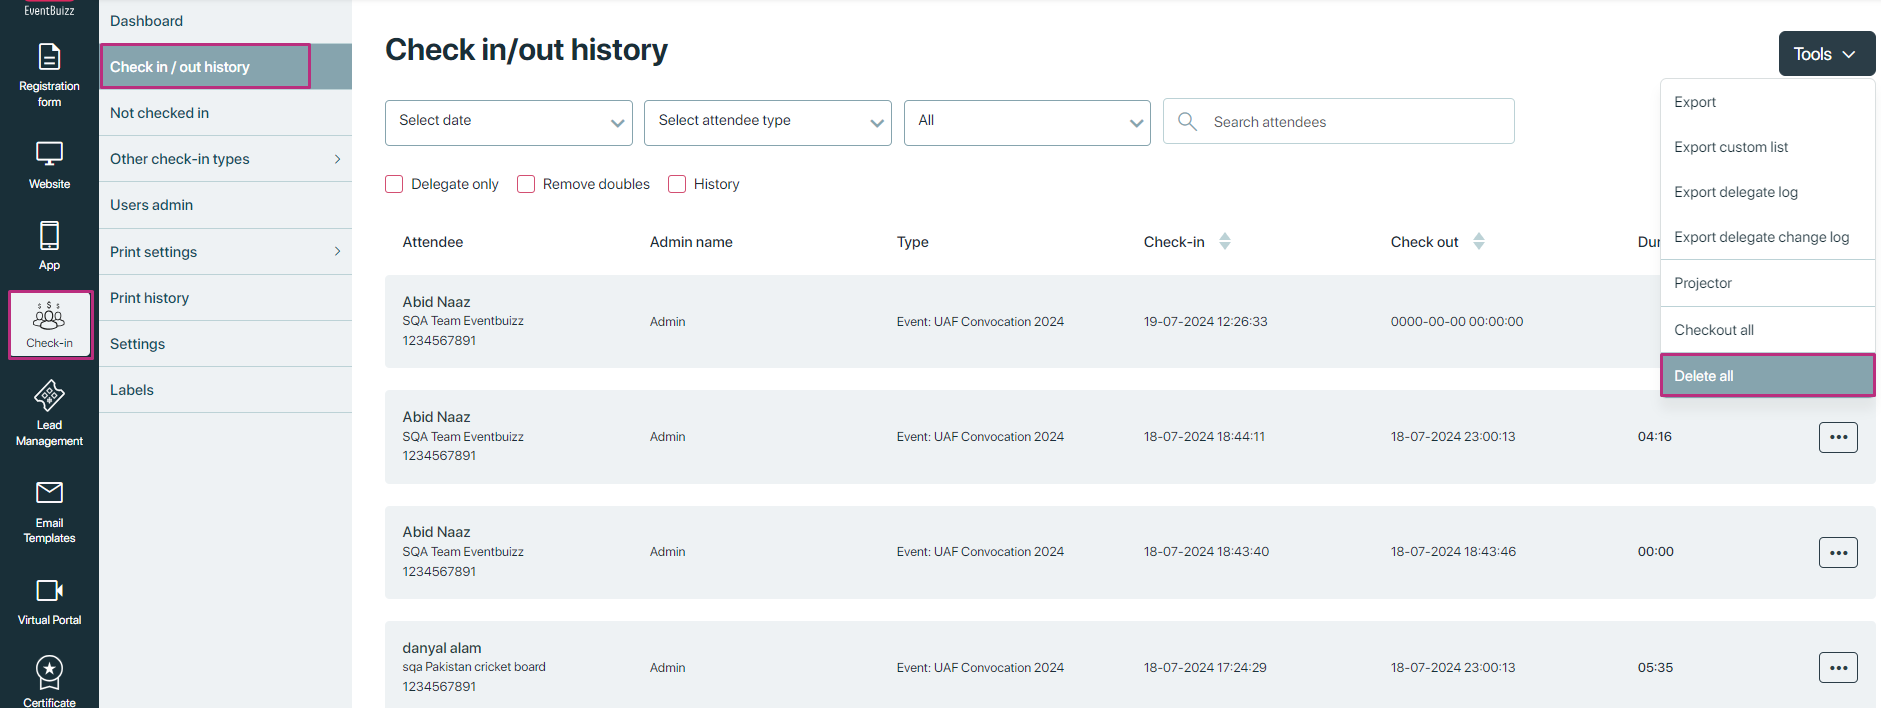
Delete all
The Delete All feature provides organisers with the ability to permanently remove all attendee records from the check-in/check-out history. Its primary purpose is to offer a quick and complete way to clear the entire history, which may be necessary after an event has ended, during system clean-up, or when preparing the system for a new event.
When this function is executed, the system deletes all data related to attendee check-ins and check-outs, including timestamps, statuses, and associated details. This action helps organisers maintain a clean and organised interface, especially when managing multiple events over time
- Purpose: Enables organisers to delete all attendee records from the check-in/check-out history.
- Functionality: Removes all attendee data and records from the history section.
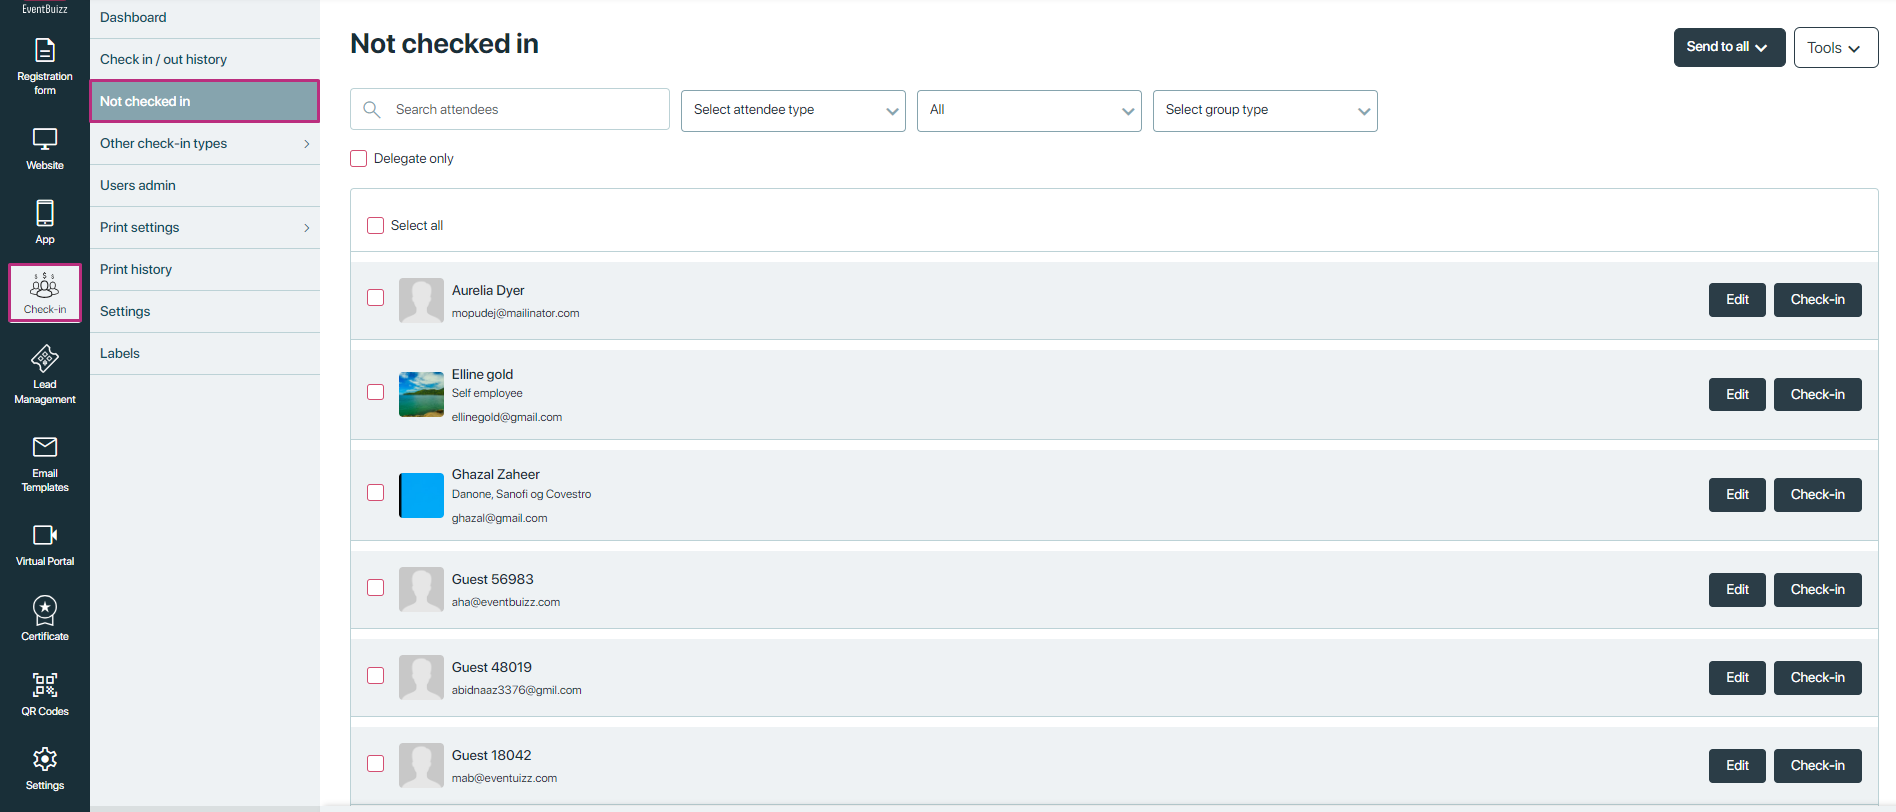
Not checked in
Not checked in
The “Not Checked-in” section offers organisers a clear and organised overview of all attendees who have not yet completed the check-in process for the event. This section serves as a vital tool for real-time monitoring and attendee management, allowing organisers to track who is still expected to arrive and take necessary actions to assist or follow up with them.
In addition to simply viewing attendee data, organisers can also manage individual records—such as editing attendee details (excluding non-editable fields like email) or performing a manual check-in directly from the listing. This ensures a smooth and efficient check-in process, especially in scenarios where attendees face technical issues or require assistance. The “Not Checked-in” section ultimately supports proactive attendee management and enhances the overall check-in experience.
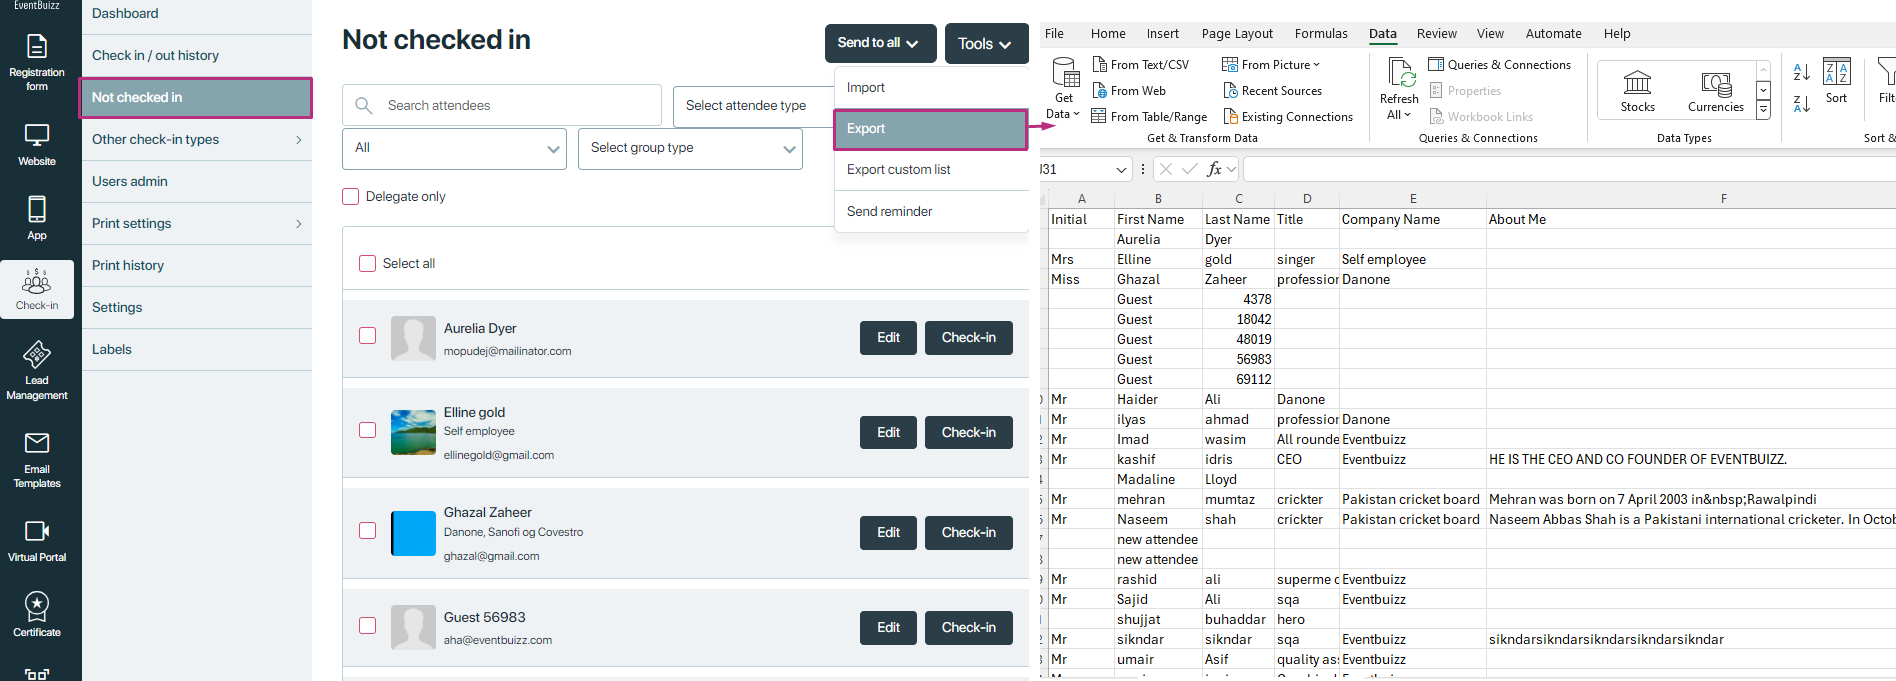
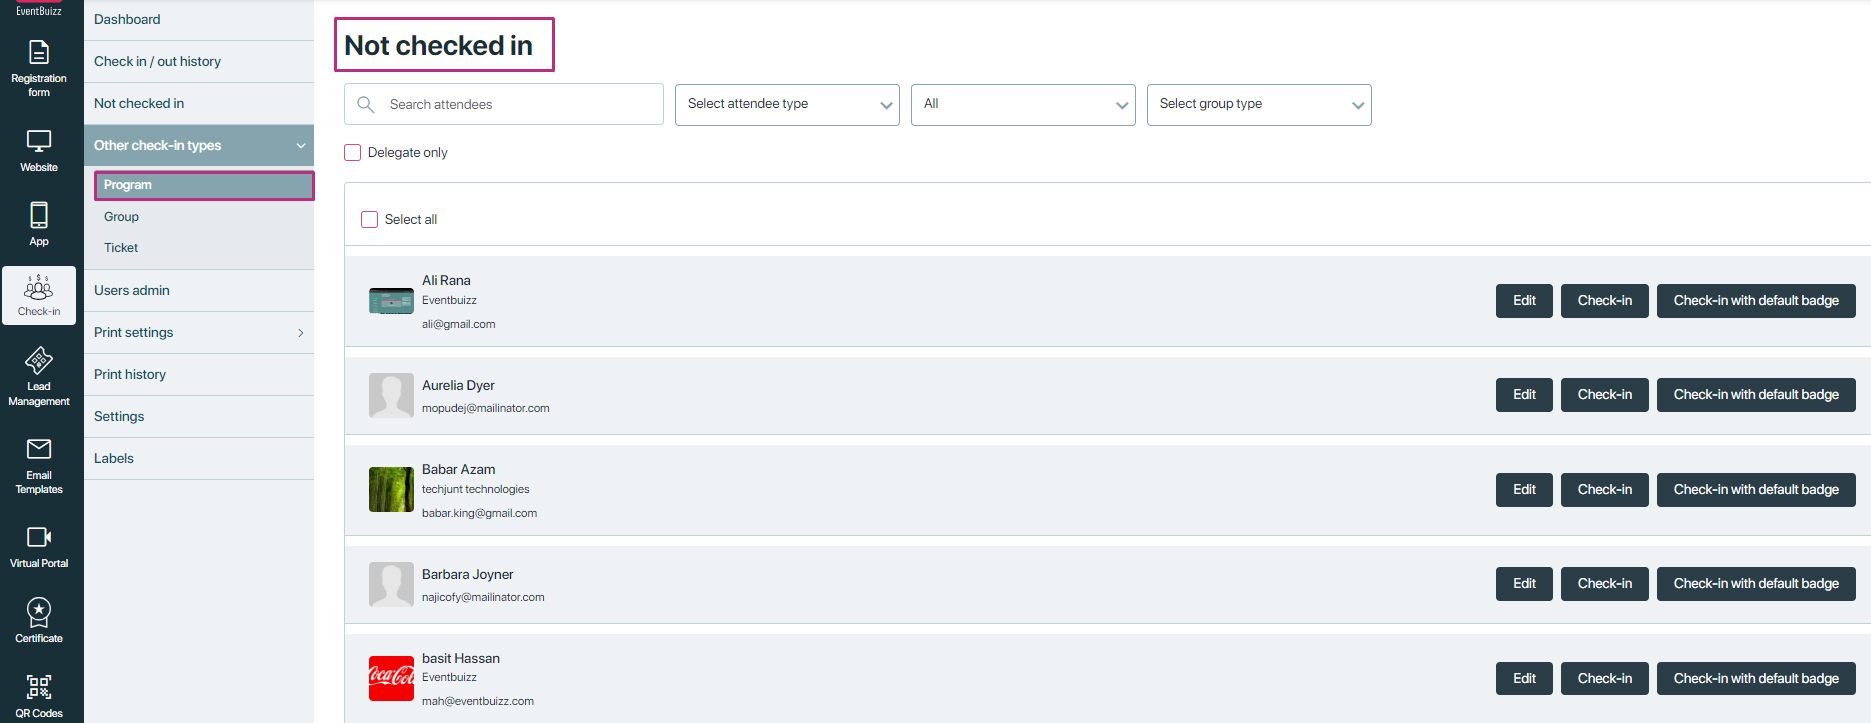
Attendee listing
Purpose: The Attendee Listing displays a comprehensive list of all unmarked attendees, including key details such as their name, company, title, attendee type, and other relevant profile information. This makes it easy for organisers to identify specific individuals.
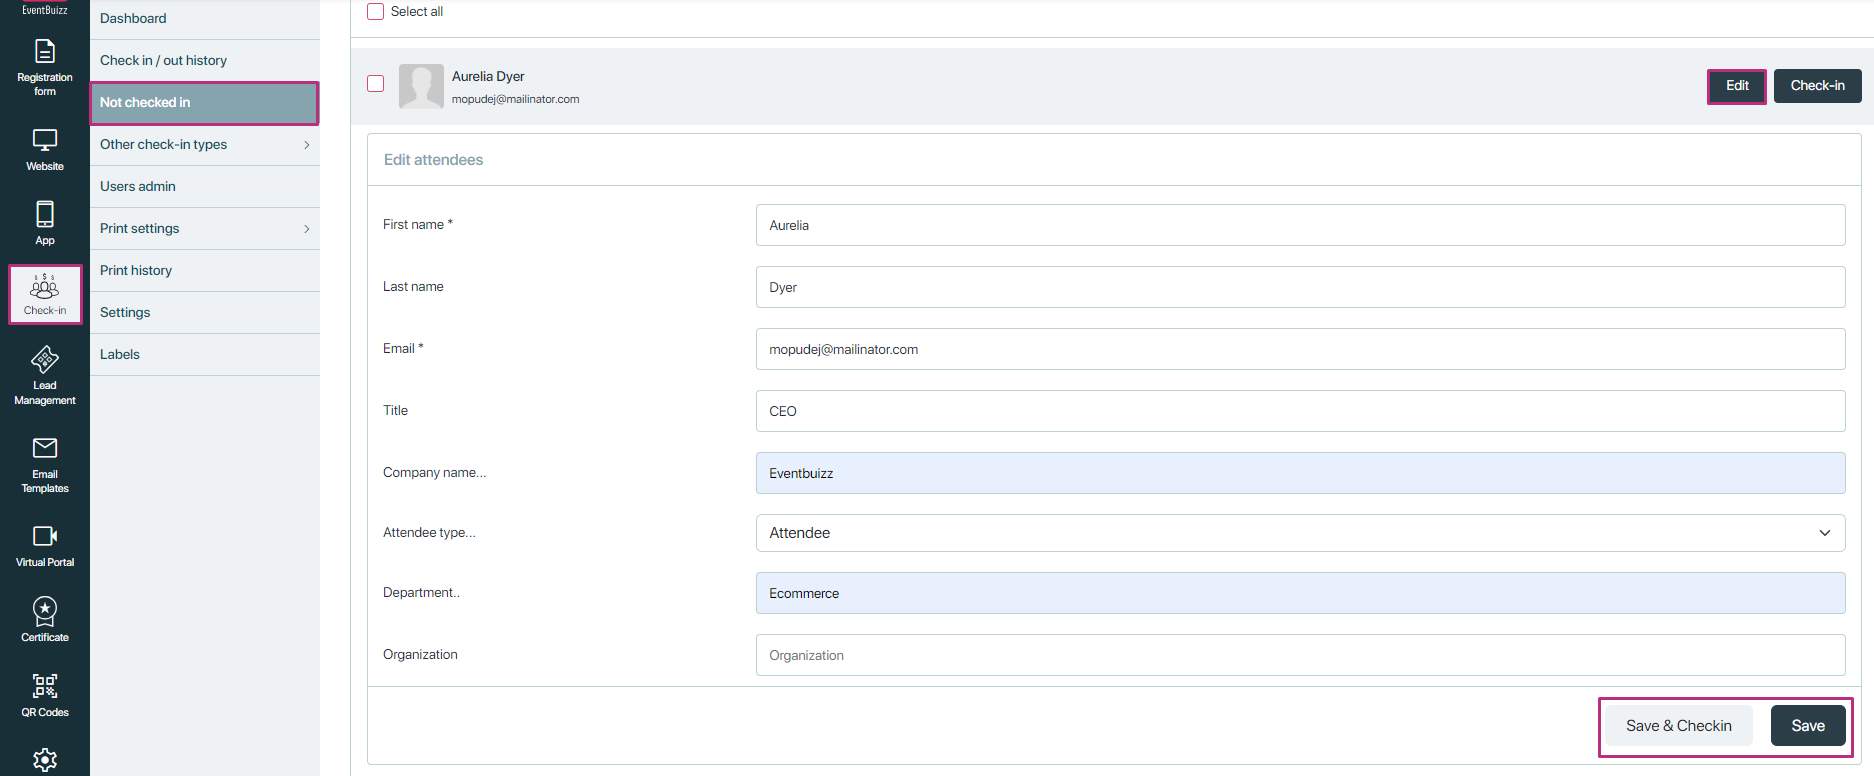
Edit attendee info
The Edit attendee info feature empowers organisers to update and manage key attendee details directly from the attendee listing. This is particularly useful for correcting errors, completing missing information, or adjusting attendee classifications during the event.
While most fields are editable, some exceptions apply. Below are the editable and non-editable fields:
Editable fields:
- First name (*): A required field, essential for identifying attendees accurately.
- Last name: Useful for full identification and formal documentation.
- Title: Allows organisers to include or update the attendee’s job title or designation.
- Company name: Helps specify the organisation the attendee is representing.
- Attendee type: Enables changing the category (e.g., Attendee, Speaker, VIP) assigned to an individual.
- Department: Adds or edits the internal department, aiding in segmenting attendees from larger organisations.
- Organisation: Specifies or corrects the broader organisation or group name linked to the attendee.
Non-editable field:
-
Email (*): While it is a required field used for identification and communication, it cannot be edited once the attendee profile is created. This restriction ensures consistency and avoids conflicts in attendee tracking or duplicate record creation.
Overall, the Edit attendee info functionality provides organisers with the flexibility to maintain accurate and up-to-date records, which is essential for smooth event operations and clear communication.
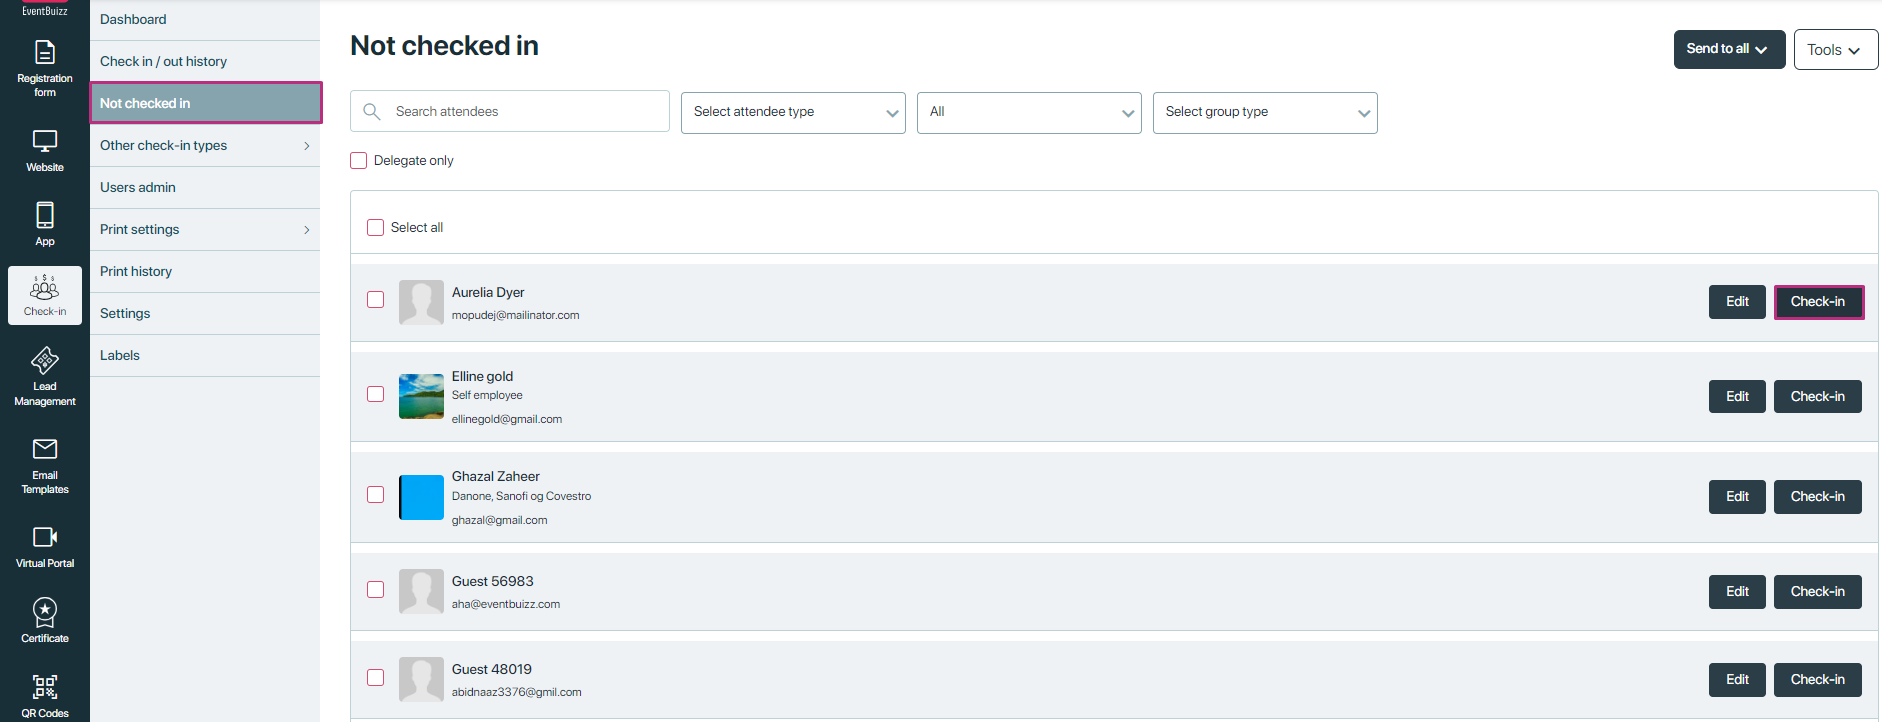
Check-in
The Check-in feature allows organisers to manually mark an attendee as checked in for the event, offering flexibility in managing attendance beyond automated or self-service check-in methods. This is especially helpful in cases where an attendee encounters technical issues, arrives without scanning a badge, or requires assistance from on-site staff.
Purpose:
To ensure all attendees are properly registered as present at the event, even if their check-in is handled manually by the organiser.
Process:
When the organiser selects the Check-in option for a specific attendee, the system initiates the check-in process, records the current timestamp, and updates the attendee’s status in the system to “Checked In.” This action also reflects in the Check-in/Check-out history, allowing for accurate tracking and reporting.
The “Not checked in” section provides powerful filtration tools to help organisers efficiently manage and analyse attendee records. These tools include both drop down filters and checkbox filters, offering flexibility in narrowing down specific data sets.
Drop down filters
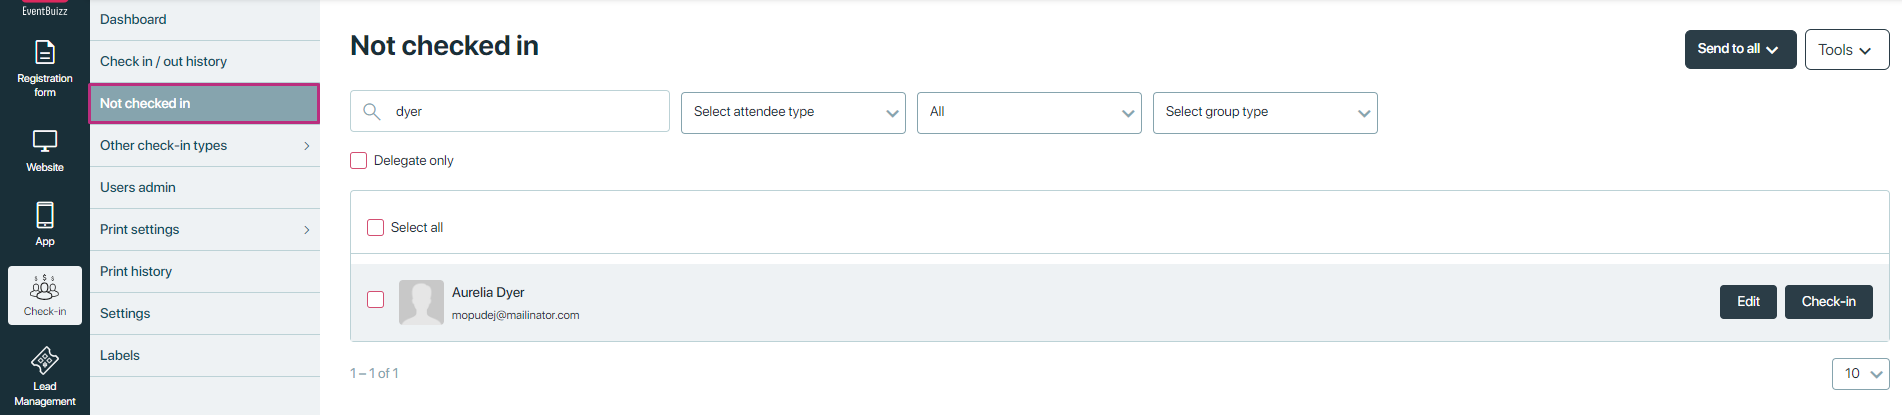
Search functionality
Attendee information search:
The search bar allows organisers to input specific attendee details—such as name, email, or company—to instantly locate individual records from the unfiltered list. This direct search capability significantly improves efficiency, especially when dealing with large numbers of attendees, by reducing the time required to find and manage specific individuals.
By combining drop down filters with the search bar, organisers can customise their view of the attendee data with great precision, ensuring they focus only on the most relevant records. This flexibility in filtering and searching is key to maintaining a smooth and organised check-in process.
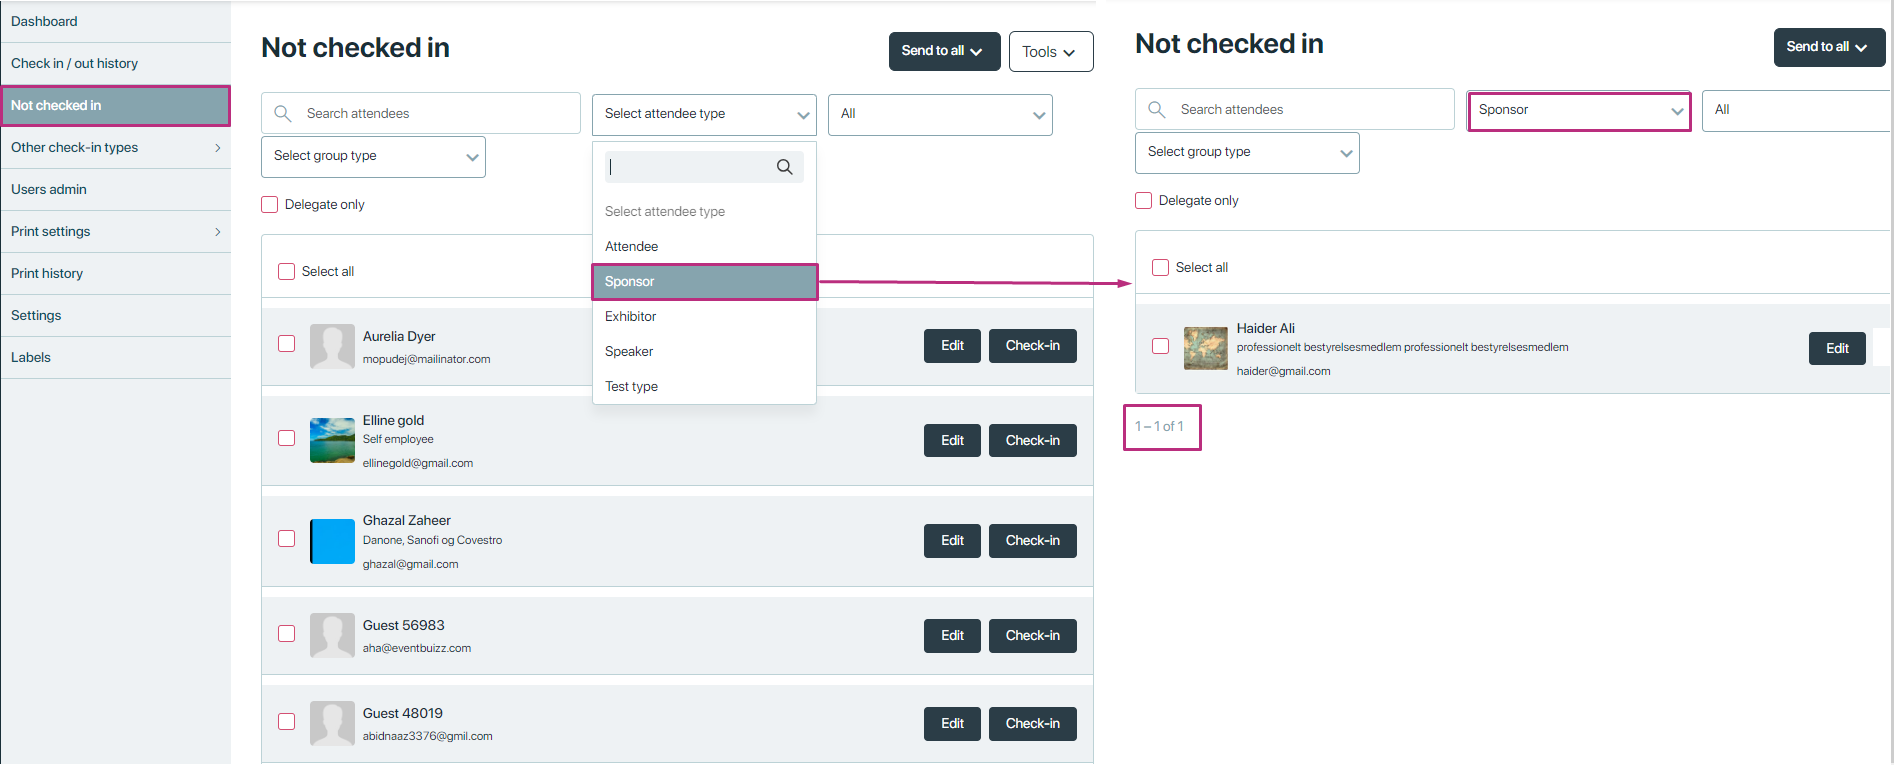
Attendee type filter:
The Attendee type filter is a valuable tool within the “Not checked-in” section that allows organisers to refine the attendee list based on specific attendee categories. Presented as a drop-down list, this filter includes predefined attendee types such as Attendee, Speaker, Exhibitor, VIP, or any other custom categories defined during event setup.
Reminder sent/not sent
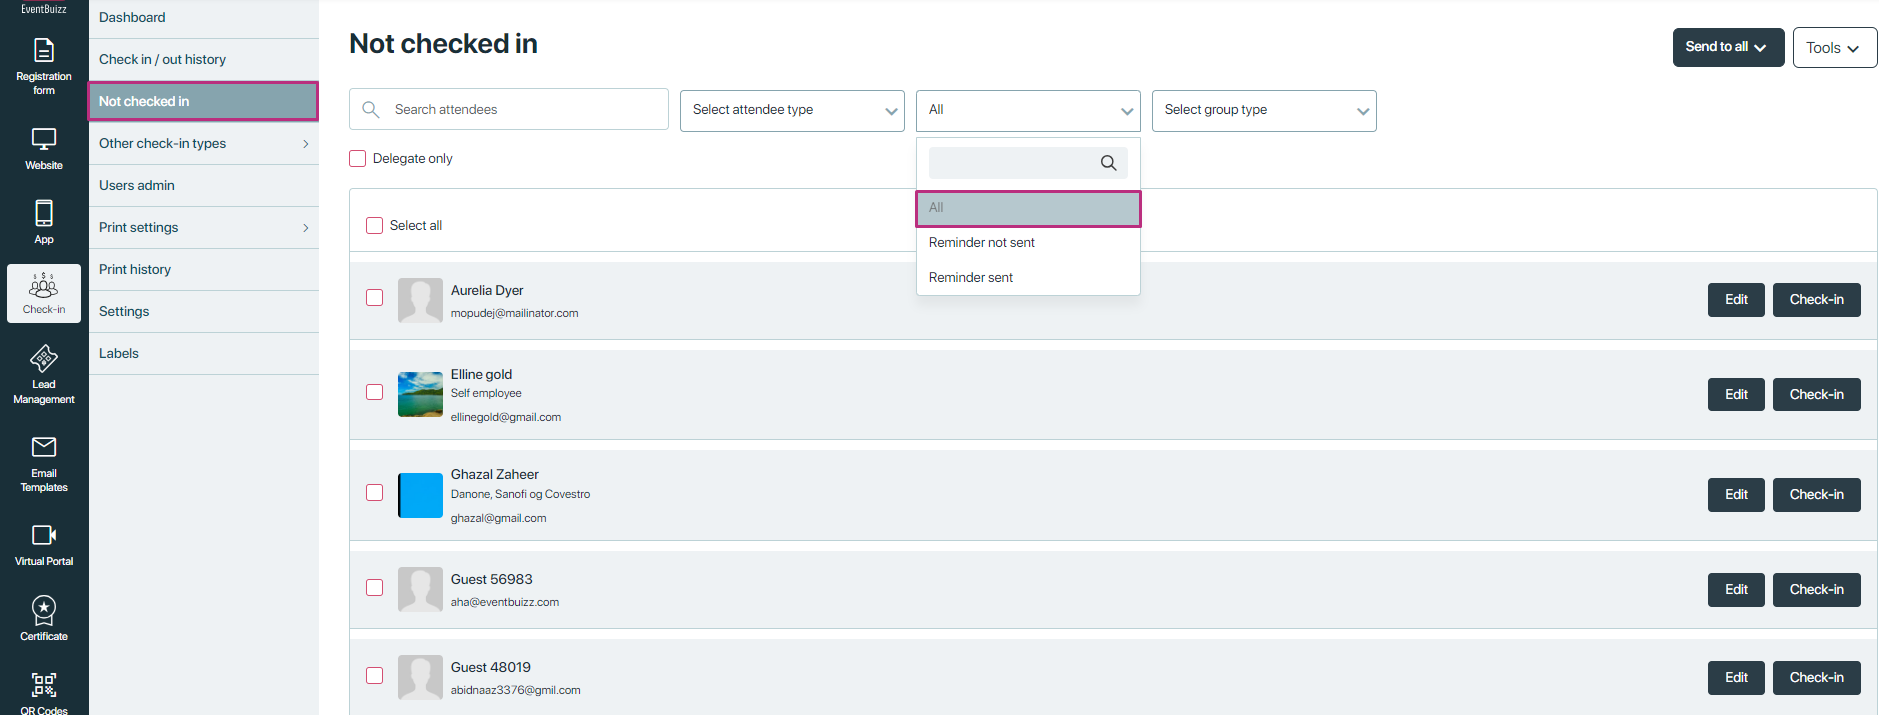
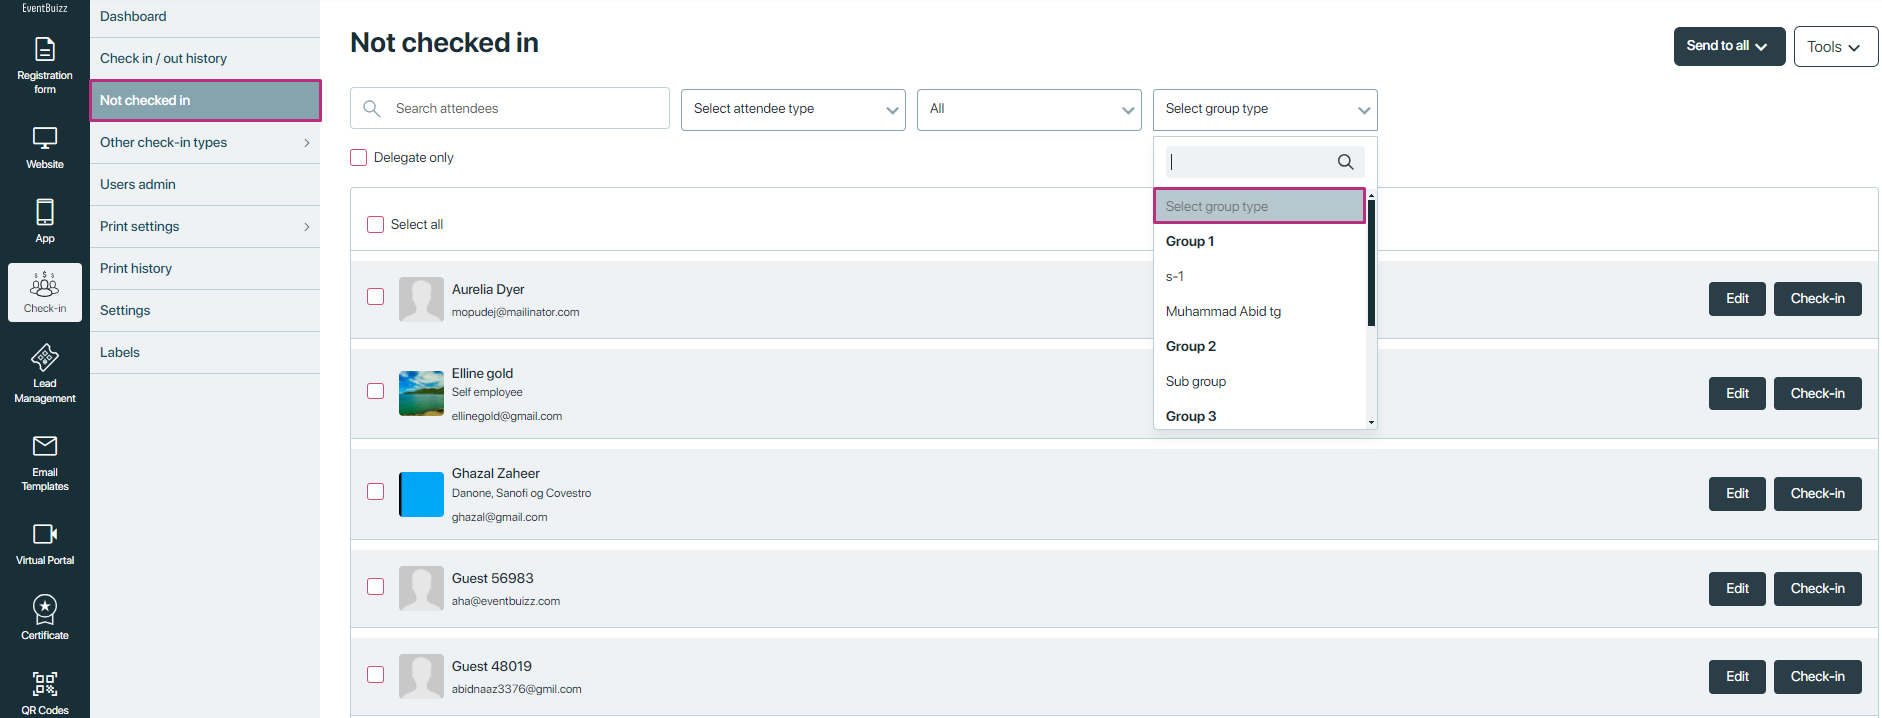
Select group filter
Purpose:
-
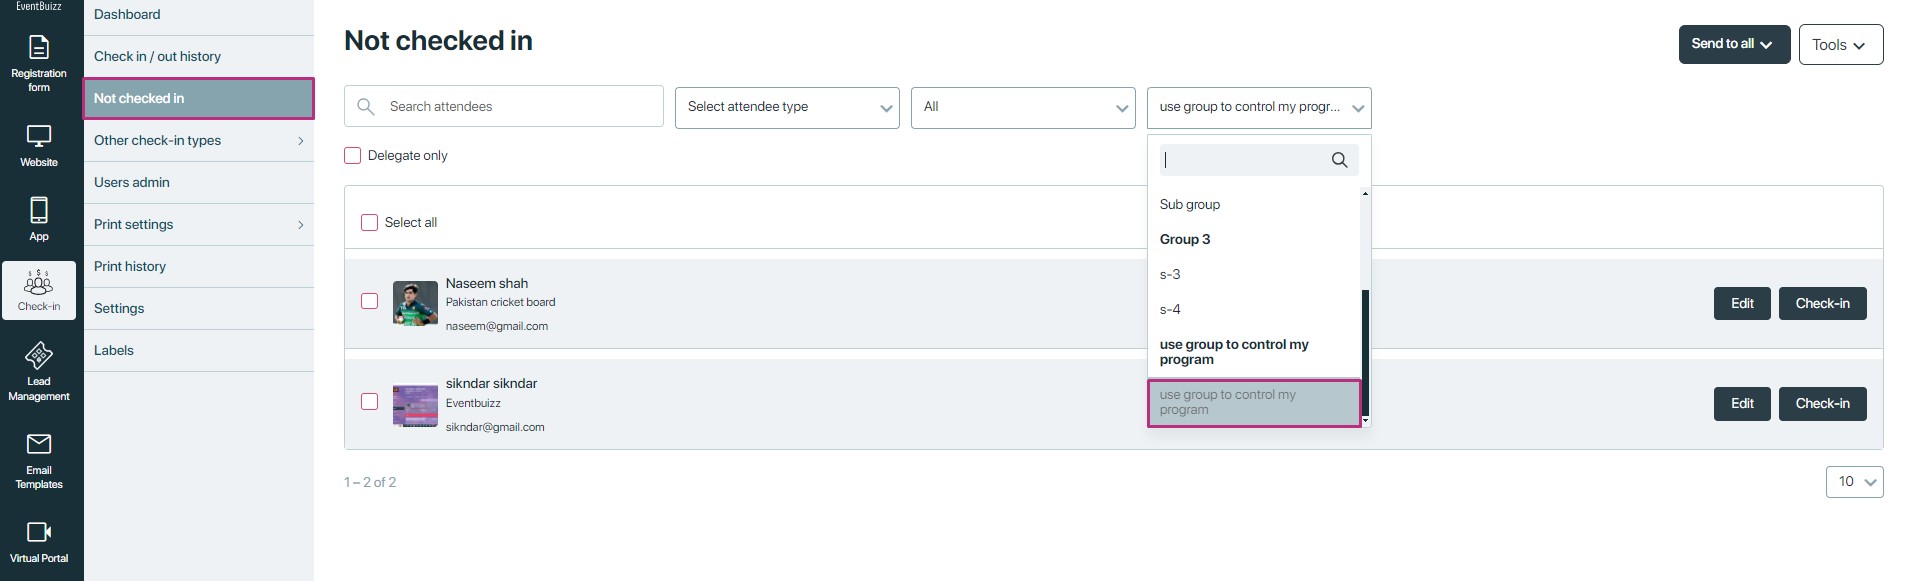
The “Select Group” filter in the “Not checked-in” section enables organisers to streamline attendee management by filtering attendees based on specific groups created within the Eventcenter. This feature is especially useful for events with a large number of participants divided into teams, departments, or other custom sub-groups.
Functionality:
When using the “Select Group” drop-down filter, organisers can choose a specific group (e.g., Marketing Team, Gold Sponsors, International Guests) to display only the attendees assigned to that group who have not yet checked in. This helps focus follow-up efforts and monitor group-level attendance efficiently.
By default, when no group is selected, the system displays all attendees who have not checked in, regardless of their group assignment. This ensures a complete overview of outstanding check-ins unless the organiser chooses to narrow it down.
How to create groups in eventcenter, please click here:
Here is the look when by default not selected any group, all not checked in attendees are showing
After applying any group in the filter, it will show you all assigned attendee to that group.
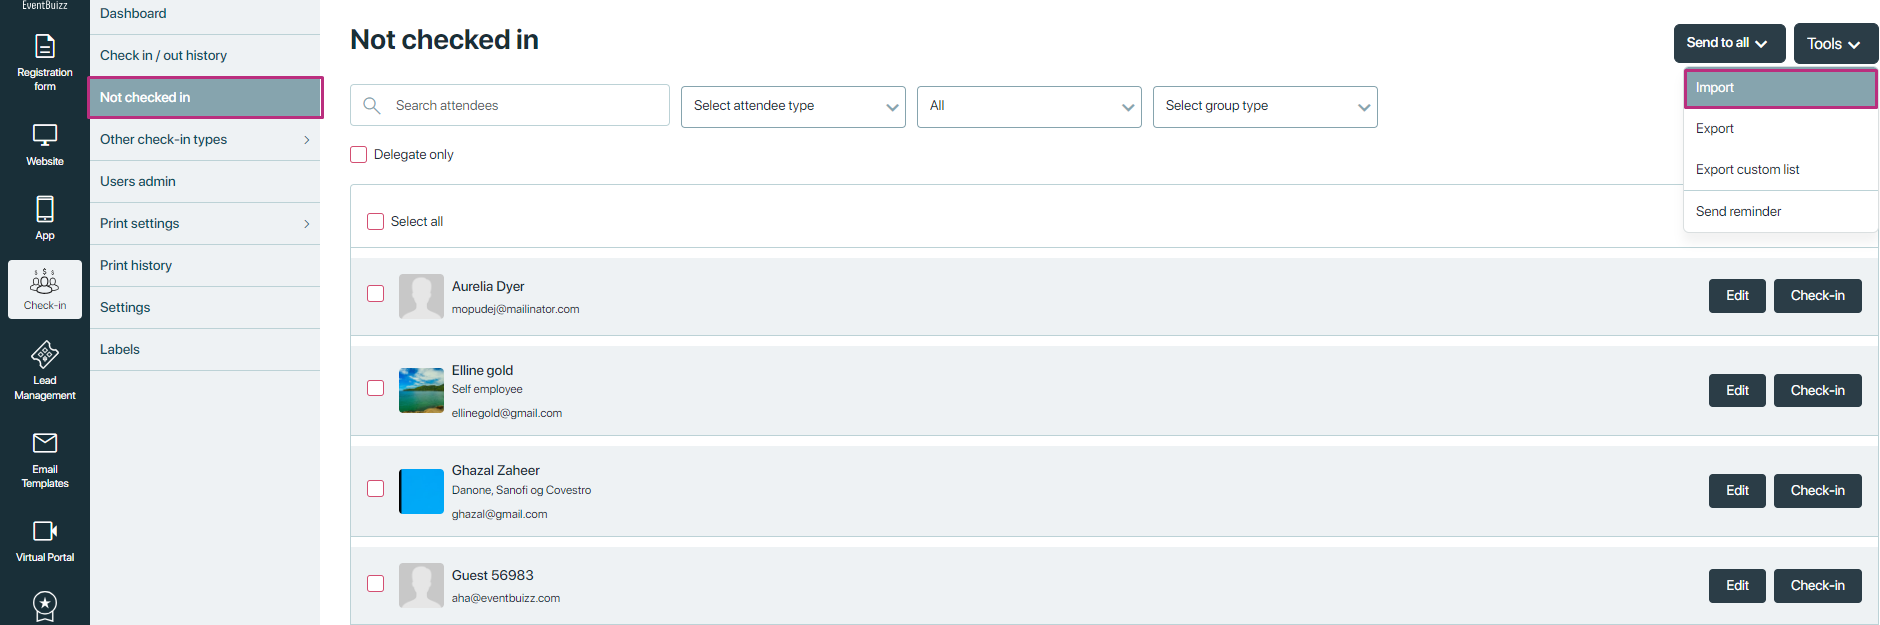
Tools in not checked in
The “Tools” section within the “Not checked-in” interface provides organisers with powerful utilities to streamline attendee management and communication. These tools are designed to handle data efficiently, enable proactive outreach, and support event logistics. Below is an overview of each available tool:
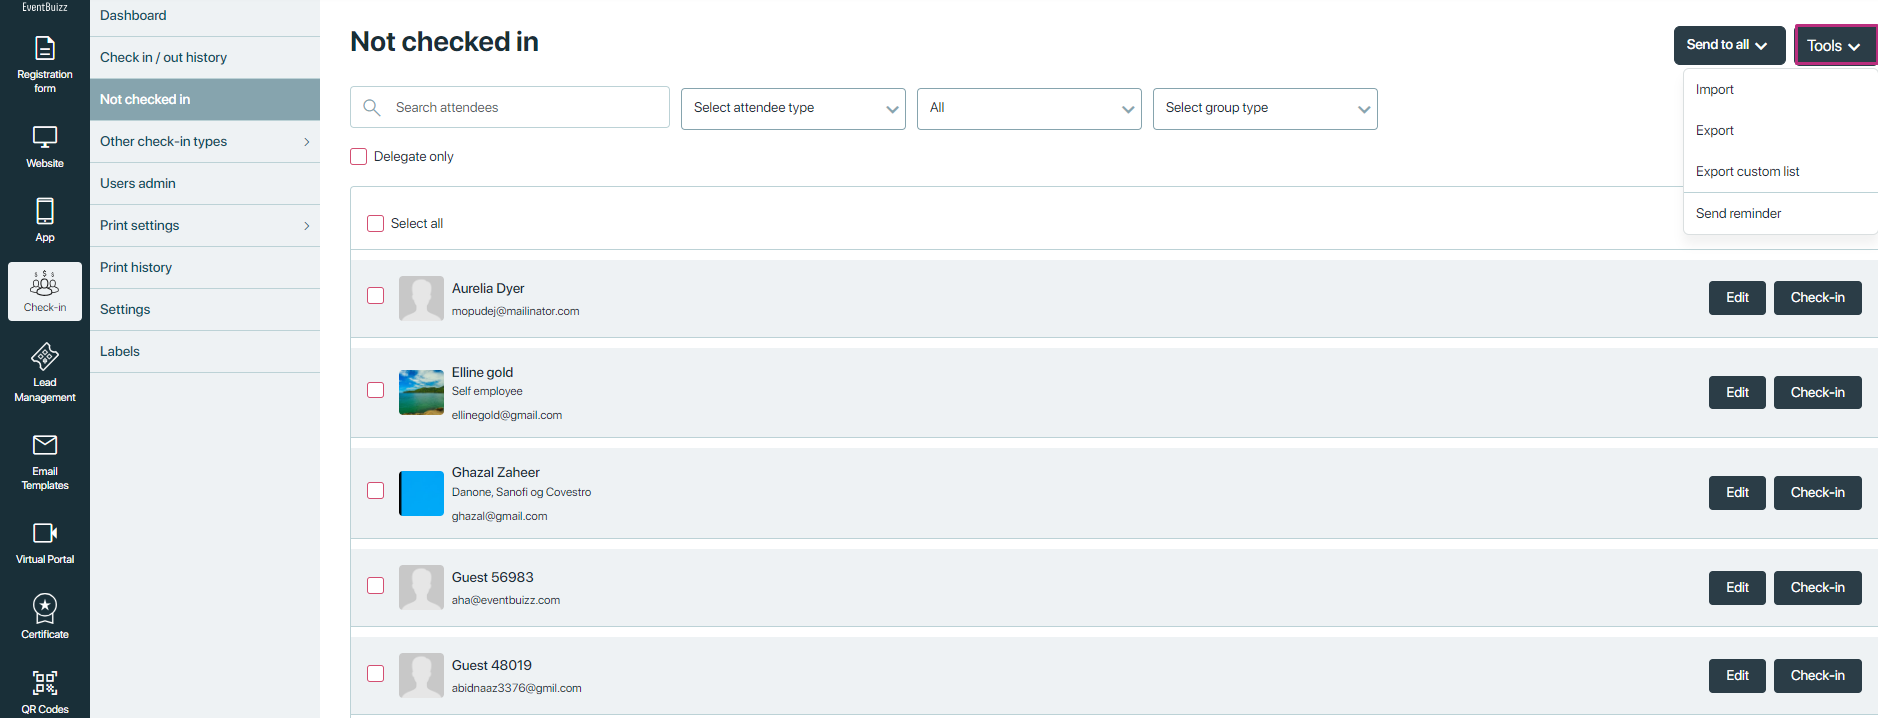
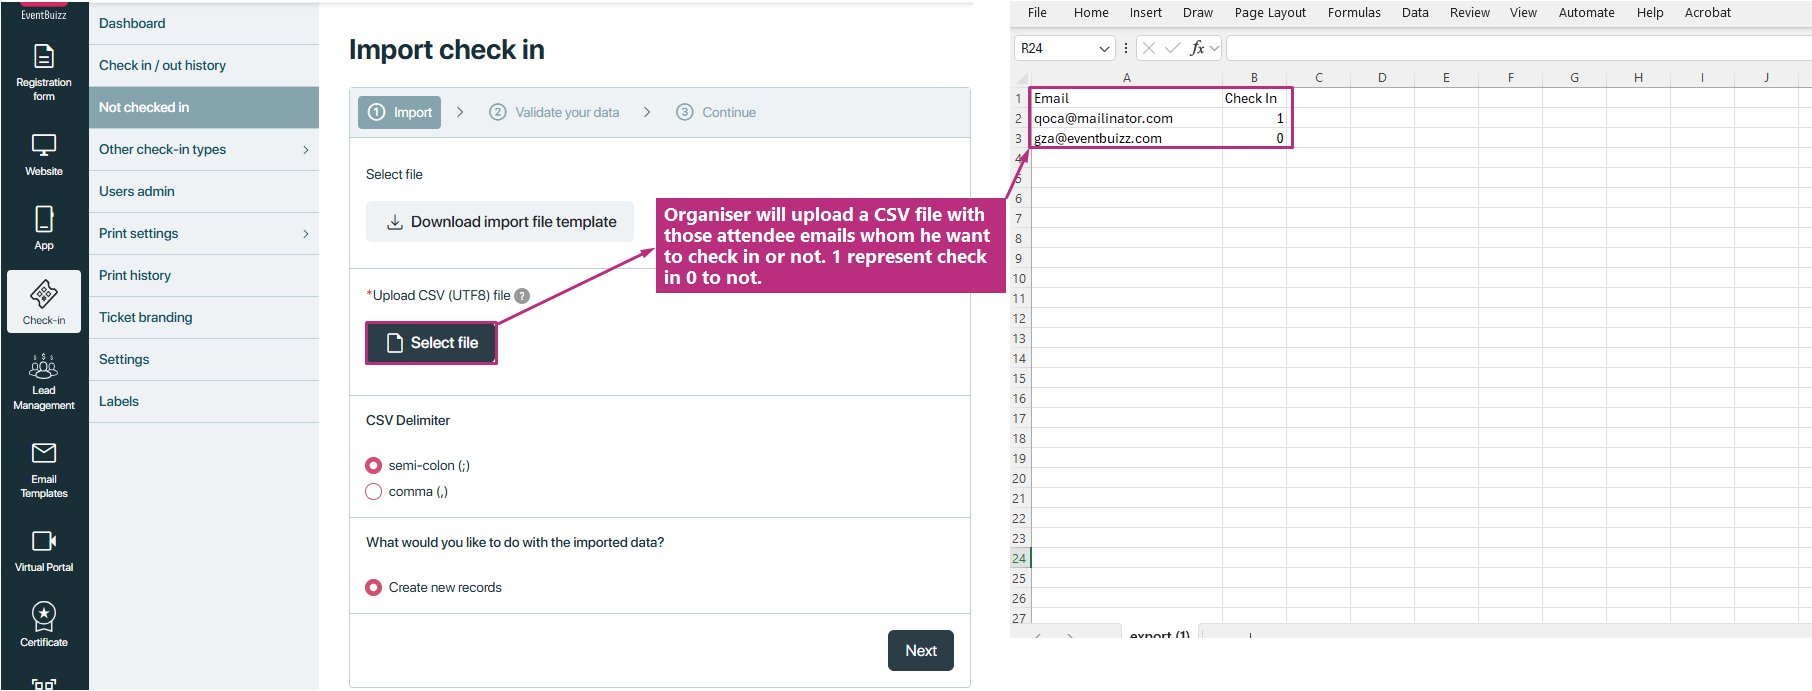
Import
The “Import” feature in the “Not checked-in” section allows organisers to efficiently update attendee check-in status in bulk using a predefined template such as a CSV or Excel file. This tool is especially helpful for managing high-volume events where manual updates are not practical.
Functionality and process:
Organisers prepare a file that contains essential attendee information—primarily the email address and the check-in status—which is then uploaded into the system. The system uses the email address to match the existing attendee records and apply updates accordingly.
How the Check-in Status Works:
- The import file should include a “Check-in” column that specifies the status for each attendee.
- Values in the “Check-in” column can be:
1orx→ This tells the system to mark the attendee as checked in.- Once imported, these attendees will be moved from the “Not checked-in” section to the “Check-in/out history”.
- A check-in time is recorded.
0ory→ This means the attendee is not checked in.- The attendee will remain in the “Not Checked-in” section with no check-in time applied.
After importing the attendees record, the 1 check in status users will move to the check in/out history section, and they will check in into the event.
First check the 1 status imported user, now in Not checked in section it will be no found there. Here you can see.
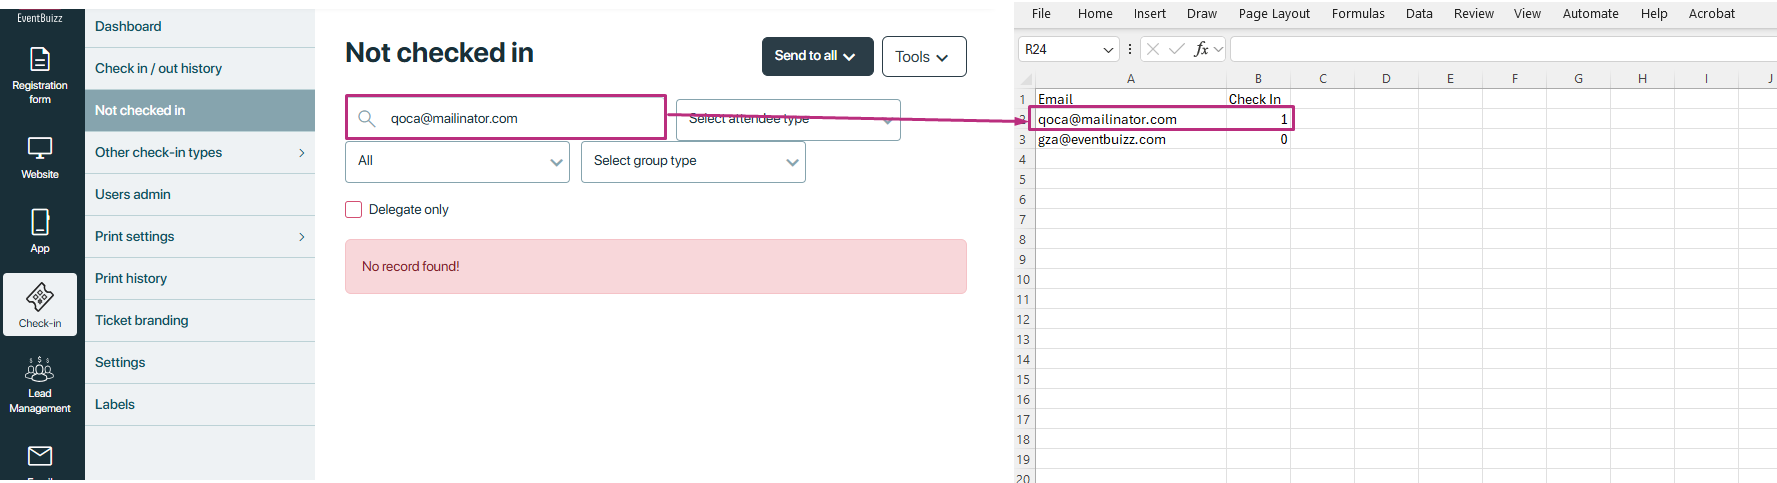
Now see the imported user is navigated into check-in/put history section.
Export
The “Export” feature in the “Not checked-in” section allows organisers to easily download a list of attendees who have not yet checked in to the event. This tool is especially useful for offline tracking, reporting, or further communication planning.
Functionality:
-
Organisers can generate a file (typically in CSV or Excel format) that includes all relevant details of attendees who are still marked as “Not Checked-in”.
-
The exported file may contain information such as name, email, attendee type, company, group, and reminder status, depending on the default or selected fields.
Export custom list
The Export custom list feature offers organisers enhanced flexibility by allowing them to export a customised subset of attendee records based on their specific needs. Unlike the standard export, which includes all available data, this feature lets organisers select only the fields they wish to include in the export—such as attendee name, email,title,company name,job task attendee type, including all the attendee profile fields and more.
- Purpose: Enables organiser to export a customised subset of attendee records based on selected fields.
- Functionality: Organisers can active the specific field (such as name,email, attendee type) and export only the relevant subset of attendee data.
For example, if an organiser only needs a report showing attendee names along with email, title and company name, they can simply activate those fields, assign a custom file name, and export the file accordingly. This helps avoid unnecessary data clutter and ensures the report is tailored to the exact requirements
Additionally, once a custom export template is created and saved, it is stored under the Email templates section for future use. From there, organisers can edit, delete, or download any previously created templates, making it easy to manage and reuse export configurations for different events or reporting purposes. This feature not only streamlines the data export process but also enhances efficiency by reducing the need to reconfigure export settings each time.
Send reminder
Purpose: Facilitates sending reminders to attendees who have not checked in through various communication channels.
Options:
- Send reminder with email: Allows organisers to send reminder notifications to not checked-in attendees via email.
- Send reminder with sms: Enables sending reminder notifications to not checked-in attendees via sms (text message).
- Send reminder with email & sms: Provides the option to send reminders via both email and sms, ensuring comprehensive communication outreach.
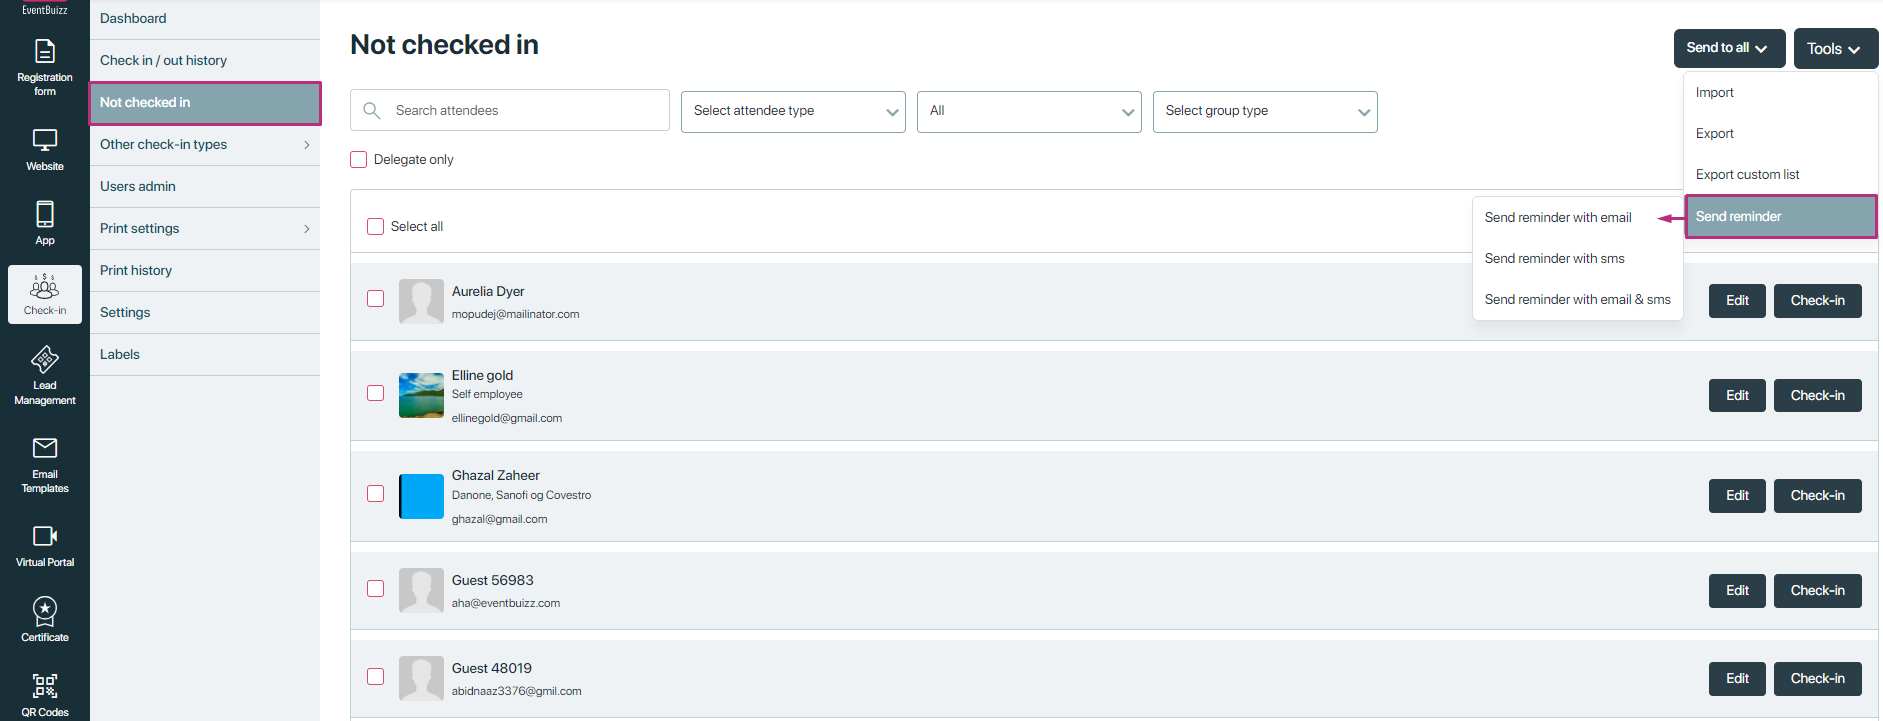
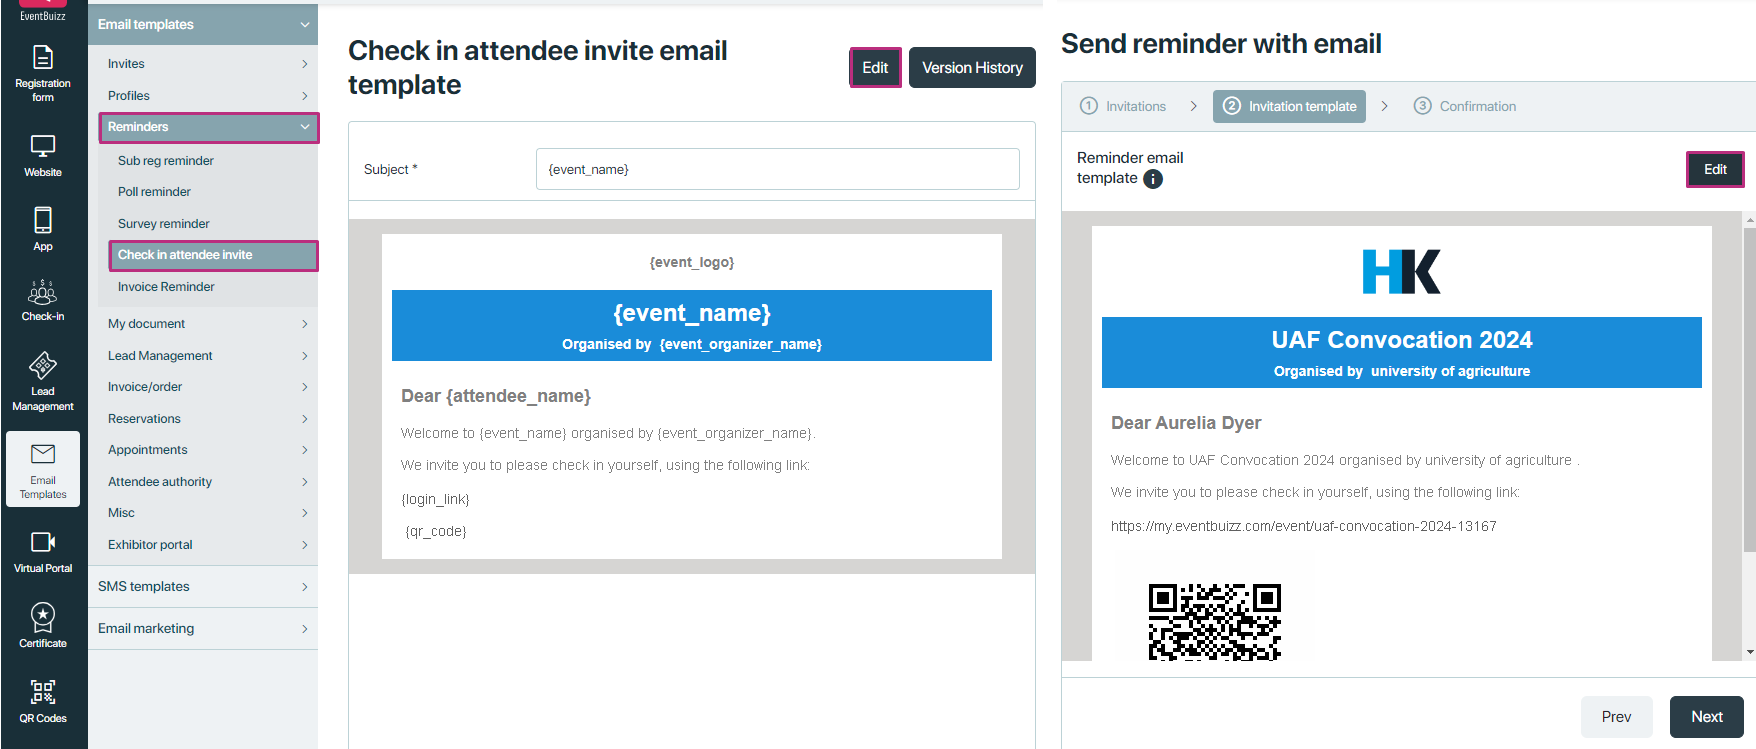
Organiser can select any option and can send the reminder to selected attendees:
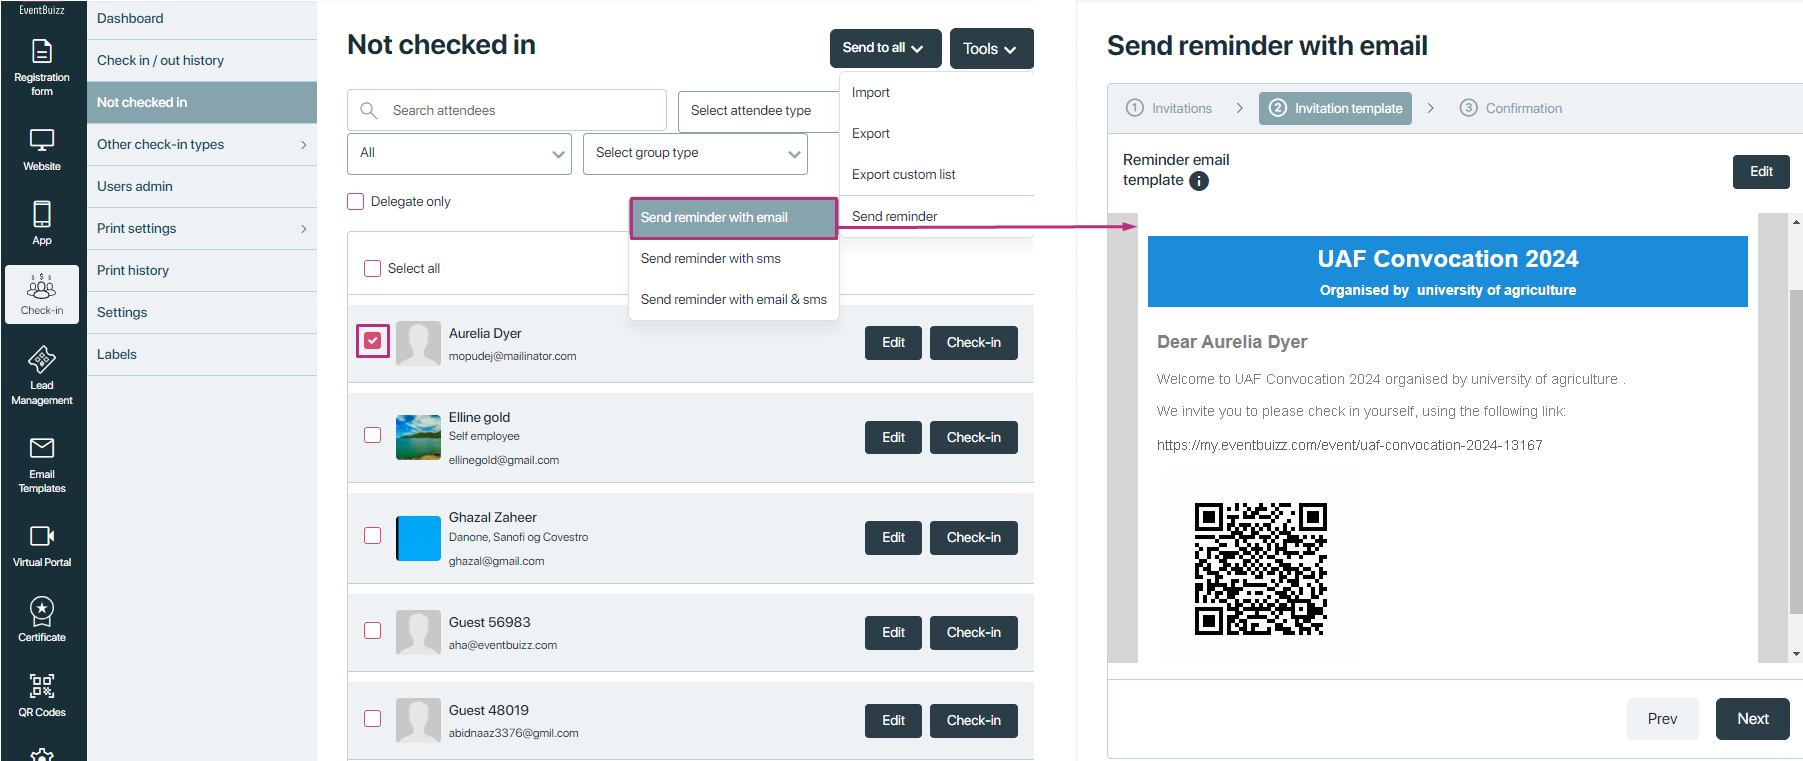
As per selected option, mail or sms will sent to attendees, organiser also have the option to edit these templates, for detail overview how can organiser customise all sort of templates, please click here:
Organiser can also customise these templates from here as well:
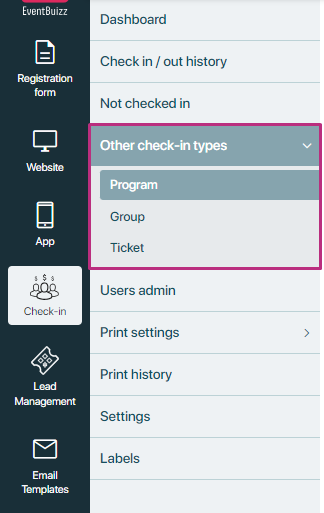
Other check-in types
Other check-in types
The “Other check-in types” section within the check-in module of the Eventbuizz platform provides organisers with advanced, targeted check-in options beyond general event-level check-in. This section enables more granular control and tracking by allowing check-ins based on specific program sessions, attendee groups, or ticket types. It is particularly valuable for events with multiple sessions, tiered access, or group-based participation.
The section is divided into three subcategories, each tailored to different check-in criteria:
- Program
- Group
- Ticket
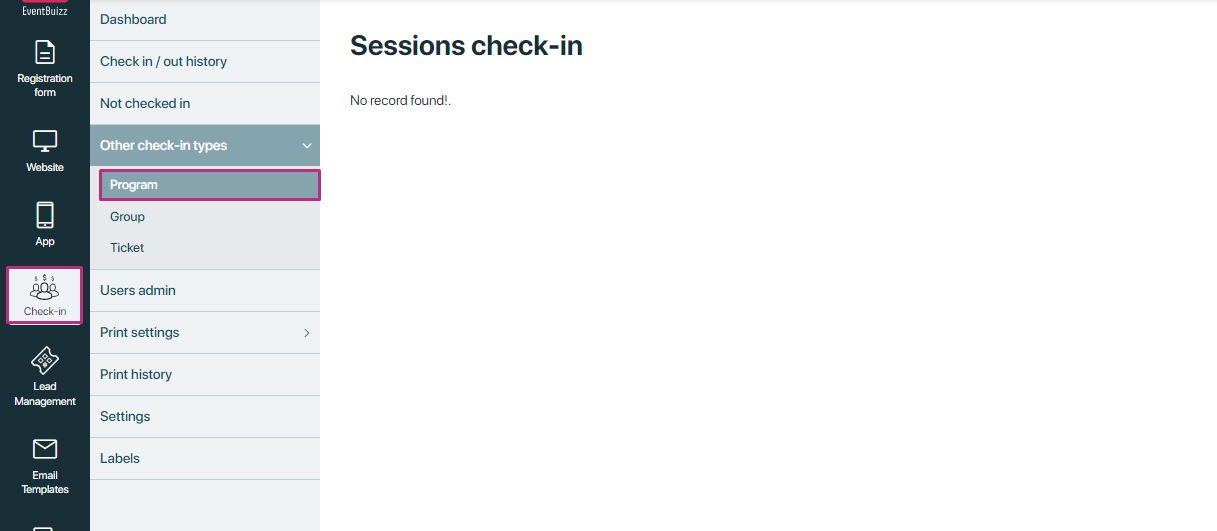
Initial view & data population
When an organiser accesses this section for the first time, all three tabs—Program, Group, and Ticket—will initially display a “No record found” message. This is by design, as these sections only populate once actual check-in actions have occurred:
- No program sessions, groups, or ticket types will appear in the listing until at least one attendee has been checked in under each respective category.
- The listings are dynamically updated based on actual check-ins, not based on predefined sessions, groups, or ticket types alone.
This design ensures that only active and relevant check-in data is displayed, keeping the interface clean and focused.
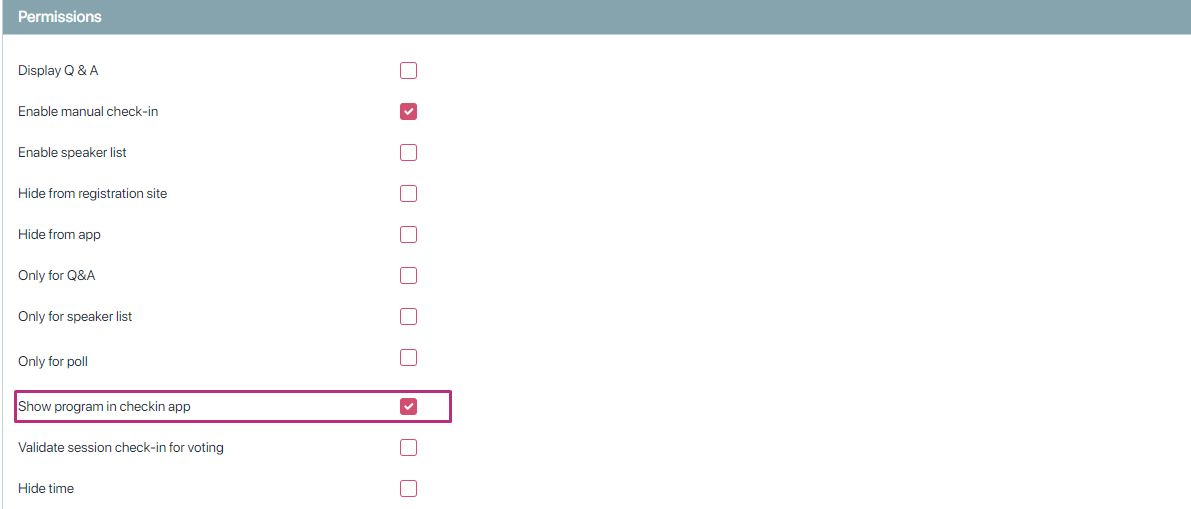
Also one more important thing to keep in mind,only user admin can check-in against those programs in which organiser give the permission to show program in check-in app
same like program, if attendee is attached with group, then user admin can check-in that attendee against that group, otherwise not.
Almost all these three sub sections are same in working, here going to explain only program, remaining are same like program.
Program
- The Program subsection within the Other check-in types area displays a complete list of all program sessions where check-ins have taken place. These sessions are dynamically listed only when a user admin has successfully checked in at least one attendee against a particular program. Until then, the section remains empty, displaying “No record found.”
- This view is specifically designed to help organisers track and manage attendee participation in different program sessions within an event. Each record in the list shows which program session was involved, who was checked in, and the check-in timestamp, giving organisers real-time visibility into session-level attendance.
- Only program sessions that have been explicitly enabled by the organiser for check-in access via the Check-in App will appear. This ensures that User Admins only interact with relevant and authorised sessions. If permission hasn’t been granted, the User Admin will not see the program session and won’t be able to perform check-ins under that session.
Through this view, organisers can:
-
- Monitor attendance at the session level.
- Verify check-in status for each session.
- Ensure that attendees are participating in the correct programs.
- Maintain a detailed session-wise history of check-ins for future analysis.
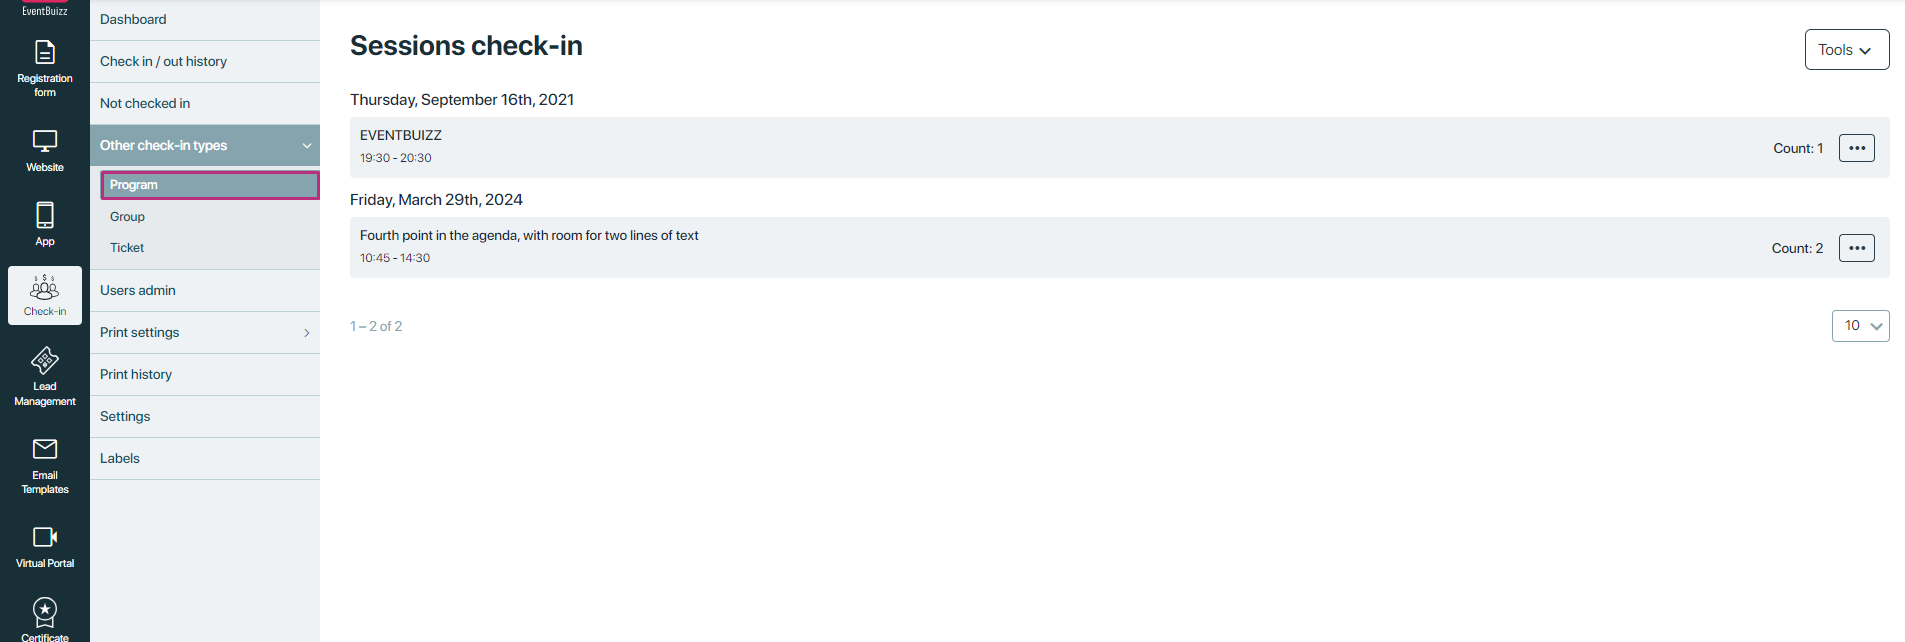
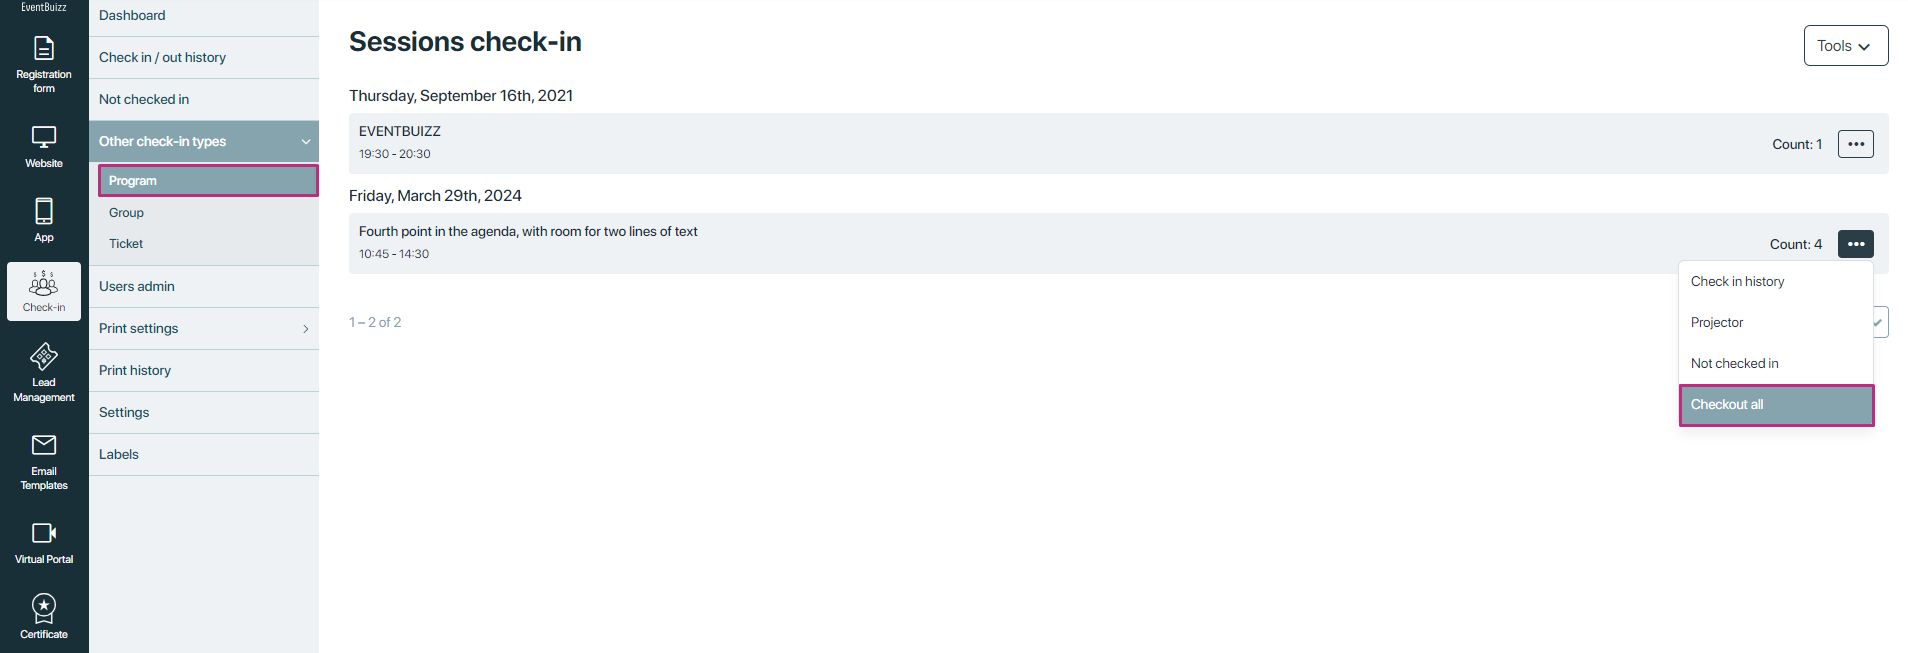
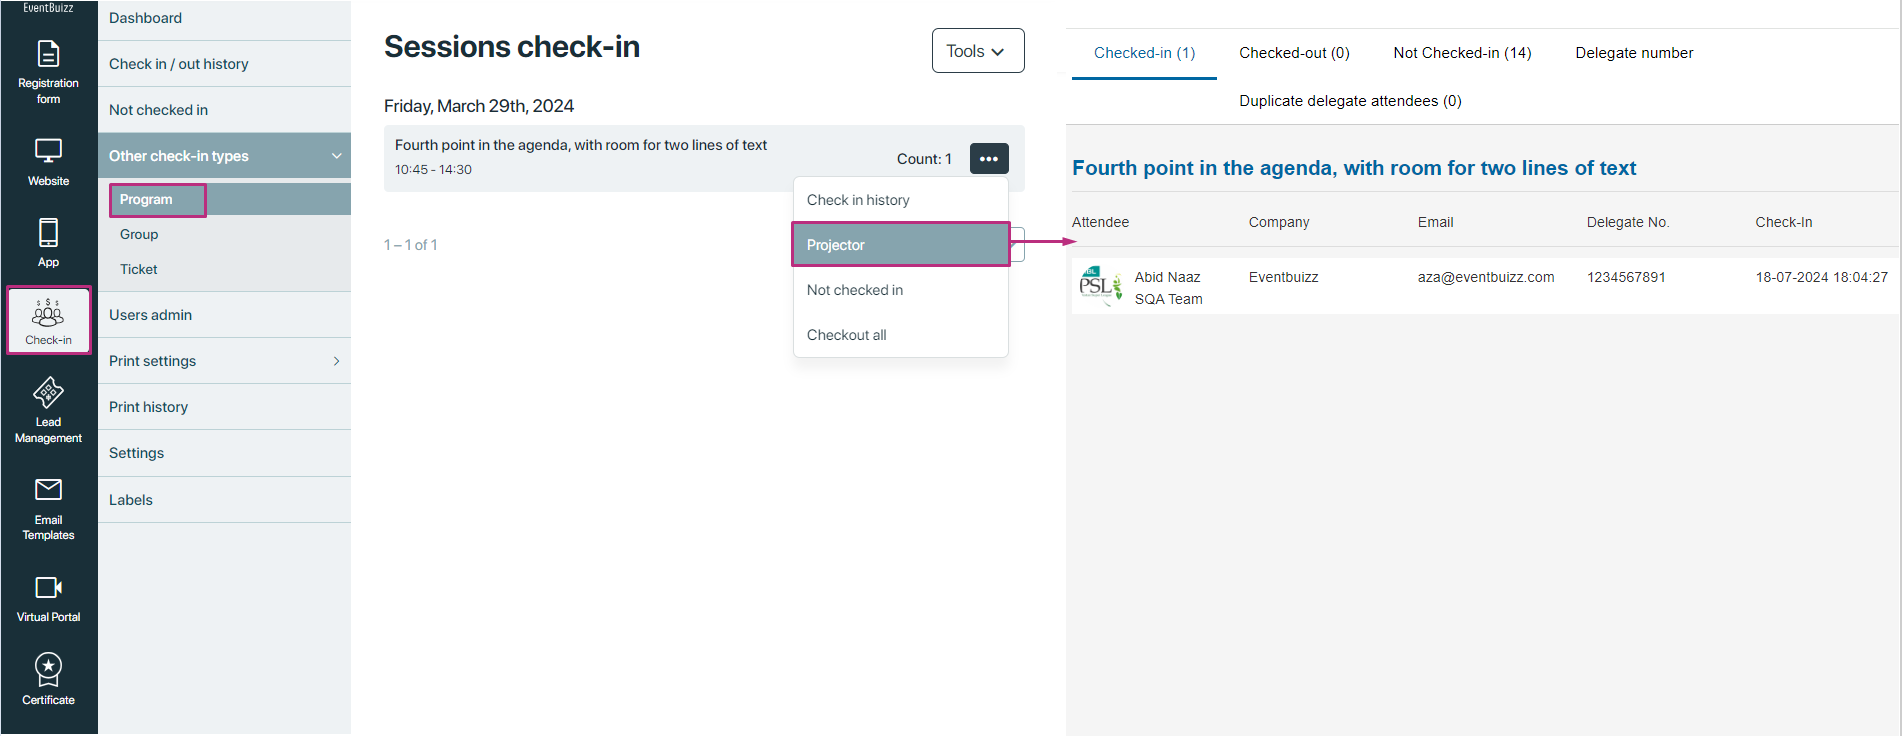
On the listing of the program, on each program showing the “count”, which shows how many attendees check-in against this program,
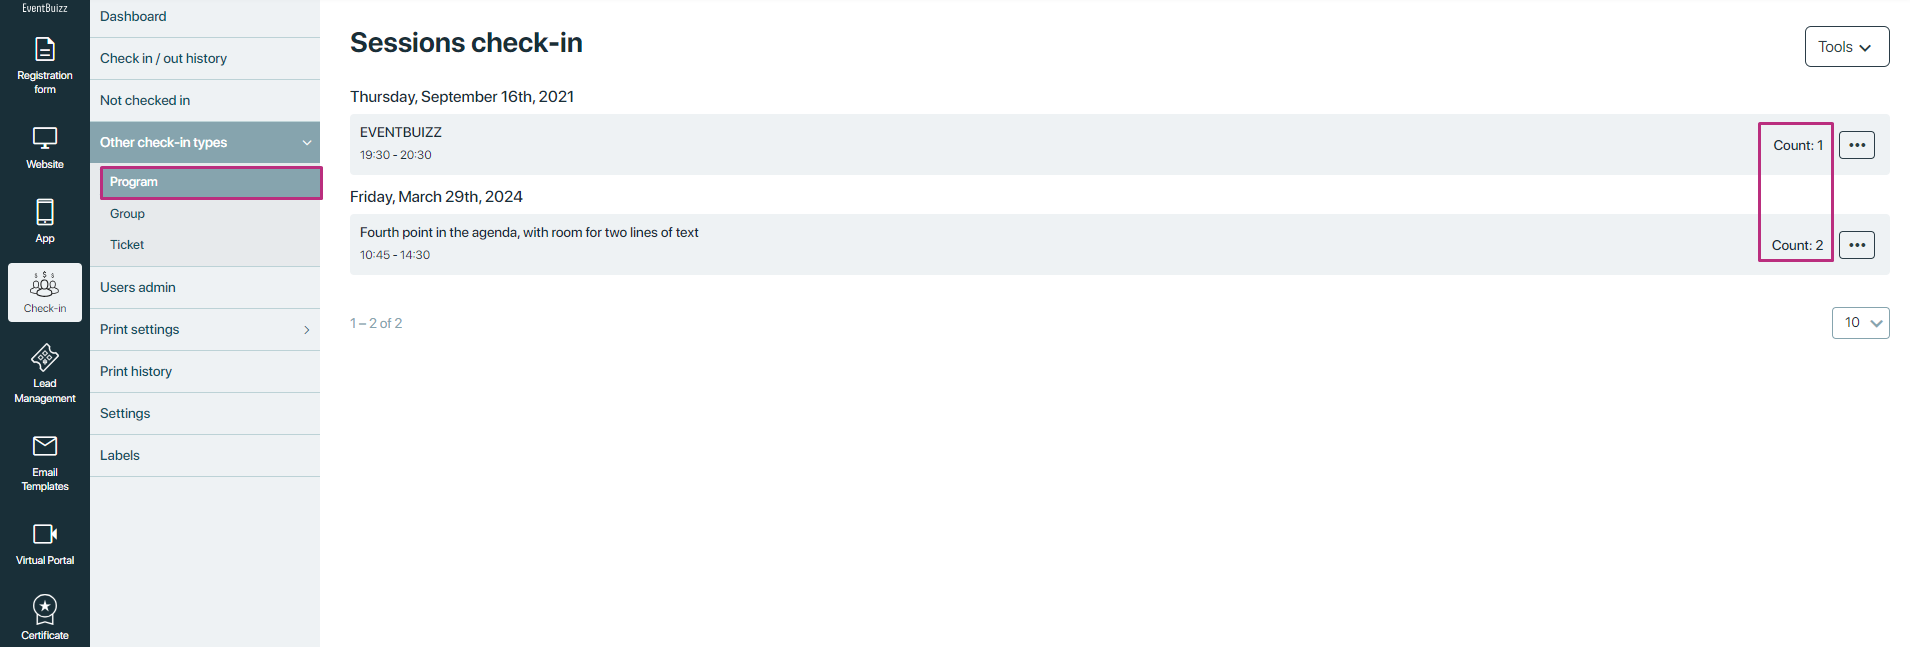
For each program session listed under the Program subsection in the Other Check-in Types section, organisers are provided with a set of powerful tools to manage and monitor attendee activity more effectively. These menu options are designed to give organisers full control over the check-in process and real-time insights into session attendance. The following are the available options for each program:
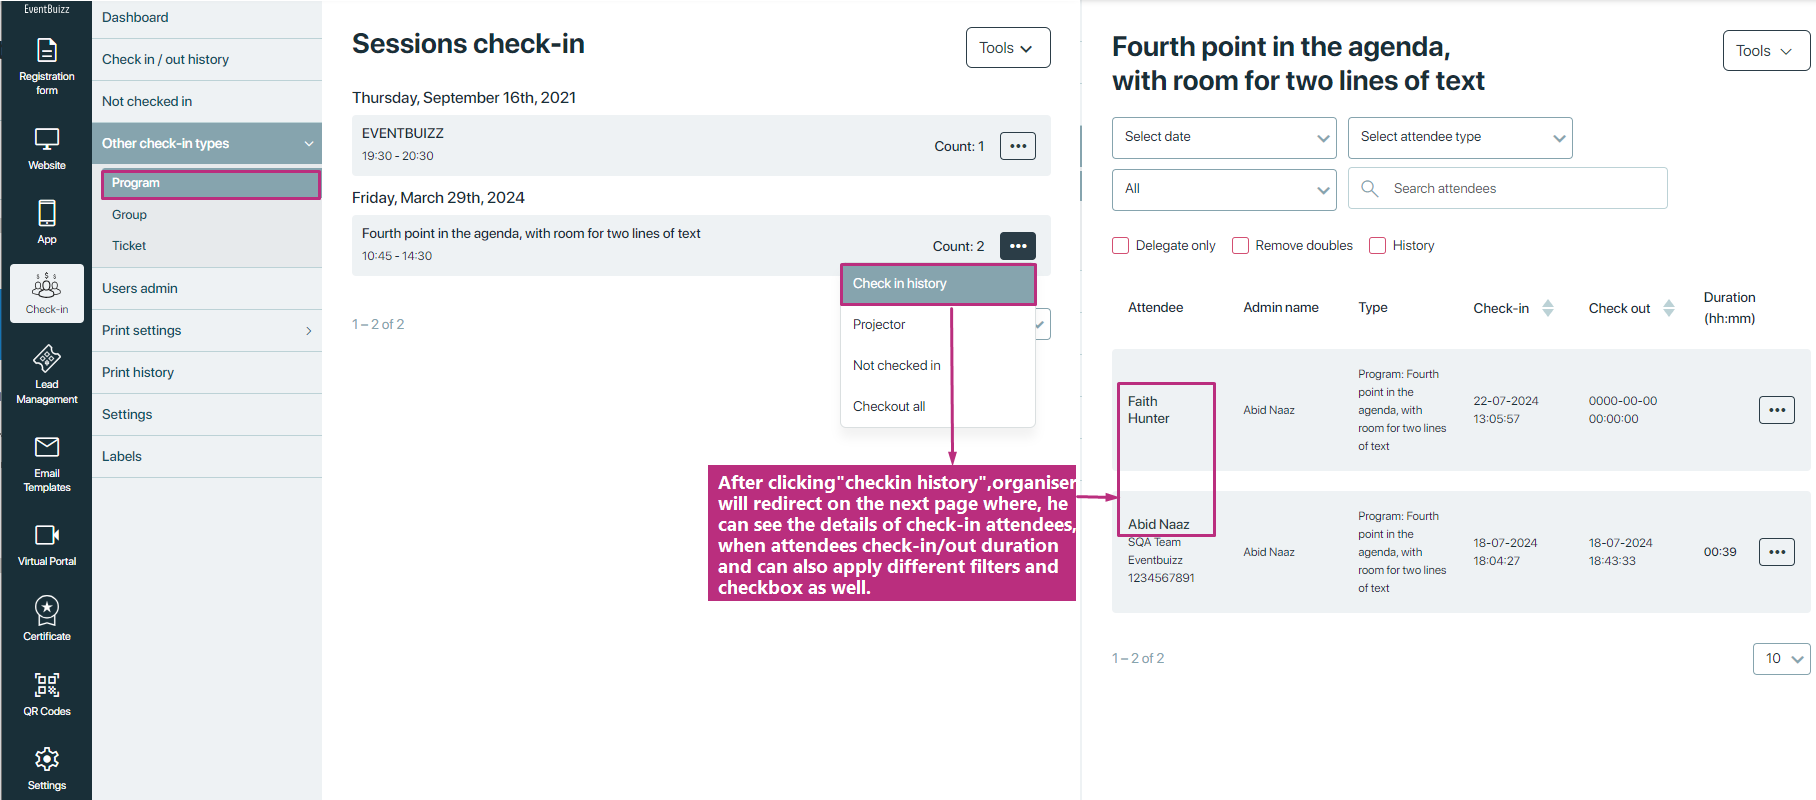
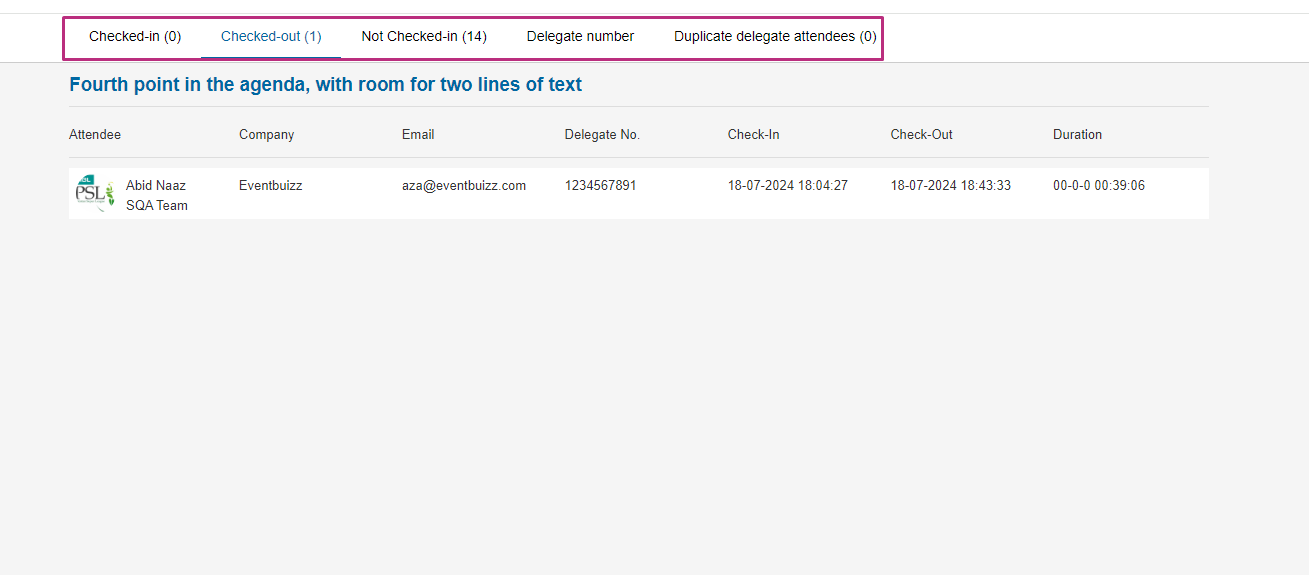
Check-in history
- Provides a log or history of all check-ins associated with the selected program, group, or ticket type.
- Helps organisers track attendance patterns, verify entries, and ensure completeness of check-in records.
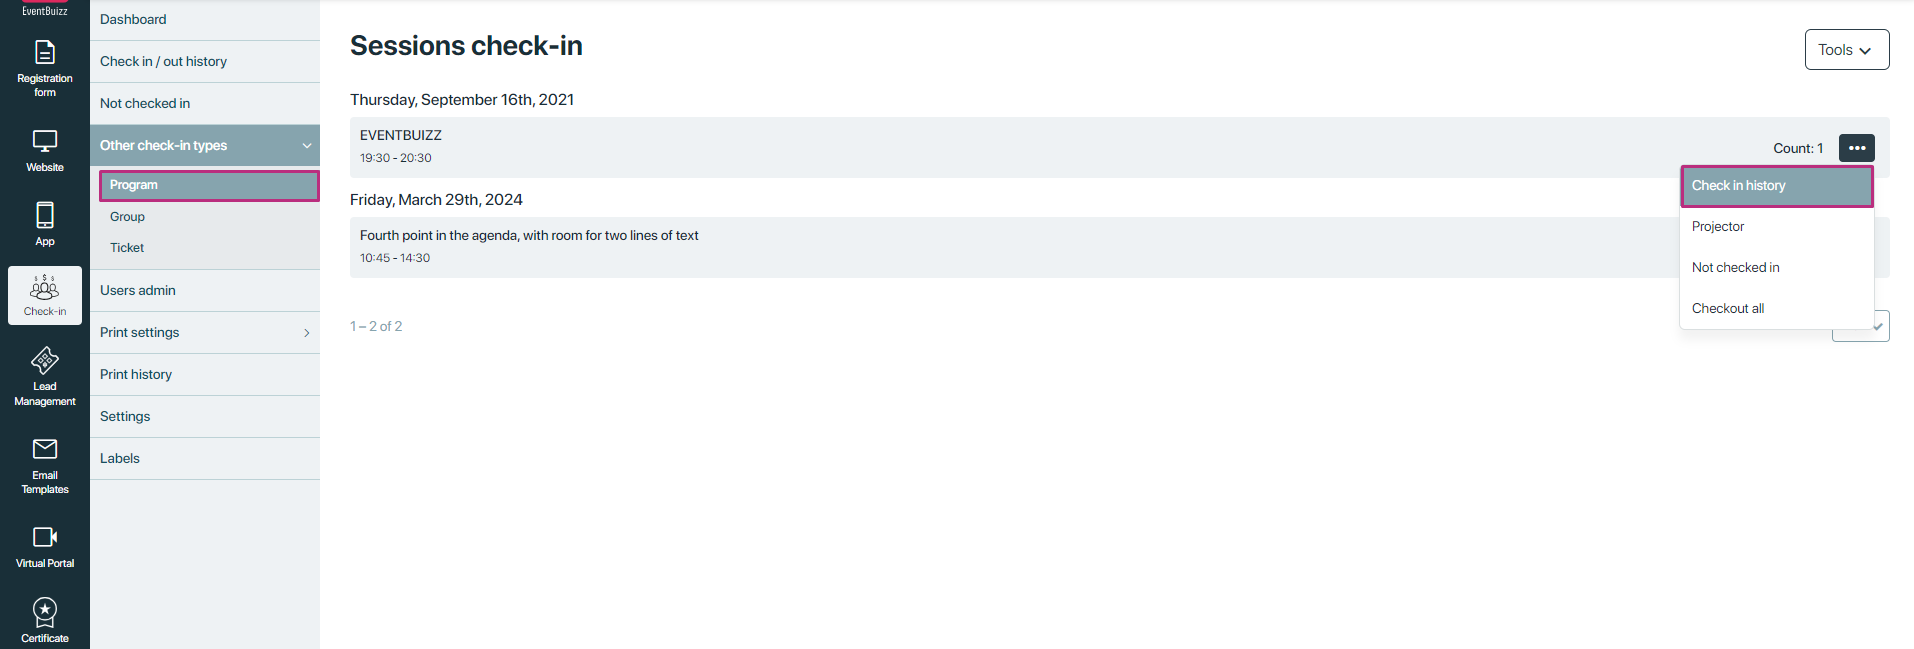
After “clicking” check-in history from menu list, organiser will navigate to next page, where organiser have the access to see the details of all attendees, those check-in against this program.
Projector
- Integrates with a projector system to display real-time check-in/check-out statistics or relevant information during the event.
- Enables organisers to showcase attendance metrics or updates to staff and attendees in real-time
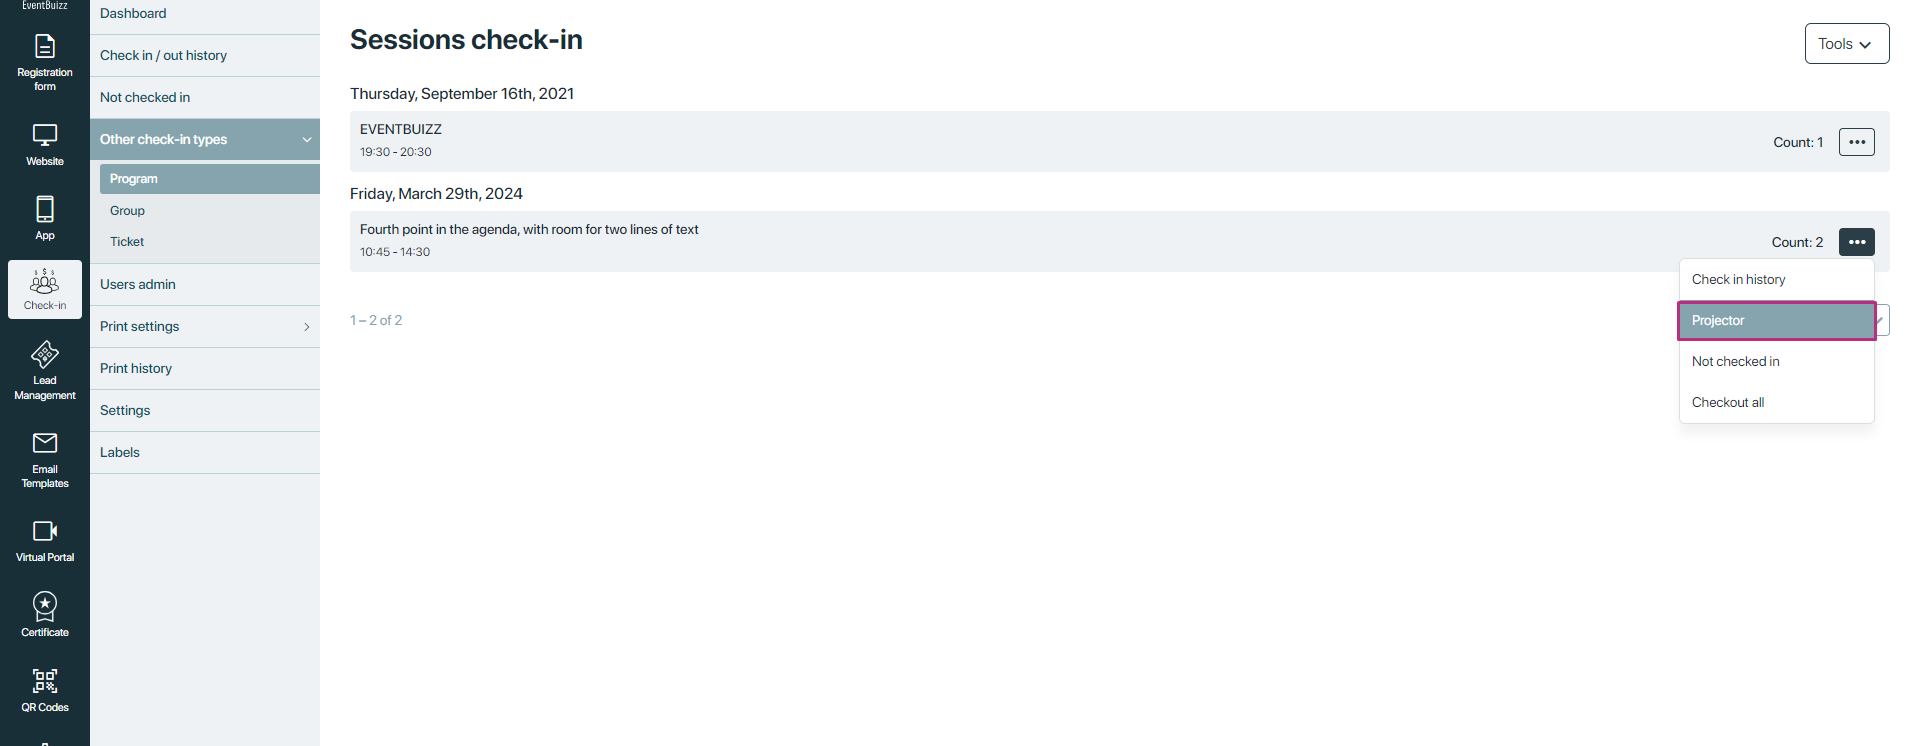
After “clicking” on “projector” organiser will redirect on the projector screen, where organiser can see the real time data, here is the look of the projector screen, how’s it looks like, all sort of data is showing in different metrics:
Not checked in
- Lists attendees who have not yet checked in for the selected program, group, or ticket type.
- Allows organisers to focus on managing and encouraging check-ins for specific categories.
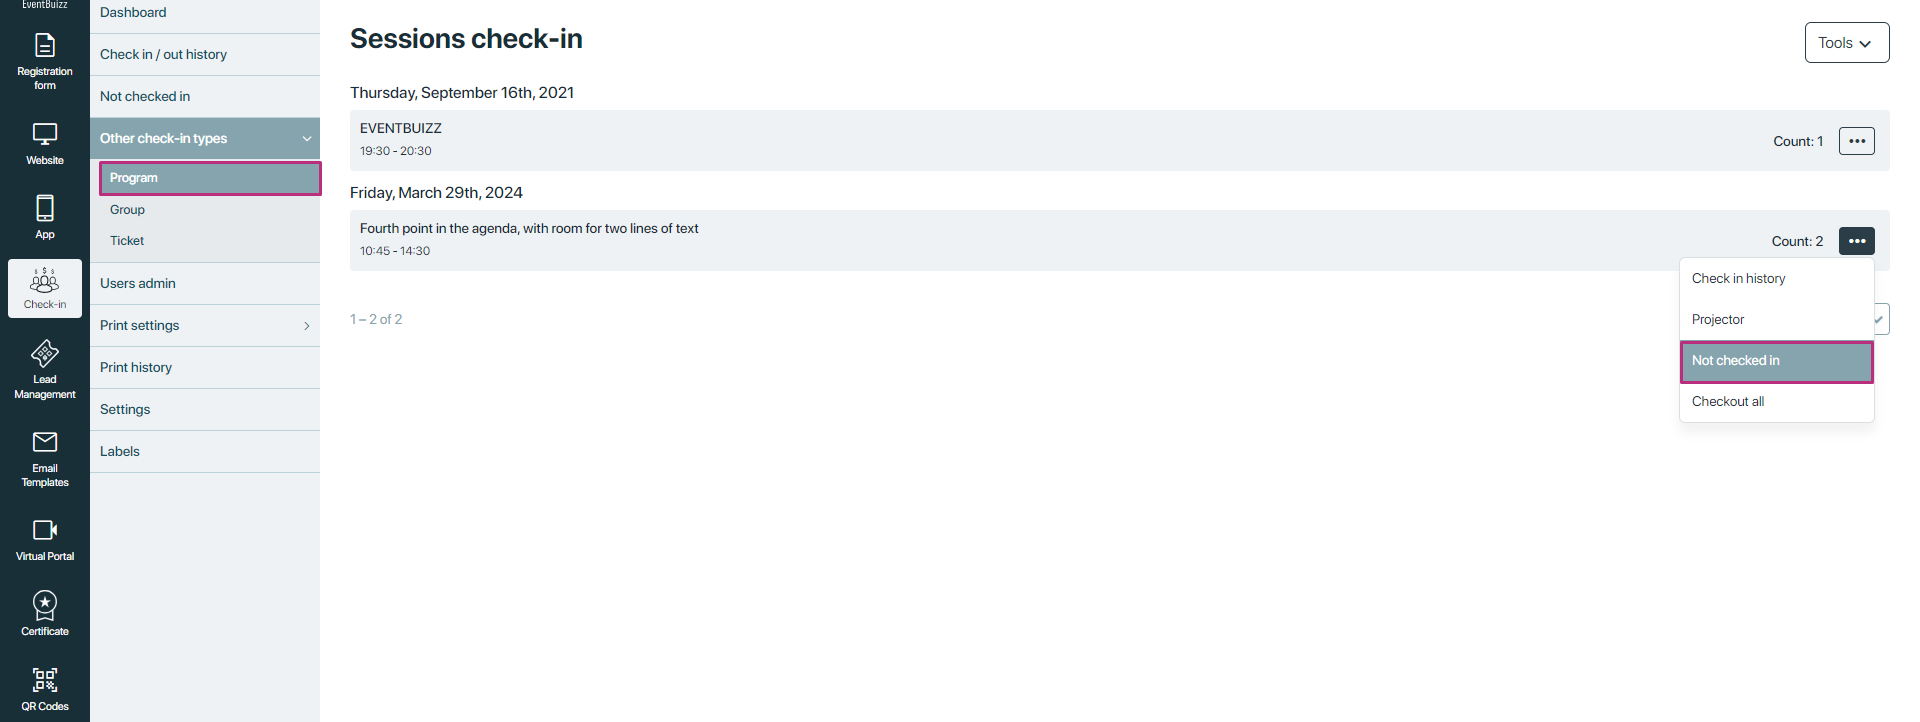
After clicking on “Not checked in” organiser will redirect on not checked in screen, where all the not checked in attendee list will be showing, organiser have the different filters and checkbox there, to filter the specific attendees quickly, also on the listing of the each attendee, organiser have the option to edit the info of attendees, manually check-in that attendee against that program, also check-in that attendee with default badge:
Check out all
Option to perform a mass check-out of all attendees who have checked in for the selected program, group, or ticket type. This option allows organiser to checkout all the attendees in one go, instead of individually check-out against that program, basically this practice use for time saving.
Users admin
Users admin
Users admins are individuals designated by the event organiser to assist in managing the check-in process at an event. They have specific permissions granted by the organiser to facilitate smooth operations during attendee check-ins.
Why users admins are created?
User admins are created to support the event organiser in several key ways:
- Operational support: They help in managing the check-in process efficiently, ensuring attendees are processed quickly and accurately.
- Role specialisation: Different user admins can be assigned specific responsibilities based on their permissions (e.g., managing group check-ins, handling program-specific entries).
- Flexibility: Allows for distributed responsibility, reducing the burden on organisers and ensuring better coverage across multiple check-in points or booths.
- Event security: Enhances security by controlling access and ensuring only authorised attendees gain entry.
How users admin are created and works?
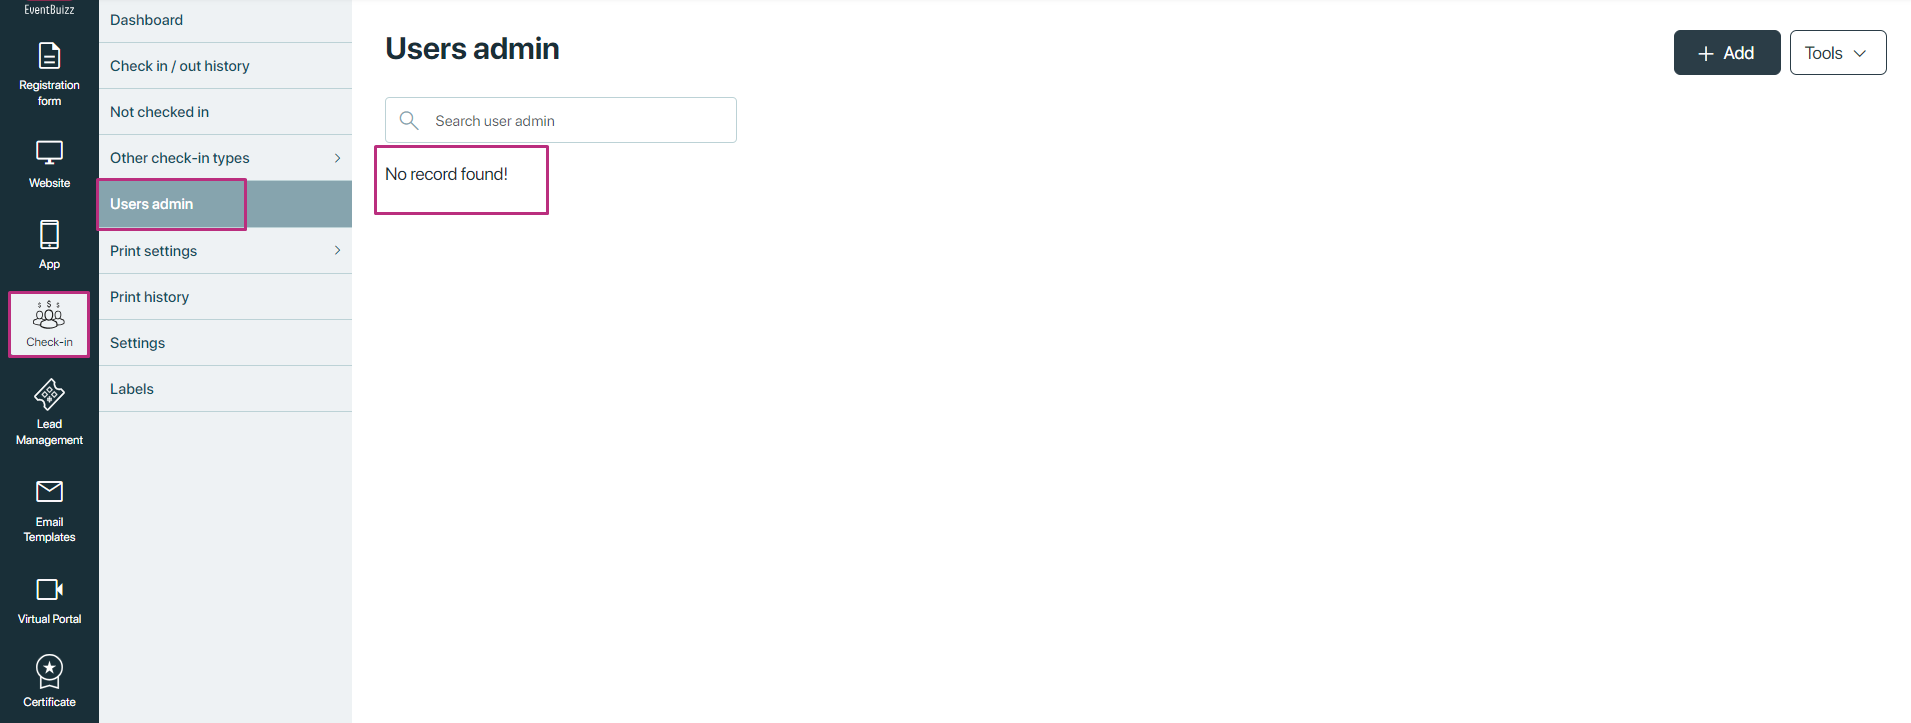
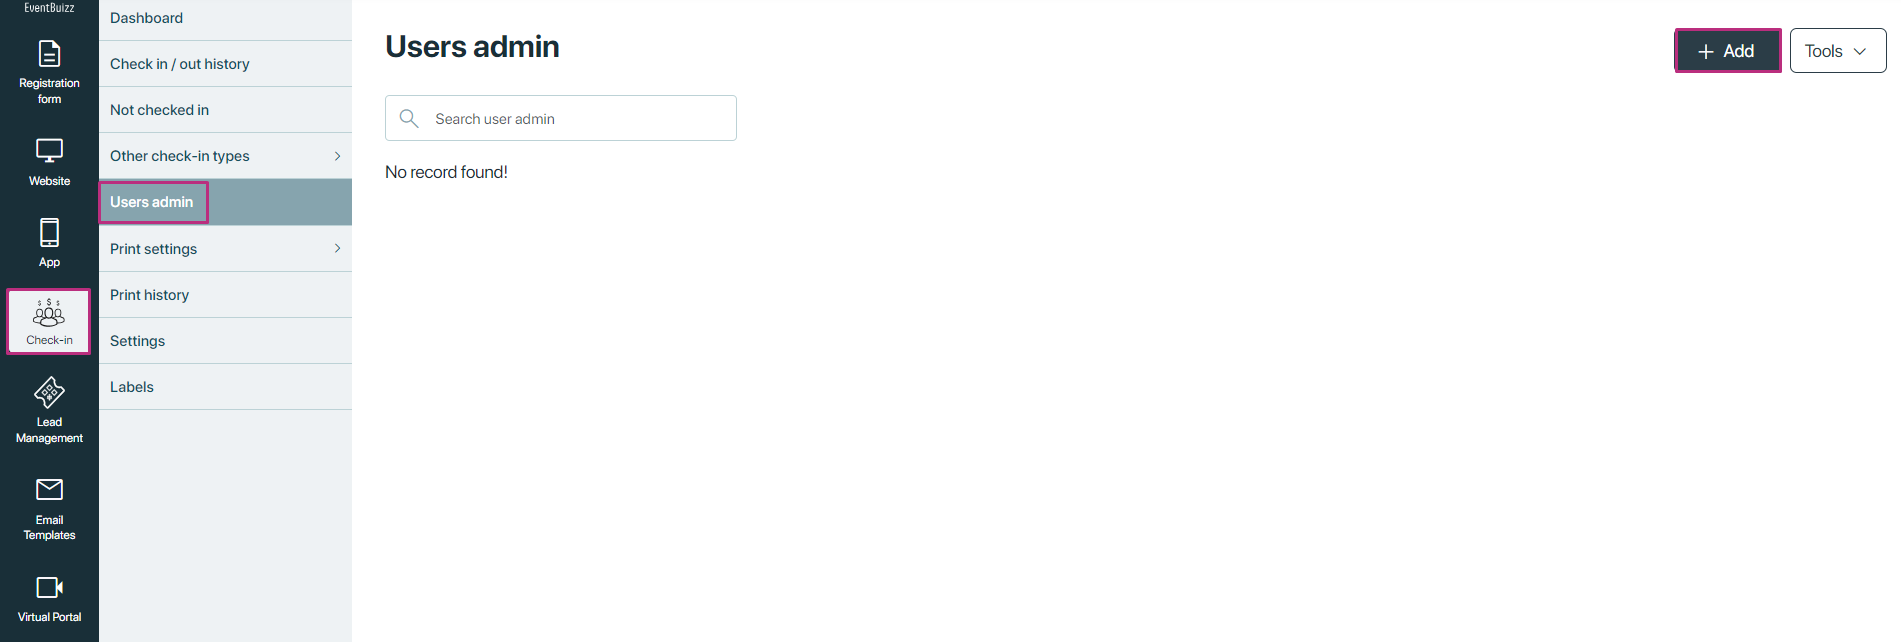
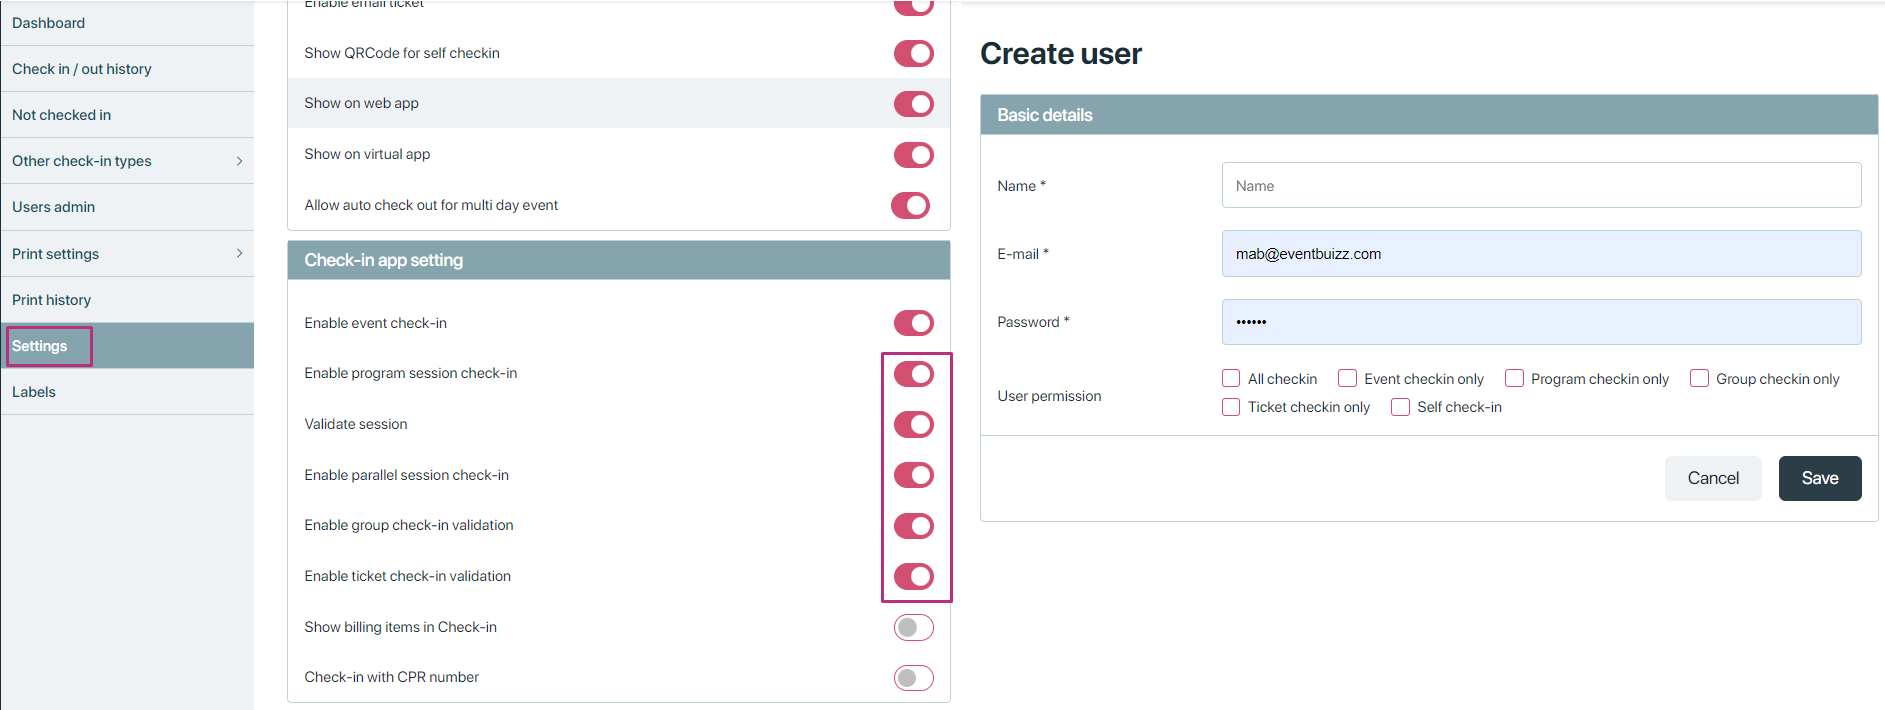
By using “Users admin” section of check-in module organiser manages user admin accounts, permissions, and roles for check-in operations. By default when organiser will land on the “users admin” screen there will be no users admin created by default, and screen will look like this:
For creating “new user” organiser will click on “+Add” button.
After clicking on “+Add” organiser will redirect on “Create user” screen, where he need to give the user name, email, password, and permissions.
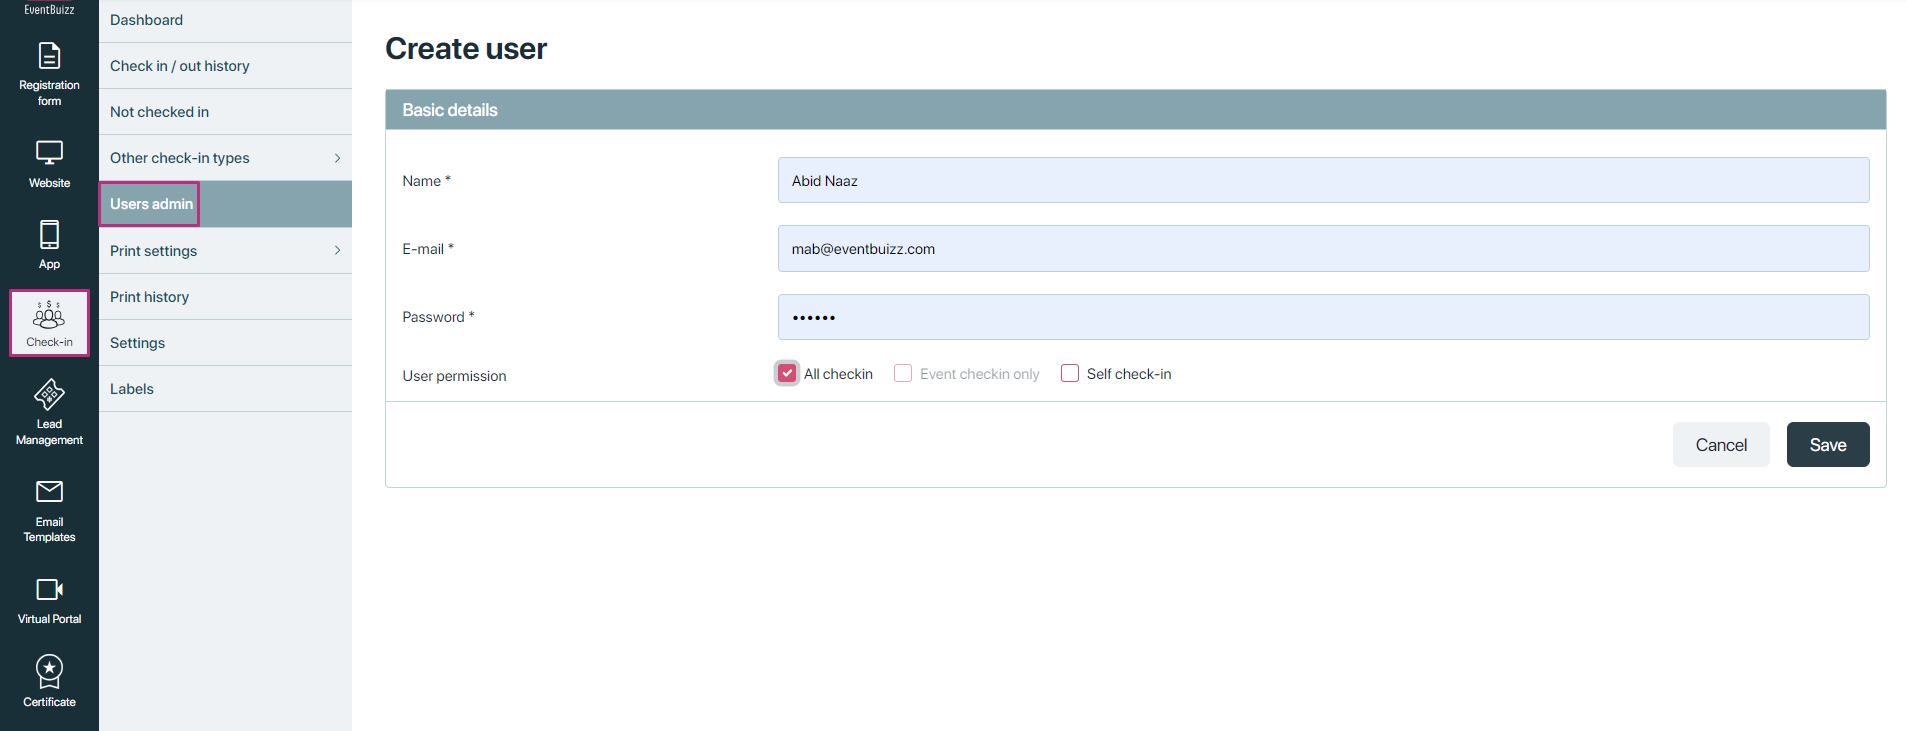
By default few permissions are showing including all, event check-in and self check in but remaining all permissions are not displaying in create user screen, for enabling them organiser need to enable them from check-in settings. When these settings are by default off, it will look like this:
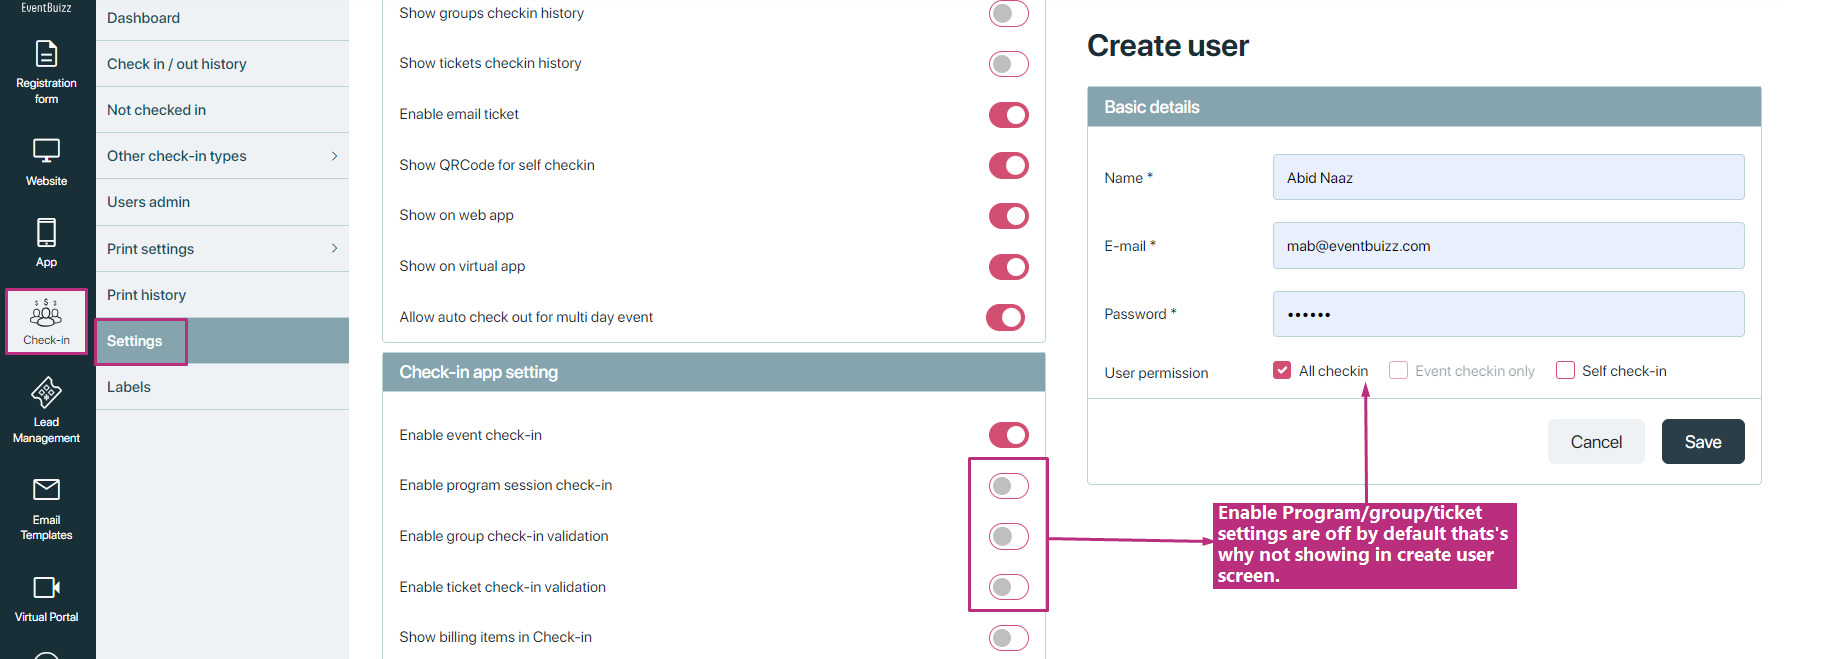
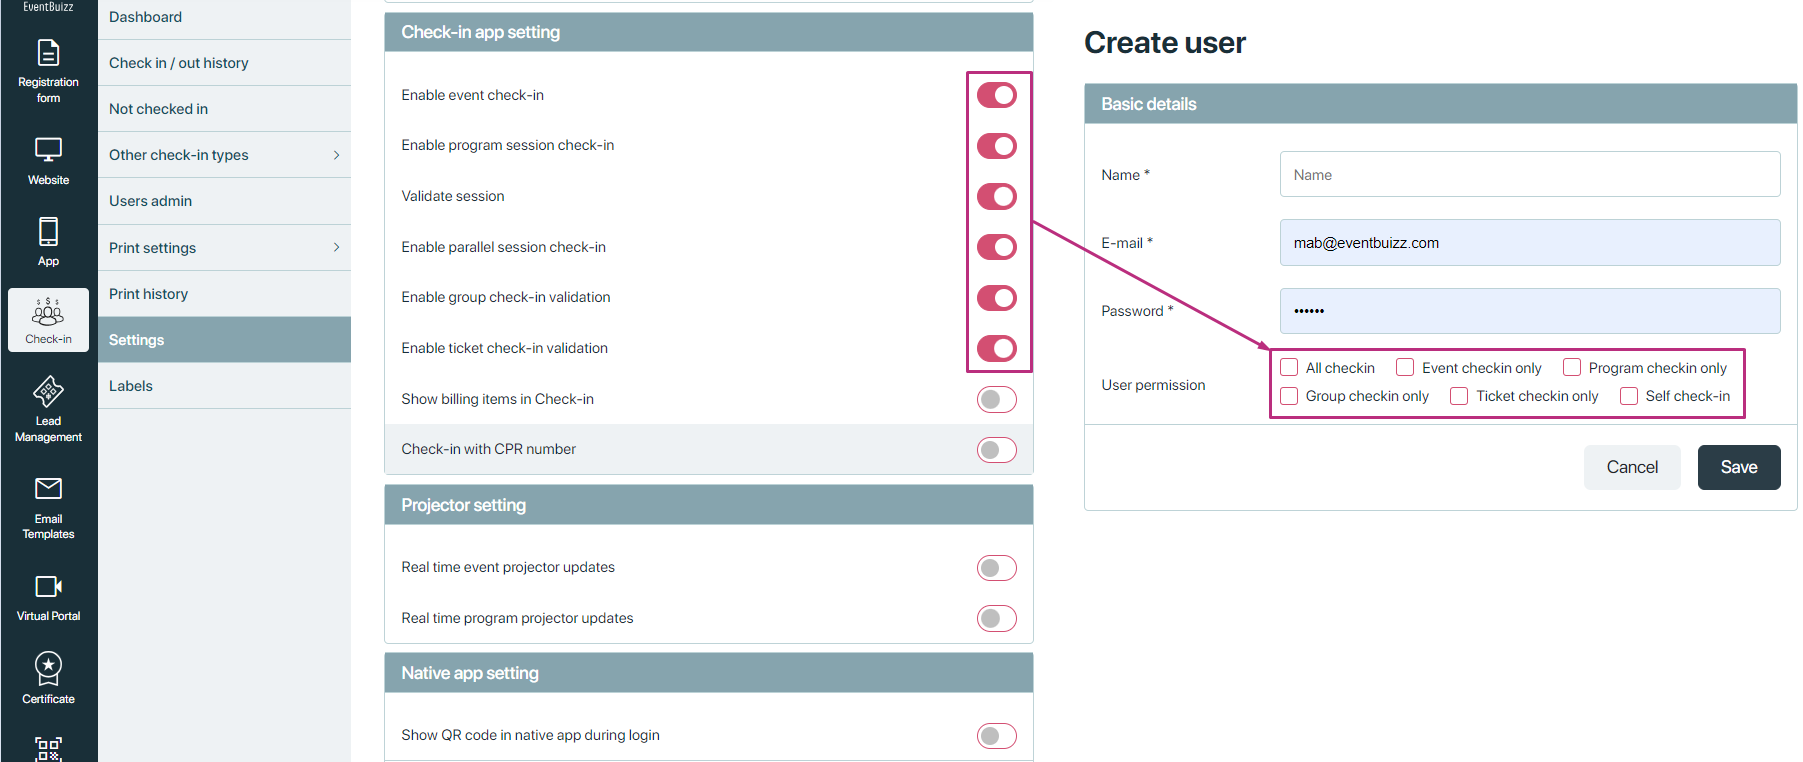
And if settings are “enabled” screen will look like this:
After adding the user admins and assigning them the specific permissions, user admin listing will look this:
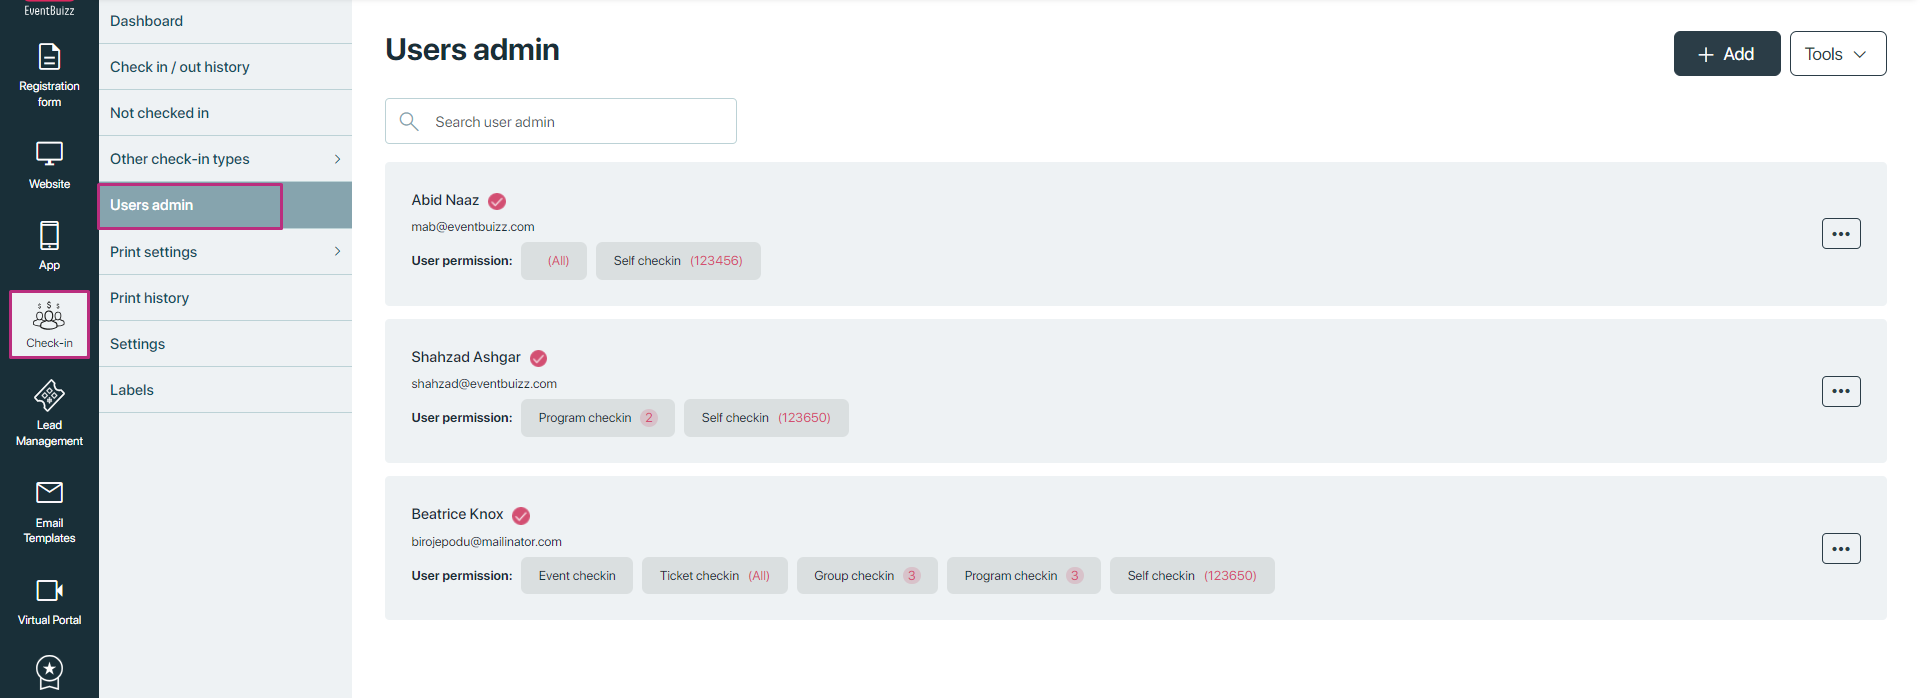
Against each user admin, organiser have the access on user admin menu:
User admin menu overview
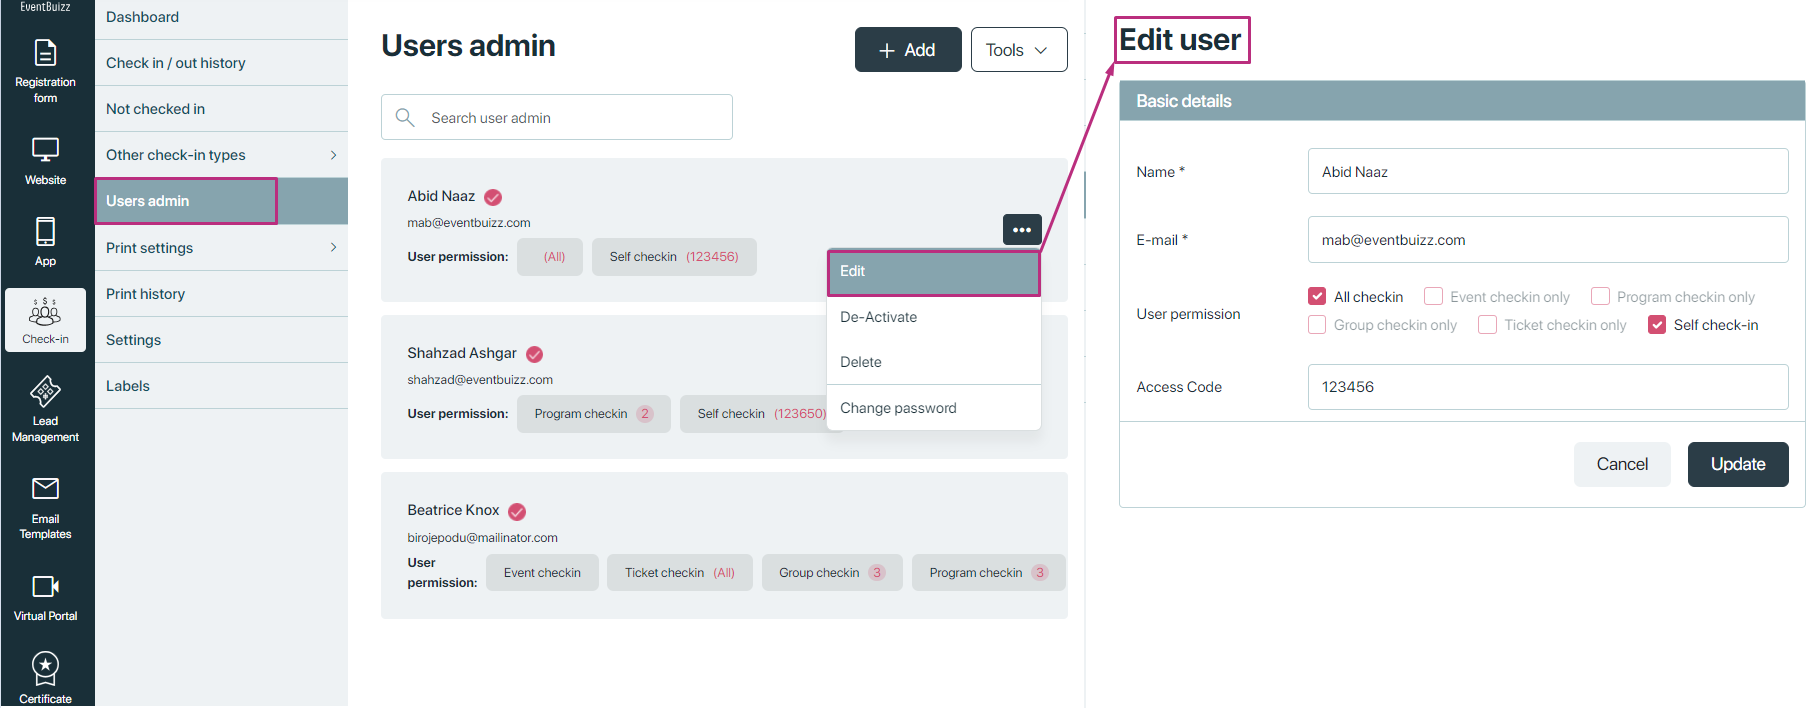
The user admin menu is designed to facilitate the management and administration of user accounts responsible for overseeing attendee check-ins and other administrative tasks during events. Organisers can access this menu to perform various actions related to user admin accounts. Here are the typical options available in the user admin menu:
Edit
- Functionality: Allows organizers to modify details and settings associated with a user admin account.
- Purpose: Enables updates to user admin information such as name, email address, permissions, and other relevant details.
De-activate
- Functionality: Allows organisers to temporarily suspend a user admin account.
- Purpose: Used when a user admin is temporarily unavailable or when their access needs to be paused.

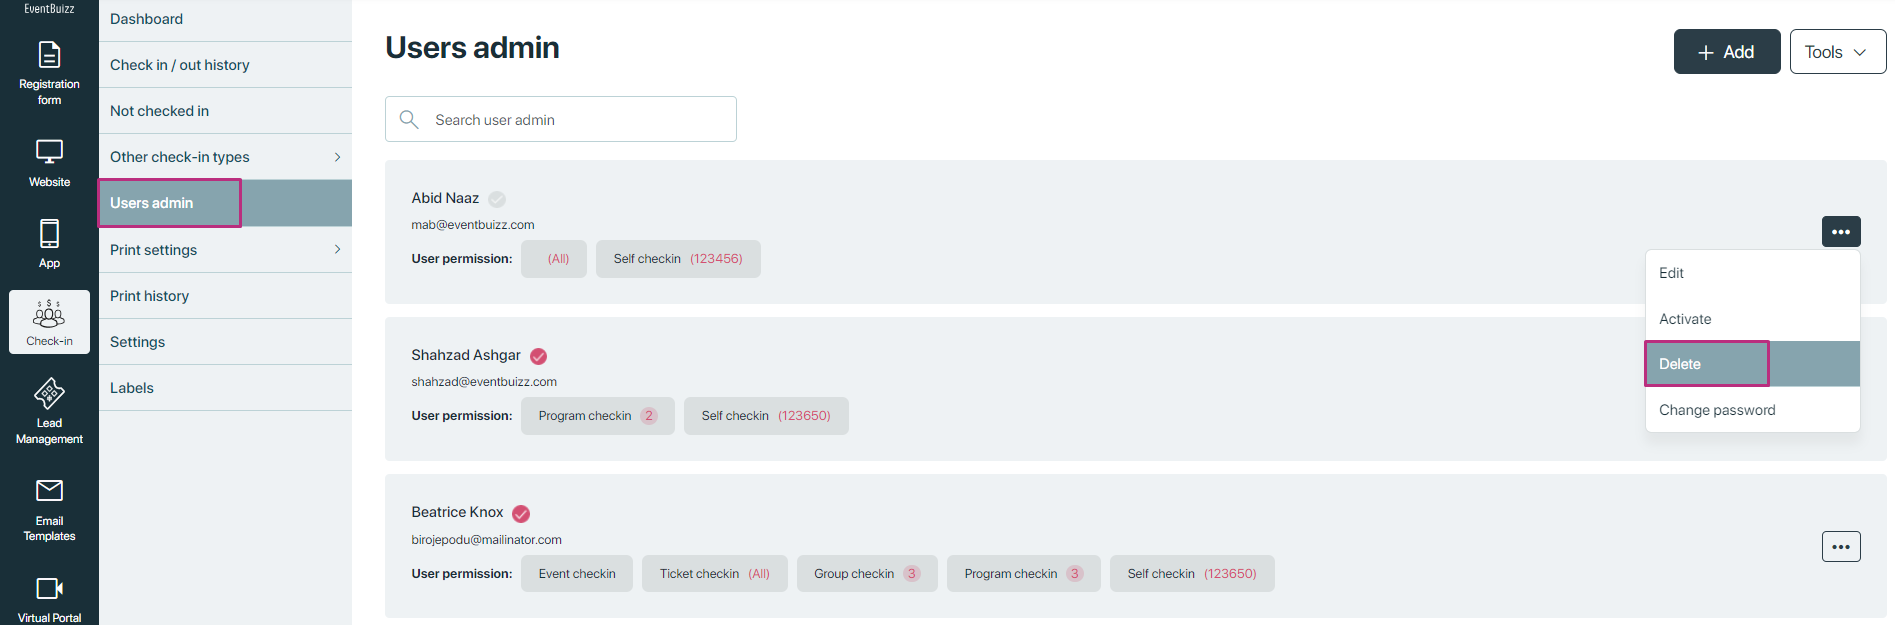
Delete
- Functionality: Permanently removes a user admin account from the user admin listing.
- Purpose: Used when a user admin account is no longer needed or when cleaning up user admin records.
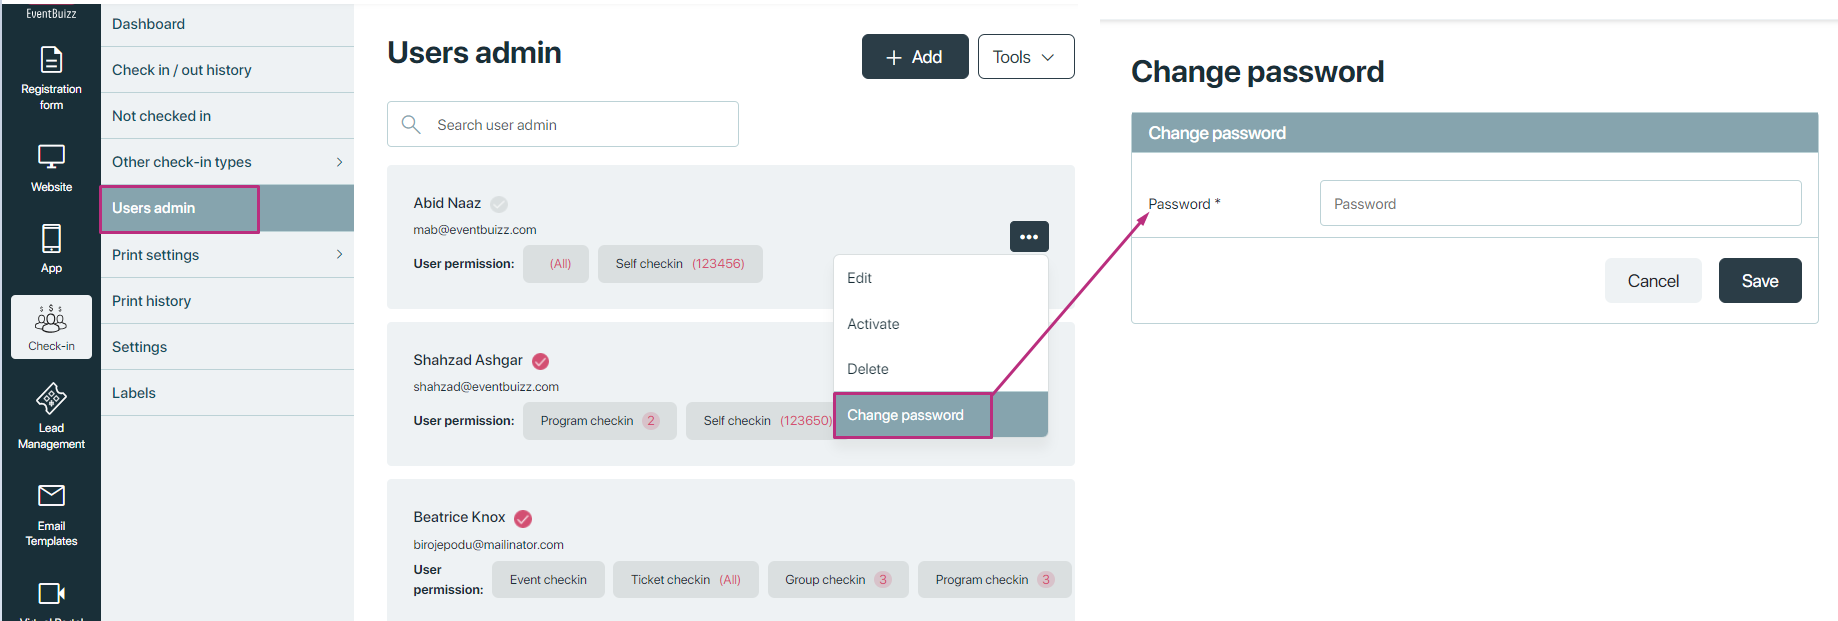
Change password
- Functionality: Allows organisers to reset or change the password associated with a user admin account.
- Purpose: Essential for security reasons or when a user admin forgets their password and needs to regain access.
Next to the “+Add” button, there is a drop down menu labelled “Tools” that allows organiser to import and export user admin data. This feature enables organisers to manage user admin information efficiently, facilitating tasks such as adding new user admins or exporting existing user admin data for external use or backup purposes.
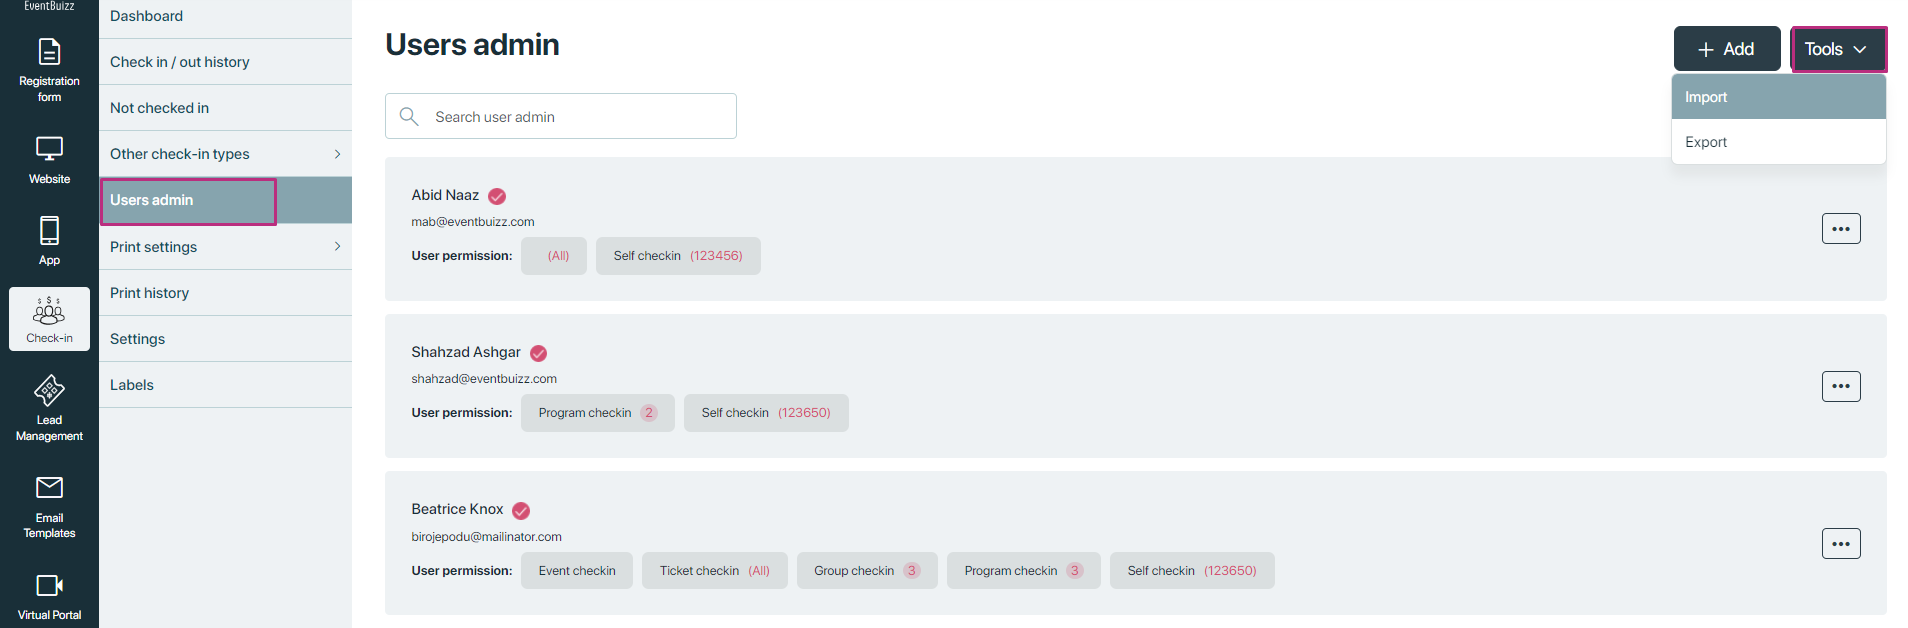
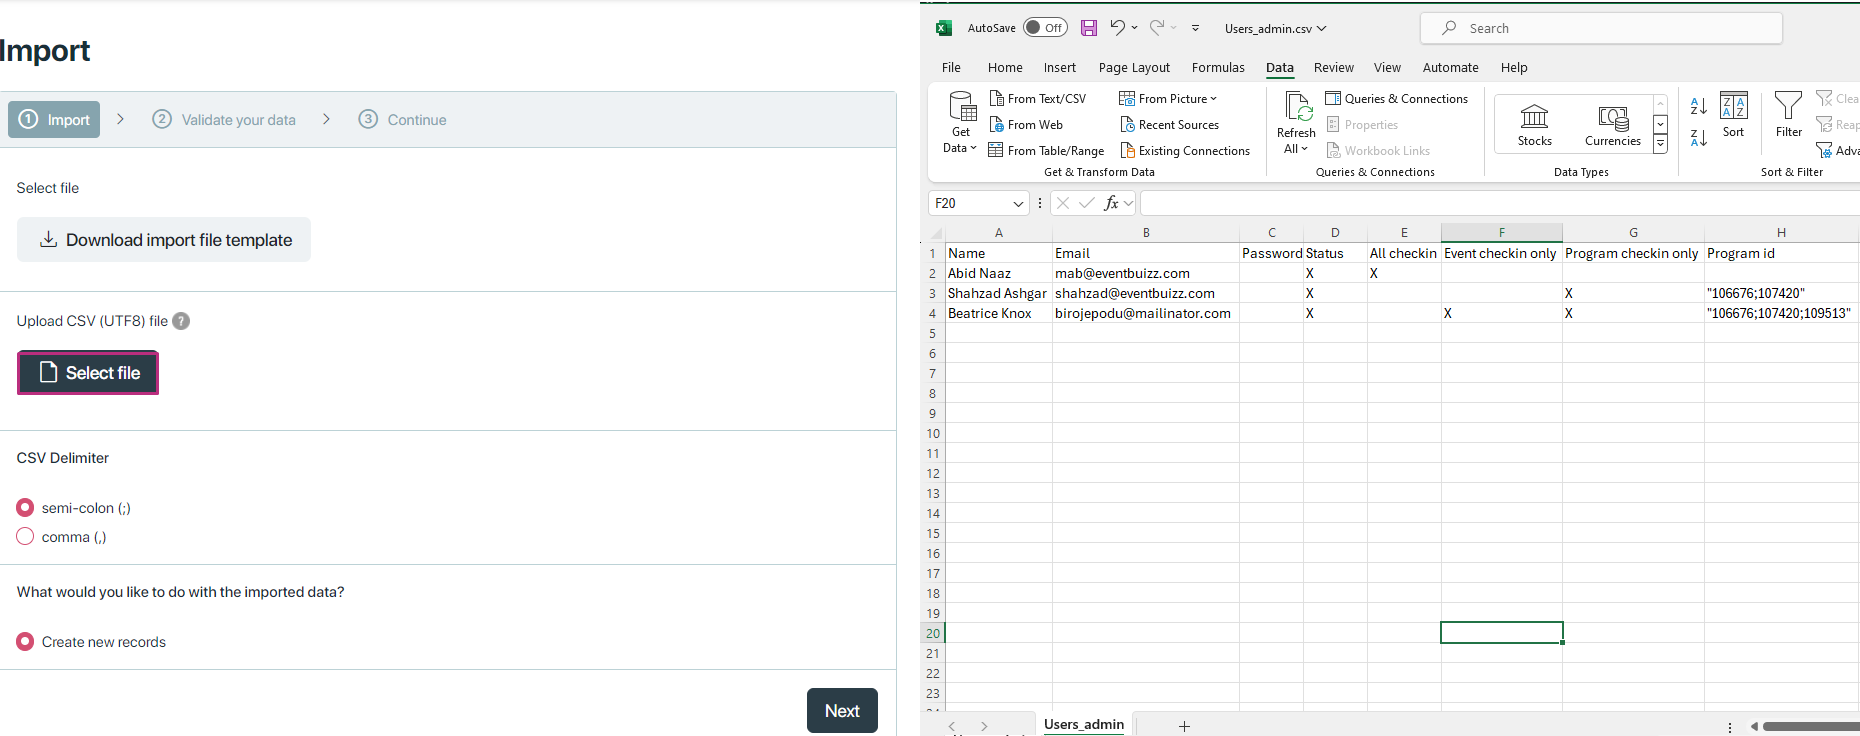
Import user admins
- Functionality: This option allows event organisers to import user admin data into the check-in user admin module
- Purpose: Organisers can use this feature to quickly add multiple user admins to the system in one go, rather than adding each user admin manually.
- Process: Typically, organisers prepare a file (e.g., CSV format) containing user admin details such as name, email, permissions, etc. They then use the import functionality to upload this file into user admin.
- Benefits: Saves time and reduces manual data entry errors when setting up user admins for an event. It ensures that user admin details are accurately transferred into the system.
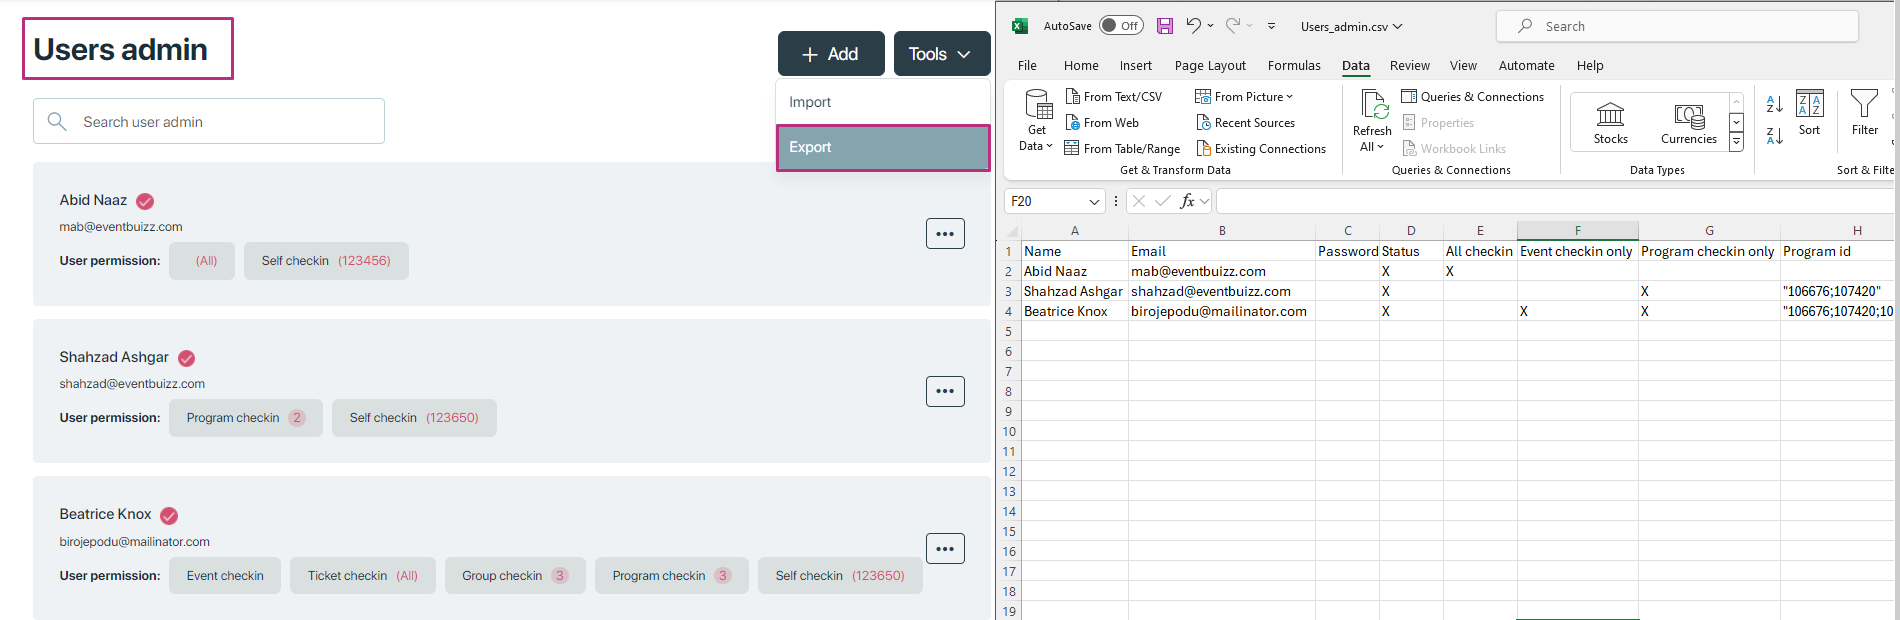
Export user admins
- Functionality: This option allows event organisers to export user admin data from the check-in module.
- Purpose: Organisers can export user admin details for various purposes, such as creating backups, analysing user admin activity, or integrating with other systems.
- Process: Organisers typically select the export option, which generates a file (e.g., CSV format) containing user admin details like names, emails, permissions, etc. This file can then be downloaded and saved locally.
- Benefits: Provides flexibility and control over user admin data. It allows organisers to maintain records externally and use the exported data for reporting or compliance purposes.
Print settings
Print settings
The “Print settings” section is designed to configure various aspects related to badge printing, preferences, terminal identification, and onsite check-in settings. Print settings section consist of four main sub sections, here’s an explanation of each sub-section:
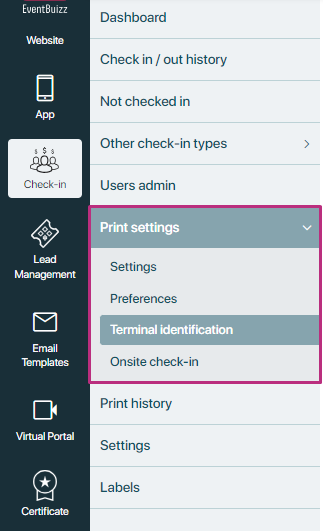
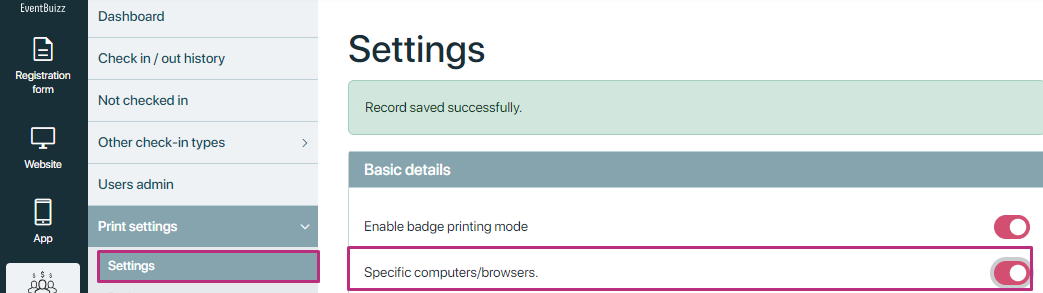
Settings
The purpose of the settings section in the print settings of the check-in module is to provide administrators with tools to configure and personalize the badge printing and terminal preferences according to the specific needs and operational requirements of the event. These settings enable organisers to streamline the check-in process, manage attendee roles effectively, and ensure smooth coordination among multiple organisers or teams involved in event management.
In print settings we have two kinds of settings:
- Enable badge printing mode
- Specific computers/browsers.
Enable badge printing mode
- Purpose: This setting enables the “print badge” button in the check-in app interface for user admins.
- Activation: When enabled by the event organiser in the system settings, user admins will see a toggle or button labelled “print badge” within the check-in app.
- For further detail of this setting usage, click here

Specific computers/browsers
Functionality:
- Purpose: Allows organisers to specify whether settings are saved in session cookies (local storage) instead of the central database.
- Organiser flexibility: Particularly useful in scenarios where multiple organisers manage different aspects of the event.
- Session-based preferences: When activated, each organiser can save their preferred settings (e.g., terminal preferences) locally within their session.
- Benefits:
- Personalization: Ensures each organiser can customise their experience without affecting others’ settings.
- Ease of Use: Provides convenience by maintaining individual preferences across sessions, reducing the need for repetitive configuration.
Example scenario:
- Event setup: Suppose there are multiple organisers for an event, each responsible for different sections or activities.
- Terminal preferences: Organiser A sets “Terminal 1” as their preference for badge printing in the Preferences section.
- Cookie-based storage: With this setting enabled, Organiser A’s preference for “Terminal 1” is stored locally in their browser’s session cookies.
- Organiser b: Meanwhile, Organiser B may set “Terminal 2” as their preference, which is also stored independently in their session.
Preferences
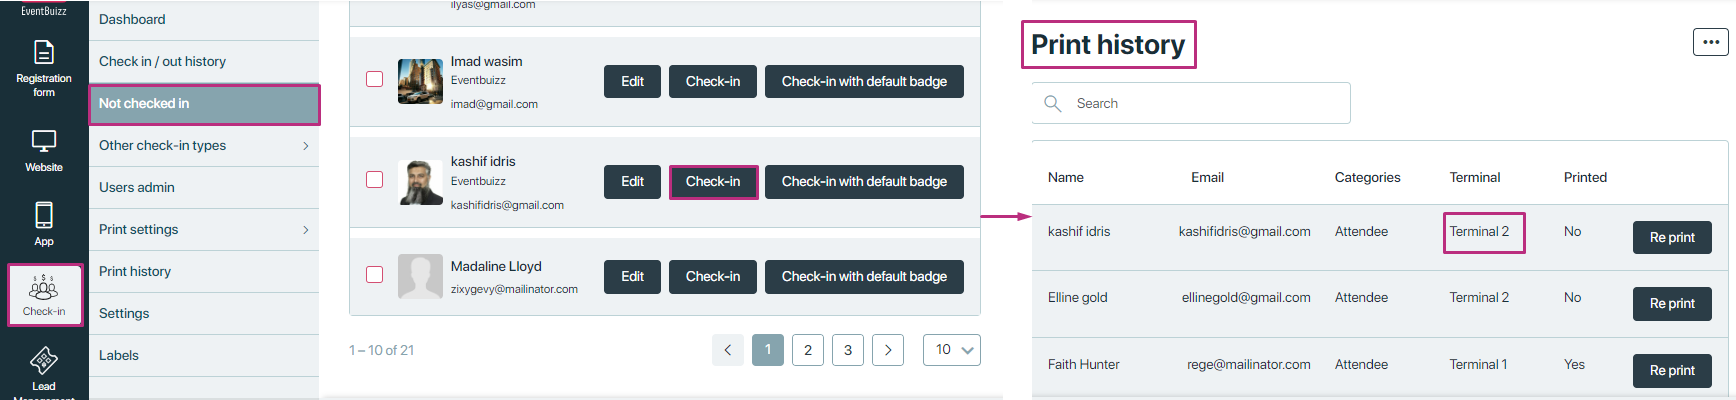
In the Preferences section of print history section, organisers can set preferences related to terminal, all the created terminal in terminal identification, will show in the drop down in the preferences section:
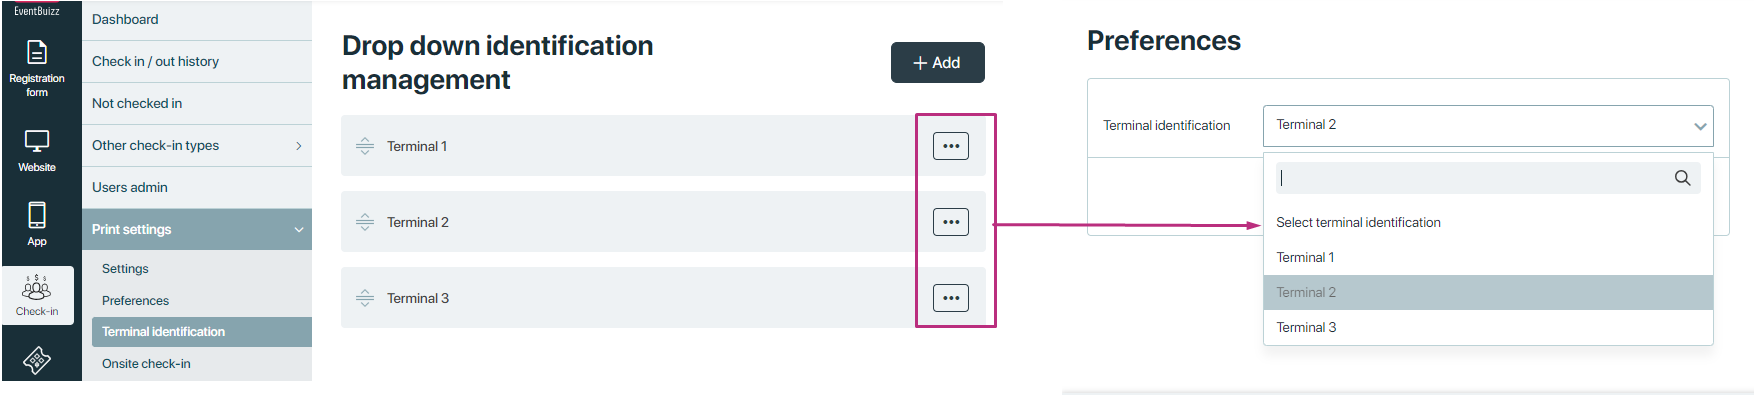
After selecting the terminal from the drop down, organiser will click on “Set” button, and selected terminal is set as a preferences:
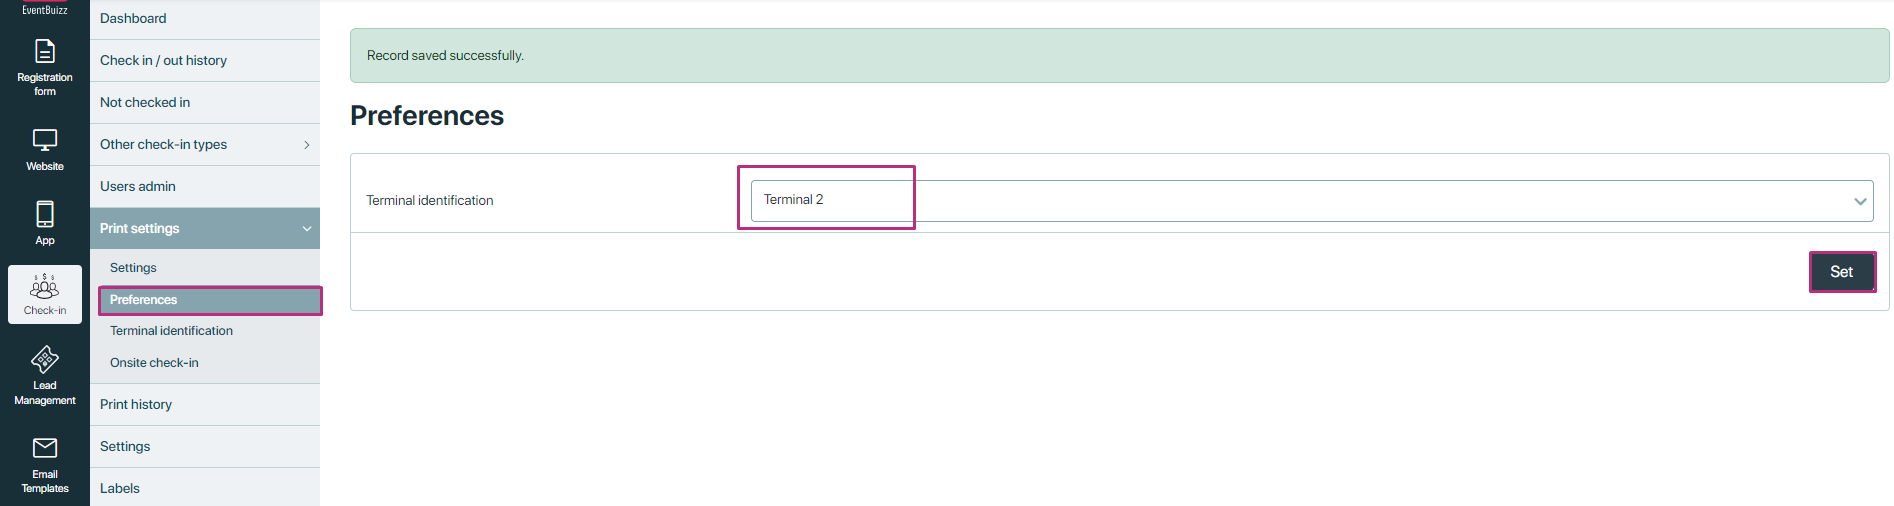
How organiser can verify the selected preferences?
- Organiser will navigate on the not checked in section in check-in module
- Organiser will perform manual check-in of the attendee from the attendee listing
- Then will go in print history and can see the selected preferences terminal.
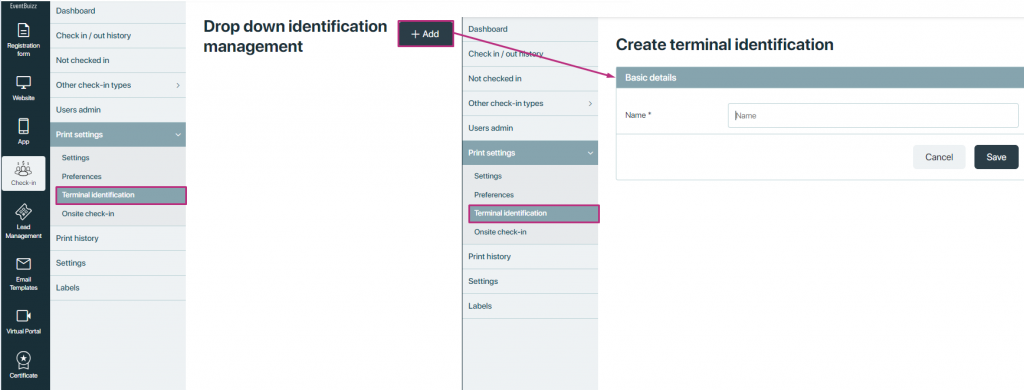
Terminal identification
Purpose: Allows organisers to identify and configure terminals used for badge printing and check-in operations.
Features:
- Terminal setup: Assigns unique identifiers or names to each terminal for easy identification and management.
- By default there is no terminal created in eventcenter, and when organiser land first time on terminal identification screen, found blank screen.

By clicking on “+add”organiser can add the terminal, by giving terminal name.
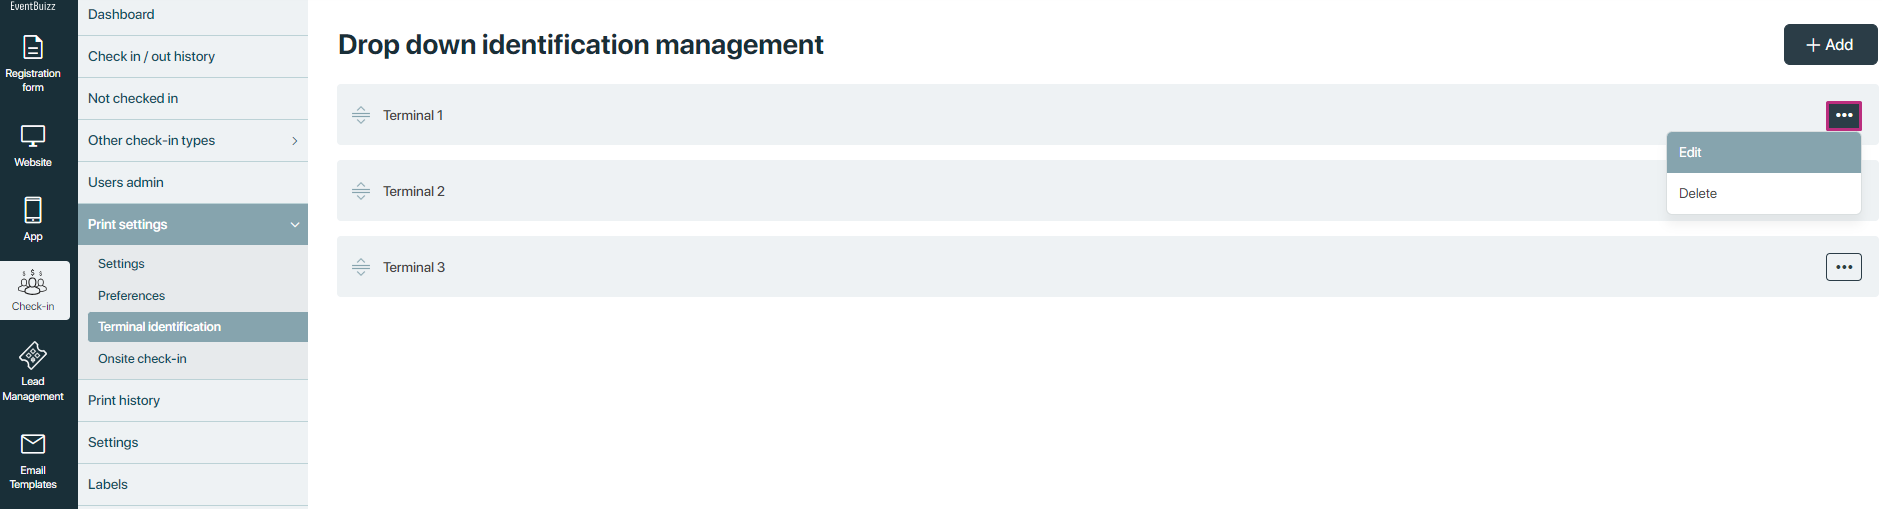
After creating new terminal identification, organiser will redirect on the terminal identification listing, where all the created terminal will show in the listing:
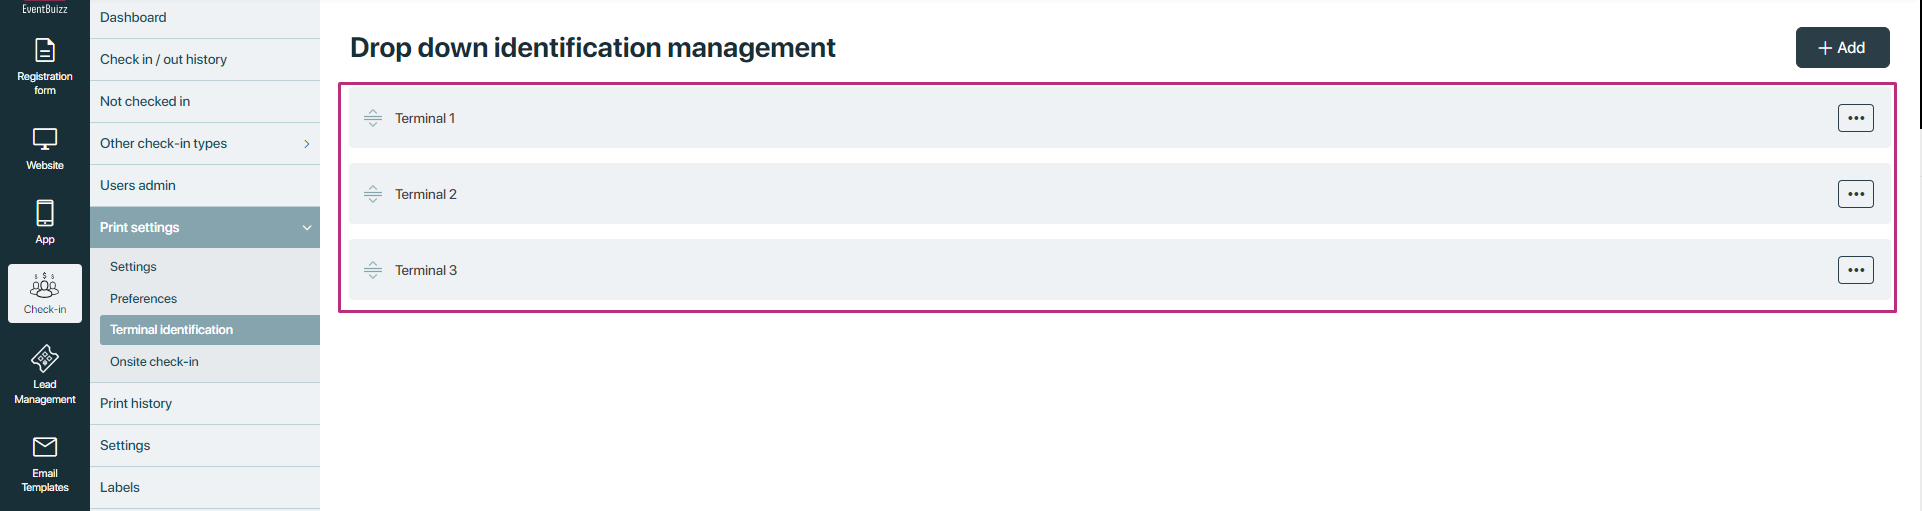
On each created terminal list, organiser have also the access to menu ![]() , and following are the available option at menu:
, and following are the available option at menu:
- Edit: By clicking on edit, organiser can edit the terminal identification name.
- Delete: Allow organiser to delete the terminal permanently from the terminal identification listing.
Onsite check-in
Onsite setup:
- On the event day, attendees who have not registered online arrive at the event location.
- Organisers set up dedicated registration stations equipped with computers or tablets already configured with event management system.
Registration process:
- Attendees approach the registration station and provide their details to the onsite registration staff.
- The staff enters attendee information into the event management system manually or via a streamlined interface designed for onsite registrations.

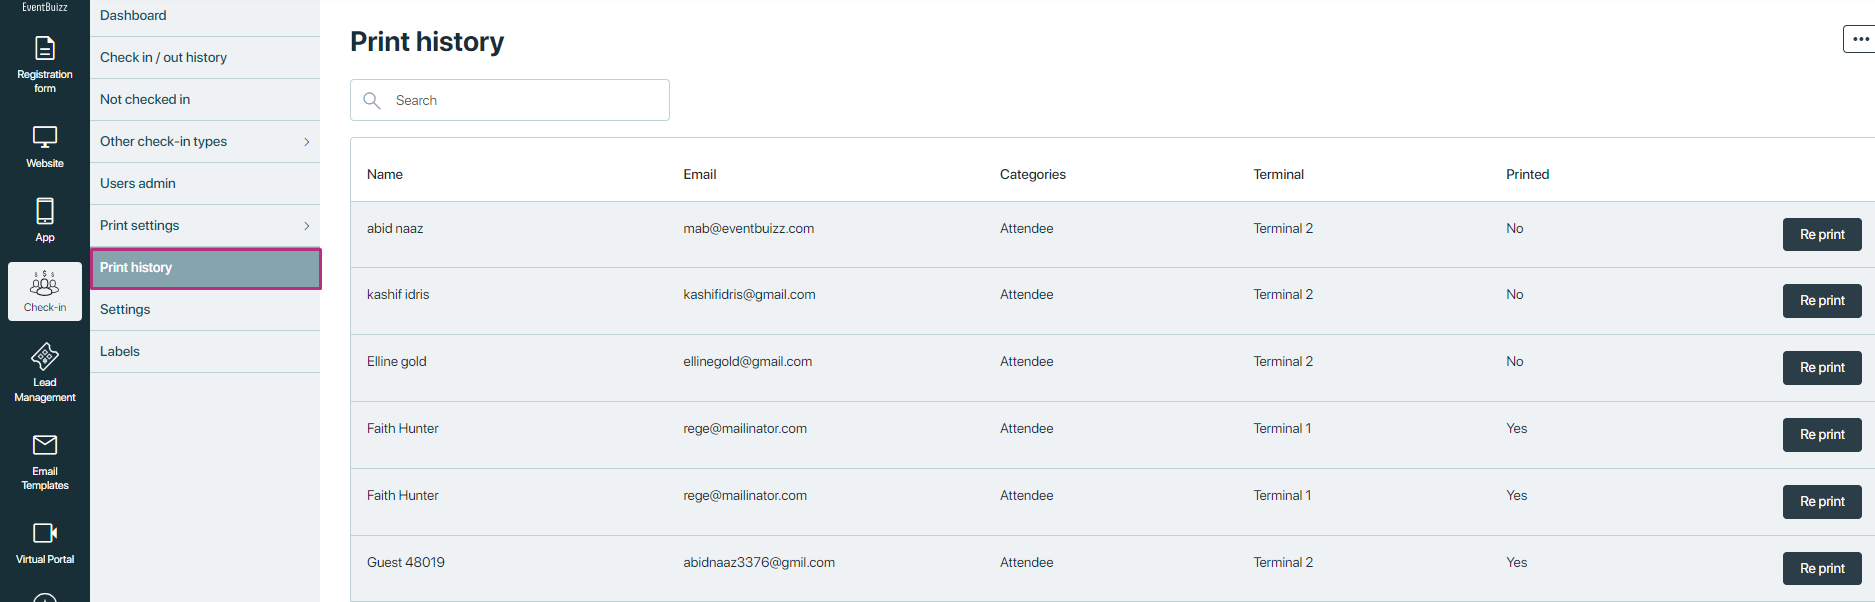
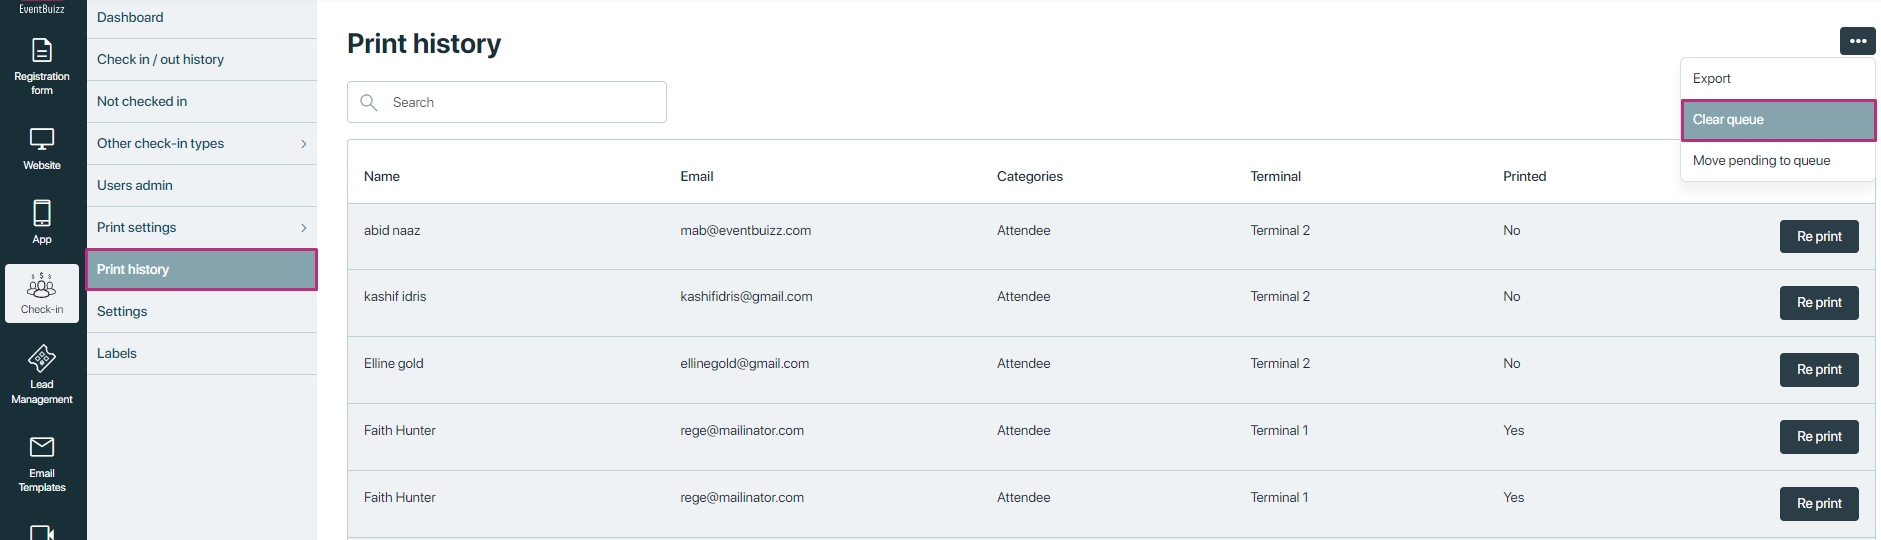
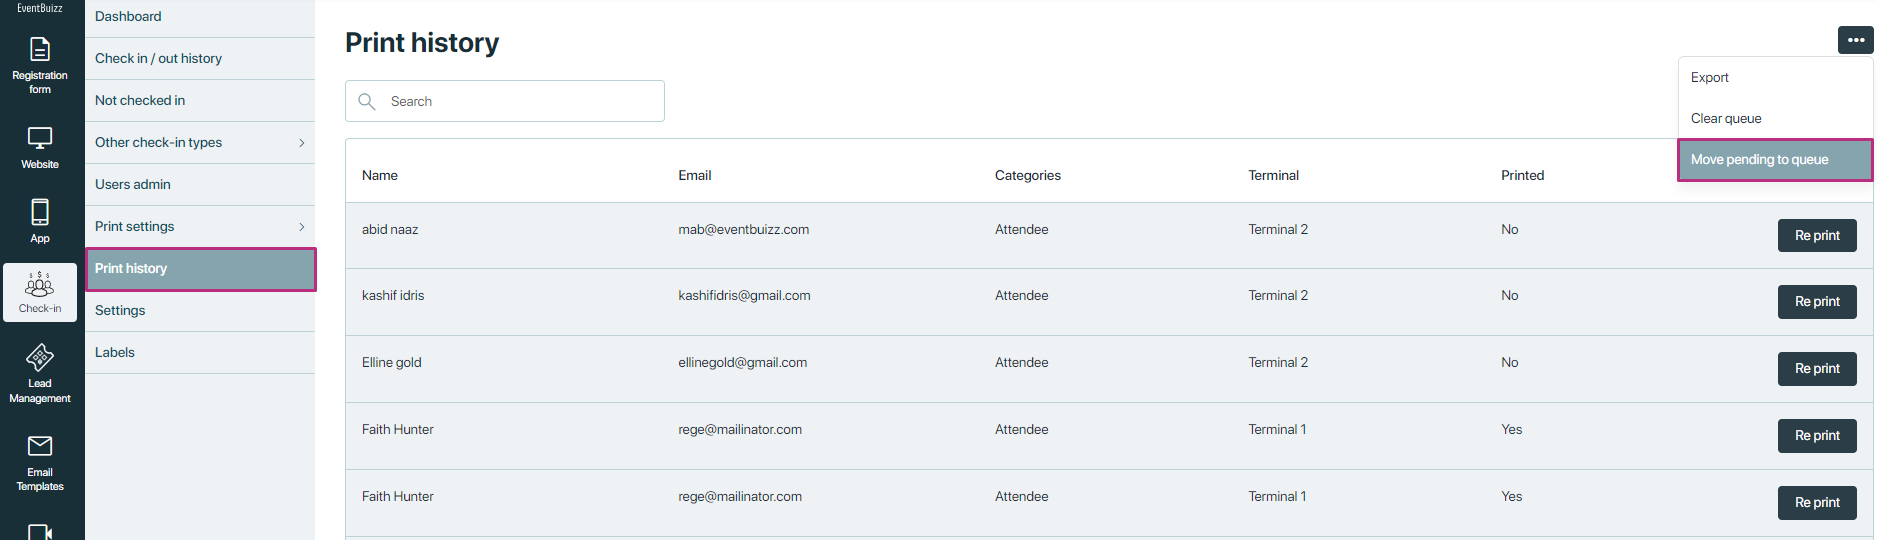
Print history
Print history
The “print history” section maintains a record of all attendees who have checked in at the event and badges are printed, and also creates a log of the attendee who have check-in through any selected terminals:
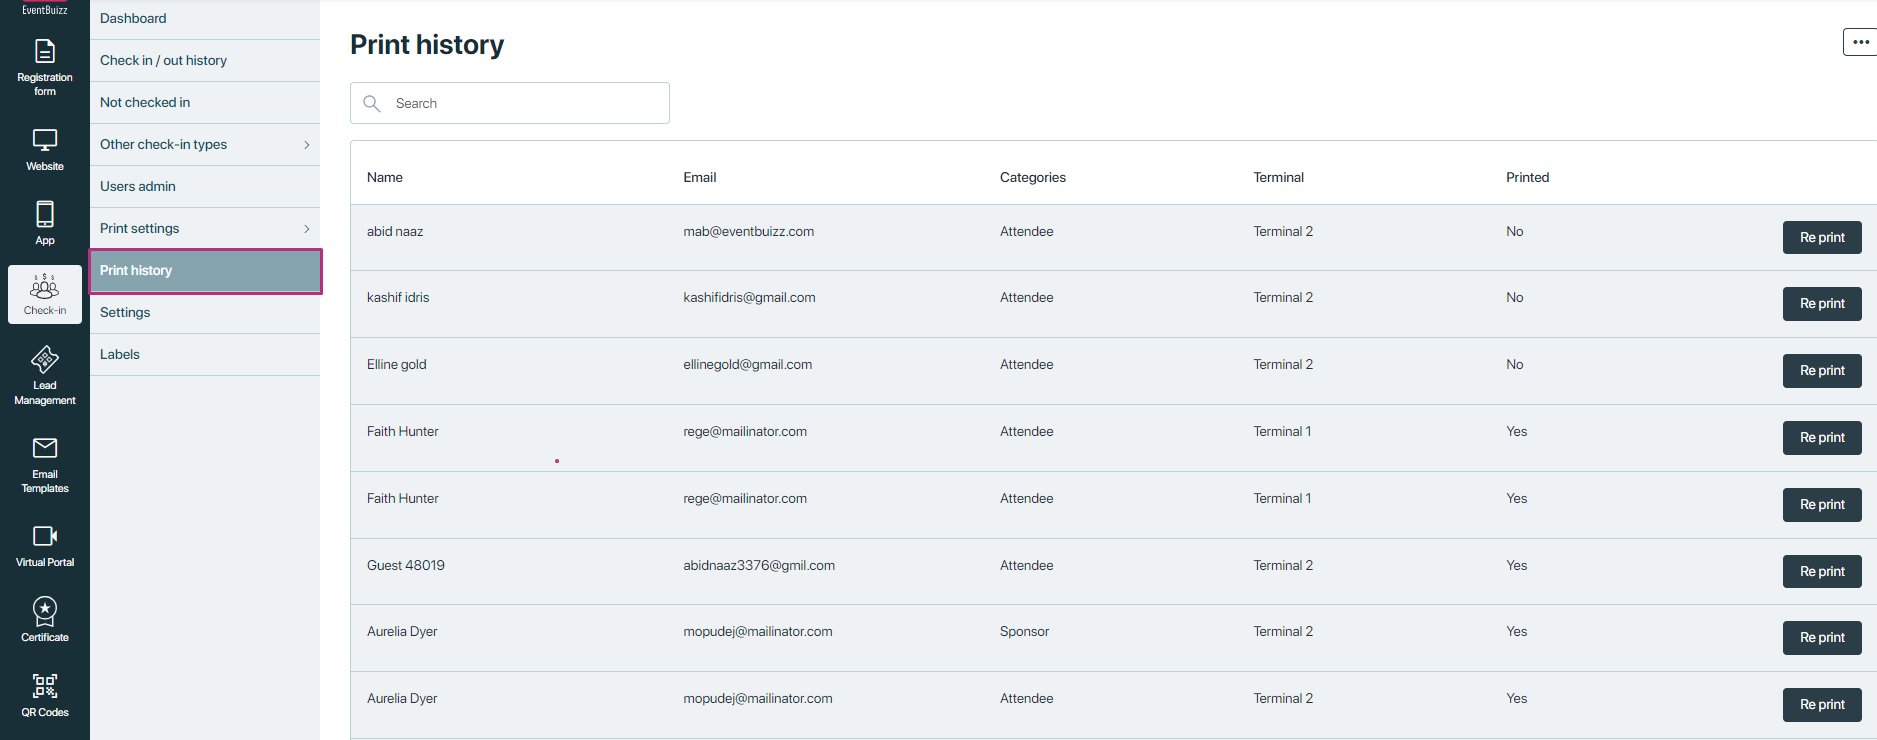
Fields in each log entry
Name:Displays the name of the attendee who checked in.
Email:Shows the email address associated with the attendee
Categories (Attendee type):Indicates the role or category assigned to the attendee (e.g., attendee, speaker, sponsor).
Terminal:Specifies the terminal or check-in station through which the attendee checked in.
Printed (badge printed?):
- Indicates whether a badge has been successfully printed for the attendee.
- Displays “Yes” if a badge has been printed; otherwise, it shows “No”.
Reprint (Button):
- Provides a functional button that allows authorised users to reprint a badge for the attendee.
- Clicking this button triggers the system to initiate the badge printing process again for the selected attendee.
Menu options in print history
In “print history” we have menu![]() options, each menu detail is given below:
options, each menu detail is given below:
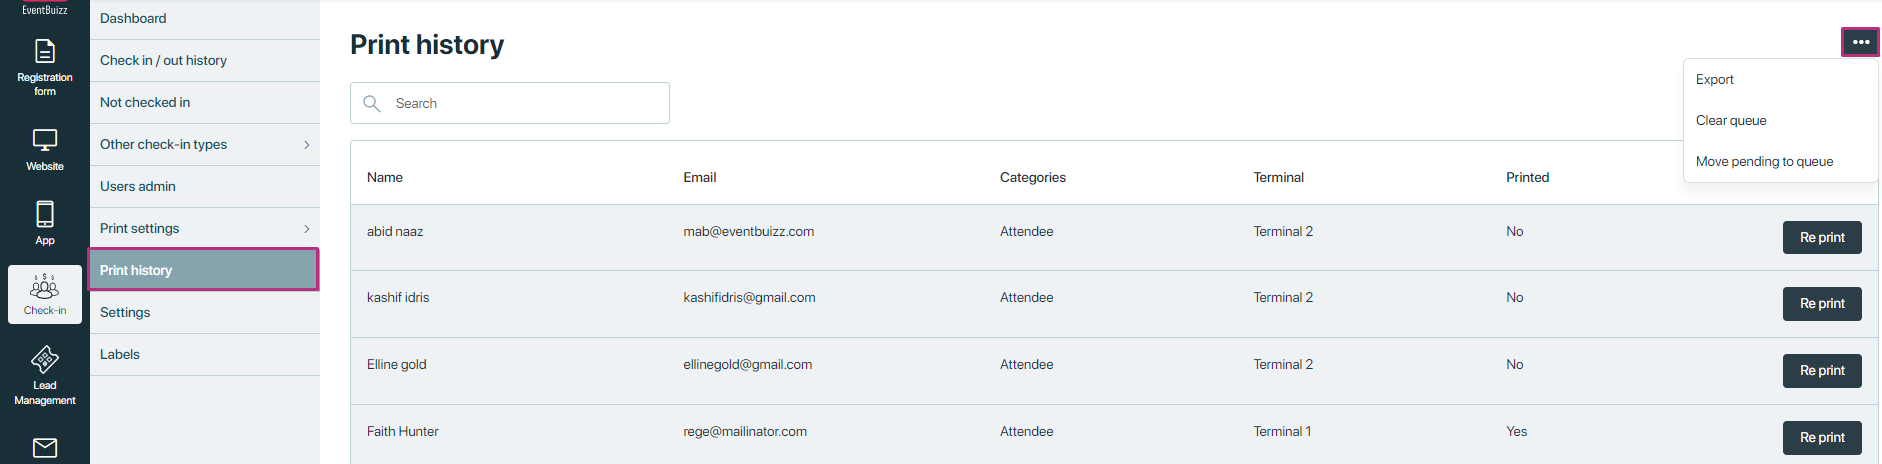
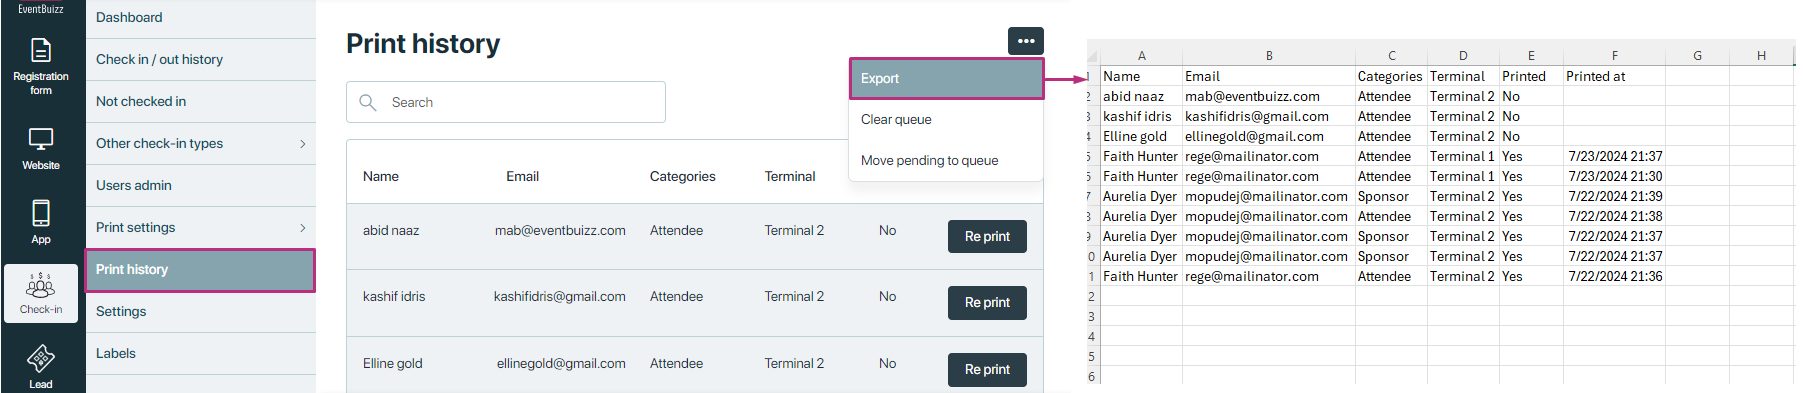
Export
- Functionality: Allows the organizer to export a CSV file containing logs of all attendees whose check-in and badge printing processes have been completed.
- Purpose: Provides a detailed record of attendees who have successfully checked in and received their printed badges.
- Format: Typically exports data in CSV (Comma-Separated Values) format for easy analysis and reporting.
Clear queue
- Functionality: Clears the current queue of attendees waiting to have their badges printed.
- Usage: Useful before starting or resetting the badge printing process to ensure only current attendees are in the queue.
- Confirmation: Often requires confirmation to prevent accidental queue clearing.
Move pending to queue
- Functionality: Moves all attendees whose badge printing process is pending into the current printing queue.
- Purpose: Ensures that all attendees awaiting badge printing are included in the current workflow.
- Execution: Typically executed when organising or preparing for badge printing sessions.
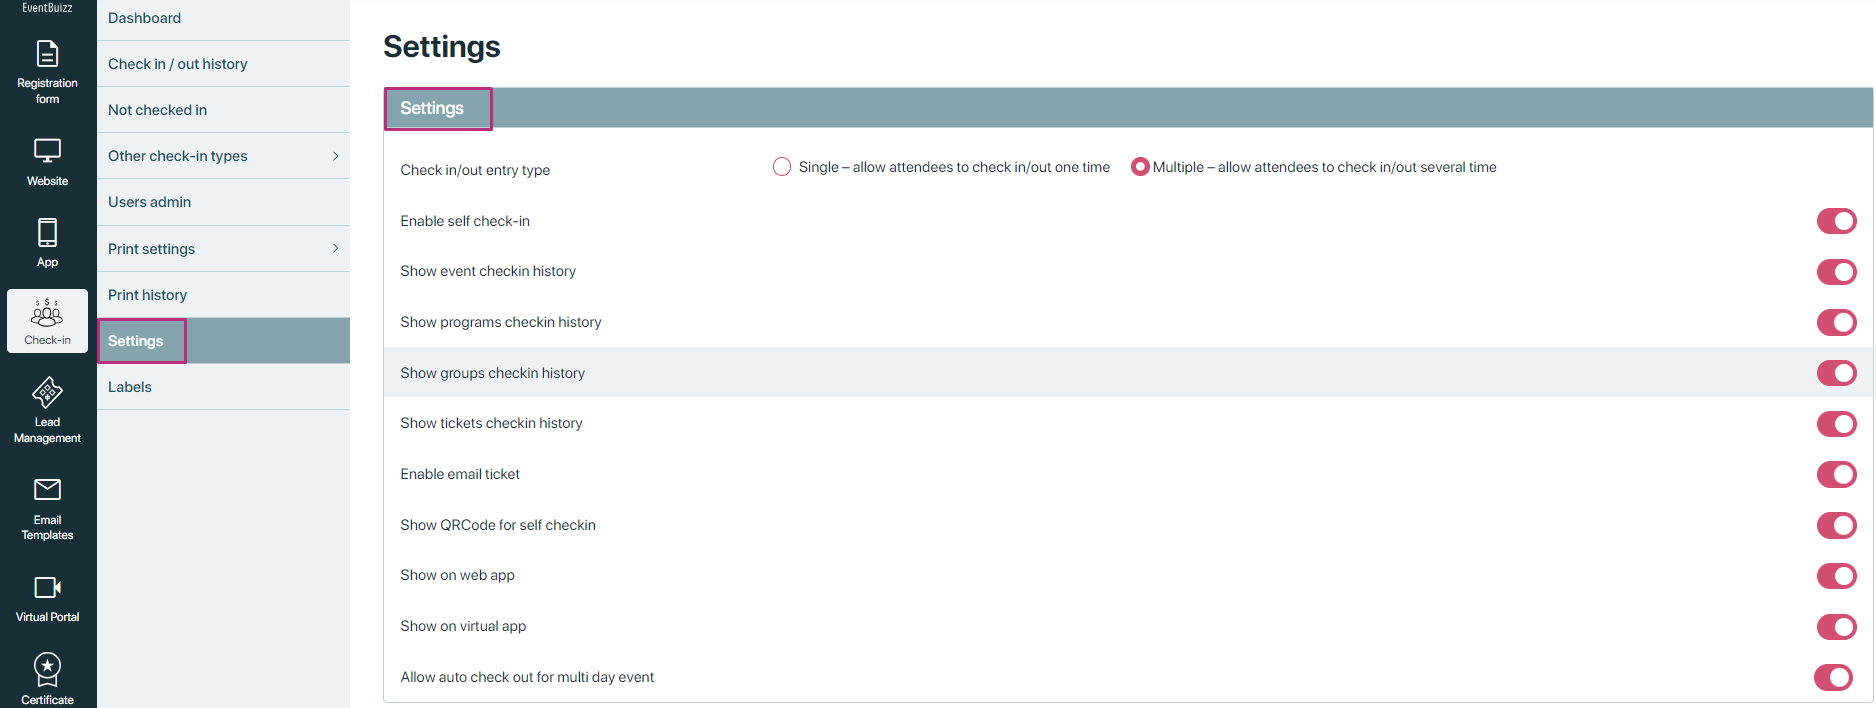
Settings
Settings
The settings module allows organisers to customise and control the behaviour of the check-in process and related functionalities. It serves as a central hub for configuring preferences, managing permissions, and optimising the check-in experience for both user admins and attendees. Here’s a detailed breakdown of the settings section within the check-in module of Eventbuizz, divided into its four subsections:
Settings(web app settings)
This subsection focuses on configuring and managing settings specific to the web-based application used for organising and managing events.
Here is the detail view of usage of all settings given below:
Check in/out entry type
The “Check in/out entry type” setting allows organisers to define how attendees can check in and out during events. This setting offers two primary options:
- Single: Allows attendees to check in and out only once.
- Multiple: Allows attendees to check in and out multiple times.

When the “Single” entry type is selected, organisers can further specify how attendees can check in:
-
Per day: Attendees can check in and out once per day. This option restricts attendees to checking in once per calendar day.
-
Per event: Attendees can check in and out once per event. This option restricts attendees to checking in once for the entire duration of the event, regardless of how many days it spans.

Enable self check-in
The “Enable self check-in” setting allows attendees to self check in the event, by “enabling” this setting a check-in button will start appearing below QR-Code, by clicking on this button attendee can self check-in or check-out.
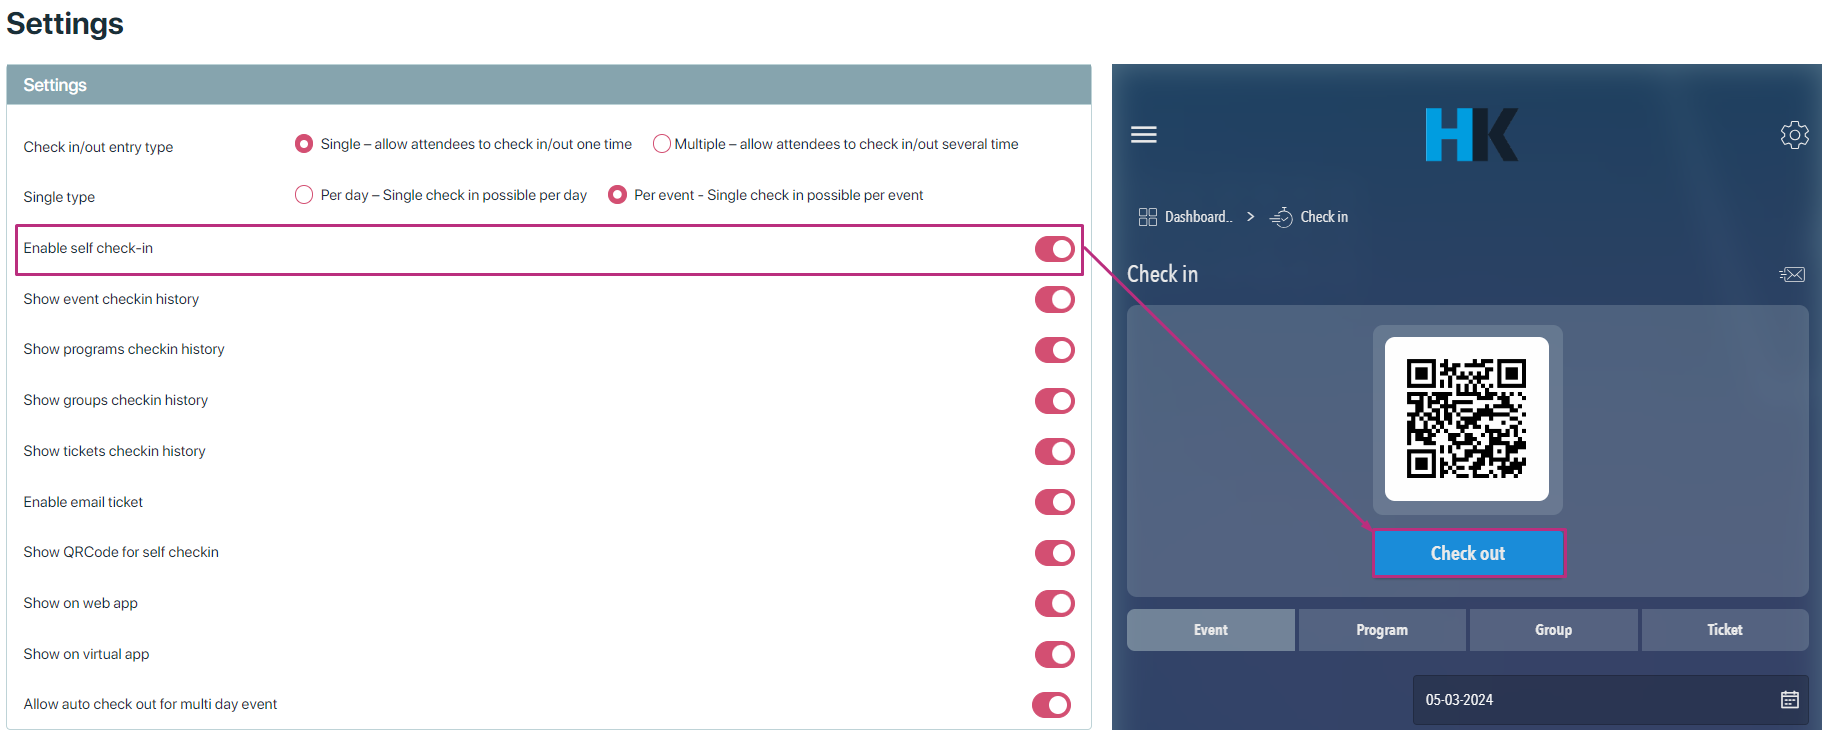
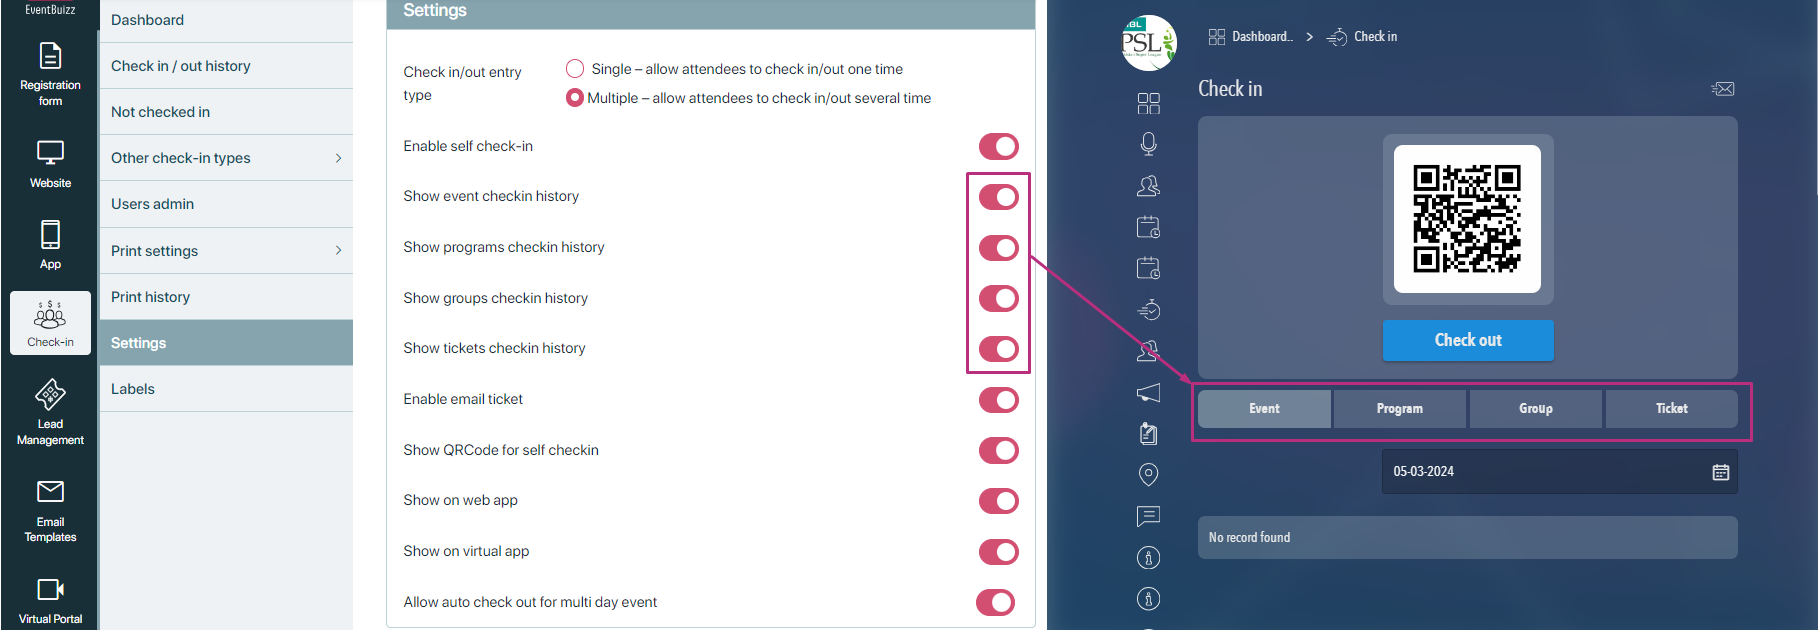
In the eventbuizz web app, below the QR code scanner, there are four distinct tabs, each displaying a specific history of check-ins:
Show event check-in history
Displays a chronological record of the logged-in user’s check-ins to various time in event. This history provides insights that how much time user check-in against event.
Show programs check-in history
Shows a detailed log of the logged-in user’s check-ins to specific programs or sessions within event. Organisers can track the user’s attendance for each program or session separately.
Show groups check-in history
Lists the check-in records of the logged-in user for different groups or categories within events. This tab helps organisers monitor the user’s participation in various group activities.
Show tickets check-in history
Provides a comprehensive view of the logged-in user’s check-ins using various ticket types or categories. This history assists in managing the user’s ticket validations and tracking attendance based on ticket types.
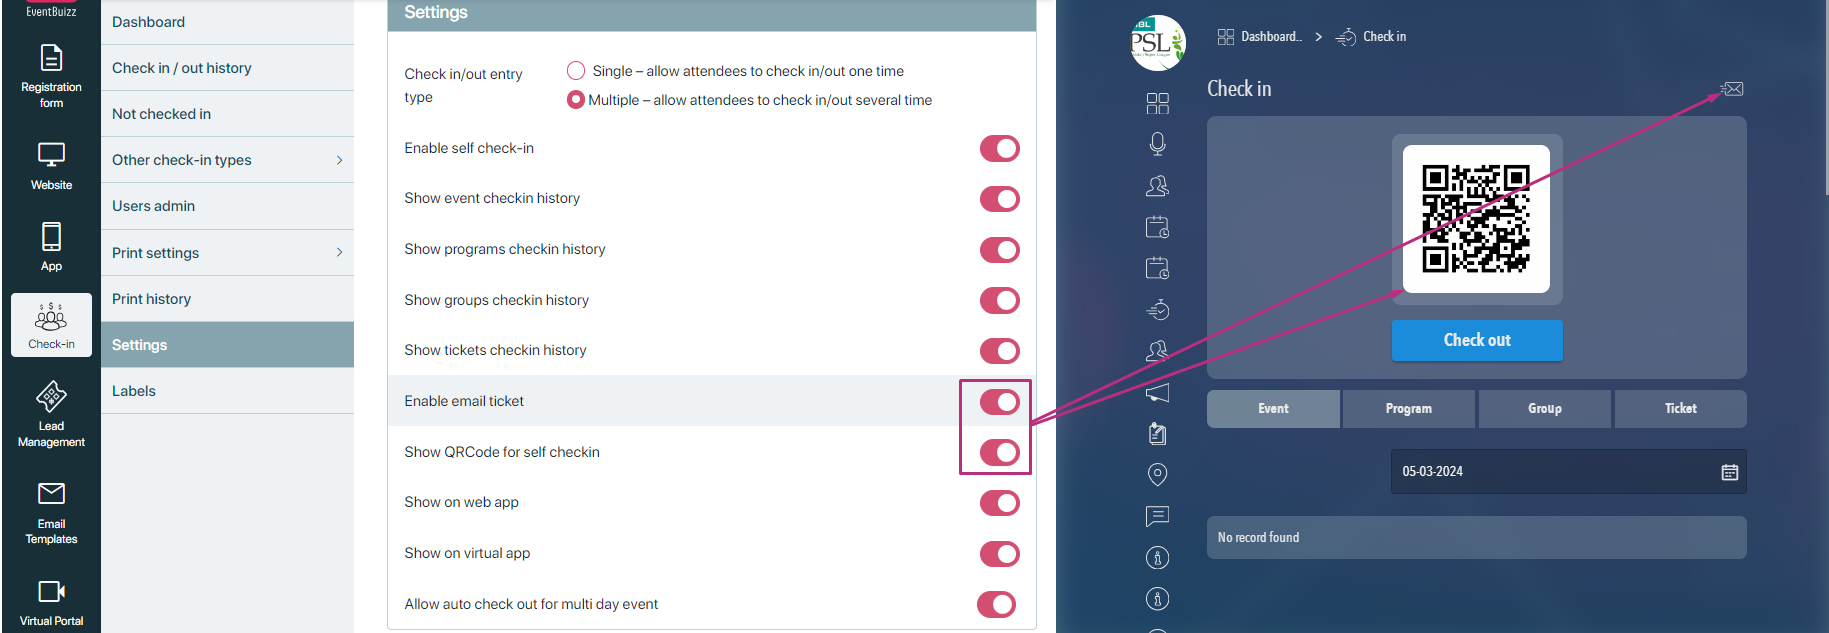
Enable email ticket
The “Enable email ticket” setting adds functionality to the check-in module interface by displaying an email icon. When user click on this icon, it allows them to send a check-in/out history record via email to the logged-in attendee.
Show QR code for self check-in
Enables the display of a QR code that user can scan for self-check-in purposes.
Show on web app
This setting controls the visibility of the check-in module within the side listing of the web app interface.
Show on virtual app
This setting determines the visibility of the check-in module within the virtual app interface.It ensures that attendees using the virtual app can access and utilise the check-in functionalities seamlessly.
Allow auto check out for multi day event
This setting automates the check-out process for attendees participating in multi-day events.It streamlines the attendee experience by automatically checking them out at the end of each event day.

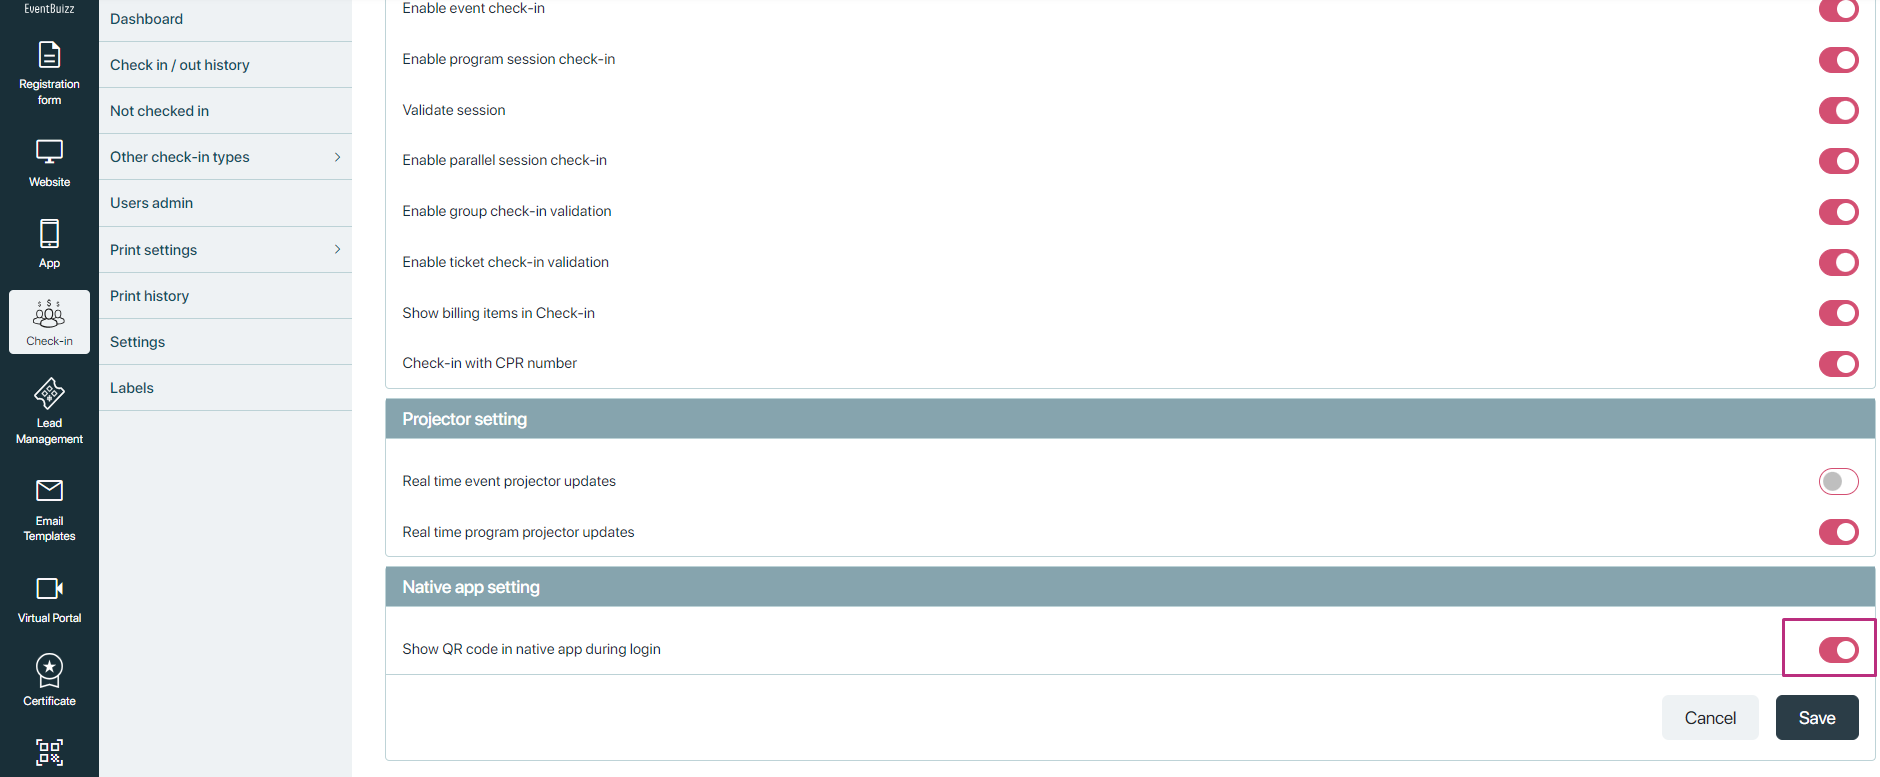
Check-in app setting
The “Check-in app settings” subsection centralises configurations related to user admin permissions for managing attendee check-ins during events. These settings dictate which permissions are visible and accessible to user admins based on organisational preferences. Here’s a breakdown of each setting and its impact:
Enable event check-in
Enables user admins to check attendees into the overall event, when enabled, organiser can view and utilise the permission for event check-in within their user admin profile.
Enable program session check-in
Allows organiser to assign permission to user admins to check attendees into specific programs or sessions within the event.
Validate session
Validates if the user attempting to check in is assigned to that specific program or session.when activated, the system checks if the user admin is authorised to check attendees into the selected program or session.
Enable group check-in validation
Organiser enables user admins to validate group attendance by checking in groups of attendees together,when activated, user admins can utilise the permission for group check-in validations.
Enable ticket check-in validation
Allows user admins to validate attendee check-ins based on ticket types or categories
When all above mentioned settings are off, then no permission is showing in user admin to assign them.
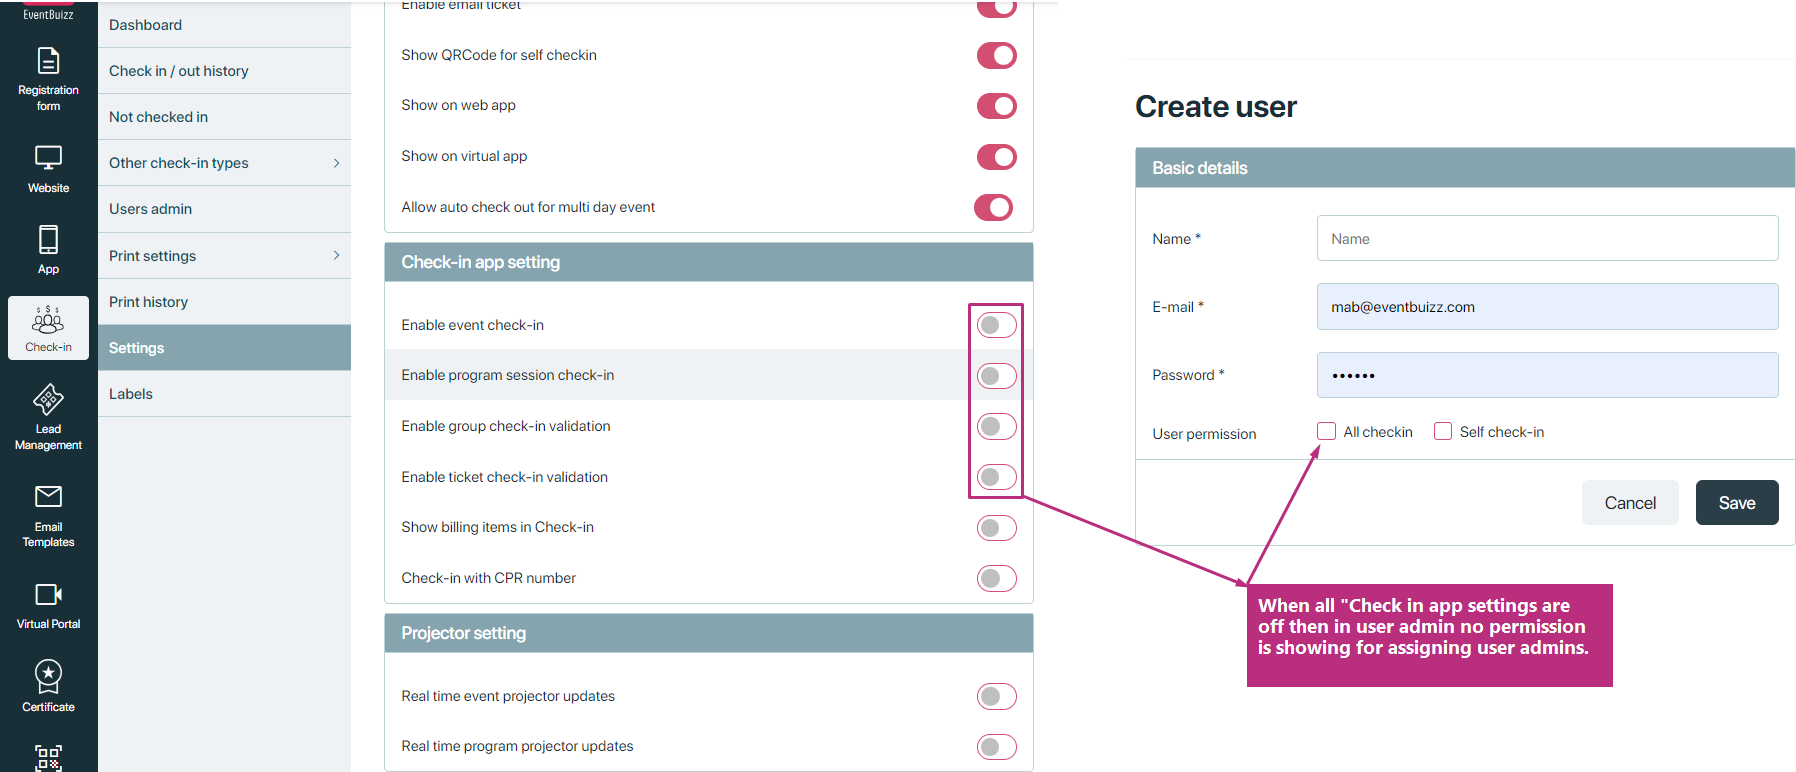
When all above mentioned settings are on, then organiser can use all the permissions and assign them to user admins.
Show billing items in check-in
Displays purchased billing items within the check-in module interface.when active, the “View Order” button appears in the check-in module, allowing user admins to review all purchased billing items associated with attendees.
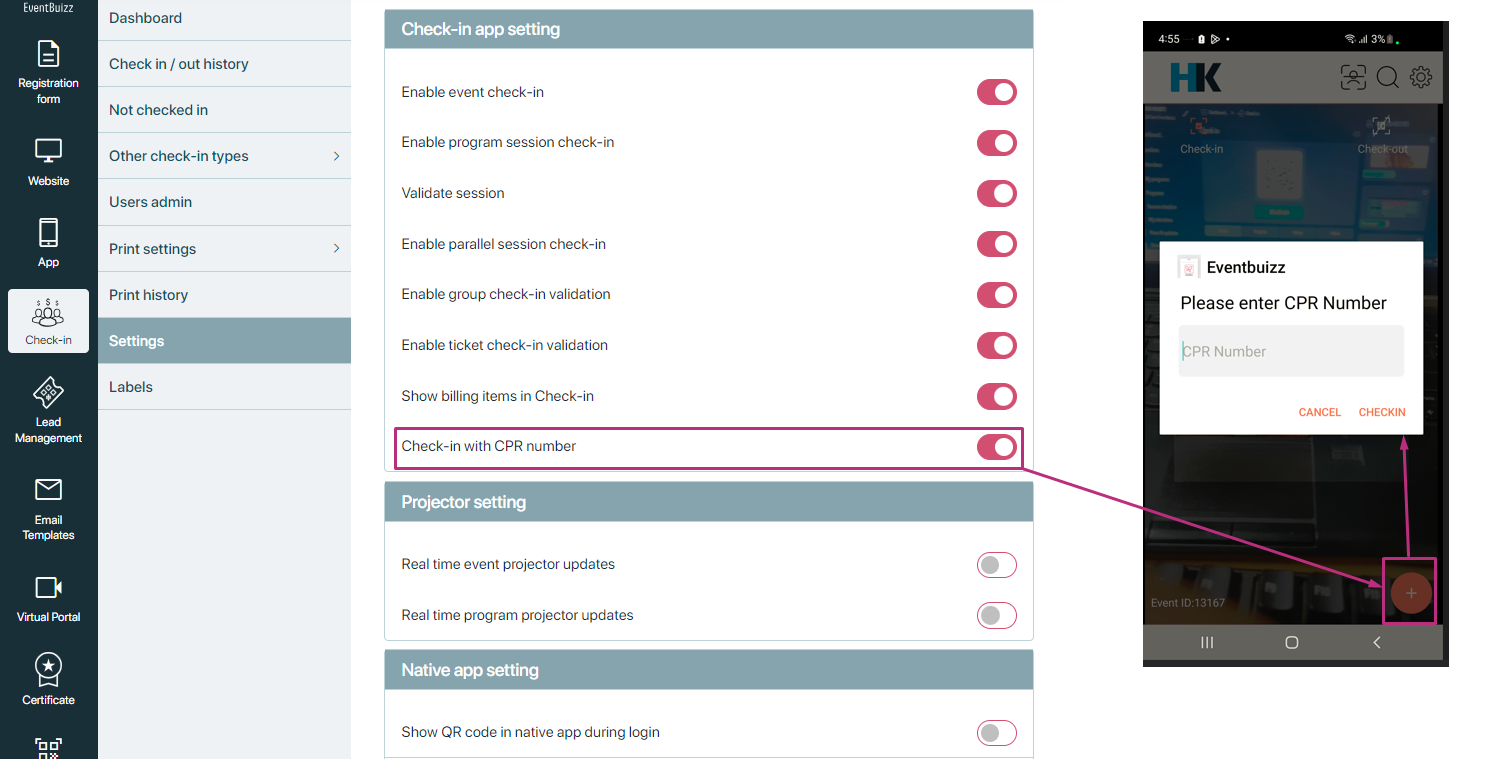
Check-in with CPR number
Allows user admins to check in attendees by entering their CPR number,when the CPR number icon is visible and enabled, user admins can input attendees’ CPR numbers to facilitate quick and direct check-ins
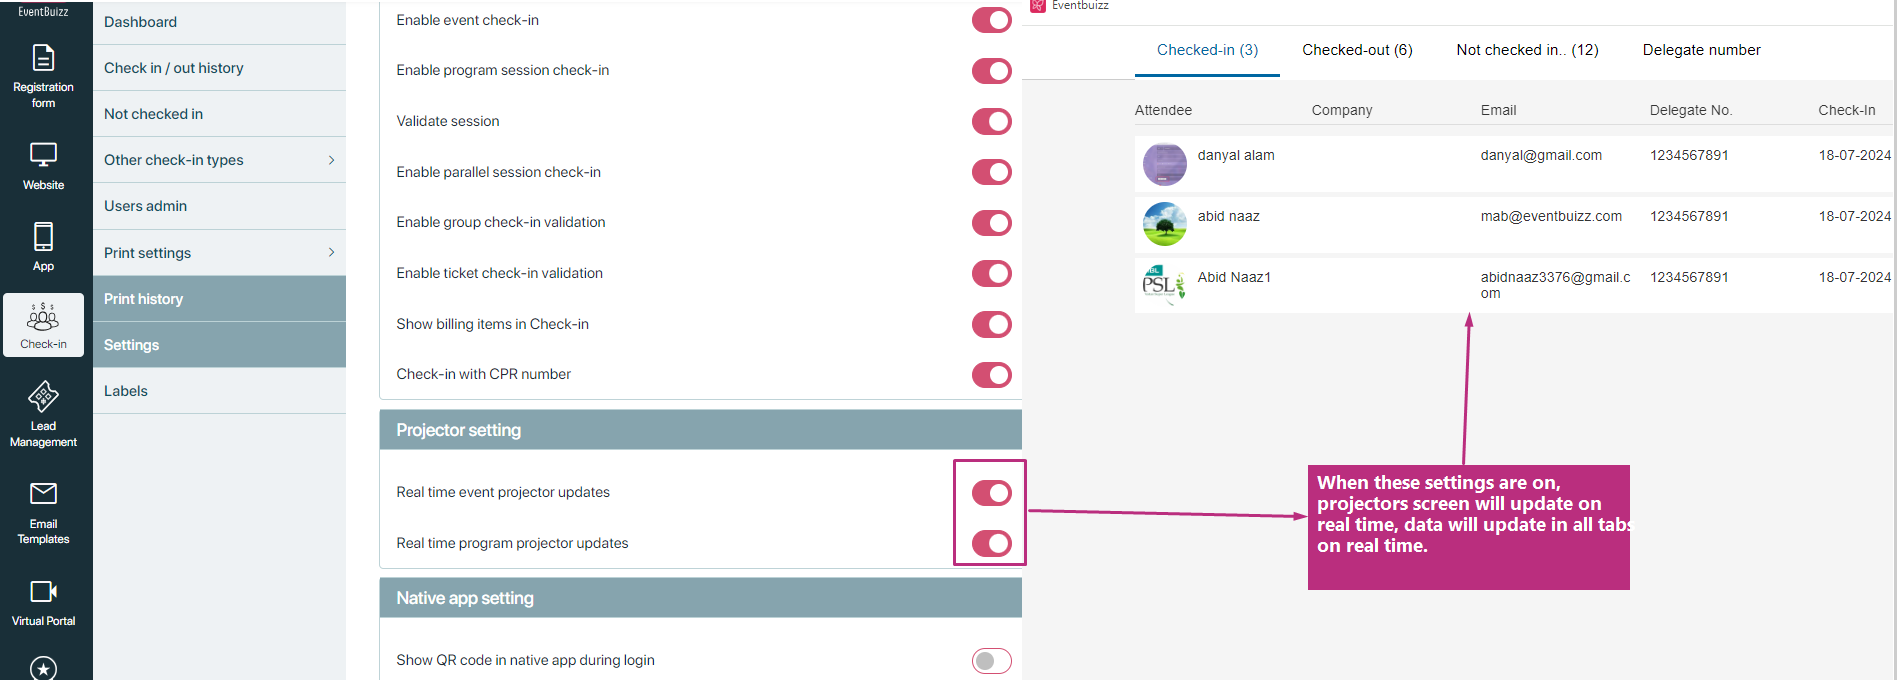
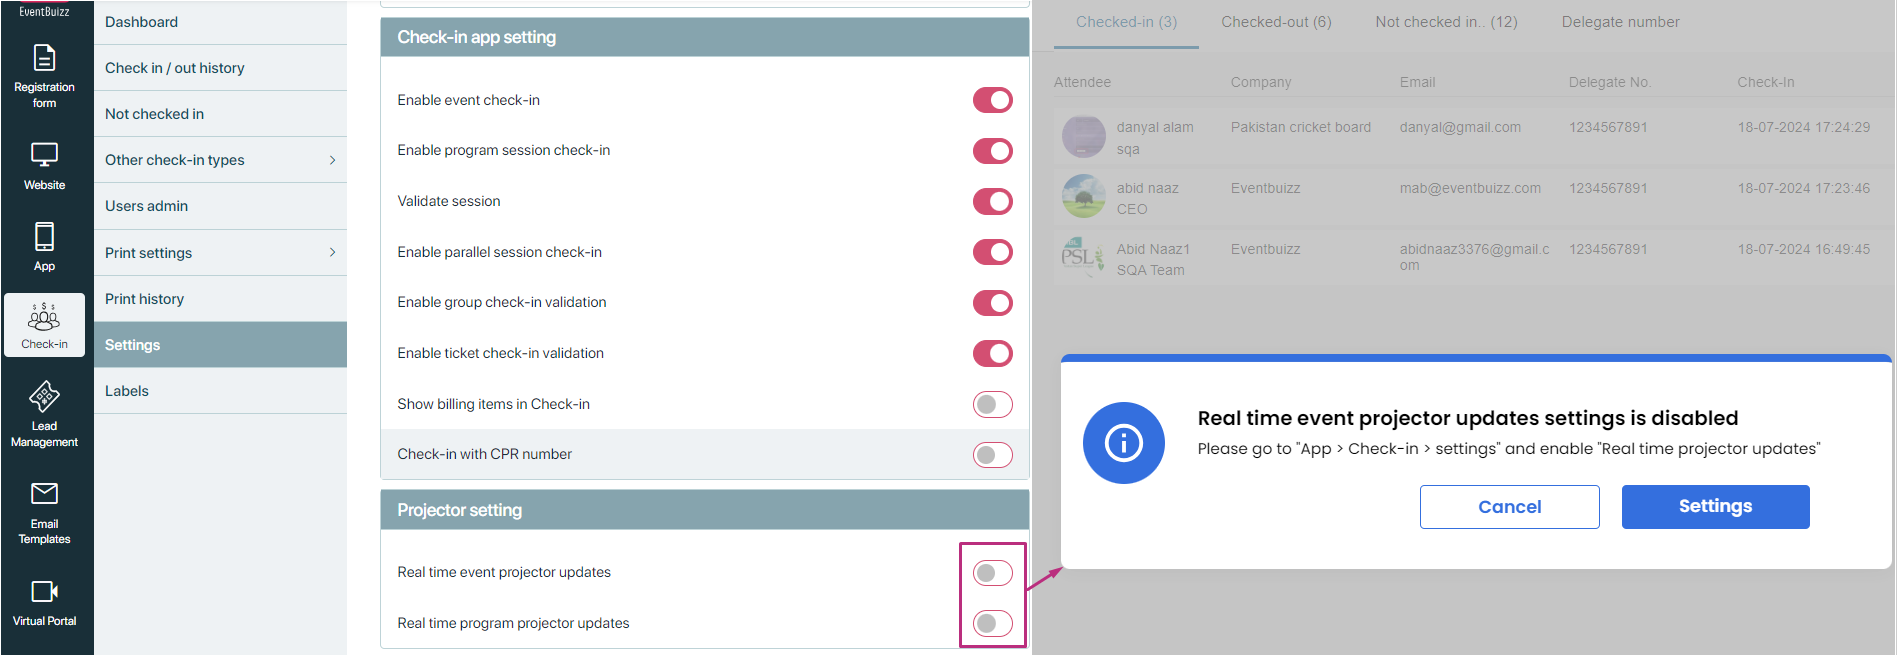
Projector setting
The “Projector settings” subsection configurations for managing how check-in data is displayed on projectors during events. These settings optimise the user experience by ensuring that displayed information is always up-to-date without requiring manual refreshes. Here are the key settings and their impacts:
Real-time event projector updates
- Purpose: Manages real-time updates for projectors displaying overall event check-in data.
- Functionality: When activated, projectors continuously update in real-time to show the latest check-in information for the entire event.
How to navigate on real time event projector updates
Here is the given path, by following this path organiser can navigate on projector screen
Check-in -> check-in/out history-> Tools-> projector
Here is the example of the navigation, by default real time settings are off, but organiser can on them at any stage.
Real-time program projector updates
- Purpose: Controls real-time updates for projectors displaying program-specific check-in data.
- Functionality: When enabled, projectors automatically update in real-time to reflect the latest check-in statuses for individual programs or sessions.
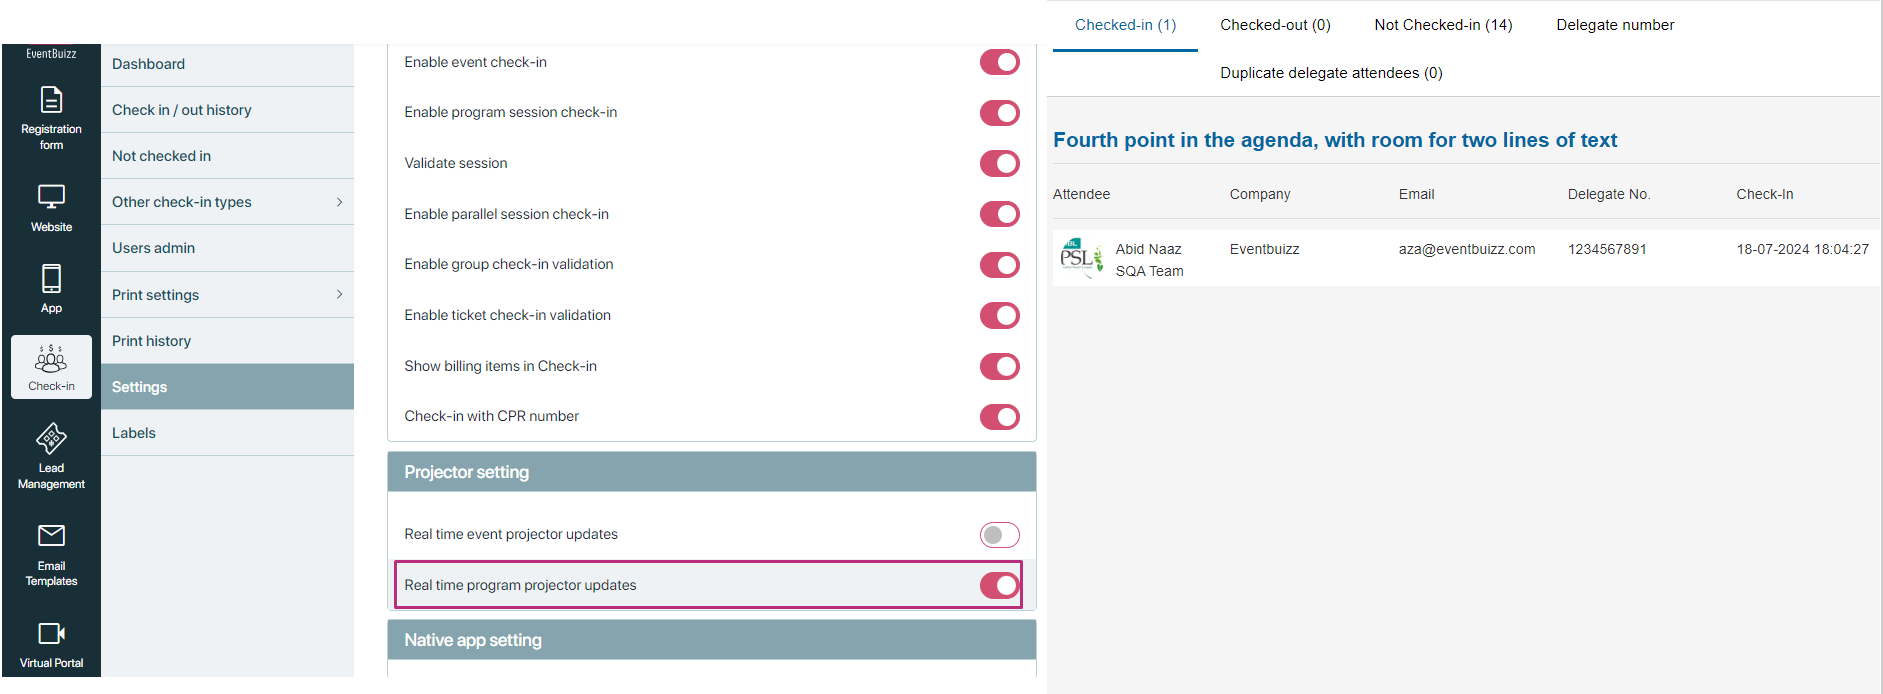
How to navigate on real-time program projector updates
Here is the given path, by following this path organiser can navigate on projector screen
Check-in -> other check-in types->program->select any program-> select menu-> select projector
Here is the example of the navigation, by default real time settings are off, but organiser can on them at any stage.
And if “projector setting” are off and then navigate on projector screens, it will show you alert message “Real time event projector updates settings is disabled”. And by clicking on settings button it will navigate organiser to projector settings section.
Native app Setting
The “Native app settings” subsection allows organisers to configure settings specifically for the native mobile application used by attendees or user admins during events. These settings enhance user experience and streamline the check-in process. Here’s an in-depth look at the relevant setting:
Show QR code in native app during login
This setting enables the display of a QR code within the native mobile app during the login process, The QR code allows users (attendees or user admins) to scan it using the native app for quick and secure check in and access to event features.
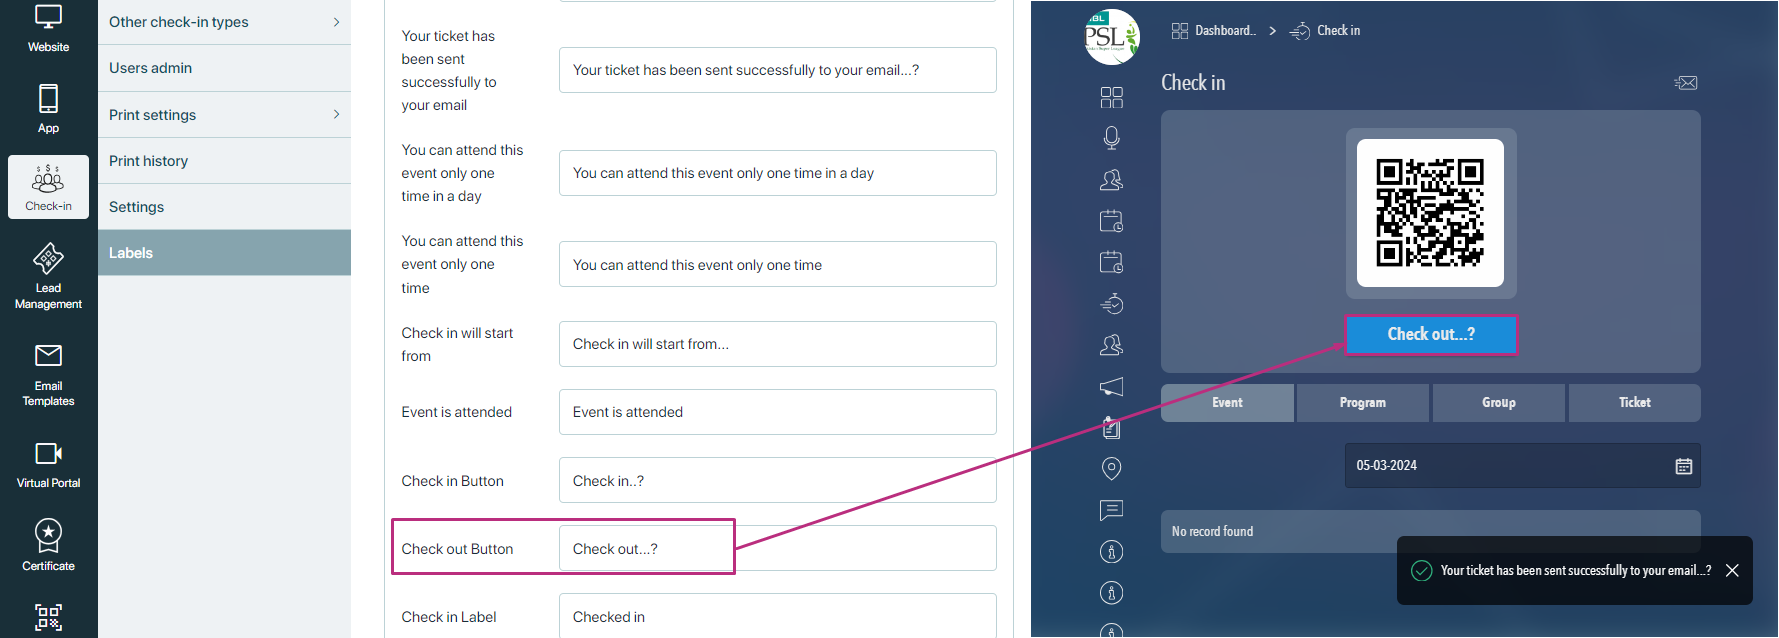
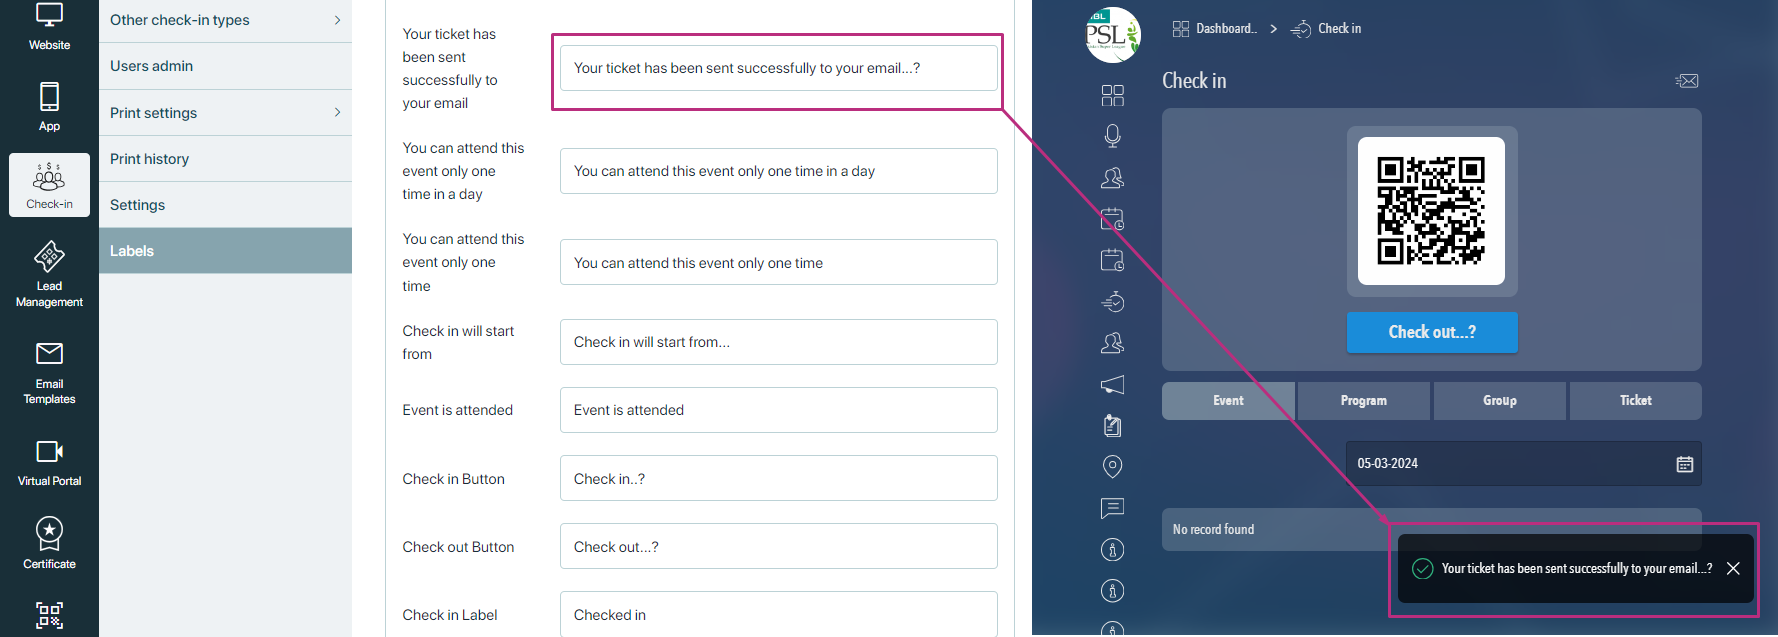
Labels
Labels
The label section within check-in module allows organisers to customise text labels, buttons, notifications (toasts), and other interface elements that users interact with in both the web app and the check-in app. This customisation ensures that the platform can be tailored to specific event requirements, languages, branding guidelines, and user preferences without requiring extensive development changes.
Flow and functionality
Accessibility and configuration:
- Organisers access the label section within the Eventcenter, through the following path
- Eventcenter->check-in->labels
- Here, they can view a list of interface elements categorised by type, such as buttons, headers, tool tips, error messages, etc.
Customisation process:
- Organisers can select each label or element they wish to customise.
- They input the desired text or content into a text field provided in the label section.
Implementation across platforms:
- Once labels are customised and saved in the eventcenter, the changes take effect immediately across both the web app and the check-in app.
- This ensures consistency in user experience and messaging regardless of whether attendees are interacting via a desktop browser or a mobile device.