Learn how to customize your registration site, activate or deactivate settings, upload banners and edit labels. We have following sections in customize website.
generalsettings
General Settings
To access the registration site settings, go to Website, then navigate to General settings and all settings will be on that page.
Registration code and event corporate
Enabling the “Event Corporate” setting restricts unauthorized users from accessing the event site or registration portal. To gain access to the site, individuals must enter a registration code provided by the event organizer.
The organizer has the flexibility to assign any code of their choice, and they can use the “Click here to generate registration code” feature to obtain a randomly generated code from the system. This ensures a secure and controlled access mechanism, allowing only those with valid registration codes to participate in the event or access registration-related features.

Search engine visibility
This setting controls your event site indexing in search engines. If this setting is OFF, we will not allow search engines to index your event site.

Show tickets left and show time left
Activating these settings, “Show tickets left” and “Show time left” will display ticket availability and event end time on eventstite. If only single form is active, it ensures that the ticket availability and event end time are shown on the event site. Yet, in scenarios where multiple forms are present, these settings are not applicable and will not display such information.
Here we can add these settings only work in “Register Now” block.
This approach maintains clarity and relevance for attendees interacting with the registration site.
Note: The left ticket count will only represent the tickets available in the order and it will not include tickets assigned to attendees or also assigned to imported attendees.

Show footer and add to calendar:
Enabling this setting on the event site and registration portal activates the “Add to Calendar” link and footer display functionality and when your attendee has registered for the event, they will see the registration successful page and will also receive a confirmation email. When users click on the “Add to Calendar” link, a file will be downloaded. Opening this file will prompt it to be added to the default mailbox calendar of the user.
This feature enhances user convenience by facilitating the easy incorporation of event details into their personal calendars, promoting better organization and attendance management.

On the registration successful page, they can choose to add the event to their own personal calendar, for example an outlook calendar.

If the attendee clicks the Add to Calendar button it looks like this:
In the calendar the event name, dates, time, location, and a description are added.

Change the description test to the calendar here:
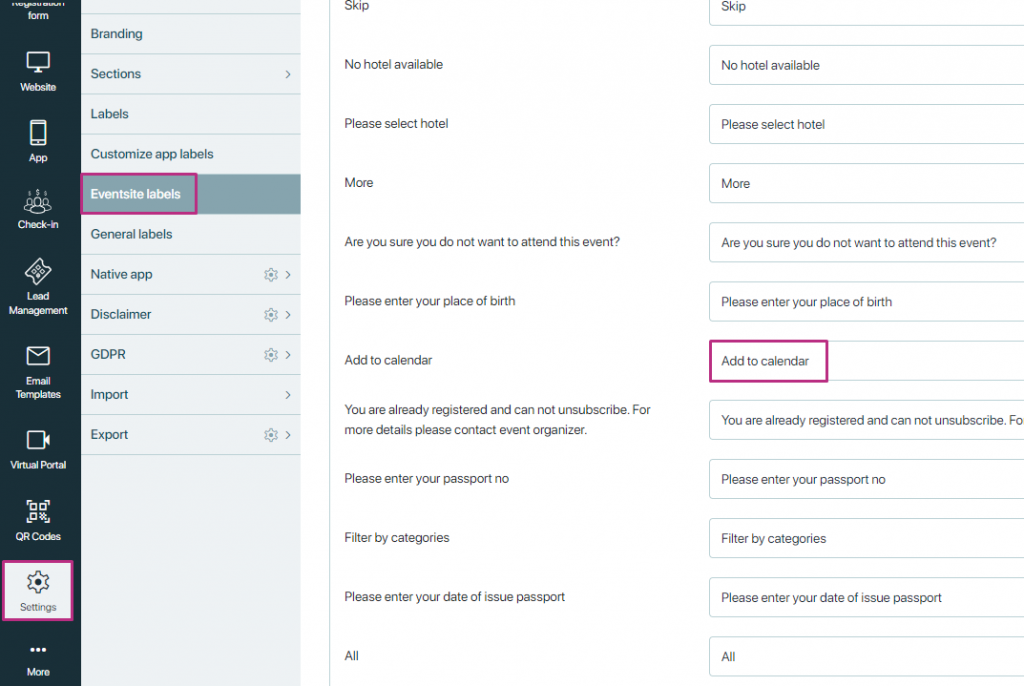
Reg. Site -> Customize event site labels -> Customize event site labels -> Login -> Calendar Description -> here you can change or delete the description.

Collapse program workshops
When enabled, these setting “collapses program workshop” within the program schedule, typically for the purpose of streamlining the display of information.
With “Collapse Program Workshops” Enabled: When this setting is turned on, the workshop sessions are collapsed or grouped together under a single heading, such as “Workshops” or “Breakout Sessions.” Users would then see only the heading or a summarized view of the workshops, making the schedule appear more concise and manageable.
Expanded View: Users can typically expand or click on the collapsed section to reveal the individual workshop sessions. This allows them to access detailed information about each workshop, such as the topic, time, location, and speaker details.

Enable program search filter
Enabling the “Program Search Filter” setting introduces a search functionality within the program allowing users to efficiently locate specific programs or sessions based on their preferences or criteria.
We have made a change in the display of the program when you click ‘Program’ in the top menu. Before, clicking on program, worked like an anchor, taking you to the program section on the front page of the registration site.
Now, it will take you to a new page – just like the other top menus do.

You will see all program on its own page.

You can also add a filter menu, so it will be easier to navigate in your program. You can search for specific program sessions, days or tracks. Days and tracks search fields will only be activated if your event takes place over more than one day and if you have created tracks.

You activate the search field here:

If you want to edit the search fields, you do it here:

Enable breadcrumbs
By activating “Enable breadcrumbs” setting, it provides users with context and orientation, helping them understand where they are in relation to the overall site architecture.
For example, if a user navigates from the homepage to a Sponsors page, then finally to any sponsor detail page, the breadcrumbs might appear as follows:
Home page > Sponsors > Overview of sponsor
This trail of links allows users to easily backtrack to previous pages or navigate directly to higher-level pages within the website’s structure.

My account tabs
Enabling all settings under the “My Account Tabs” ensures that upon login, users will see tabs relevant to their profile information.
For example, the presence of a billing history linked to placed orders triggers the display of the “Billing History” tab. Similarly, if a registration cancellation has been initiated, the “Cancel Registration” tab will appear.
This setup optimizes user experience by presenting personalized tabs that directly correspond to their account activity, facilitating efficient navigation and access to pertinent information.

Top menu
Top menu
Go to the left-hand navigation and select “Websites” followed by “General Settings”.
Once there, access the “Display on registration site” setting. Activate the option labelled “Show top menu,” and the top bar will be visible on the event site.

Once you’ve enabled the “Top menu” option in General settings, navigate to the website customization section by going to Website > Customize Website. Within the top menu settings, toggle the options to show or hide modules on the registration site top bar.

home
Home
Sections
Learn how to customize your registration site, activate, or deactivate settings, show register now button, description, about event description etc.
Start by choosing your event. Navigate to the left-hand menu, click on Website, then go to Customize website -> Home -> Top menu -> Sections. Any setting that is enabled here will result in a corresponding section being displayed on the event site, while those that are not enabled will not be shown.
The main page of the eventsite is divided in different sections and these sections can be rearrange or turned off from the Event enter. Simply click the arrows on the left side of the individual sections and drag them up or down to change the order in which they appear.

Register Now:
If the “Register Now” button setting is enabled, the corresponding section will be displayed on the event site, featuring the “Register” button.

Banners
By going to website -> customize website -> home -> banners -> Add banners.

Choose Top site banner from the list – the type of Banner can also be inserted, but this is more of a page breaker.

NOTE: You can have several top site banners running in a loop on your registration site. Just make sure that all banners have the same height.
Listing
All the banners are listed in this section, by clicking on the icon ![]() you can edit, delete or activate/ de-activate banners.
you can edit, delete or activate/ de-activate banners.

Settings
When you have uploaded your banner images, you need to check your settings.

If the banner image is not showing on your registration site, then check if the Reg. site banner is activated in Sections.

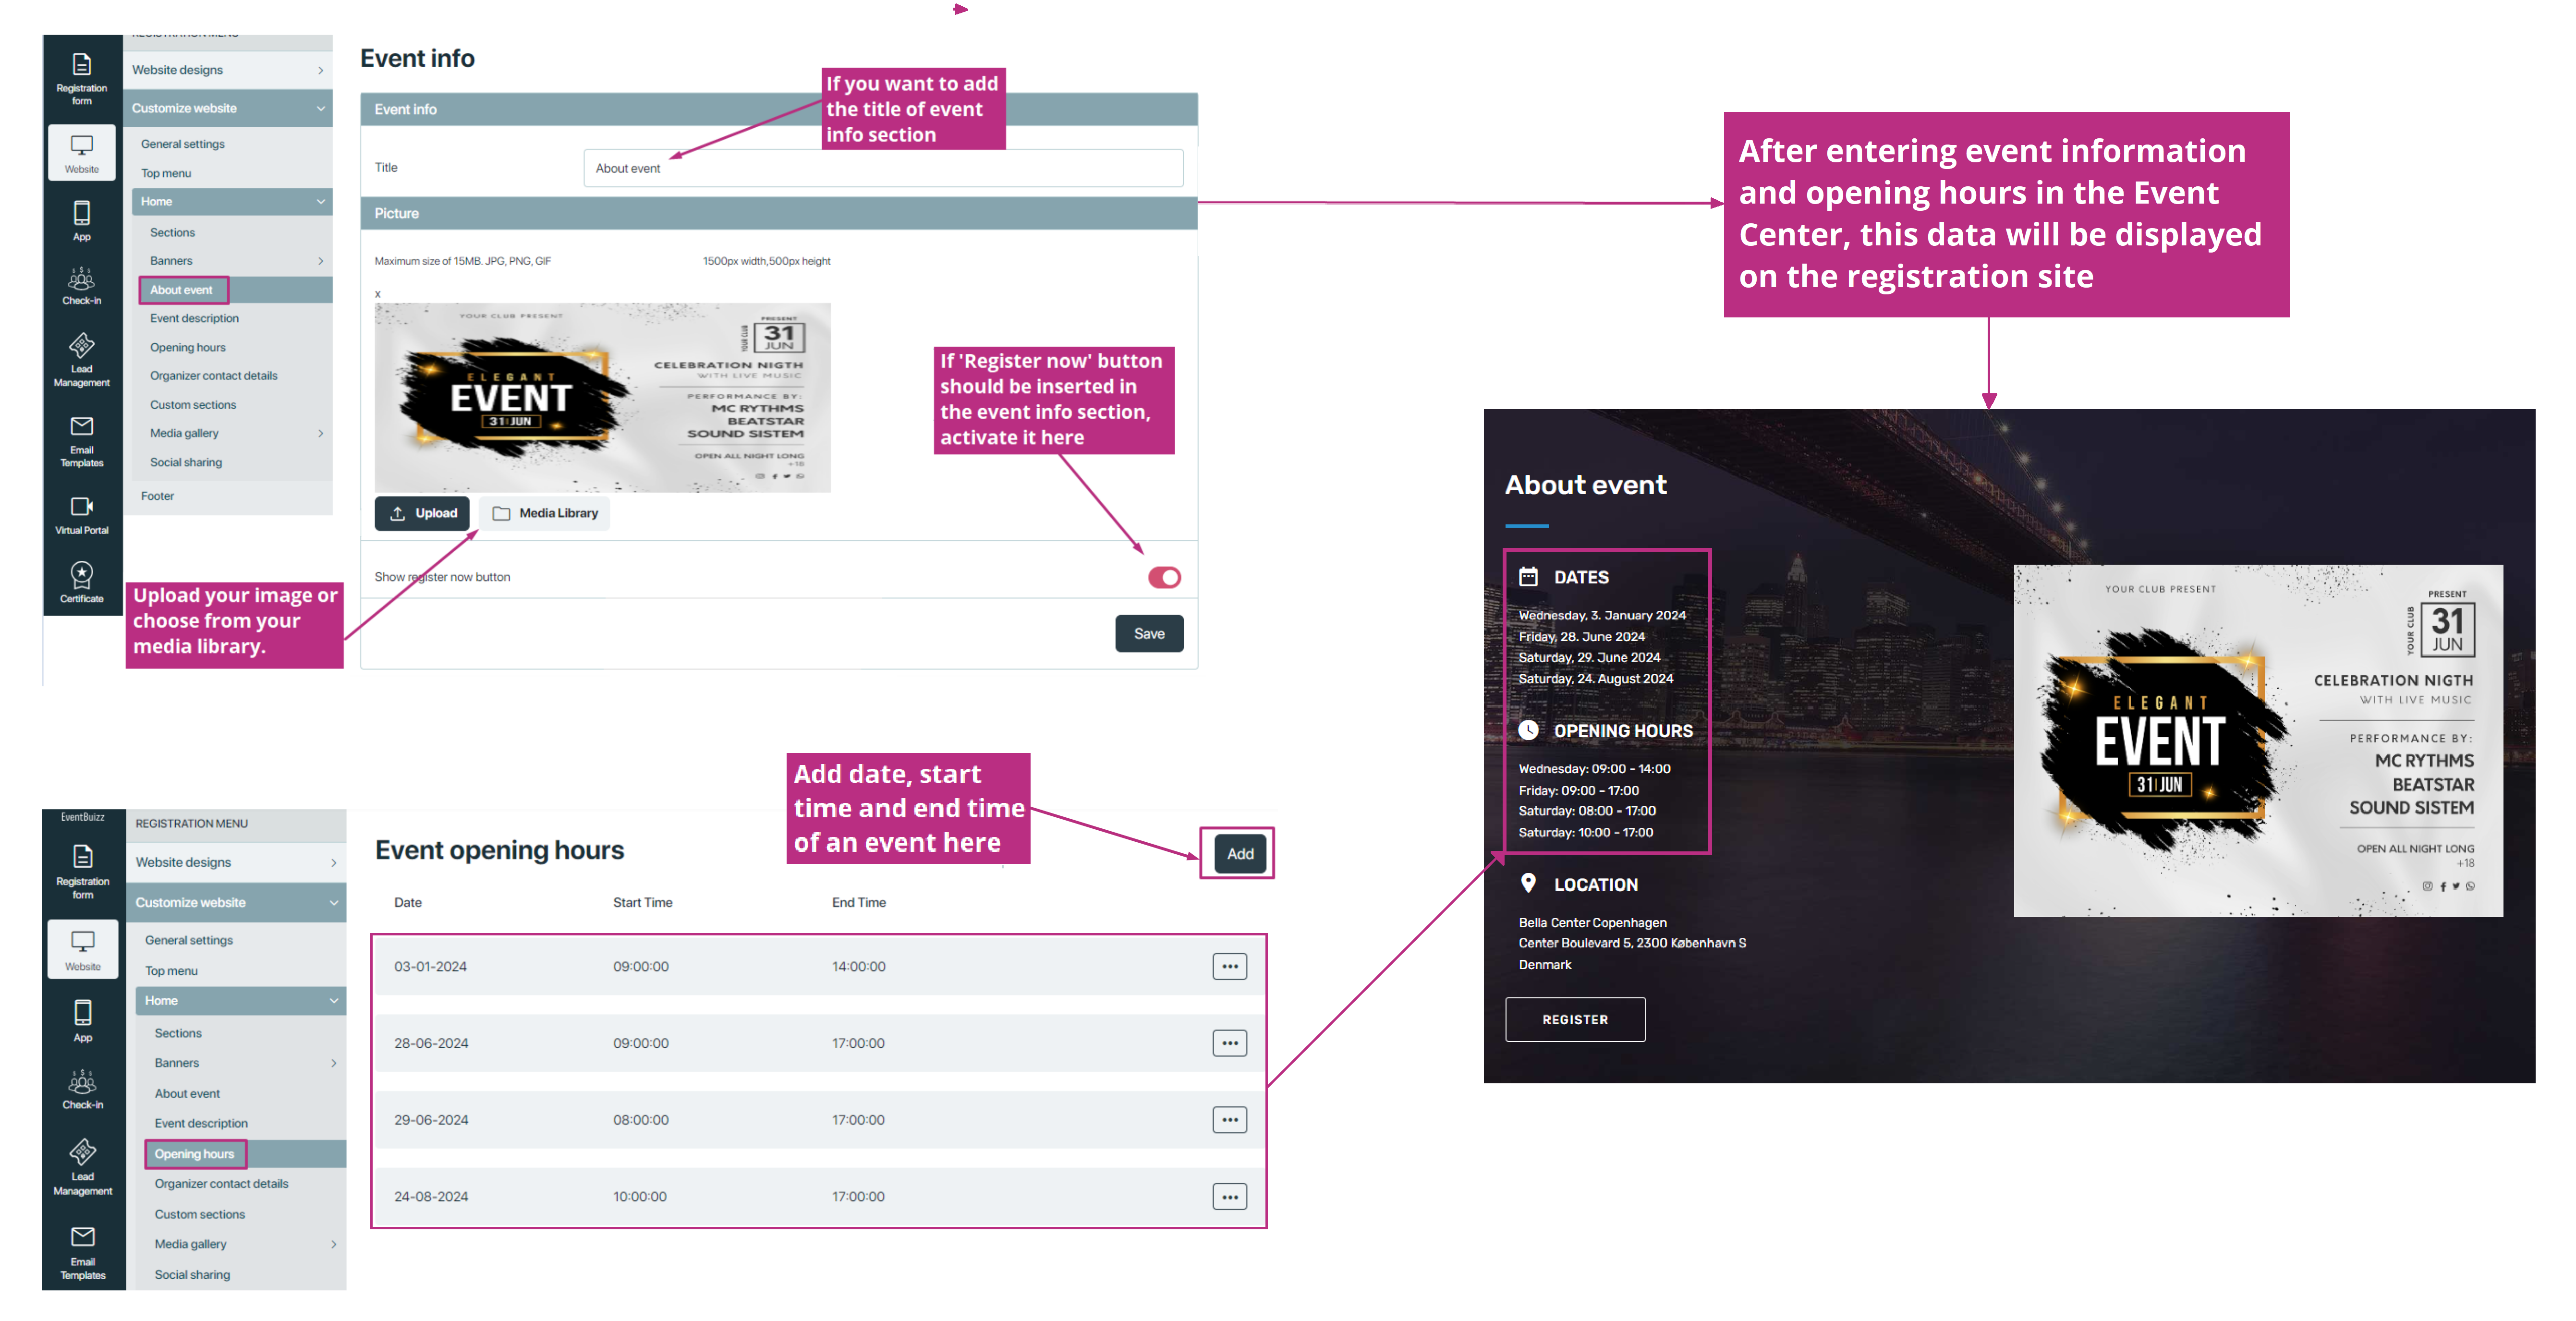
About Event and Opening Hours
“About Event and Opening Hours” feature refers to the capability to input and manage information related to the event itself and its operational hours. This includes details such as the event title, description, date, time, location, and any other relevant information regarding the event. Additionally, the feature allows organizers to specify the opening hours during which the event will be accessible to attendees.

Event Description
The Event Description section serves as a space where organizers can provide detailed information about the event. Event description that is displayed on the registration site. The description field can also include YouTube videos as iframes. Be aware that iframes and images you upload in any description field, will not automatically be resized. So, test on several devices and adjust accordingly.

Organizer contact details
By going to website -> customize website -> home -> organizer contact details -> Add contact persons.
Multiple contact persons can be added, and they will all be listed in this section. To edit or delete a contact person, simply click on the icon ![]() associated with each individual entry.
associated with each individual entry.

Contact persons details show in footer on registration site.

Countdown section
In Eventbuizz, countdown variations refer to the different ways you can display a countdown timer leading up to an event. This feature allows organizers to customize how the countdown appears on the eventsite , providing flexibility in how the event is promoted and creating a sense of urgency for attendees.
Access countdown section
To access the countdown section, Go to website > customize website > home > sections > enable countdown setting.
When countdown setting is ON, It will only show on eventsite.

Countdowns can be styled differently based on the event theme, and you can choose where and how prominently the countdown is displayed. This customization helps align the visual appeal of the countdown with the overall branding of the event, ensuring a consistent and engaging user experience. Click here to see countdown variations.
This setup allows the user to create a customized countdown with a clear title, relevant description, and a defined end date, along with a message that will appear once the countdown expires.
Here’s what each field in the section appears to represent:
Title: This is where you would enter the title for the countdown. The title might be displayed alongside the countdown timer, helping users understand what the countdown is for (e.g., “Event Starts In,” “Sale Ends In”).]

Description: This field is for adding additional information or context about the countdown. It might explain the significance of the countdown or provide details about what will happen when the countdown reaches zero.

Expiry Date: This is where you set the specific date and time when the countdown will end. The countdown timer will count down to this date.
Expiry Message: Organizer can add the message he would like to display on the eventsite when timer stops. It could inform users that the event has started, the sale has ended, or any other relevant status update. Organizer can upload files and other type of documents, links also.
Toggle: The option “Show below text after timer ends. (if OFF, text will always appear)” controls when certain text is displayed based on a timer setting. When the setting is ON, the text will only appear after a countdown timer finishes, allowing a delay before the text becomes visible. This can be useful for timed messages or information meant to show up after a specific period. If the setting is OFF, the text will be displayed immediately without any delay, as soon as the page or section loads. This feature provides flexibility by allowing the text to either appear instantly or after a timed interval, depending on user preference or the needs of the application.

Note: When no expiry date is given, countdown will not appear on eventsite.
Labels
“Labels” are typically used as customizable tags or markers to help categorize, organize, and manage various elements related to hotel booking and guest information.
Accessing labels
Organizer can follow this path to access labels in setting module:
- Eventcenter > select event > settings > eventsite labels > general information label.

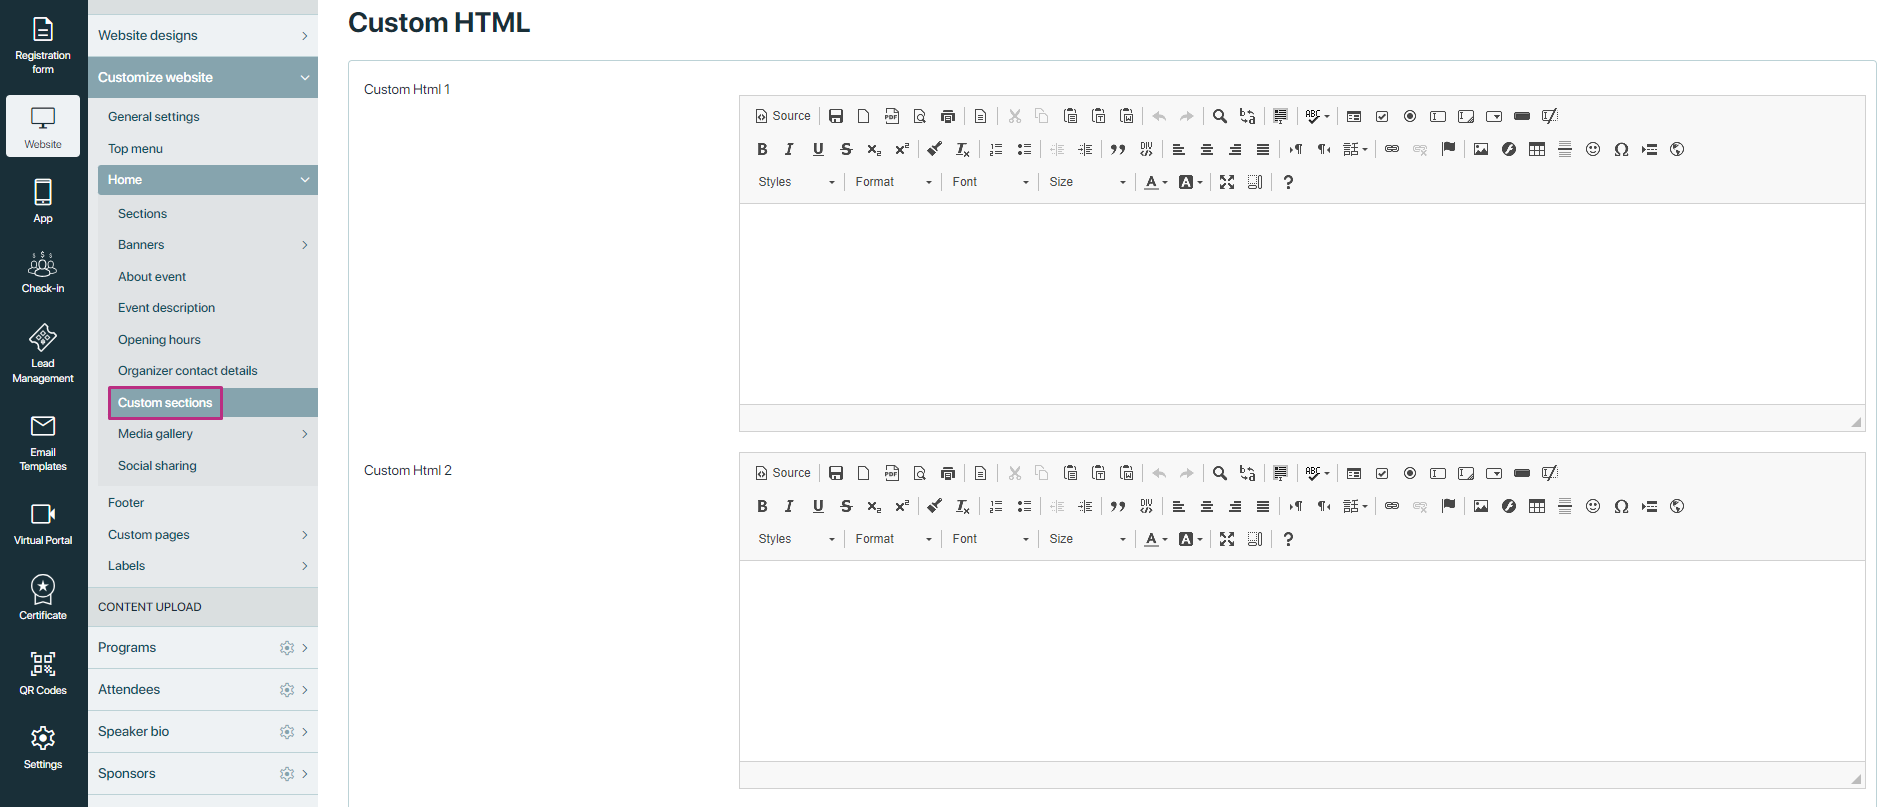
Custom sections
Custom sections refer to customizable areas within the event platform where organizers can add personalized content, features, or functionalities tailored to their specific event needs. These sections typically allow organizers to enhance and customize the event experience for attendees by adding unique elements that align with their event objectives and branding.
Custom sections provide organizers with the flexibility to add various types of content, including text, images, videos, links, forms, widgets, and interactive elements. This allows organizers to showcase event-specific information, announcements, promotions, or resources in a visually appealing and engaging manner.
Custom sections in Eventbuizz empower organizers to create dynamic, interactive, and branded event experiences that captivate attendees, drive participation, and achieve event objectives effectively.

Media gallery
In Eventbuizz, the “Media Gallery” refers to a feature or section within the platform where organizer can upload media related to an event. This may include images and videos which shows on event site.
The media files displayed on the event site will correspond to the order in which the organizer has sort them in event centre.

Social sharing
Social sharing refers to the functionality that allows users to easily share event-related content, such as event details, schedules, sessions, or announcements, across various social media platforms. Eventbuizz typically integrates with popular social media platforms such as Facebook, Twitter, LinkedIn, and others.

Footer
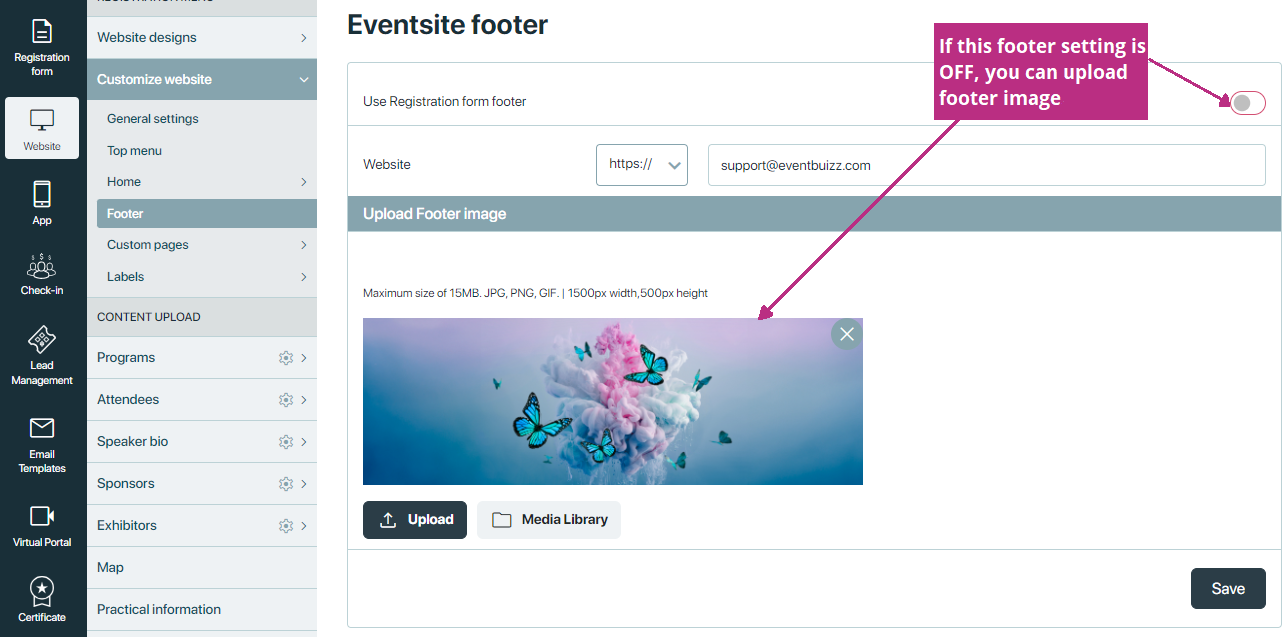
We have two types of footers available:
1- First Type: When we enable the “Use registration form footer” setting, a built-in footer will be displayed. This footer contains essential details such as event opening information, location, contact person details, and organizer information. It provides attendees with comprehensive event-related information directly within the footer section.

2- Second Type: In case we turn off the “Use registration form footer” setting, we have the option to add a custom footer image specifically for the event site. This custom footer image will only be visible on the event site and allows for additional branding or visual enhancements tailored to the event’s theme or branding.

NOTE: The built-in footer in the registration flow will always be displayed, regardless of whether the footer setting is turned on or off.
labels
Labels
Labels refer to customizable tags or identifiers that can be assigned to various elements within the event platform to categorize, organize, or provide additional context. These labels can be applied to different components such as sessions, speakers, sponsors, exhibitors, attendees, and other entities associated with the event.
