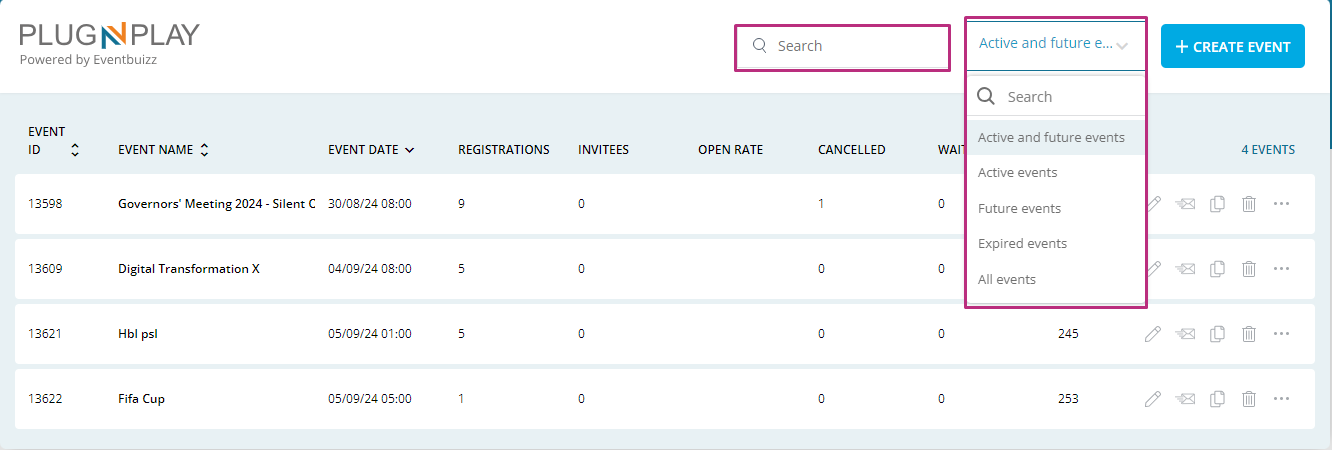
Overview
“Plug and play” is a simplified management portal within the eventbuizz system. It is designed to streamline and expedite the event creation process by leveraging pre-defined templates. This portal is intended to provide users with a quick and user-friendly interface to set up events with minimal effort and configuration.
Purpose:
The primary purpose of plug and play is to enable fast and efficient event creation for who do not need or require the extensive features available in the full eventcenter portal. By focusing on simplicity and ease of use, plug and play caters to users who need to create events quickly, often without the need for detailed customisation.
Key objectives include:
- Efficiency: Reduce the time and effort required to set up events.
- Simplicity: Provide a straightforward interface with minimal options to avoid overwhelming users.
- Accessibility: Allow sub admins and other users with restricted permissions to create events based on pre-defined templates.
Working:
- Access Control:
-
- User permissions: Only sub admins with specific permissions, granted by super admins, can access plug and play. This typically includes sub admins and, in some cases, organisers themselves.
- Template visibility: Organisers determine which templates are made available in plug and play. These templates are configured in the eventcenter and then made accessible to plug and play users.
- Template selection:
- Upon logging into plug and play, sub admins are presented with a list of available templates. These templates have been set up in the eventcenter by organisers and can include a variety of event configurations.
-
Event creation:
- User admin select a template from the available options. This action loads the template’s pre-configured settings into the event creation interface.
- The interface guides sub admins through a series of simplified steps to set up the event, such as entering basic event details, selecting dates, and adding necessary information.
-
Finalization:
- Once all required fields are completed, the user finalizes and submits the event setup.
- The event is created based on the chosen template, inheriting the settings and configurations specified in that template.
Functionalities
Pre-requisite for working with plug and play:
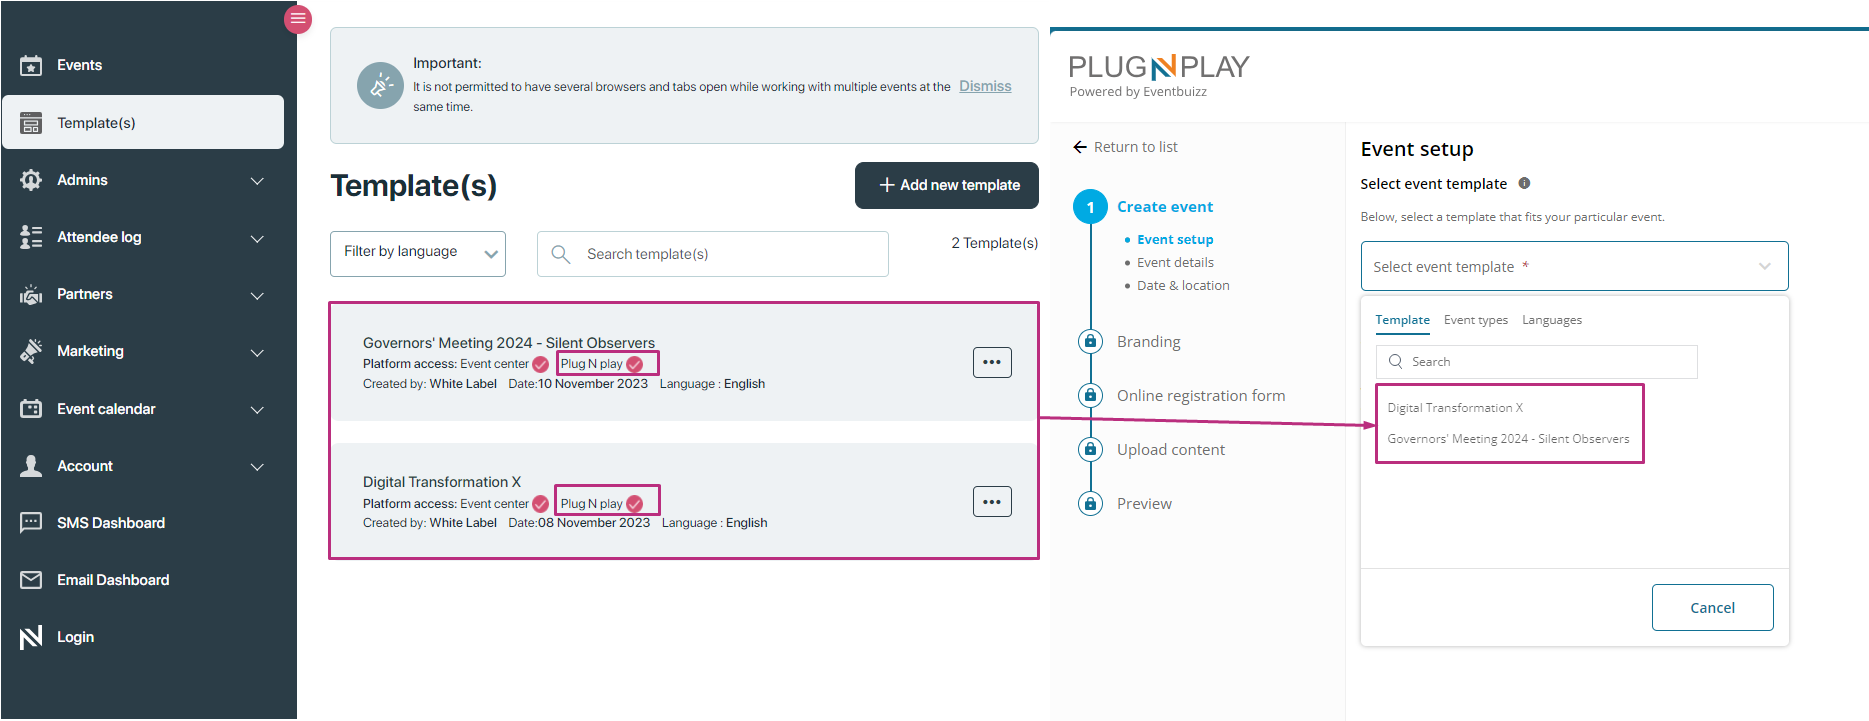
For creating the events through plug and play portal first, need to make sure pre-templates are created, and these templates organiser can create in eventcenter portal, here is the view of it:
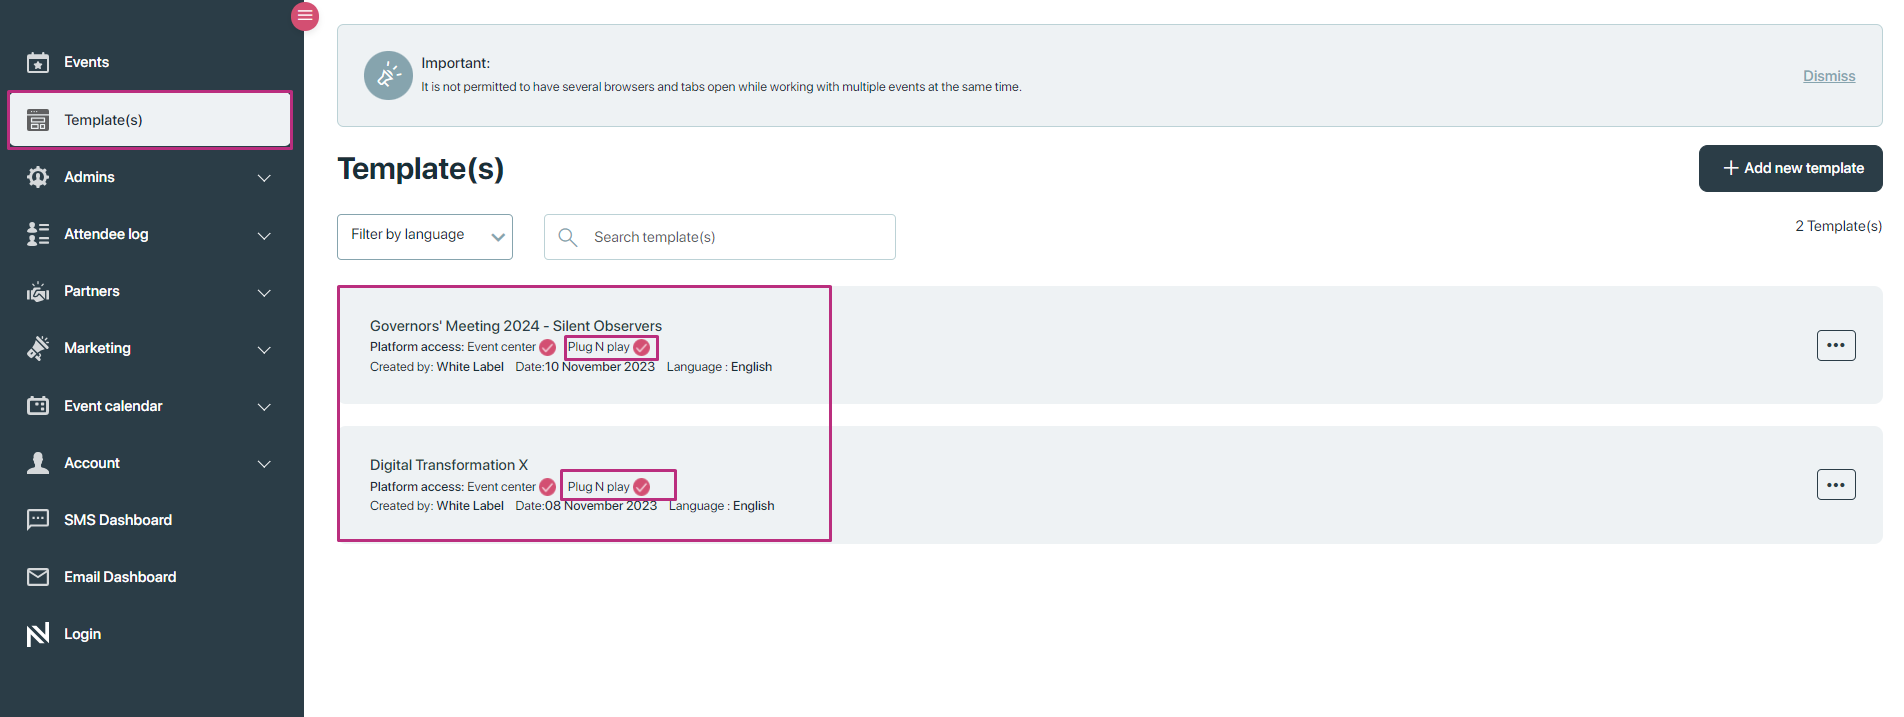
For more detail how to creates templates and how they works, please click here
How to access plug and play portal:
For Organisers:
Organiser can access the “plug and play” portal, through eventcenter, and also through URL directly if permission is assigned to that organiser from super admin.
Through eventcenter access:
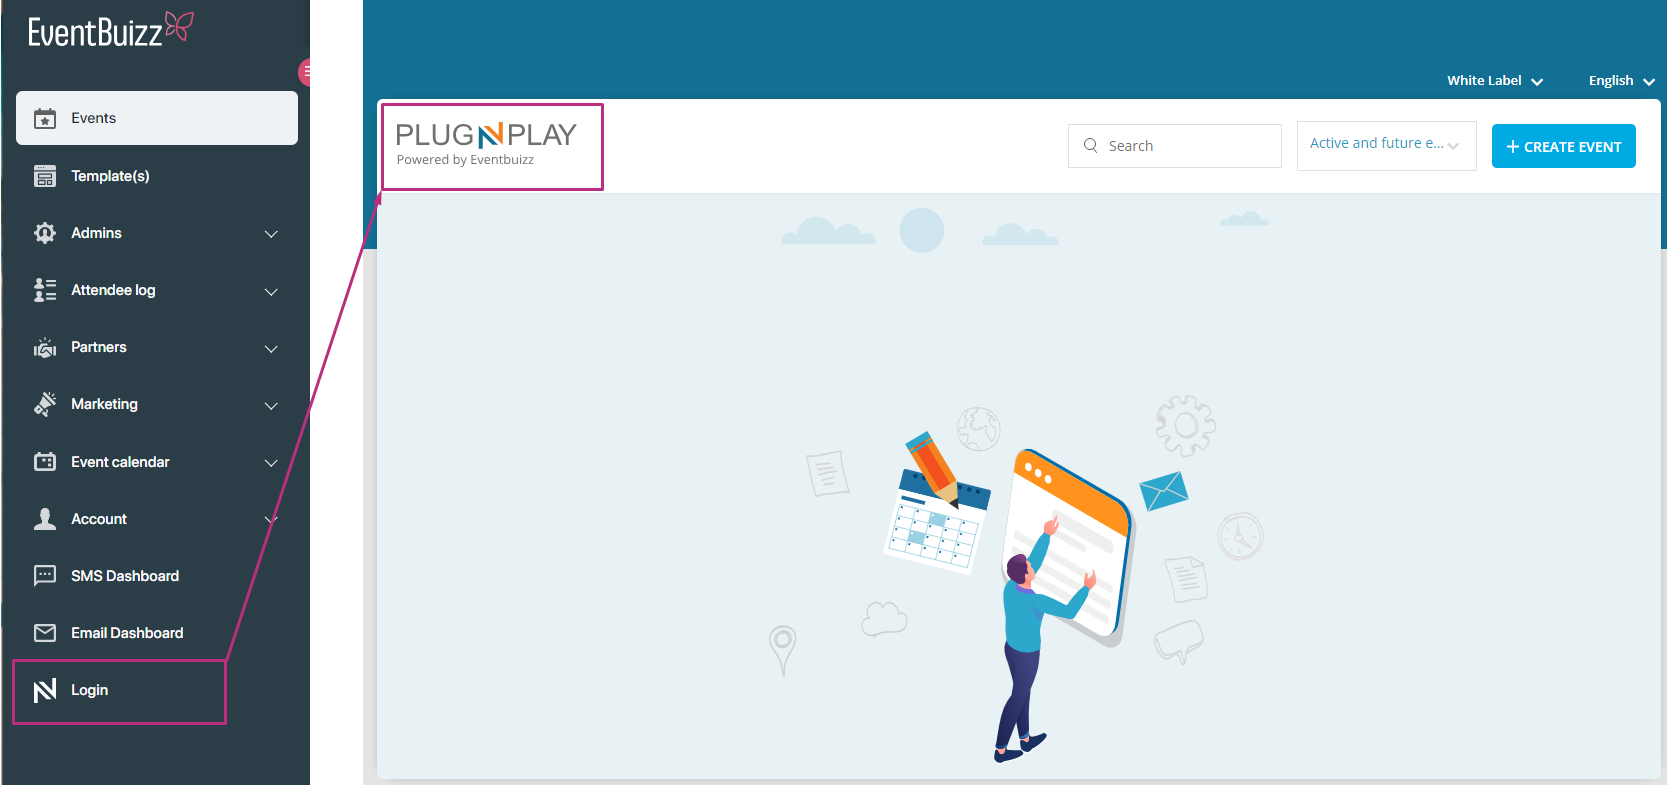
If permission is given by super admin, then in eventcenter menu listing organiser can simply click on login menu and will directly redirects to plug and play portal. Here is the view how it works:
Access plug and play through URL directly:
Organisers and sub-admins both can also access plug and play through URL directly. For accessing the URL click here

Login into plug and play portal
After accessing the plug and play portal through the URL, organiser or sub admin will give his own credentials and login into the portal:
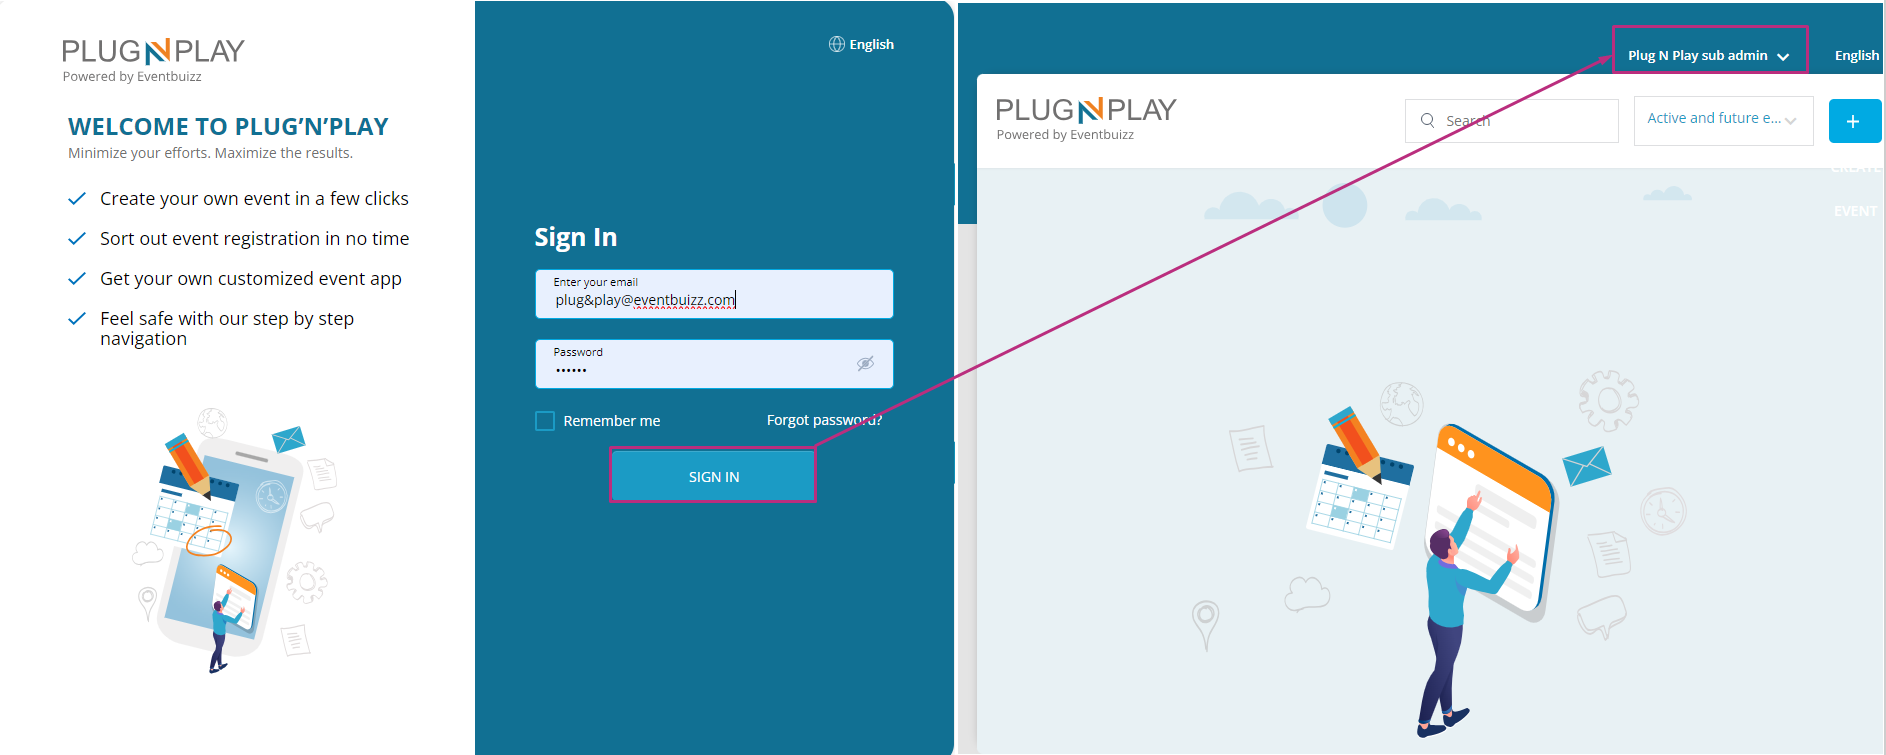
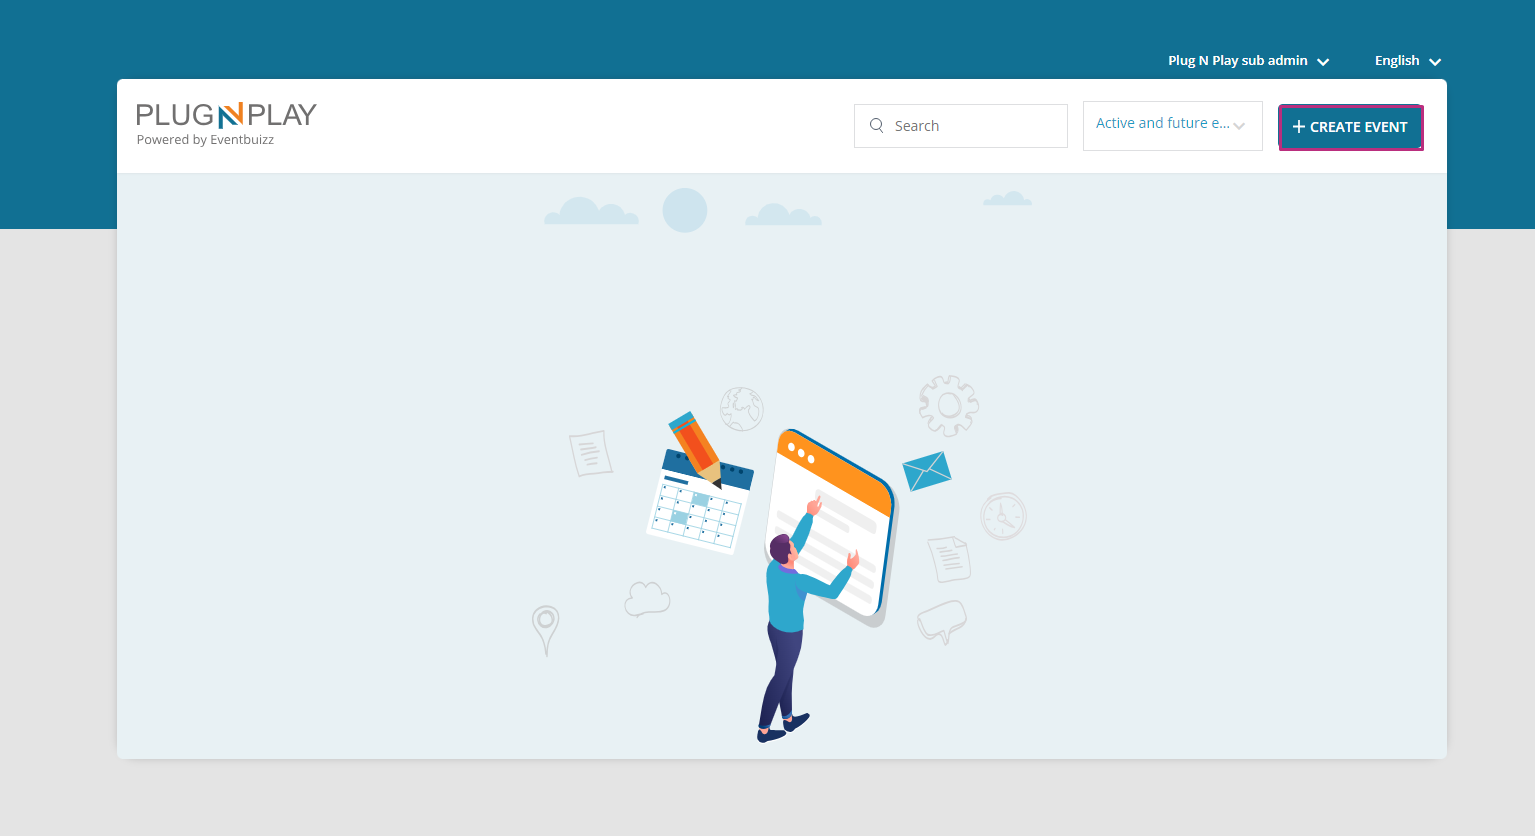
After login into plug and play portal, organiser will click on create event button, and will start creating event:
For creating an event user admin or organiser have to complete five different steps, detail is given below for each step:
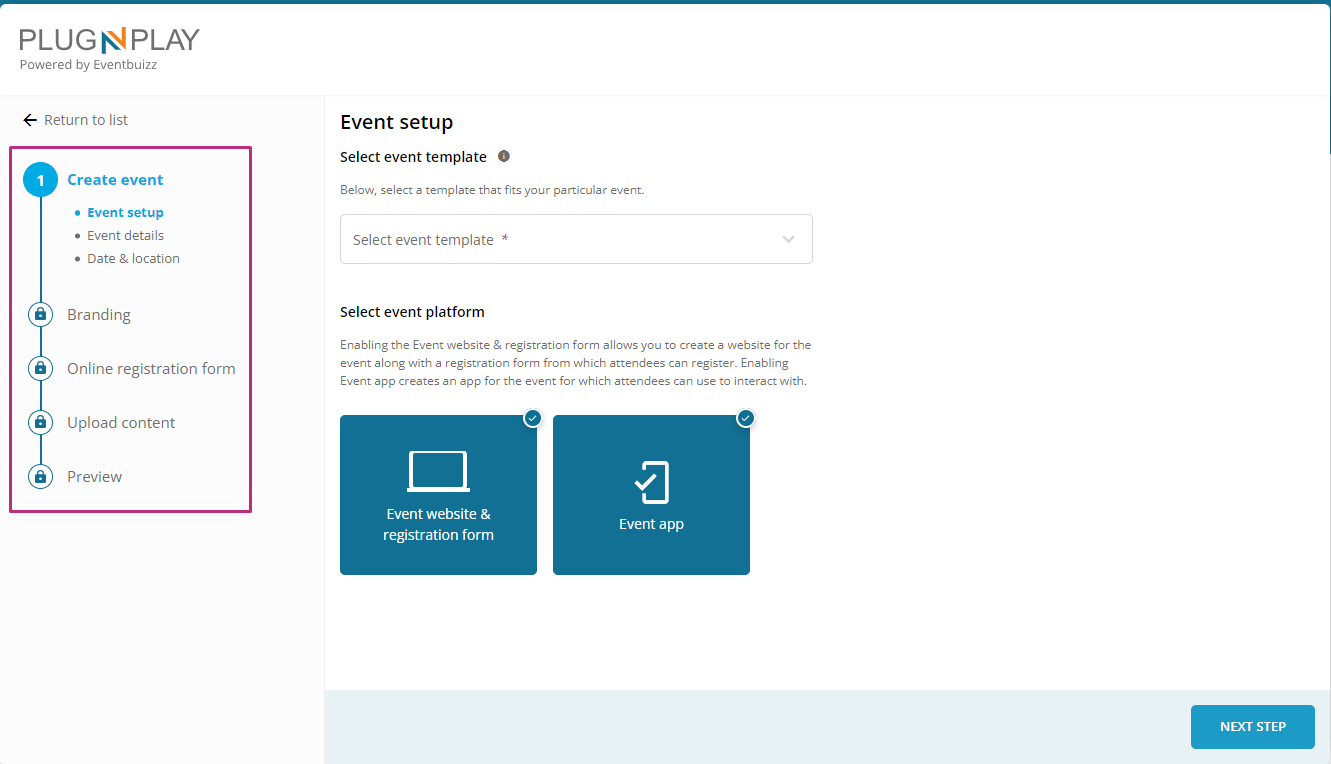
Create event
Create event
Create event consist of three different section detail is given below of each step individually:
Create event
Event setup:
- Basic event details: Users can enter essential information such as event name, date, time, and location.
- Pre-configured options: The template provides default settings and options that the user can either accept or adjust within predefined limits.

Template access:
- After clicking on “Create event”, user admin or organiser will first access the screen of select template from the drop down listing.
- View templates: Users can view a list of templates that are made available to them. This list is curated by organisers in the eventcenter.
- Filter and search: Depending on the implementation, users may be able to filter or search through templates to find the one that best fits their needs.
Select event types:
After selecting the template from the drop down listing organiser will select the event type as well from the event type sub section, there are wo types of events which are availble, detail is given below:
- Free events
- Paid events

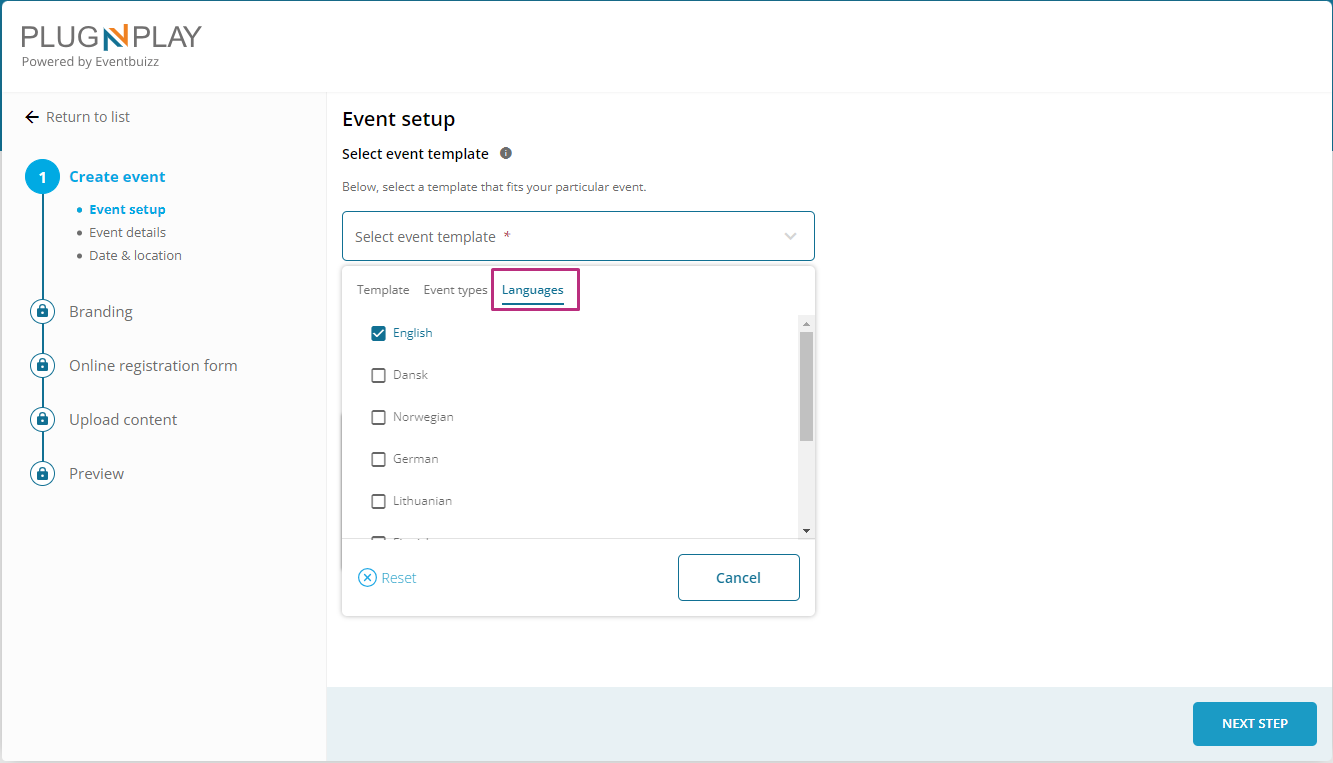
Select event language:
After selecting the event template, event type, next section is to select the event language, form the event language section.
Select event platform:
After selecting event template from the drop down list, organiser or sub admin also select the required event platforms, as per the event requirements given by the users. Two types of event platforms are available, detail is given below:
- Event website & registration form: Enabling the event website & registration form allows to create a website for the event along with a registration form, from which attendees can register.
- Event app: Enabling event app creates an app for the event for which attendees can use to interact with.
Organiser can give the individual permission or also can assign the both as well:

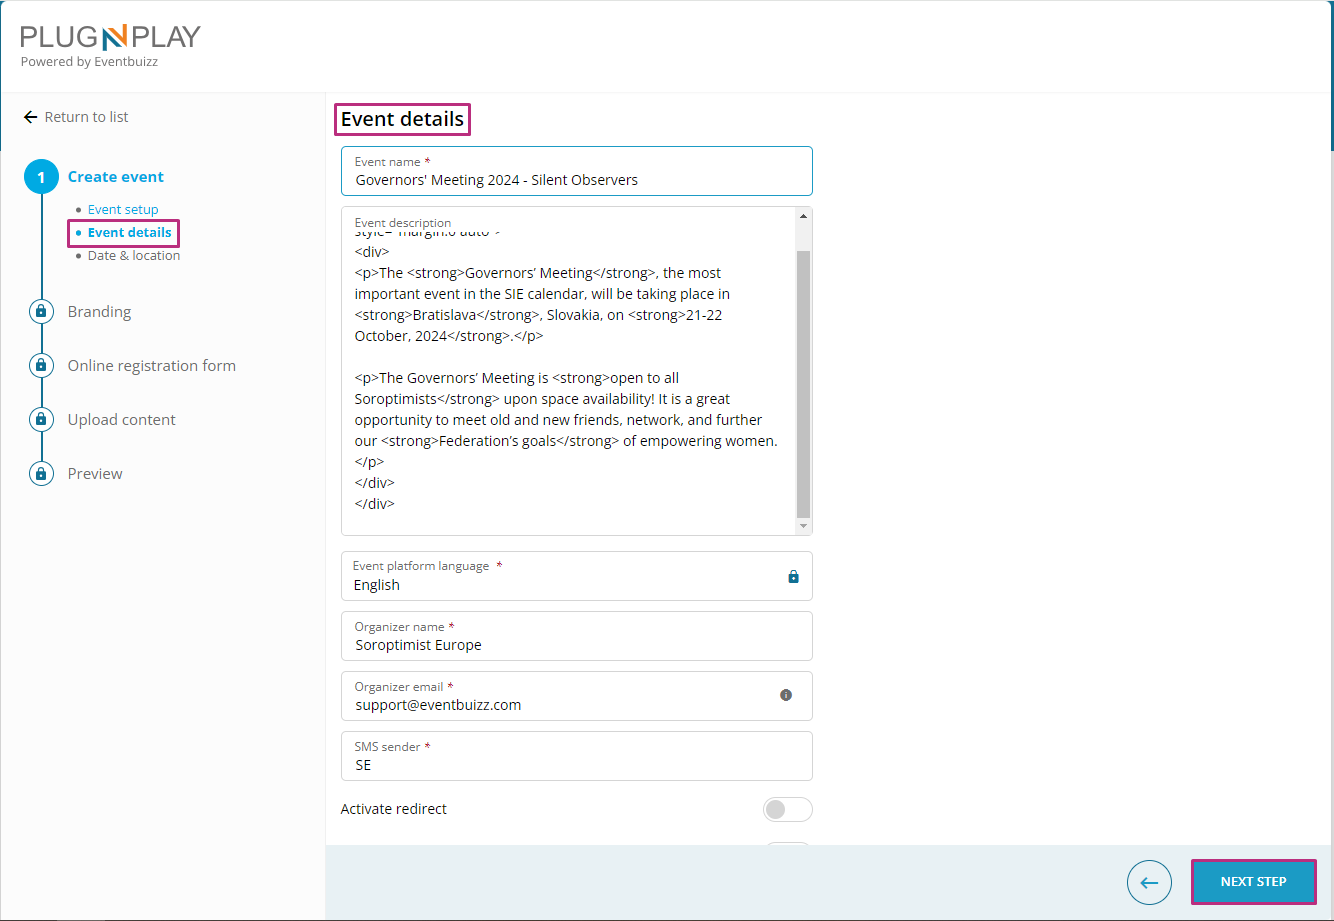
Event details:
After event setup, when organiser will move on next step, and next step is “event details”, where he can add multiple event details like event name, event description, event organiser name, message info, organiser info etc:
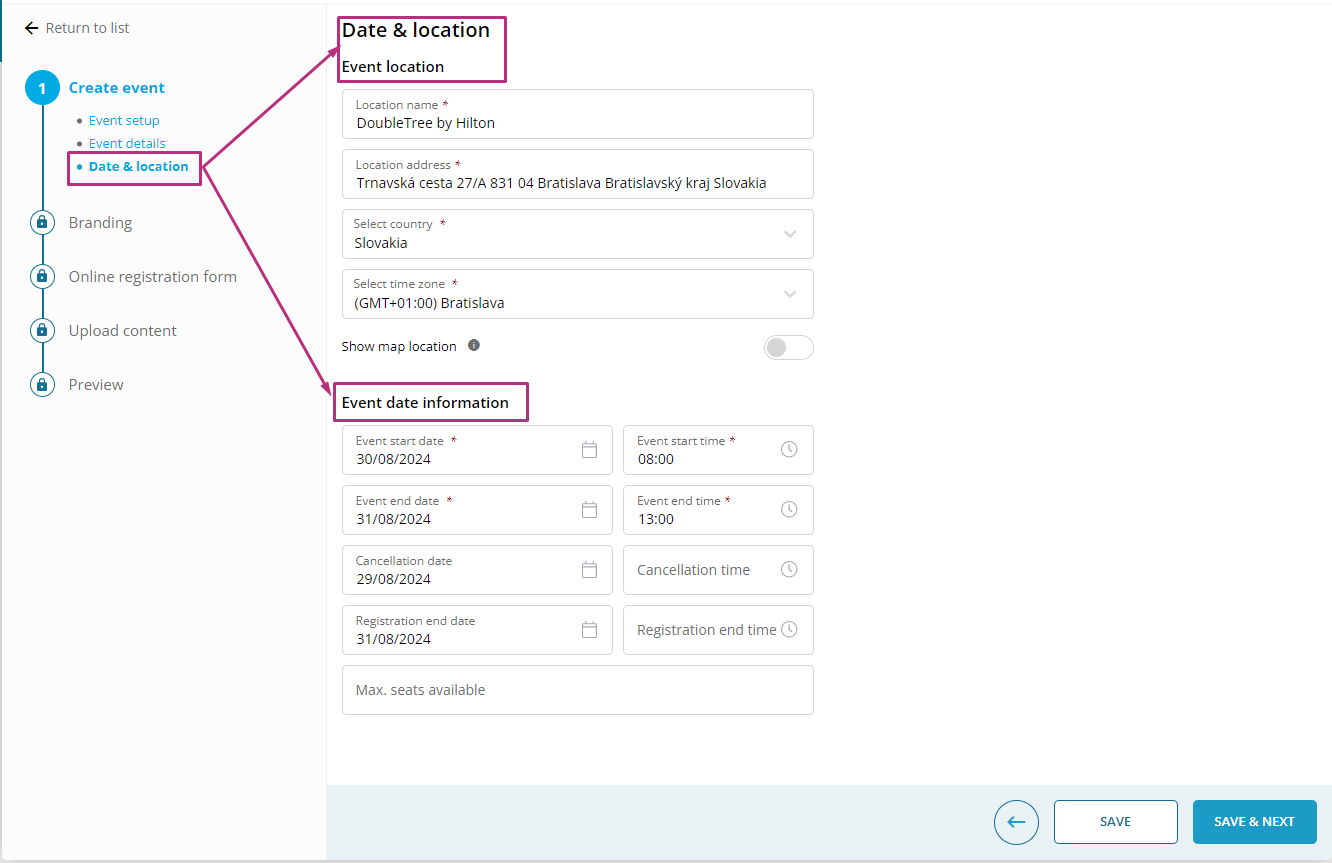
Date & location:
After entering the event details, next step will be “event date and location”, this steps divided into two main sub parts, one is about event location organiser will add the all information related to event location, like event country, timezone, location address, location name. And second part is related to event date, where organiser or sub admins will put the event start date, event end date, event cancellation date, event registration date etc. Detail is shown below, how it wok’s:
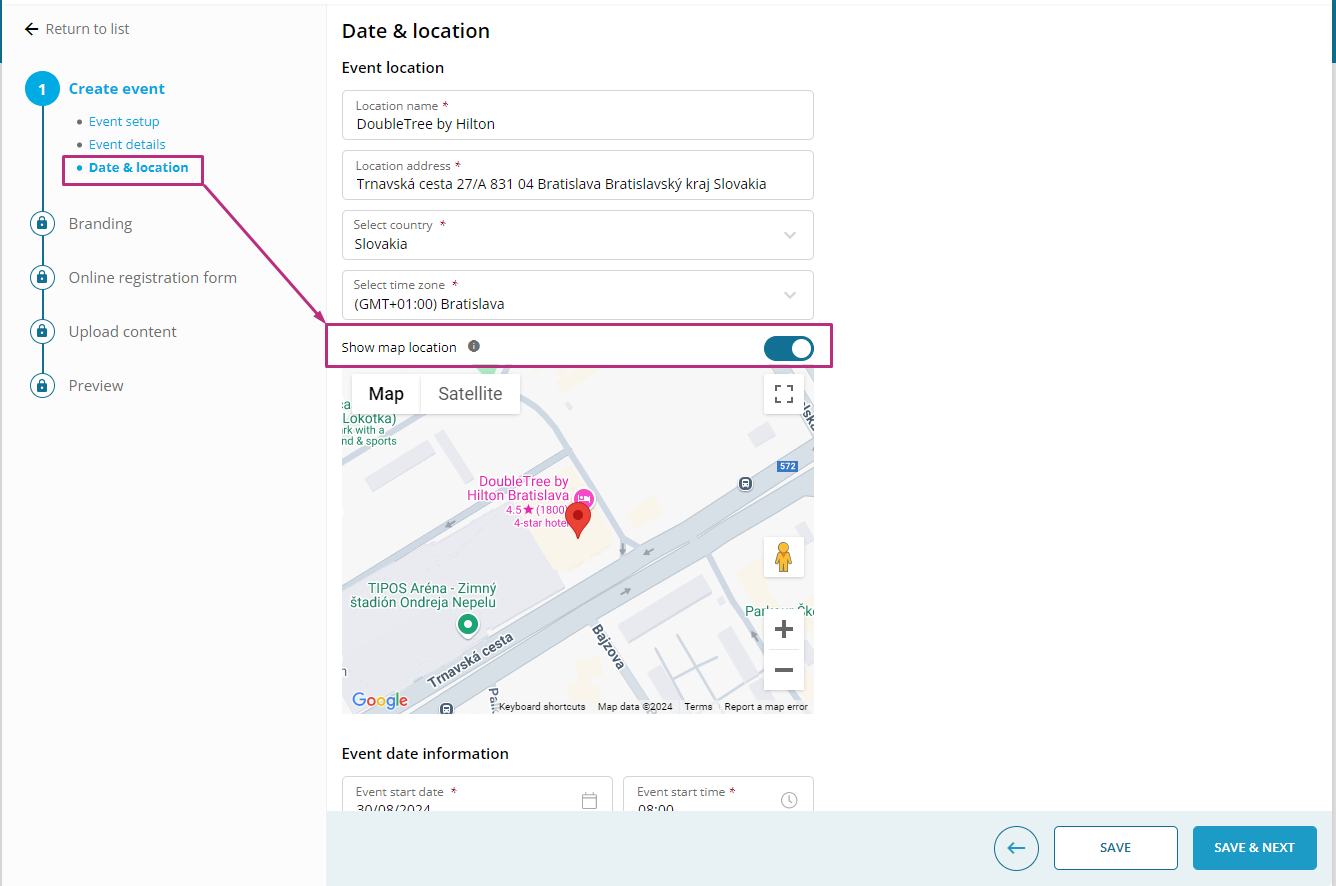
Additionally organiser or sub admin have the additional feature of show location on map toggle button, if they want to show map location, will on the toggle button otherwise it will be disabled by default:
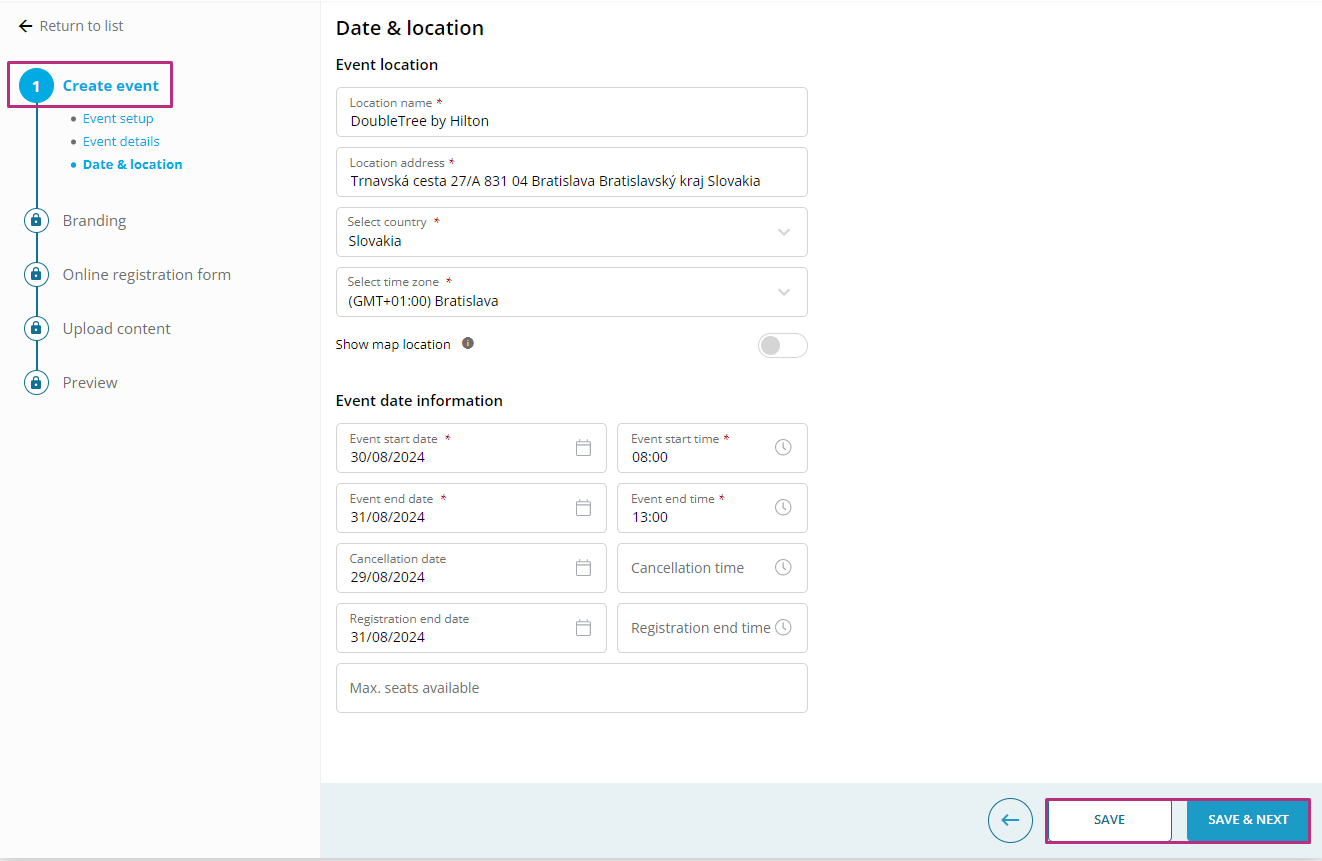
After completing first step, organiser can save it for later use, just by clicking the save button or also can proceed further by clicking the save & next button:
Branding
Branding
Branding
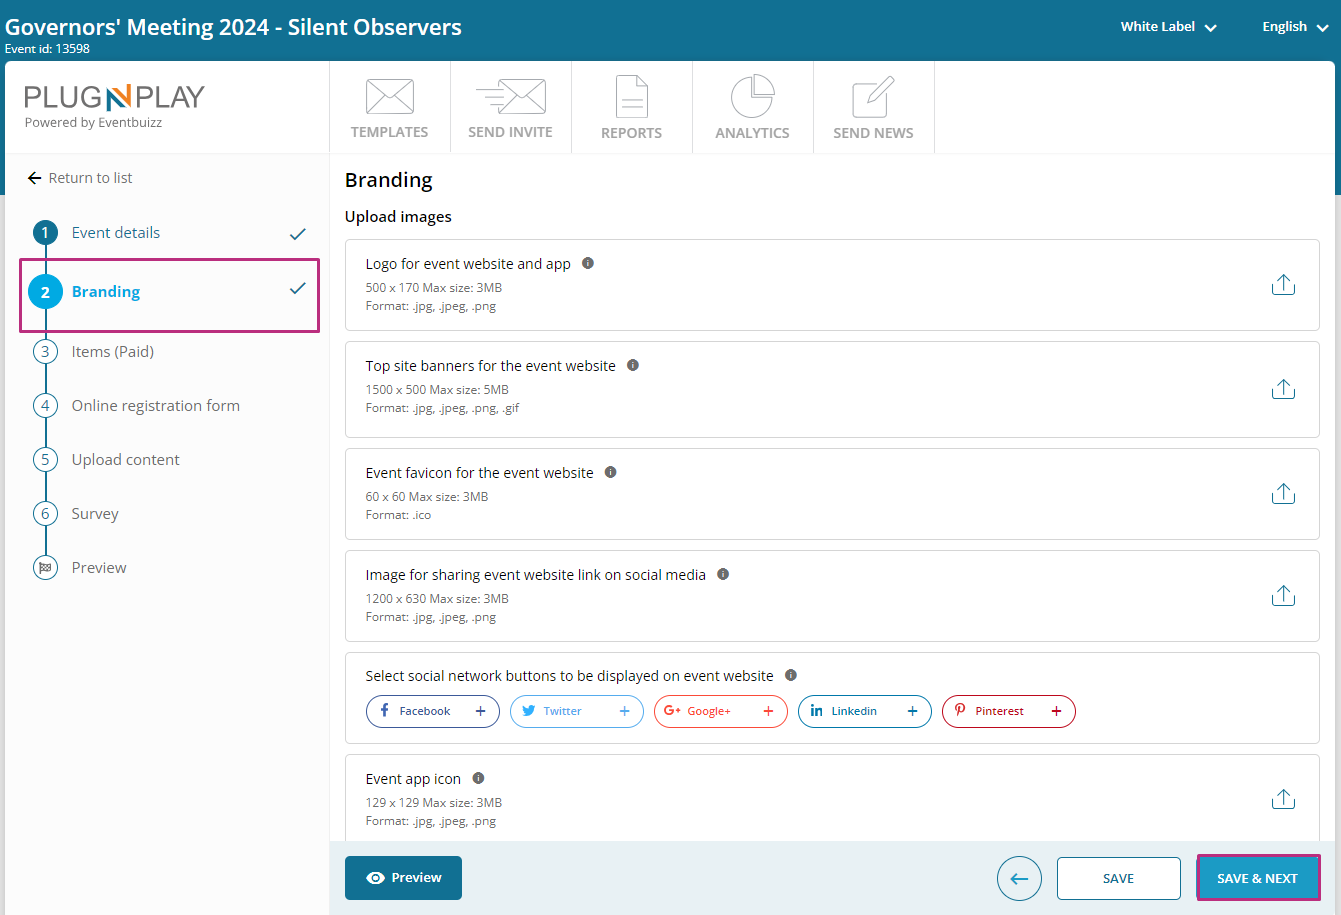
After completing the create event, next step is related to “event branding”, Where organiser can give the different logos or colour scheme which are essential for making the event recognisable from user interface point of view:
Item(Paid/free)
Item(Paid/free)
Item(Paid)
Item – detailed breakdown
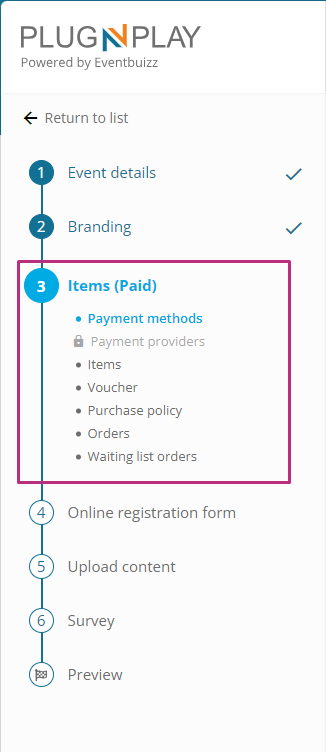
When creating an event using the plug and play portal, the “Item” step is crucial for configuring the paid aspects of the event. This step allows organisers to set up and manage registration items, payment methods, and various related options. This step is specifically focused on setting up and managing all aspects related to paid registrations for the event. It includes configuring payment methods, setting up payment service providers, defining registration items, creating vouchers, establishing purchase policies, and managing orders.Here’s a detailed breakdown of each component involved in this step:
Payment methods
Purpose:
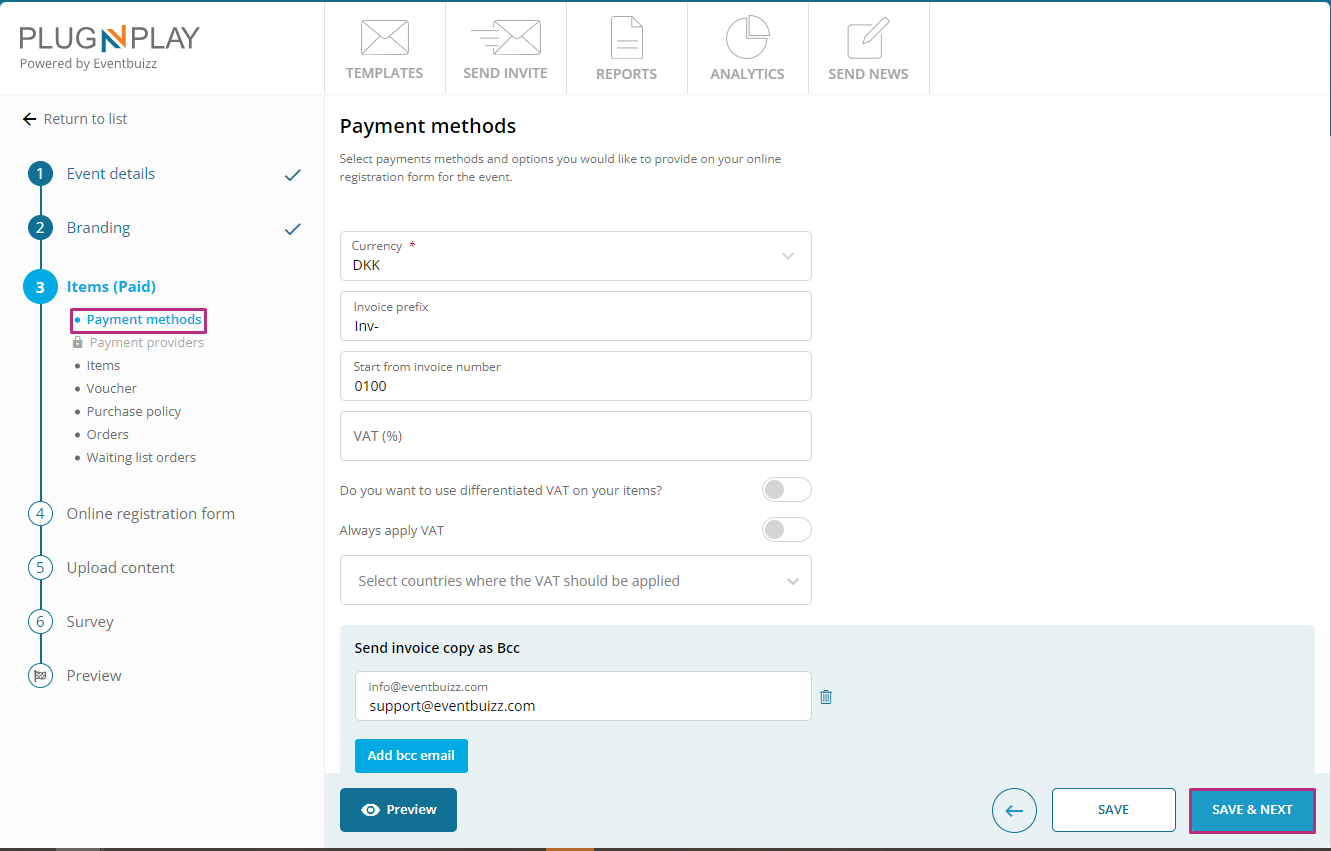
Select payments methods and options organiser would like to provide on online registration form for the event. On payment method step, organiser have the multiple fields and options available, for managing the payment related things. Detail is given below of each available option:
- Currency: Defines the currency for transactions. Only one currency can be select per event. If you are using “Dankort” as one of your credit card option, then it is mandatory to set the currency to “DKK” according to NETS requirement. Following currencies are available DKK, EUR, USD, NOK, SEK, AUD, CHF, GBP
- Invoice prefix: Sets a prefix for invoice numbers, e.g., “EV.” It will be printed on the invoice before the invoice number.
- Invoice number: Specifies the starting number for invoices. Enter a number and the invoice will start from the specific number that has been entered.

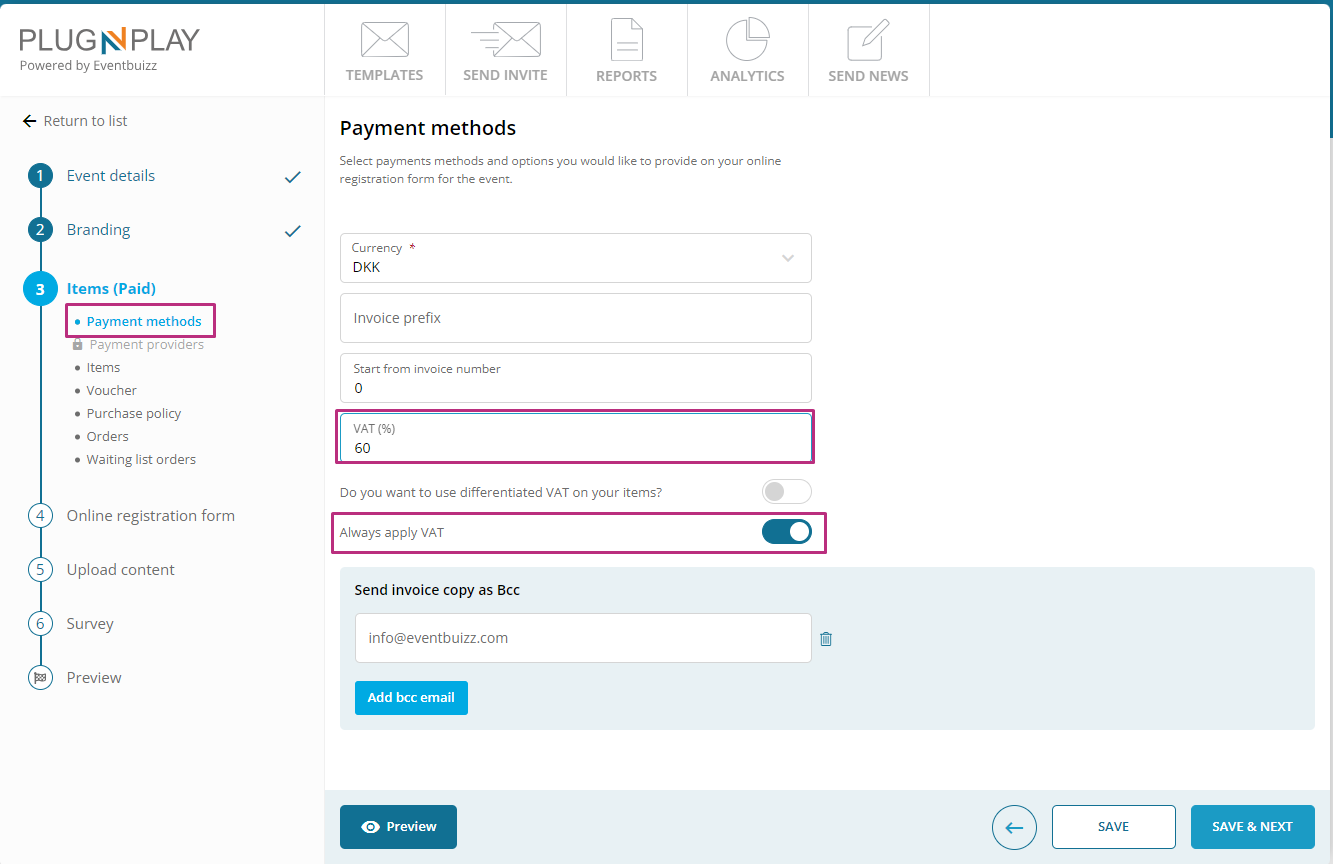
VAT can be applied on order level and items level.
For order level VAT,
- Always apply VAT must be ON to ensures VAT % is applied to all transactions mentioned in the VAT field.
- VAT (%): Sets the VAT percentage.
If Always apply setting is ON, VAT country field will get hide.
Items level VAT:
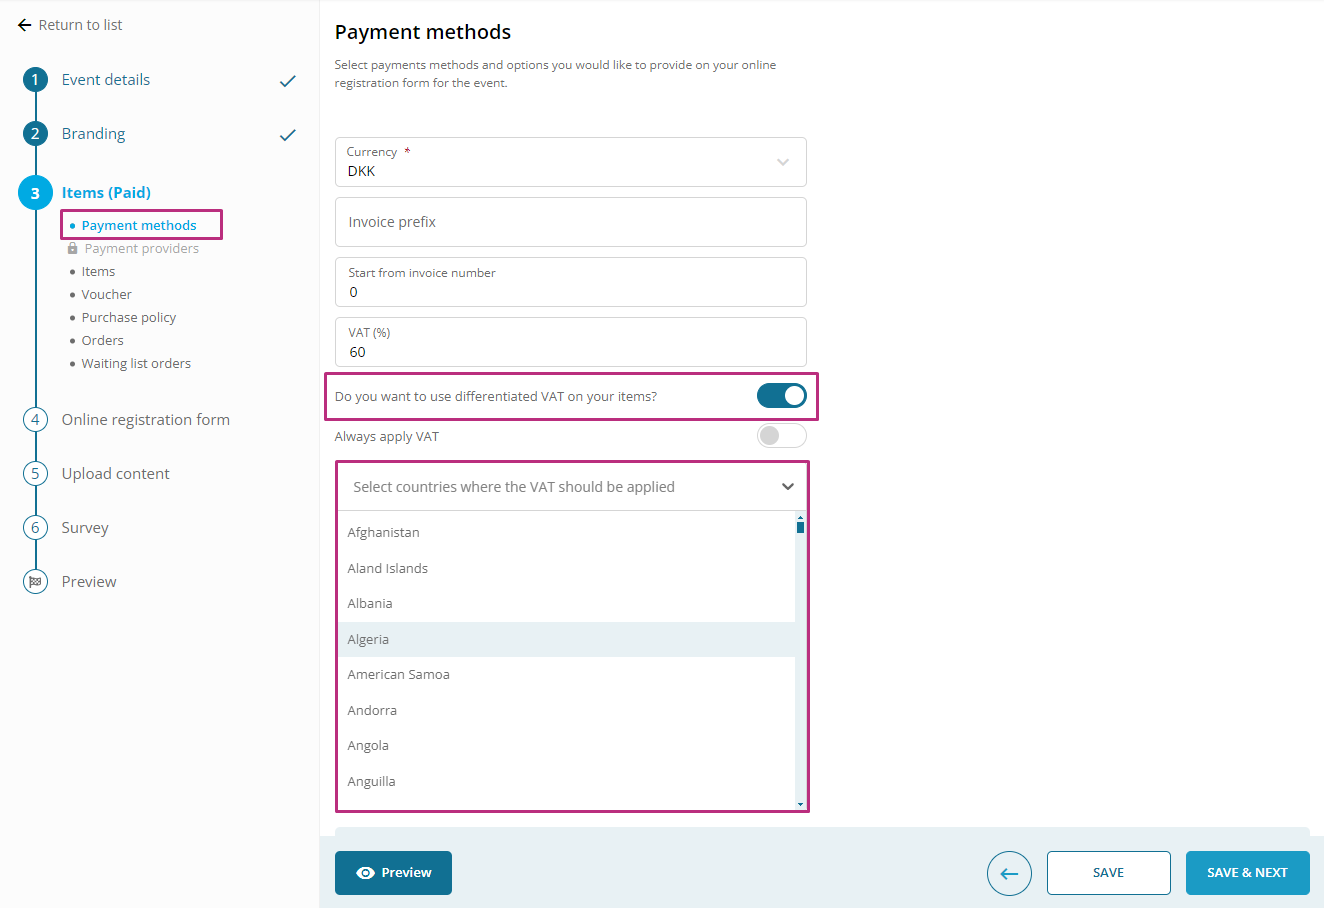
To use VAT on items, Differentiate VAT on items setting must be ON.
- Differentiated VAT on items: Allows for the application of varying Value Added Tax (VAT) rates to different items or services within the billing system. This means that each item or service can have its own specific VAT rate applied, accommodating situations where different products or services may be subject to different tax rates based on regulatory requirements or other factors. You can follow this guide to set up your billing items.
- VAT country(s): Selects countries where VAT applies. If country is selected then VAT applies on selected country, otherwise applies to all.
After giving the all relevant information in payment method section, and will save this step and move on next step:
Payment providers
Purpose:
- To select and configure the service provider that will handle the processing of payments for the event.
Details:
- Select provider: Choose a payment service provider (PSP) from the available options.
- Integration: Configure the integration between the chosen PSP and the event registration system. This may involve entering API keys, setting up webhooks, and testing payment flows.
- Provider-specific S]settings: Adjust settings according to the requirements and capabilities of the PSP, such as currency options, transaction fees, and security features.
Different payment service provider organiser have in this portal detail is given below:
- DIBS
- Mister-tango
- Swedbank
- Pensopay
- Wirecard
- Stripe
- Bambora
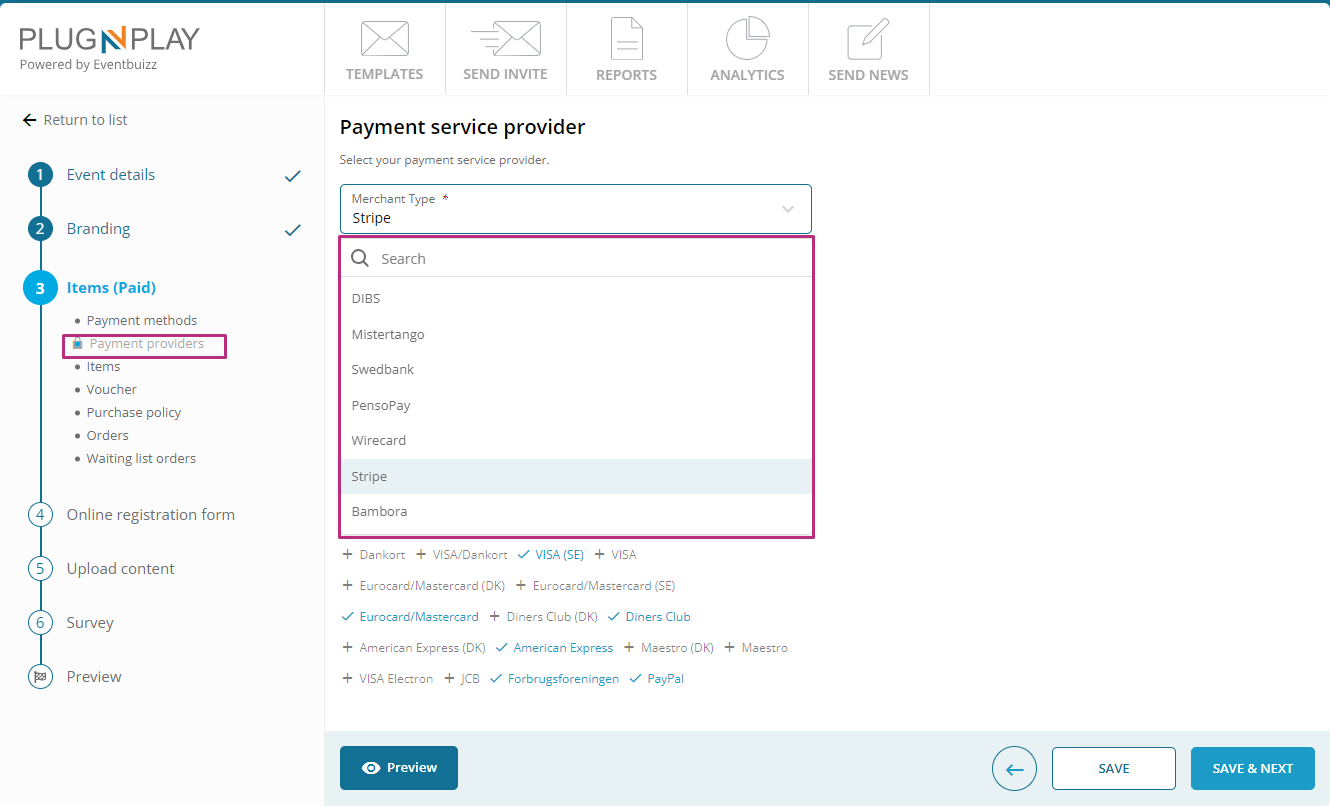
After selecting the payment service provider,organiser or sub admins will select the payment cards. Detail about payment cards given below:
Payment cards
Select payment cards that are supported by organiser agreement with payment service provider. Based on selection the card logos will be visible on online registration.
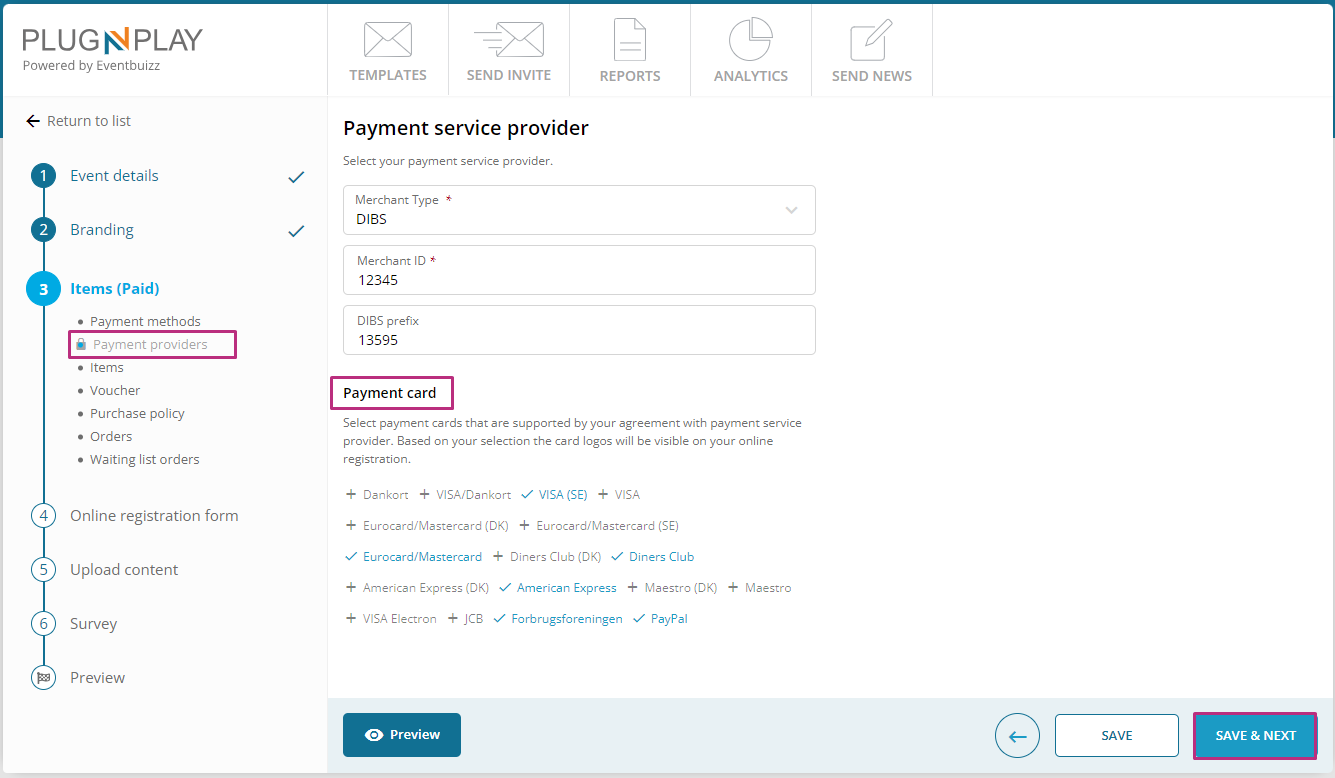
After filling this all information, organiser or sub admins, will save this information and move on next step.
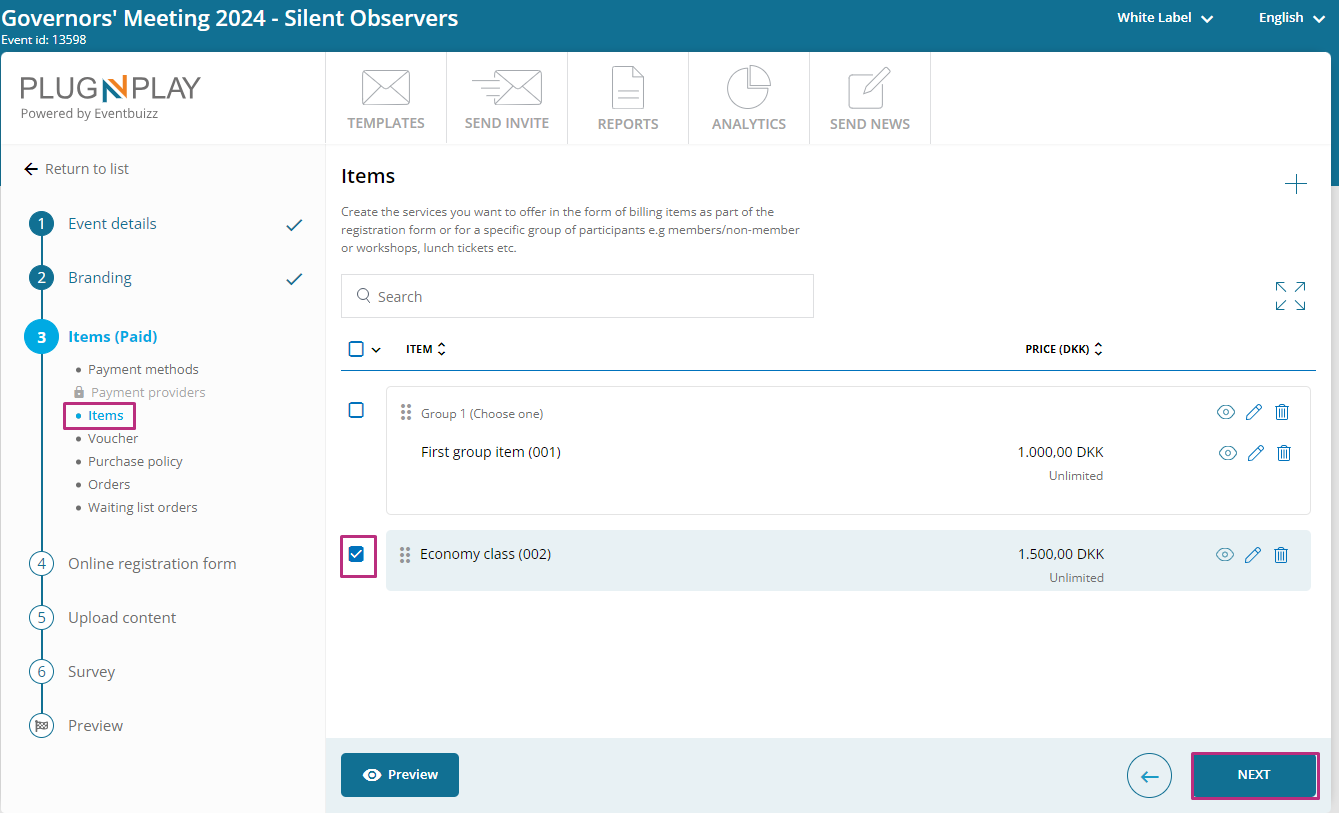
Items
In PNP “Registration items” typically refer to the different types of tickets, passes, or registration options that event organisers can offer to attendees. These registration items can vary based on the nature of the event and the preferences of the organizers. Create the services organiser want to offer in the form of billing items as part of the registration form or for a specific group of participants e.g members/non-member or workshops, lunch tickets etc.
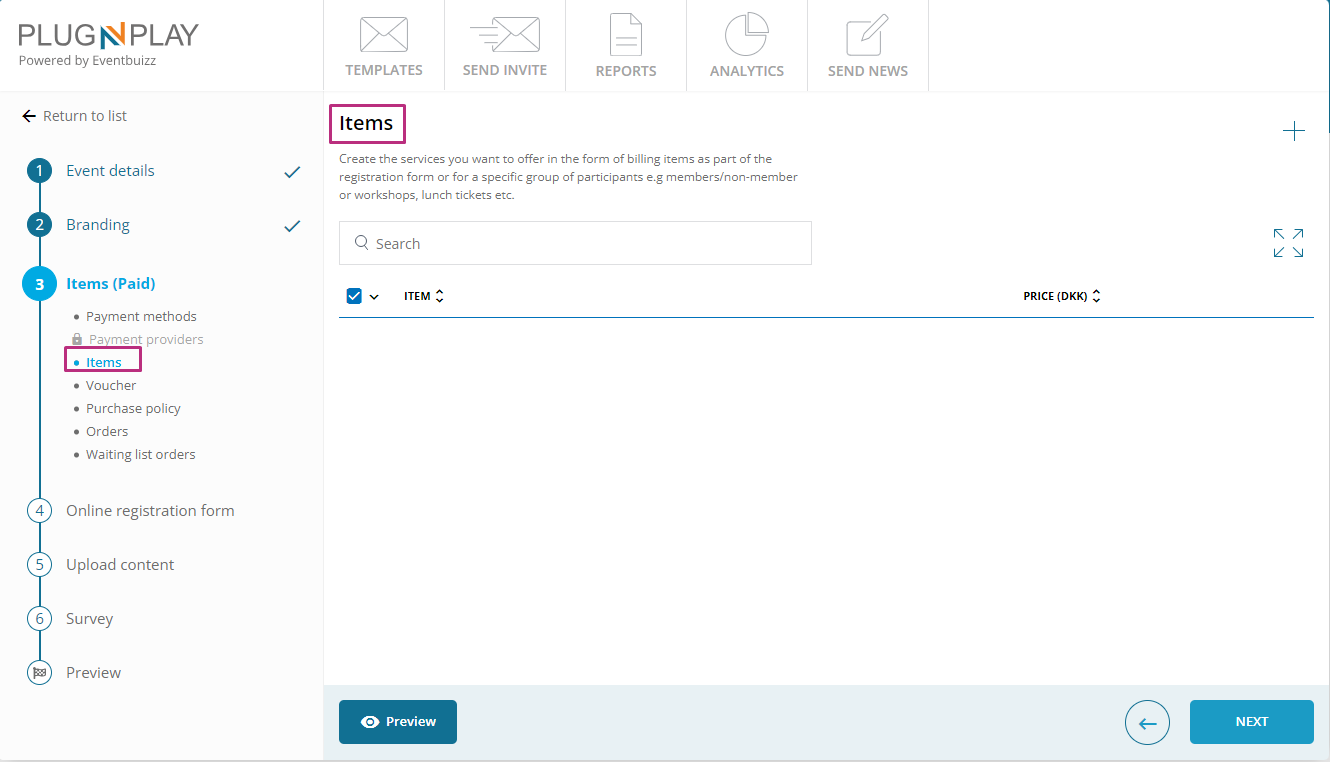
For adding “registration item” organiser will click on “+” icon and menu will open, where organiser have two options
- Item
- Group
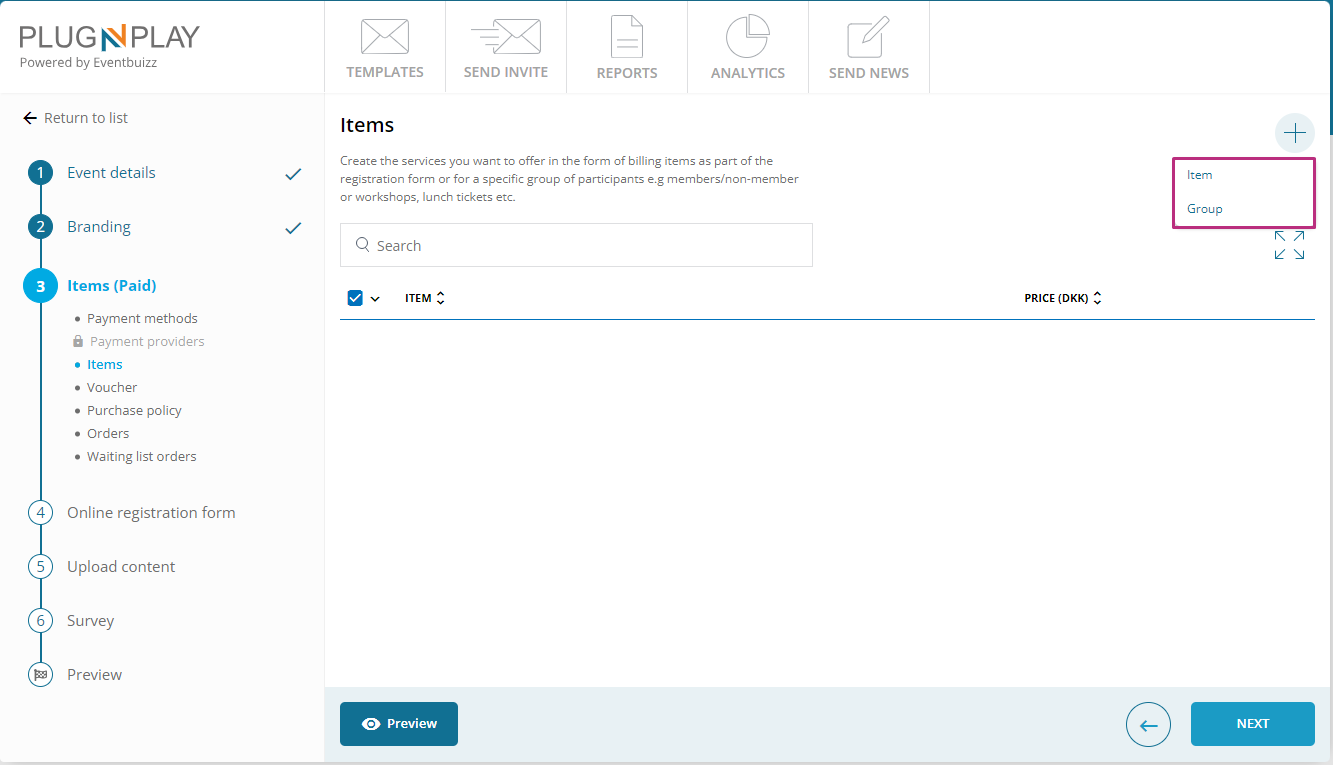
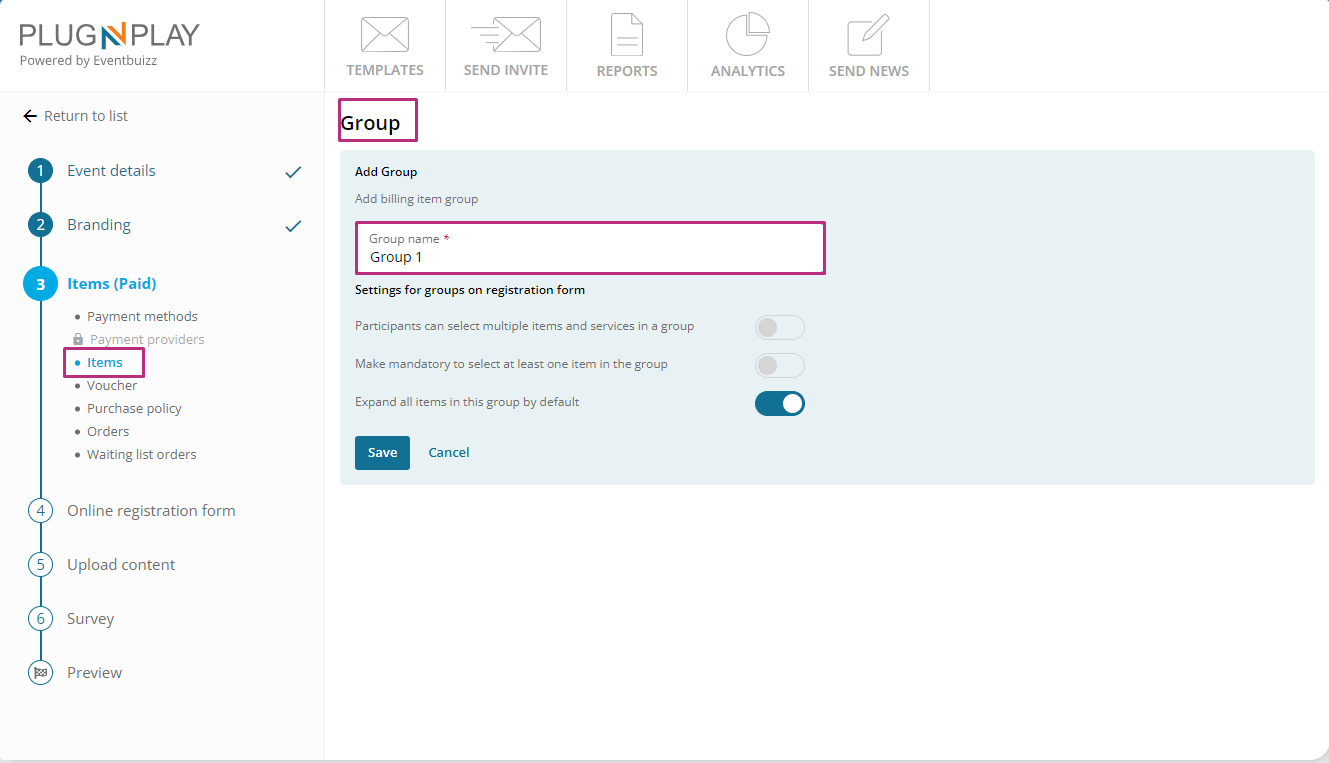
If organiser want to link the registration items with groups then will create the group first, here is the detail of it:
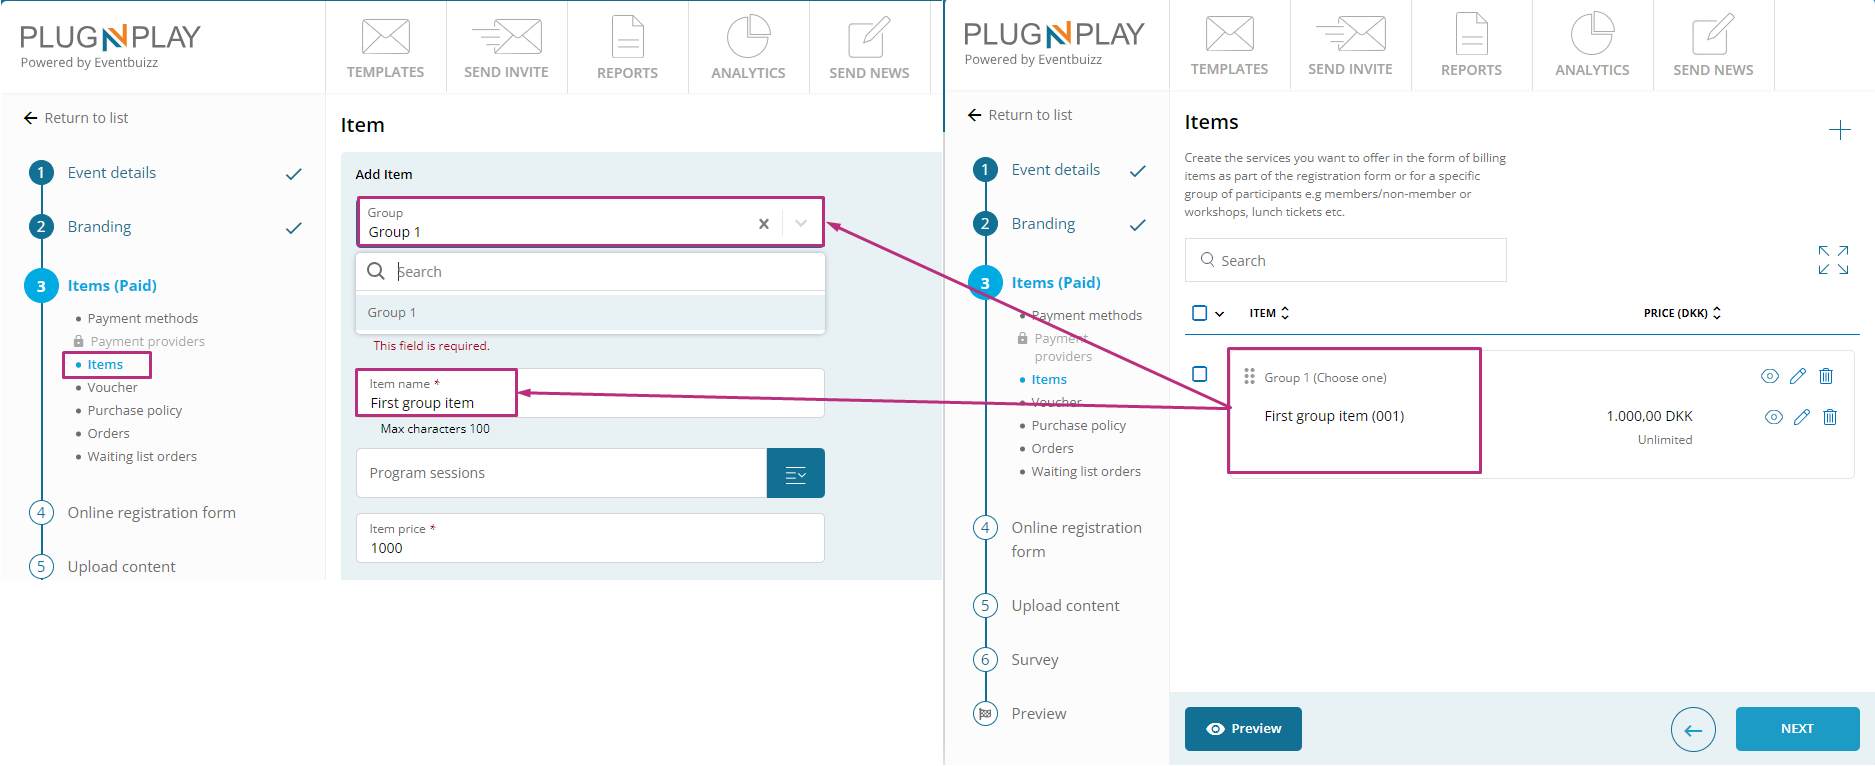
Created groups will show in drop down when organiser create the “item” ,if organiser wand to link item with group, then he will select the group name from the drop down, otherwise will create without it, and filled the required fields like item name, and item price, etc.
If item is linked with group will look like like this:
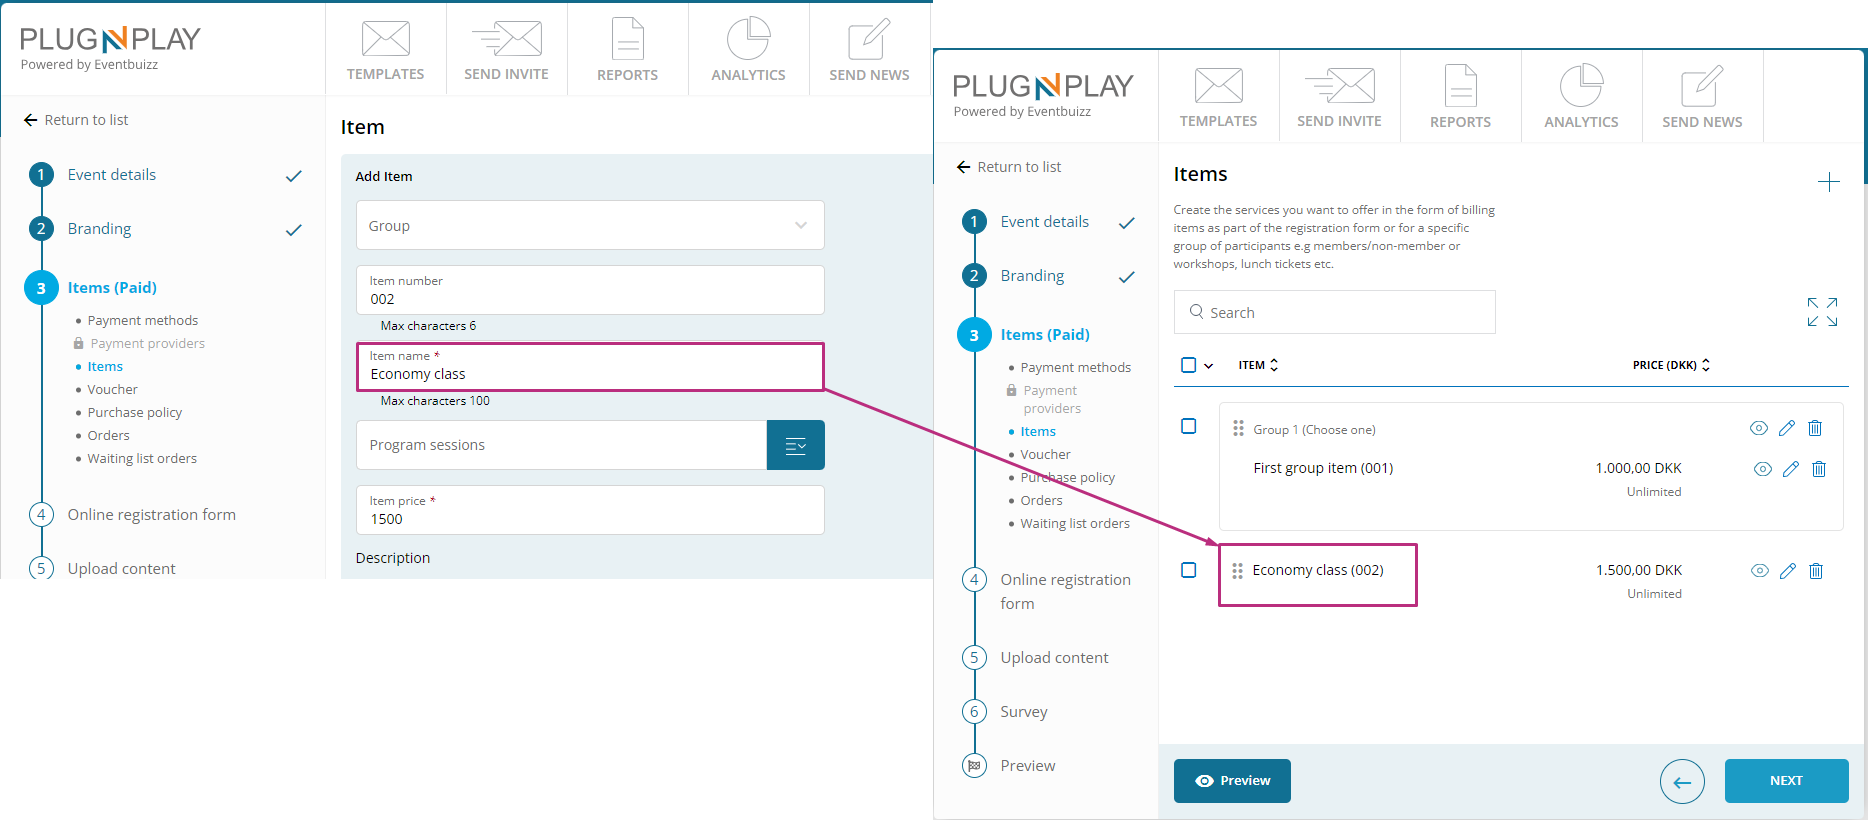
If item is not linked with group, then it will look like this:
On item listing, against each created group, item linked with group, and item with out group have the same sort of actions available. Detail of all available actions given below:
- View: View is enable user to just only view the details of the particular selected item.
- Edit: By clicking edit organiser can edit the selected particular item, or group.
- Delete: By clicking the delete icon, organiser can delete the group collectively or group item individually, or item as well, which are no more used.

Meanwhile if item are already built-in organiser will just select the required item, by clicking the check box and save this step and move to the next step:
Voucher
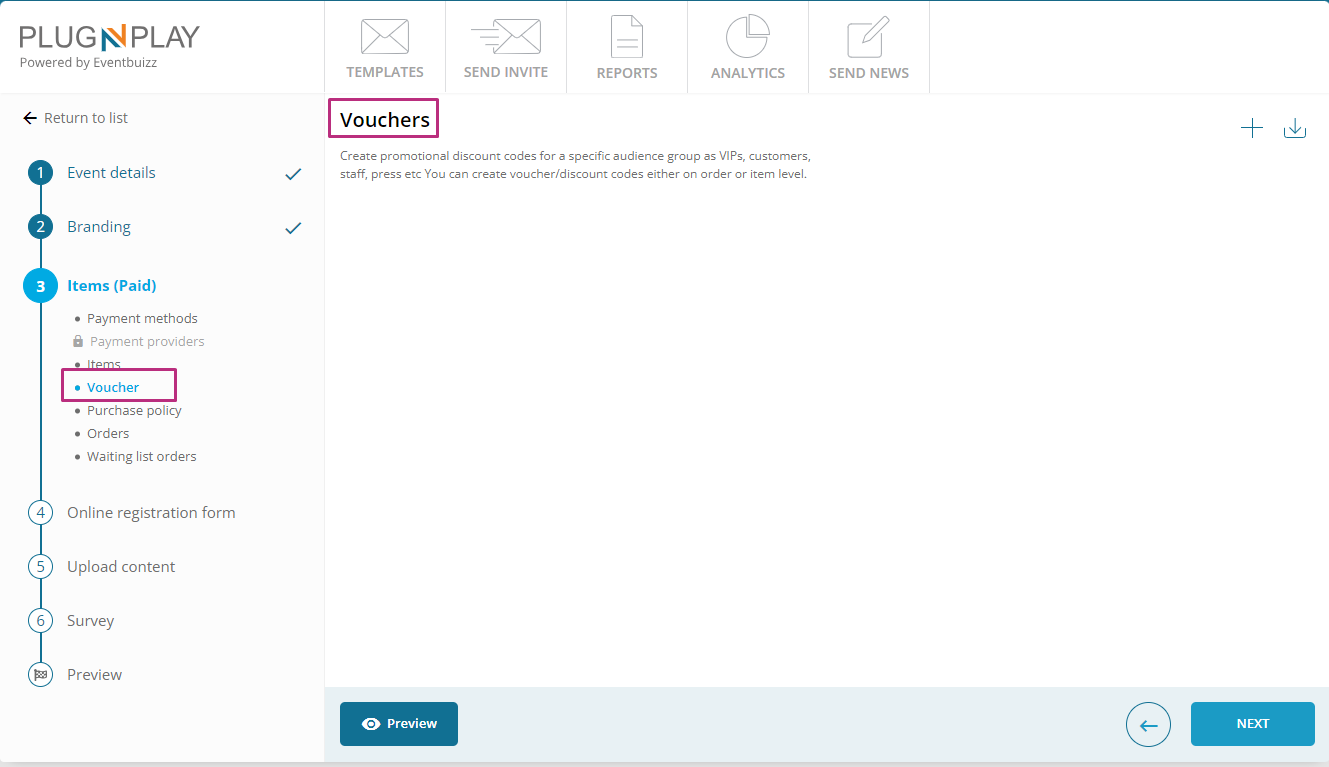
Vouchers allow the organisers to offer discounts, promotions, or special deals to attendees for event tickets, registrations, or other offerings. Create promotional discount codes for a specific audience group as VIPs, customers, staff, press etc organiser can create voucher/discount codes either on order or item level.
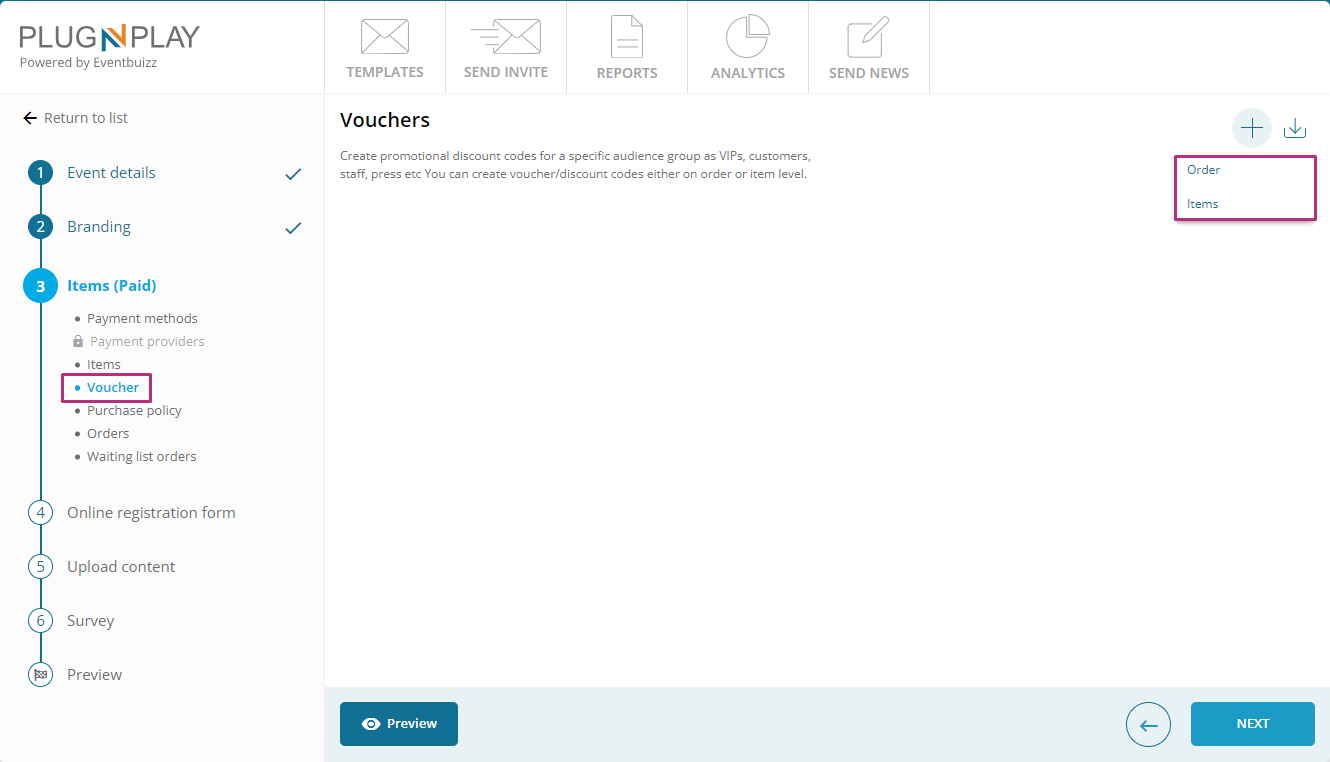
There are two types of voucher available in plug and play portal. Detail is given below:
- Order voucher
- Item voucher
Order voucher
Organiser can add order voucher by navigating on the following path:
Plug and play->items(paid)->voucher->”+” icon->order
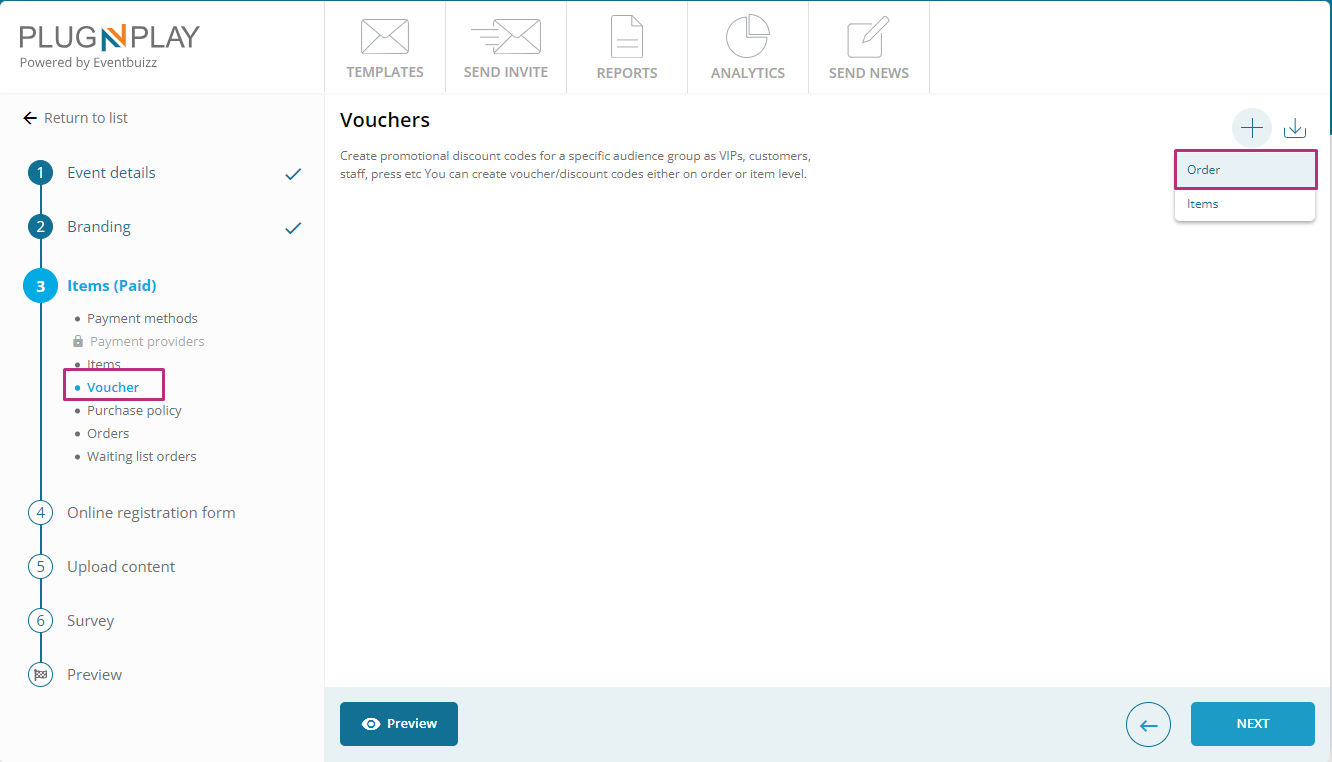
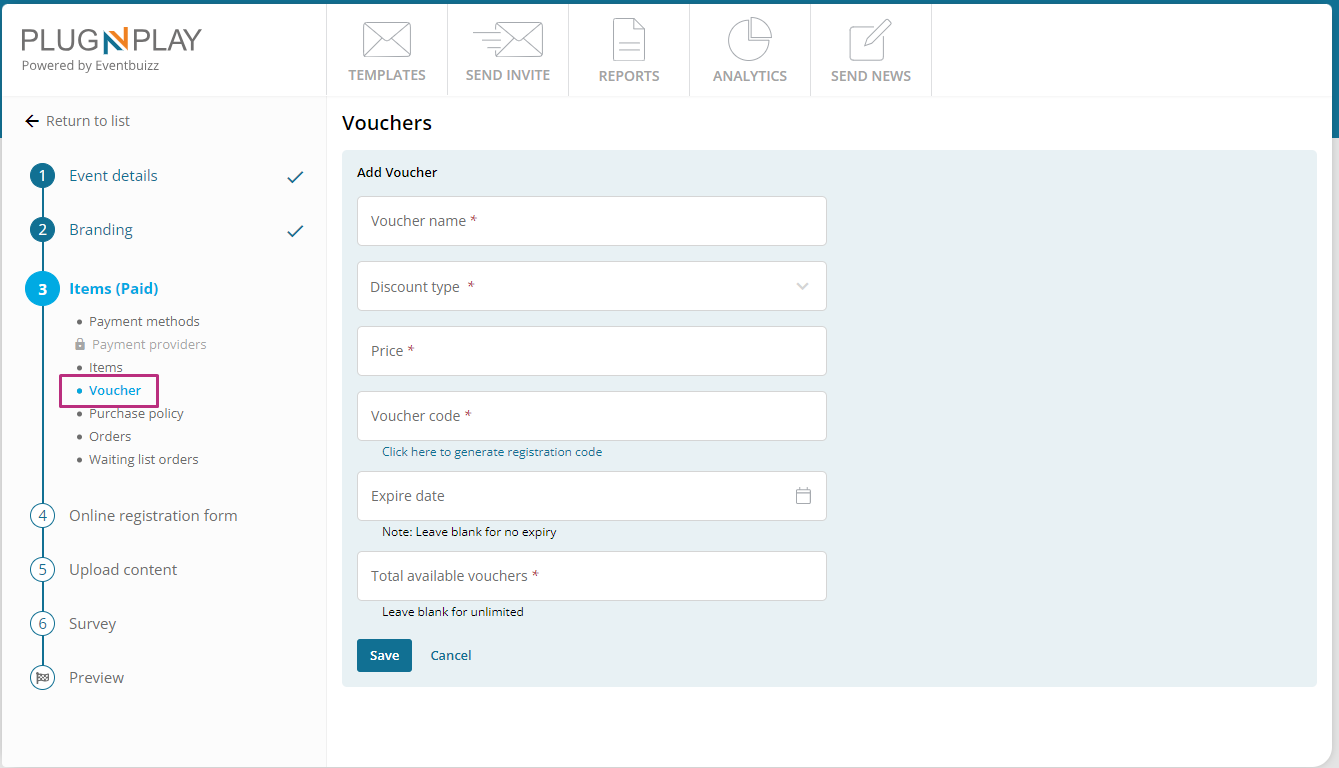
By clicking on “order” organiser will navigate on add voucher screen, where he will add data on this following fields and creates the order voucher.
- Voucher name: Organiser will give the voucher name as per the required name.
-
Discount type: you specify how the discount will be applied. It could be a fixed amount (e.g., $10 off) or a percentage discount (e.g., 20% off) on the ticket price and that discount value will be added in the price field.
-
Voucher code: Name the voucher code. Each voucher can have a unique promotion code that attendees enter during the registration or checkout process to redeem the discount.
- Expiry date: This field allows you to set an expiration date for the voucher. After this date, the voucher will no longer be valid for use. Leaving it blank means the voucher has no expiry date.
Billing item voucher
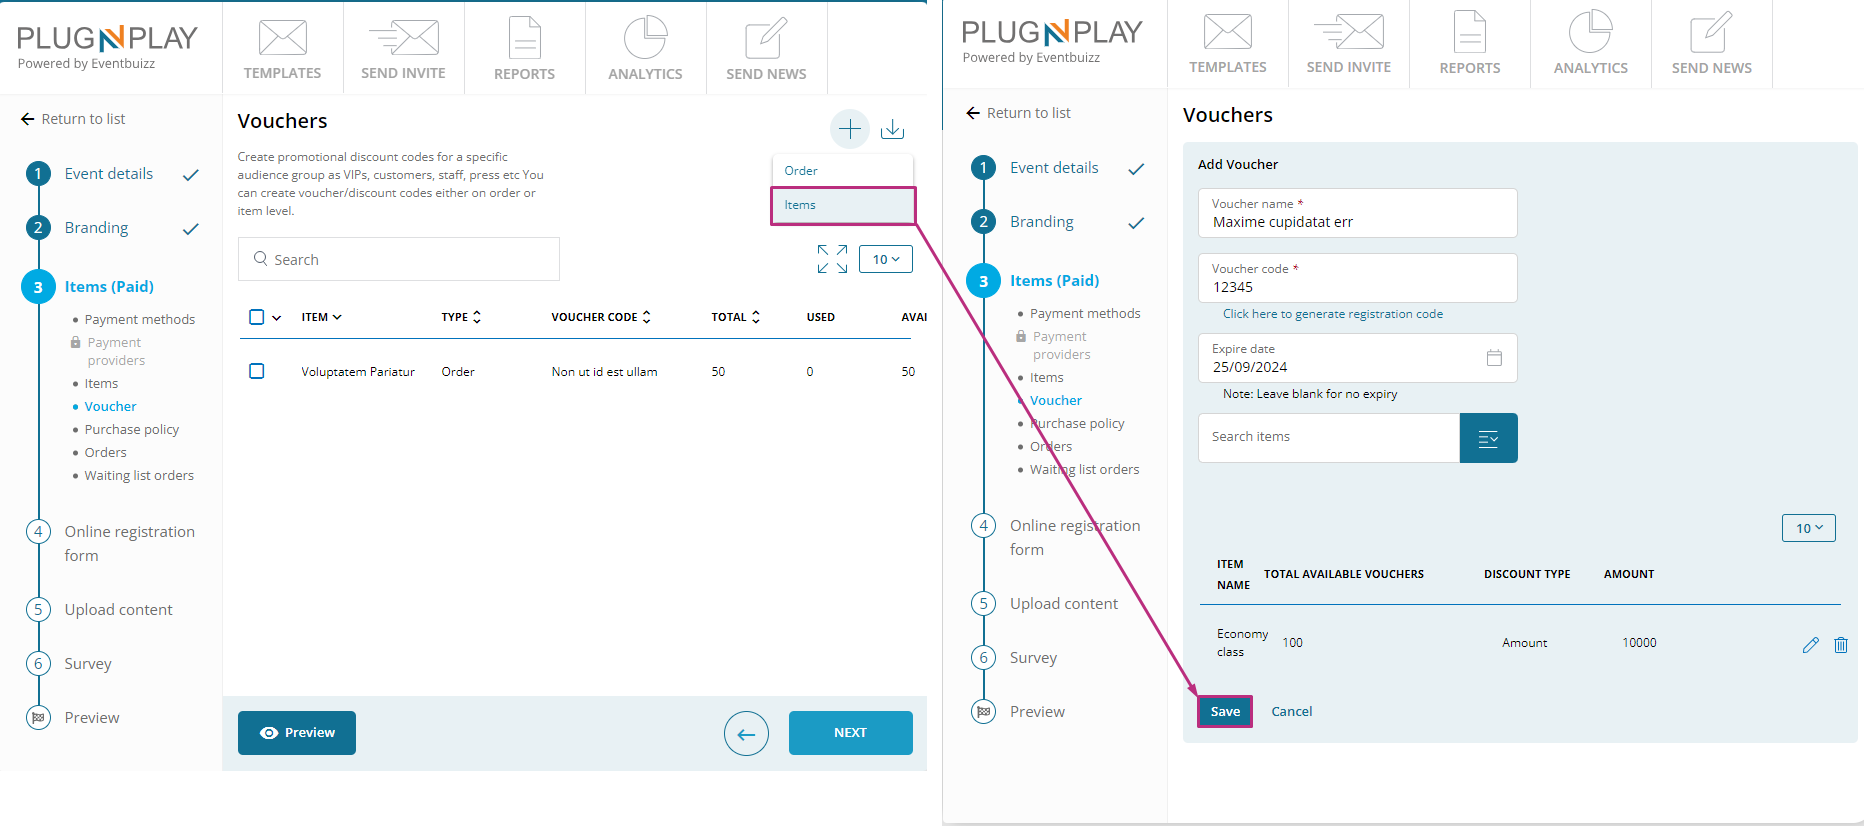
By clicking on the “voucher item” organiser will redirects on the add item voucher screen, where give the required field data and select the billing item, against which billing item, he want to add the voucher and creates the voucher.
- Voucher type: If you want to link a voucher to a certain billing item, then you choose “Billing items“ in voucher type.
- Billing items: Choose which billing item the voucher is linked to from the list.
After creating the voucher organiser will move on, voucher listing, and against each voucher listing voucher type is mentioned.
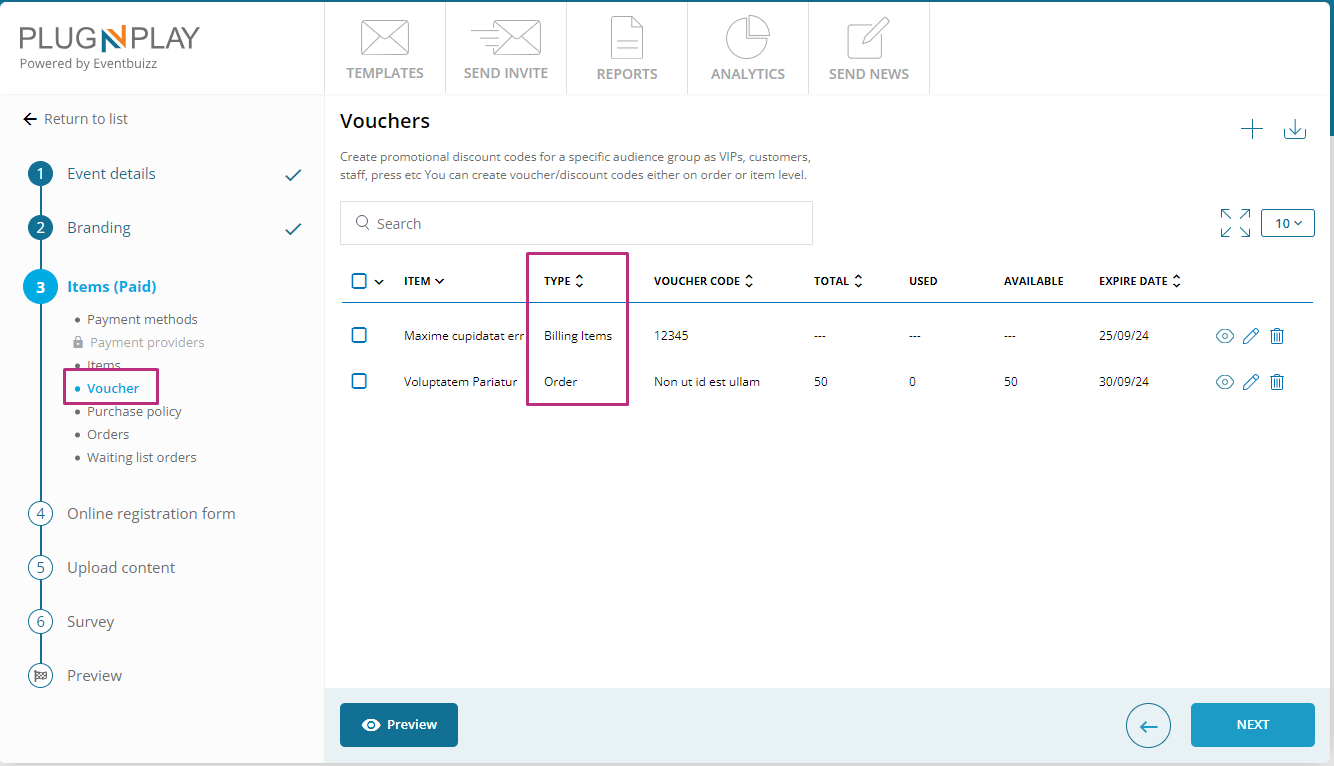
On voucher listing, have the same sort of actions available. Detail of all available actions given below:
- View: By clicking the view organiser can preview the created voucher details.
- Edit: By clicking the edit organiser can edit the created voucher details.
- Delete: By clicking the delete icon, organiser can delete the created vouchers, which are no more used.

Purchase policy
Purchase policy terms and conditions
Purpose:
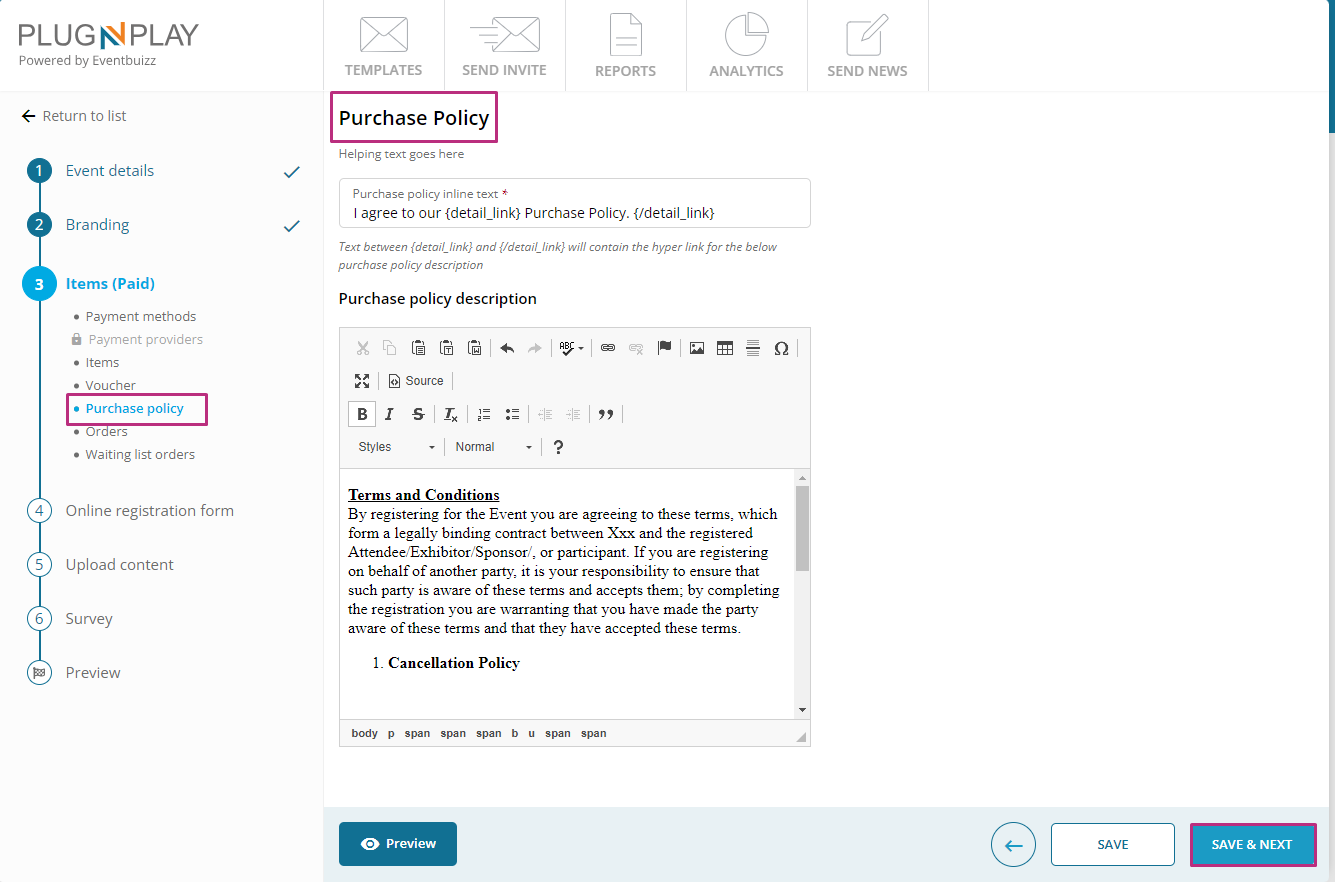
- To define and communicate the terms and conditions related to purchases and registrations for the event.
Details:
- Policy text: Write and configure the terms and conditions that attendees must agree to during registration. This can include refund policies, cancellation terms, and any other relevant conditions.
- Display: Ensure that these terms and conditions are clearly visible and accessible to attendees during the registration process.
- Compliance: Make sure the policies comply with legal requirements and best practices.
Orders
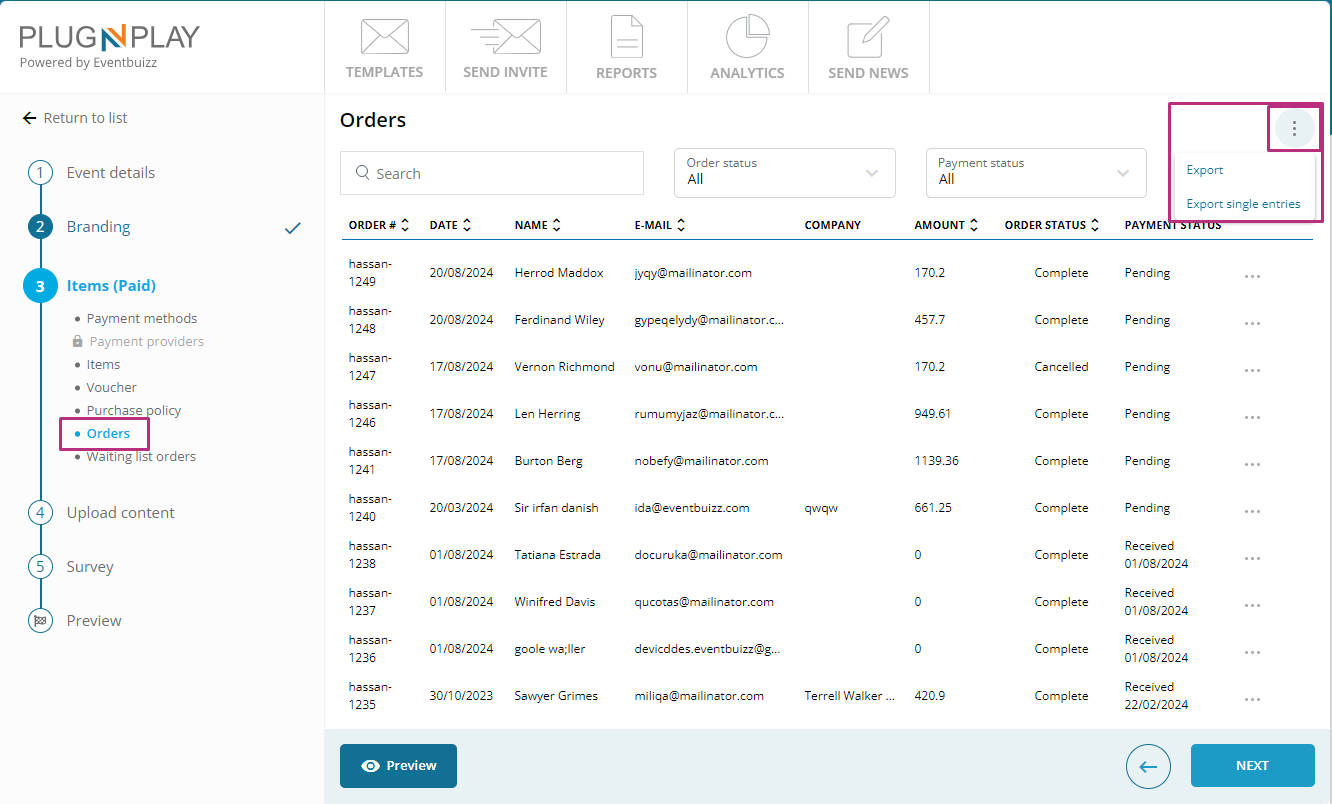
In plug and play, an order list typically refers to a list of orders placed by users for various services or products related to an event. This list may include details such as the order ID, the name of the user who placed the order, the items or services ordered, quantities, prices, payment status, and any other relevant information pertaining to the orders made through the plug and play platform. This feature helps event organisers and administrators keep track of all transactions and manage the logistics of fulfilling orders efficiently. All the placed orders by using this order will show on the listing of the order section:
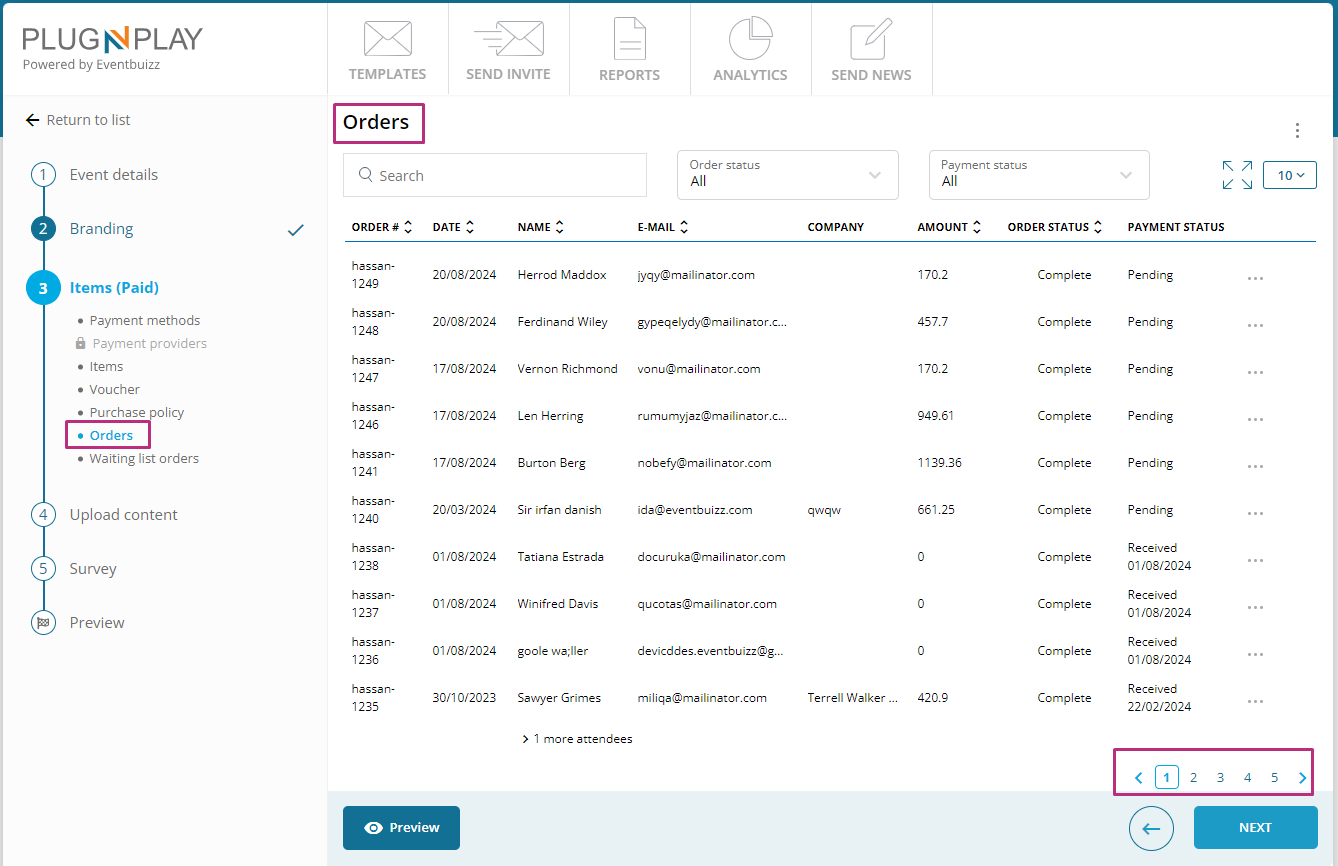
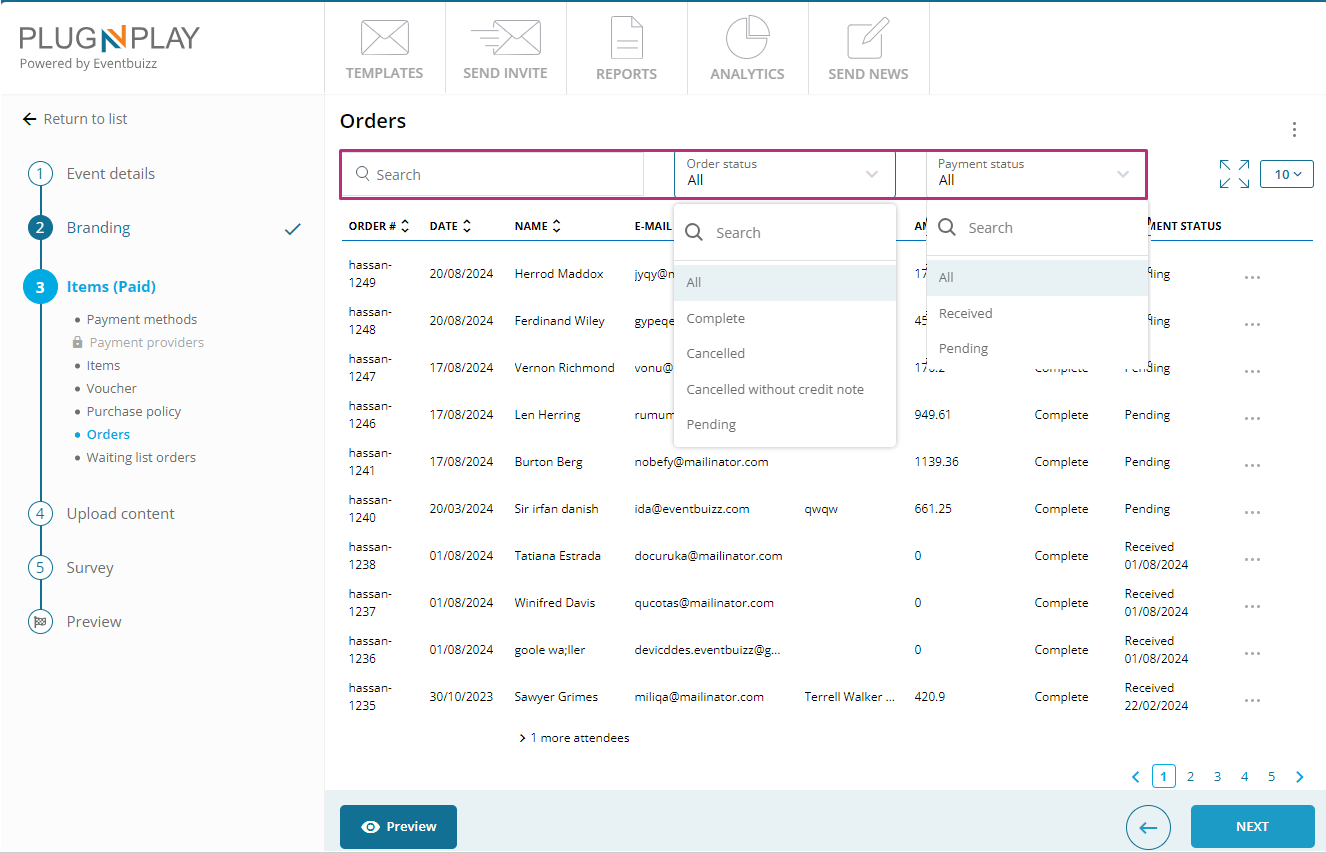
On the listing of orders, organiser have the access of different sort of filters like search, order status, payment status . Detail of each available filter is given below
- Payment status: Users can filter orders based on their payment status, such as received or pending.
- Order status: Users can filter orders based on their status, such as pending, processing, completed, cancelled, or cancelled without credit note.
- Search: By giving any specific in search bar organiser can filter out the data, base on the searched keyword.
Order status:
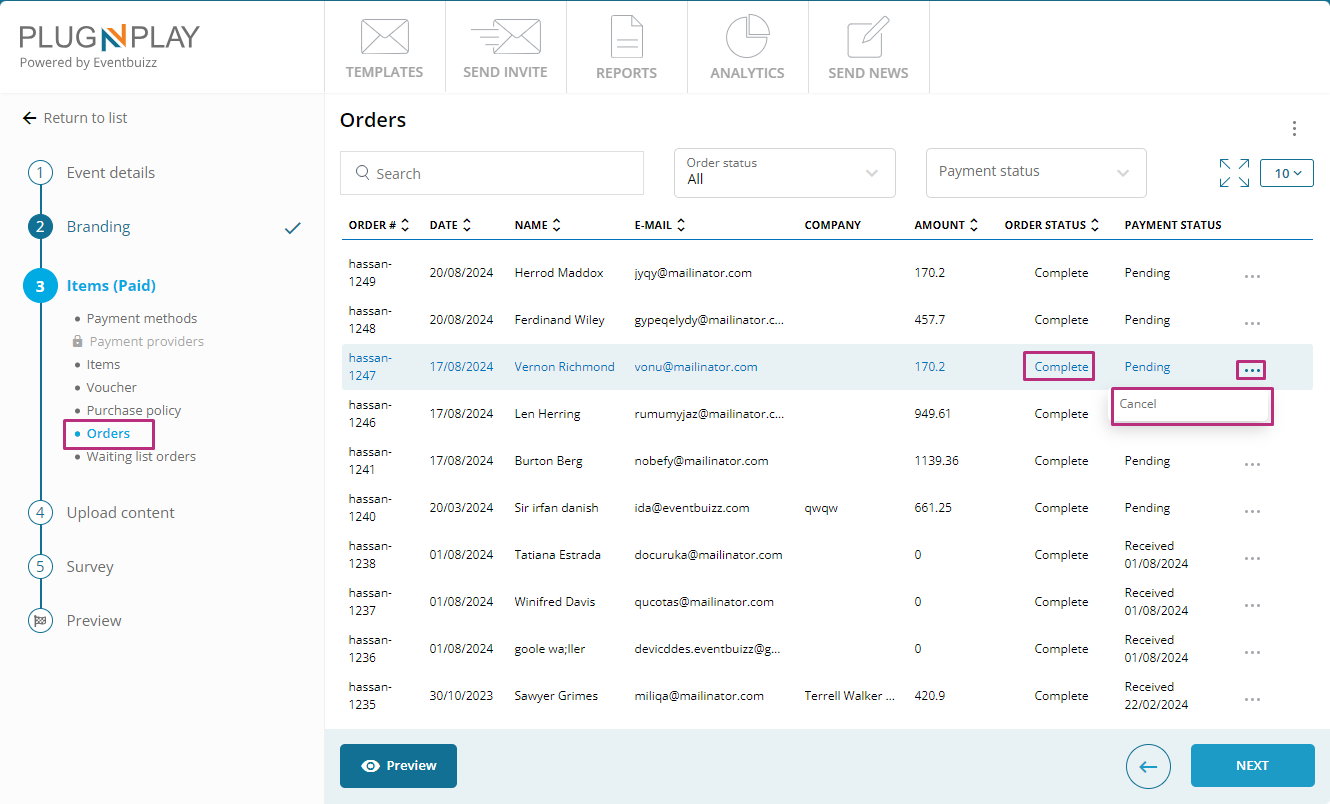
In plug and play portal, the order status refers to the current state or condition of an order placed by an attendee. This status typically includes stages “completed,” or “cancelled”, “pending” indicating the progress of the order through the system. Users can track their orders and monitor their status to stay informed about the progress of their purchases or registrations within the plug and play platform.
Here, Organiser can cancel an order any time – just click on cancel an order in menu option.
Payment status:
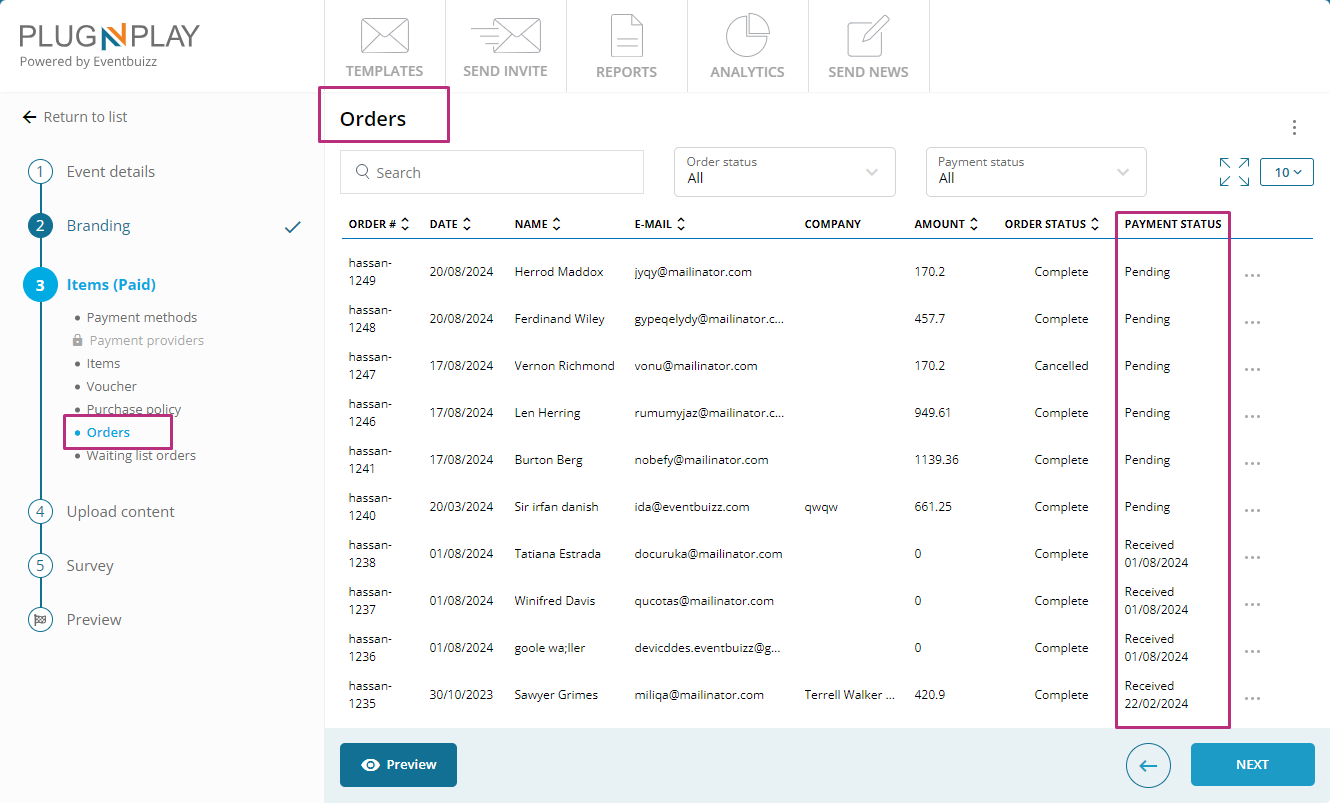
In Eventbuizz(plug and play), the payment status refers to the state or condition of a payment associated with an order or transaction within the platform. This status indicates whether the payment has been successfully processed, is pending, or has encountered any issues.
- Pending: The payment is awaiting processing or needs confirmation. This status typically occurs when the payment method is public or invoice, Once the payment is done by an attendee it requires manual verification.
- Received: When the payment method is card, the order has been successfully processed, and the transaction is complete.
Click on the ![]() icon, We have following export options export, export single entries:
icon, We have following export options export, export single entries:
The major difference between export and single entries is:
- In Export: all orders, billing items, or any form of data are displayed separately in separate sheets.
- In Export single entries: In exports, we view the complete information of attendees and all sub-registrations on the same sheet.
Waiting list orders:
A waiting list in plug and play platform refers to a list of individuals who are interested in attending an event that has reached its maximum capacity or sold out. When someone tries to register for an event that is already full, instead of outright denying them, Eventbuizz offers them the option to join the waiting list. This allows event organisers to keep track of additional interest in the event and potentially accommodate more attendees if there are cancellations or additional spaces become available.
How waiting list works, how organiser can make them enable against any event, for detail view please click here
All the orders which are placed by users, after reaching the event maximum limit, will goes on waiting list order section,here is the view of it, how it will look like:
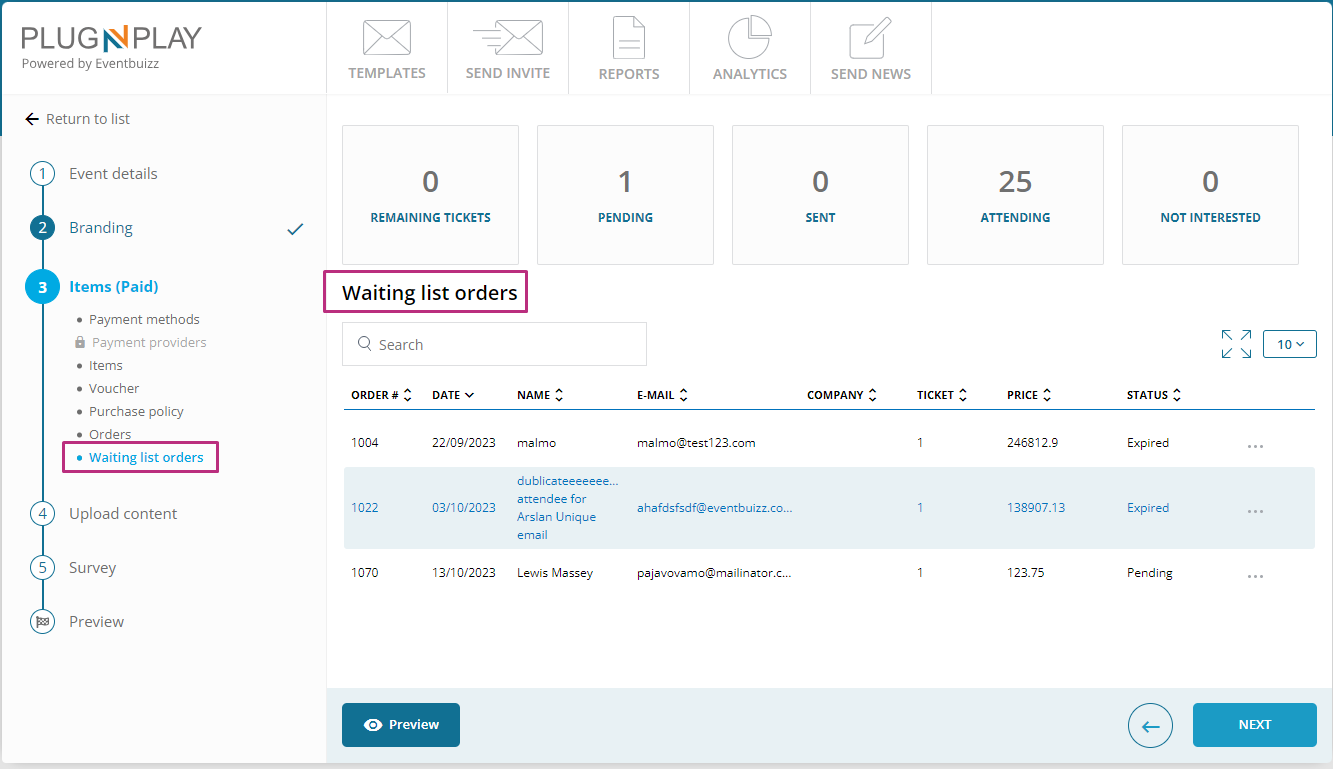
In waiting list order listing, organiser or sub admins have the access to different analytics widgets, which give the analysis, like how much attendees register for the event, how much attending or not interested. Detail of each available widget is given below:
- Remaining tickets: This widgets indicate that how many tickets are left from the total number of tickets available for the events.
- Pending: All the registered attendee, will shows in pending widget, and they will show in pending widget until organiser not sent them offer. Let suppose if an event open the manual waiting listing, and total available tickets for that event are 100, and 100 attendees registered for that event, so in remaining tickets it will show 100 number and in pending also show 100 registered attendees, and then organiser send offer letter to 10 attendee from them, then this number will change 100 to 90 in remaining ticket widget, and same in pending widget it will change 100 to 90, and in sent widget it will be 10.
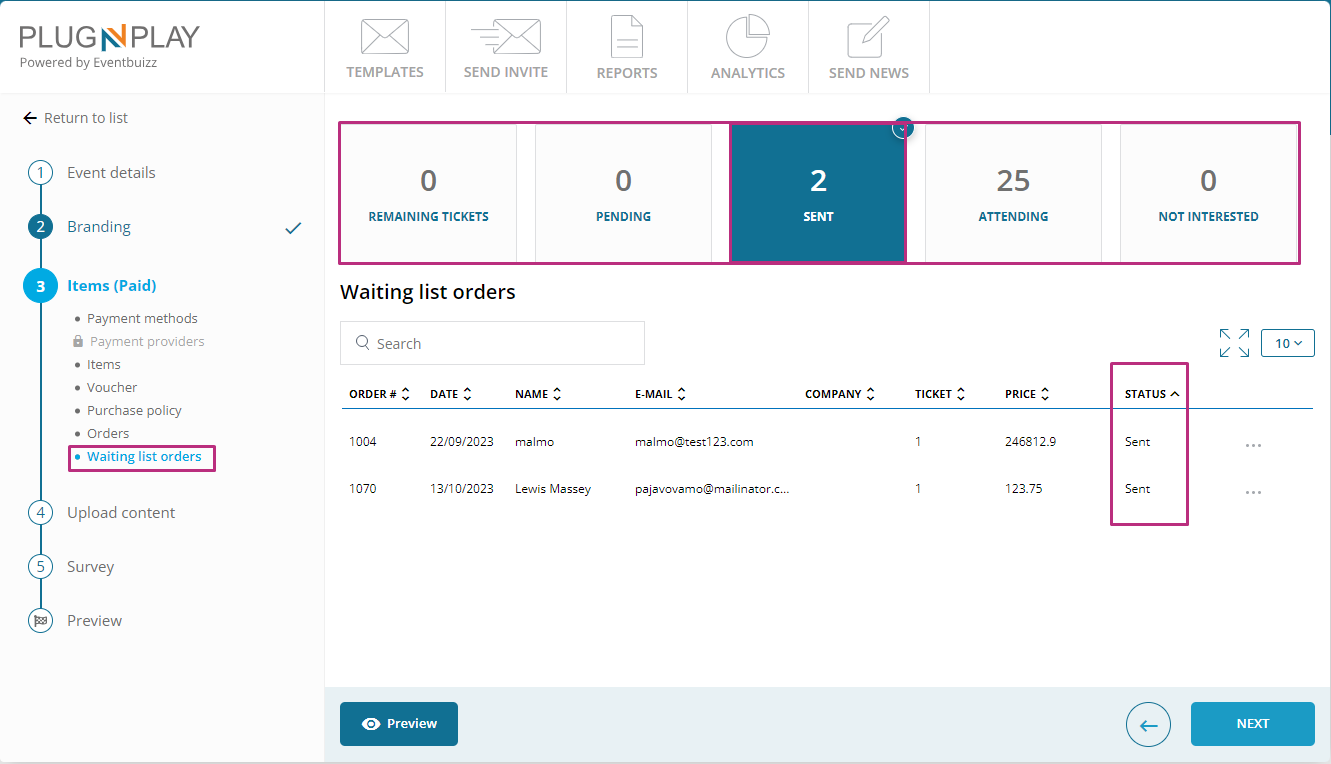
- Sent: Sent will show the number of offers which are sent from user admin or organiser.
- Attending: Attending will show the number of attendees those who accept the offer for attending the event. For example if 10 offers are sent, and five accept the offer, so 5 will show in the attending widget, and 5 who not accepted will show in not interested.
- Not interesting: Attendees those who reject the offer, or not react on the offer will show in not interesting widget.
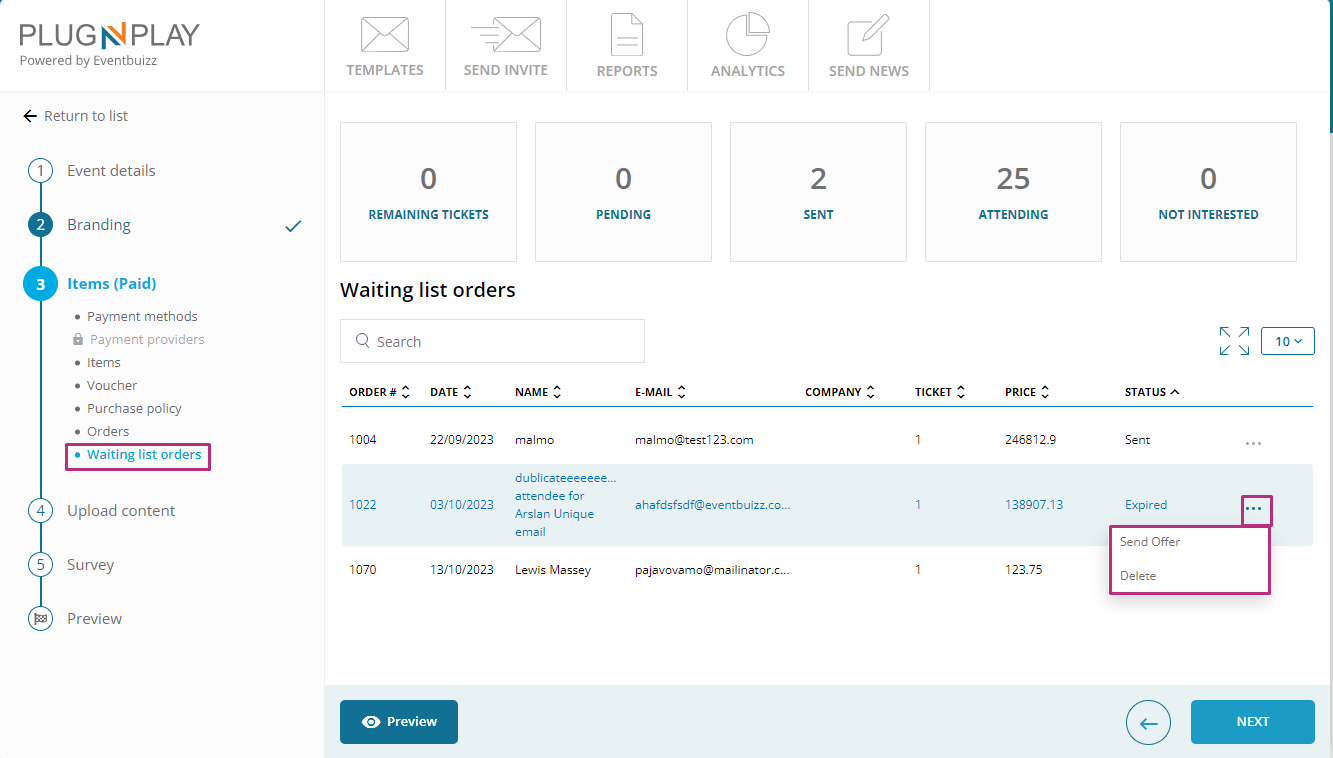
Against each registered attendee for event, which are showing in the waiting list, have the menu![]() , and in menu different options are available. Detail of each available option given below:
, and in menu different options are available. Detail of each available option given below:
- Send offer: By clicking on the send offer menu option, organiser or user admin can send the offer to that particular attendee or user.
- Delete: By clicking on delete menu, organiser or user admin can delete the registered attendee.
Online registration form
Online registration form
Online registration form overview
An online registration form is a crucial component in event management systems, designed to streamline the process of attendee sign-up for events. This form serves as a digital interface where prospective attendees provide essential information to register for an event. It ensures that event organisers can collect accurate data, manage participant information efficiently, and tailor the event experience to individual needs.
Purpose of the online registration form
The primary purpose of the online registration form is to:
- Collect attendee information: Gather necessary details from attendees to facilitate their participation in the event.
- Customise the experience: Allow organisers to tailor the registration process to suit specific event needs and preferences.
- Ensure compliance: Manage legal and regulatory requirements such as GDPR and terms and conditions.
- Streamline data management: Provide a structured way to handle participant data, which can be used for event planning and communication.
Features and functions:
The online registration form comprises several key features and functions, each designed to enhance the user experience and improve event management. Detail of available features given below, available features are:
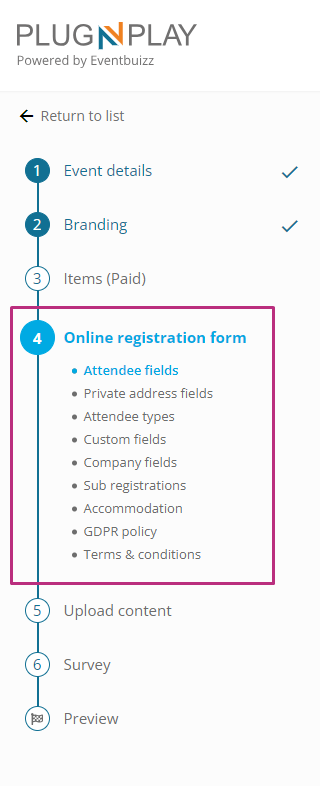
Attendee fields
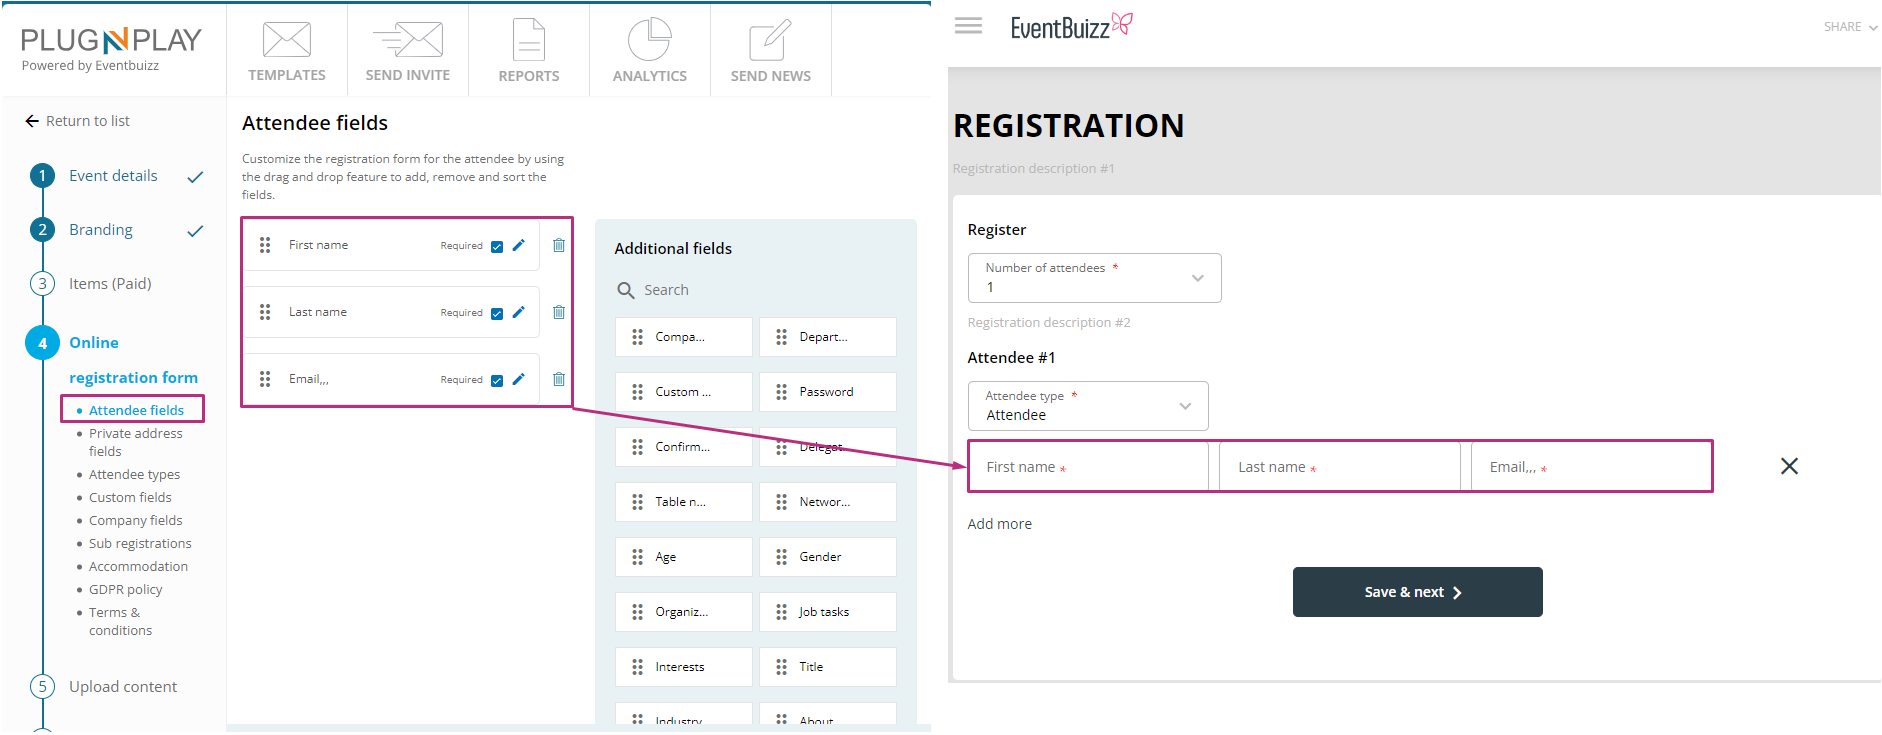
Select all the information organiser require from attendees when signing up. First name and email are mandatory. Organiser can customise the registration form for the attendee by using the drag and drop feature to add, remove and sort the fields. By default first name, last name,email, will be active, and other-fields are deactivated. Here is the view of it:

Organiser can add or remove the fields from registration form by using drag and drop features, let suppose organiser want to take initial data as well from attendee, then he will make initial field active.

Organiser have different actions available, against each active attendee fields, detail is given below of each available options:
- Required
 check-box: If organiser want to make this field required in registration form then will mark it required.
 - Edit: Organiser can edit the name of the field by clicking the edit icon.
- Delete: Delete can delete the active sort field.

All active fields are accessible in registration form for attendees as per given actions:
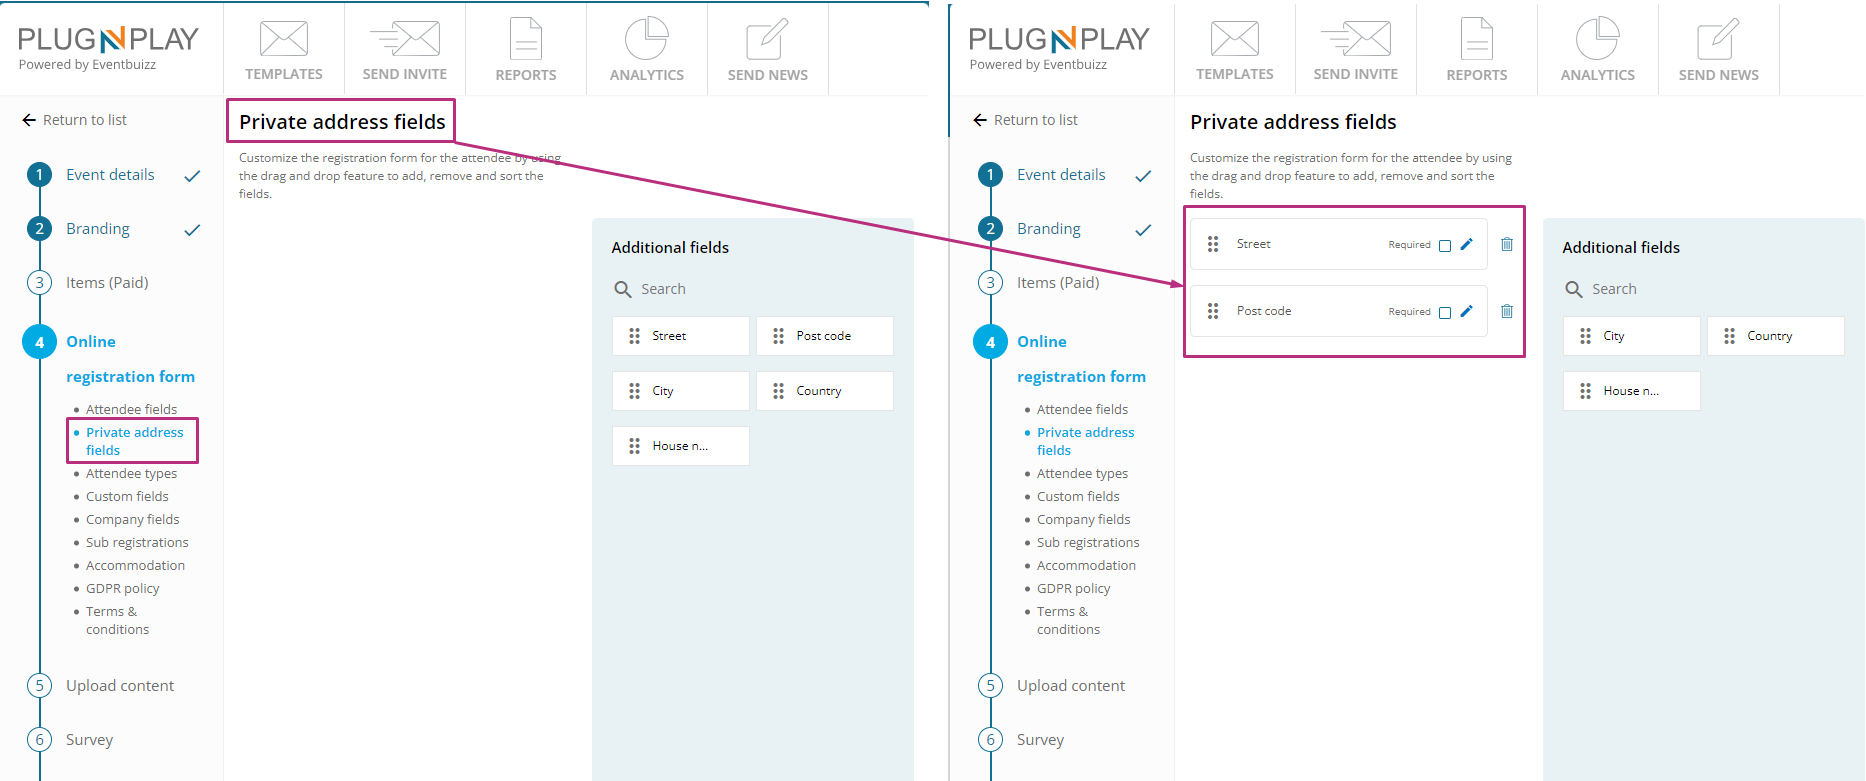
Private address fields
Customise the registration form for the attendee address fields by using the drag and drop feature to add, remove and sort the fields.
- Customisation: Similar to attendee fields, organisers can customise private address fields through drag-and-drop functionality. This typically includes fields related to the attendee’s personal address details, which may be required for mailing or administrative purposes.
- Active fields: Adjustments here also affect what information is requested from attendees, focusing on their private addresses.

By default no private field is active, but organiser can make active as per event requirements:
Attendee types
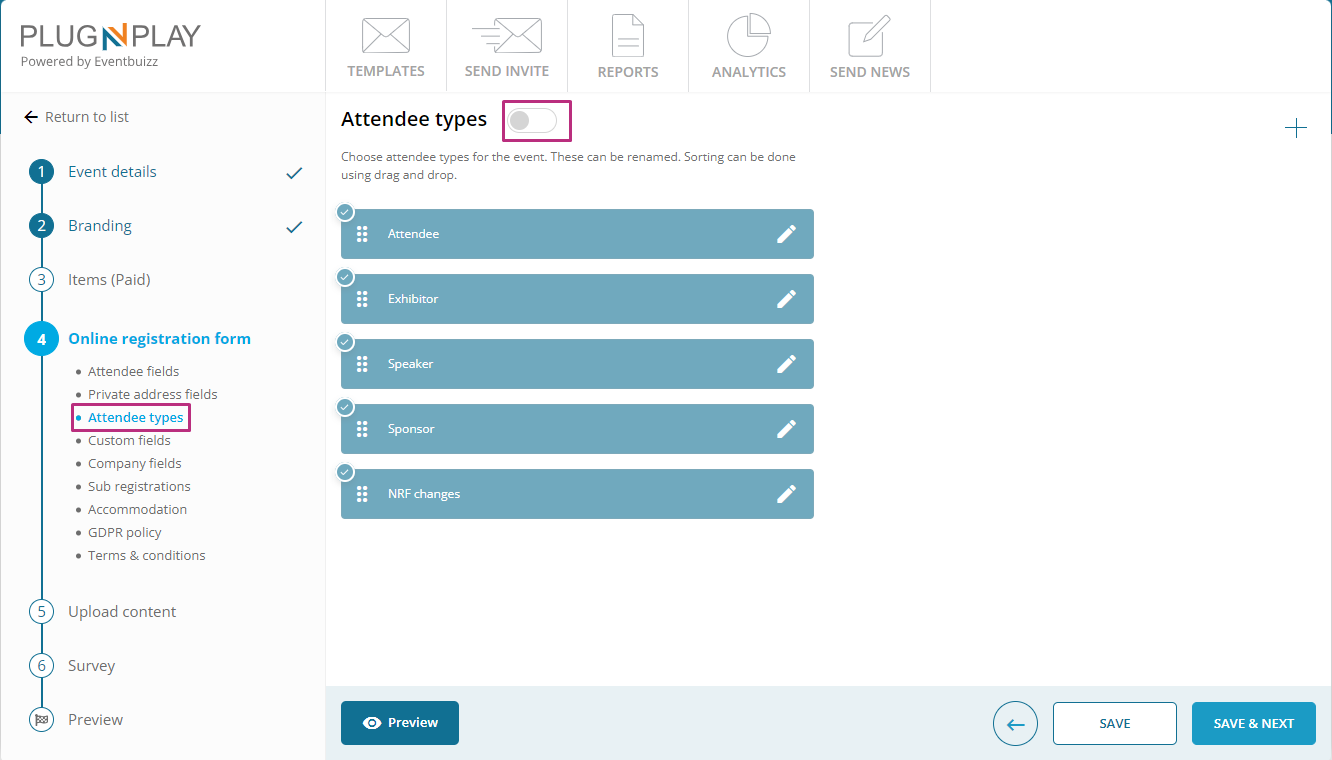
- Predefined types: The portal includes default attendee types such as “attendee,” “sponsor,” “speaker,” and “exhibitor.”
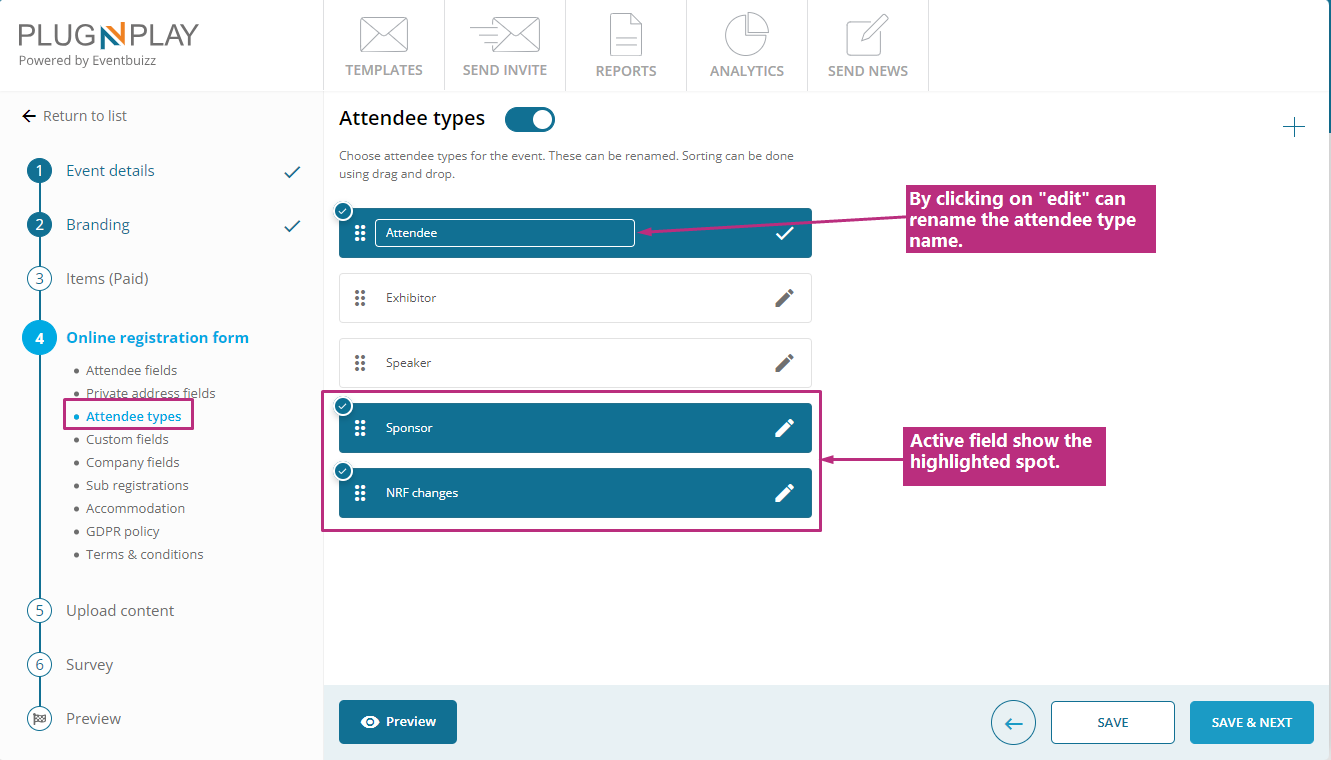
- Customisation: Organisers can add new attendee types by clicking the plus icon and entering a custom type name. Attendee types can be renamed and reordered using drag-and-drop to fit the event’s needs.
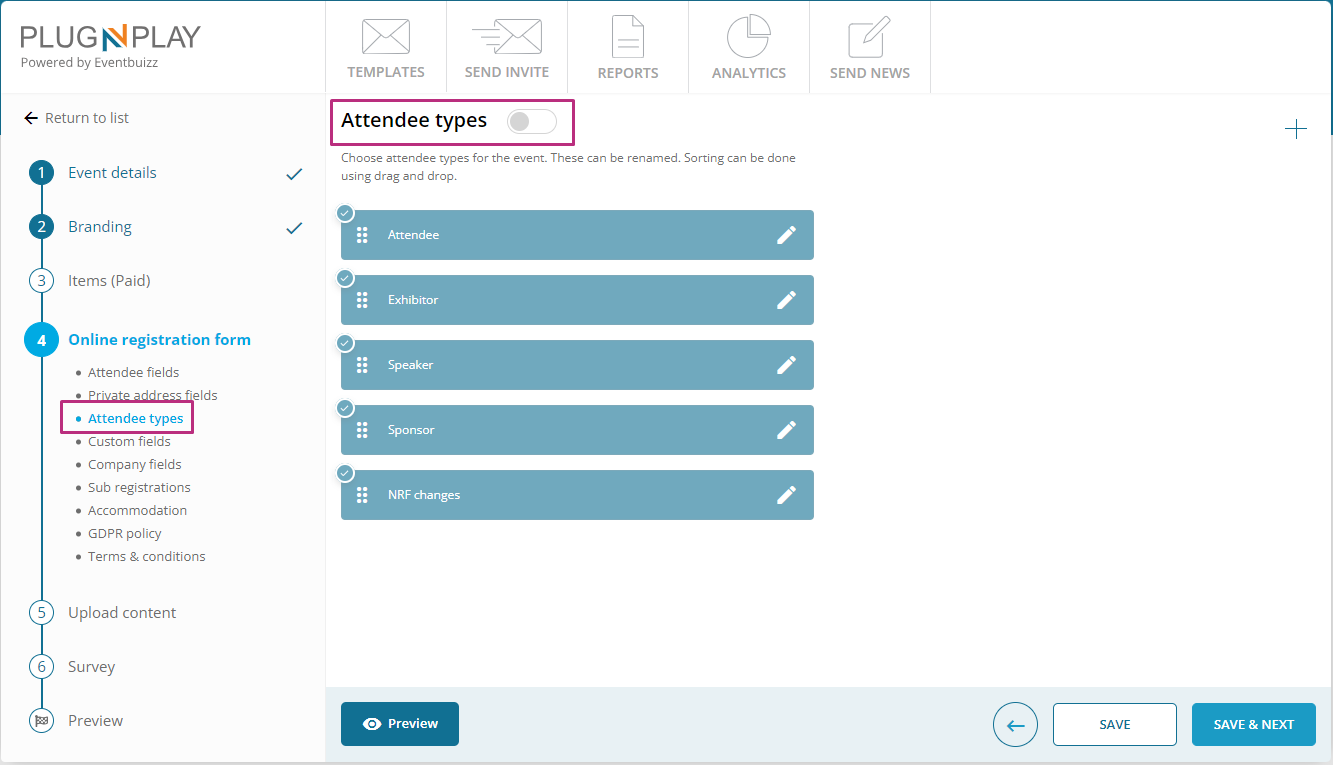
At the top of attendee types there is a toggle button, if this button is disabled, then organiser cannot edit the attendee types, or also cannot make active or deactivate them.
If toggle button is on, then organiser can edit the field or by clicking on the field can make enable or disable, and active attendee types organiser can access in registration form in attendee type field.
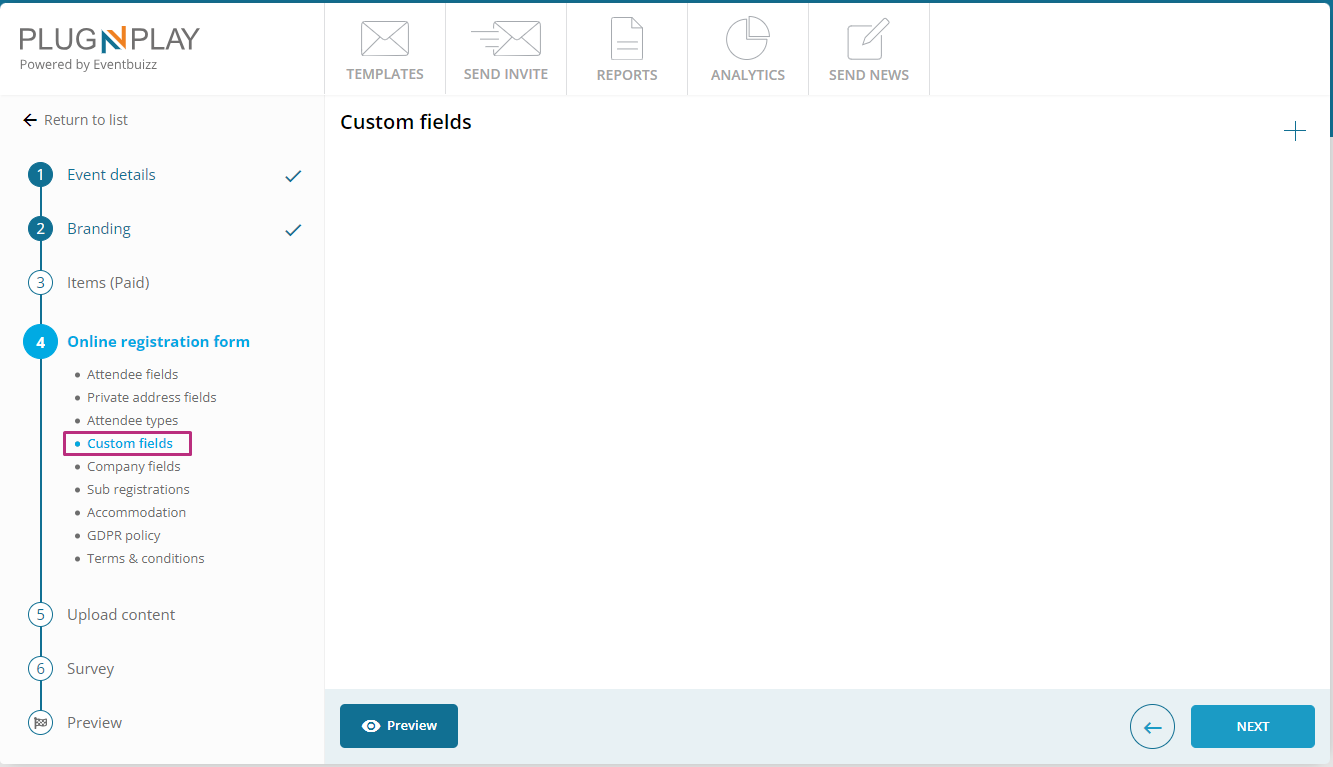
Custom fields
A custom field is a feature that lets event organisers collect additional information from attendees beyond the standard registration details.
- Additional information: Custom fields allow organisers to collect extra information not covered by the standard fields. This can include specific preferences or requirements that are unique to the event.
- Flexibility: These fields can be tailored to gather any type of information that might be relevant, enhancing the detail and customisation of the registration process.
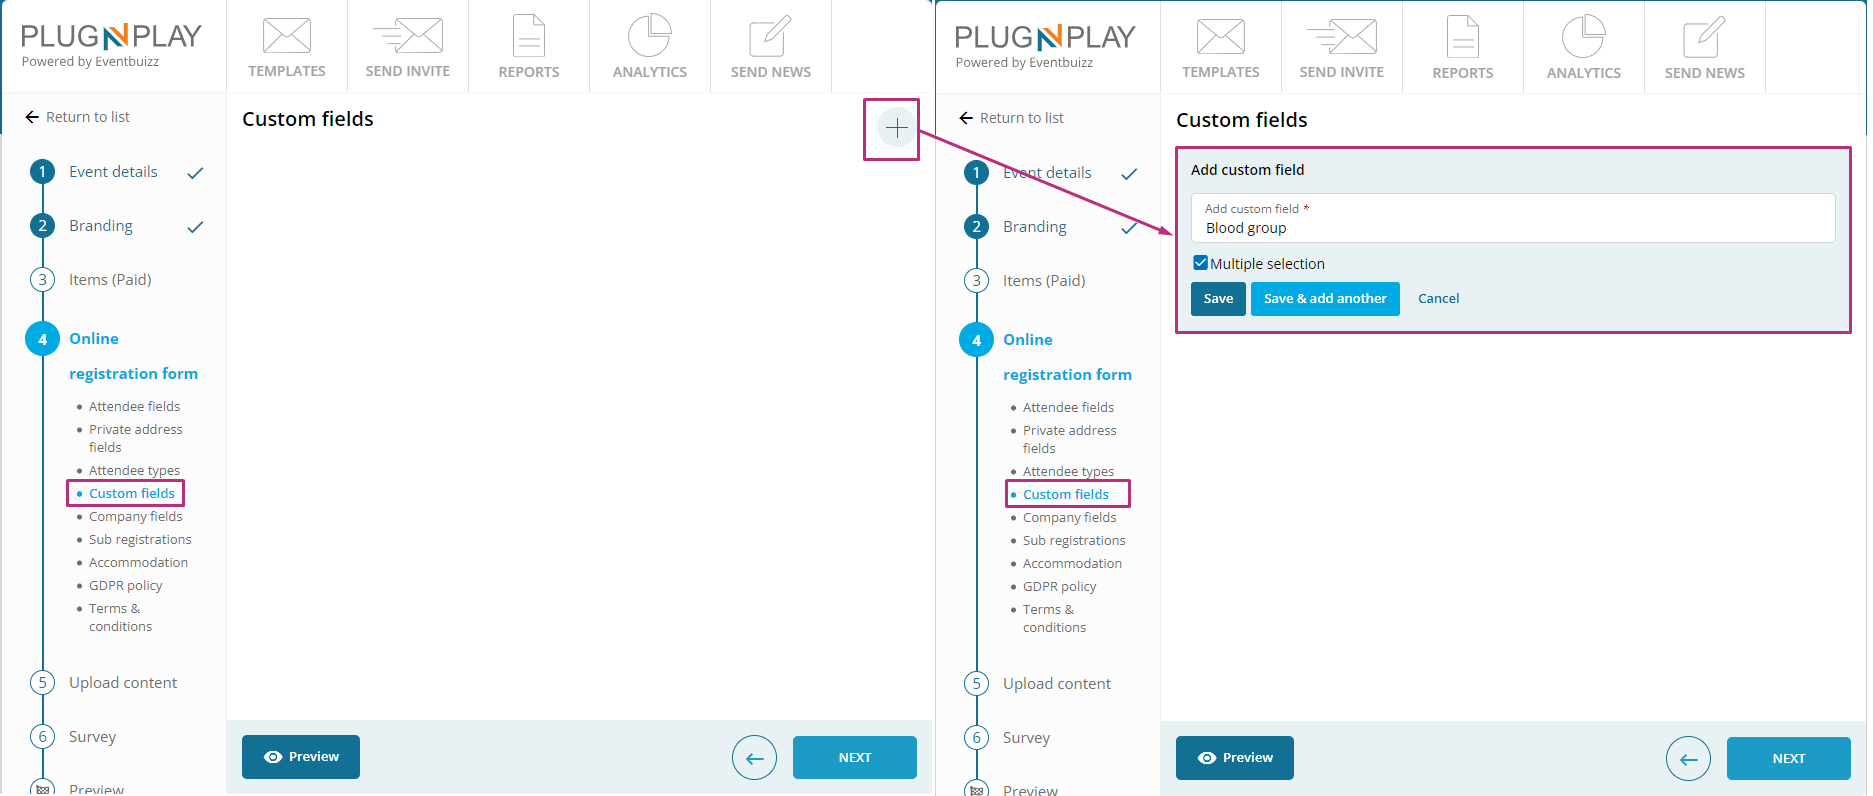
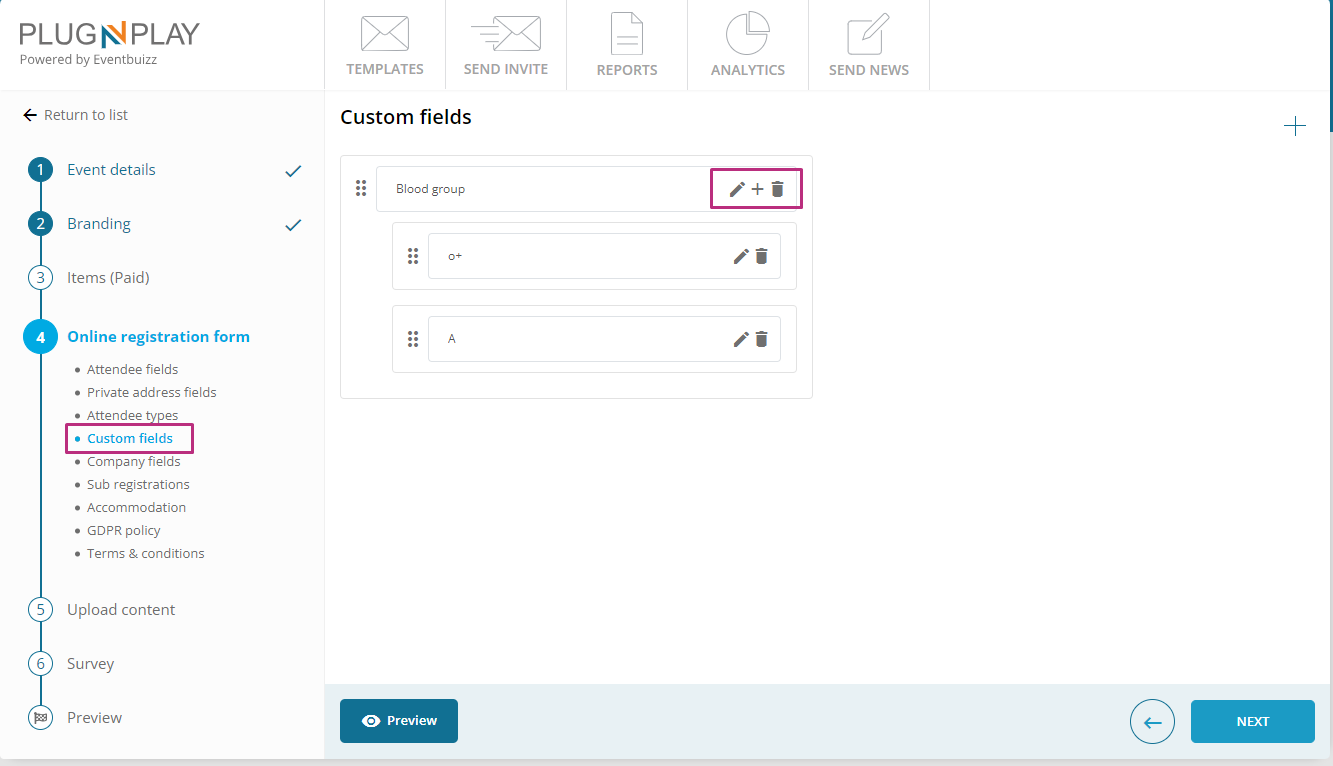
By clicking on “+” icon, organiser can create the required custom field, just need to input the name of field, and save it, will create the field. And created fields will be accessible in registration form.
All created fields will show on listing and have different actions are available against each created fields. Detail of each available options:
- Edit: Can rename the field by editing the field
- Delete: Can delete the unwanted or no more used fields.
Company fields
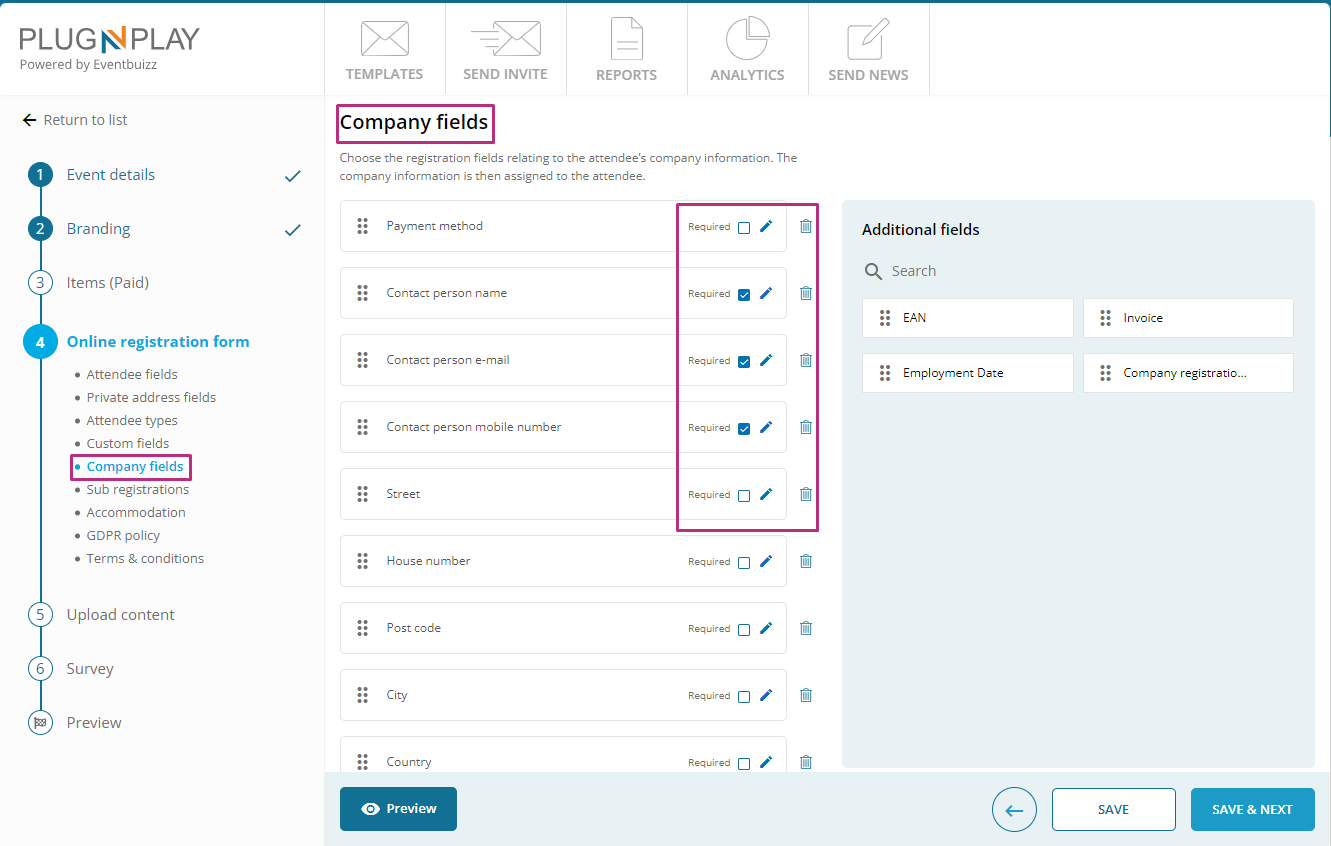
Choose the registration fields relating to the attendee’s company information. The company information is then assigned to the attendee.
- Company information: Organisers can choose which fields to include related to the attendee’s company information. This might cover details such as company name, industry, and job title.
- Assignment: The collected company information is assigned to the individual attendee, providing context for their participation in the event.
Sub registration
Sub registration allows event organisers to create multiple registration forms or sections within a single event. This can be used in different ways for managing different aspects or segments of an event, such as workshops, sessions, or activities that require separate sign-ups. You can ask the attendees questions regarding special dietary needs, travel plans or even permissions to send out newsletter etc.
The Sub registrations can be used as a part of the registration process or in relation to the web-app.
Organisers can set up different registration forms for various parts of the event. For example, there could be one form for the main event and separate forms for each workshop or breakout session.
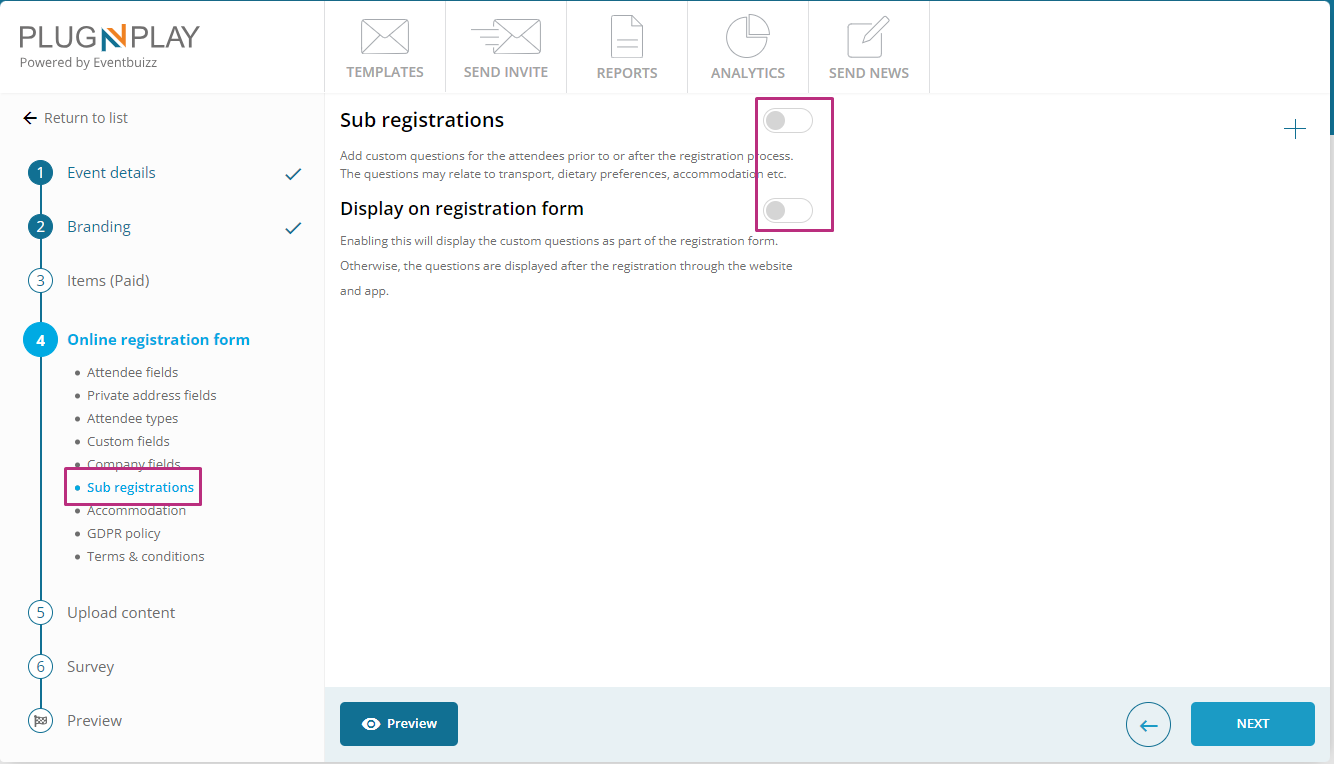
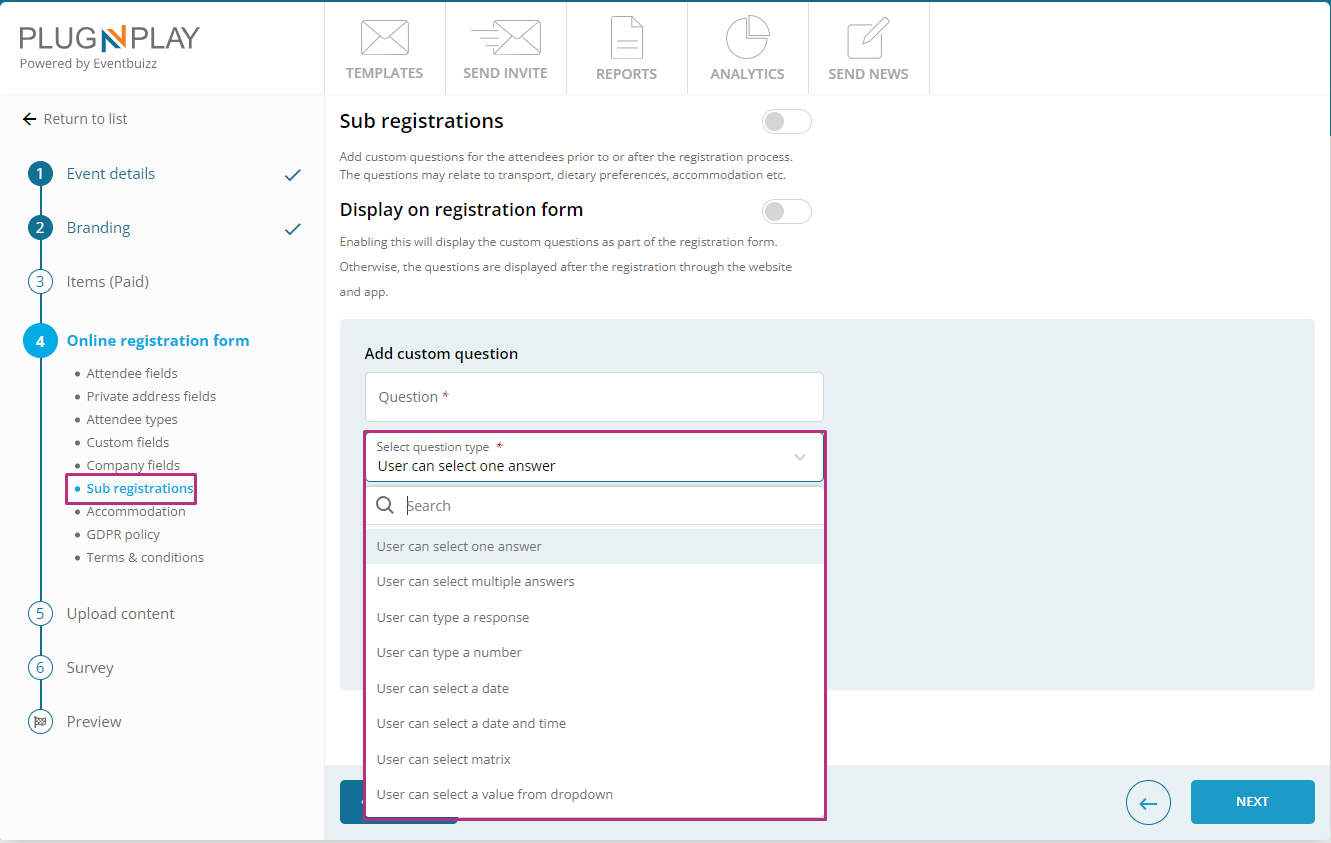
In plug an play portal organiser have two toggle buttons when landed by default on the sub registration screen. Detail is given below:
- Sub registrations: By default this toggle is off, basically this toggle button is used for making the sub registration module on in the plug and play portal.
- Display on registration form : By default this toggle also disable, and if organiser want to show sub registration on registration form then make it enable. A toggle option allows organisers to choose whether these custom questions appear on the initial registration form or after the registration is completed. This helps in managing the user experience and streamlining the registration process.
By clicking in “+” icon, organiser can add add custom question by giving the data in required fields:
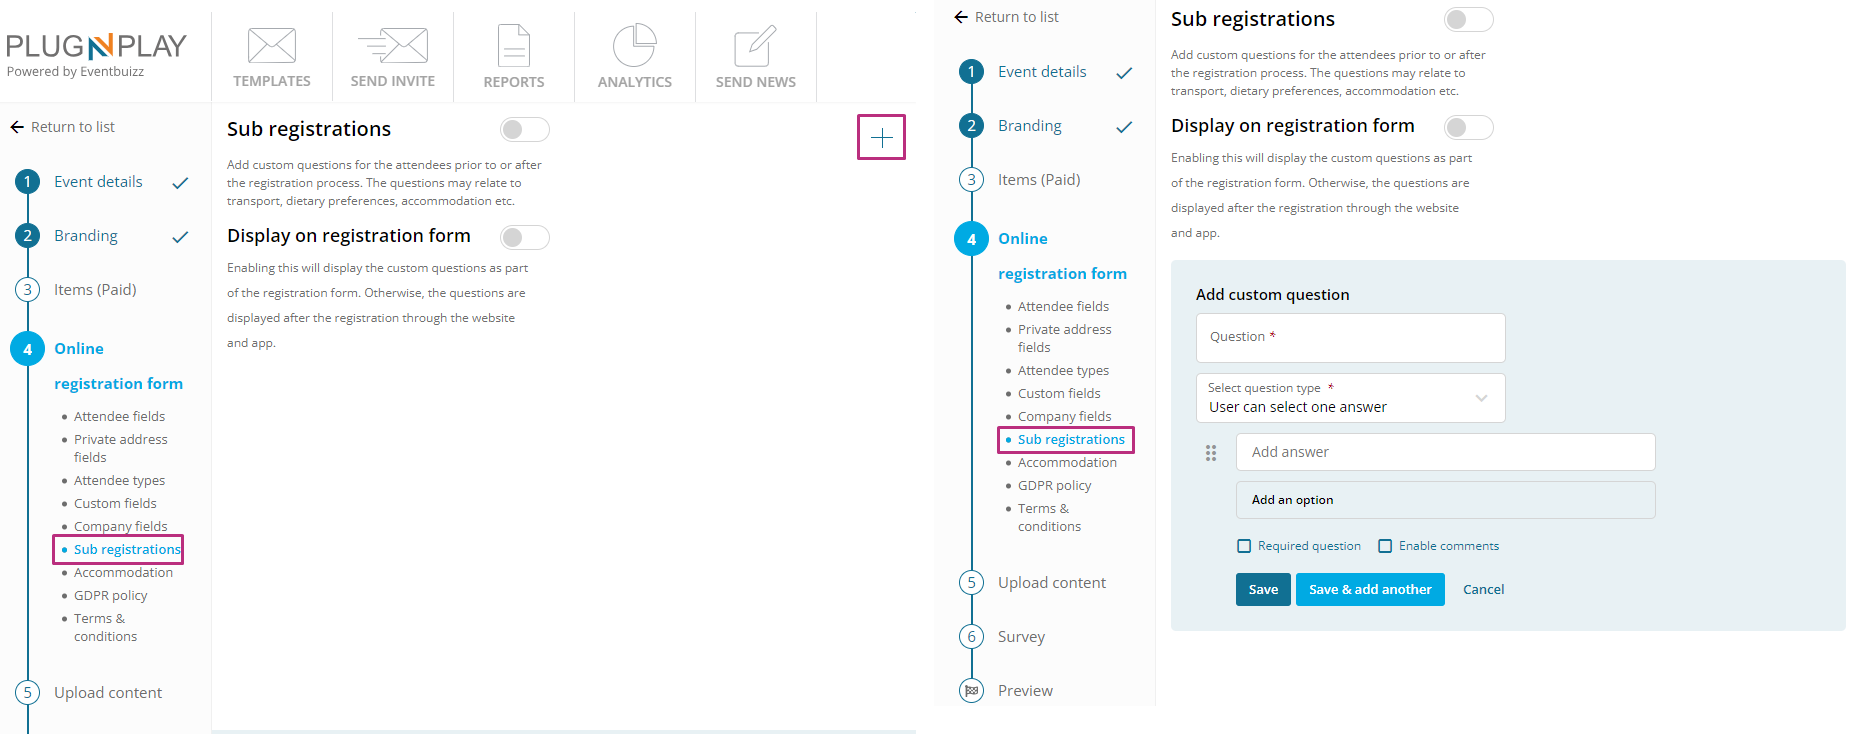
For detail overview how to add question, and how question types work, and how sub registration, add and works please click here
Accommodation
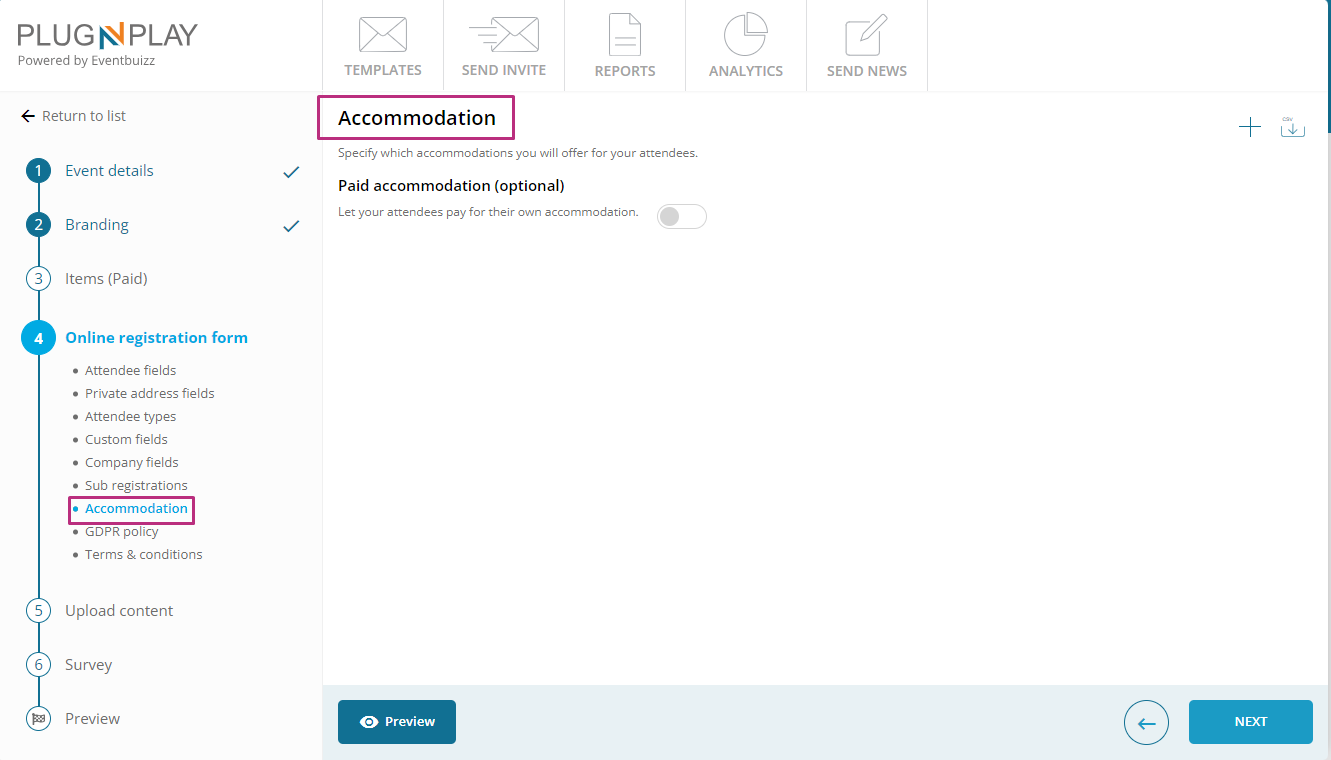
The “Accommodation module” refers to a feature or component within the software that facilitates managing accommodations for events. Hotel management is designed to handle all aspects of accommodations for events. This includes the process of adding hotels, booking hotel rooms, managing room blocks, tracking reservations, and coordinating with partner hotels. For detail overview of accommodation or hotel management, like how it works how it creates, please click here
GDPR
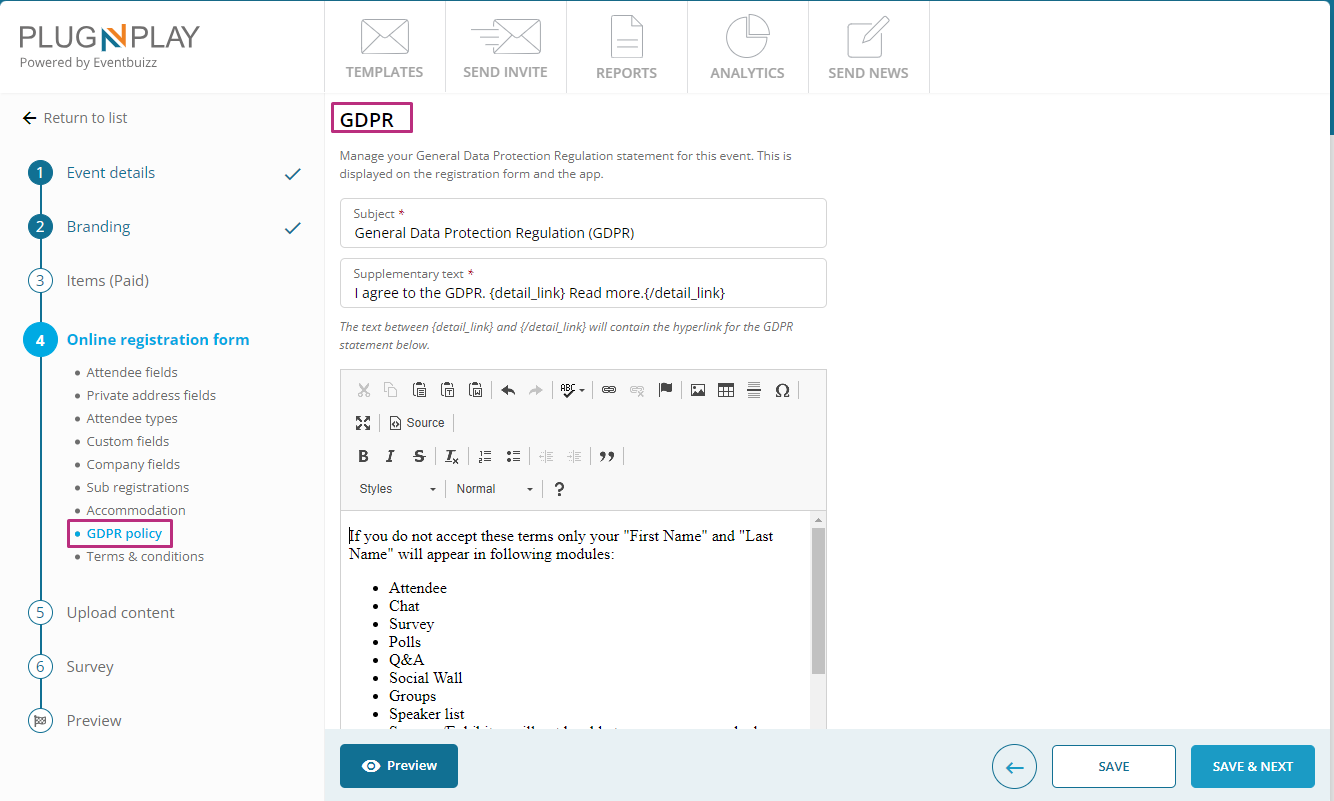
Compliance Statement: The GDPR section allows organisers to manage and display a compliance statement related to data protection. This statement is included on the registration form and app to inform attendees about how their data will be handled and protected. For detail overview like how GDPR work, please click here
Terms & conditions
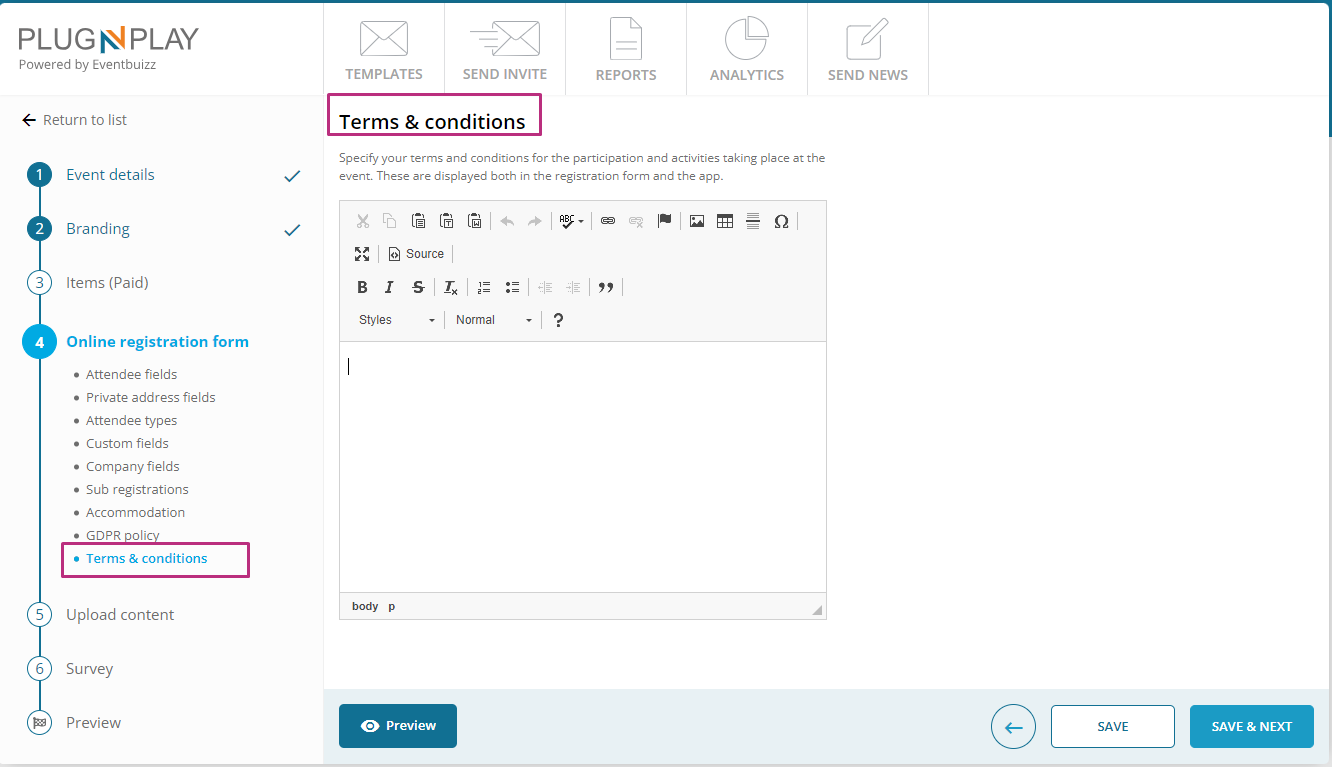
- Participation terms: Organisers can specify the terms and conditions for participation in the event. These terms outline the rules and regulations attendees must agree to.
- Display: The terms and conditions are presented on both the registration form and the event app, ensuring that all participants are aware of and agree to the event’s policies.
Upload content
Upload content
The content upload step in the plug and play portal is crucial for organising and managing an event. This step allows organisers to input, customise, and manage various types of information and media that attendees and participants will access via the event website and mobile app. The purpose is to ensure that all relevant details about the event are accurately represented and easily accessible, enhancing the overall experience for attendees and streamlining event management.
Key objectives:
- Centralised information management: Streamline the management of all event-related data from a single interface.
- Enhanced visibility: Ensure that relevant information is visible on both the event website and mobile app.
- Customisation: Allow for the personalization of menus and content to align with the event’s branding and requirements.
- Documentation: Provide essential documents and resources related to programs, speakers, and other event elements.
- Interactive features: Enable interactive features such as maps and custom registration questions to facilitate attendee experience and engagement.
Upload content module is consist of the following sub module sections, detail of each available section is given below:

Detailed flow of the content upload step
Customise app menus:
- Purpose: Tailor the menu structure of the event app to improve navigation and relevance. Organiser can customise the event app menu by making modules active or in-active.
- Process:
- Enable/disable menus: Choose which menu items should be visible on the app.
- Sort menus: Arrange the menu items in the desired order.
- Rename labels: Change the labels of menu items to fit the event’s branding or needs.
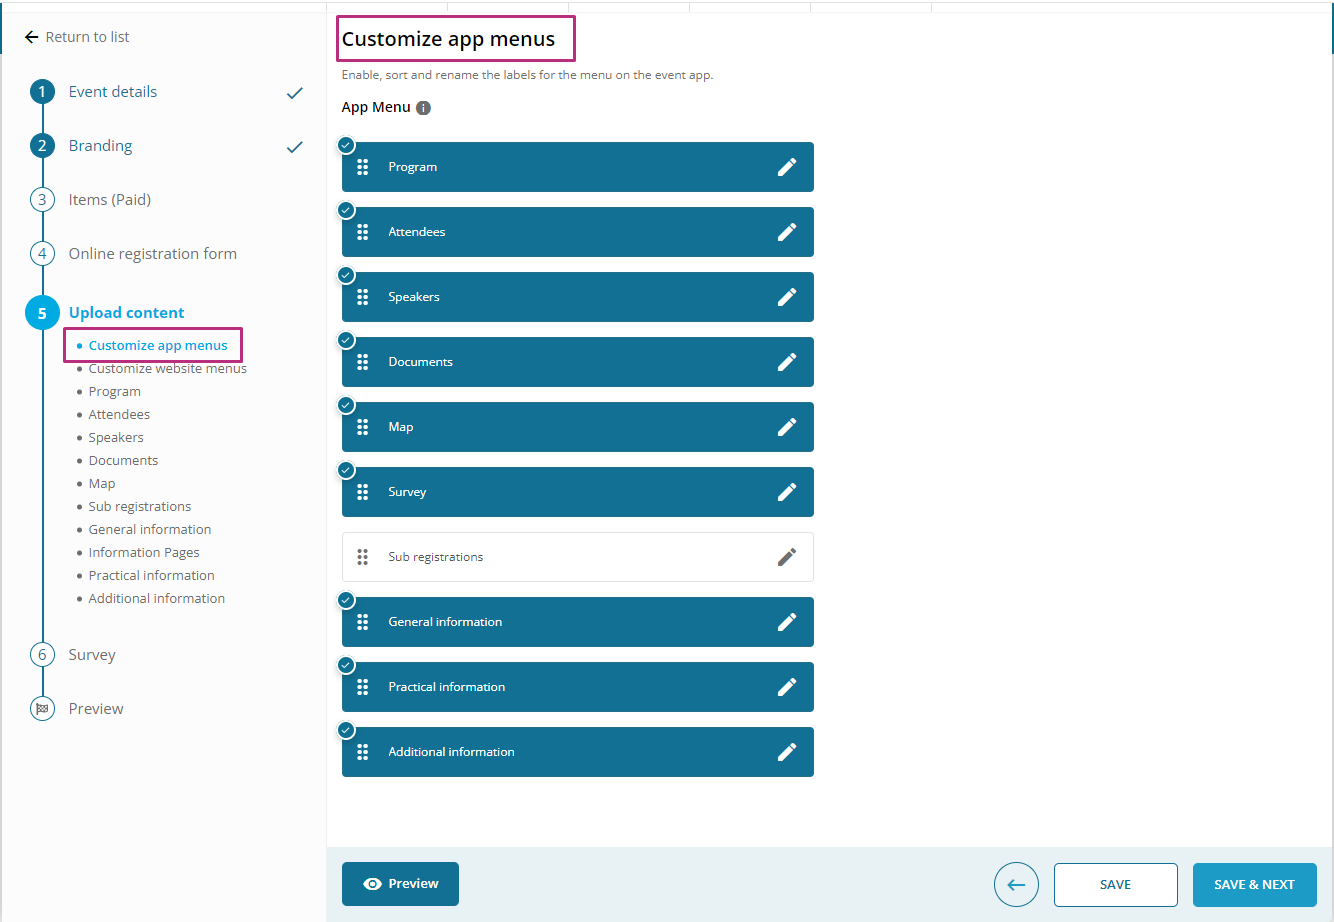
All the highlighted modules name are active with the success sign, and un-highlighted modules are deactivated, organiser can make any module active or in-active at any time. Also by clicking on edit icon organiser can edit the module name as well.

Customise website menus
- Purpose: Personalise the top menu on the event website for better user experience. Organiser can customise the event website menu by making modules active or in-active.
- Process:
- Enable/disable menus: Control the visibility of different menu items.
- Sort menus: Organise menu items as needed.
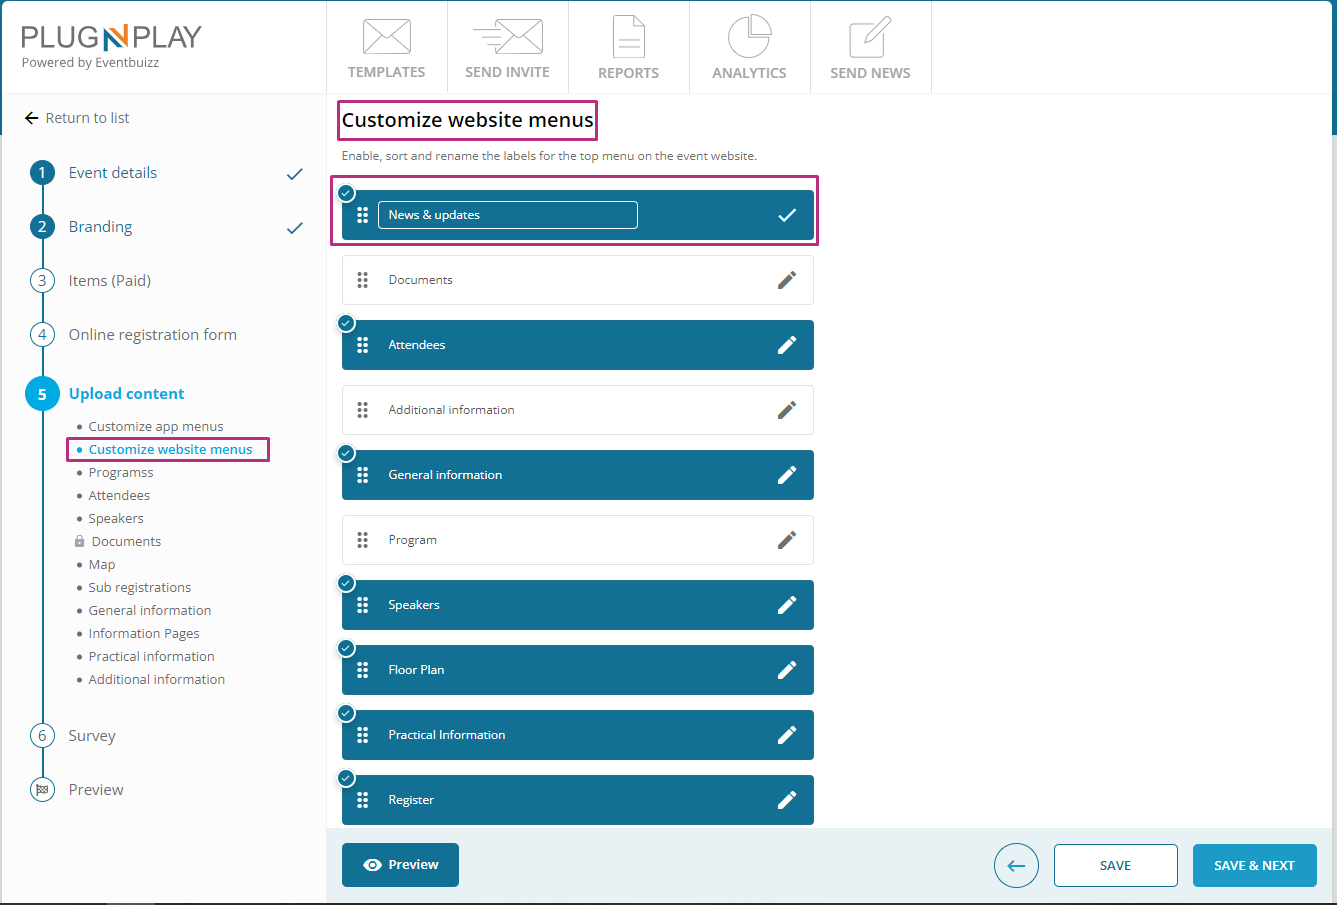
- Rename labels: Adjust the text labels to match event specifics or branding.
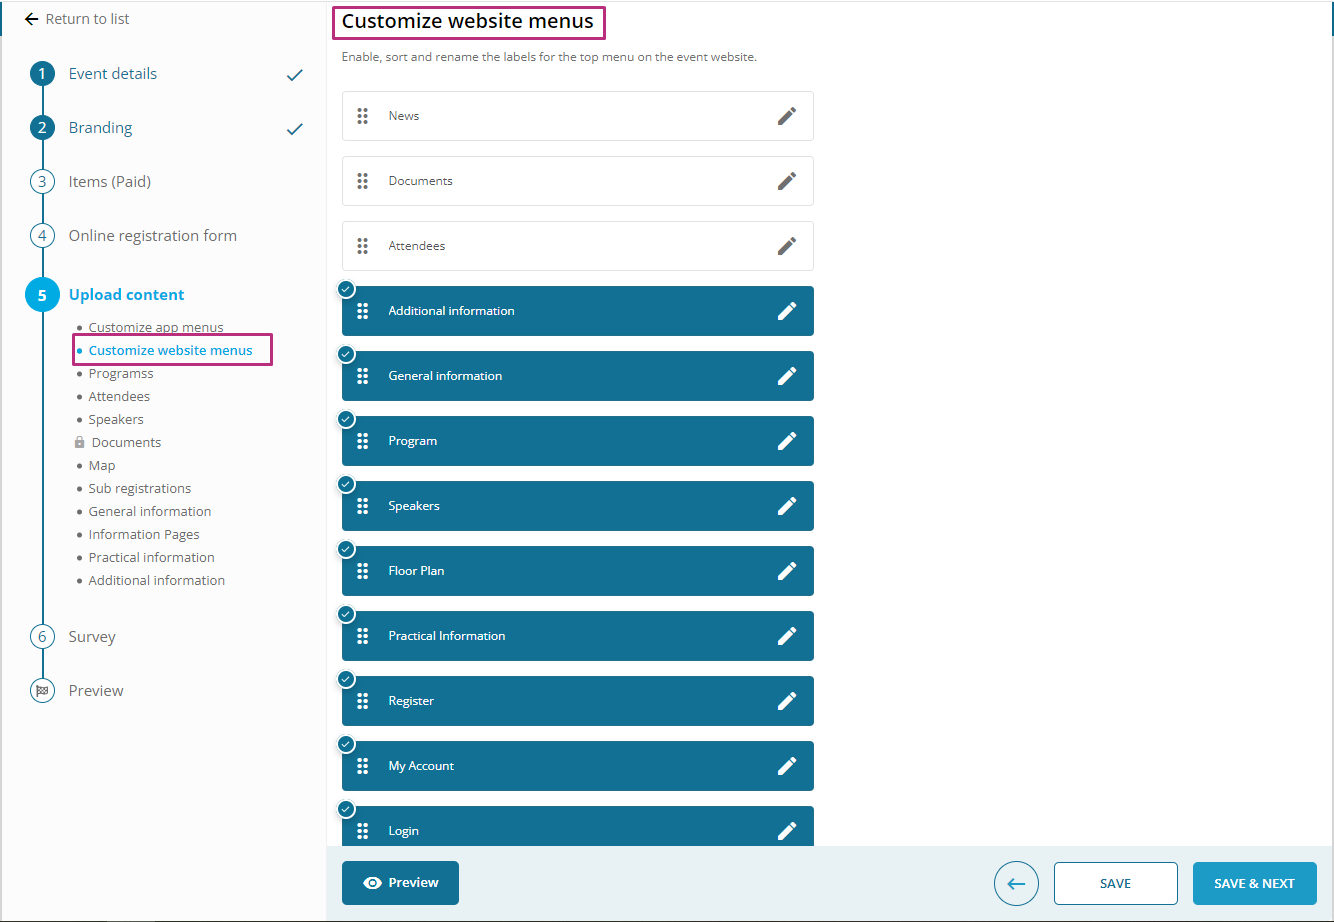
All the highlighted modules name are active with the success sign, and un-highlighted modules are deactivated, organiser can make any module active or in-active at any time. Also by clicking on edit icon organiser can edit the module name as well.
Program
- Purpose: Manage and display the event’s program sessions, including schedules and session details. Add and manage the program sessions for this event. These become visible on the event website and app.
- Process:
- Add sessions: Input details of various program sessions.
- Manage sessions: Edit or update session information.
- Visibility: Ensure that these sessions are visible on both the website and app.
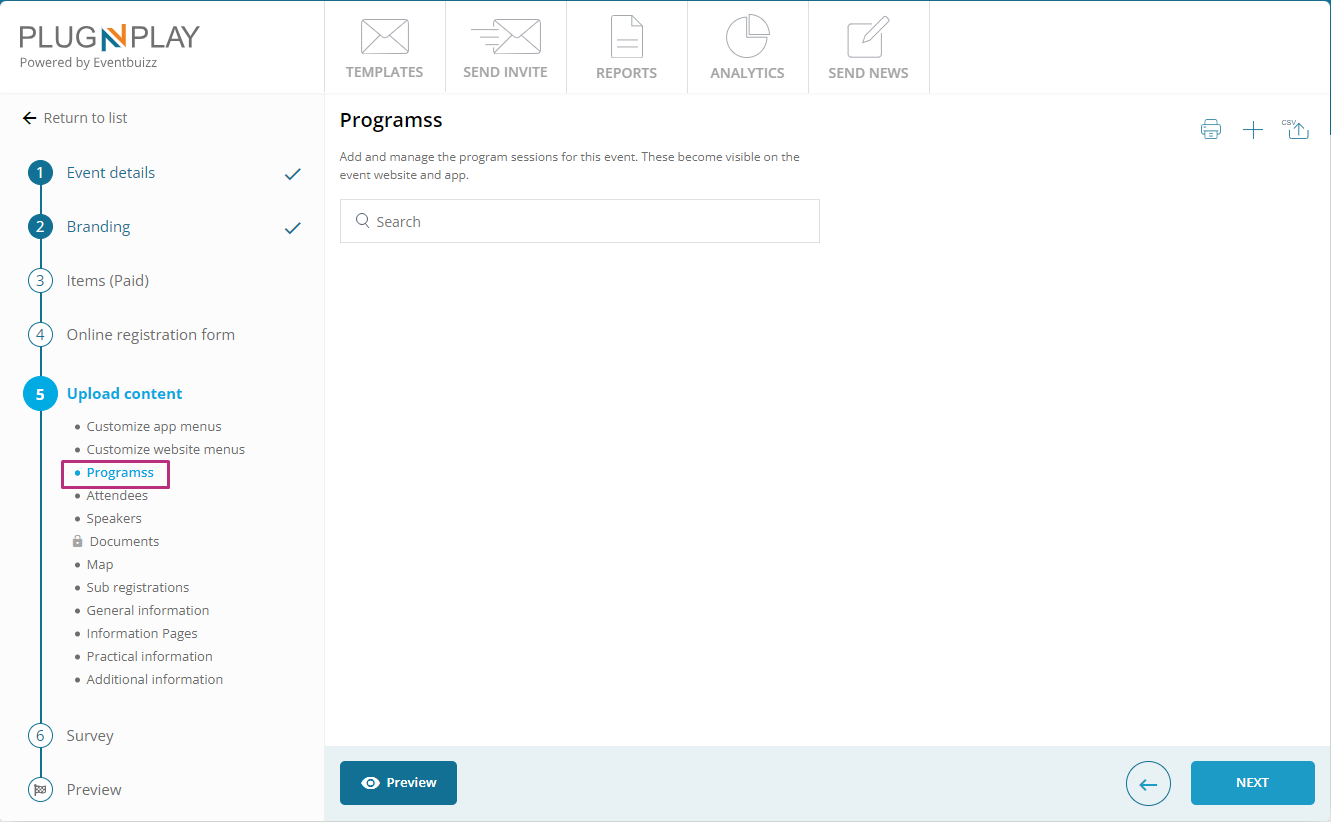
Add program
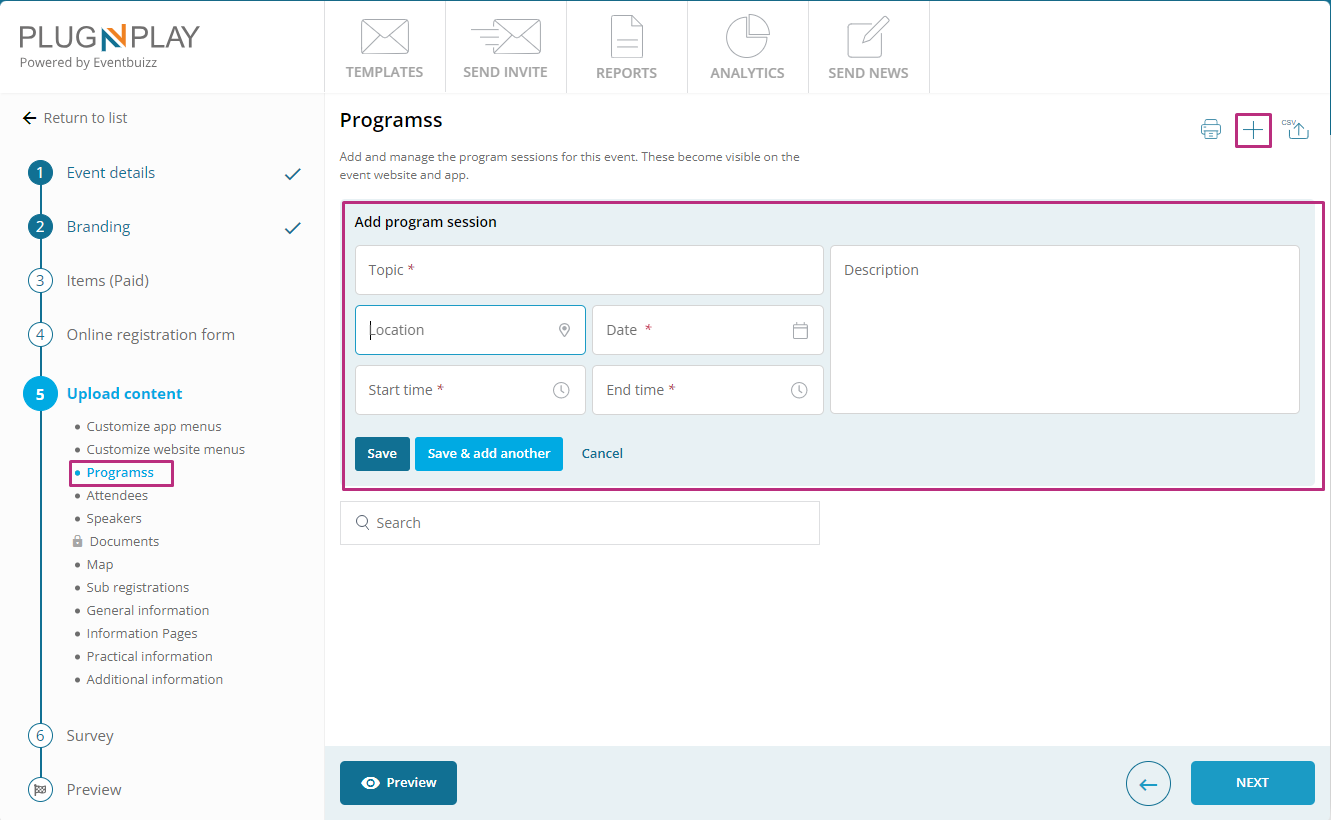
Organiser can add program’s by clicking on “+” button, and when organiser click on “+” icon, and new section is opened , where organiser will add the data in required fields and create the program, following are the fields required for adding program.
- Program name: Organiser will give the name in program name input field.
- Date: Organiser will selected the date of the program from the date picker.
- Start time: Organiser will set the start time for the program.
- End time: Organiser will set the end time for the program.
- Location: Organiser will set the location for the program, by using input fields.
- Description: It is optional, if organiser want to give additional information related to program will add in description section.
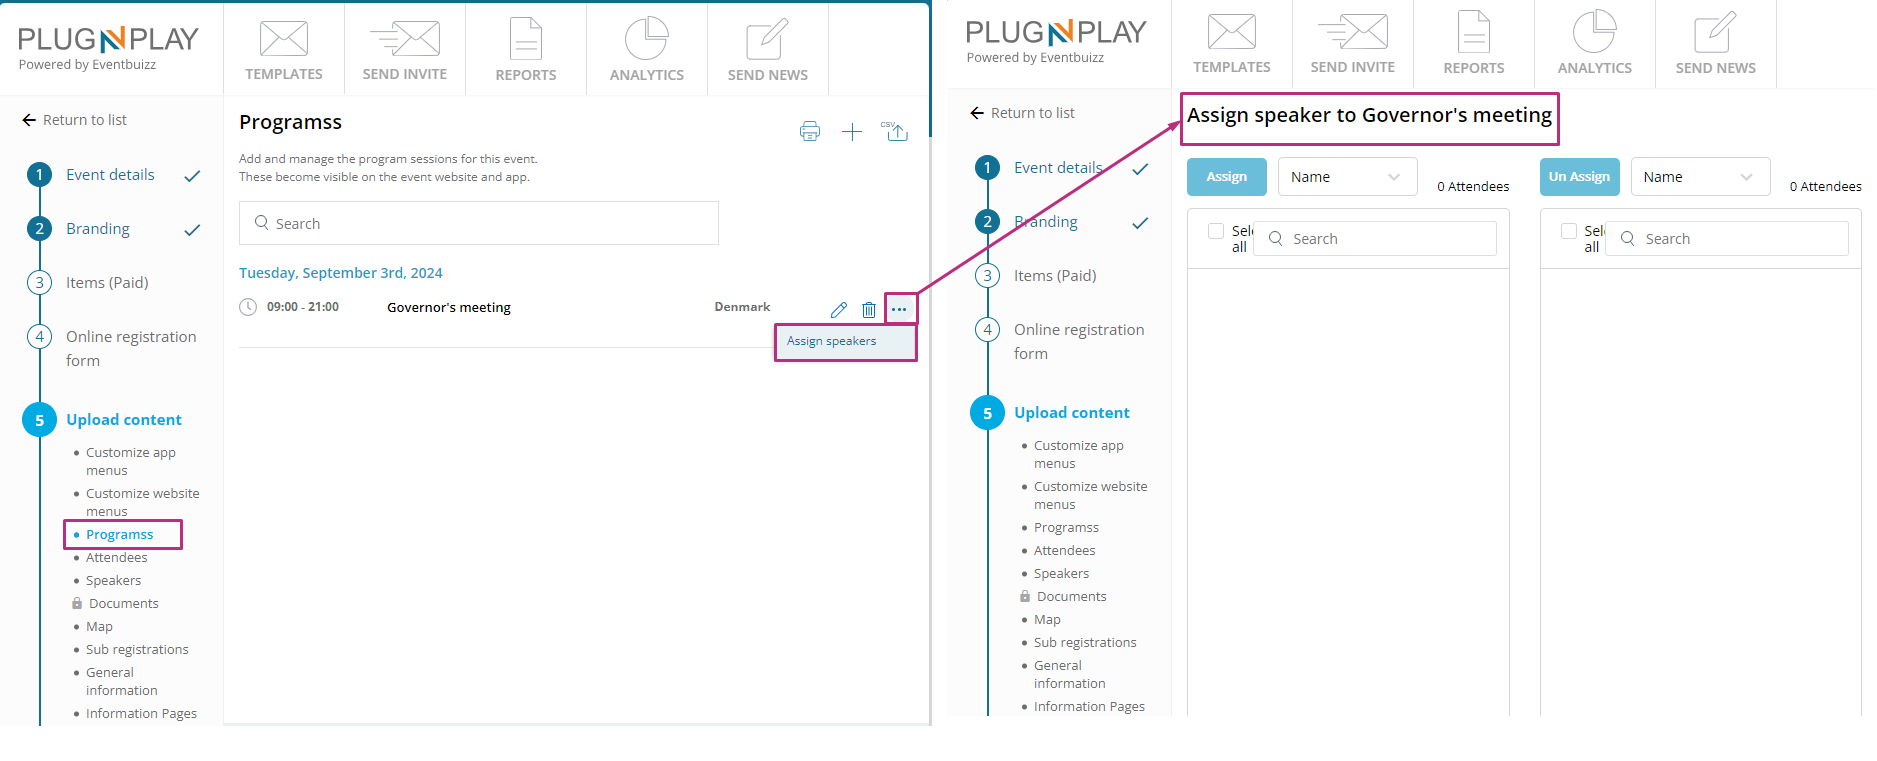
Additionally on each program listing organiser have the three options are available, detail of each available options given below:
- Edit: By clicking the edit icon organiser can edit the information of the selected program.
- Delete: By clicking the delete icon organiser can delete the no more used program.
- Assign speaker: by clicking on assign speaker organiser will move on “assign speaker” screen, where organiser can assign or un-assign speaker against selected program.

Assign/un-assign speaker
By clicking on assign speaker organiser will move on “assign speaker” screen, where organiser can assign or un-assign speaker against selected program.
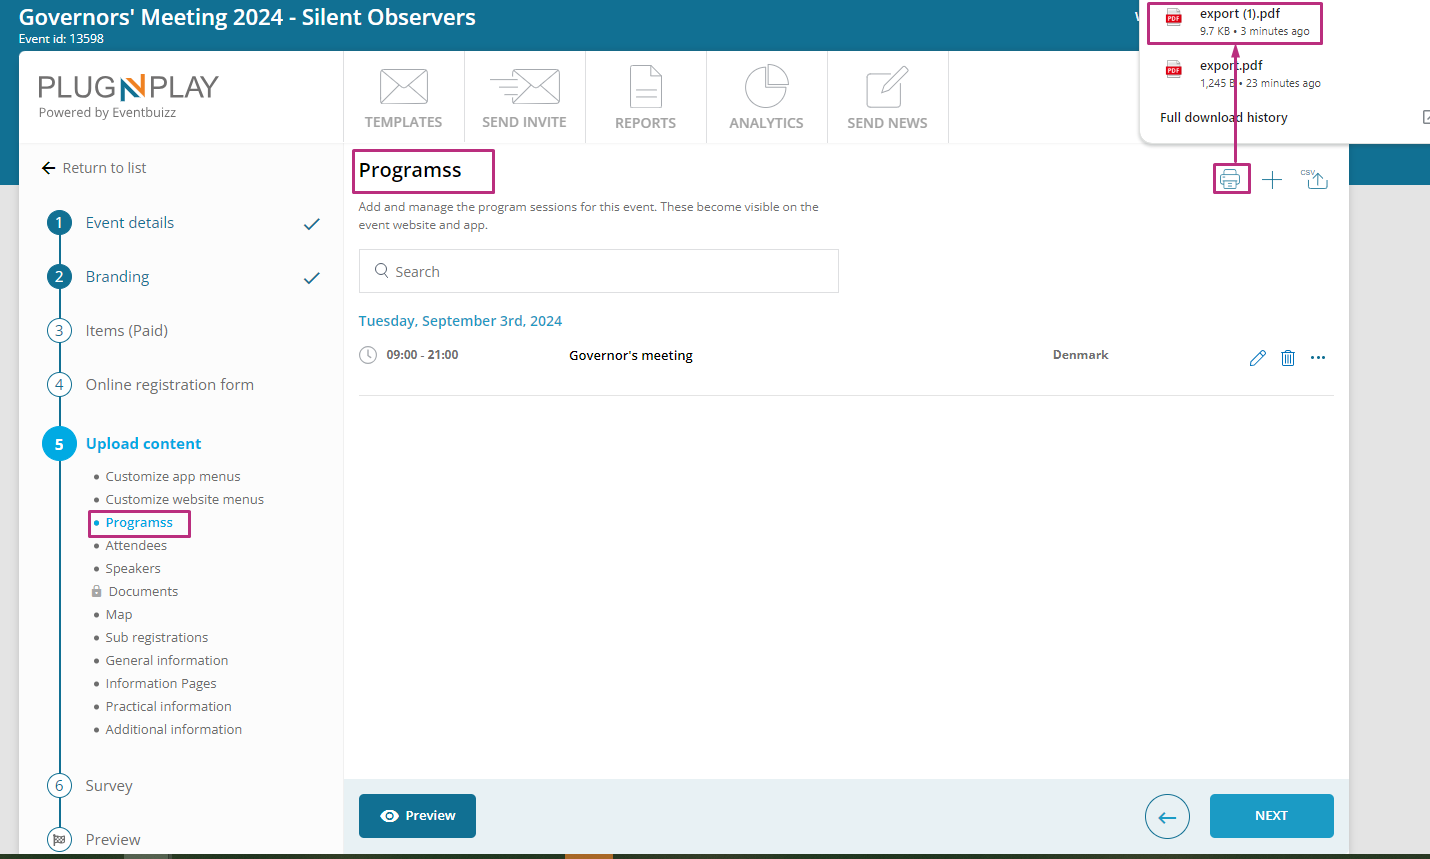
Additionally on top right side of the program module organiser have the two action buttons, detail of these buttons given below:
- Download PDF: By clicking on download PDF icon, a PDF file will download which consist the listing of all program with all given information’s in programs.
- Import csv file: Organiser can also import the programs by giving the required information, this is the shortest way to create the programs in event. By clicking on download file template, organiser can get the idea like which type of data needed to import the prgorams.

Attendees
The “Attendee list” is a feature within the attendee module that provides event organisers with a comprehensive view containing information of all registered attendees for a particular event. This information typically includes attendee names, contact details, affiliations, job titles, and any other relevant data collected during the registration process.
- Purpose: Track and manage attendee information for the event. This module is used for add and manage the attendees for the event.
- Process:
- Add attendees: Input details of people who will attend the event.
- Manage attendees: Edit or update attendee information as necessary.

Organiser can add the attendees in event, by using two methods. Method 1 is a manual approach by using “+” sign organiser can add the each attendee individually. Method 2 is the import method, organiser can import the csv file by giving the required information of each attendee at once.

Add attendee
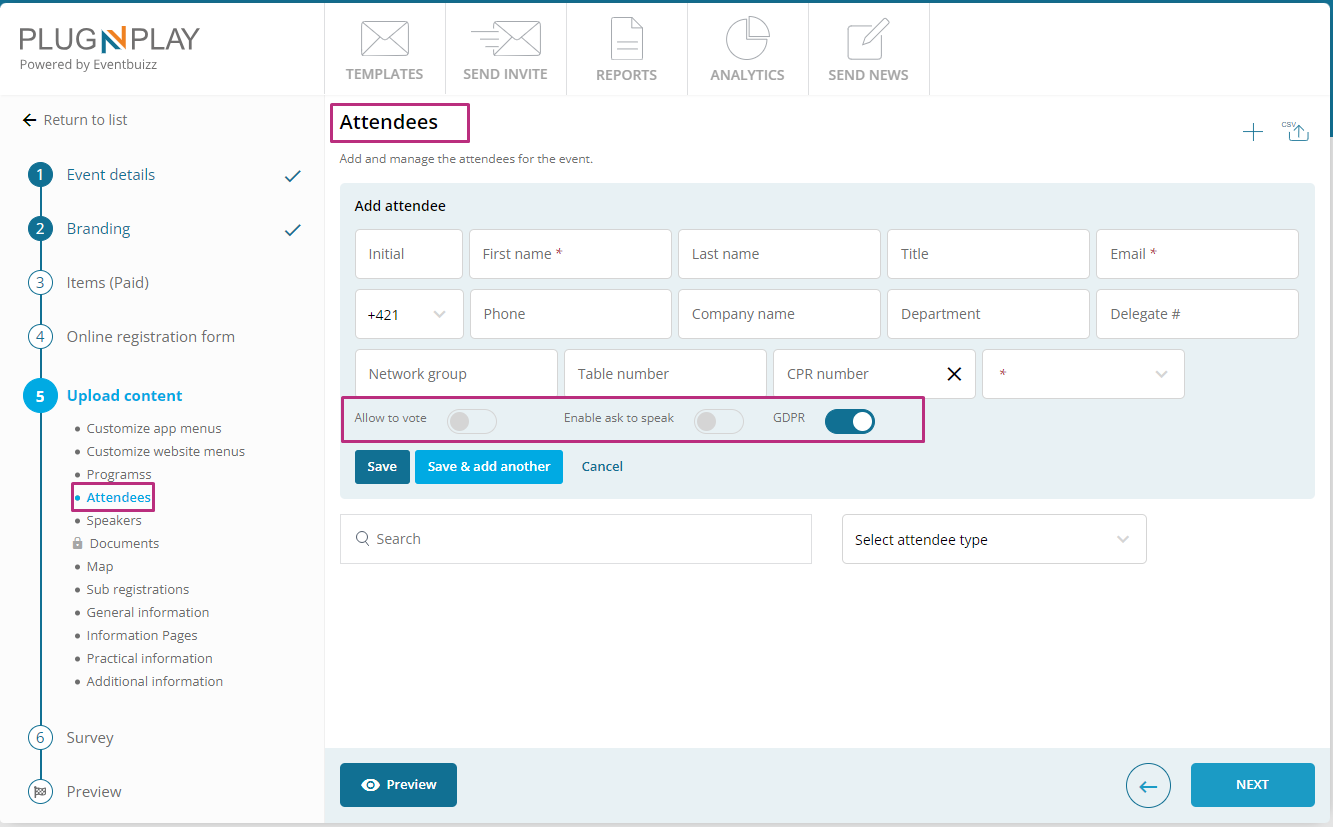
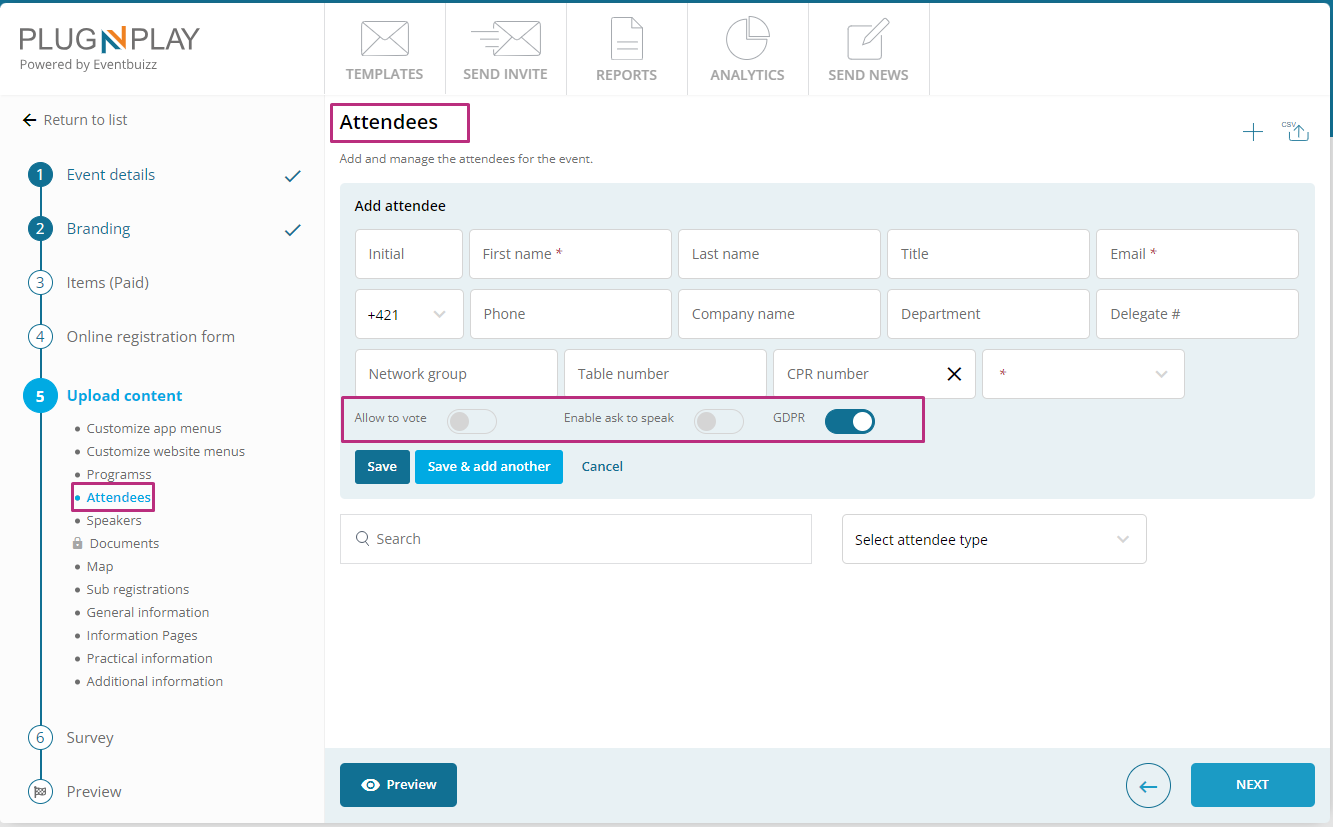
- Access the attendee: Begin by selecting your event. From the left-hand navigation, click content upload, then Attendees -> Click “+”.

Organiser’ll be presented with a registration form where organiser can input details for the attendees which is adding. This form typically includes fields for attendee information such as name, email, organisation, job title, and any other relevant details. Fill out the form with the necessary information.

When you’re finished, click Save. This will automatically add/update the attendee’s details for in your account.
Permissions:
In plug and play, these permissions are typically used to customise the attendee experience and interaction within the platform. Here’s how they might be utilised within an attendee profile:
- Allow to vote: In the attendee add/edit page -> there is toggle button for “allow voting” . If this setting is turned on, all assigned attendees in the event can vote. However, if this setting is turned off and individual attendees have enabled this setting in their profiles, they will bypass the main setting and still have permission to vote and upload documents.
- Enable ask to speak: Organiser have “Enable ask to speak to all” permission in request to speak module, it will allow all attendees to speak who are assigned in the event but if this setting is OFF, and in attendee profile individual setting is ON, it will not check the module permission and allow the attendee to speak.
- Enable GDPR: When this option and policy is enabled, and the attendee has not accepted the event organiser’s GDPR policy, the attendee will only appear with “First name” and “Last name”.
Filters on attendee listing
Additionally on attendee listing, organiser can filter out the data by searching any specific attendee by name or mail or also base on the attendee type, all the available attendee types are shown in drop down.
Speakers
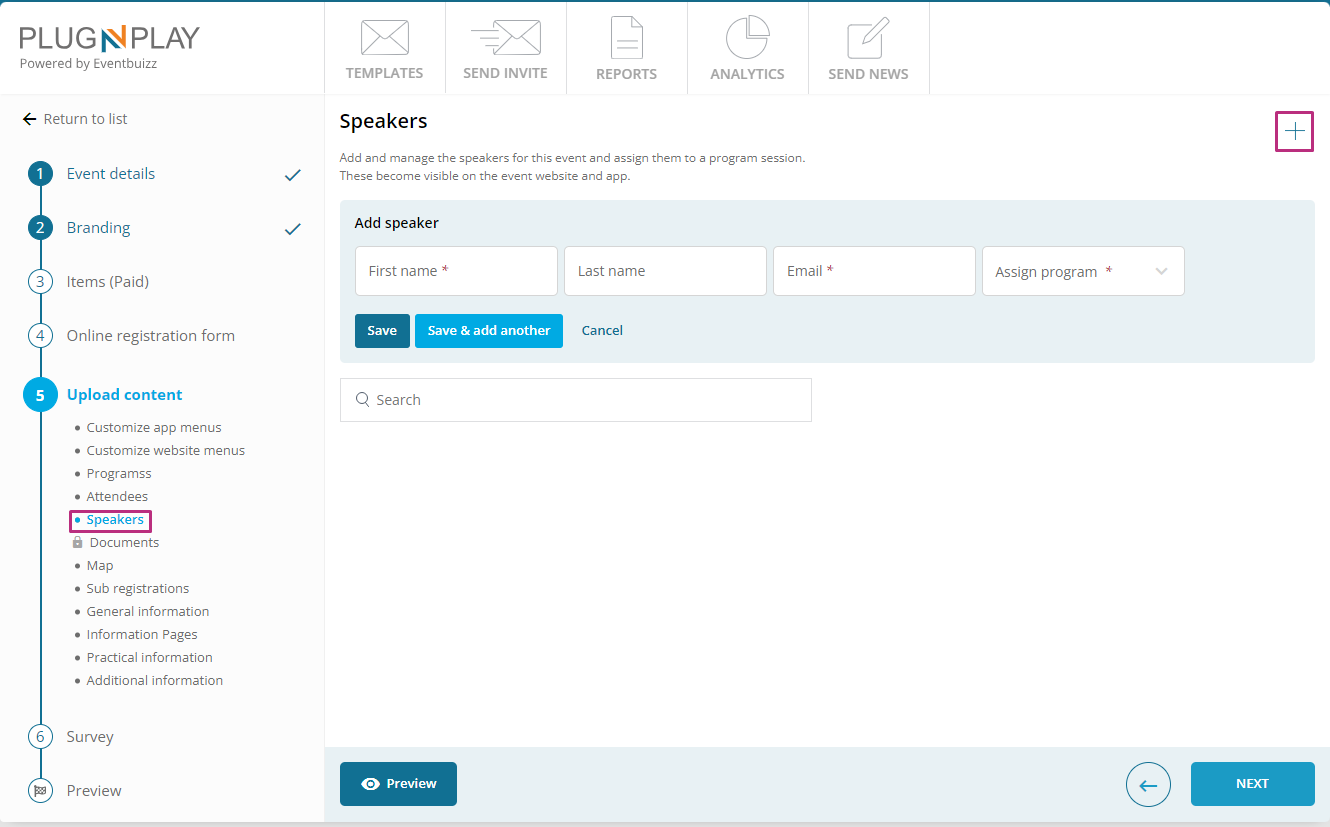
The “Speaker module” in plug and play is a vital component of the event management platform that is specifically tailored to streamline the management of event speakers. It offers a range of features and functionalities designed to simplify the process of handling speaker creation, assign speaker to a specific program, tracking, and engagement.
What is speaker?
A speaker is an individual who participates in an event as a presenter, keynote, or panellist. They are typically chosen for their expertise, experience, or prominence in a particular field relevant to the event’s theme or subject.
Key responsibilities:
- Deliver presentations: Provide insightful and engaging talks or presentations on specific topics.
- Engage with attendees: Interact with the audience through Q&A sessions, panel discussions, or networking opportunities.
- Represent the event: Serve as an ambassador or face of the event, often contributing to its success through their presence and contribution.
- Purpose: Manage speaker profiles and link them to program sessions.
- Process:
- Add speakers: Input details of speakers.
- Assign to sessions: Link speakers to relevant program sessions.
- Manage speakers: Edit or update speaker information.

Add speakers
By clicking on “+” icon organiser can add the speakers by giving the required field data, and also can assign the speaker from the program menu![]() assign speaker.
assign speaker.
Documents
The Documents module in plug and play allows organisers to manage and share documents related to various aspects of events, such as programs, speakers, and other general information. Organiser can access these documents through dedicated sections within the app and website modules, and can add documents against any program/speaker and other general information.

Process:
- Program documents: Upload documents related to the event’s program sessions. Organiser can add the documents by clicking on “+” icon, and a model will open and select the program from the drop down against which program organiser want to add documents.
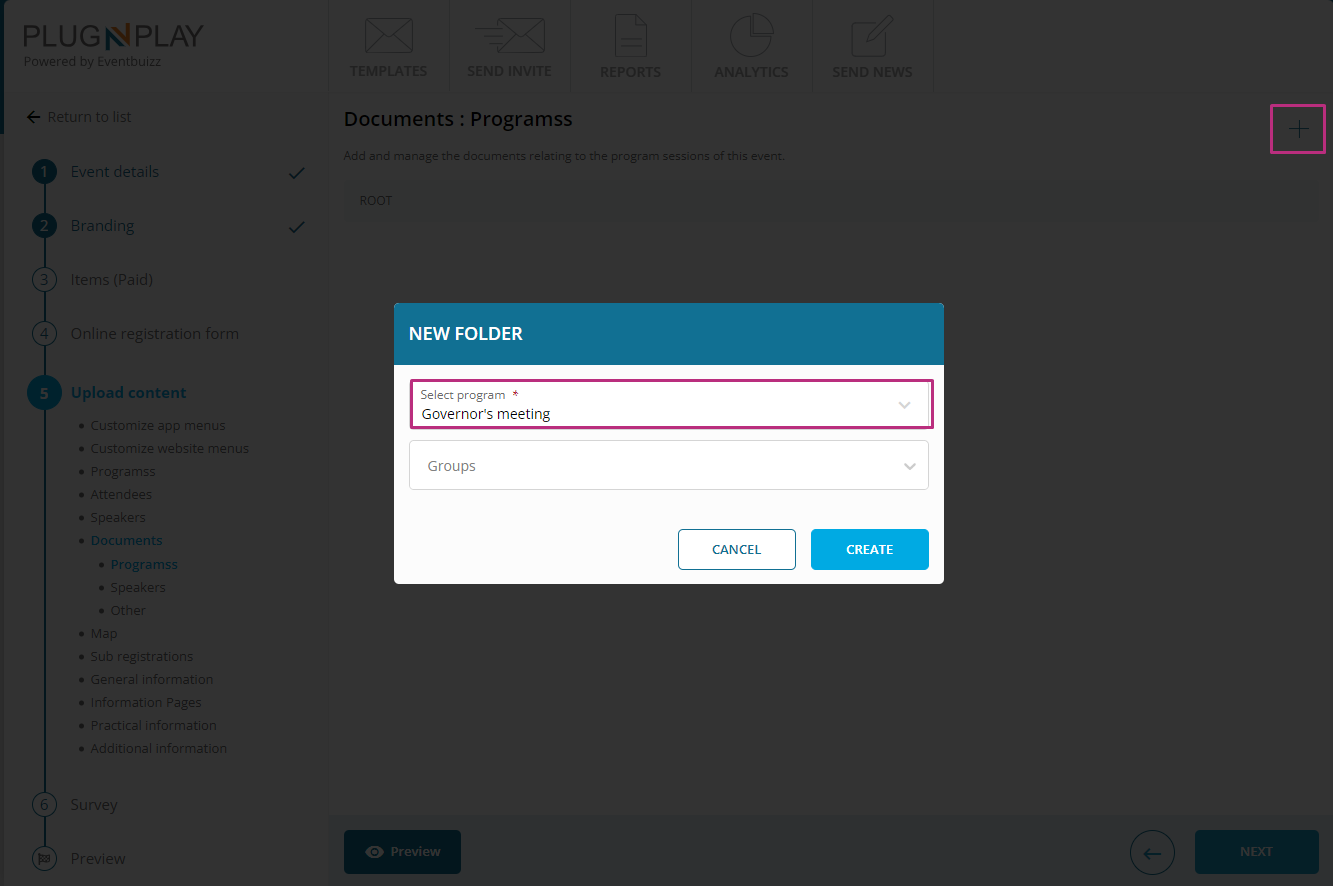
After selecting the program and create the folder and against each selected program a folder is created, and documents listing against each folder organiser have the menu![]() and different options are available in menu:
and different options are available in menu:
- Rename: Organiser can rename the folder name.
- Edit: Organiser can edit the selected group or program from the drop down.
- Delete: Organiser can delete the selected folder.

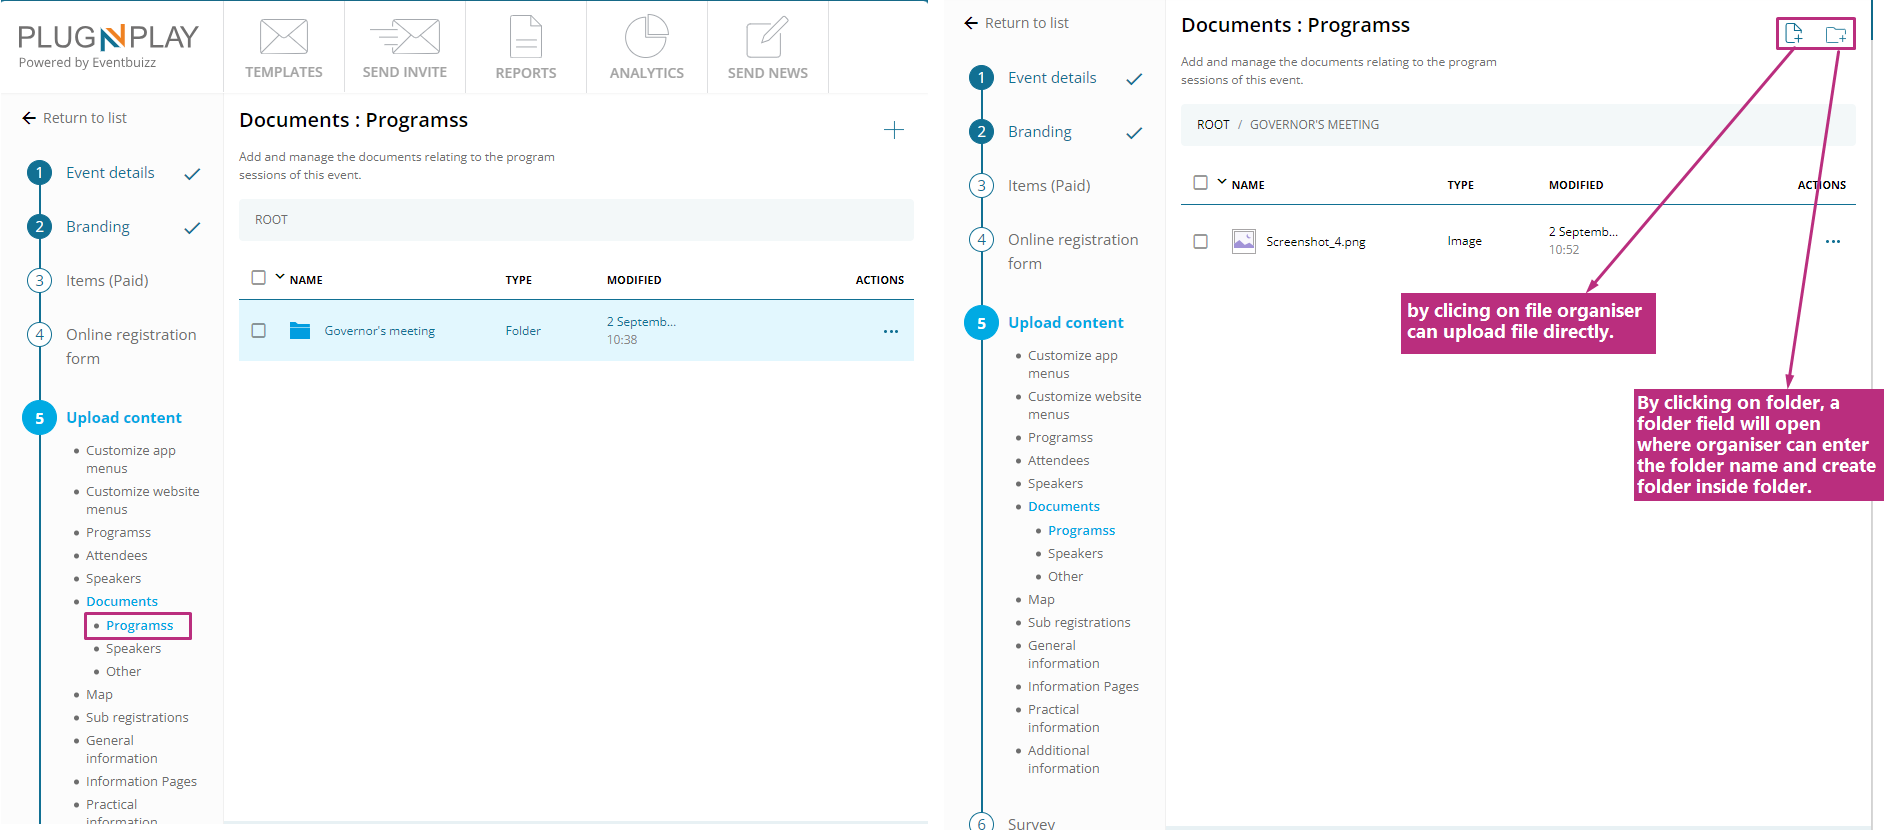
Additionally by clicking twice on the created folder, organiser will redirects on the detail of the folder where he can create folder inside folder or can upload documents directly.
For more details how documents works in plug and play and eventcenter portal click here
Map
The “Map” module in “plug and play” allows event organisers to upload and manage maps to guide attendees through various aspects of the event venue. This module supports two types of map integrations: uploading a static image or embedding a dynamic google map. The maps help attendees locate session areas, facilities, exhibitor booths, and other important locations within the venue.
Purpose: Provide a visual guide to the event location.
- Process:
- Insert map location:
- Google map integration:
- Go to maps.google.com.
- Enter the event address.
- Click on the “Share” button.
- Select “Embed a map.”
- Copy the HTML code provided and paste it into the designated field.
- Google map integration:
- Embed Image: Alternatively, upload an image of a map if not using Google Maps.
- Insert map location:
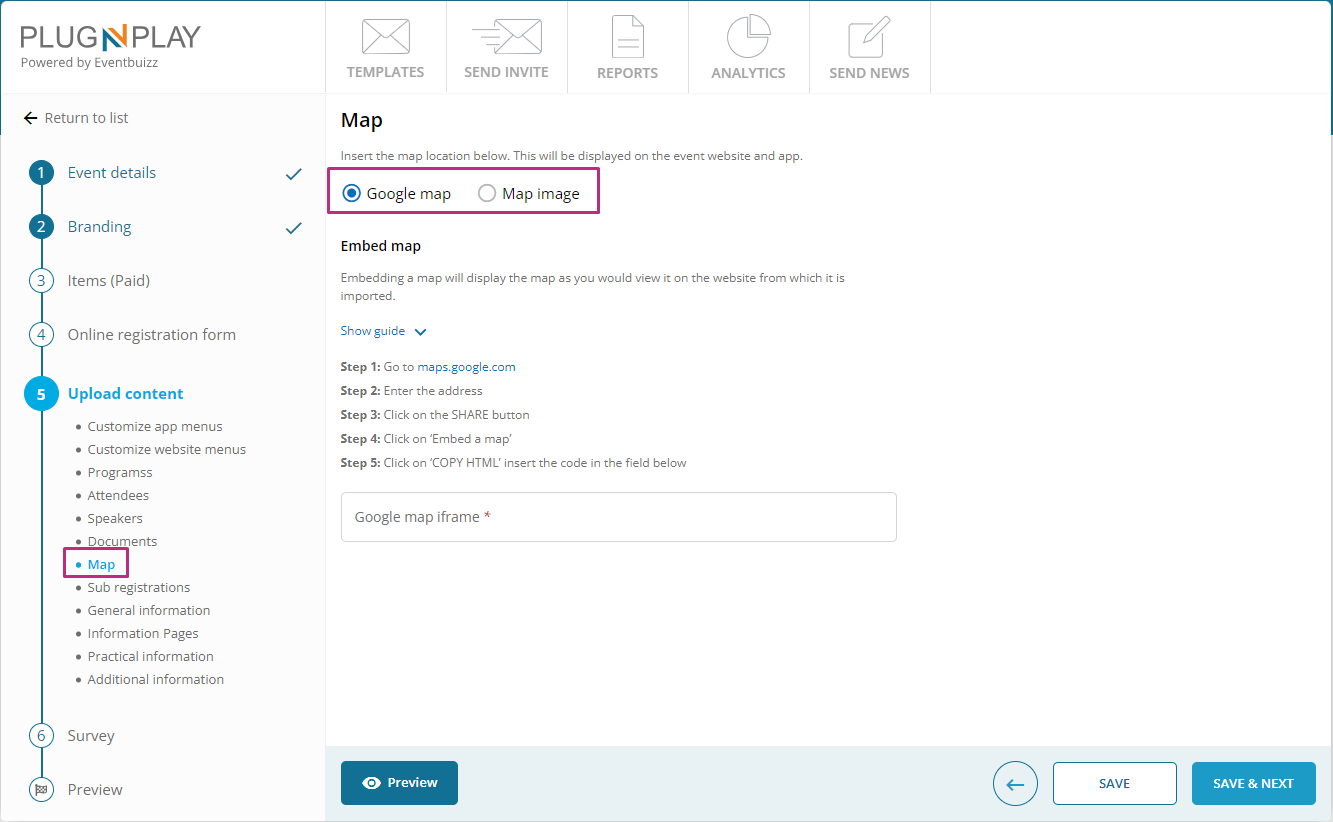
For more details, how map work and how organiser can add map and users can access in app, for detail click here
Sub registration
Sub registration allows event organisers to create multiple registration forms or sections within a single event. This can be used in different ways for managing different aspects or segments of an event, such as workshops, sessions, or activities that require separate sign-ups. You can ask the attendees questions regarding special dietary needs, travel plans or even permissions to send out newsletter etc.
The Sub registrations can be used as a part of the registration process or in relation to the web-app.
How sub registration works?
For the detail review, how its works please click here

General/practical/additional information
In Eventbuizz, the following modules—Practical Information, Additional Information, and General Information—act as structured collections of various types of data related to an event. Here’s how they can be understood as organised repositories of information:
Additional information
- Folders: Located within the event’s main folder, Additional Information has its own section.
- Pages: Pages within this section provide supplementary details beyond the core information.
- Links: Pages may link to announcements, networking opportunities, special instructions, and social media handles.
Content:
- Additional Information Pages serve to enhance attendee engagement and provide updates or supplementary instructions related to the event.
- Content includes announcements, networking details, special instructions for specific groups, and links to social media for ongoing interaction.
General information
Content:
- General Information Pages provide comprehensive context about the event organiser(s), their mission, history, and media resources.
- This section also includes FAQs that aren’t logistical but provide broader insights into the event series or organisation.
Structure:
- Folders: Positioned within the event’s main folder, General Information is a critical section.
- Pages: Pages within this section cover overarching details about the event or organisation.
- Links: Links may direct users to background information, media resources, FAQs about the organisation, and details about sponsors or partnerships.
Practical information
Content:
- Practical Information focuses on logistical details essential for attendees to plan their participation effectively.
- Information is structured to provide clear guidance on venue locations, transportation options, accommodation recommendations, contact information, and event policies.
Structure:
- Folders: Organised under the event’s main folder, Practical Information has its own section.
- Pages: Each practical aspect—venue details, transportation, accommodation, etc.—has its own dedicated page or section.
- Links: Pages may also include links to maps, transportation services, booking sites, etc.
Basically in all these information’s types purpose is a collection of data, related to event.
How all information’s works, here is the step by step implementation of it.
How it’s work
For adding these information firstly organiser will navigate on the following path:
plug and play->create event->Upload content-> General/additional/practical information module->select the desired menu(Either he want to create folder/page/link)
Here is the look when organiser land first time on above mentioned path:

Create folder
By clicking on “ folder” icon a new input field open, where organiser can give the title of the folder
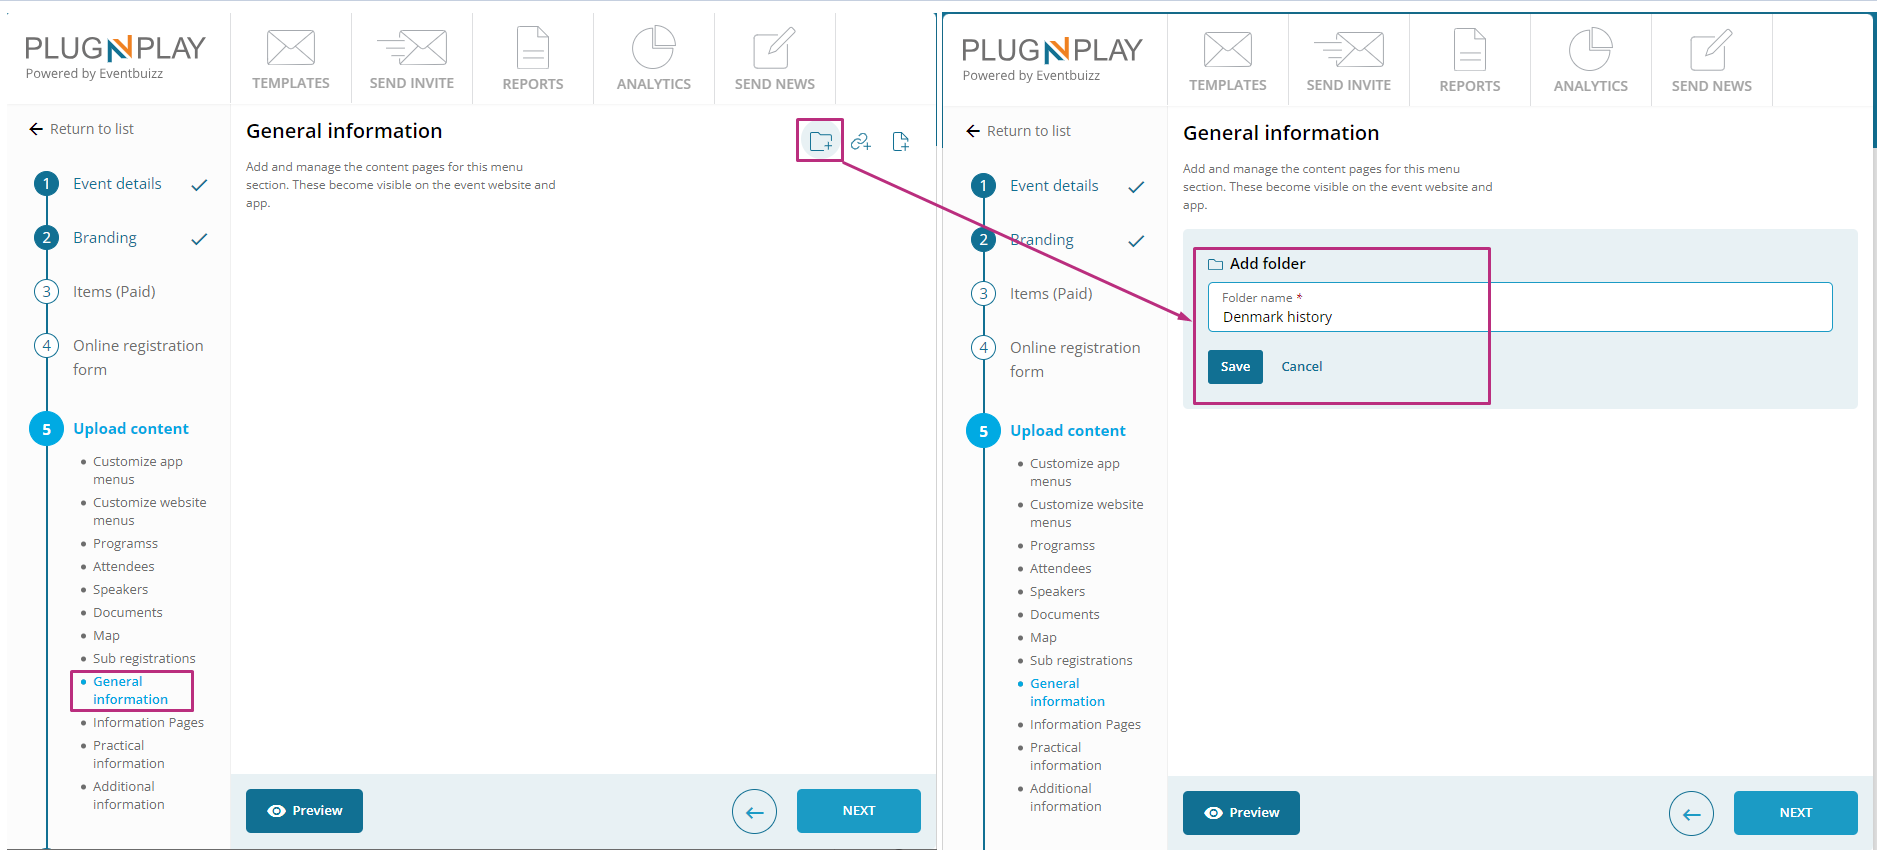
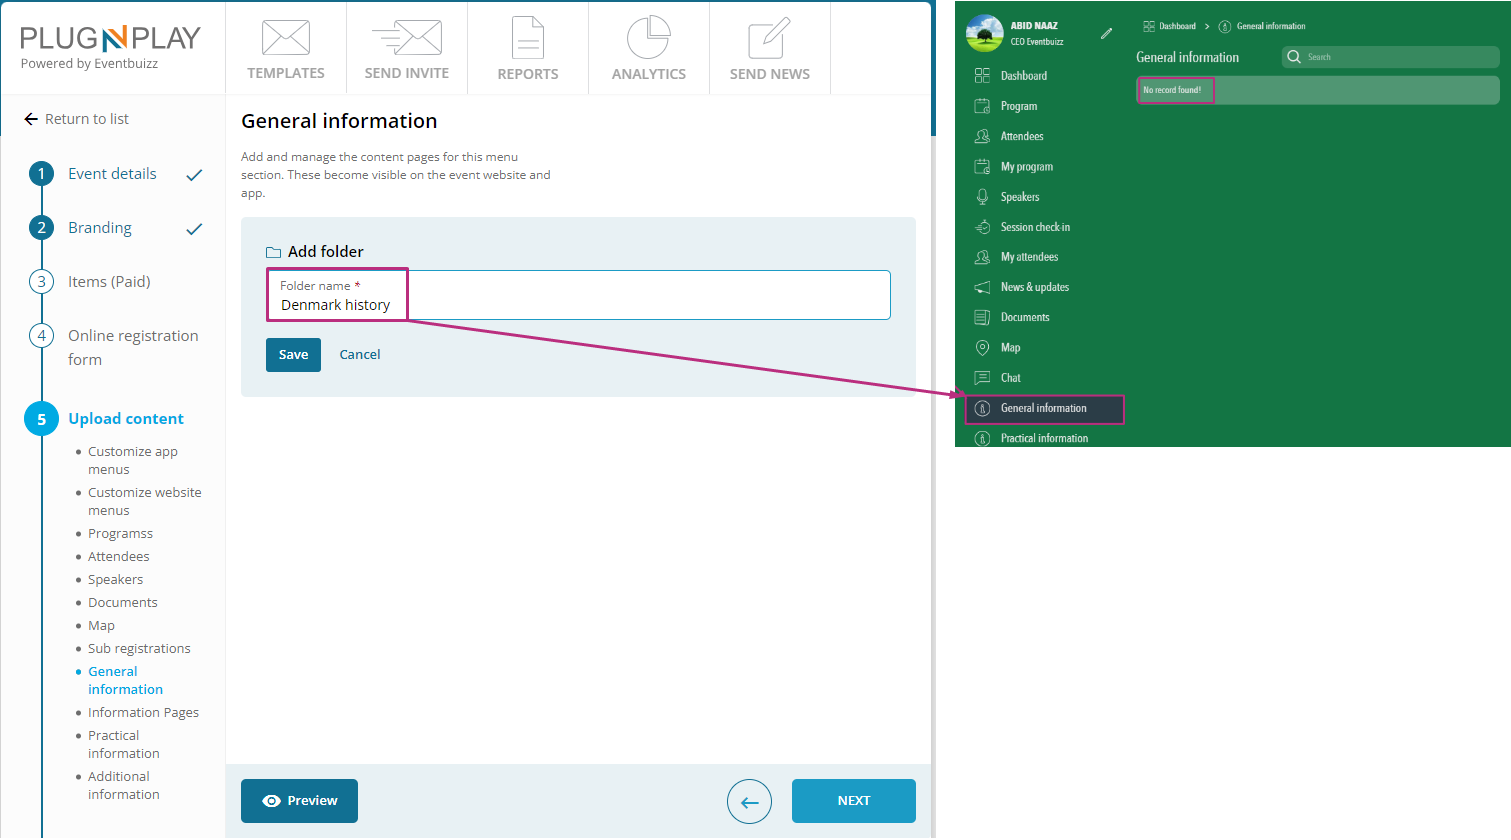
After creating folder there is one important thing which organiser need to keep in mind, until organiser didn’t put content in the folder it will not show in native app or web app, here is the example of it:
Each created folder/page/link gives organiser few options to handle them easily, here is the list below of that particular menu ![]() options:
options:
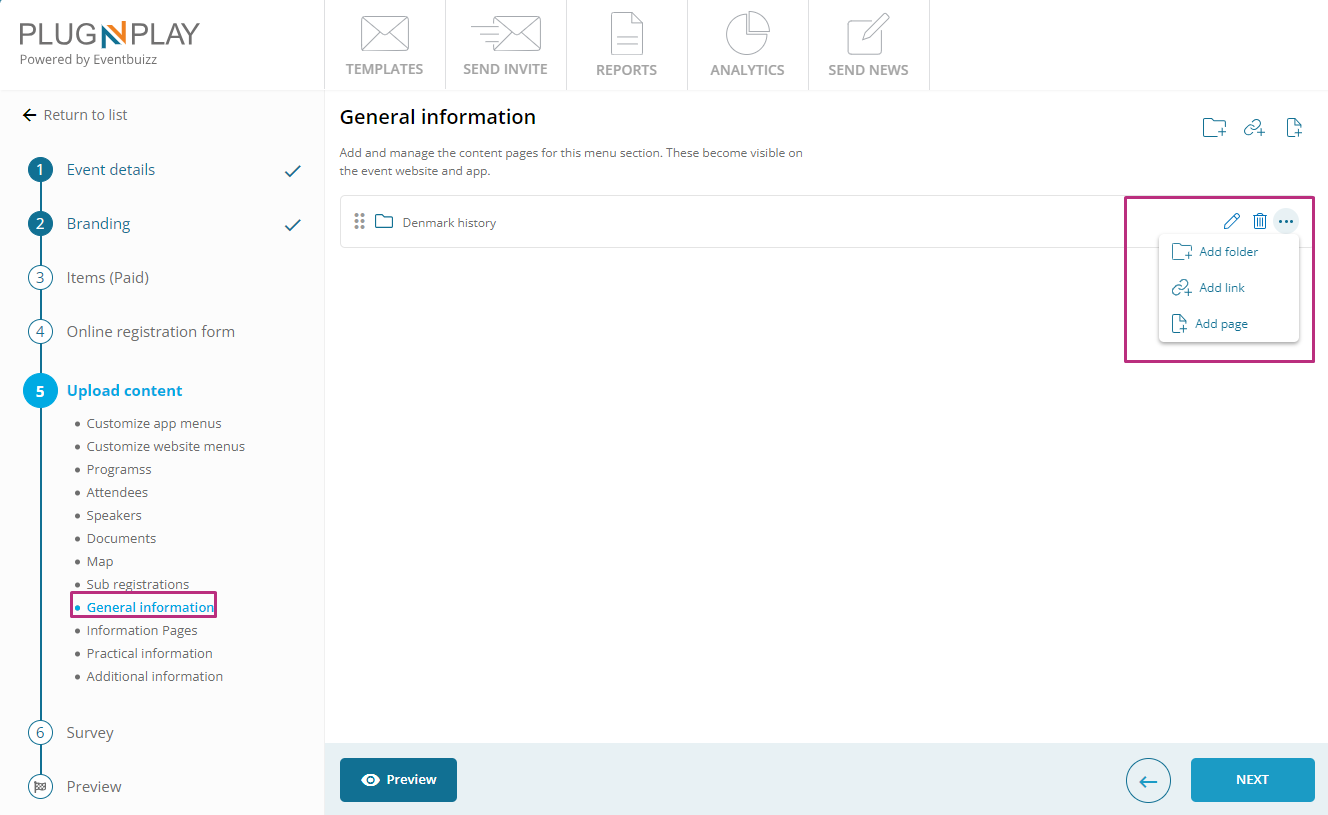
Add folder
-
- Users can navigate into folders to view and manage contained pages and links.
- Inside folders, new pages and links can be created to further organise content.
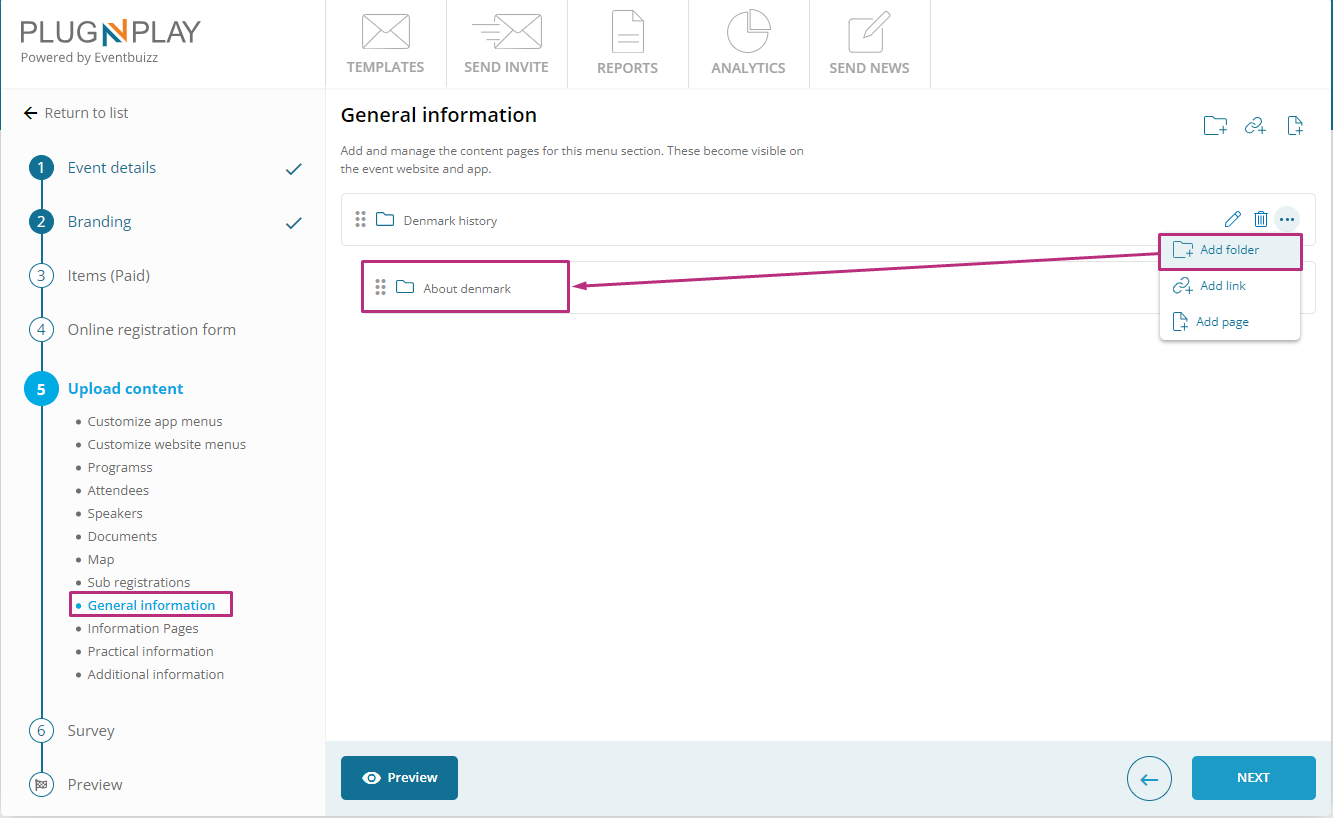
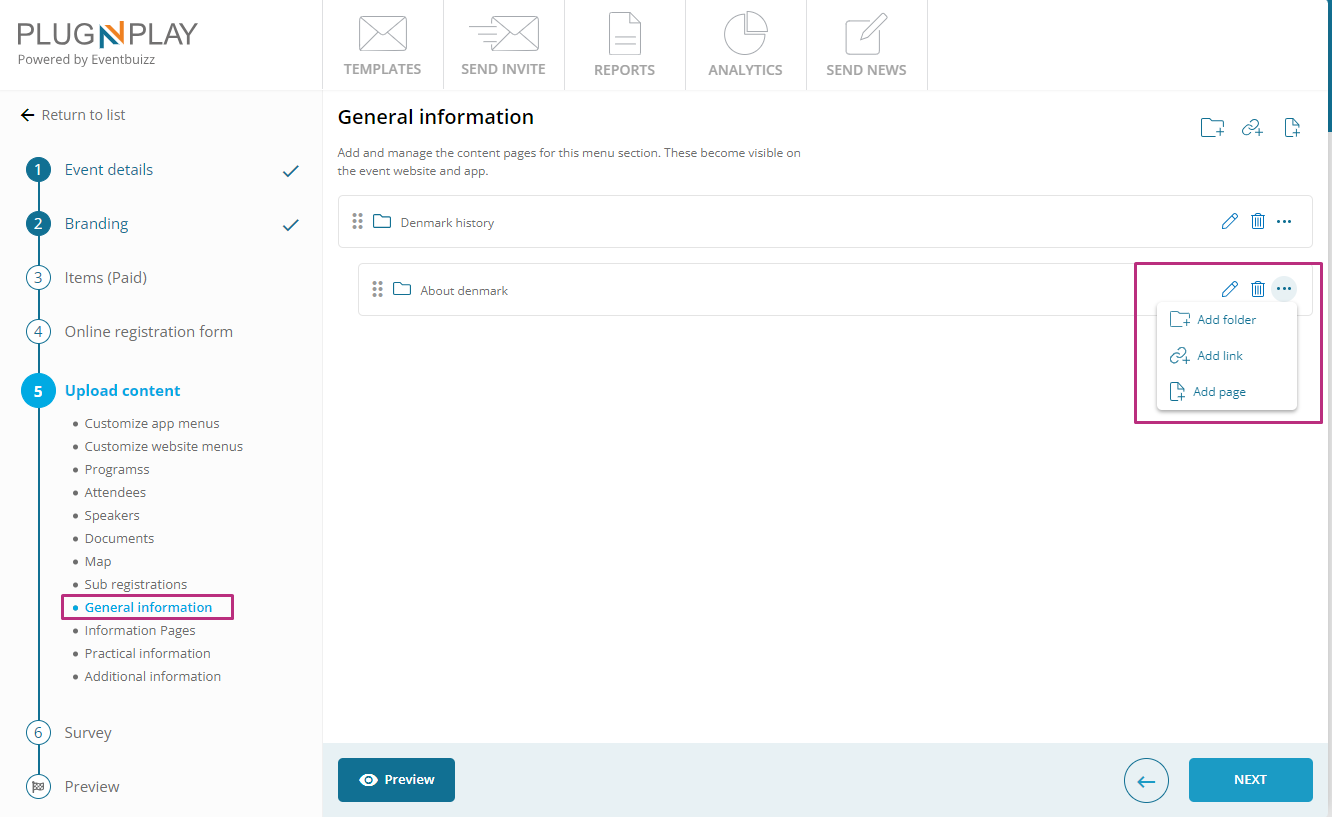
Created folder detail:
On created nested folder organiser have the same menu options, organiser can create folder, page link or also can edit or delete the created folder.
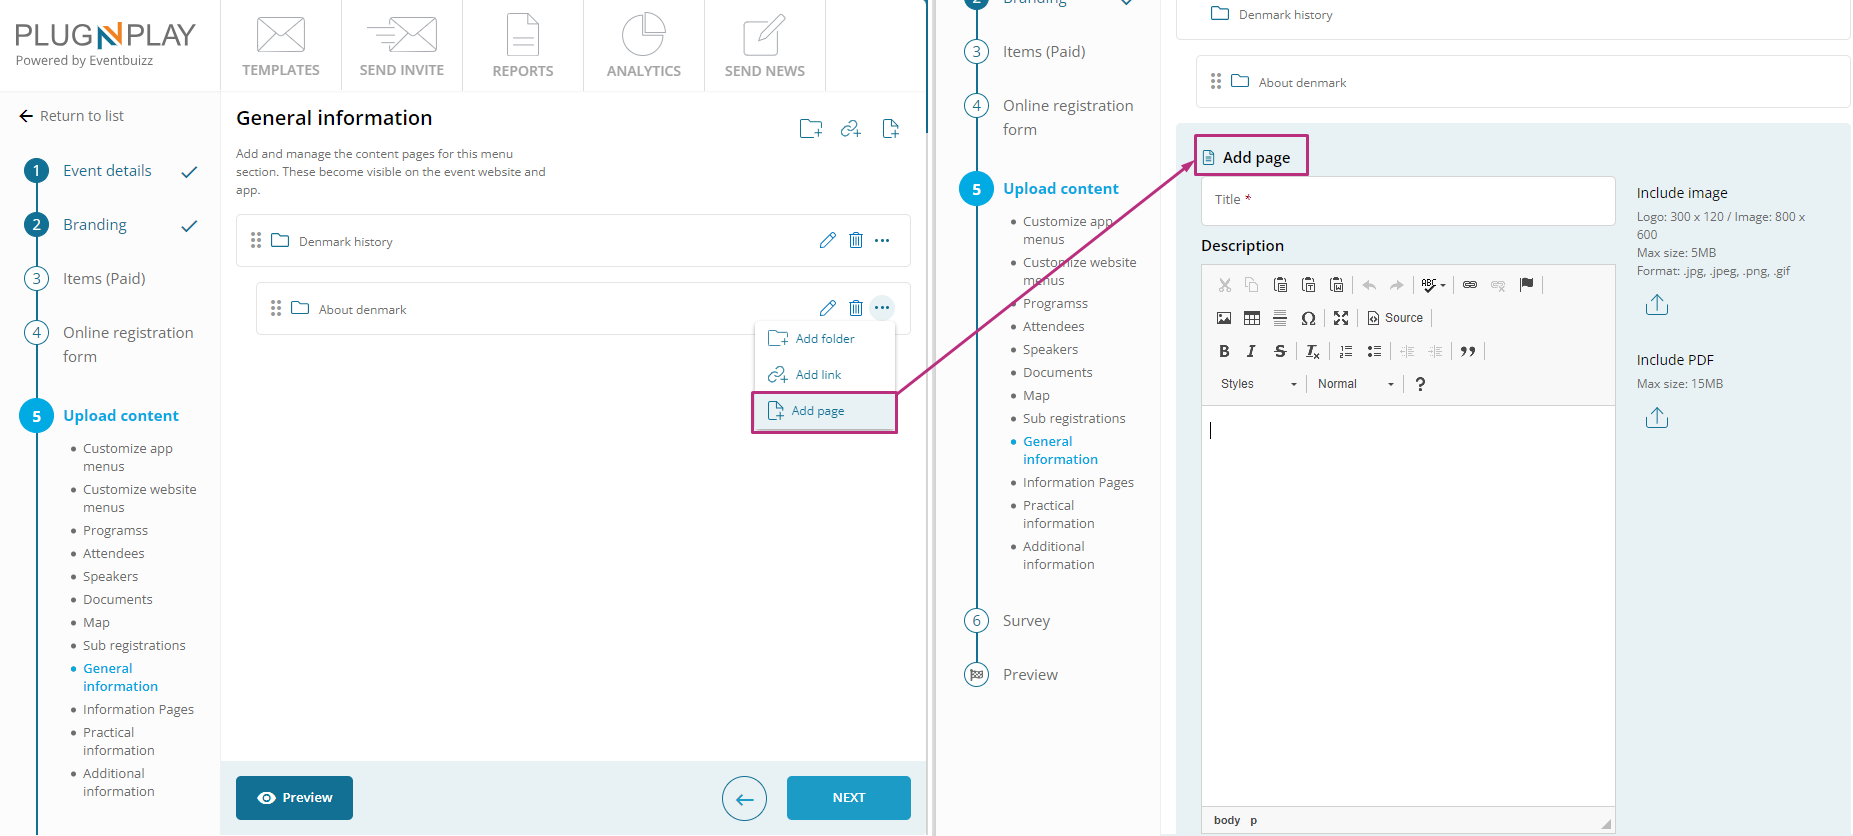
Add page
- Organiser can add detailed descriptions, upload images, and attach PDF files.
- Provides a comprehensive way to store and present document-like information.
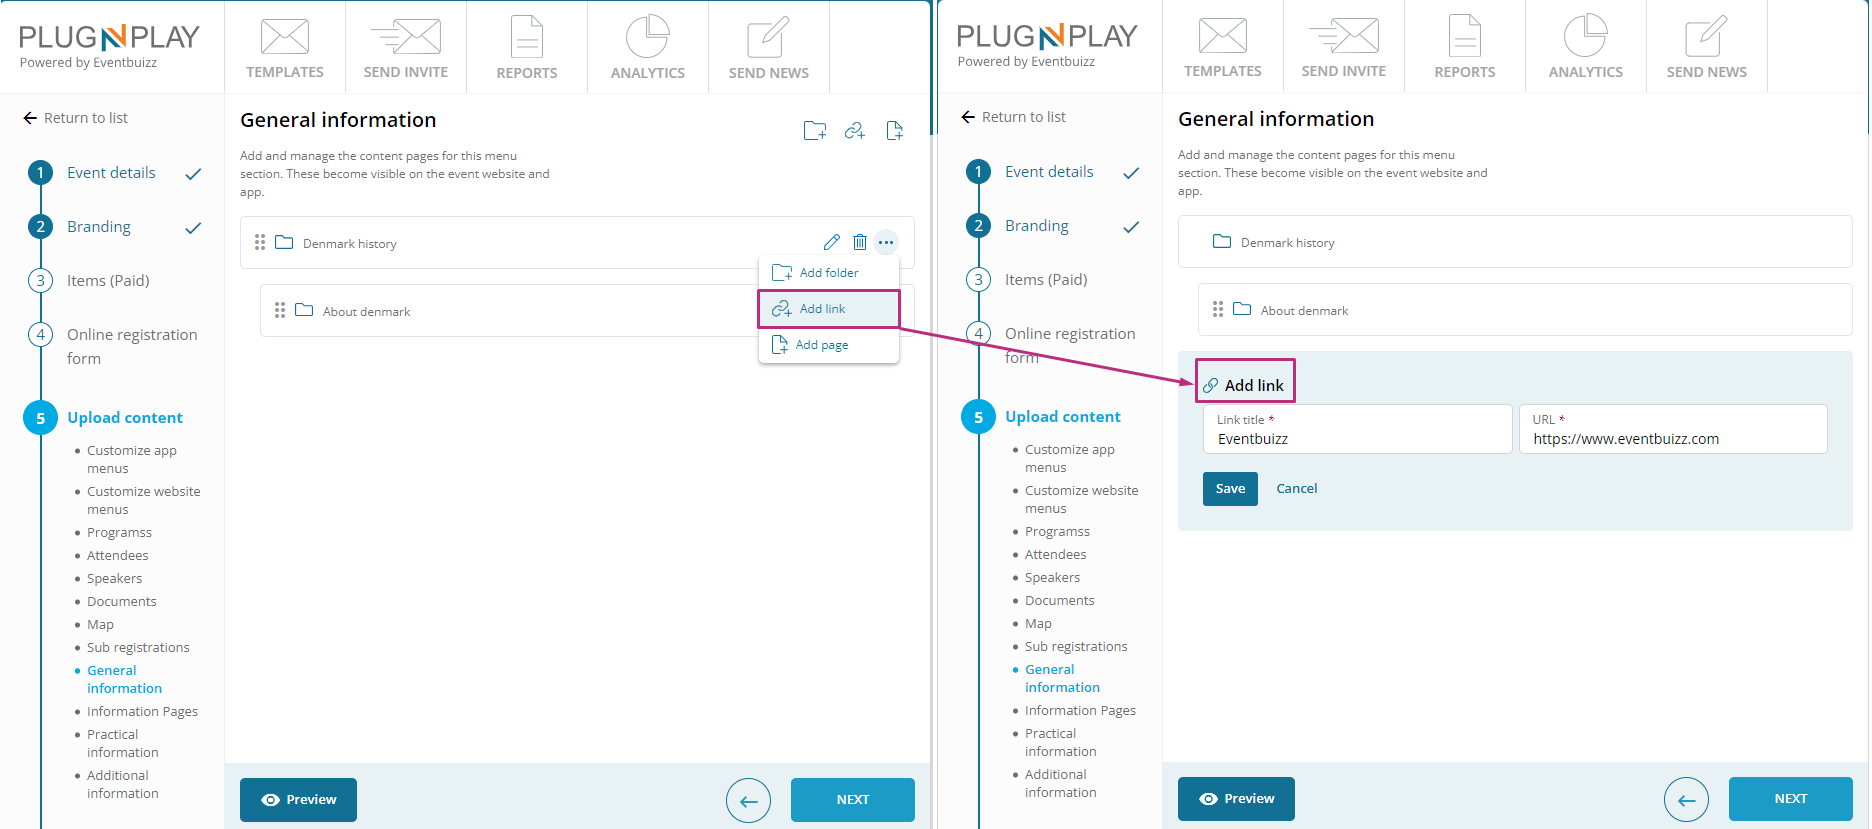
Add link
- Permits users to add a new link directly within the current folder.
- Simplifies the process of linking to external resources.
Edit
- Enables users to modify the name or properties of the selected folder, page, or link.
- Provides flexibility to update information as needed.
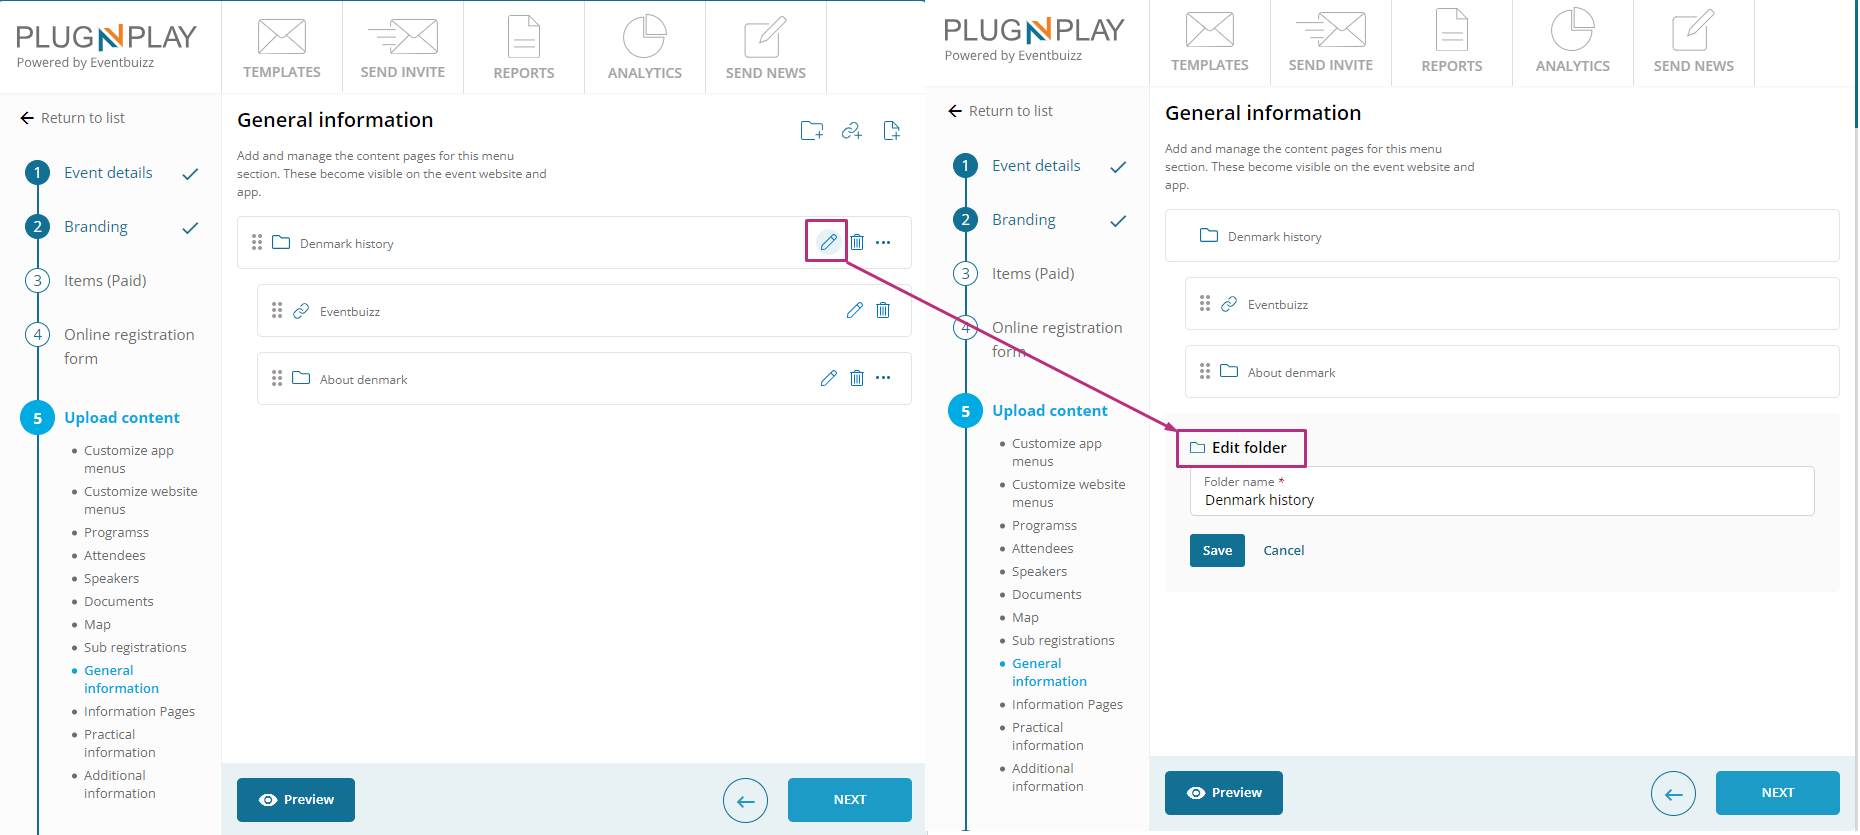
Delete
- Allows users to remove the selected folder, page, or link.
- Ensures the ability to manage and organise content effectively.
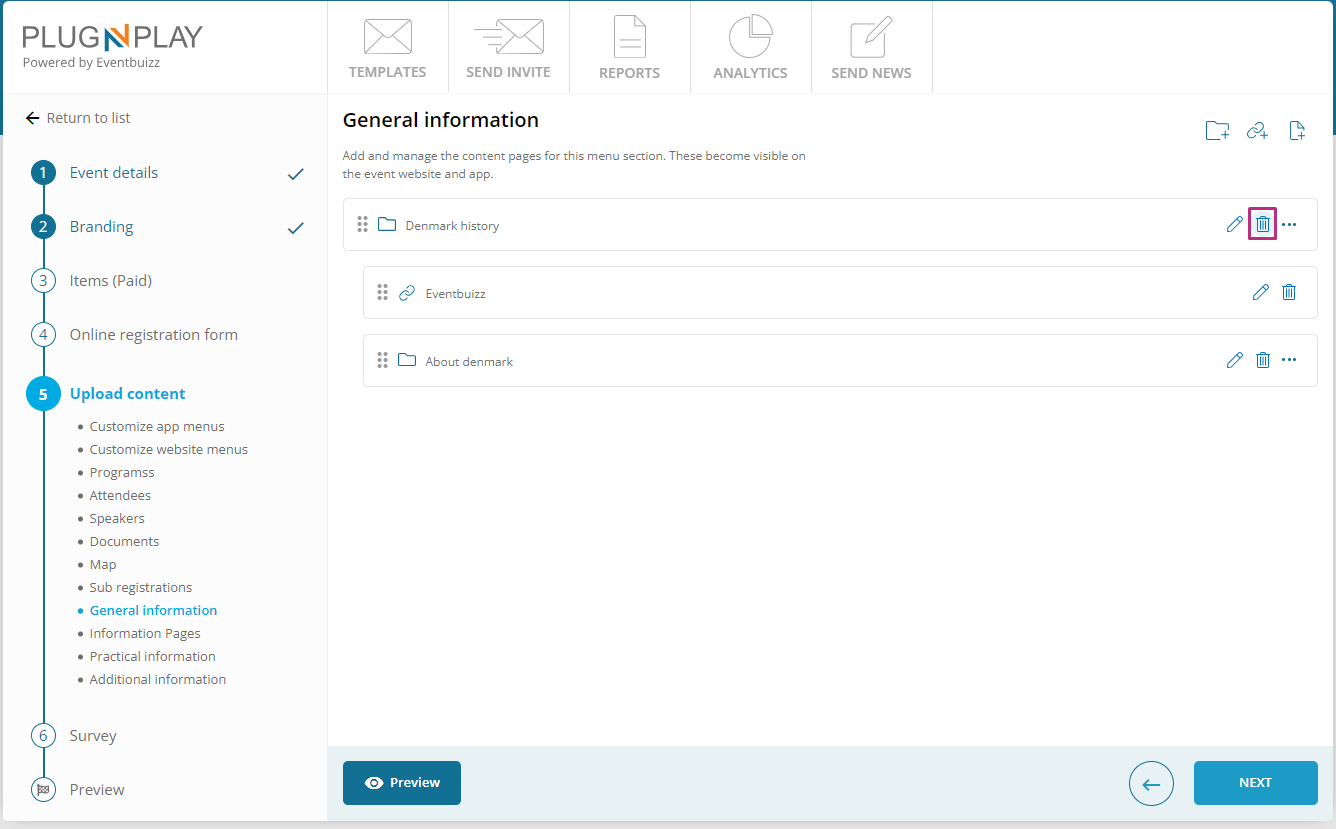
Information pages
Information pages in Eventbuizz serve to provide comprehensive details about the event that are essential for attendees and stakeholders to understand its purpose, logistics, and content.
Key features:
- Event overview: Provides a summary of the event, including its theme, objectives, and any relevant background information.
- Speakers/Performers: Details about individuals or groups presenting at the event, including bios, session topics, and schedules.
- Schedule: A detailed agenda of the event, including session times, breaks, and any networking opportunities.
- Registration: Information on how attendees can register for the event, purchase tickets, and manage their attendance.
- Location and venue: Maps, directions, and details about the event venue(s), including facilities and accessibility information.
- FAQs: Commonly asked questions and answers regarding event logistics, policies, and attendee queries.
Use case: Information pages ensure that attendees are well-informed about the event’s content, structure, and practical arrangements, thereby enhancing their overall experience and preparedness.
How information pages are works?
To know about the information pages, like how it works, for more information please click here

Surveys
Surveys
Surveys are a powerful tool for gathering real-time responses from attendees, enhancing engagement, and collecting detailed feedback before, during, and after an event. They help event organisers understand attendee satisfaction, improve the event experience, and gather actionable insights for future improvements. Here’s a comprehensive guide on creating and managing surveys effectively:
Purpose of surveys
- Real-time feedback: Collect instant feedback on various aspects of the event, such as sessions, speakers, and overall experience.
- Engagement: Increase attendee interaction by involving them in the feedback process and making them feel valued.
- Detailed insights: Obtain comprehensive feedback that goes beyond quick polls, helping to understand specific areas of satisfaction or concern.
- Future improvements: Use feedback to make informed decisions for future events, improving overall quality and attendee experience.
Creating and Managing Surveys
Survey creation
-
Purpose: Surveys are designed to collect detailed feedback and insights. They can be used to gauge attendee satisfaction, gather opinions on specific elements of the event, or solicit suggestions for future improvements.
-
Usage timing:
- Pre-event: Understand attendee expectations, preferences, or gather registration details.
- During event: Get feedback on sessions, speakers, or logistics to make real-time adjustments.
- Post-event: Assess overall satisfaction, gather suggestions, and evaluate the success of the event.
How it works?
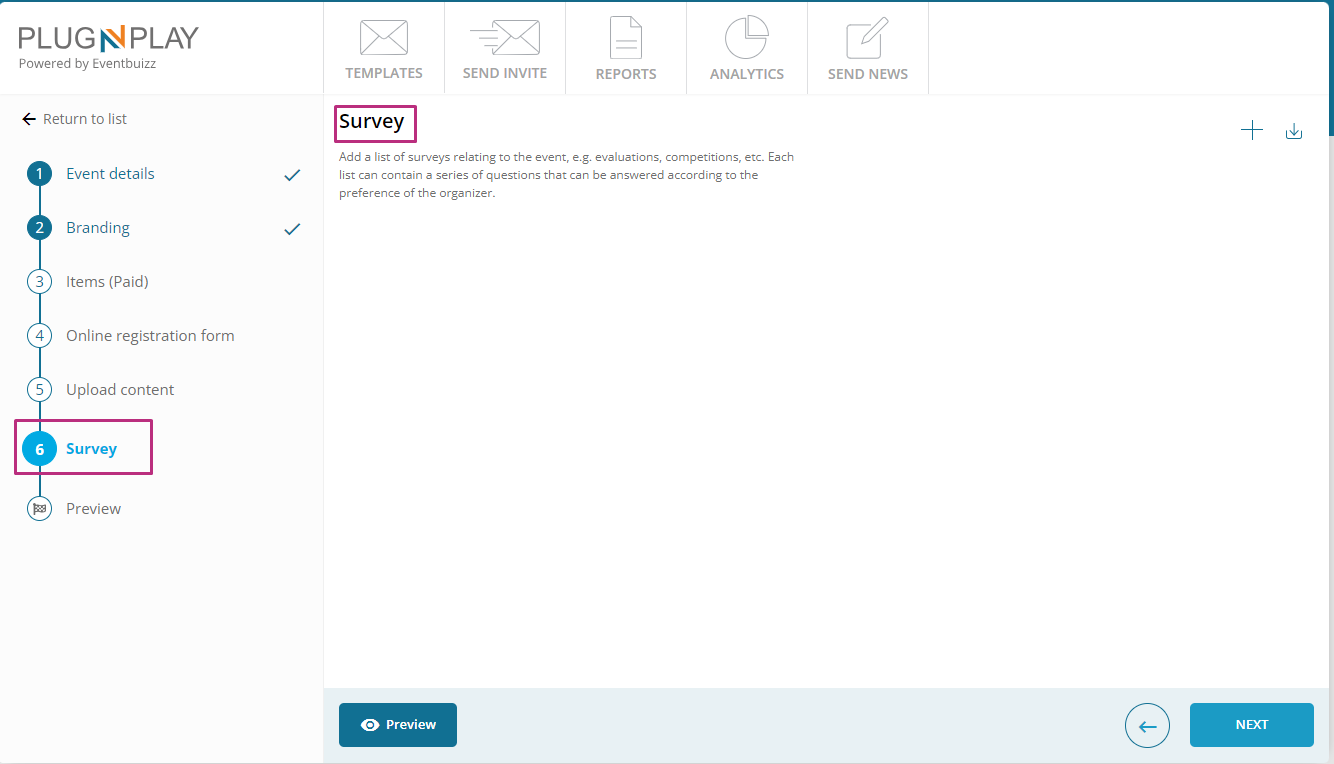
Organiser can add a list of surveys relating to the event, e.g. evaluations, competitions, etc. Each list can contain a series of questions that can be answered according to the preference of the organiser. For more detail how surveys can create or works and how to create all type of questions please click here
Preview
Preview
The preview step in the event creation process is crucial for ensuring that all aspects of your event are set up correctly before finalising it. This step allows organiser to review how your event will appear to attendees across different platforms, ensuring that everything looks and functions as intended. Here’s a detailed overview of the three types of previews available in the plug and play portal and how to use them effectively:
- Online registration form
- Event website
- Event app
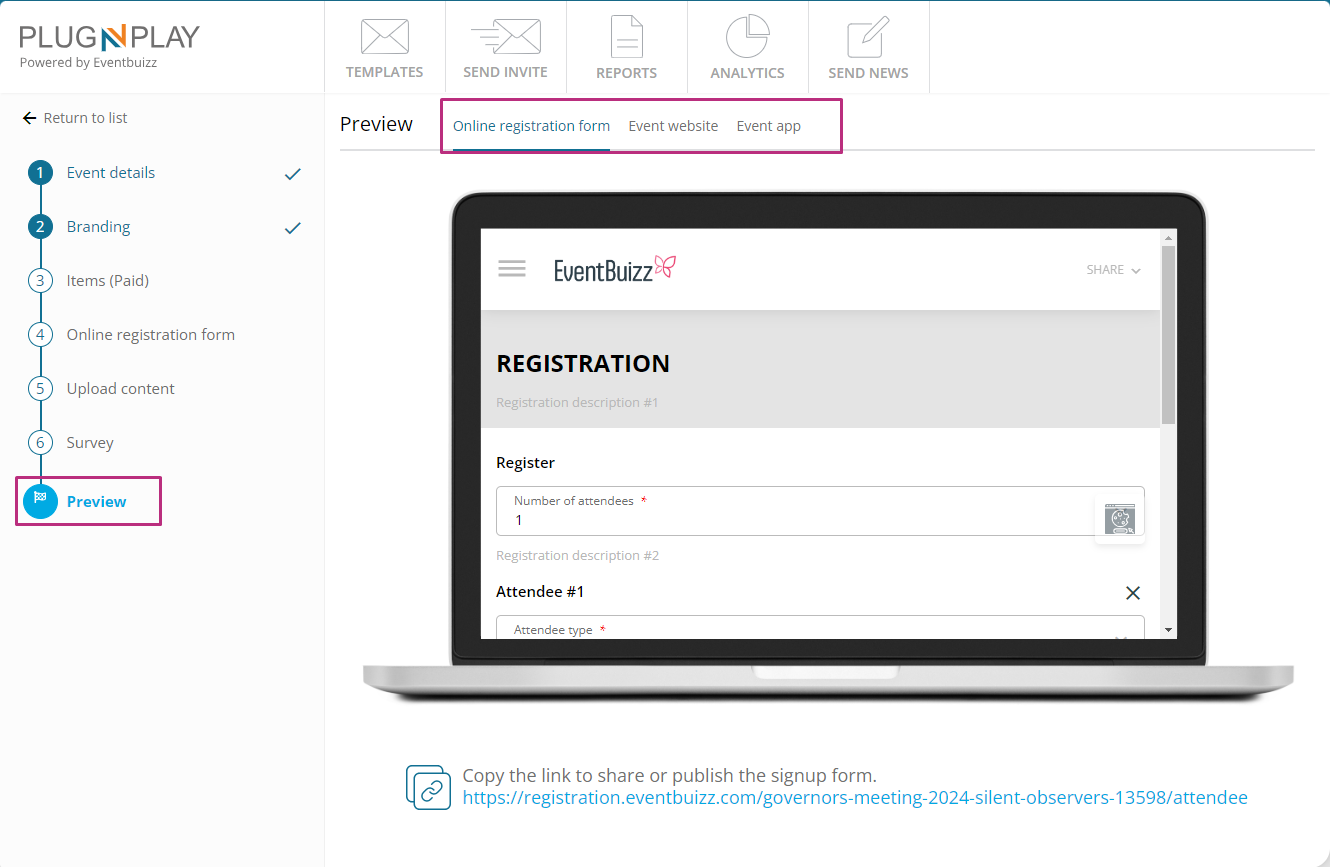
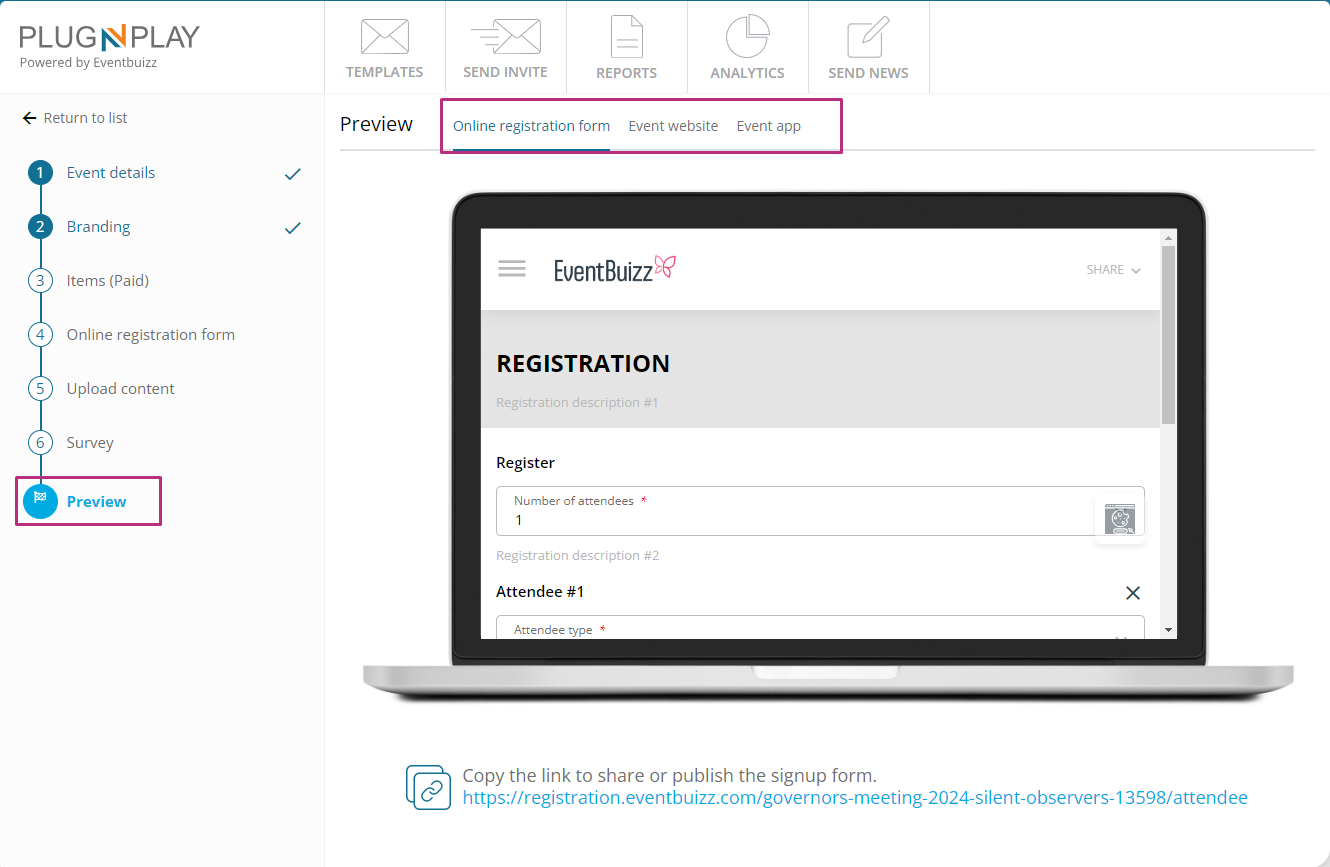
Online registration form preview
Purpose:
- Visualise the registration process: This preview allows organiser to see how the registration form will appear to attendees once it is live. It ensures that all fields, instructions, and design elements are correctly set up.
What to check:
- Form fields: Confirm that all required fields (e.g., name, email, dietary preferences) are present and correctly labelled.
- Design and layout: Ensure the form layout is user-friendly and aligns with your event’s branding.
- Instructions: Verify that instructions and error messages are clear and helpful.
- Registration flow: Test the form to ensure that the registration process is smooth and functional.
Action:
- Link Sharing: Use the link provided to share the preview with team members or stakeholders to get feedback before going live.
Steps:
- Go to the preview section for the online registration form.
- Review the registration form layout and functionality.
- Use the “Copy the link to share or publish” option to distribute the preview link for external review.
Event website preview
Purpose:
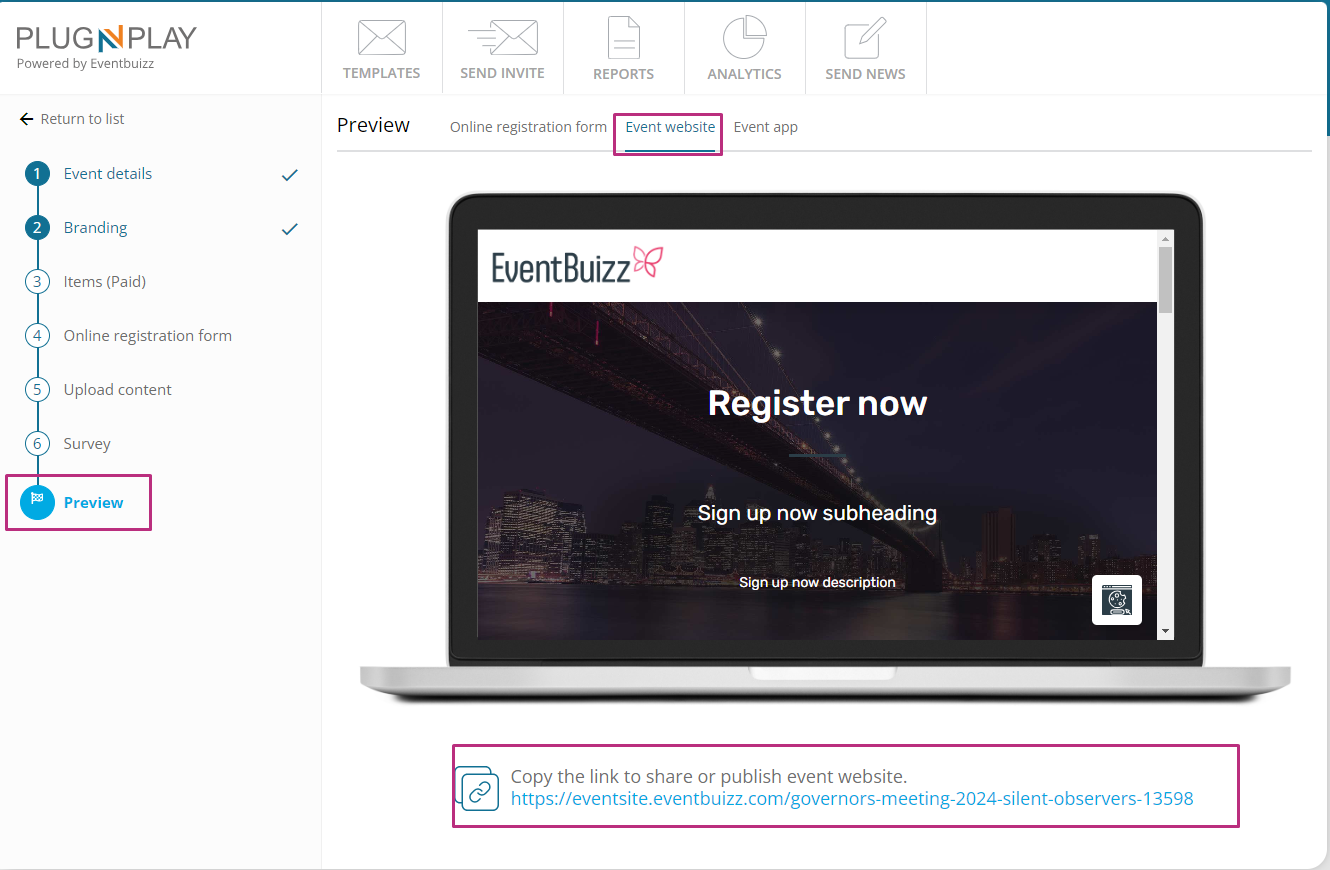
- View event site layout: This preview shows how the event website will look based on all the changes made during setup. It provides a comprehensive view of the website’s appearance and functionality.
What to check:
- Website layout: Ensure that the website design and structure align with your event’s branding and objectives.
- Modules and content: Verify that all intended modules (e.g., schedule, speakers, sponsors) are present and functioning as expected.
- Active and inactive modules: Check which modules are visible or hidden based on your settings.
- Data display: Ensure that all data (e.g., program sessions, speaker information) is accurately displayed.
Action:
- Link sharing: Share the preview link with your team or stakeholders to review the website before it goes live.
Steps:
- Access the preview section for the event website.
- Review the website layout and functionality.
- Use the “Copy the link to share or publish” option to distribute the preview link for feedback.
Event app preview
Purpose:
- Preview mobile app appearance: This preview shows how the event will appear on mobile devices, reflecting any customisation made for the app.
What to check:
- App layout: Ensure the app’s design is consistent with the event’s branding and is user-friendly on mobile devices.
- Functionality: Test all interactive elements (e.g., program schedules, attendee networking features) to ensure they work as intended.
- Content visibility: Verify that all content (e.g., session details, speaker profiles) is correctly displayed in the app.
Action:
- Link sharing: Provide the preview link to your team or stakeholders to gather feedback on the mobile app experience.
Steps:
- Navigate to the preview section for the event app.
- Review the app’s layout and interactive features.
- Use the “Copy the link to share or publish” option to share the preview link for external review.

Summary of steps to use the preview function
-
Access preview options:
- Locate the preview section in the event creation process.
-
Review each preview type:
- Online registration form: Check form fields, layout, and registration flow.
- Event website: Verify website design, module visibility, and data display.
- Event app: Review mobile app layout, functionality, and content.
-
Share preview links:
- Use the provided links to share the previews with team members or stakeholders.
- Collect feedback and make necessary adjustments before finalising the event.
-
Finalise event:
- Make any final changes based on feedback from the previews.
- Complete the event creation process and publish the event.
By thoroughly reviewing each type of preview, you ensure that all aspects of your event are polished and ready for your attendees, enhancing the overall event experience and preventing any last-minute issues.
After completing the event creation all steps , an event will create, and newly created event will show on the event listing. Here is the view of event listing:

Additionally against each created event, organiser have the access for different actions. Detail of each individual option is given below:

Edit
Edit
By clicking on edit icon, it will redirect to the organiser on event create and detail step, where organiser can edit or modify as per requirements.

Send email
Send email
This module helps organisers create and distribute different types of invitations to guests. It consists of multiple steps, and multiple type of invitations, detail of each step is given below:

Create invite
- Select invite type: Choose from various types of invites such as registration invite, resend registration invite, registration reminder, app invite, or app reminder.

Edit email
Depending on the selected type, the system displays the corresponding email template. Organisers can modify the content to suit their needs.This is the email that will be sent to the guests to invite them to register for the event. Update the contents and design of this email in accordance with the internal guidelines of your company. By clicking on the “edit” icon, organiser will move on the edit template screen, where organiser can modify template as per requirements.

Guest list
Send an invite for the registration of the event. In order to proceed, it is required to upload or add a guest list. Organiser can select the guest from the list if already created, otherwise organiser can add guest as well. For creating guest there are two options available for organiser. Detail of each available option given below:
- Add guests manually: By clicking on “+” icon organiser can create a new guest. For creating new guest organiser enter guest details (first name, last name, email, CPR number, phone, and permissions).
- Available permissions are(allow to vote (give the permission to vote), allow to speak(will enable attendee to speak)

- Import CSV: Organiser can also add guest in a bulk, by uploading the csv file. Organiser will upload a CSV file with guest information like(first name, last name, email etc).

All the imported record will show in guest list, and also can export all guest list by clicking on menu export option:

Also organiser have the additional action options against each created guest user, detail of available options are given below:
- Edit: Allows user to edit or update the guest information
- Delete: Allow user to delete the un-wanted or no more used users.

Additionally there is a filtration option also available for organiser, with the help of this filtration organiser can select the recipients of the email.
- Send email to the selected guest only: It will only sent the email to the selected guest.
- Send email to all the guest: This option allow organiser to send email to all guest users in one go.

Preview & send email
In this step organiser will review the email before sending it. And after verification organdie send the email to the selected guest users.

Copy event
Copy event
Copy event allow organiser to create a copy of the selected event with same settings and data, by clicking the copy icon, a new model will open, where organiser will enter the relevant details, like name, event start date, end date, start time, end time etc.

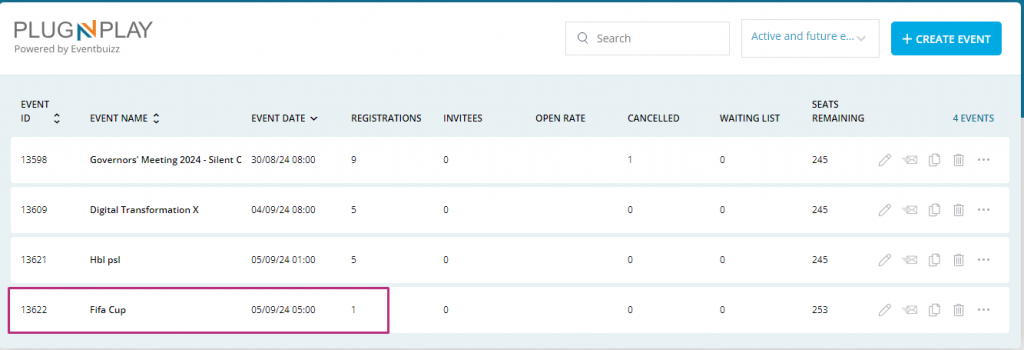
After entering all the relevant details of the event, organiser will click on create button, and event will create with all similar sort of data, and start showing on the portal event listing screen, here is the view of it:
Delete
Delete
The “delete” function in an event listing allows administrators or event organisers to remove an event from the portal. This function is crucial for maintaining accurate and up-to-date event information. Here’s a detailed explanation of how the delete function works, including its purpose, steps involved, considerations, and potential impacts:
Purpose
- Remove obsolete events: Deletes events that are no longer relevant, either because they have been cancelled, completed, or mistakenly listed.
- Maintain accuracy: Ensures that only current and accurate events appear in the listing, preventing confusion for attendees and organisers.
- Free up system resources: Helps in managing and optimising system performance by removing unnecessary data.

Reports
Reports
Reports
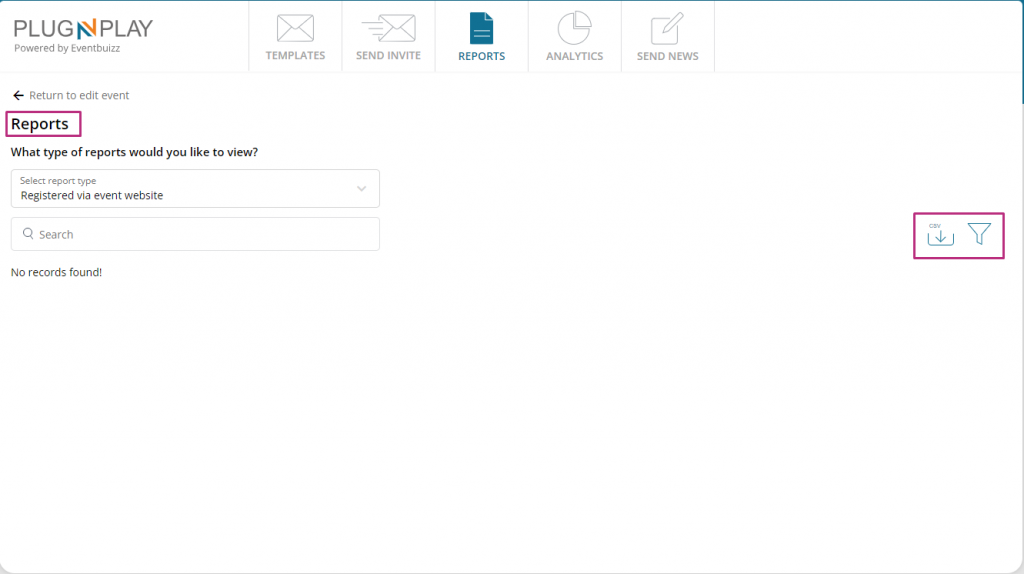
The reports module provides data insights based on selected filters. This helps organisers analyse various aspects of event registrations and attendance. There are a lot of filter option available for organiser, and based on the selected filter, organiser can review the data
Filters:
- Registration via report: Breakdown of registrations by different methods.
- Registration via event website and manually assigned: Data on registrations from the event website and manual entries.
- Registration invite recipients: List of individuals who received the registration invite.
- Registration reminder recipients: List of those who received registration reminders.
- Invites that did not register: Data on individuals who received invites but did not register.
- Invites that chose not to attend: Data on those who declined the event.
- Attendees that cancelled their attendance: Data on those who cancelled their registration.
- App invites recipients: List of recipients who received app invites.
- Attendees awaiting app invites: List of attendees who are waiting for their app invites.
- Attendees that have booked accommodation: Data on attendees who have made accommodation arrangements.

Additional options:
- Download selected filter data: Export the filtered data into a file (e.g., CSV or Excel) for further analysis.
- Filter date range: Choose a date range to view data relevant to that period.
Analytics
Analytics
The “Analytics” module in plug-and-play management portal is a comprehensive tool designed to provide organiser with detailed insights into various aspects of event management. Each type of analytics provides specific information to help organisers understand and optimise the event process.
Accessing the analytic module
For accessing the analytics module organiser need to navigate on the following path:
Plug and play portal->Select the specific event from event listing->menu->analytics
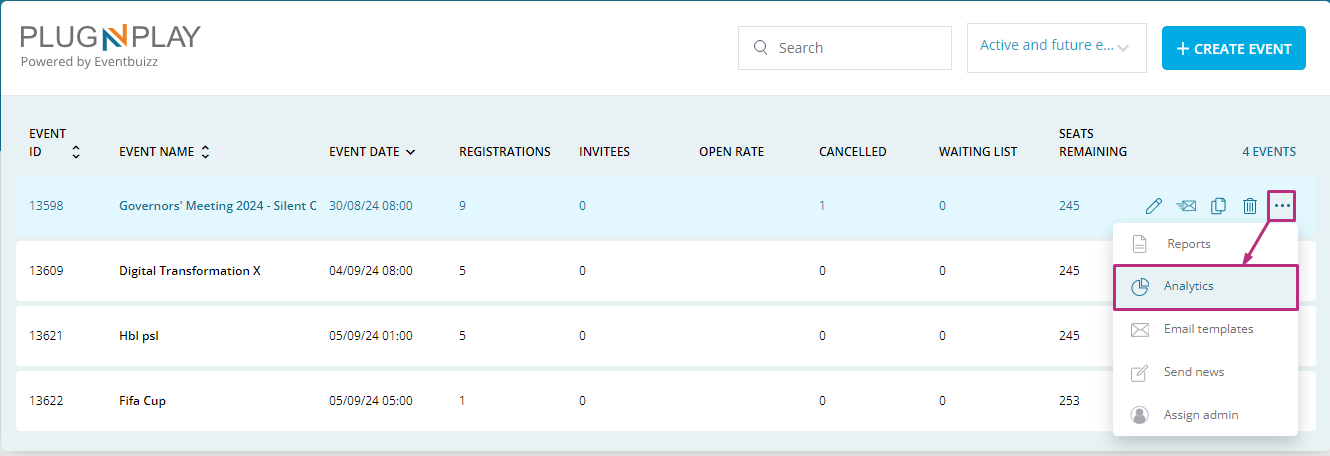
After accessing the analytics menu, organiser will redirect on analytics module, where organiser have the multiple analytics available, Here’s a view of it:
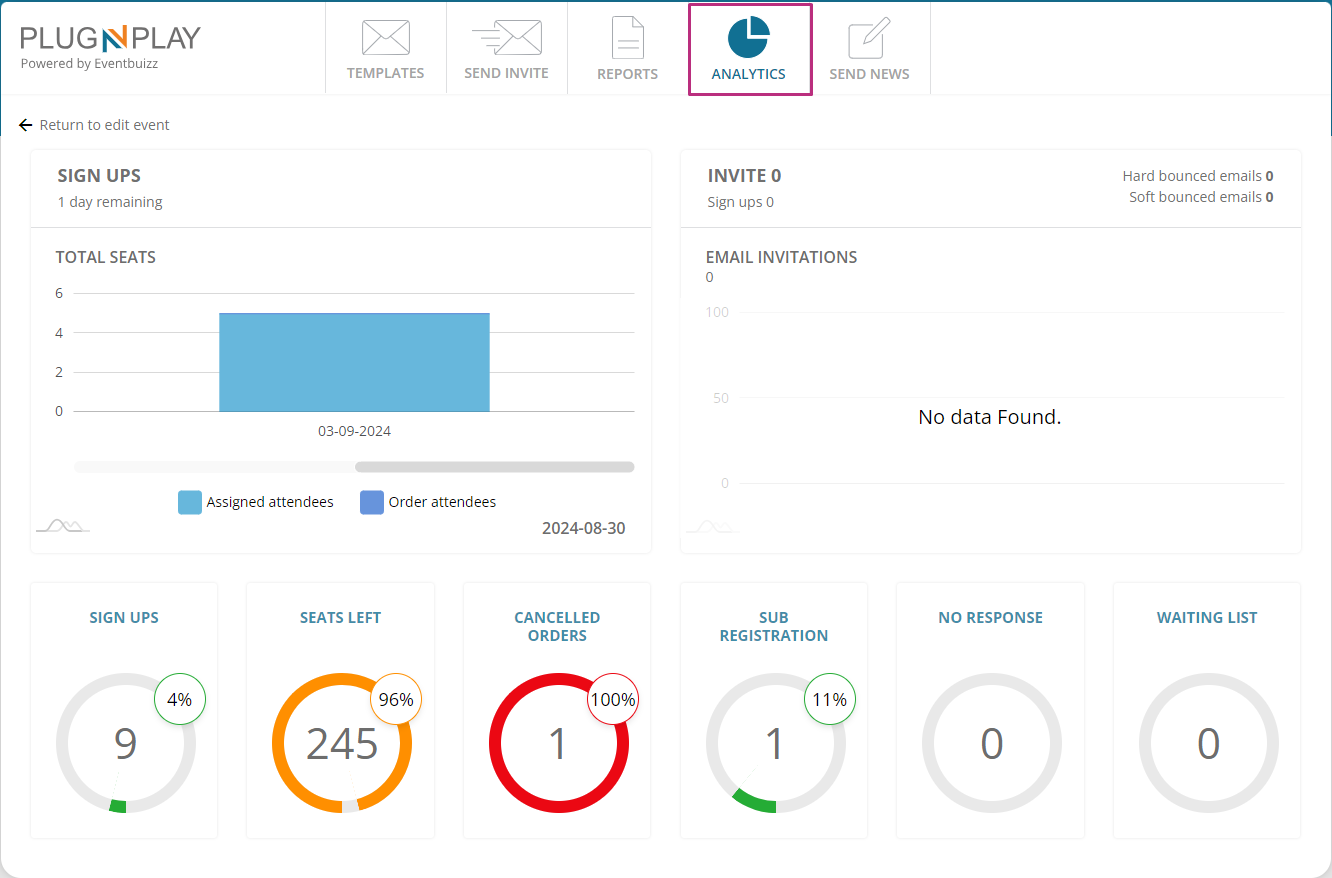
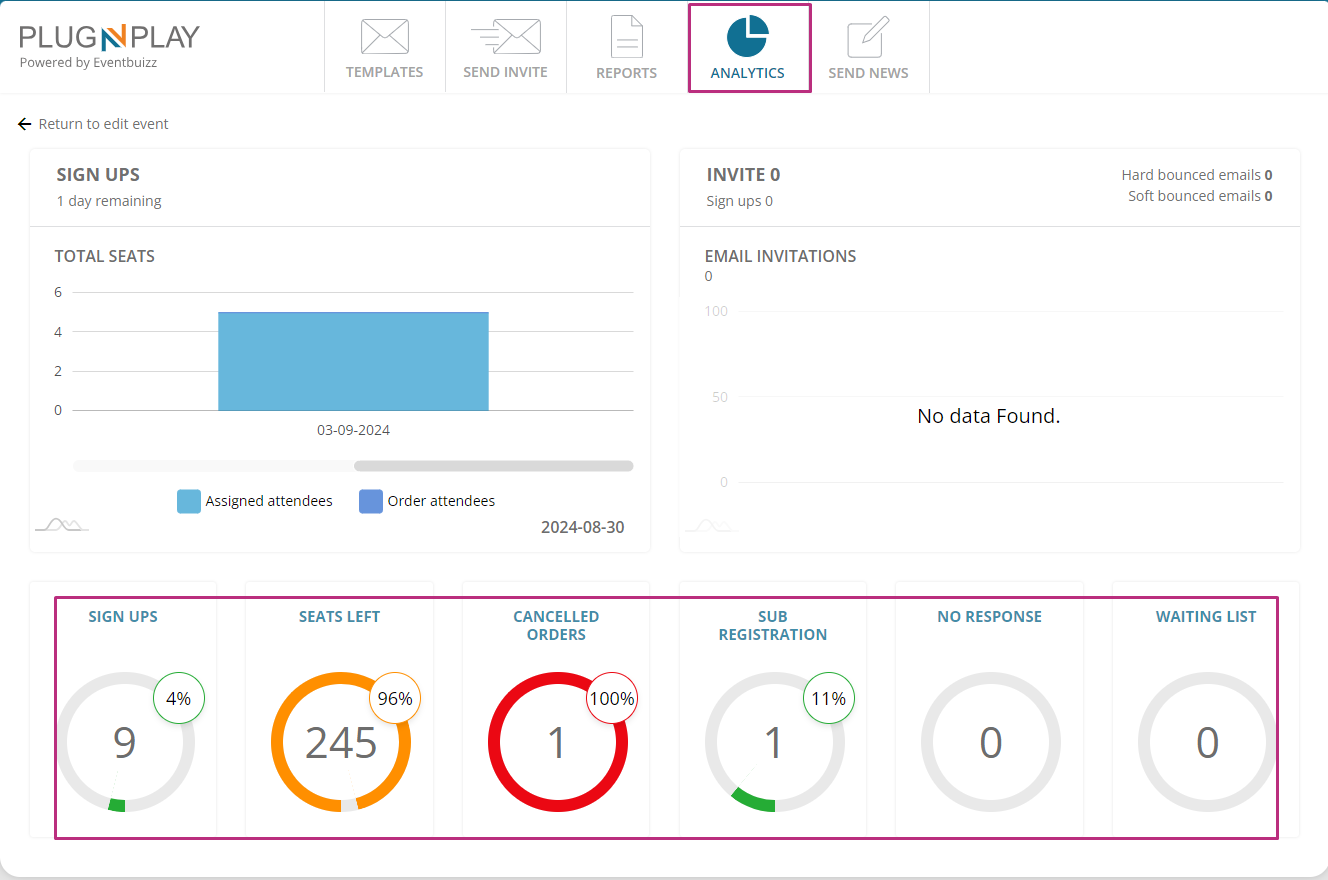
Here’s a detailed explanation of each type of analytics:
Sign ups
- Purpose: This analytic shows how many individuals have registered for the event via the registration site.
- Functionality: It tracks the number of sign-ups over a specified period, allowing organisers to gauge the level of interest and popularity of the event. This can help in assessing marketing effectiveness and overall event appeal.
Seats left
- Purpose: This analytic informs organisers about the remaining available seats for the event.
- Functionality: Organisers set the total number of seats available. As registrations are processed and offers are accepted, the number of remaining seats is updated in real-time. This helps in managing capacity and understanding how quickly seats are being filled.
Cancelled orders
- Purpose: This analytic provides data on how many orders (registrations) have been cancelled by the organiser.
- Functionality: It tracks the number of cancellations, which can be useful for identifying trends or issues in event management. For example, if cancellations are frequent, it might indicate a need to review the registration process or event policies.
Sub registrations
- Purpose: This analytic measures how many users have responded to sub-registration questions.
- Functionality: Sub-registration questions are additional queries asked to gather more detailed information from participants. This analytic helps organisers understand how many people have engaged with these questions, which can be useful for collecting important data or preferences from attendees.
No response
- Purpose: This analytic shows the number of individuals who have not responded to offers sent by the organiser.
- Functionality: After sending out event offers, this metric helps organisers track who has not yet responded. This information can be used to follow up with those individuals or adjust strategies to improve response rates.
Waiting list
- Purpose: This analytic shows how many individuals are on the waiting list, waiting for an offer to attend the event.
- Functionality: When an event reaches full capacity, additional registrants may be placed on a waiting list. This analytic helps organisers understand how many people are waiting and can assist in making decisions about potentially increasing capacity or managing offers to waiting list members.
Overall purpose and functionality
The overall purpose of the Analytics module is to provide organisers with a comprehensive view of the event’s performance and participant engagement. By offering graphical representations of key metrics, it allows for easy interpretation of data and aids in making informed decisions.
- Purpose: To enable organisers to monitor and optimise various aspects of event management, from registration numbers and seat availability to participant engagement and response rates.
- Functionality: The module provides real-time or near-real-time data visualisation to help organisers track event status, identify issues, and take corrective actions promptly.
By leveraging these analytics, organisers can enhance their event planning and execution processes, ensuring a better experience for attendees and a more successful event overall.
Email templates
Email templates
The “Email templates” module in plug-and-play management portal is designed to streamline the communication process with guests and attendees for various stages of event management. This module allows organisers to manage, customise, and maintain email templates that are sent to users based on their actions or status related to the event.
Accessing the email templates module
For accessing the email templates module organiser need to navigate on the following path:
Plug and play portal->Select the specific event from event listing->menu->email templates.
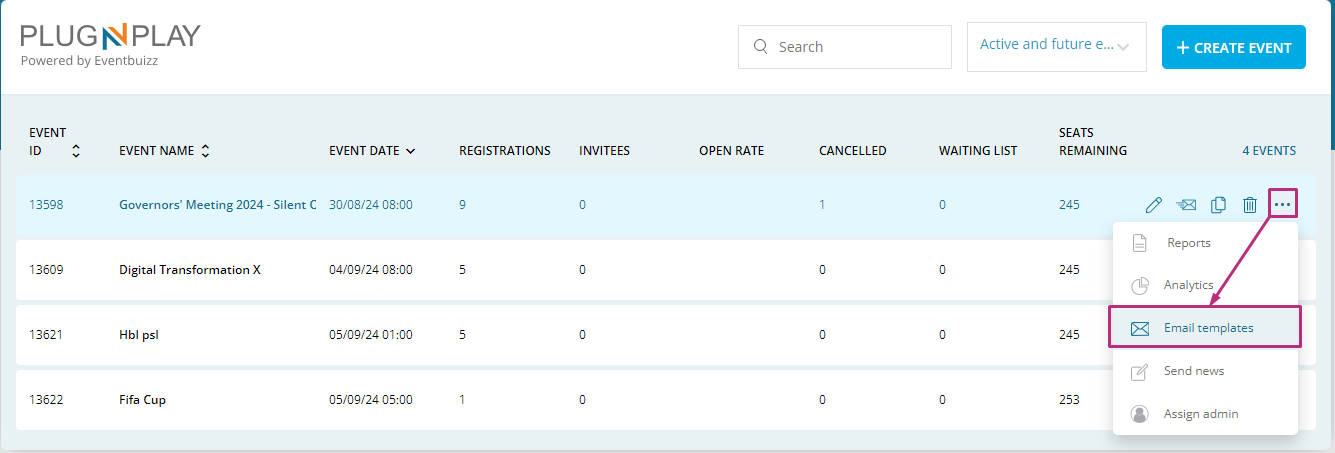
After accessing the email templates from menu, organiser will redirect on templates module, where organiser have the multiple templates available, Here’s a view of it:
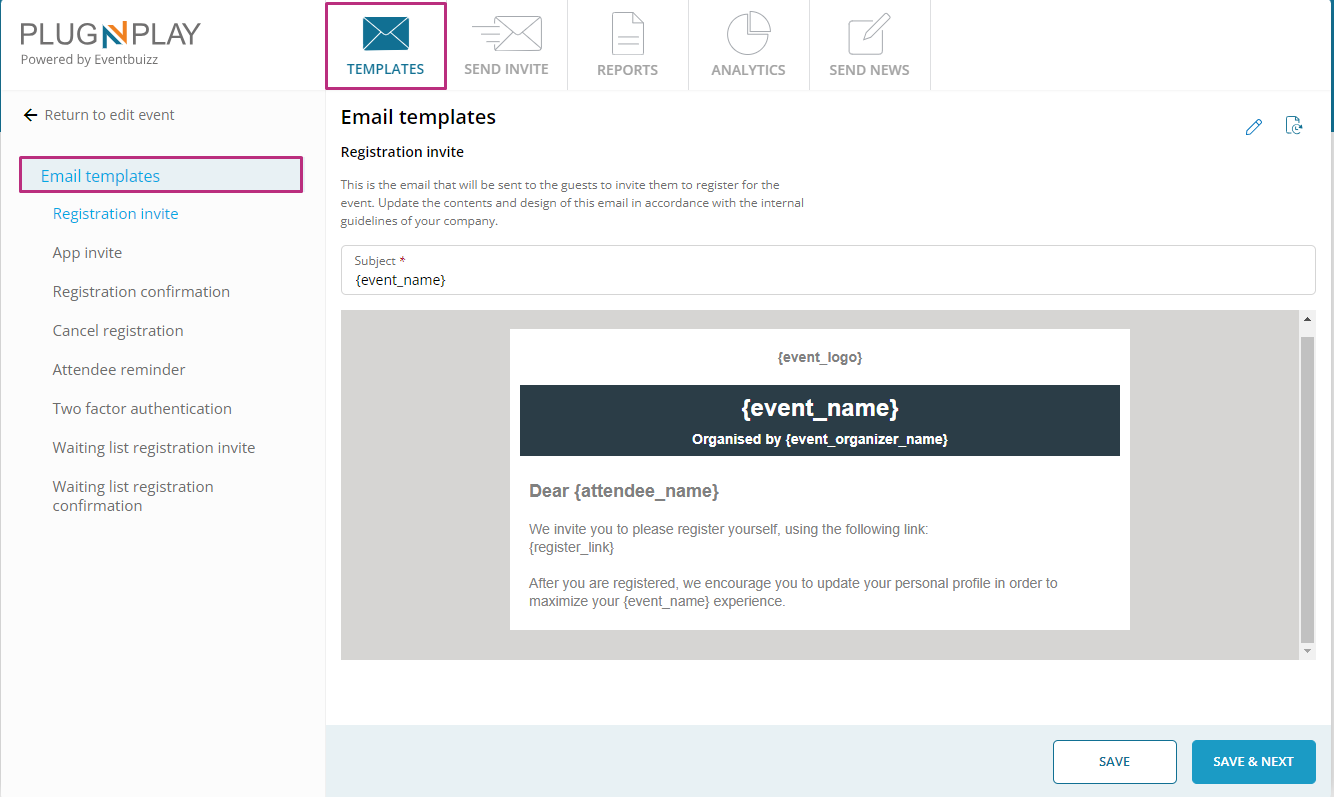
Purpose of the email templates module
- Customisation: Enables organisers to tailor the email content and design to align with their company’s branding and internal guidelines.
- Efficiency: Streamlines the process of creating and managing email communications for different scenarios, reducing manual effort and ensuring consistency.
- User engagement: Improves engagement by sending personalised and relevant emails to guests and attendees based on their interactions with the event.
Email templates consist of different templates, detail of all available templates is given below:
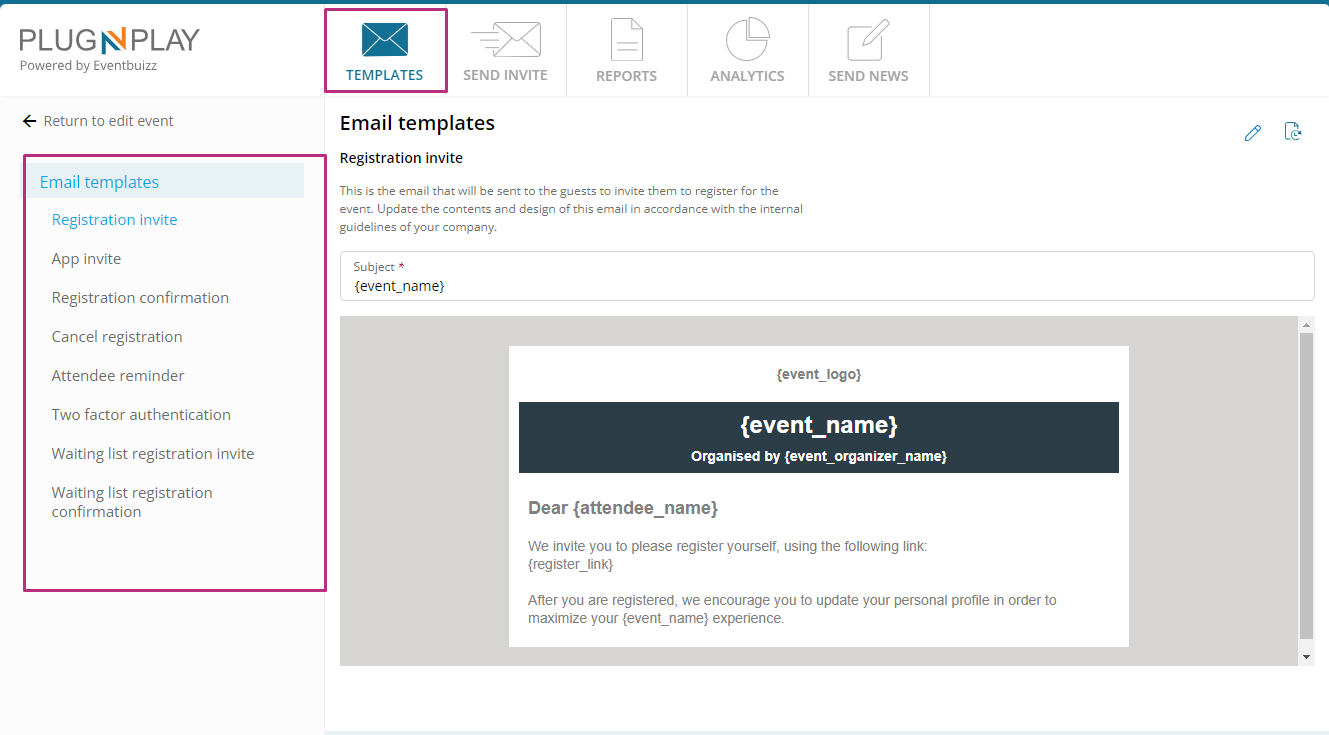
Detailed breakdown of available templates
Registration invite:
- Purpose: To invite potential guests to register for the event.
- Functionality: Organisers can update the content to include event details and registration instructions, ensuring it adheres to company guidelines.
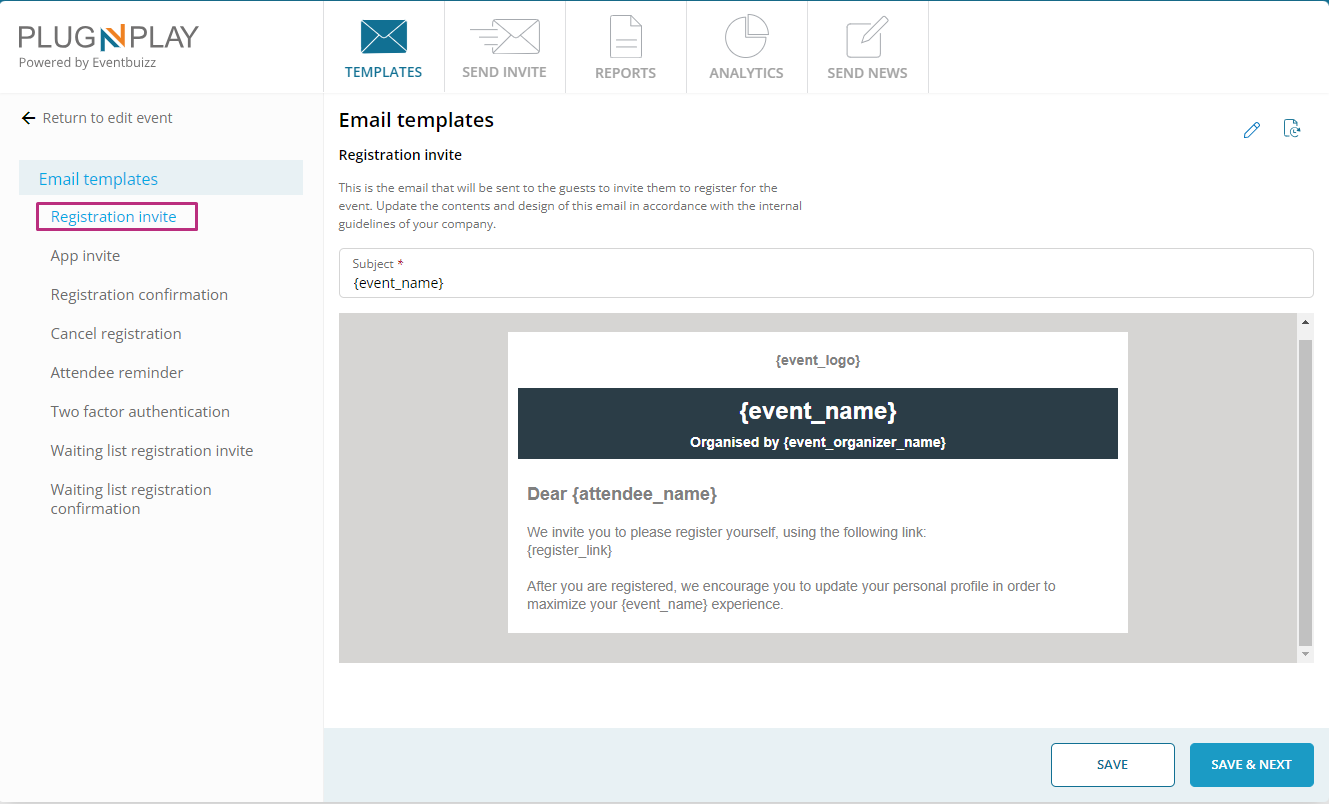
Customising the registration invite template
Against each available organiser have the customise or edit option, by clicking on “edit” icon, organiser can customise the template.
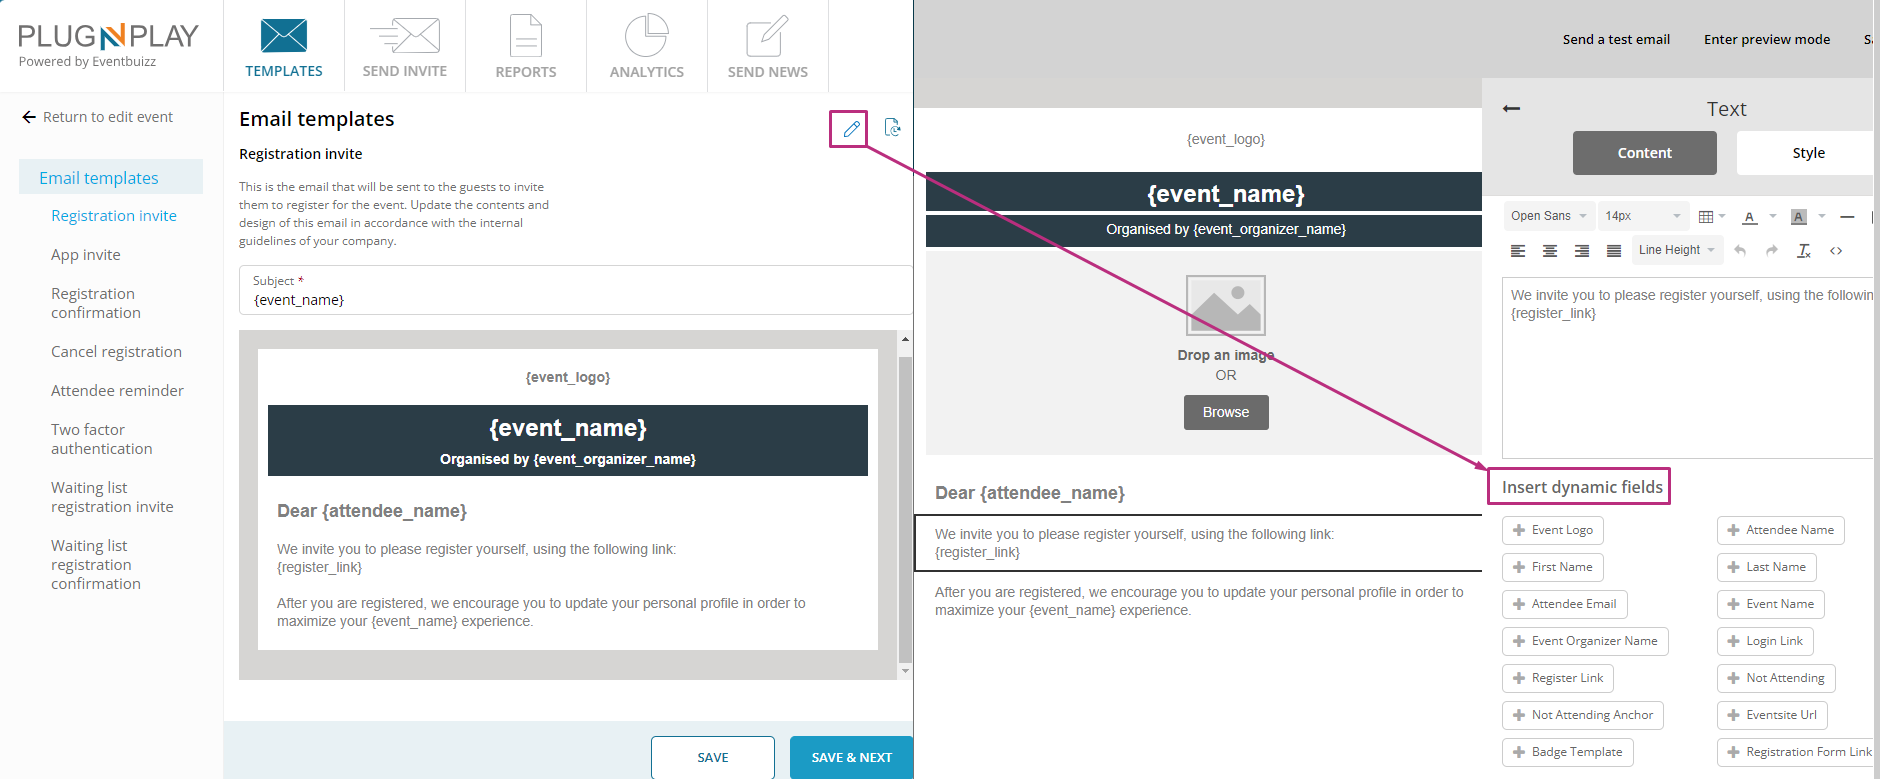
The email template has a number of dynamic fields. Click edit to open editor of the form to edit the invitation template and add desired dynamic field. If you use <attendee_ name> the system automatically integrates the name of the possible attendee that you wish to invite.
The dynamic field {not_attending} can be used if you wish to keep track of the people who has declined your invitation to register. In the invitation, you can write something like:
“If you are not able to attend, please click here: {not_attending}”
App invite
- Purpose: To provide registered attendees with access to the event app.
- Functionality: Includes instructions on how to download and access the app, along with any necessary login details.
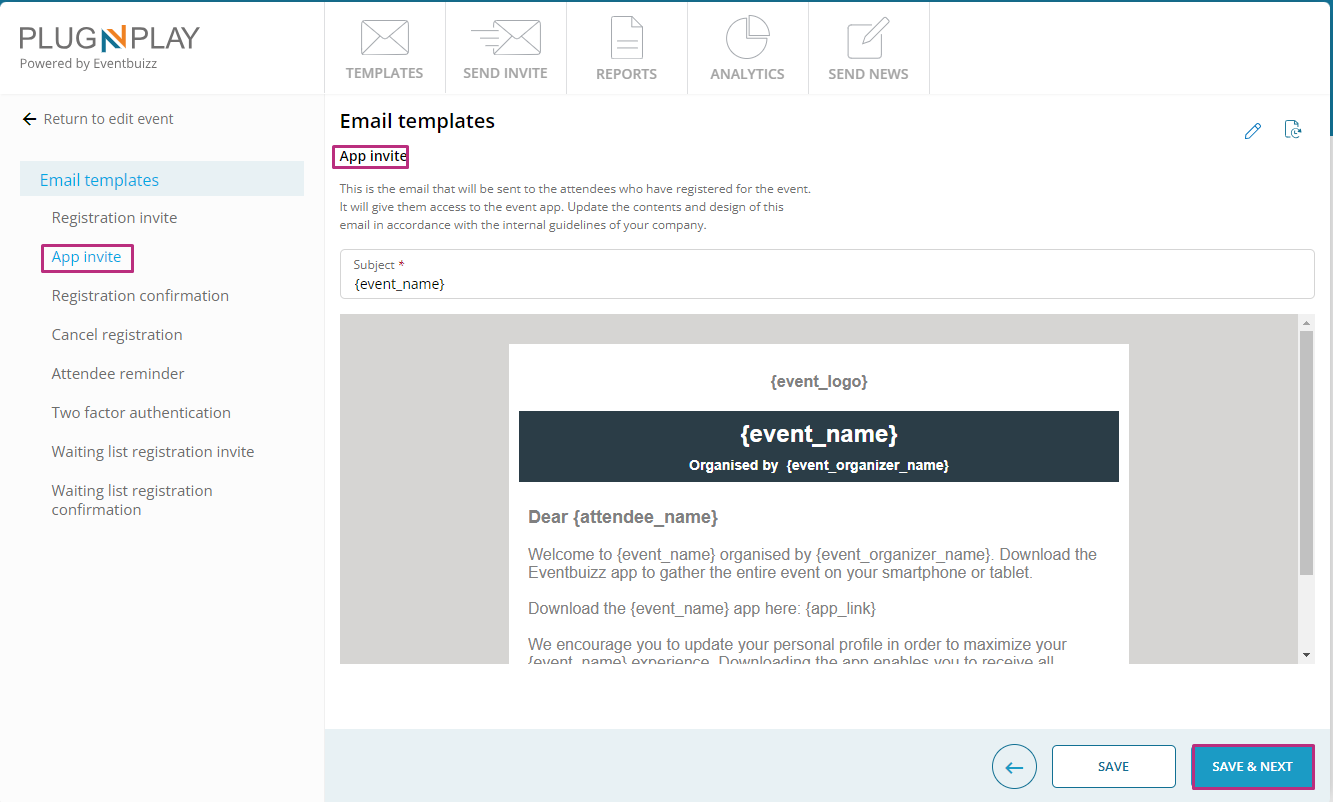
Customising the app invite template
Against each available template organiser have the customise or edit option, by clicking on “edit” icon, organiser can customise the template.
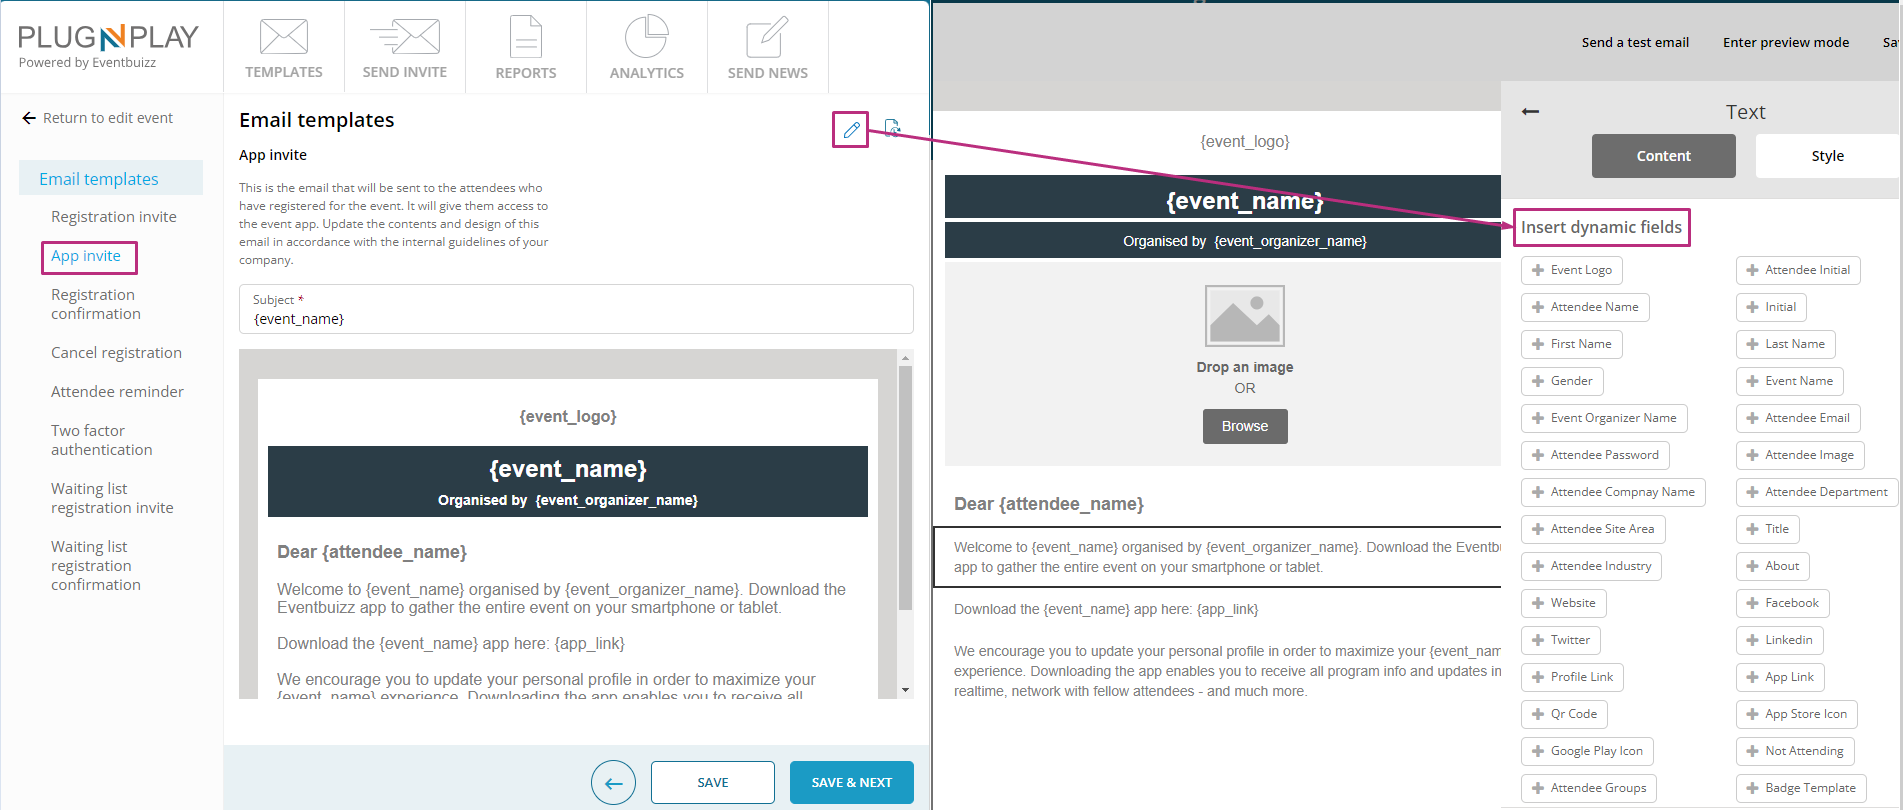
Dynamic fields for the “app invite” email template
Event logo:
- Purpose: Displays the event’s logo in the email.
- Functionality: Adds visual branding to the email, making it recognisable and consistent with the event’s marketing materials.
Attendee initial:
- Purpose: Shows the initial letter of the attendee’s first name.
- Functionality: Personalizes the email by addressing the attendee with a specific detail, which can add a touch of personification.
Attendee name initial:
- Purpose: Displays the initial letter of the attendee’s full name.
- Functionality: Can be used to customize greetings or sections of the email where the attendee’s name is mentioned.
First name:
- Purpose: Inserts the attendee’s first name.
- Functionality: Personalizes the email greeting and any references to the attendee throughout the email, making the communication more engaging.
Last name:
- Purpose: Inserts the attendee’s last name.
- Functionality: Complements the personalization by using the attendee’s full name in the email, if required.
Gender:
- Purpose: Displays the gender of the attendee.
- Functionality: Allows for gender-specific greetings or content, which can make the email feel more personalized.
Event name:
- Purpose: Shows the name of the event.
- Functionality: Provides context for the email, reminding the attendee of the specific event they are invited to.
Event organizer name:
- Purpose: Displays the name of the event organizer.
- Functionality: Adds a personal touch by identifying who is hosting the event, which can build credibility and trust.
Attendee email:
- Purpose: Shows the attendee’s email address.
- Functionality: Useful for including contact information or in case the recipient needs to verify their details.
Attendee password:
- Purpose: Provides the attendee with their login password for the app.
- Functionality: Enables easy access to the event app by including the password directly in the invite.
Attendee image:
- Purpose: Displays a photo of the attendee.
Functionality: Adds a personal touch by including the attendee’s image, which can make the email feel more tailored.
Attendee company name:
- Purpose: Shows the name of the company where the attendee works.
- Functionality: Useful for professional networking and personalization, especially in B2B events.
Attendee department:
- Purpose: Displays the department within the attendee’s company.
- Functionality: Allows for more targeted content and personalization based on the attendee’s role.
Attendee site area:
- Purpose: Shows the geographical area or site where the attendee is based.
- Functionality: Can be used to customize content based on location, such as regional event details or local information.
Title:
- Purpose: Displays the attendee’s job title.
- Functionality: Adds another layer of personalization, which can be useful for professional events.
Attendee industry:
- Purpose: Shows the industry the attendee works in.
- Functionality: Helps tailor the content of the email to be relevant to the attendee’s industry, making it more engaging.
About:
- Purpose: Provides a brief description or bio of the attendee.
- Functionality: Useful for networking events or to give context about the attendee.
Website:
- Purpose: Inserts the attendee’s personal or company website.
- Functionality: Allows attendees to share their online presence or company details.
Facebook:
- Purpose: Displays the attendee’s Facebook profile link.
- Functionality: Provides a way to connect on social media.
Twitter:
- Purpose: Displays the attendee’s Twitter handle.
- Functionality: Offers another social media connection point.
How this module works
Selecting Dynamic Fields:
- Organisers choose which dynamic fields to include in the “App Invite” template based on the level of personalization they want to achieve.
Editing the Template:
- Organisers use the drag-and-drop editor to insert the selected dynamic fields into the email template. This allows for a customised layout where the email content dynamically adjusts based on the recipient’s information.
Preview and Testing:
- Organisers can preview the email to ensure that dynamic fields are correctly populated and that the email appears as intended.
Sending the Email:
- Once the template is finalised, it is used to send personalised invites to attendees, automatically filling in the dynamic fields with the relevant information for each recipient.
By using these dynamic fields, organiser can ensure that each attendee receives a personalised and relevant email invite, which enhances the likelihood of engagement and provides a more professional and tailored communication experience.
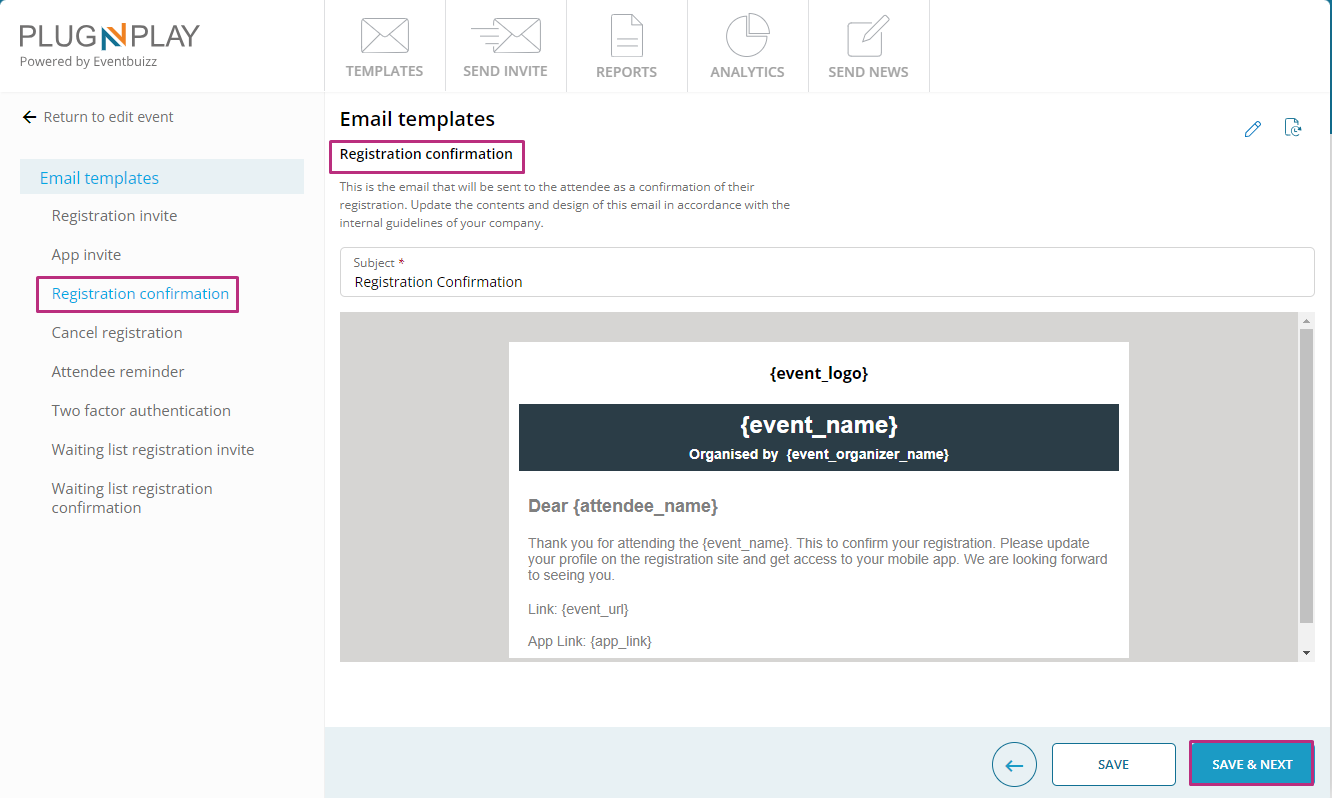
Registration confirmation
- Purpose: To confirm an attendee’s successful registration for the event.
- Functionality: Sends a confirmation message with details about the event, registration information, and possibly next steps.
This is the email that will be sent to the attendee as a confirmation of their registration. Update the contents and design of this email in accordance with the internal guidelines of your company.
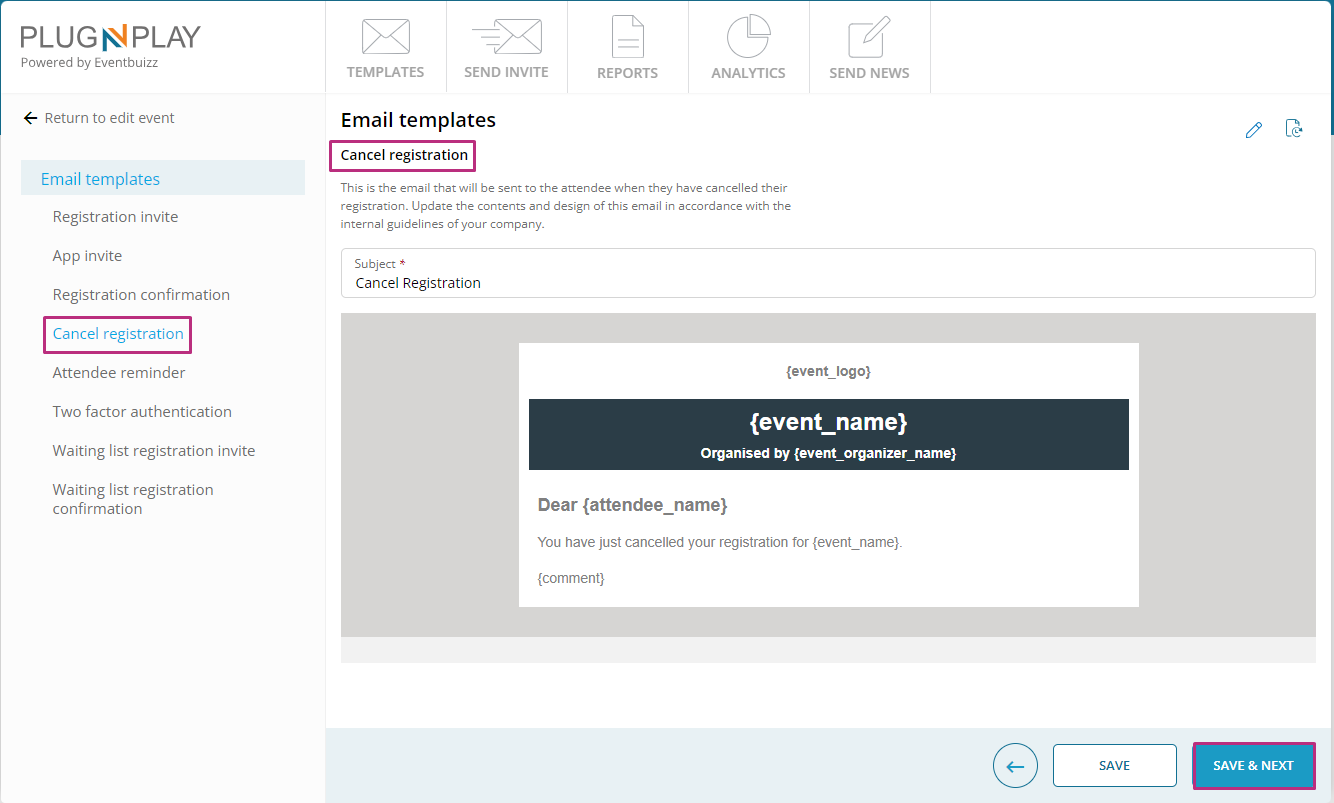
Cancel registration:
- Purpose: To notify an attendee that their registration has been cancelled.
- Functionality: Provides information on the cancellation and any potential next steps or refunds.
This is the email that will be sent to the attendee when they have cancelled their registration. Update the contents and design of this email in accordance with the internal guidelines of your company.
Attendee reminder:
- Purpose: To remind guests to register for the event.
- Functionality: Encourages action by highlighting key event details and the registration deadline.
This is the email that will be sent to the attendee when they have cancelled their registration. Update the contents and design of this email in accordance with the internal guidelines of your company.
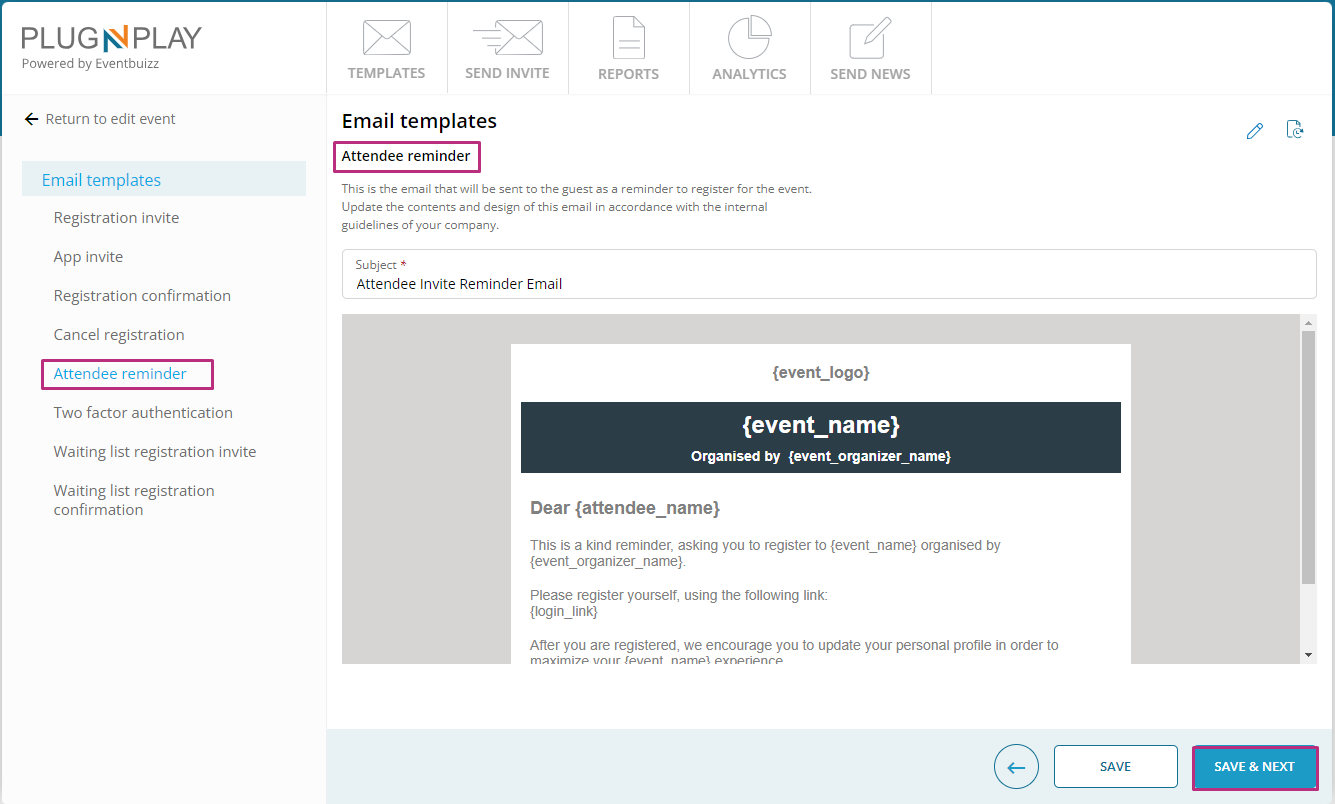
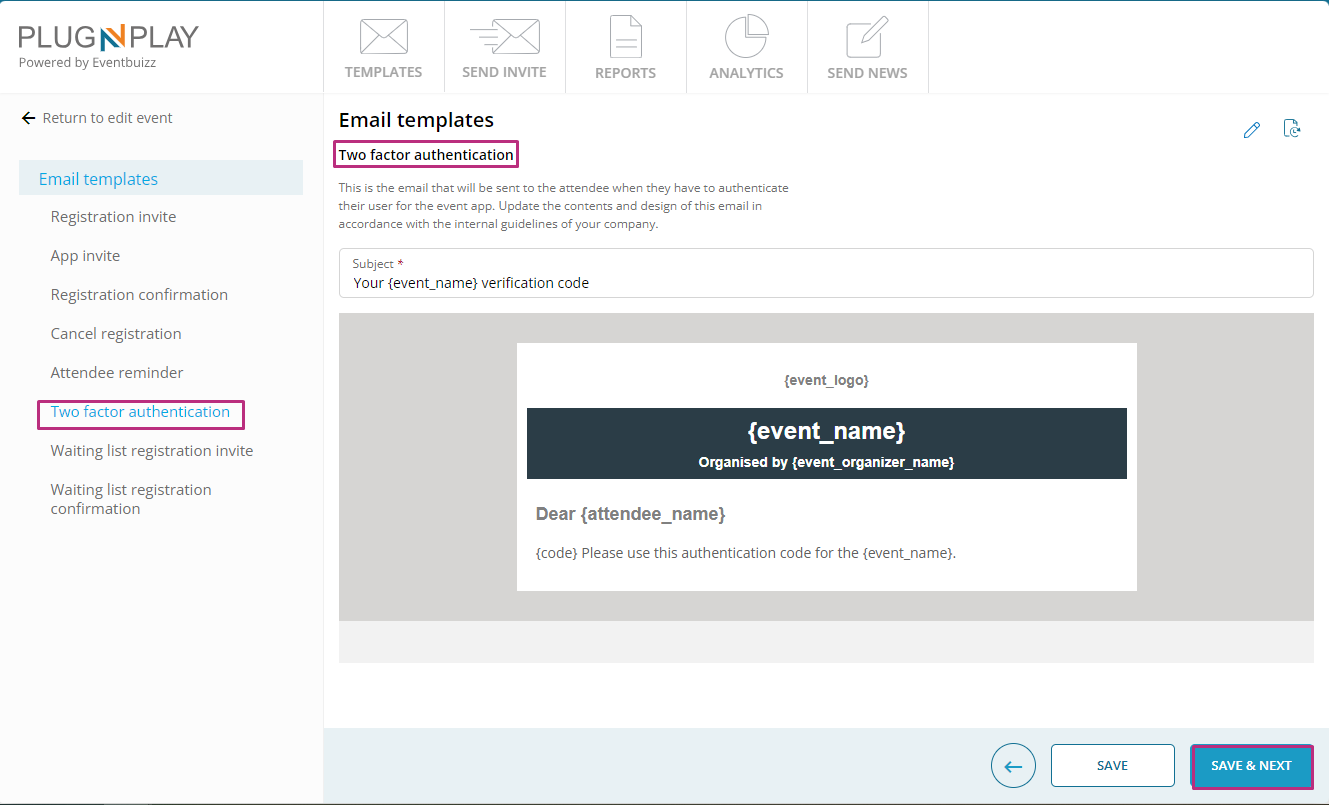
Two factor authentication:
- Purpose: To verify the identity of attendees who need to authenticate their access to the event app.
- Functionality: Sends a code or link to facilitate the authentication process.
This is the email that will be sent to the attendee when they have to authenticate their user for the event app. Update the contents and design of this email in accordance with the internal guidelines of your company.
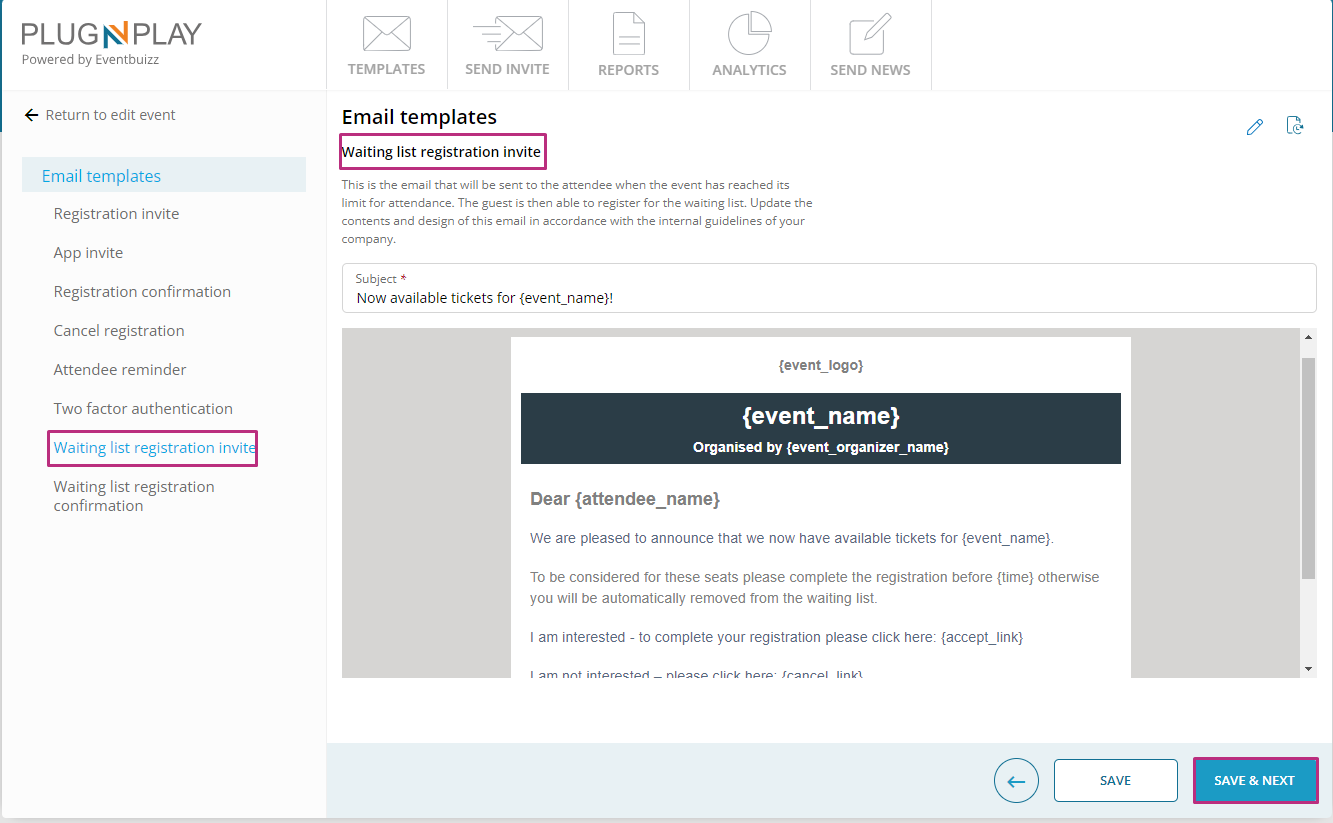
Waiting list registration invite:
- Purpose: To invite guests to join the waiting list when the event is fully booked.
- Functionality: Provides information on how to join the waiting list and what to expect next.
This is the email that will be sent to the attendee when the event has reached its limit for attendance. The guest is then able to register for the waiting list. Update the contents and design of this email in accordance with the internal guidelines of your company
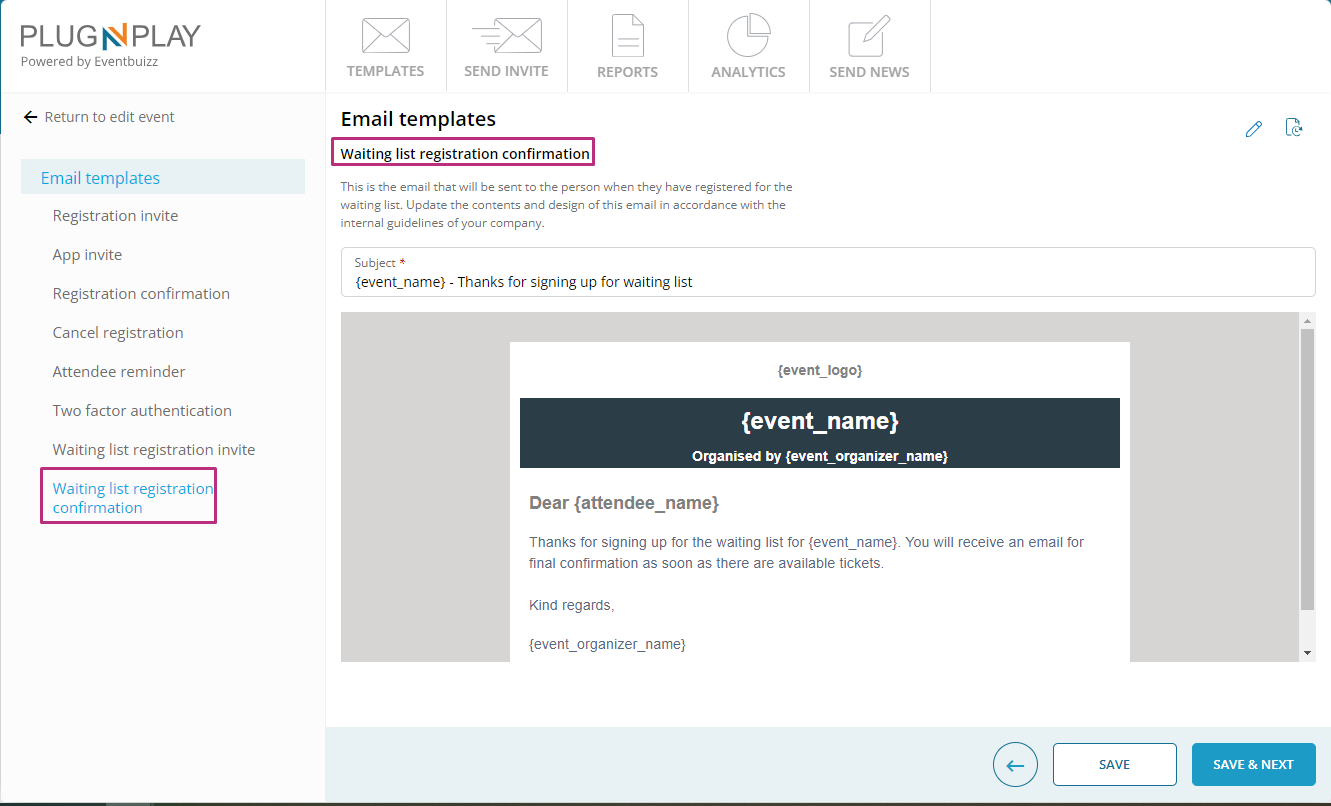
Waiting list registration confirmation:
- Purpose: To confirm that a guest has been added to the waiting list.
- Functionality: Informs the guest of their waiting list status and any further actions.
This is the email that will be sent to the person when they have registered for the waiting list. Update the contents and design of this email in accordance with the internal guidelines of your company.
Working of the templates module
Access and manage templates:
- Organizers access the module to view and manage the available templates. They can choose to edit or view the version history of each template.
Editing templates:
- Organizers select a template and use the editor to modify its content. They can drag and drop dynamic fields to personalize the emails. Changes are saved, and the updated template is used for future communications.
By utilising the email templates module, organisers can ensure that their communication with guests and attendees is consistent, professional, and tailored to their specific needs, enhancing the overall event experience.
Send news
Send news
The “News and update” module provides organsierwith a tool that enables you to communicate with your attendees very easily. You can pre-schedule messages to be sent at a certain time and date or organiser can send out the message instantly. In addition to sending out a message organiser can also ask the system to send a copy of the message to the attendees email, making sure that everybody receives the message. If organiser always wish to send out the message as a text message, please be aware that additional cost apply.
Accessing the news and update
For accessing the news & update module organiser need to navigate on the following path:
Plug and play portal->Select the specific event from event listing->menu->Send news
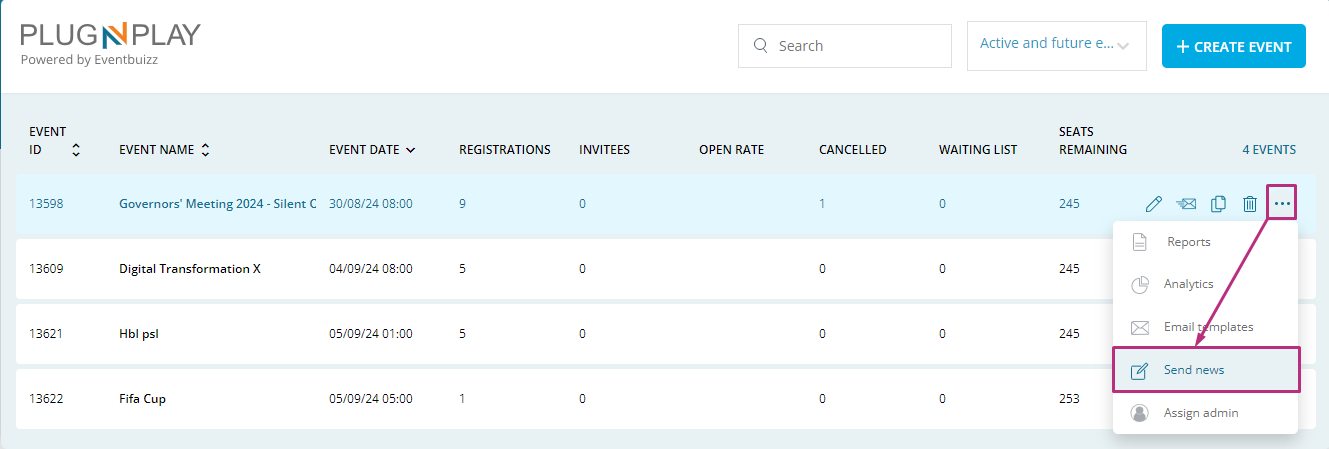
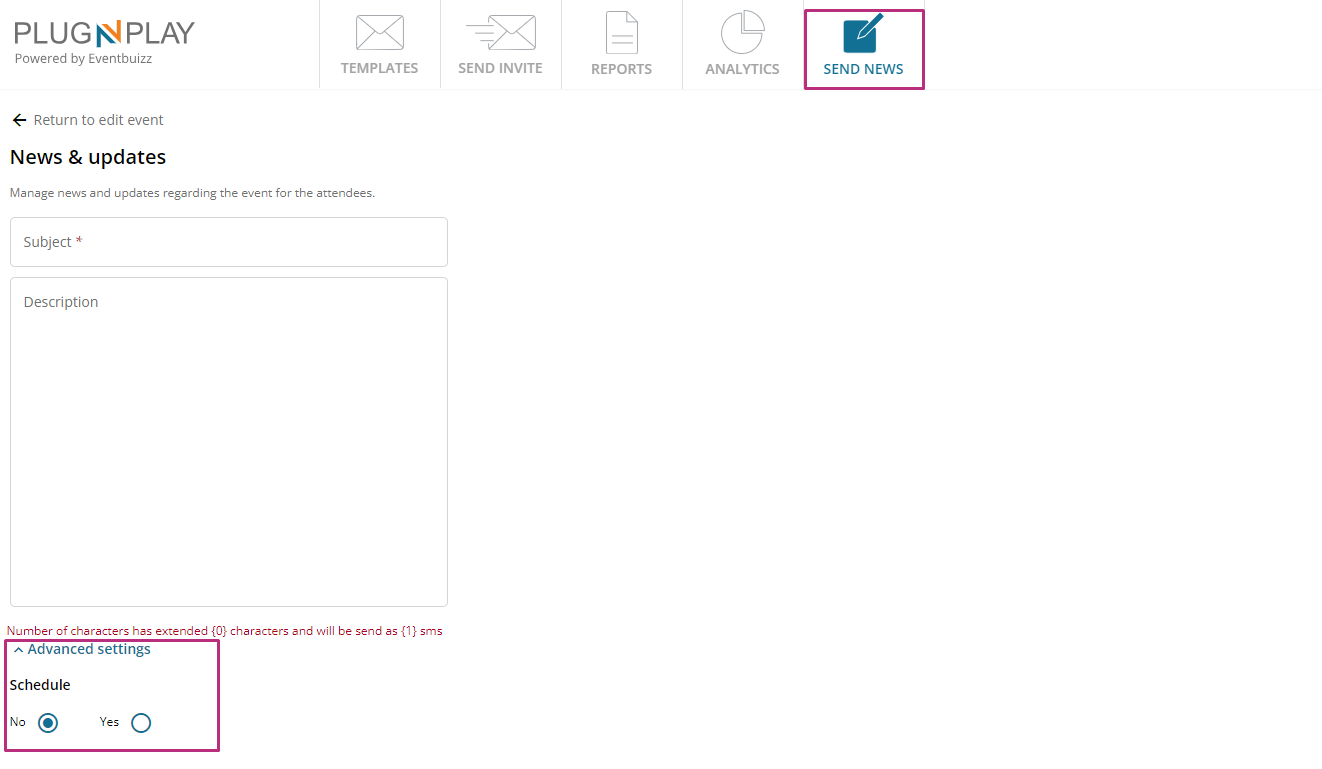
After accessing the send news menu, organiser will redirect on send news module, where organiser have the multiple options available, Here’s a view of it:
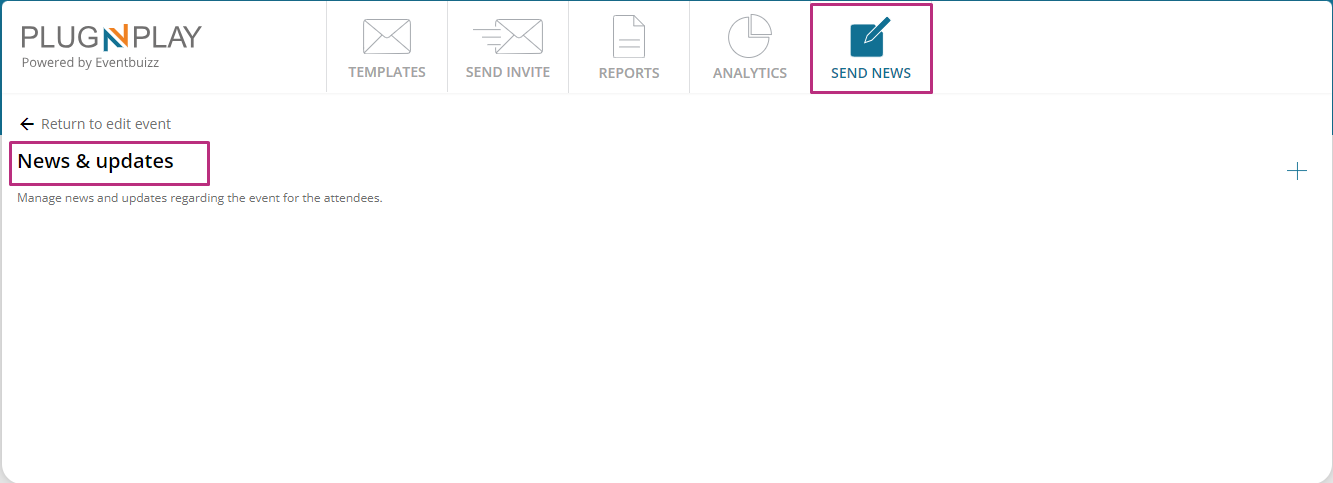
Add news
To add new news, look for a button “+”. Click this option to open a form where you can input the details of the news. News and update information divided into two sections.
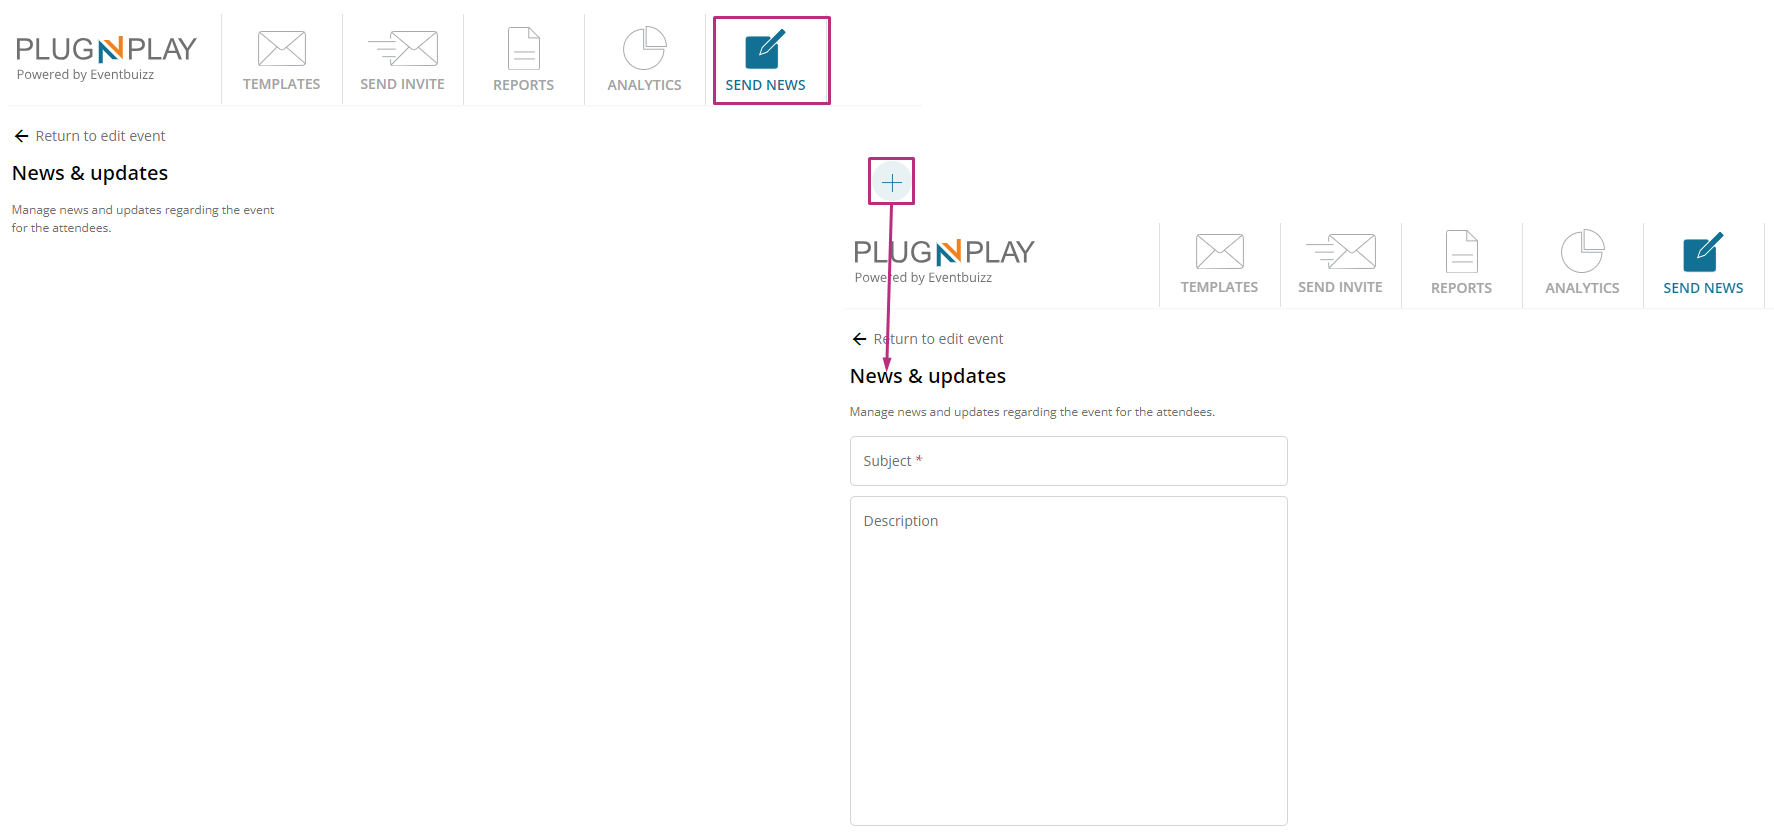
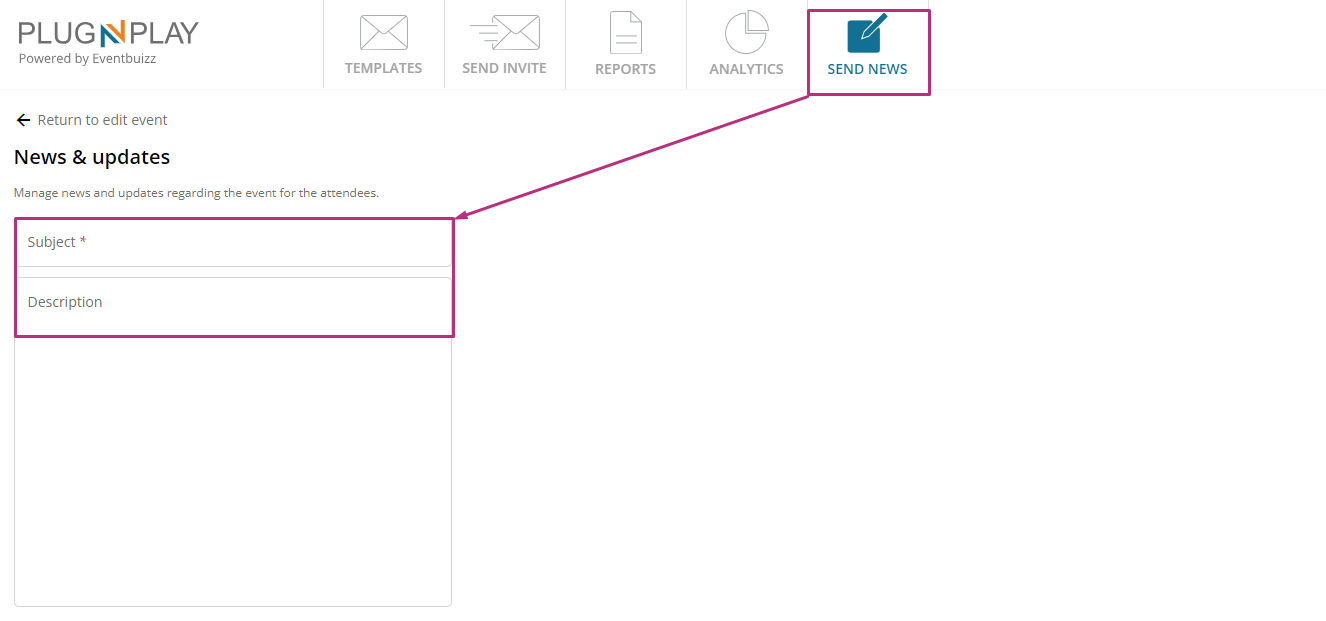
Basic details:
- Title: This field is where you input the title or name of the event or notification.
- Description: This is a text box where you can provide a description or additional details about the event or notification. The text might be displayed or sent along with the title to the attendees.
Advanced settings
The advanced settings includes pre-scheduled and send to option:
Pre-schedule (Yes/No):
This option allows you to choose whether the event or notification should be scheduled in advance. If you select “Yes,” additional options for date and time will appear.
- Date (Required Field):
-
-
-
- This is the date when the event or notification is scheduled to occur. The calendar icon allows you to pick the date from a calendar view.
- Like the title, this is also a required field, so it must be filled out before proceeding.
-
-
-
- Time (Required Field):
-
-
-
-
- This field allows you to set the specific time for the event or notification. The clock icon can be used to pick a time more conveniently.
- This is also a mandatory field.
-
-
-
Send to:
Organiser can send news and alerts to the following and If organiser select any option other than “All Attendees” a field will appear where organiser can choose multiple options.
- All Attendees: Sends the notification to everyone who is part of the event.
- Individuals: Allows you to send the notification to specific individuals.
- Attendee types: Allows for the selection of specific types of attendees to send the notification to.
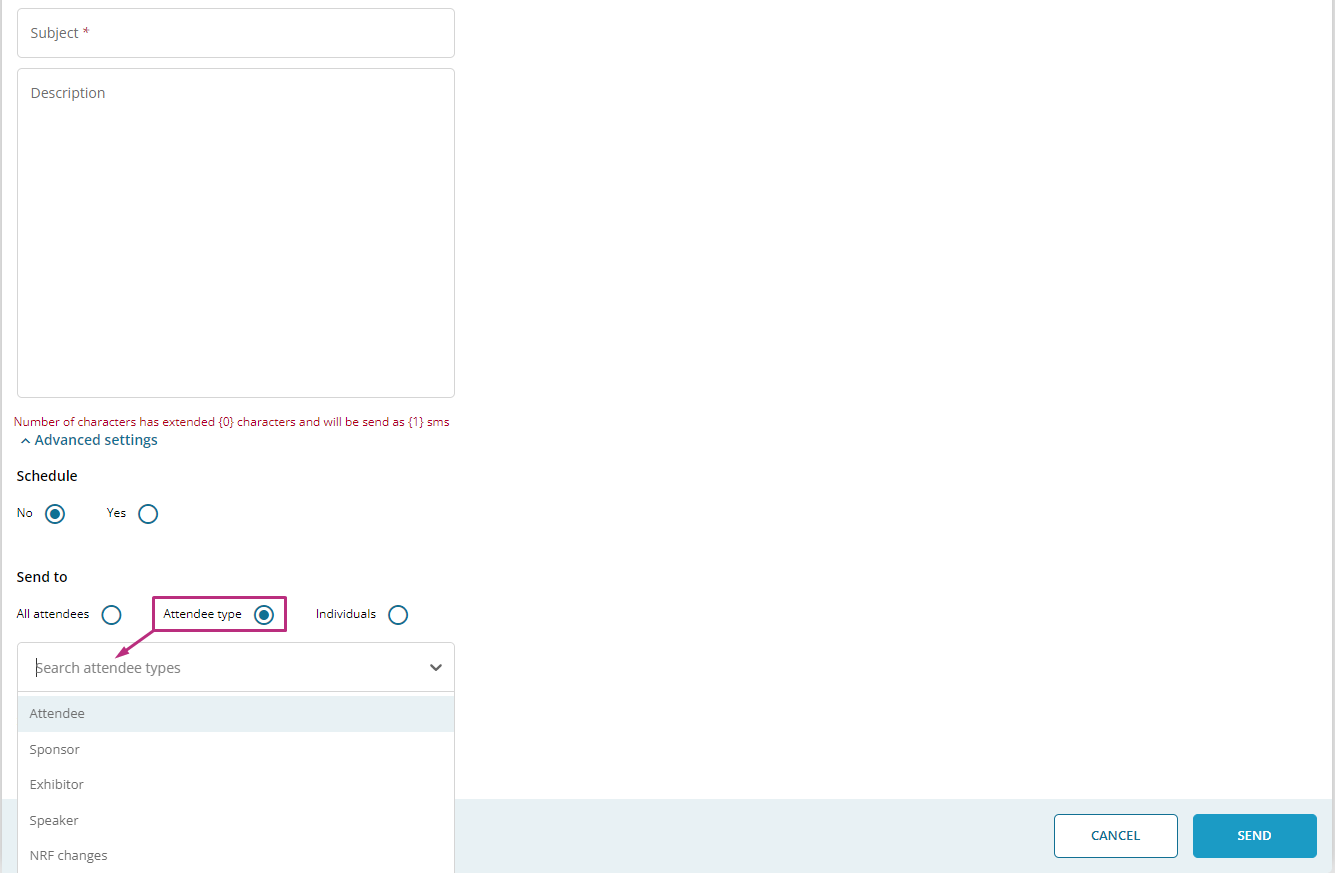
Additional there are two more options available on add news screen for organiser, where organiser can select the medium, like through which medium, organiser want to send news.
- Send by email: If this checkbox is selected, the notification will be sent via email to the chosen recipients.
- Send by SMS: If this checkbox is selected, the notification will be sent via SMS to the chosen recipients.
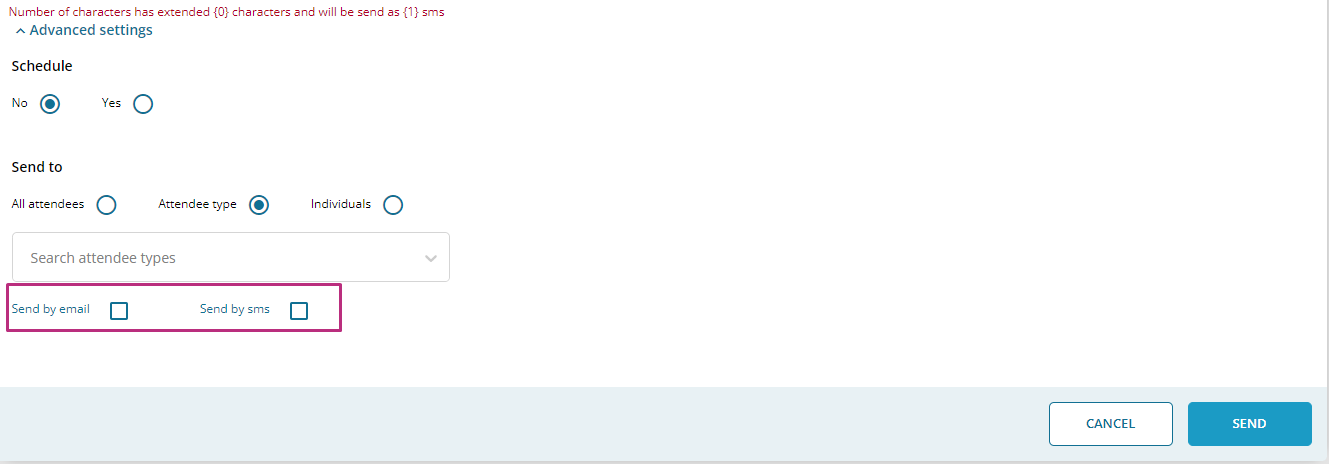
Clicking the saves the news and update or notification details and schedules it based on the settings provided. Also sent news will show on send news listing, where organiser have the multiple action icon, detail of each available action given below:
News and update listing
The new updates and news that are added will show up in the list. To edit, delete and see logs. click on the three dots icon.
- Edit: Allows the user to modify or update the content of a news and update. This feature is useful for correcting mistakes, updating information, or adding new details to existing news.
- Delete: Enables the user to remove a news and update from the platform entirely. This might be done if the information is no longer relevant, contains errors, or is no longer needed.
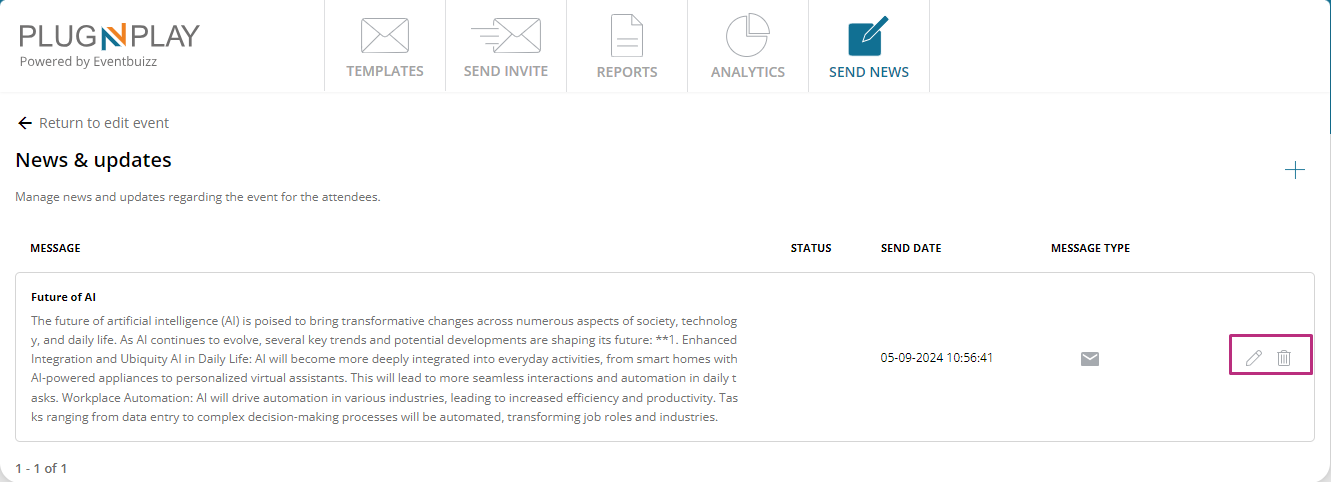
Additionally on new listing, organiser can see the message type, like through which medium, that particular news sent:
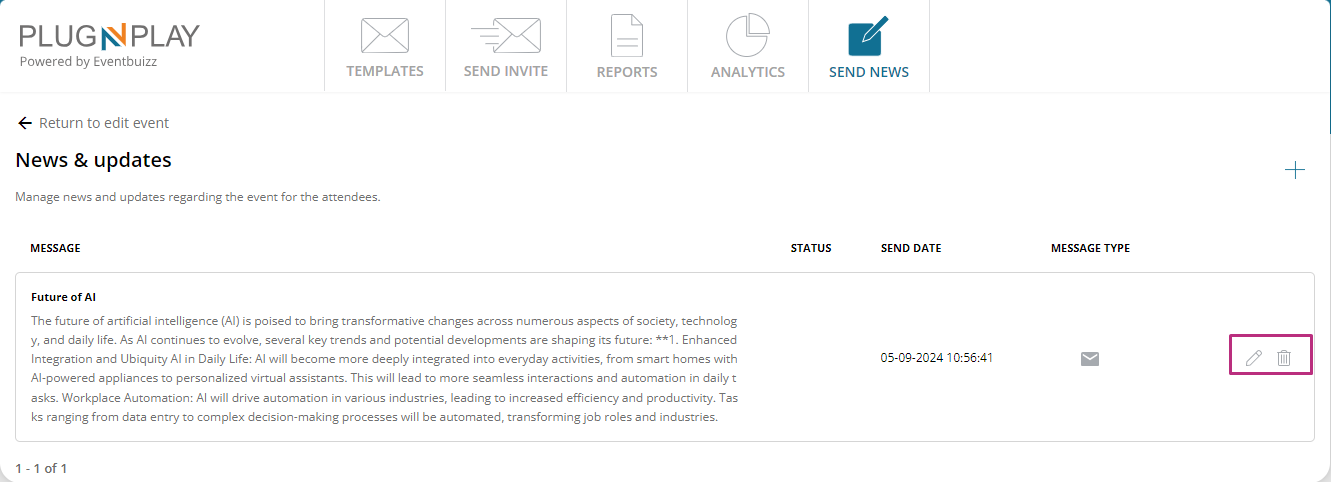
For more detail view, like how news shows in app side, and all other related action to news, please click here
Assign admin
Assign admin
The “Assign admin” feature in plug-and-play portal is designed to facilitate the management and administration of events by allowing event organisers to assign specific sub-admins to oversee various aspects of each event. Here’s a detailed explanation of how this feature works, its purpose, and its functionalities:
Purpose of the “assign admin” feature
- Event management: To enable organisers to delegate responsibilities and manage events more efficiently by involving multiple sub-admins.
- Role distribution: To ensure that tasks related to event management are distributed among various individuals, allowing for more streamlined operations and oversight.
- Customisation: To provide flexibility in assigning different admins to different events based on their roles and expertise.
Accessing the assign admin menu feature
For accessing the assign admin module organiser need to navigate on the following path:
Plug and play portal->Select the specific event from event listing->menu->assign admin
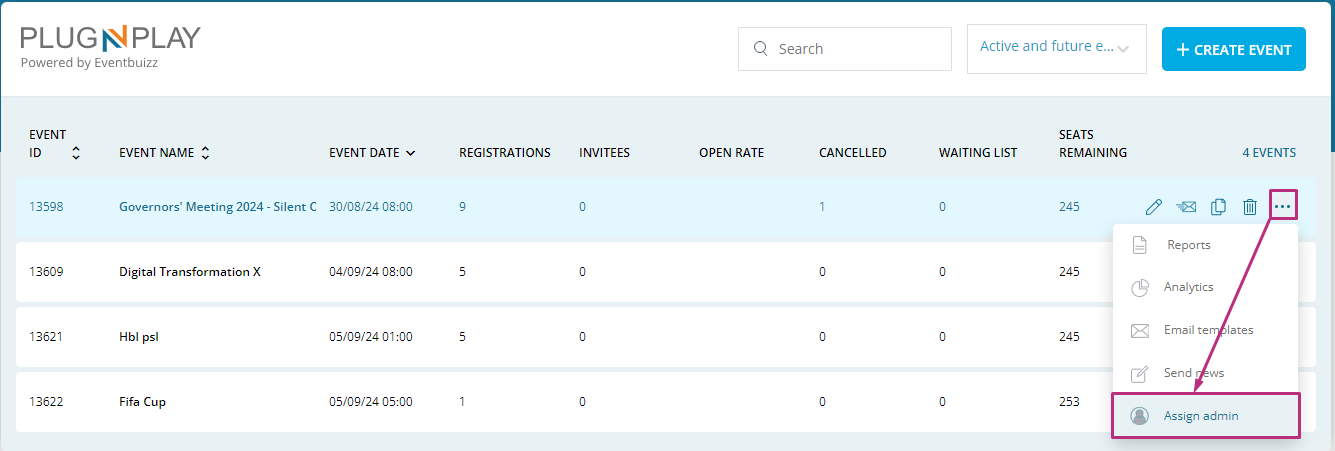
How the “Assign admin” feature works
Admin creation by super admin:
- Role of super admin: The super admin has the capability to create and manage sub-admins across the platform. They define the roles, permissions, and assign these sub-admins to different organisers.
- Sub-admin creation: Once created, these sub-admins are listed in the plug-and-play portal and are available for assignment to events.
Accessing the “assign admin” feature:
- Navigating to assign admin: For each event, the event organiser can access the “assign admin” option. This feature is typically available from the event management dashboard or a similar interface within the portal.
- Redirection to admin assignment screen: Clicking on the “assign admin” button redirects the organiser to a screen where they can manage admin assignments for the selected event.
Assigning admins:
- Assignment process: On the assignment screen, organisers can view a list of available sub-admins. They can select one or more sub-admins to assign to the event.
- Permissions and access: Assigned admins are granted specific permissions related to the event, enabling them to perform tasks such as managing registrations, updating event details, and overseeing logistics.
Un-assigning admins:
- Removal process: If an admin’s role or involvement needs to change, the organiser can un-assign them from the event. This removes the admin’s access and responsibilities related to that event.
- Adjusting roles: Organisers can reassign or modify the list of admins as needed throughout the event planning and execution process.
Managing multiple admins:
- Flexibility: More than one admin can be assigned to an event, providing the flexibility to manage various aspects of the event simultaneously.
- Role distribution: Different admins can take on specific roles or areas of responsibility, such as attendee management, technical support, or content updates.
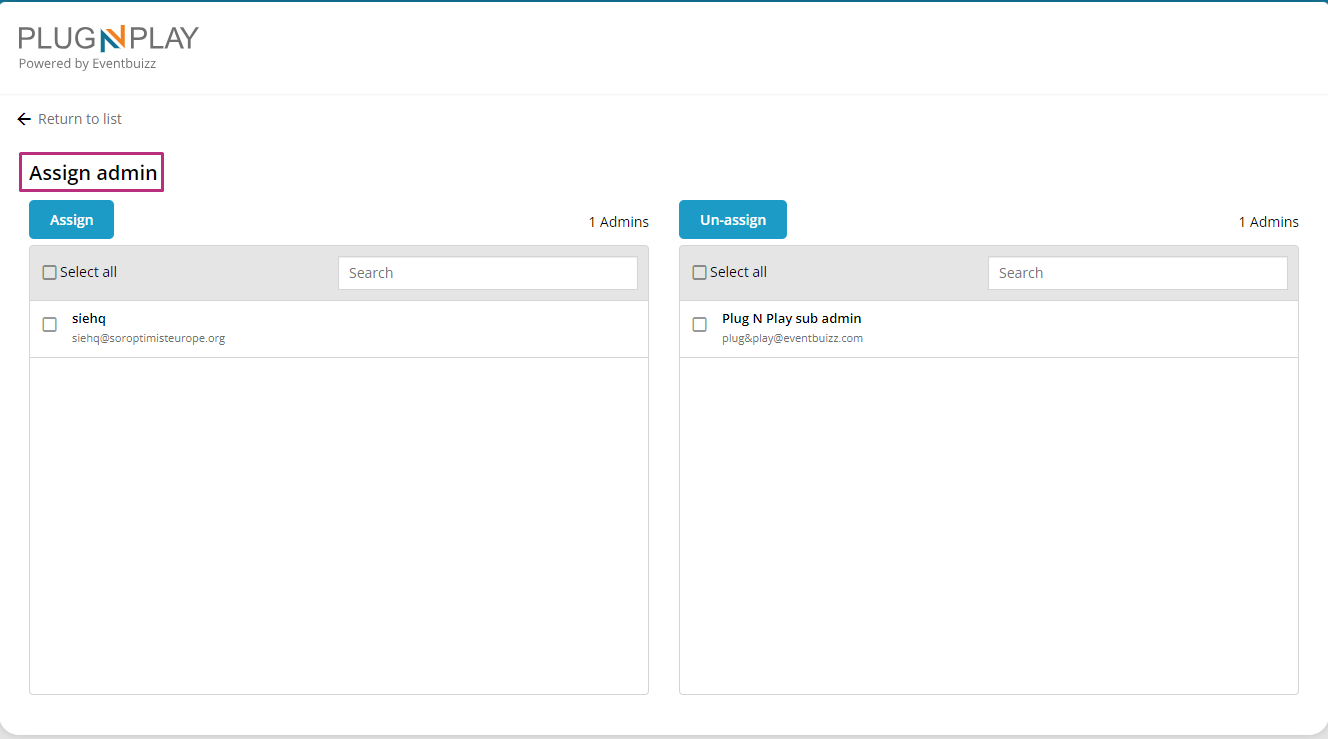
Filtering options
Additionally on plug and play event listing, organiser have the access on different filtering options, detail of each available filtering option given below:
Search:
Use a search bar to quickly locate events by typing in the event’s name.
- Description: Provides a search bar where users can type in keywords to find events by name.
- Usage: Essential for quickly locating specific events when the exact name or part of it is known.
Active and future events:
Show only events that are currently active or scheduled to take place in the future.
- Description: Filters to show only events that are currently ongoing or are scheduled to occur in the future.
- Usage: Allows users to focus on events that are relevant now or in the near future, excluding past events.
All events:
View a complete list of all events, regardless of their current status.
- Description: Displays a comprehensive list of every event, regardless of its status (active, expired, etc.).
- Usage: Useful for a full overview of all events, enabling users to see the entire scope of events without restrictions.
Active events:
Highlight events that are currently ongoing.detail is given below:
- Description: Shows events that are currently in progress.
- Usage: Ideal for checking which events are happening right now, providing information on ongoing activities.
Expired events:
List events that have already passed their end date.
- Description: Displays events that have concluded, i.e., passed their end date.
- Usage: Useful for reviewing past events, analysing what has already occurred, or for archival purposes.
Future events:
Display events that are set to occur after today’s date.
- Description: Lists only events that are scheduled to occur after the current date.
- Usage: Helps users focus on planning and attending upcoming events, ignoring those that have already passed.
