The “Exhibitor portal admin” in eventbuizz is typically a role or a section within the eventbuizz platform that allows administrators to manage and oversee the activities of exhibitors participating in an event. Eventbuizz is an event management platform used to organize and manage events, including conferences, trade shows, and exhibitions.
Here’s what the Exhibitor portal admin typically does:
- Exhibitor management: The admin can add, edit, or remove exhibitors from the event. This includes assigning booth spaces, updating exhibitor details, and managing exhibitor profiles.
- Booth management: The admin can allocate and manage booth spaces, ensuring that exhibitors are assigned the correct booth size and location as per their agreement.
- Communication: The admin can communicate with exhibitors, sending out important updates, instructions, and notifications related to the event.
- Access control: The admin manages the access permissions for exhibitors, determining what parts of the portal exhibitors can view or edit.
- Document upload: Exhibitors can upload necessary documents, such as logos, brochures, and other marketing materials, which the admin can review and approve.
- Reporting and analytics: The admin can track exhibitor engagement and activity within the portal, providing insights and reports on exhibitor participation.
- Support: The admin provides support to exhibitors, assisting them with any issues they encounter within the portal.
This portal streamlines the process of managing exhibitors, making it easier for event organizers to ensure a smooth and organized event.
portaladmins
Admins
In Eventbuizz, the role of an “Exhibitor admin” involves managing and overseeing the participation of exhibitors at an event. Let’s see how you can add an admin.
Add Admin
To add a hub admin, Navigate to the dashboard -> select “Admins.” -> press the “+Add” button.
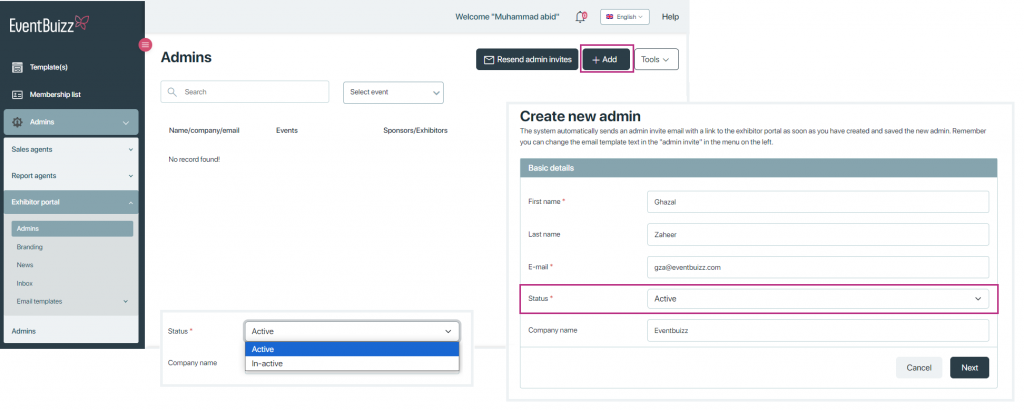
When creating a new admin, you are automatically redirected to the “Assign Events” screen, where you can assign specific sponsors or exhibitors of various events to that admin. enabling them to manage their company’s profile and other related tasks as a sponsor or exhibitor for that event.
In the below screenshot, you can select an event and sponsors/ exhibitors for an admin. The left column is the list of all unassigned company profiles you have on your event and the right column is the list of all profiles assigned to the admin.

NOTE: The system automatically sends an admin invite email with a link to the exhibitor portal as soon as you have created the new admin and assign any sponsor/exhibitor profile. Remember you can change the email template text in the “admin invite” in the menu on the left. Click “Email templates” for more details.
After assigning a sponsor’s or exhibitor’s profile to an admin, simply click save, and the admin will appear on the listing page. For each admin, it also shows which event is assigned to them. Along with that, it also displays which sponsor or exhibitor is linked to the event in the admin listing.


You can delete by clicking on the recycle bin icon, and click on the edit and active/ in-active admin by clicking on the three dots icon.

Clicking this icon will redirect the admin to the exhibitor portal and log them in automatically, giving them quick access to their company profile information. For more details about exhibitor portal. Click Exhibitor portal.

Tools
We have two options in tools. Export and Import admins.
Export: All the admins data with assigned events and sponsors/ exhibitors name exported in csv file.


Import admin:
If you want to import admins directly to the list, you do like this:
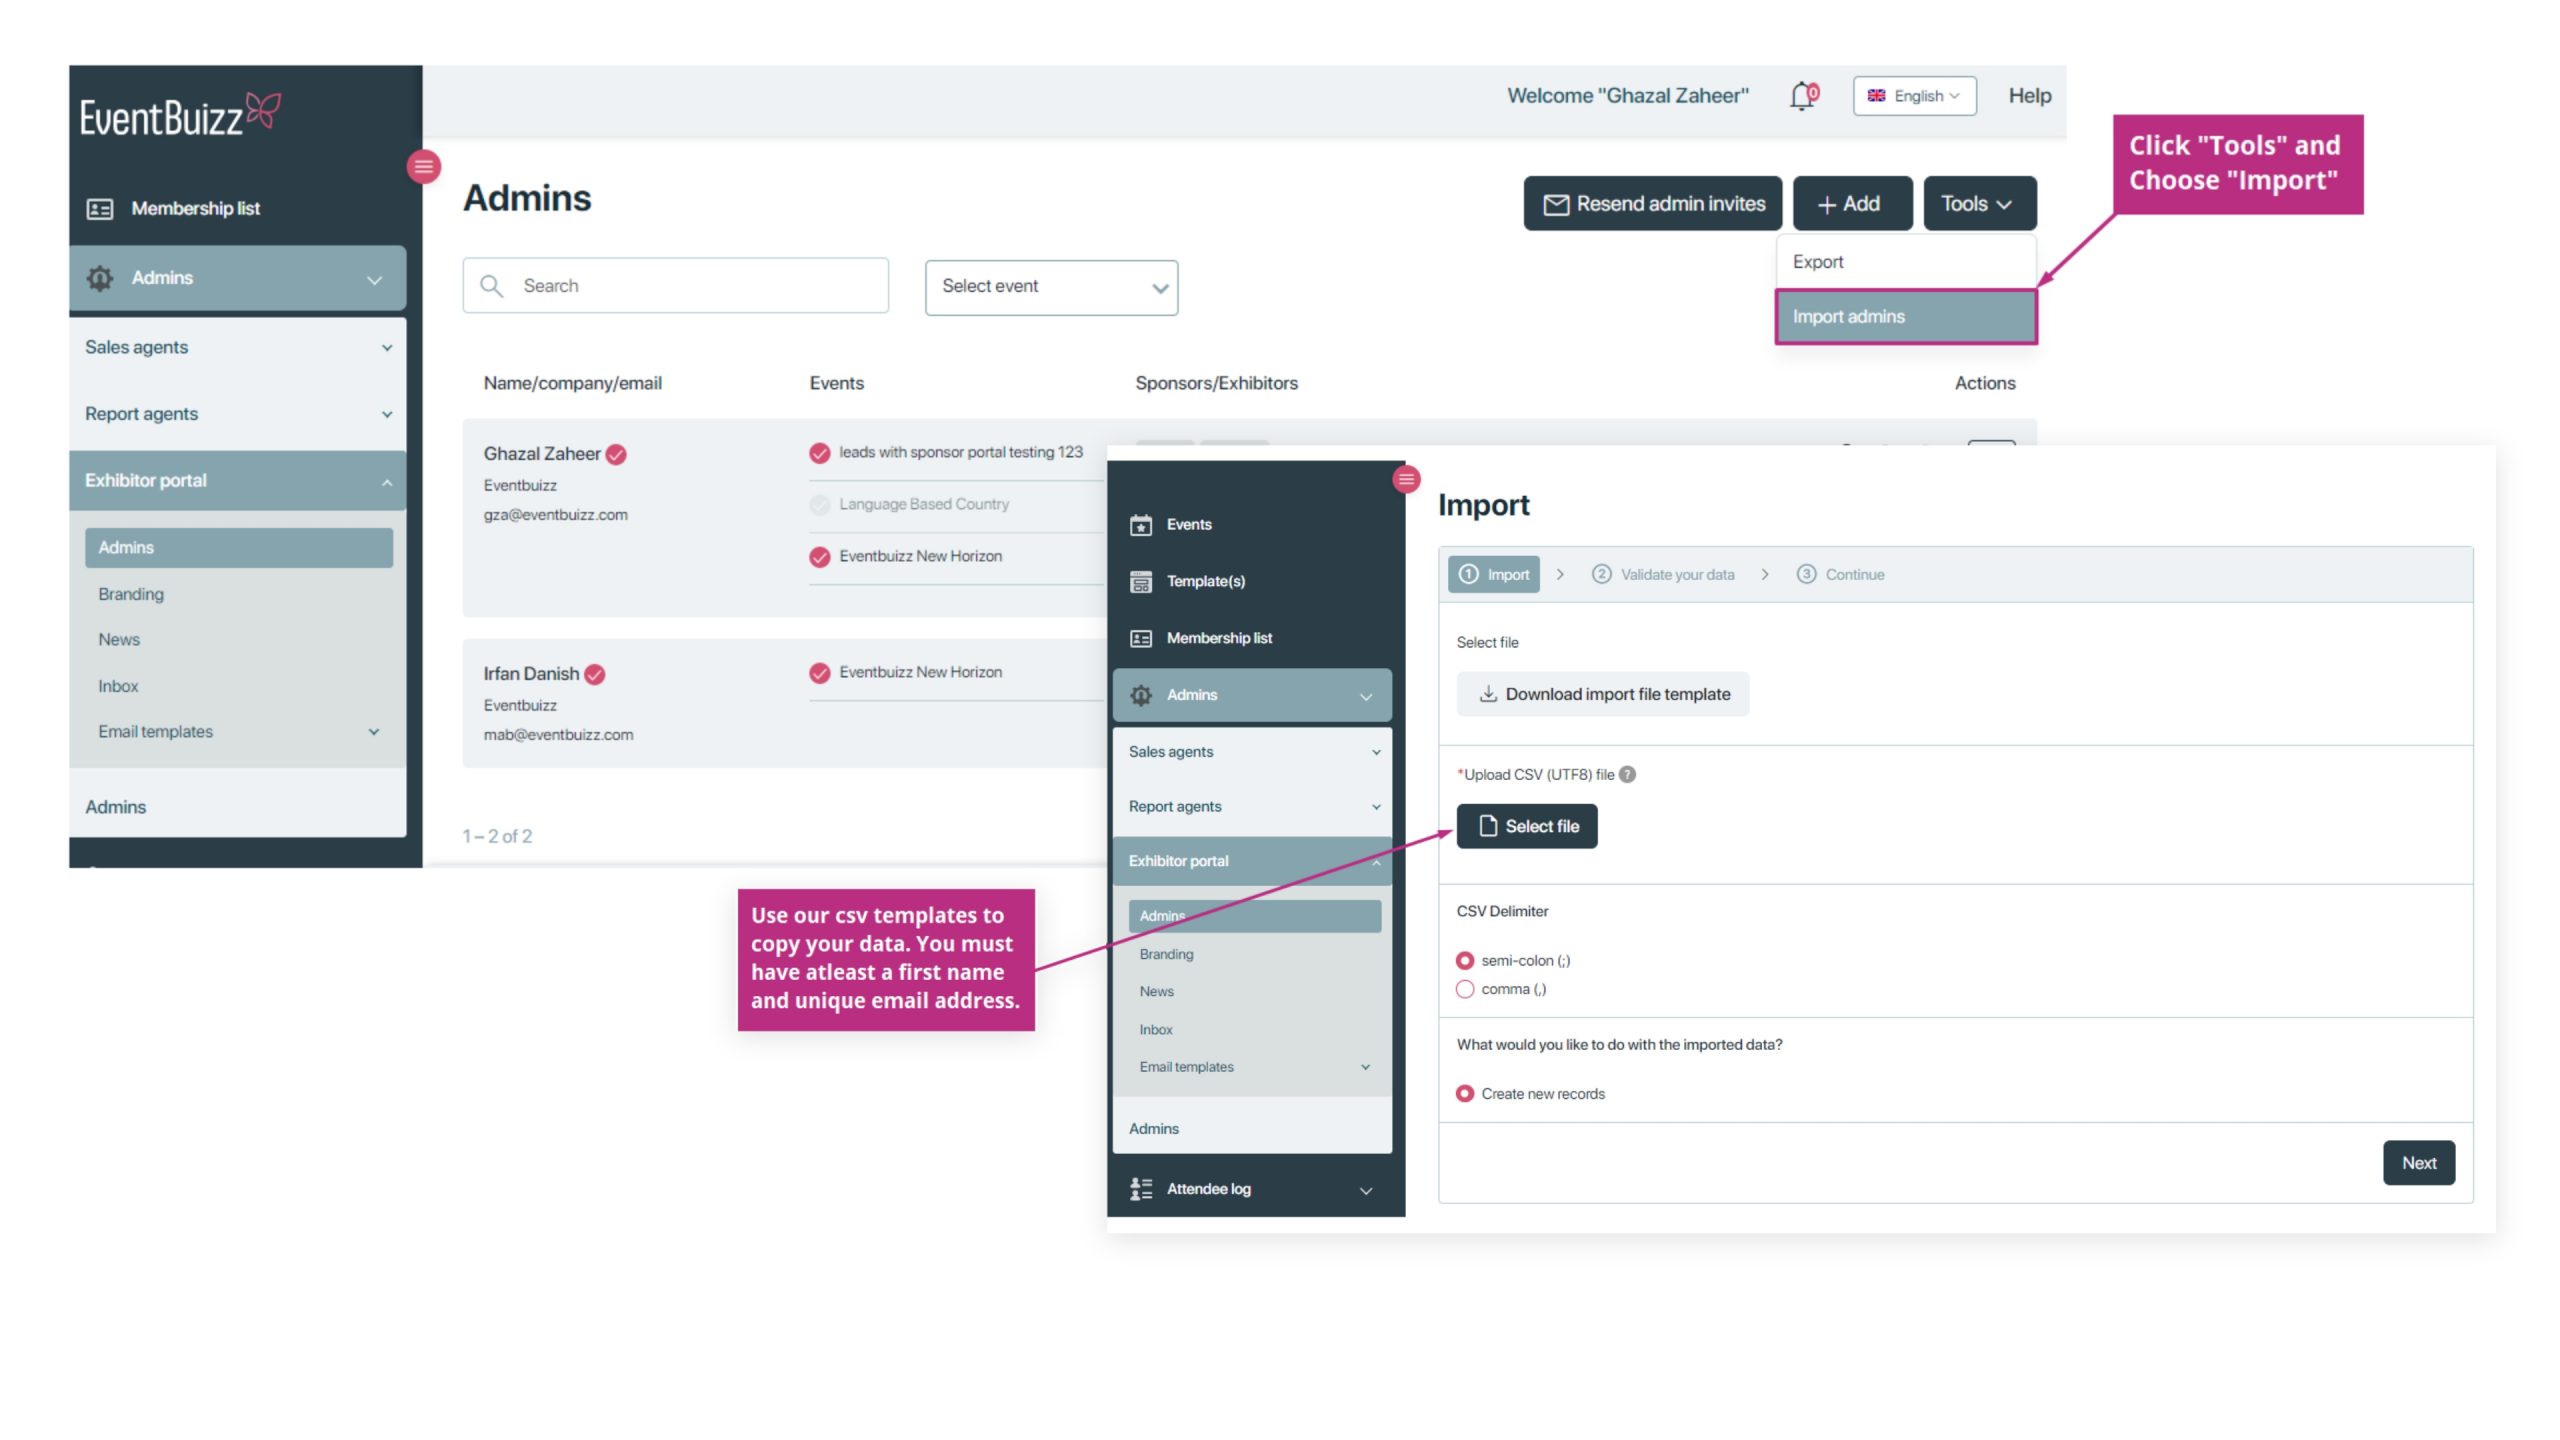
Download Import file template. Copy pastes all the relevant data you have. Save the CSV file on your pc.
NOTE: First name, email and status is required. Importing an admin is not possible unless you include this information during the import process.
Select file and then you are asked to either import new records or also update existing records.

VALIDATIONS:
| FIELDS | DESCRIPTION |
| First name | First name is required |
| Email is required and each attendee must have a unique email address |
Select file and then you are asked to import new records.
Import a file -> by clicking on Select File

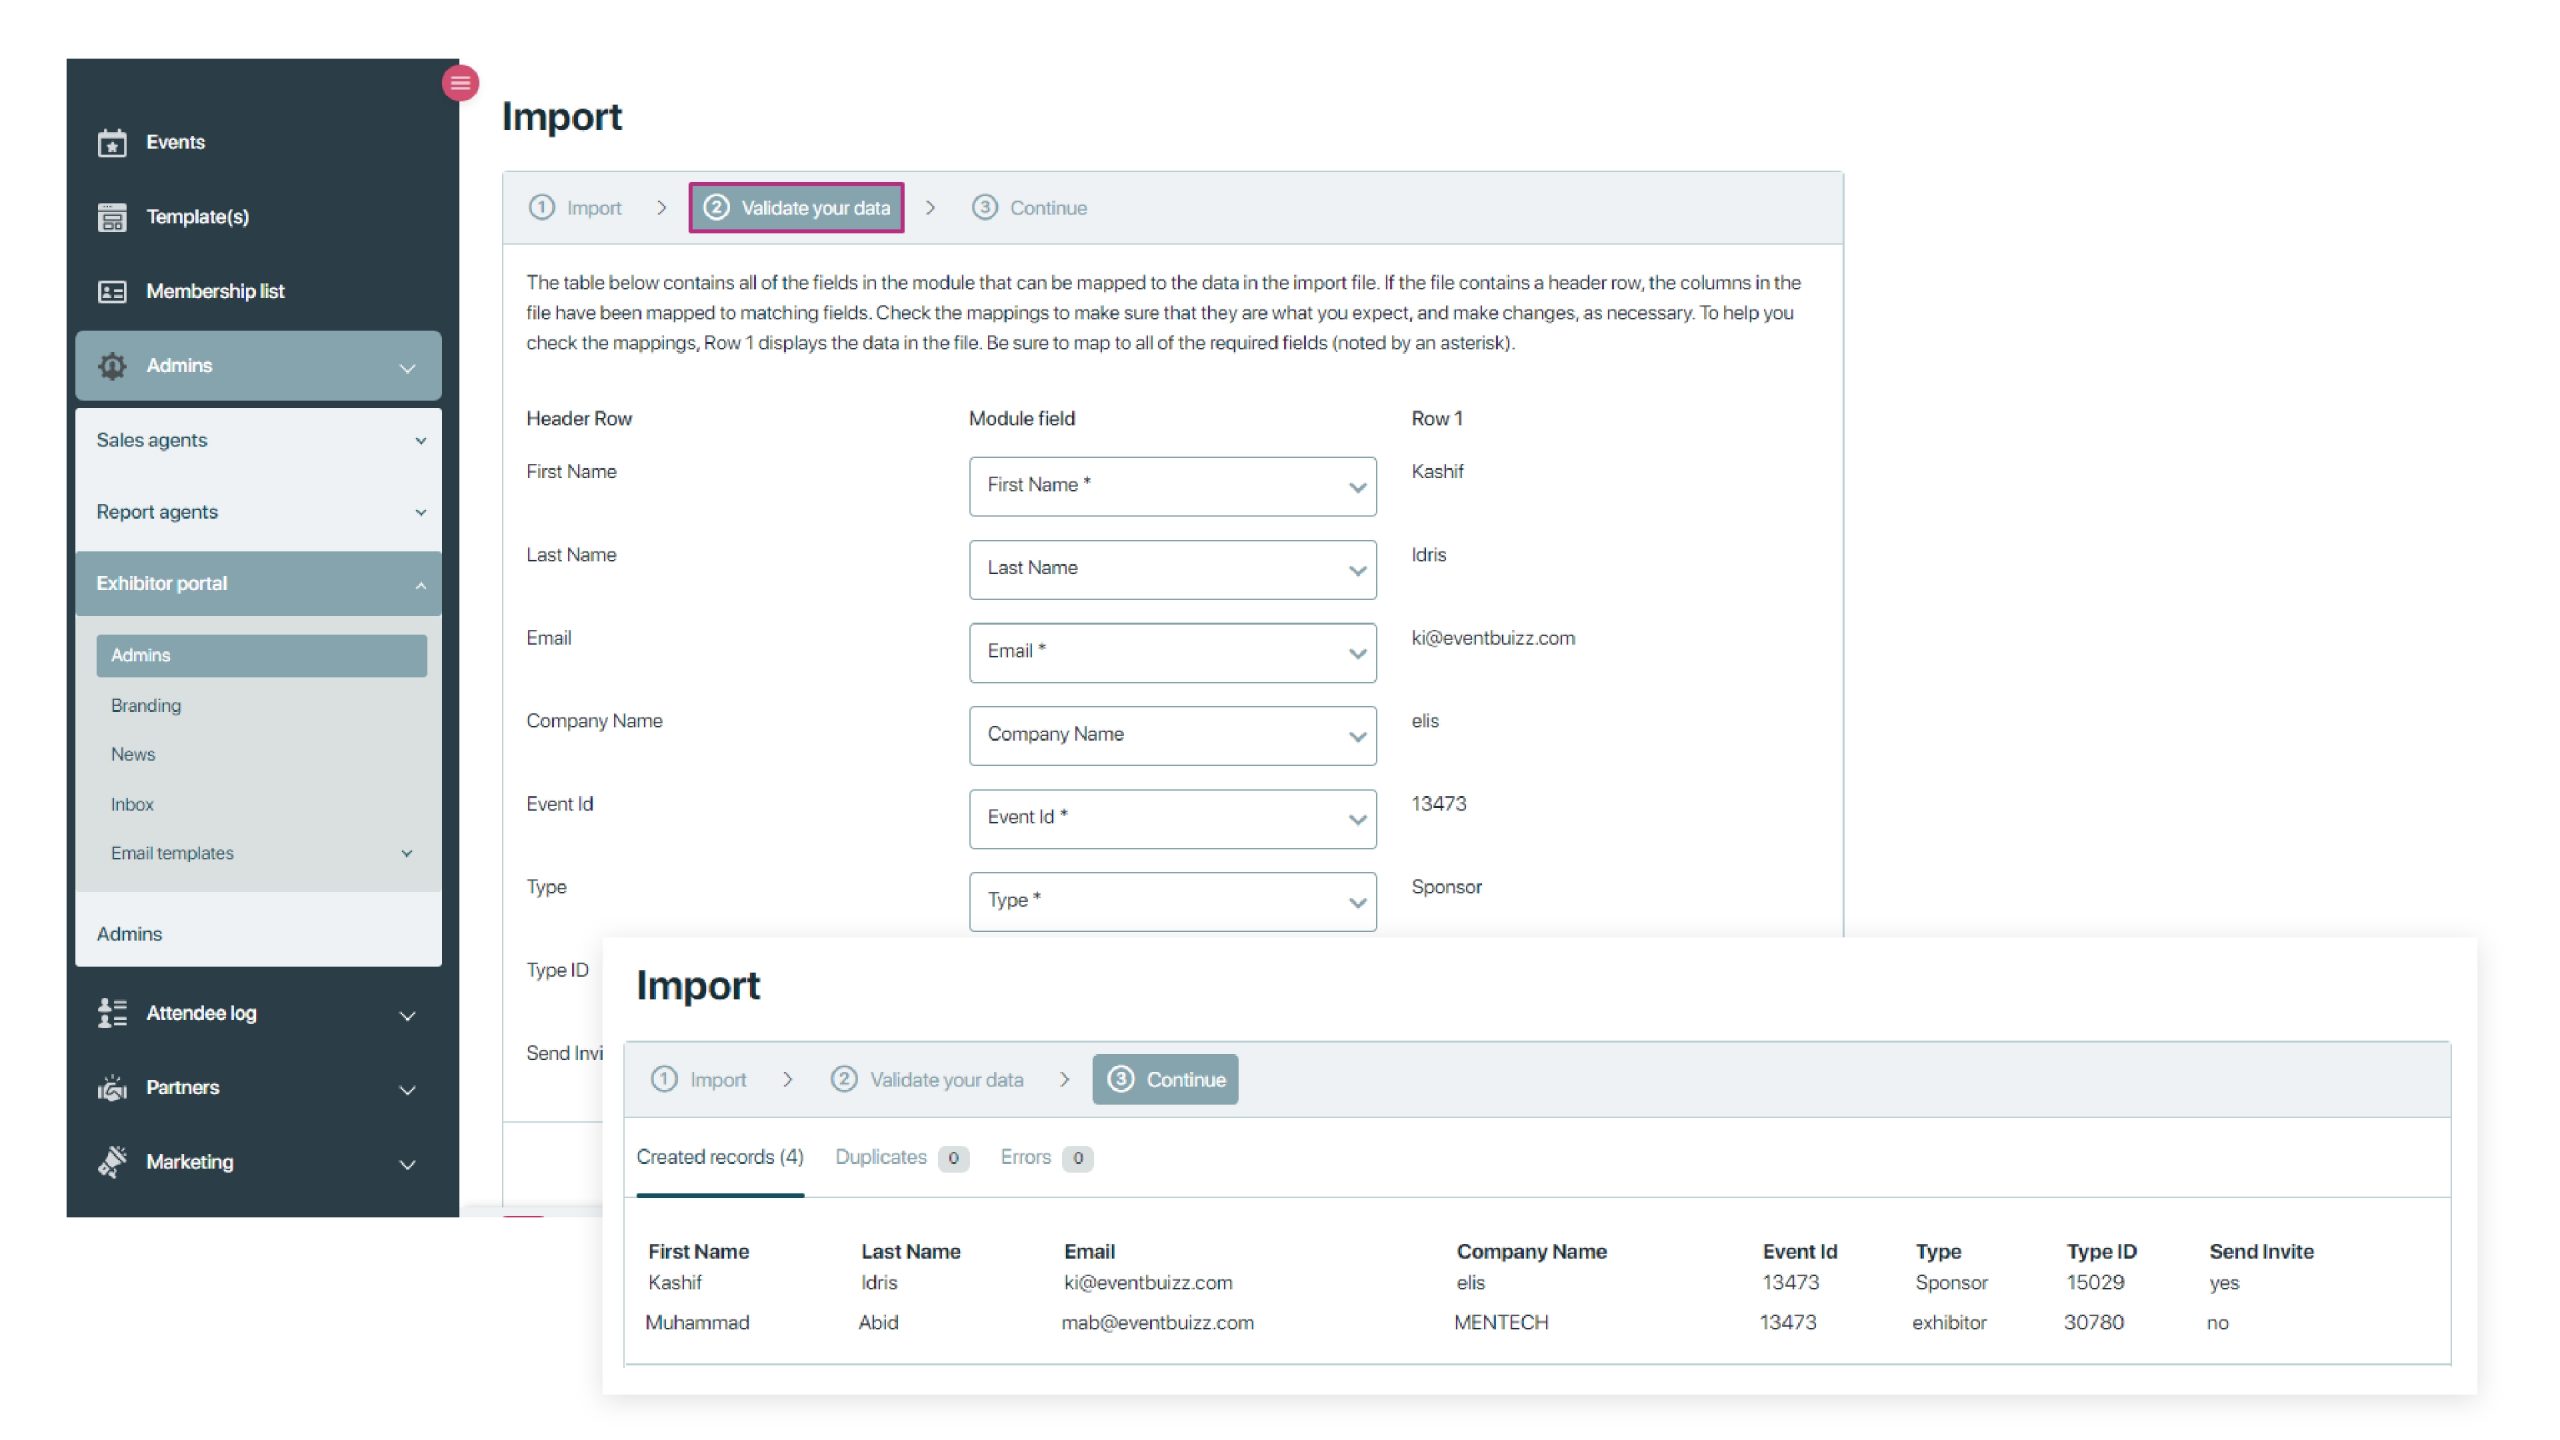
If you have used our template, you do not need to do any changes in mapping, just click ‘Next’. If you use your own CSV file – where the columns are name differently, please map the relevant information.
When you click ‘Next’ you can see how new records are created and if there are some errors, the system will show this too.
Resend Admin Invites
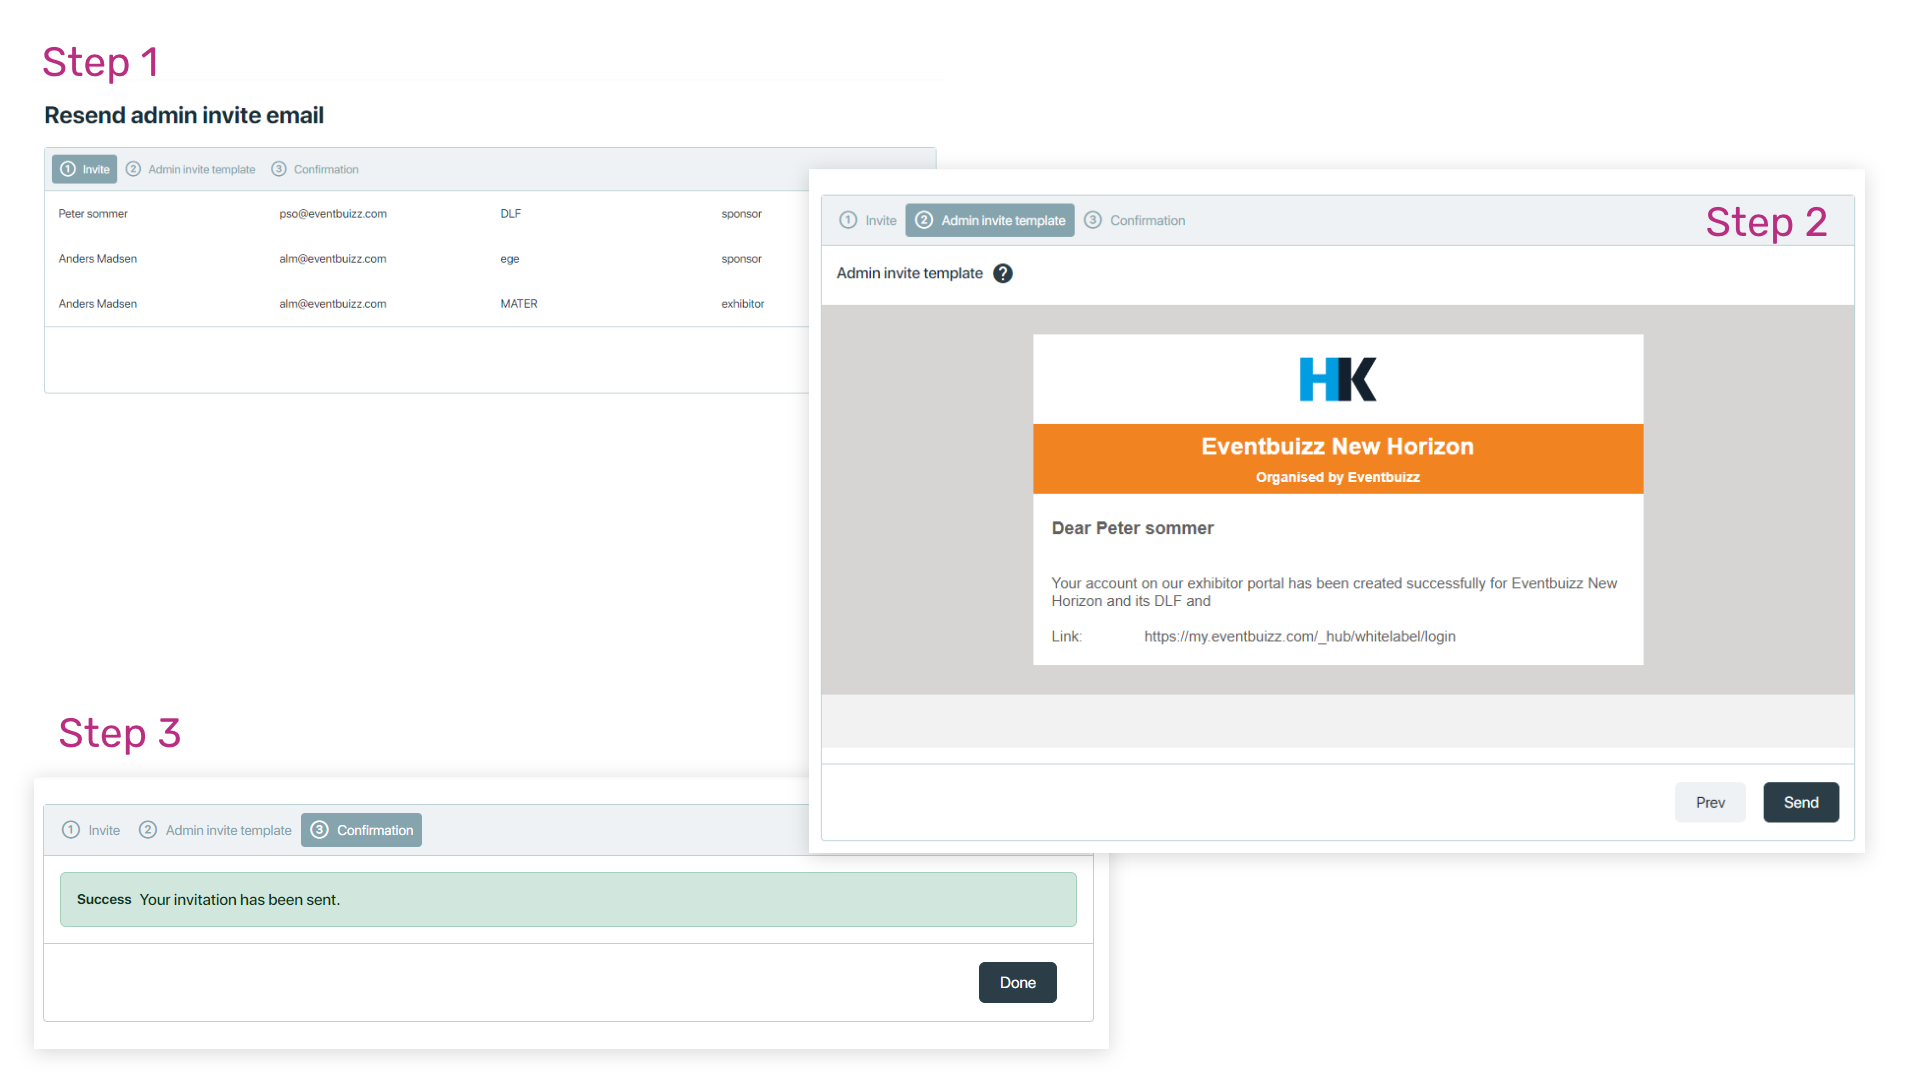
The “Resend Admin Invites” feature allows administrators to resend invitations to individuals who have been previously invited to join as administrators but may not have accepted the invitation or missed it. The email used is “Message Reminder,” which is explained in detail in the email template below.
Steps Involved:
- Select Users: The admin selects the specific individuals to whom they want to resend the invitation.
- Resend Invites: The admin clicks the “Resend Admin Invites” option, which triggers the system to send a new invitation email to those users.

You can select an event from the event dropdown. Once you choose an event, all the admins linked to the sponsors or exhibitors for that event will start to show up.

You can then select the people you want to send emails to and click the “Send Email” button. An email will be sent to all the selected individuals.

portalbranding
Branding
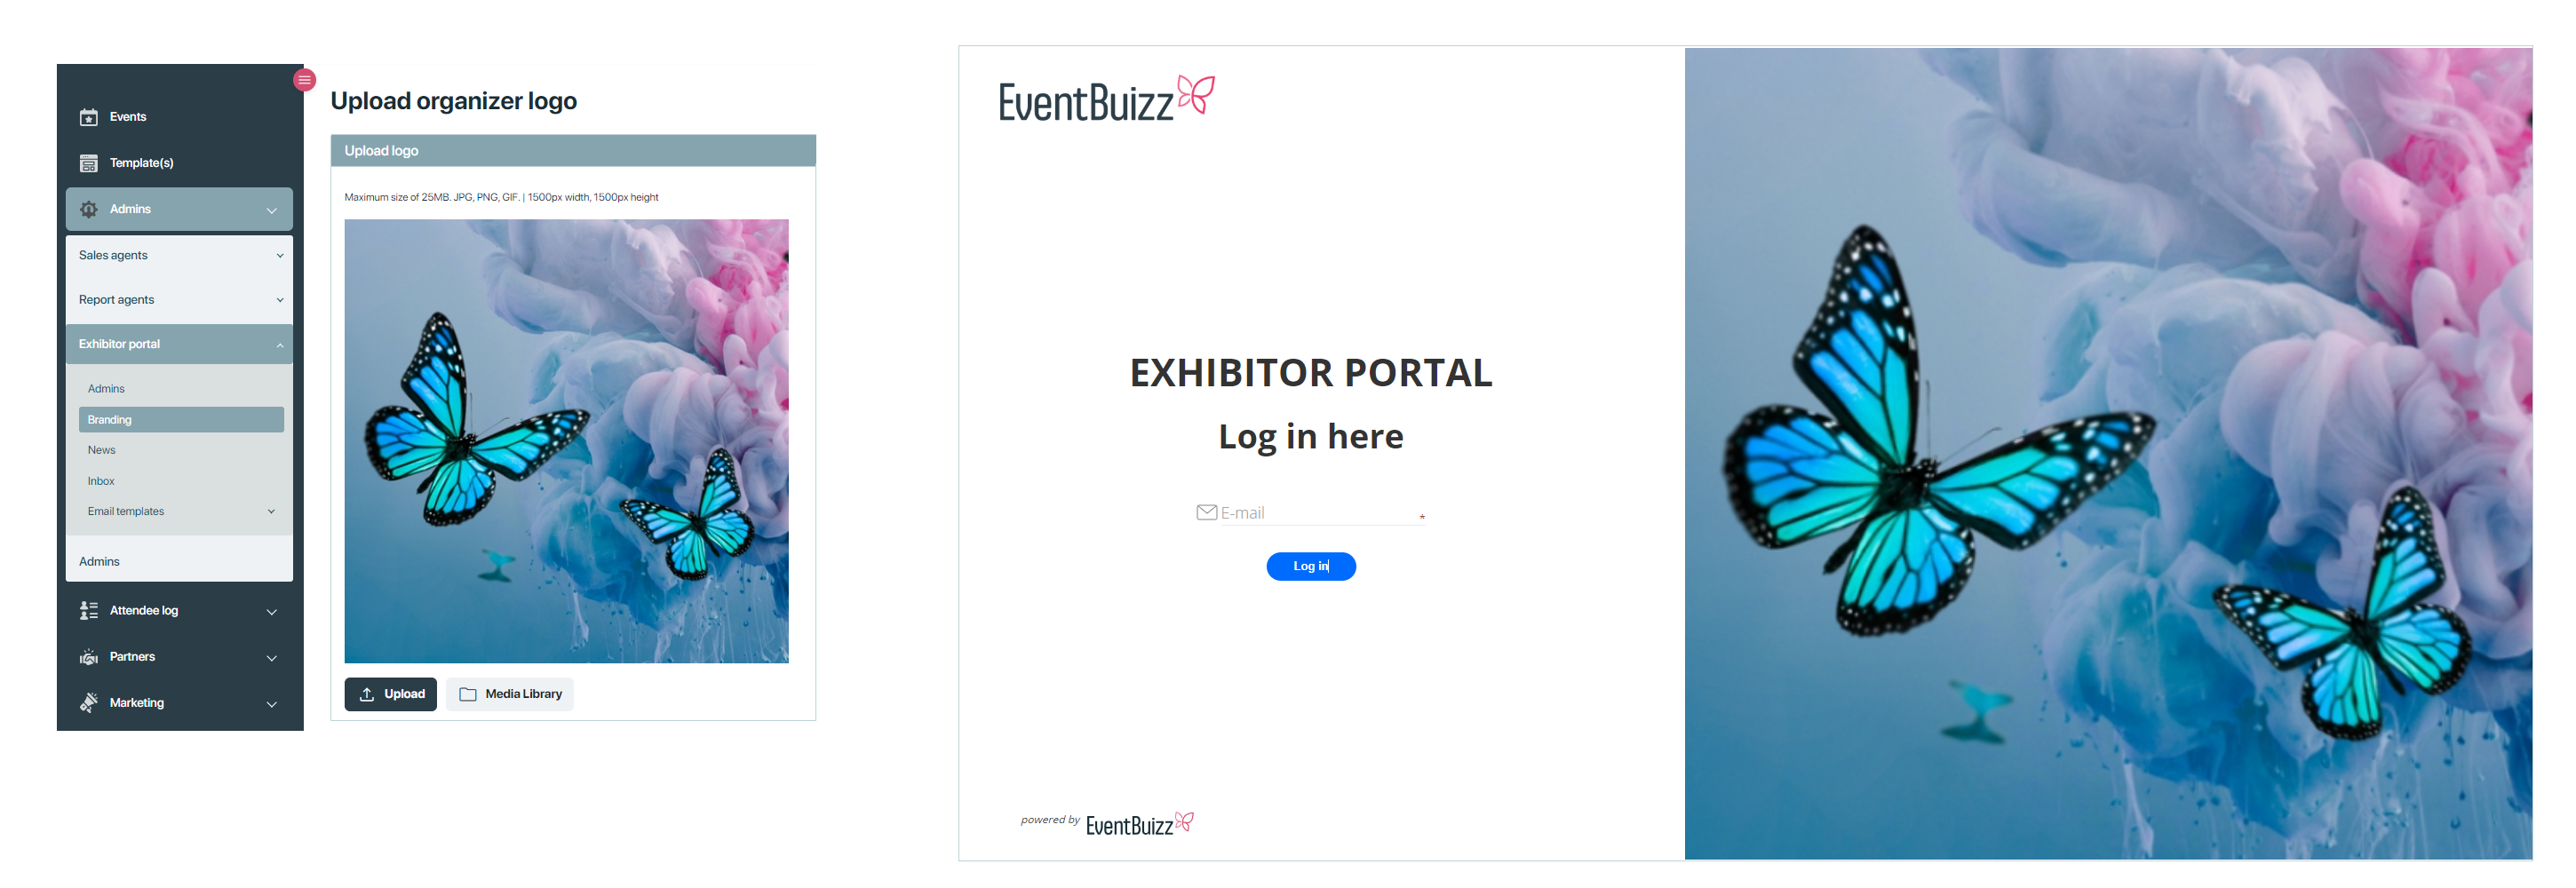
Upload logo
A branding logo typically refers to the visual representation of a brand that exhibitors can upload to enhance their profile. The logo helps to establish and showcase the identity of the exhibitor’s brand.
Hub portal URL
The Hub Portal URL is the specific link that give access to the exhibitor portal, and other users can access to log into the platform and manage their event-related activities.
Whenever an admin is created, they receive an invitation email. This email contains the URL for the Hub Portal.

If you’re looking for the specific URL for a particular event, check with the event organizer or the instructions provided in your event invitation or email.
portalnews
News
The feature allows event organizers to publish important exhibitor information and news directly in the exhibitor portal, ensuring that all exhibitors receive the same updates at the same time.
Event organizers can post updates, announcements, or important details in the exhibitor portal. This portal is a dedicated space where exhibitors can access all relevant event information. Instead of sending emails to each exhibitor individually, this feature allows organizers to publish information in one place, making it available to all exhibitors at the same time.

After creating the news and clicking the “Next” button, an editor will open where you can proceed.

In this editor, you can create your own custom news layout. The way you design it here is exactly how it will appear to the user.

Add the components you want to design your layout. If you want to preview it, click the preview button. A new screen will open where you can see how it looks on both desktop and mobile.

Once the news layout is finalized, you have several options for saving and sharing it: These options give you flexibility in managing and sharing your news layout.
-
Save as Draft: You can save the layout as a draft, which means it is stored but not yet visible to others. This allows you to make changes or review it later before publishing.
-
Send via Email: You can send the layout directly through email. This is useful if you want to share it with your team or get feedback before making it live.
-
Publish: Once you’re happy with the layout, you can publish it immediately, making it visible to all users.
-
Schedule: You can set a specific date and time for the layout to be published. This is helpful if you want the news to go live at a future time without needing to manually publish it. Clicking on the schedule button, will open up a new pop up, where you can set date and time.

Once everything is set, you can publish the layout. As soon as you publish it, the news will start appearing in the exhibitor portal for all the sponsors and exhibitors linked to the specific admin. This ensures that the news is visible to the intended audience within the exhibitor portal, giving them access to the latest updates or information directly. Click Exhibitor portal for more details.

All the news and updates will be displayed on the main screen. From there, you can easily edit or delete them as needed.
On this screen, there is also a filter option that allows you to search the news based on whether they are draft, published or scheduled. This makes it simple to manage and organize your content.

portatinbox
Inbox
The Inbox is the central hub key tool for receiving and managing all communication within the portal from the sponsor/ exhibitor admin. This tool allows exhibitors to stay connected with various stakeholders, such as event organizers, attendees, and even other exhibitors. For more detail, how sponsor/ exhibitor admins can send message to organizer. Please click here.
Here you will find messages from your exhibitors. It is important that you regularly check your inbox as an organizer.
In Inbox, we have some sub menus:
- Inbox
- Starred
- Drafts
- Spam
- Trash
Let’s first have a look, how to add and send a message.
Add Message

After selecting an event and sponsor/ exhibitor, you can select the admin to whom you want to send a message.

Once the recipient has been selected, Add the subject and message you want to send to desired sponsor/ exhibitor. Once the message is ready.
You can save the message as a draft to make changes later and send it afterward. You can also send it immediately by clicking the send button.

Drafts
The messages save as a draft allows users to save an email that they are in the process of composing without sending it immediately ensuring that they don’t lose their progress.
Drafts can be opened and edited anytime before sending, allowing users to make changes as needed. You can create and save multiple drafts simultaneously, allowing them to prepare various messages for different recipients. Once the user is satisfied with the email, they can send it with a simple click.

Sent
Once you send an email, the Sent folder keeps a record of all your sent messages, so you can refer back to them later. You can see details like the recipients, subject lines, and timestamps for each email. This folder helps you track ongoing conversations by showing what you’ve communicated with others. If needed, you can easily find and resend any email from this folder. Overall, the Sent folder helps organize your email communication, making it easier to manage and reference your past messages.
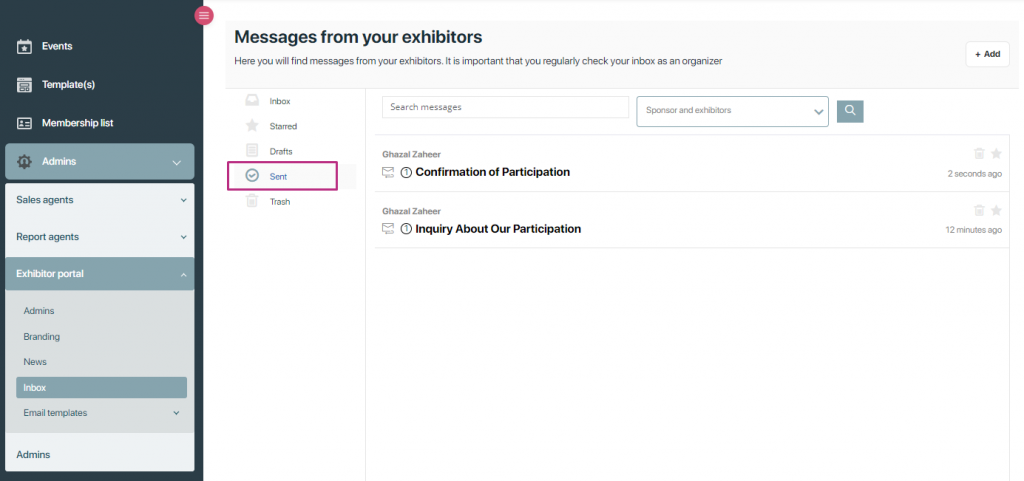
Click on the email subject, and the details will open on the right side. From there, you can directly reply, forward, delete, or star the email.

You can only starred message from sent folder. Star emails that they want to easily find later, such as urgent messages or those requiring follow-up. Starred emails are typically accessible from a dedicated “Starred” folder, making it easy to locate important messages without scrolling through the entire inbox.

Starred
The Starred feature allows users to mark specific emails as important or noteworthy. Users can star emails that they want to easily find later, such as urgent messages or those requiring follow-up. Users can star emails temporarily (for immediate attention) or keep them starred for longer periods based on their needs.
As soon as an email is marked as important, the star icon will change color. The number of starred emails will also appear in the Starred folder section.

Trash
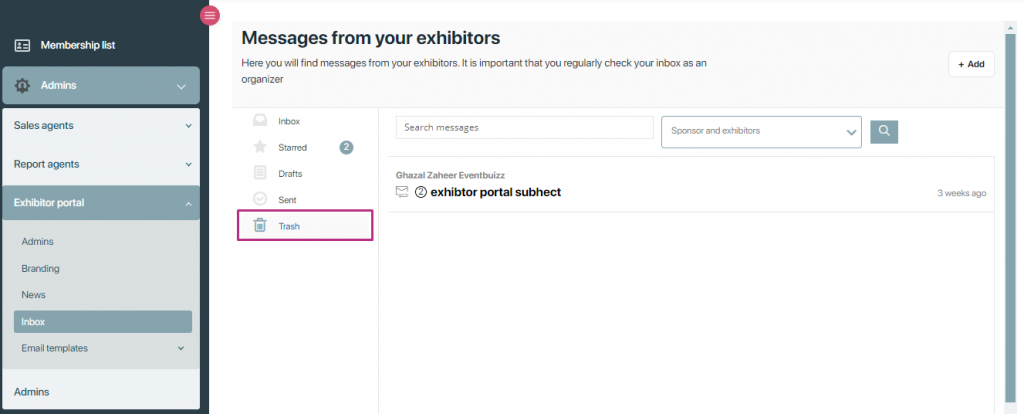
The Trash folder temporarily holds deleted emails, acting as a safety net to undo deletions before they are permanently removed. When you delete an email, it moves to the Trash folder instead of being immediately erased. If you accidentally delete an email, you can recover it from the Trash as long as it hasn’t been permanently deleted yet. Typically, emails in the Trash are automatically deleted after a set period (like 30 days), or you can manually empty the folder to permanently remove them.
portaltemplates
Email templates
Here’s a detailed explanation of each template,
Admin Invite:
- This template is likely used when inviting a new admin or user to access the exhibitor portal. The email contains instructions on how to accept the invitation and potentially includes login credentials or a link to set up a password.
- When a new administrator is added to manage an exhibitor’s profile or booth in the portal, they would automatically receive this email to gain access.

Authentication code:
- This email template is likely sent when an exhibitor or admin tries to log in and needs an authentication code for security purposes. It could be part of two-factor authentication (2FA), where the user must enter a code received via email to complete the login process.
- When logging into the exhibitor portal, the admin may need to enter this code for extra security.

Registration Confirmation:
This email template is used to confirm that the registration process has been successfully completed. Once an attendee register himself from the portal he gets this registration confirmation email having app link for IOS and Android.

Message remainder
The “Message remainder” allows administrators to resend invitations to individuals who have been previously invited to join as administrators but may not have accepted the invitation or missed it.
